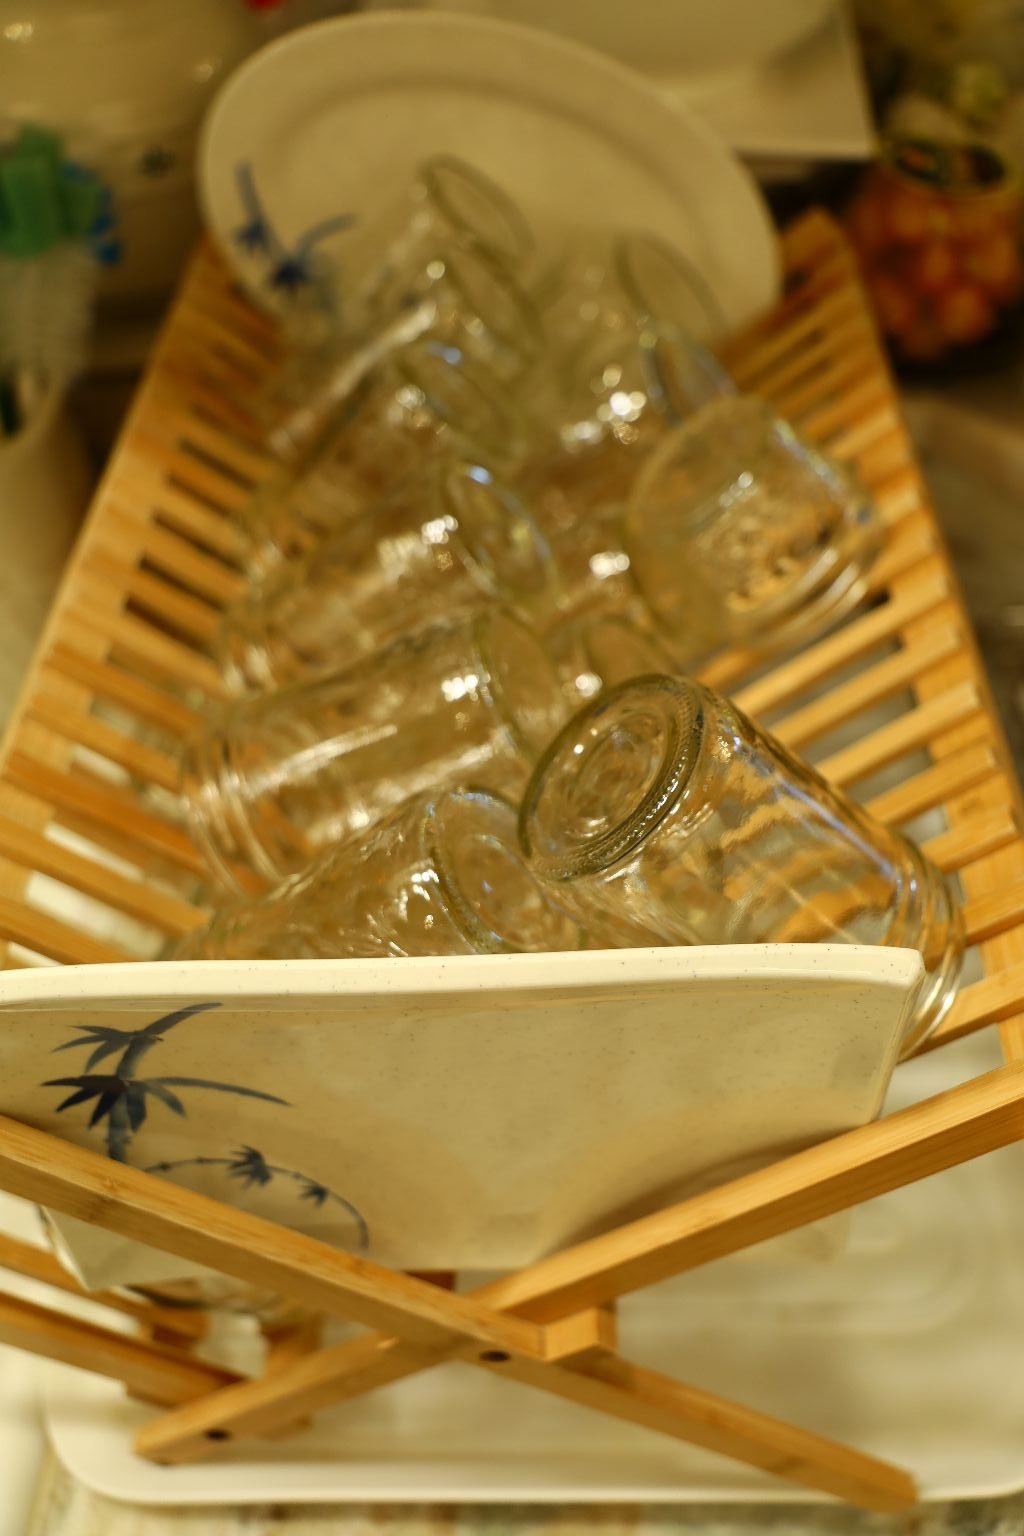
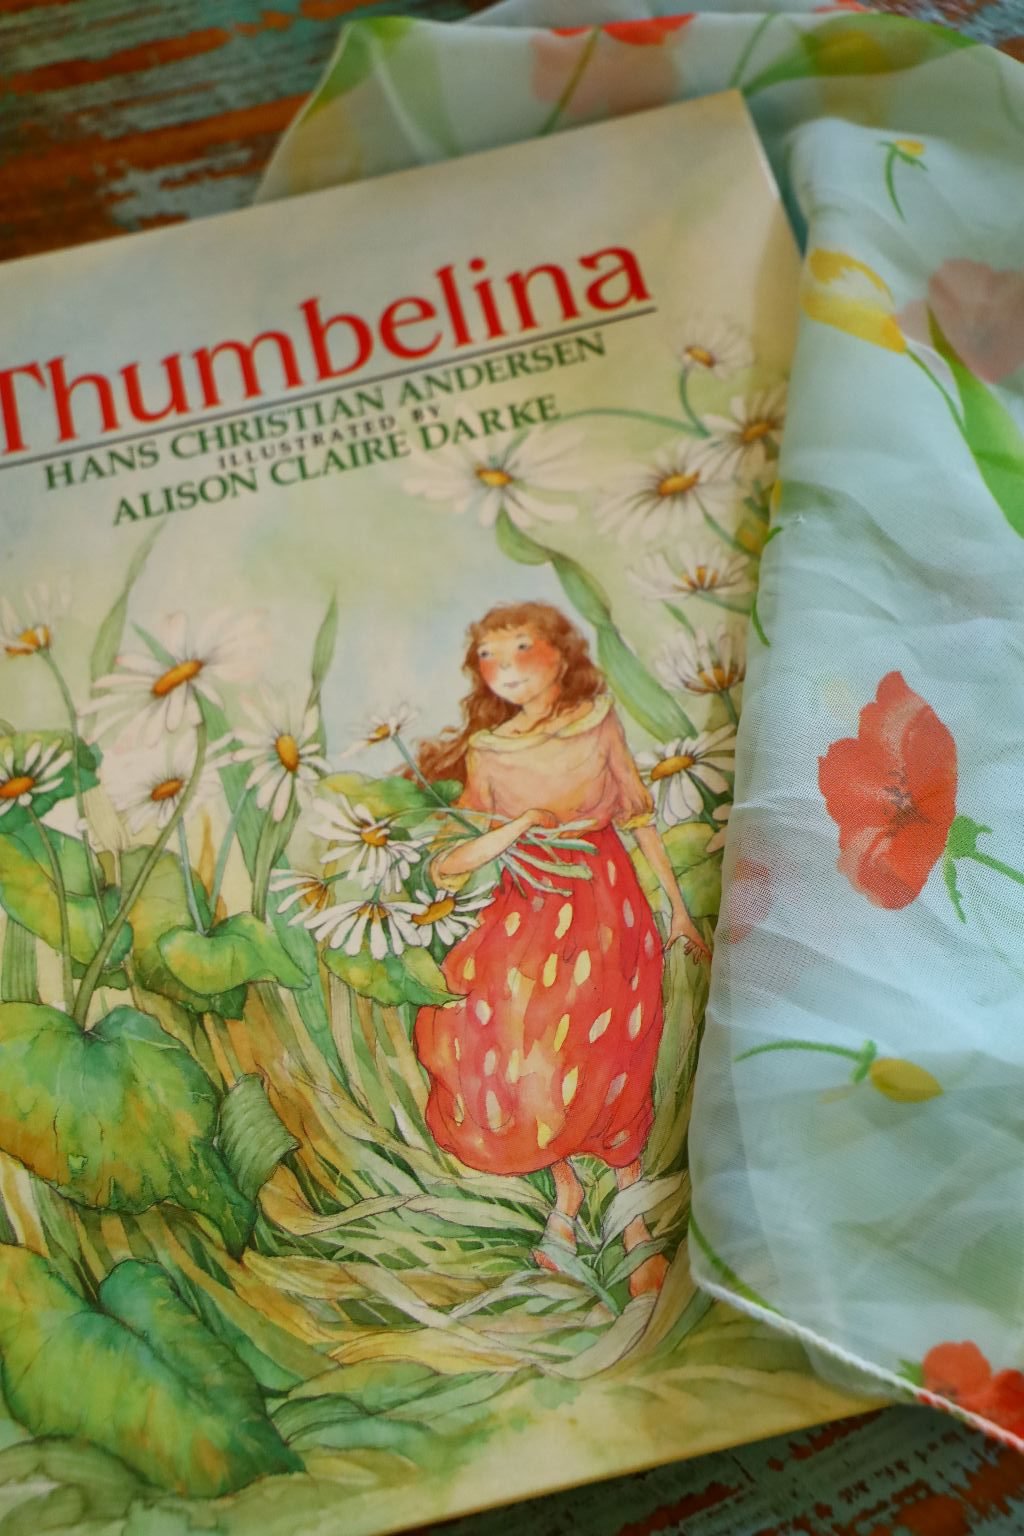
The Hale Koa Hotel, Waikiki
UNDER CONSTRUCTION …
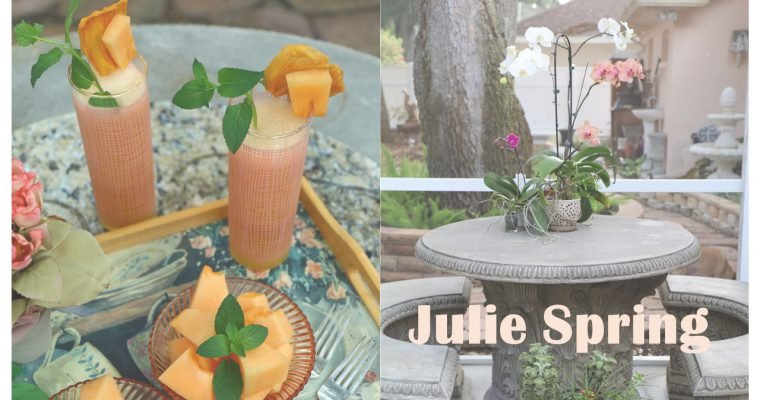
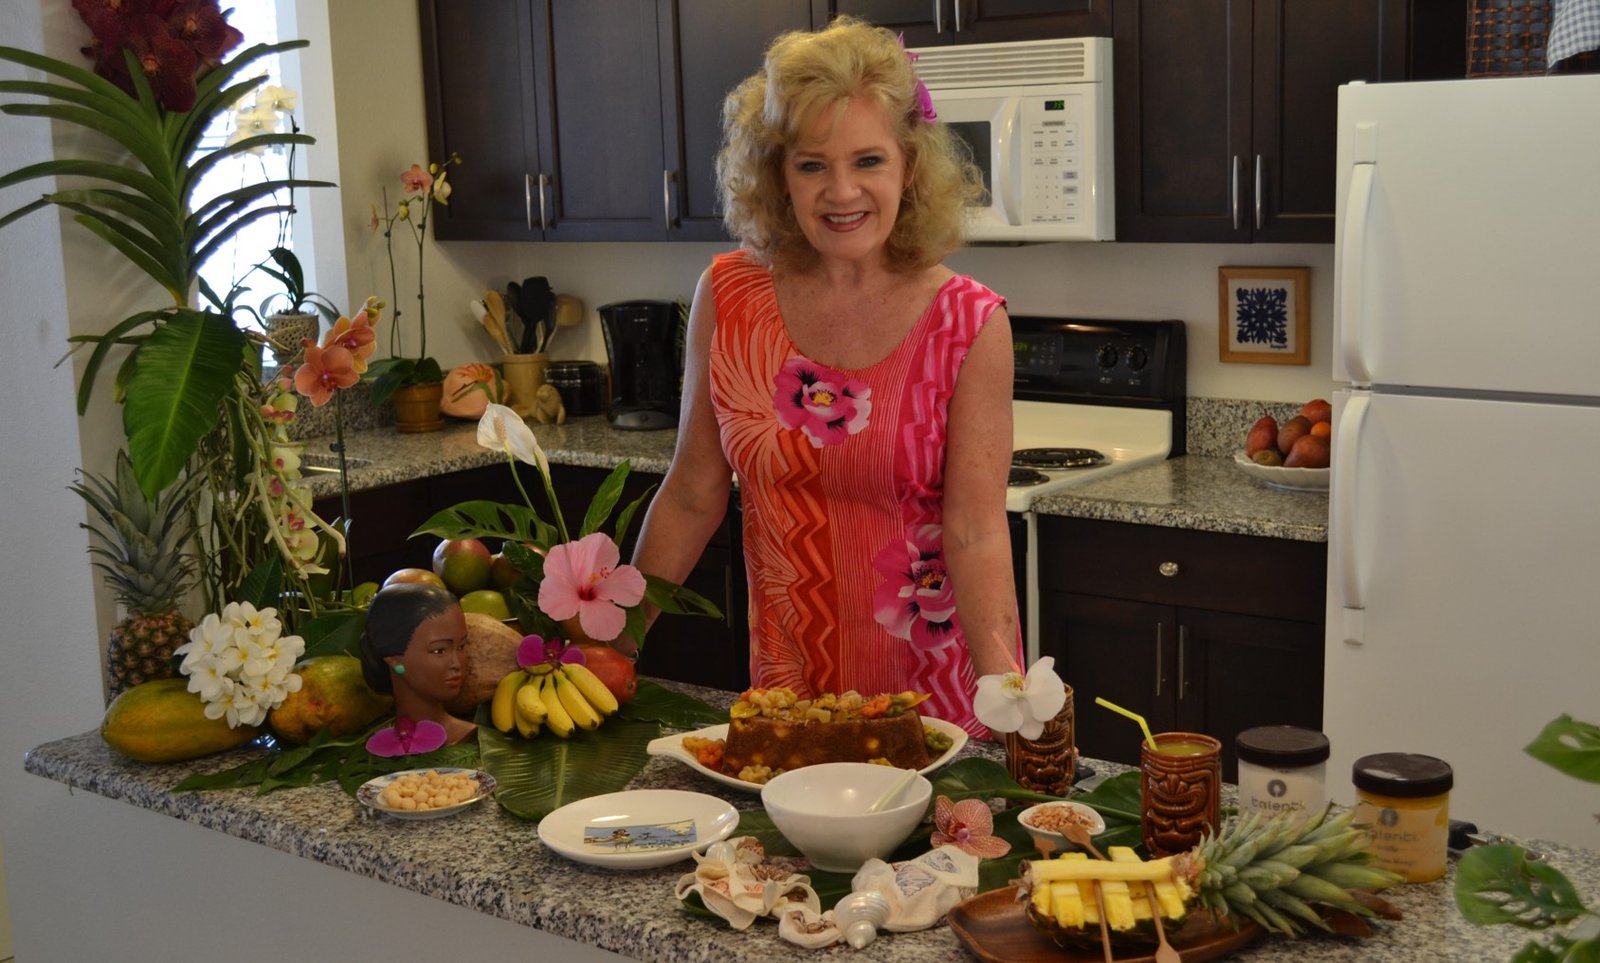
Life in sunny Florida... shoes optional

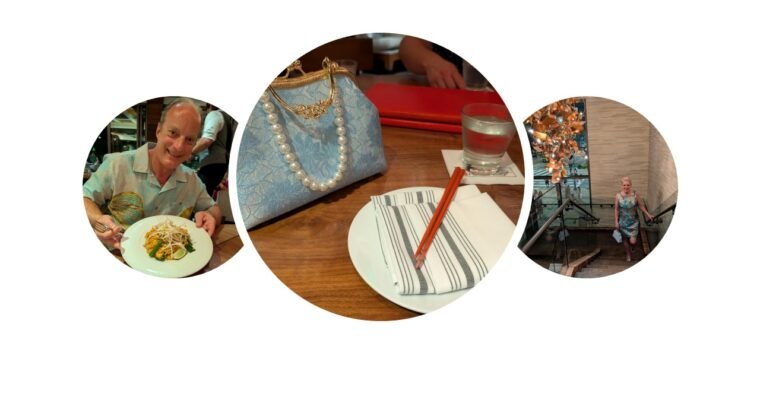
This is an account of our travels from Tampa to Las Vegas, to Honolulu, for the Wedding of our Son, and Future Daughter-In-Law, and Back Again… —————————————————————————————— We Do Start With: Mother of the Groom The Save The Date, and The Wedding Invitations …

On February 13th., 2026 I Turned 65 Gordon and I ‘Out and About’ on My Birthday 65 Feels Pretty Good —————————————————————————————— When I Turned 60 I Started this Website Page: Sixty’s, (Sensational or Surviving?), We’ll See, Right? (If you would like …
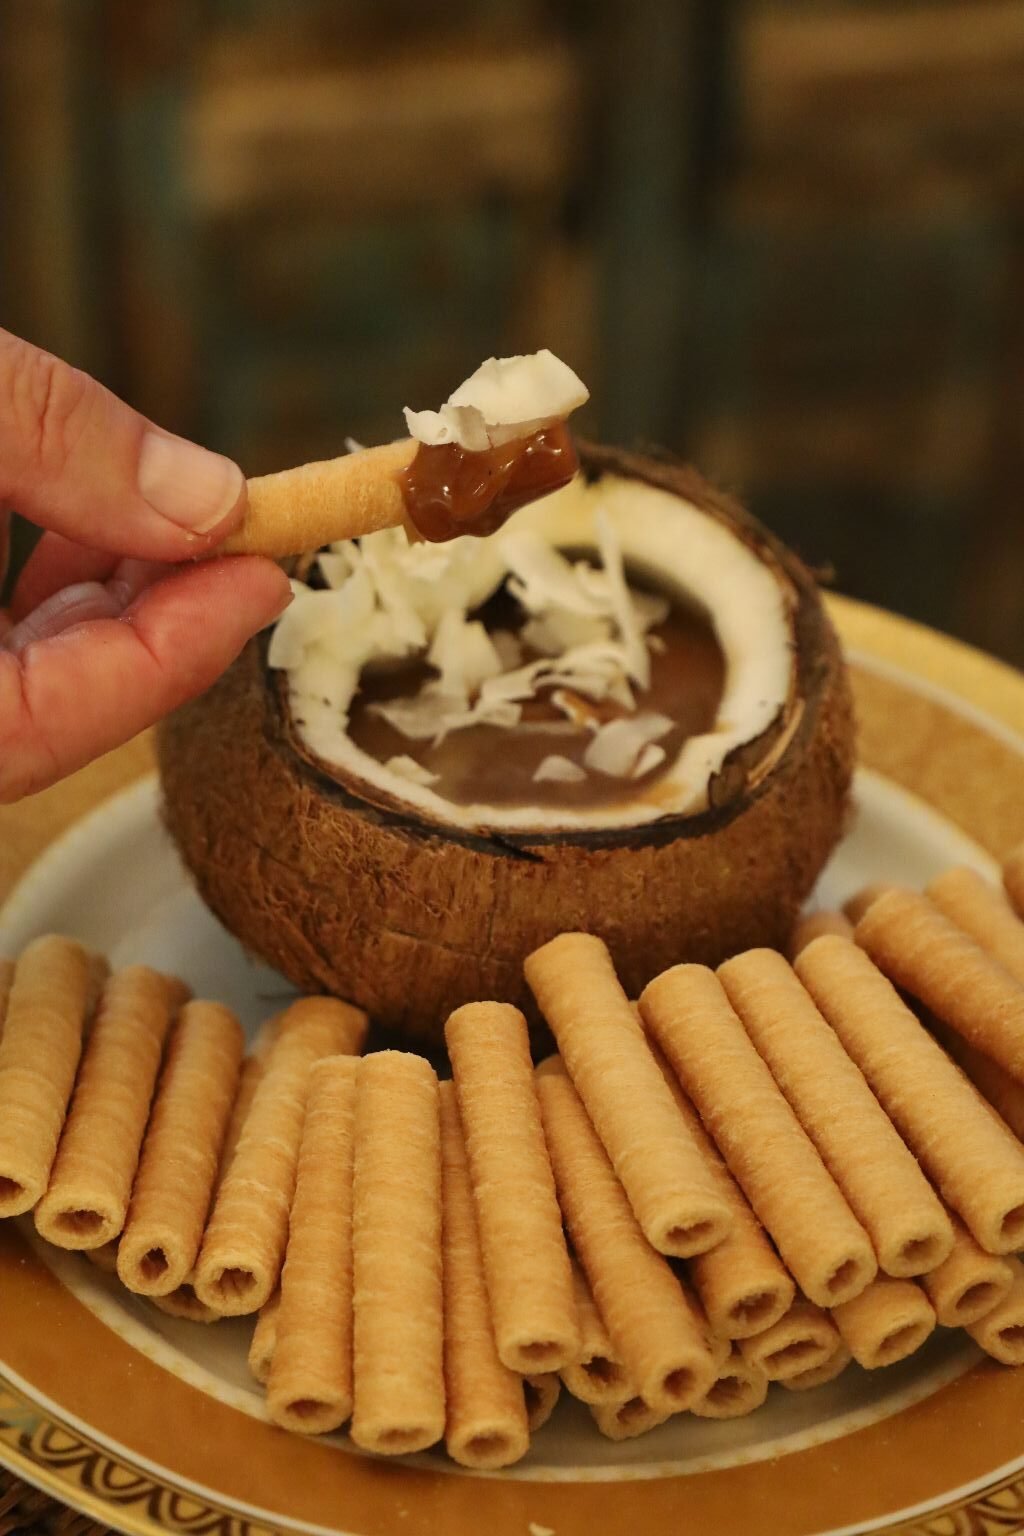
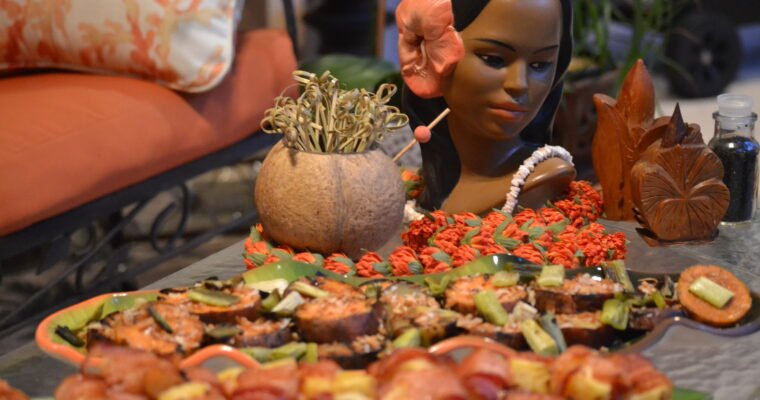
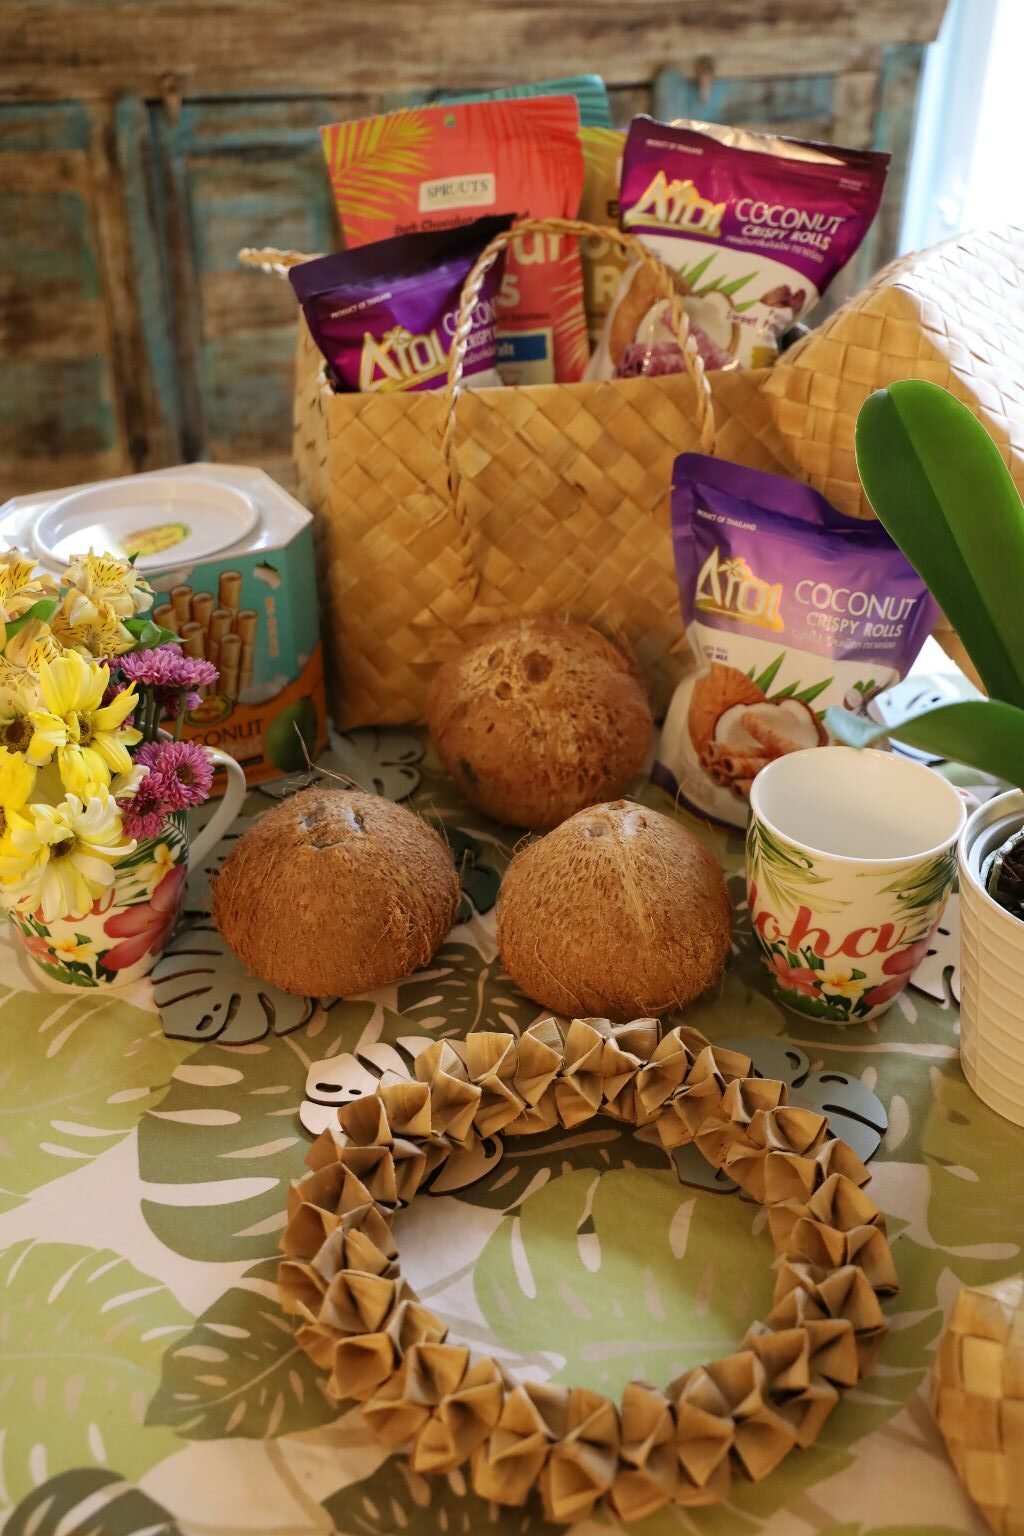
A Fresh Coconut Filled With Delicious Coconut Jam, Topped With Flaked Coconut
And Dipped With Coconut Rolls
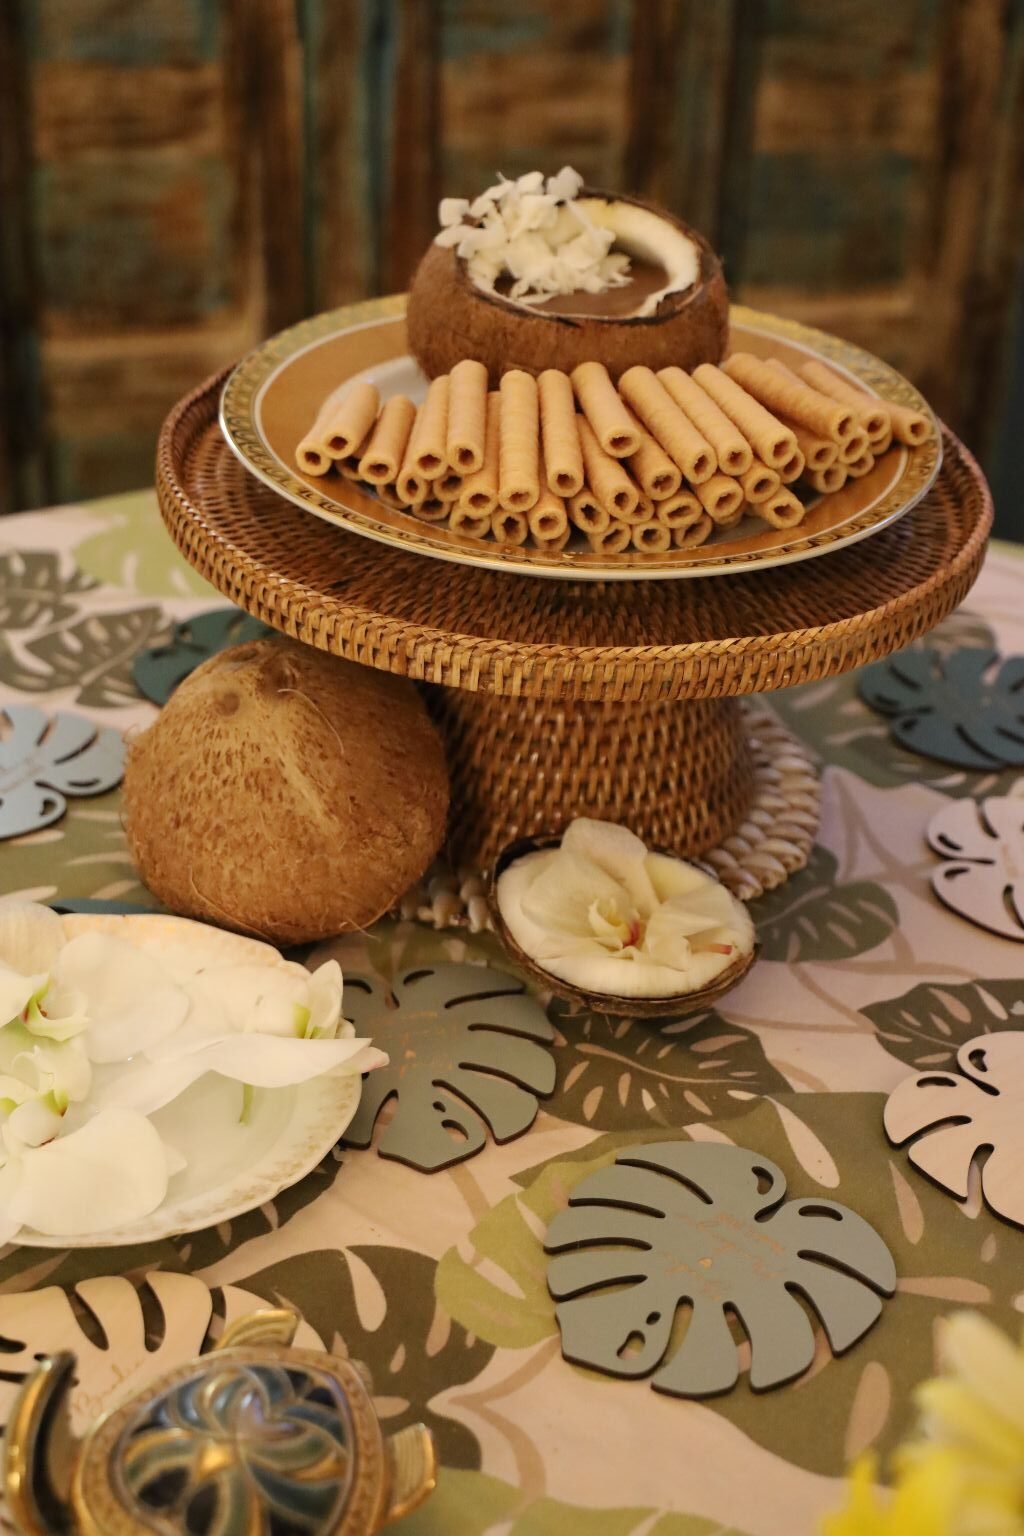
A Perfect Little Sweet Snack
—————————————————————————
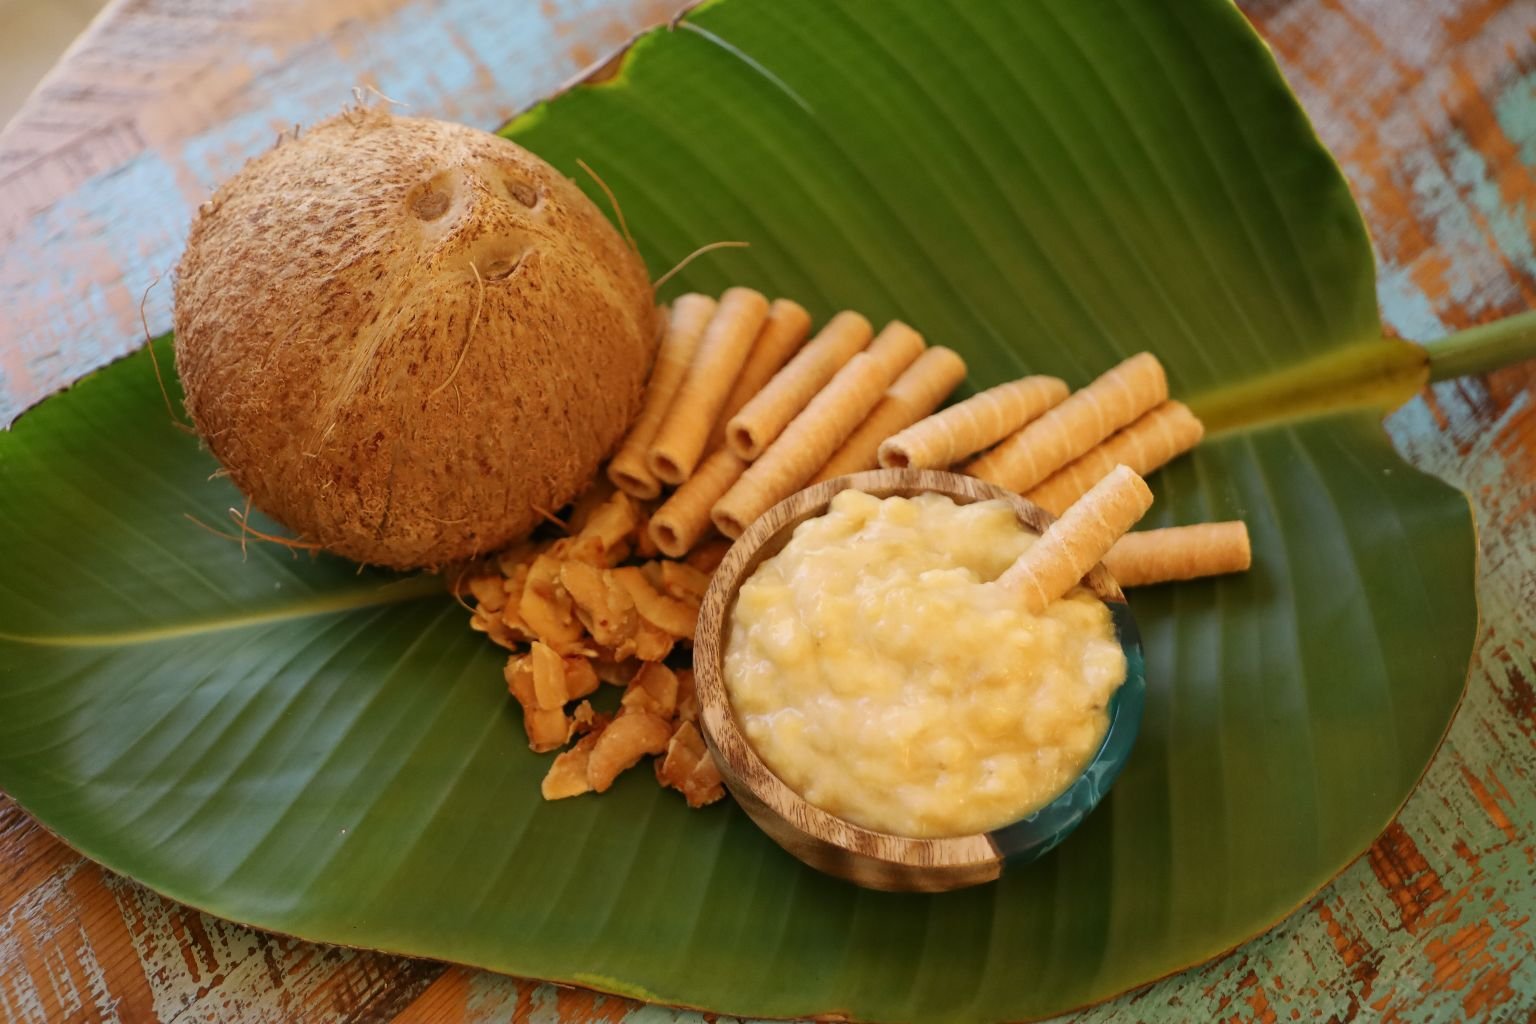
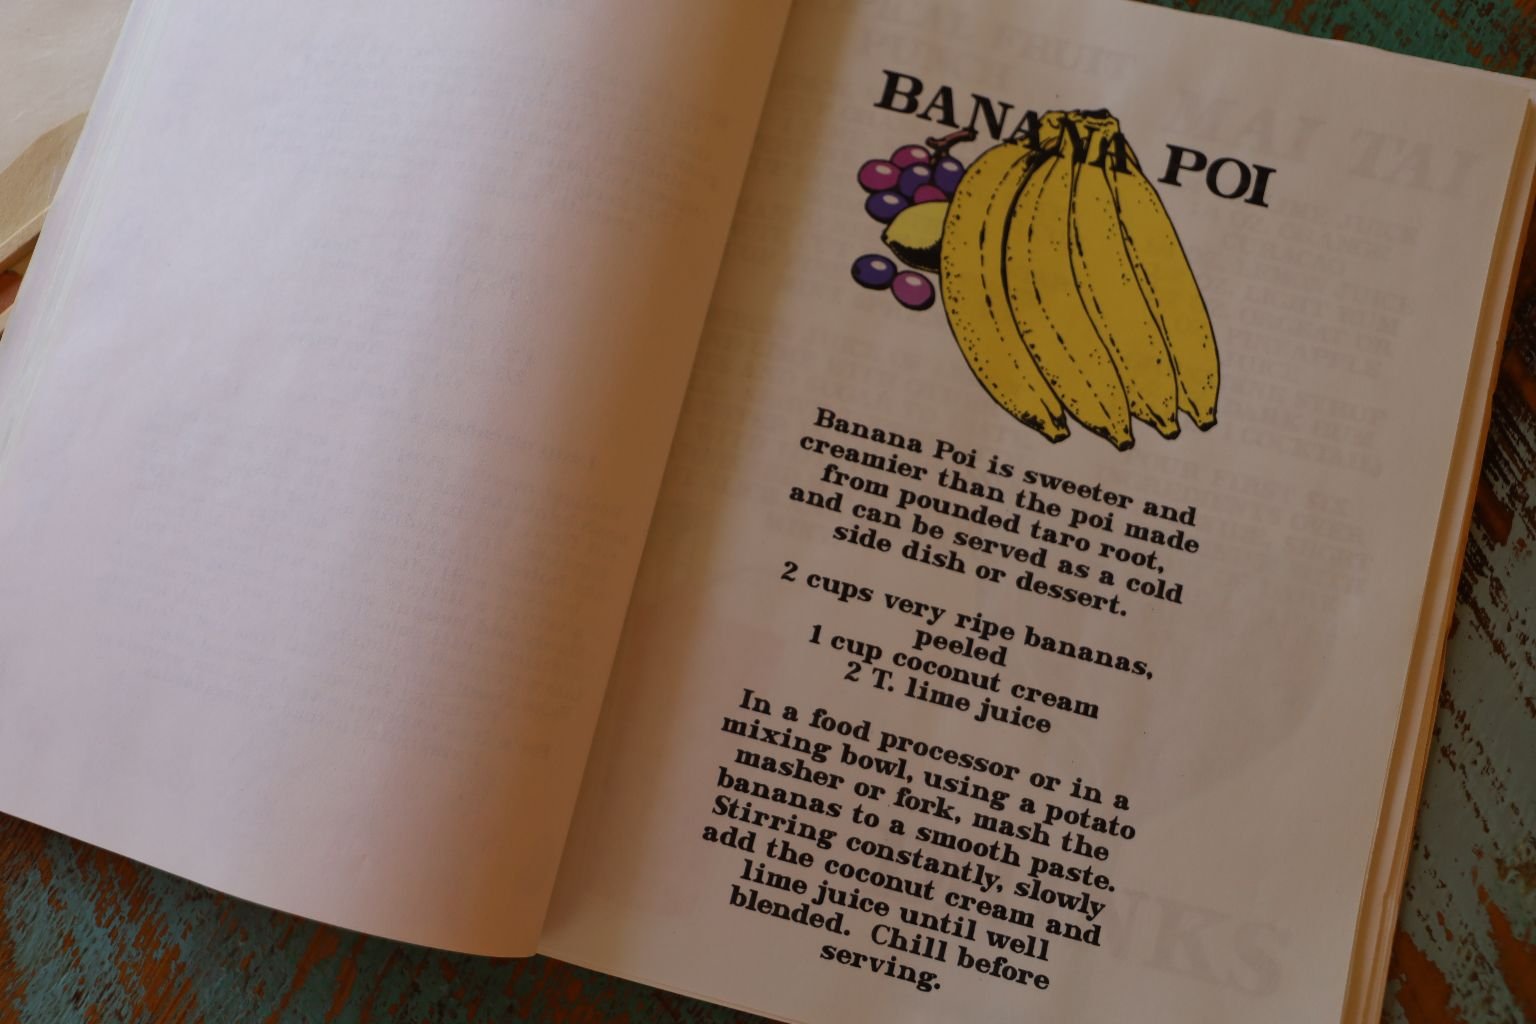
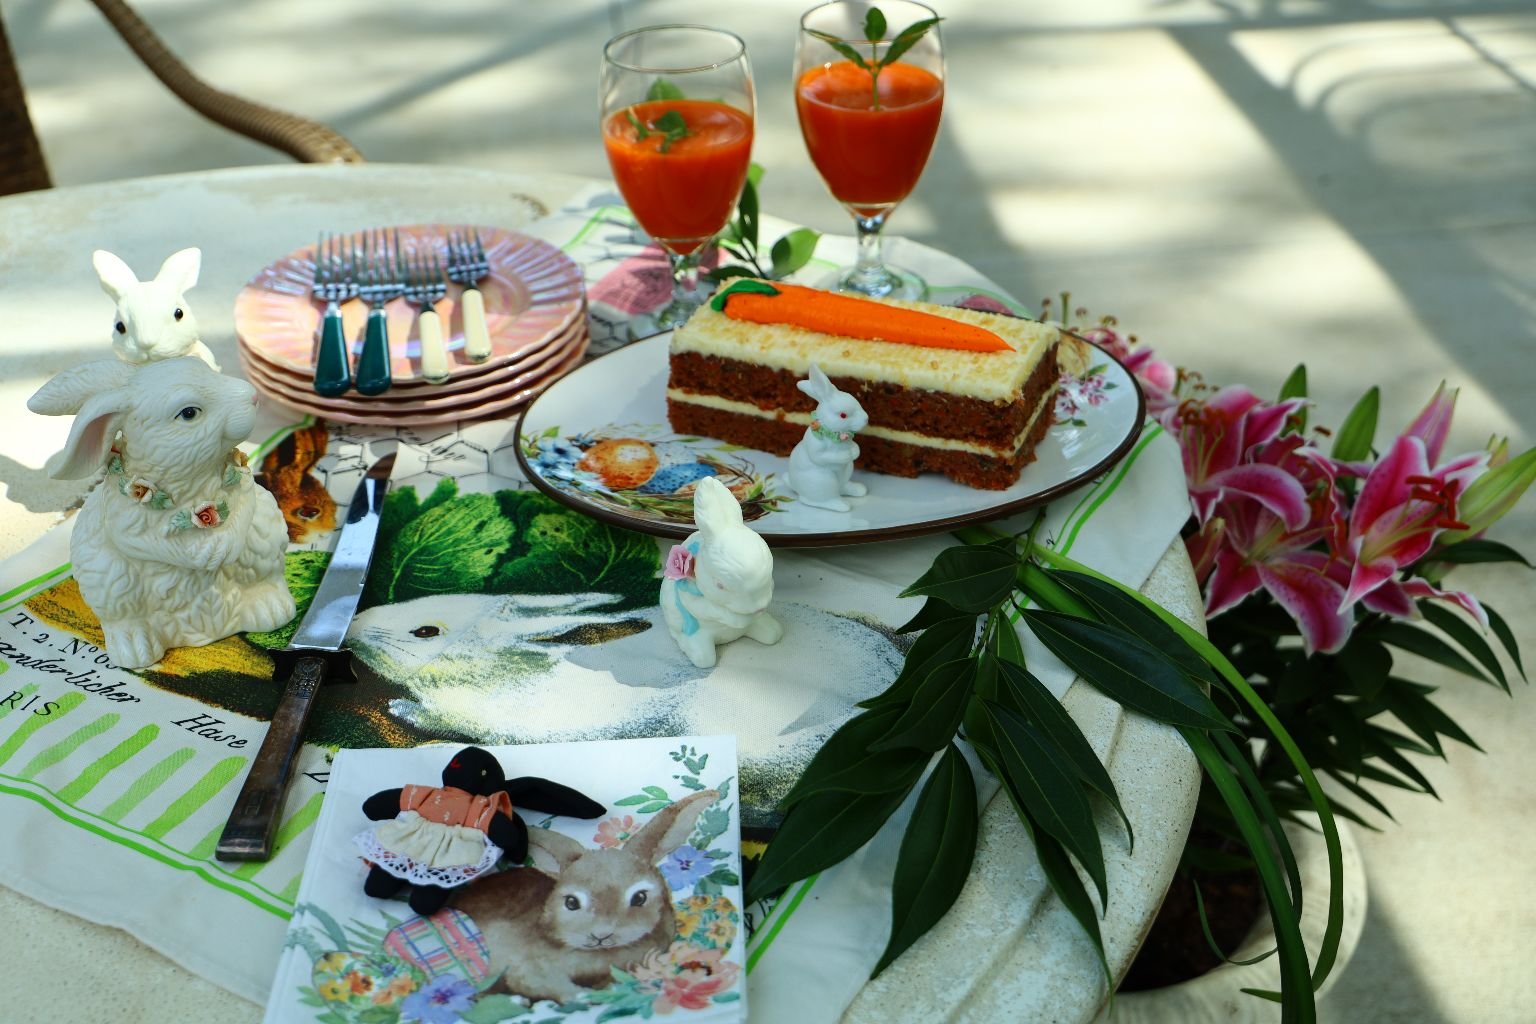
Banana Poi for Isabelle
A great way to use up Ripe Bananas, perfect for the little ones.
The babies and children on the islands of Hawaii grow up eating Poi. I’m talking about the Taro Root Poi, the purple paste served at Luau’s that some say tastes like Wall Paper Paste. (Although, how would they know unless they’ve tasted Wall Paper Paste?) It is very healthy and that’s why the local children of Hawai’i grow up to be so big and strong. We tried feeding Poi to Veronica when she was a baby but our last memory of that is holding her over the sink as a baby while she was throwing it all up. Yeah, so much for that. At the time we did have a Japanese Pediatrician who told us to trying mixing it with some juice to see if that would help. It did. 🙂
————————————————————————————-
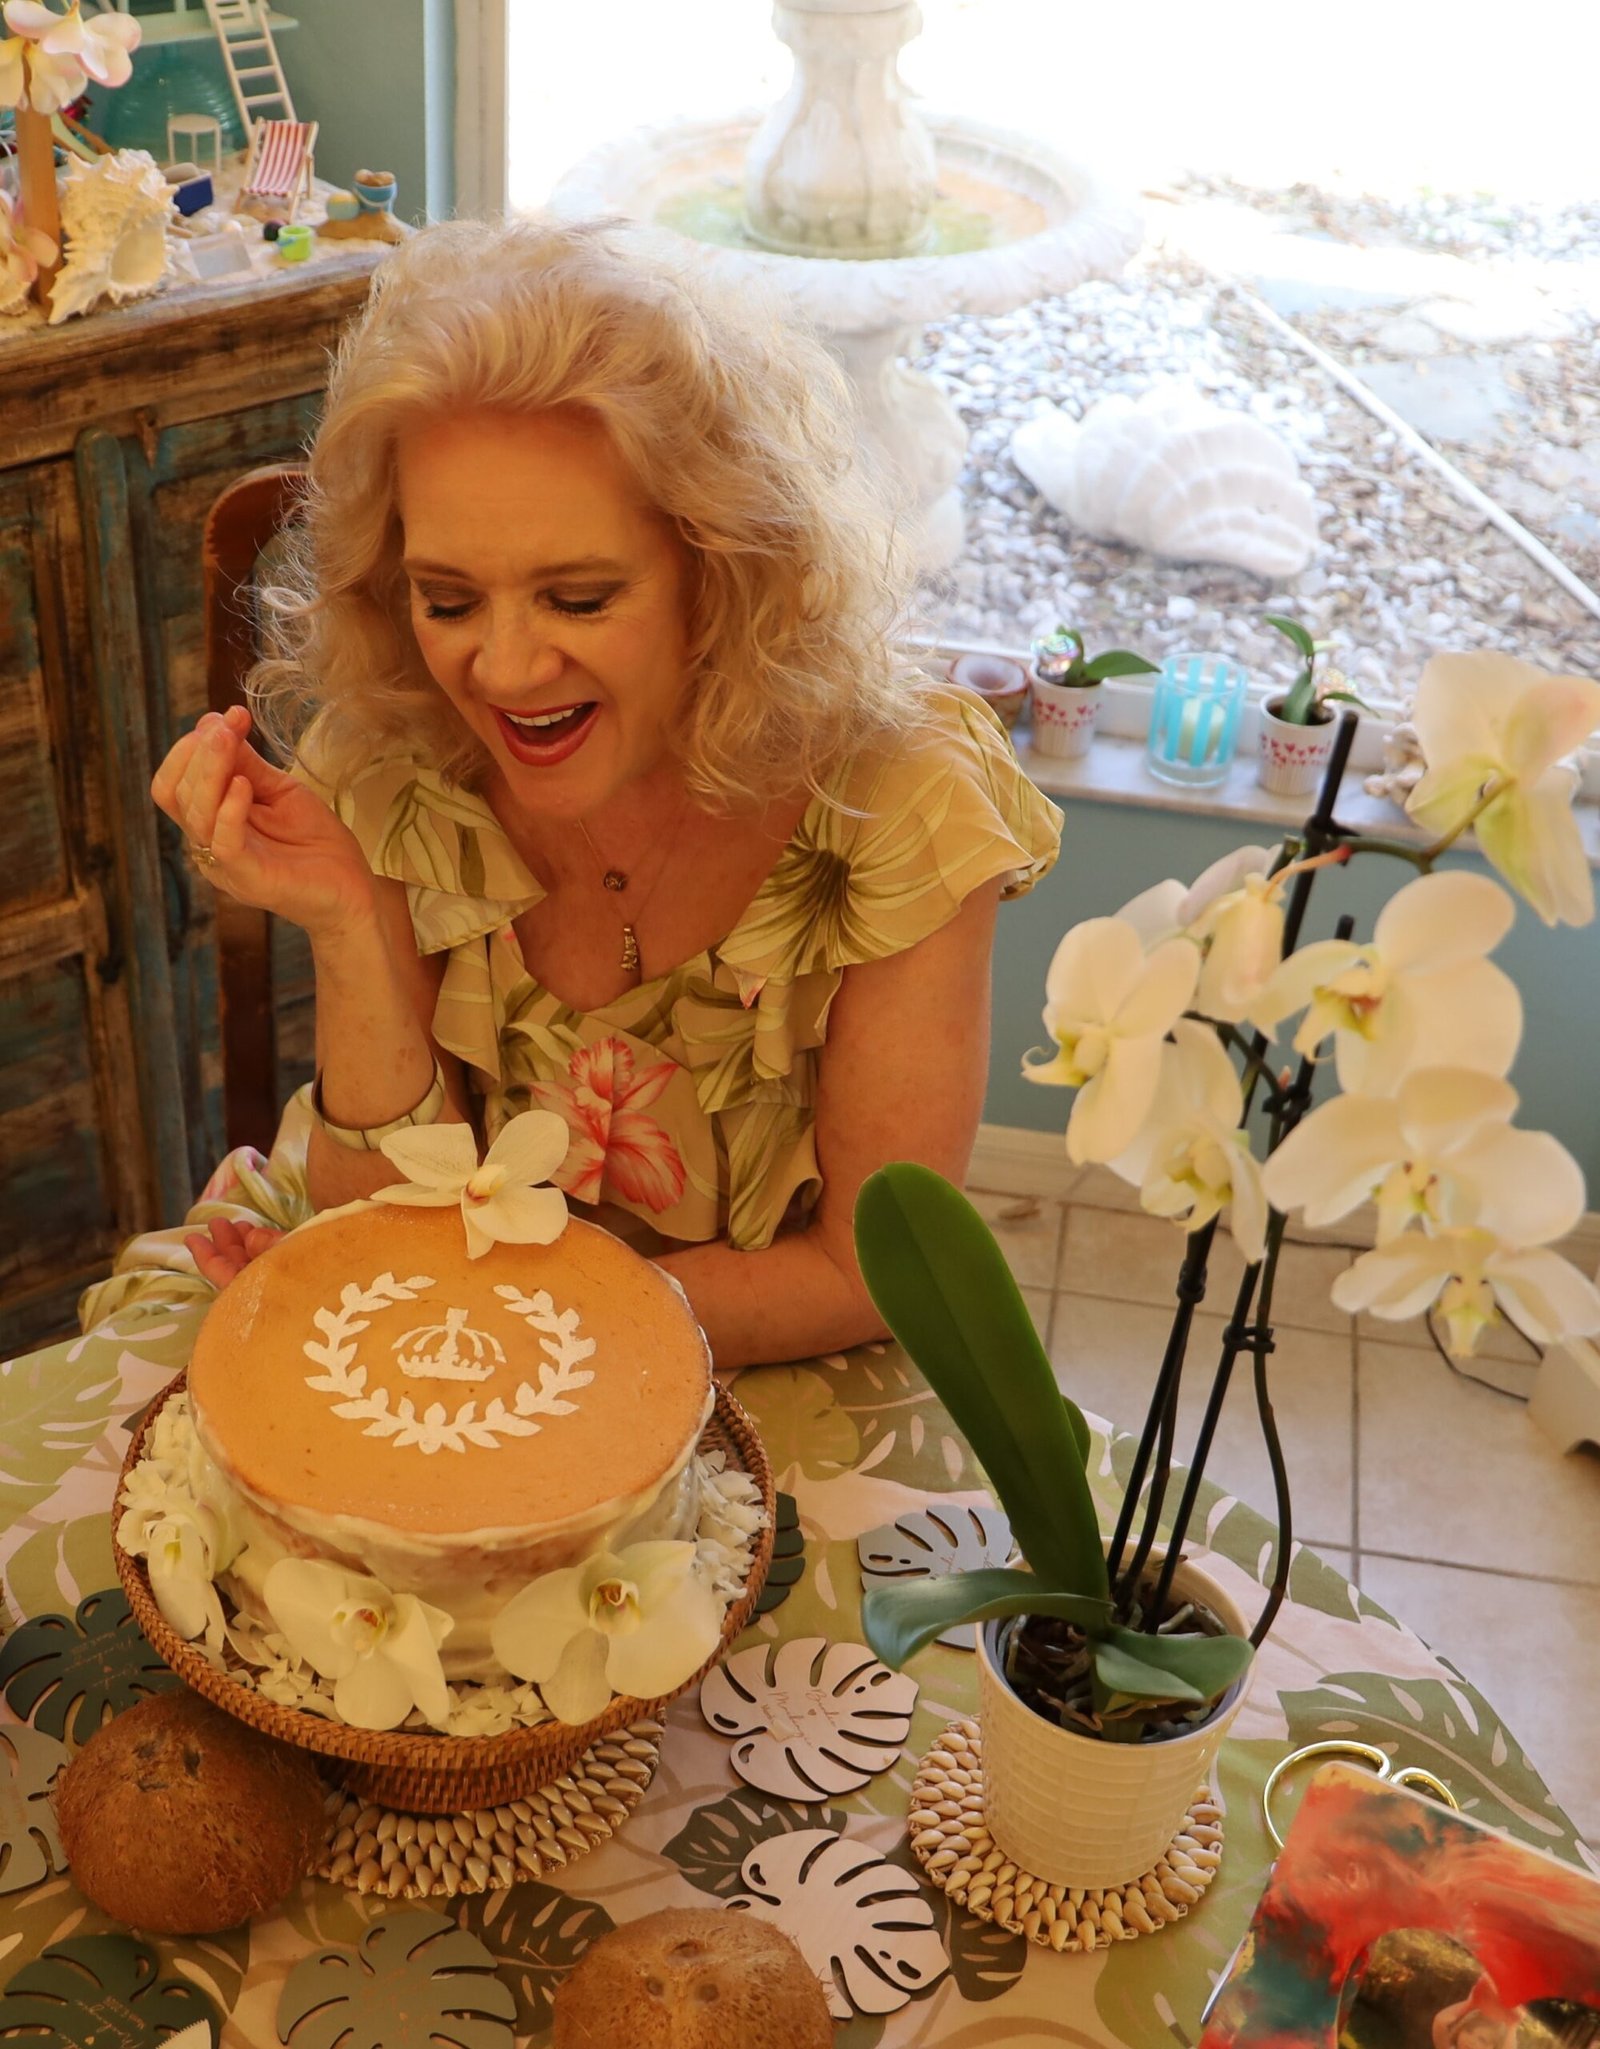
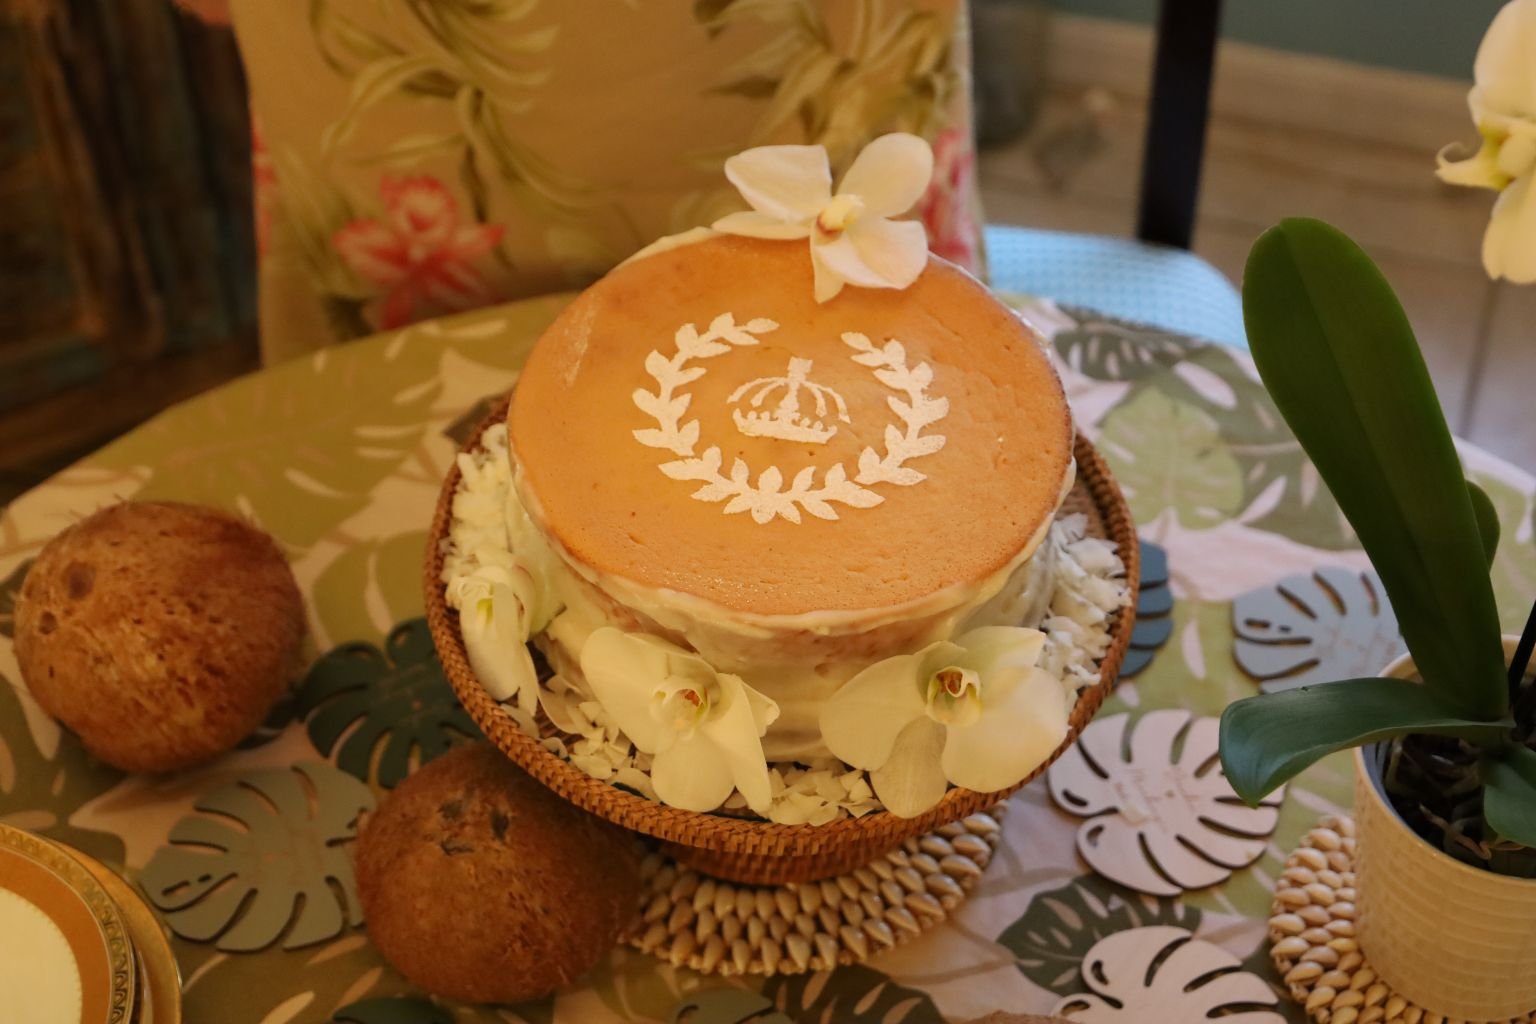
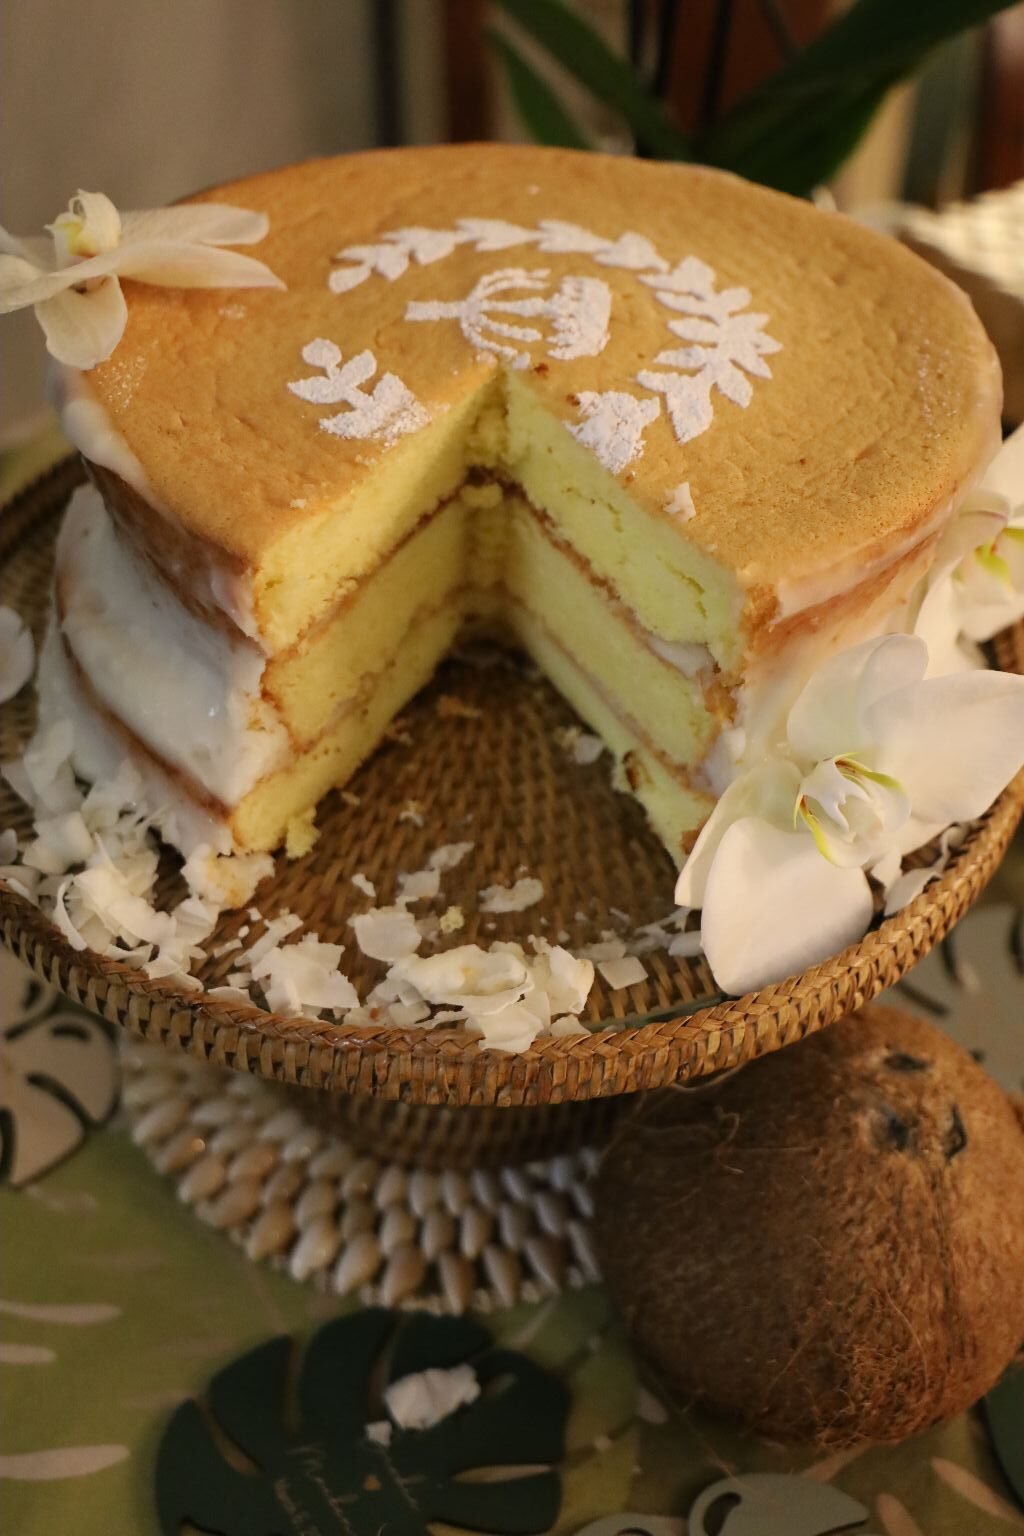
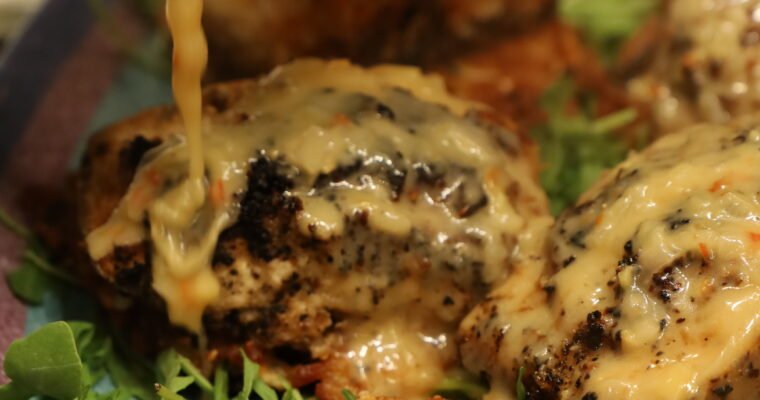
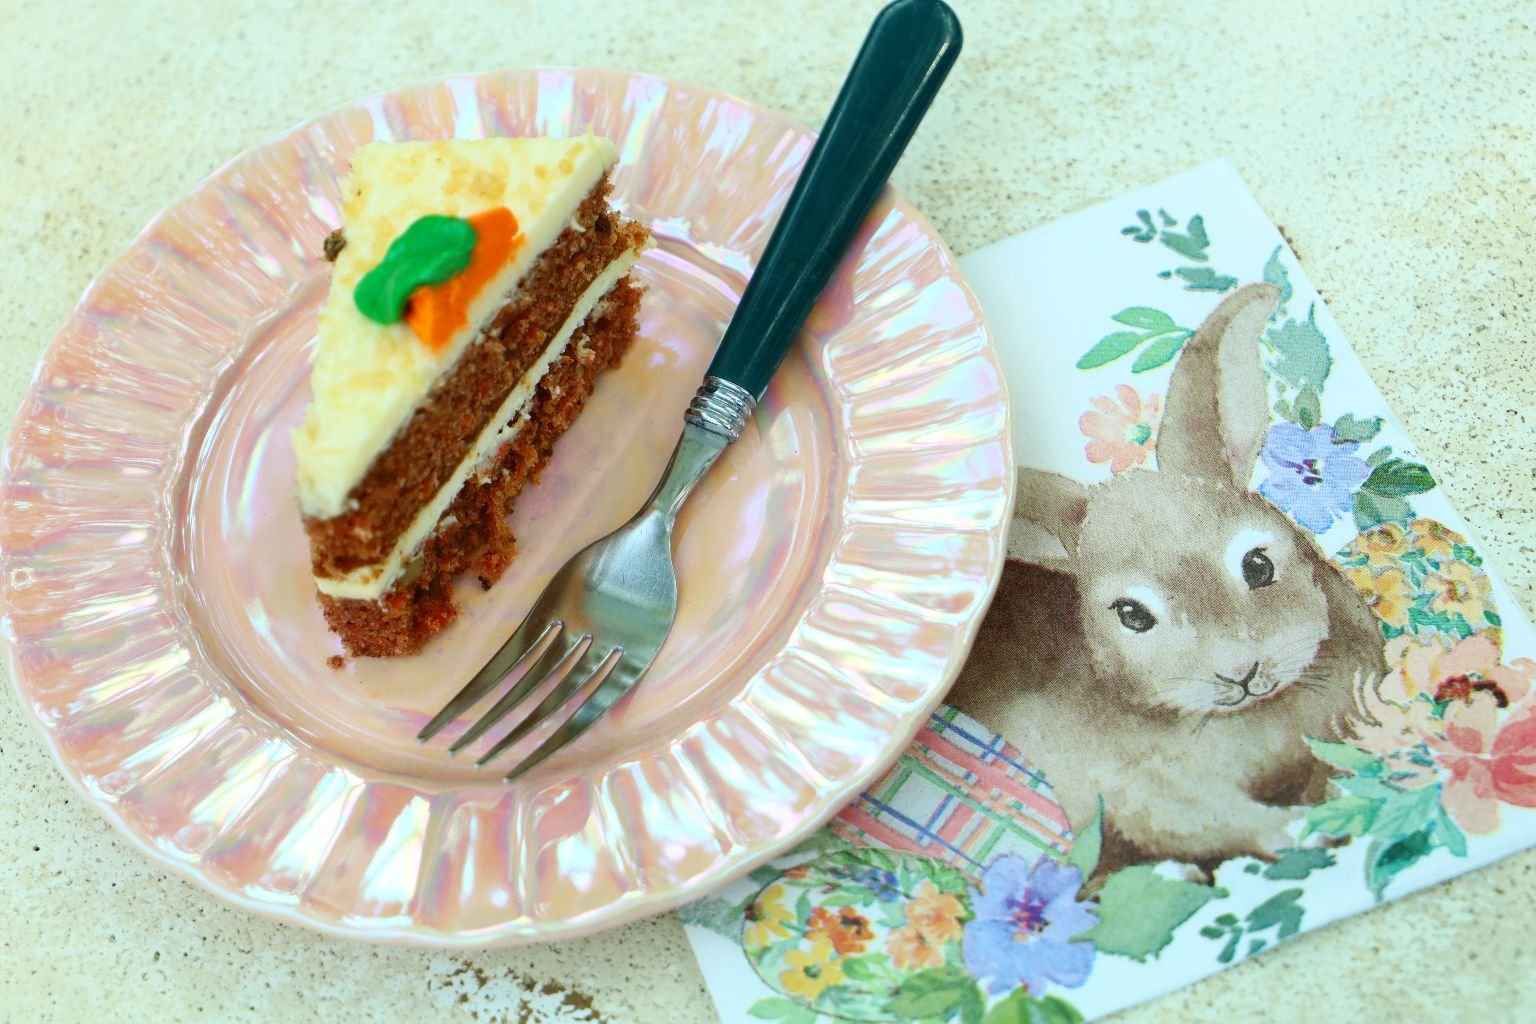
My Haupia Cake w/ Haupia Frosting
I wanted something special for when I turned 65. I wanted something Hawaiian.
I wanted to revise those old taste buds that I took for granted all those years we lived there.
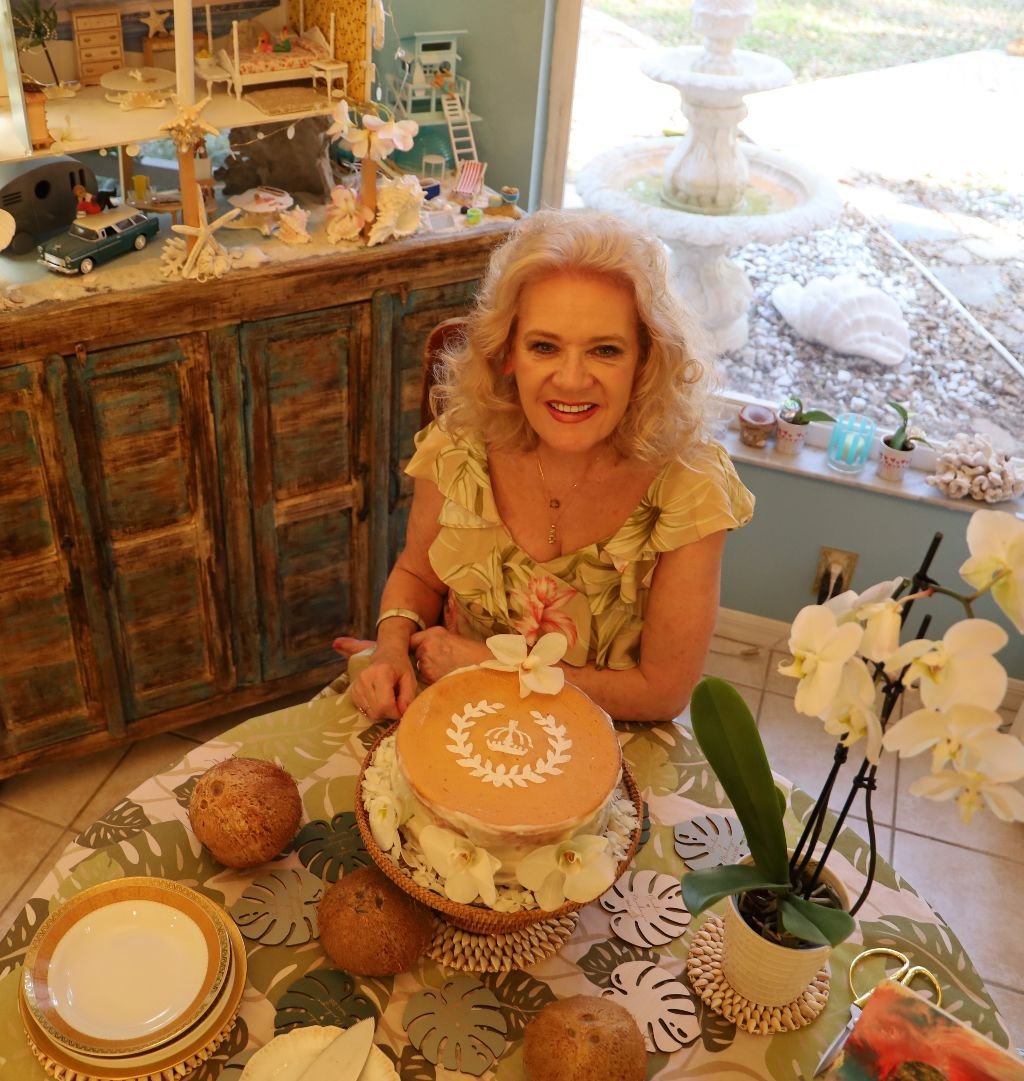
I also wanted to have Coconuts and Orchids around me.
Orchids are a big part of Hawaiian culture. They are a sturdy flower that lasts a long time.
Which is why you will see many a purple lei draped over tourists.
You will also see the lovely flowers ornately placed into foods and food arrangements.
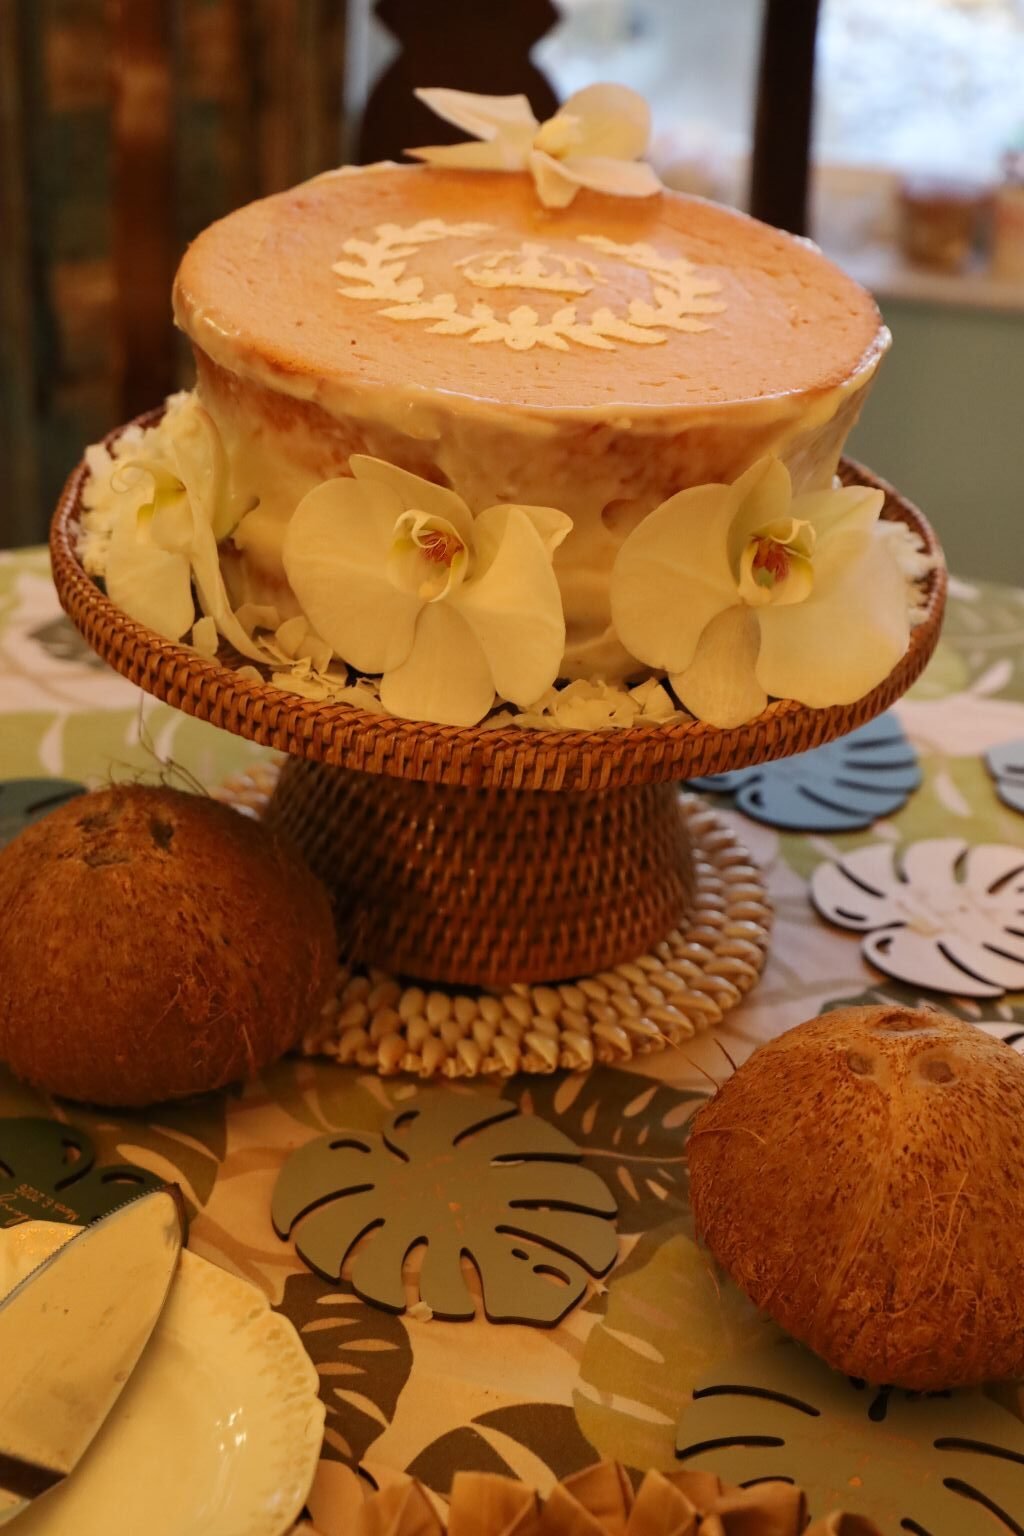
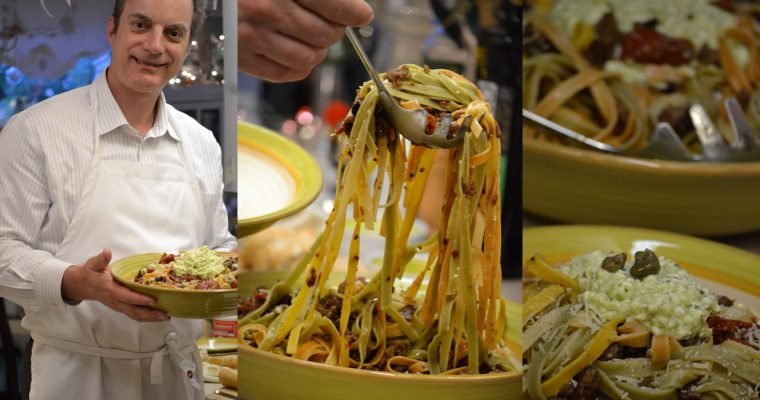
Gordon Made My Cake, But I Designed It
I Wanted White Orchids Here
I Also Wanted To Use One Of My Old Hawaiian Stencils On Top
It’s ONOLICIOUS!
———————————————————————————————
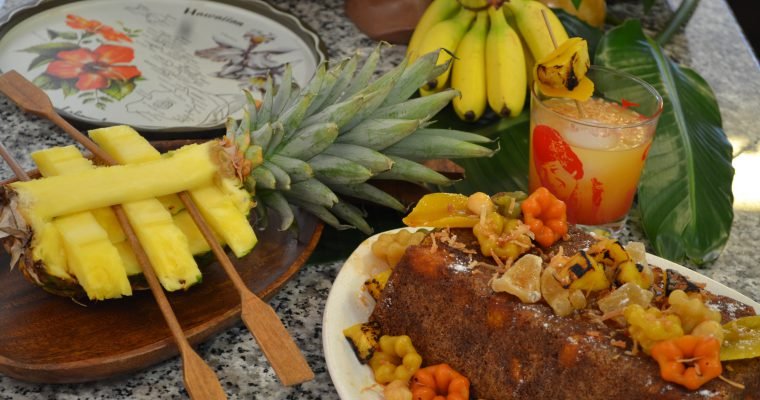
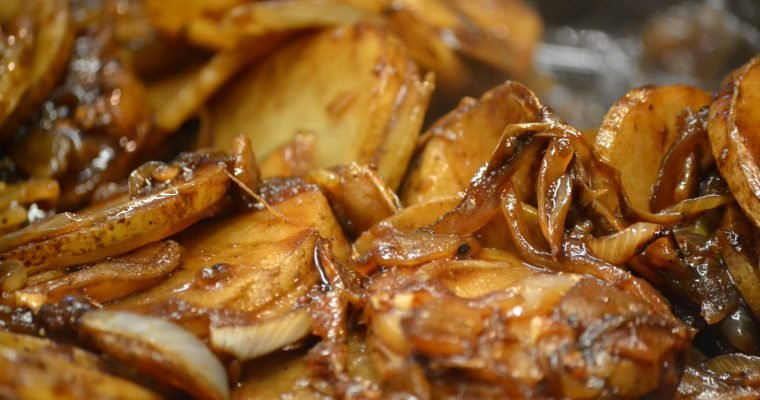
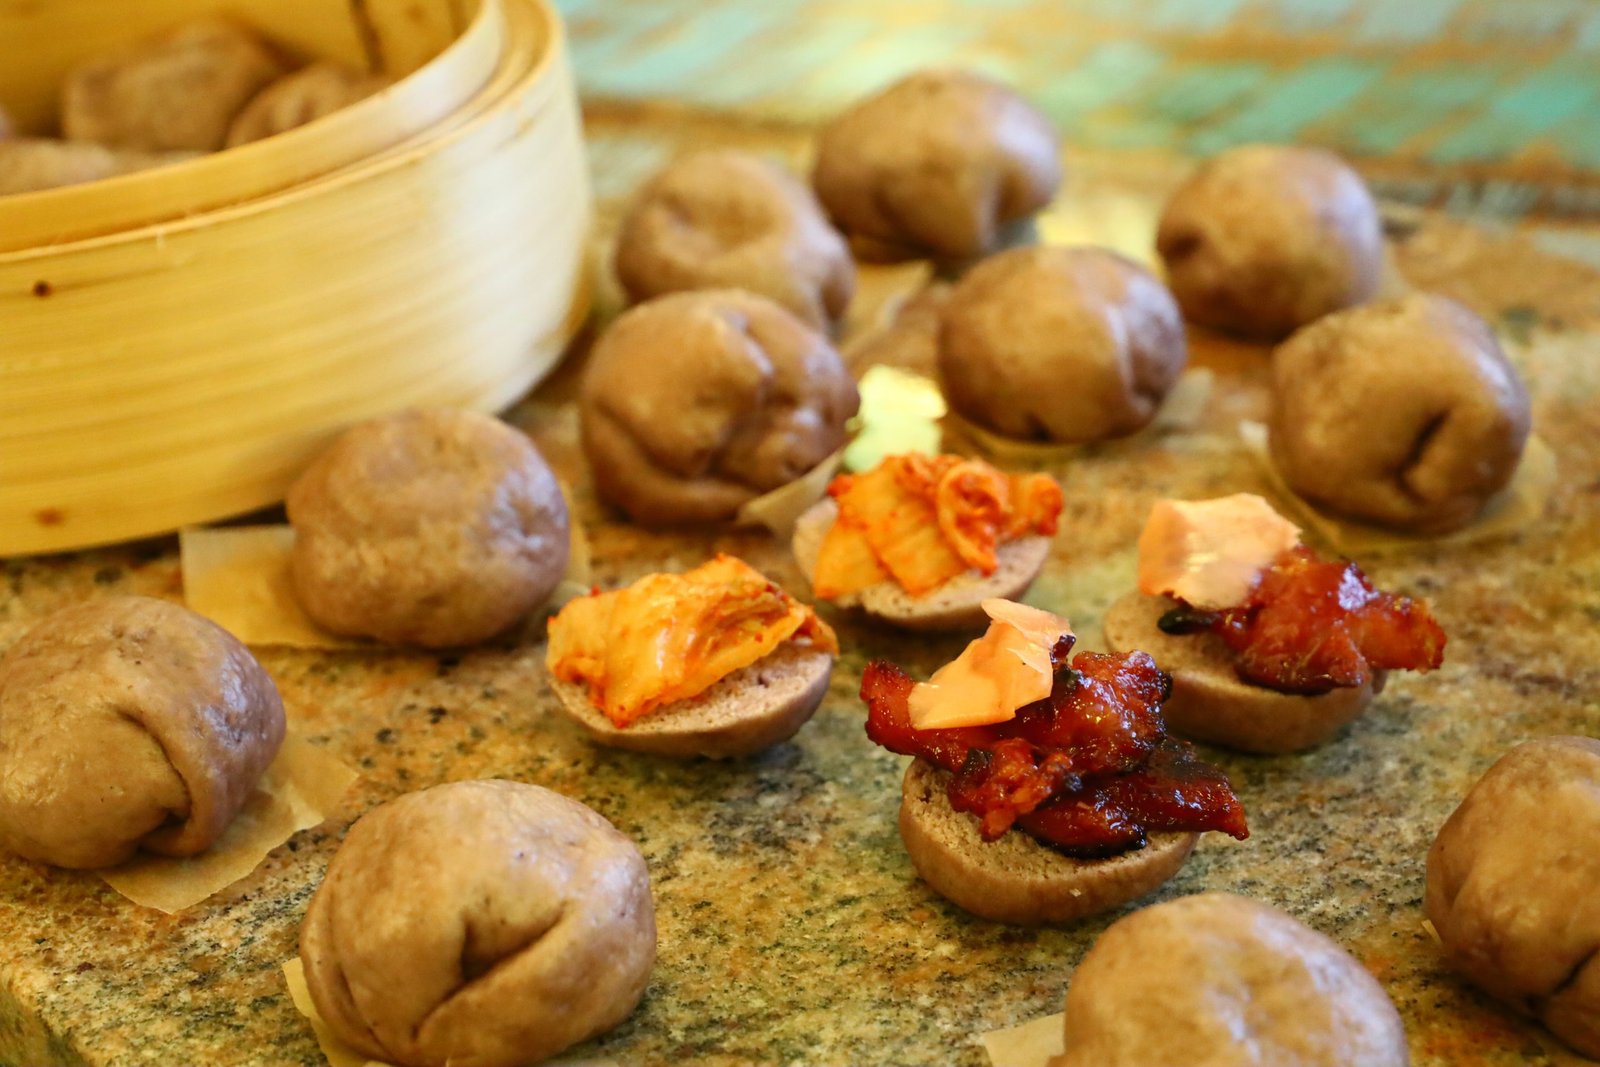
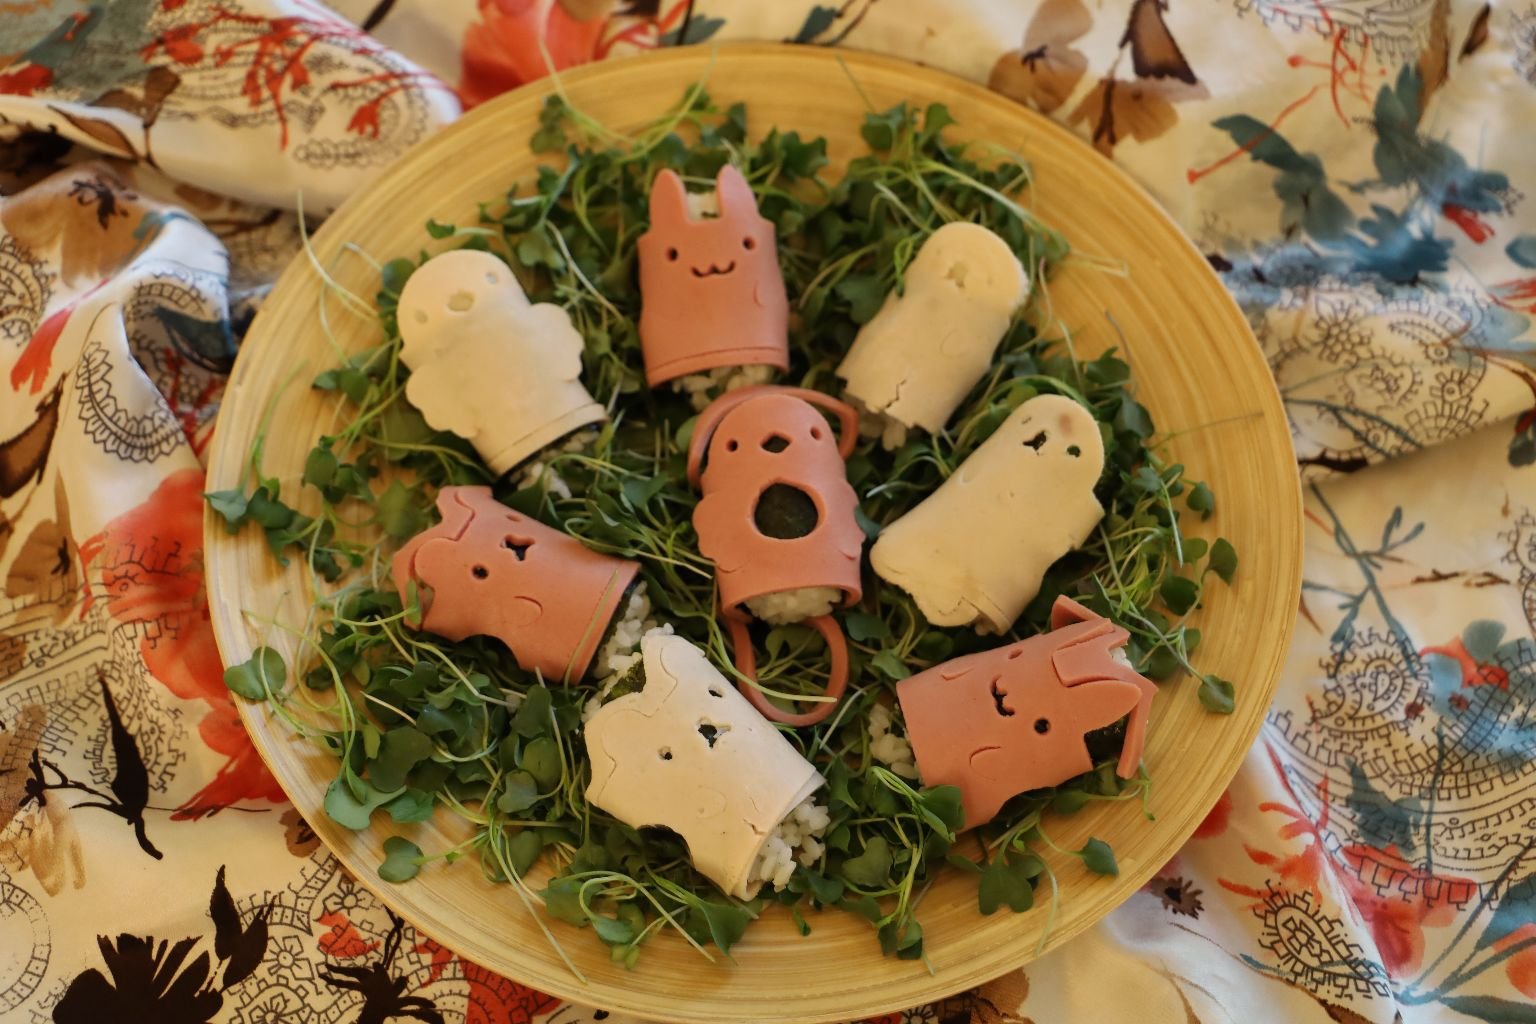
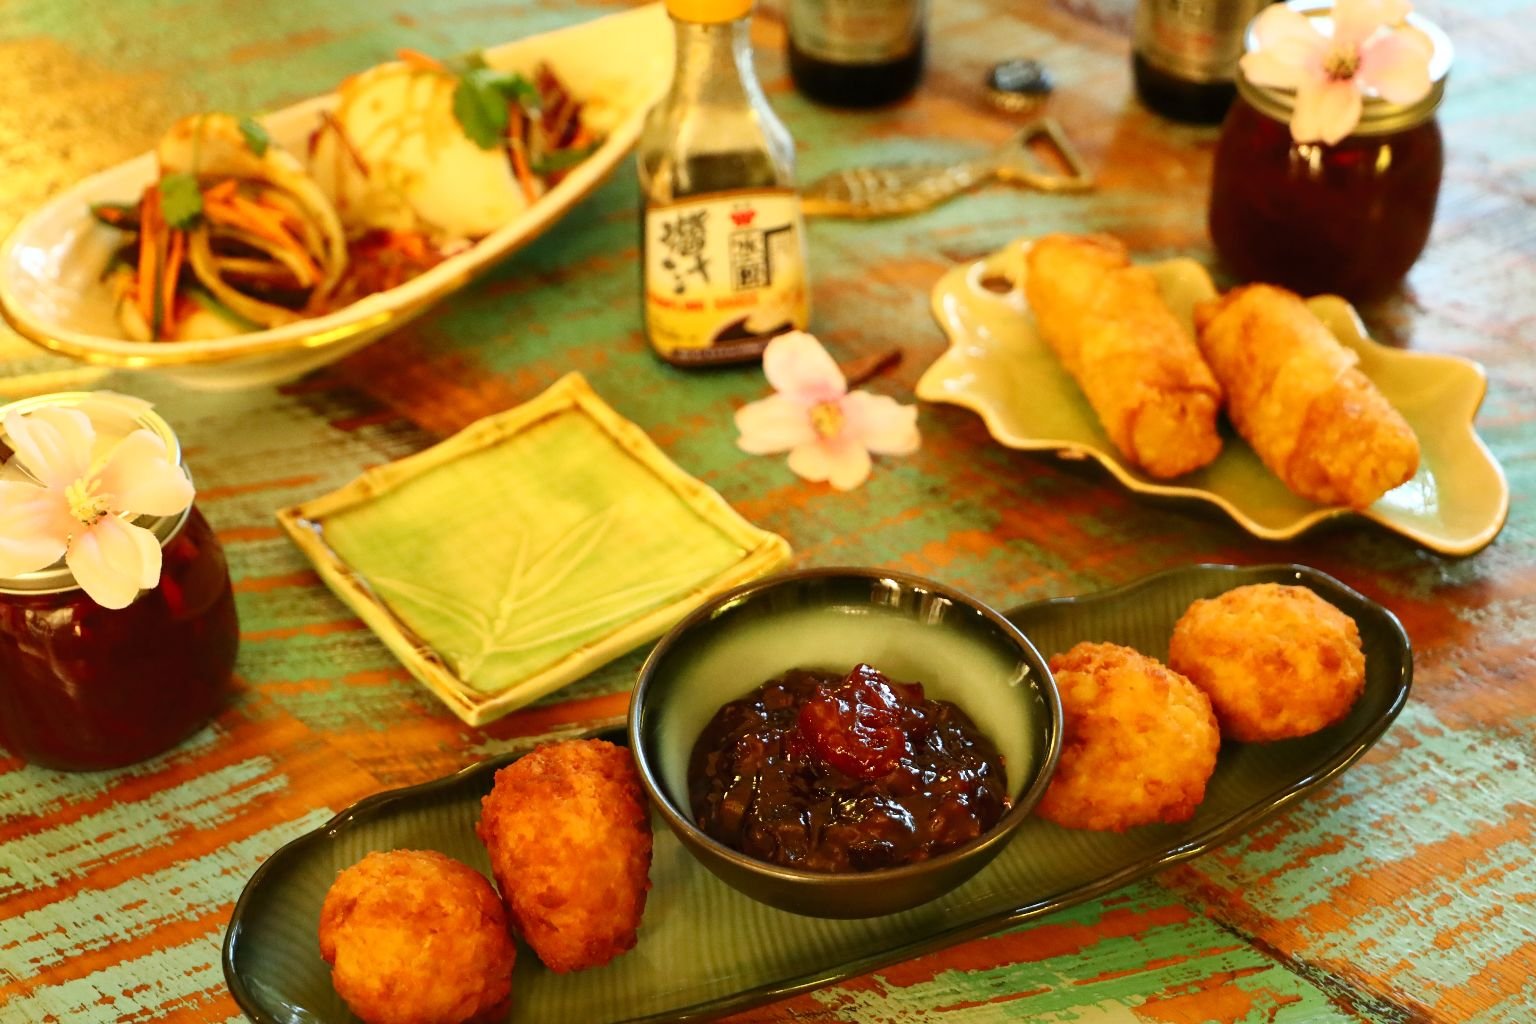
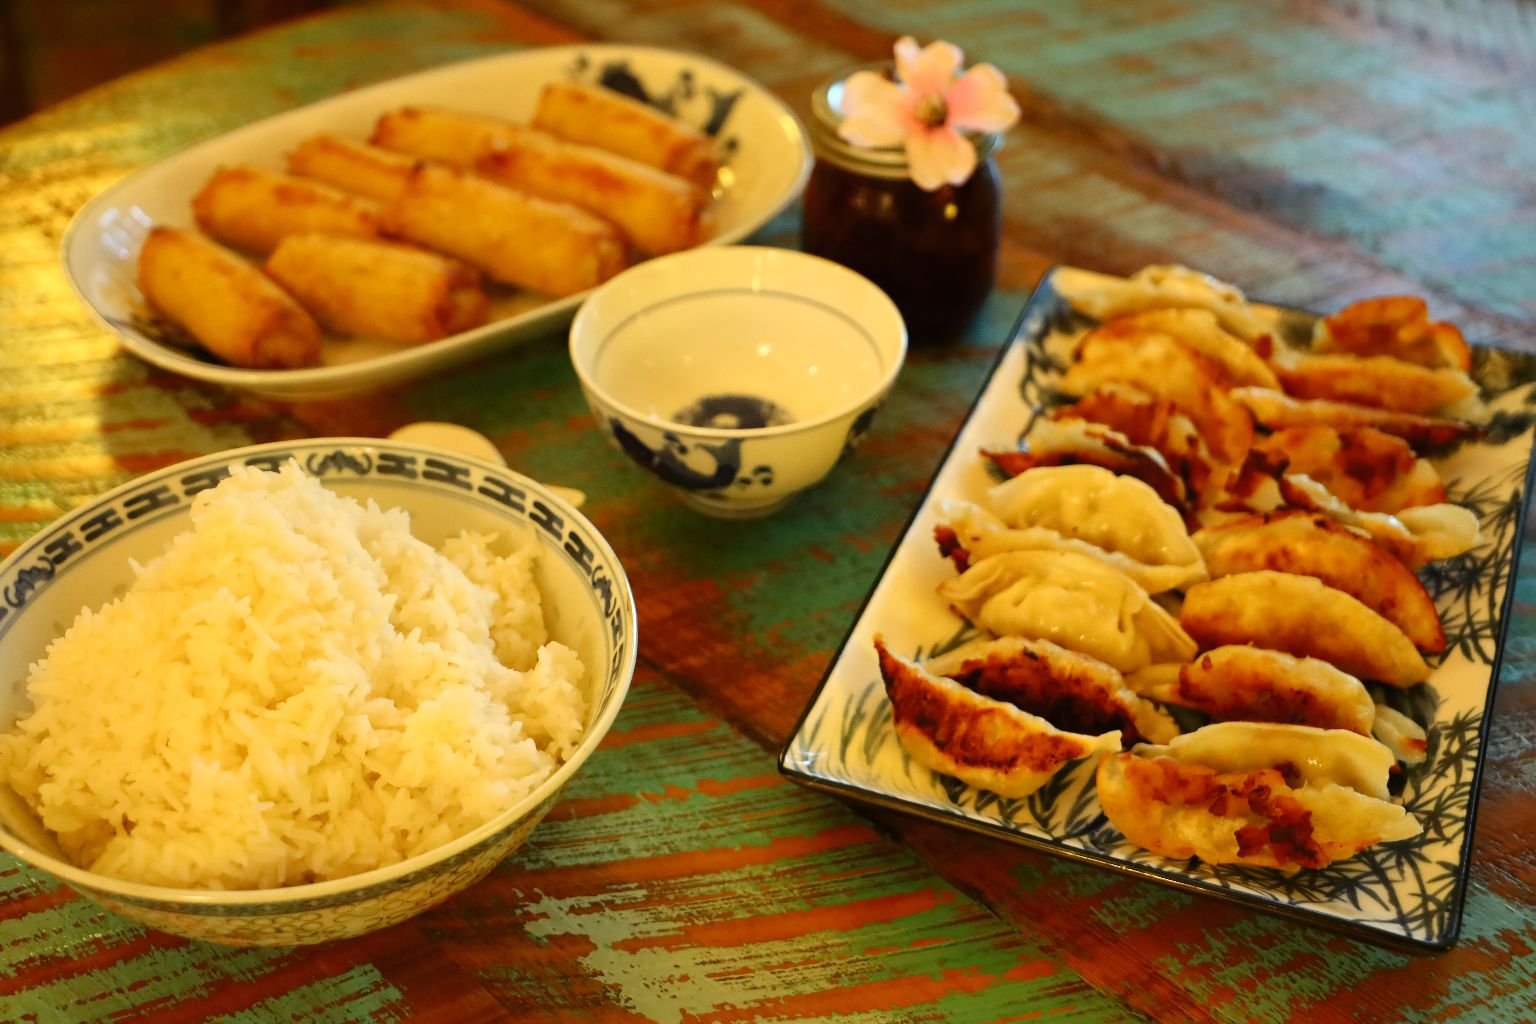
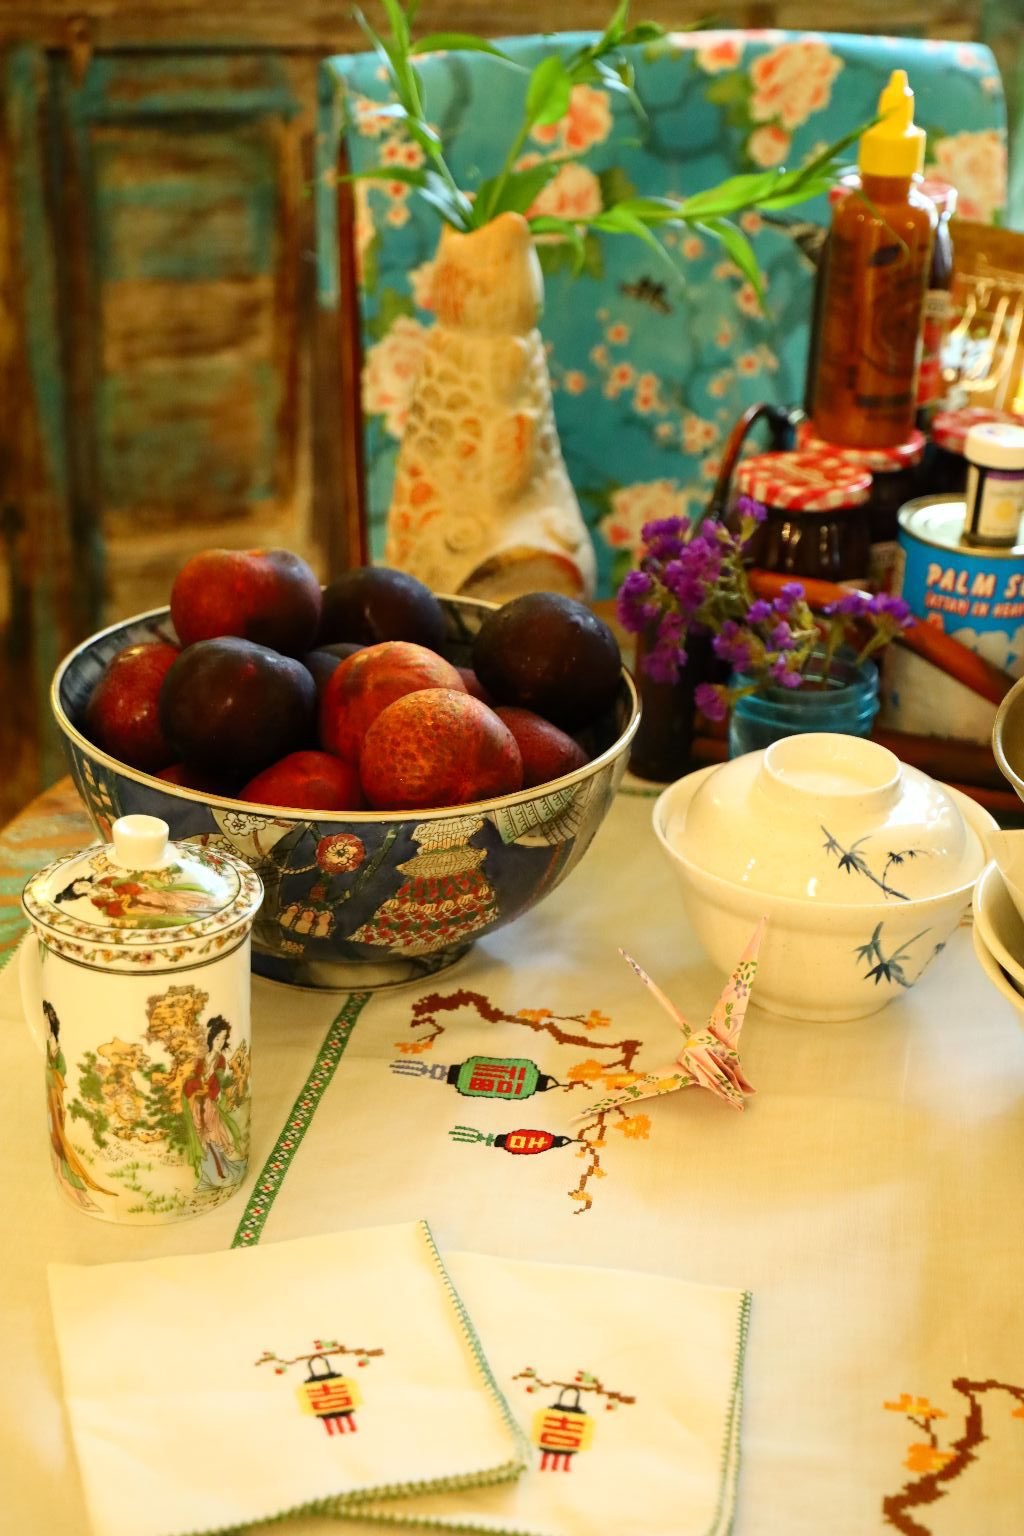
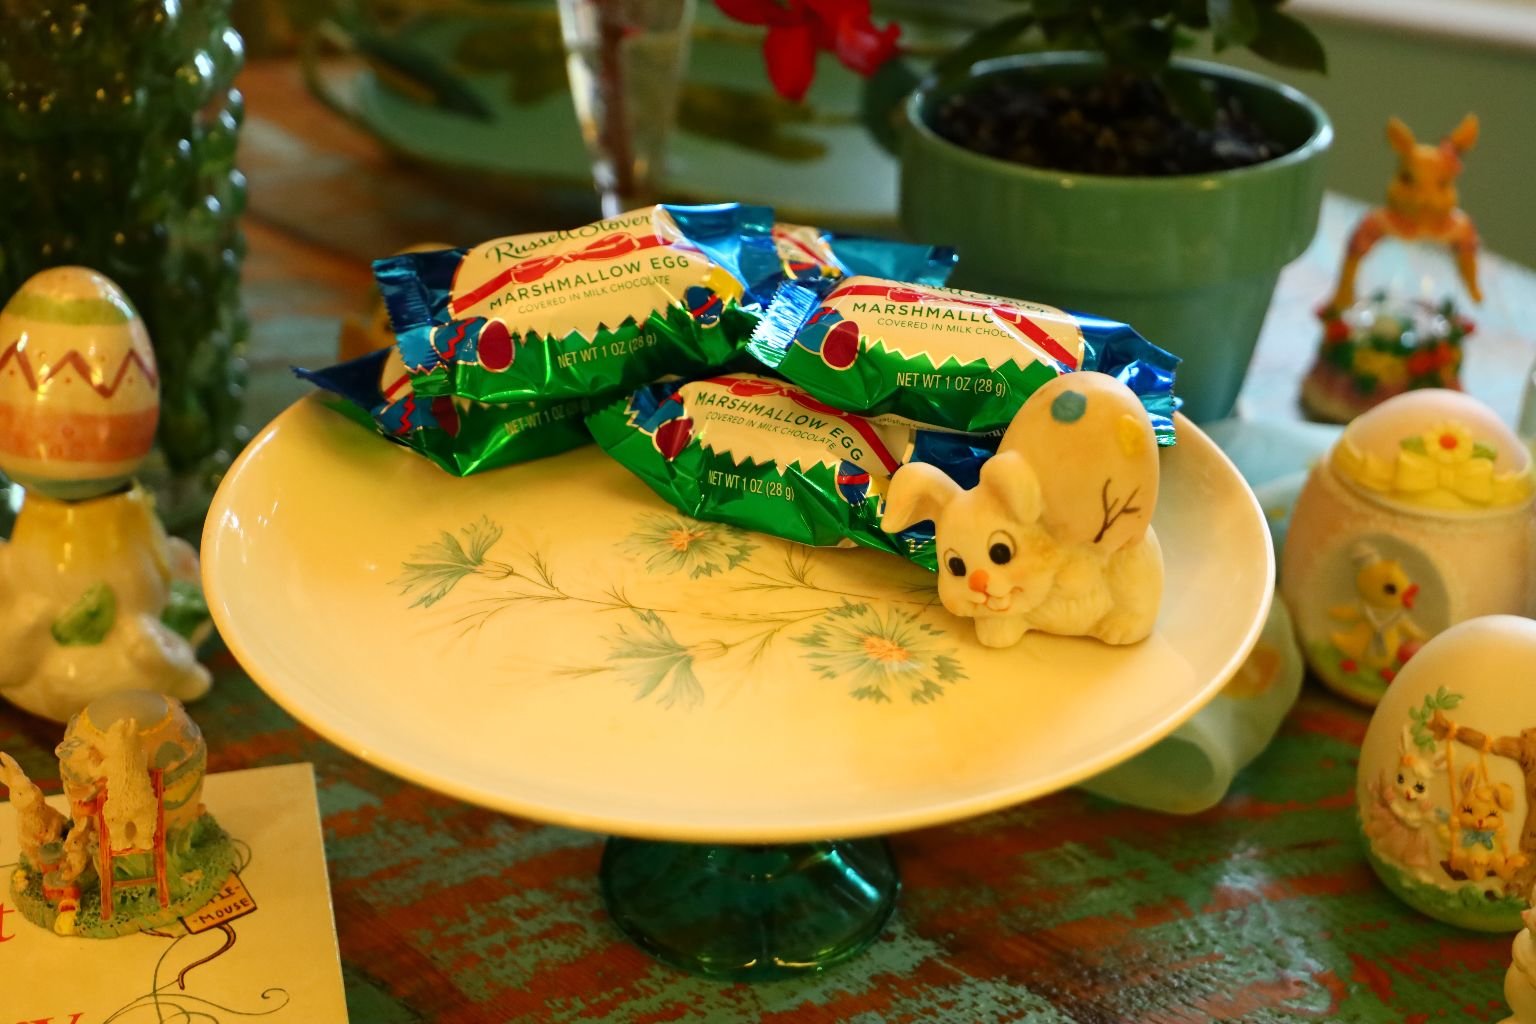
A Few Island Themed Snacks
Delicious = ONO!
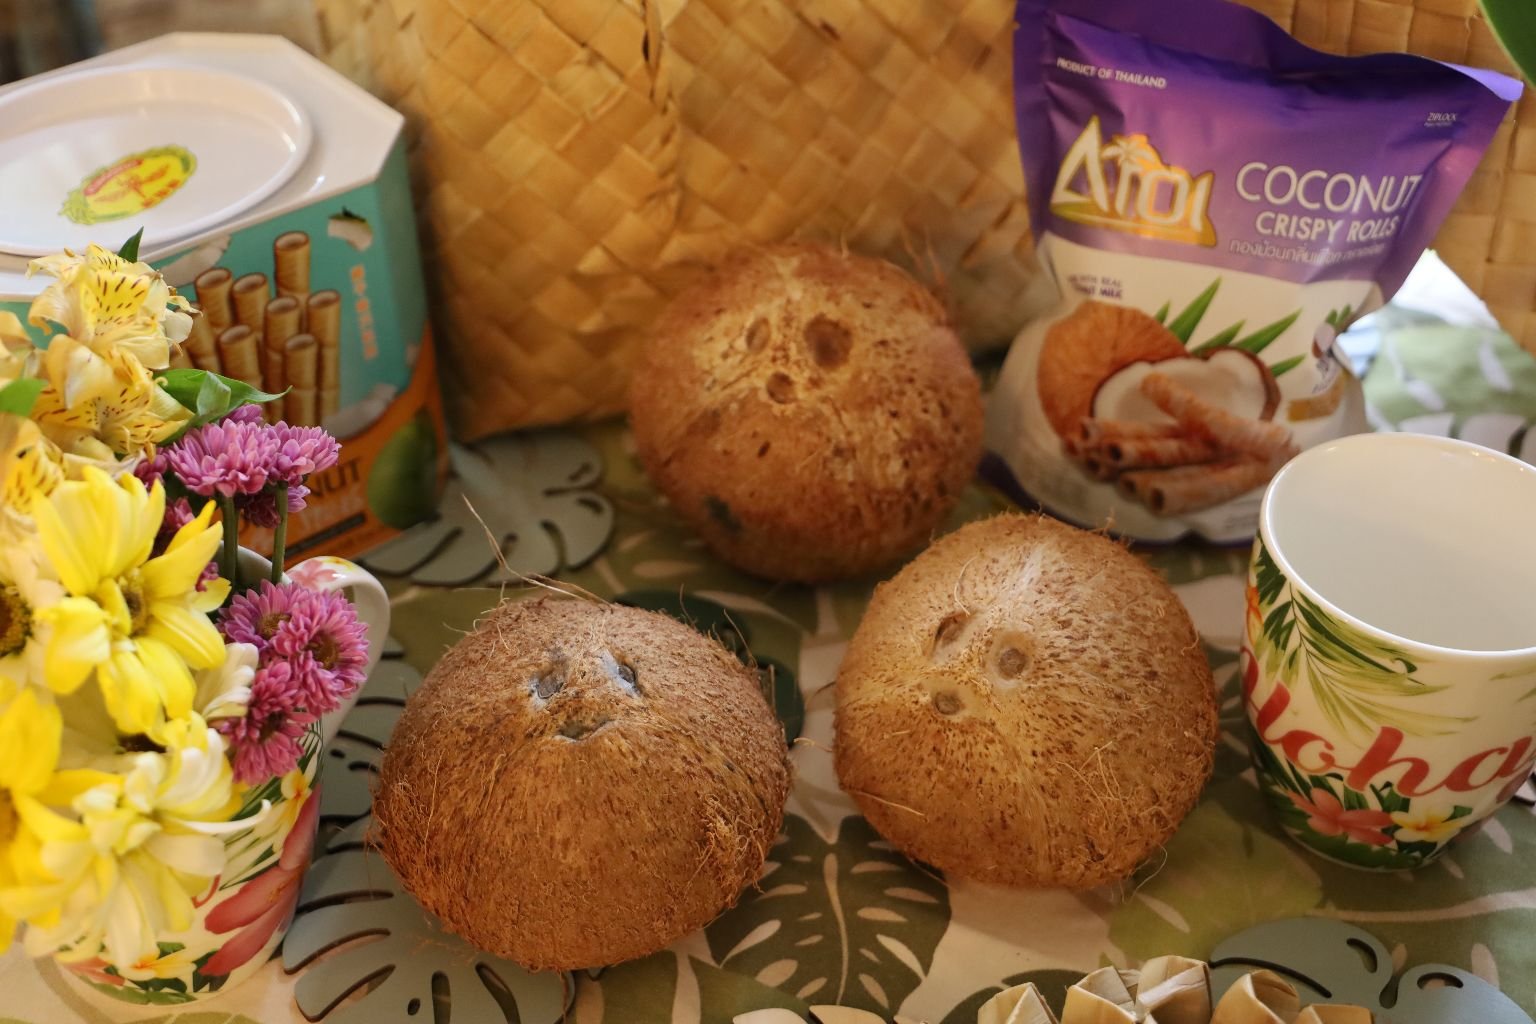
In Hawaiian Legend the Coconut has the face of the Monk Seal.
———————————————————————
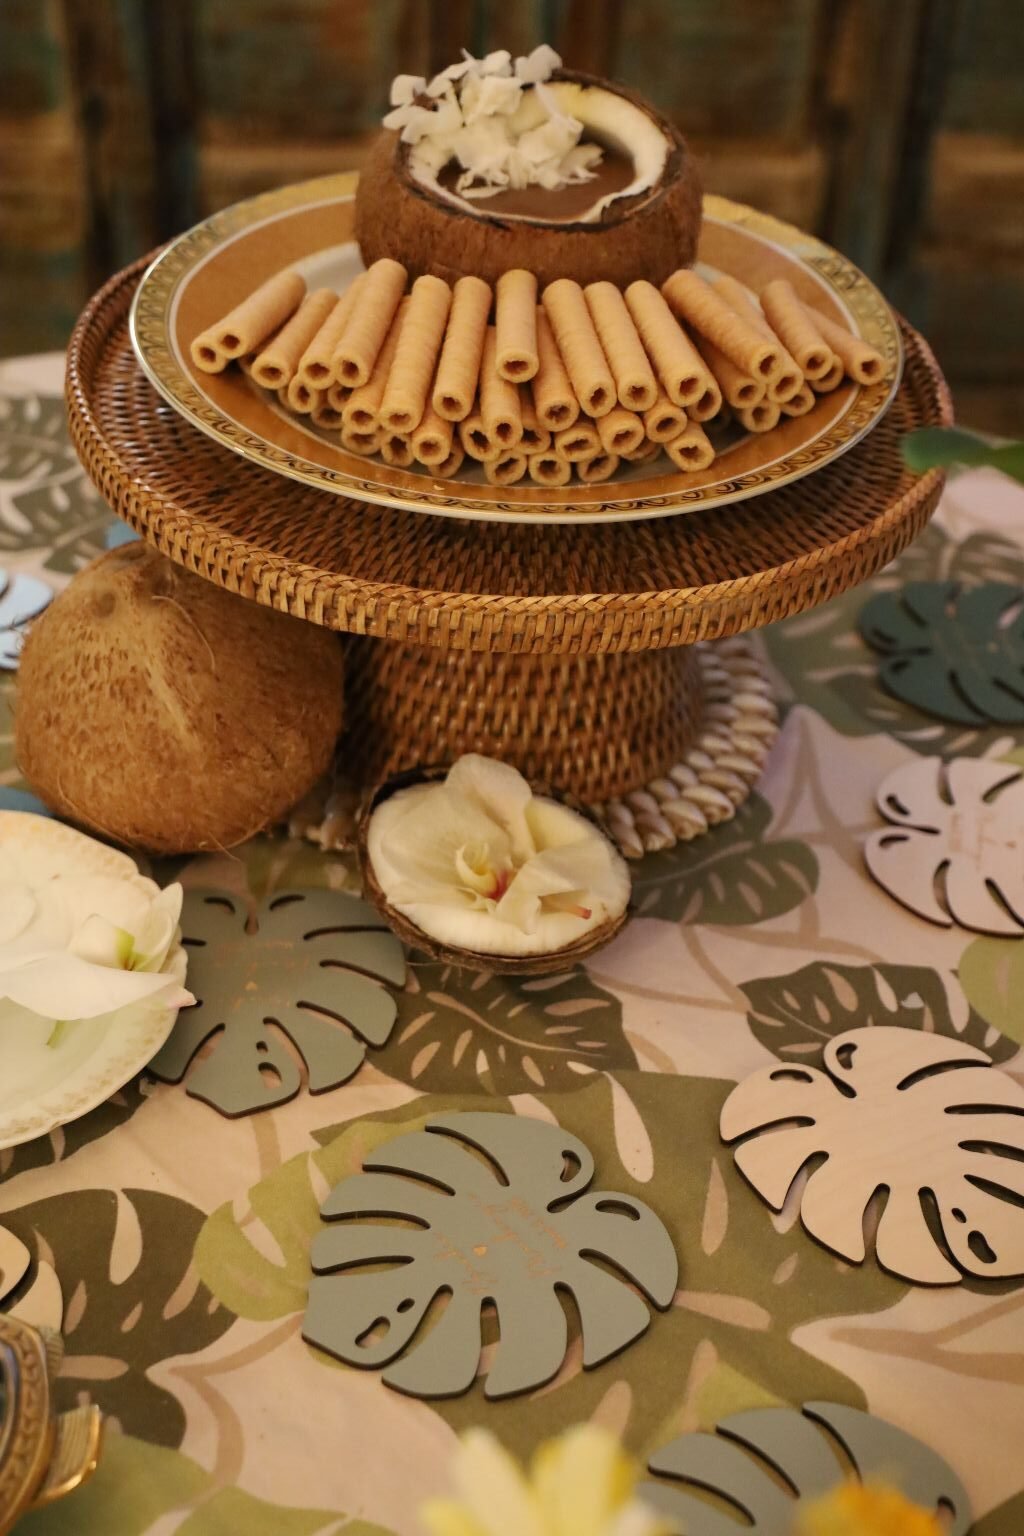
The Coconut Jam in the Coconut above, I found at the Asian Supermarket. It is some of the best Jam that we have ever eaten. I now love eating a Peanut Butter and Coconut Jam Sandwich. Something I would have never thought to eat together until I discovered that Coconut Jam.
Birthday Recipes Start Here
————————————————————————————–
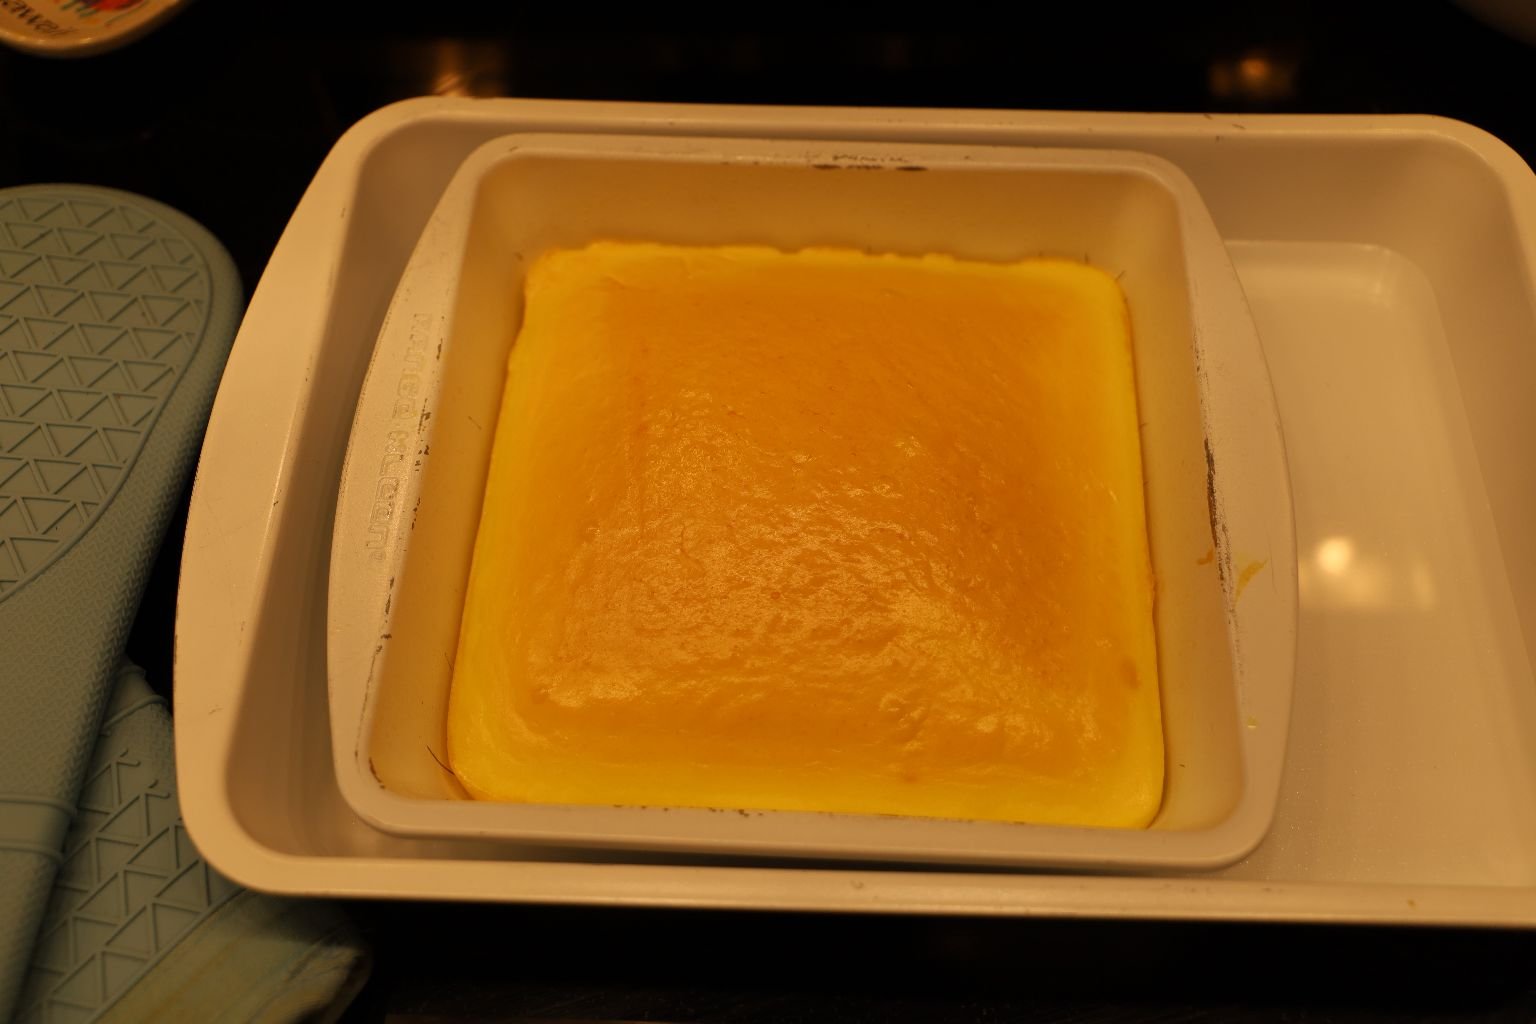
This is a Vintage Hawaiian Cake
It Reminded Me Of An Angel Food Cake, It Had A Bit Of That Consistency
My Haupia Cake w/ Haupia Frosting
Haupia is a traditional Hawaiian Coconut Pudding commonly served at Luau’s.
It is quite nice. It also makes a great Cake, Frosting, and Pie.
—————————————————————————————

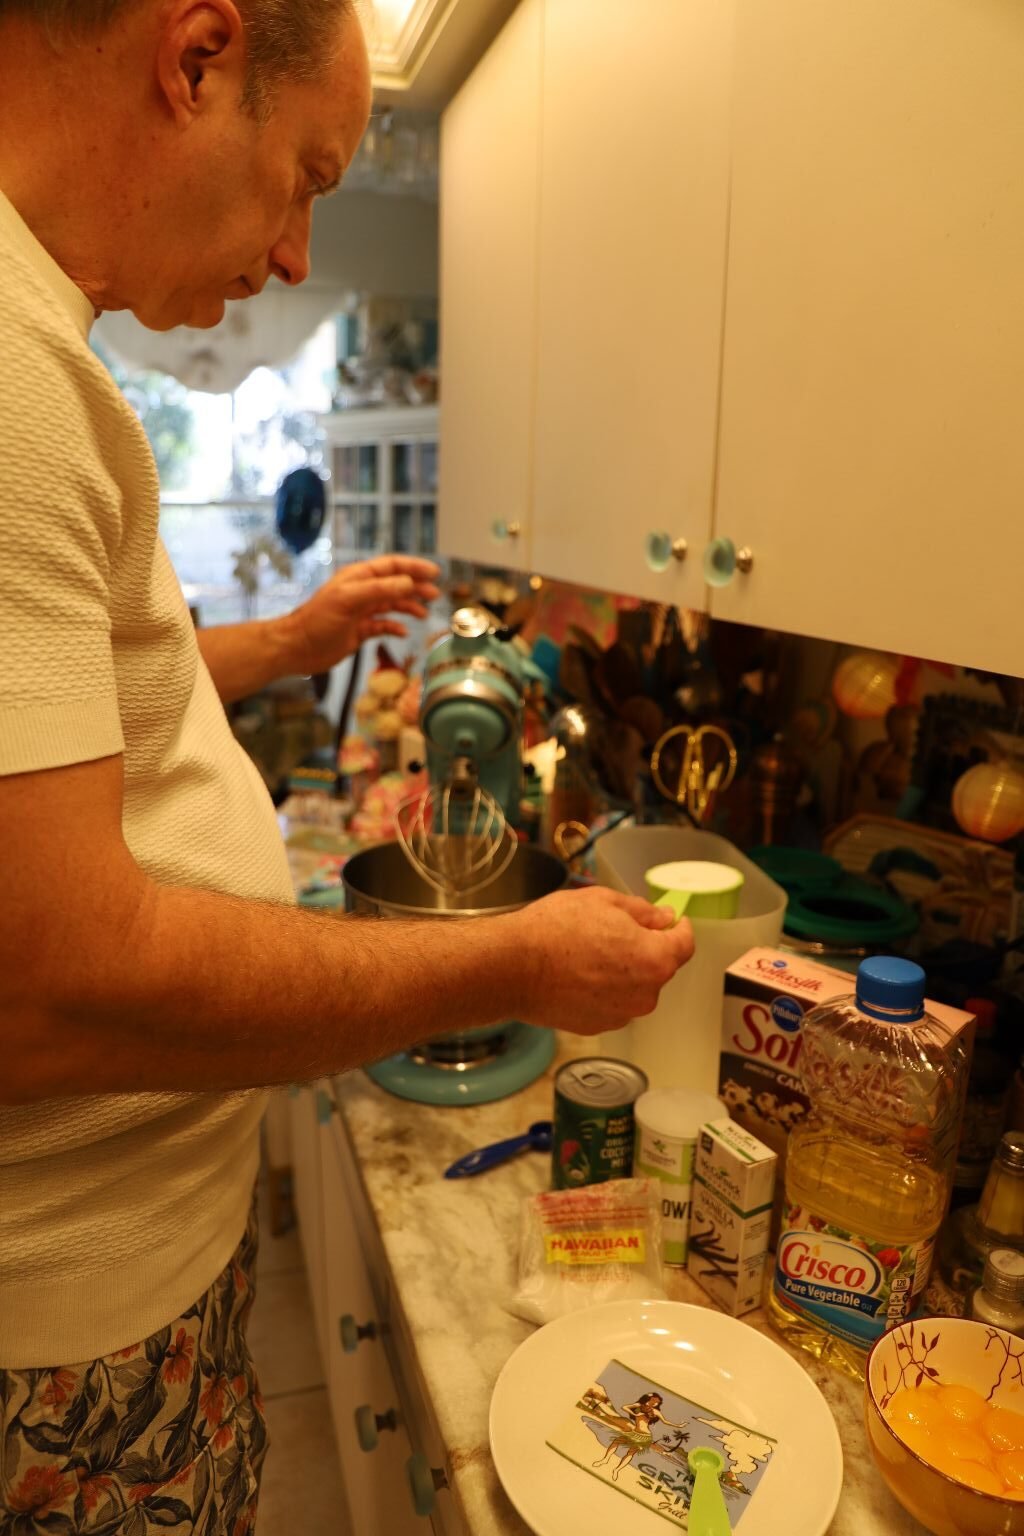
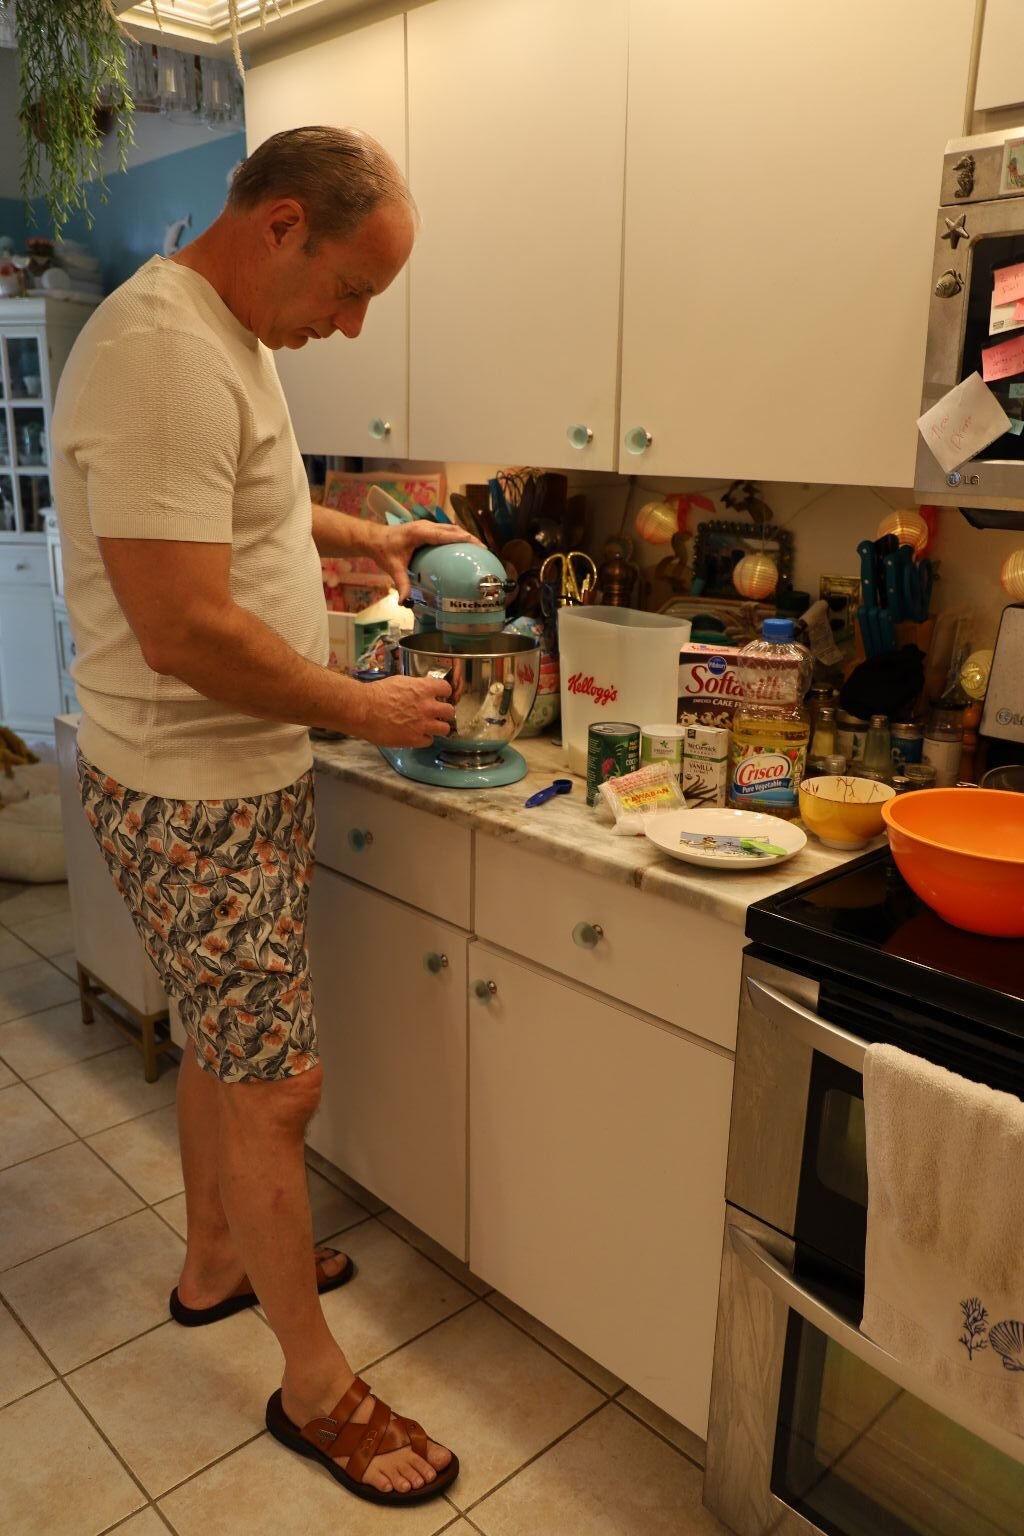
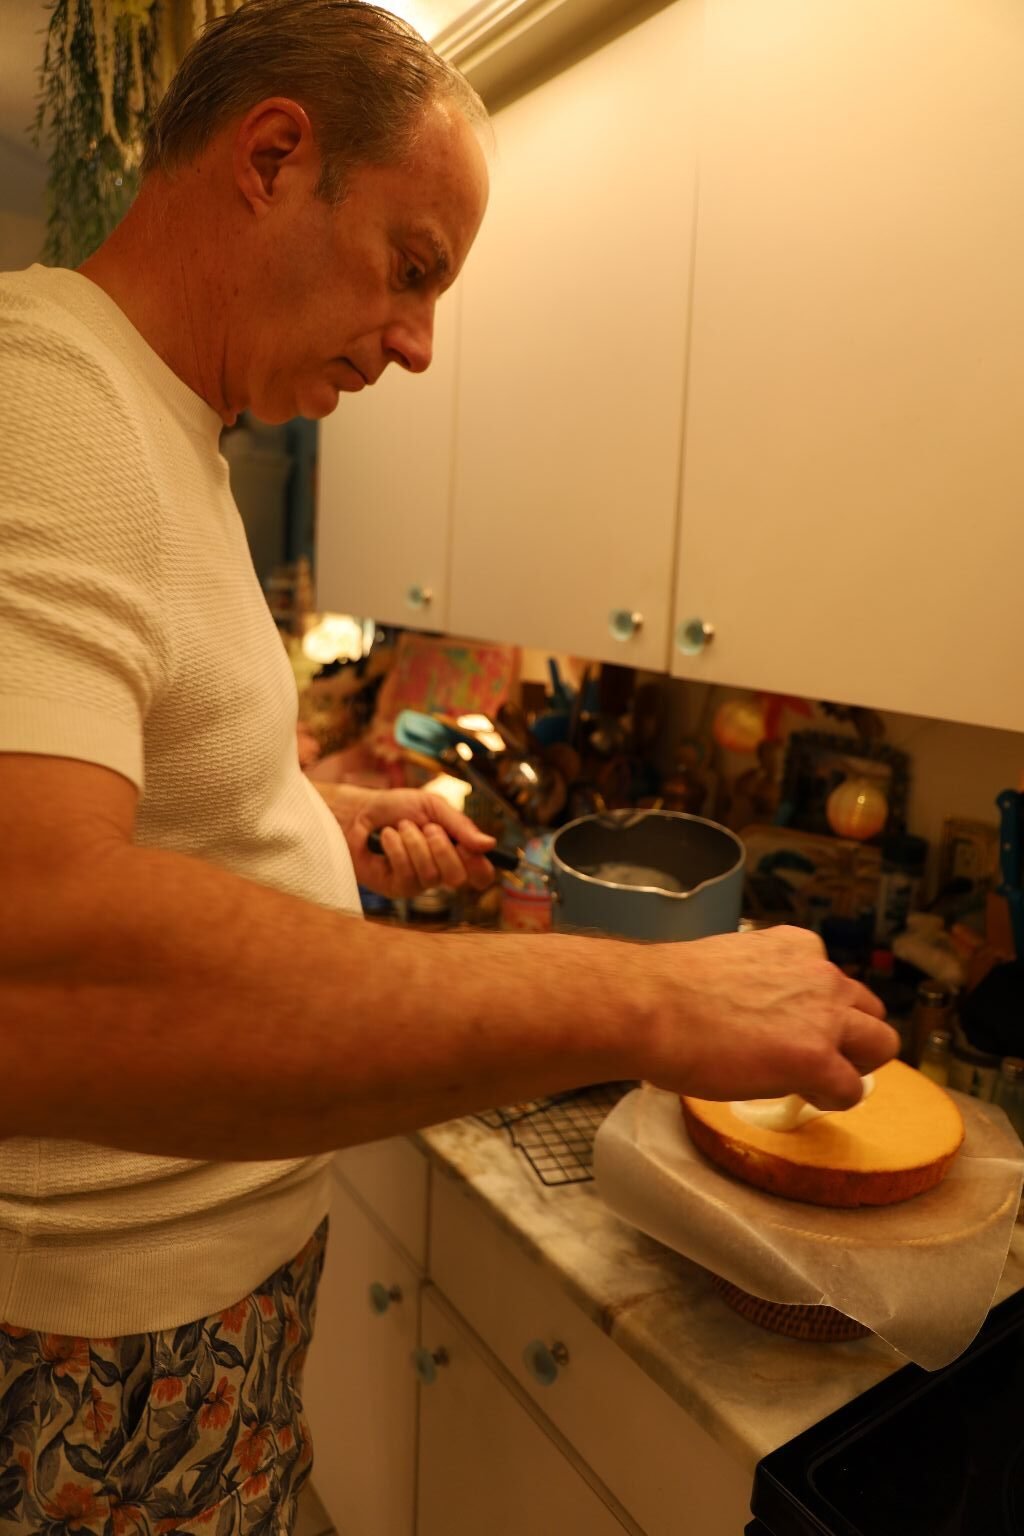
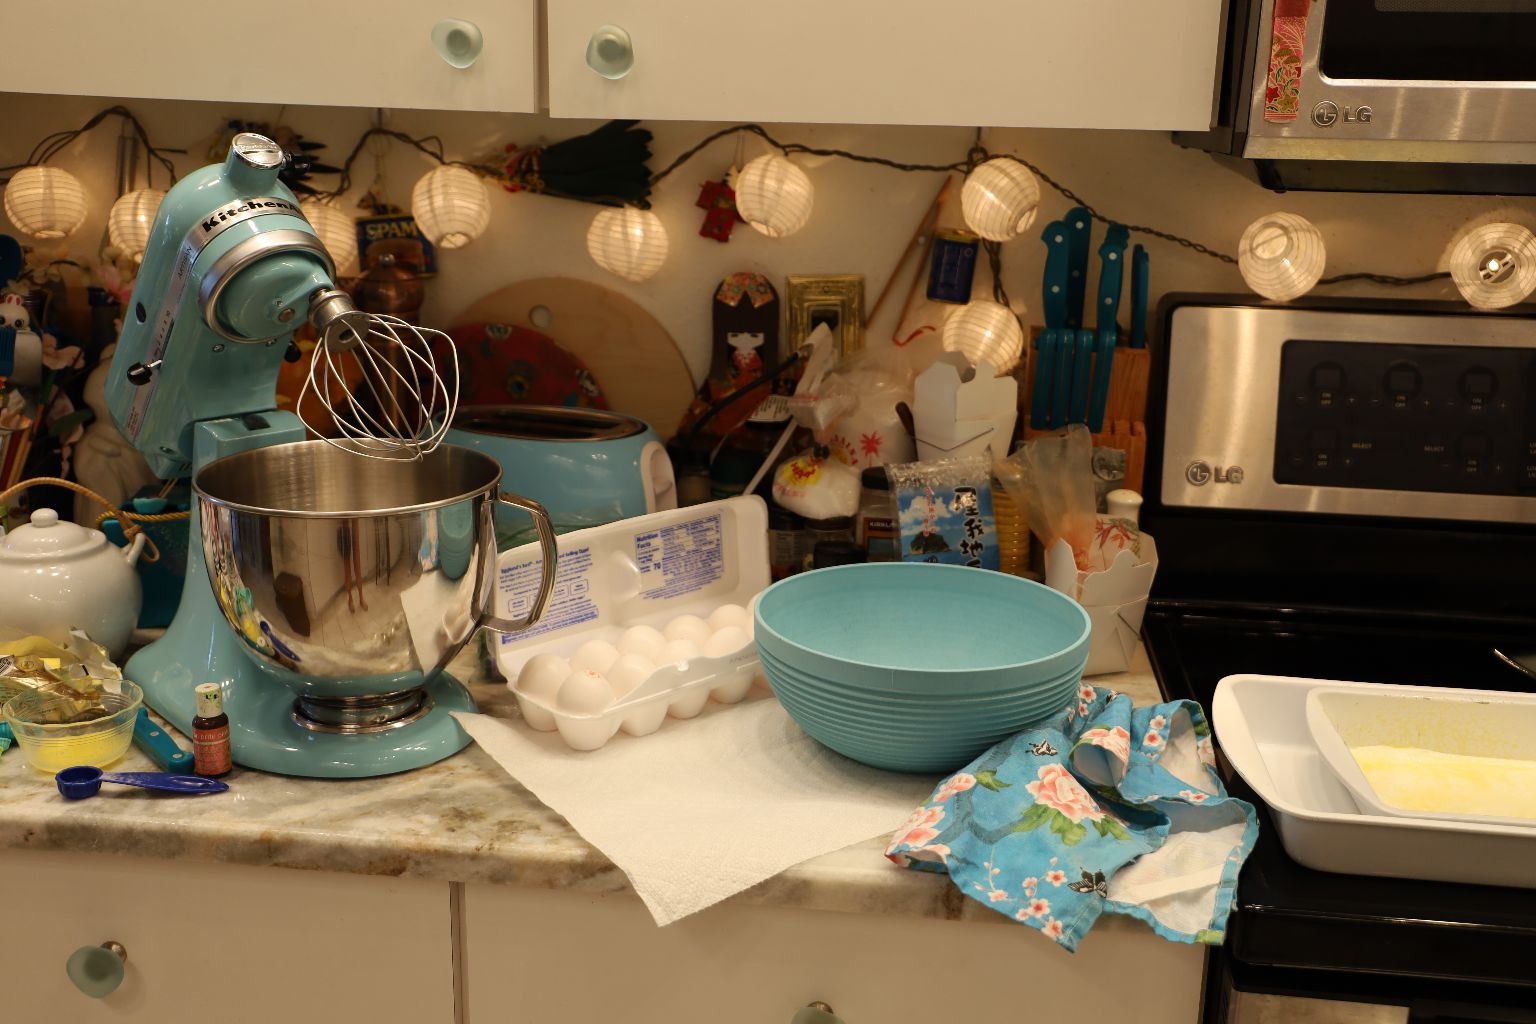
Gordon Ready To Make My Cake
—————————————————————————————–
(Write Up By Gordon)
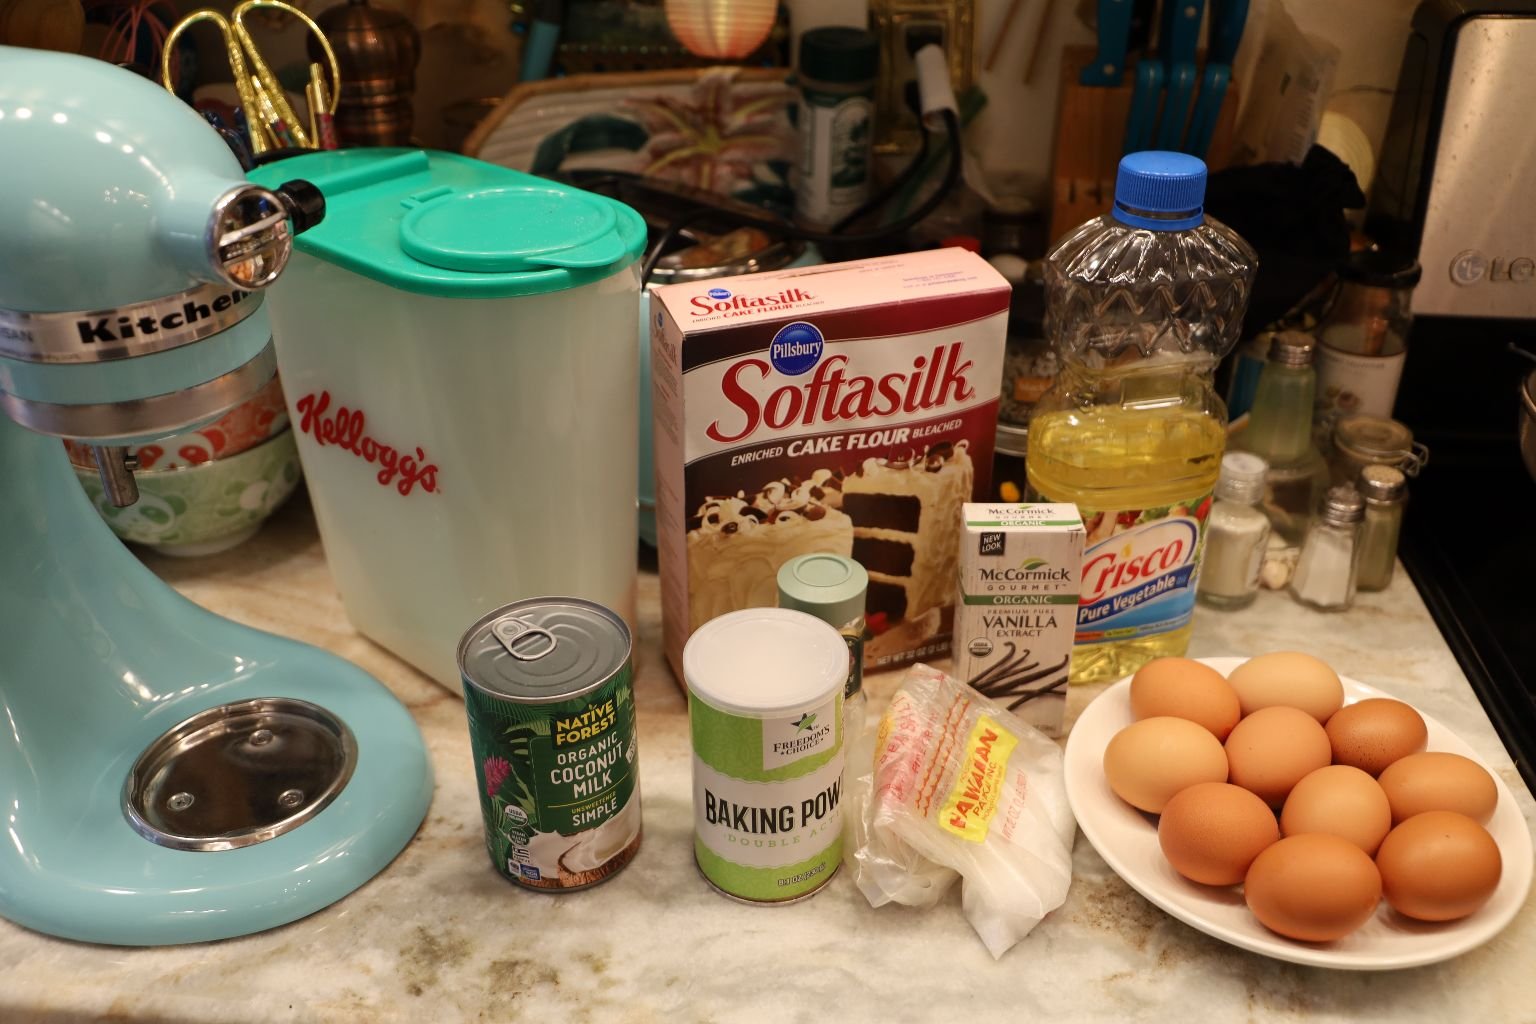
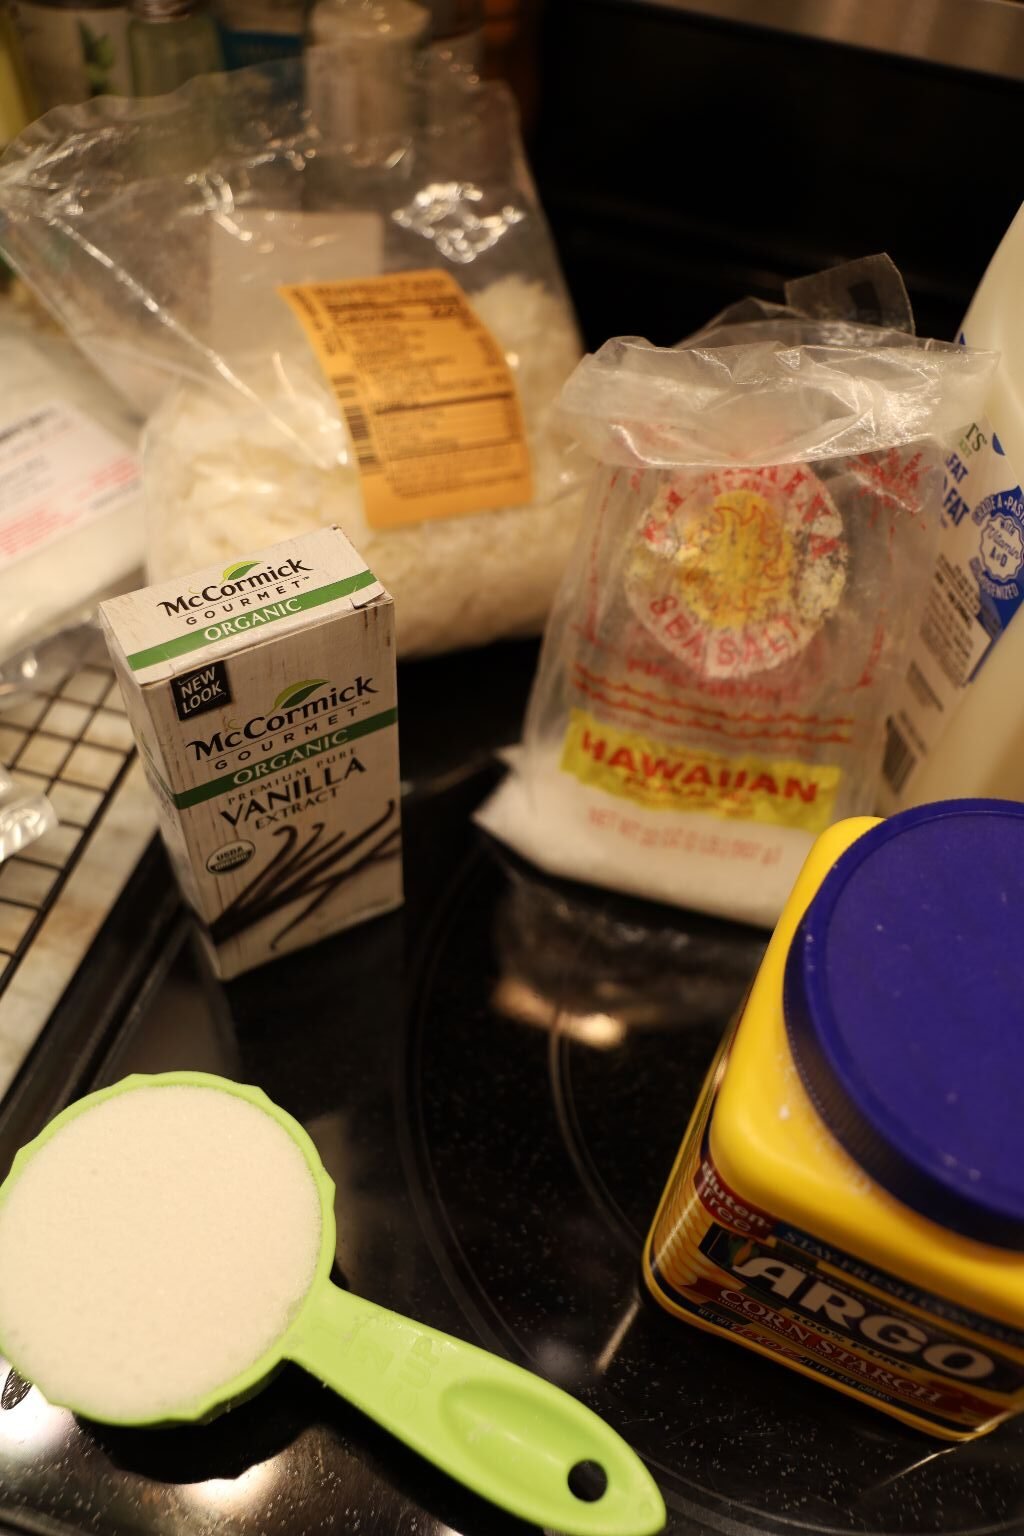
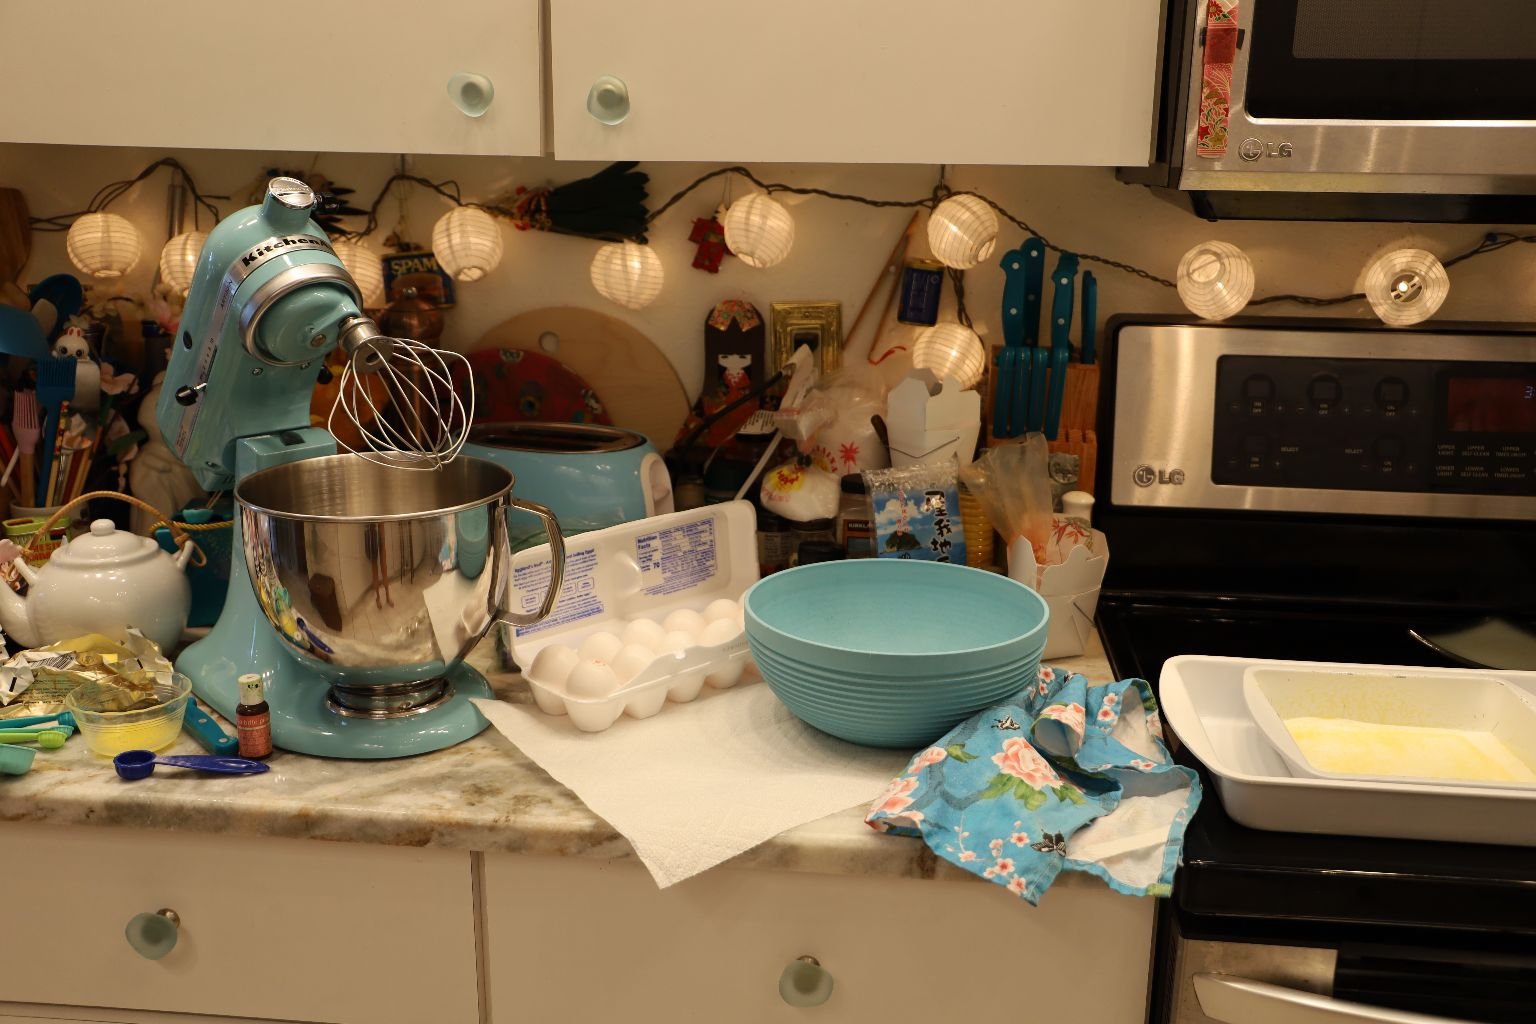
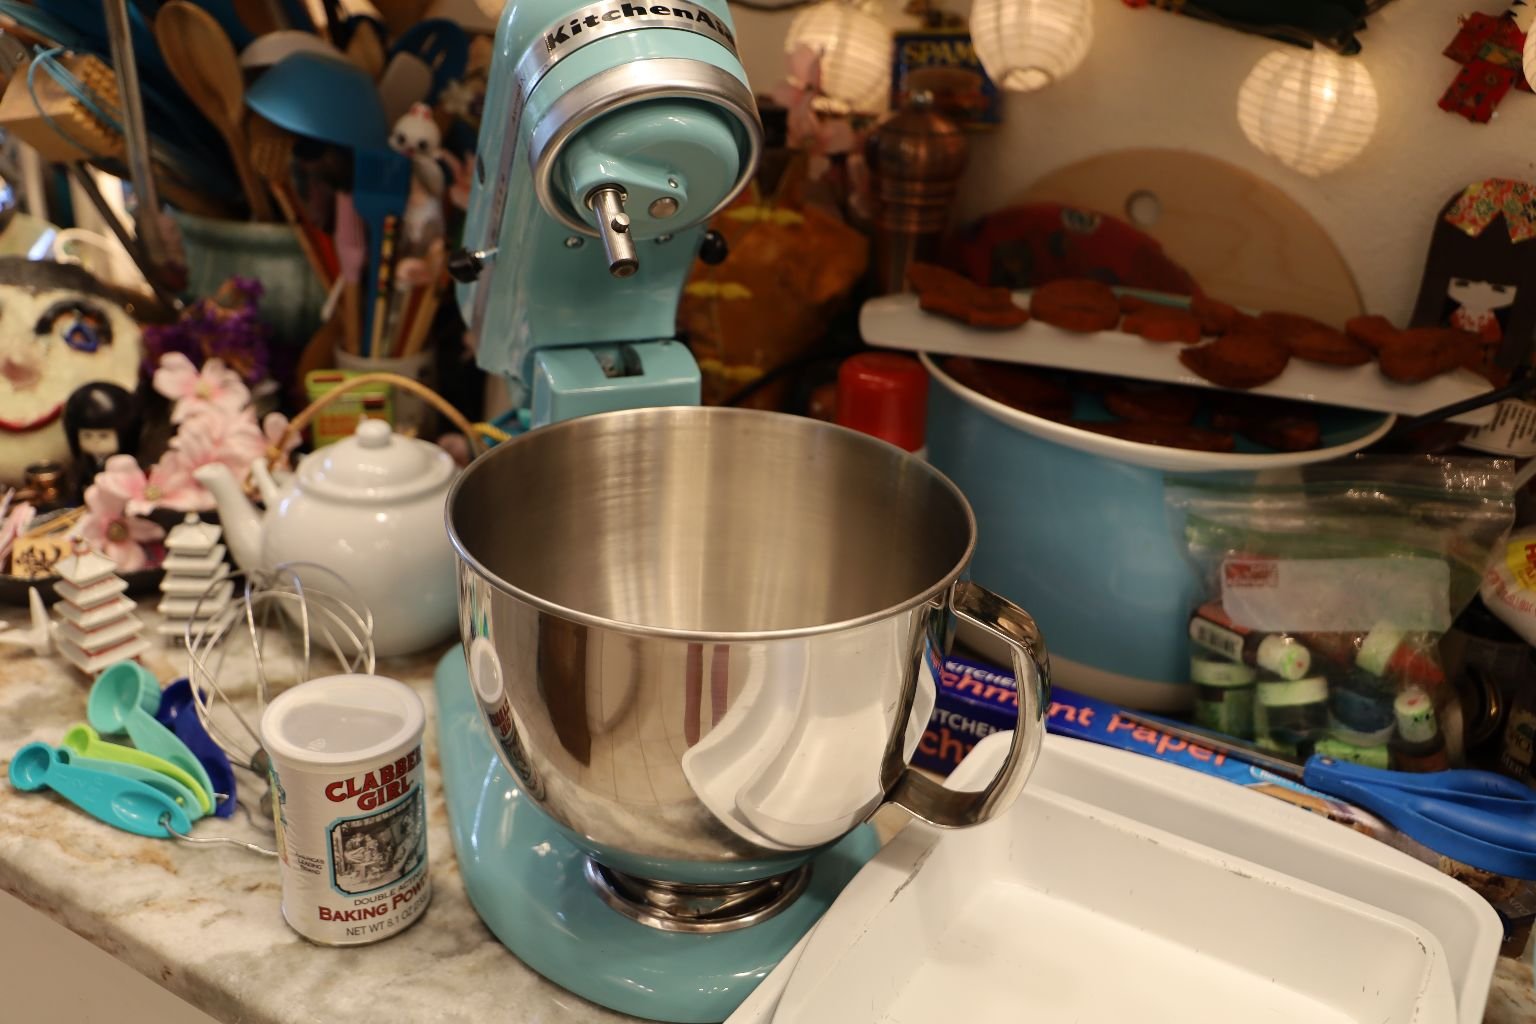
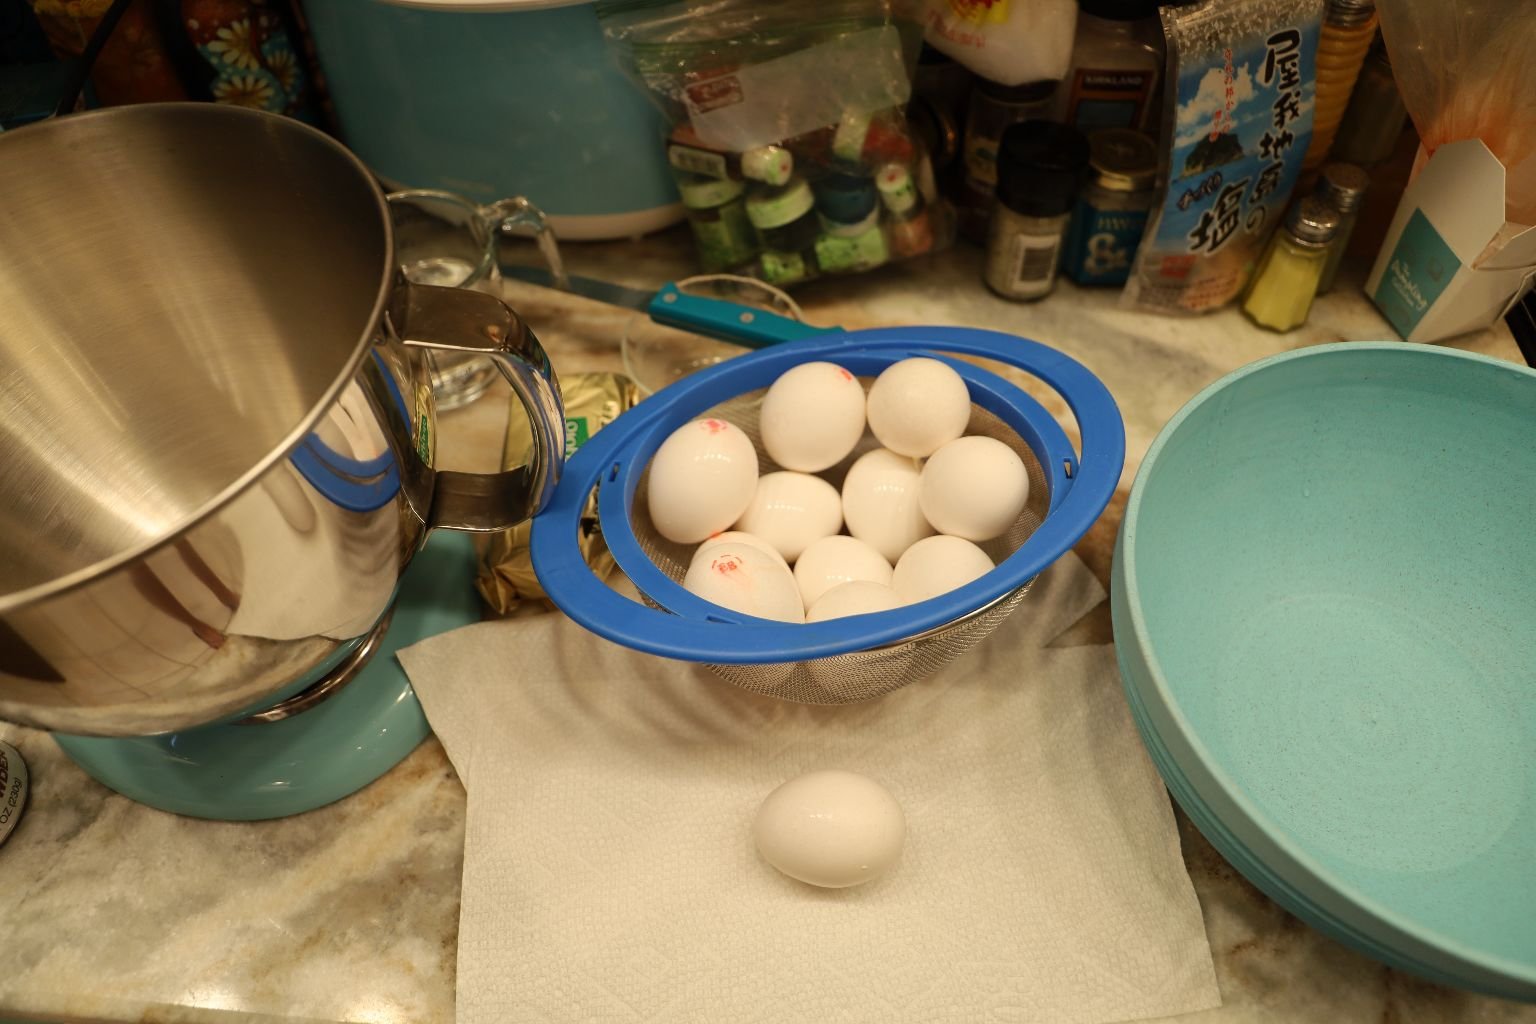
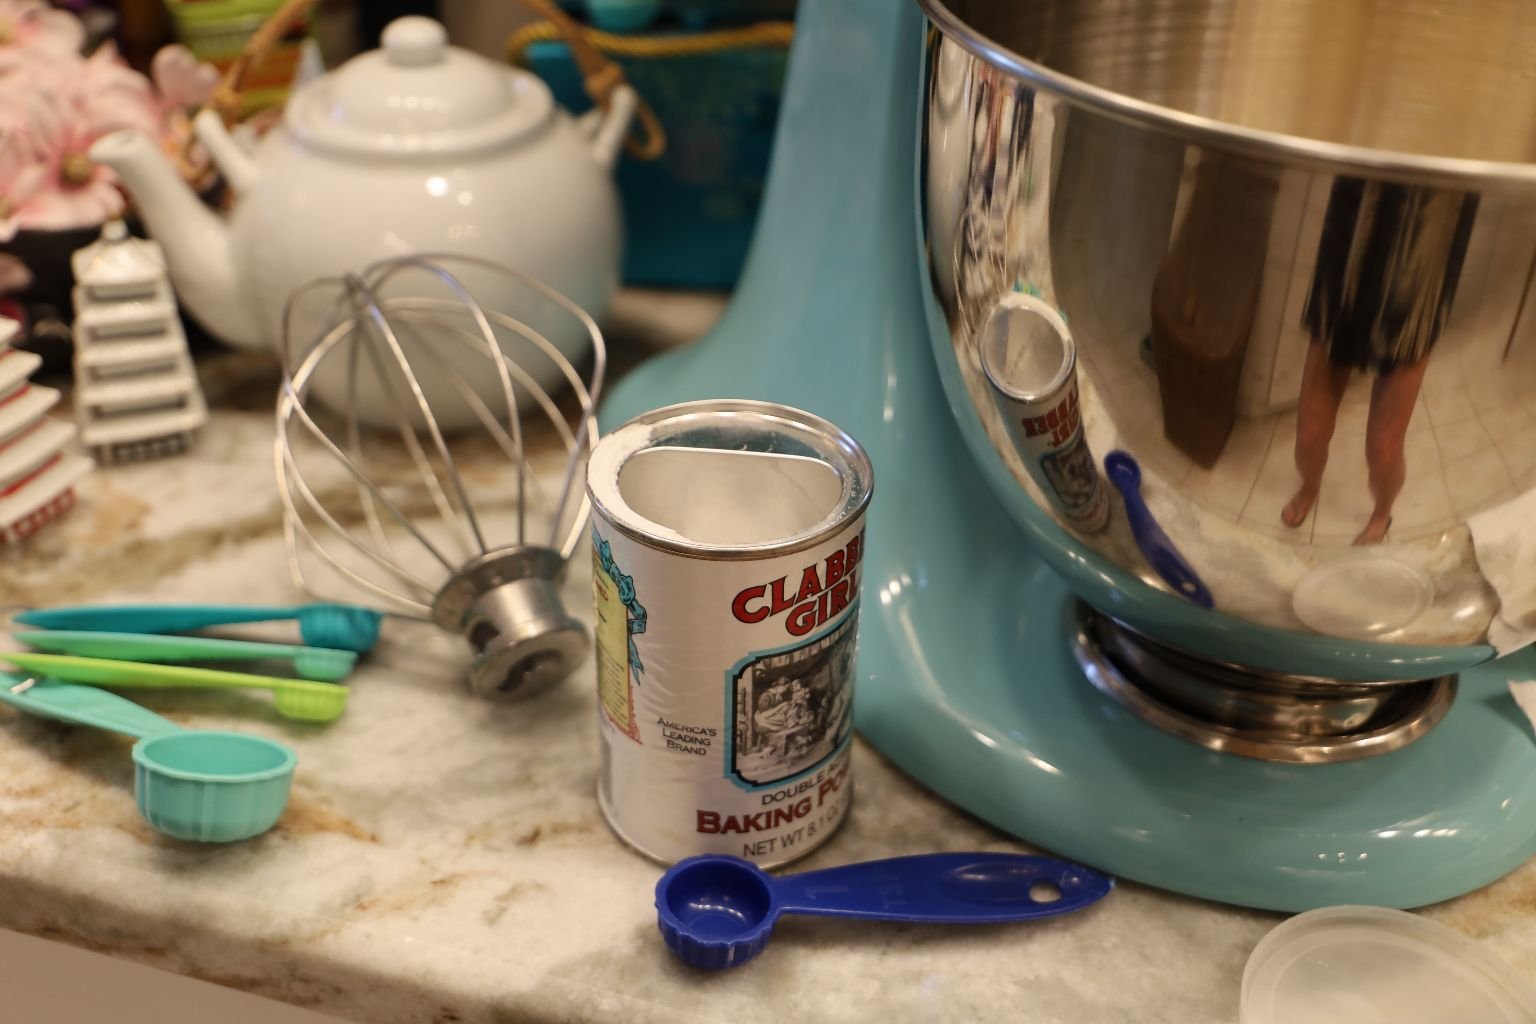
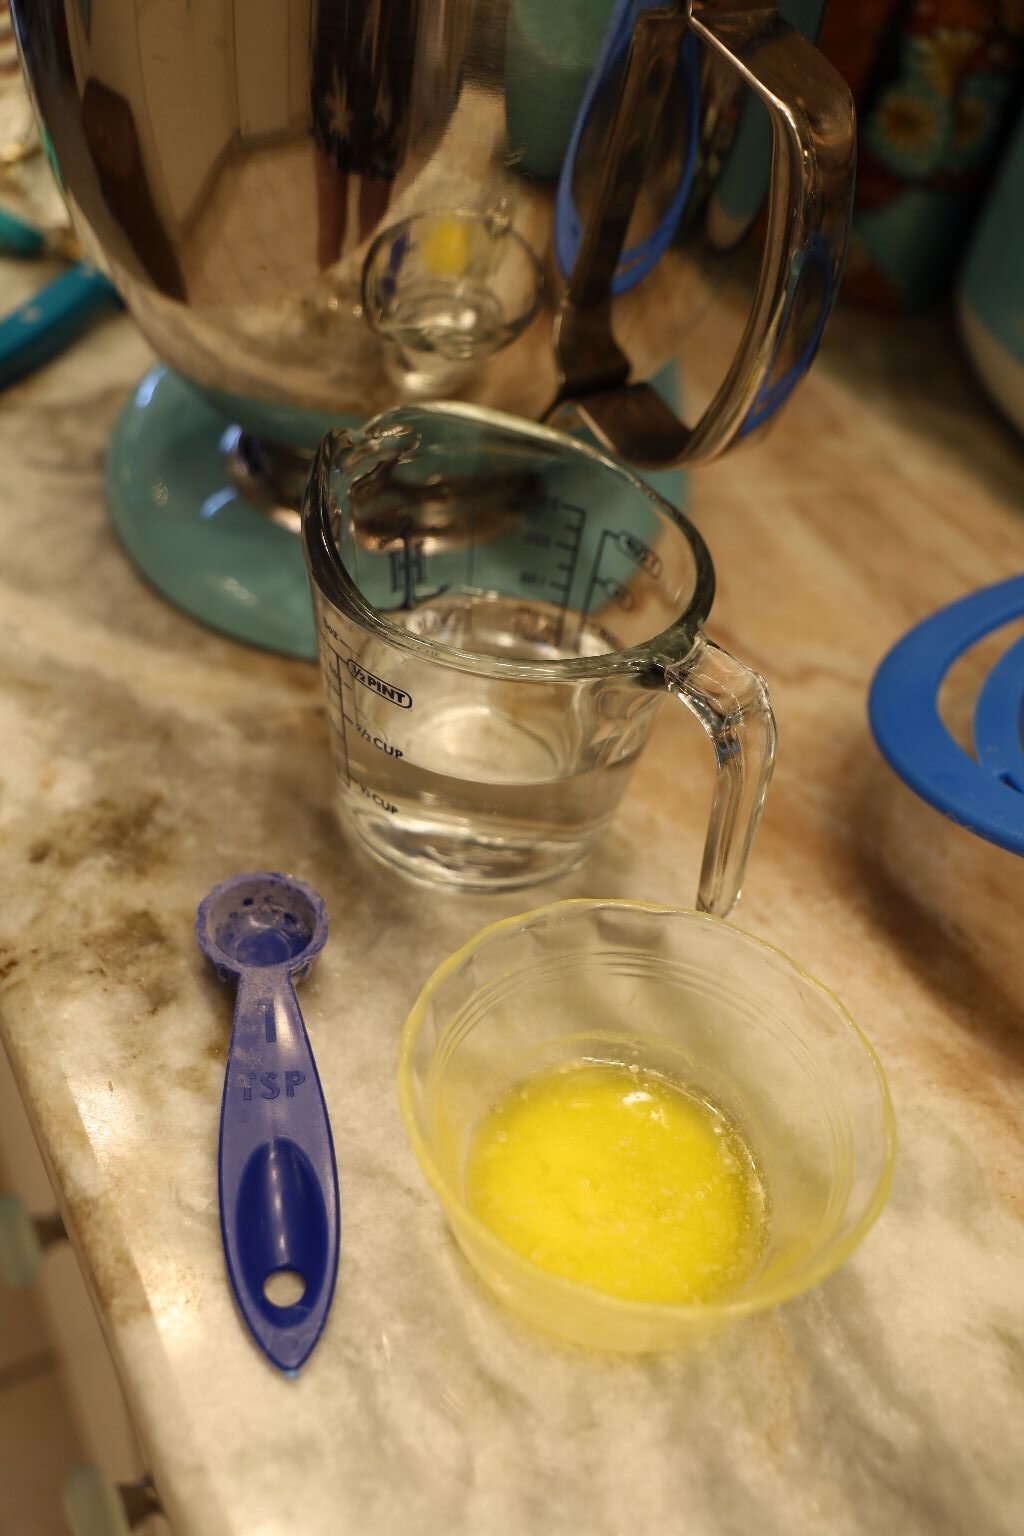
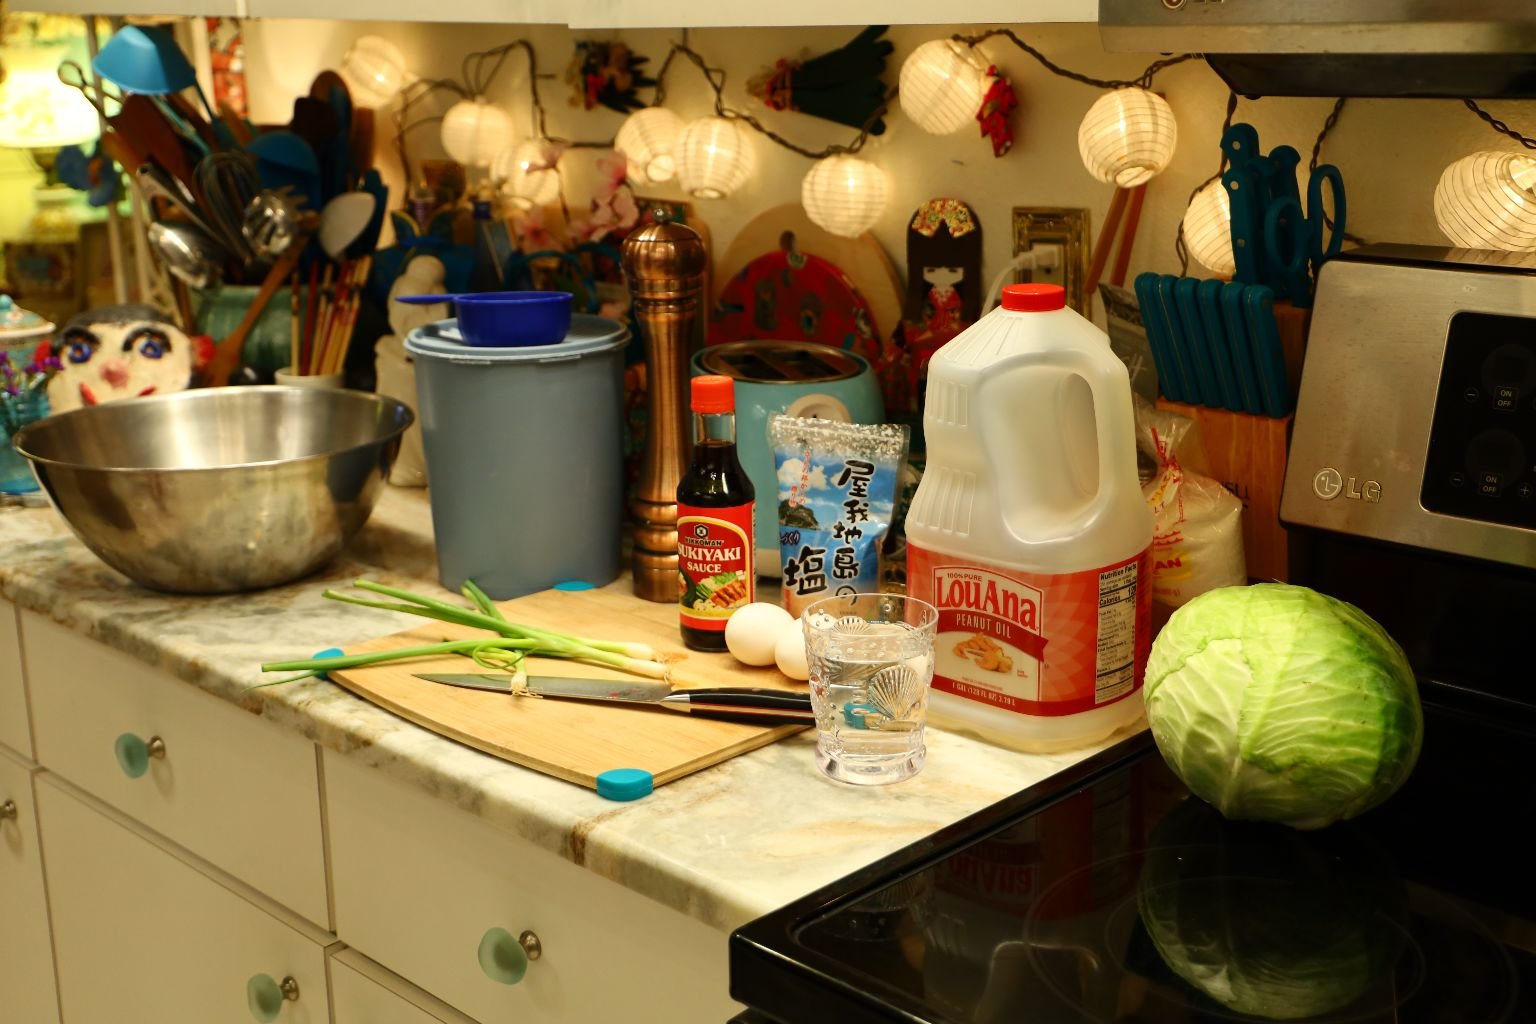
Pictured are the Haupia Cake ingredients…
10 Eggs, to be separated
1 tsp. Cream of Tartar
1 1/4 Cups Sugar total – 1/2 Cup for the egg whites and the rest (3/4 Cup) for the Cake
1 1/2 Cups Cake Flour
1 Tbsp. Baking Powder
1/4 tsp. Salt
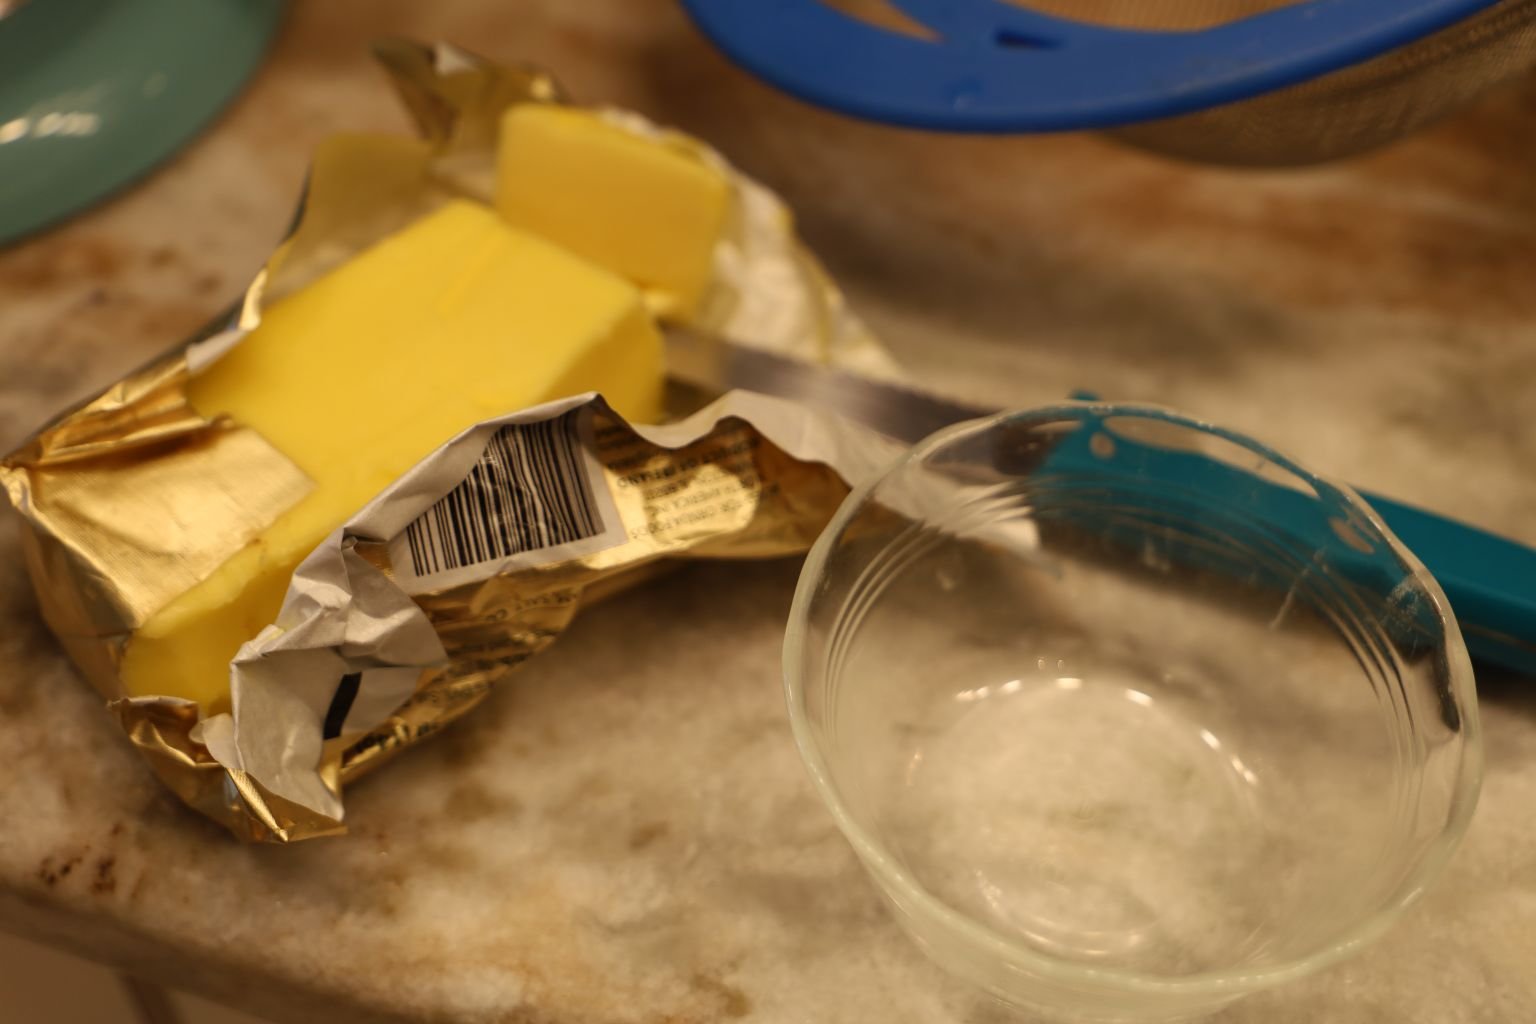
1/4 Cup Coconut Milk
1/4 Cup Water
1/2 Cup Vegetable Oil
1 tsp. Vanilla Flavoring
—————————————————————————————–
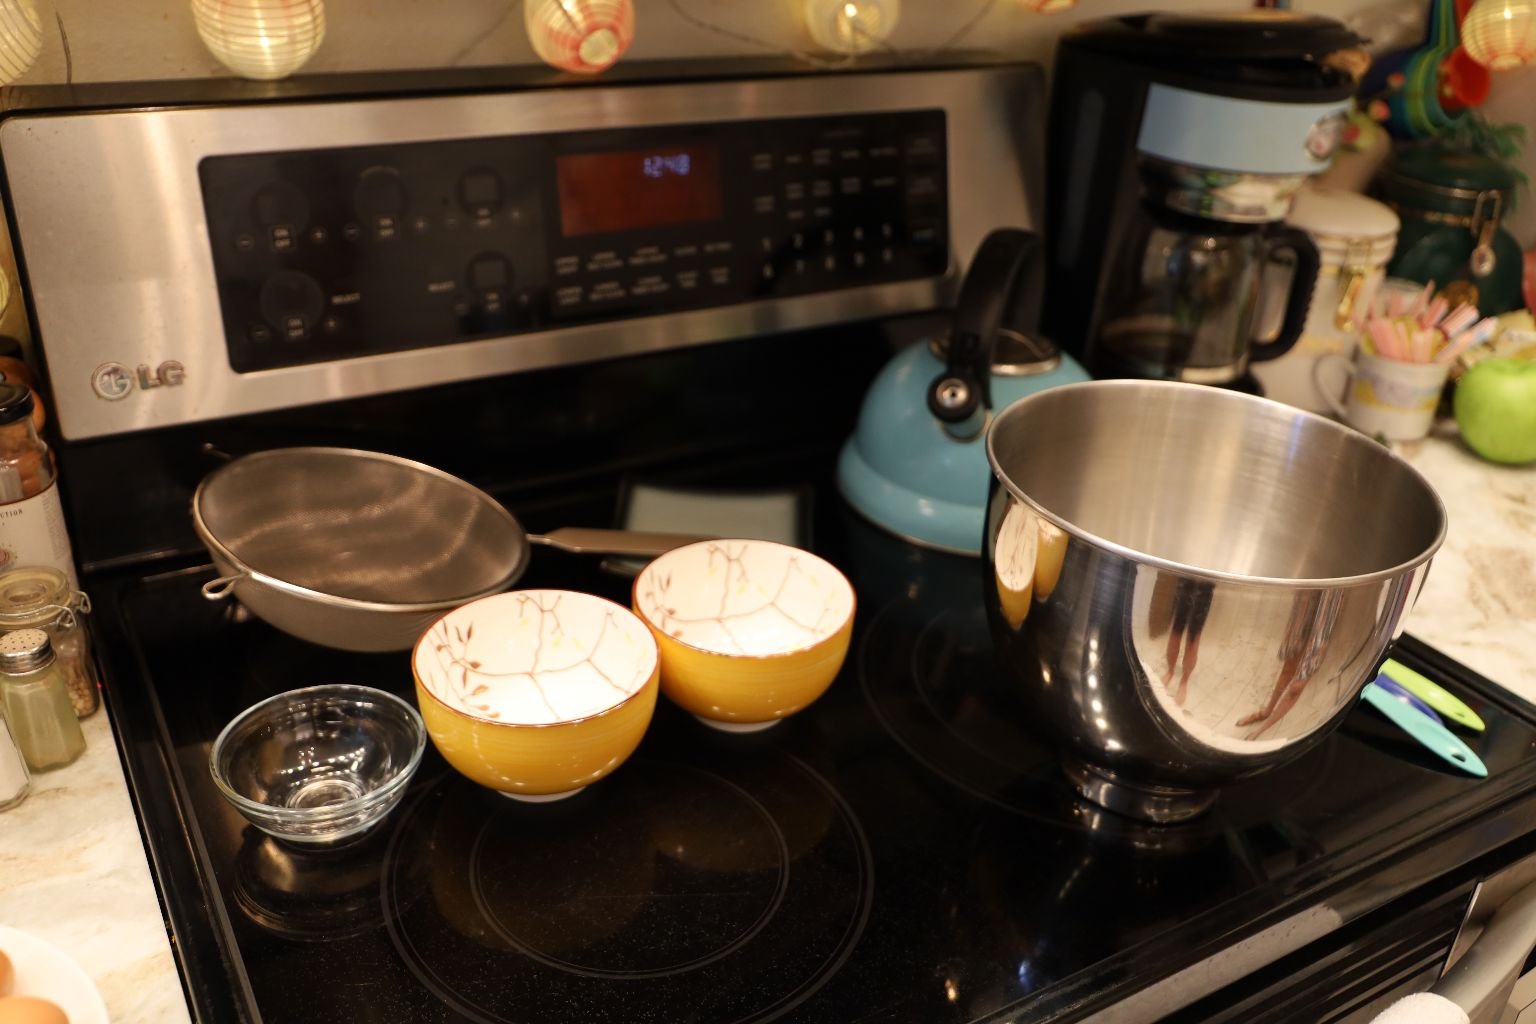
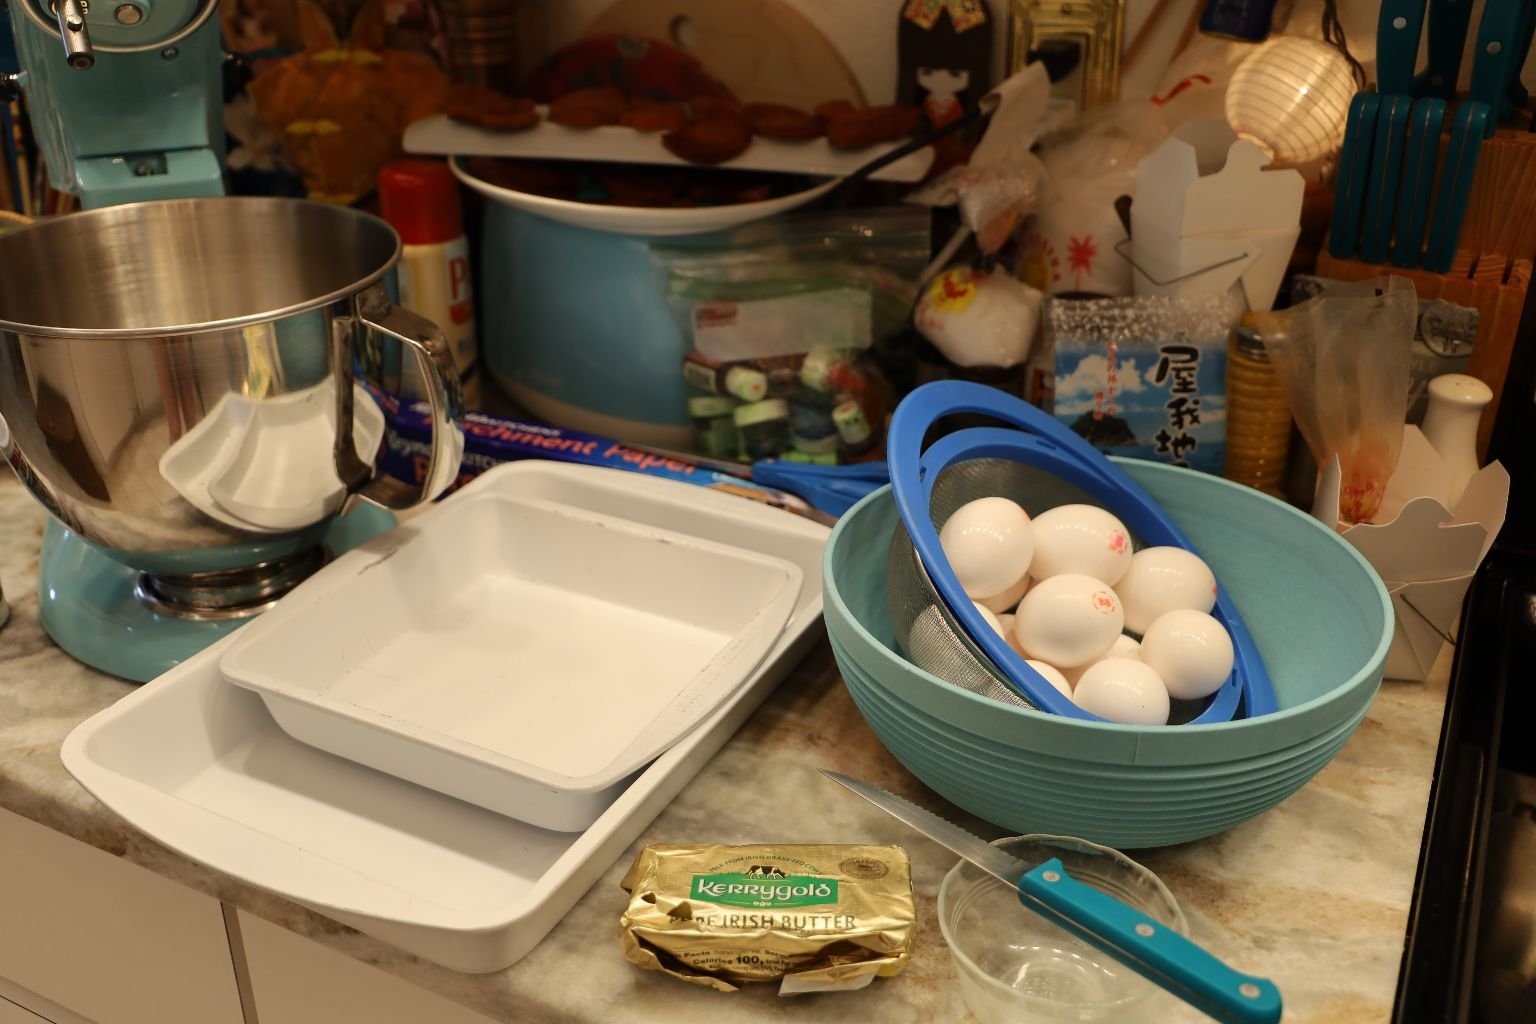
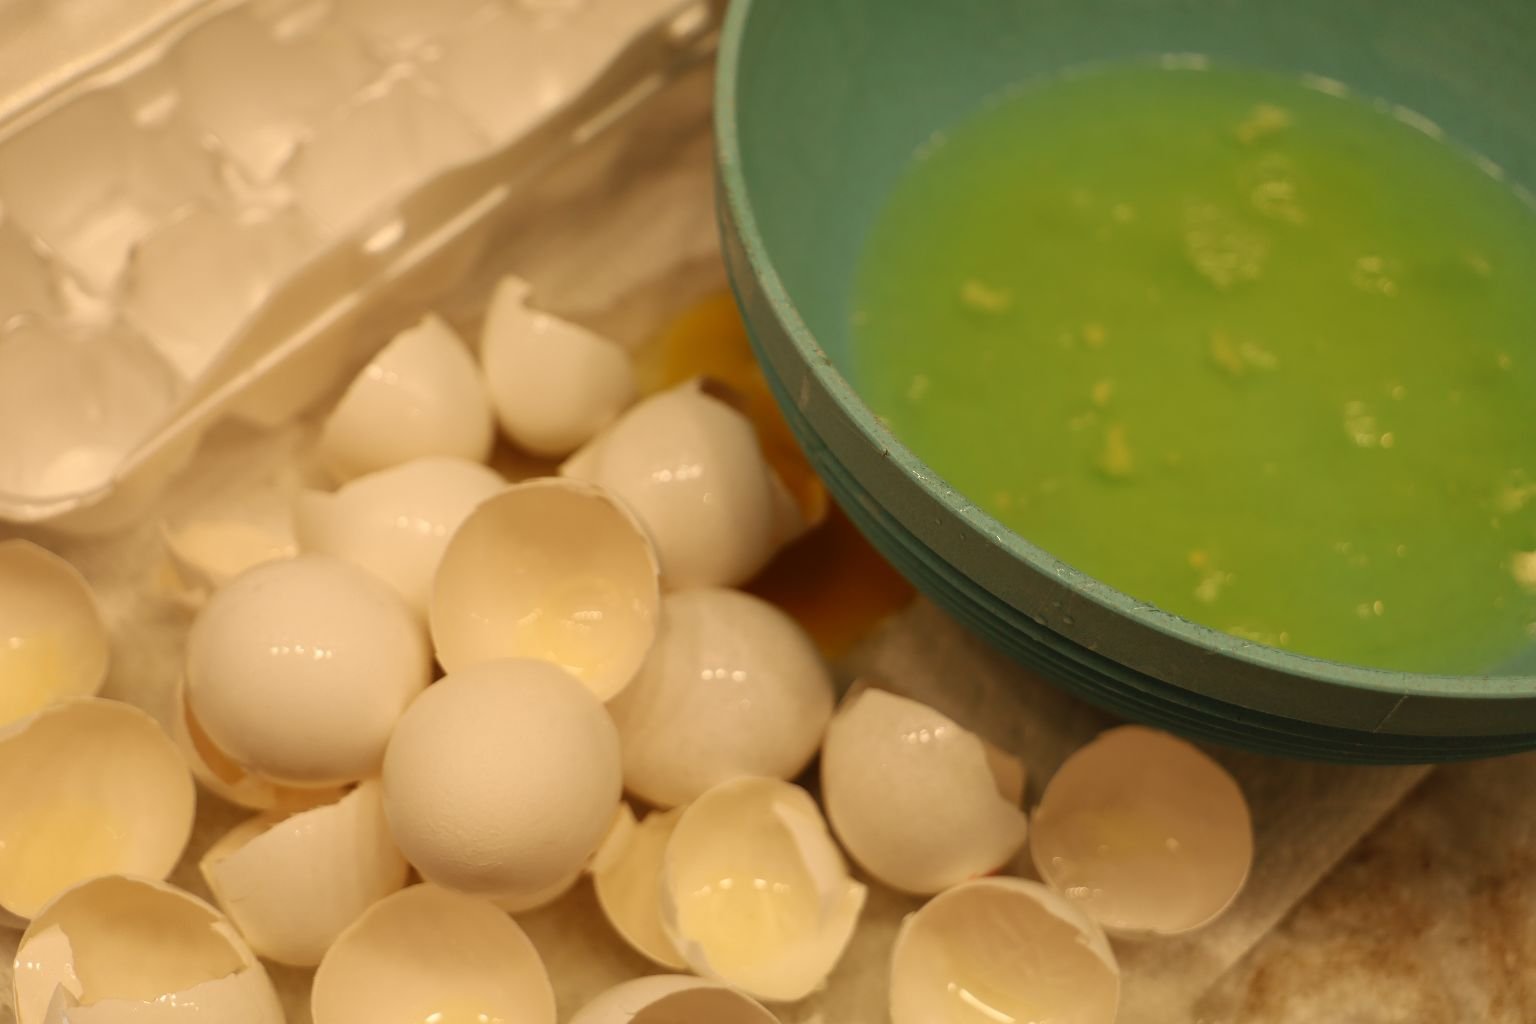
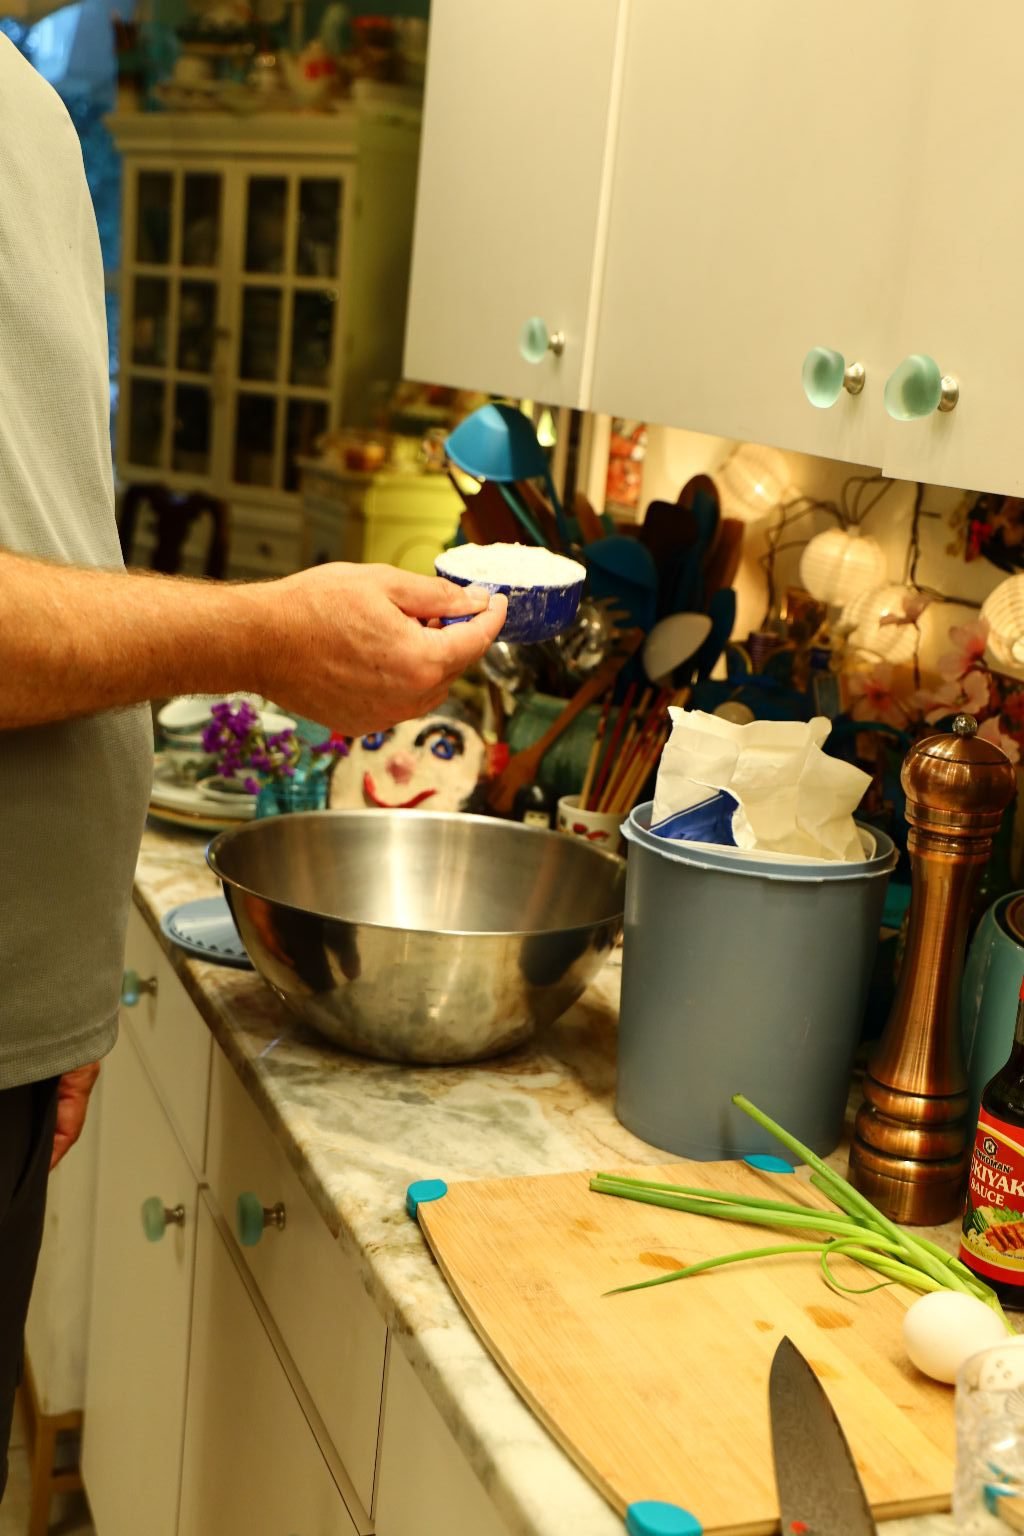
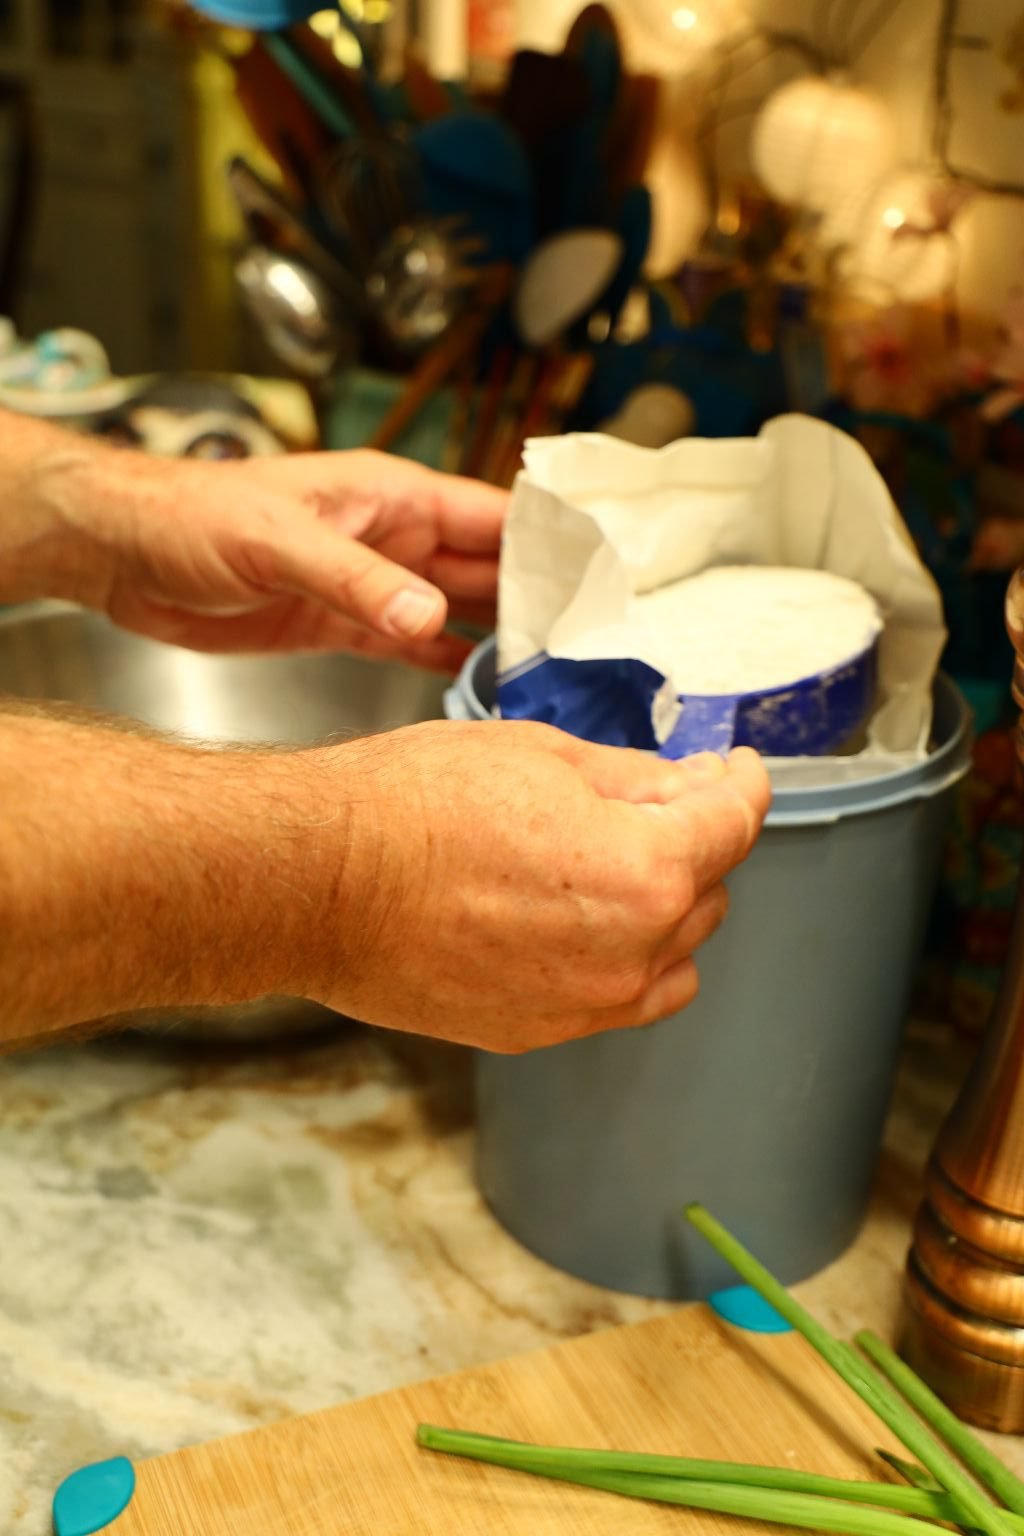
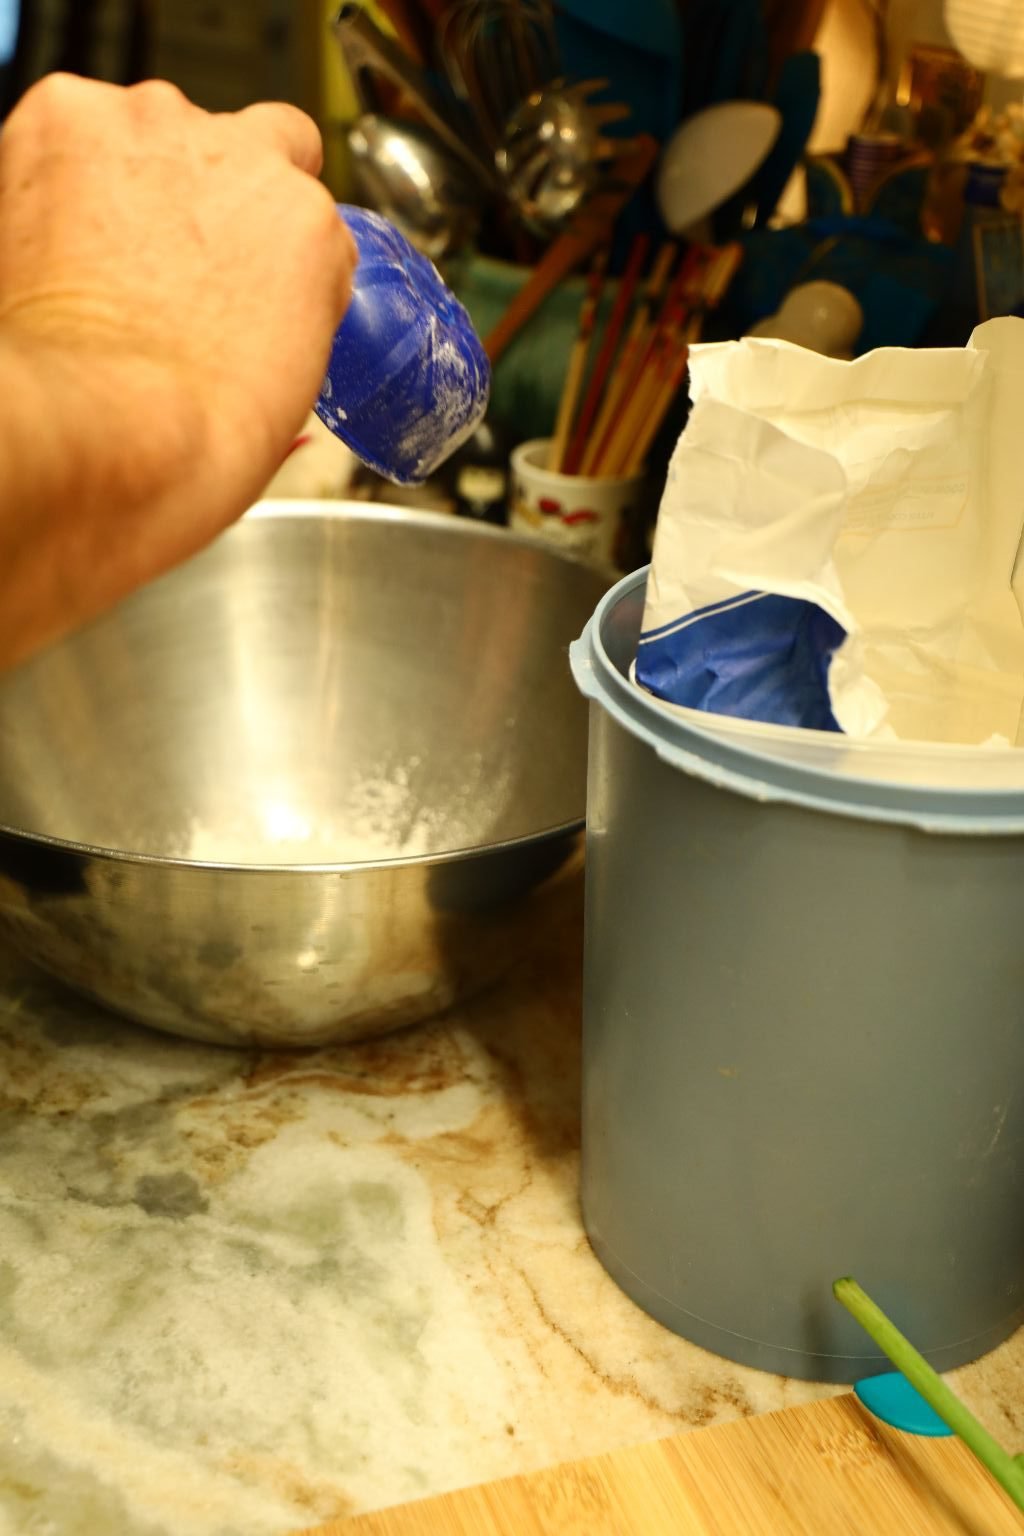
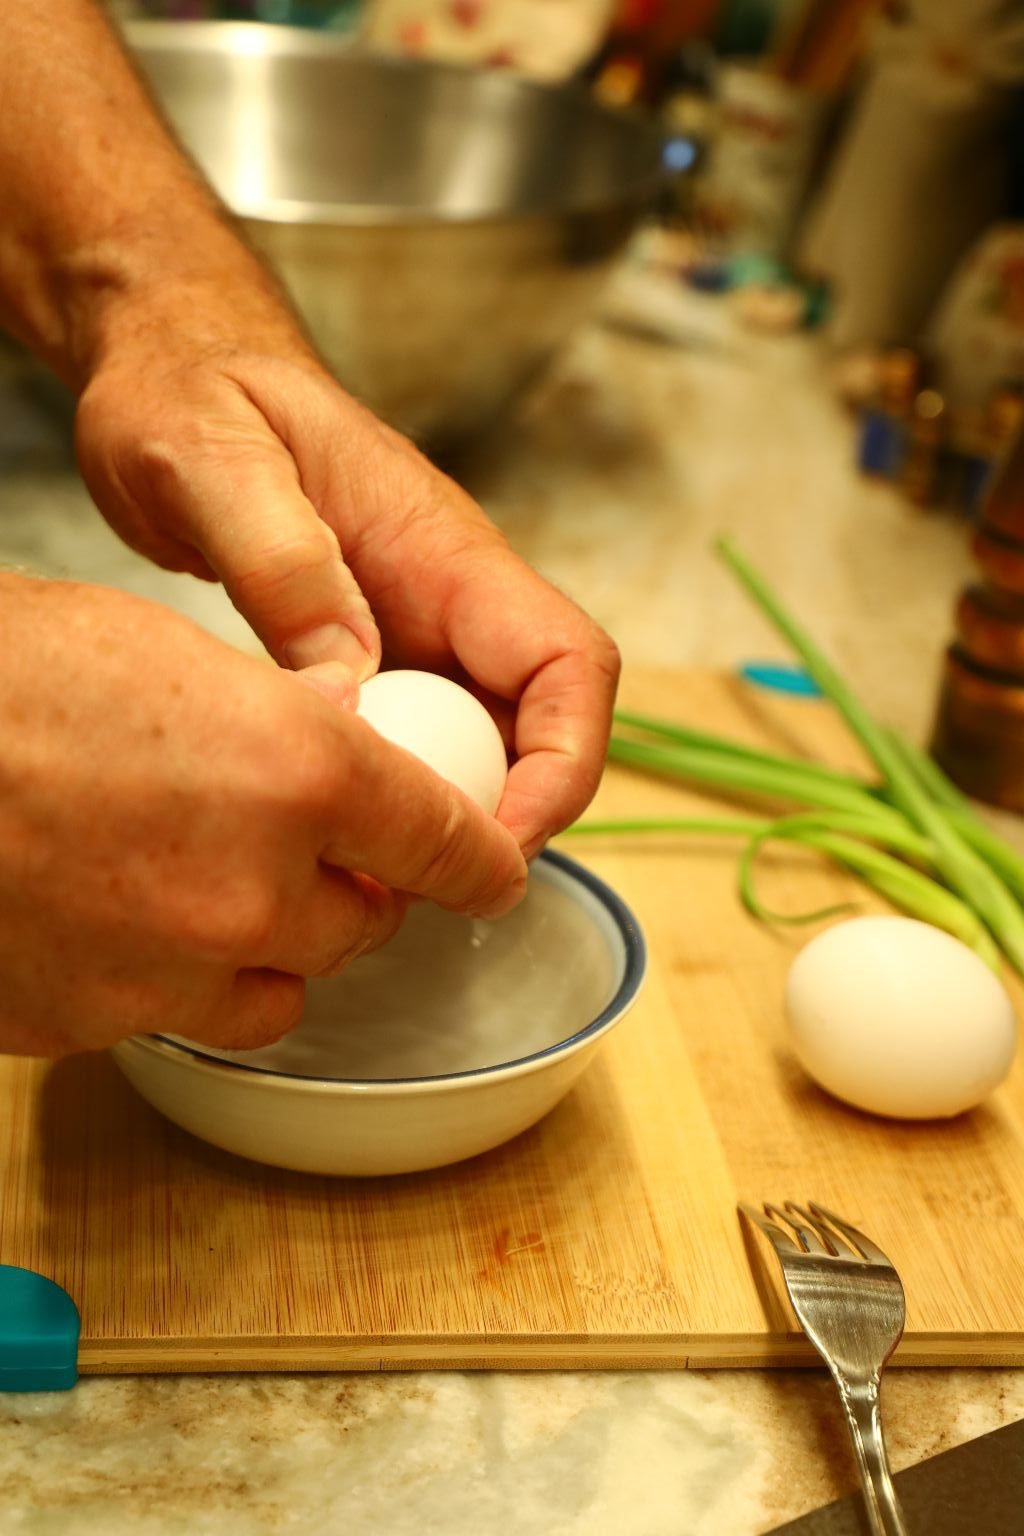
Pictured are all the bowls you will need and the sifter we used.
TIP: If your eggs are old, be sure to float test them. This is done by pouring some water into a cup deep enough to submerge an egg. If the egg sinks the egg is GOOD! if the egg floats the egg is BAD and needs to be thrown out.
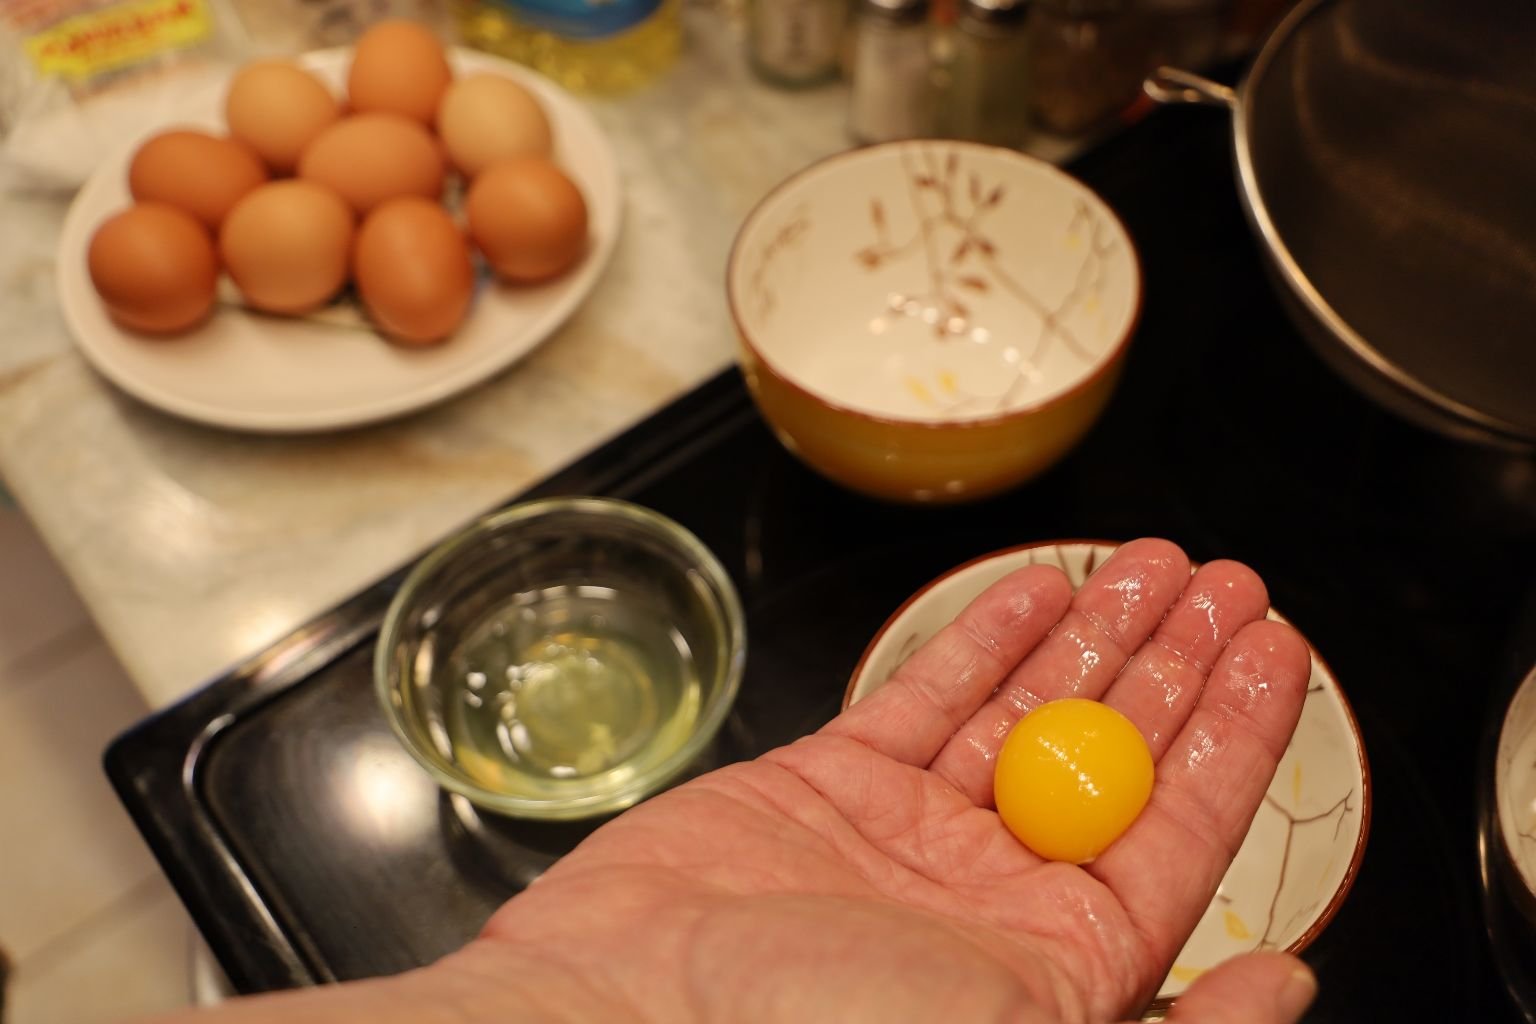
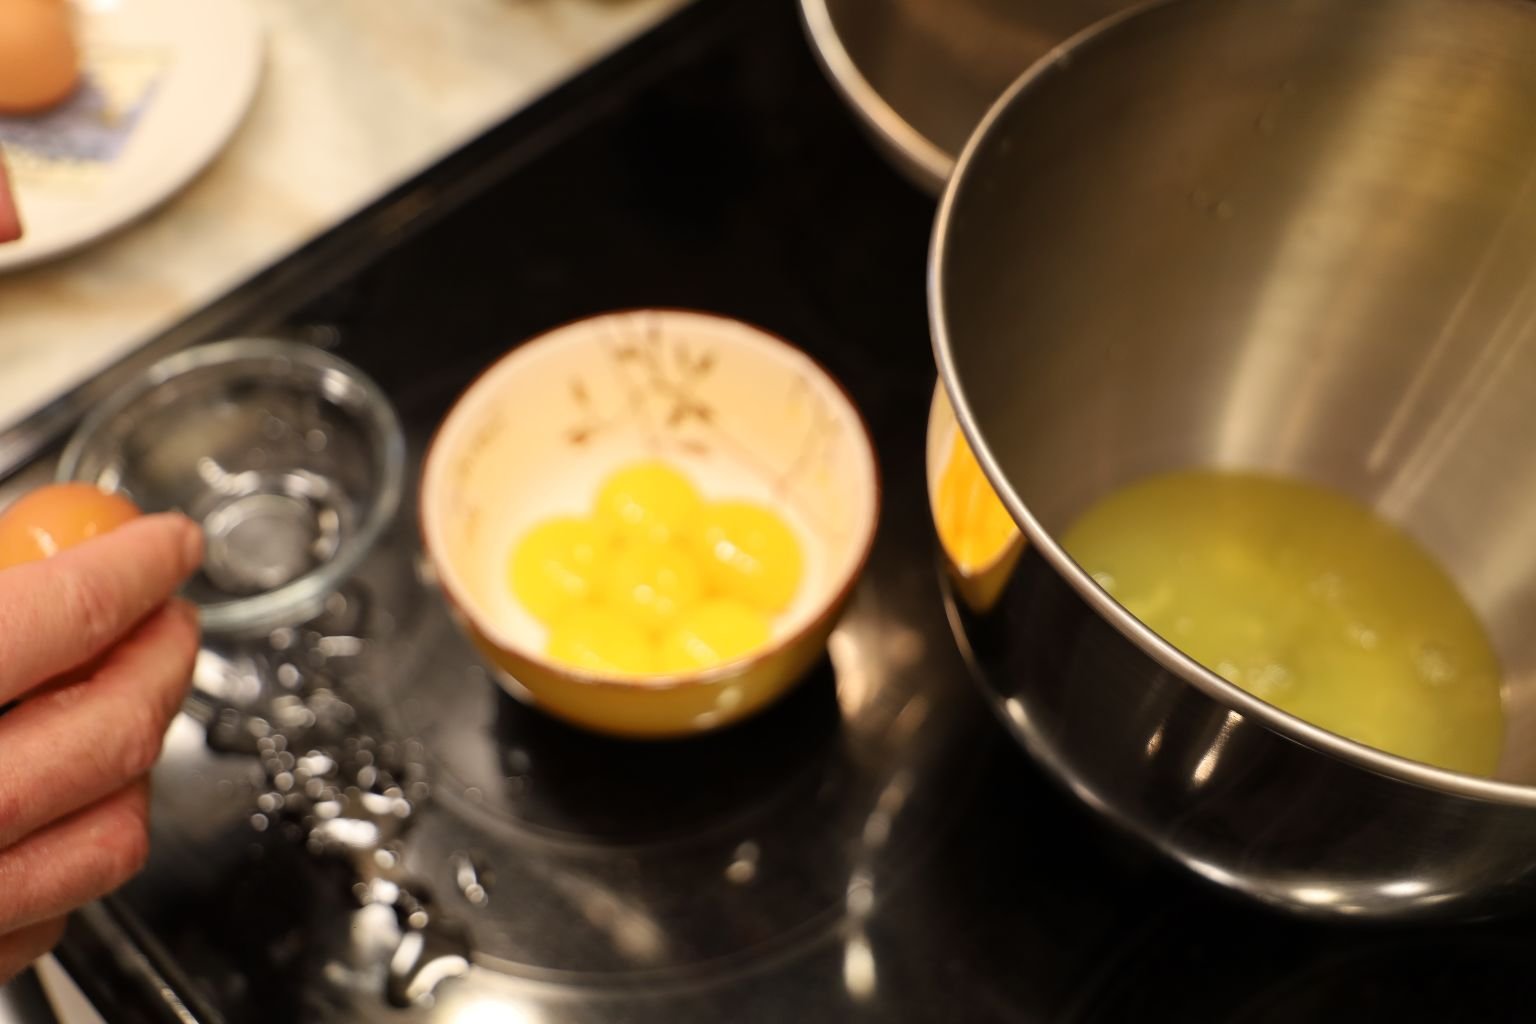
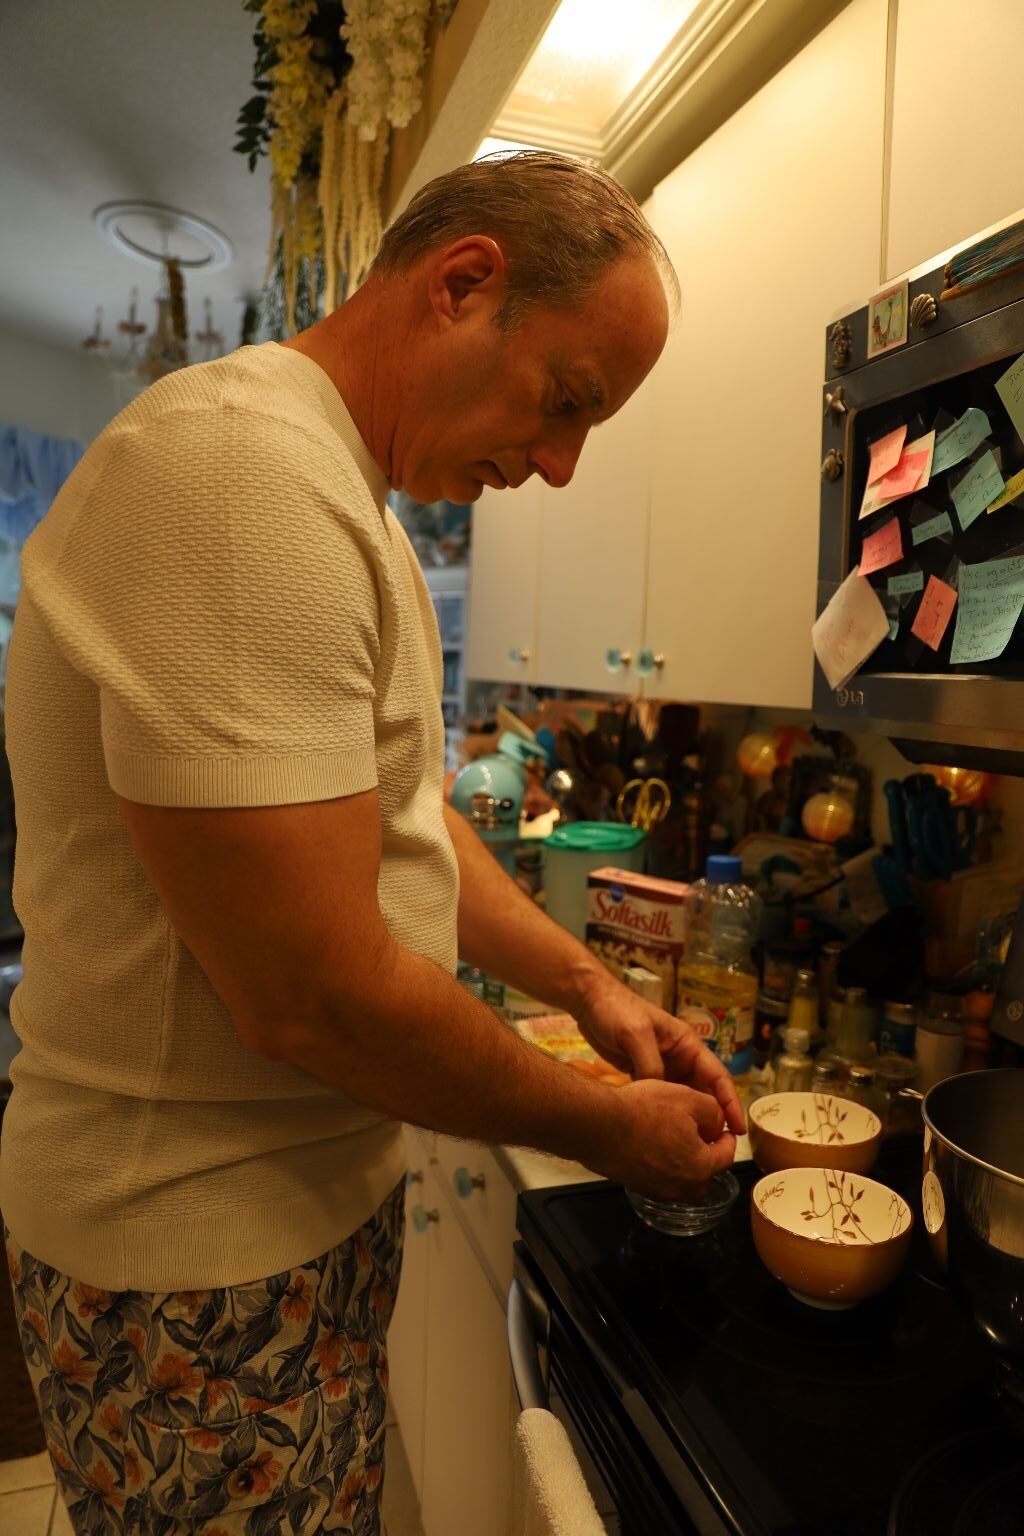
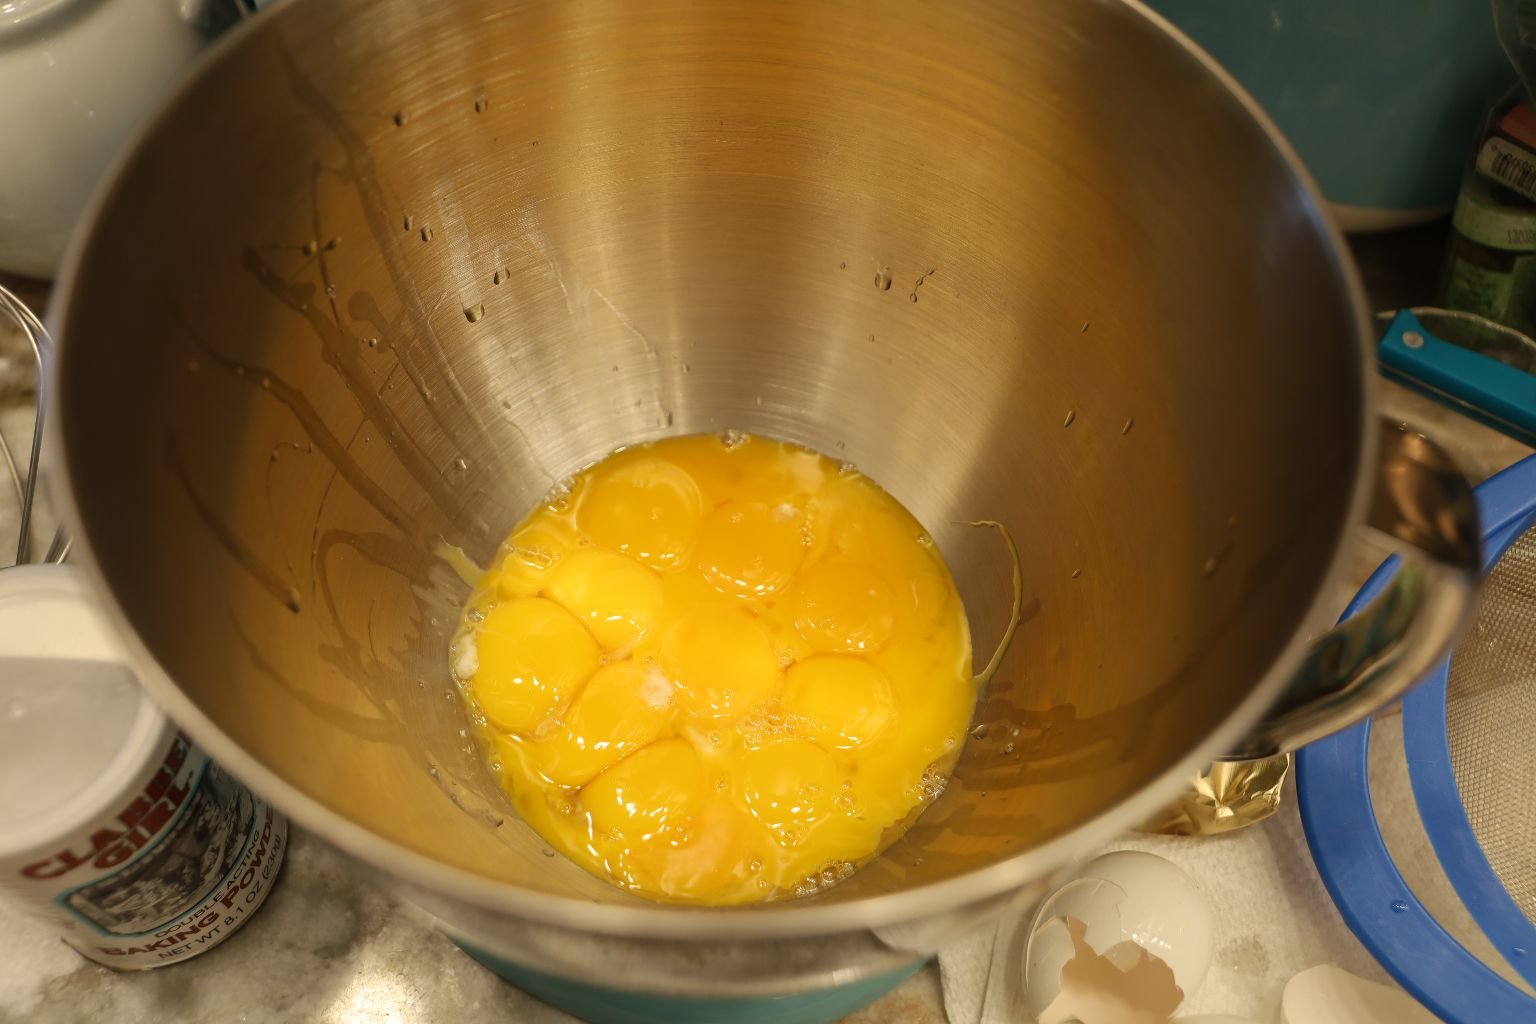
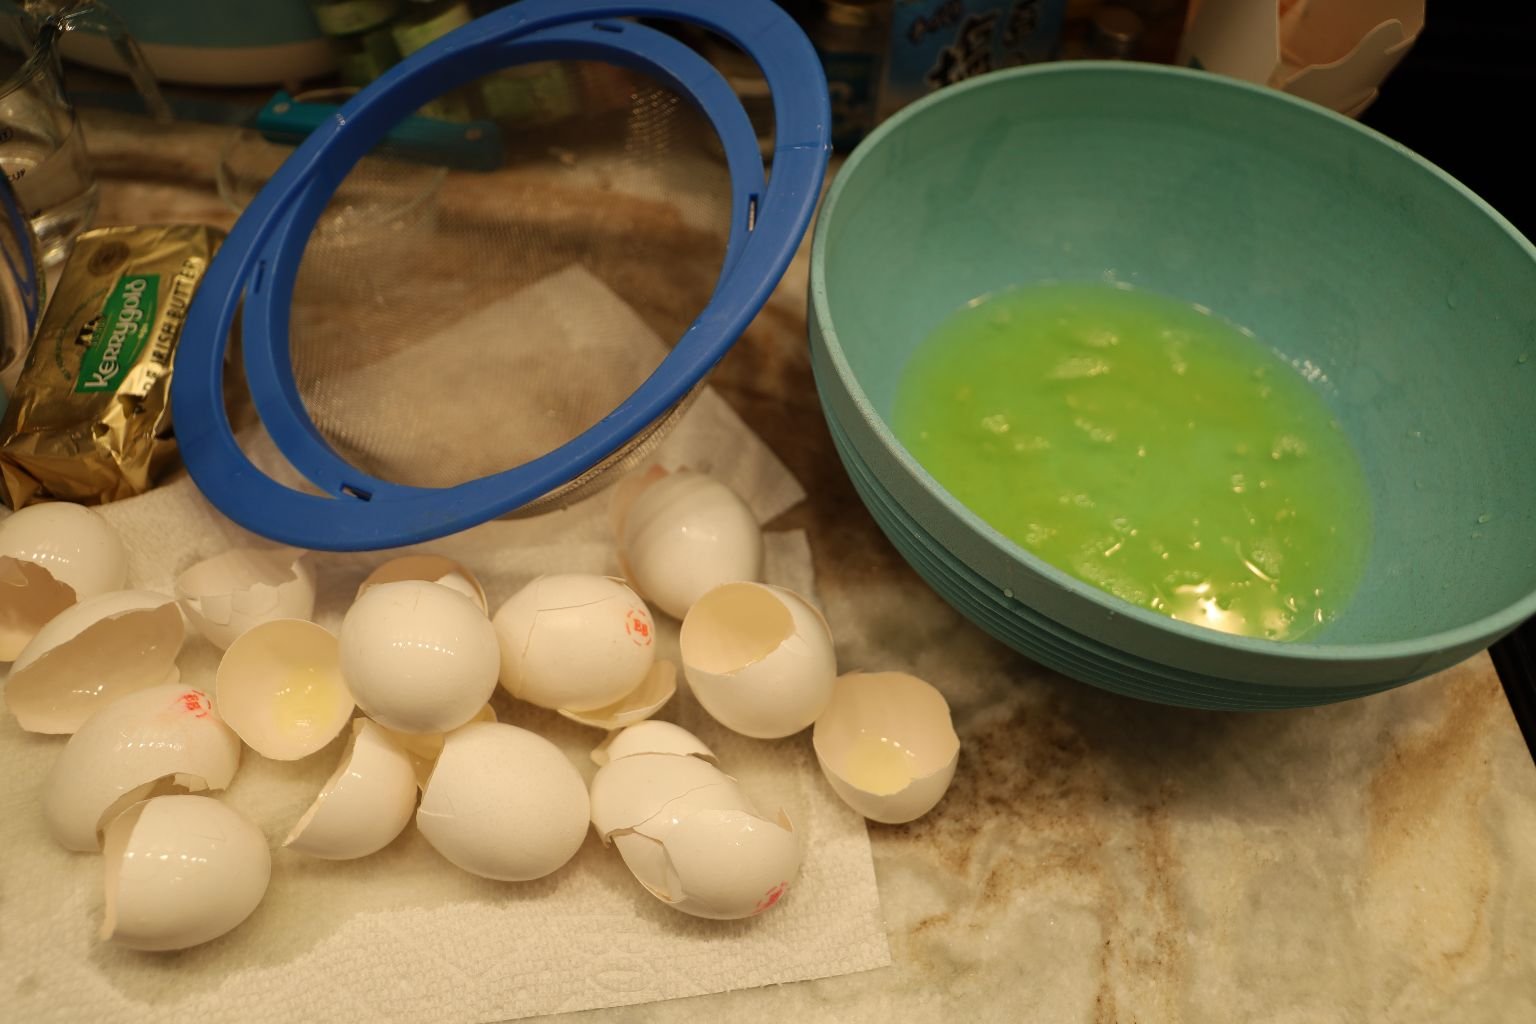
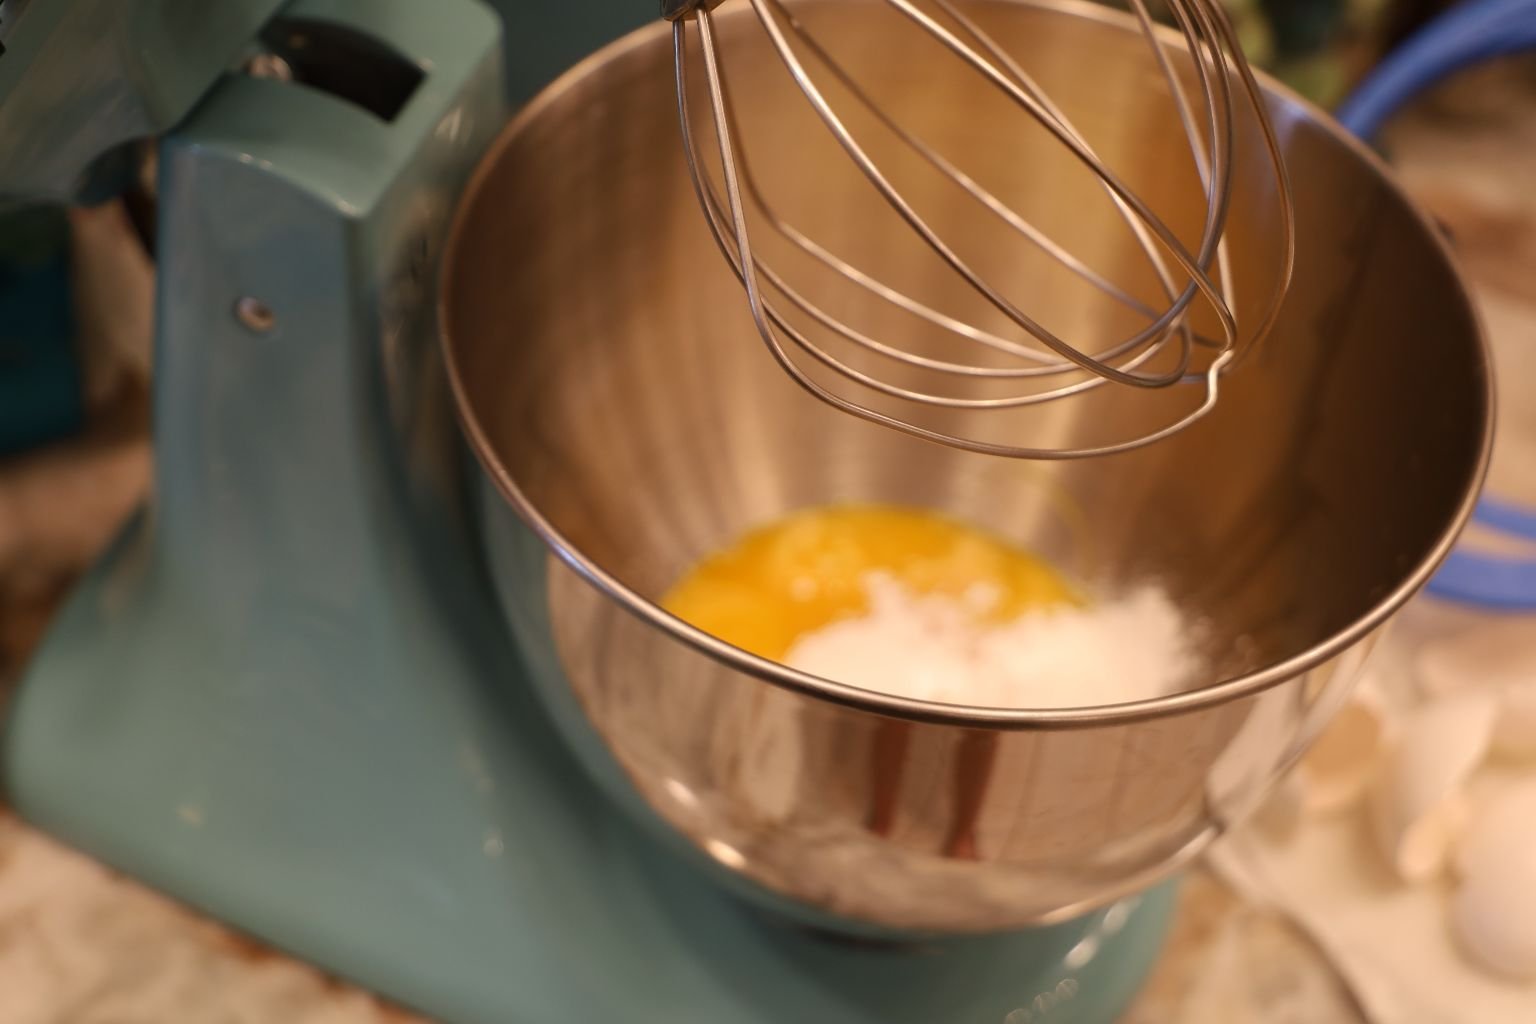
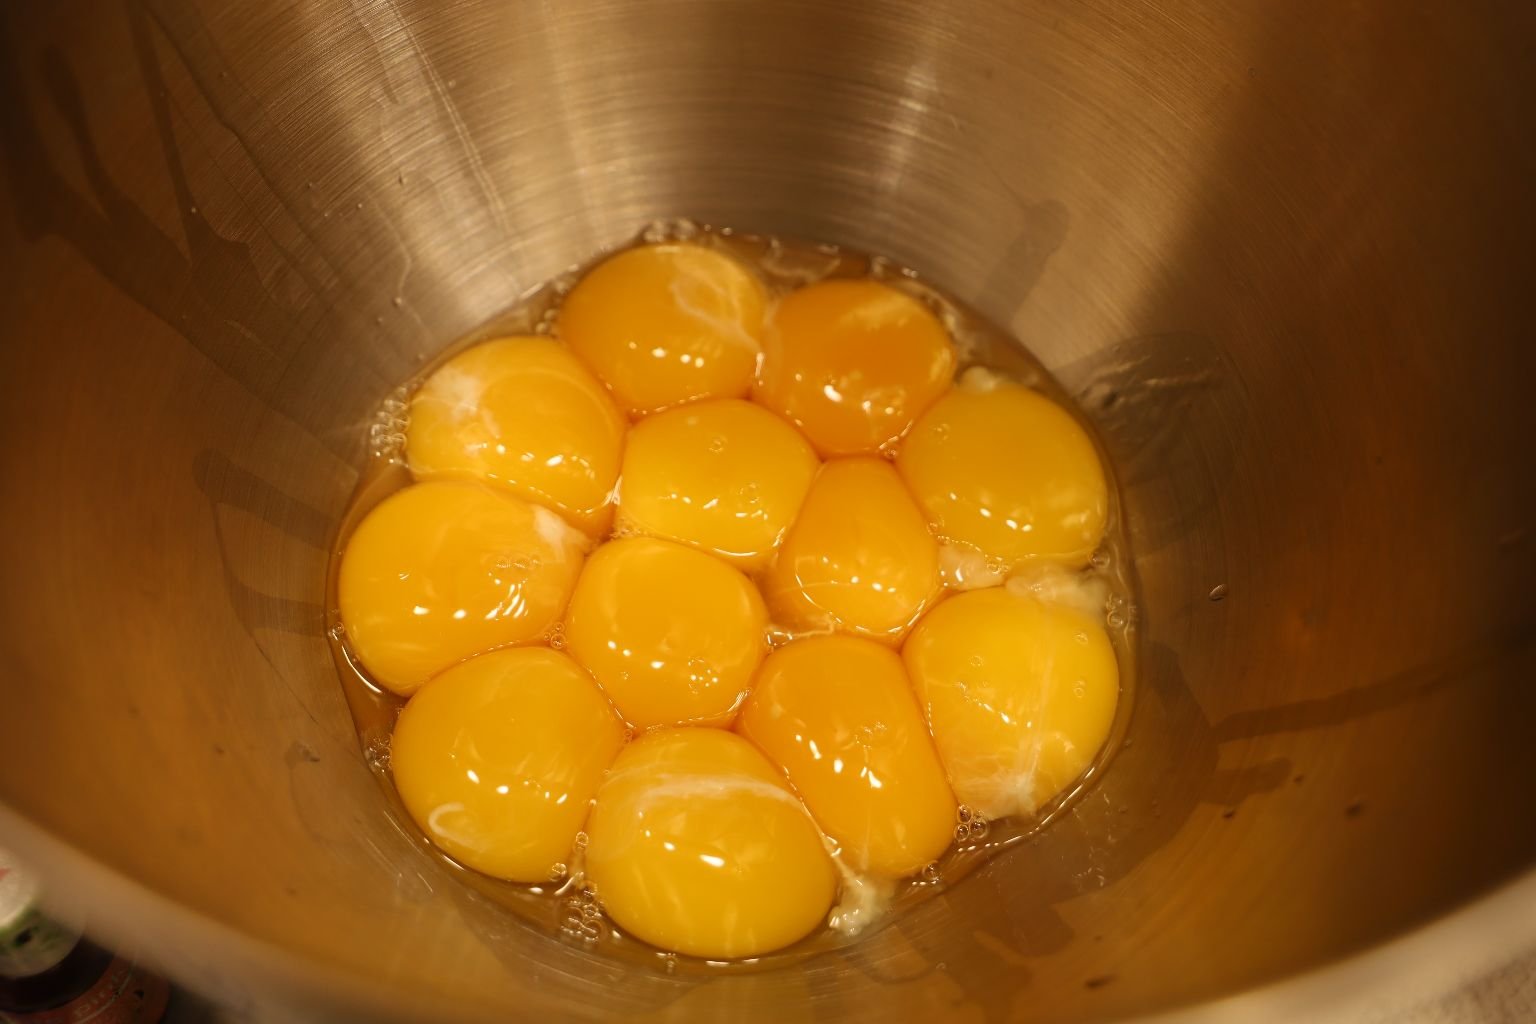
Separating the egg whites from the yolk. Use three bowls for this. One for the egg white, one for the yolk and one to drop the entire egg into. The best tool for this is your hands. Start by breaking the egg on a flat surface, as cracking it on the side of a bowl allows egg shell shards break off and go into the egg. The flat surface simply cracks the shell. Try it! If you don’t have the dexterity, you carefully drop the egg into a bowl. then pick up the bowl with one hand and pour the entire egg into your hand as seen in the picture on the left. Do this over the egg white bowl. Open your fingers slightly and let the egg whites flow through your fingers until you have just the yolk. Then drop the yolk into the yolk bowl. Finally, pour the egg whites into your mixer bowl. You do these steps separately as at times the yolk breaks, and will flow through your fingers into the egg whites. Your egg whites have to be pure to work properly in the next steps of this recipe. Repeat these steps for each egg.
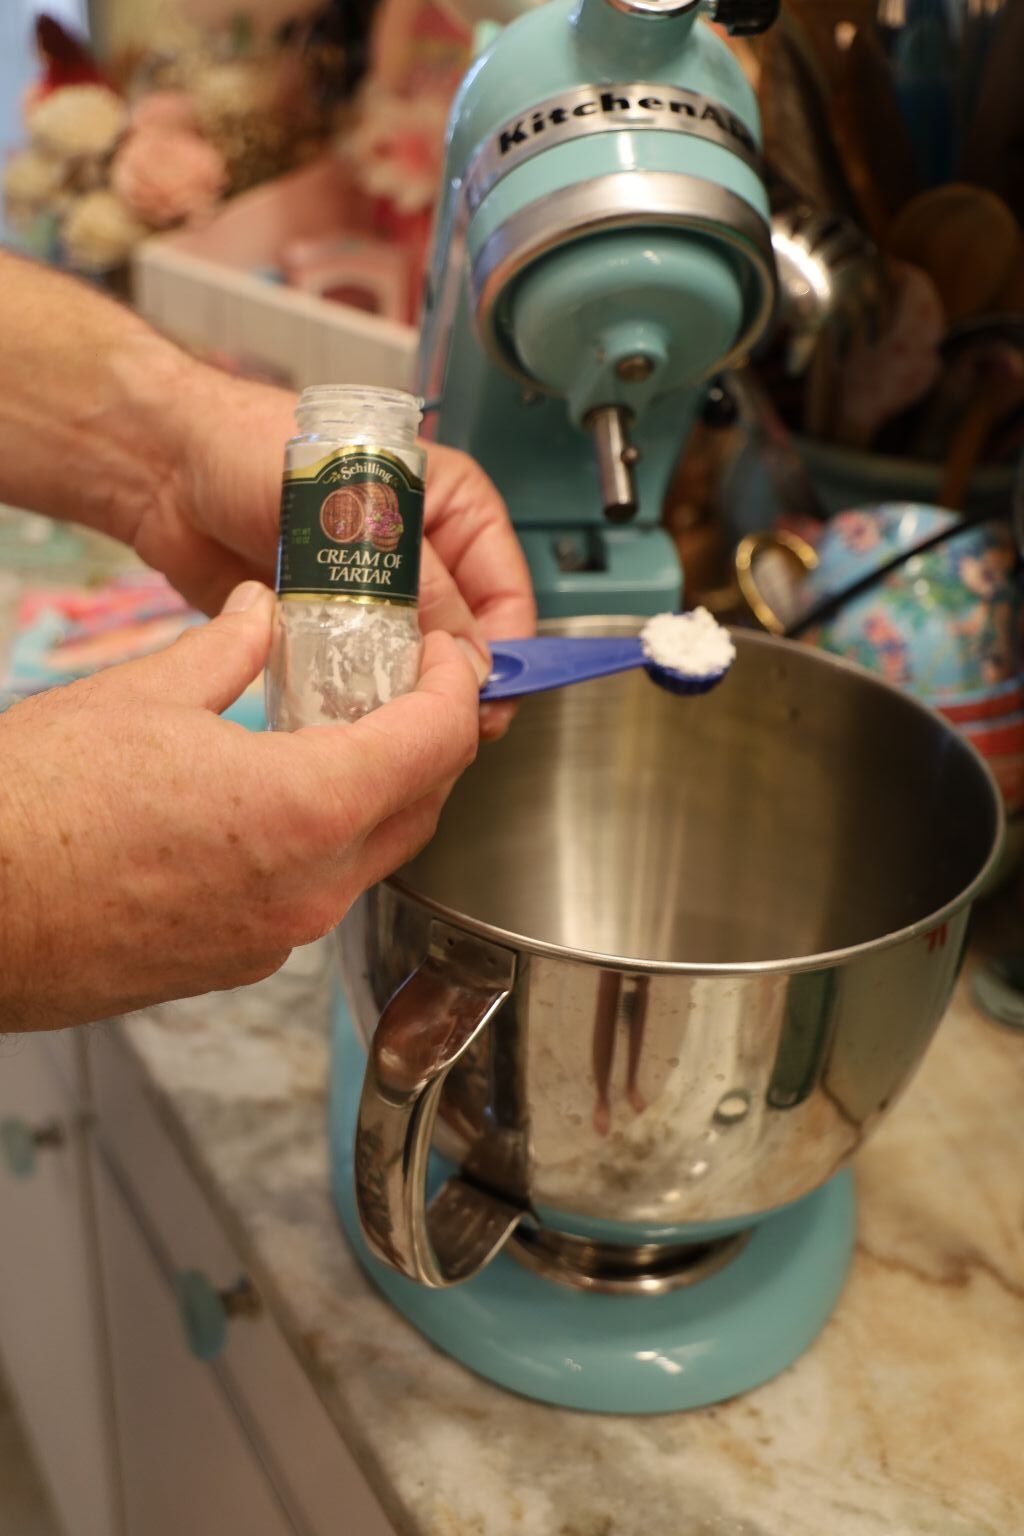
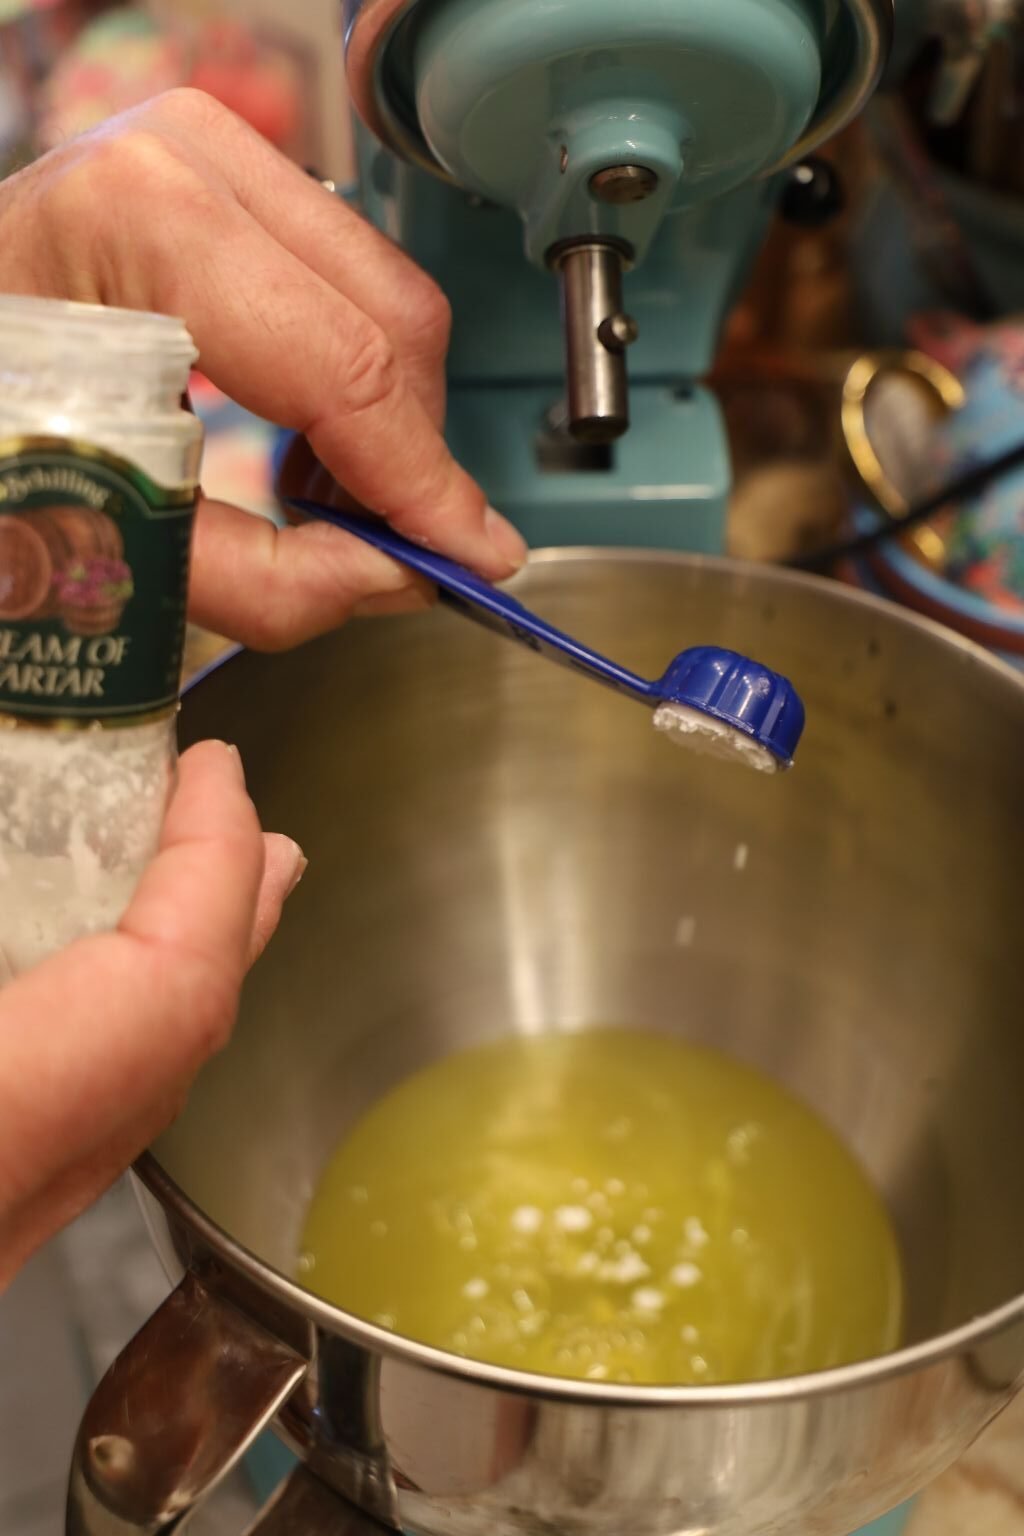
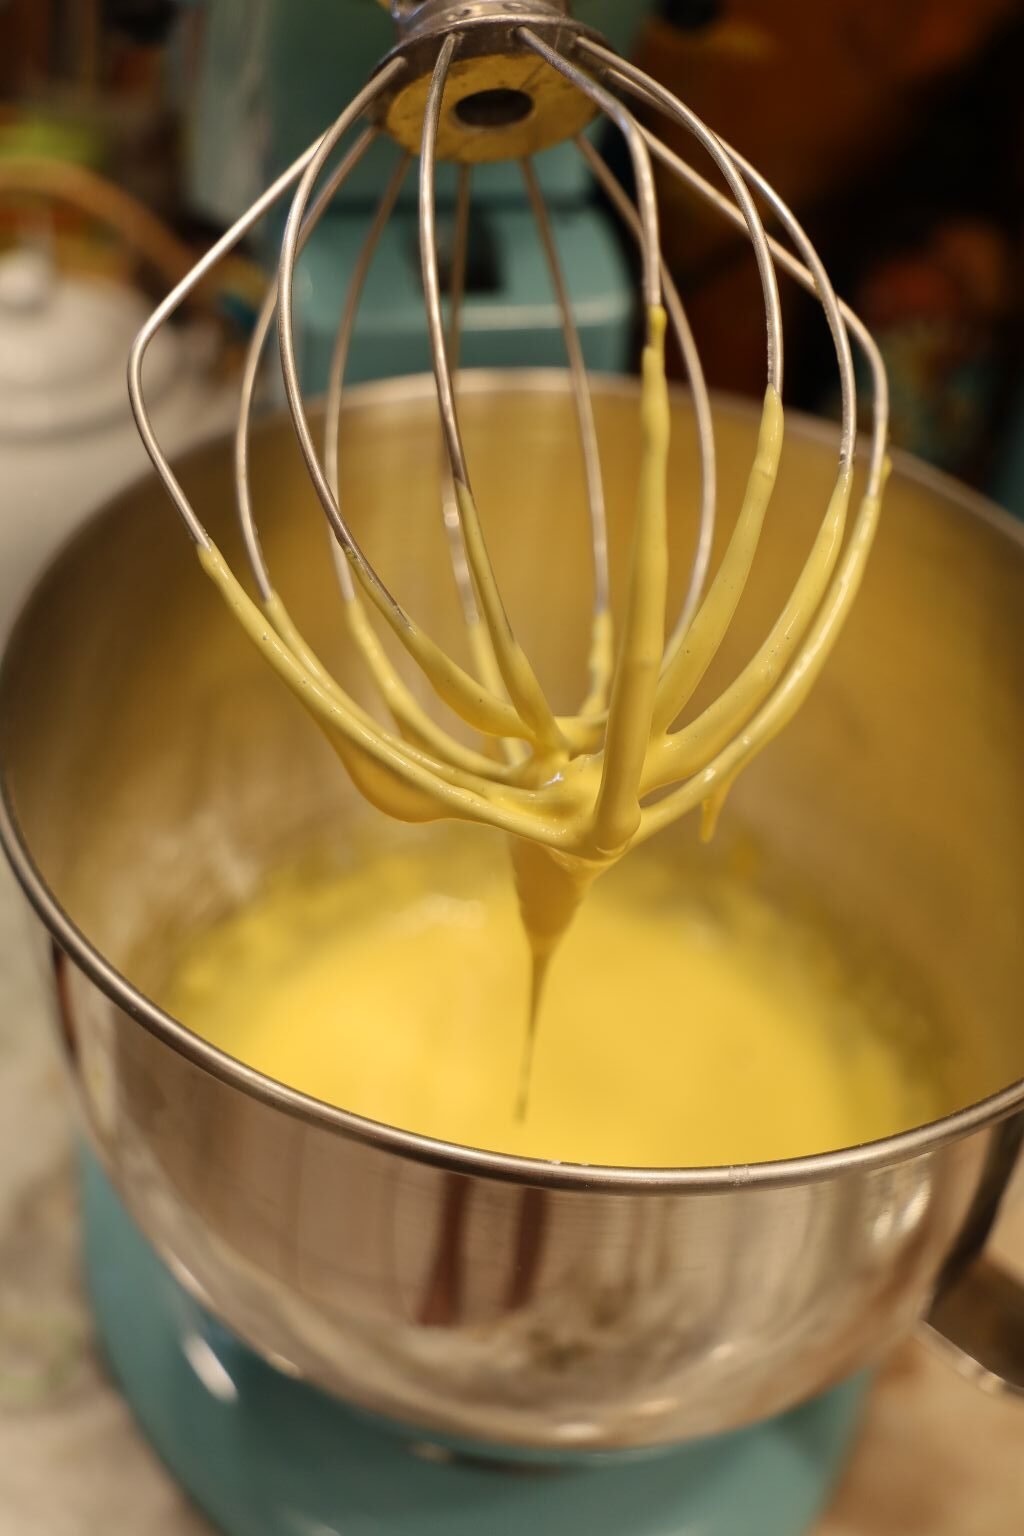
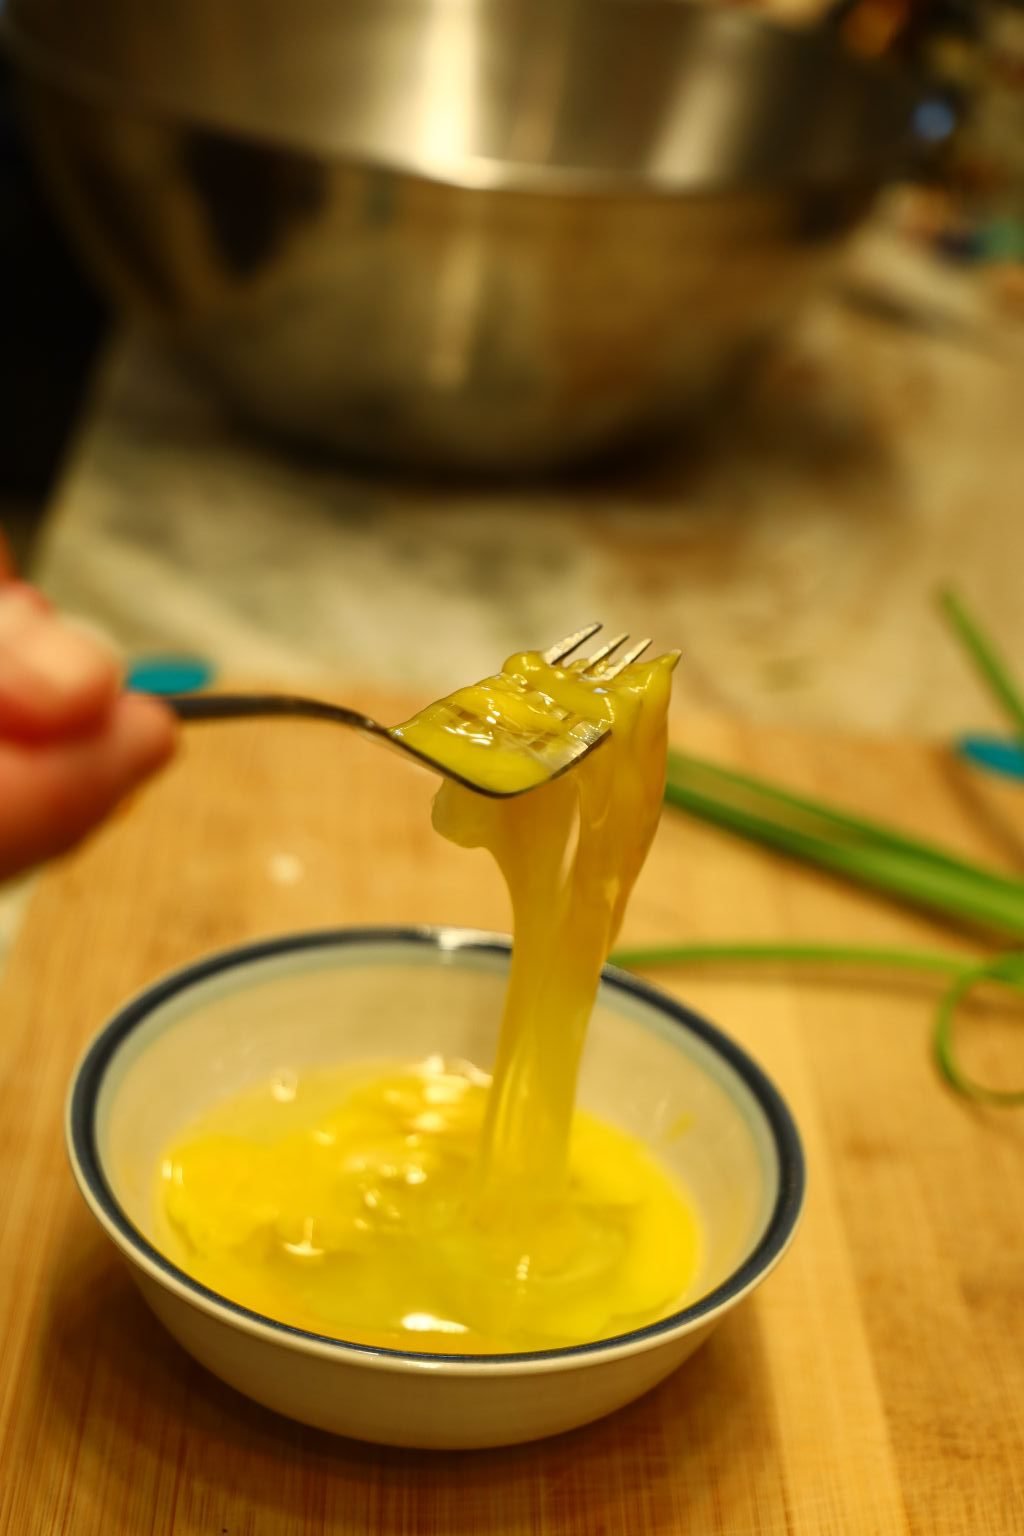
Now that you have all the egg whites in your mixing bowl, add your Cream of Tartar to help the egg whites stiffen.

Start your mixer on a slow speed …
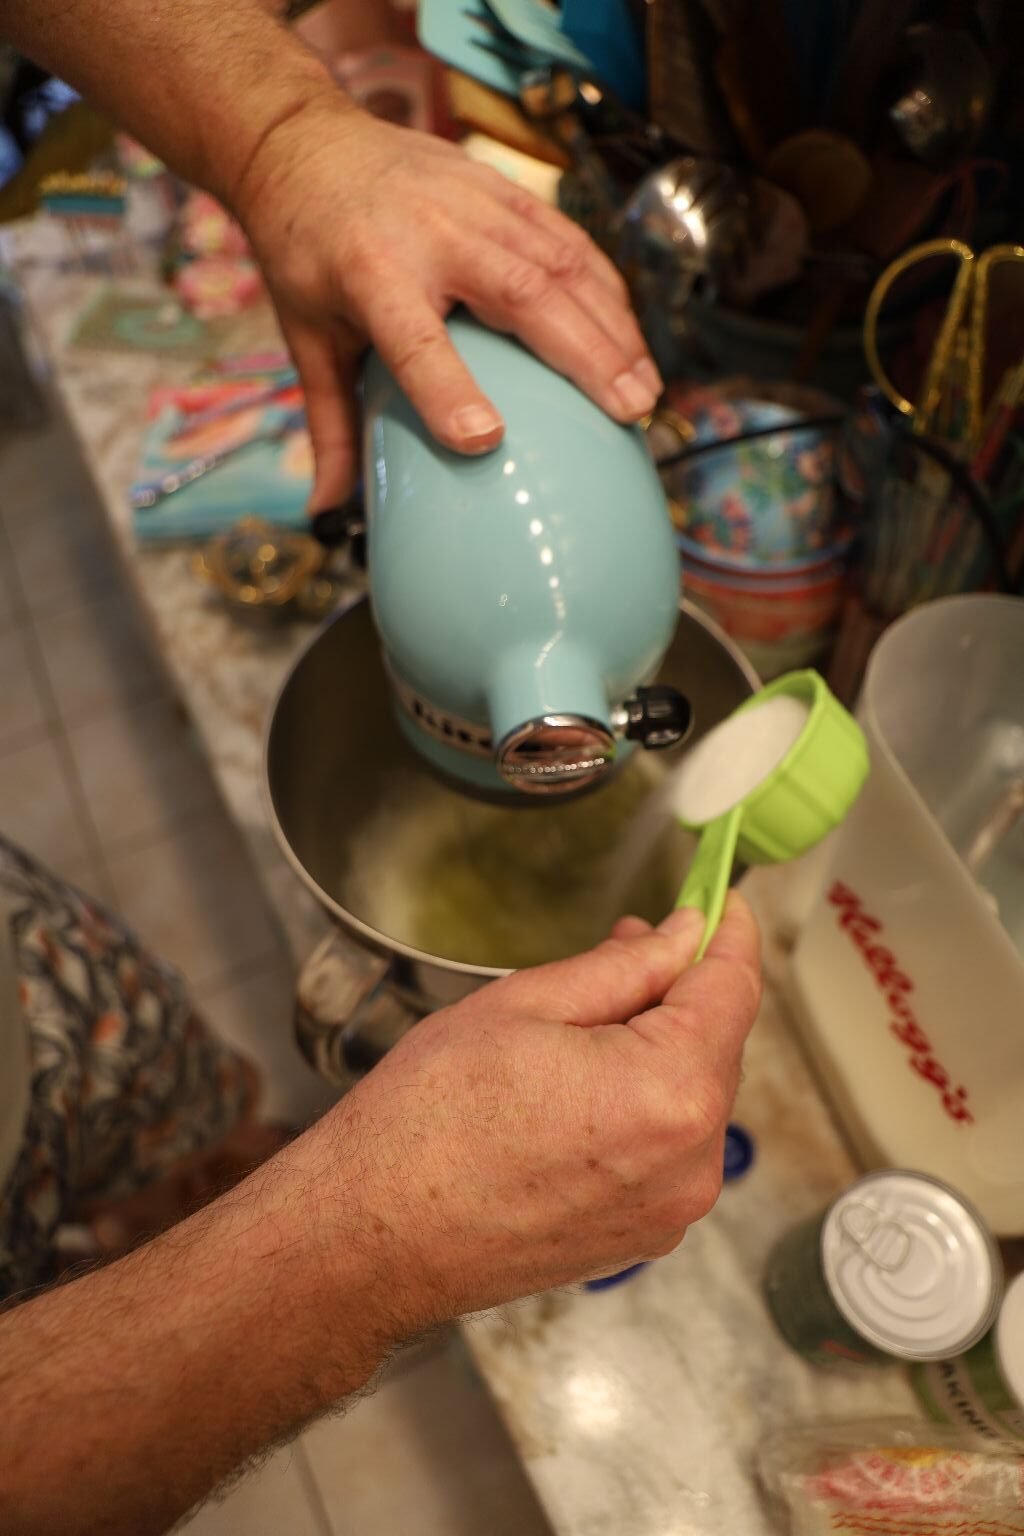
then gradually add your 1/2 Cup sugar.
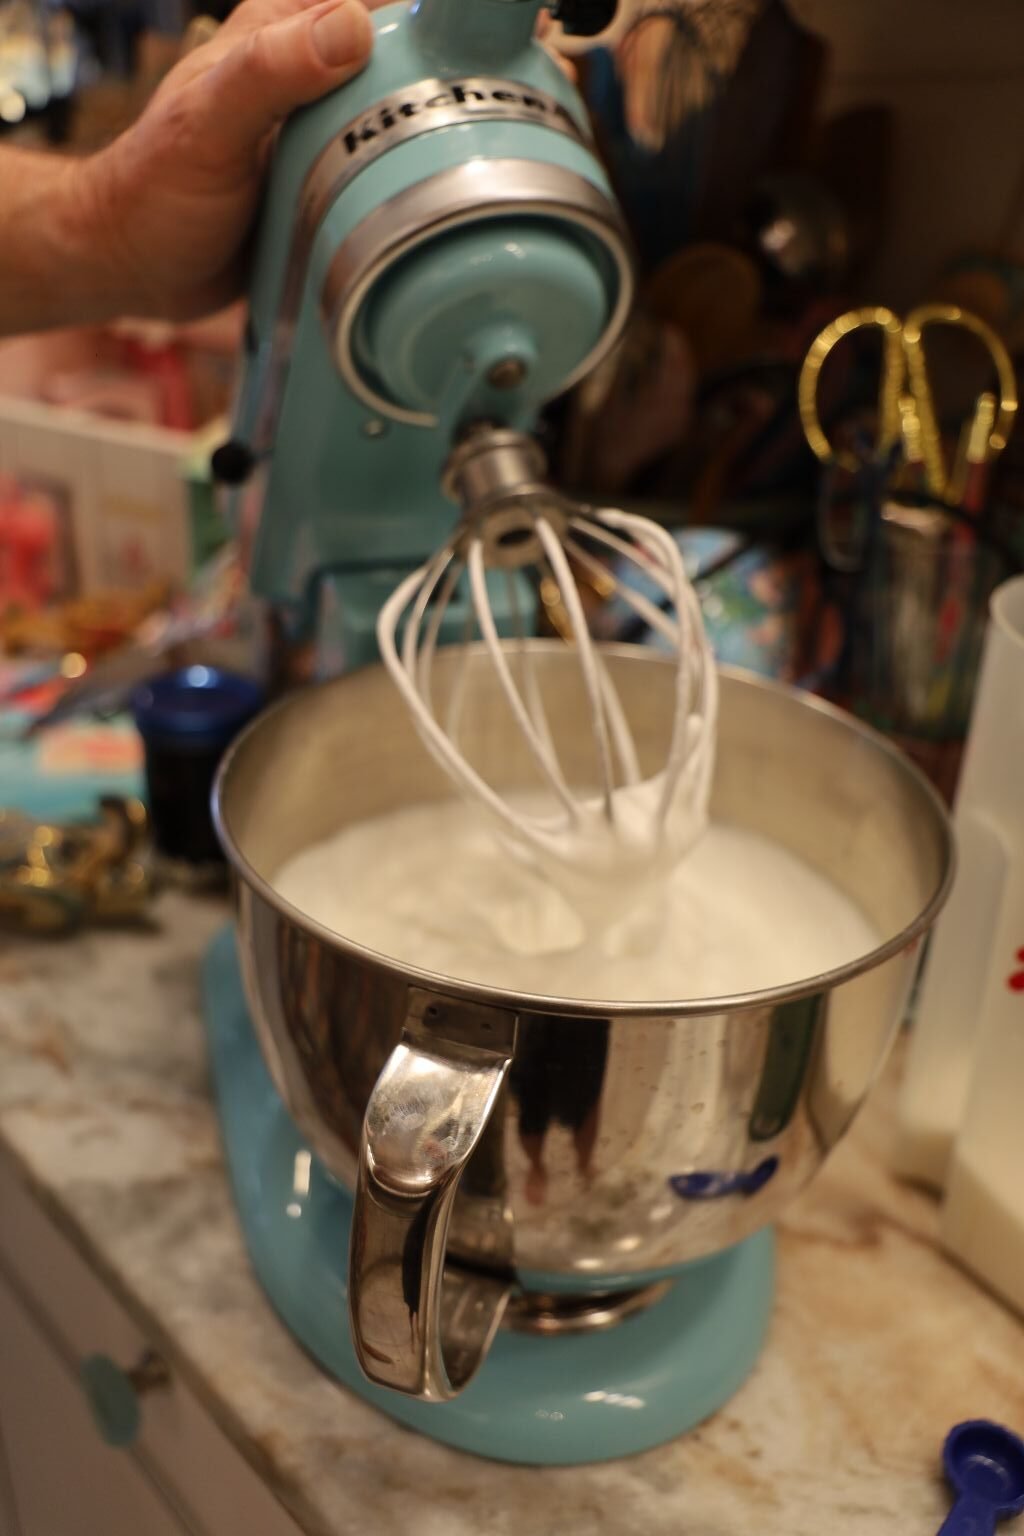
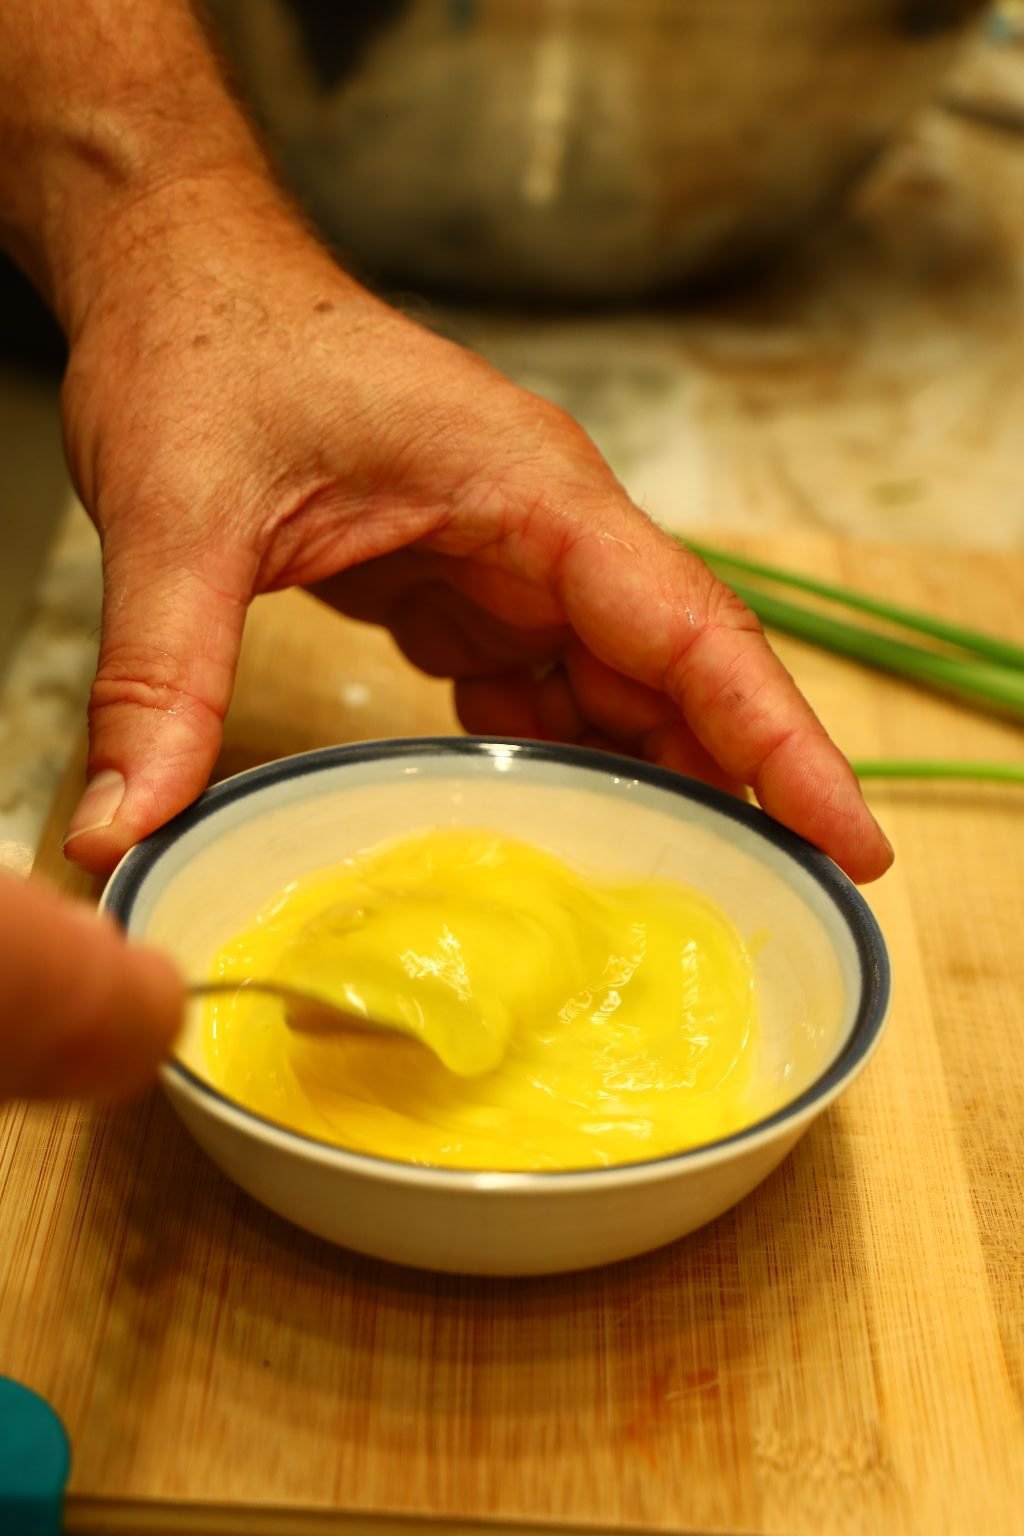
Gradually increase the speed of your mixer, which aerates your eggs and within 5 min. or so, your egg whites will become firm. You want the mixture to make stiff peaks, which means the egg whites will retain their shape and make a point or peak when the beater is removed as shown. You can test this often if needed as there is a fine line between stiff peaks, and over beating the egg whites. Over beating them will actually make the egg whites collapse. If this happens, you will have to start over again. When done set the mixture aside.
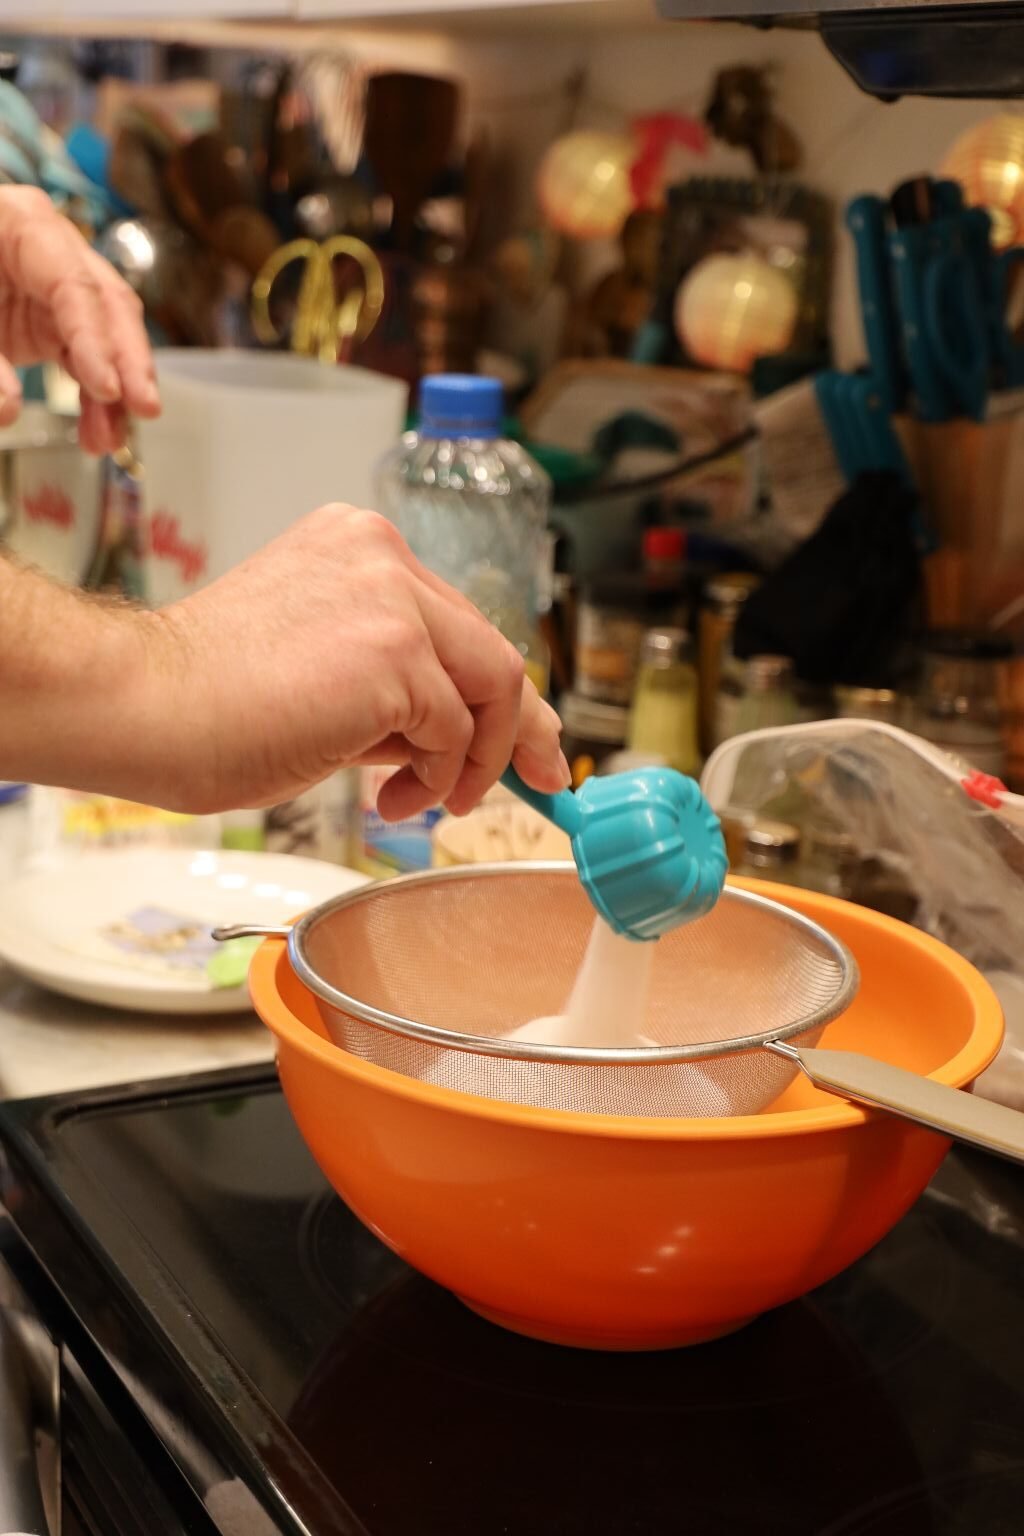
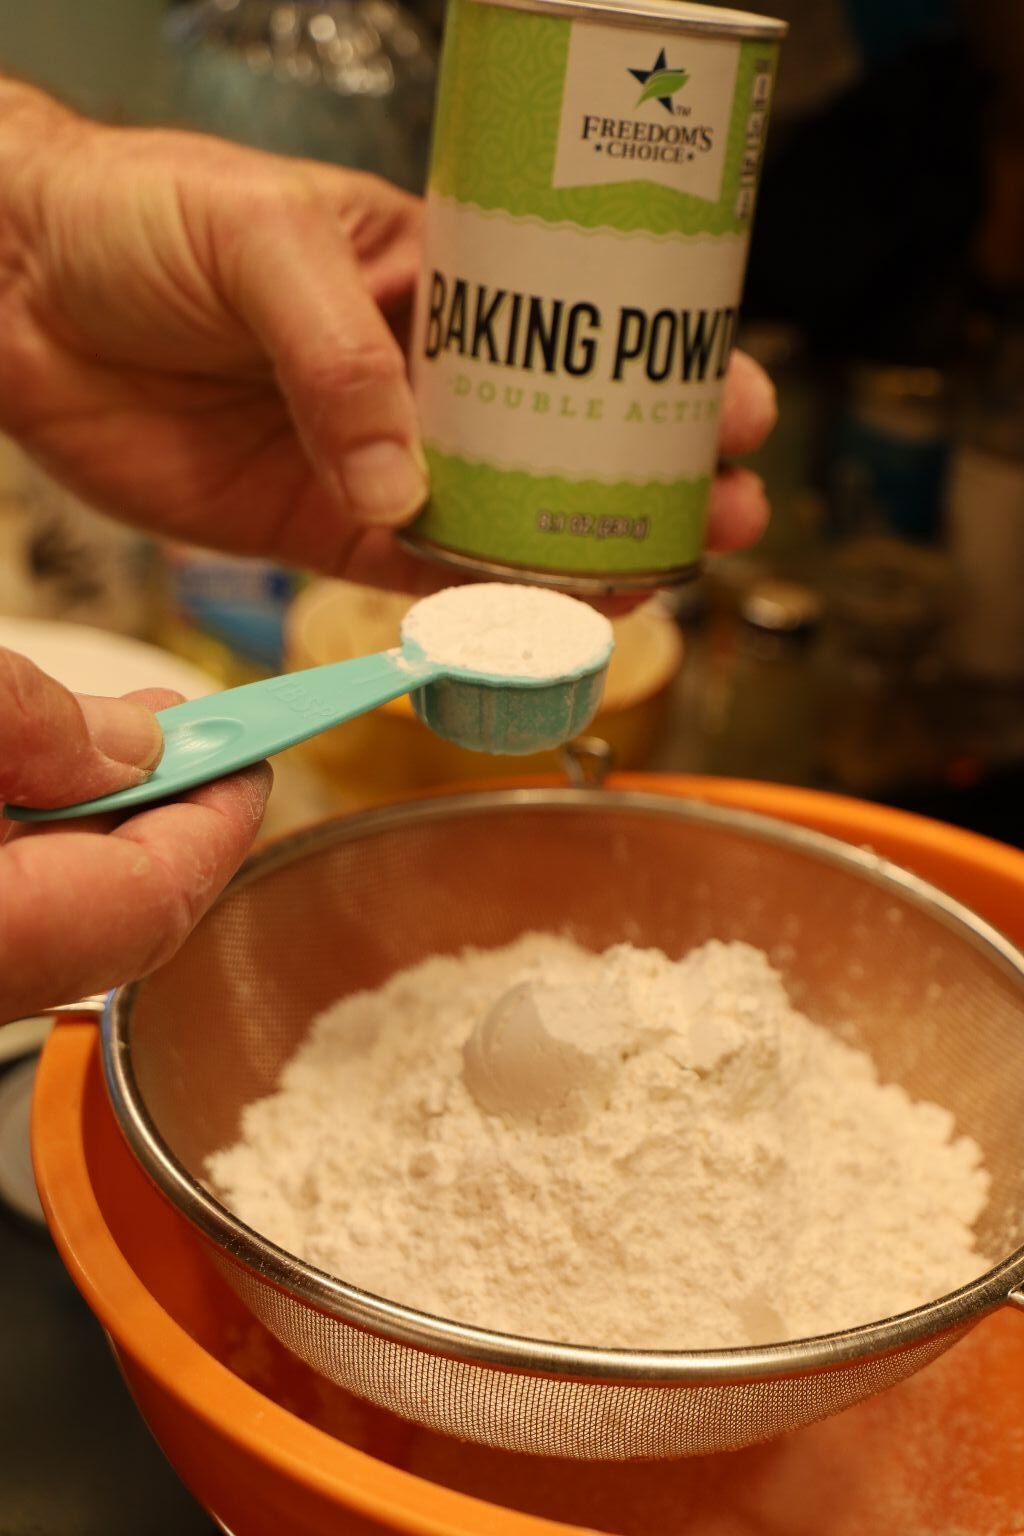

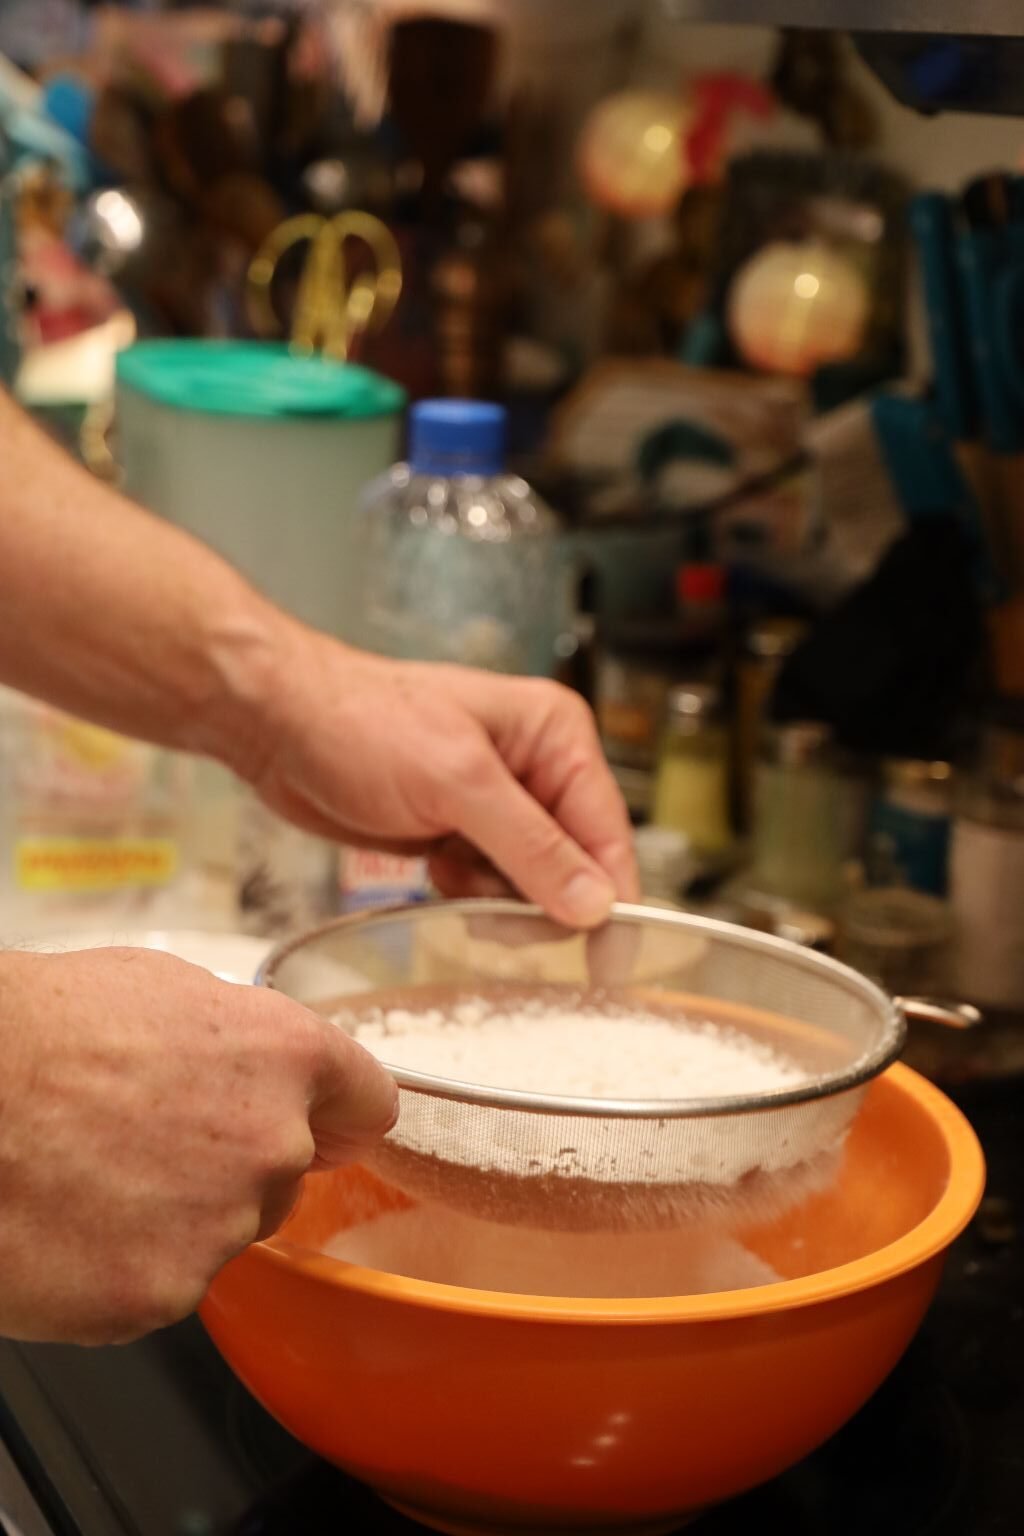
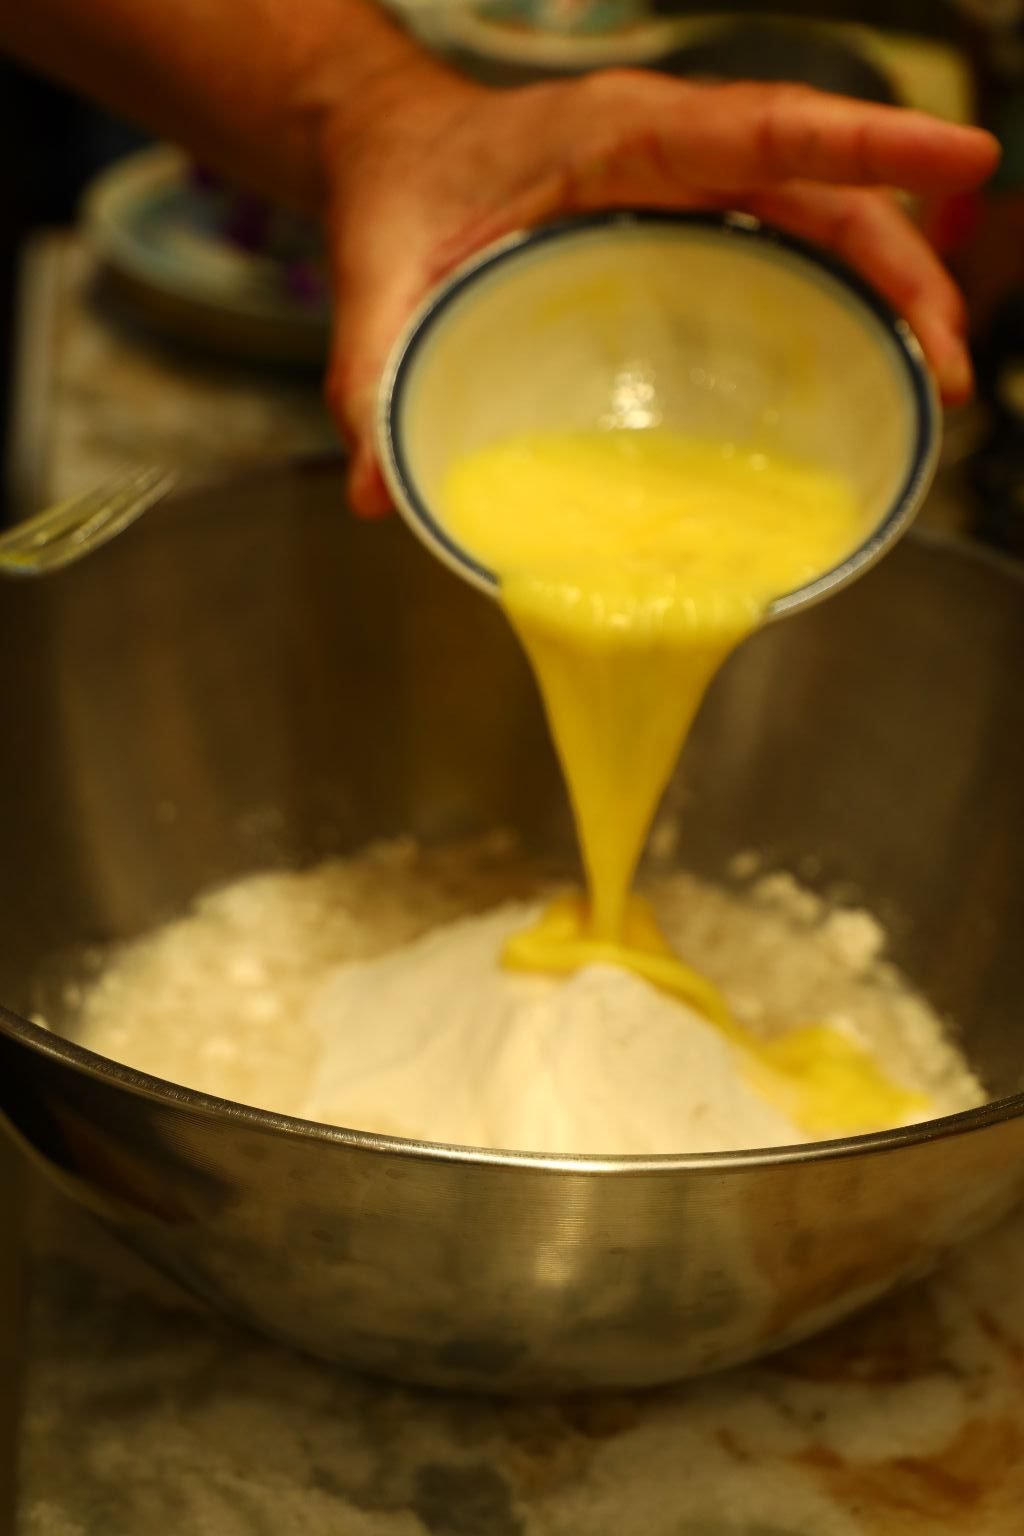
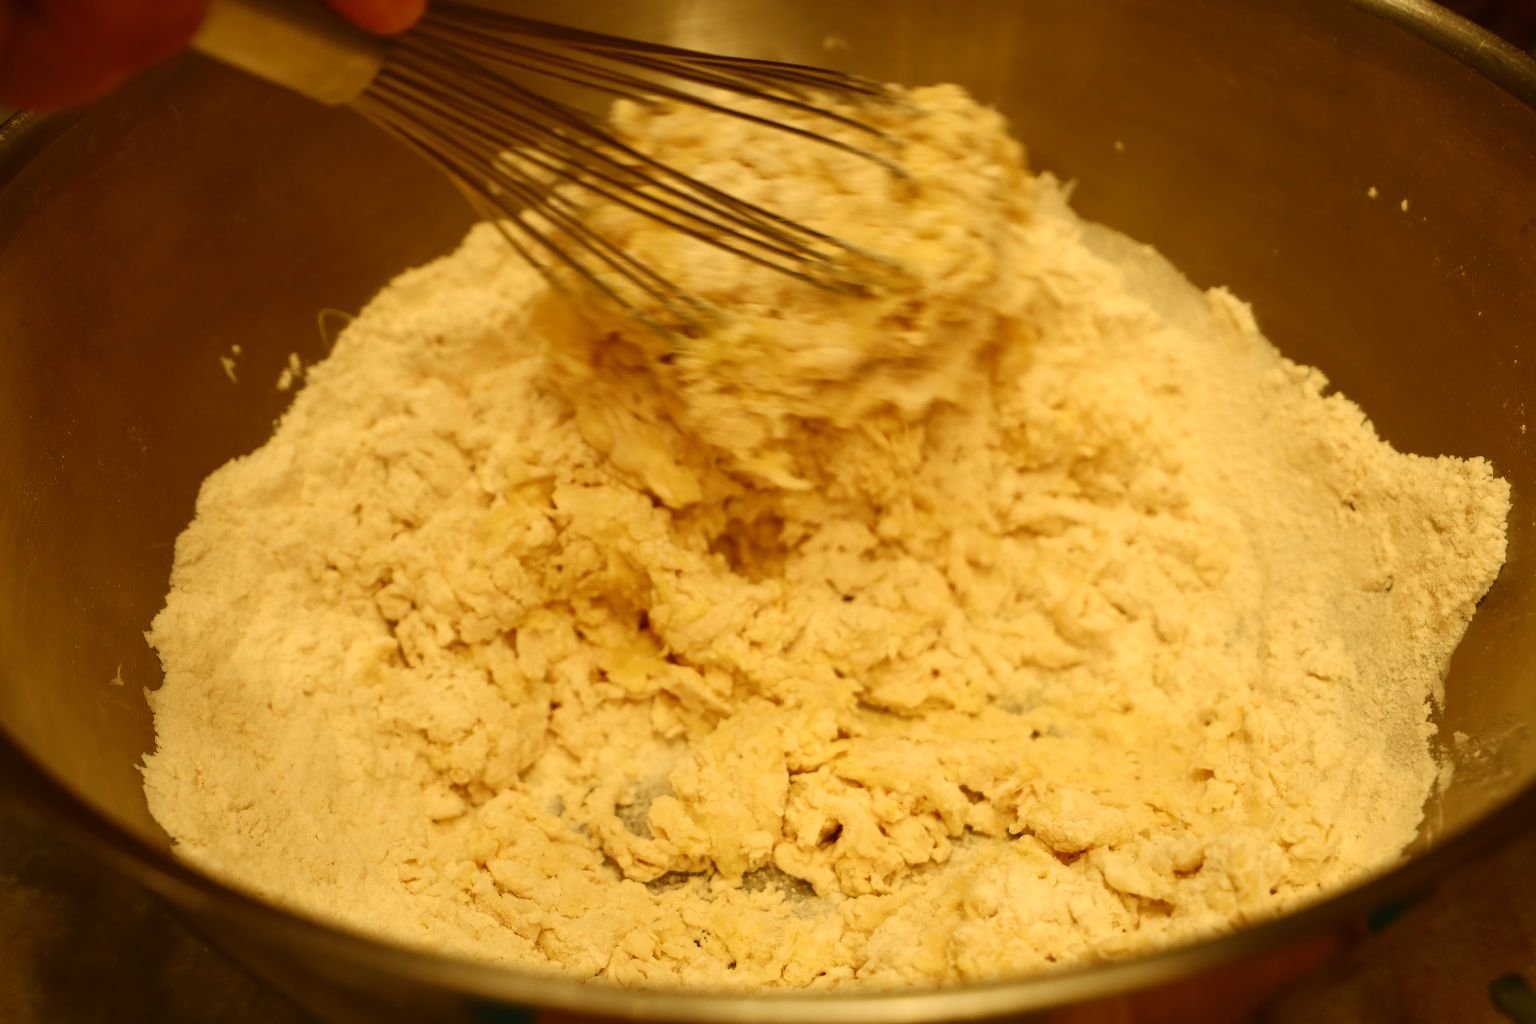
Here we are sifting the dry ingredients for the cake mixture….the remaining 3/4 Cups of sugar, Cake Flour, Baking Powder and Salt into a bowl. Sifting the ingredients does two things… It makes the ingredients lighter, and it mixes them together.
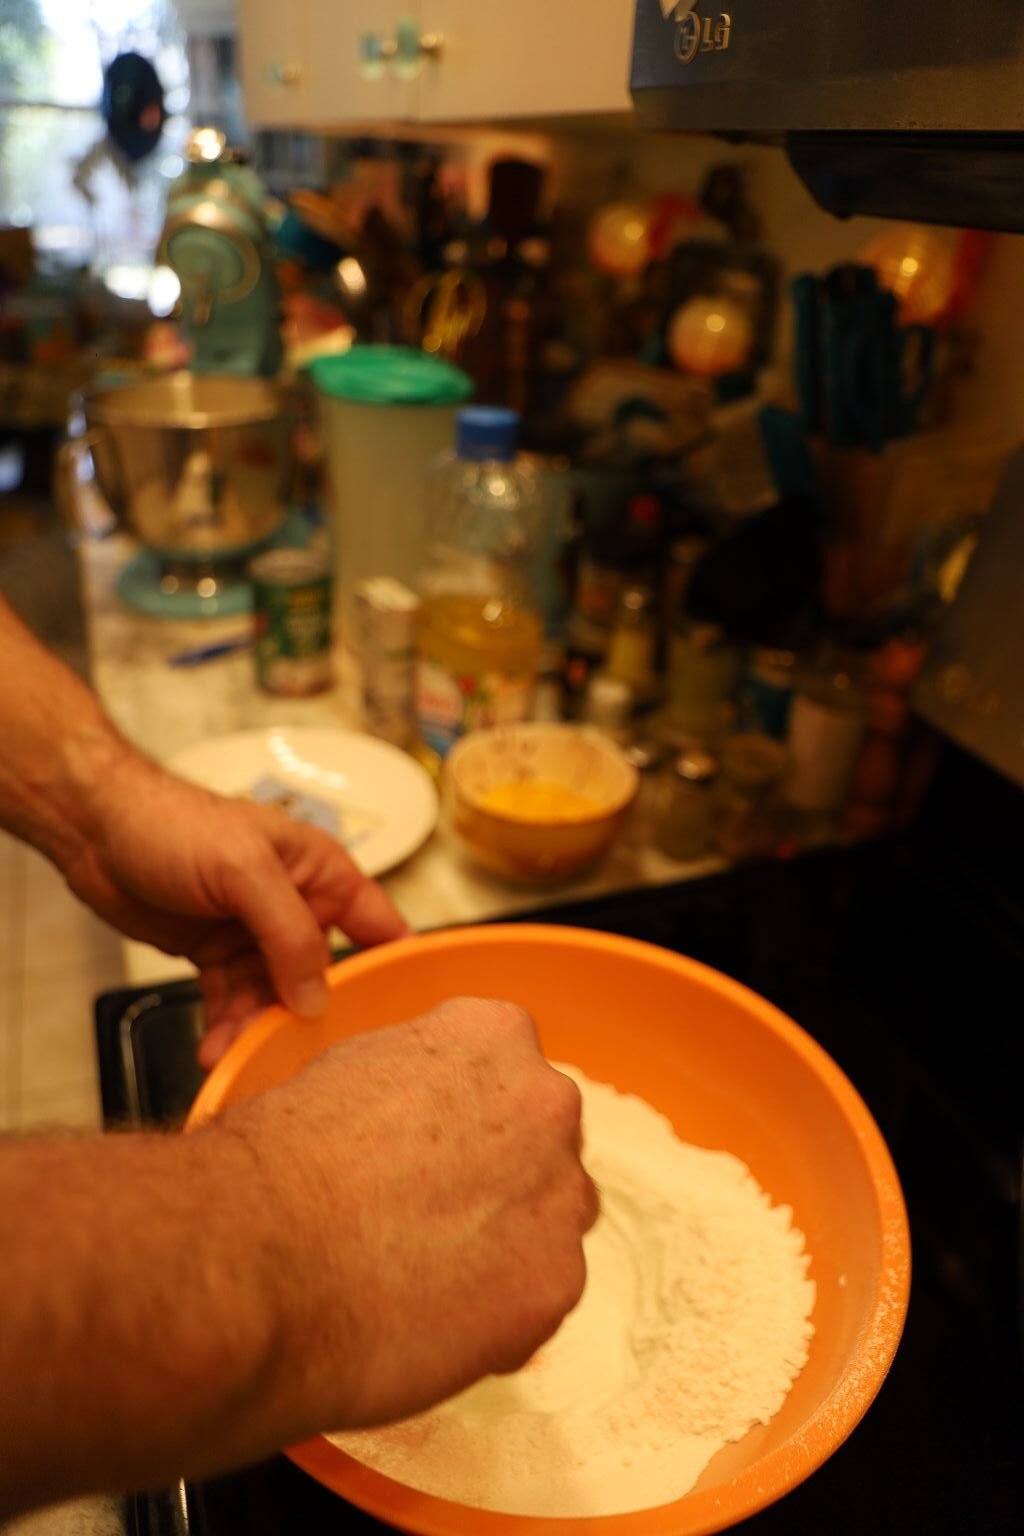
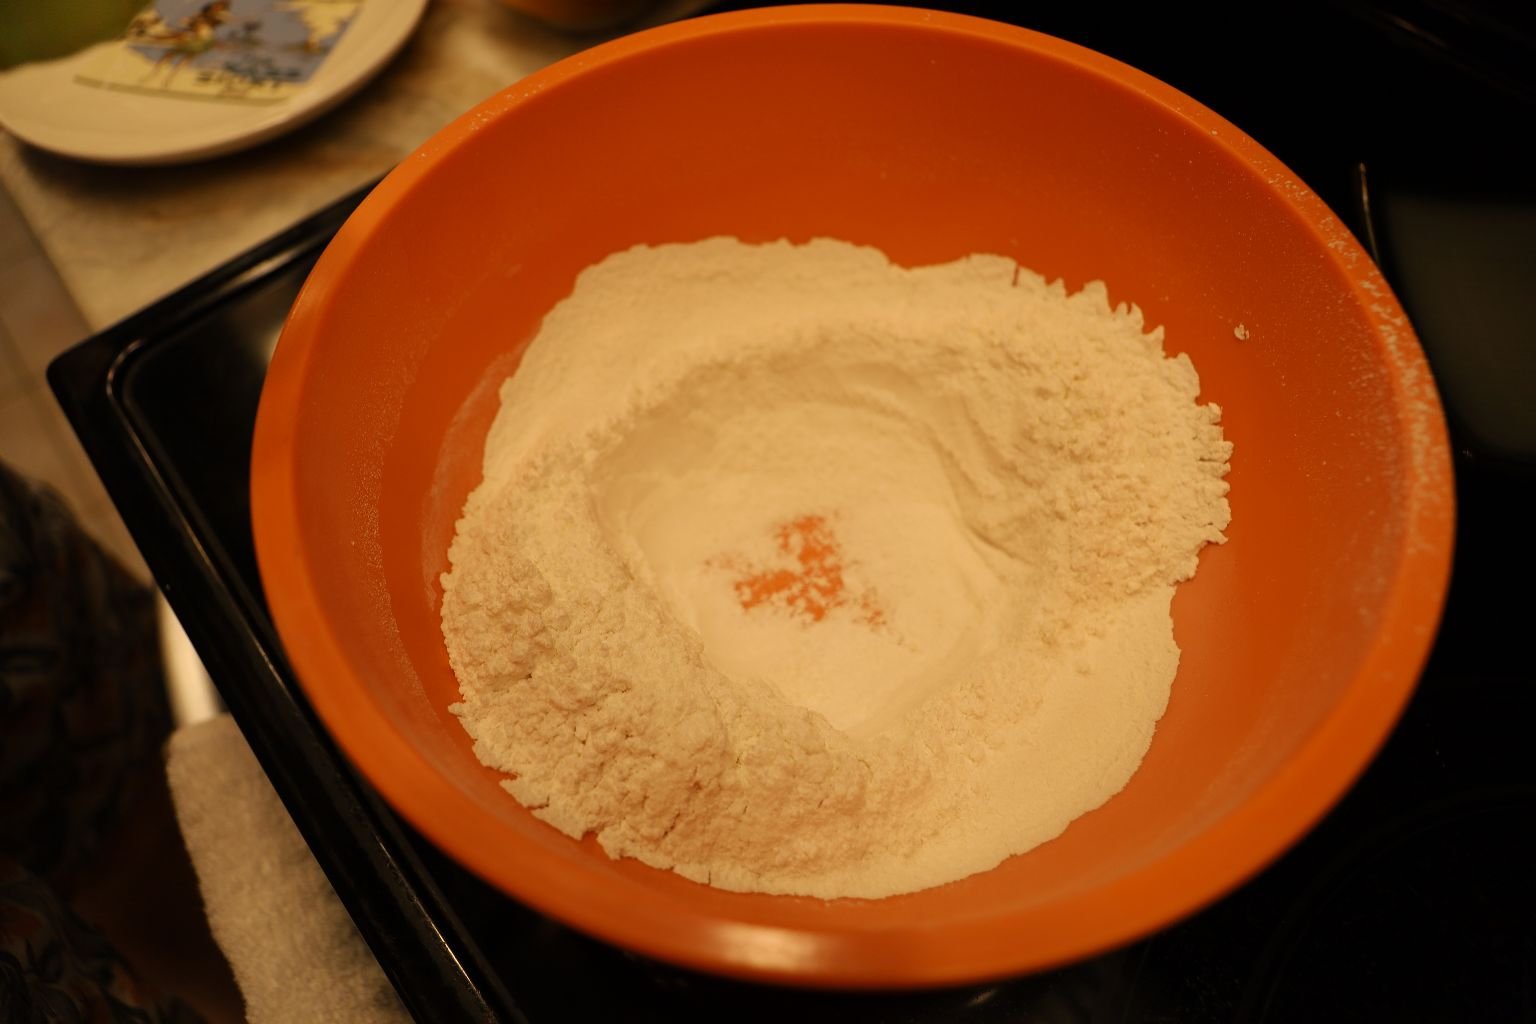
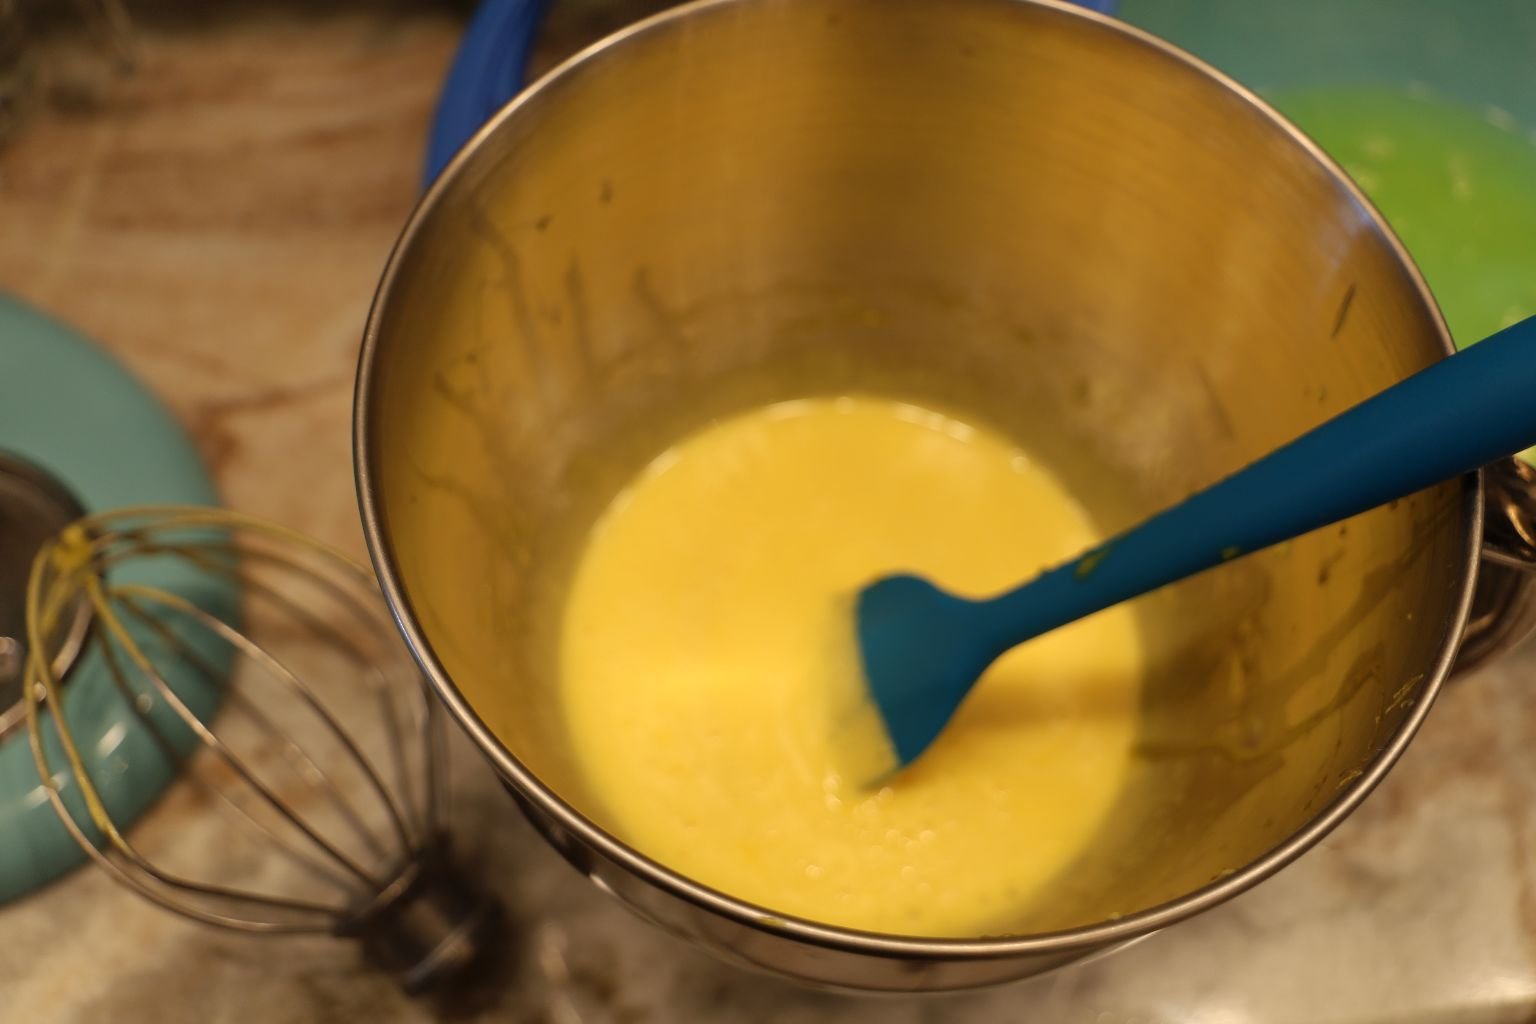
Make a well within the dry ingredients as shown, then add your wet ingredients…
————————————————————————————–
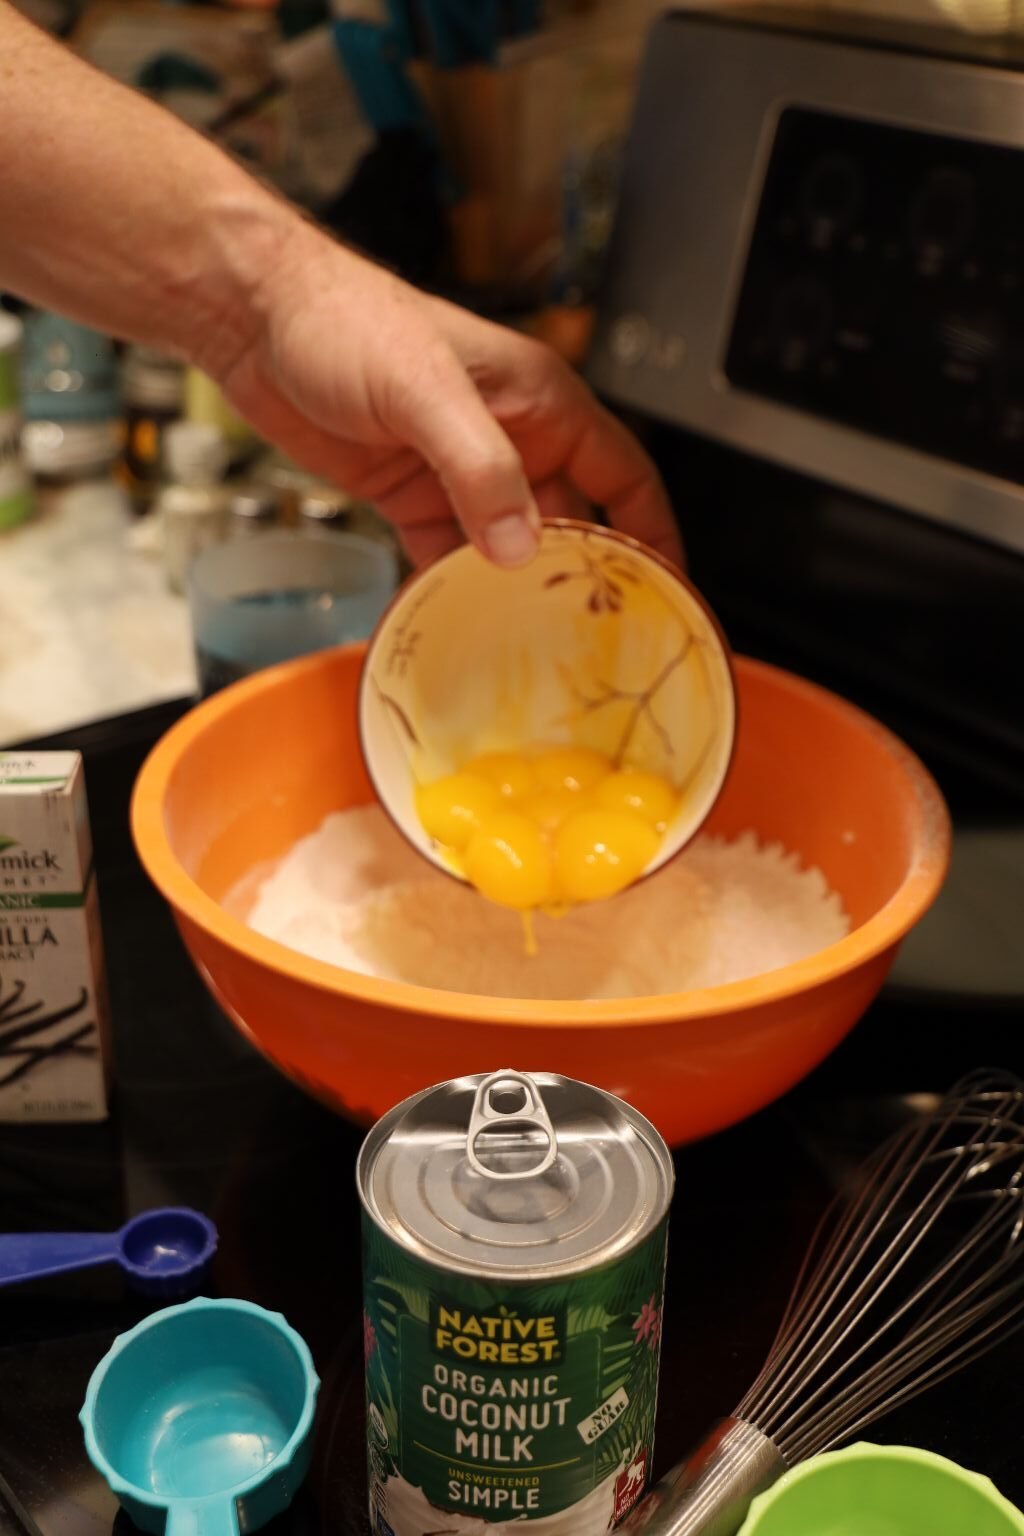
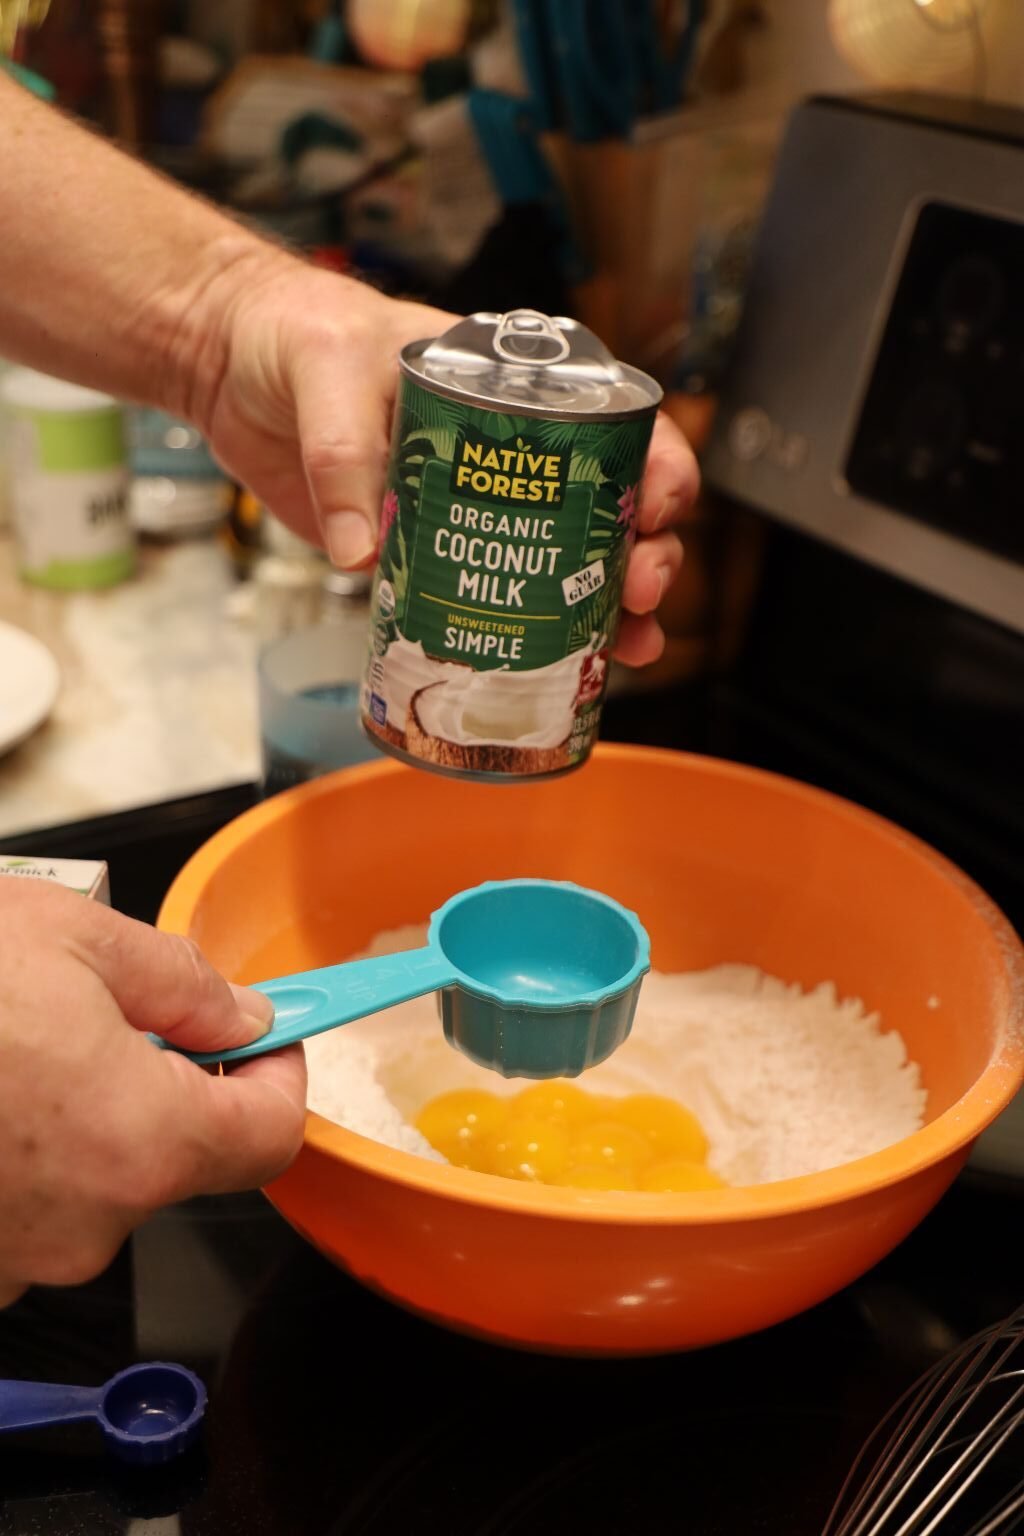
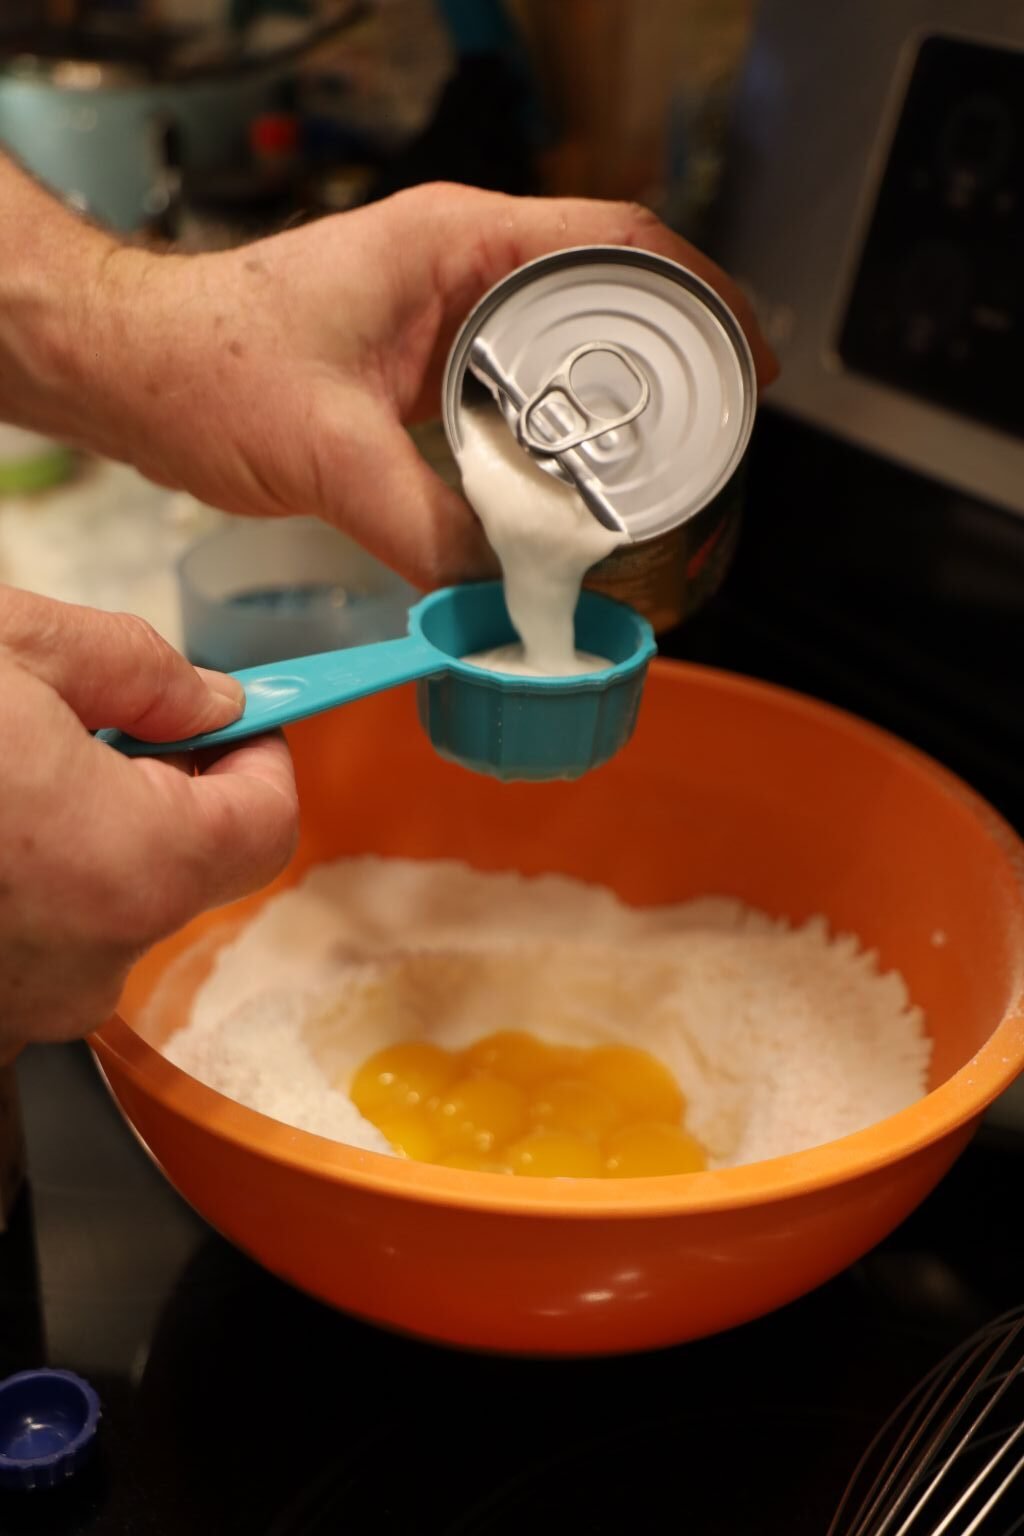
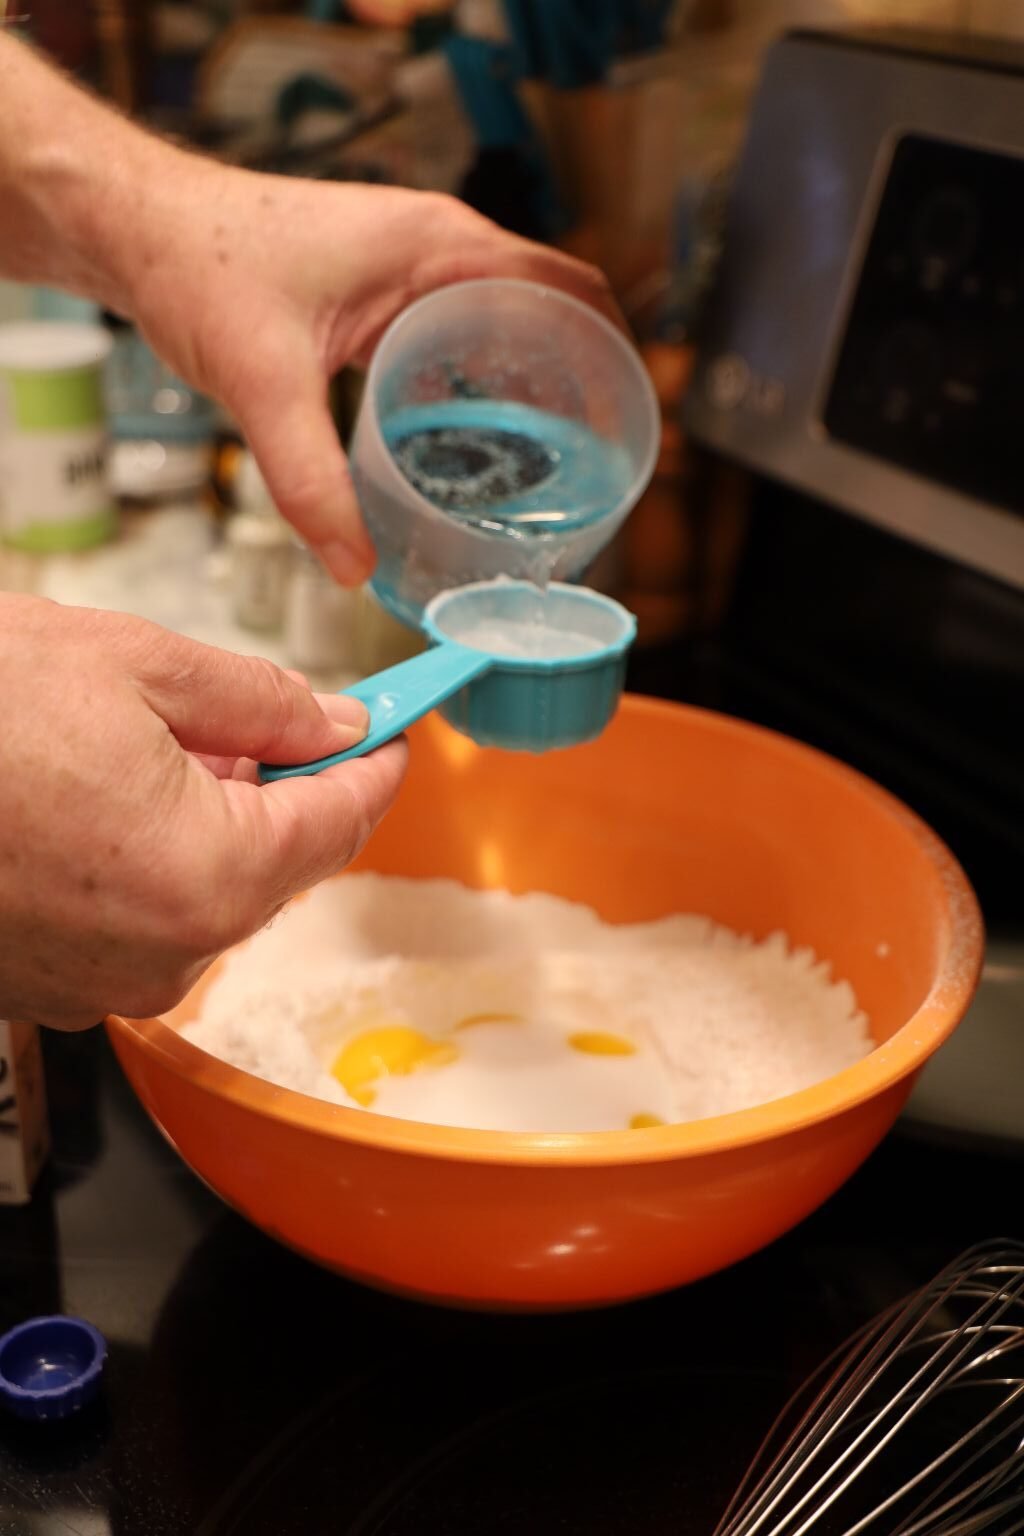
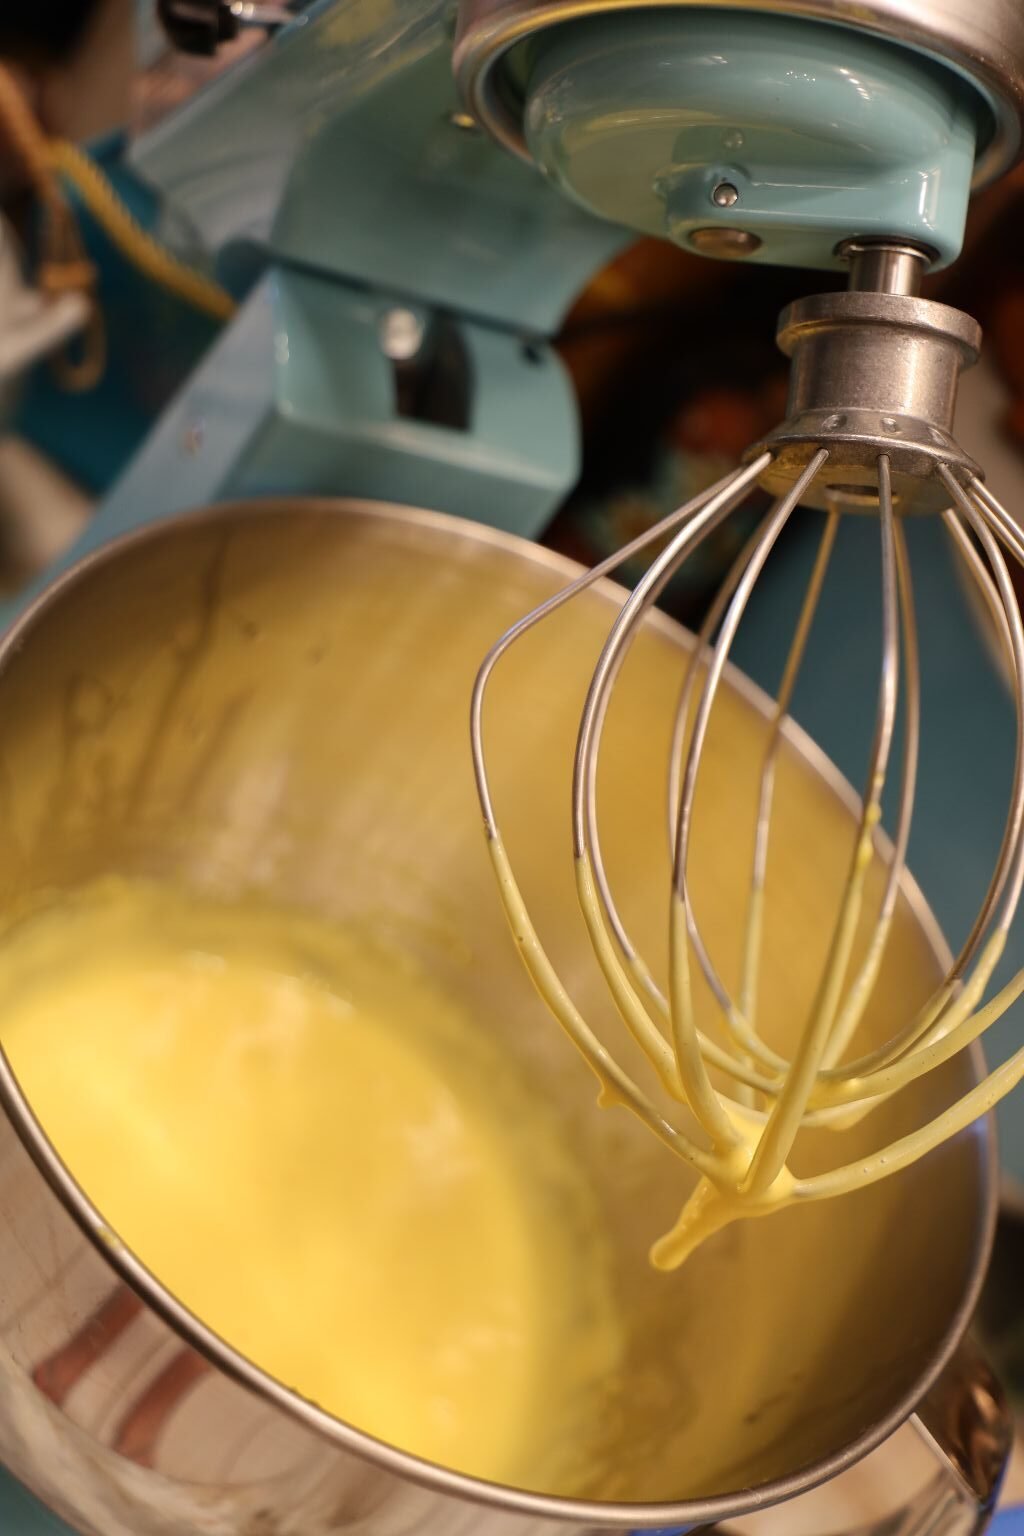
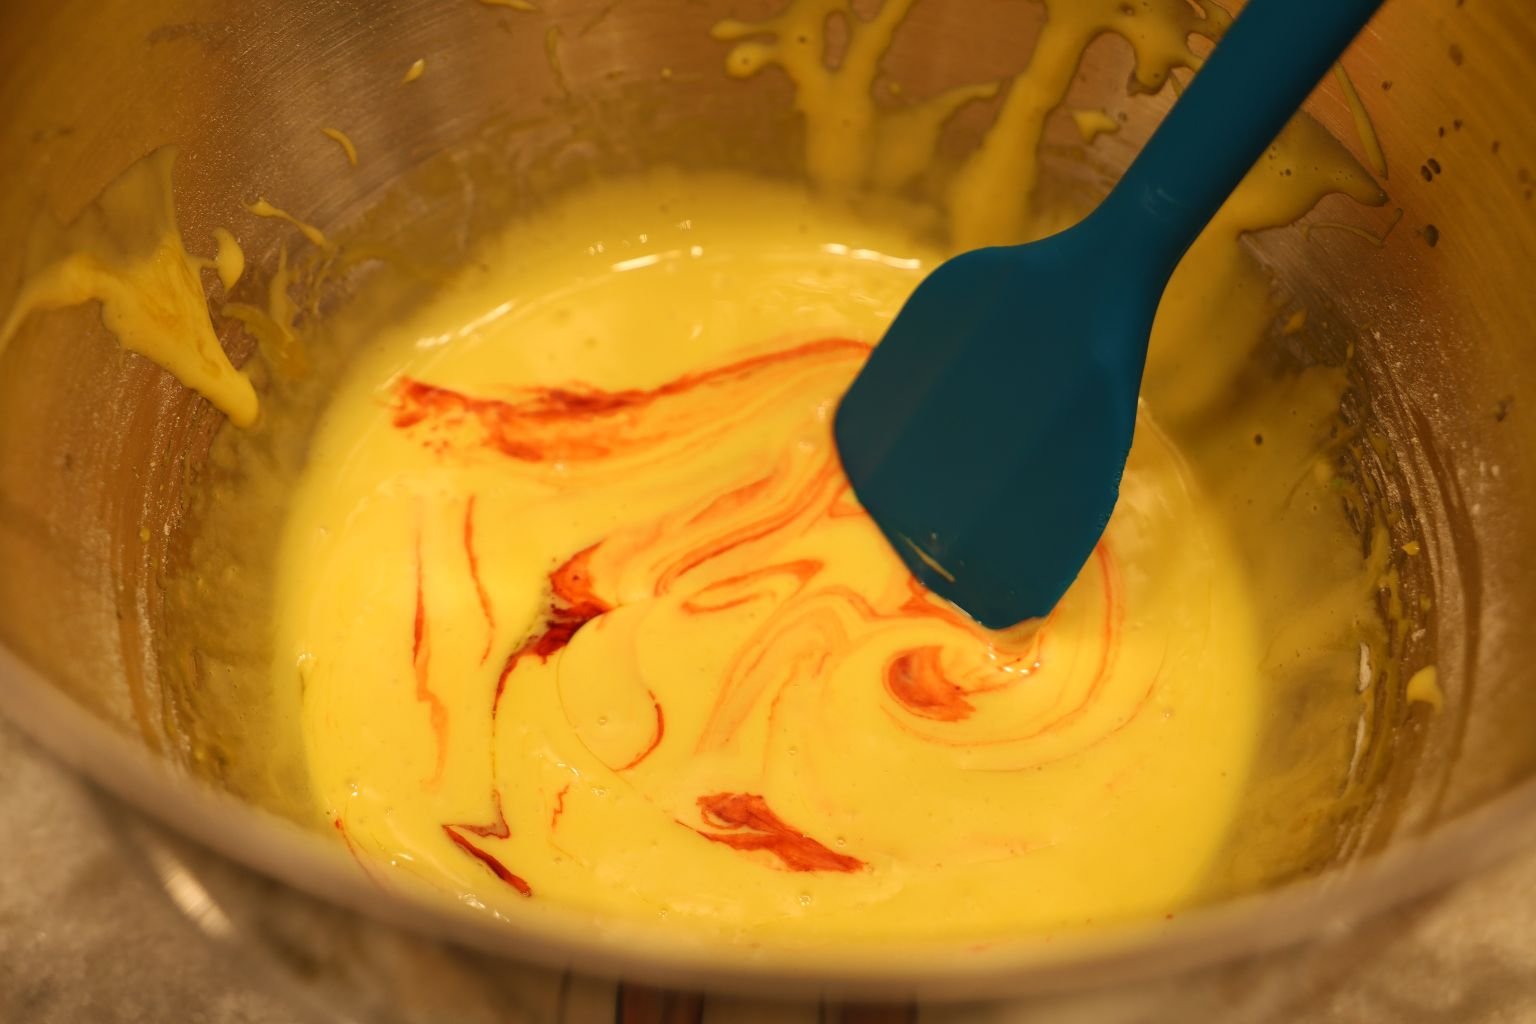
Egg Yolks, Coconut Milk, Water,
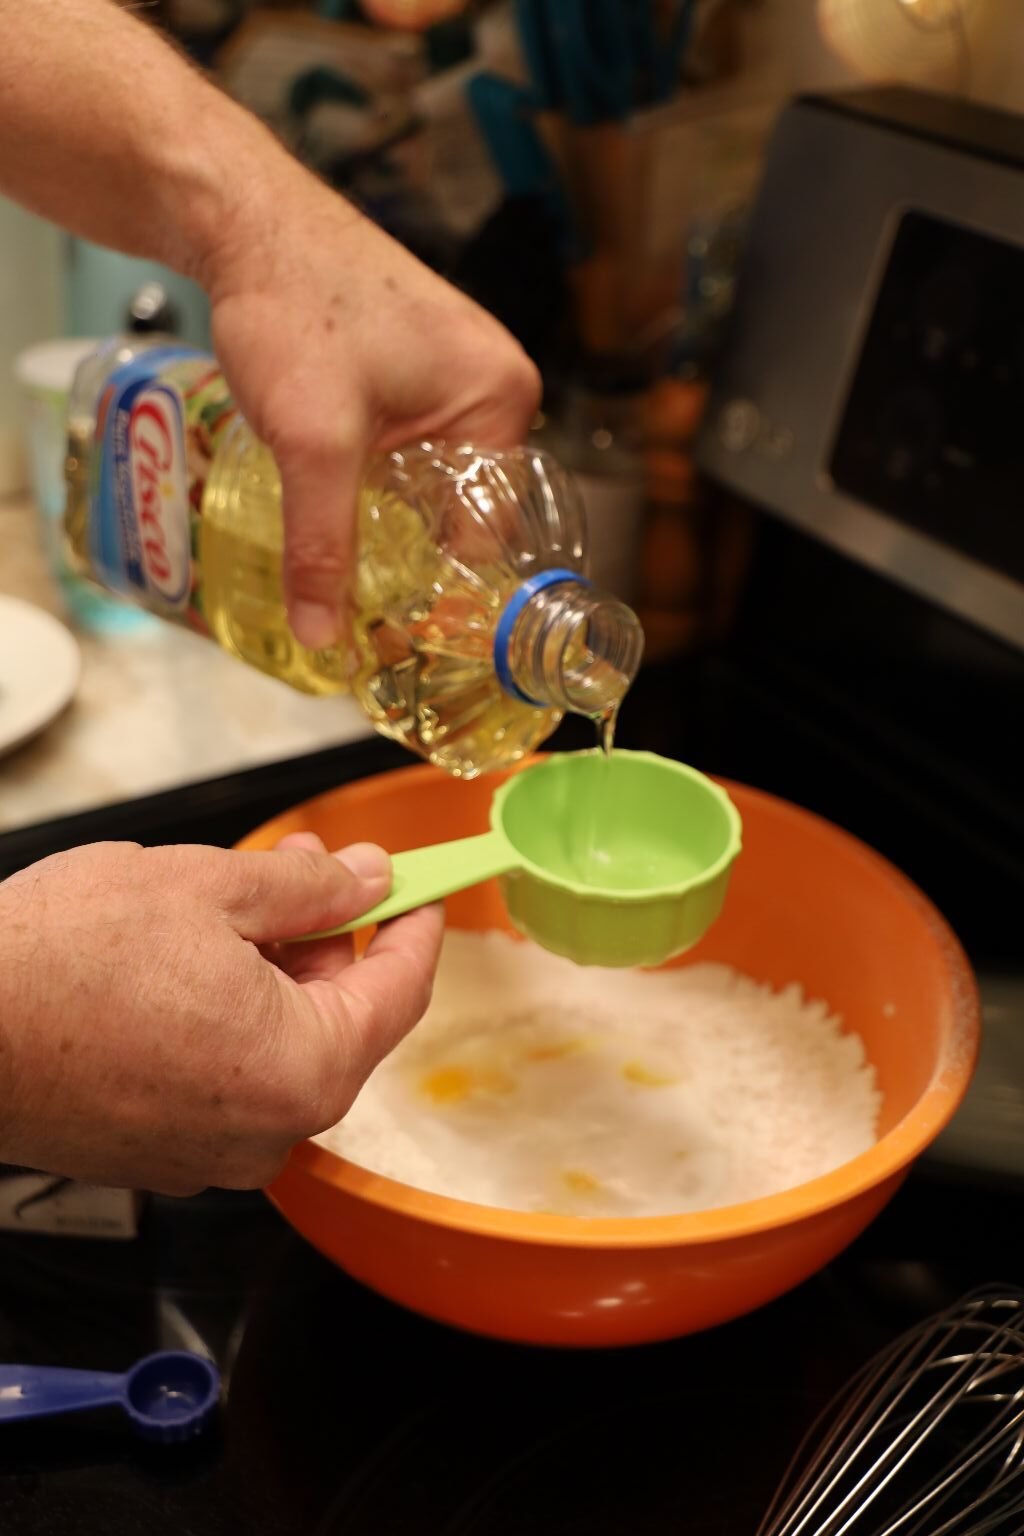
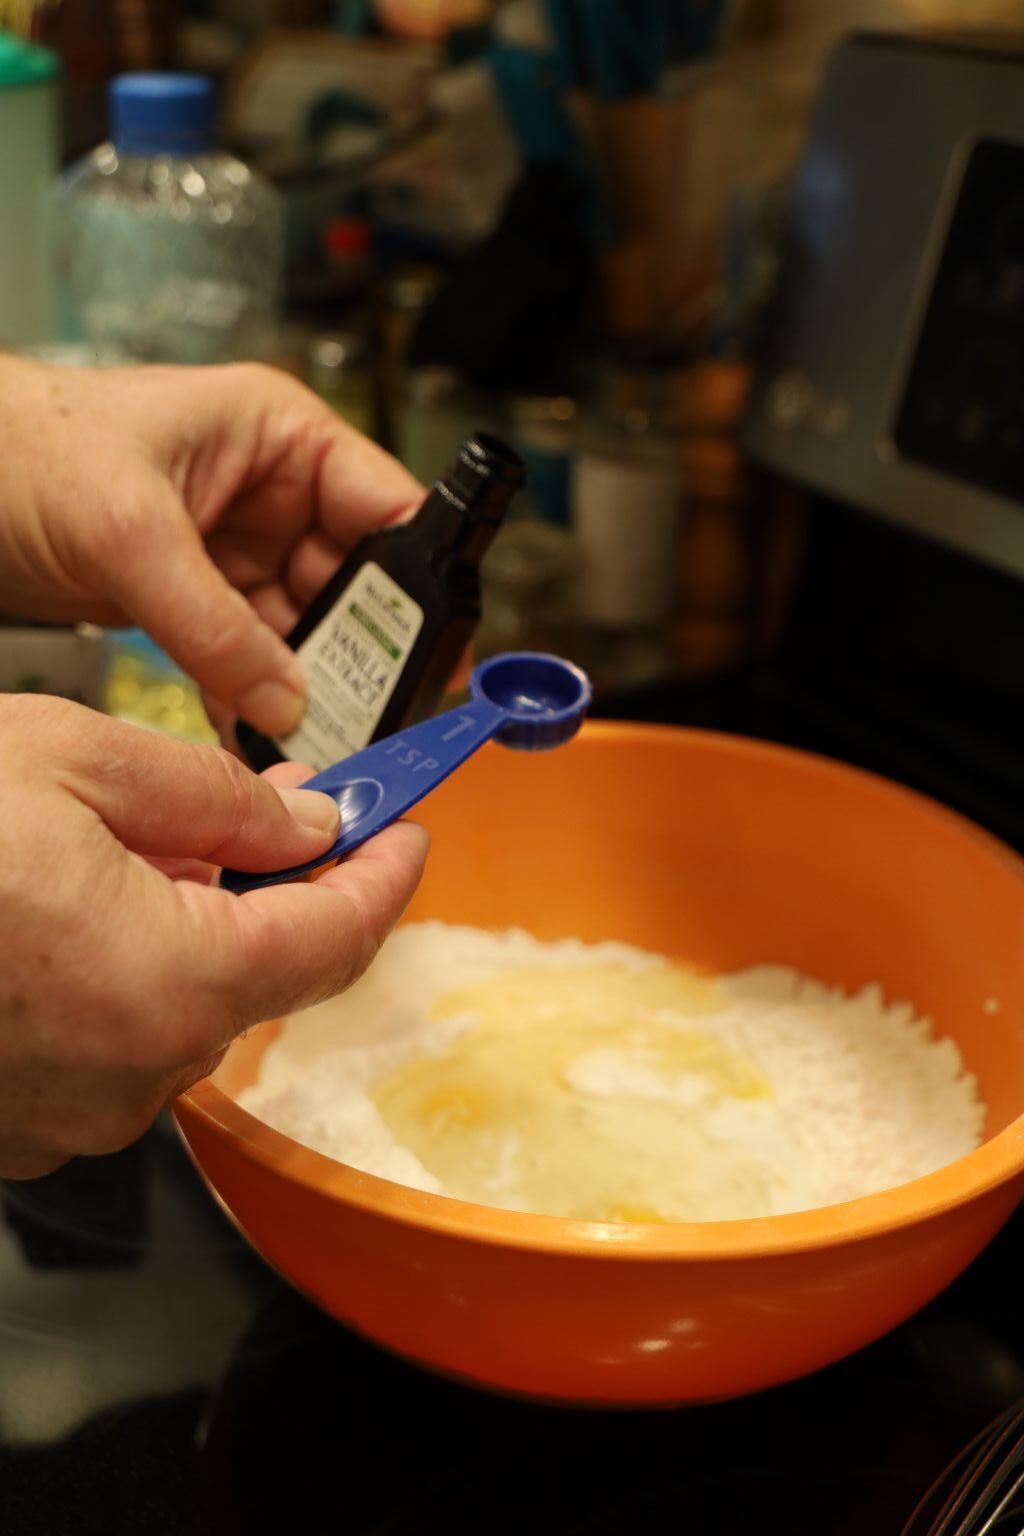
Vegetable Oil, and Vanilla.
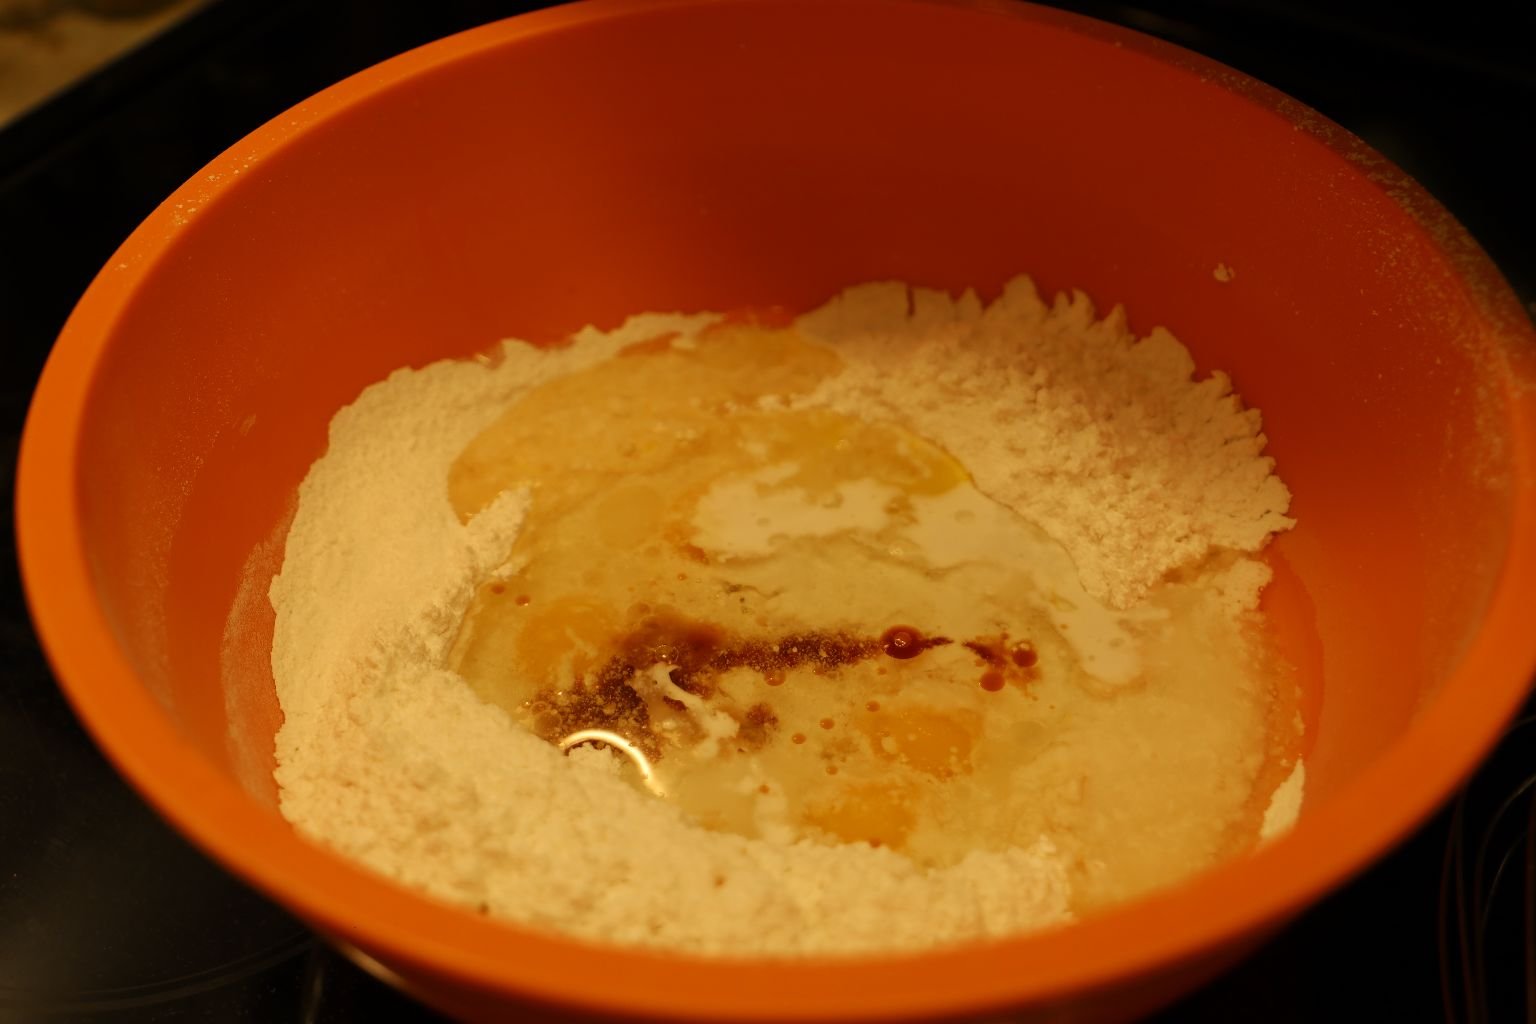
—————————————————————————————–
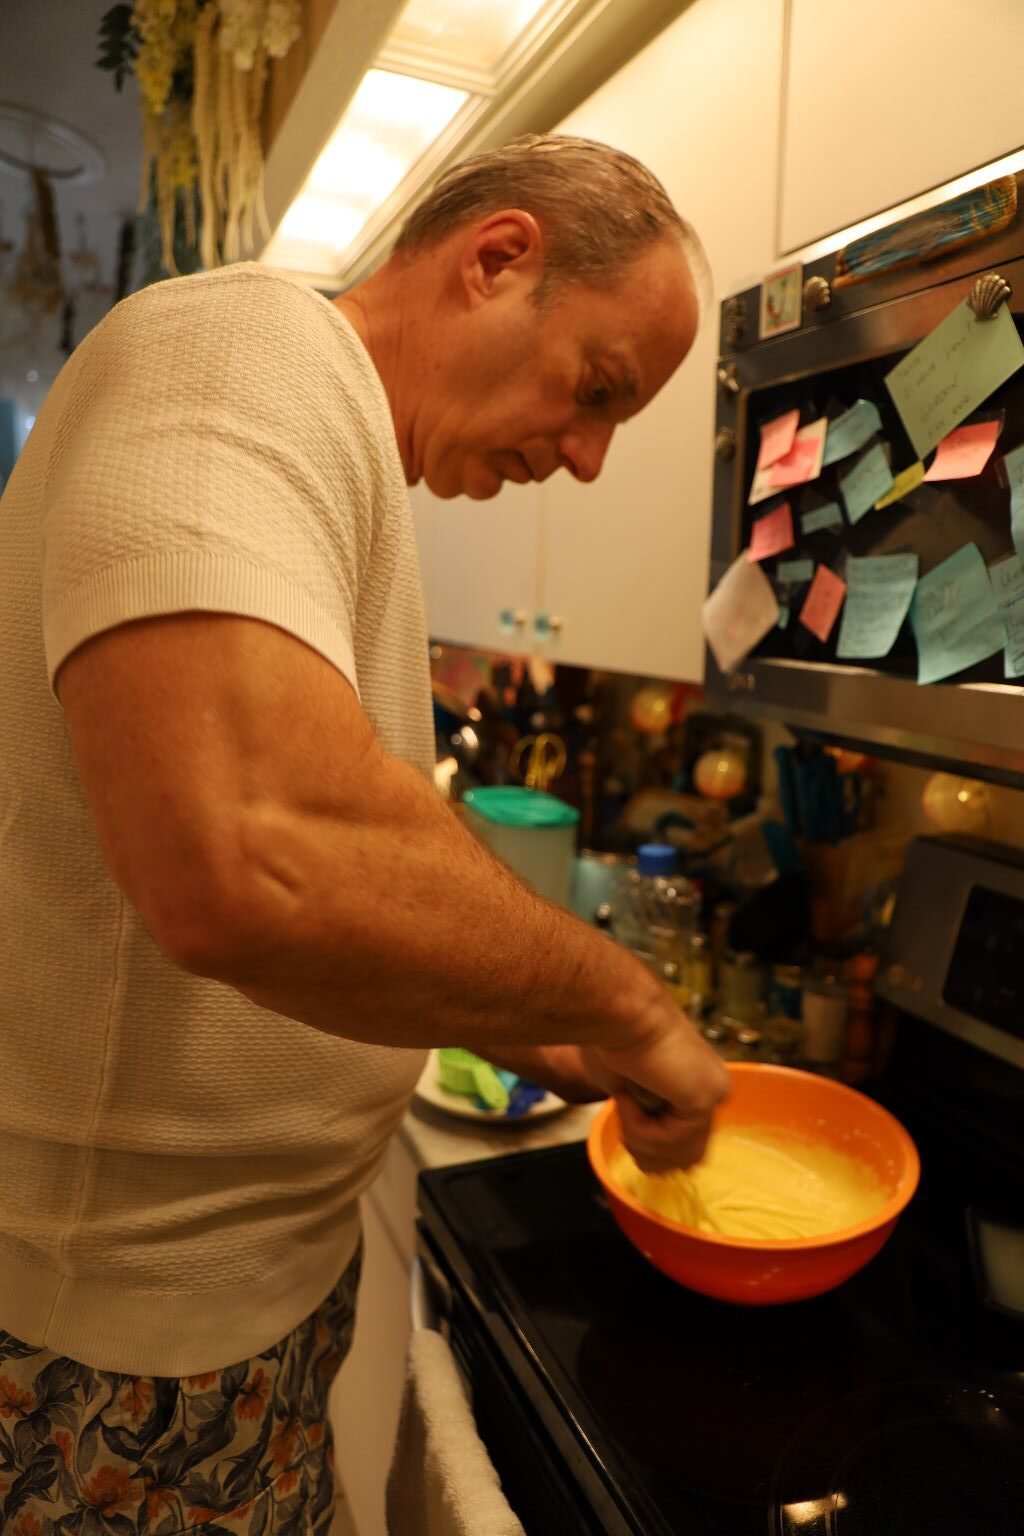
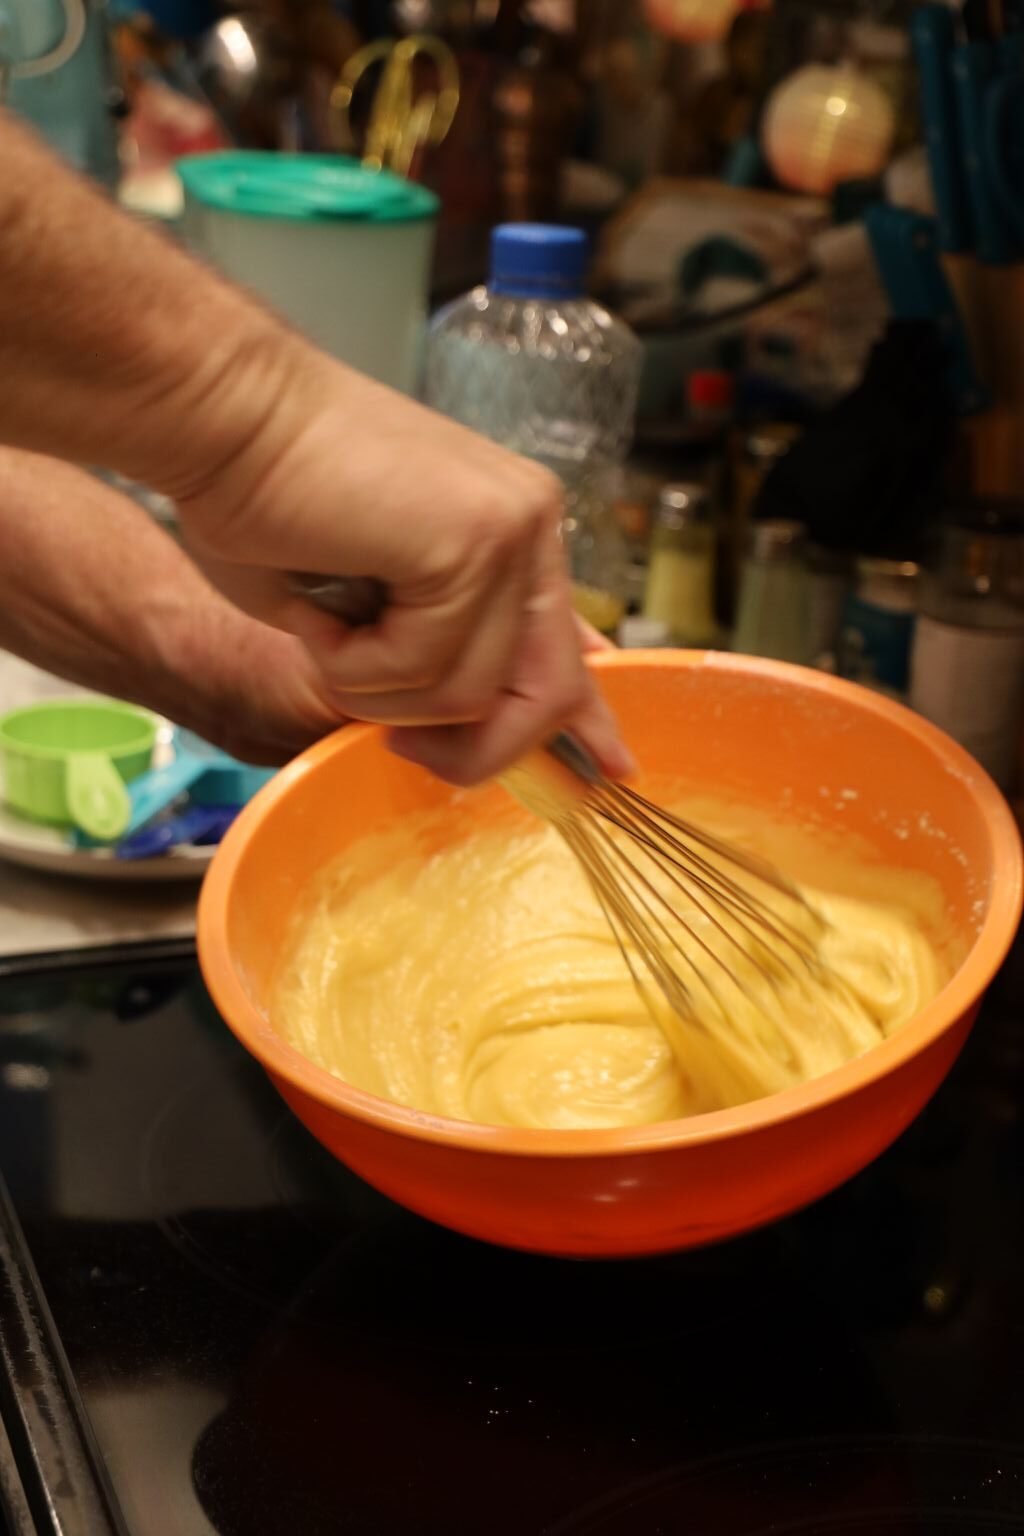
Whisk the ingredients together.
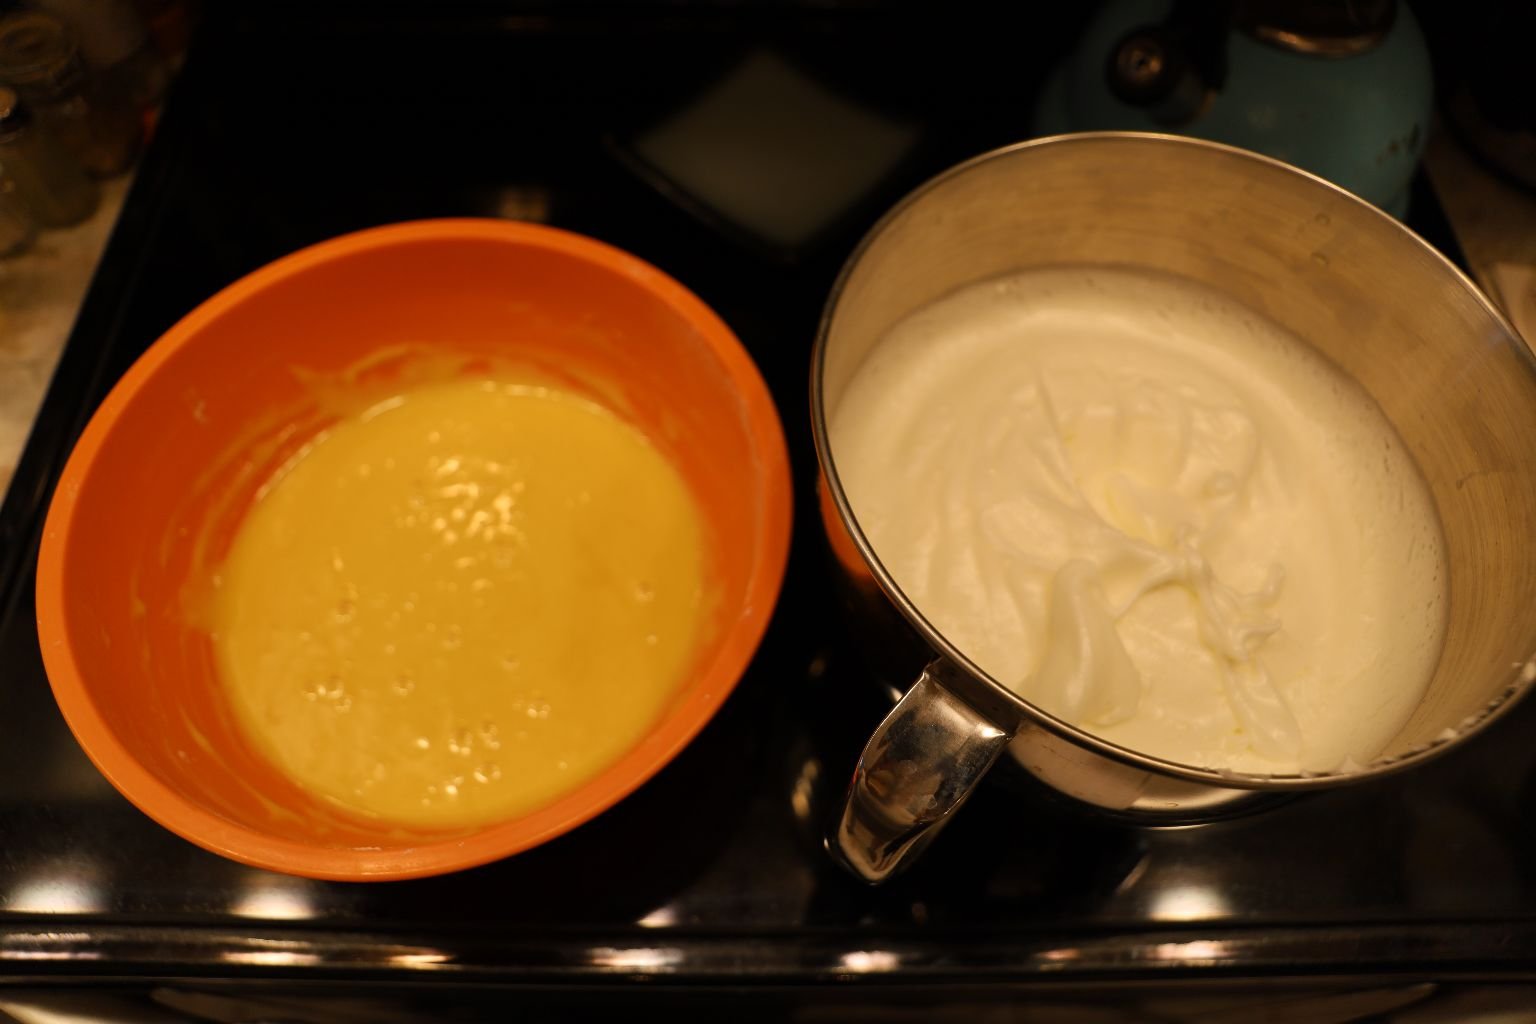
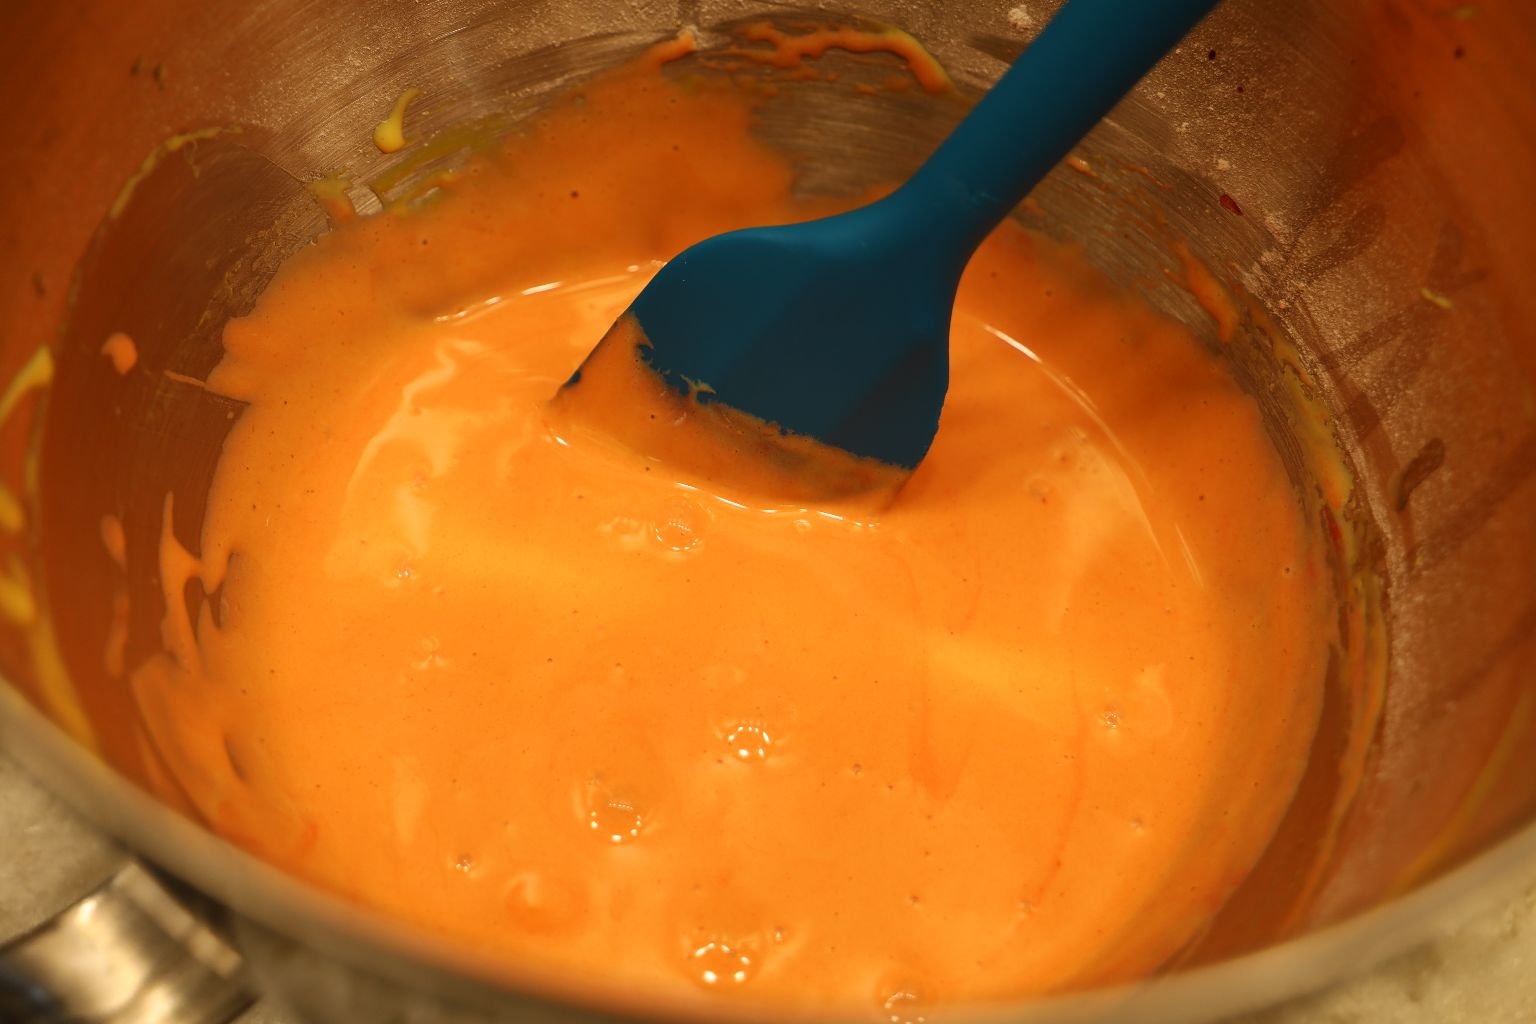
Shown are the cake mixture and the egg whites.
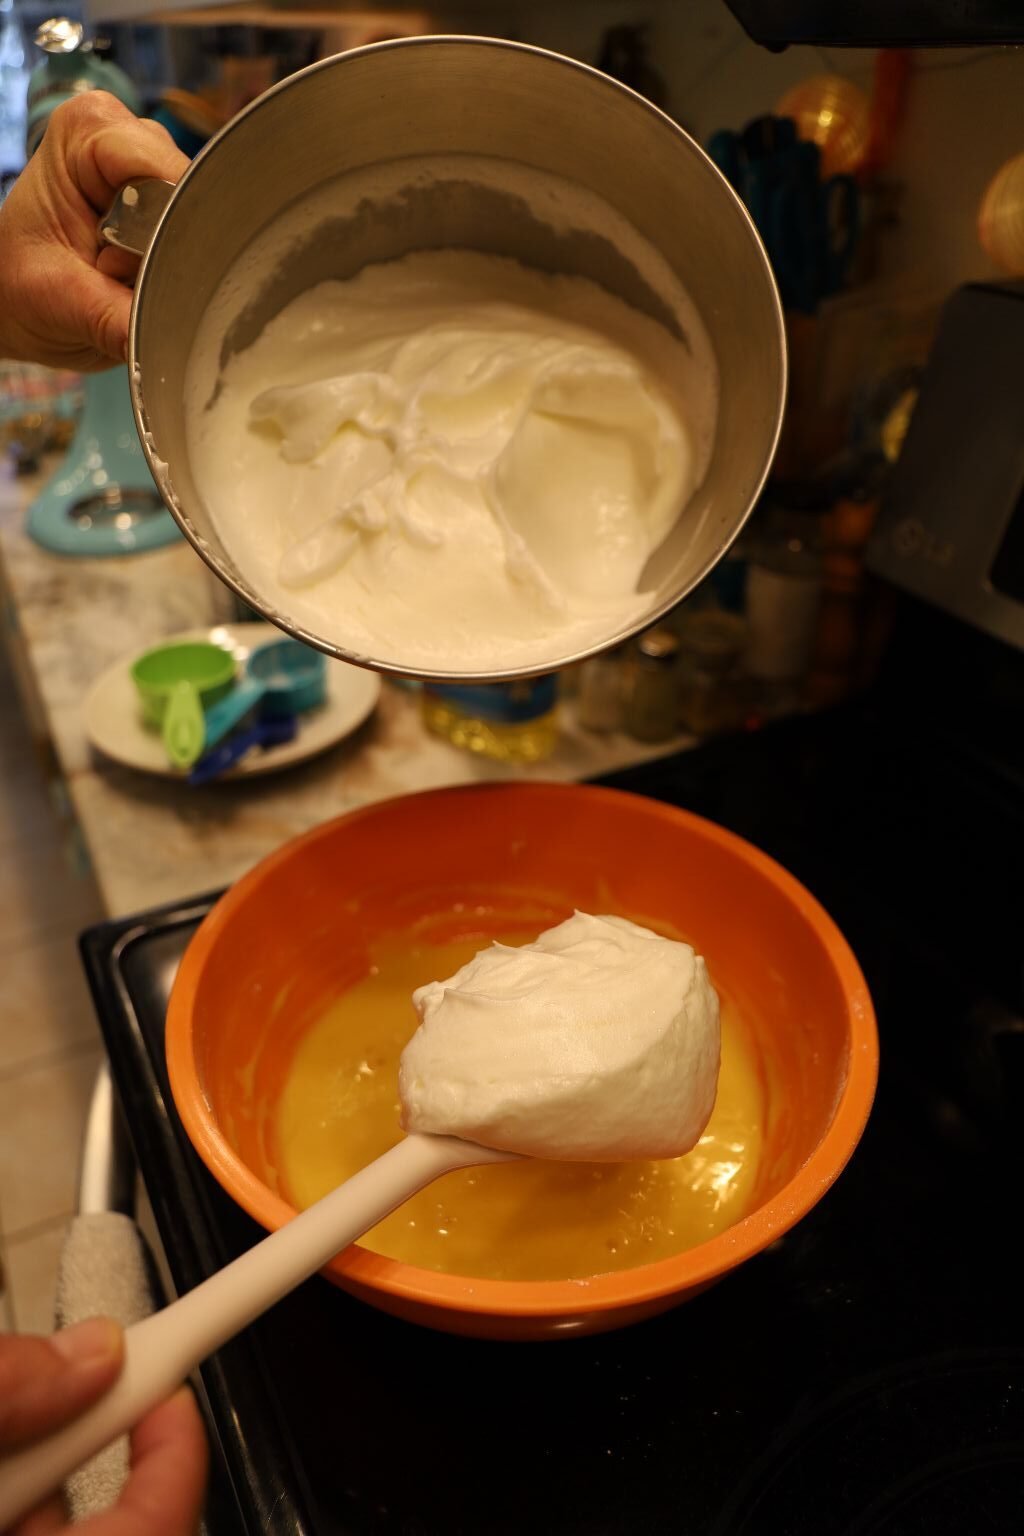
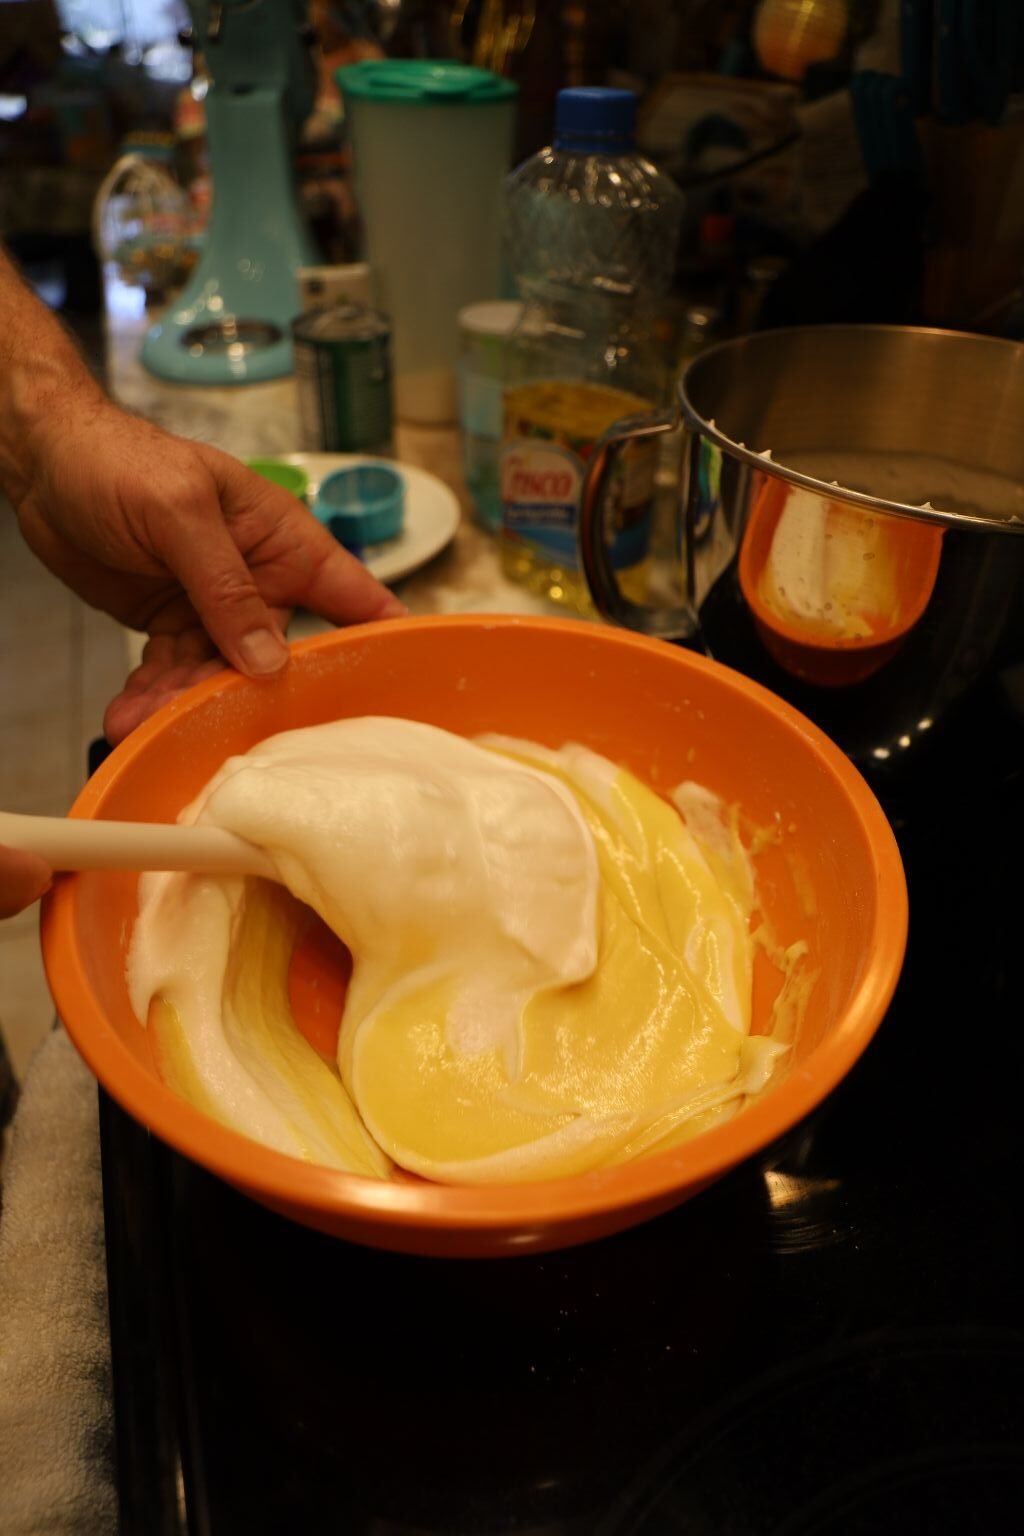
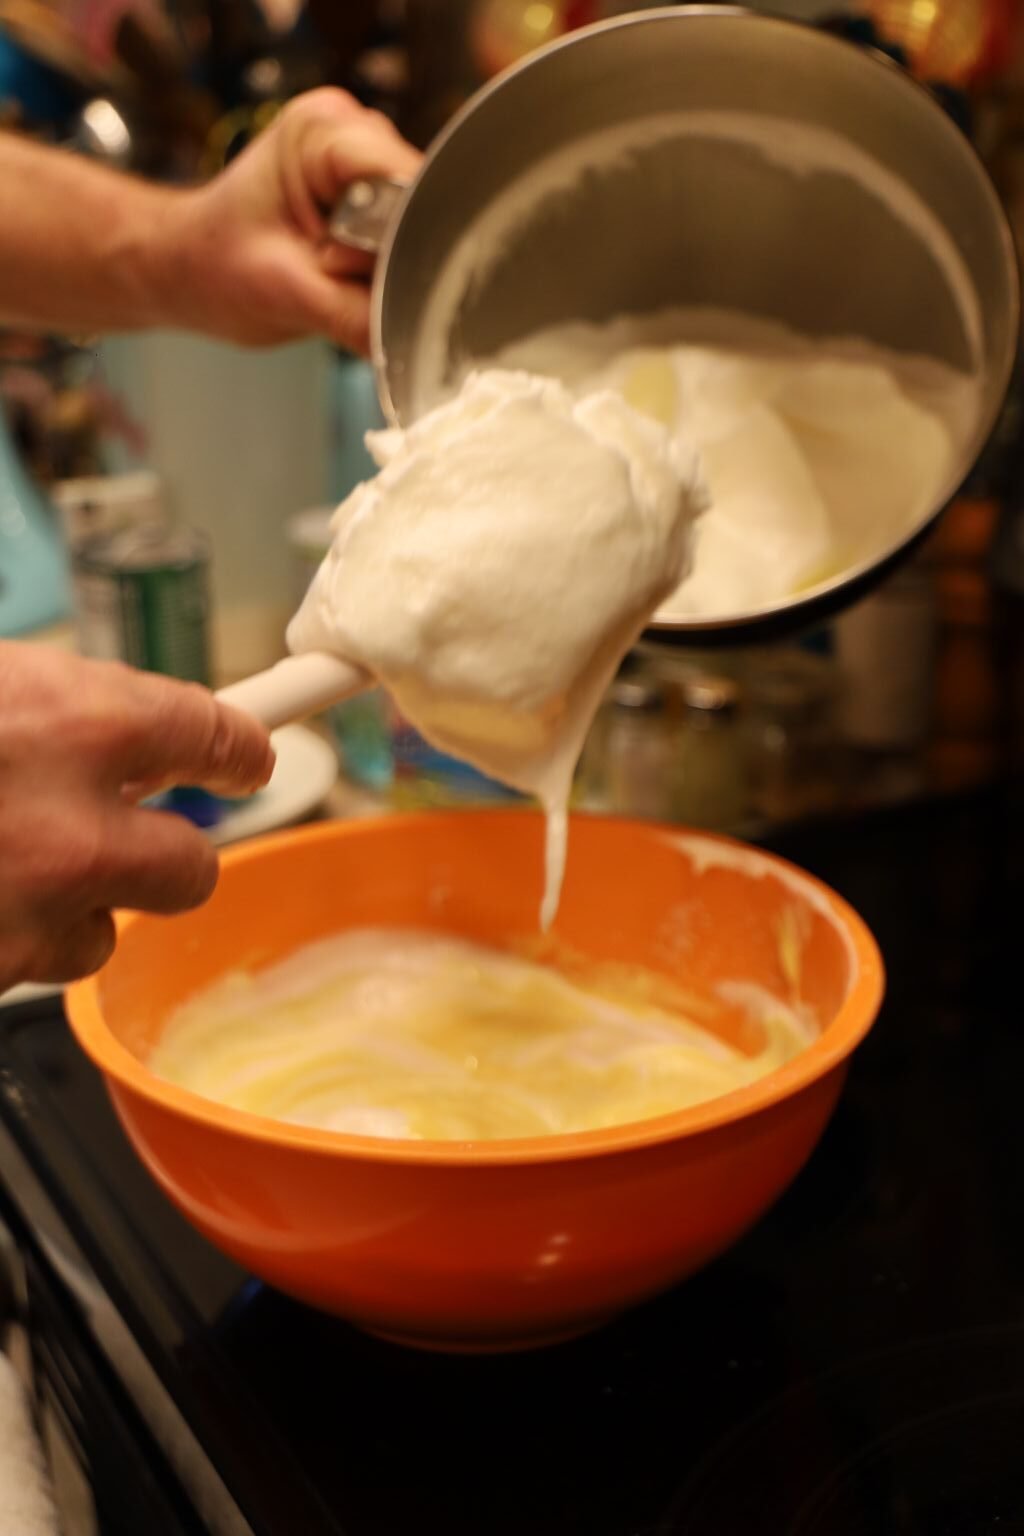
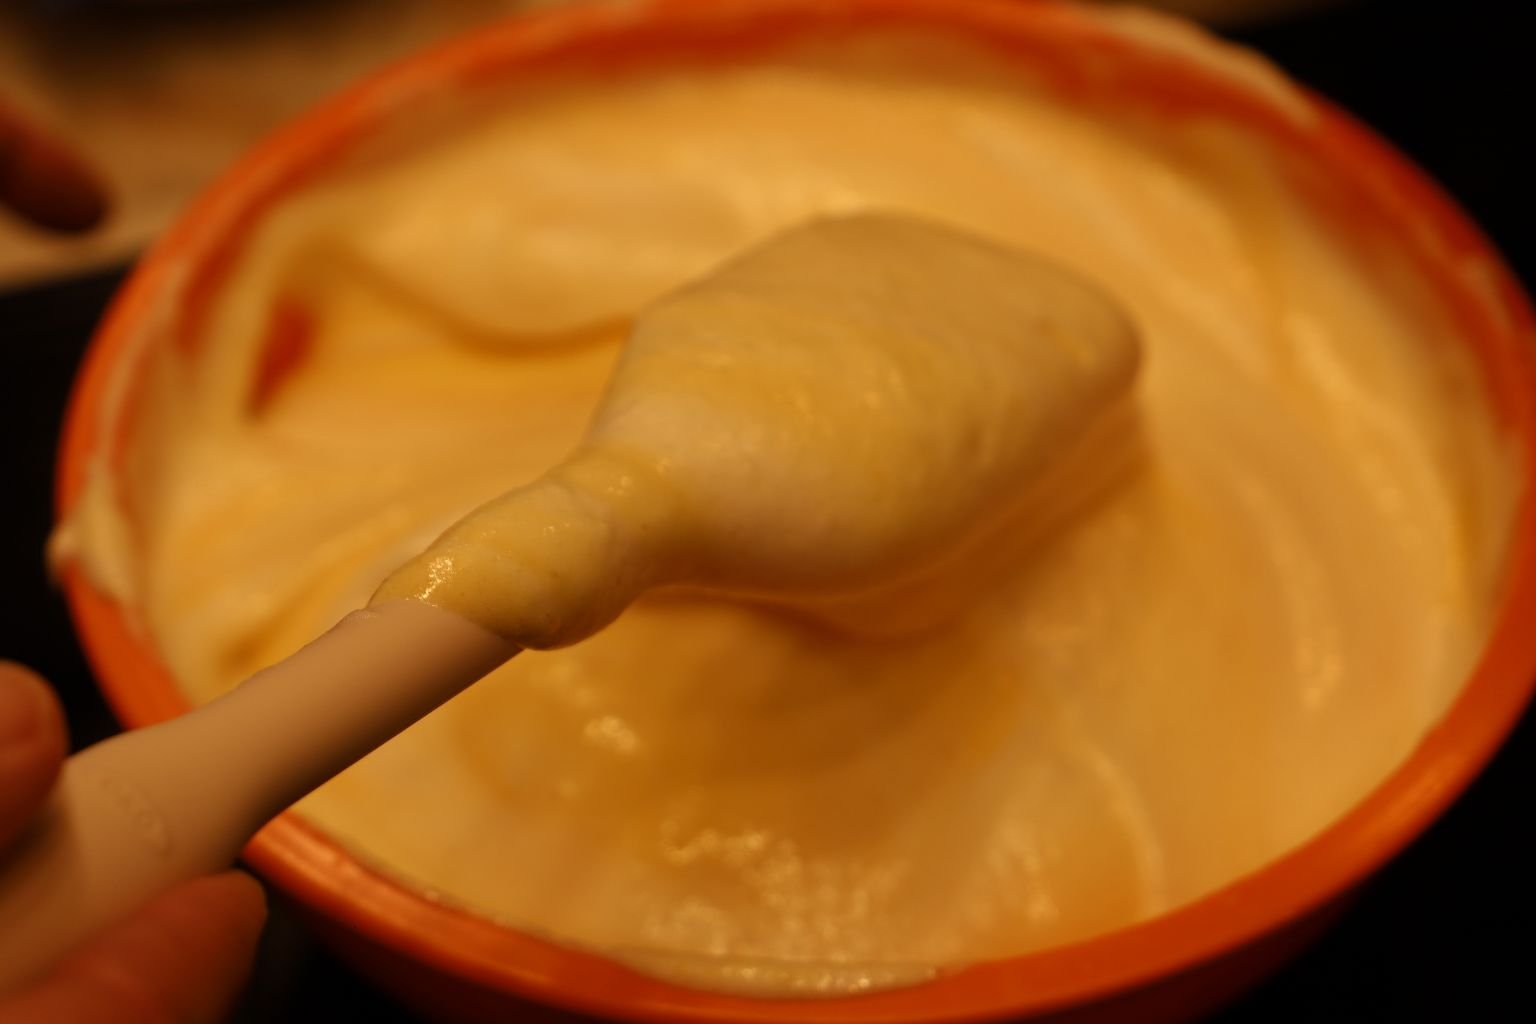

Using a rubber spatula, add a good amount or about 1/3 of your egg whites to the cake mixture. Fold the egg whites into your cake mixture by pushing your rubber spatula point down into the center of the mixture then scraping back up on the sides using a rounding motion and then repeat the process. Fold another 1/3 of your egg whites then the last 3rd until all of the egg whites are incorporated into the cake mixture.
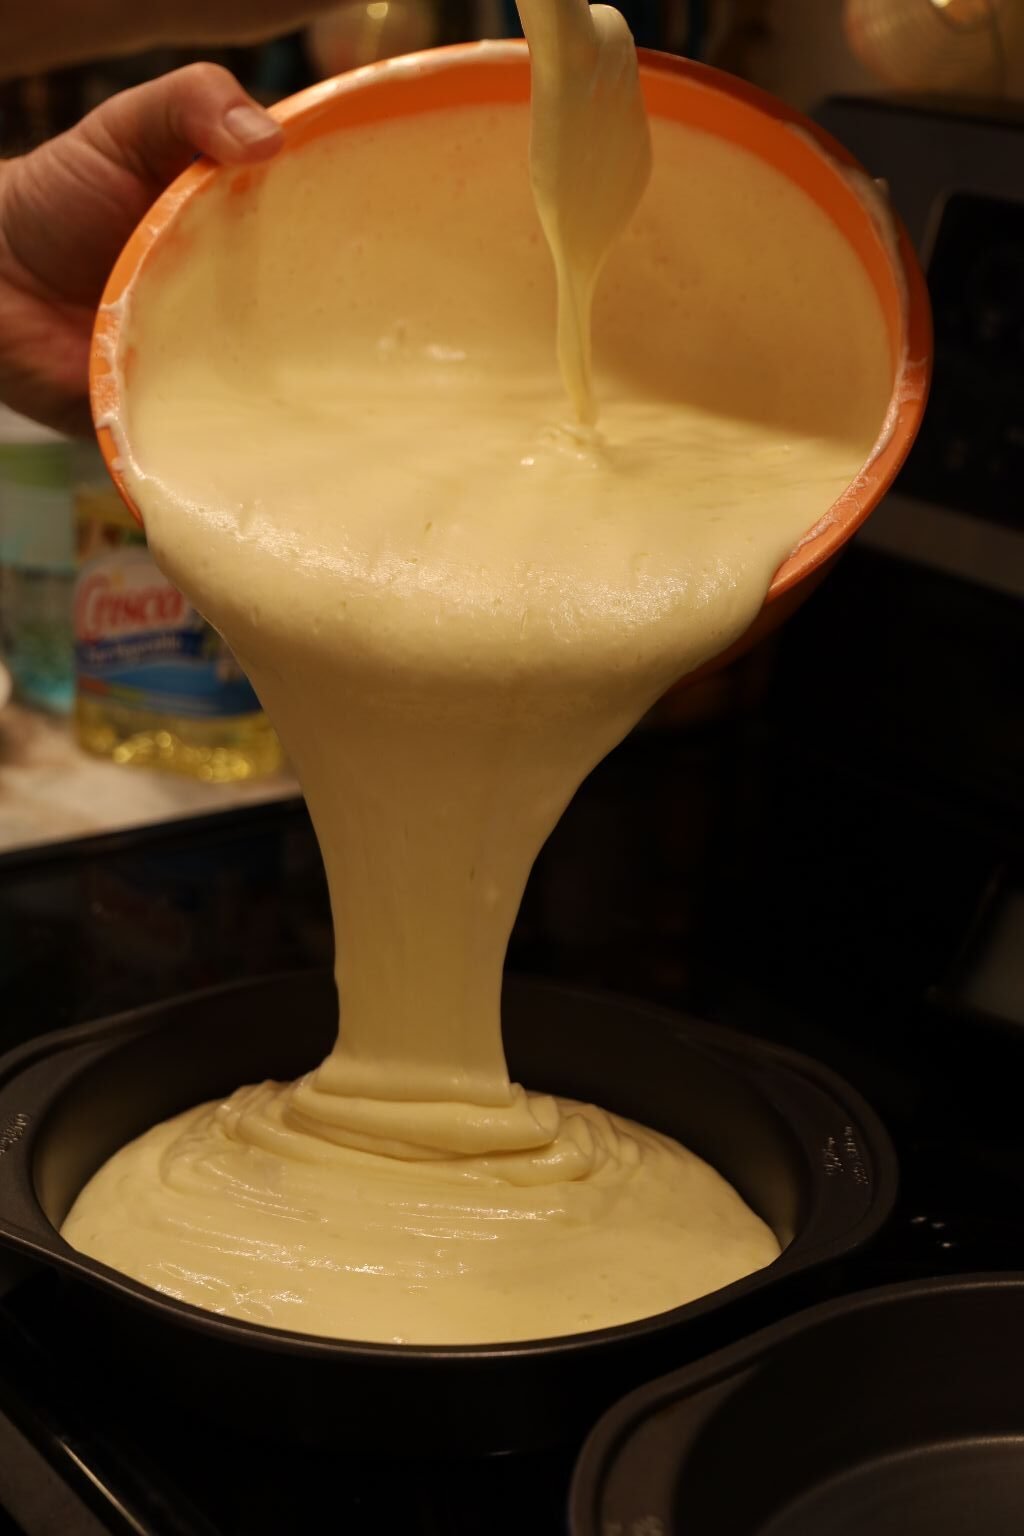
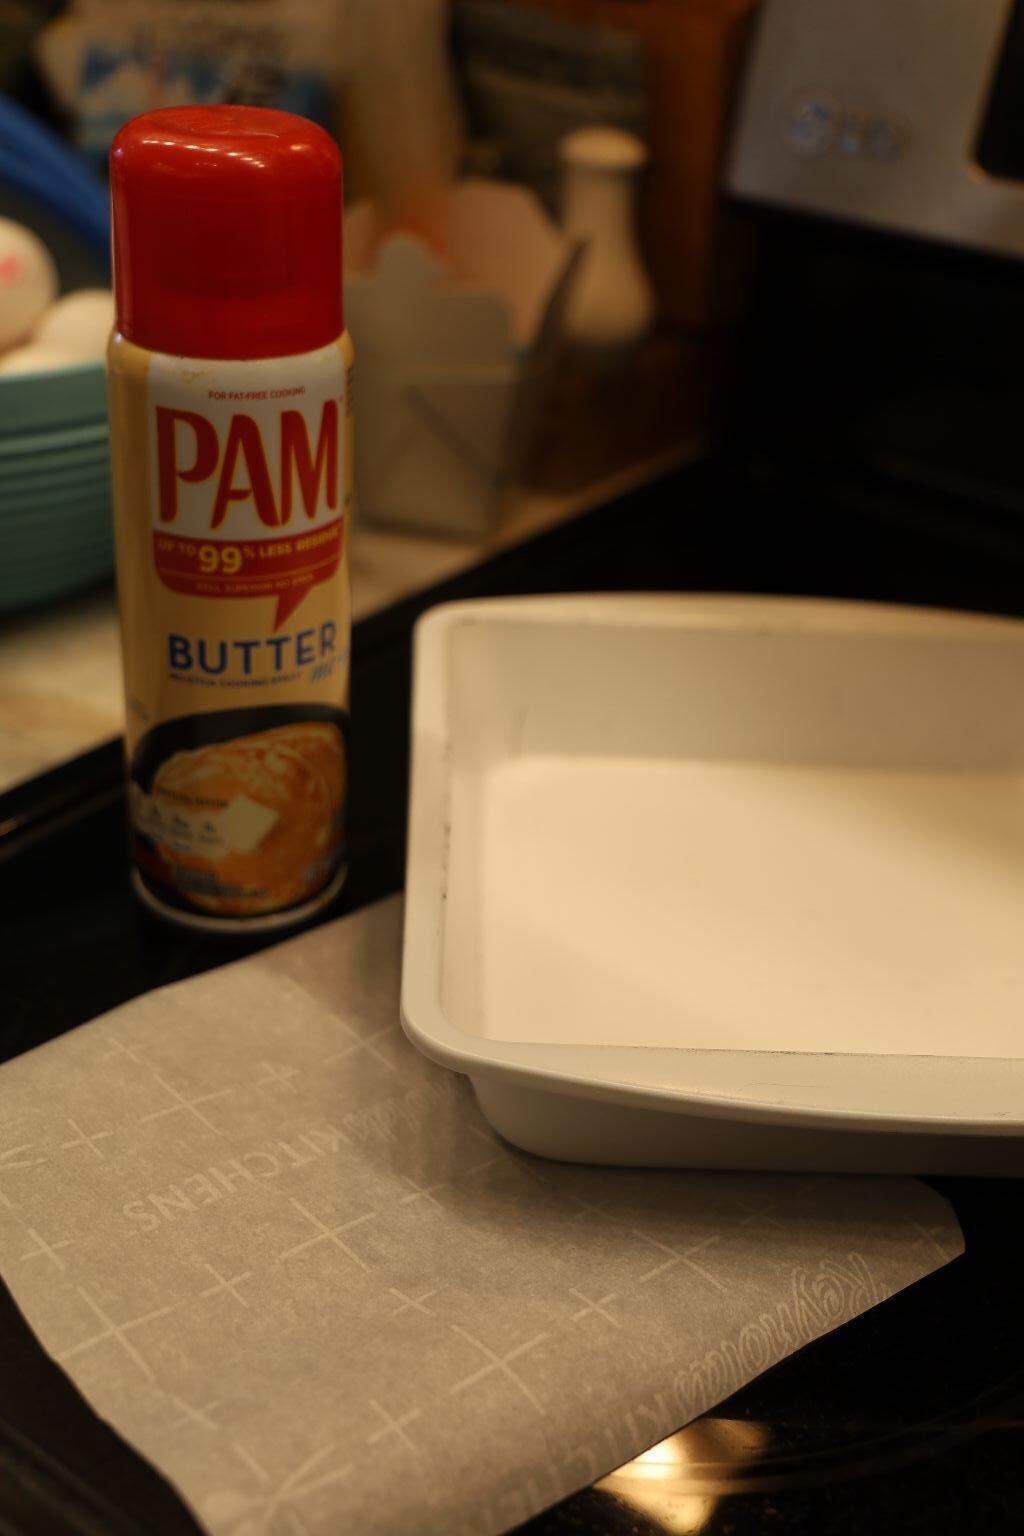
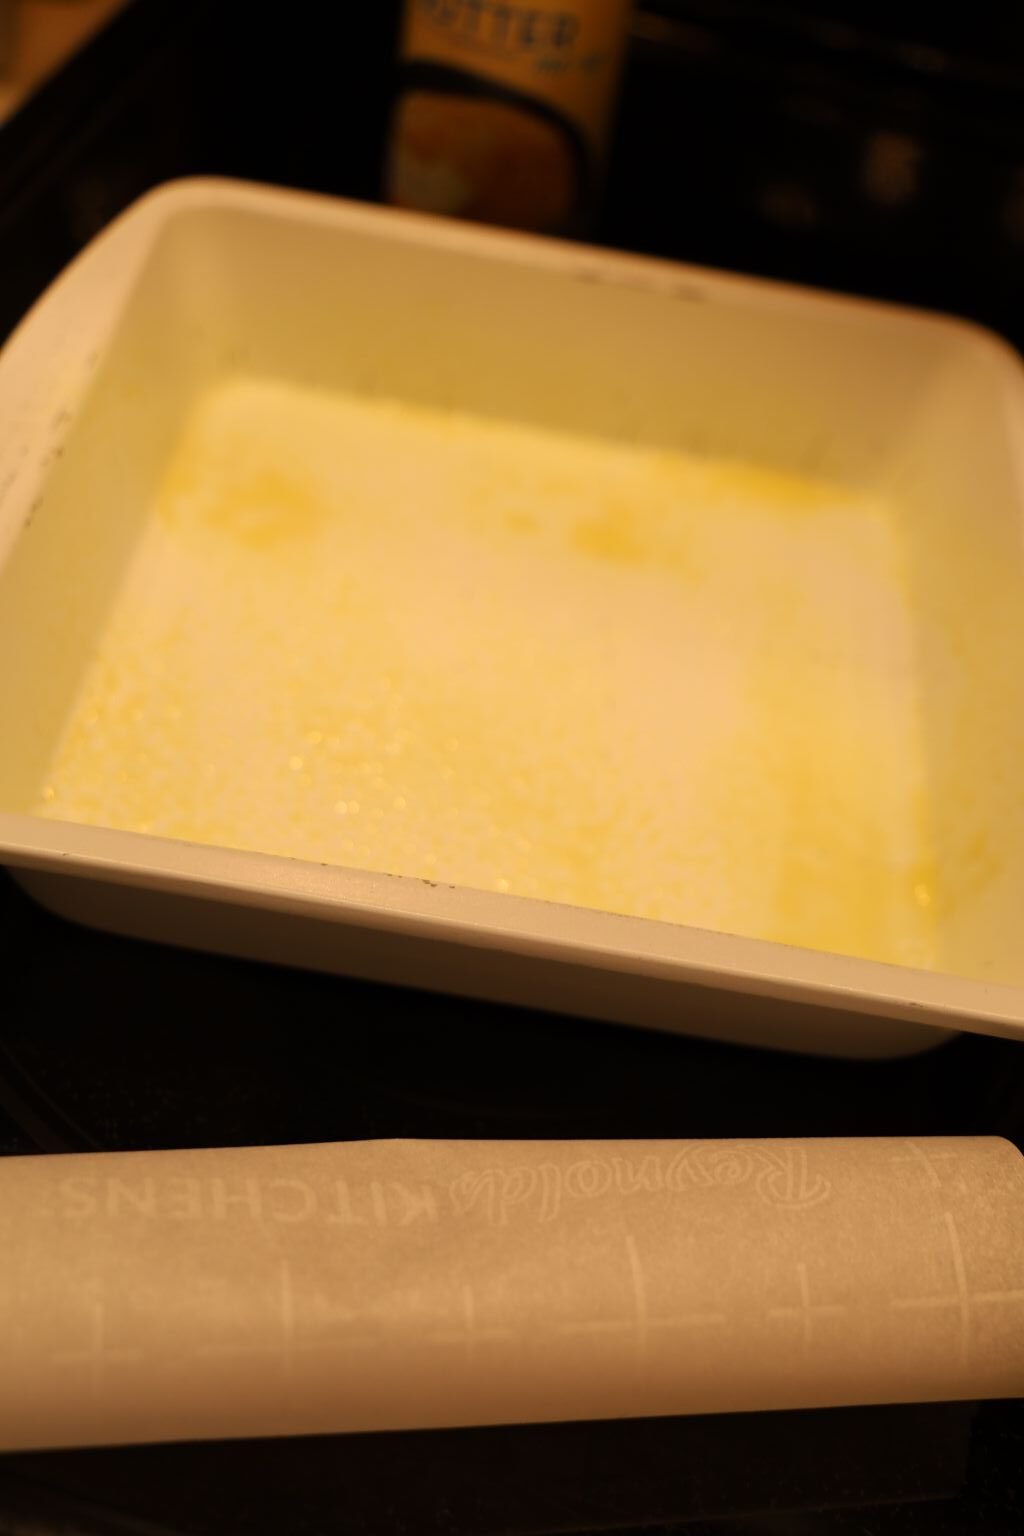
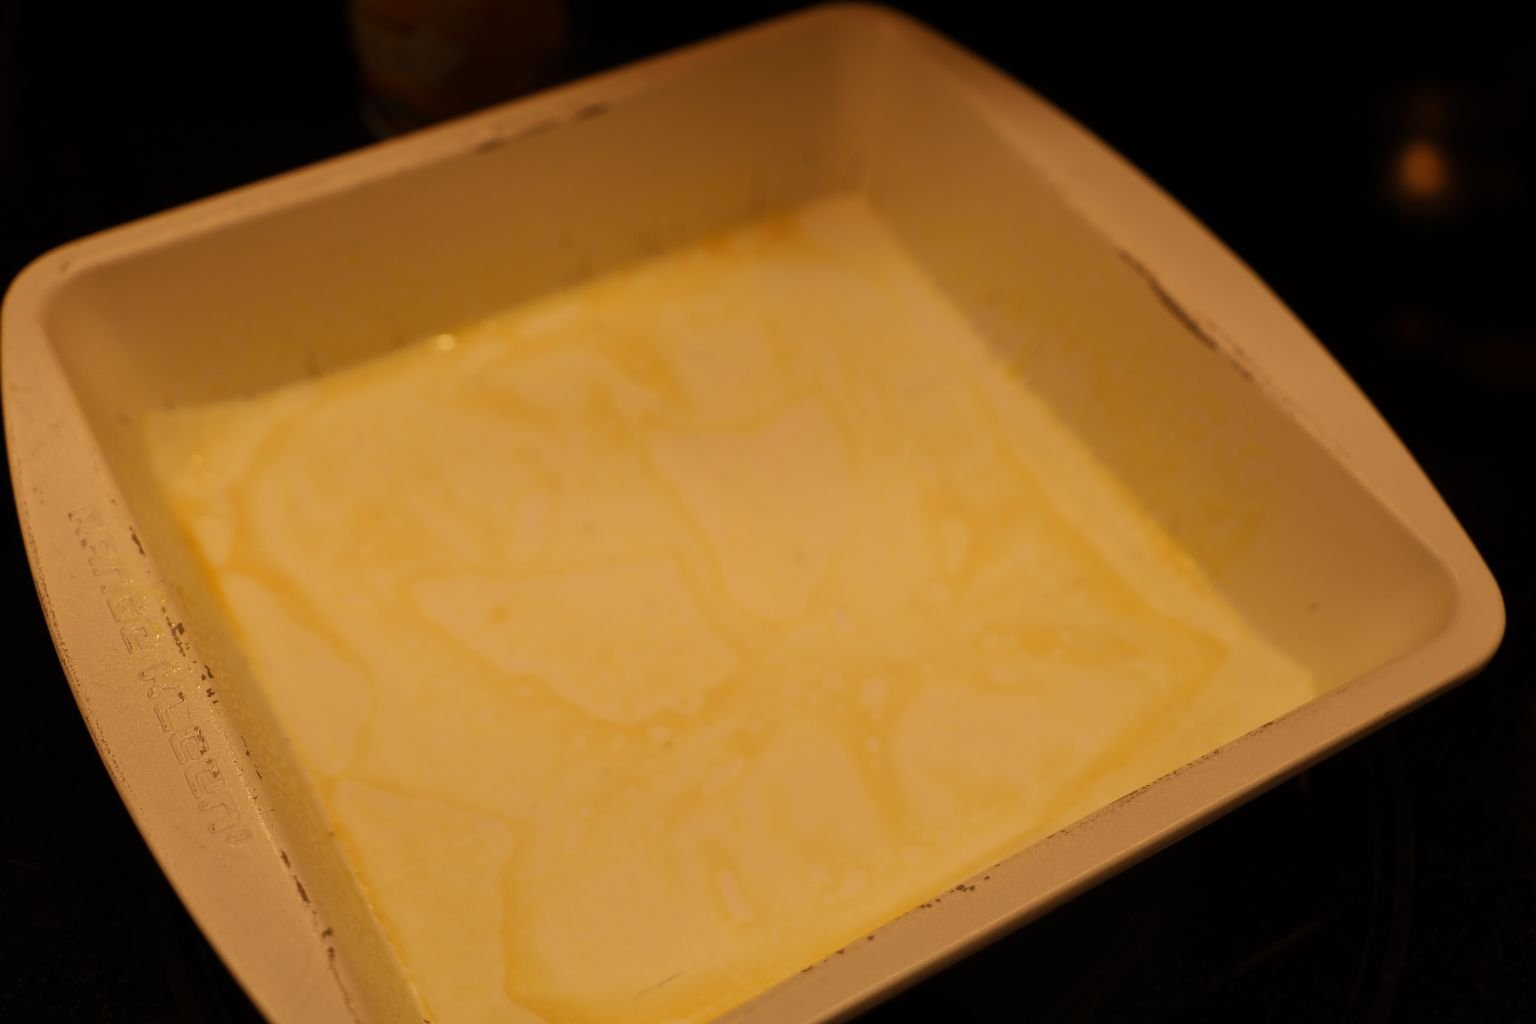
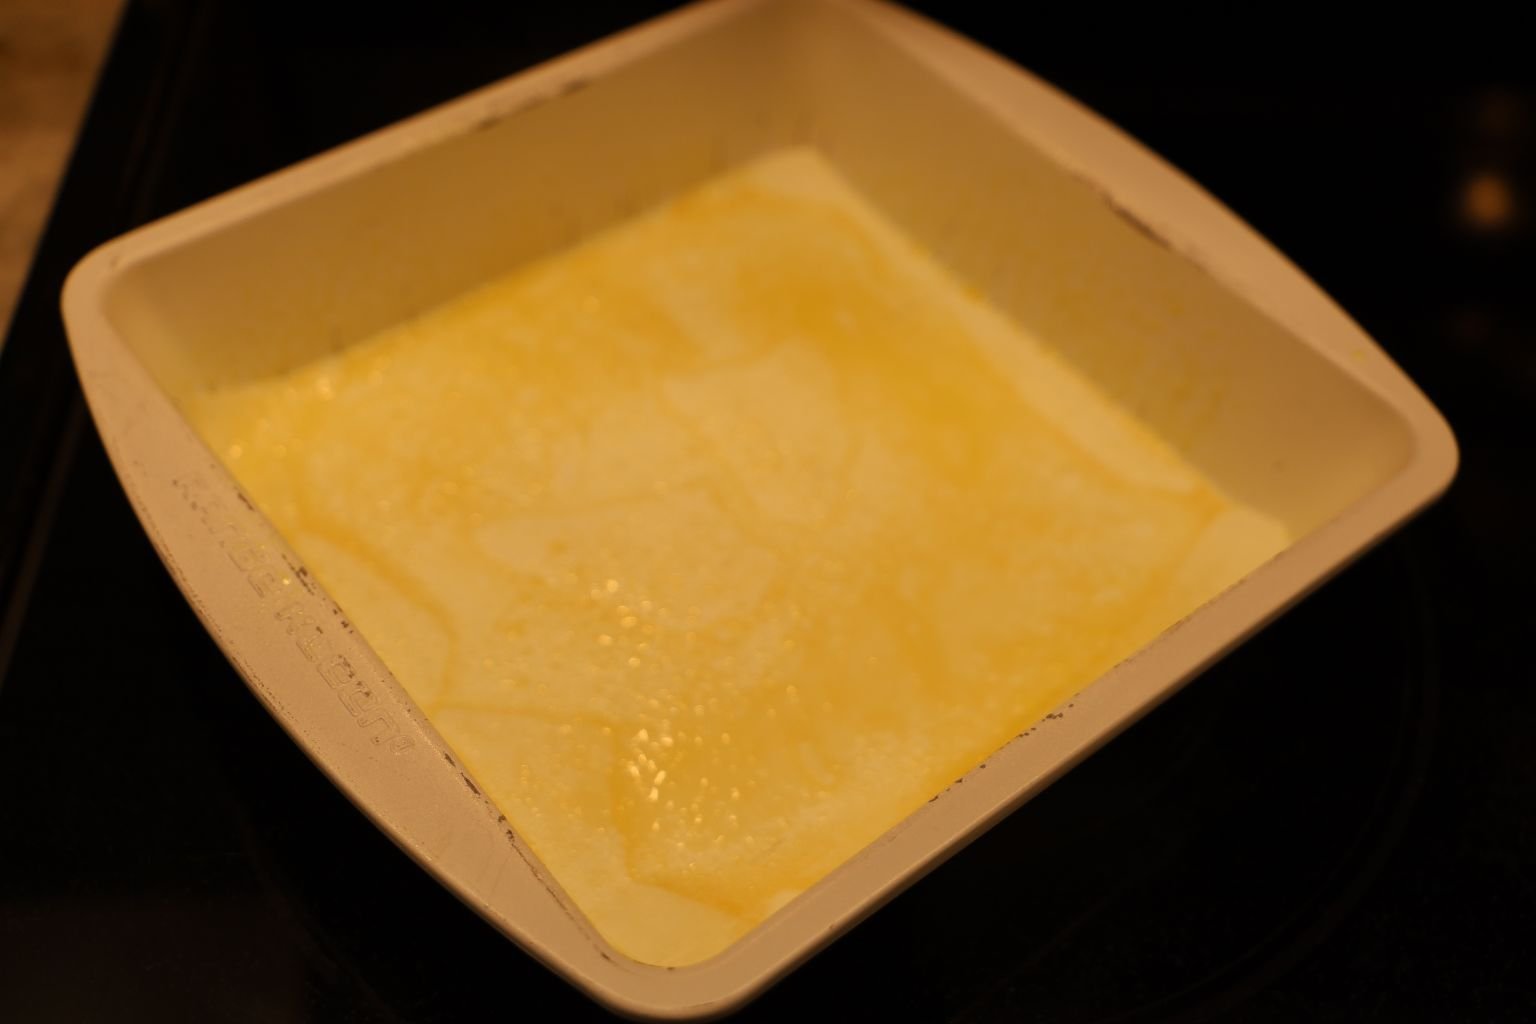
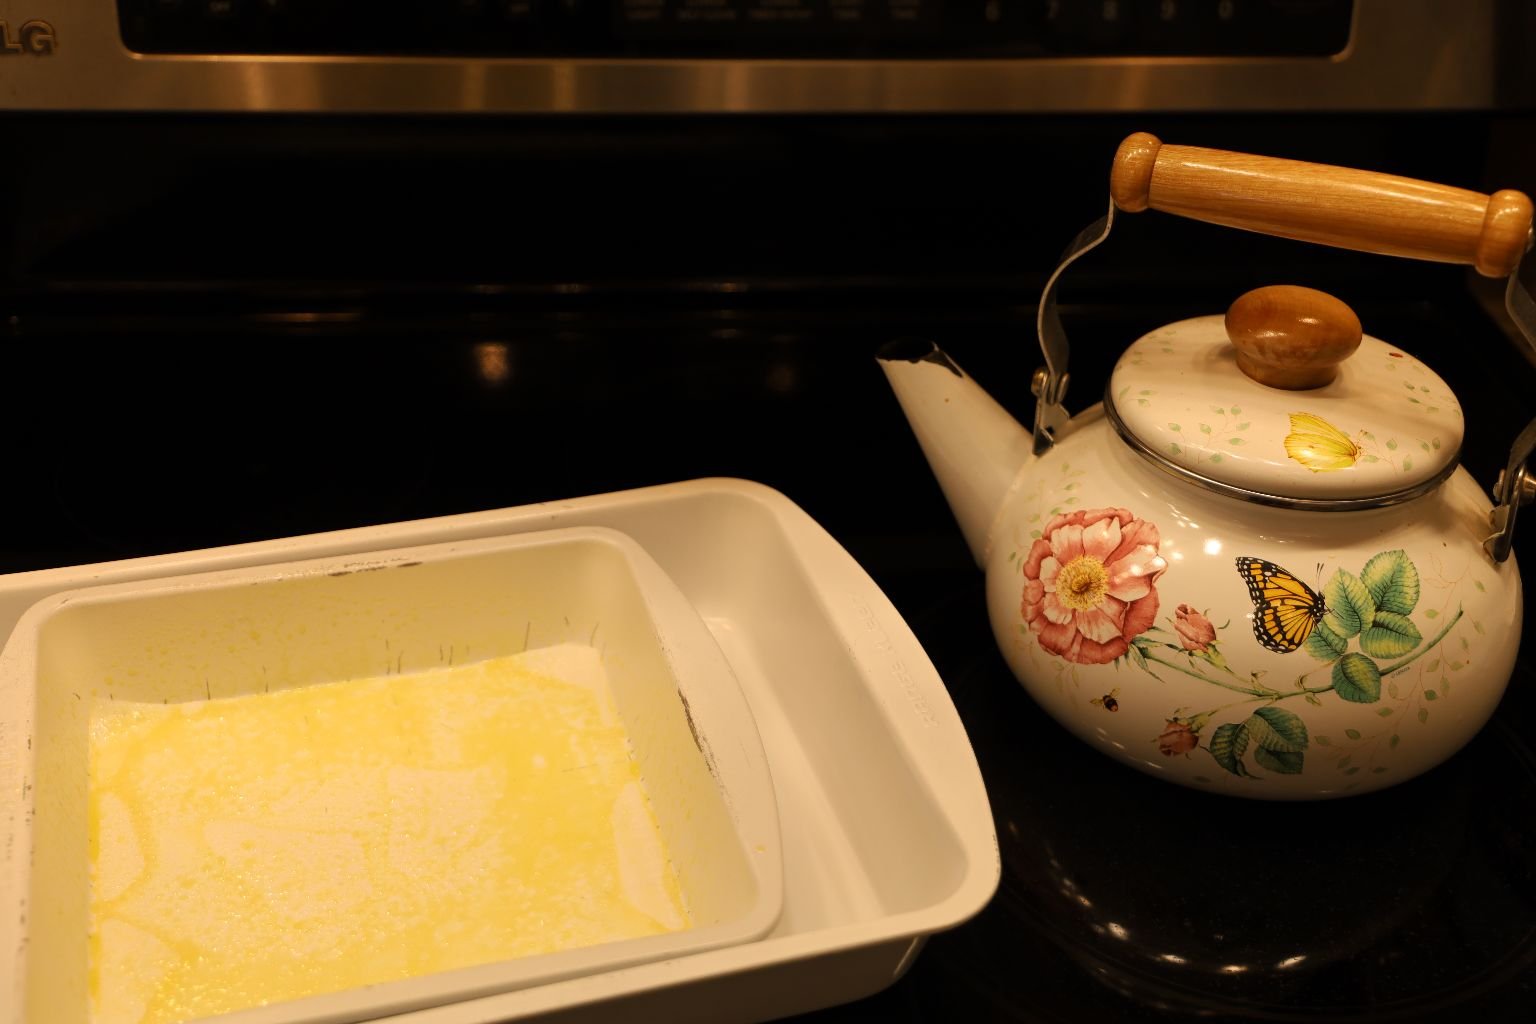
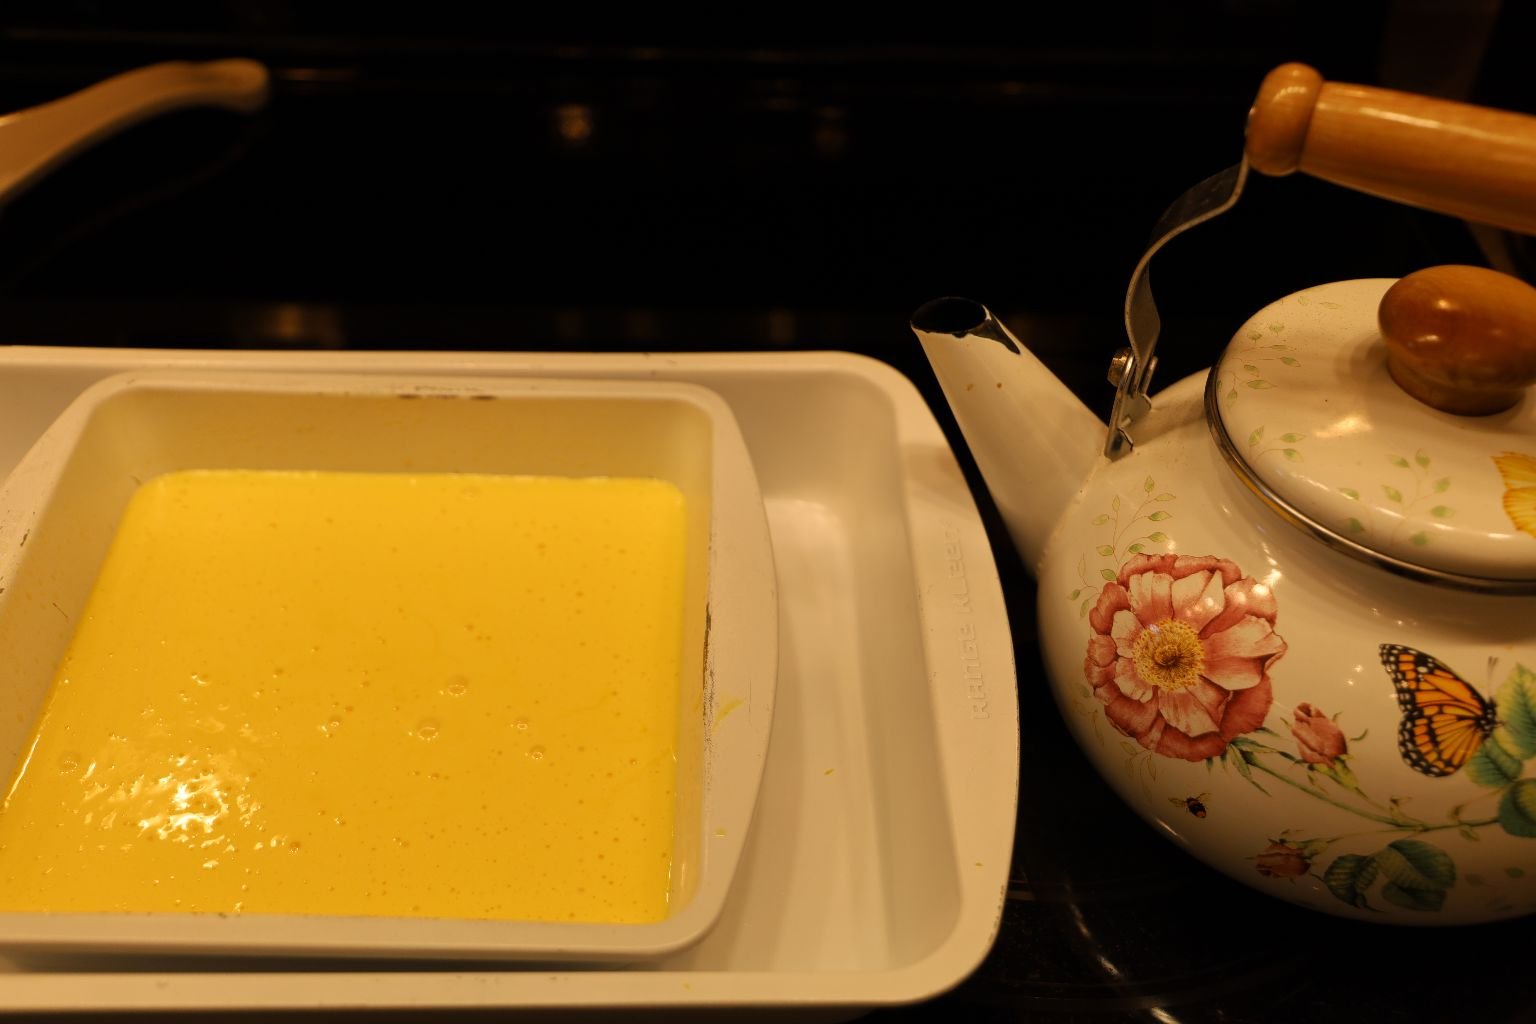
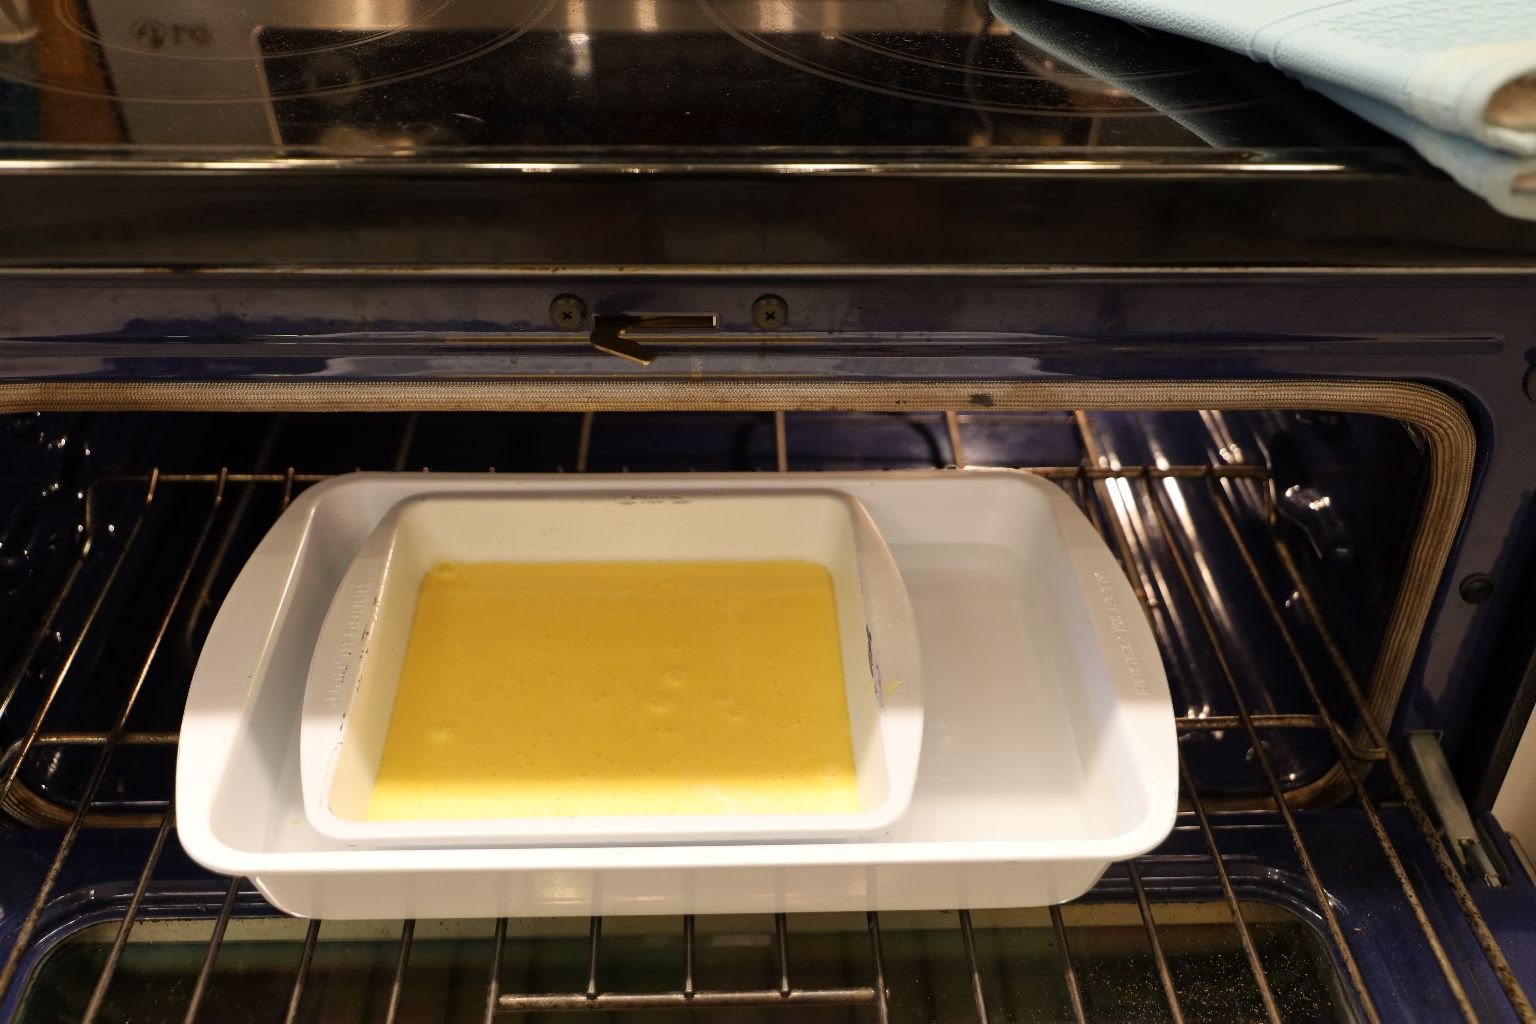
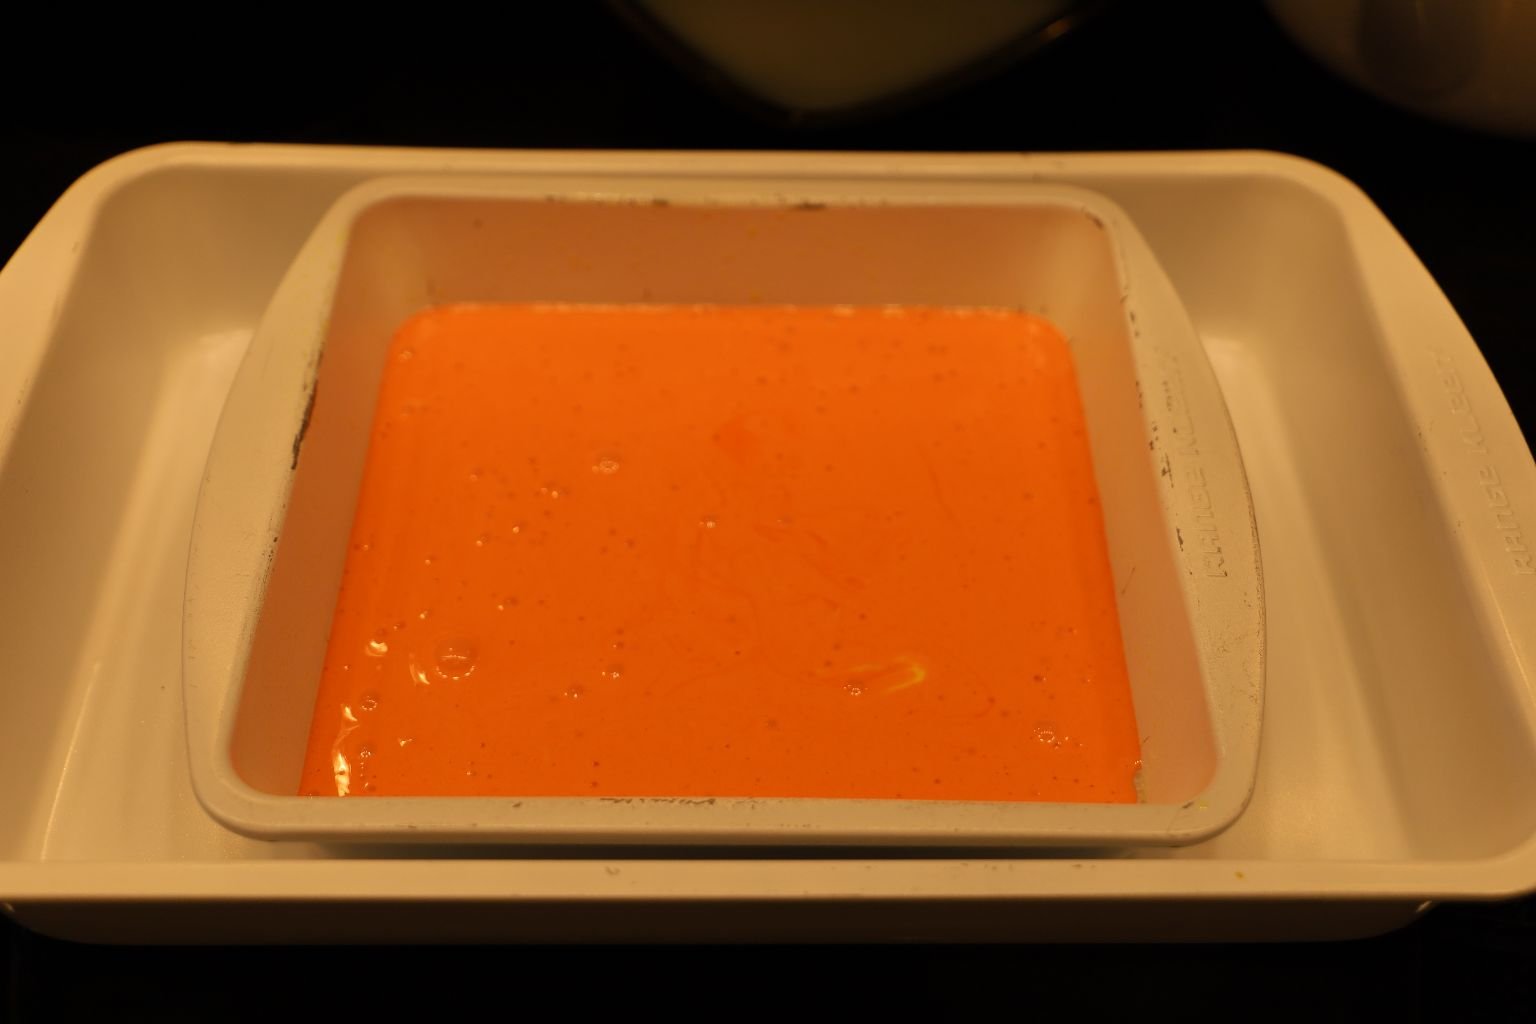
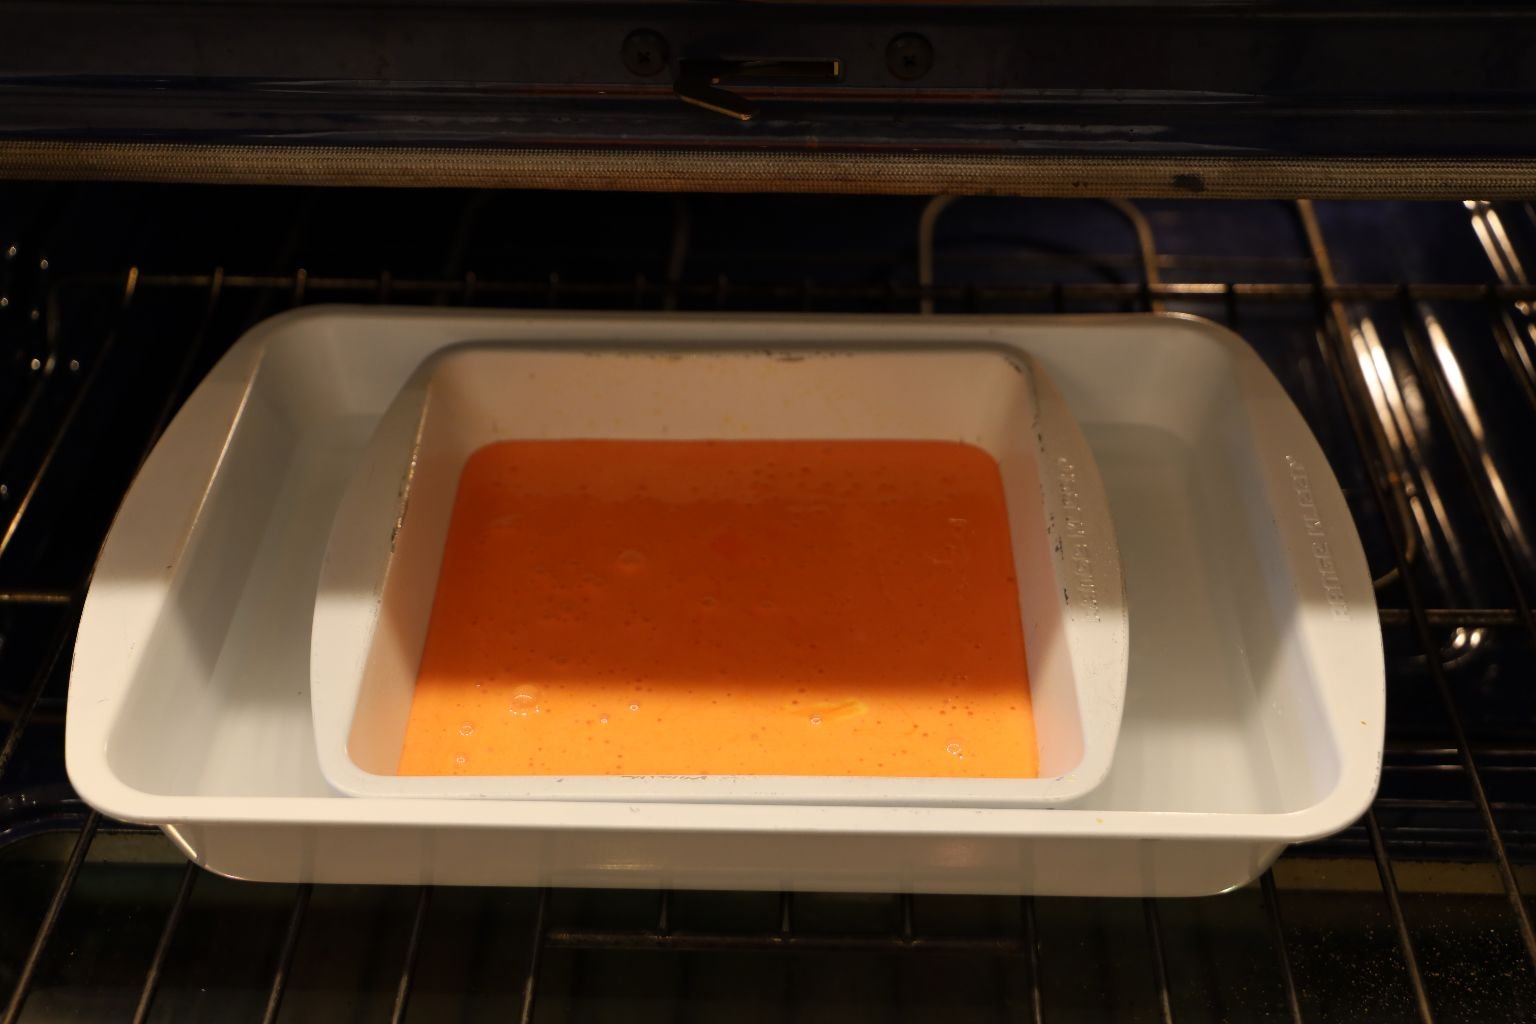
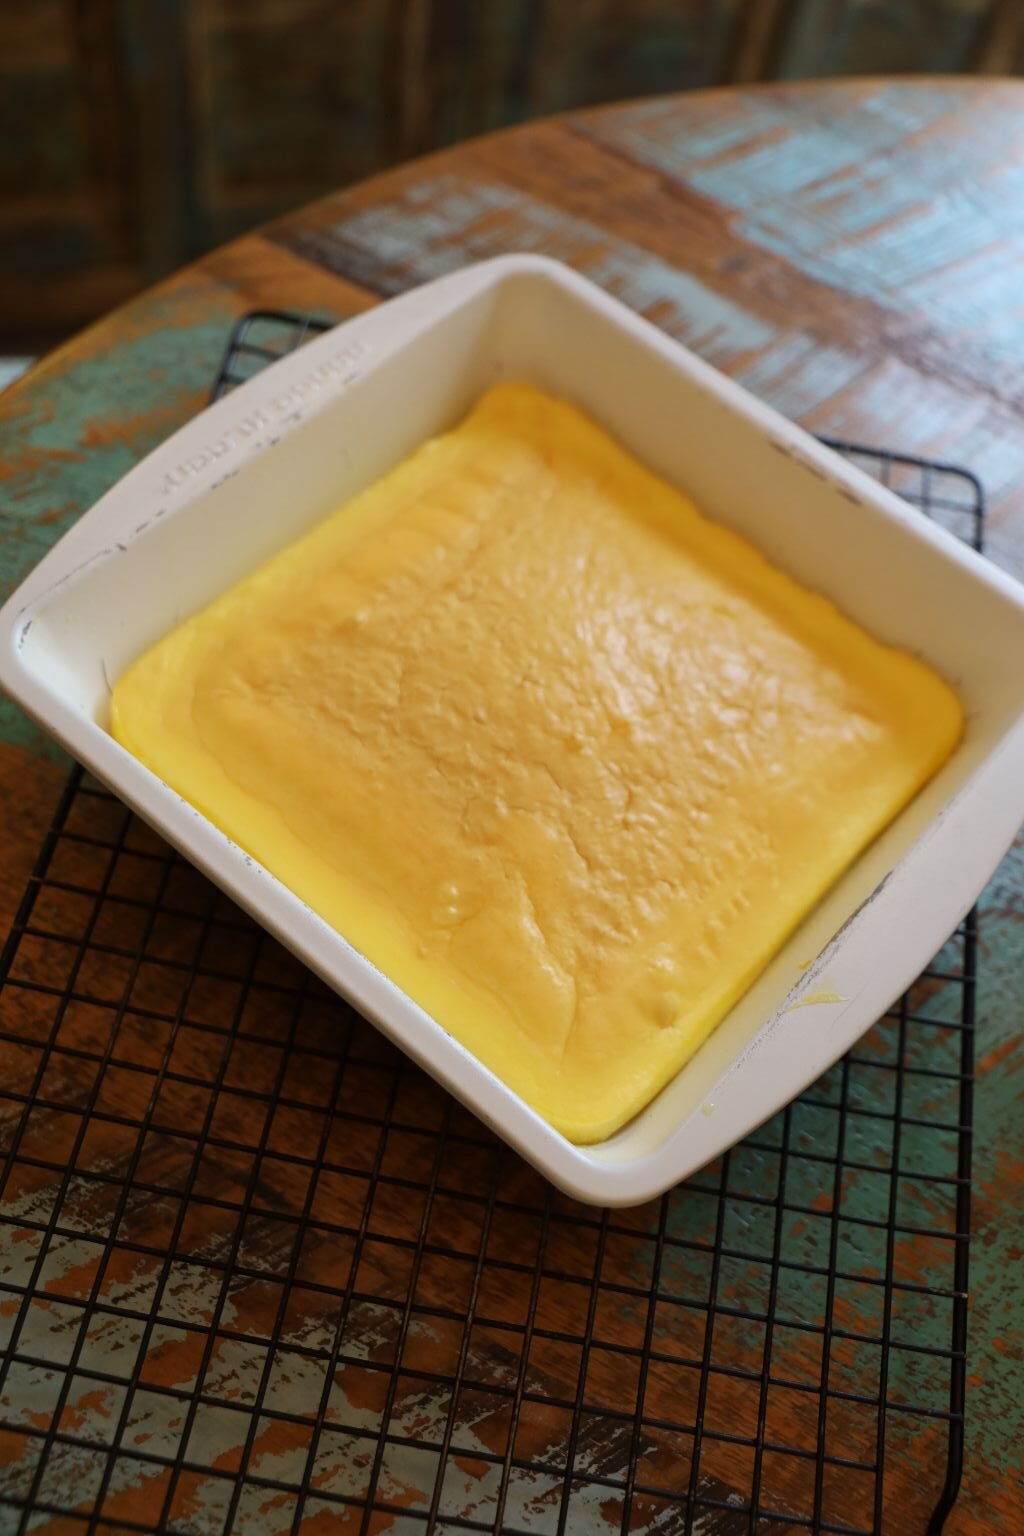
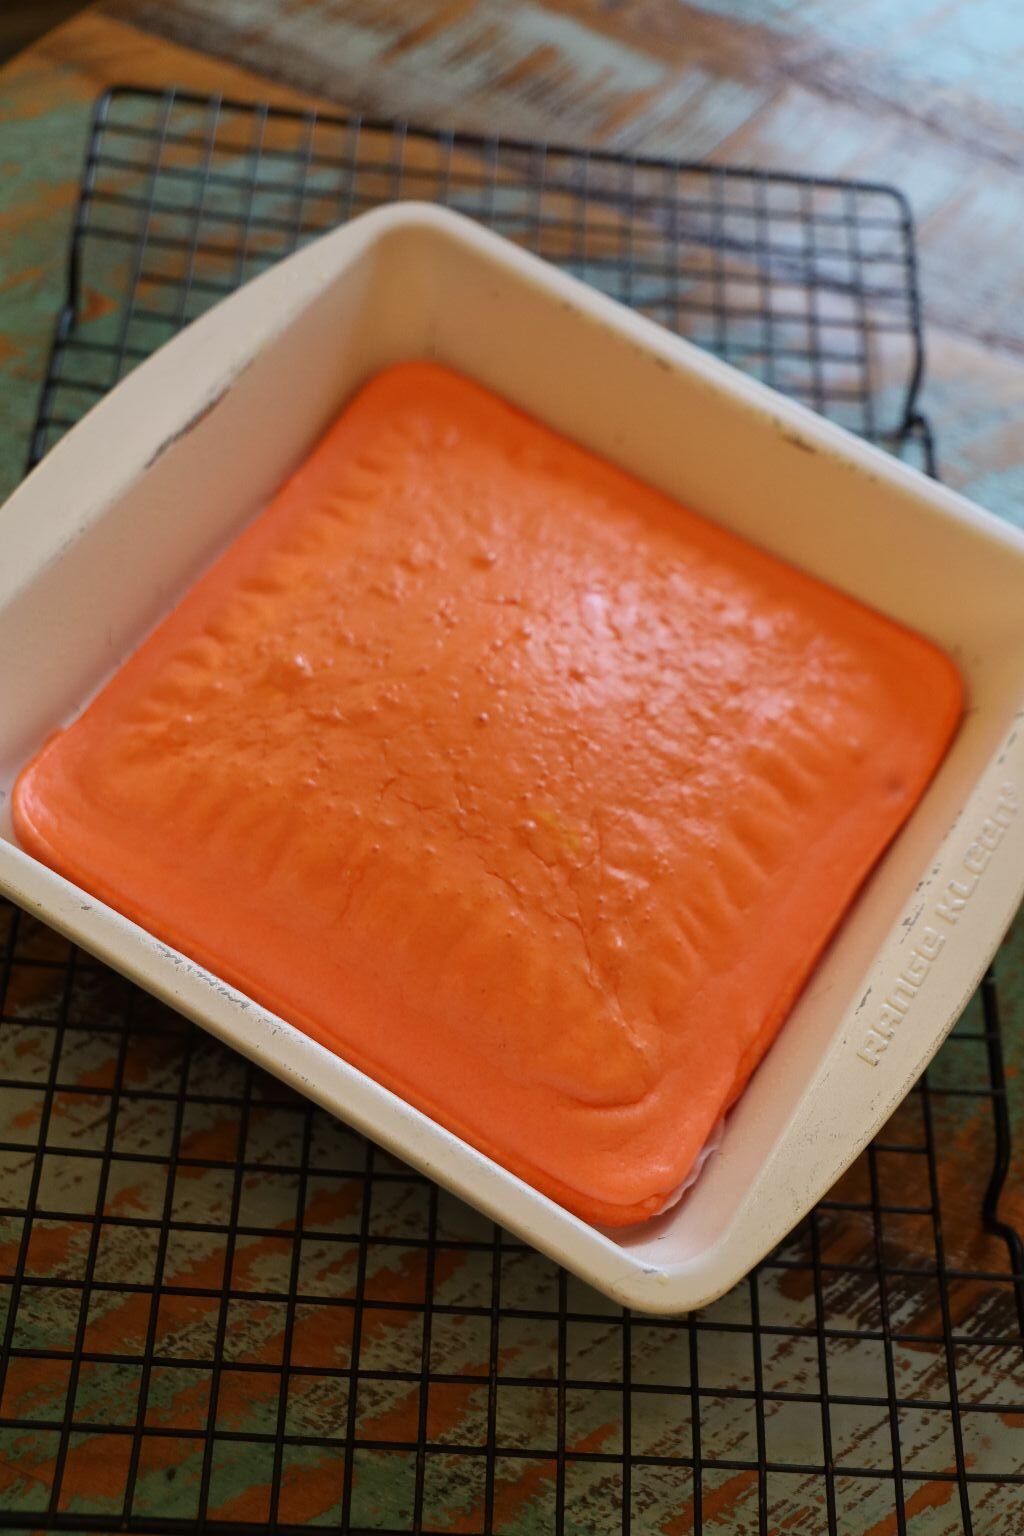
Preheat your oven to 350’F. Pour this mixture into a greased 13 x 9 x 2 inch baking pan. In this recipe, we used three 9 x 1/2 inch round cake pans. We also used ungreased pans and had difficulty removing the cakes. (We followed the vintage recipe and it said not to grease them.)
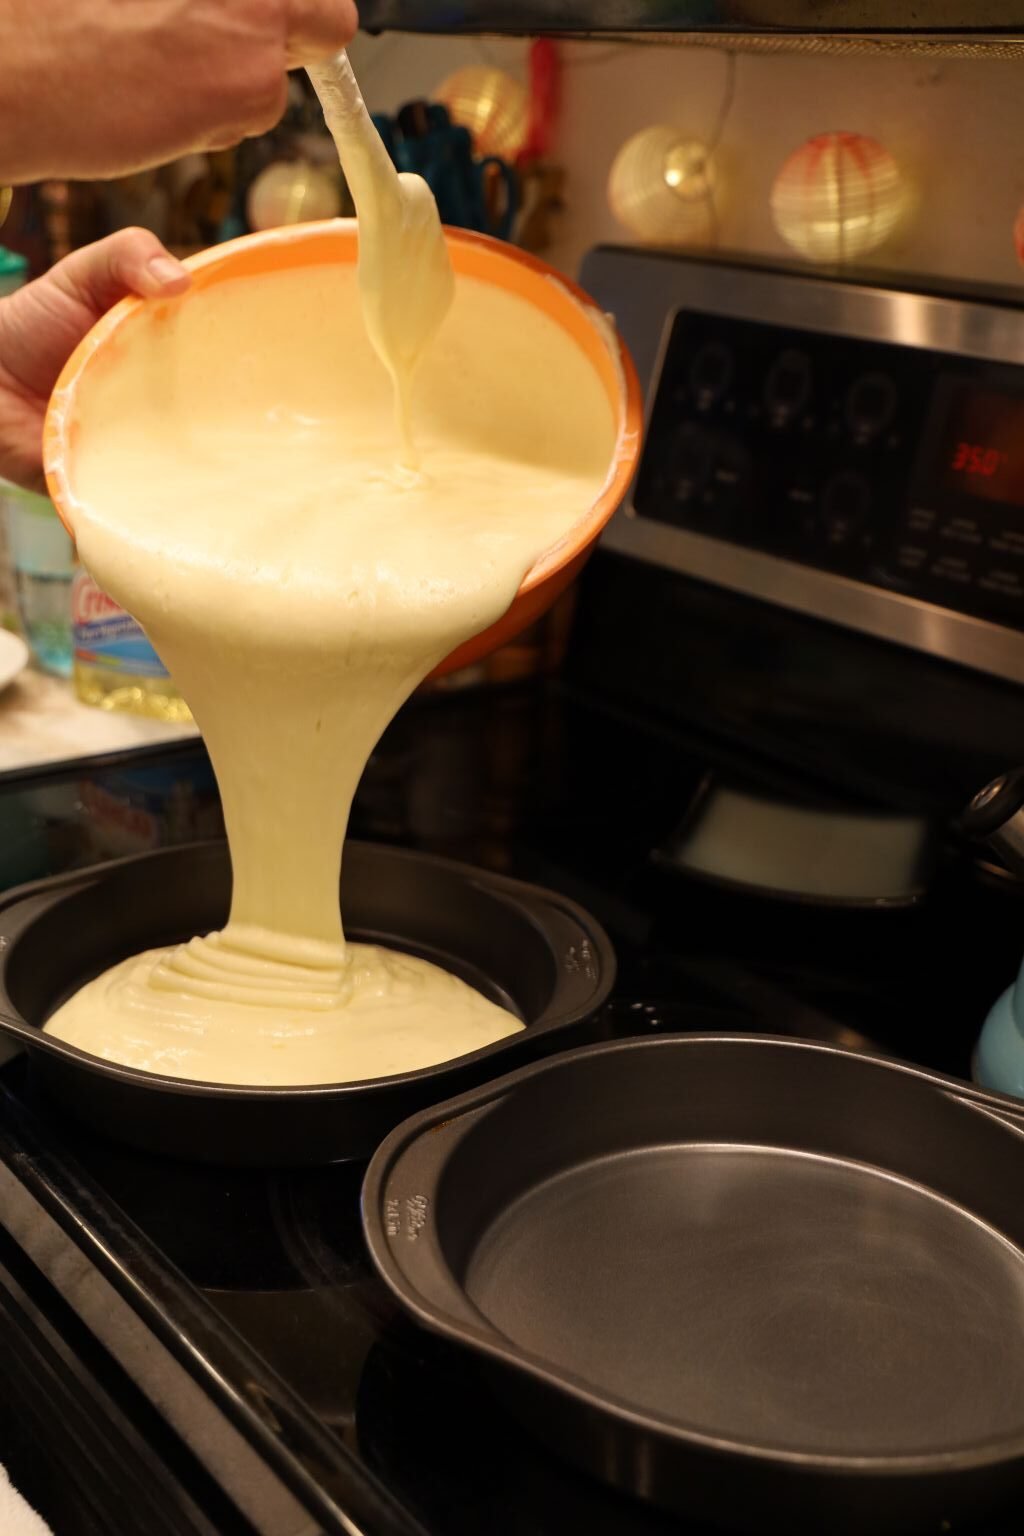
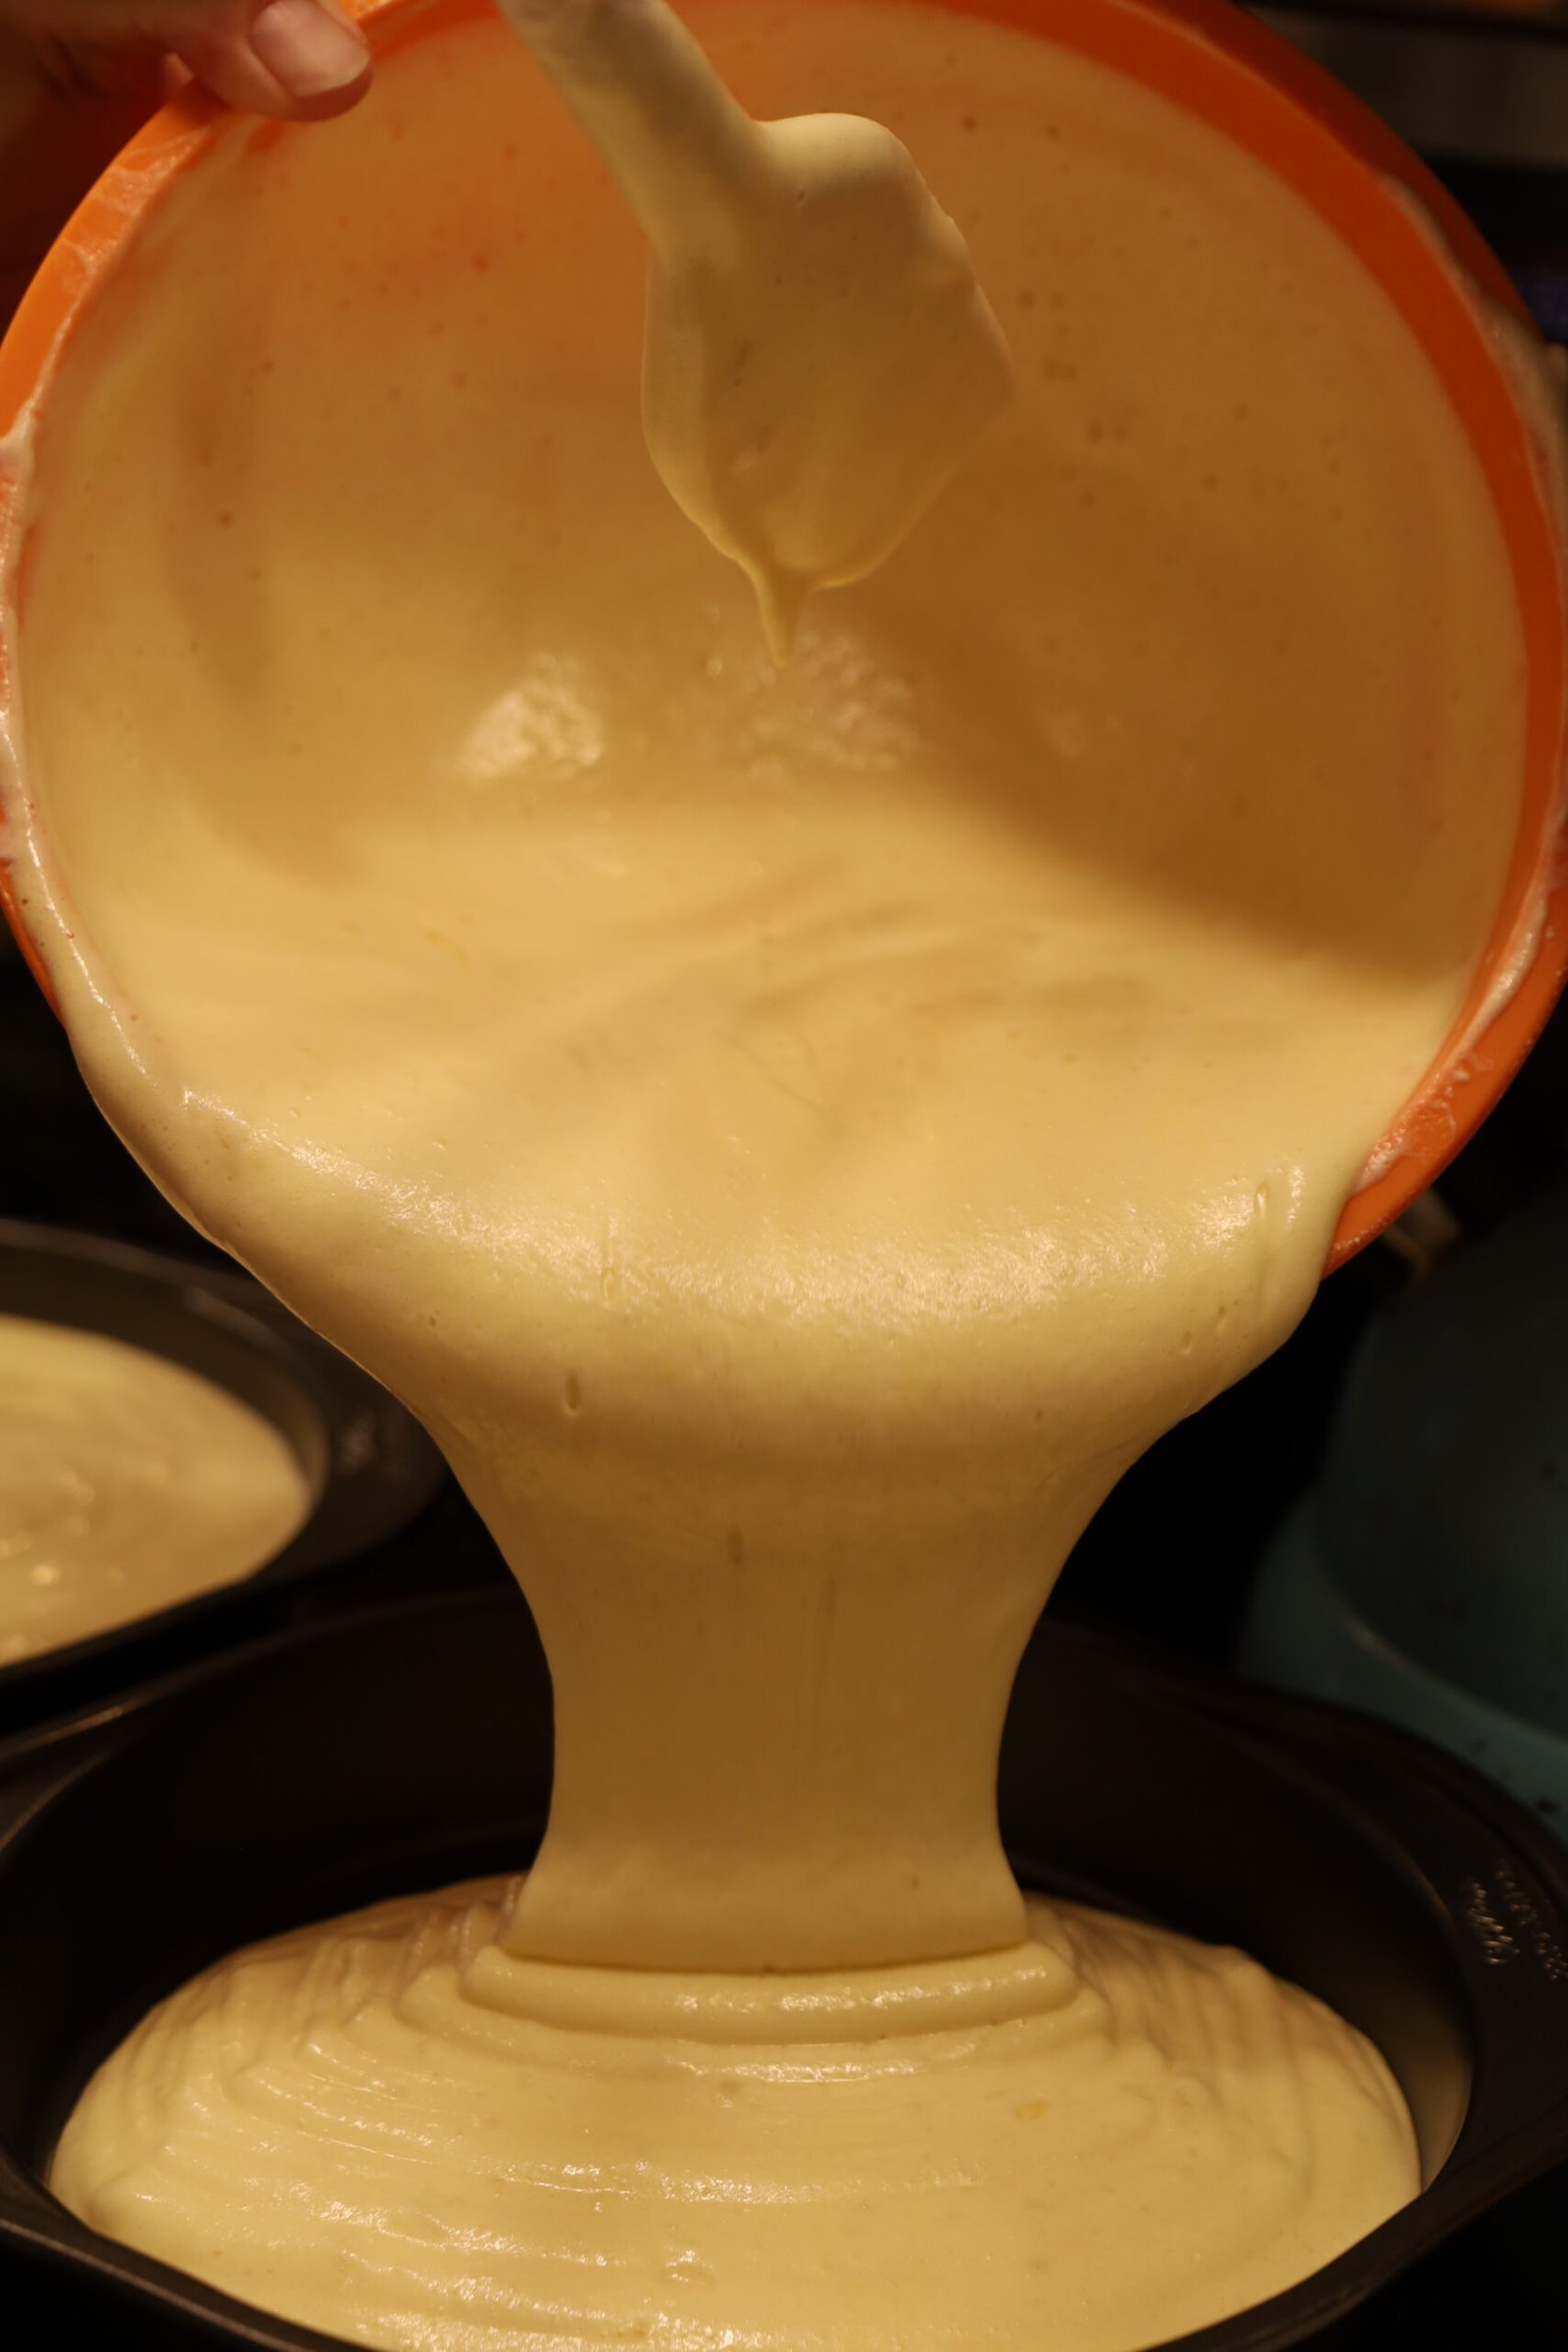
As best you can, evenly pour the cake mixture into each pan.
——————————————————————————————
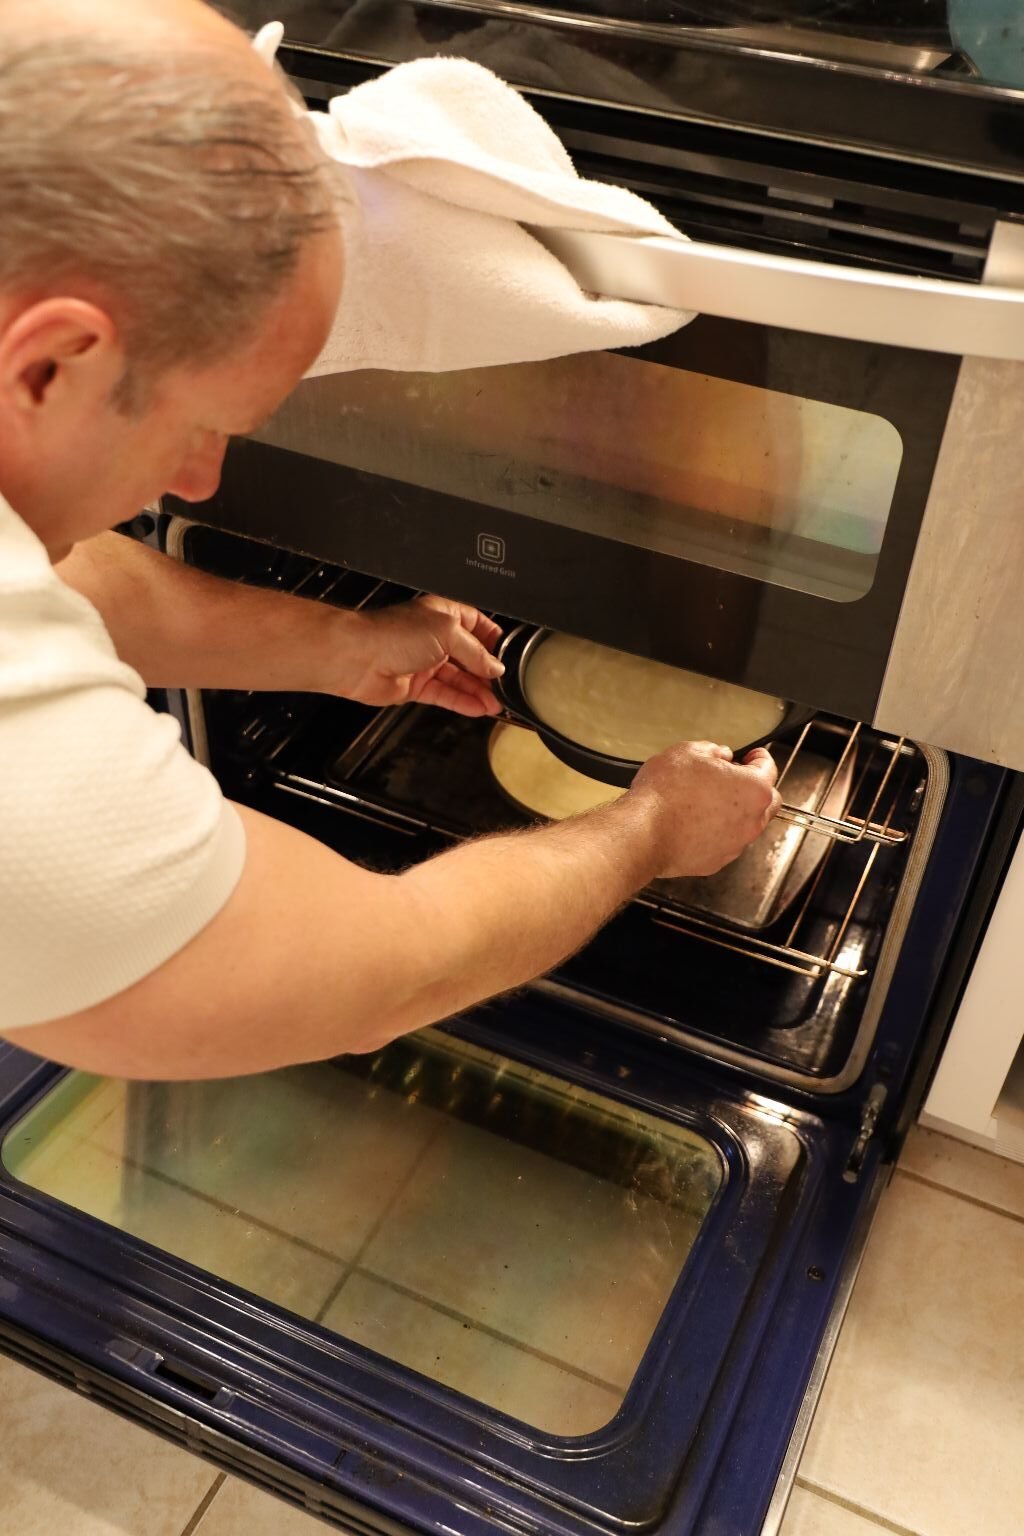
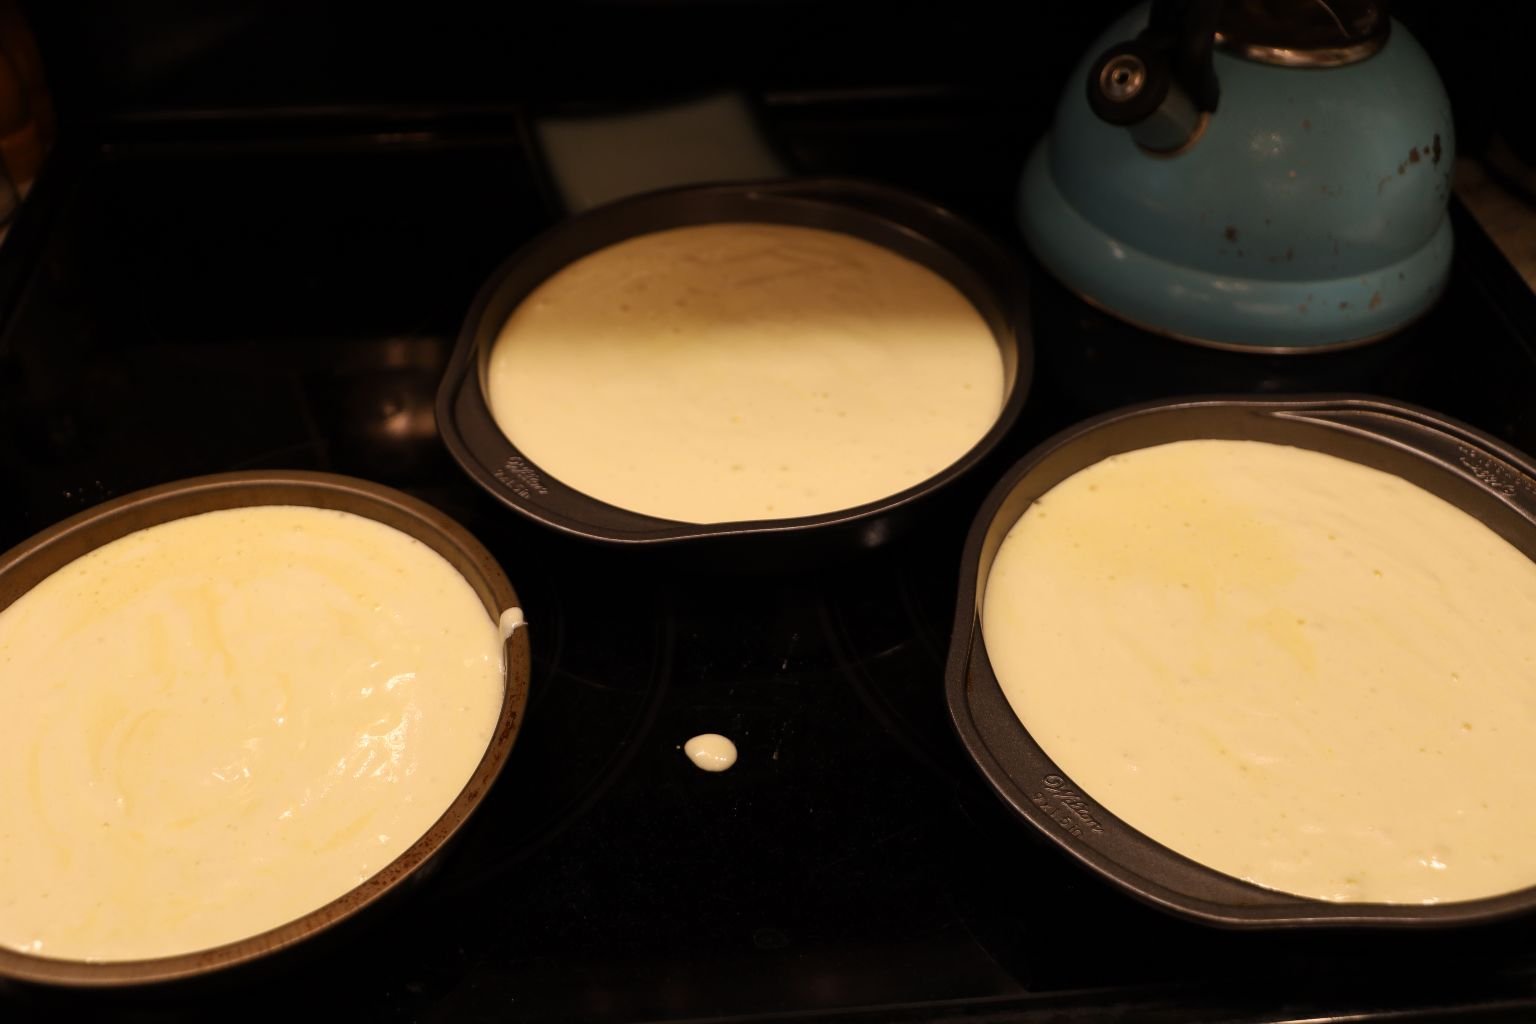
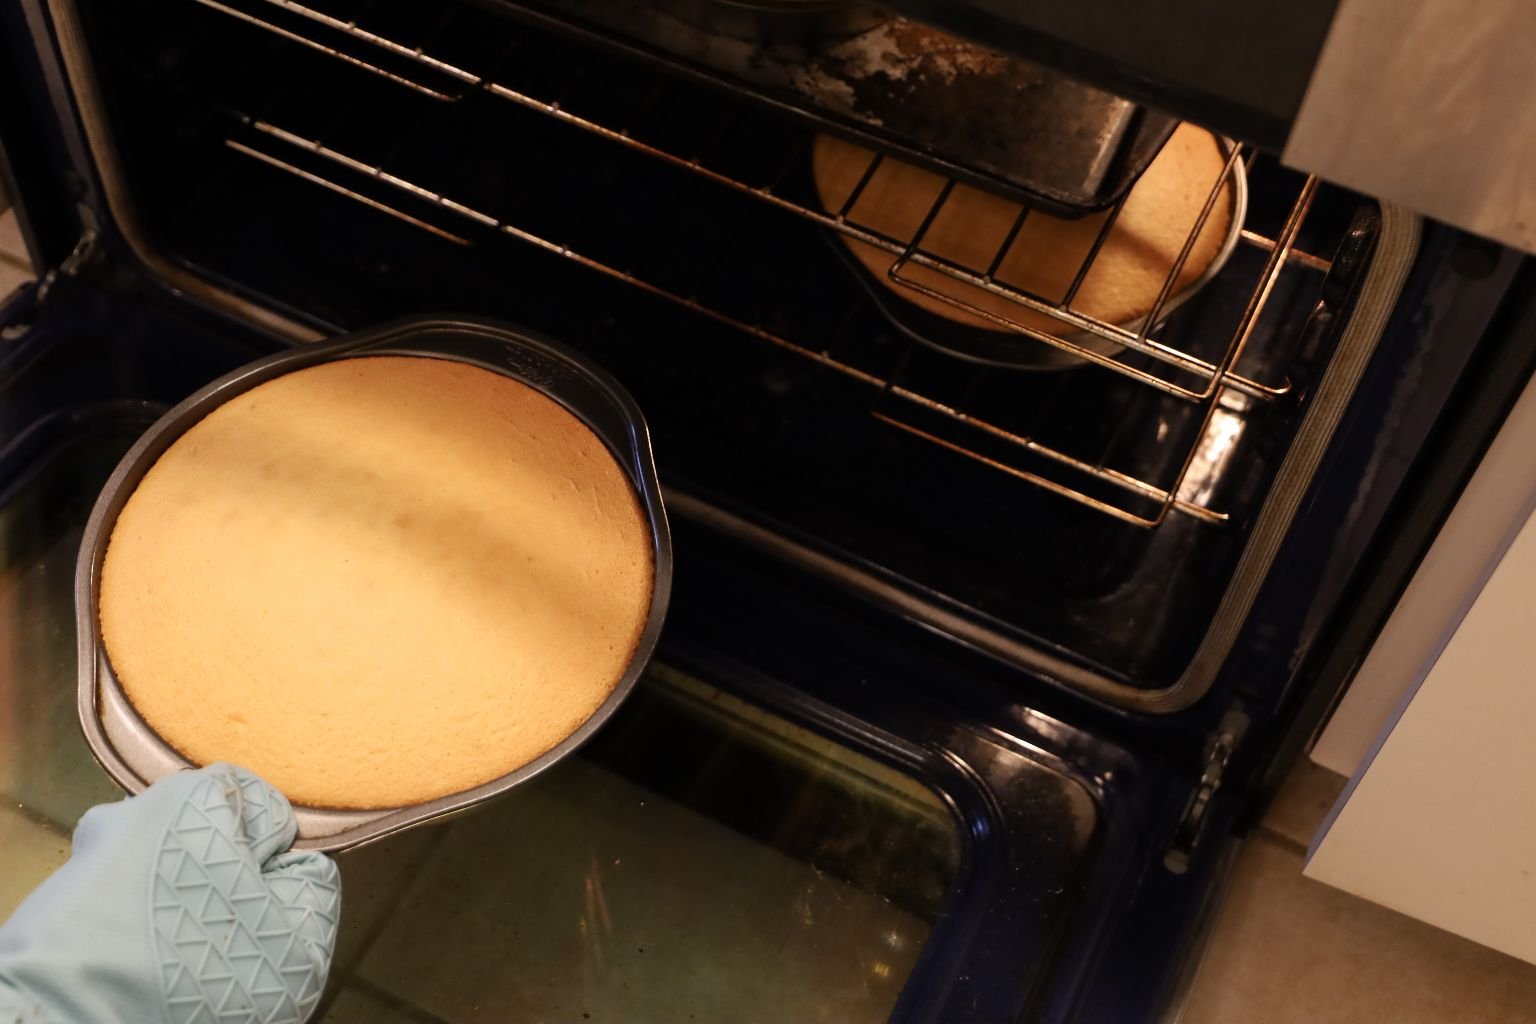
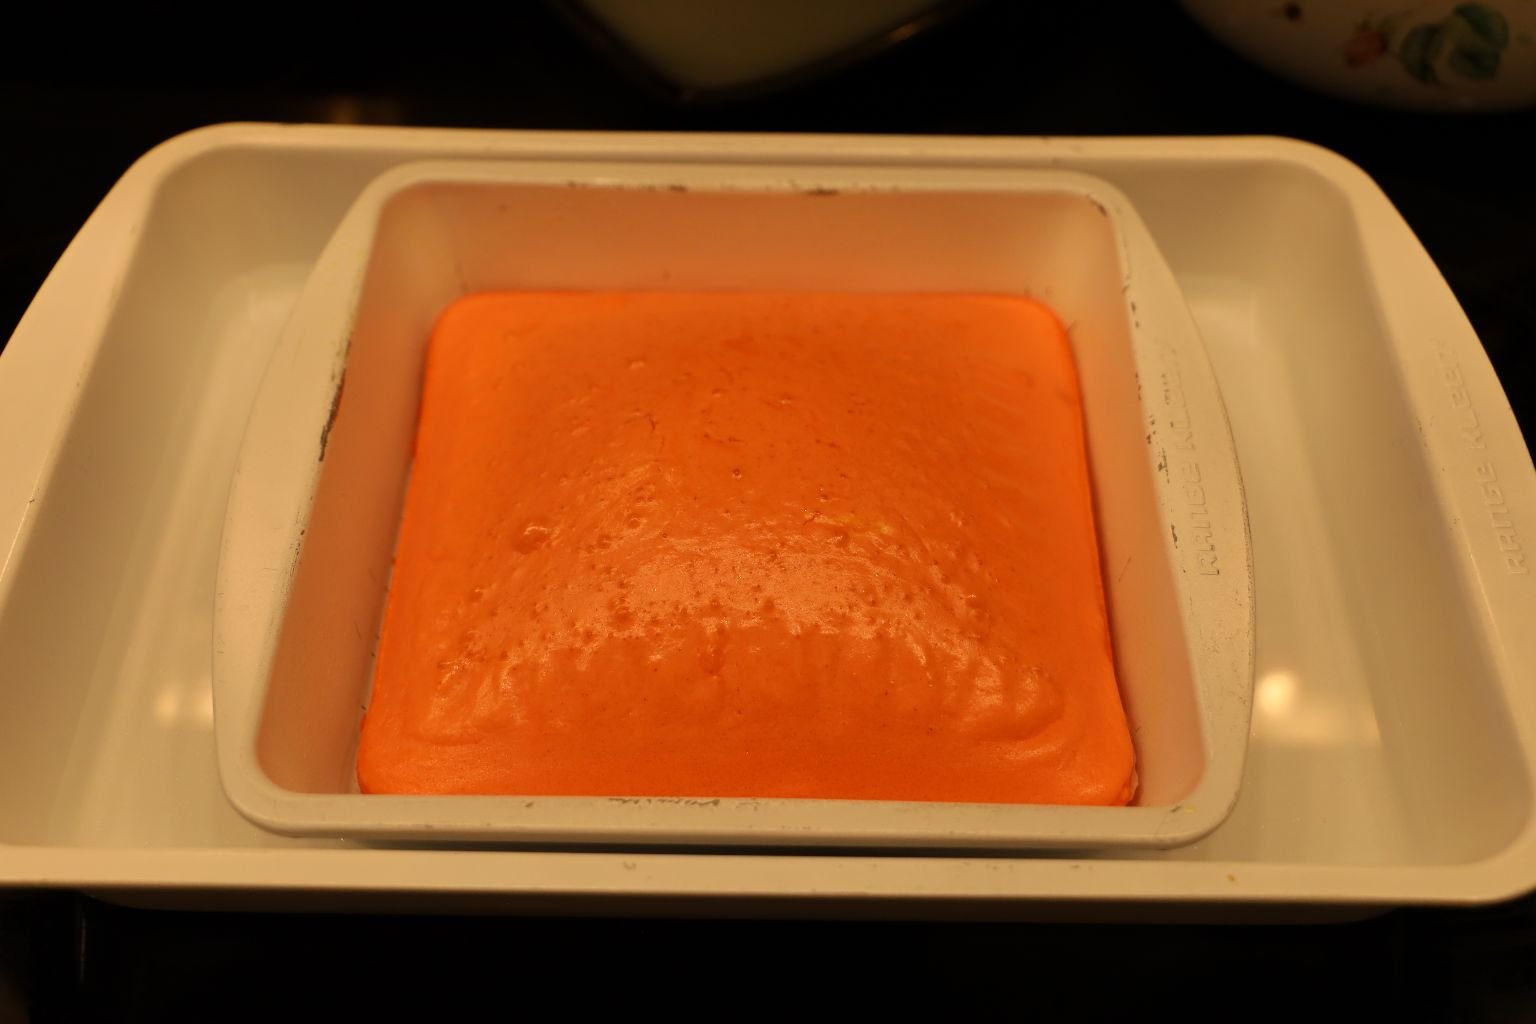
Place all three pans into your oven and bake them for about 35 – 40 min. or until done.
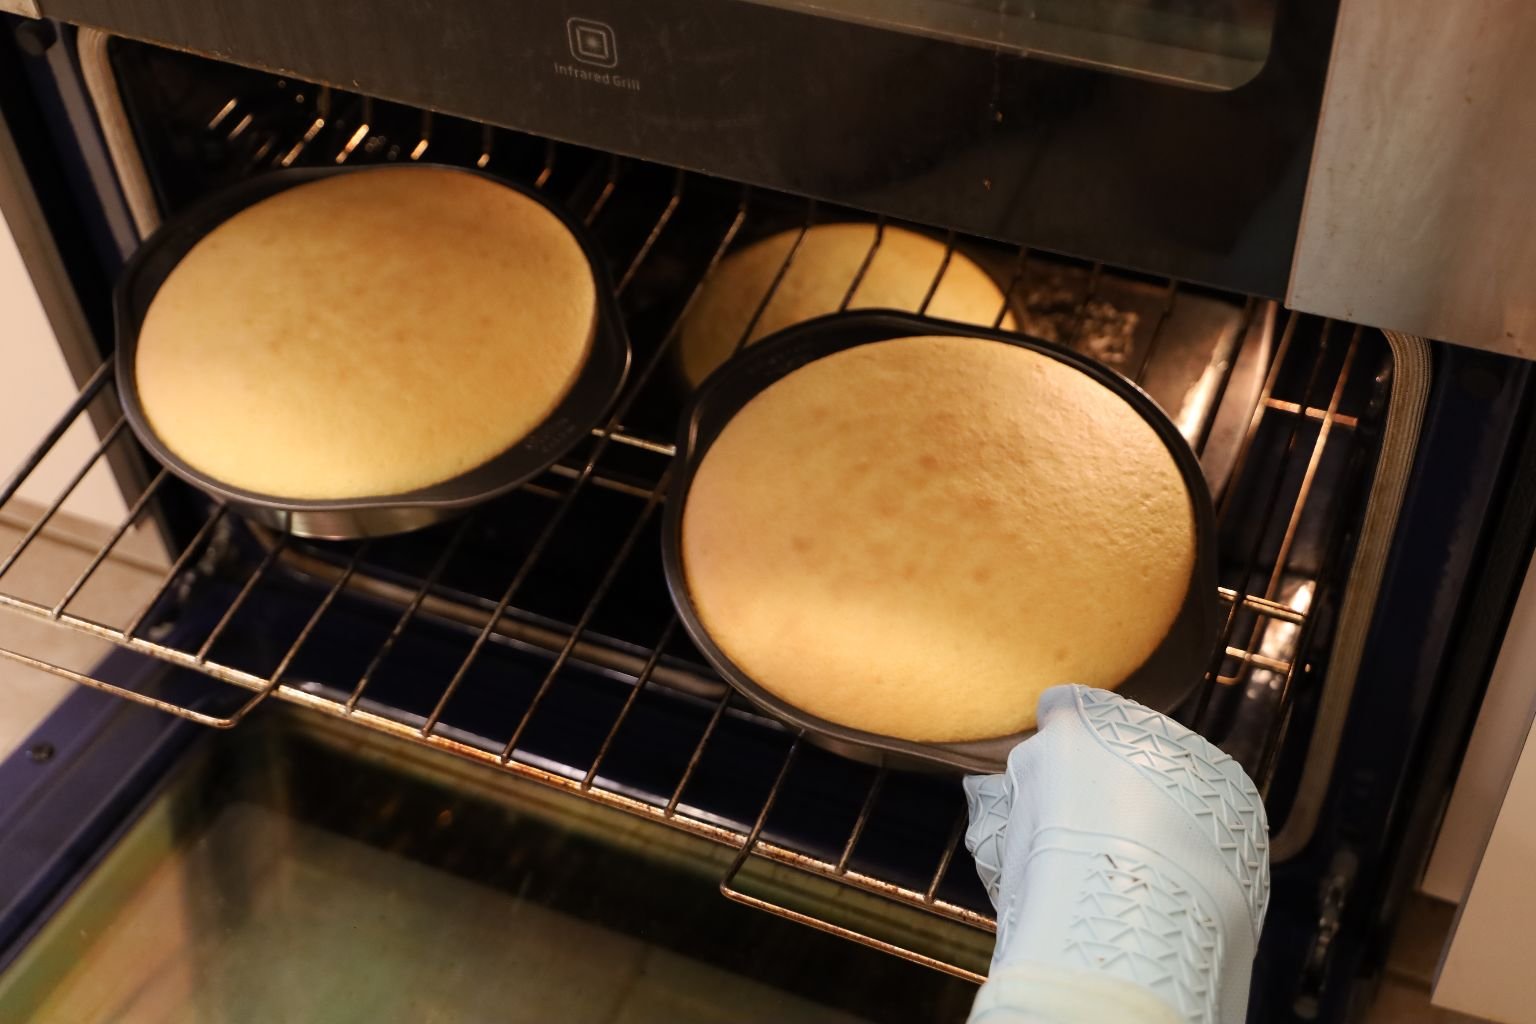
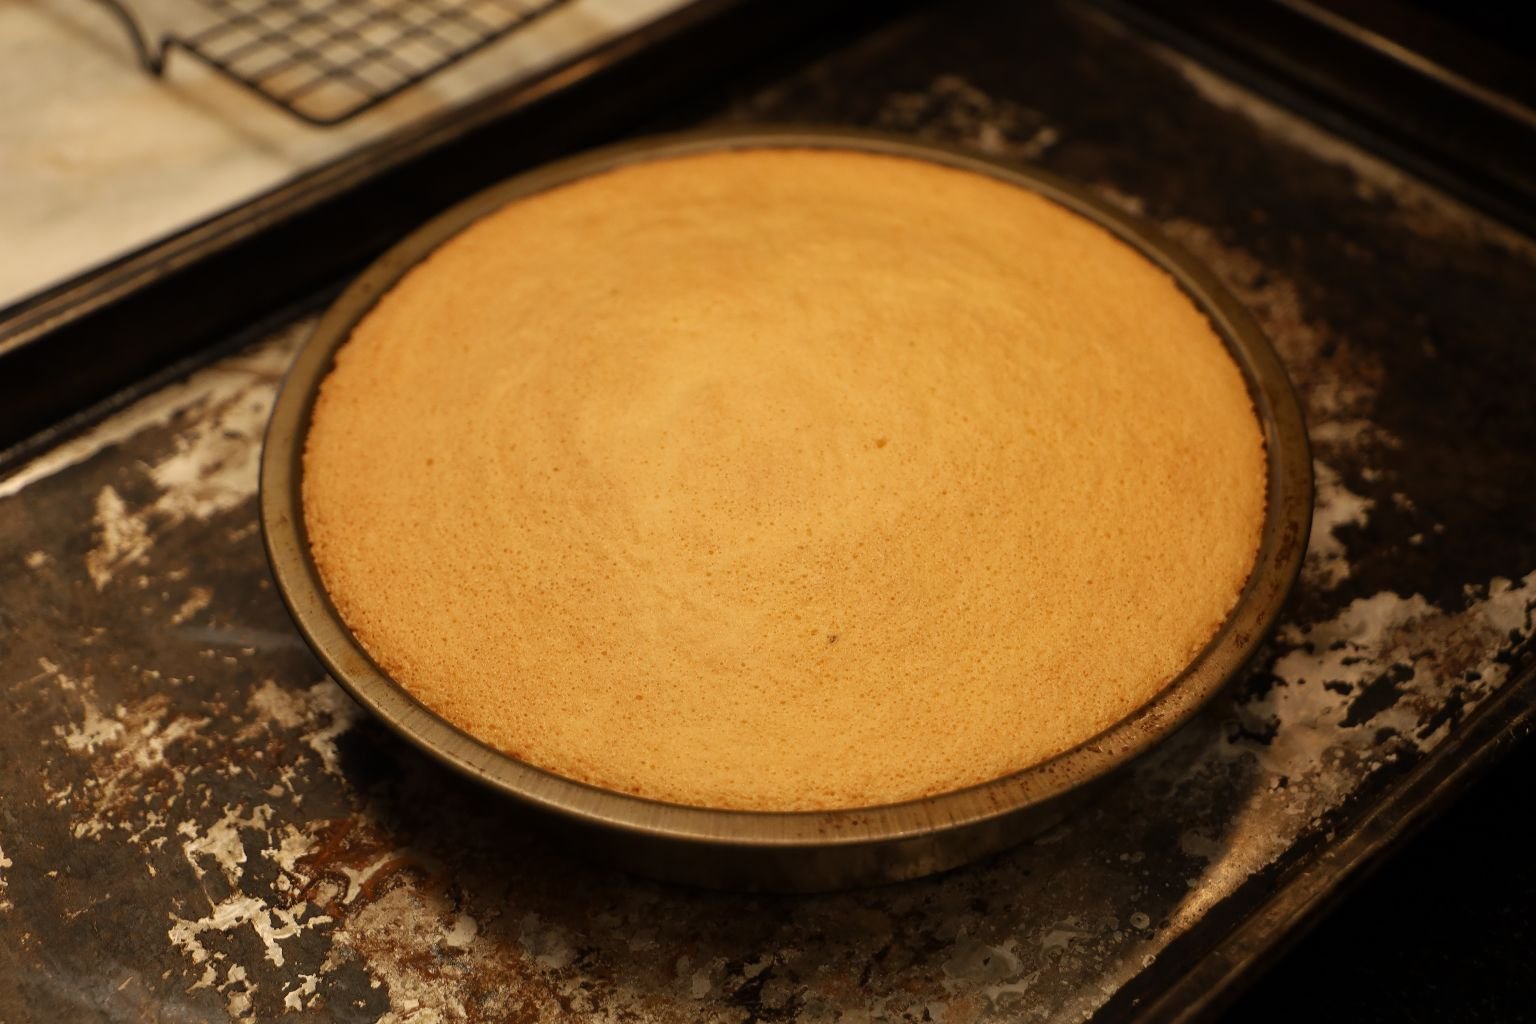
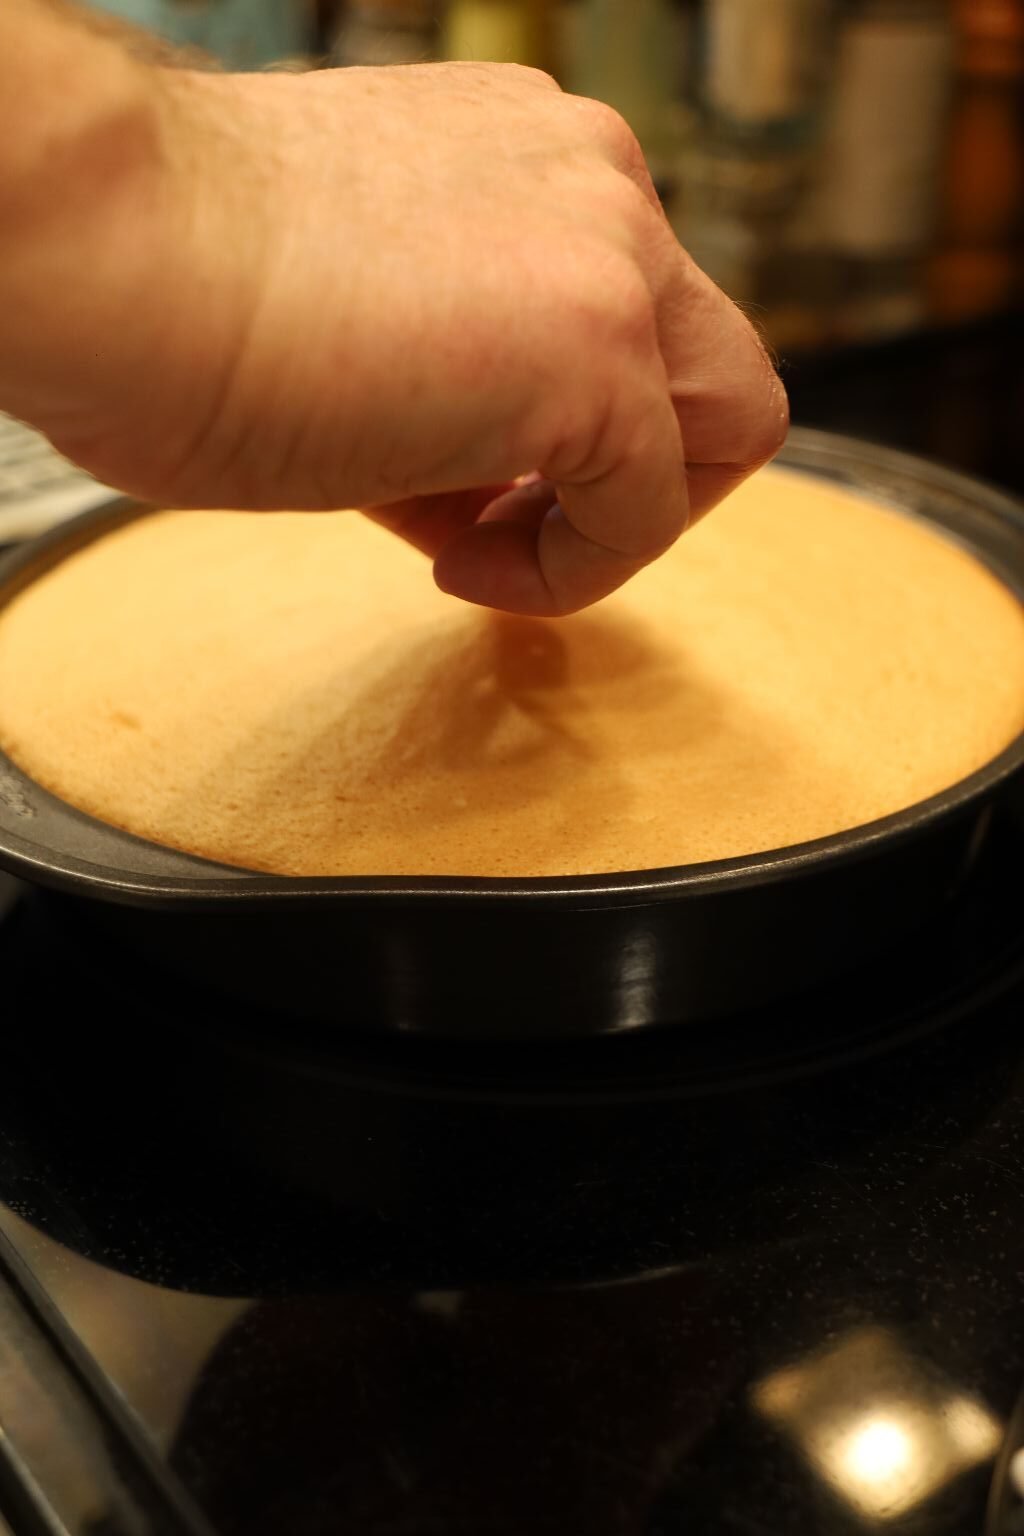
You can test the cake’s doneness by using a toothpick! Push the toothpick into the cake. If the toothpick come out clean it is done. If the toothpick comes out with batter attached, the cake needs to be baked longer.
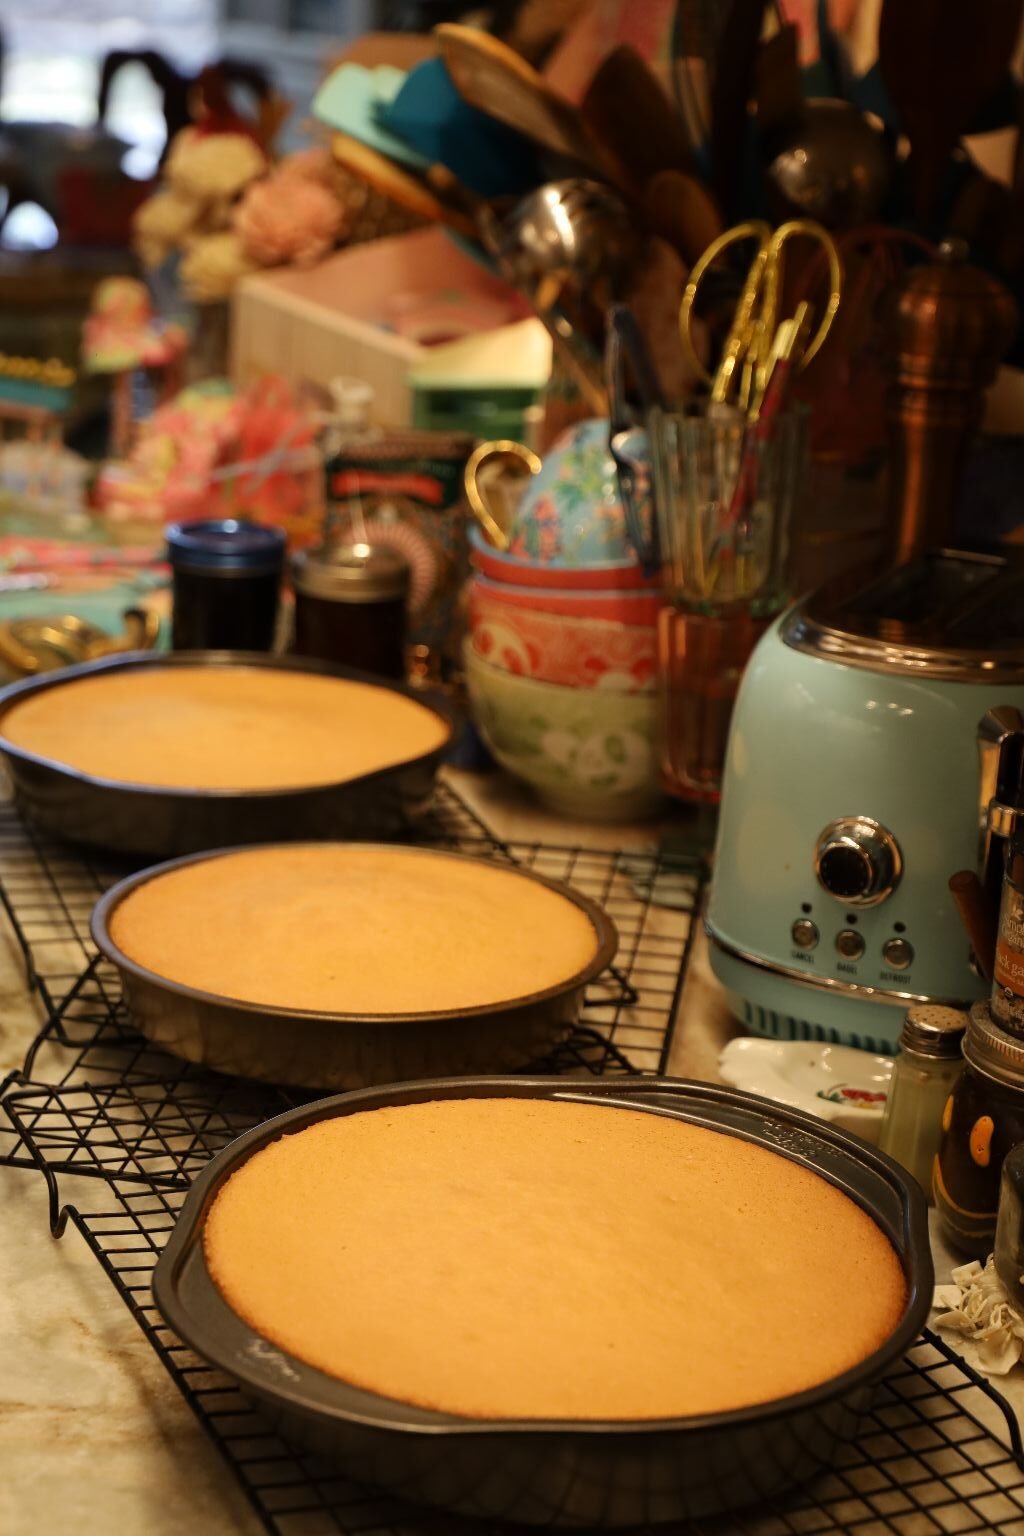
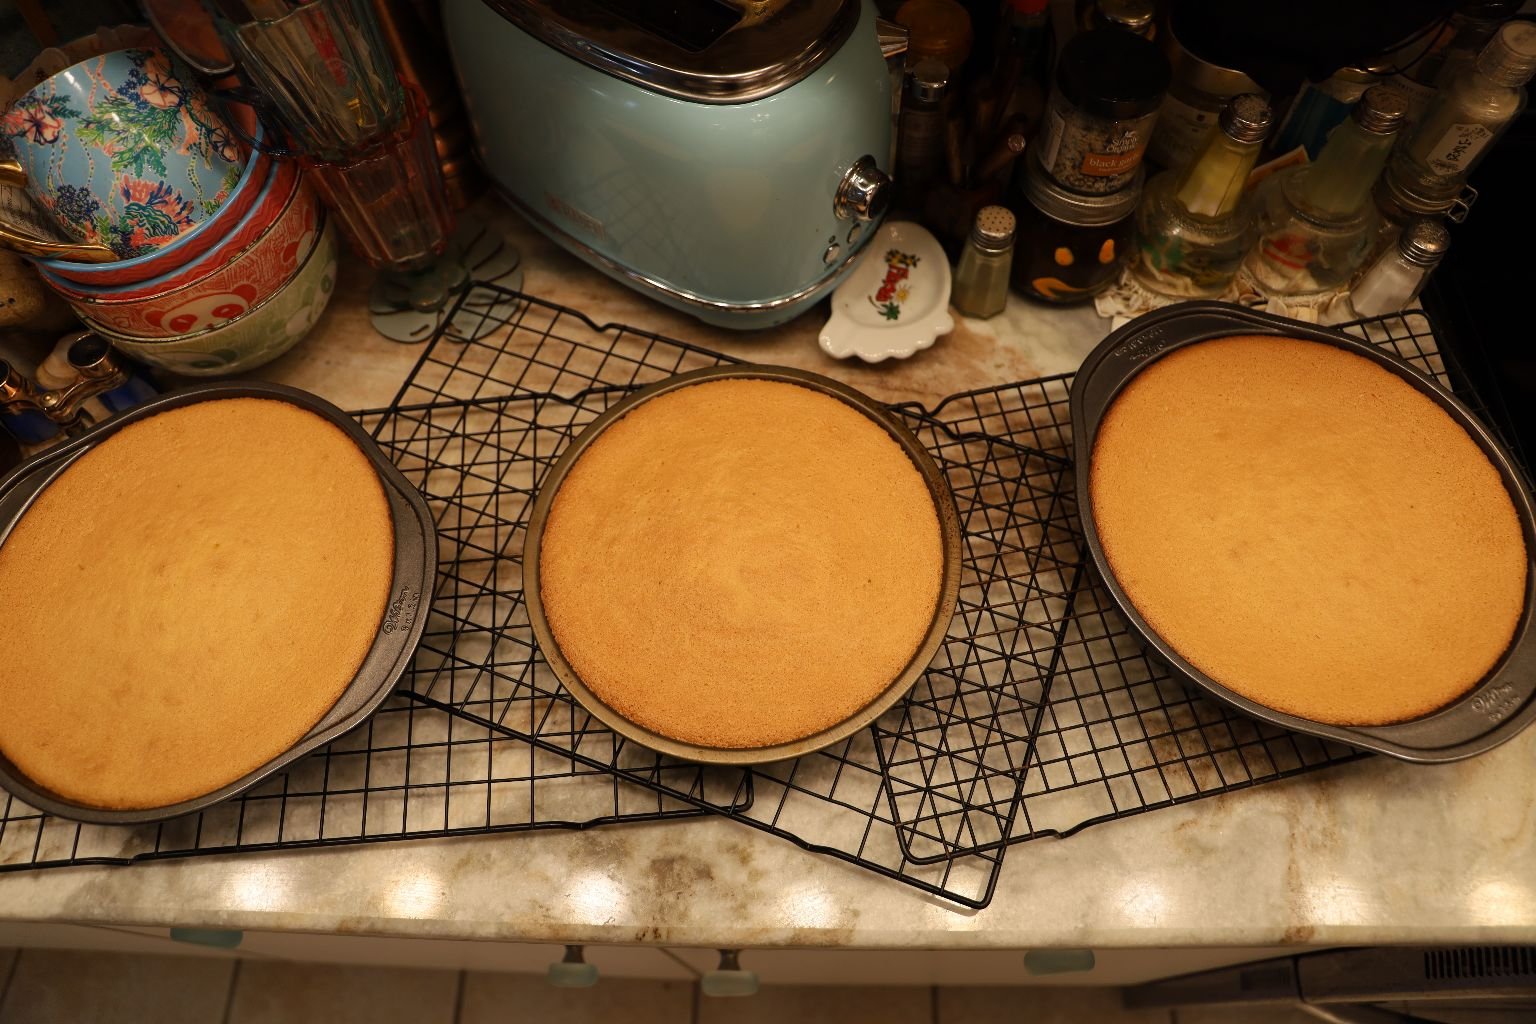
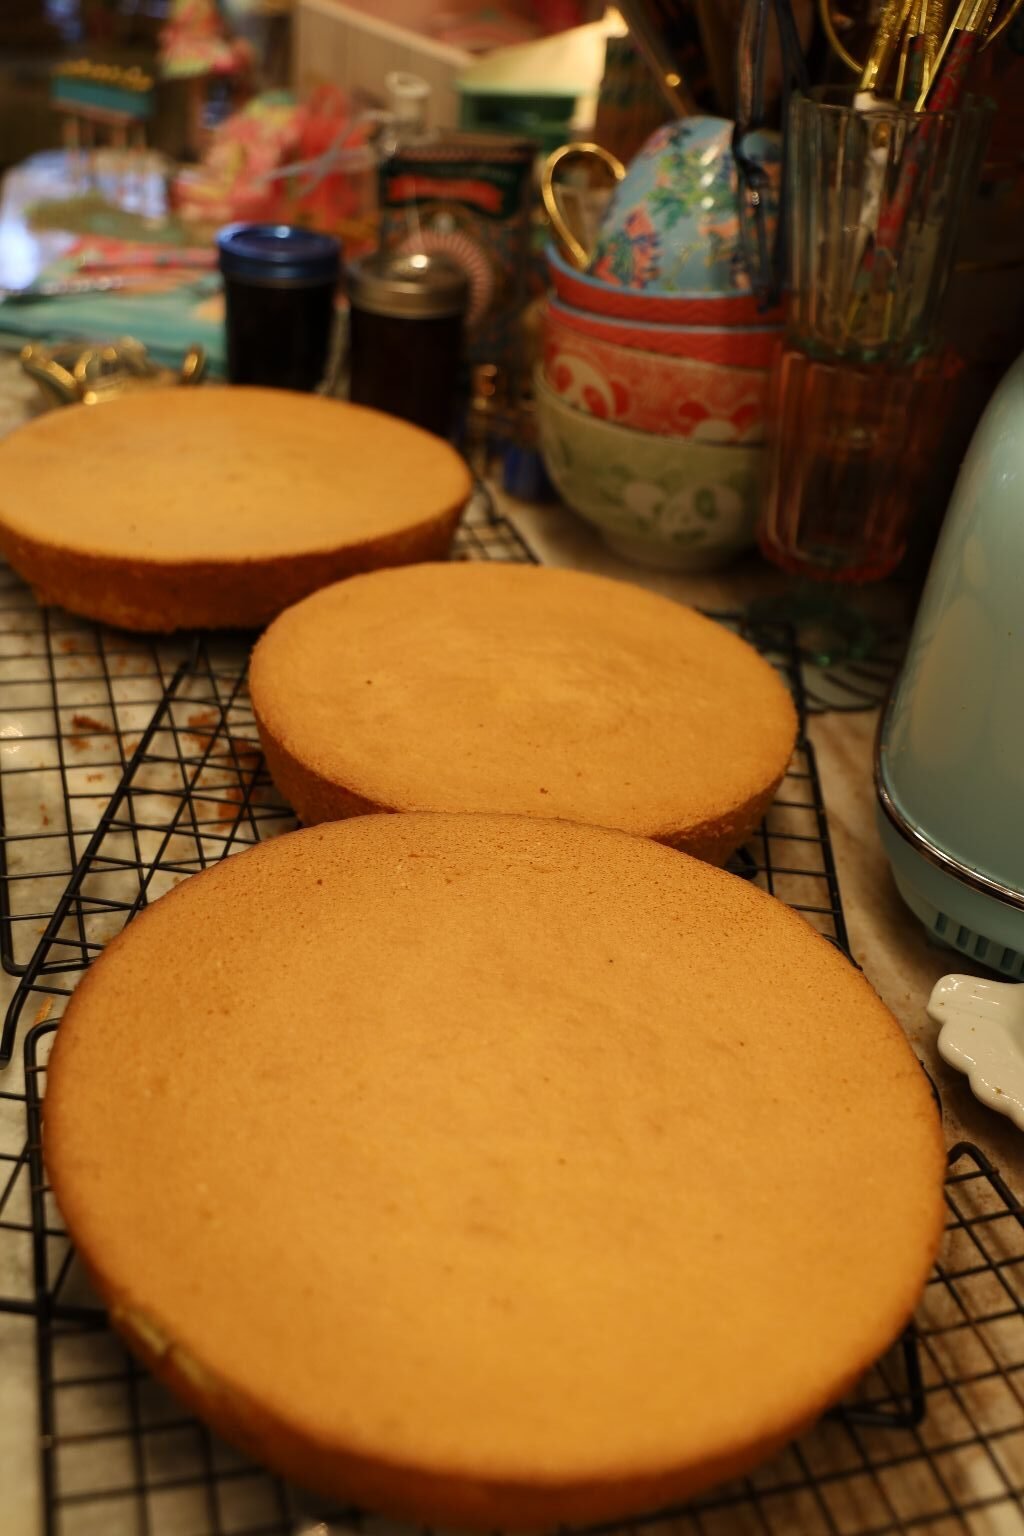
We let the cakes cool on top of wire racks to.
Inverting the cakes on the wire racks might help the cakes removal from the pan.
While The Cakes Are Cooling…
——————————————————————————————
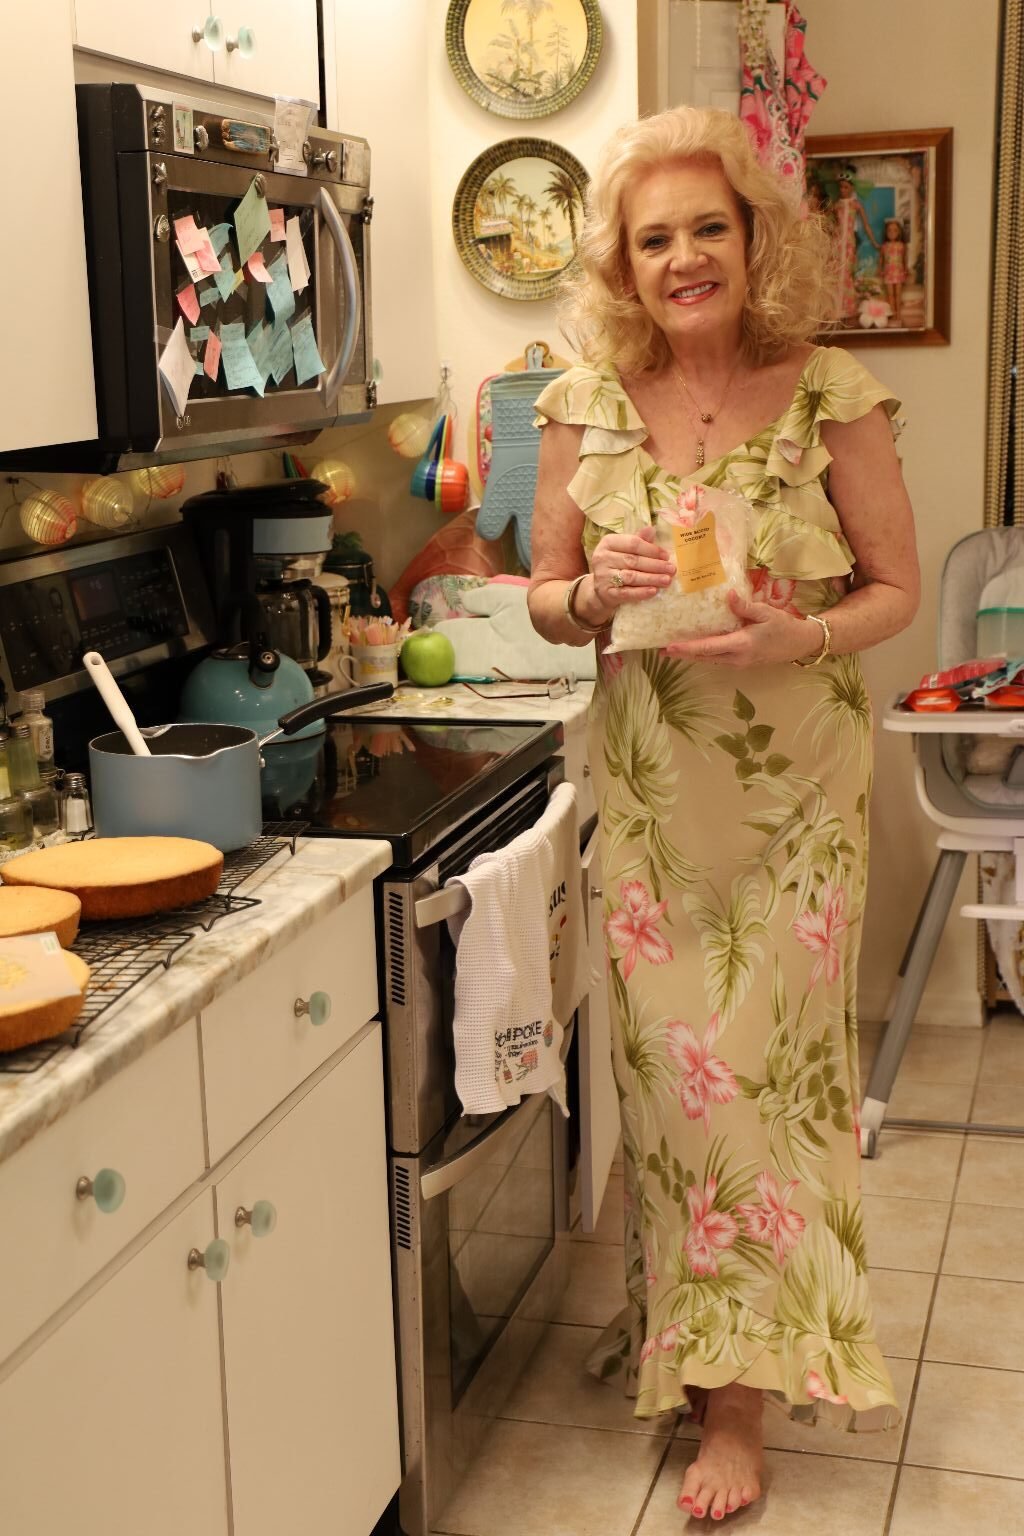
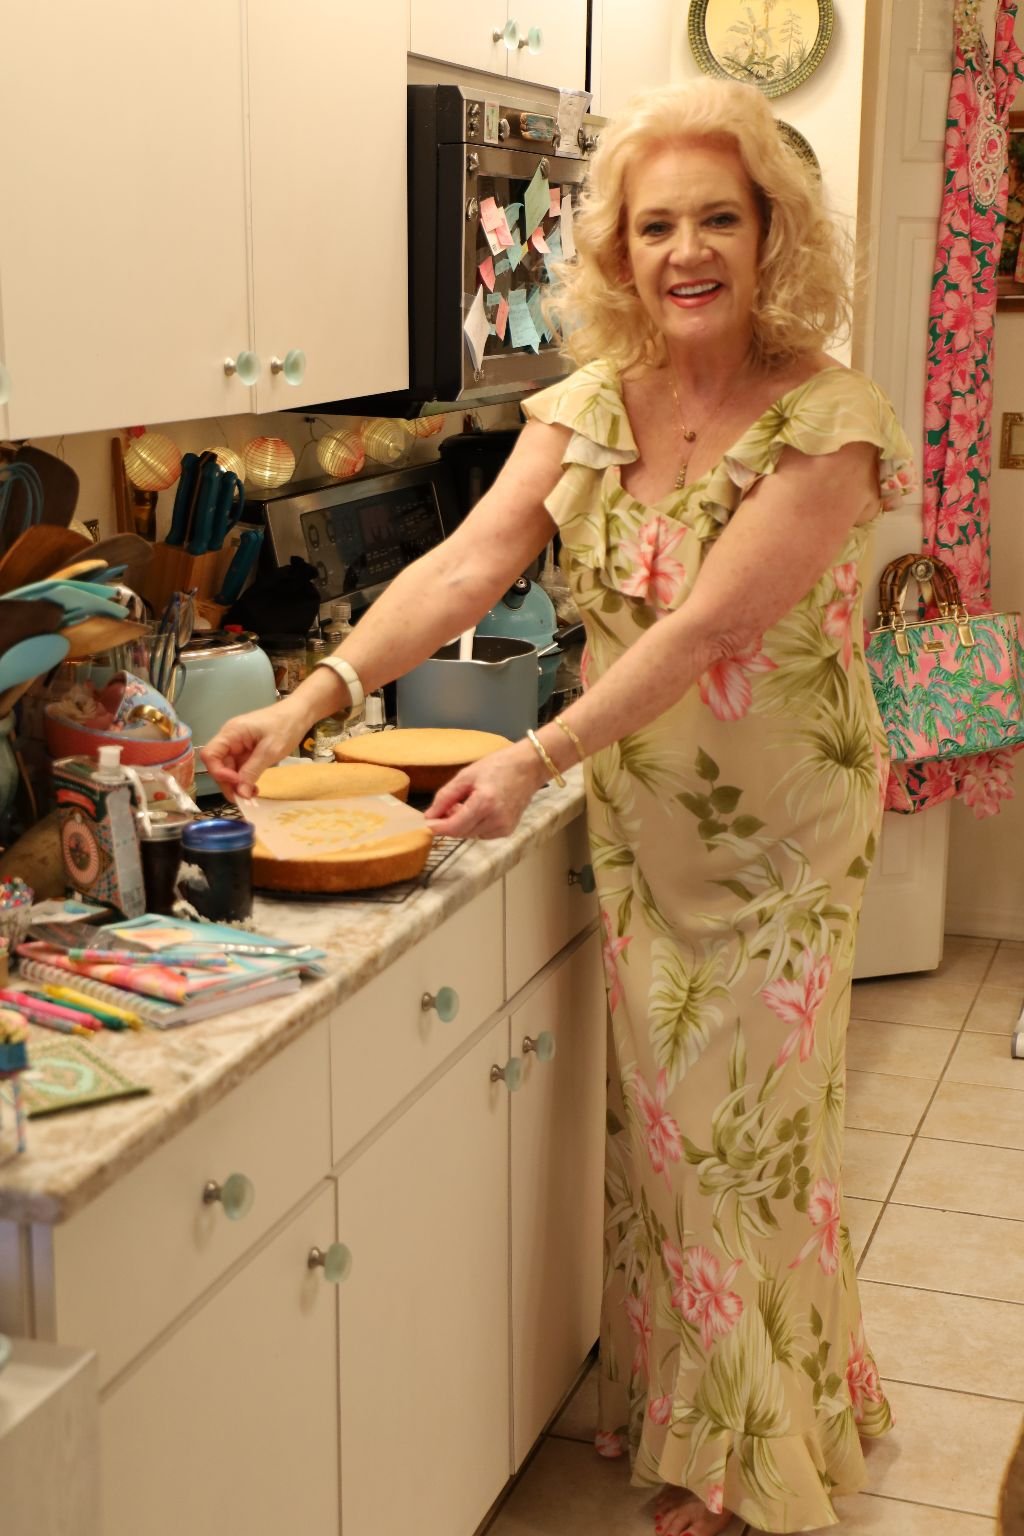
Taking My Wedding Rehearsal Dinner Luau Dress On A Test Drive Through The Kitchen
————————————————————————————————–
Haupia Frosting
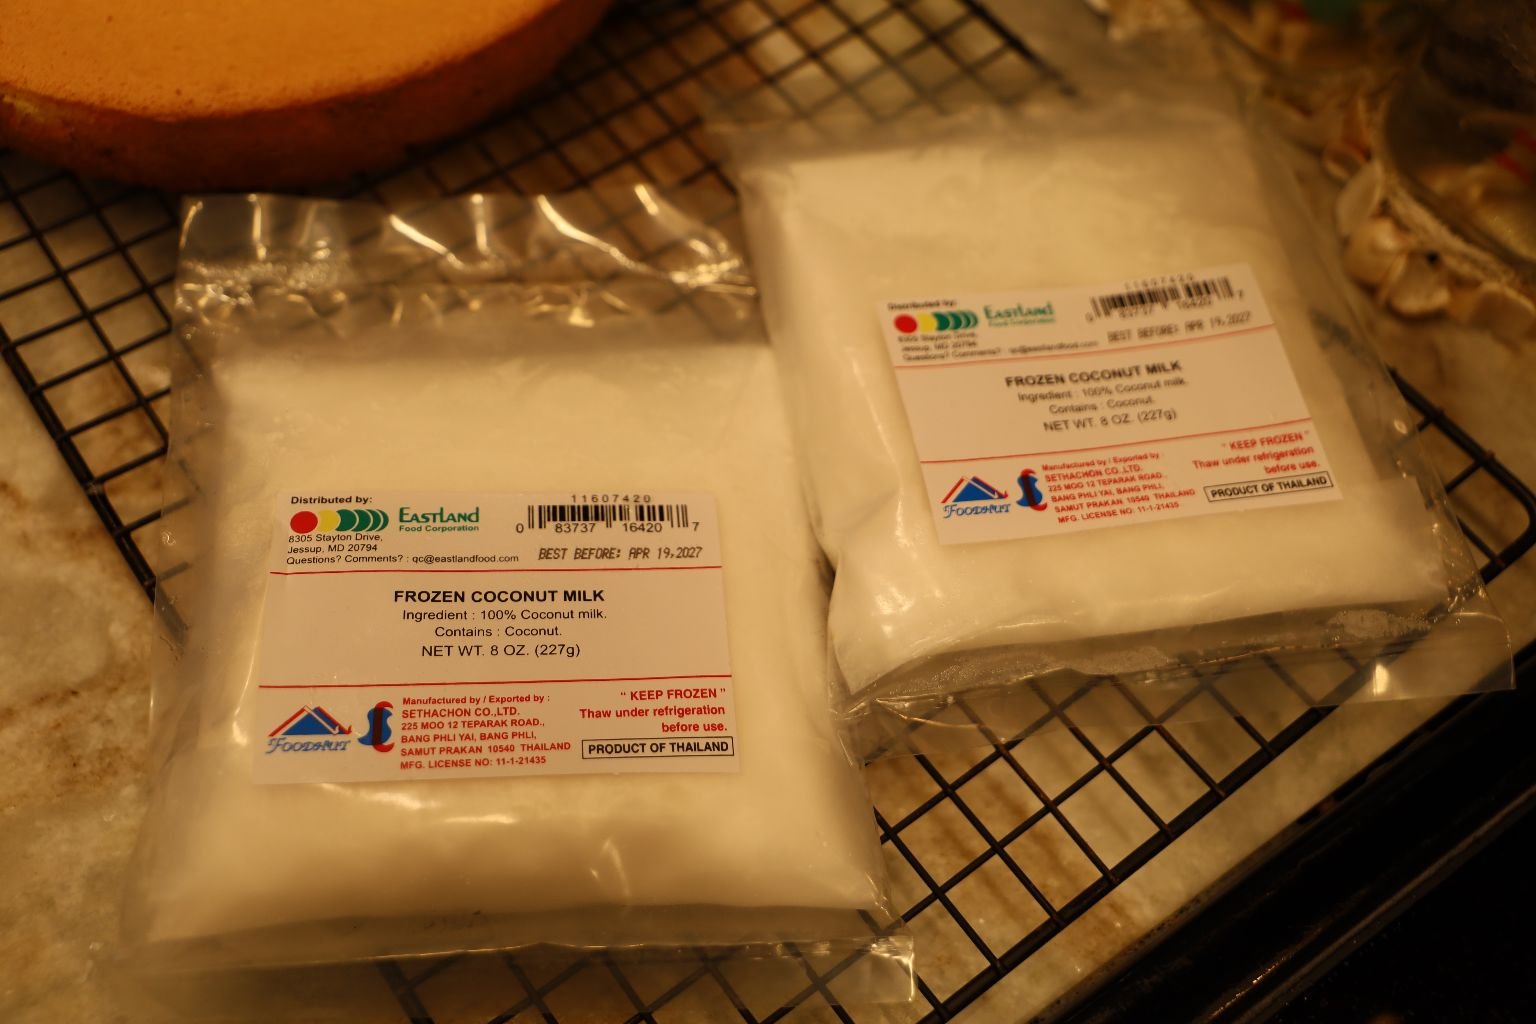
Frozen Coconut Milk
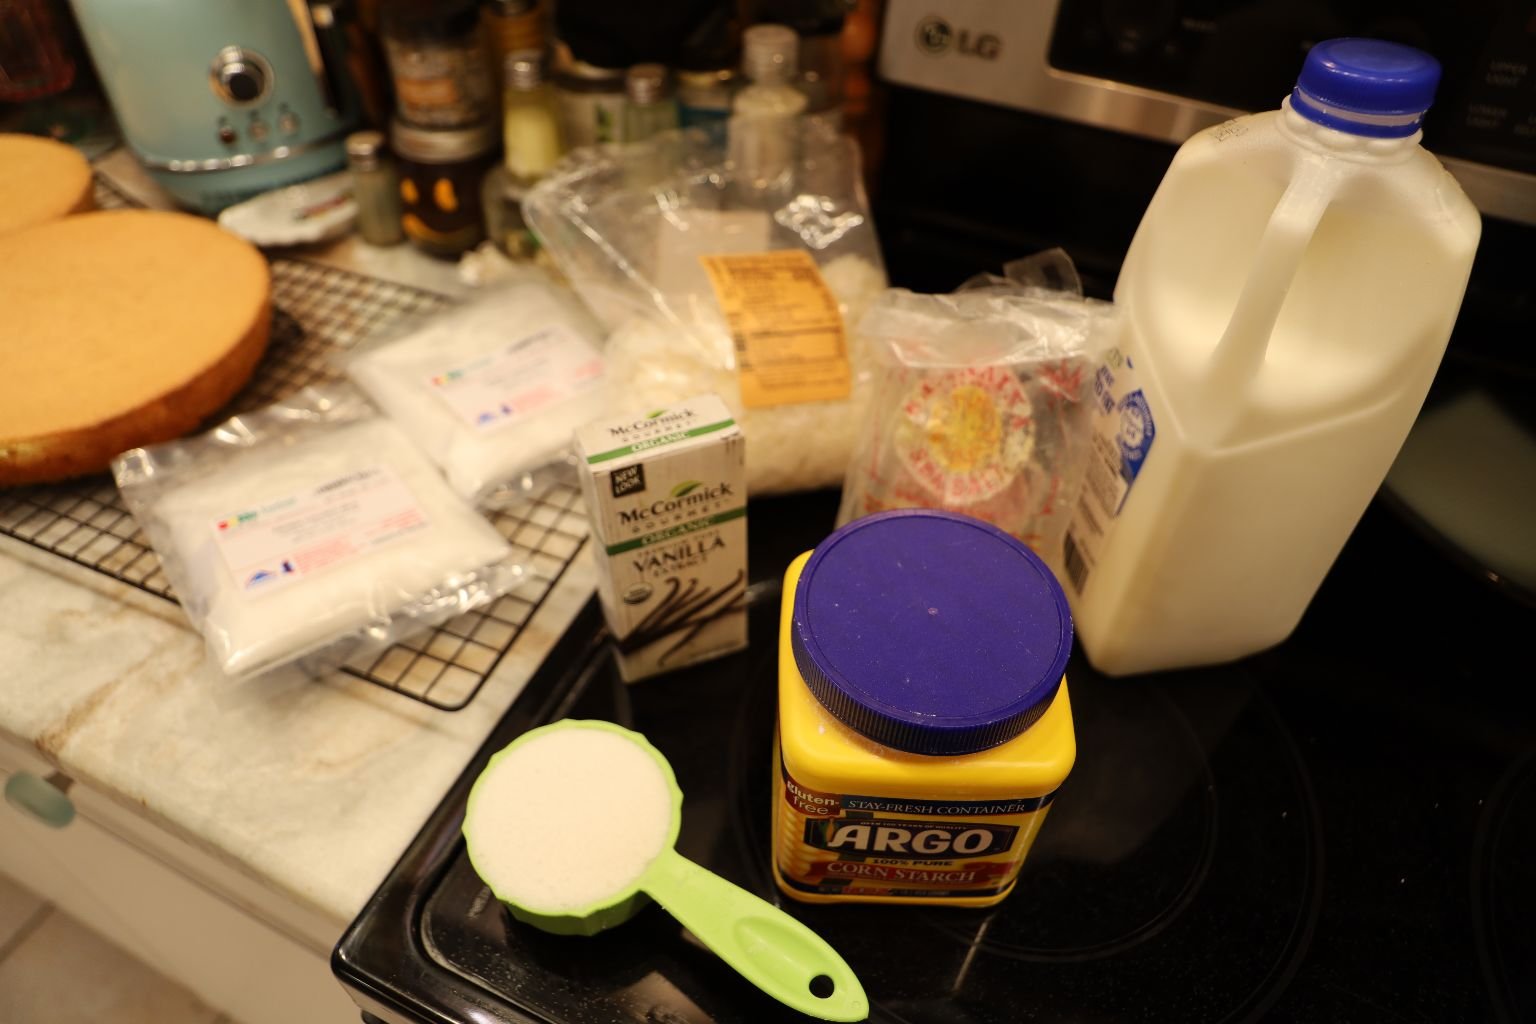
Haupia Frosting Ingredients:
12 ounces Frozen Coconut Milk
2 Cups Milk
1/2 Cup Sugar
1/4 tsp. Salt
6 Tbsp. Cornstarch
1 1/2 tsp. Vanilla Flavoring
Fresh Shredded Coconut as needed
———————————————————————————-
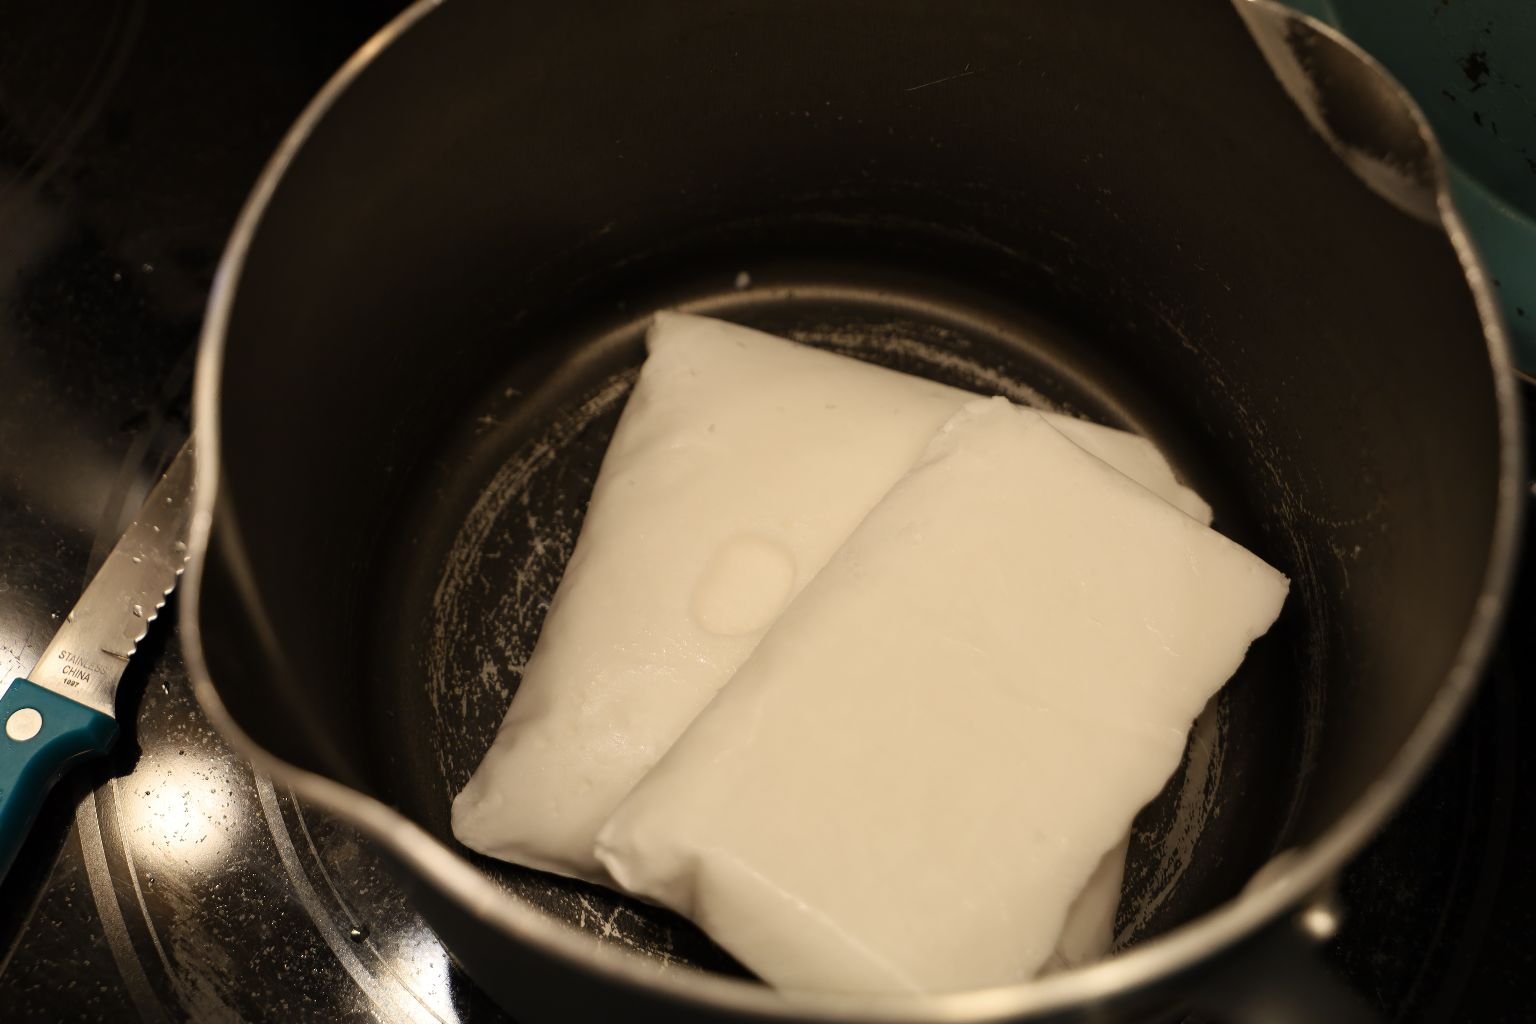
We purchased the frozen coconut milk from the Asian Supermarket, they came in these plastic packages, just remove the plastic and add them to a medium sized saucepan, on a Medium-High Heat.
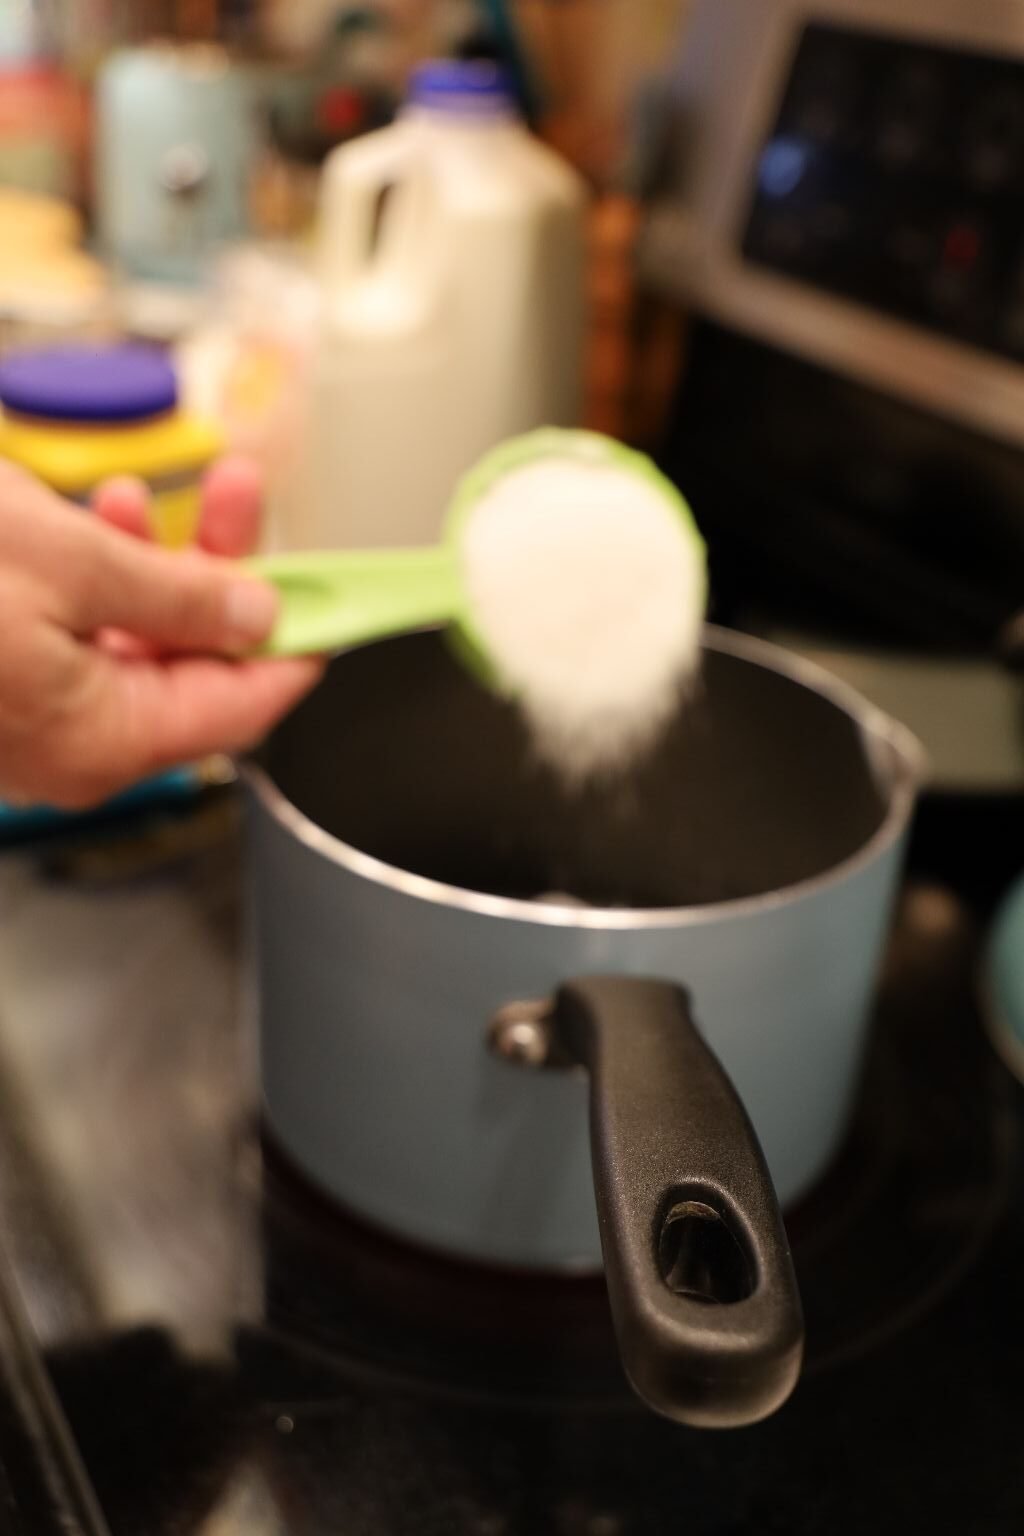
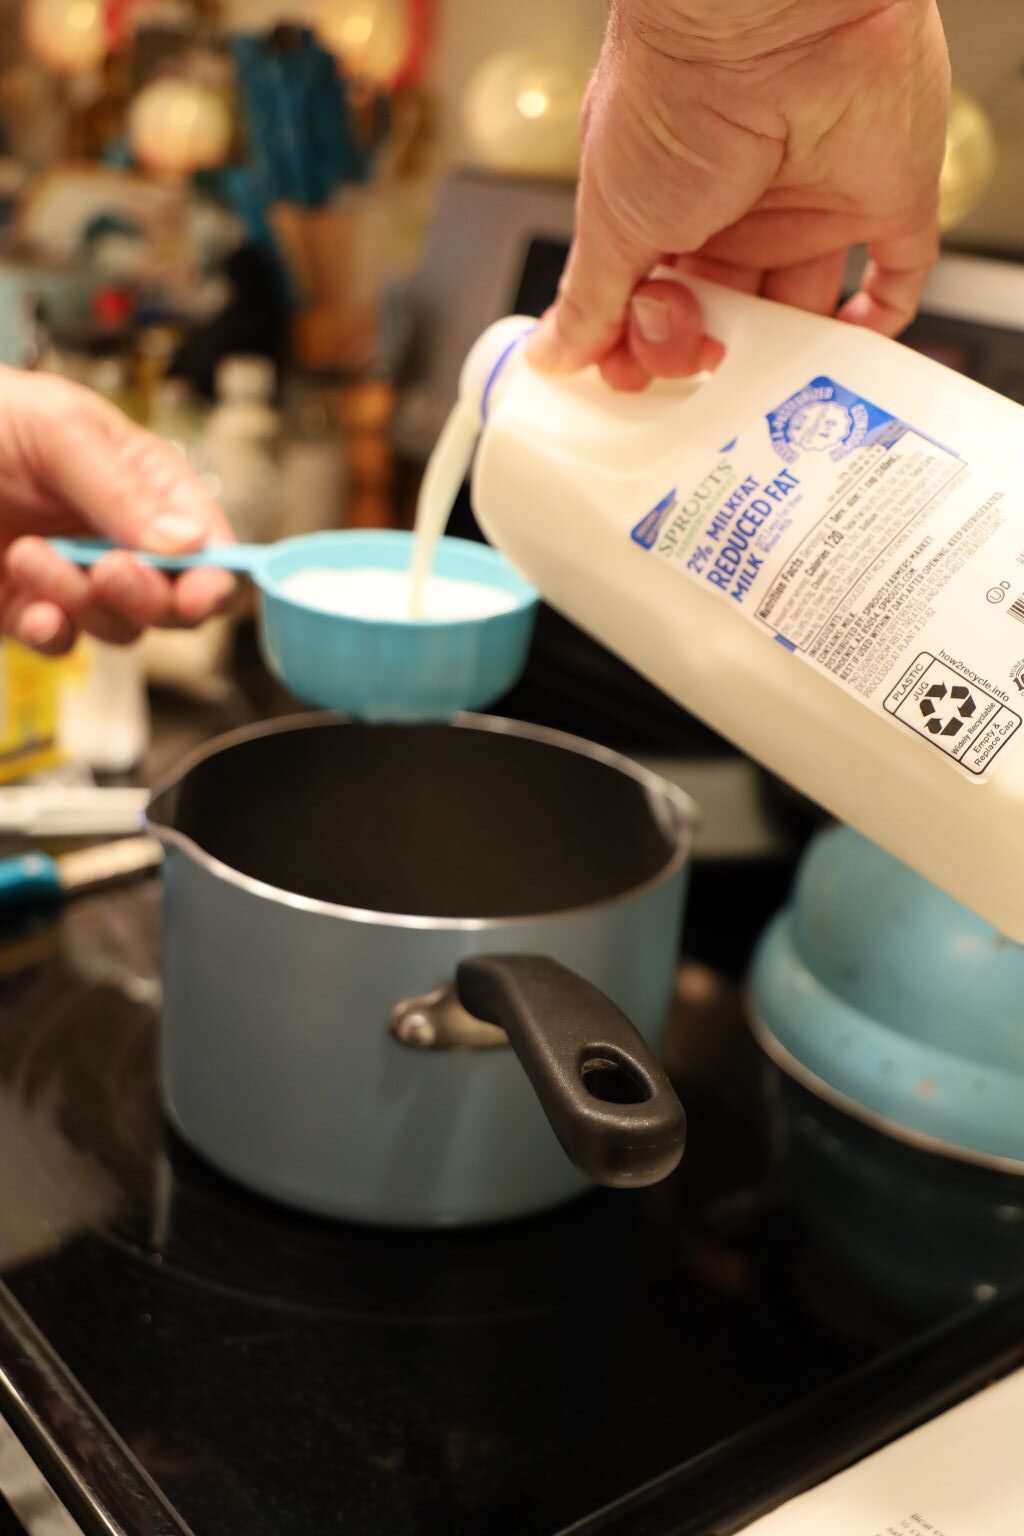
Add your sugar and milk…
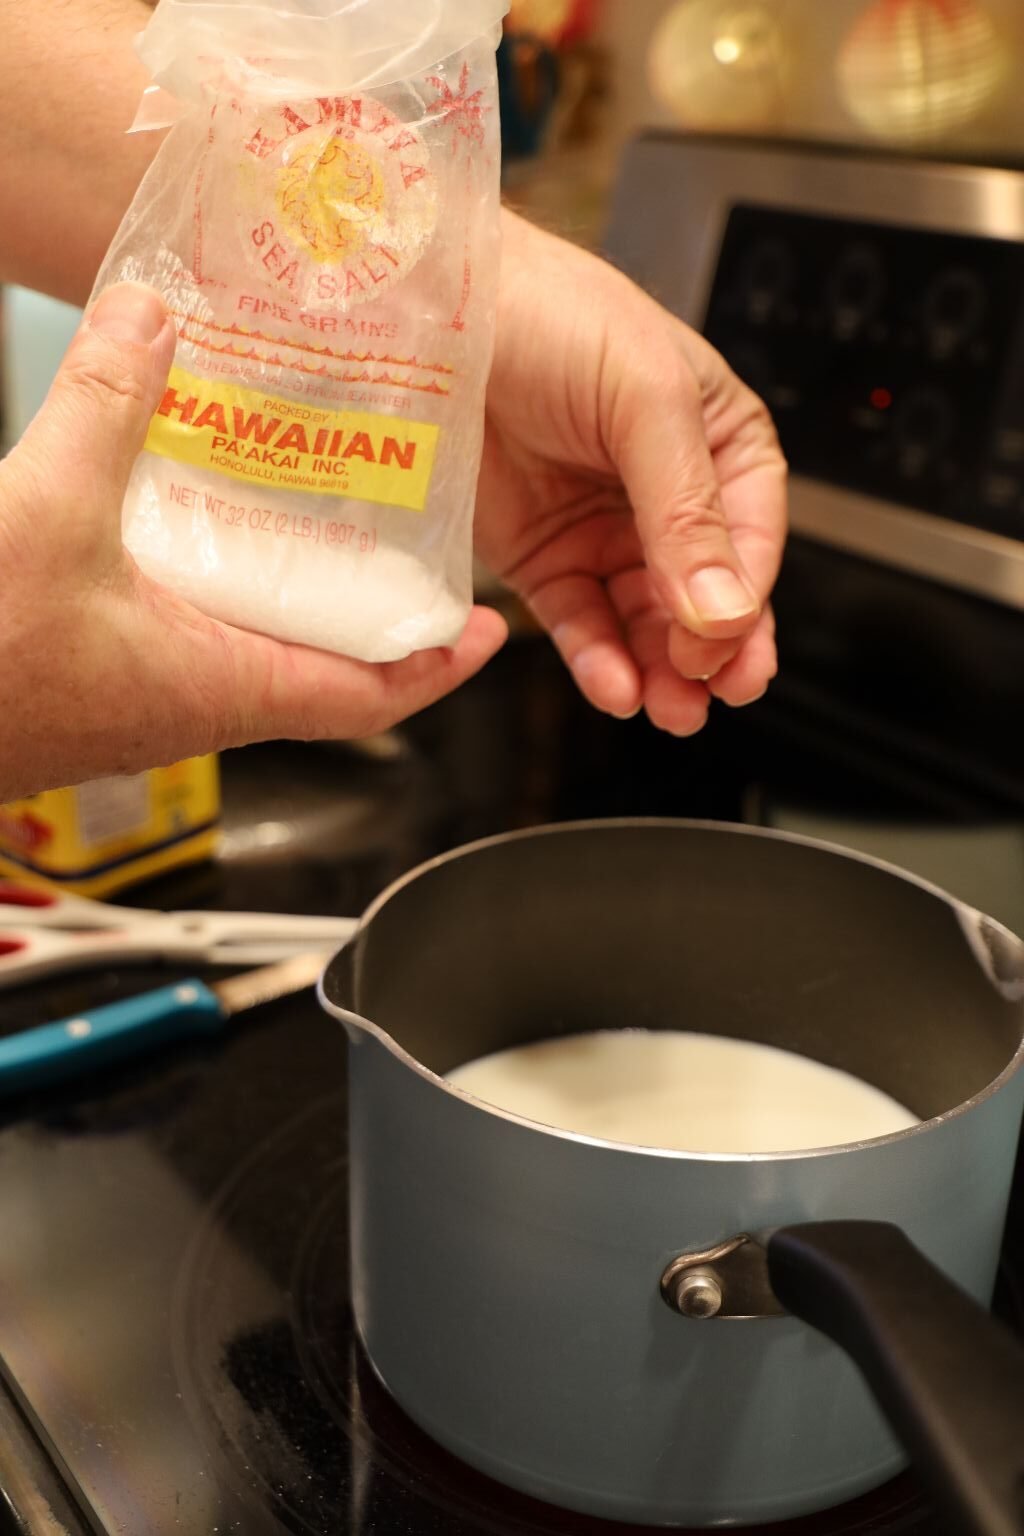
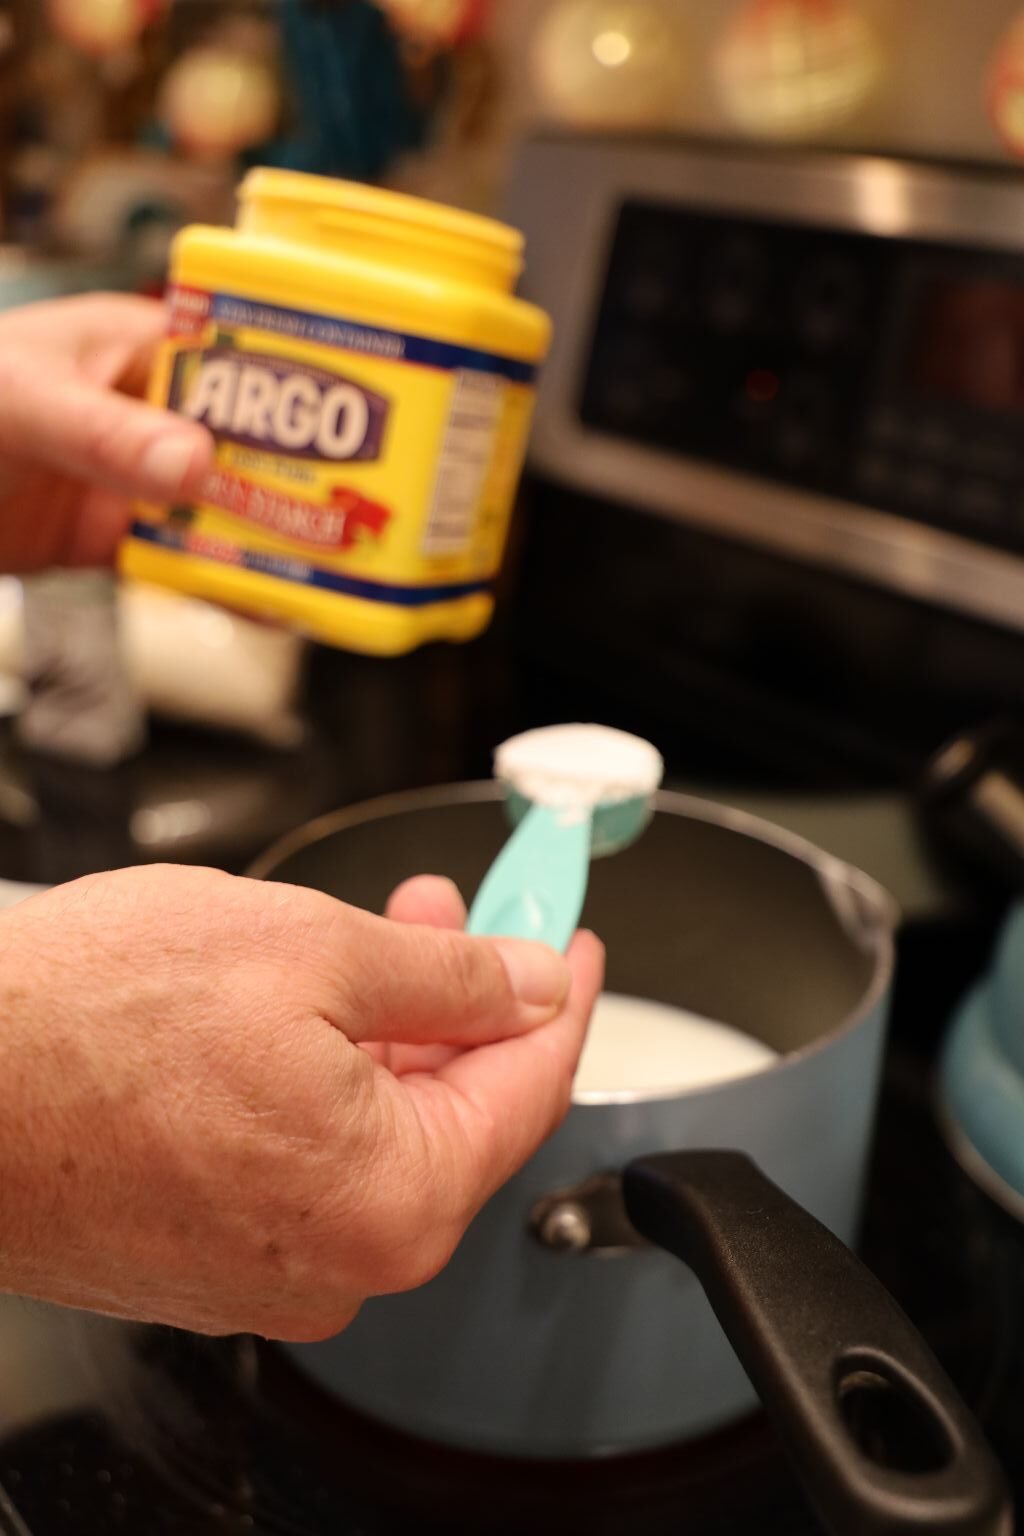
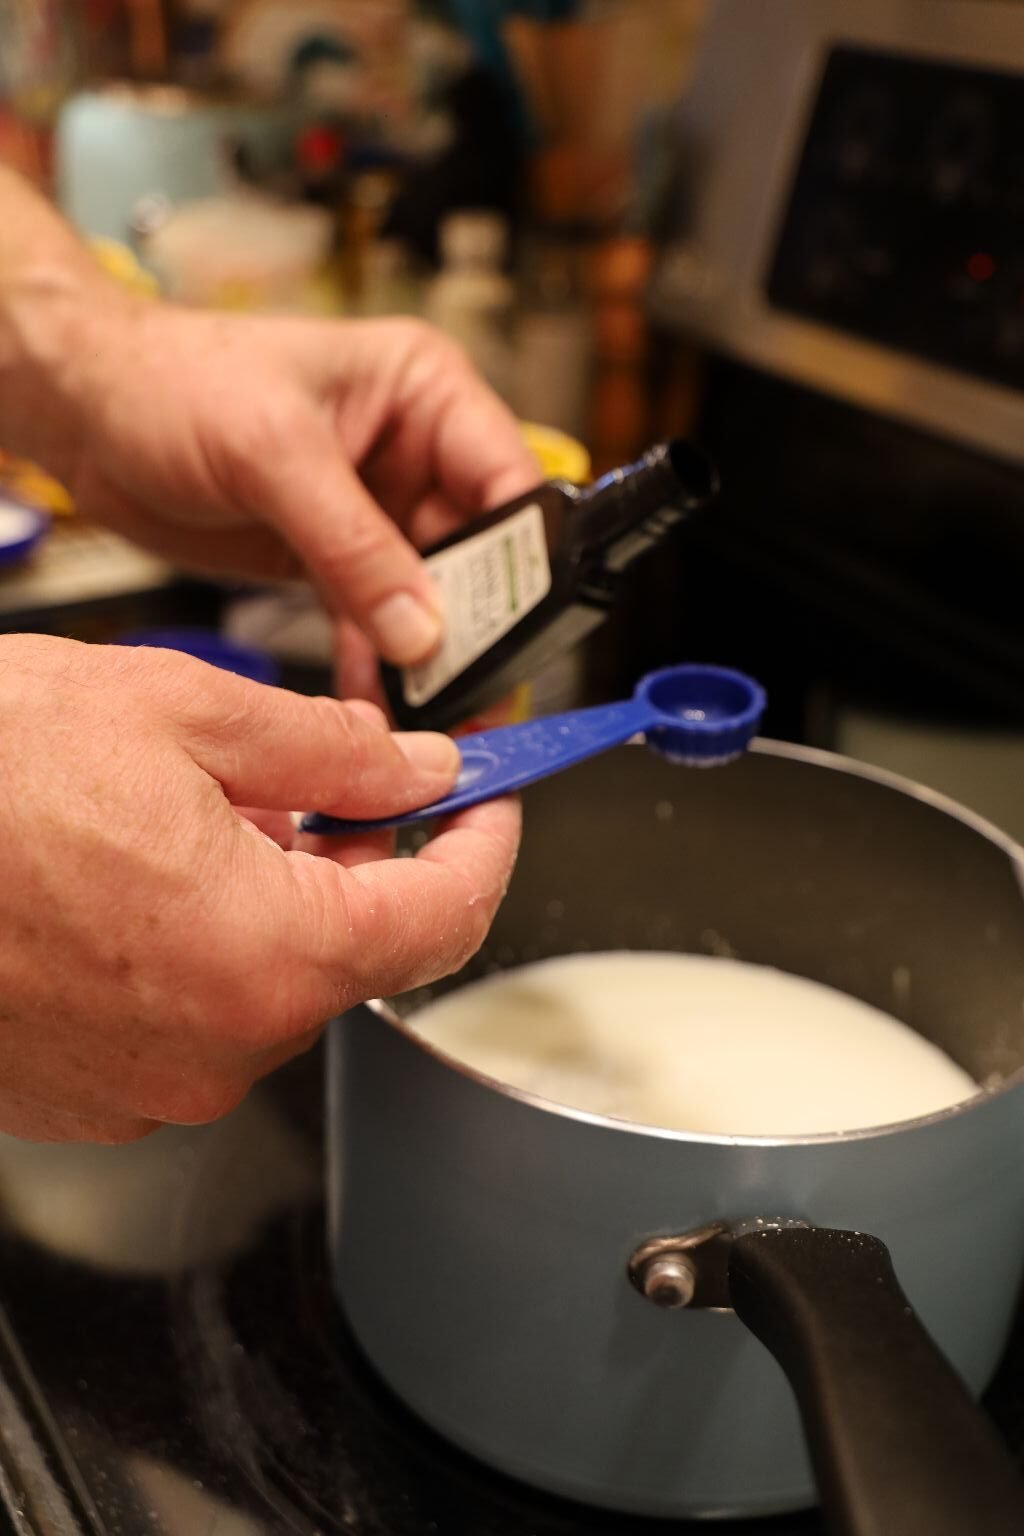
then your salt, cornstarch and vanilla to the saucepan.
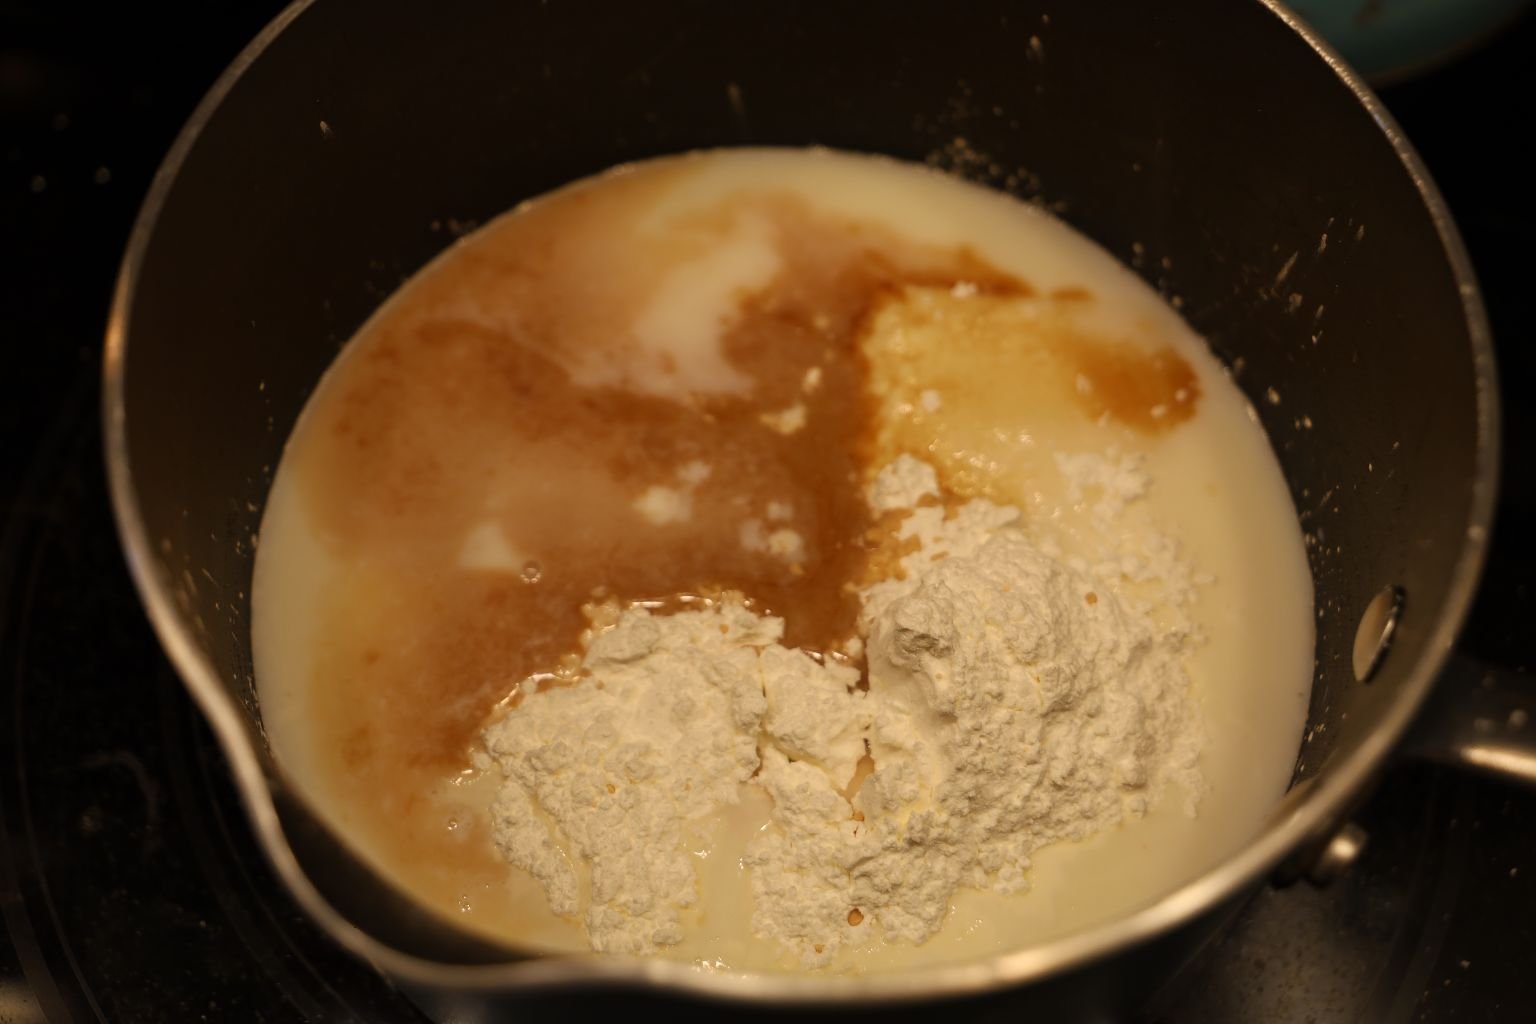
Pictured are all the ingredients in the saucepan.
————————————————————————

Mix all the ingredients together with a rubber spatula.
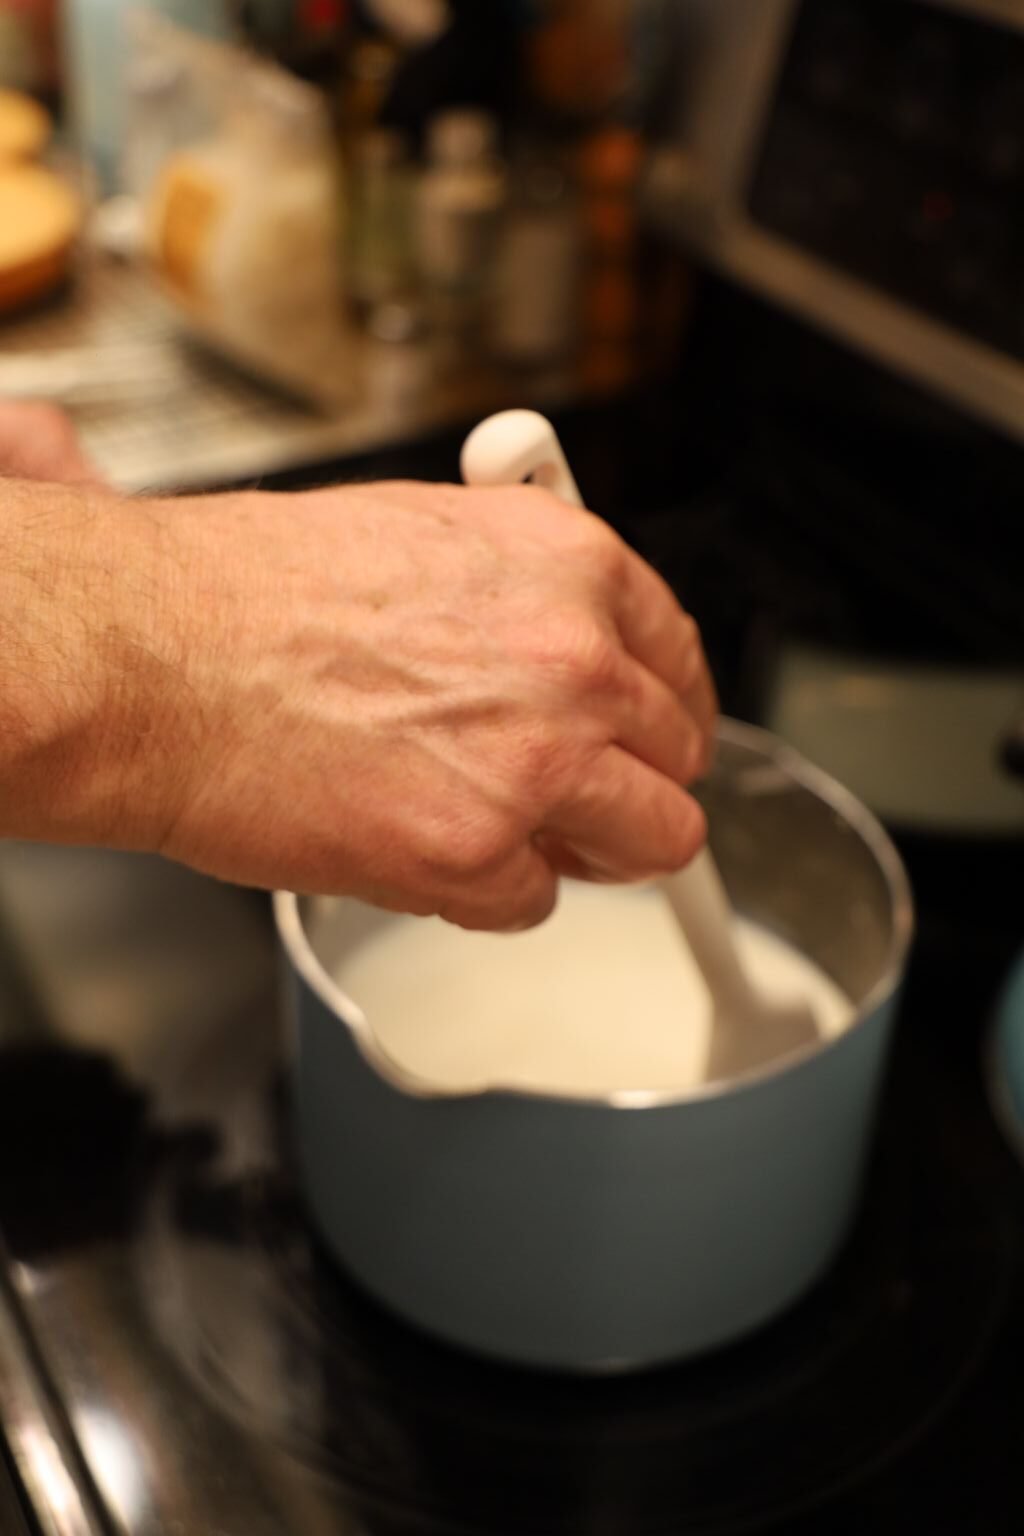
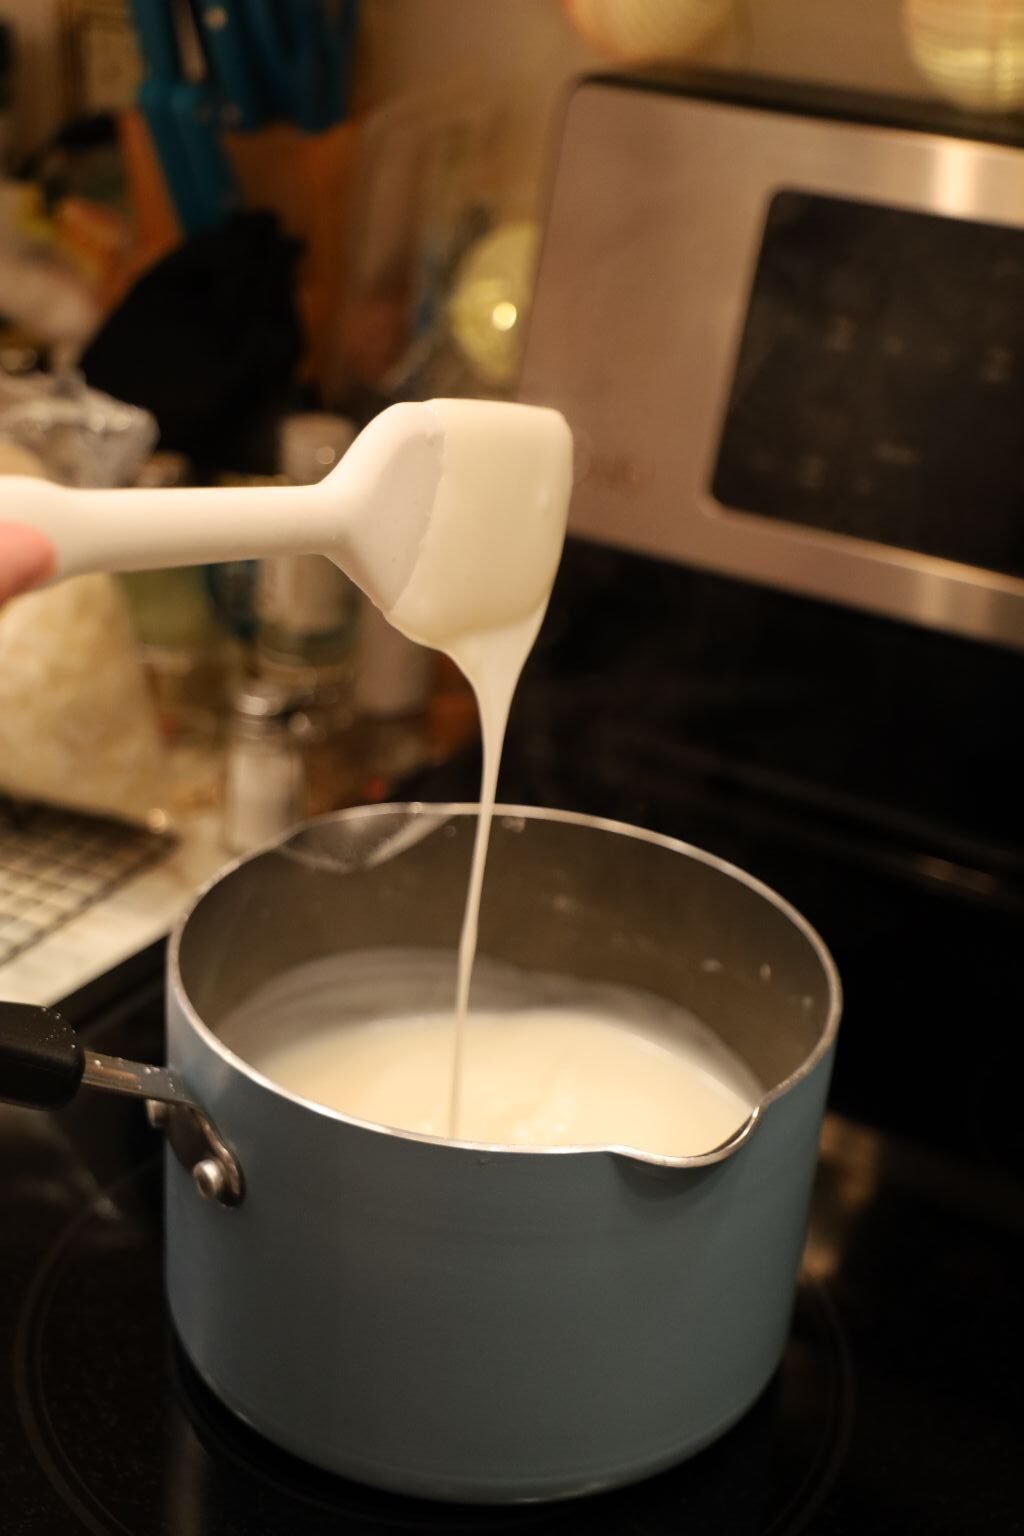
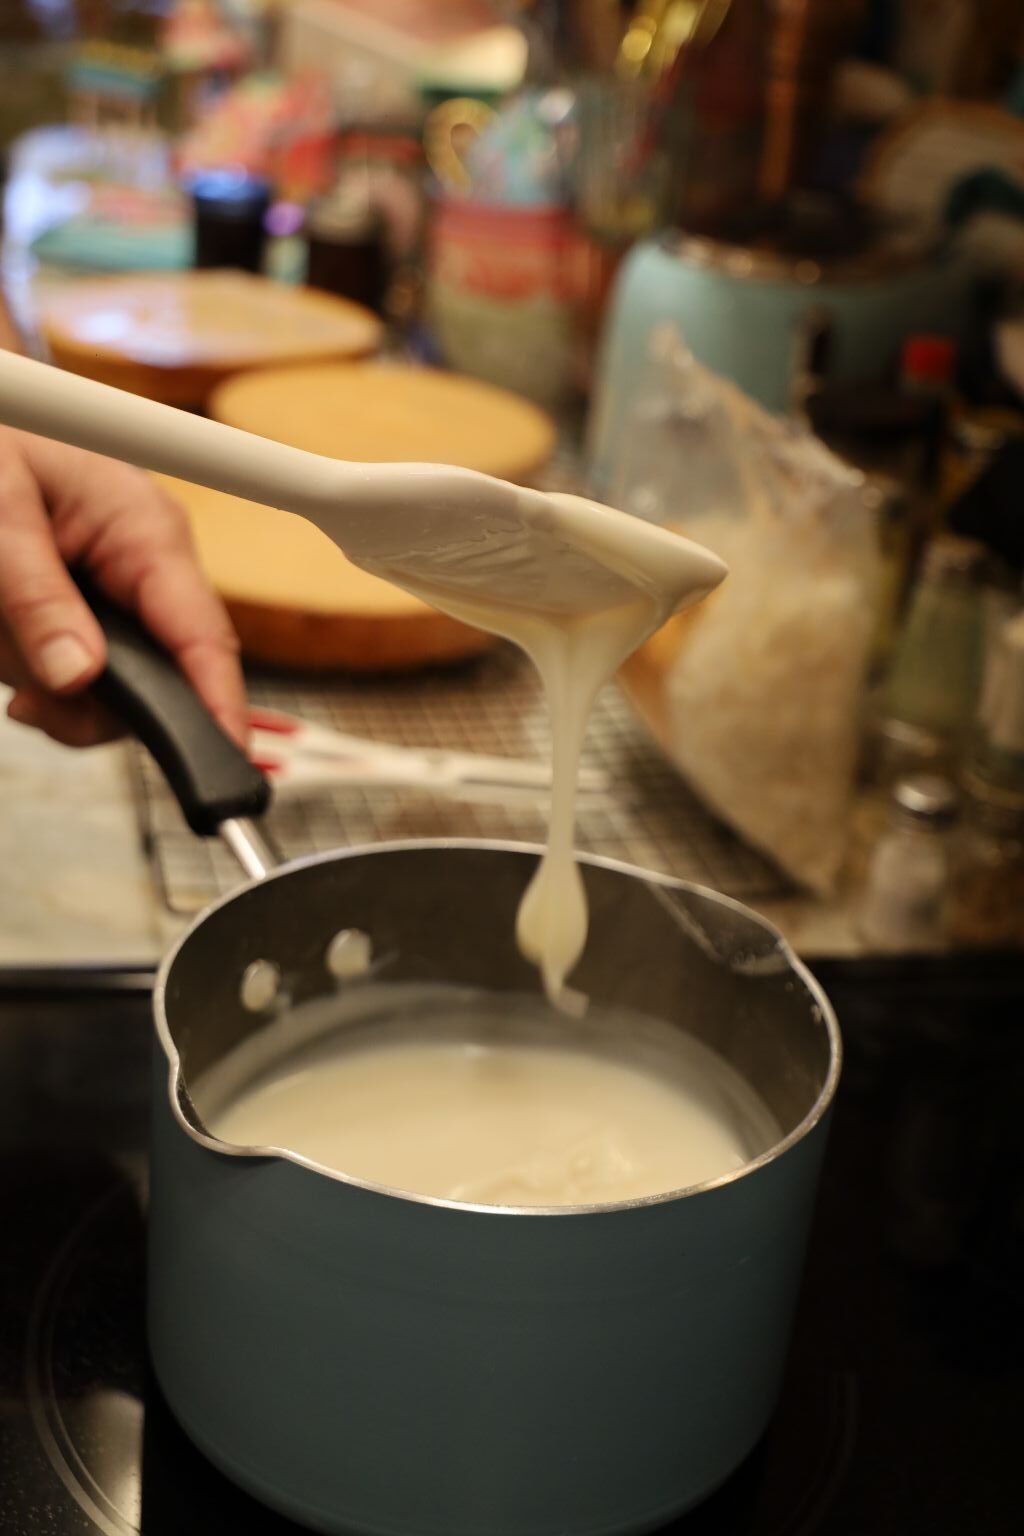
Stir the mixture constantly, and about the time the mixture boils, the icing will become very thick as shown.
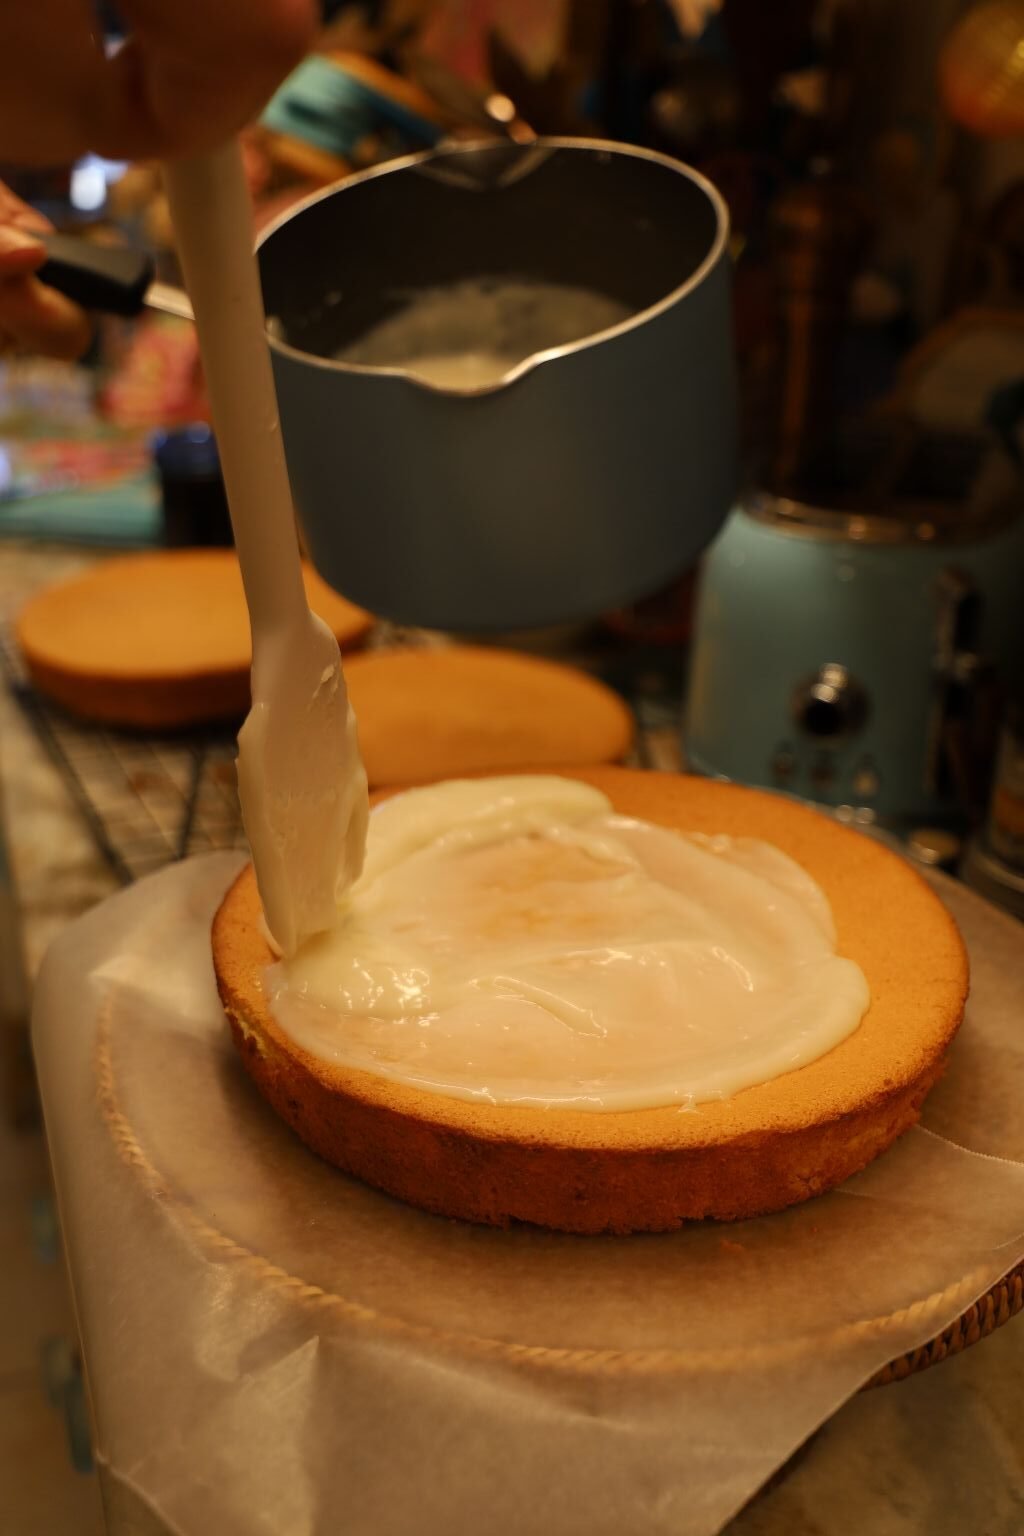
Let the icing mixture cool.
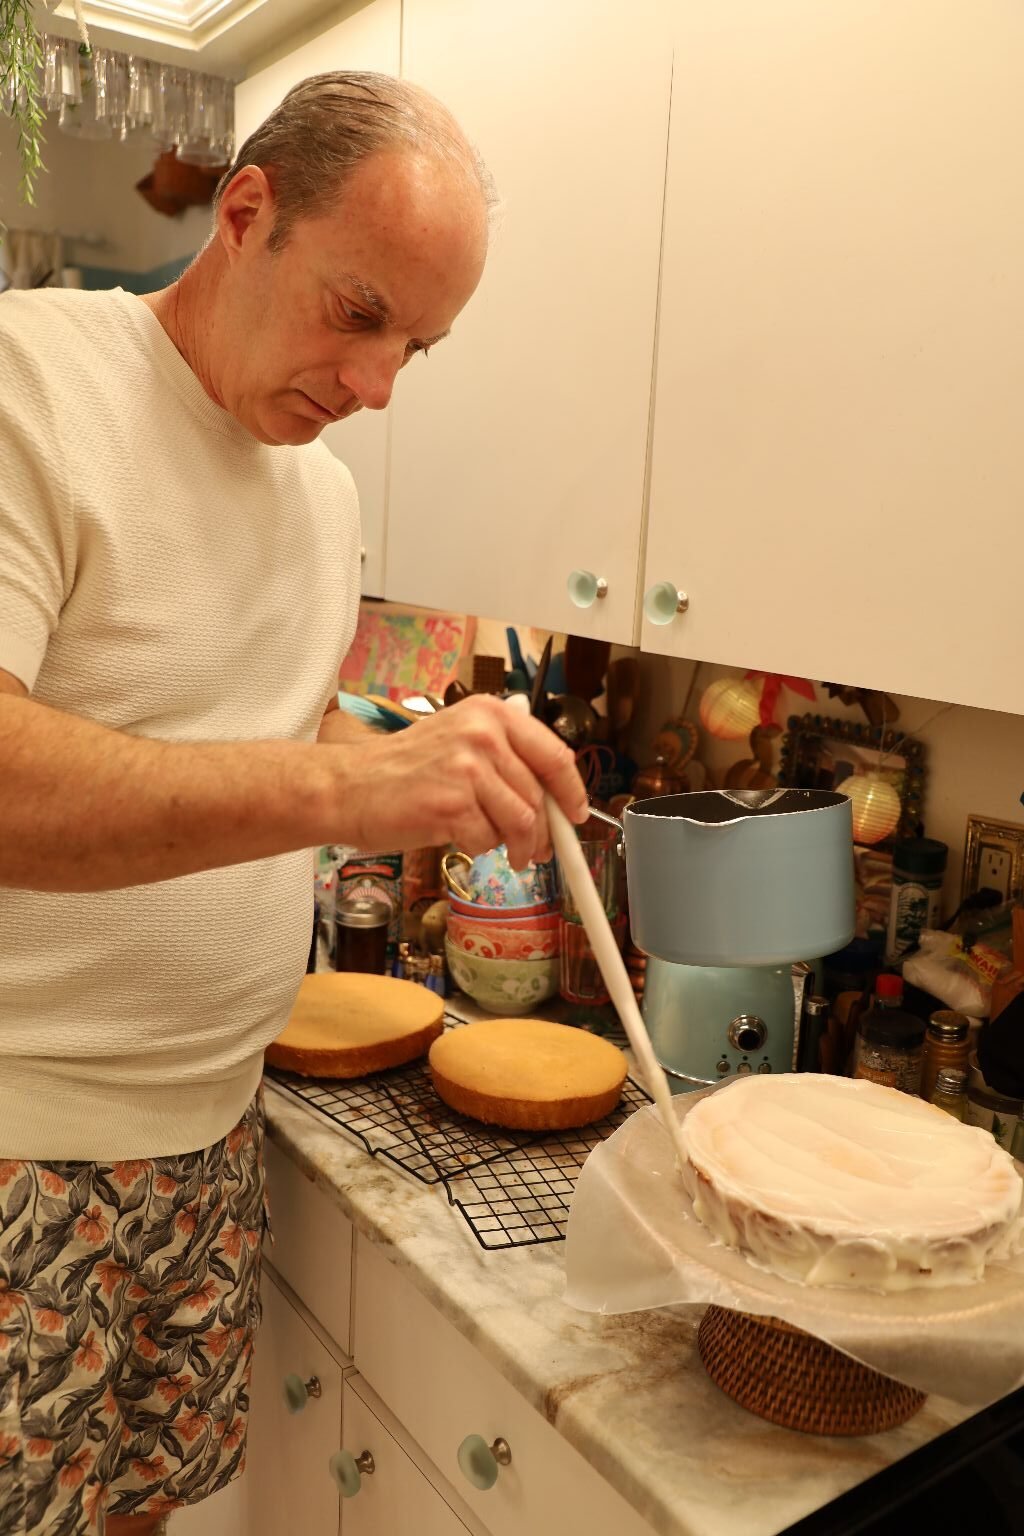
Place some wax paper on top of a cake stand and then add one of your cakes to be frosted. You do this so that the cake stand stays clean. We then added 1/3 of the icing on the top and sides of the first layer down.
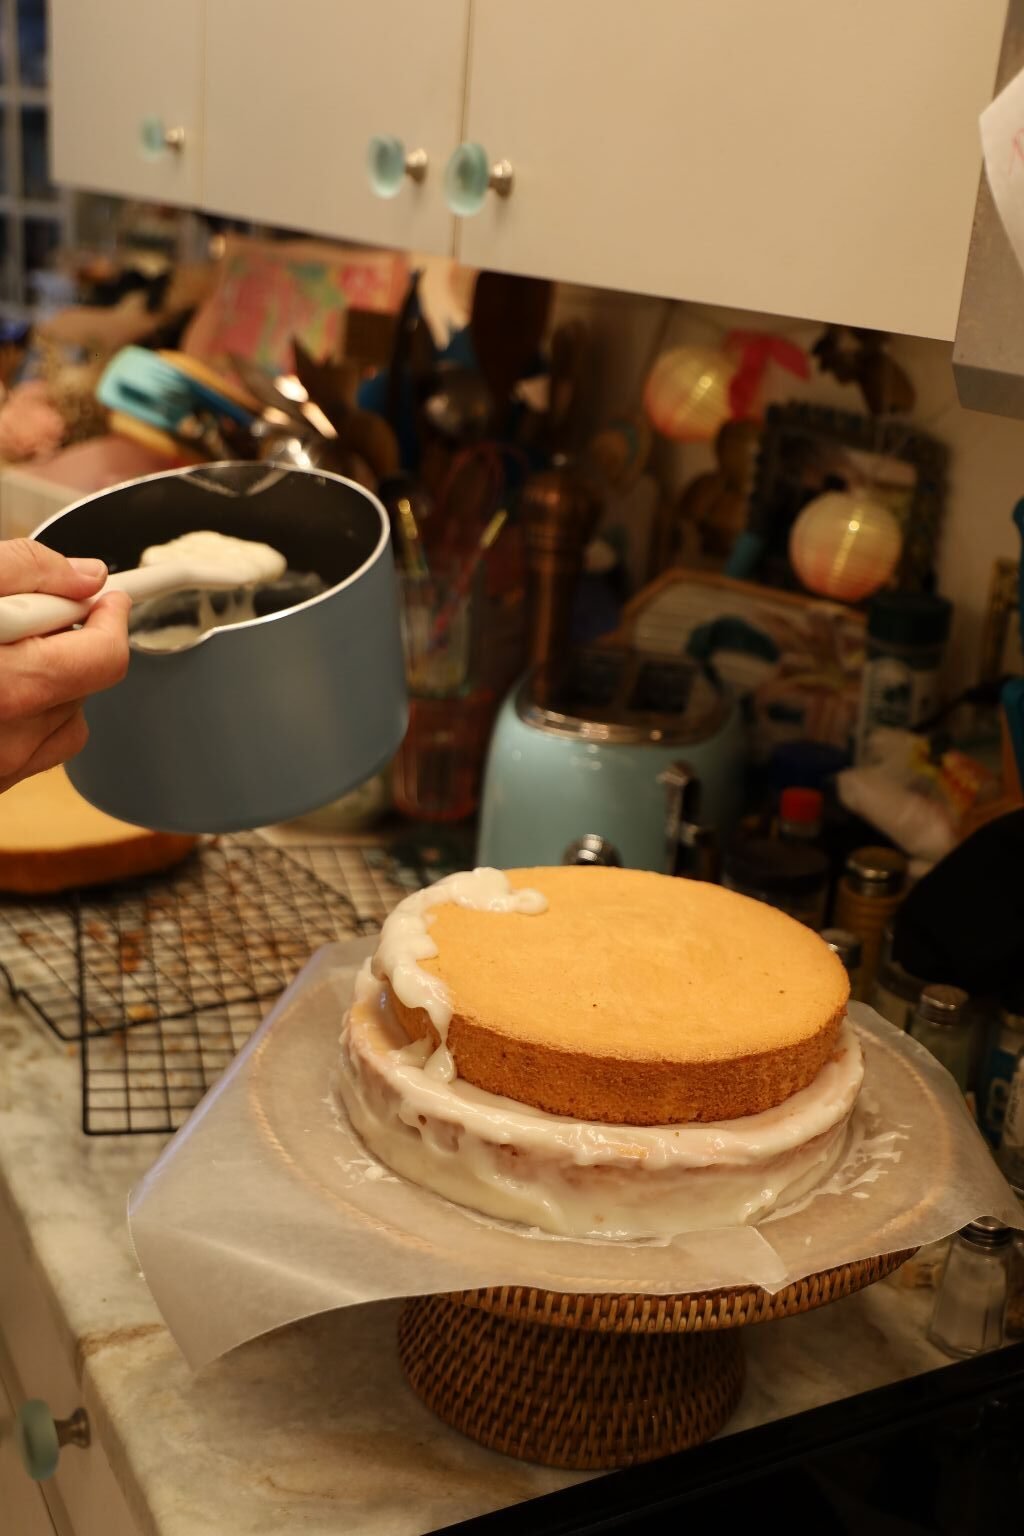
Then, add your second cake and repeat the process.
(I Julie, wanted the smaller cake between the two larger ones. My idea was for the cake to be smaller in the middle, kind of like a waist, and then add the fresh Coconut all around that ‘shelf’ that I had created in the middle.)
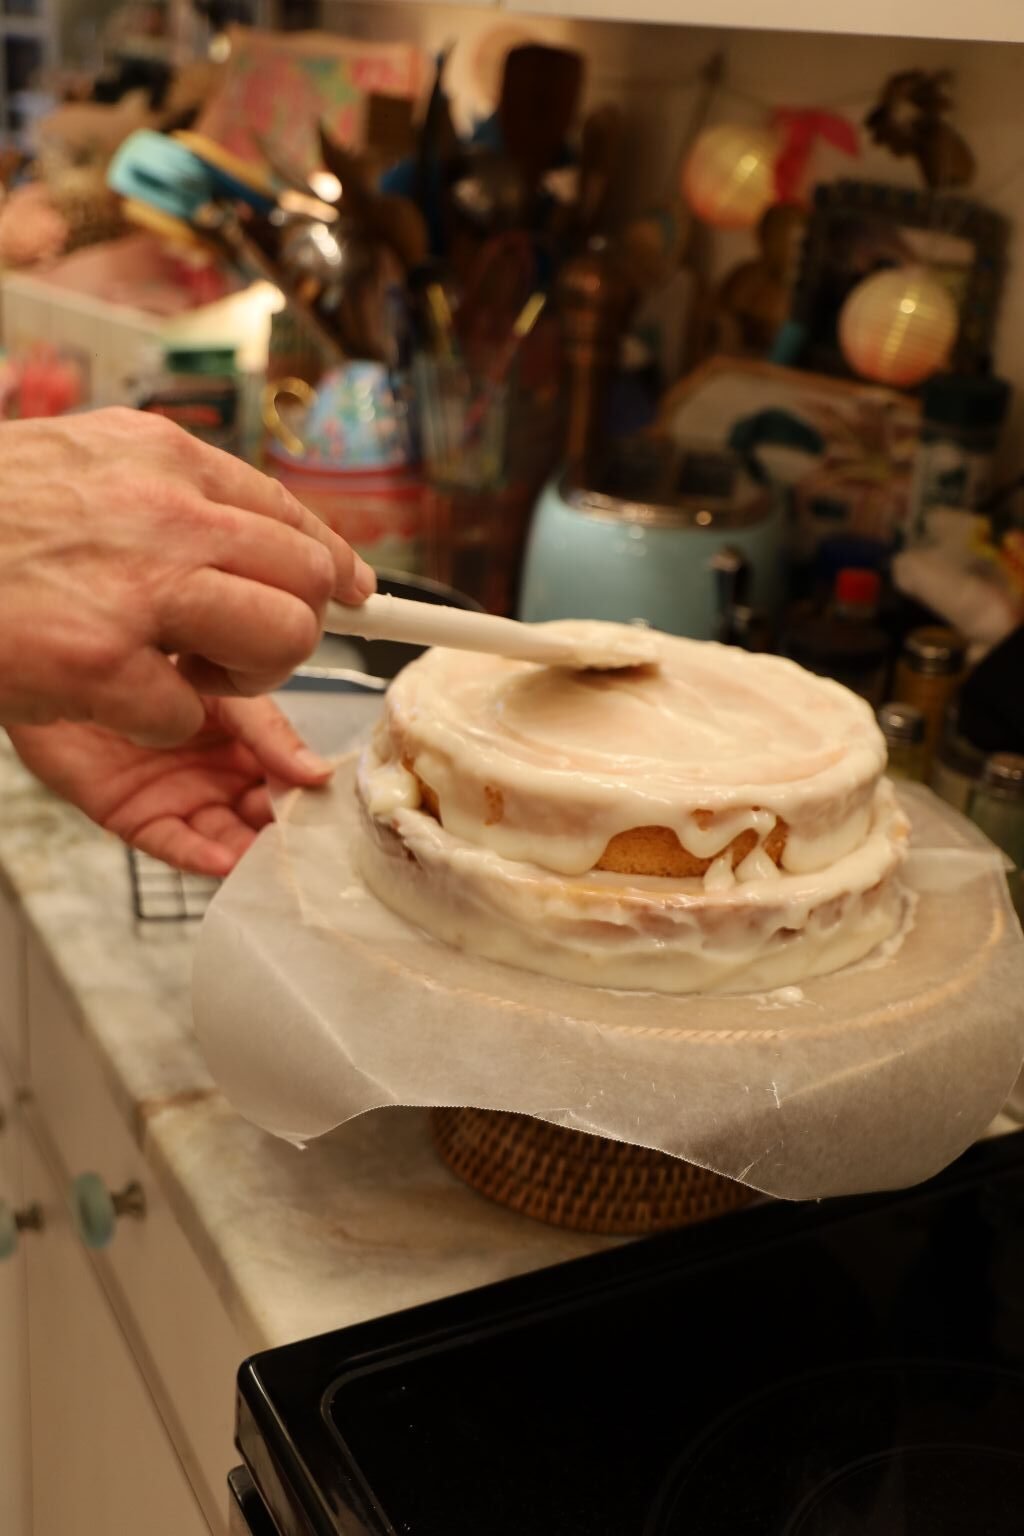
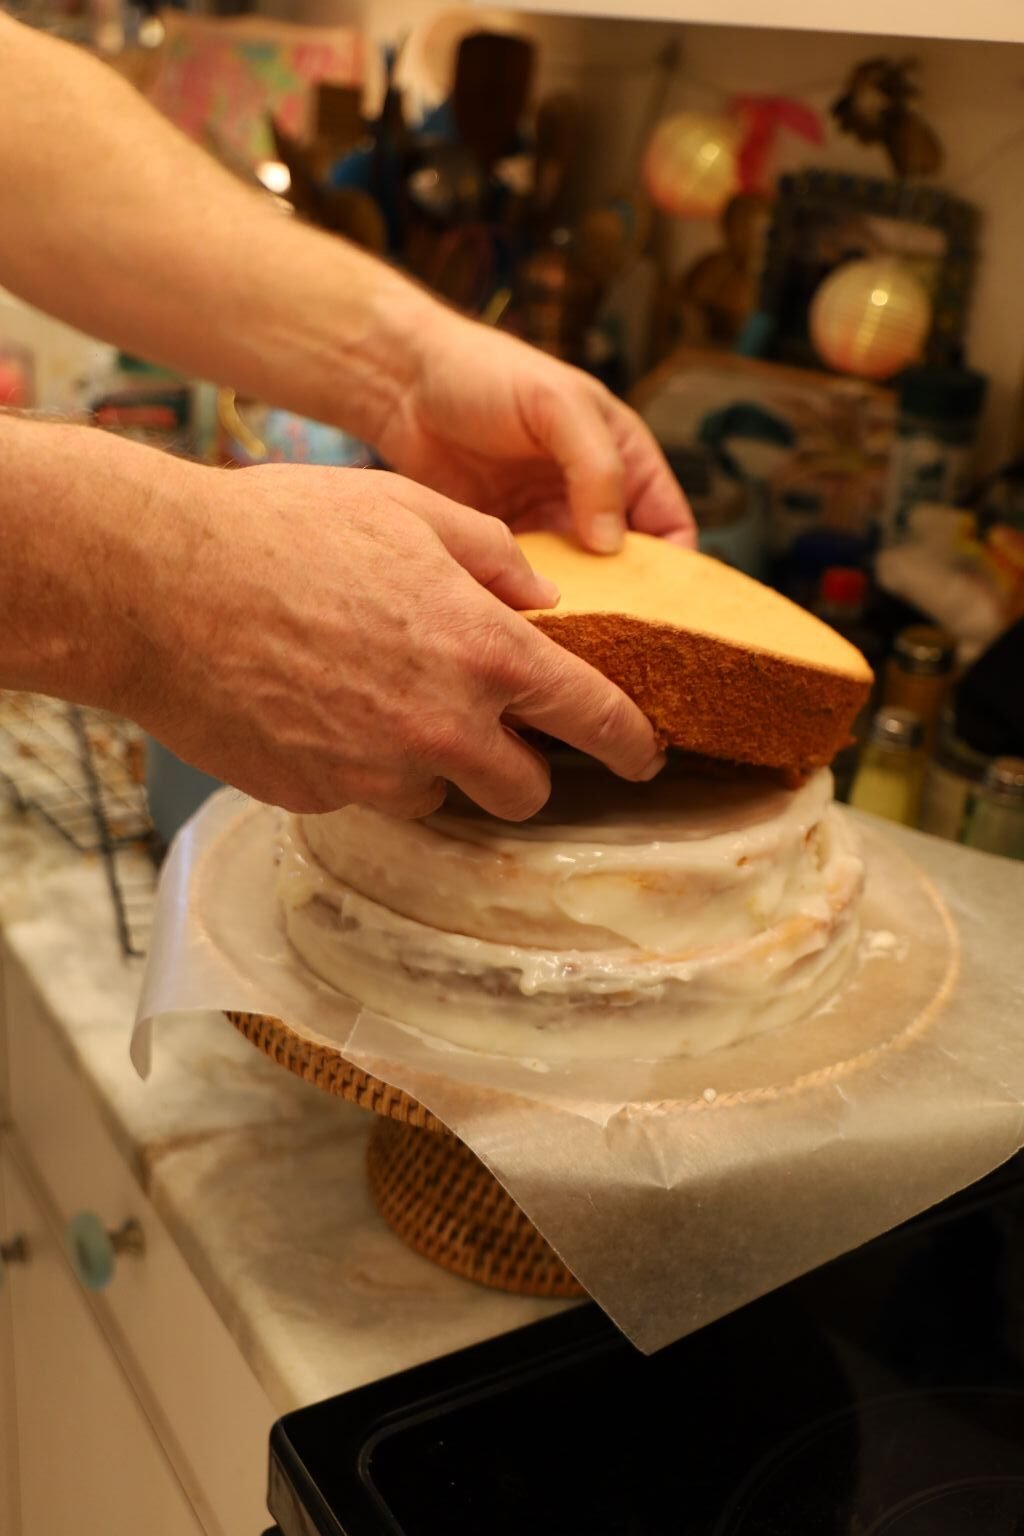
Lastly, add the third cake and spread the icing only on the sides.
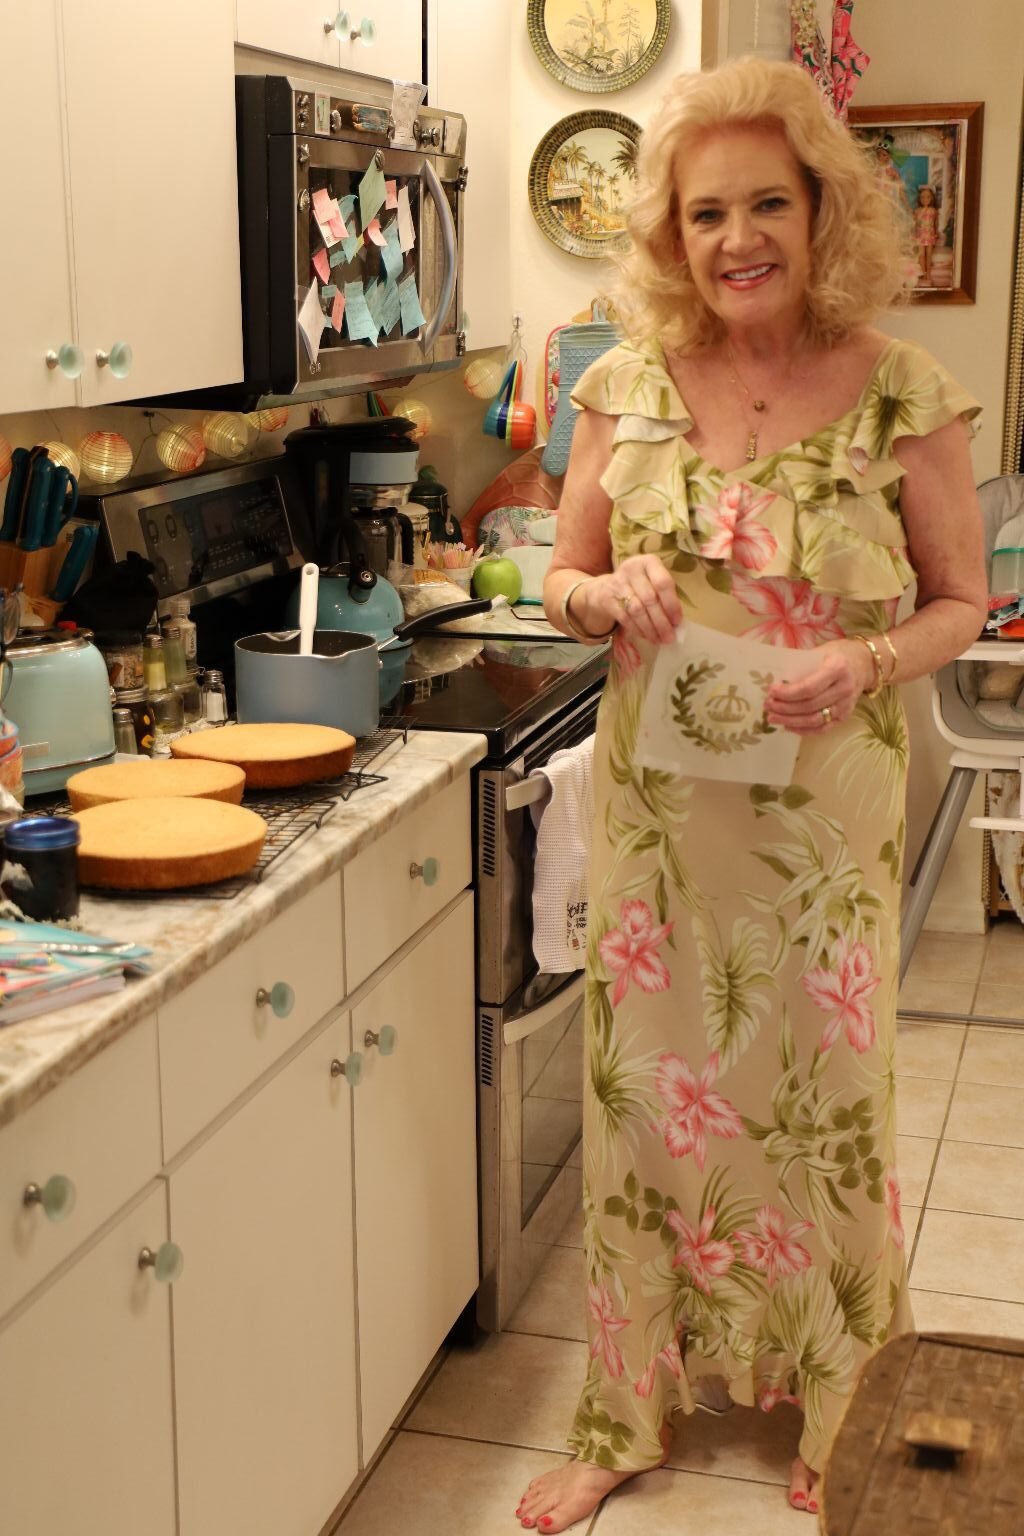
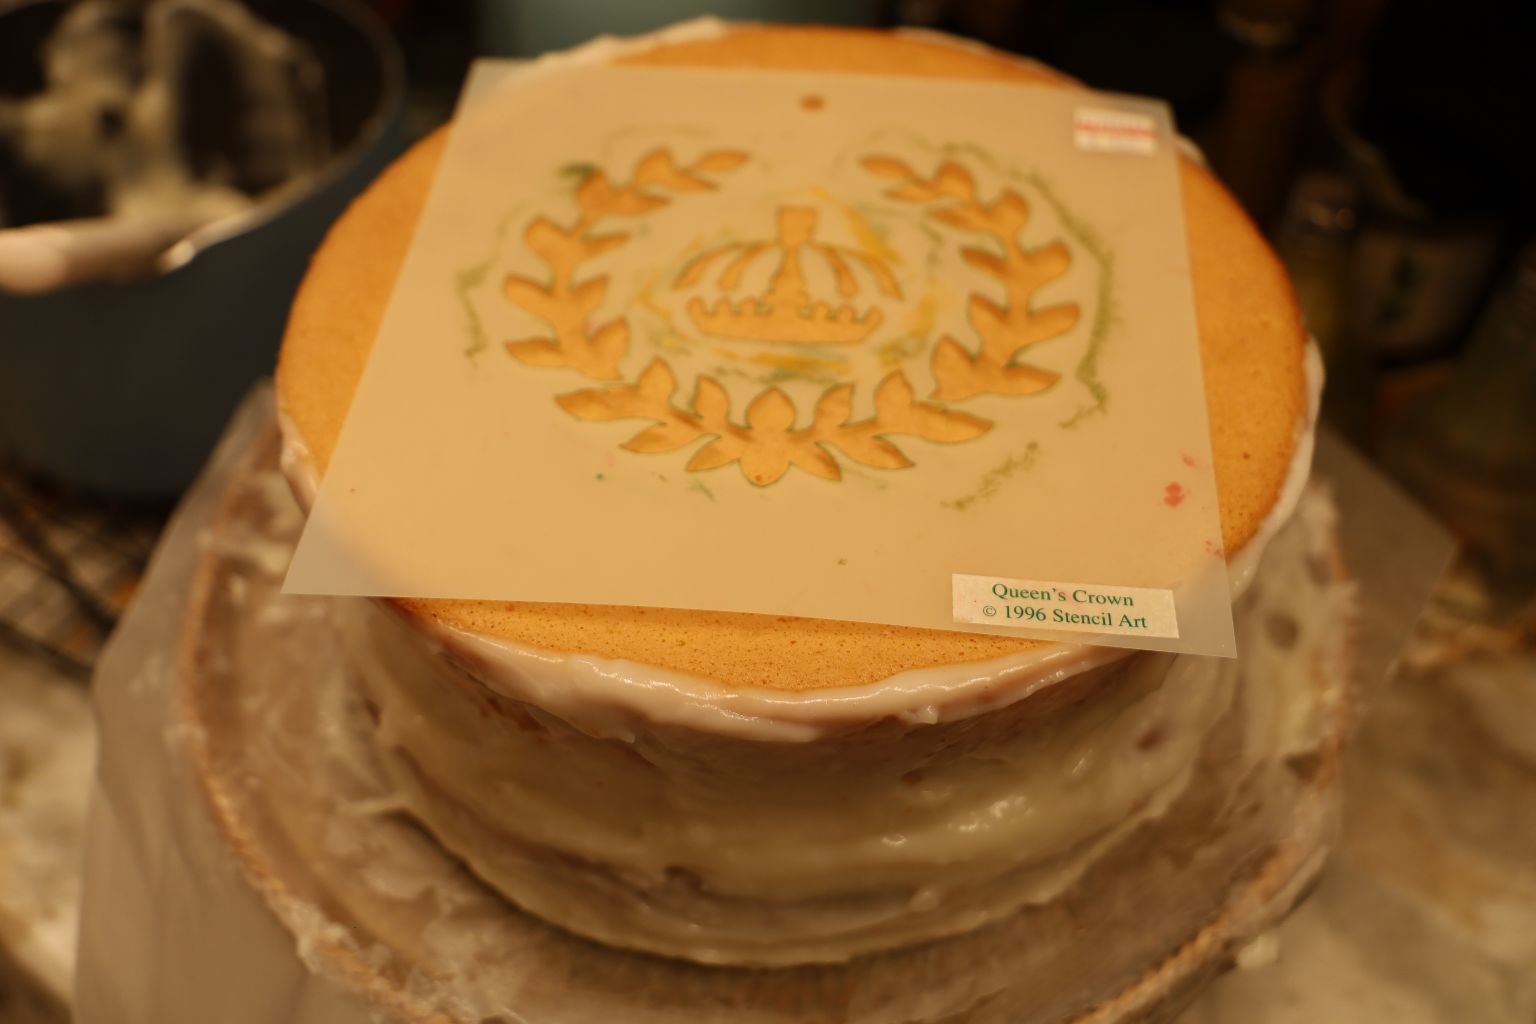
Isn’t Julie Pretty! She had the idea to stencil the top. Here we used a Hawaiian Royal Design stencil from her painting coconut days in Hawaii, and simply dusted some powdered sugar on top. The cake was light in taste like an angle food cake, but was much more flavorful due to the use of the coconut milk. We will be making this delicious cake more often. Happy 65th Birthday Julie! I love you so much!
————————————————————————————————–

65 Feels Pretty Good!
Mahalo Nui Loa,
Julie Barefoot

Currently Hawaii Blogging… A co-worker of Gordon’s sent these to us right before we left for Hawaii. He made them. We thought they were funny and wanted to include them in our write up’s of our trip. 🙂 ————————————————————————————— Gordon …

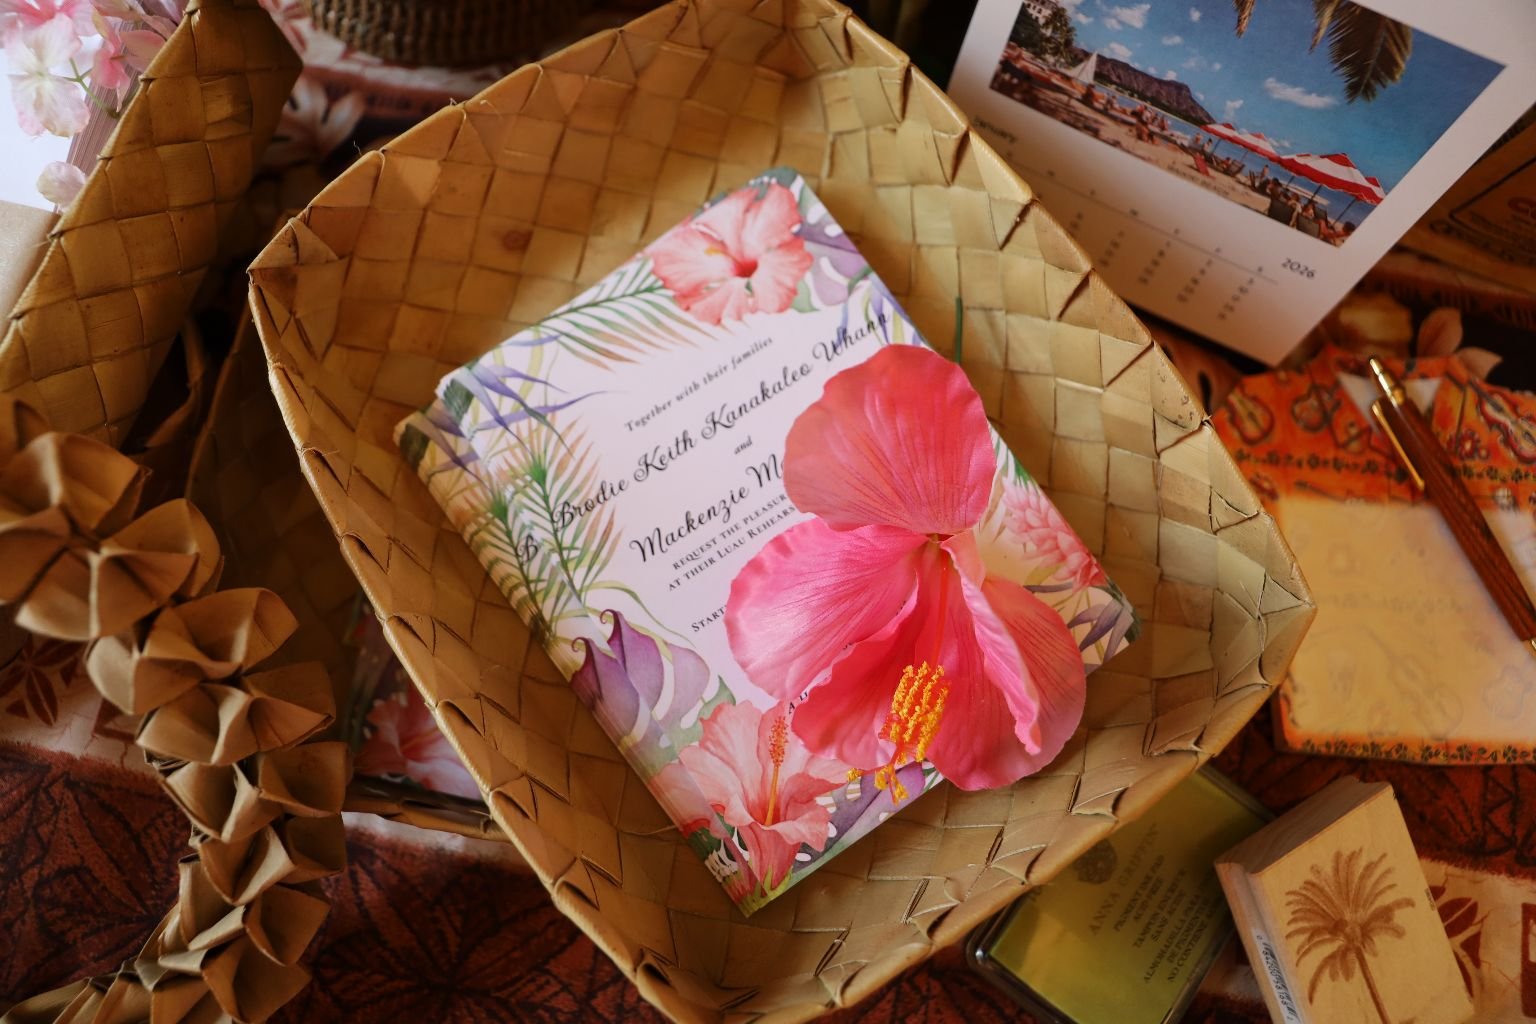
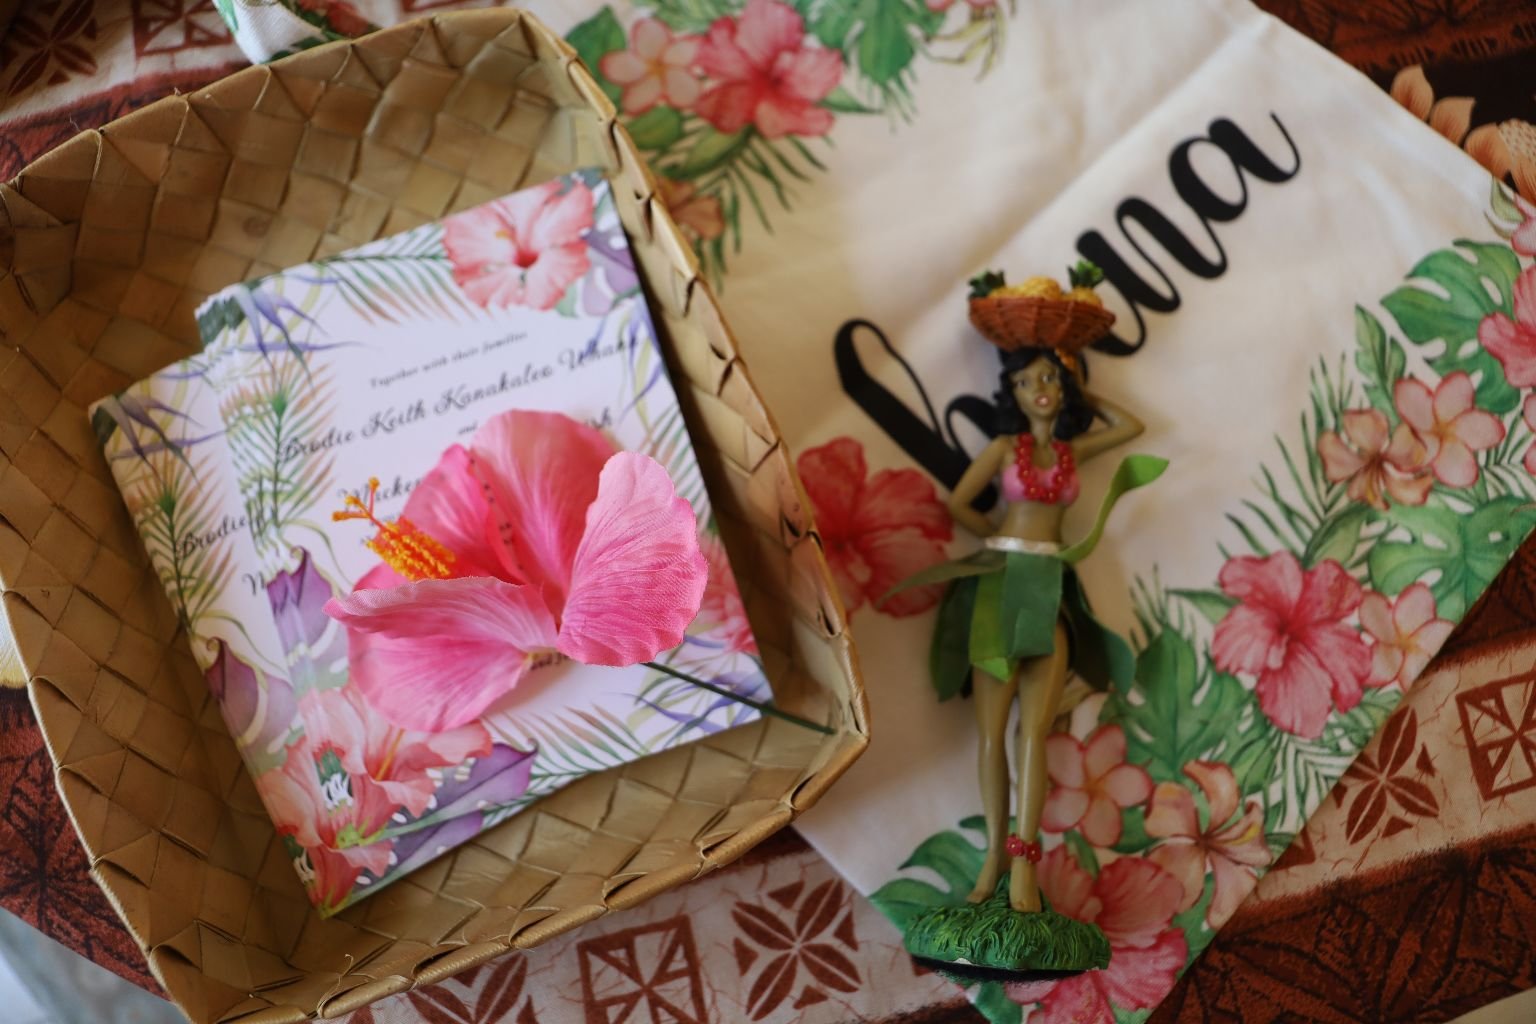
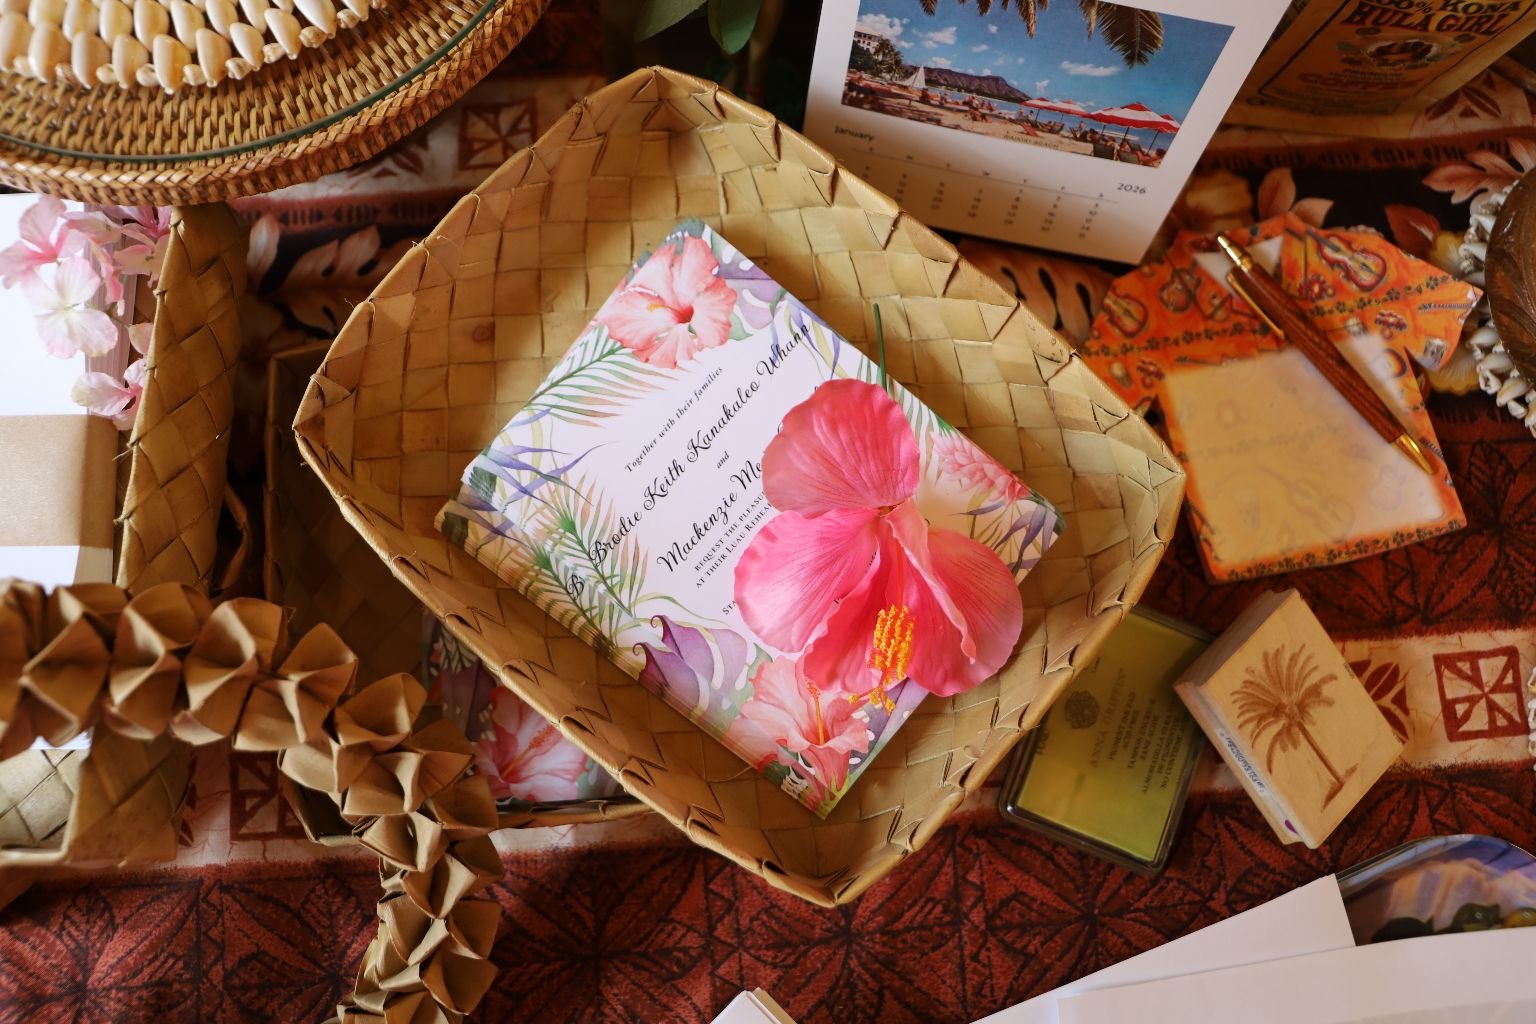
Preparing The Luau Invitations
100% Hula Girl Coffee, The Big Island
(I had sent a few bags to the future Bride and Groom, and the Parents of the Bride, along with a few bags for us.
Just to get us into the Hawaiiana mood.)
Here I am putting together The Rehearsal Dinner Luau Invitations
As the parents of the Groom, it is our responsibility to host the Rehearsal Dinner.
But this year, there is no rehearsal dinner, however there is a Rehearsal Dinner Luau.
Now how much better could it be than that?
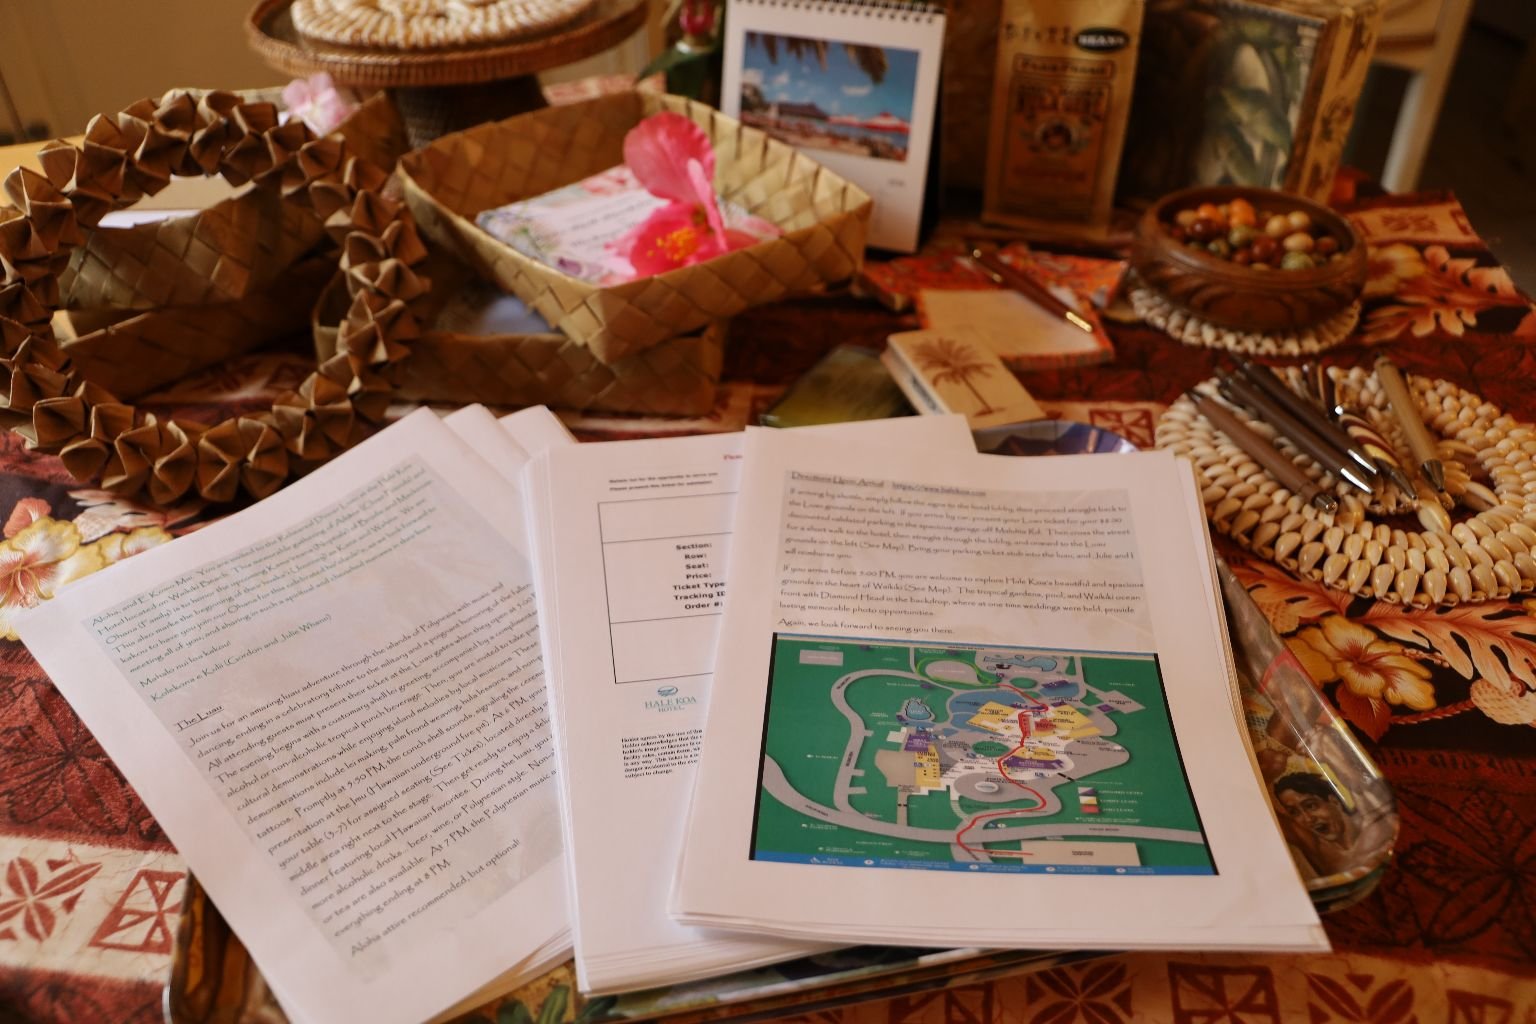
(In the photo above you can see the work that Gordon and I put into in doing the write-ups for the Luau for the guests. We had the best time putting them together. Brushing up on our old Hawaiian vocabulary. It was a lot of fun. Once Gordon and I had the write up down, he printed them off, along with about 45 Luau Tickets, and Maps of the Hotel and it’s grounds, and then sent them to me to include in the invitations I had printed out.)
————————————————————————————————
We decided to have the Luau at the hotel we would be staying in, The Hale Koa Hotel. We didn’t just want to have the Luau at our hotel because of convenience, it just happens to be one of the best Luau’s on the island of Oahu. At the time of this planning, I had Cataracts, and could barely see 8 inches from the computer screen. Gordon was also working overseas so in his spare time he is the one that had to be the liaison between me, and Carol, the mother of the bride, and The Hale Koa Hotel Luau Staff. While I was getting both surgeries on my eyes last October, Gordon and Carol were planning the date, time, tables, seating, guests invited, etc. Once they did all that, and I had recovered from my surgery, I ordered the invitations printed.
I Think I Did A Good Job On Them
We were very pleased with booking the Hale Koa Luau. We knew they were the best, as we had been to a few Luau’s at the Hale Koa when we lived on Oahu from 1986 – 1999. We had also went to a few others throughout the island while we lived there. The Hale Koa is one of the best, if not THE best.
So, we began keeping in touch with the Hale Koa for the planning and preparations.
I had the invitations made in the same style as the brides ‘Save The Date, and Wedding Invitations’.
It was then up to the family of the bride to get in touch with us as to how many would be attending, and if that number changed, so that we could then reserve the tables necessary. Carol and Bill also wrote up the table sittings of the guests. We had approximately 45.
I knew that I wanted the Bride’s Table to be the best, and the Groom’s Table, ours, to be the second best, and then to have the rest of the guests to flank us. If you would like to read more about our Luau…..
—————————————————————————-

Click Here For: The Wedding Rehearsal Dinner Luau
——————————————————————————————
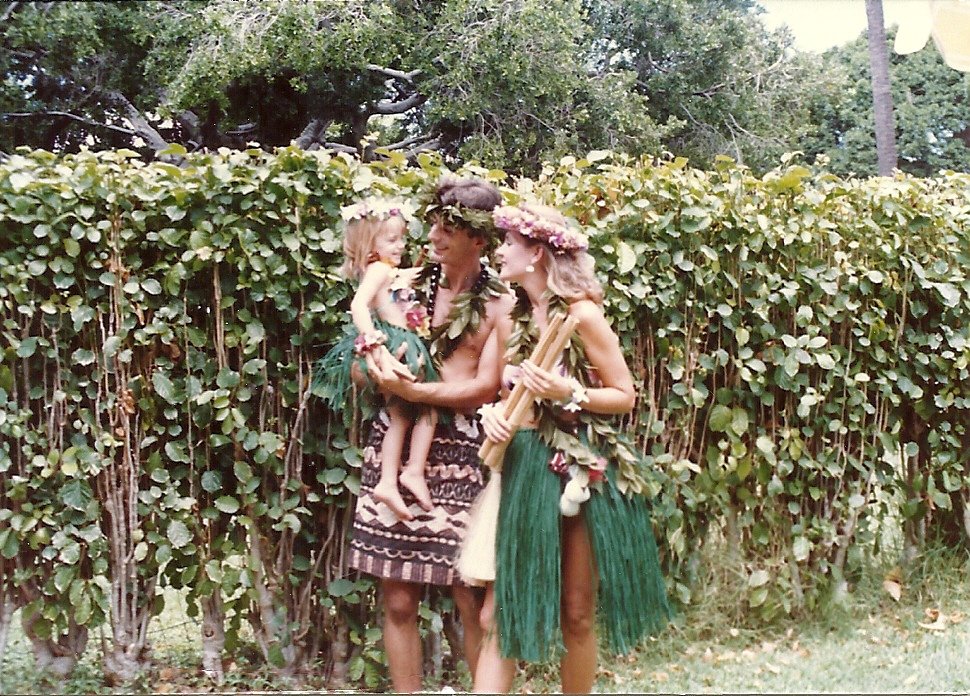
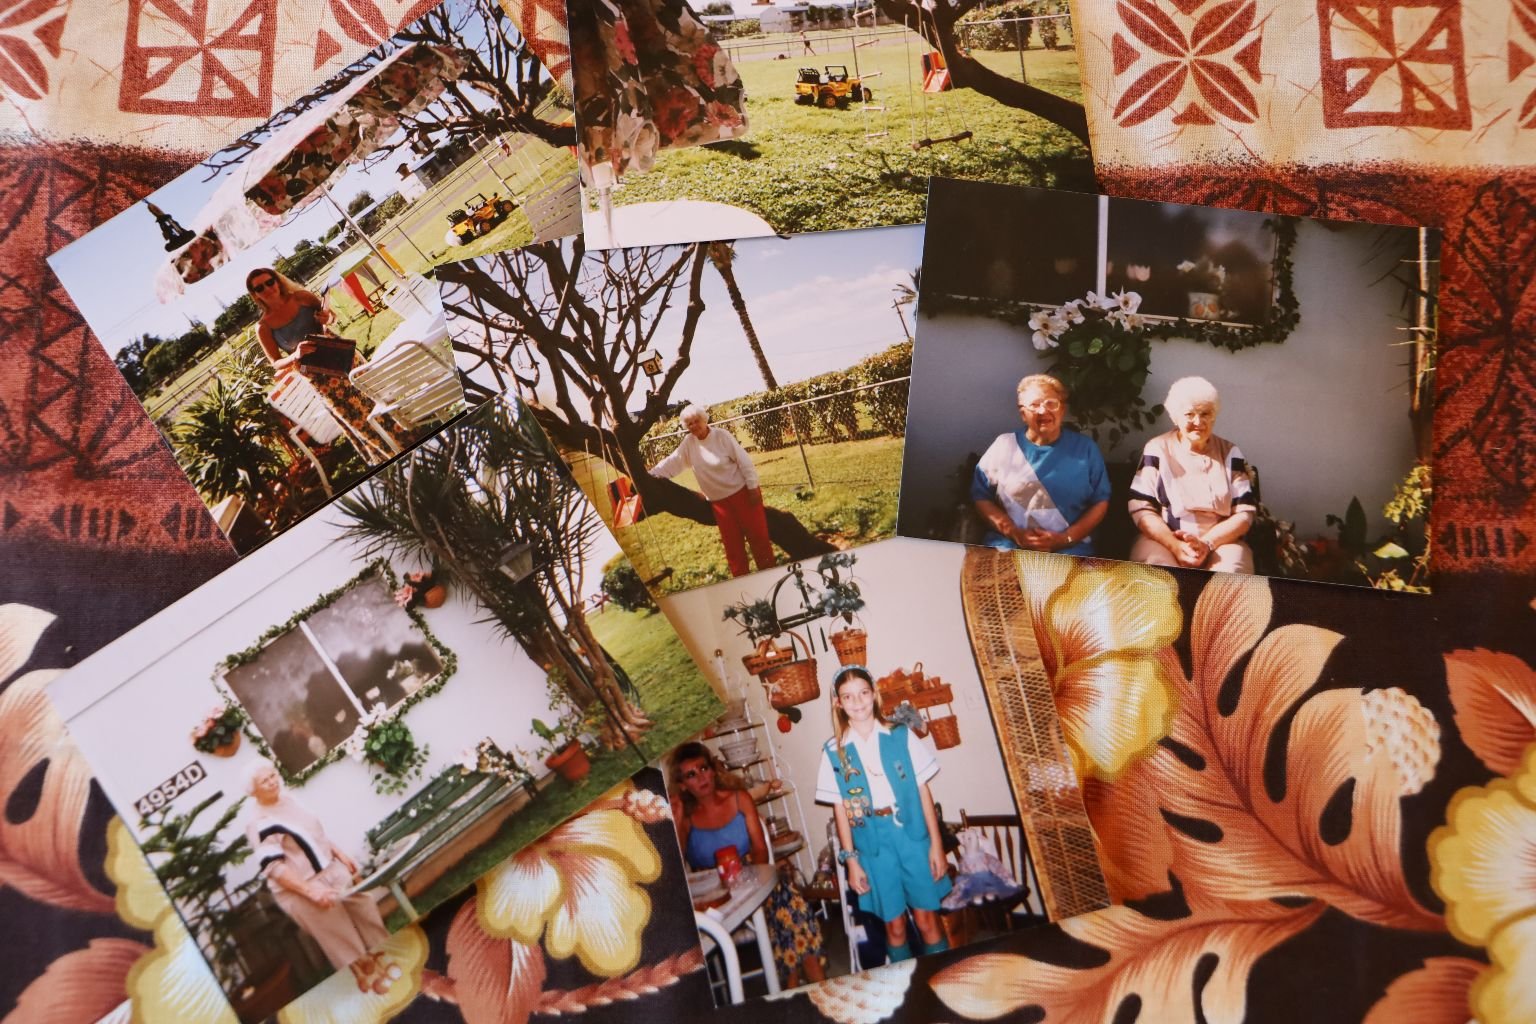
Just Some Old Memories Of Our Time In Hawai’i
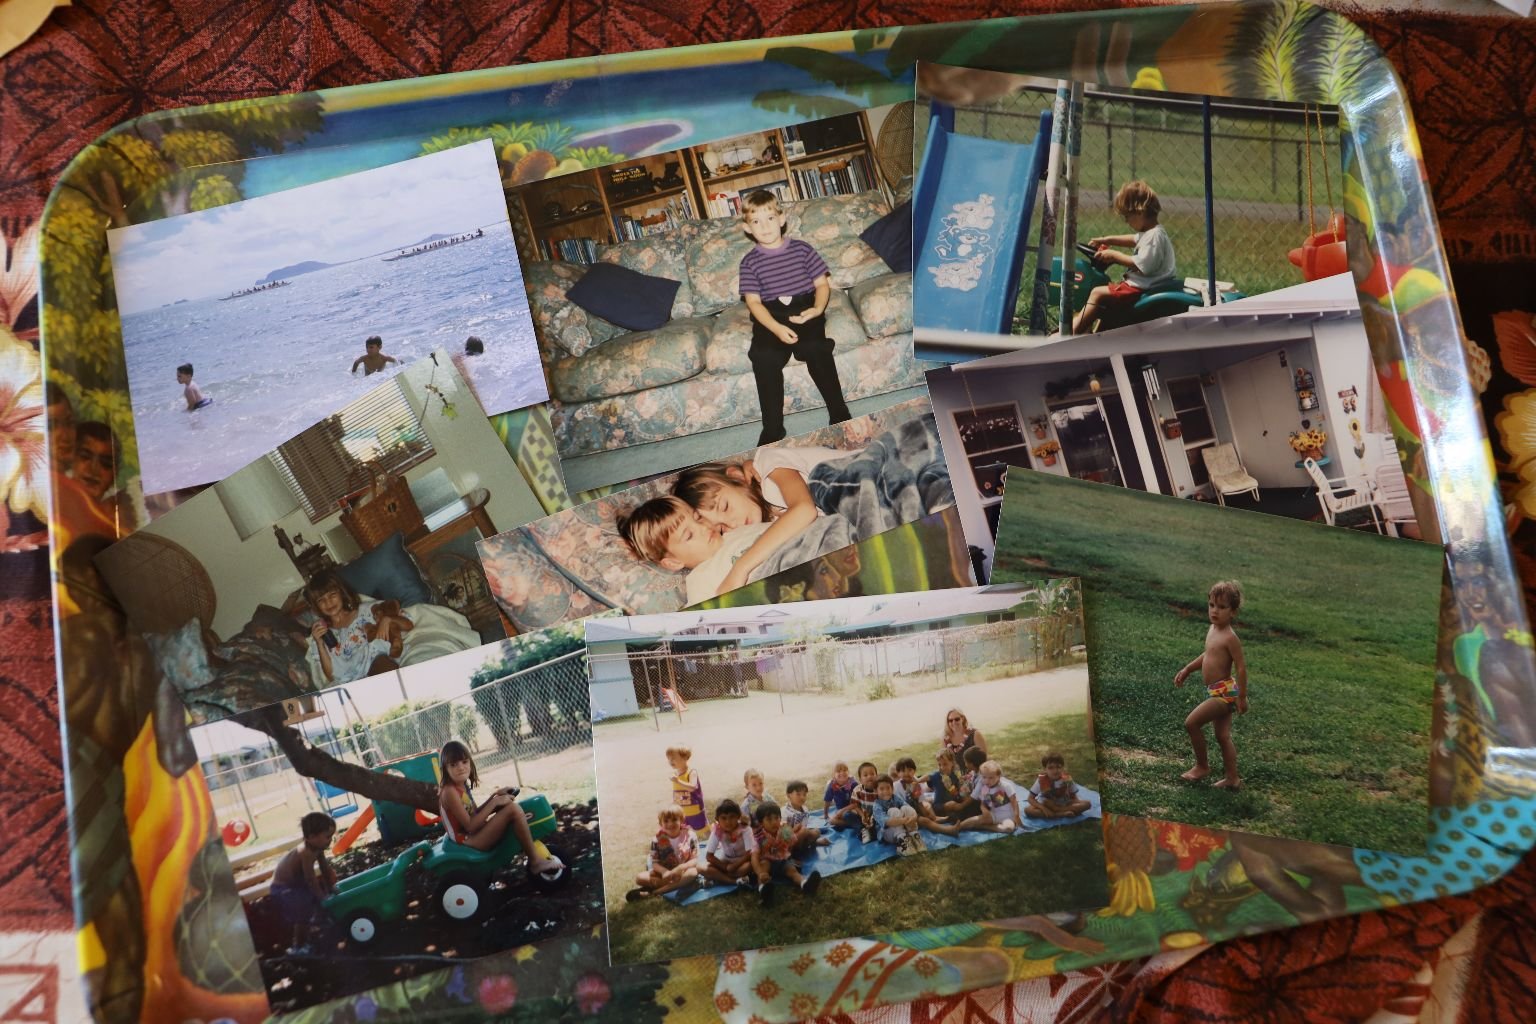
I Wanted To Include These As They Are Relevant For This Day
Brodie At His Pre-School, And In Our Backyard
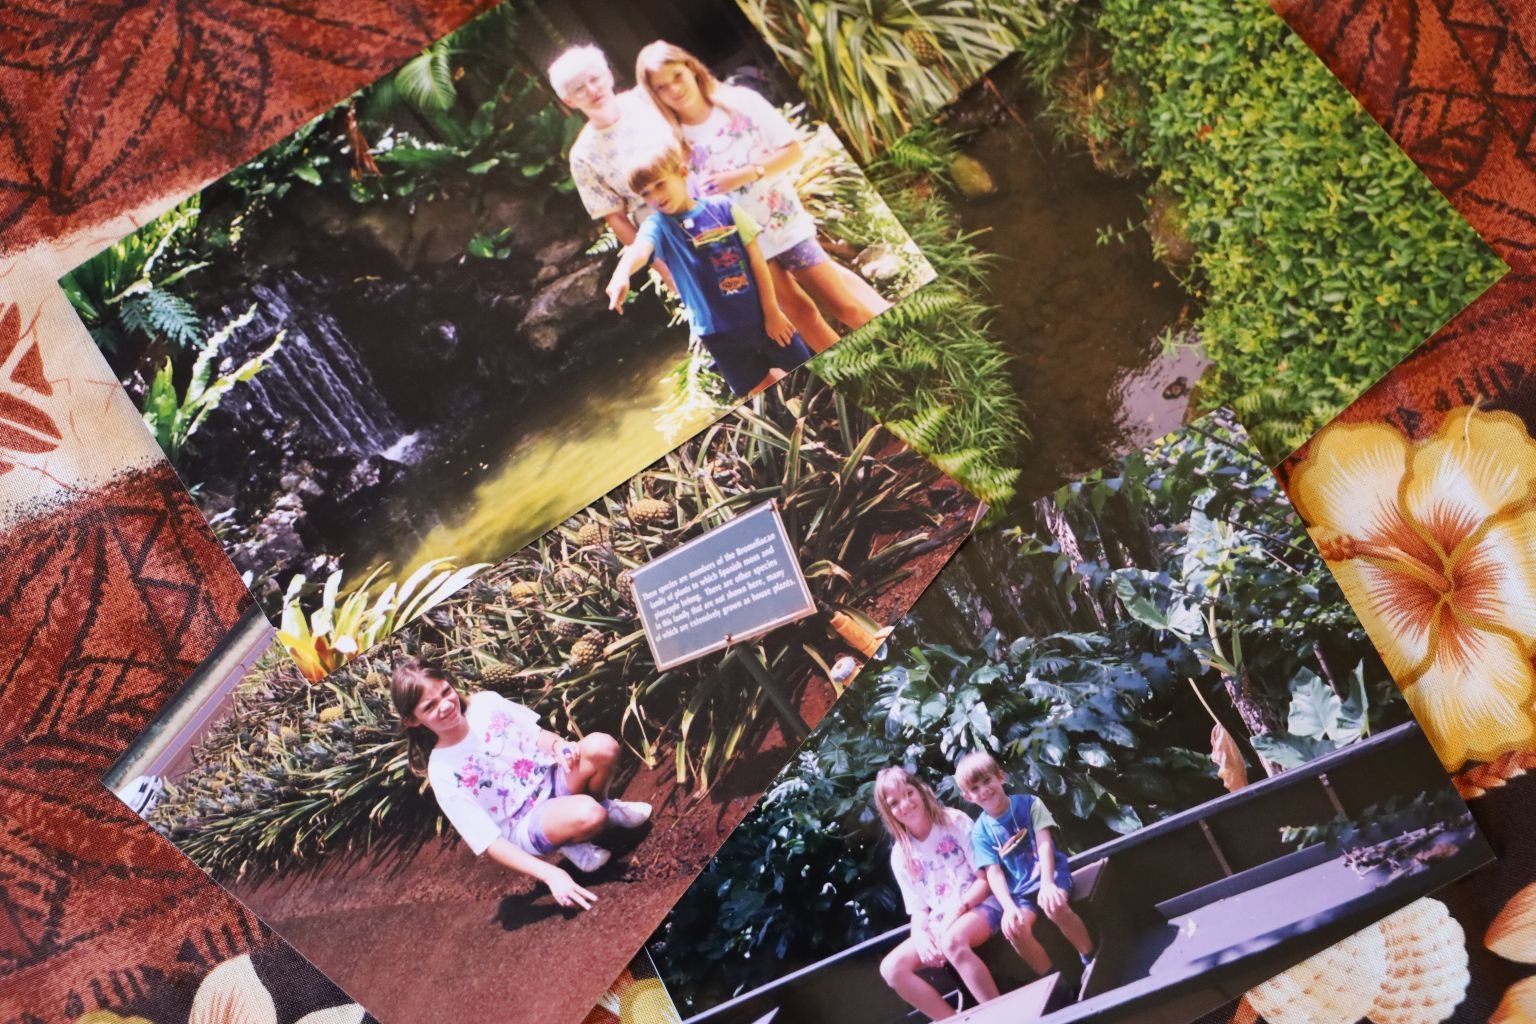
Veronica and Brodie in the Pineapple Fields Towards North Shore
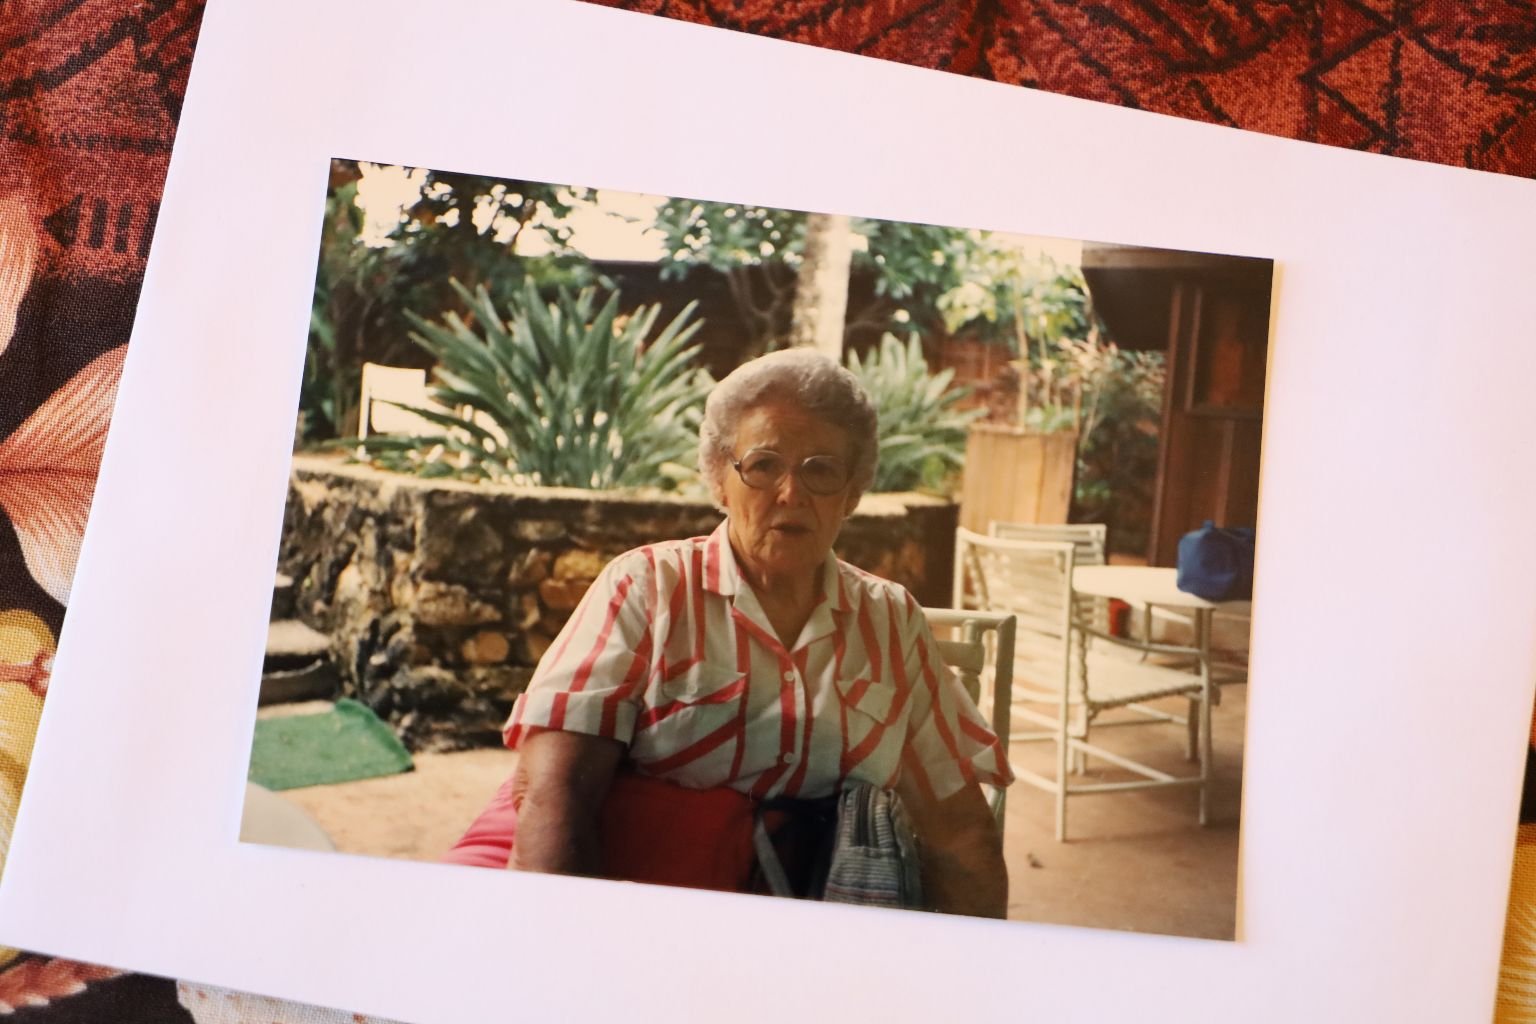
Grammaw Nellie Mae in Hawai’i
(My Grandmother is extremely important to me, and her influence.)
The photos are relevant because they are why Brodie wanted to get married in Hawaii to begin with.
His history, our family history. And his future history with his lovely bride.
——————————————————————————————–
When We Received The Luau Guest Attendees, I Made Out The Invitations
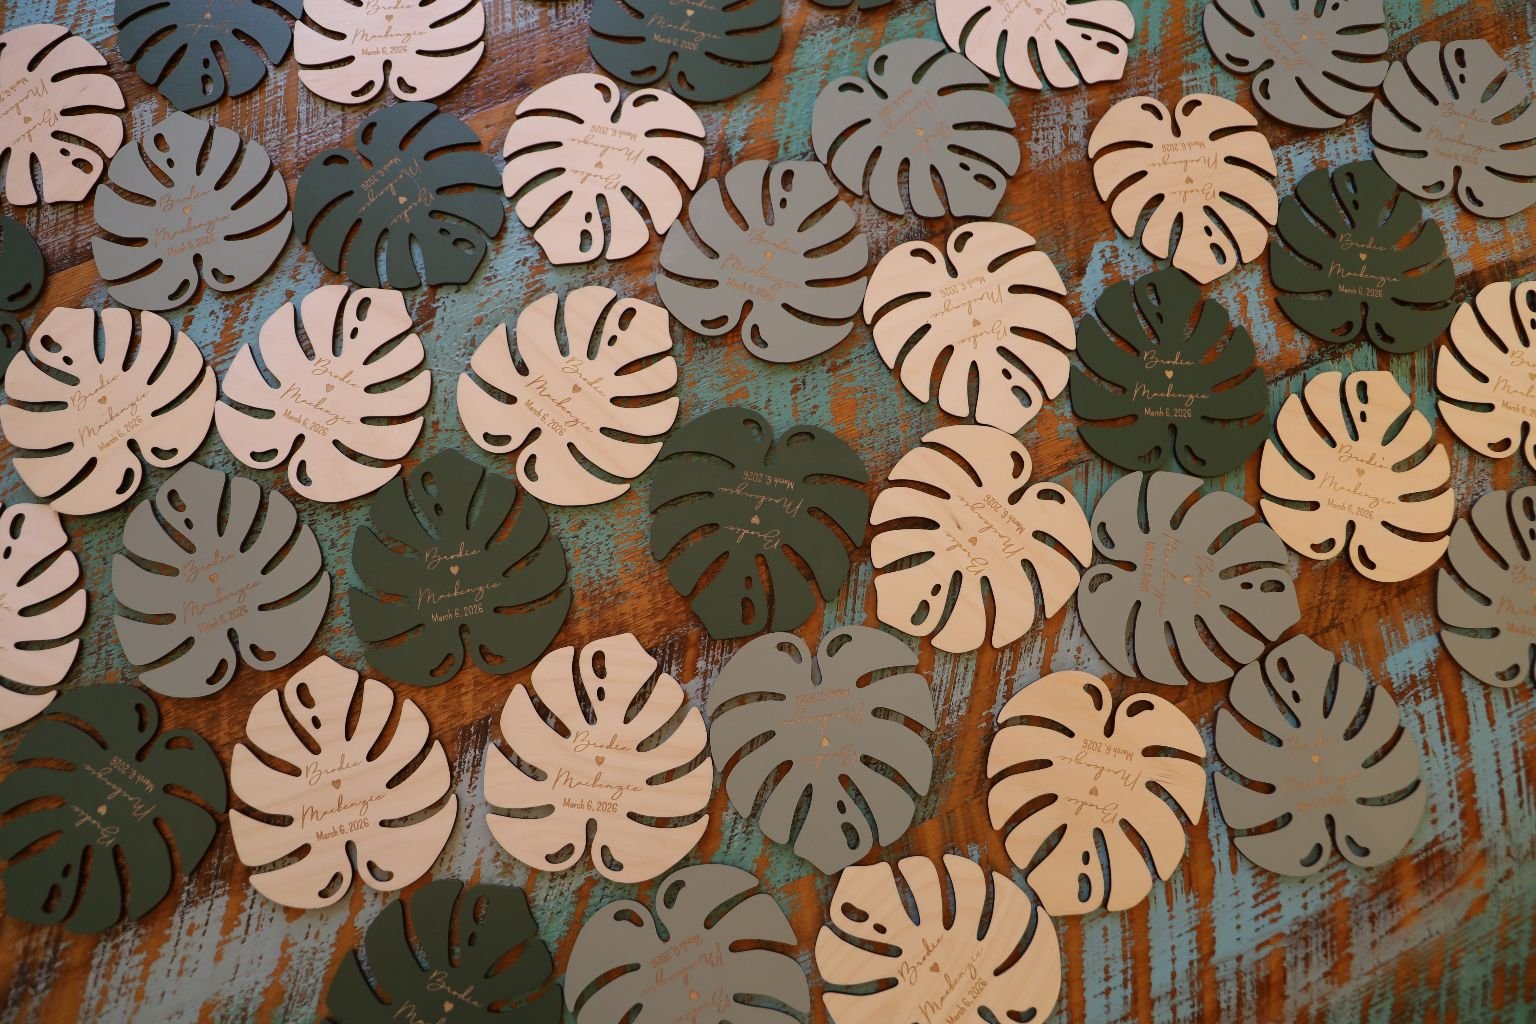
Just A Few Personalized Coasters To Send To The Bride And Groom
———————————————————————————————-
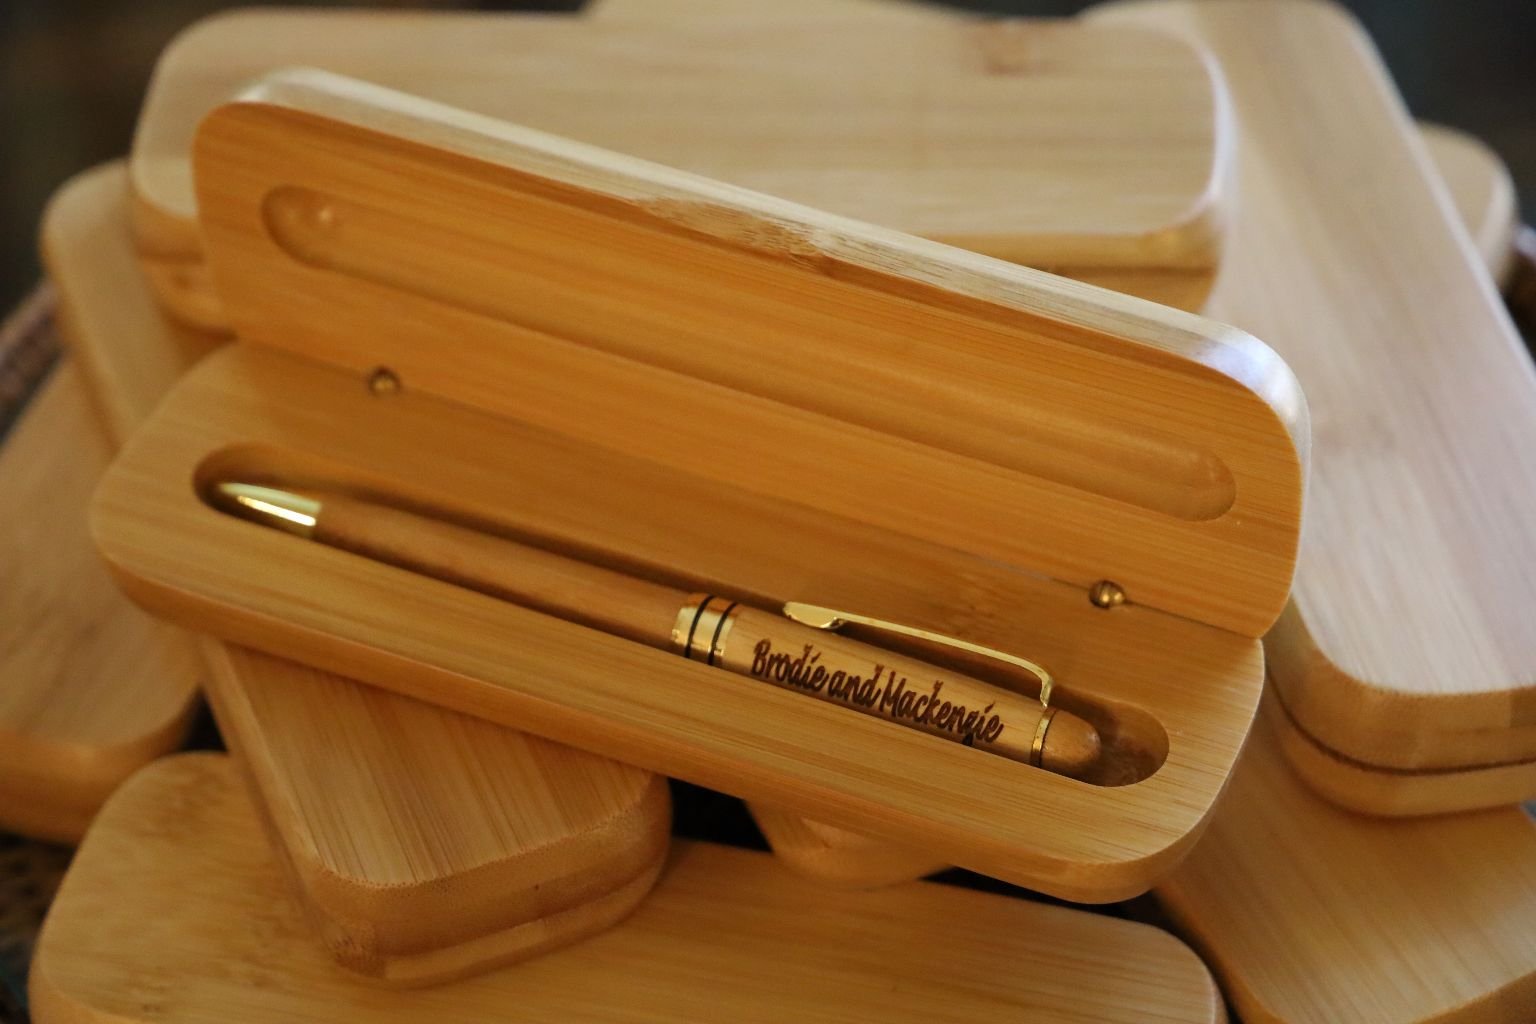
Brodie And Mackenzie
I Also Created Some Personalized Pens for Those Special People
———————————————————————————————-
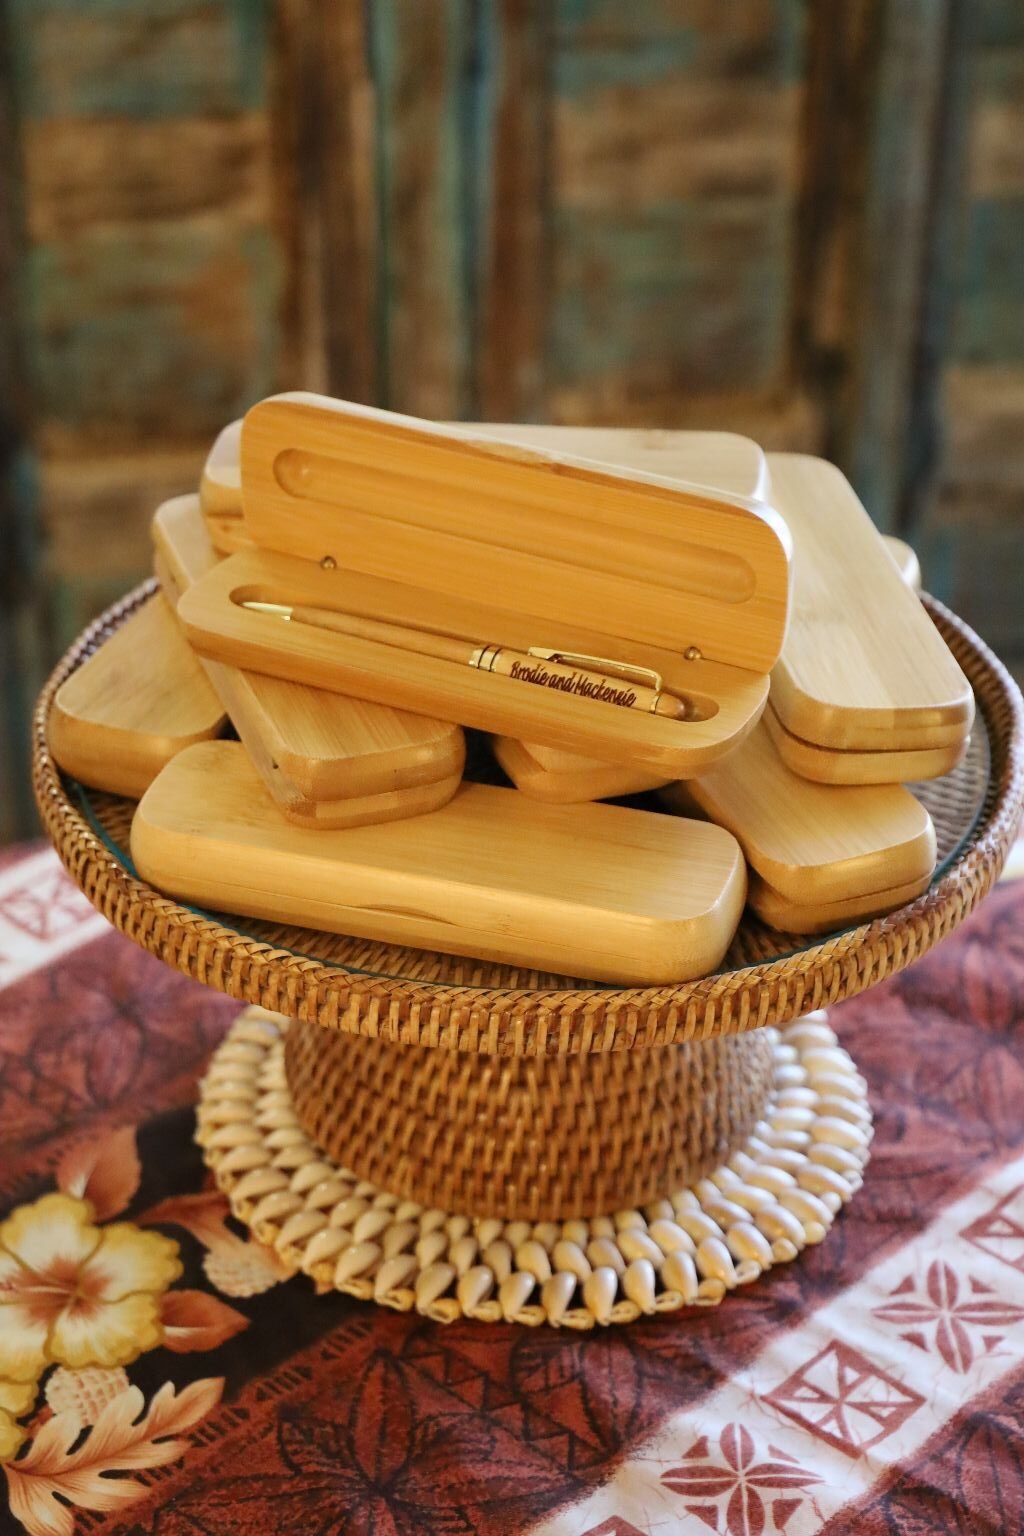
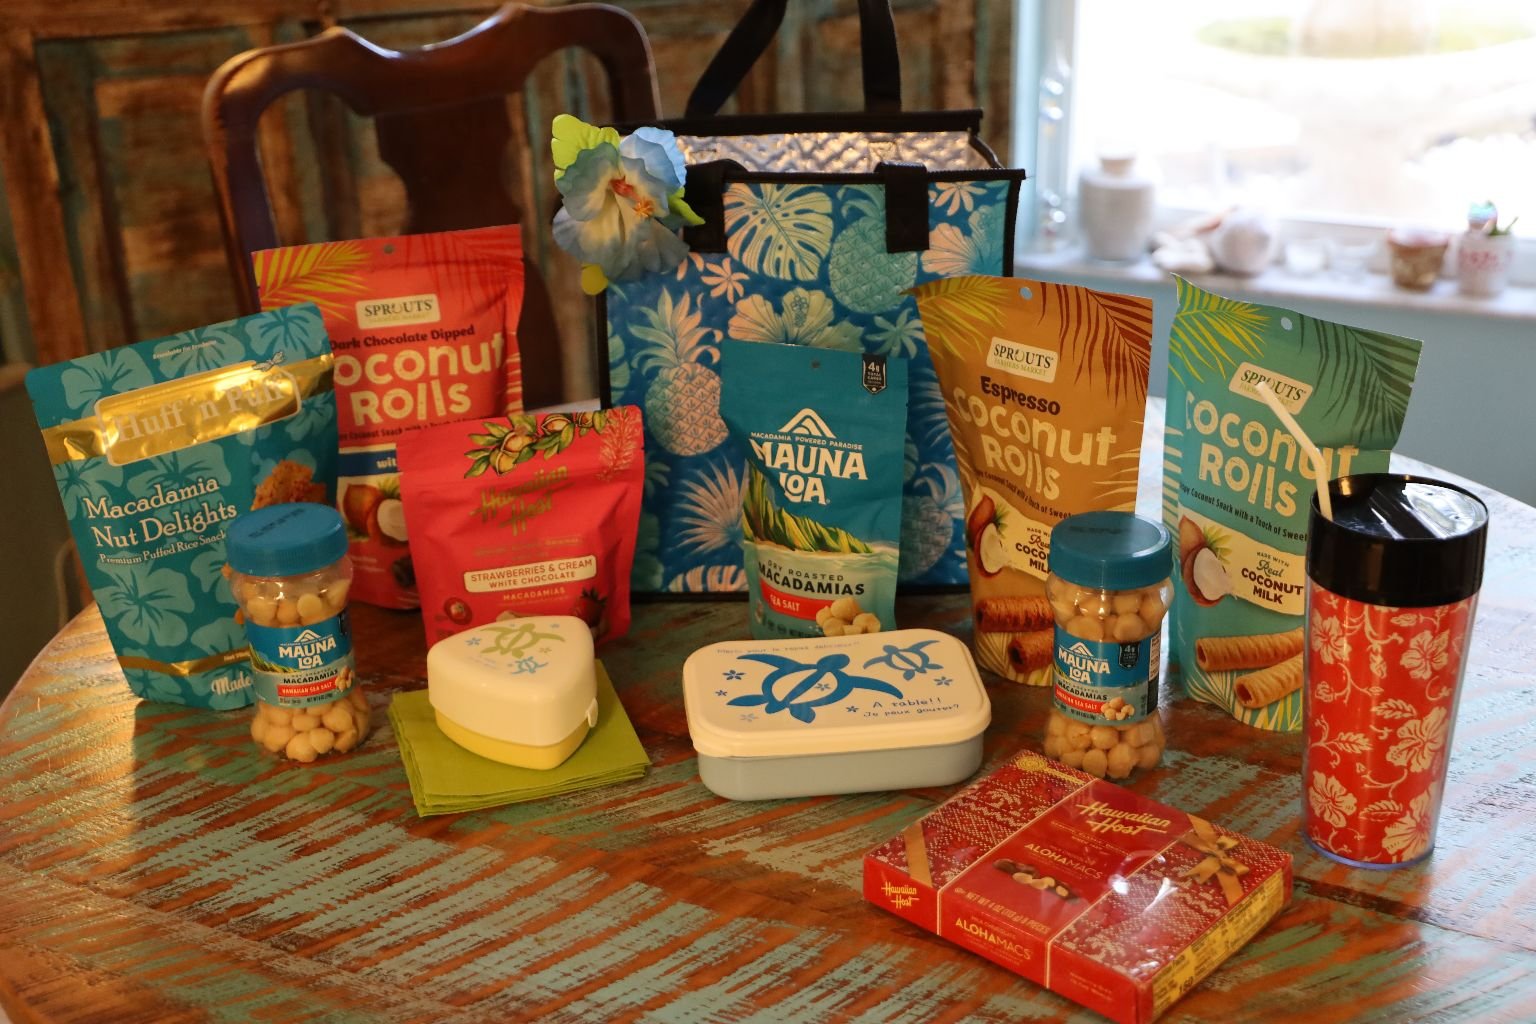
Gifts For The Luau Guests
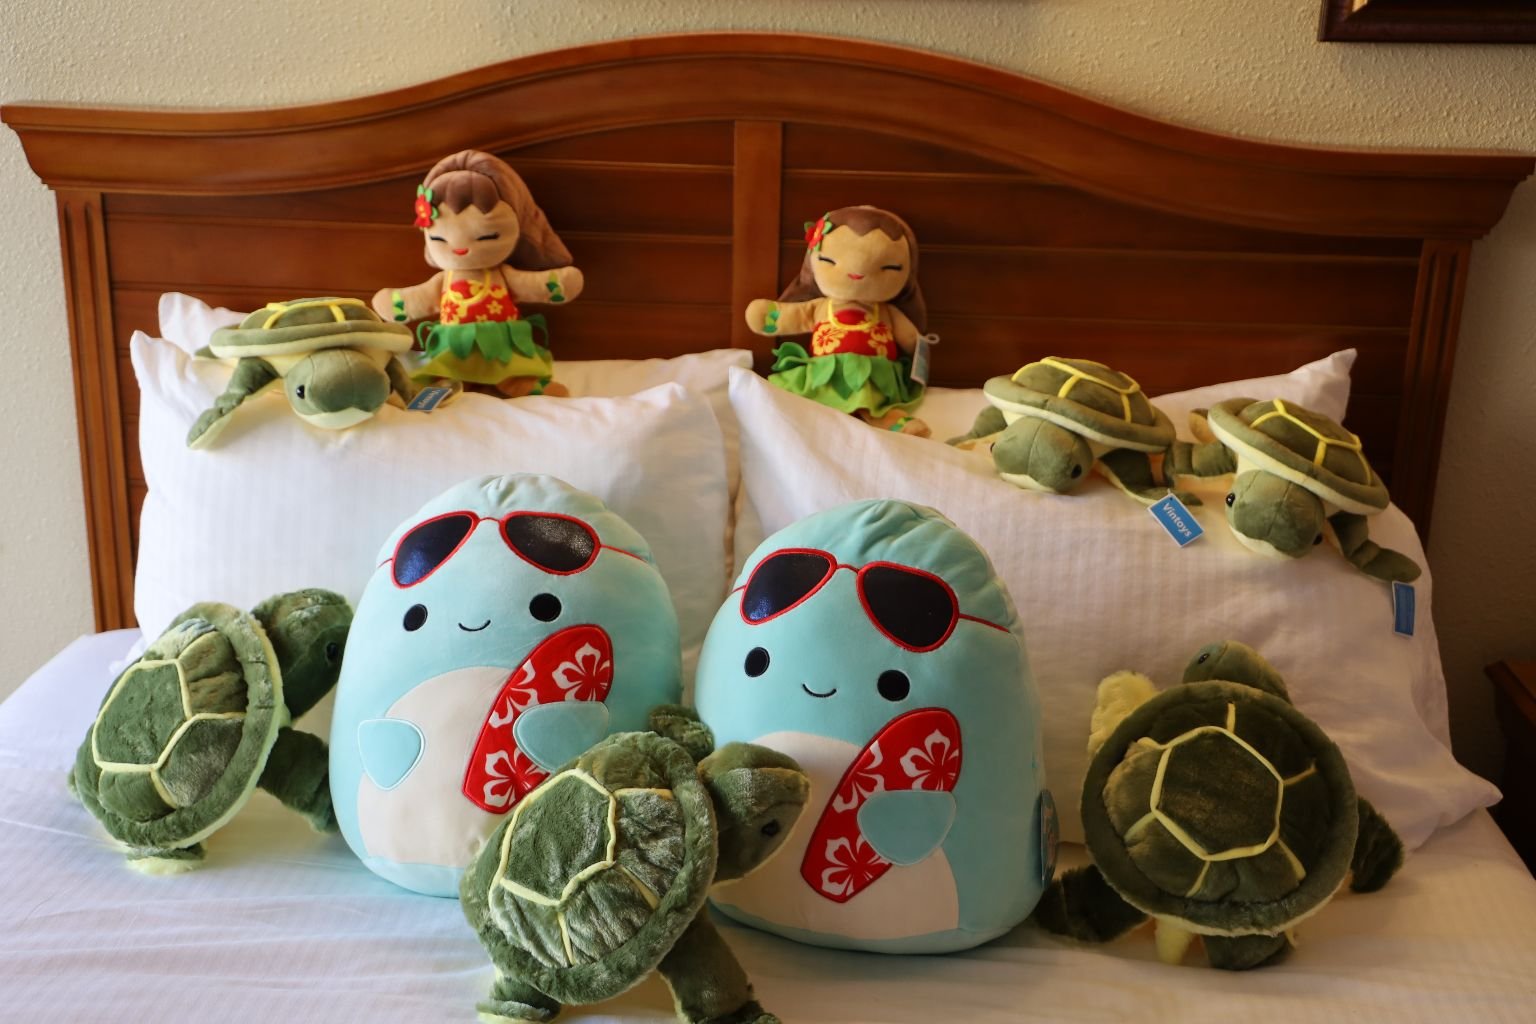
Some Stuffed Animals For Some Of The Children Attending The Luau
Lots of Personalized Coasters
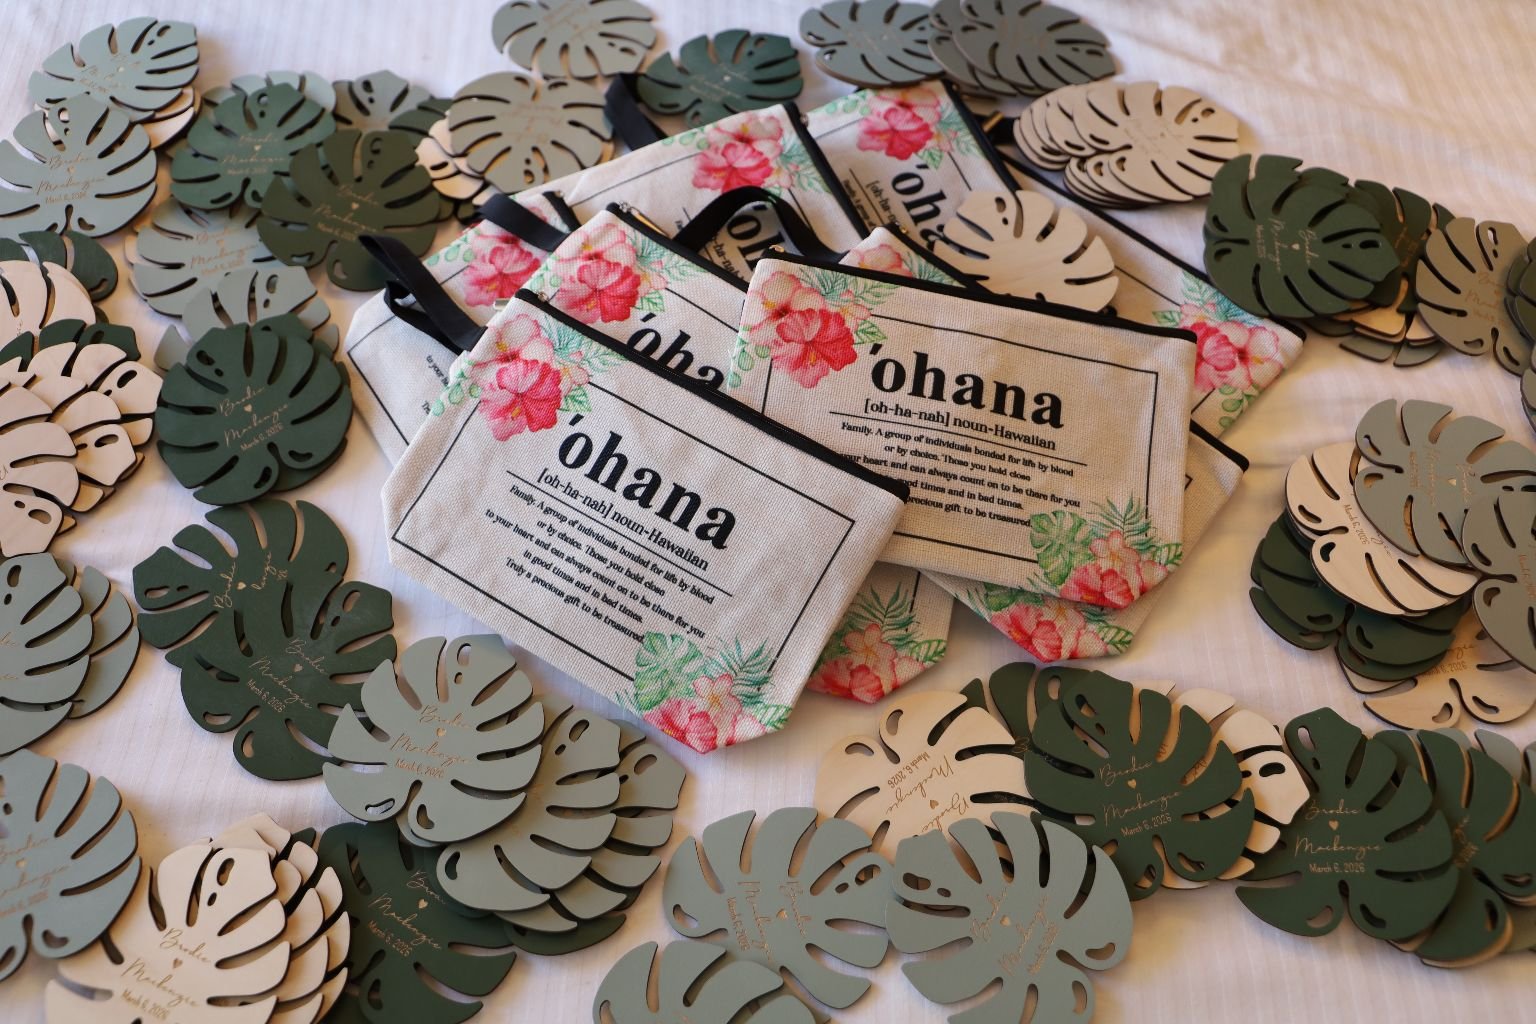
Many Cosmetic Bags
——————————————————————————————-
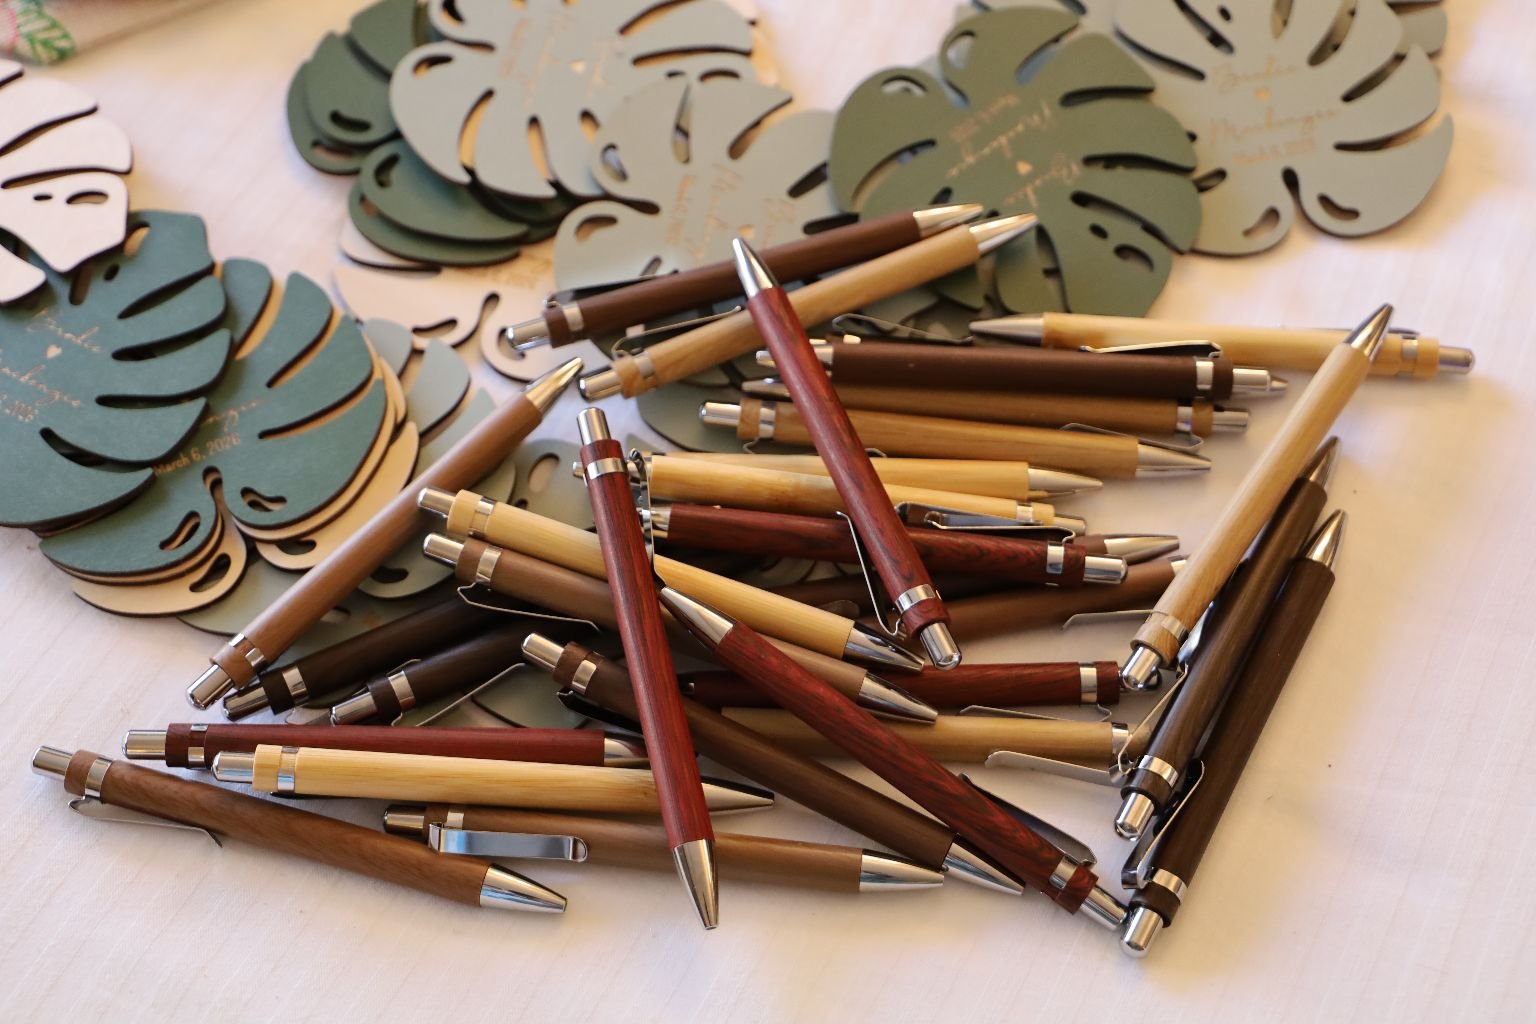
Everyone Gets A Bamboo Pen
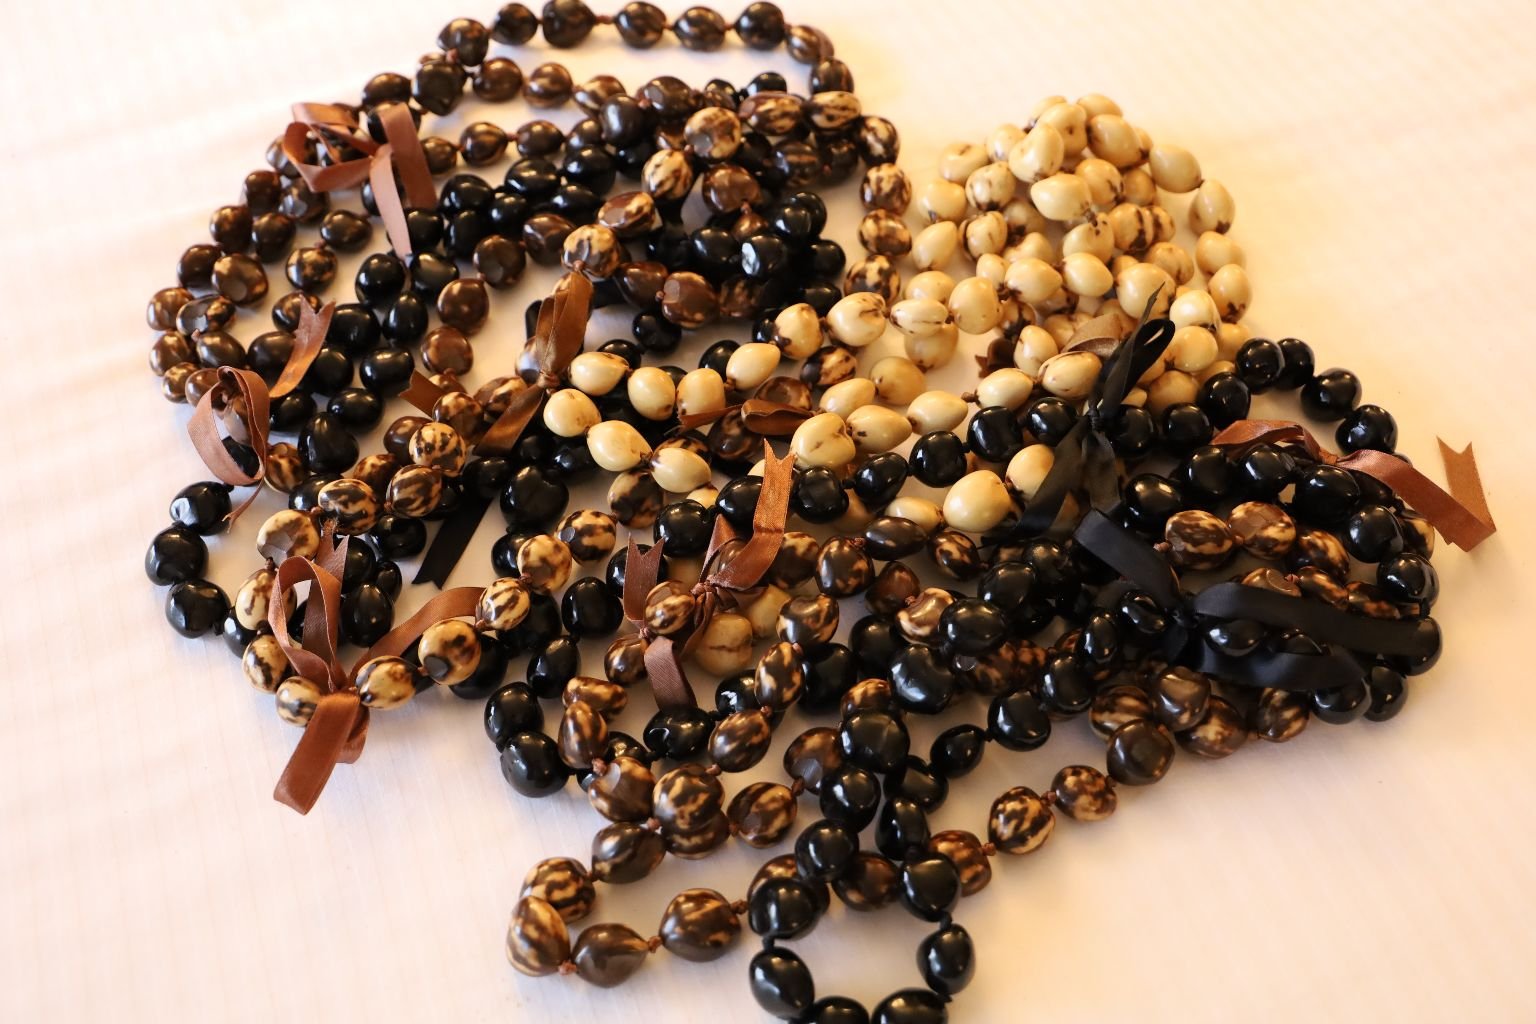
Some Kukui Nut Leis
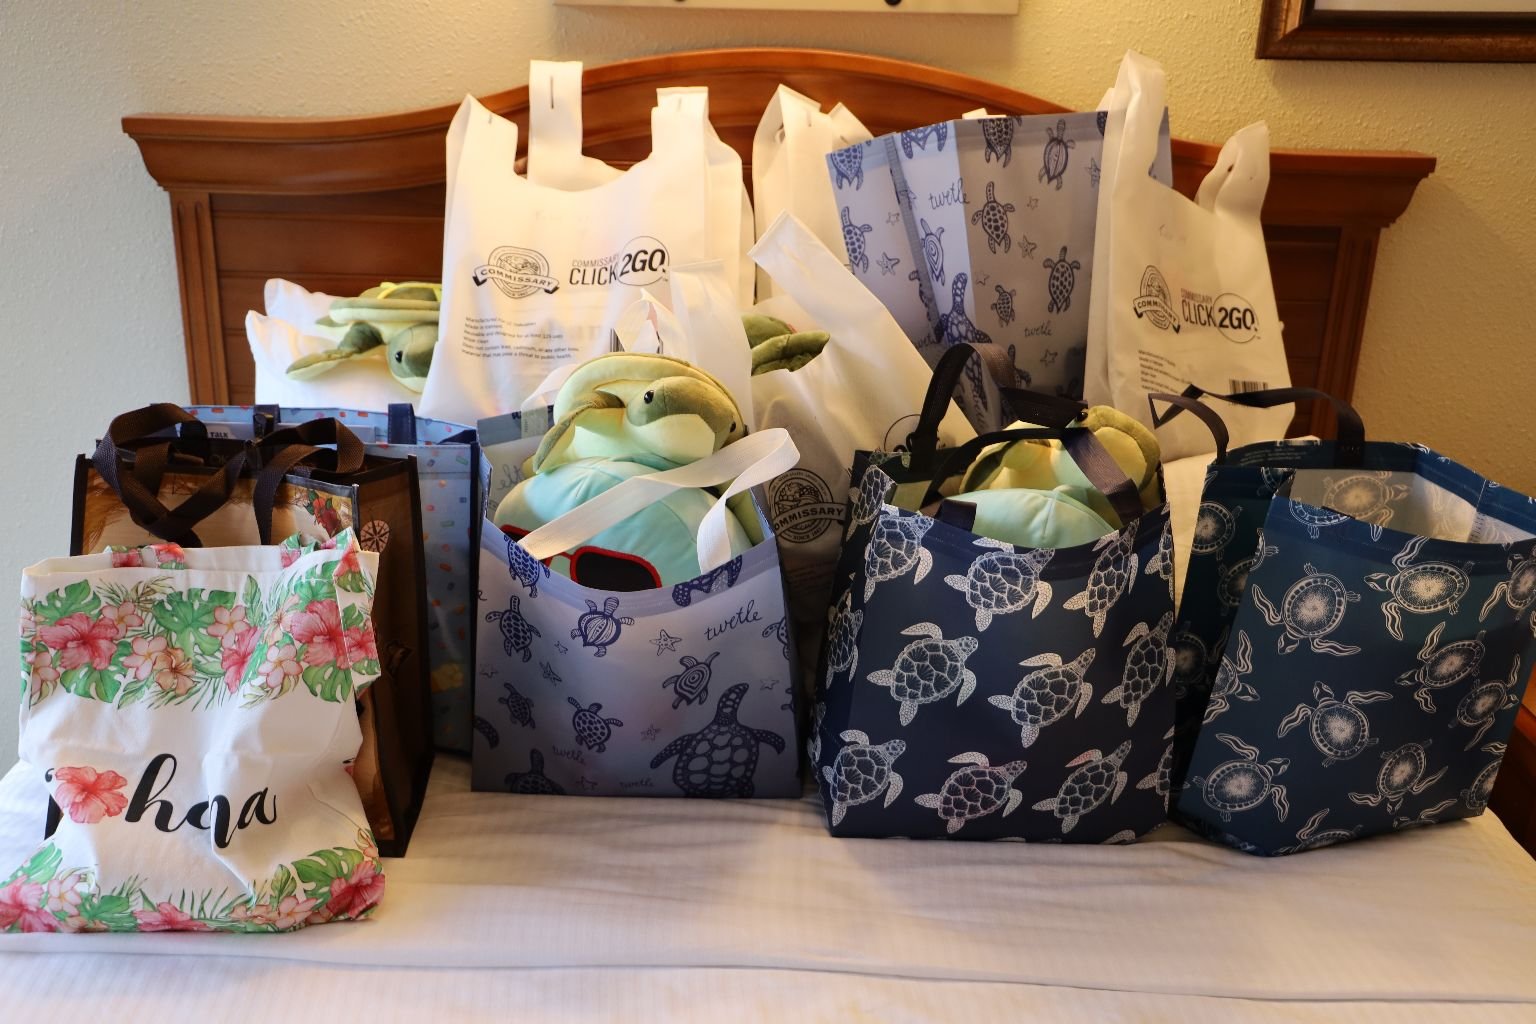
All Wrapped Up And Ready For The Luau
We Also Included Hawaiian Host Macadamia Nuts and Chocolates For Everyone
————————————————————————————————
I dug out my Pidgin To Da Max book. Just wanting to catch up.
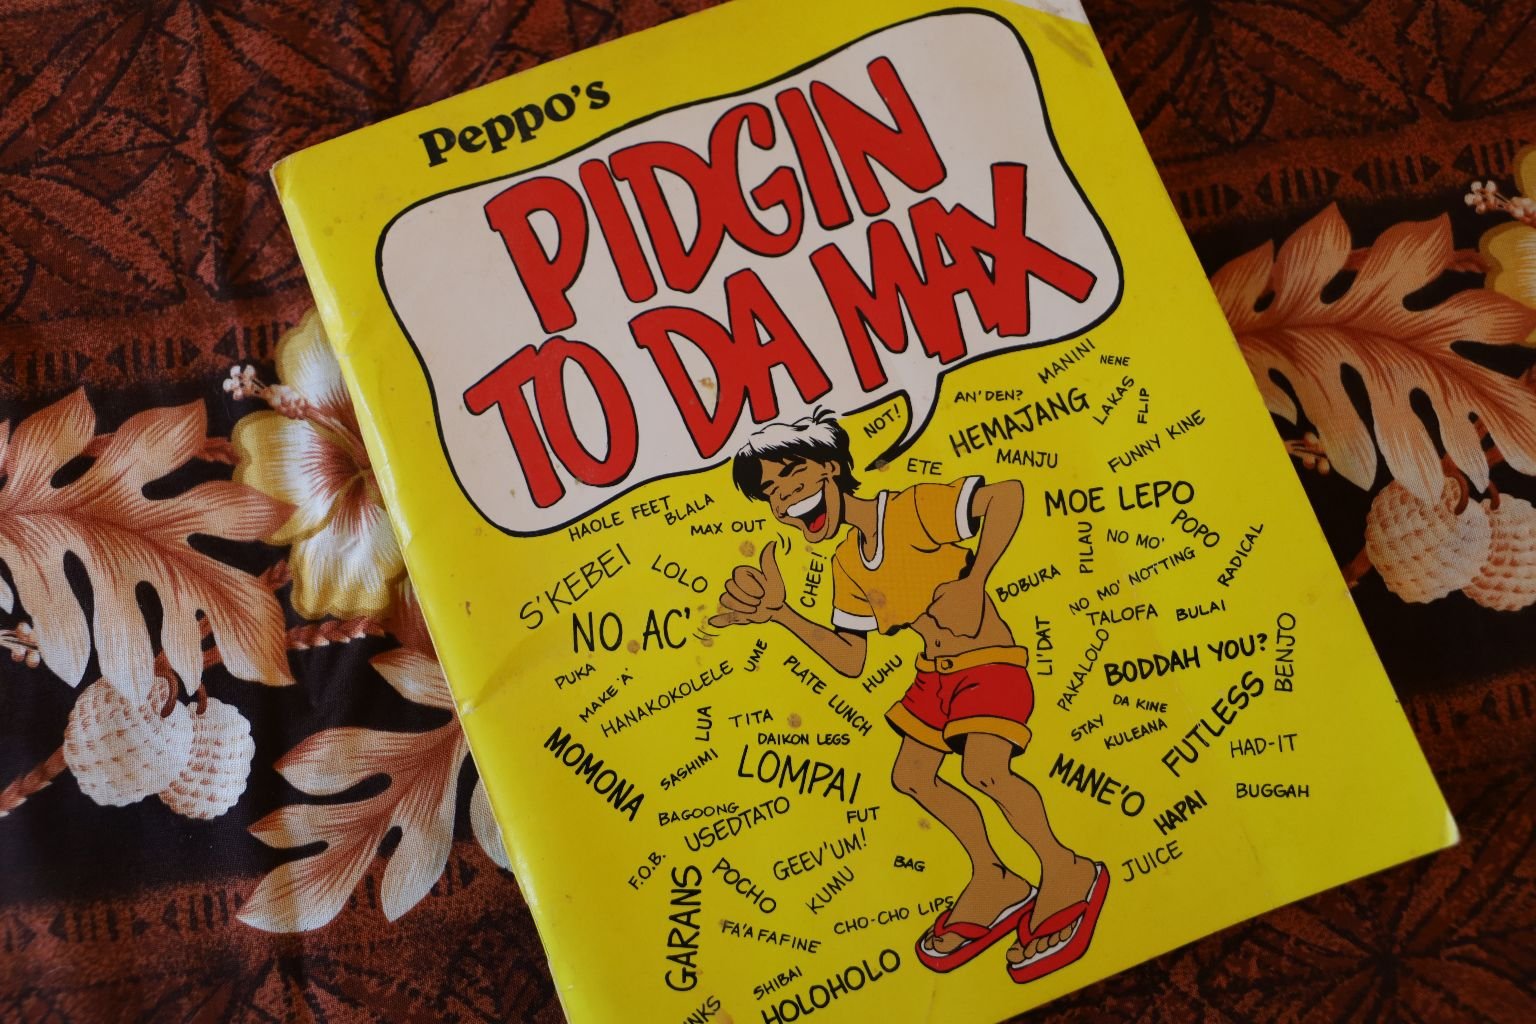
When tourists say, Aloha, locals say Howzit. Same thing, it’s the local way of saying Aloha.
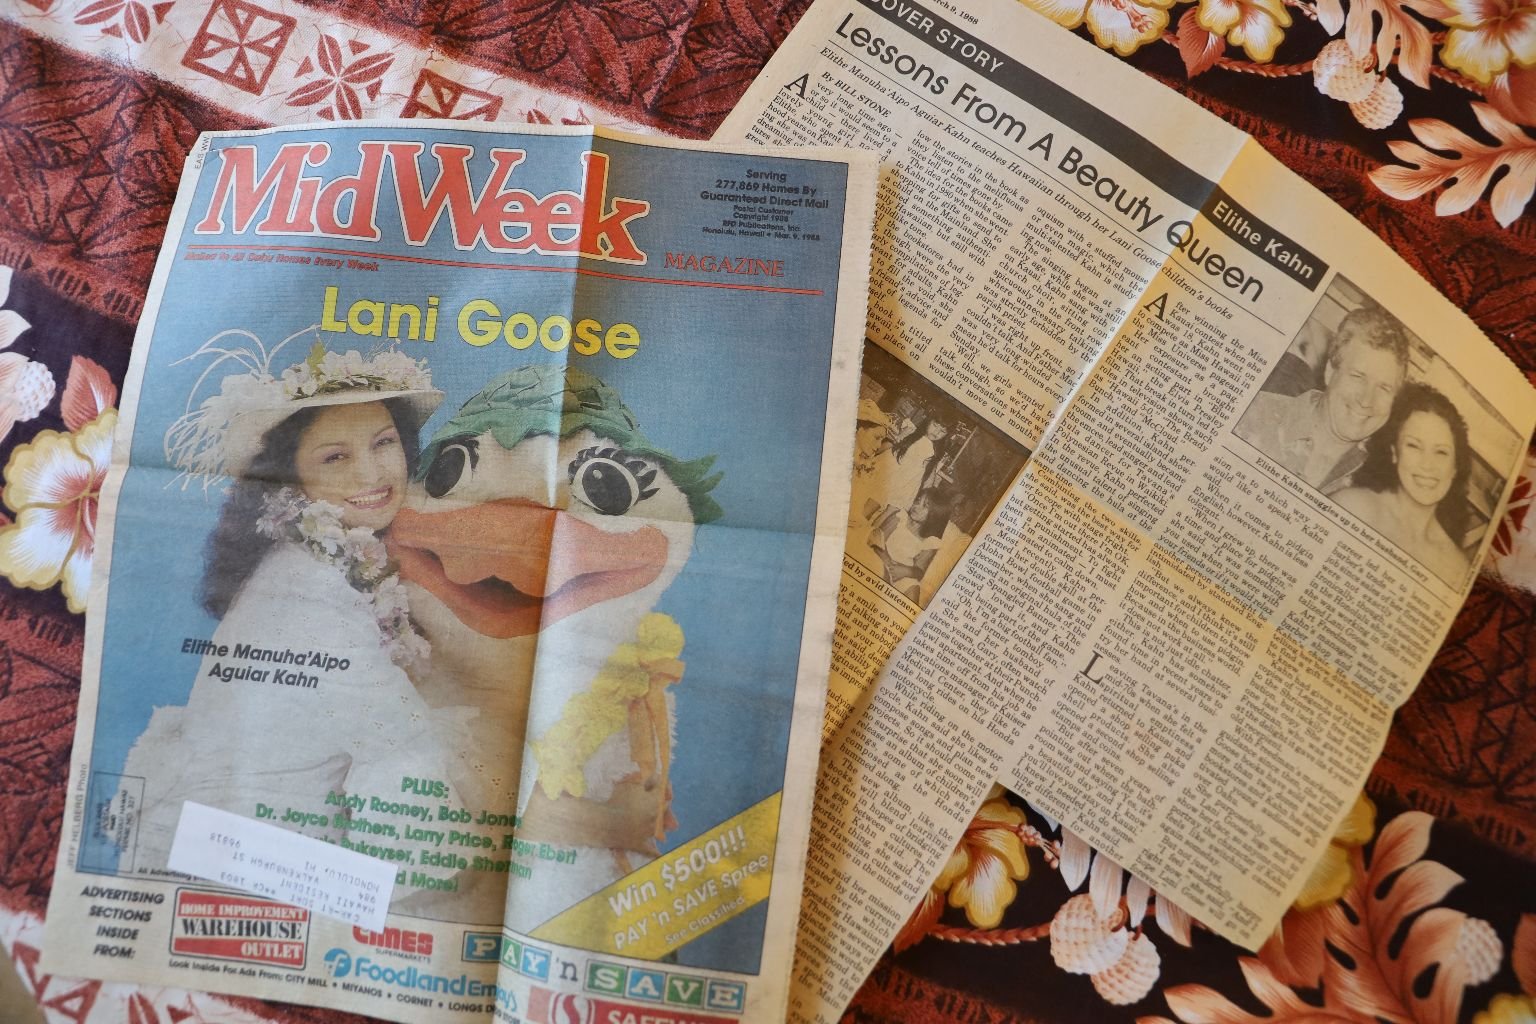
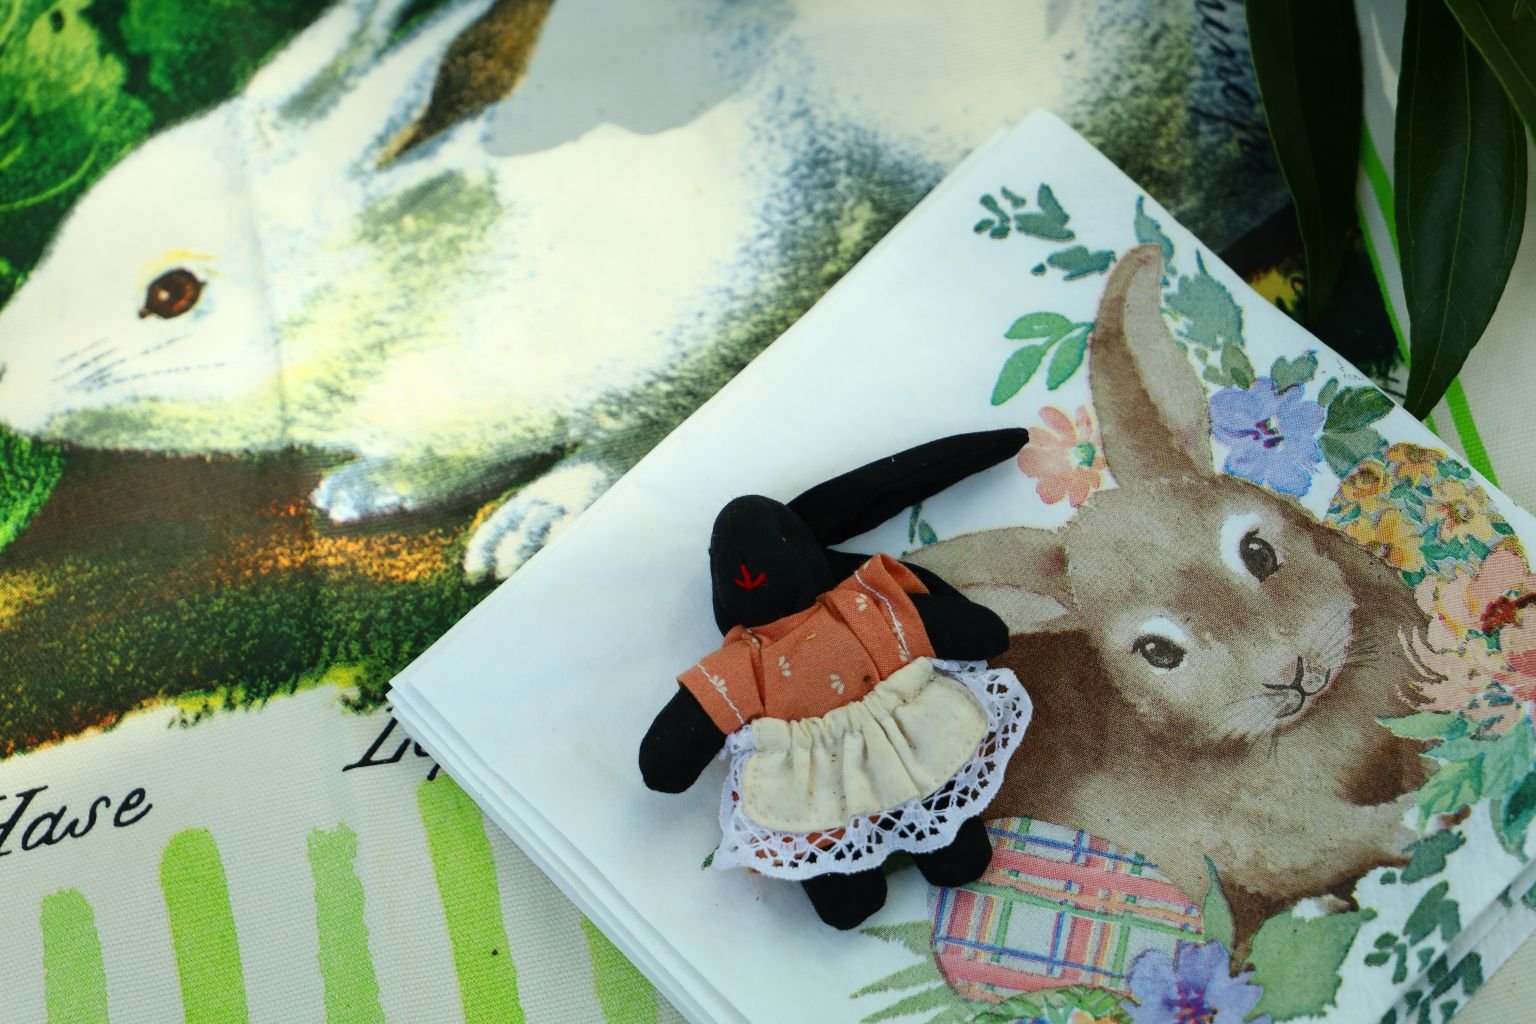
I was also thrilled to find these Lani Goose cut-out’s that I saved from years ago tucked into my book.

—————————————————————————————————

Gordon, and Our Backyard Banana Tree in Honolulu
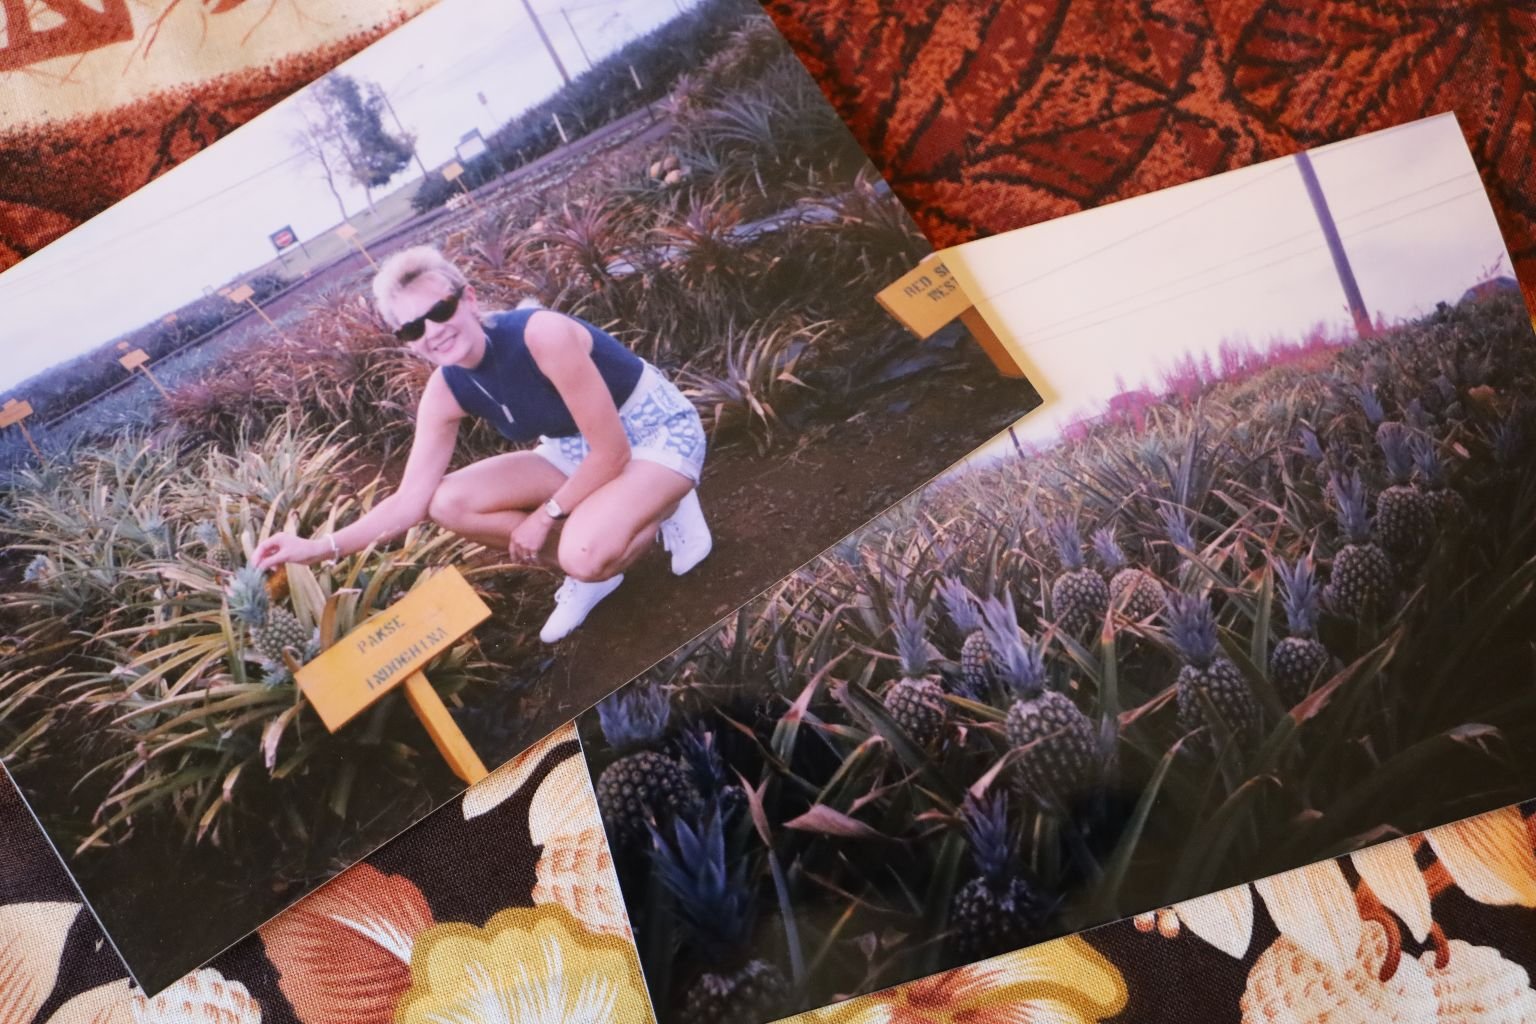
Me, in the Pineapple Fields
Photos of My Grandmother, Her Friend Laureen, and Veronica with Me
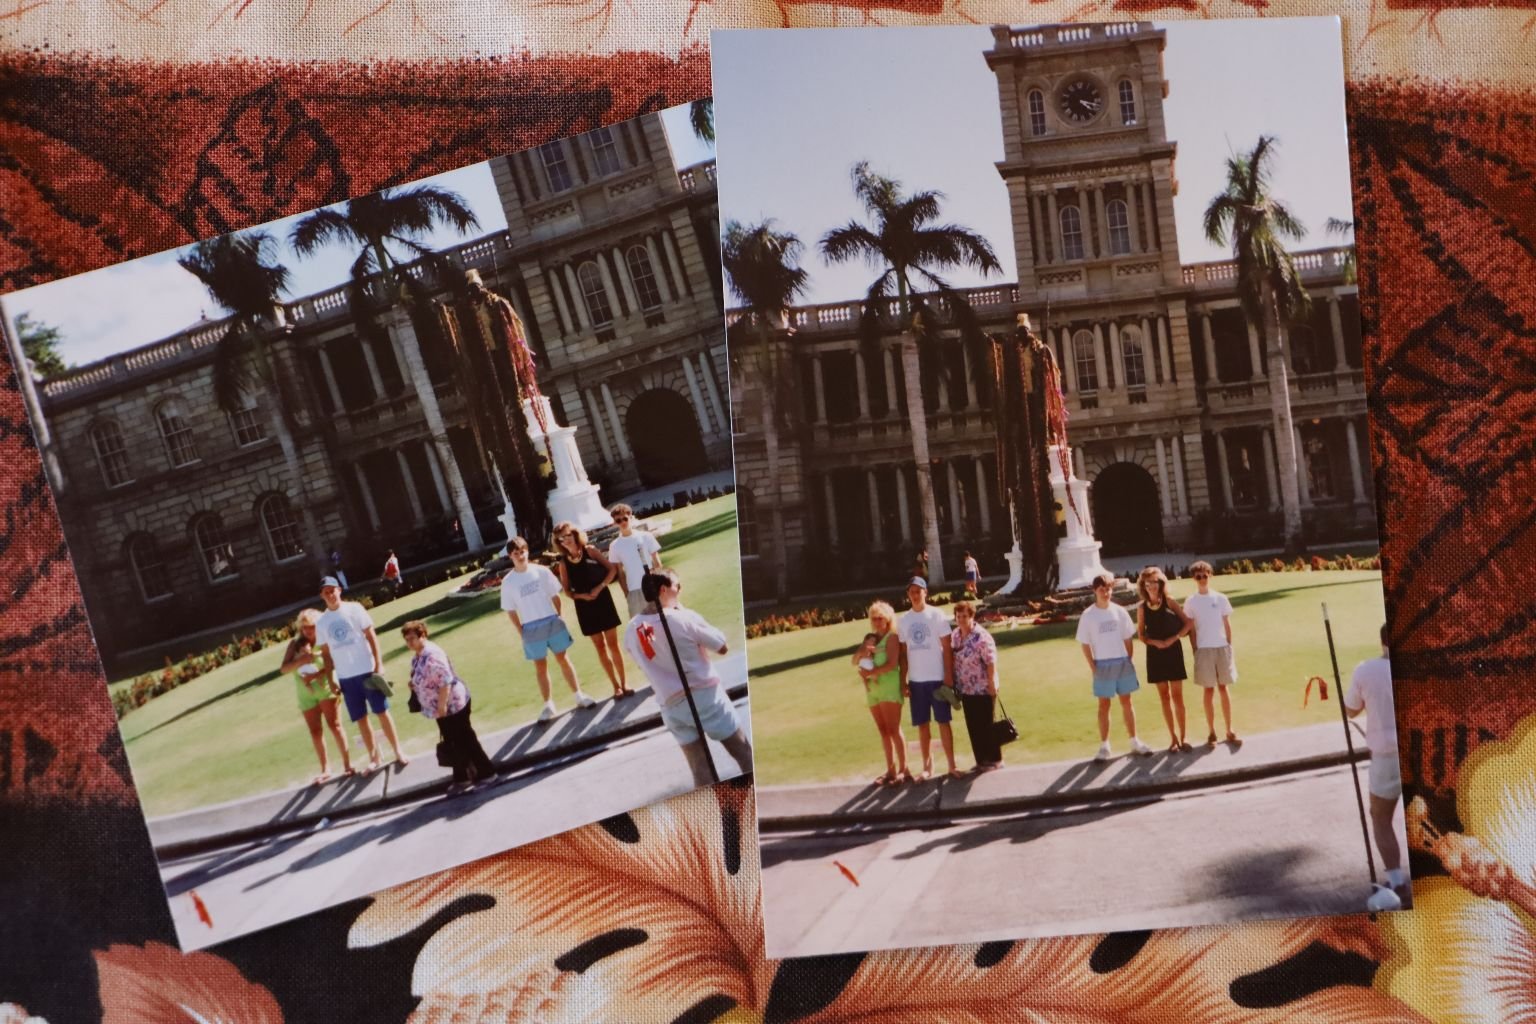
Me, and My Brothers Frank and Ben in front of King Kamehameha’s Statue in Honolulu
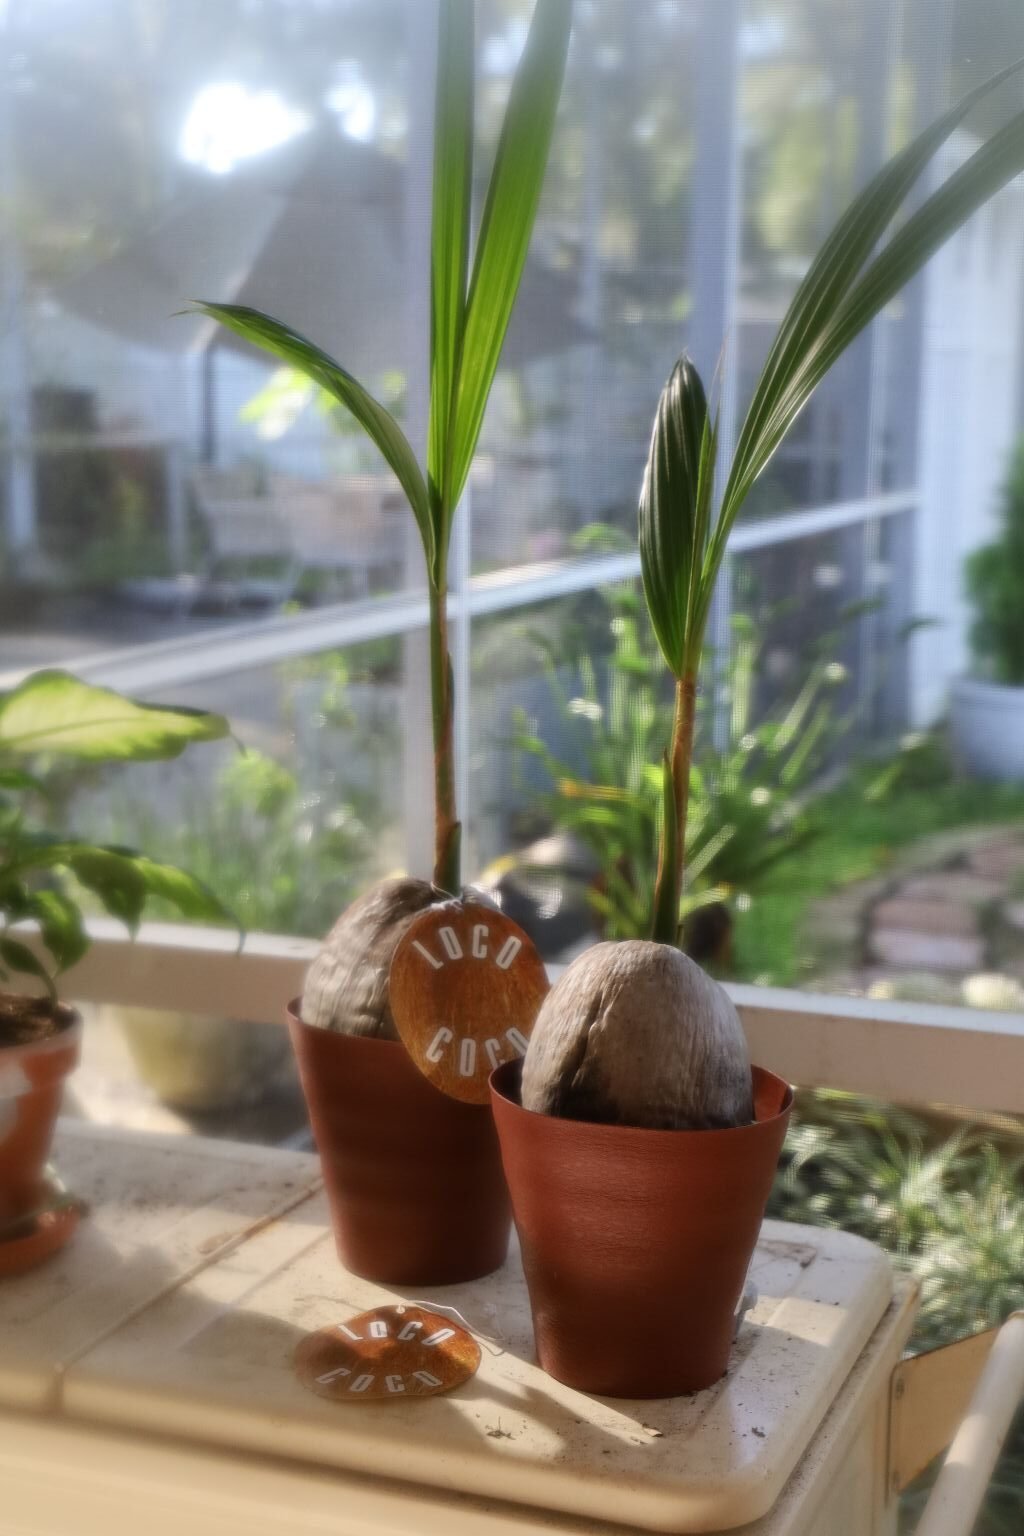
Loco Coco 🙂
————————————————————————————
Hawaii will be with us until the end.
Aloha,
Julie

2026 A Morning Aloha (Hawaiian Kona Coffee) —————————————————————————————— Brodie In Our Backyard Plumeria Tree in Ewa Beach, 1996 ————————————————————————————- E Komo Mai Welcome to My Aloha Julie Barefoot 2026 ‘Puke Punaewele (Blog) Ready for 2026 This year will be a …

I Created A New Website: Click Here For: VintageJulieBarefootArchives I gave my Web Designers in India instructions on what I wanted, and they did the most remarkable job of bringing my vision to life. I could not be happier with it! My …
Currently Under Construction
————————————————————————————
Also Check Out My:
Click Here For: Julie’s Jezebel Sauce

AND,
AND,

AND,
An Old Florida Jezebel (Sauce)
AND,
One HOT Jezebel for Breakfast (Sauce, That is.)

AND,
Click Here For: More of Julie’s Jezebel Recipes to Enjoy
AND,
AND,
——————————————————————————————

PLUM PLUM BUM BREAD CAKE —————————————————— PLUM FLOWERS PLUM PRUNE CAKE/BREAD ————————————————————————————— You Can See How Dense It Is Rich, and Delicious Made With Plums, and Pear and Prune Baby Food ————————————————————————————- Excellent For Breakfast As Well ——————————————————————————– Plums With …

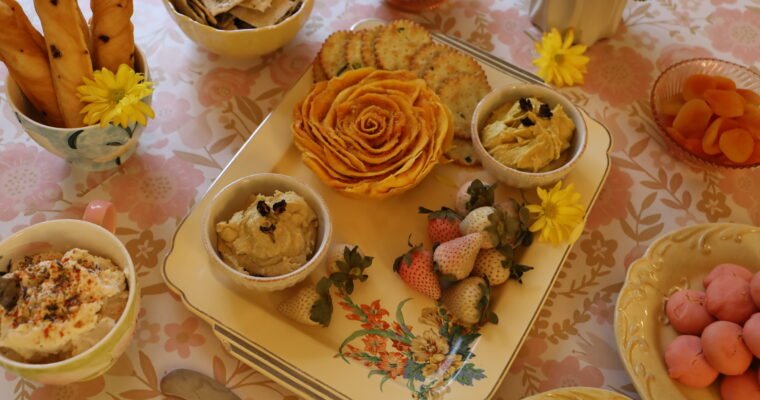
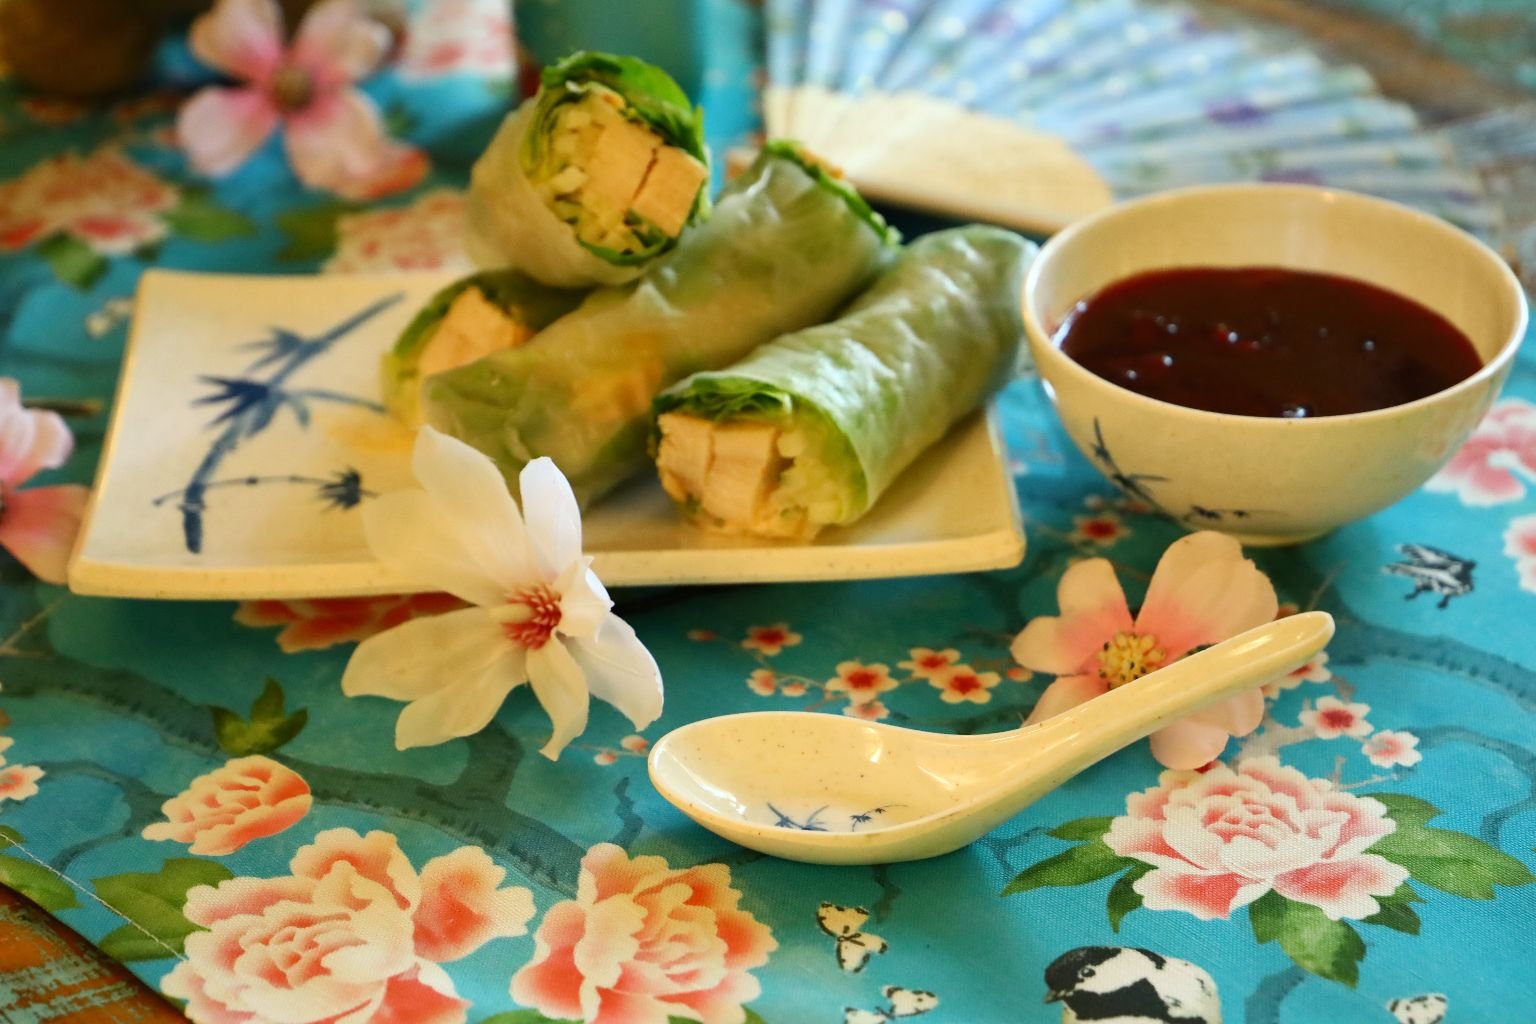
Welcome To A Tasty Asian Summer I want to make this page about fun, and tasty foods that have an Asian flair to them. Nothing complicated, but the kinds of foods you would expect to eat in the summer. I …

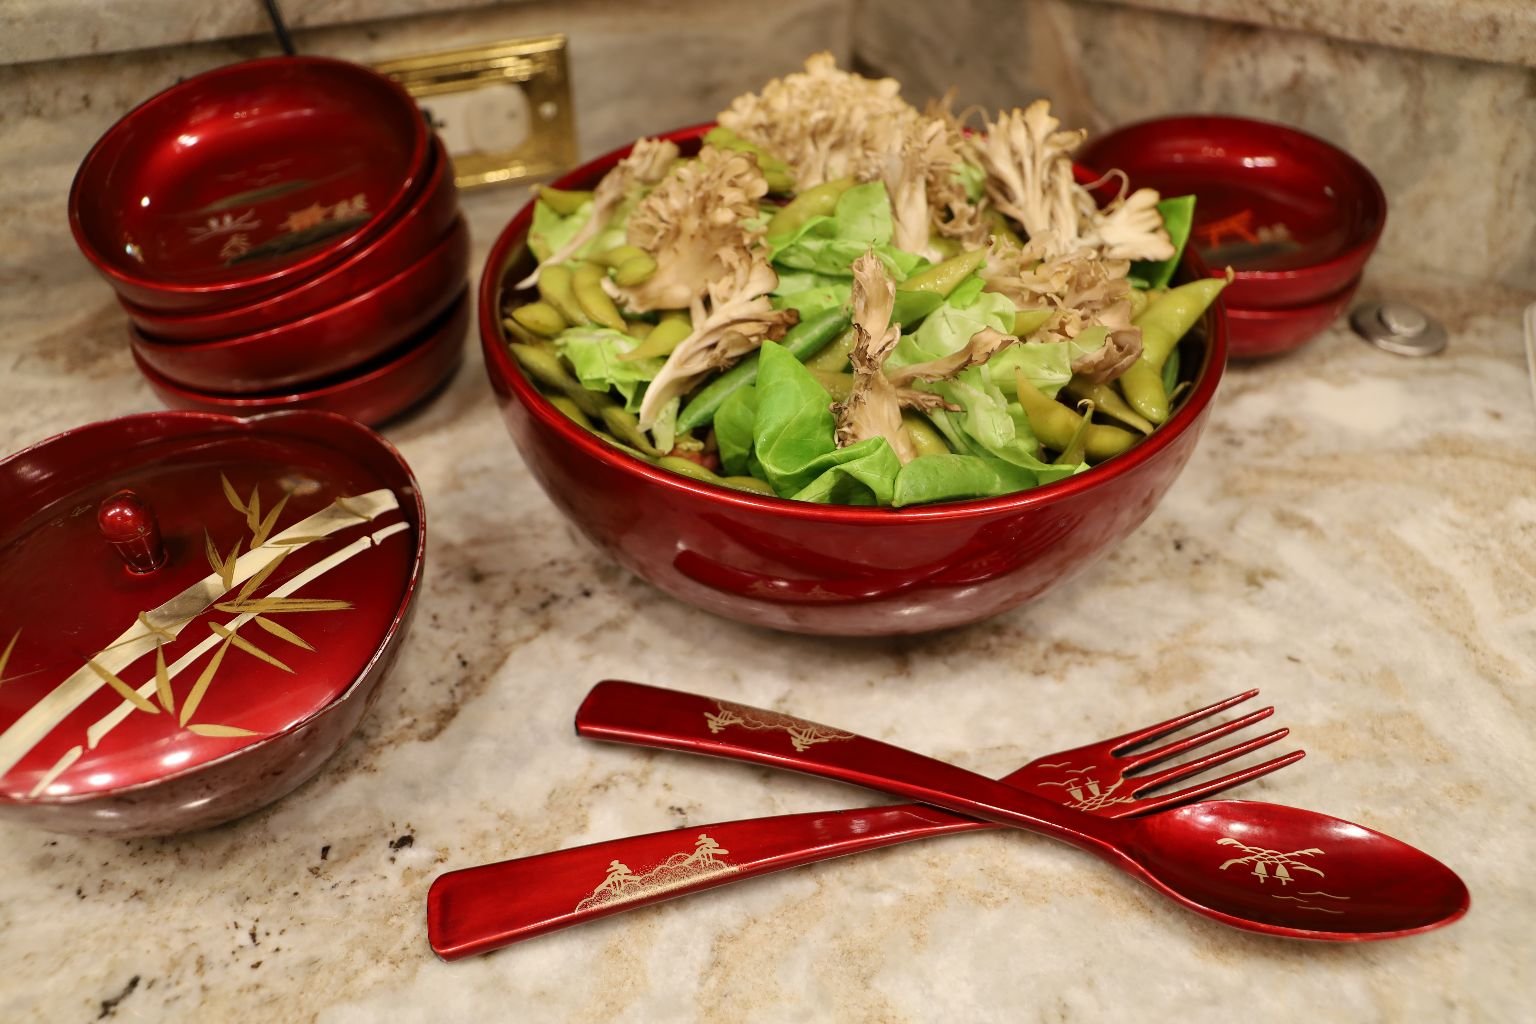
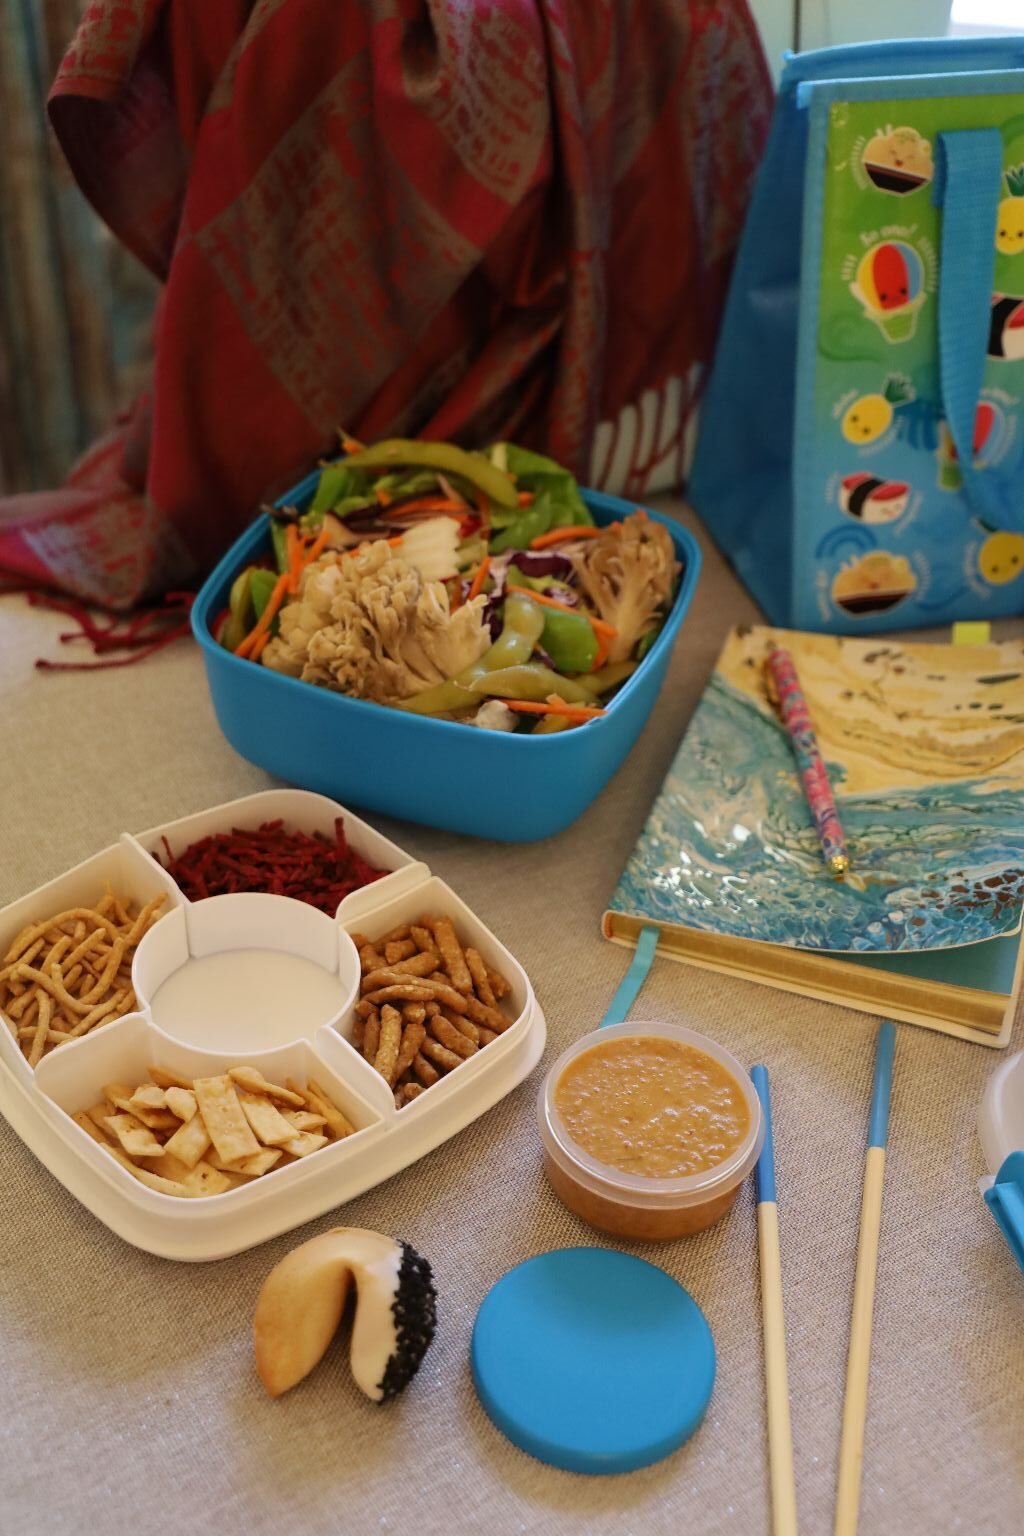
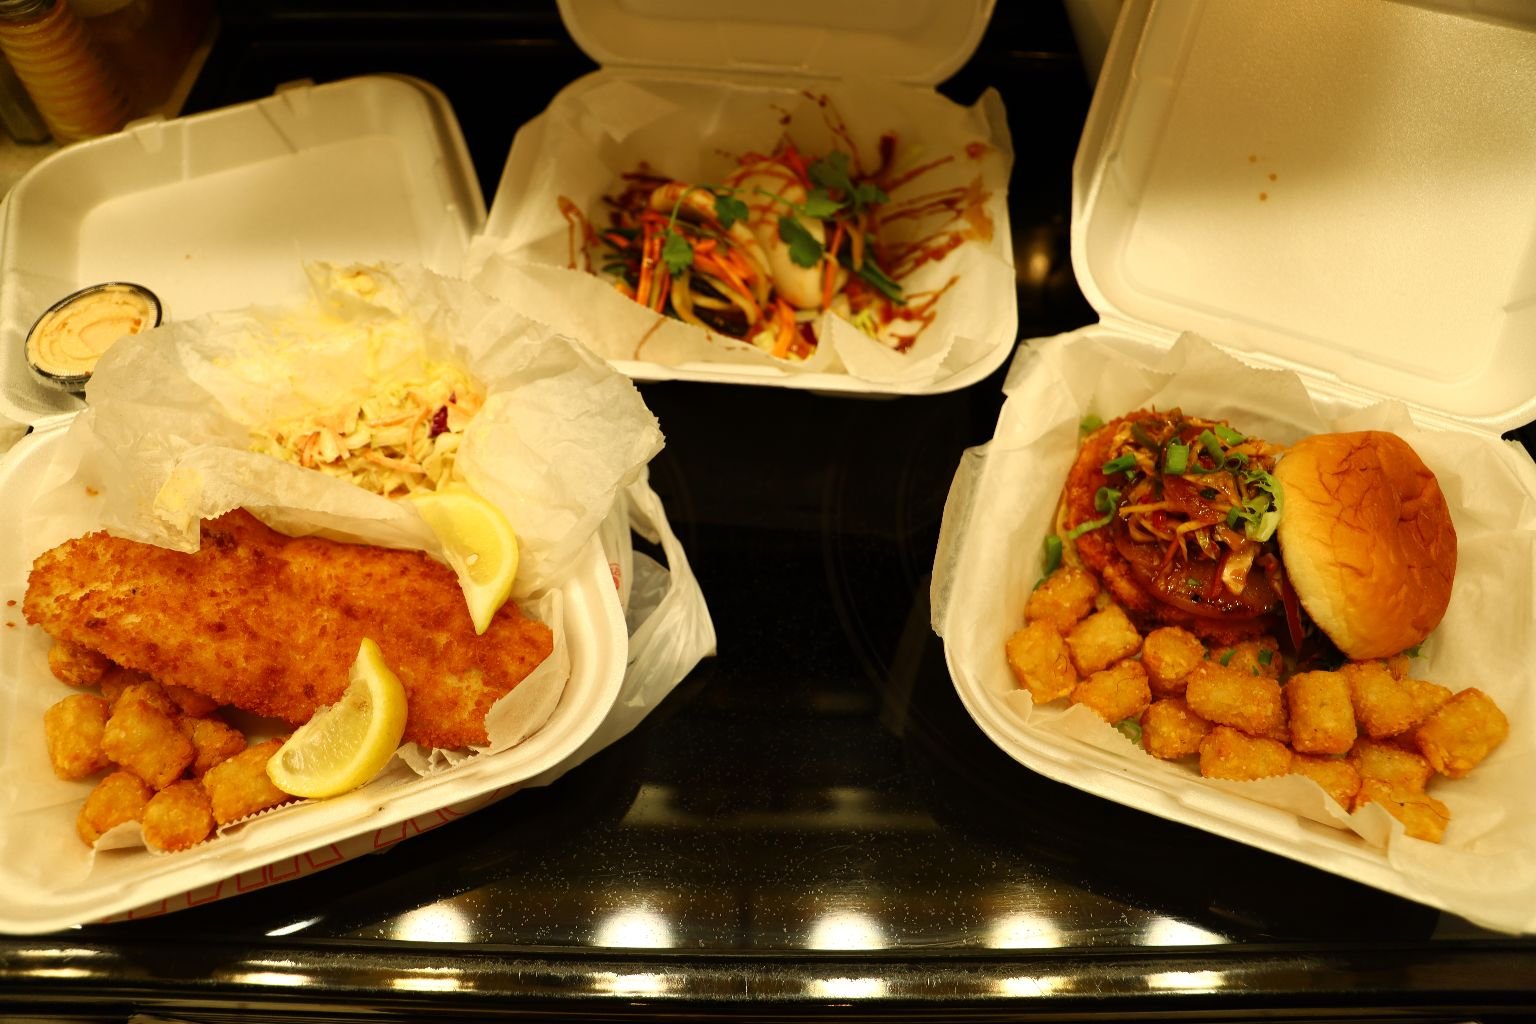
Julie’s Lunchbox Take Out
My theory is to always take food with you.
You never know what you may encounter, and you shouldn’t be at the mercy of having to settle for something you don’t want, or need to eat, just because it is available and you are hungry. Or worse, you may not have access to food at all when you need it.
Packing a lunch, based on your likes and tastes to me, is the best lunch you can eat.
Also, when you prepare your own food you know exactly what you put in it. I view eating out as a treat, not a daily occurrence.
Here are a few examples of my fun lunches that I take with me. I didn’t intend for them to be of an Asian theme, that’s just how it has turned out.
Julie
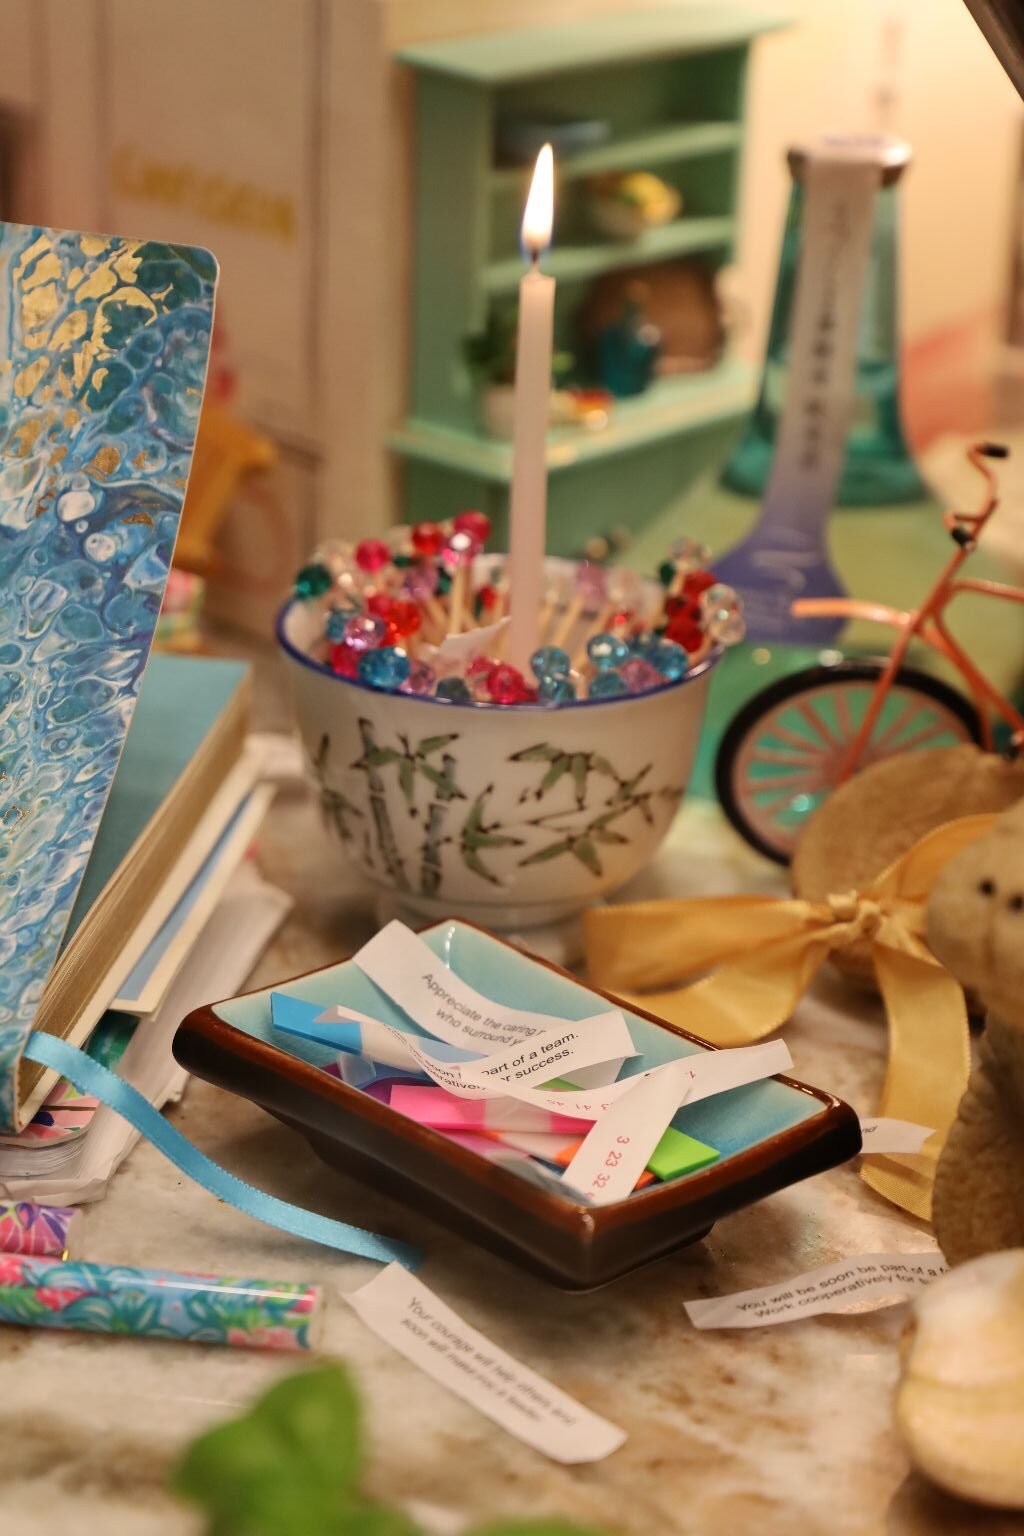
A Candle and Fortunes
P.S. I hope to add to this page as time goes by.
—————————————————————————————-
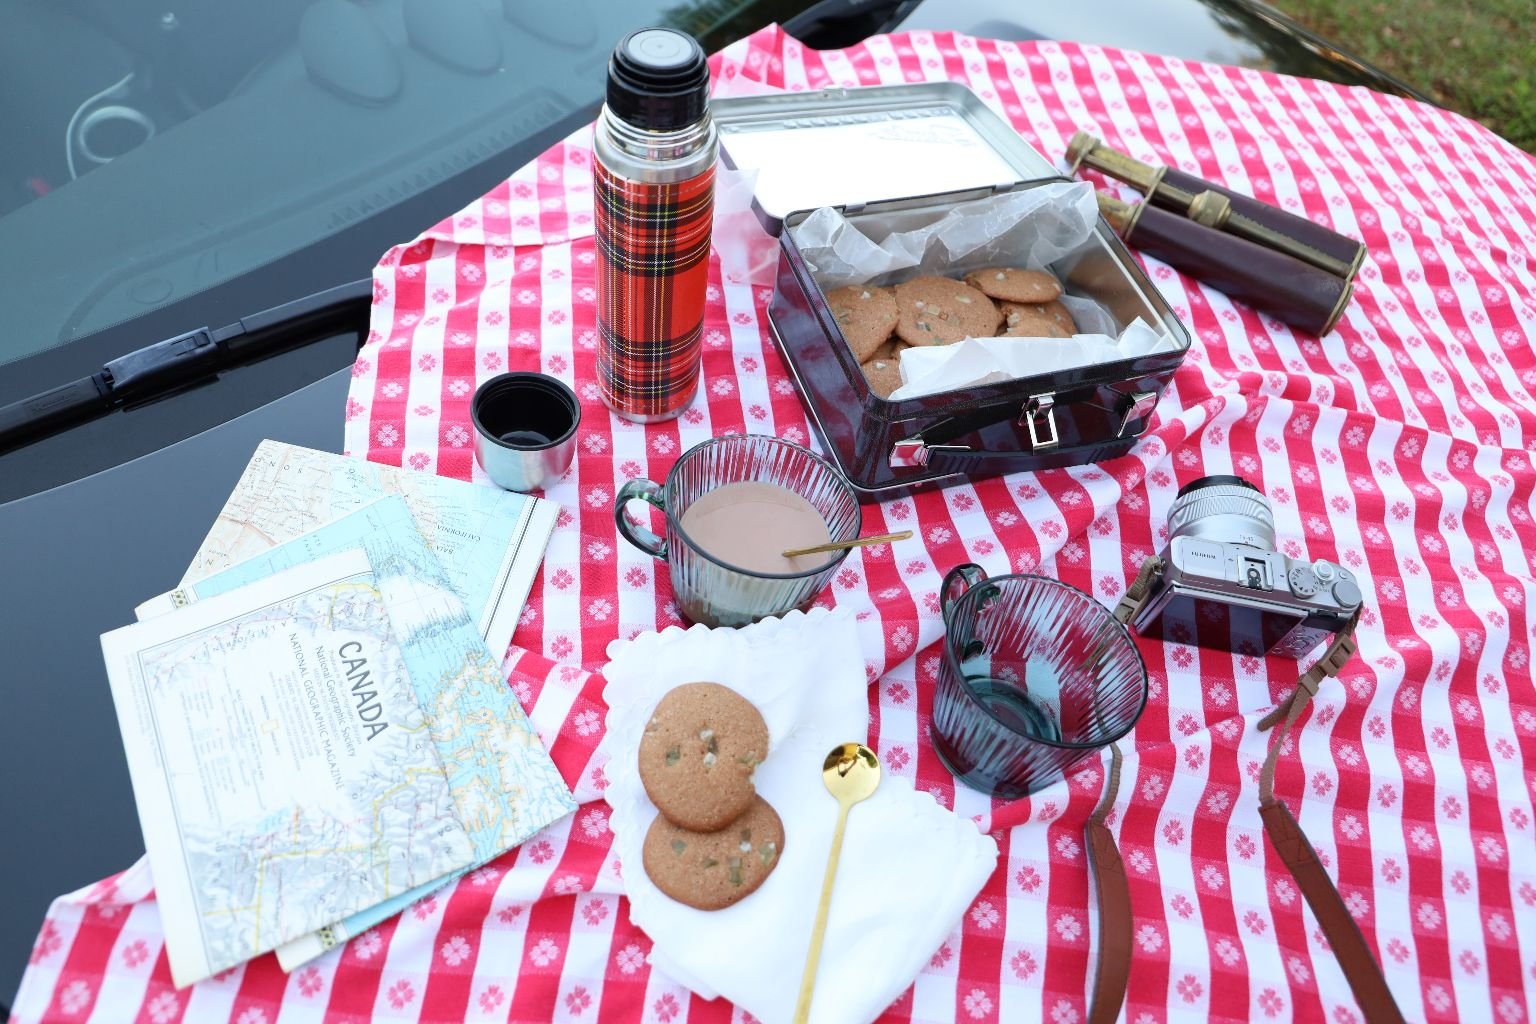
Coffee, Before I Hit The Road…
——————————————————————————————


Let’s See:
I have to go into Tampa,
Drive into the (Military) Base,
Pick up my Prescriptions,
Fill the Car with Gas,
Shop at the Exchange,
Run into Class 6 (Base Liquor Store),
Shop at the Commissary,
And, Shop at the Commissary AGAIN.
(I run in the first time for toiletries, household items, etc.
and I run into the Commissary the second time, for Food.)
———————————————————————————————–
Seeing as how this is going to be one of my big days,
I need to bring a nice lunch, and a snack or two with me, as I head out the door for the day.

There is always a Purse, and a Lunch Tote, and Plenty of WATER!
————————————————————————————
If I Don’t Take Food With Me,

Then I End Up Picking At A Chicken From The Deli While Driving Home,
Which We All Know Is Kinda Gross.
————————————————————————————-
SNACKS!
—————————————————————————–

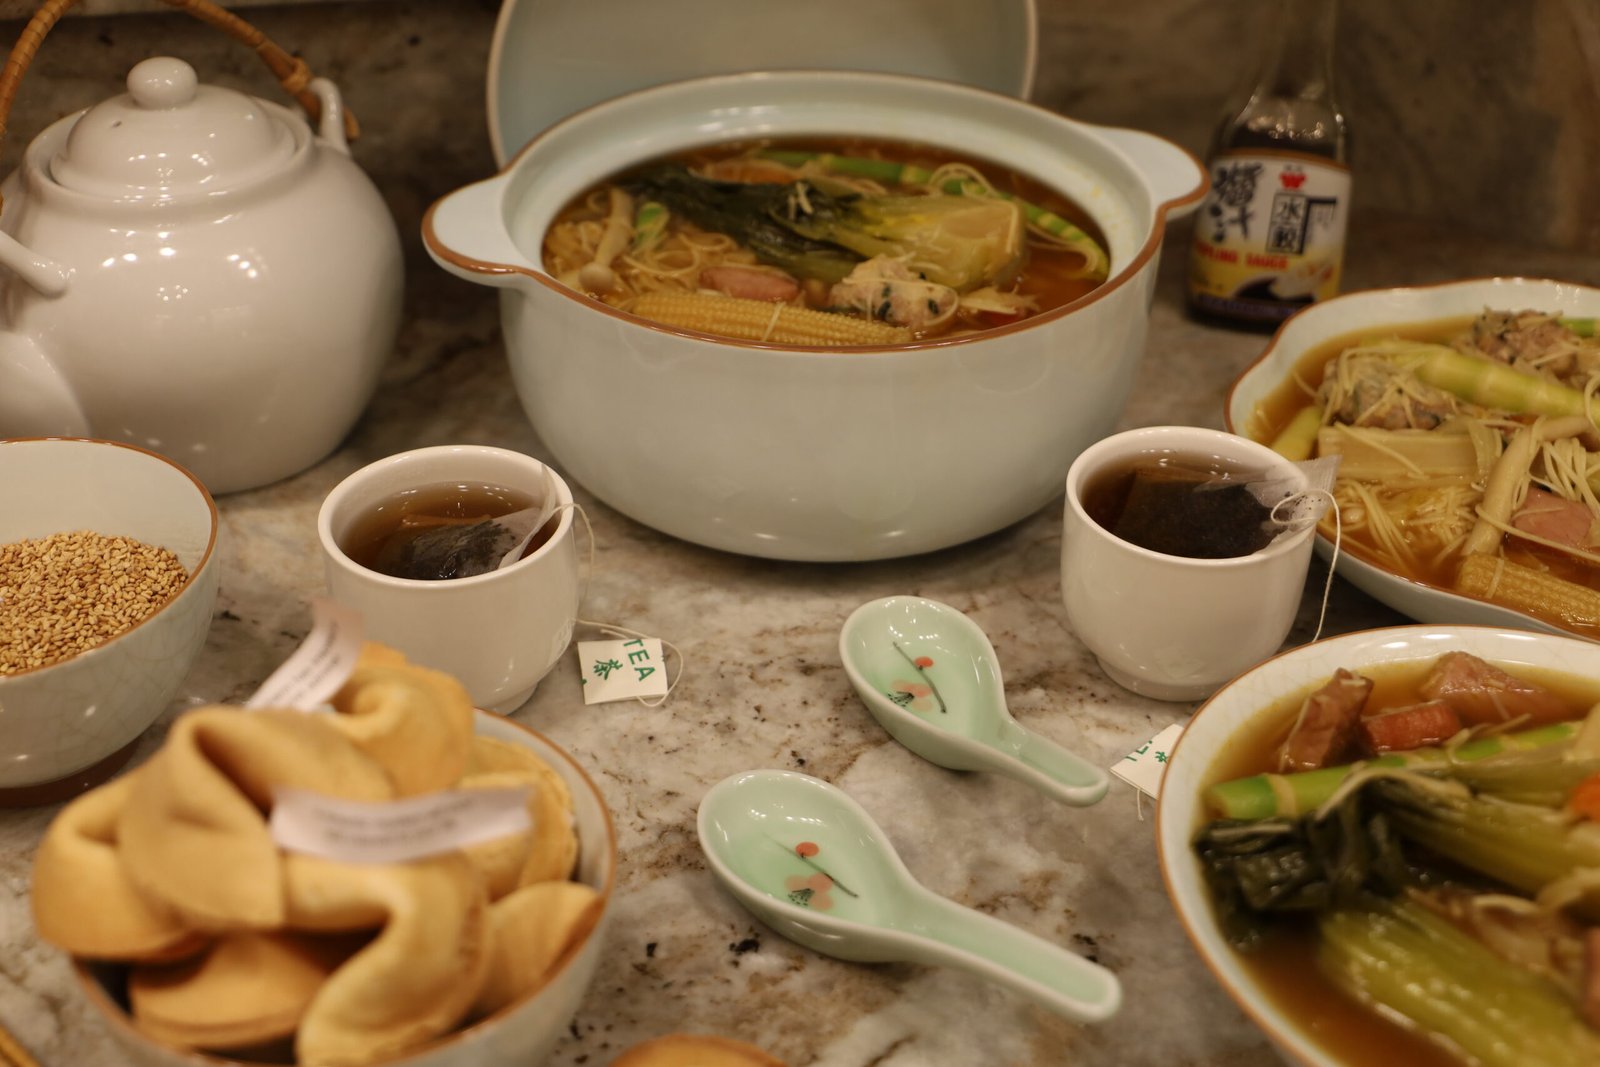
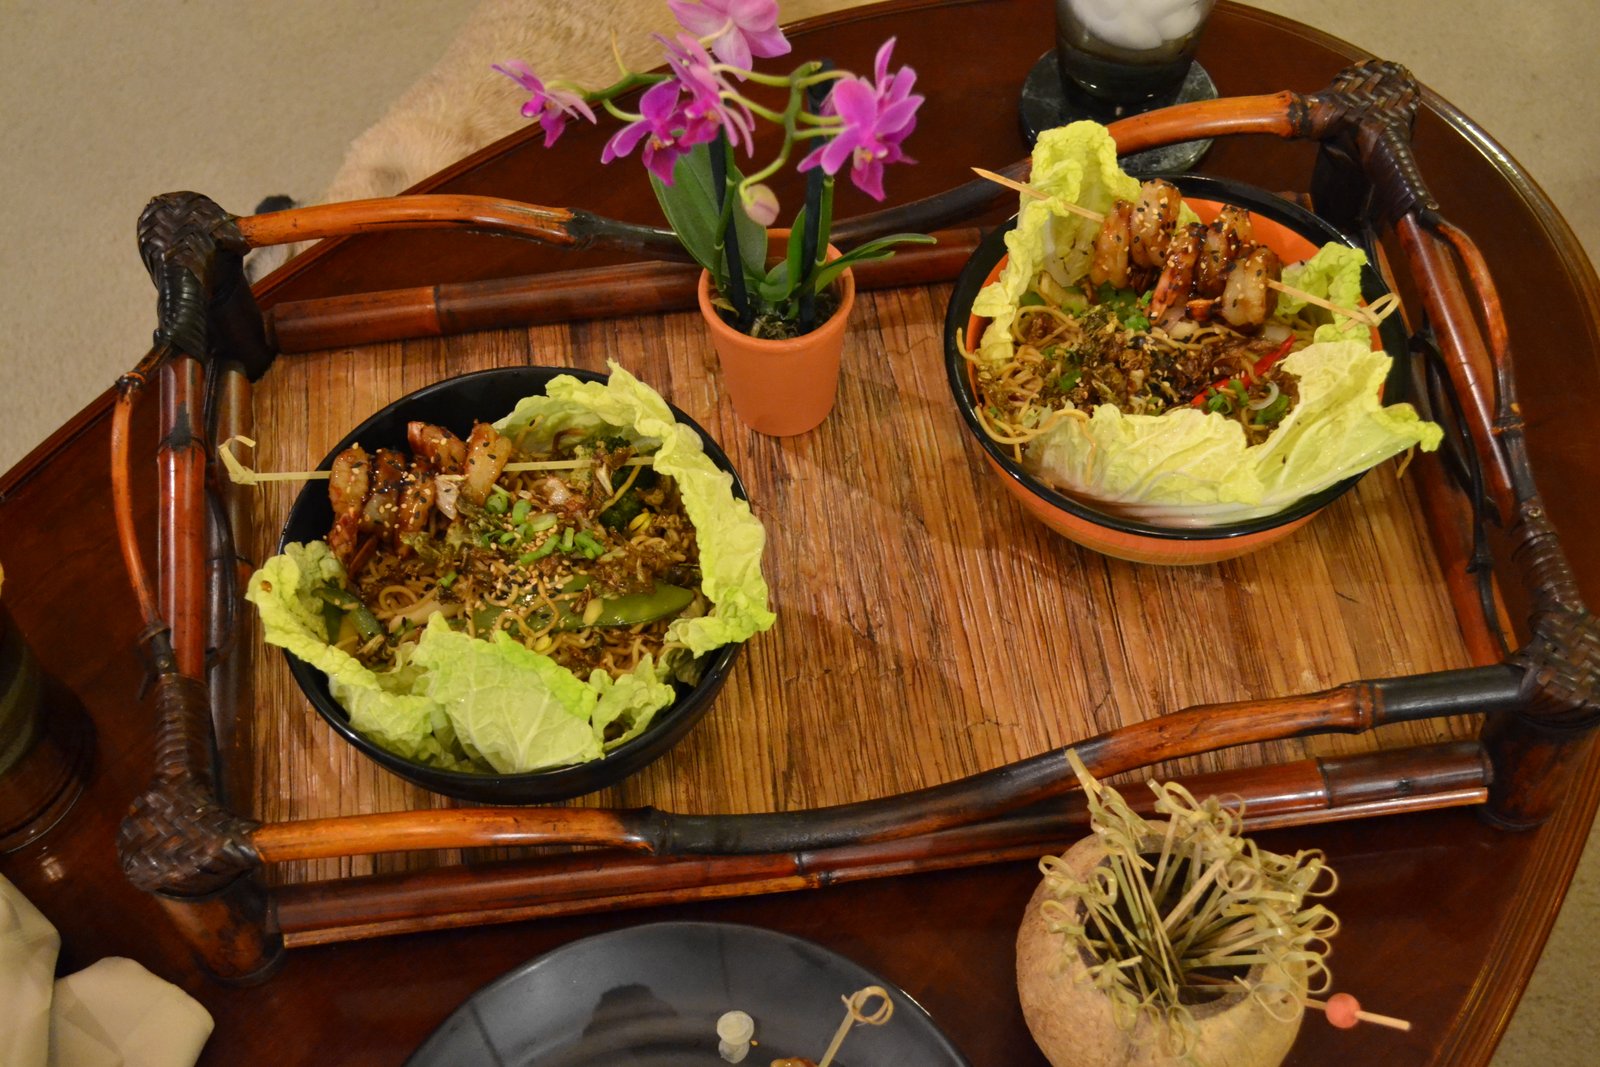
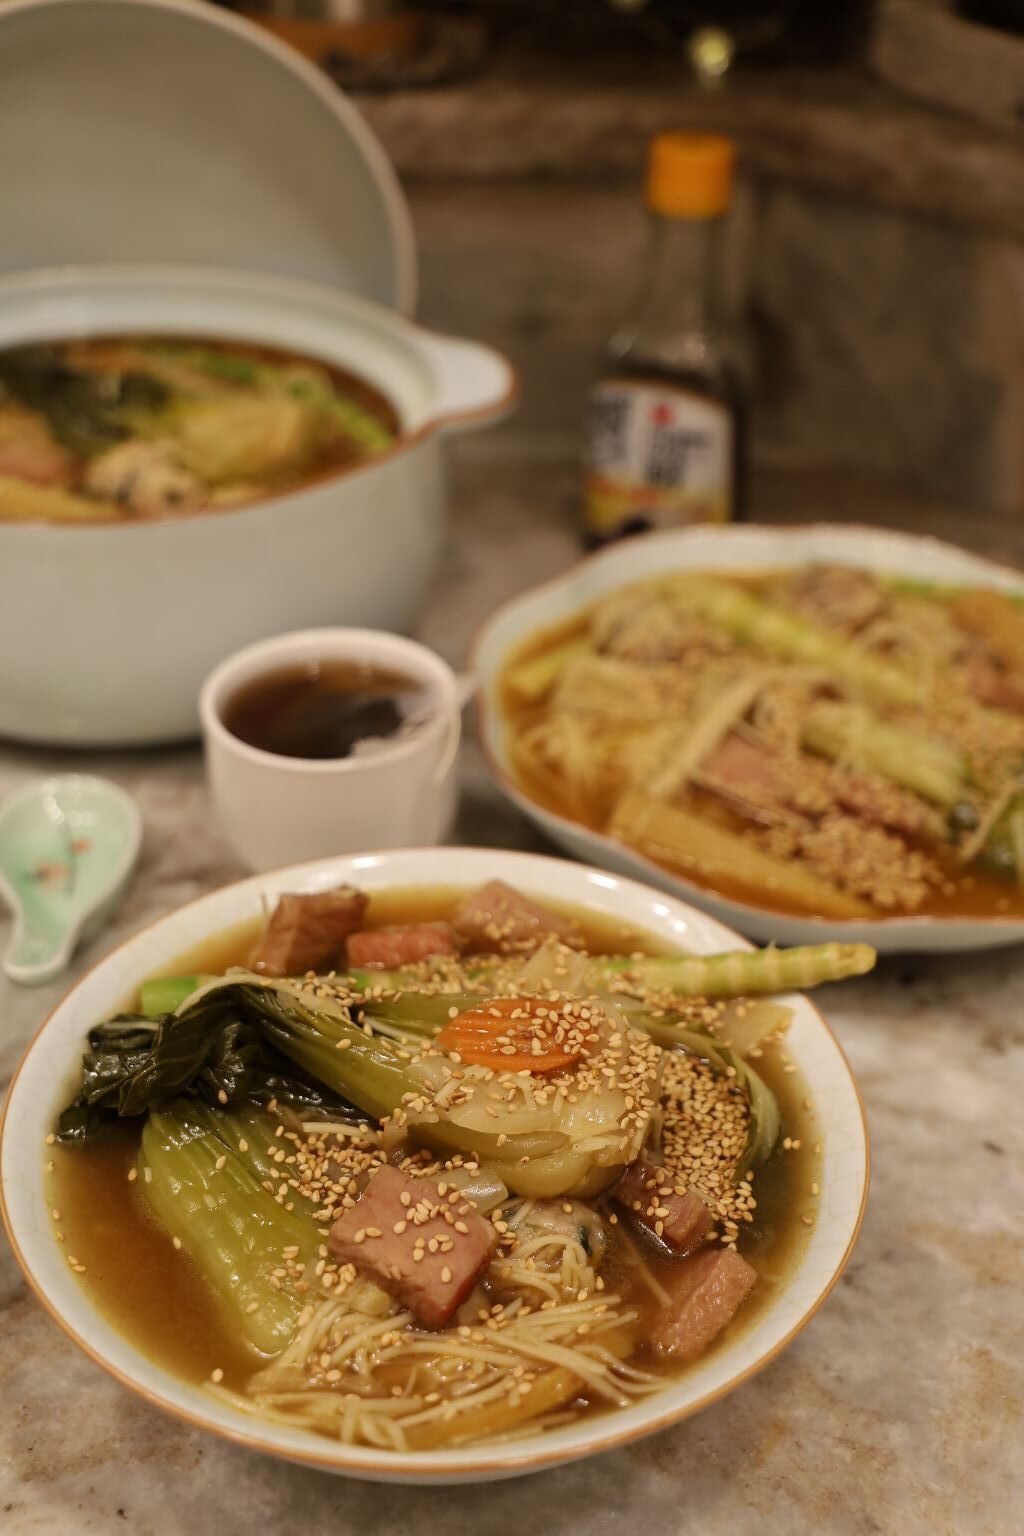
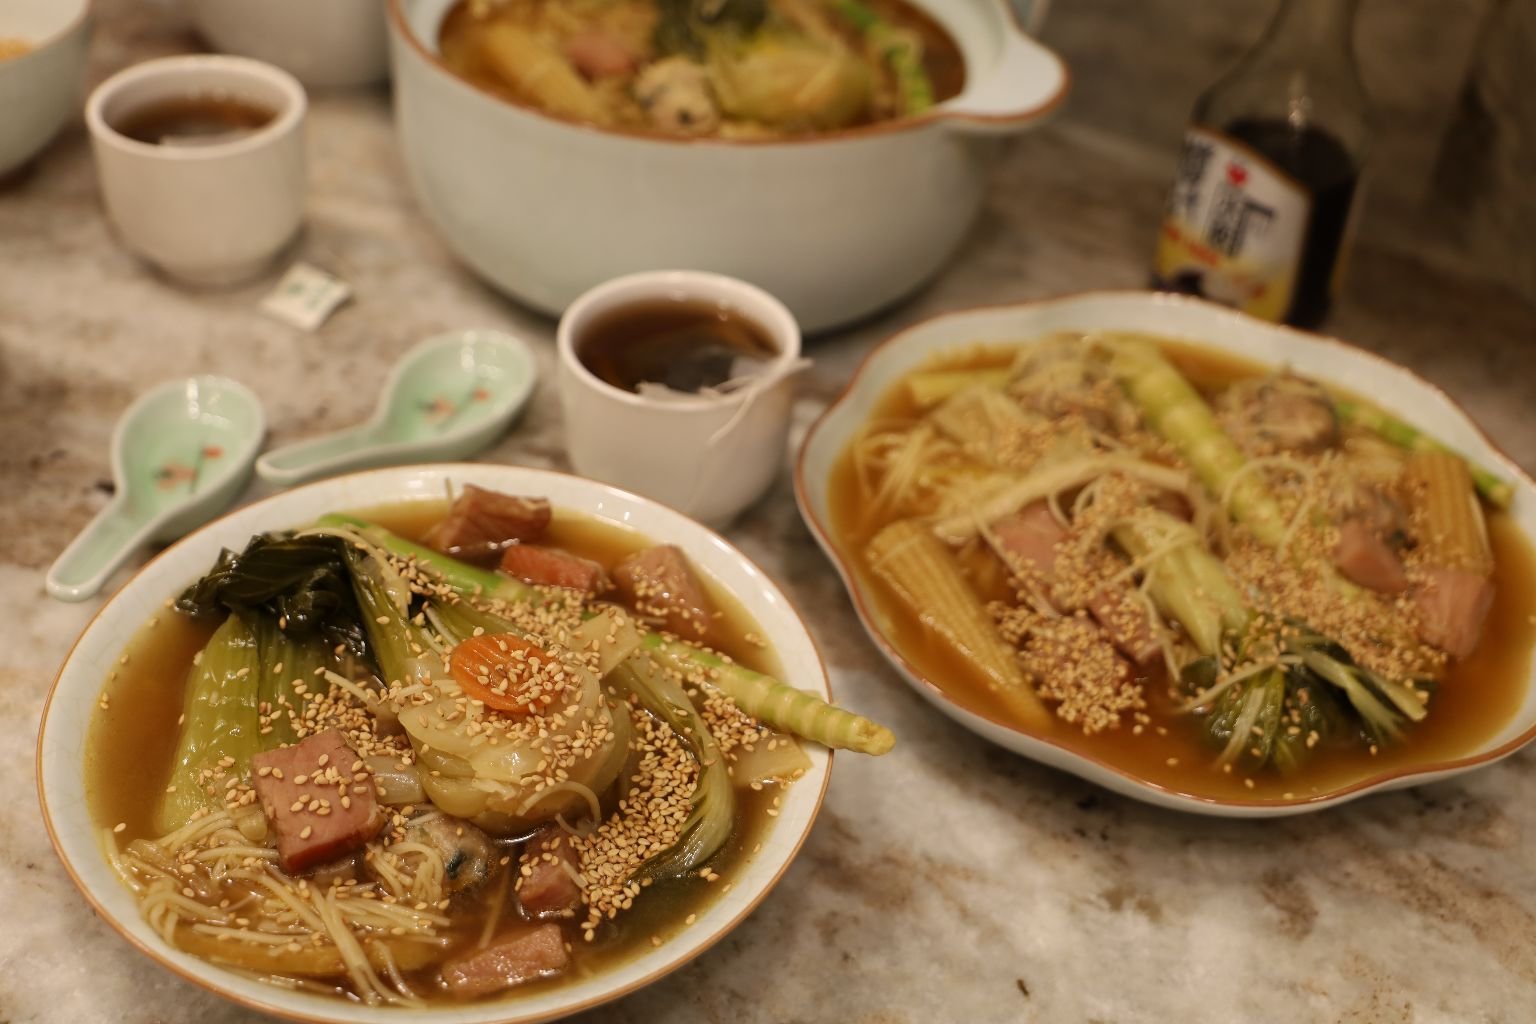
I Think Leftover Asian Food Makes Great Take Out Lunch
————————————————————————————————–

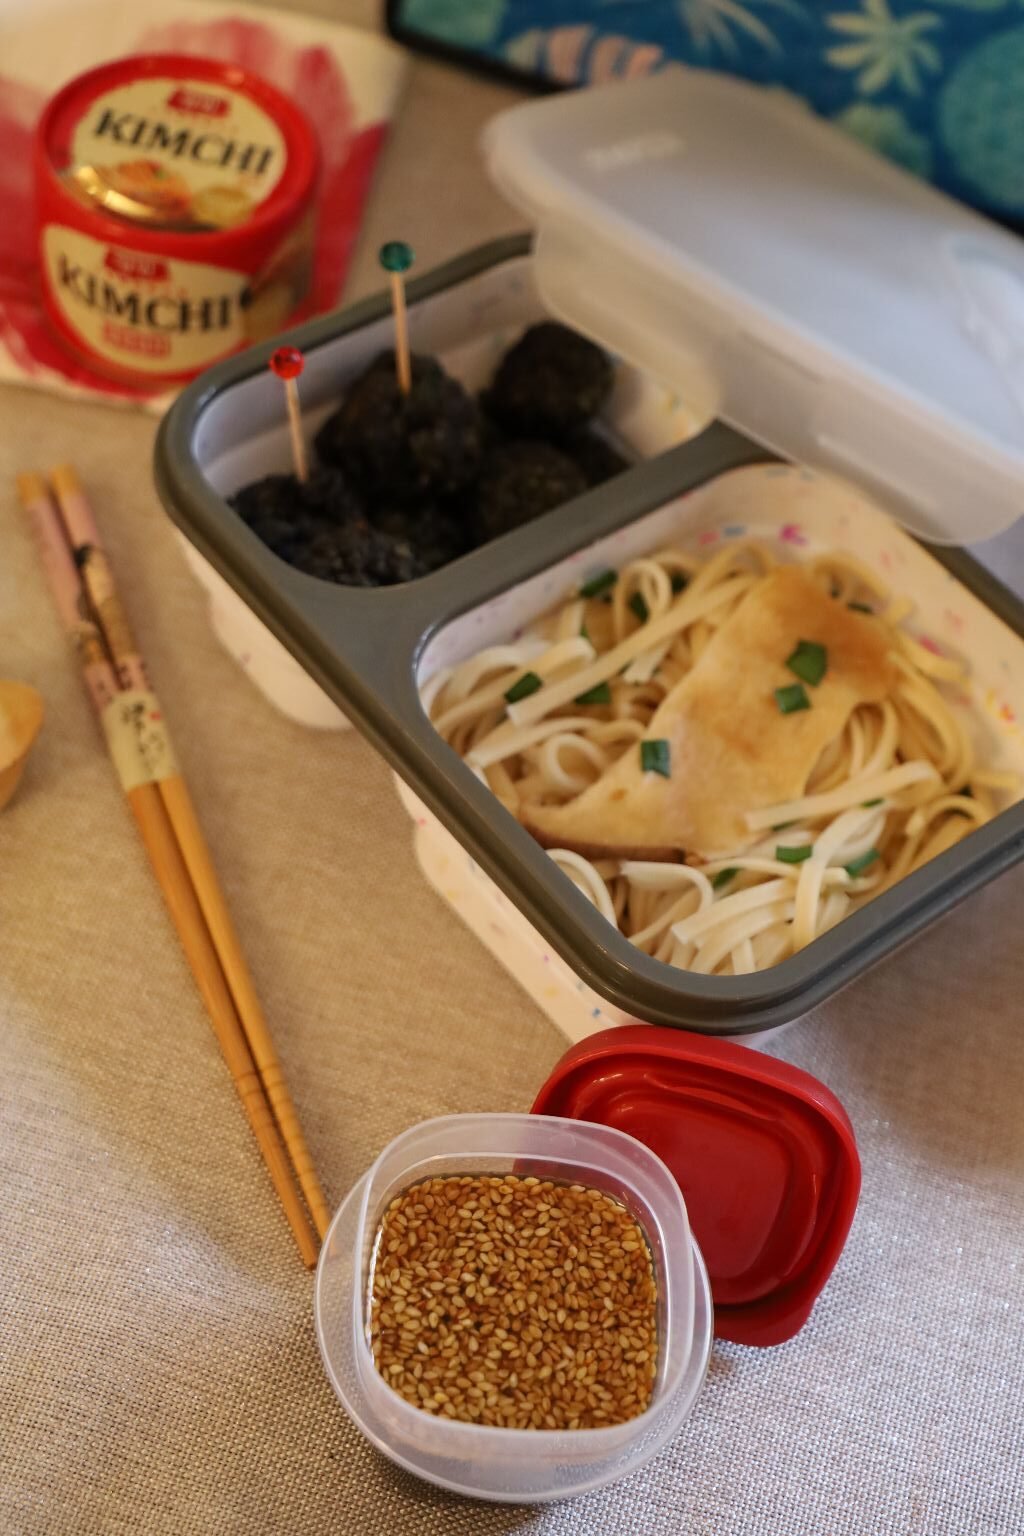
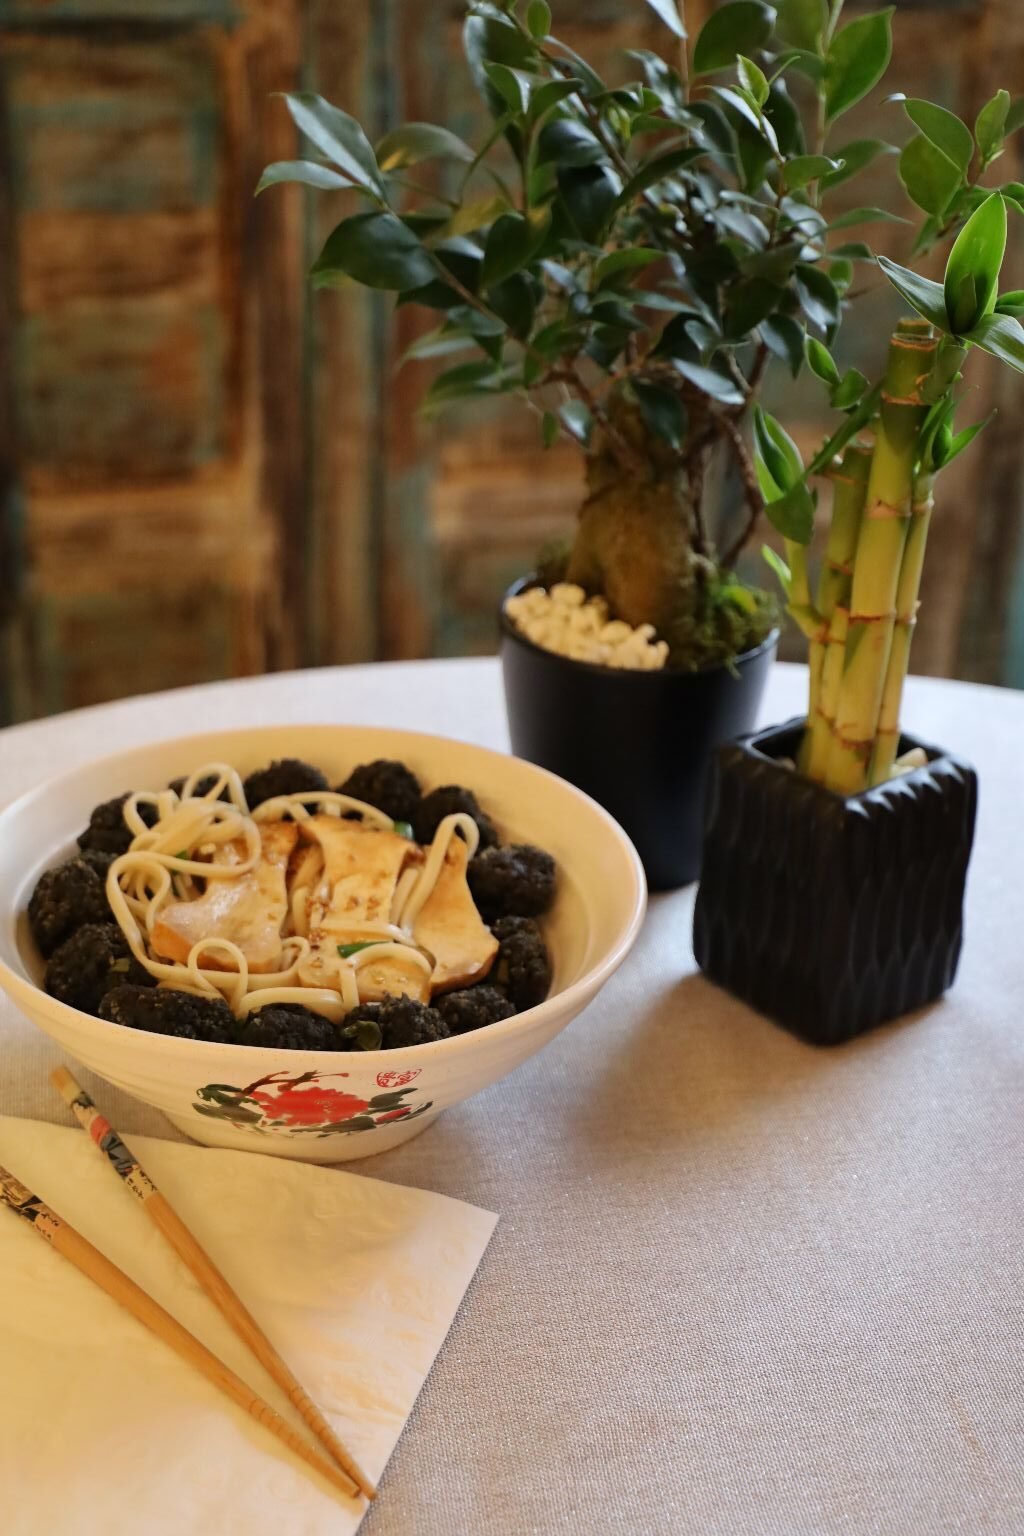
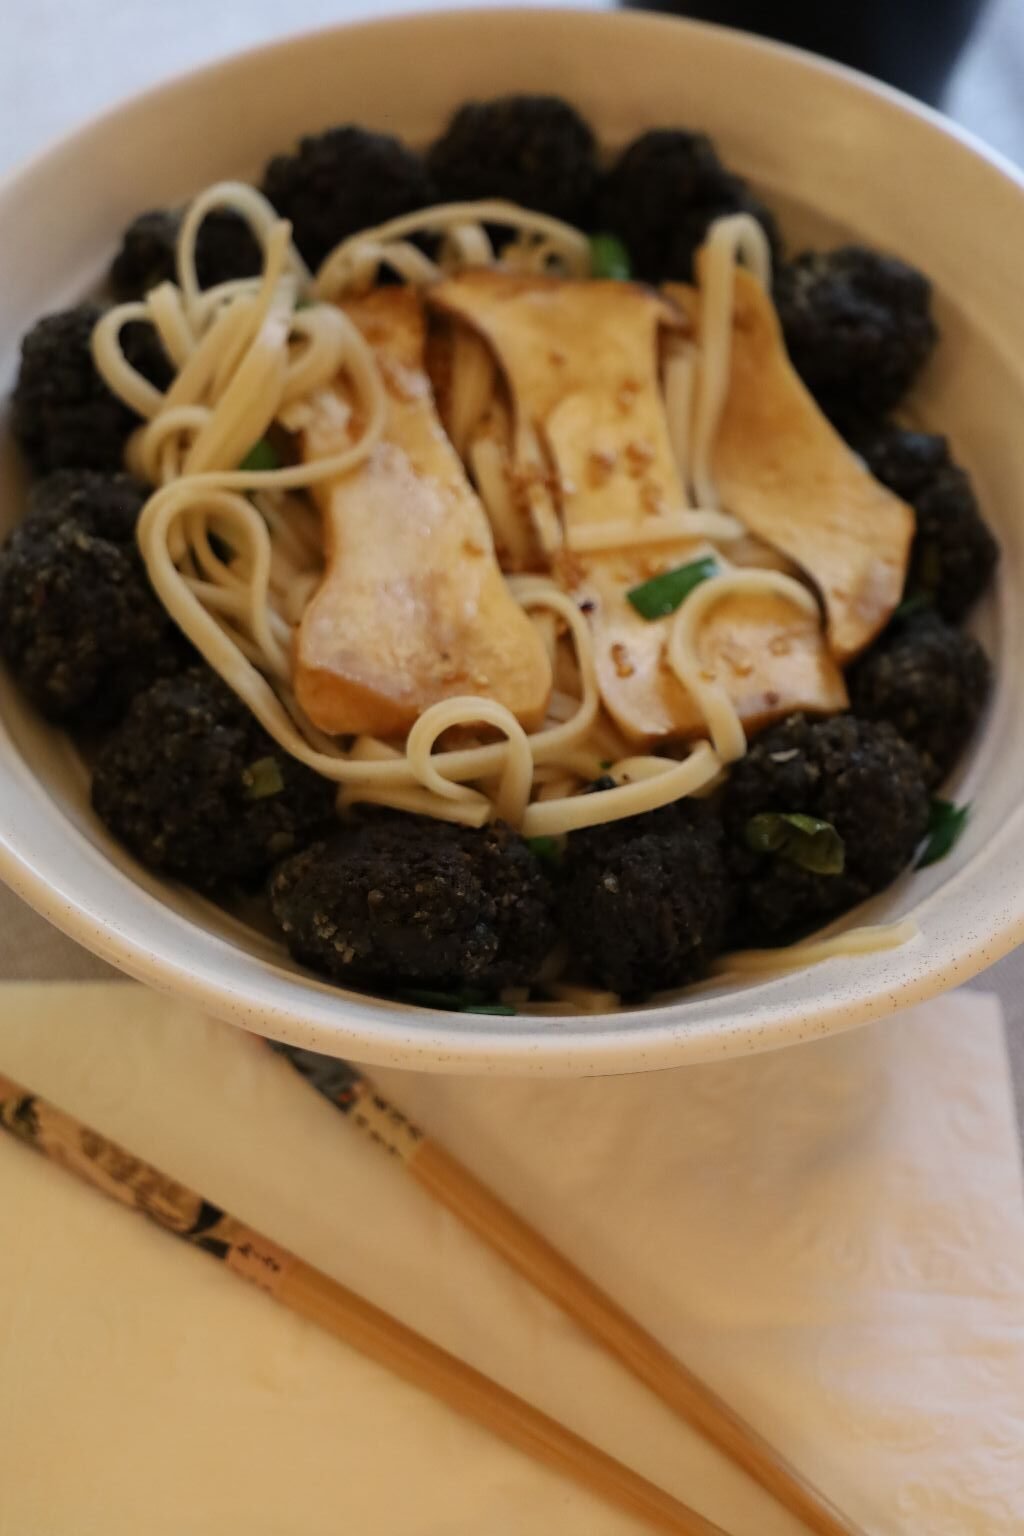
Asian Soup To Go
W/ Mushrooms, Chives, Black Meatballs, and Kimchi!
(If you are wondering how Soup can be ‘Take Out,’ that is because it is generally quite hot before you leave the house, or you are able to keep it hot with good insulation, or you are able to heat it up while you are out and about. Either way, it is possible. Also, lukewarm is also acceptable sometimes.)
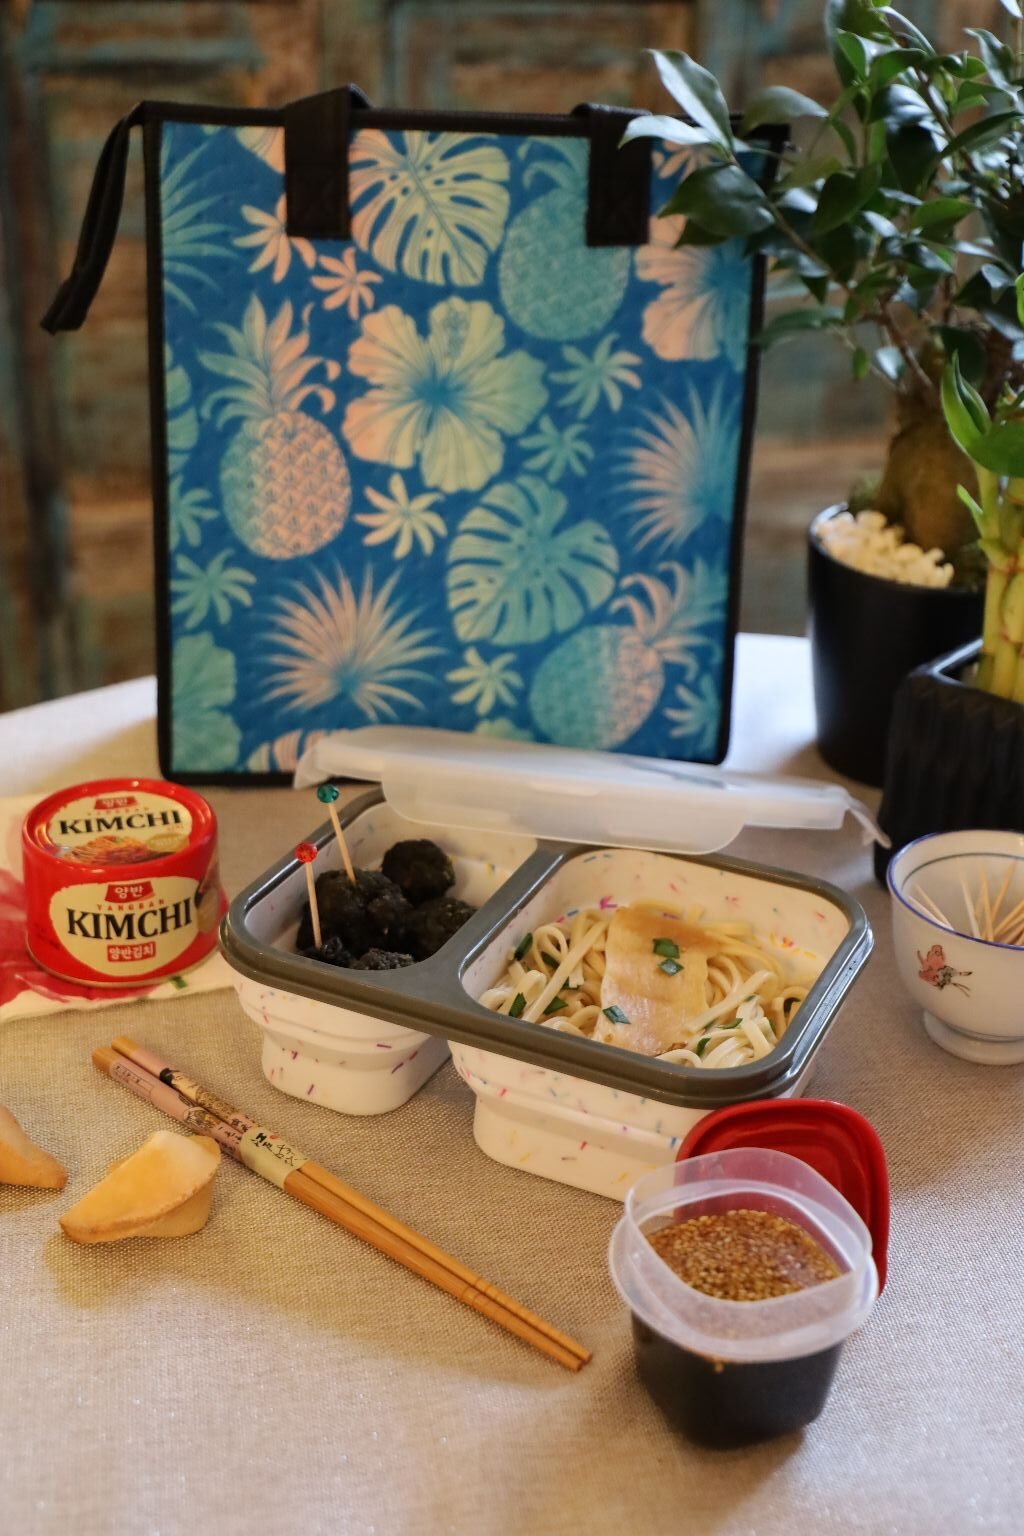
Don’t forget the Sanbai-Zu, (Sweet Vinegar Sauce)
———————————————————————————————-
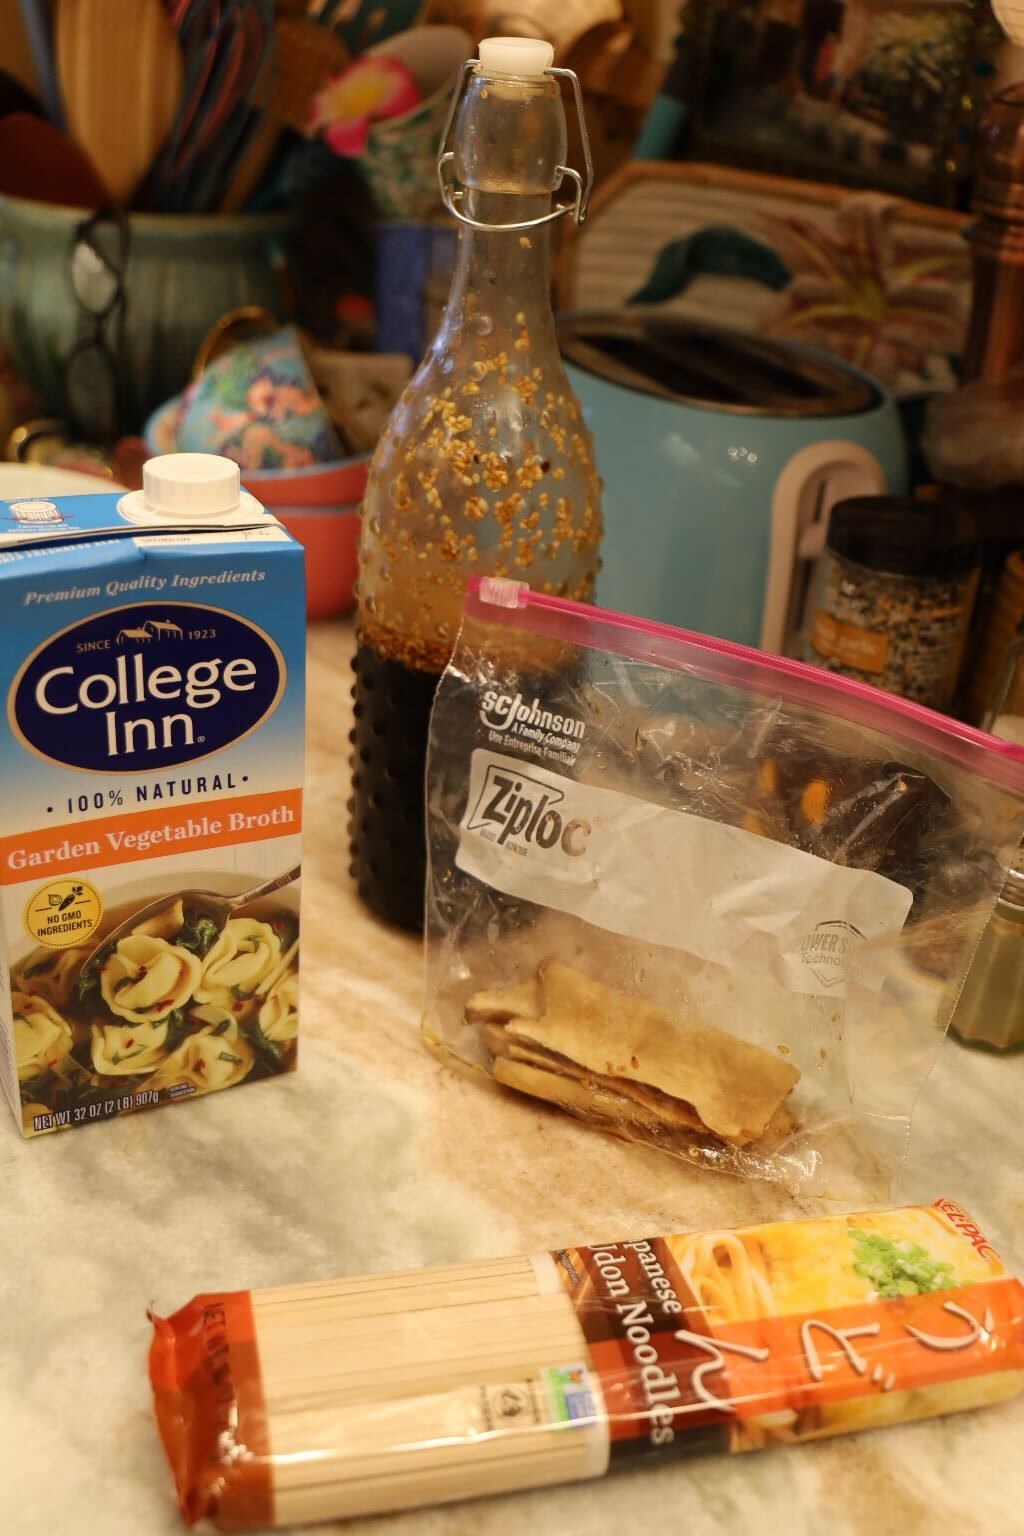
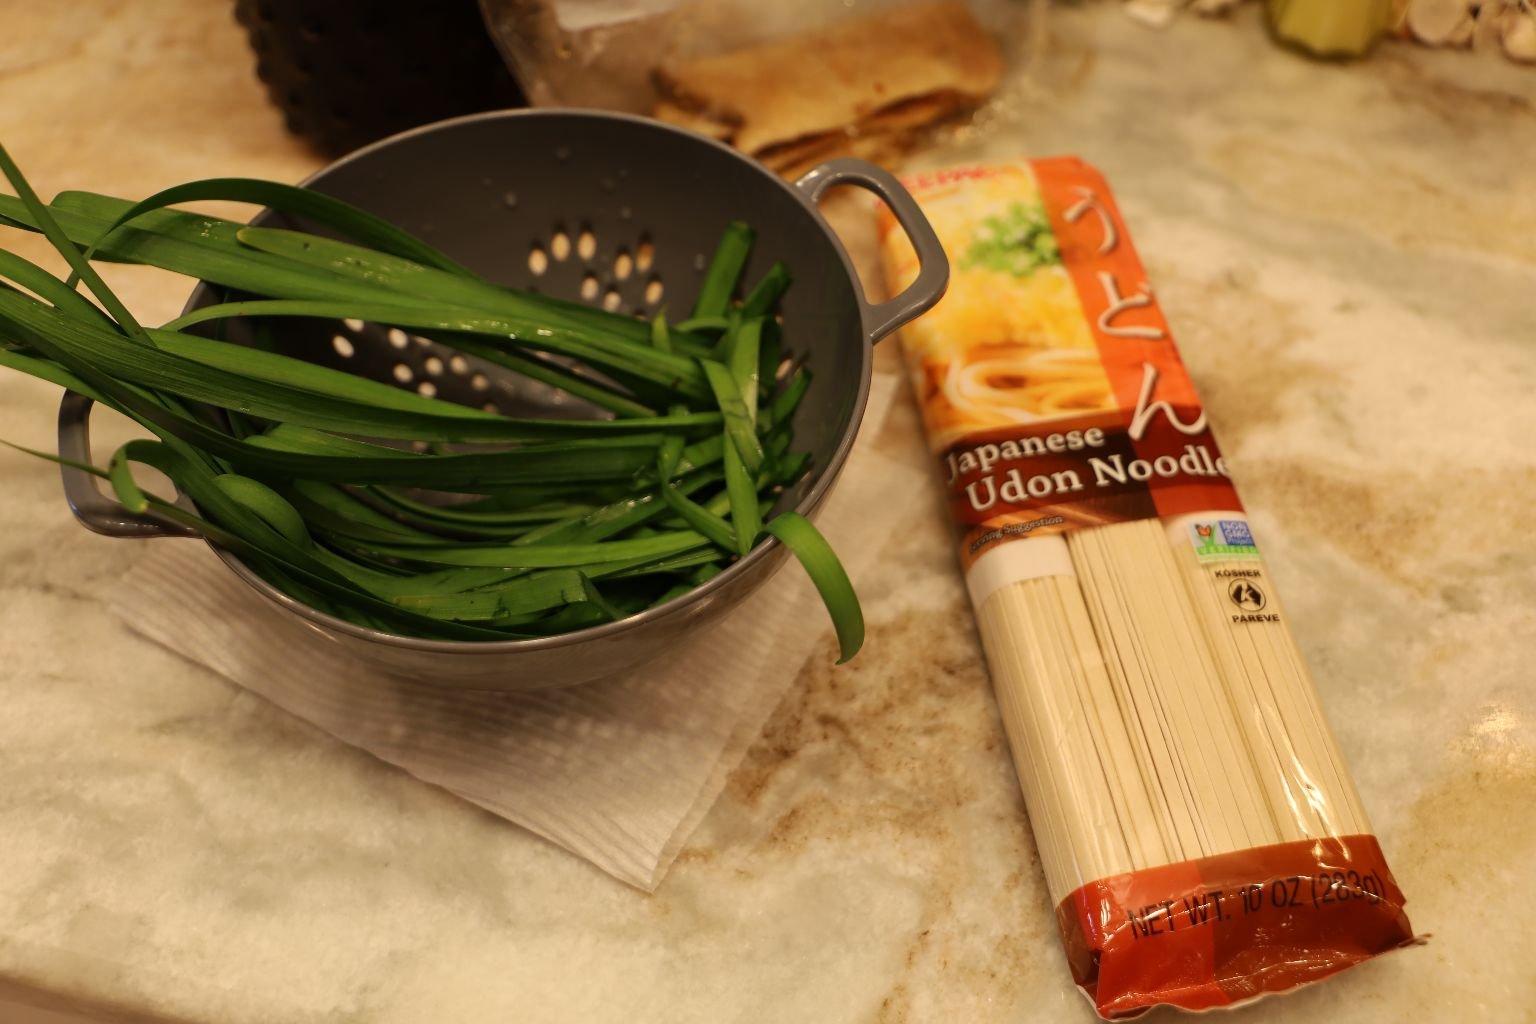
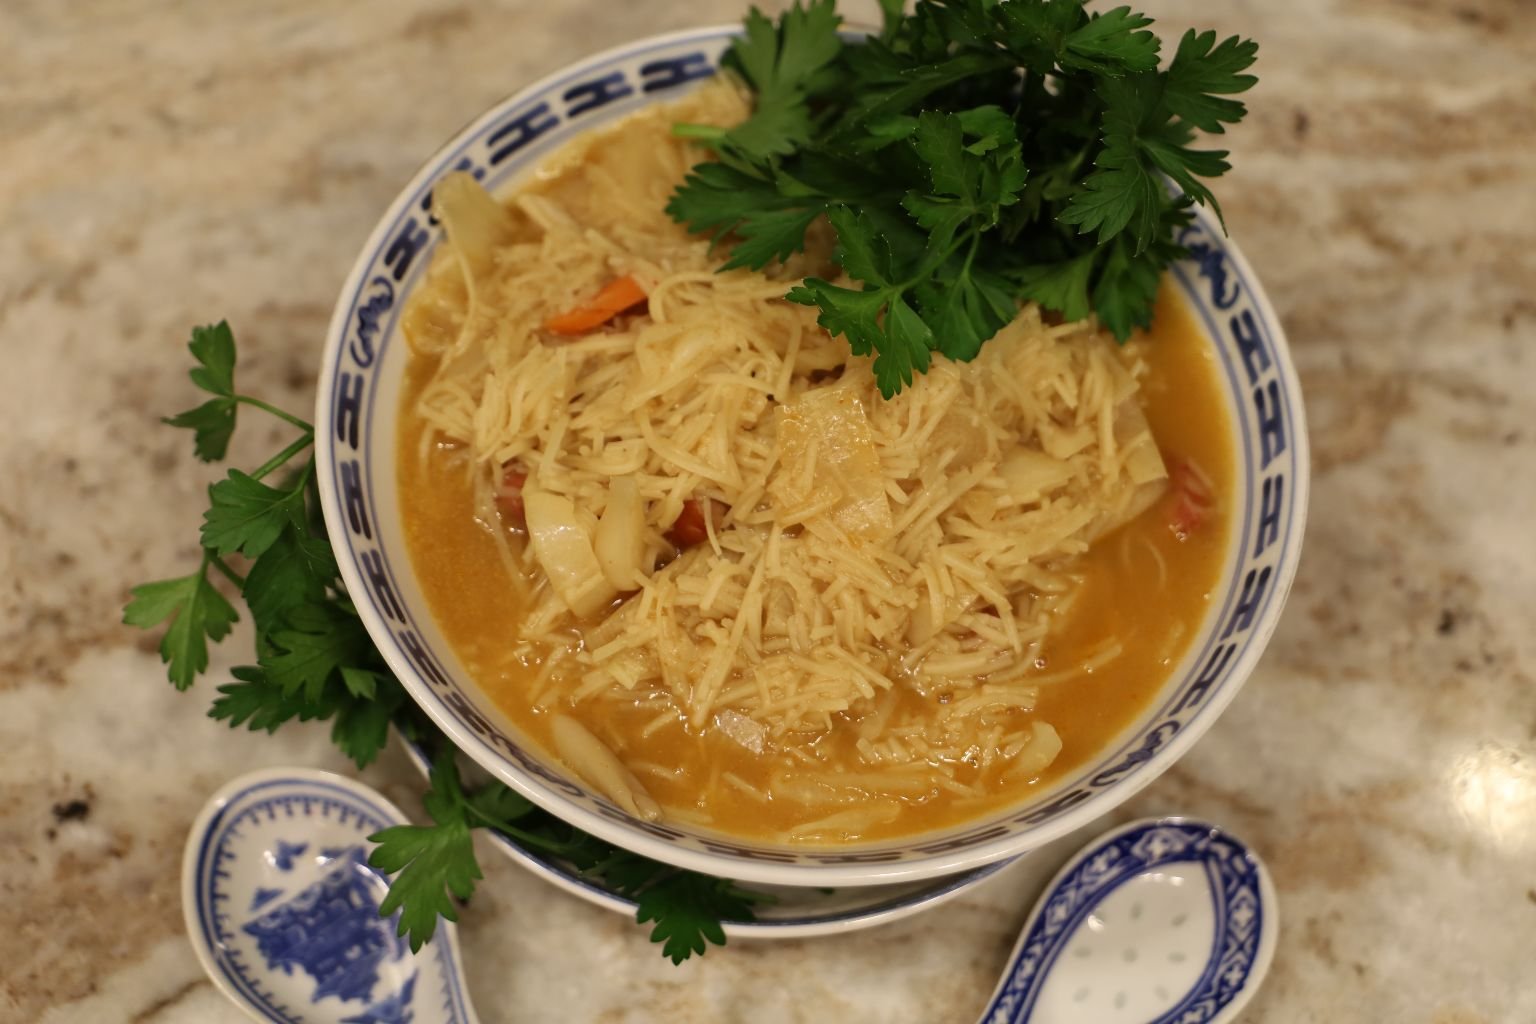
A Taste of my Easy Asian Soup
Chicken Stock, Asian Noodles, Fresh Chives, Sauteed Mushrooms, and Sanbai-Zu
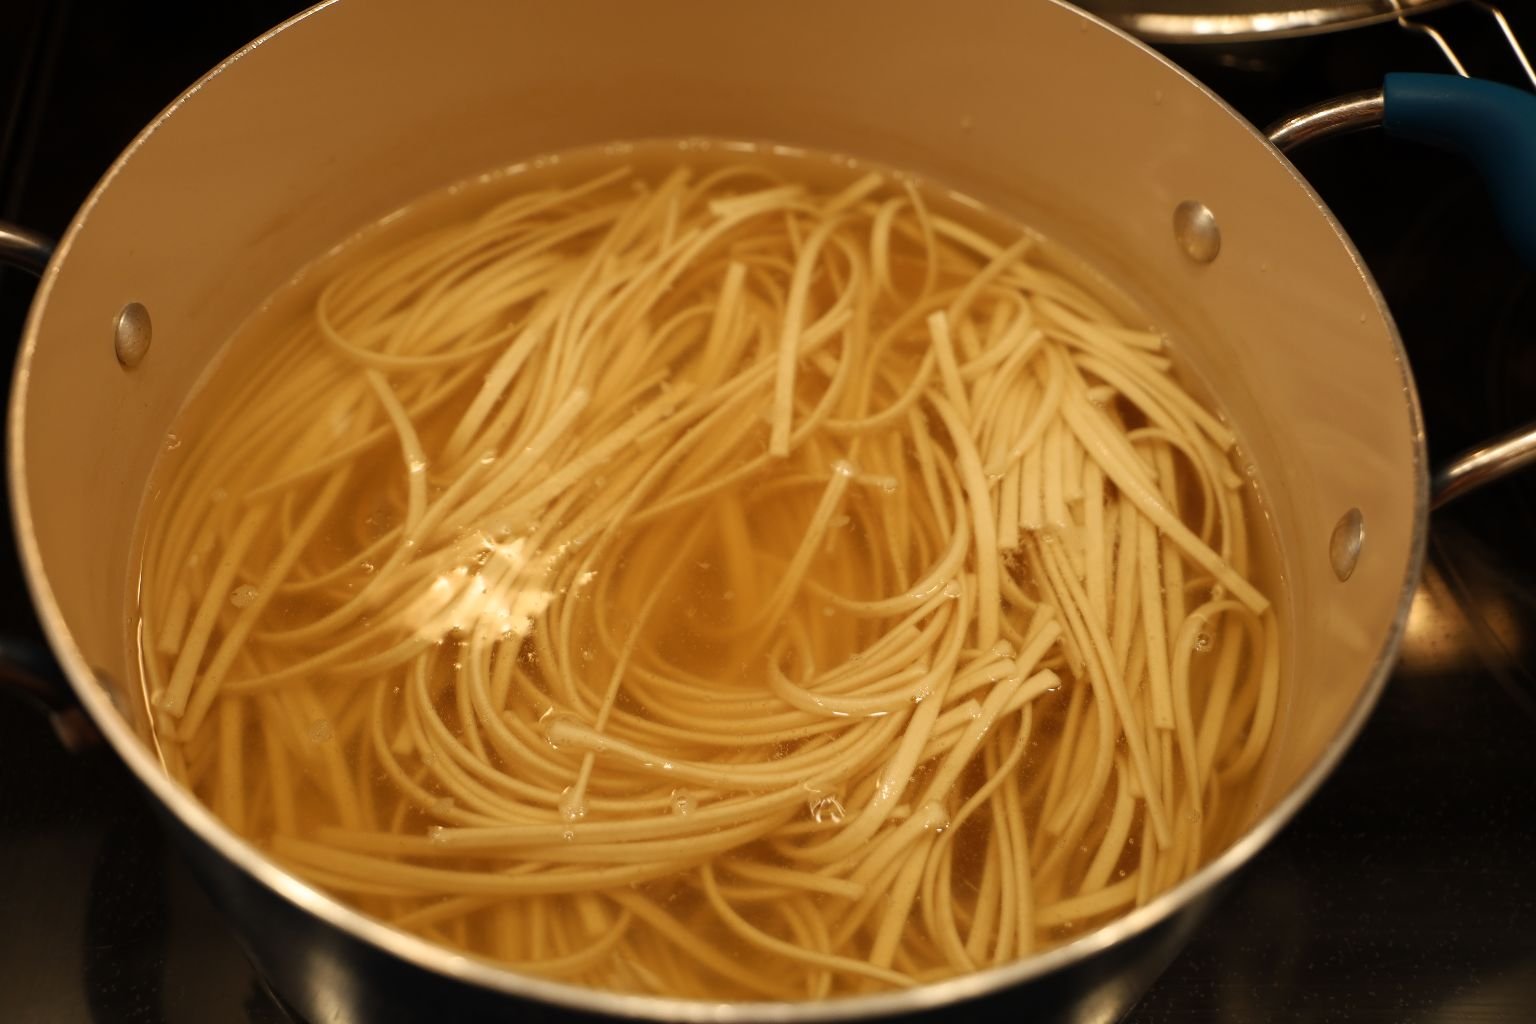
Cooking the Noodles in the Chicken Broth…
then adding the Mushrooms, Chives, and the Black Meatballs.
————————————————————————————
The Black Meatball Recipe will be coming this way eventually.
Or at least the link to click on for the recipe. Check back later on.
This will be where the above recipes will be posted.
—————————————————————————————–
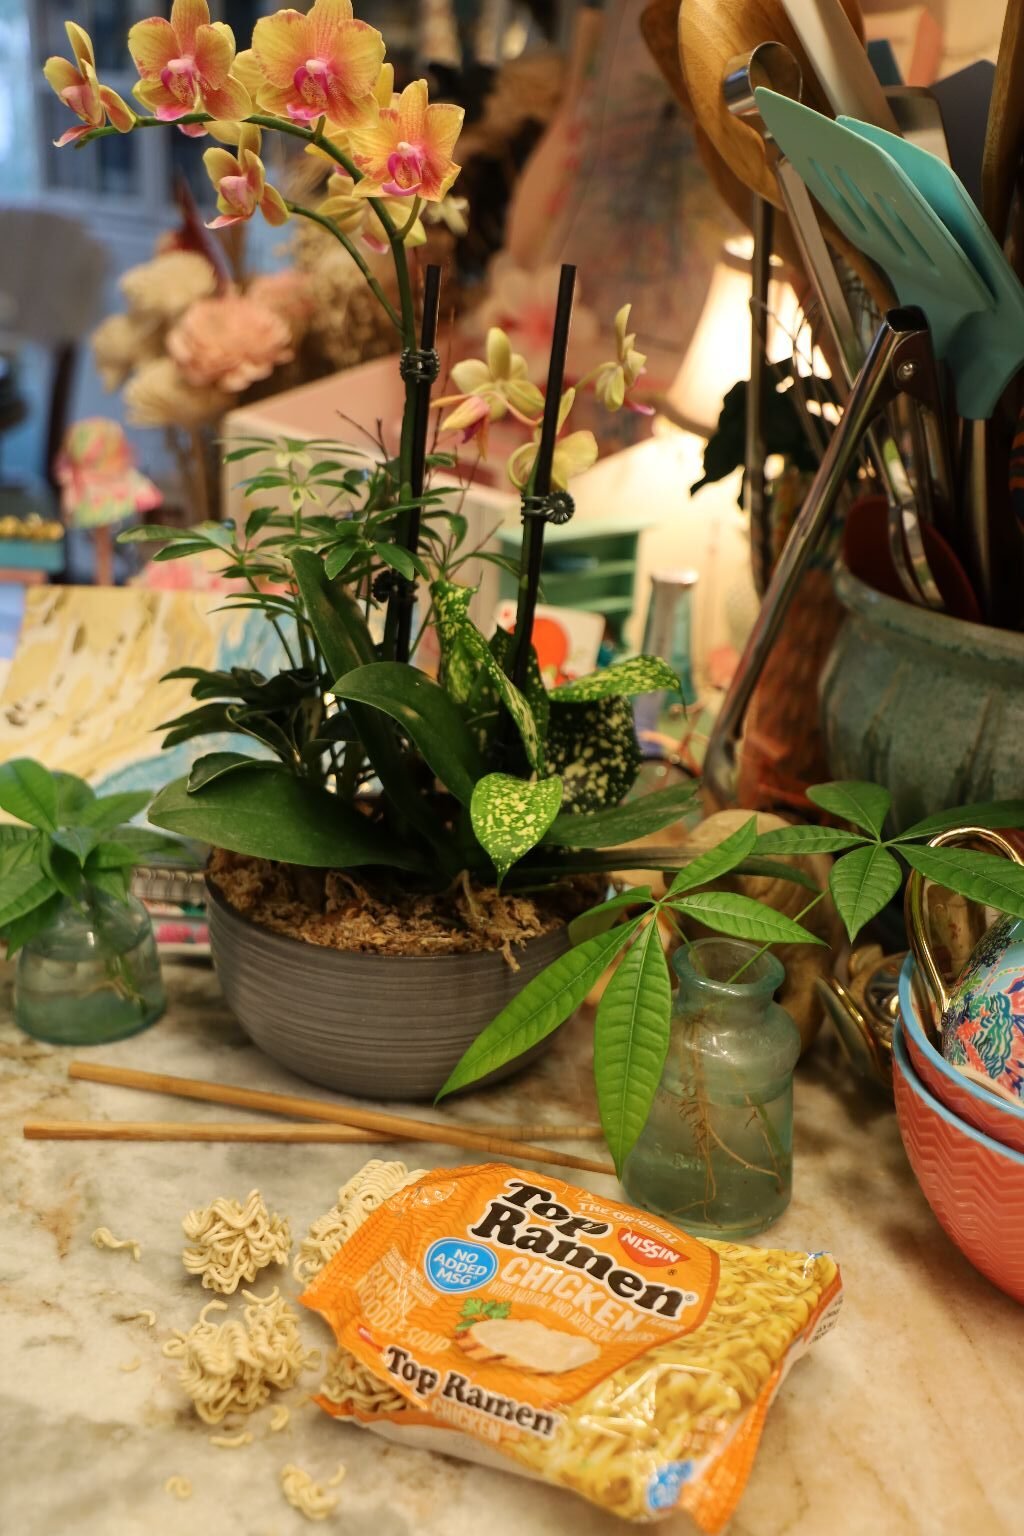
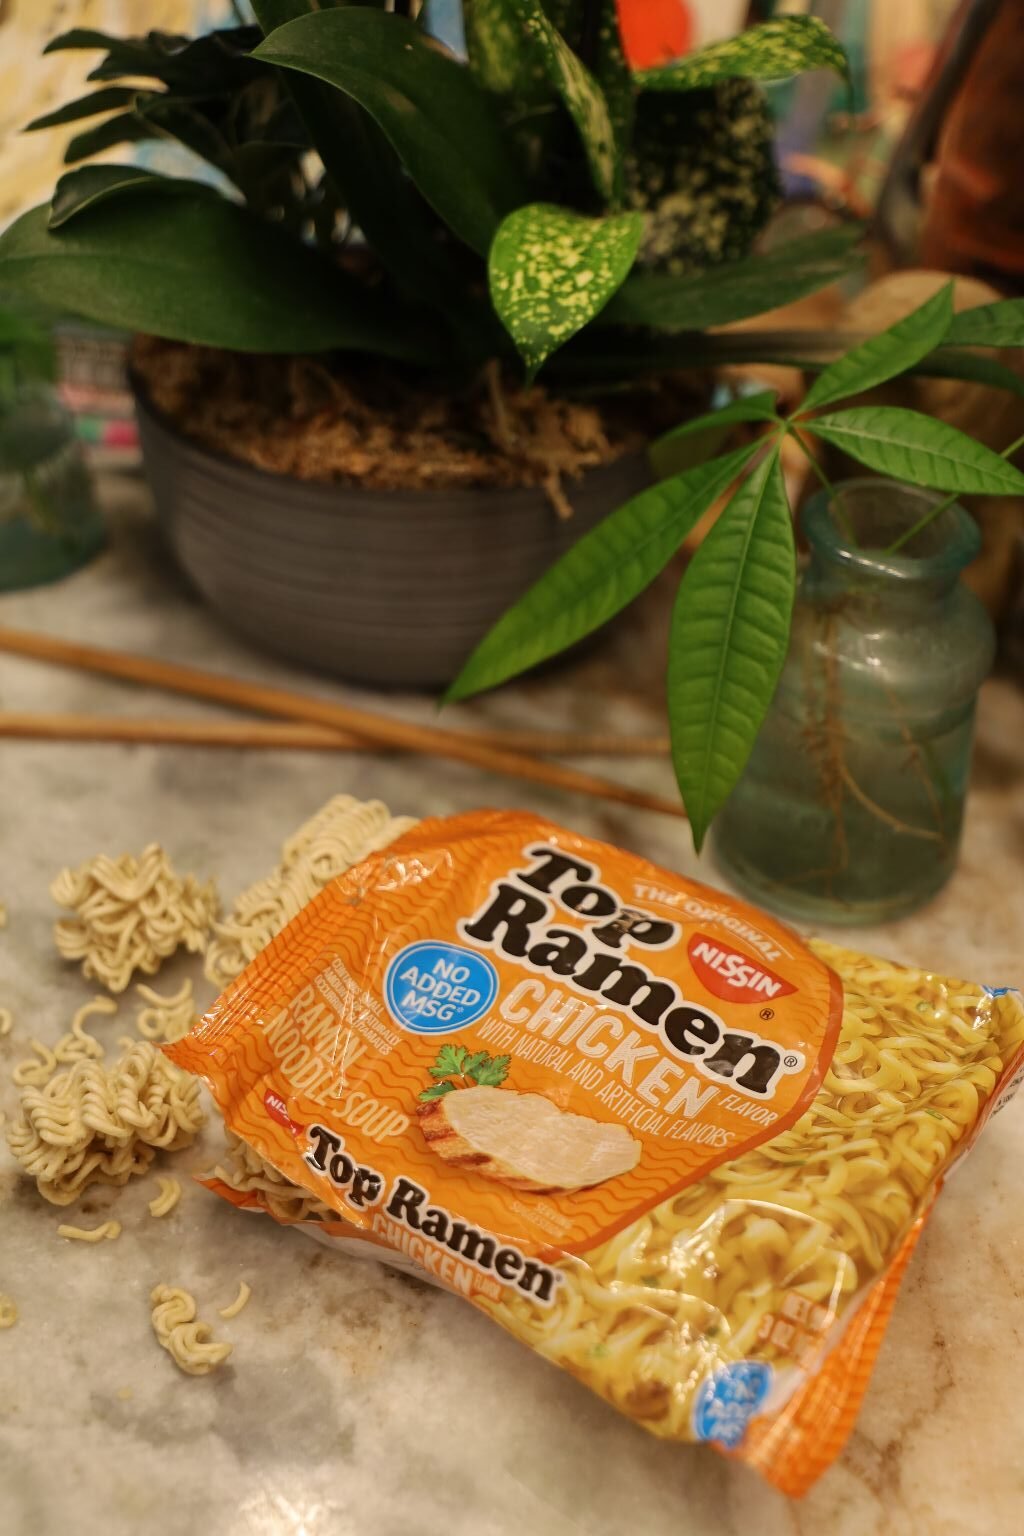
Dry Top Ramen Snack
The keiki’s (Kids) in Hawaii always keep a pack of Top Ramen in their pockets to snack on while they play outside.
Sometimes I will grab one to snack on while I’m driving and on the go.
——————————————————————————————-
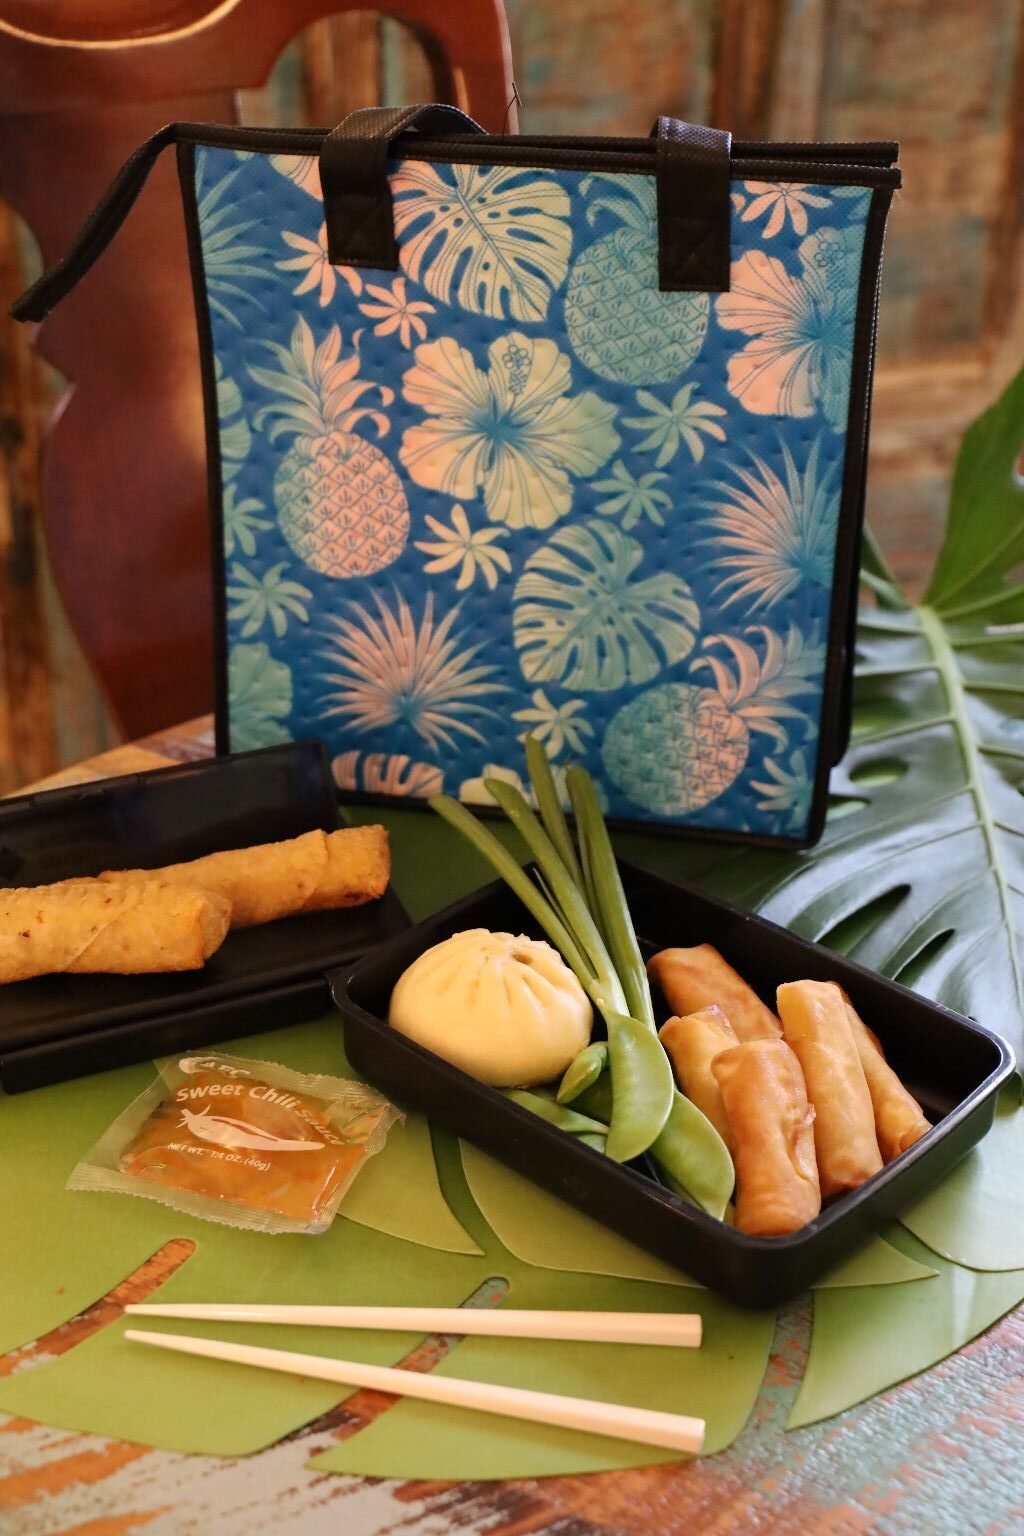
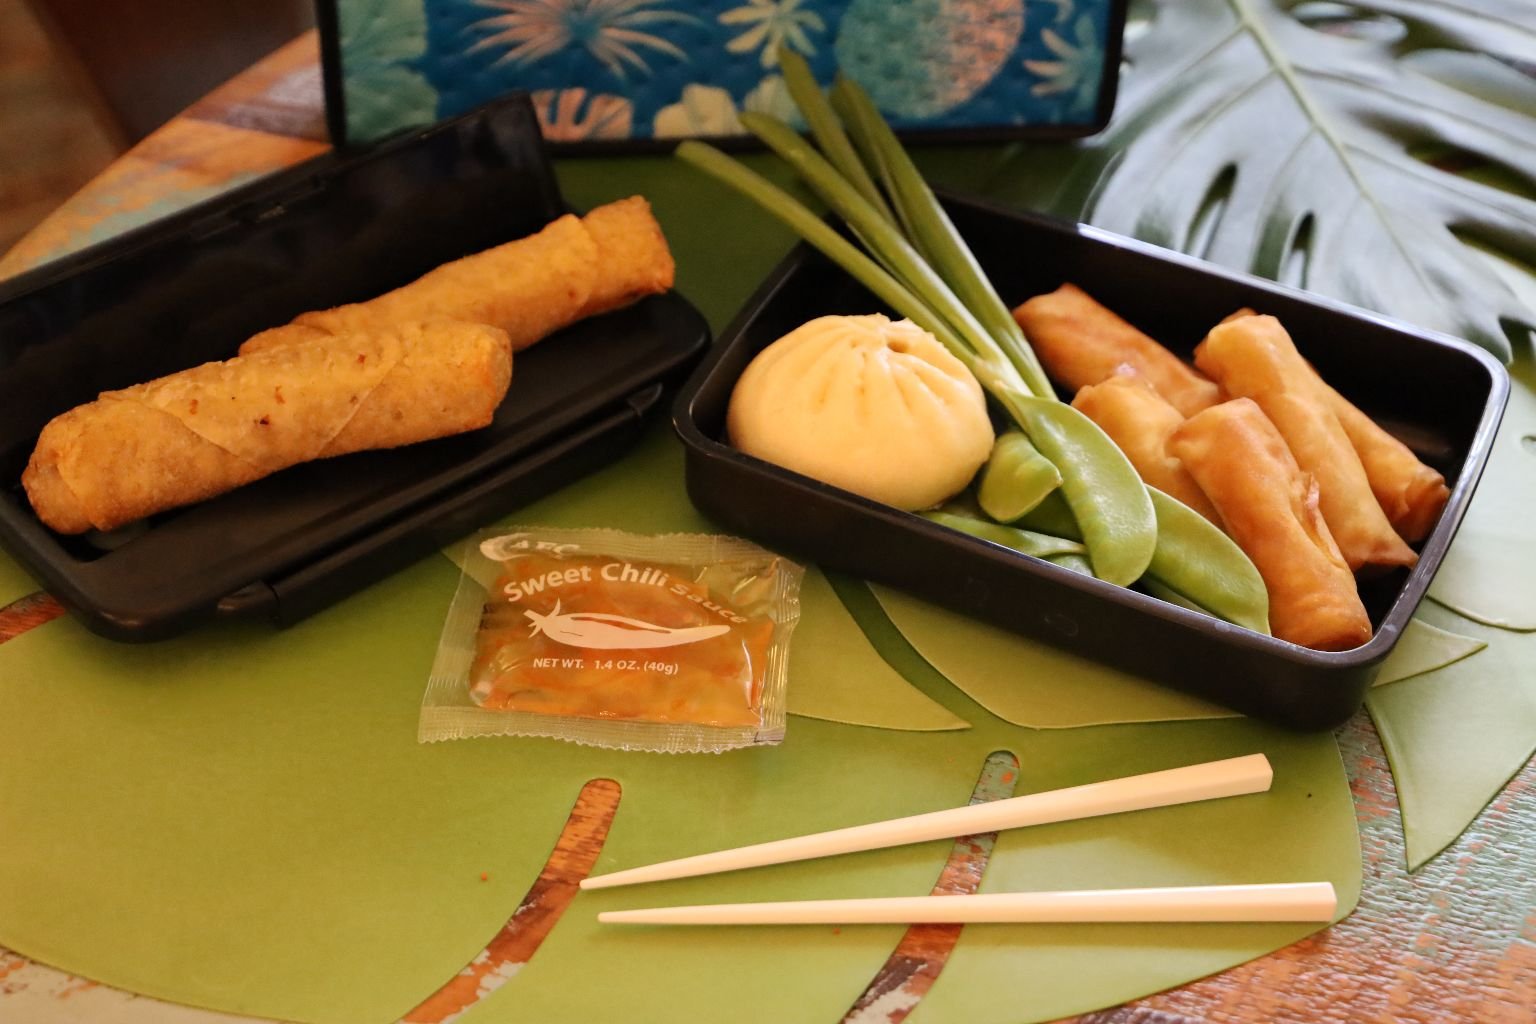
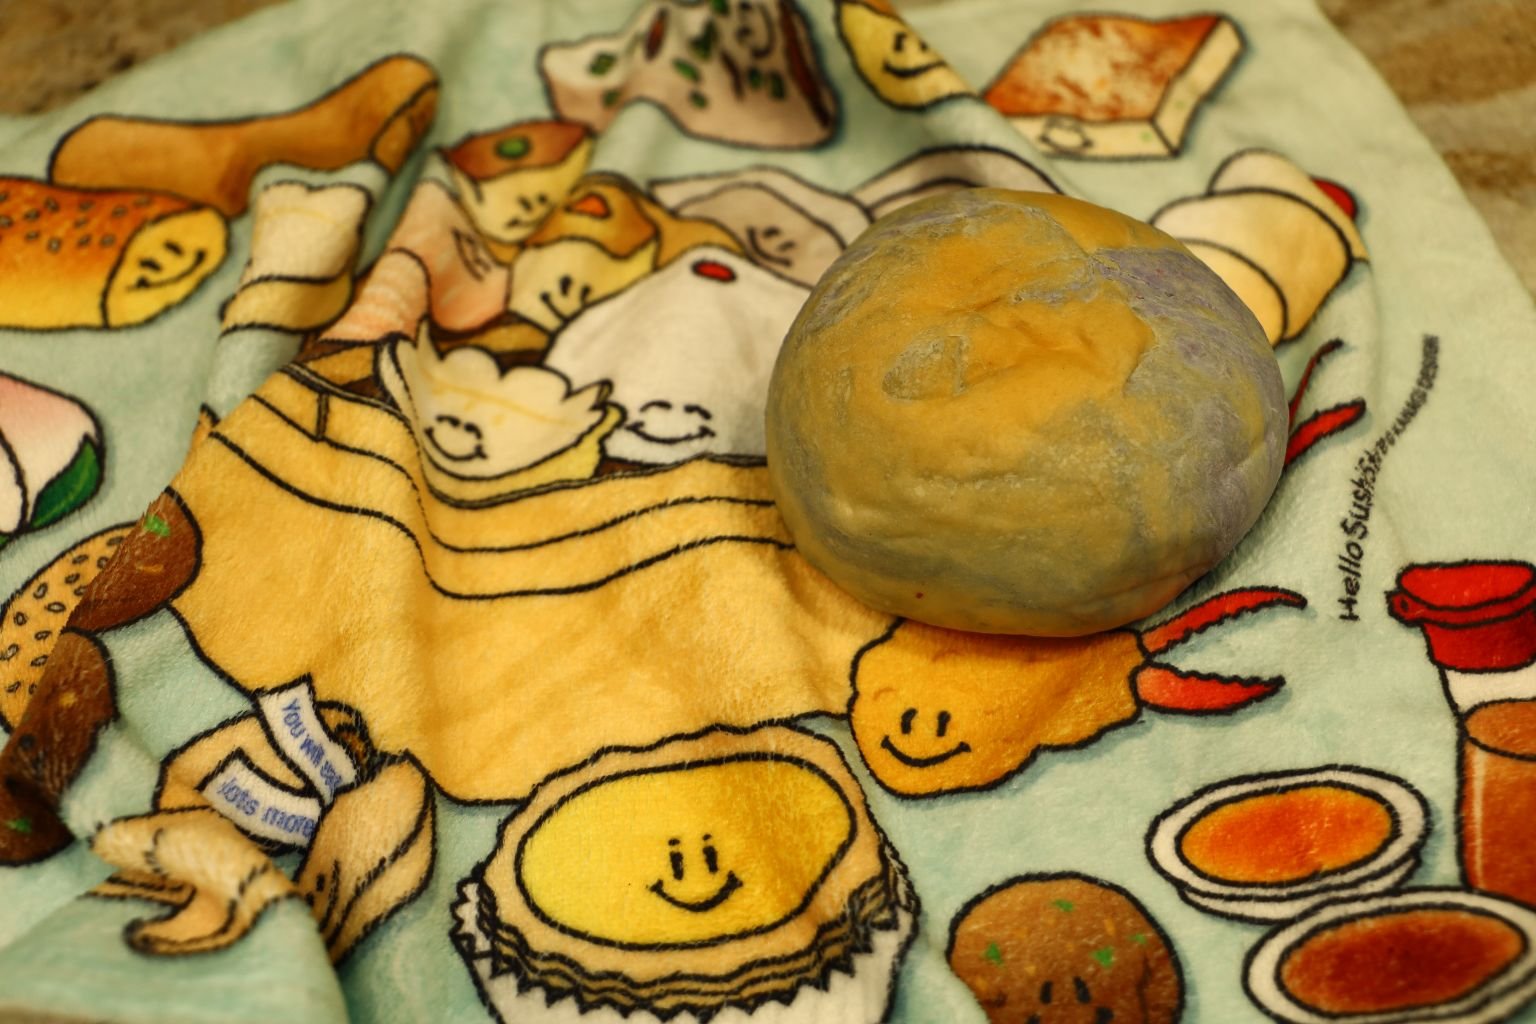
Another Fun Lunch For Me
Egg Rolls, Bao Buns, Spring Onions, and Chili Sauce
(I save the portable Chili Sauces from various Take Out foods that I have eaten over time.)
Again, you can keep your food warm with good insulation.
———————————————————————————————–
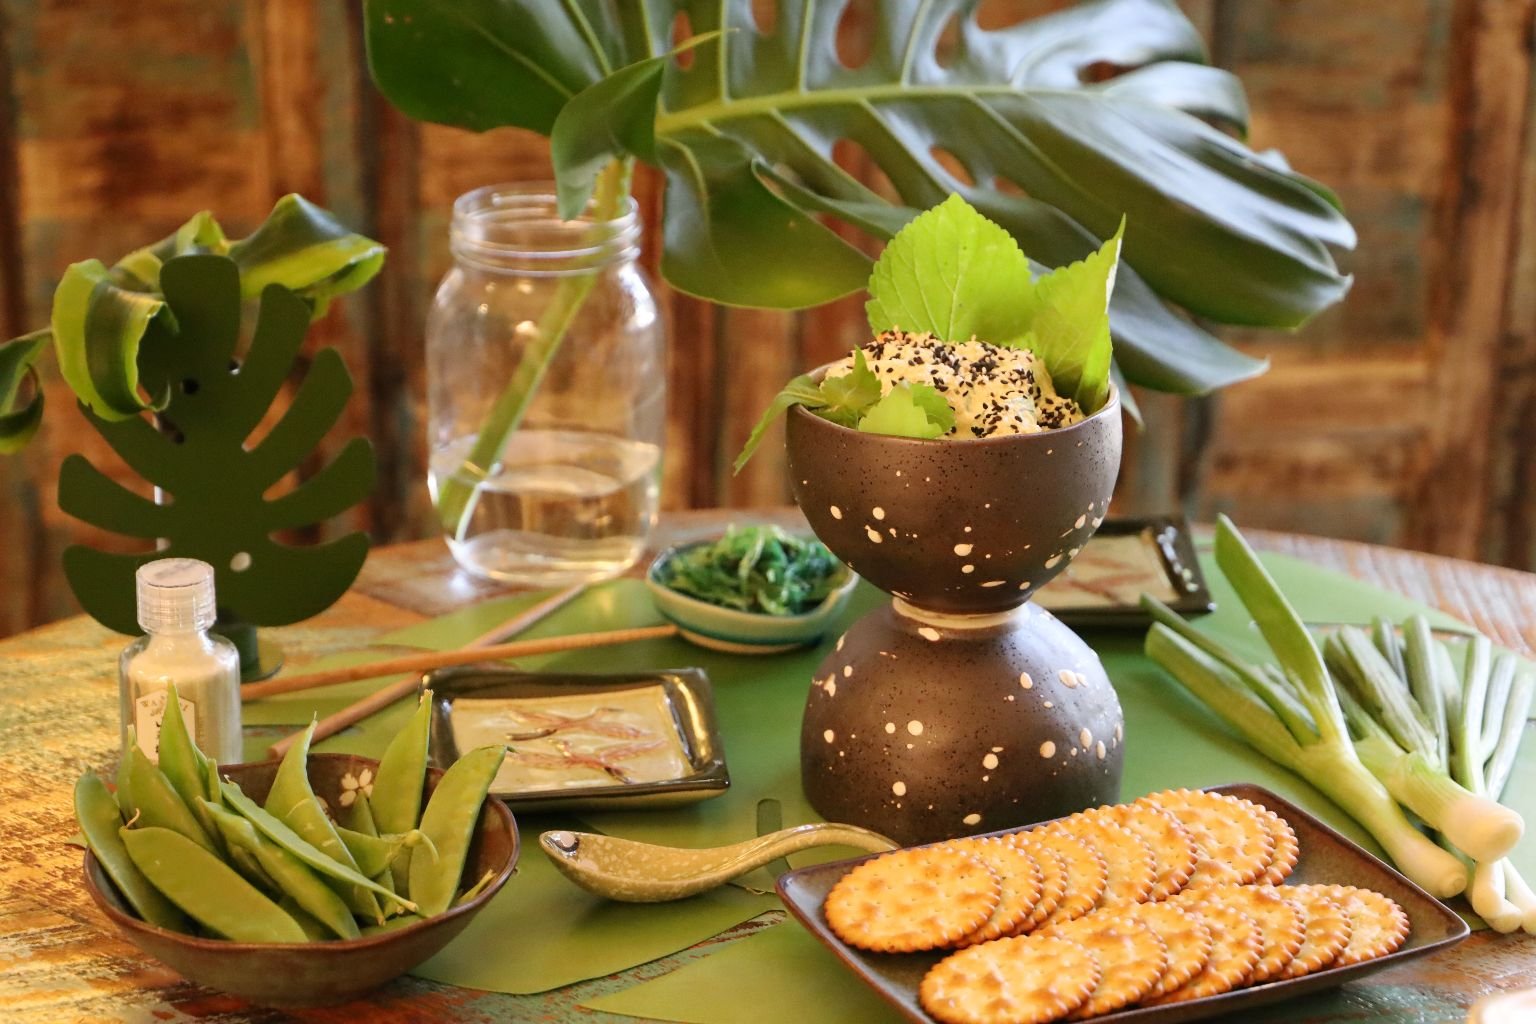
My Tasty Asian Seaweed Dip/Spread
If You Would Like The Recipe…
Click Here For: A Tasty Asian Summer
———————————————————————————

I love these Asian Crackers:
Seaweed and Onion, and Shallot
They are large, and very sturdy. I also like that they are packed in a plastic container, and wrapped with about 4 to a pack.
They don’t come all broken as our crackers do here in America.
Here I have placed my Seaweed Dip/Spread into a small Bento Box with the Crackers, for a Take Away Snack
—————————————————————————————–
Once Again, Out For The Day

This Time, I Just Needed A Snack

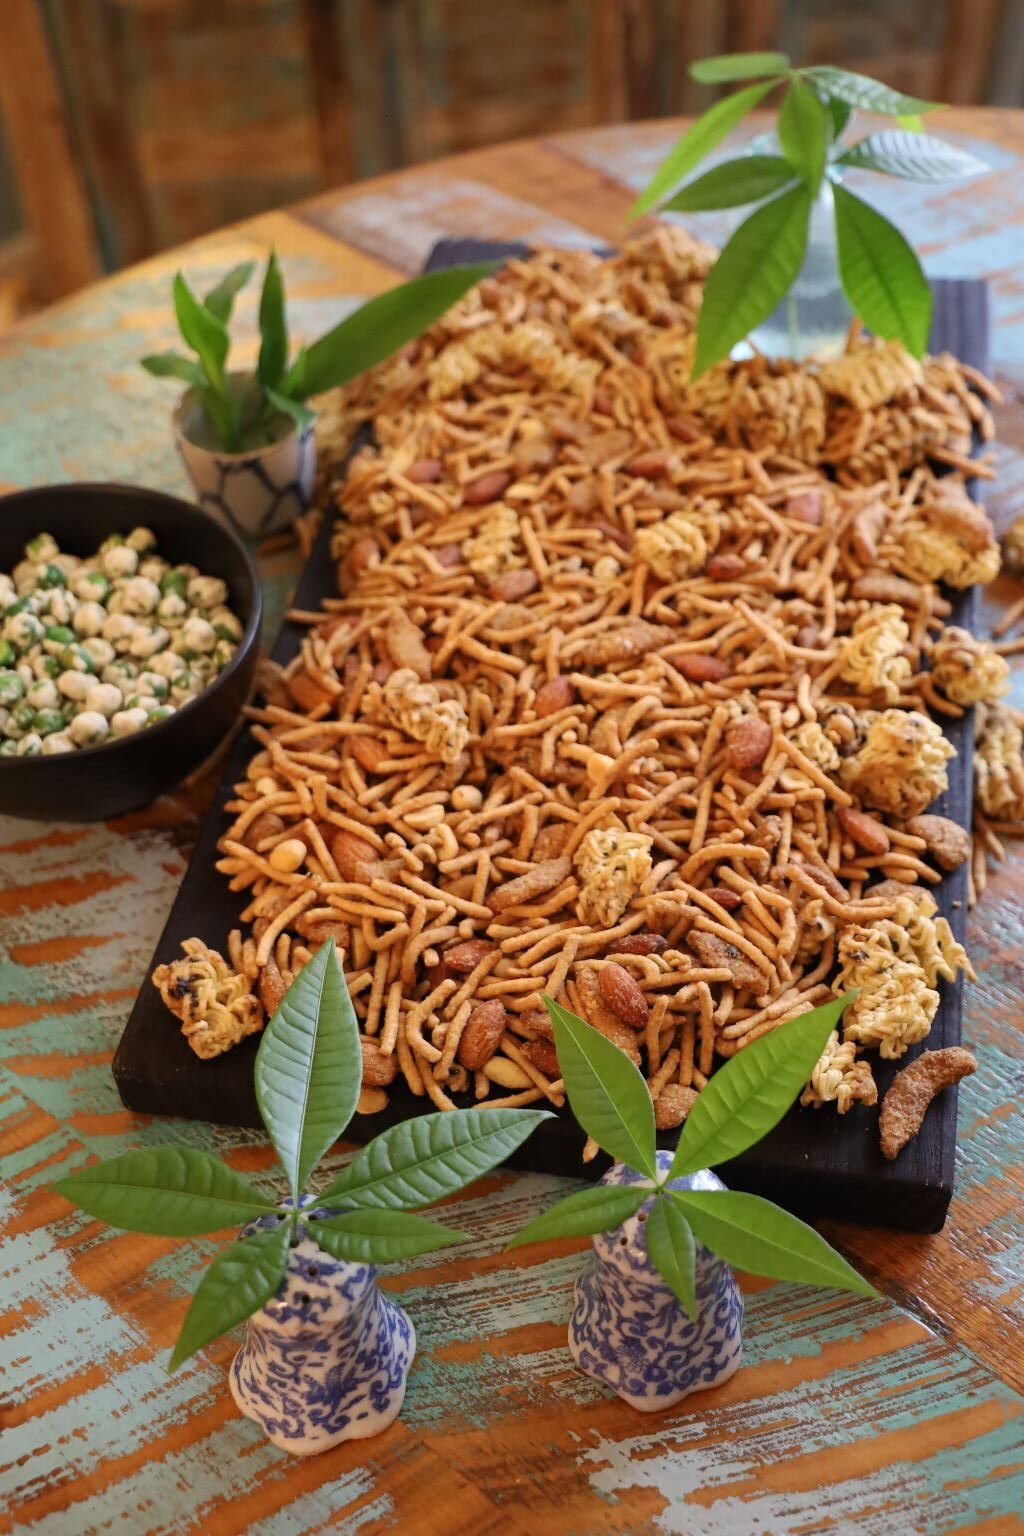
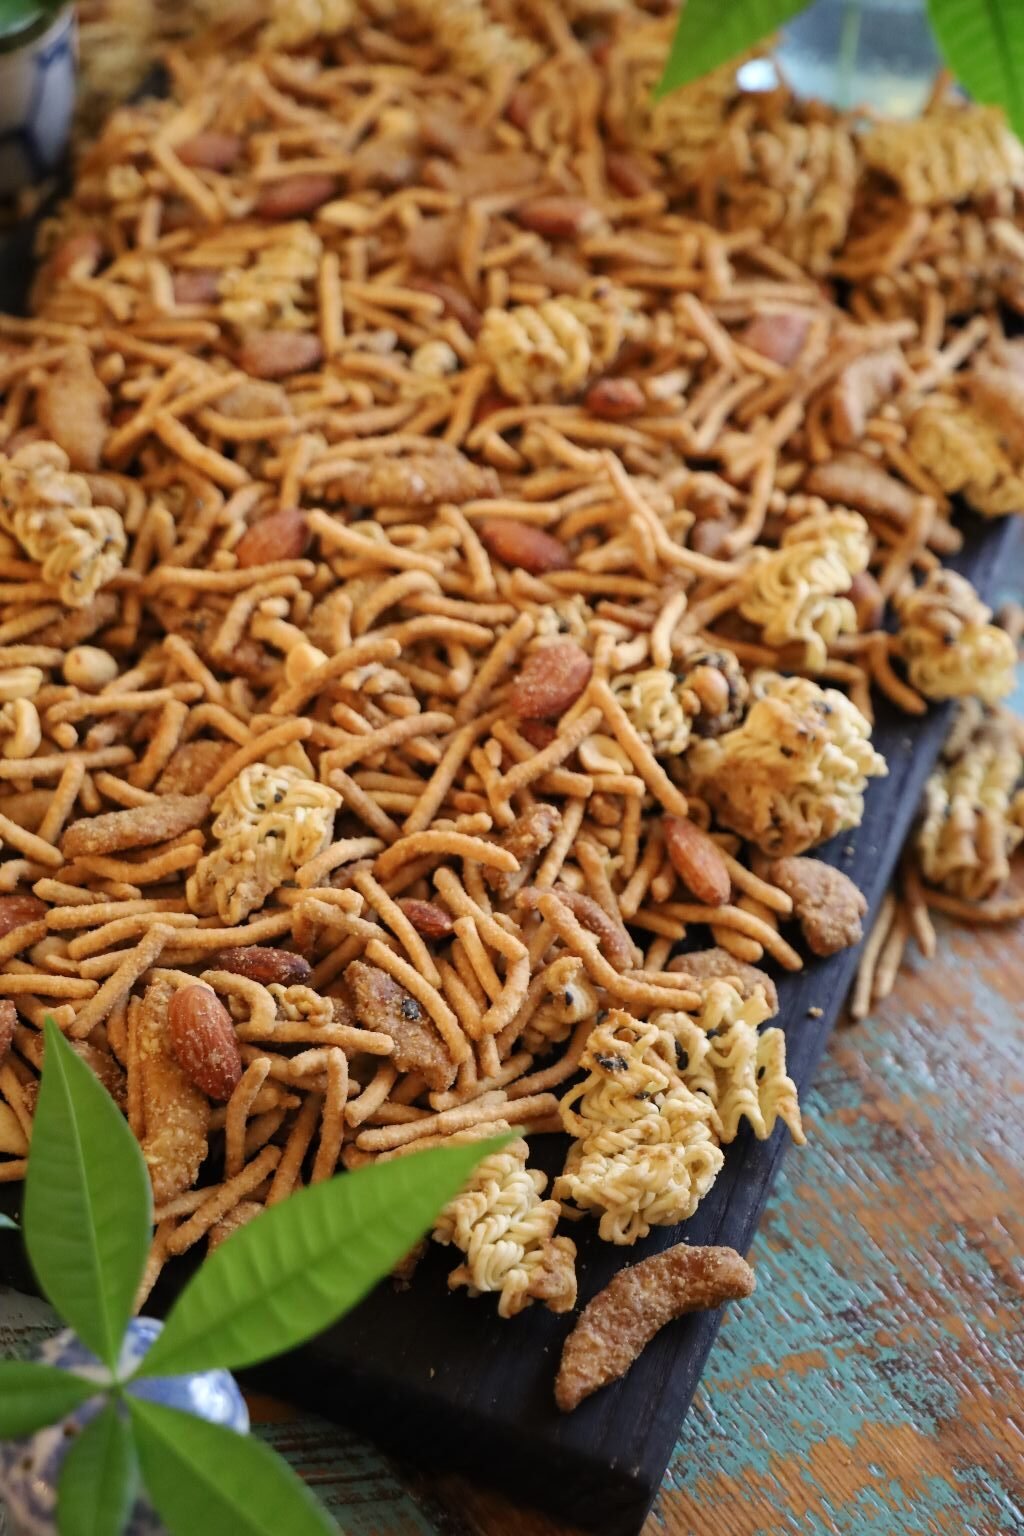
Taking My Aloha Snack Mix


The reason I named this my Aloha Snack Mix is that I had geared it more towards Hawaii than I did any Asian creation I might have come up with.
Hawaii does have a large Asian influence. But, it is a tropical Polynesian/Asian influence here.

(Recipe Down Below)
—————————————————————————————————–
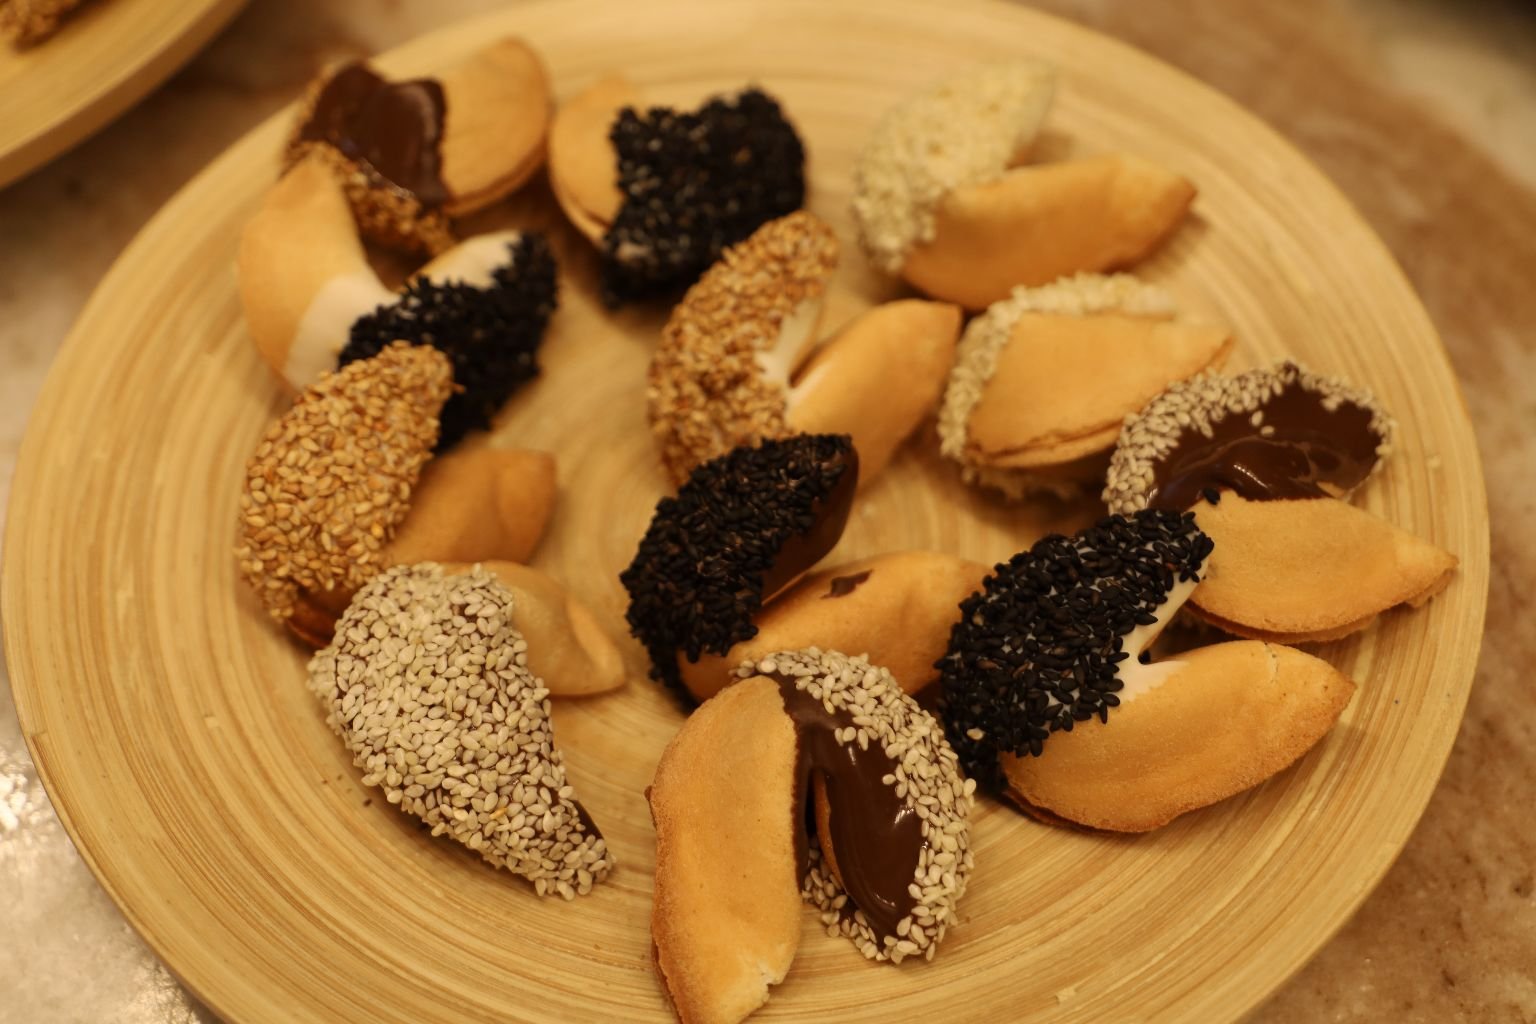
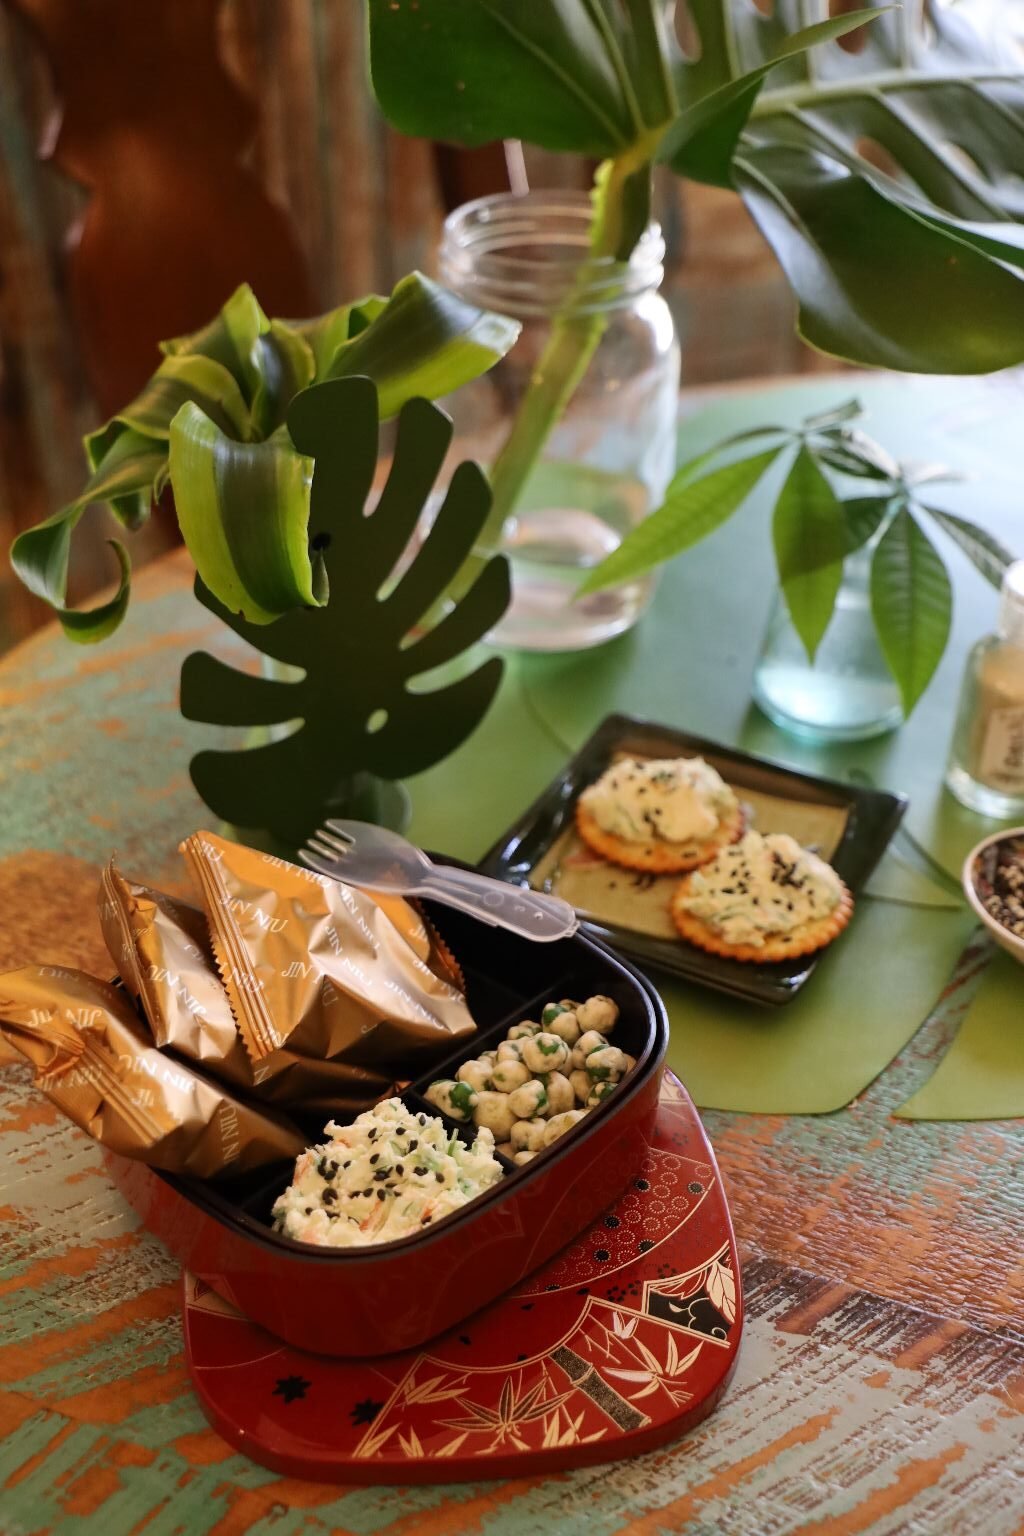
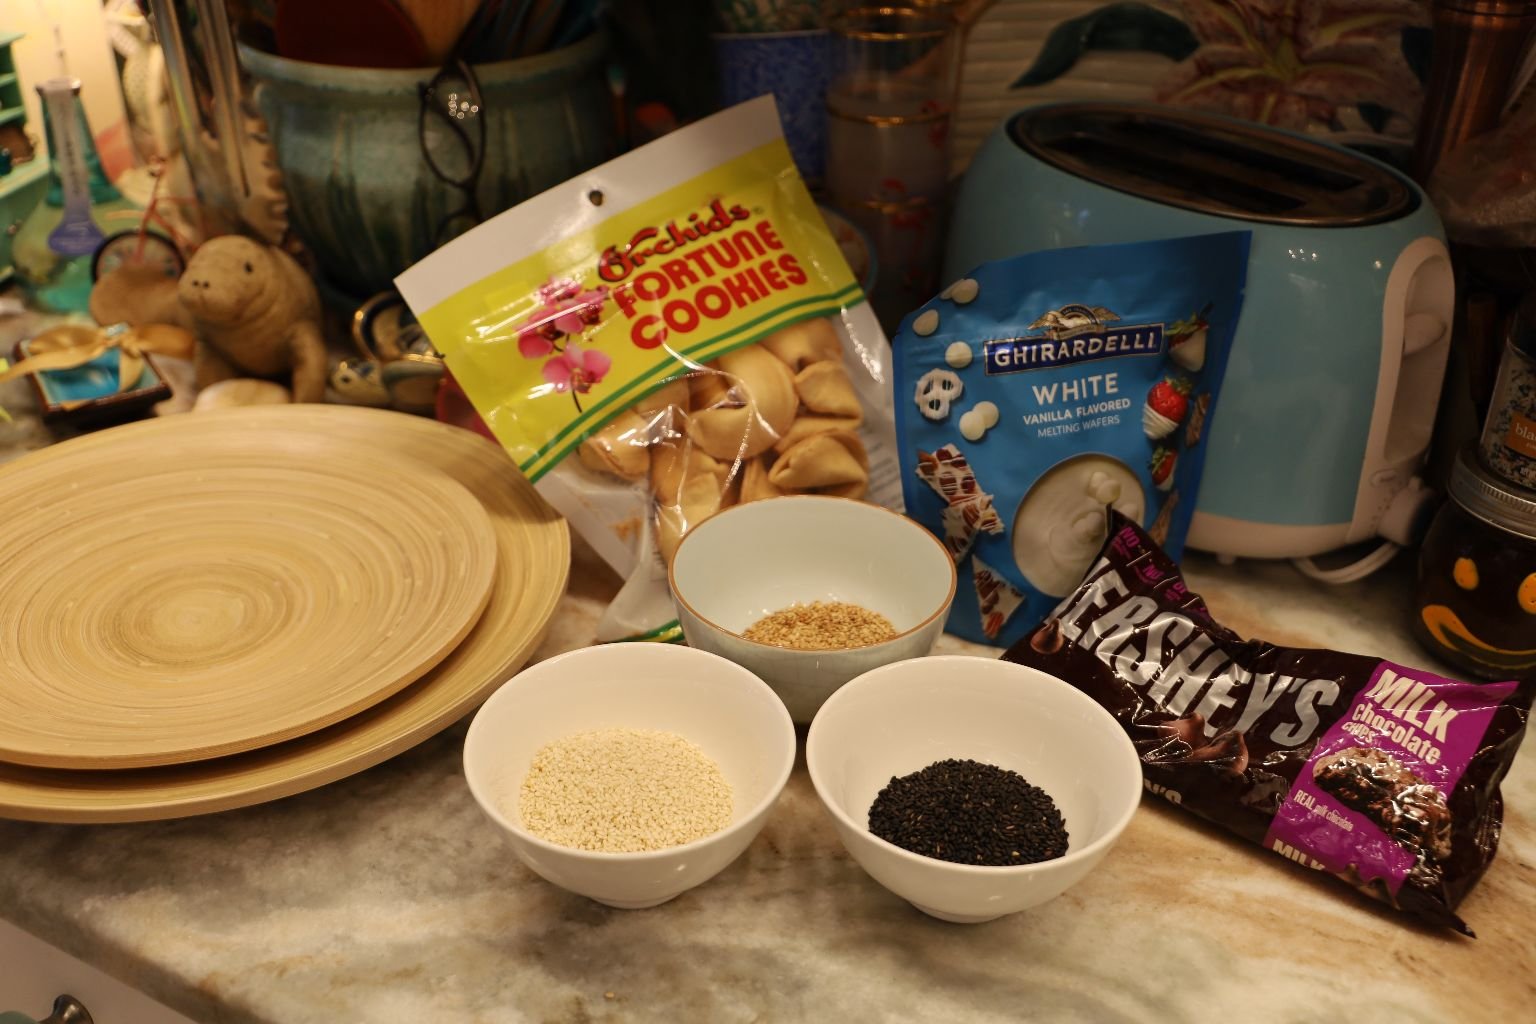
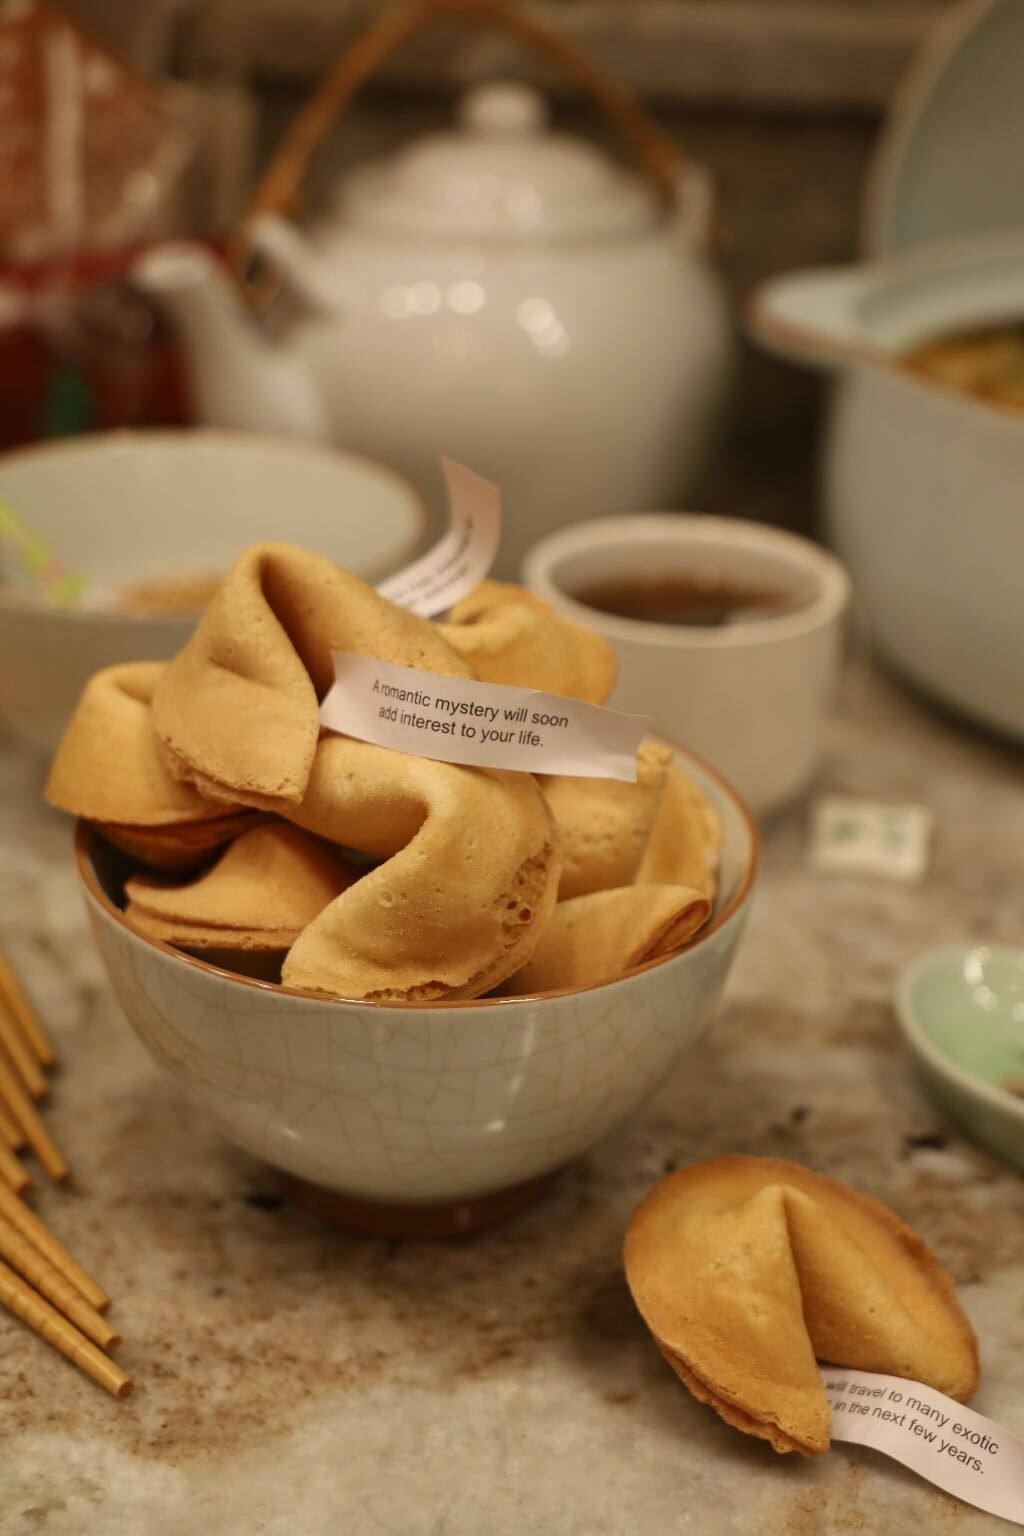
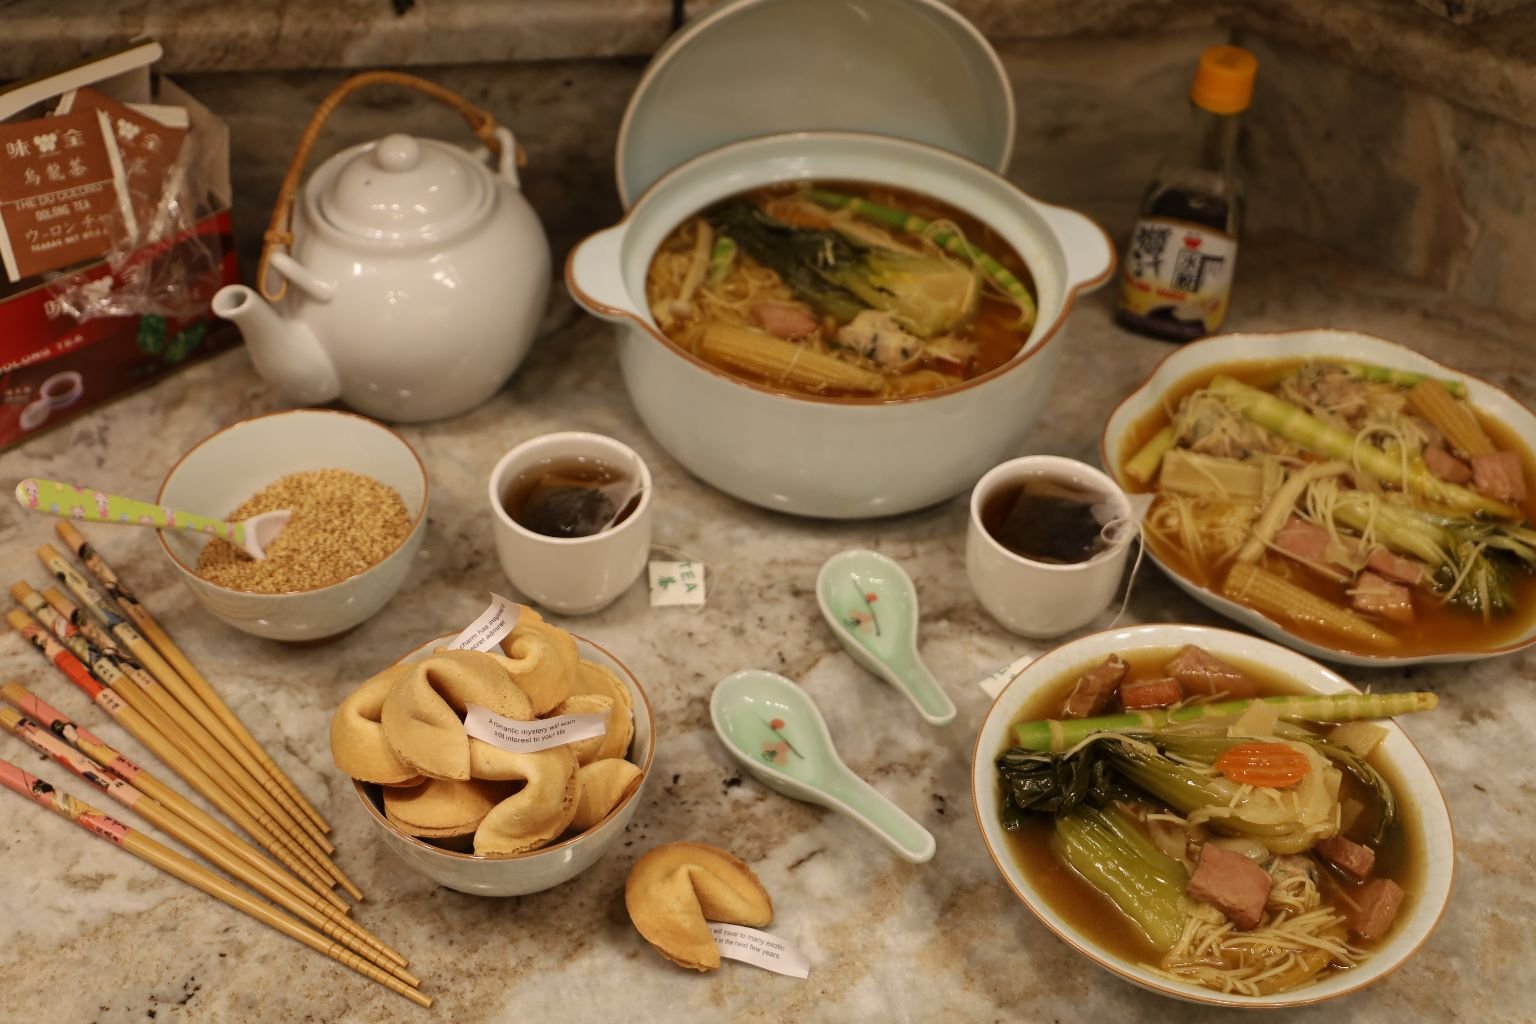
My Monochromatic Fortune Cookies
I Love Fortune Cookies!
I love that they are a nice crunchy cookie treat that isn’t very sweet. I love the cute little message inside every cookie. I also love that we can easily dress them up, and enhance them to make them even better. Here is what I did to these Fortune Cookies…
You can find Fortune Cookies in the Ethnic Isle of your local supermarkets, usually.
But if not, you can always shop the Asian Supermarkets near you.
Ingredients:
Plain Fortune Cookies
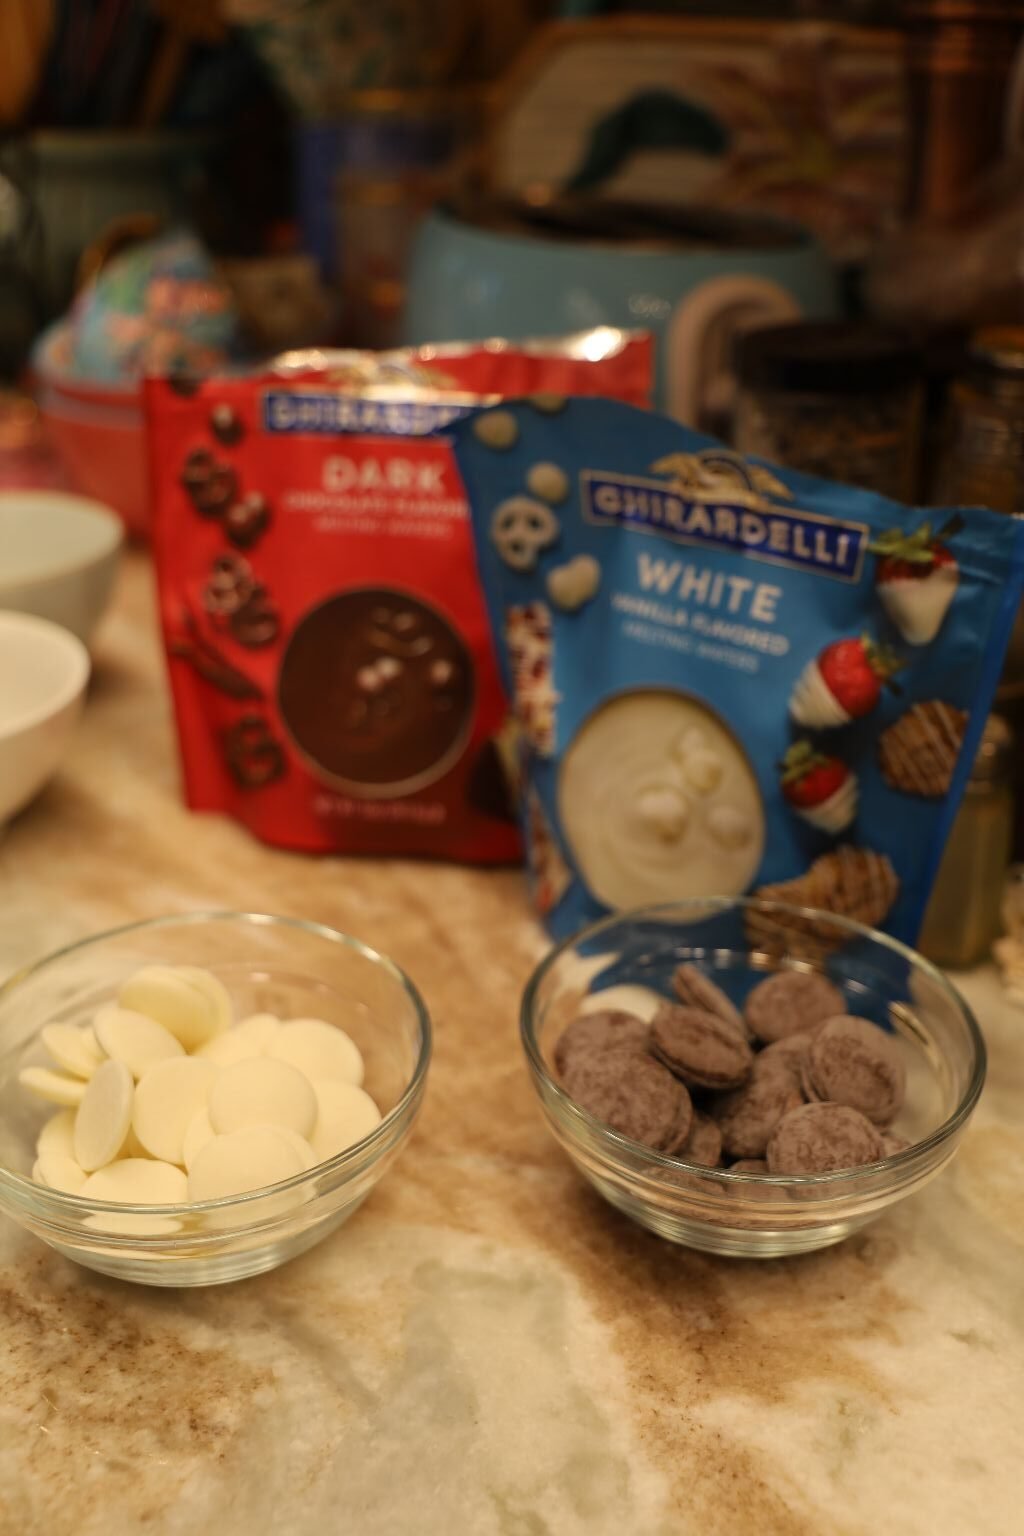
Dark Chocolate, and White Chocolate Melting Wafers
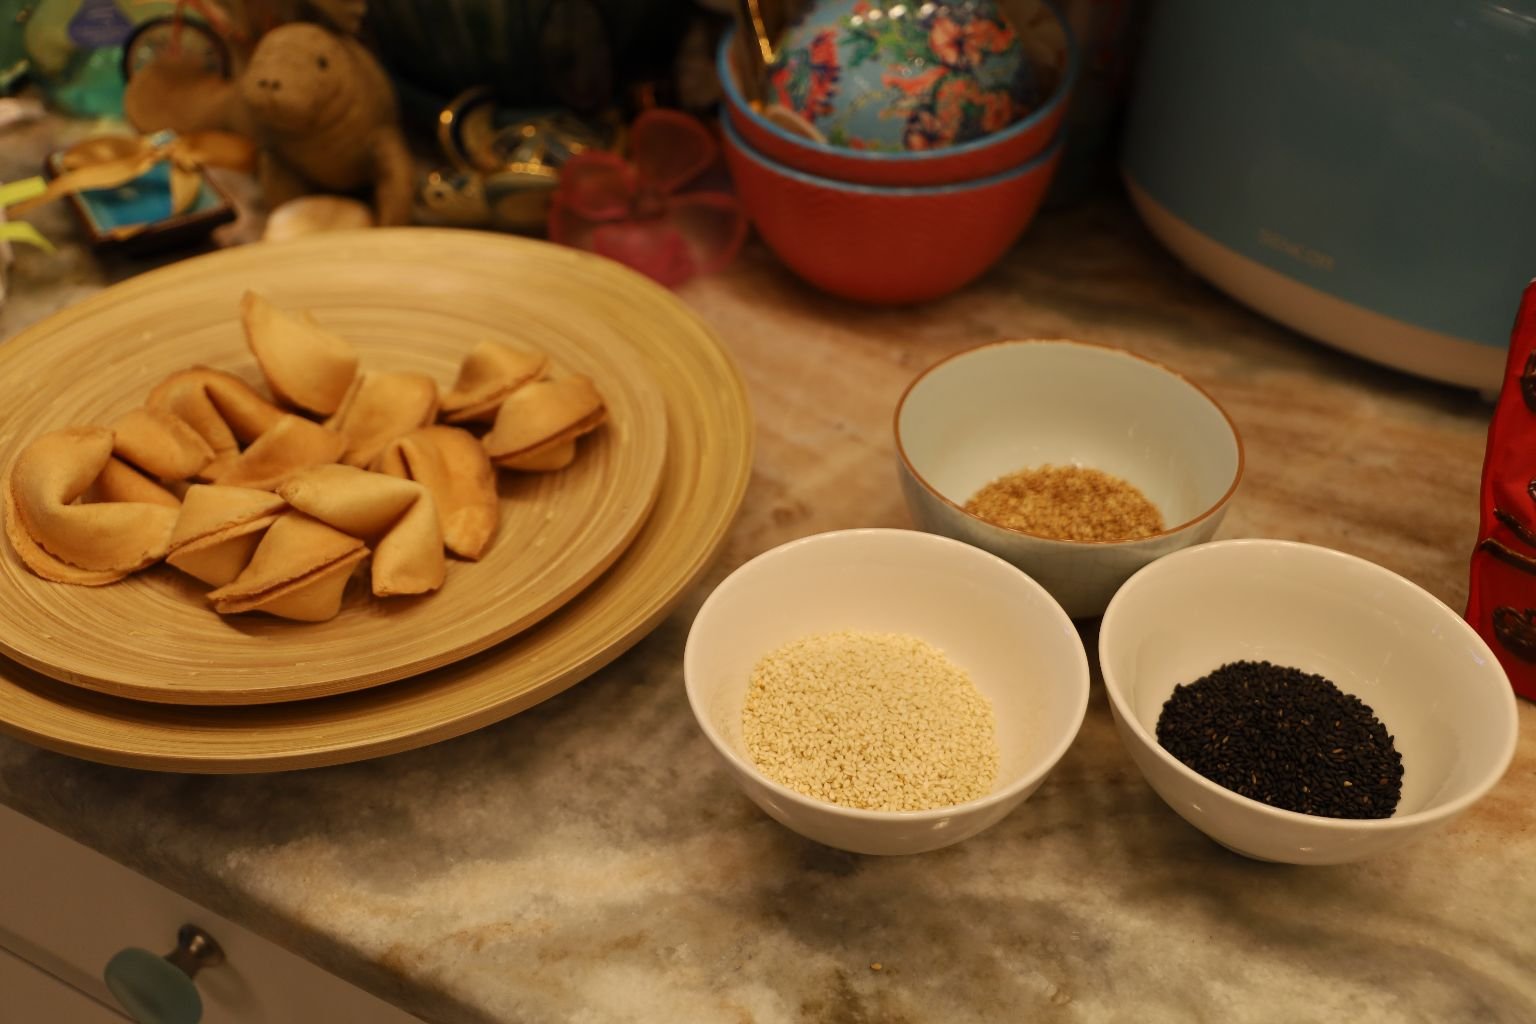
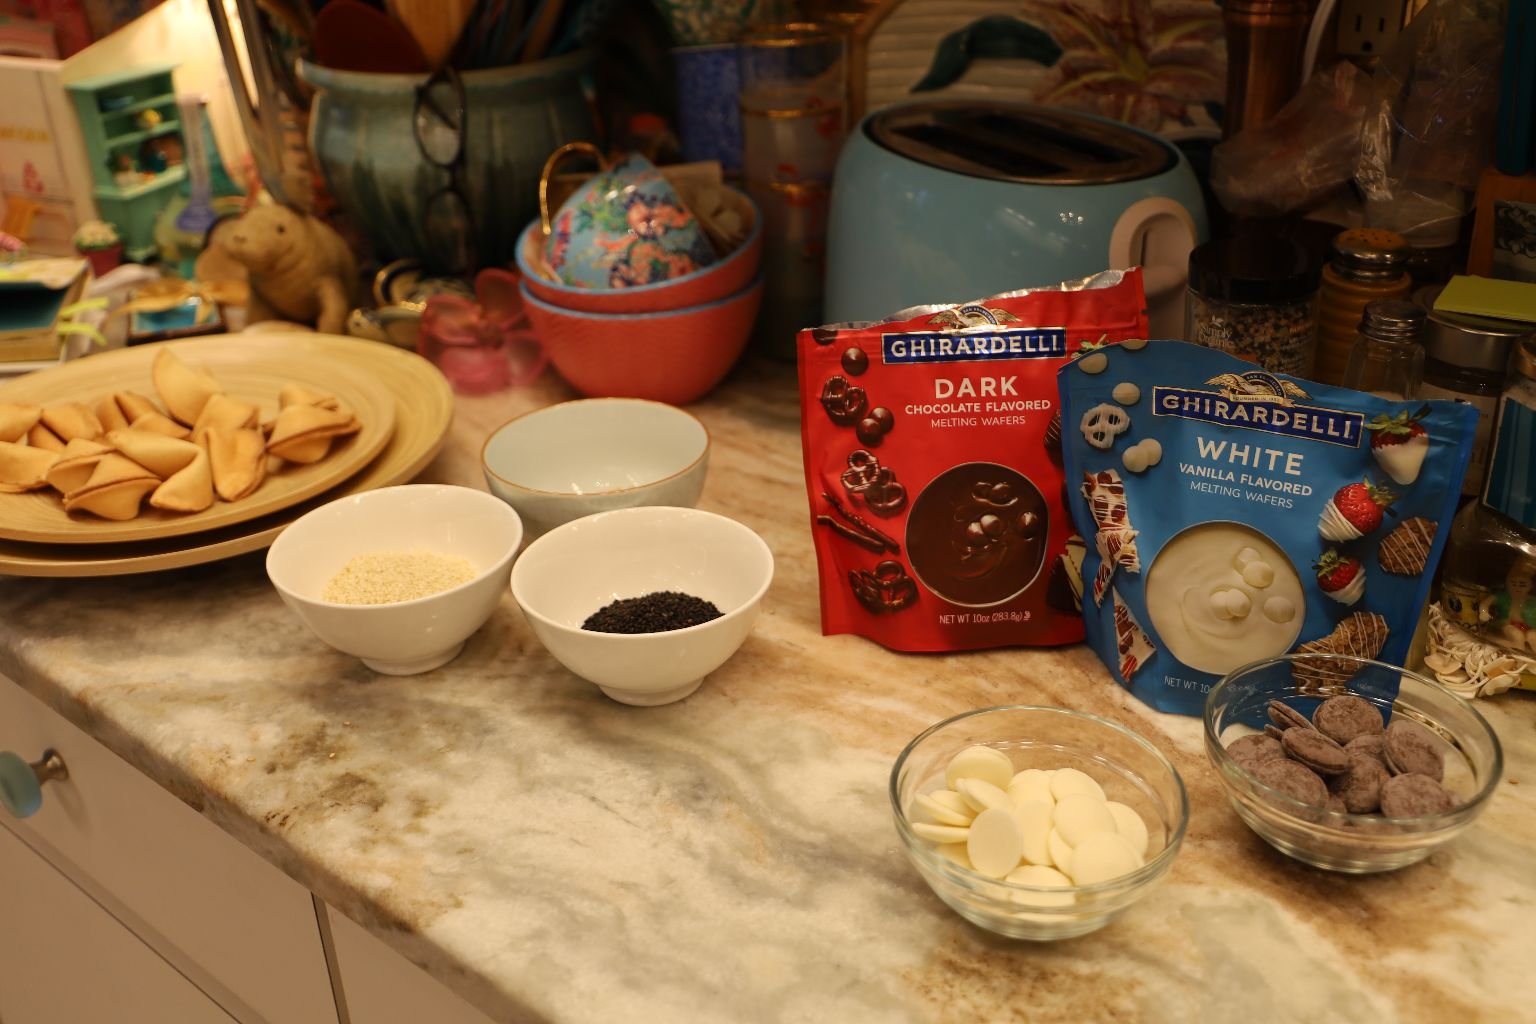
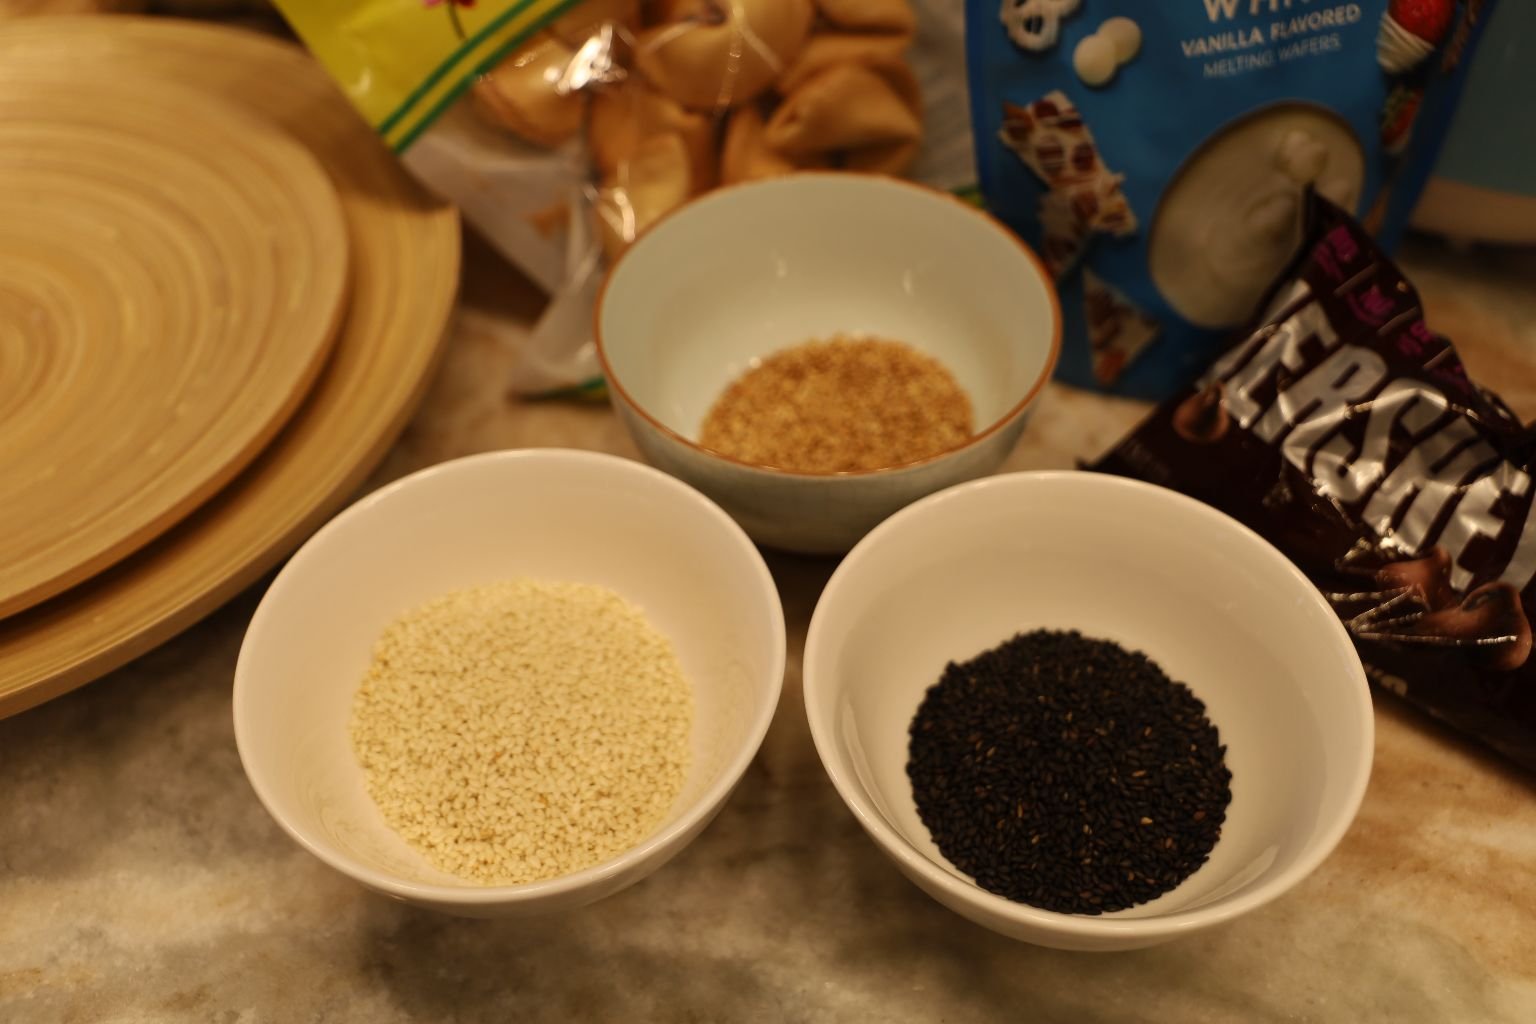
Sesame Seeds:
Black, White, and Tan Sesame Seeds
—————————————————————————————
This is very simple to make:
You just want to melt some of the Chocolate Wafers in Microwave Safe Bows…
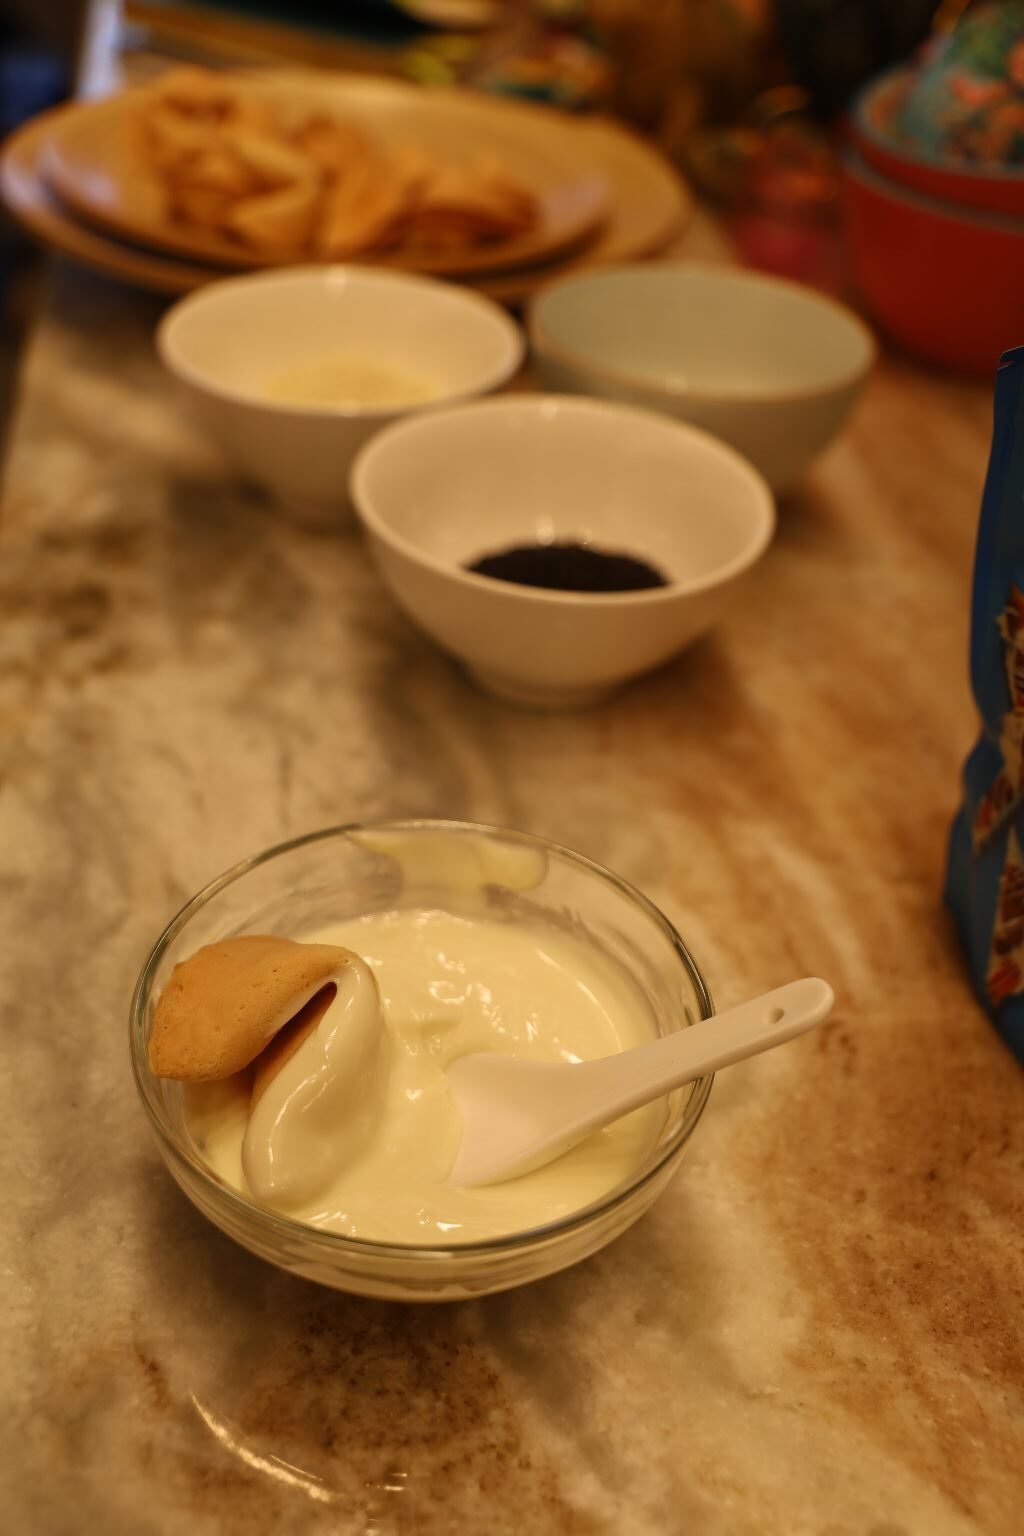
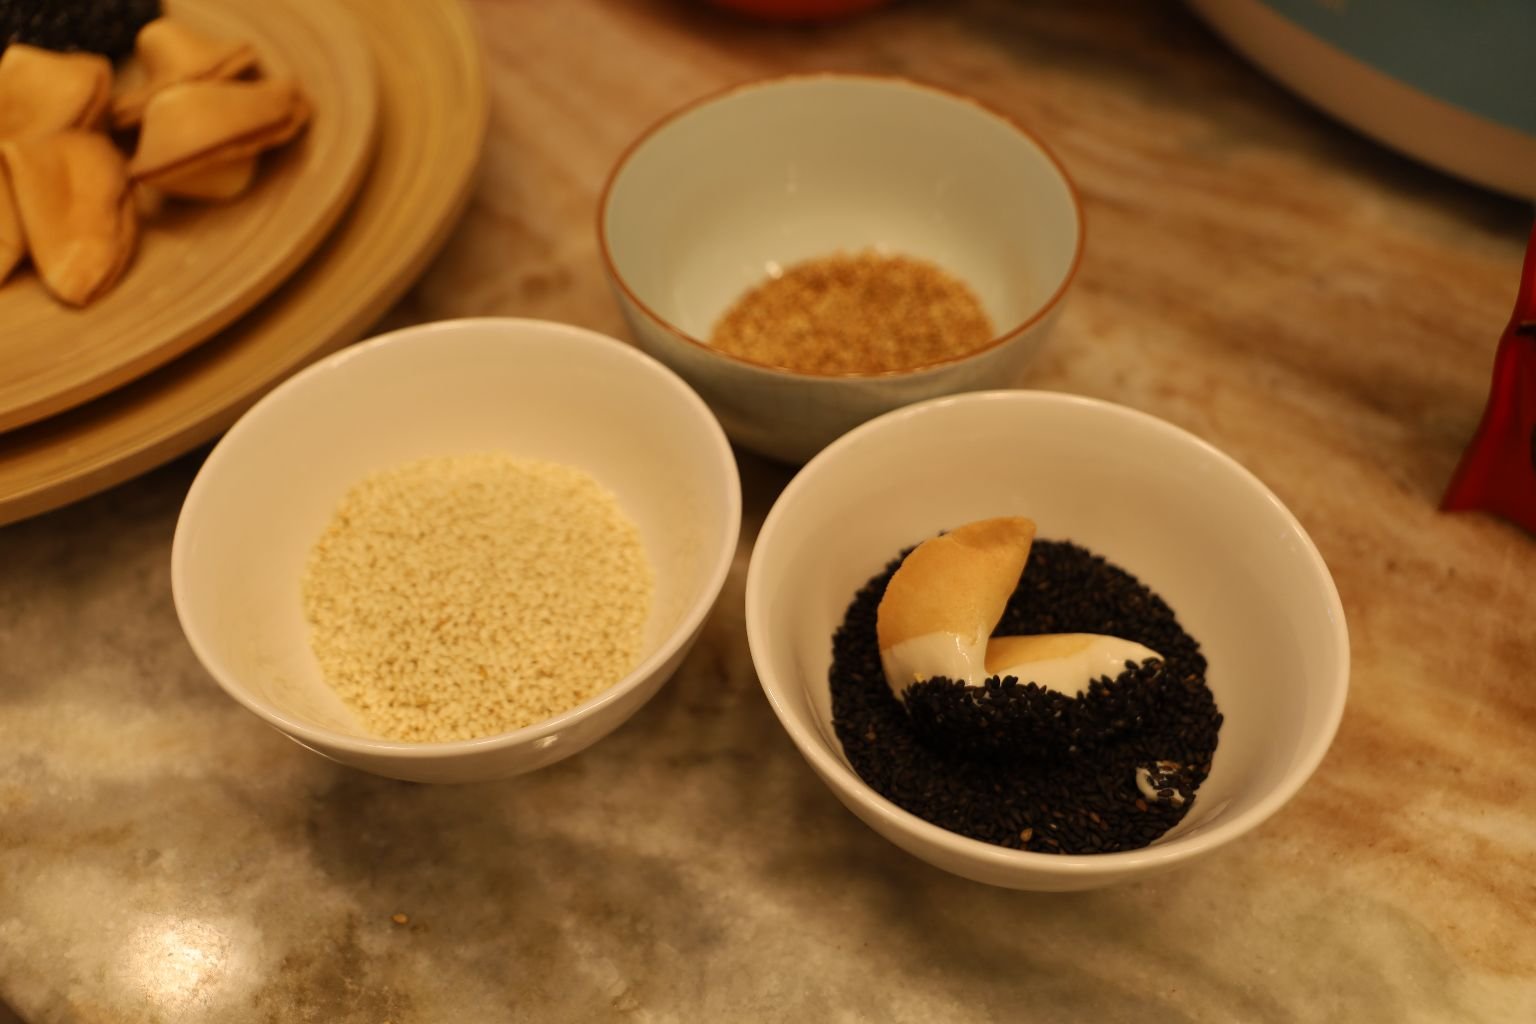
..and then dip one side of the Fortune Cookie into the melted Chocolates….
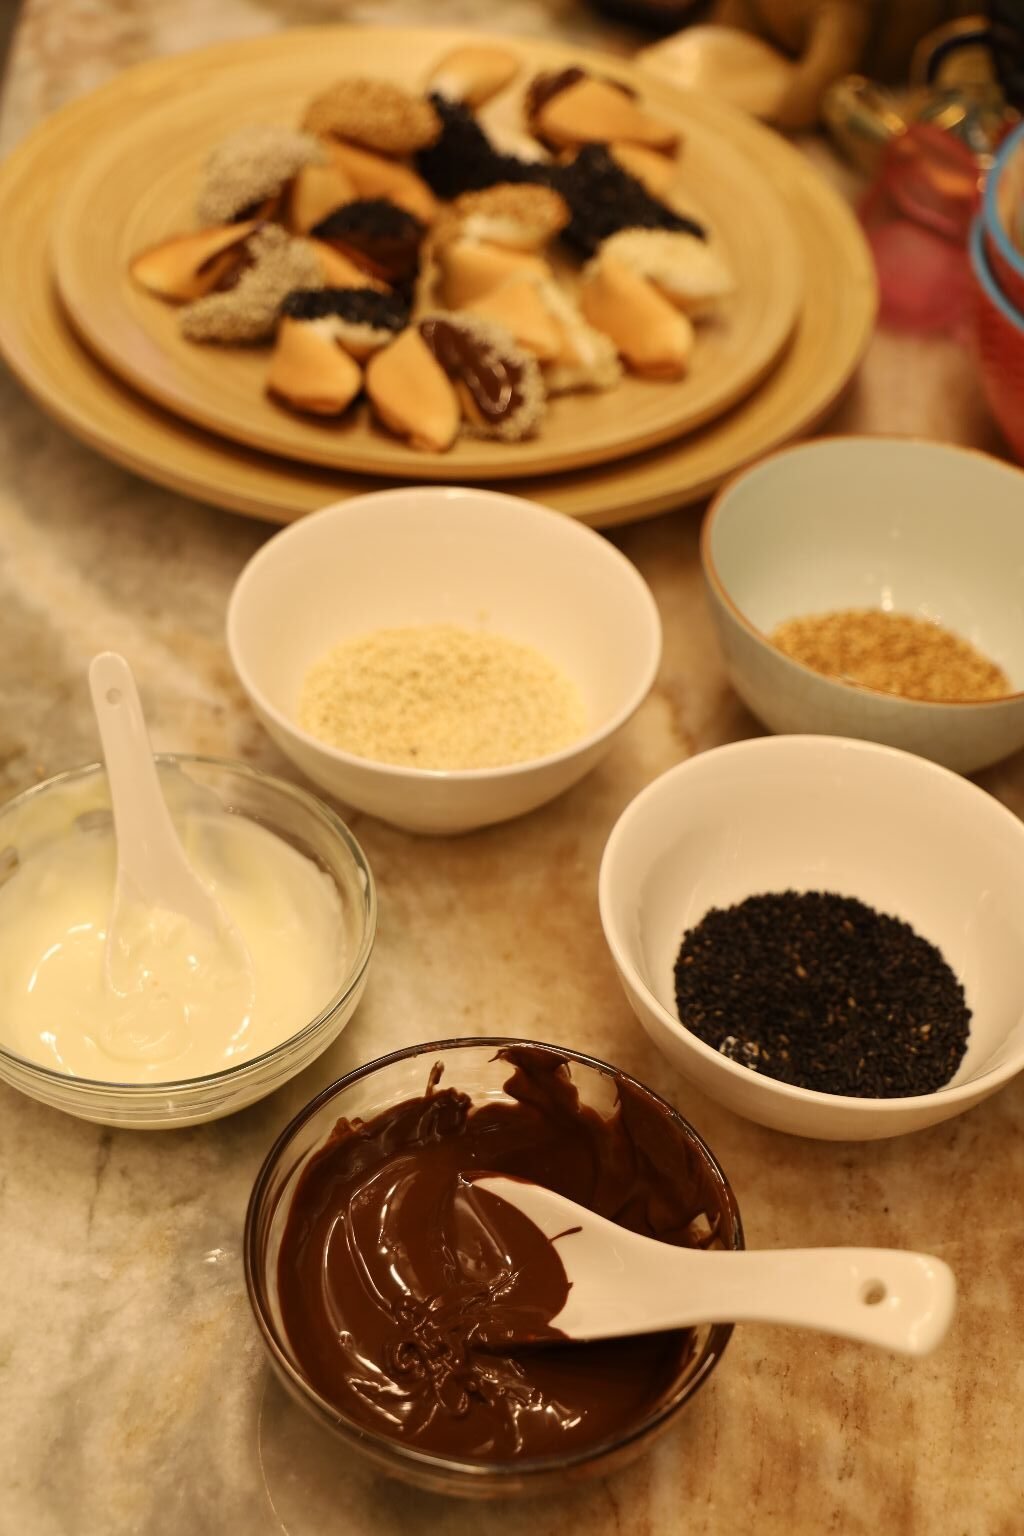
..and then, dip that chocolaty side of the Fortune Cookie into the Sesame Seeds.

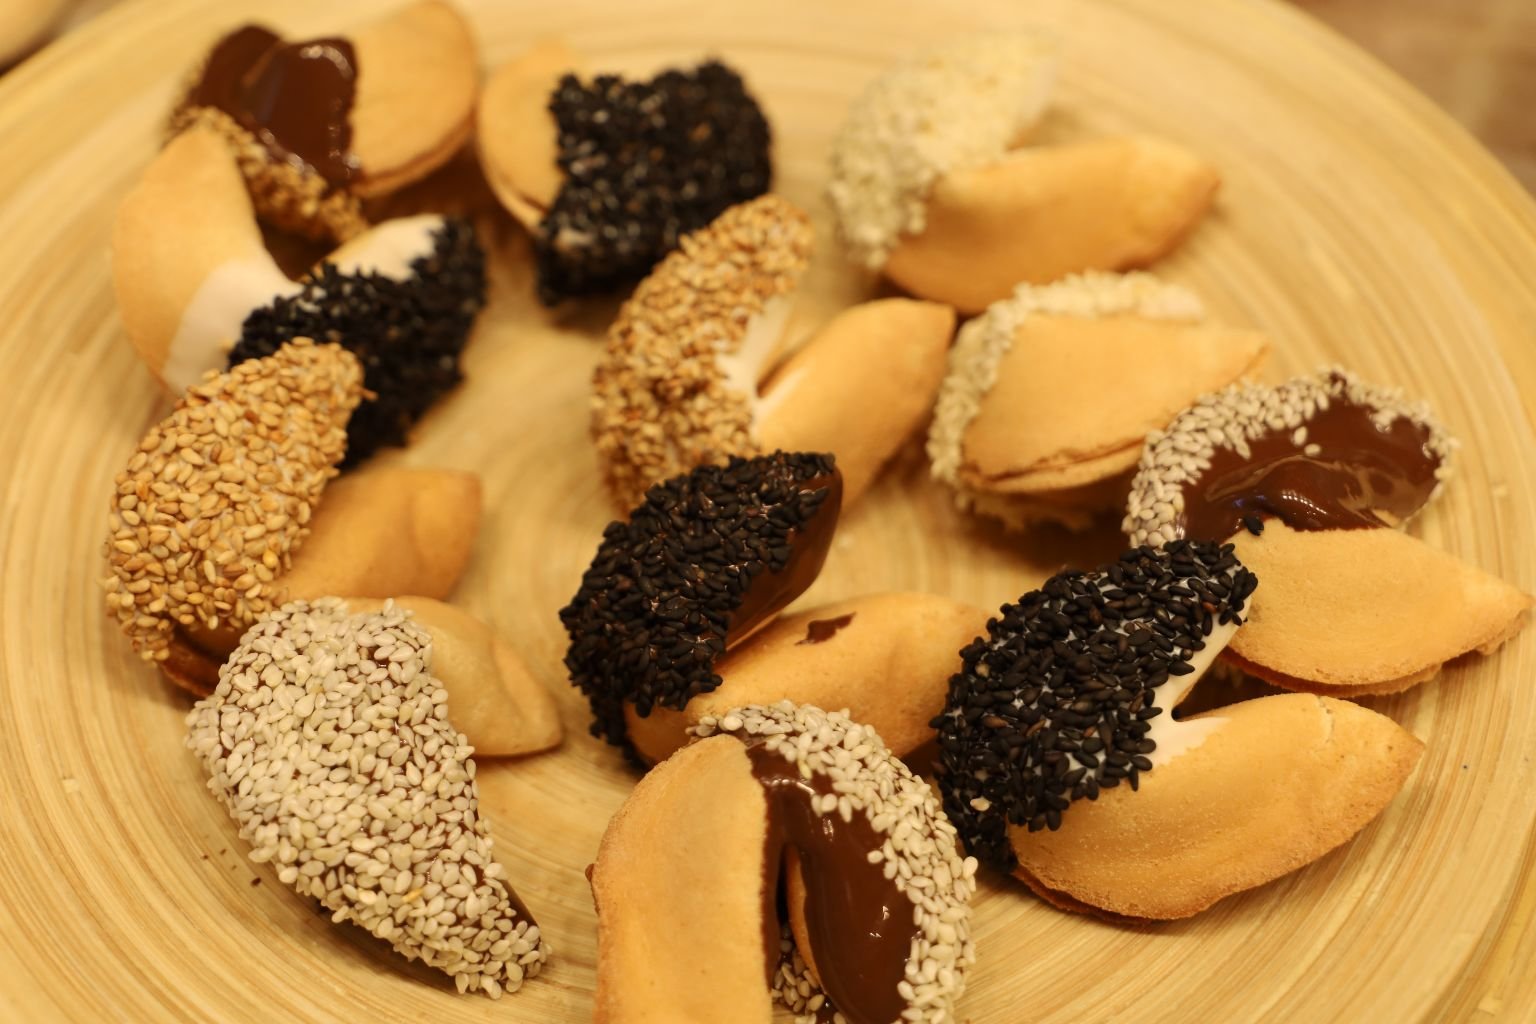
Quite Beautiful and Tasty Too!
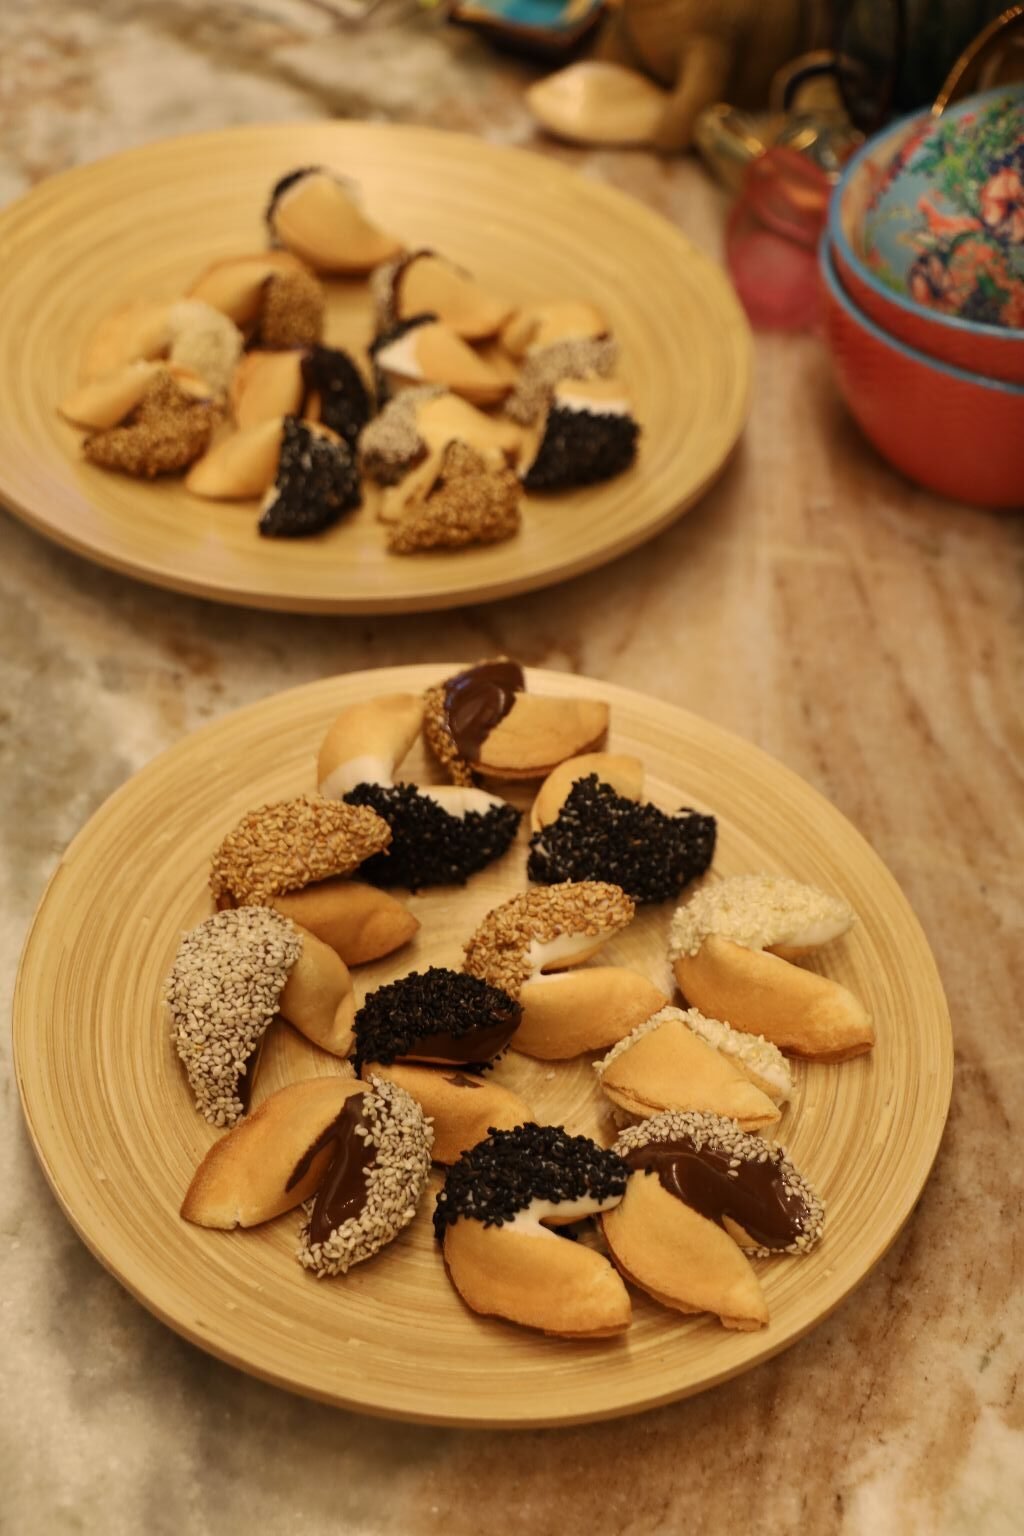
Just Allow Them To Cool and then Store in an Airtight Container
————————————————————————————-
Just a Sidebar Here….

Fortune Cookies, and Green Tea Ice Cream go very well Together 🙂
—————————————————————————————


Fortune Cookies, and Crumbs
———————————————————————————–

Made in Japan, Purchased in Vietnam…
..by my cousin Susan Keith when her husband Joe was injured during the Vietnam War, and Aunt Margie and Uncle Ray paid to fly Susan over to see Joe while he was in the hospital. She bought two sets. One red, and one black. She gave Aunt Margie the red one. I then asked for it when Aunt Margie died, and Susan let me have it. I love it!
——————————————————————————————————
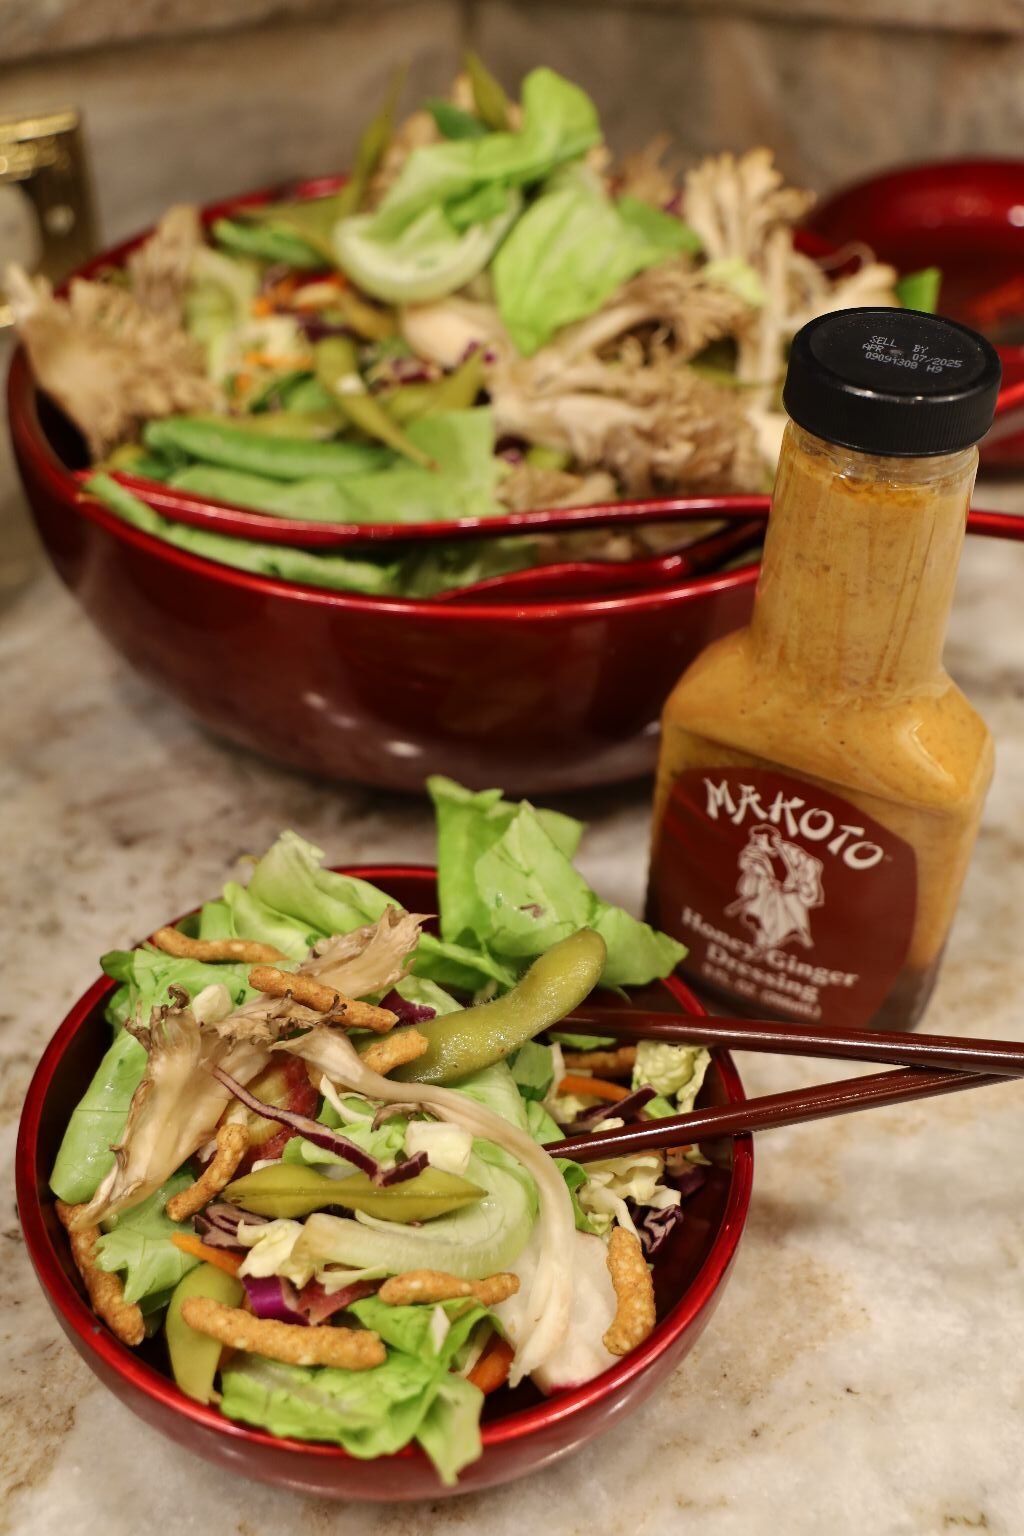
My Asian Salad, with a Ginger Dressing
I am one who enjoys taking a Salad for Lunch
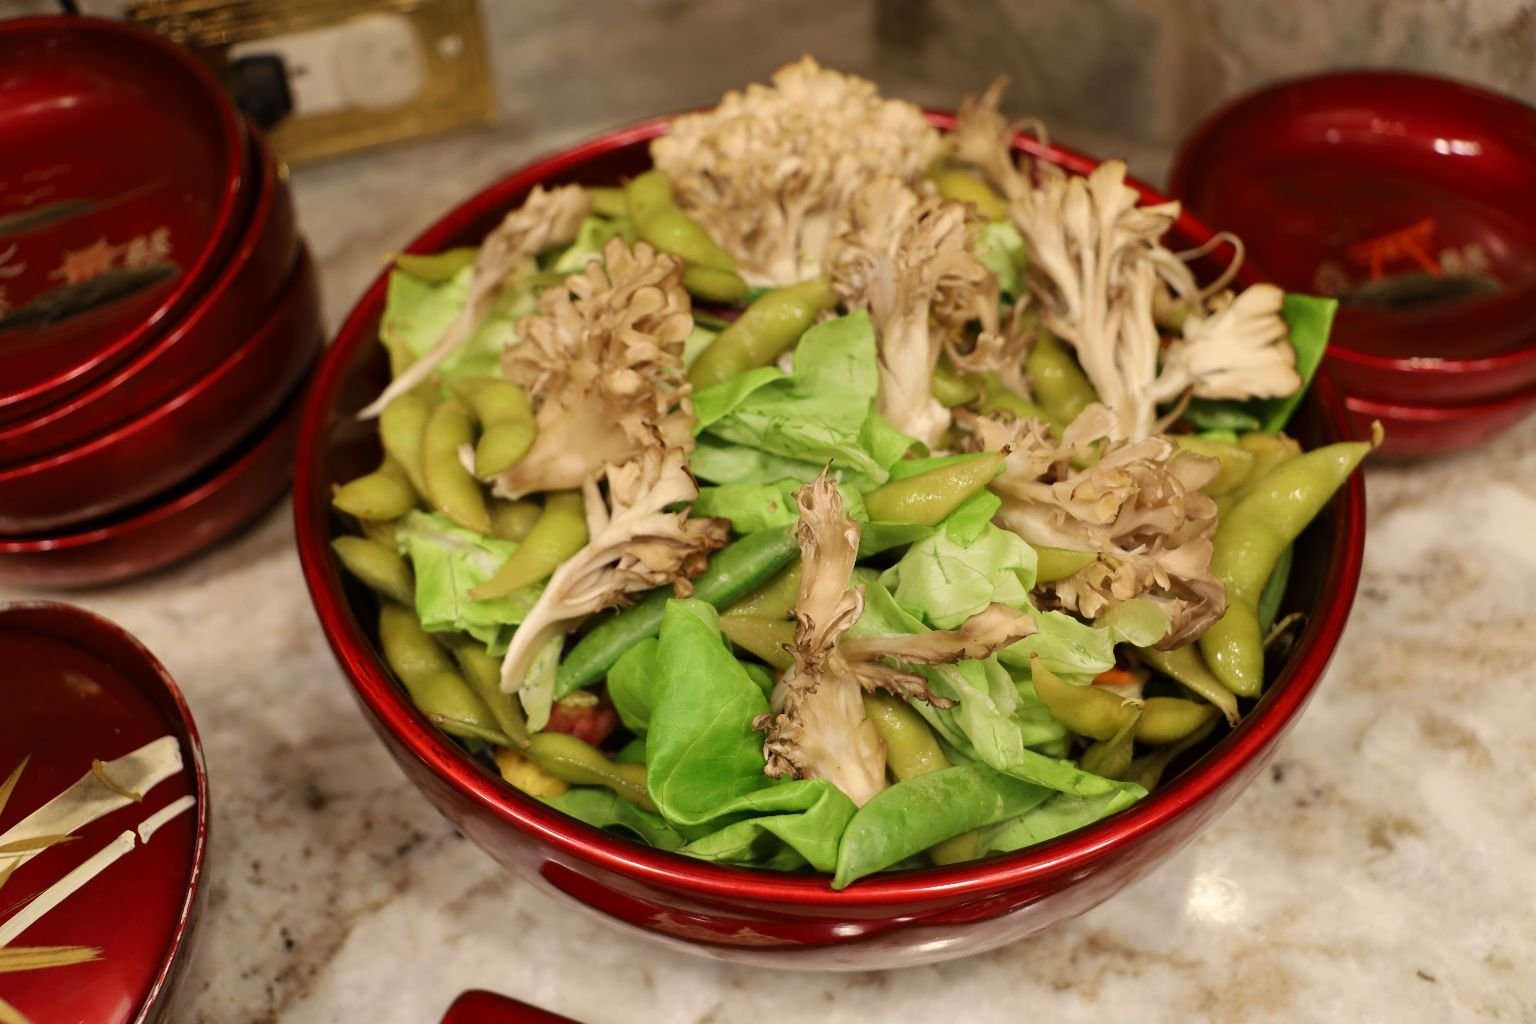
I Love The Leftovers!
Especially With Chopsticks!
(Recipe Down Below)
————————————————————————————

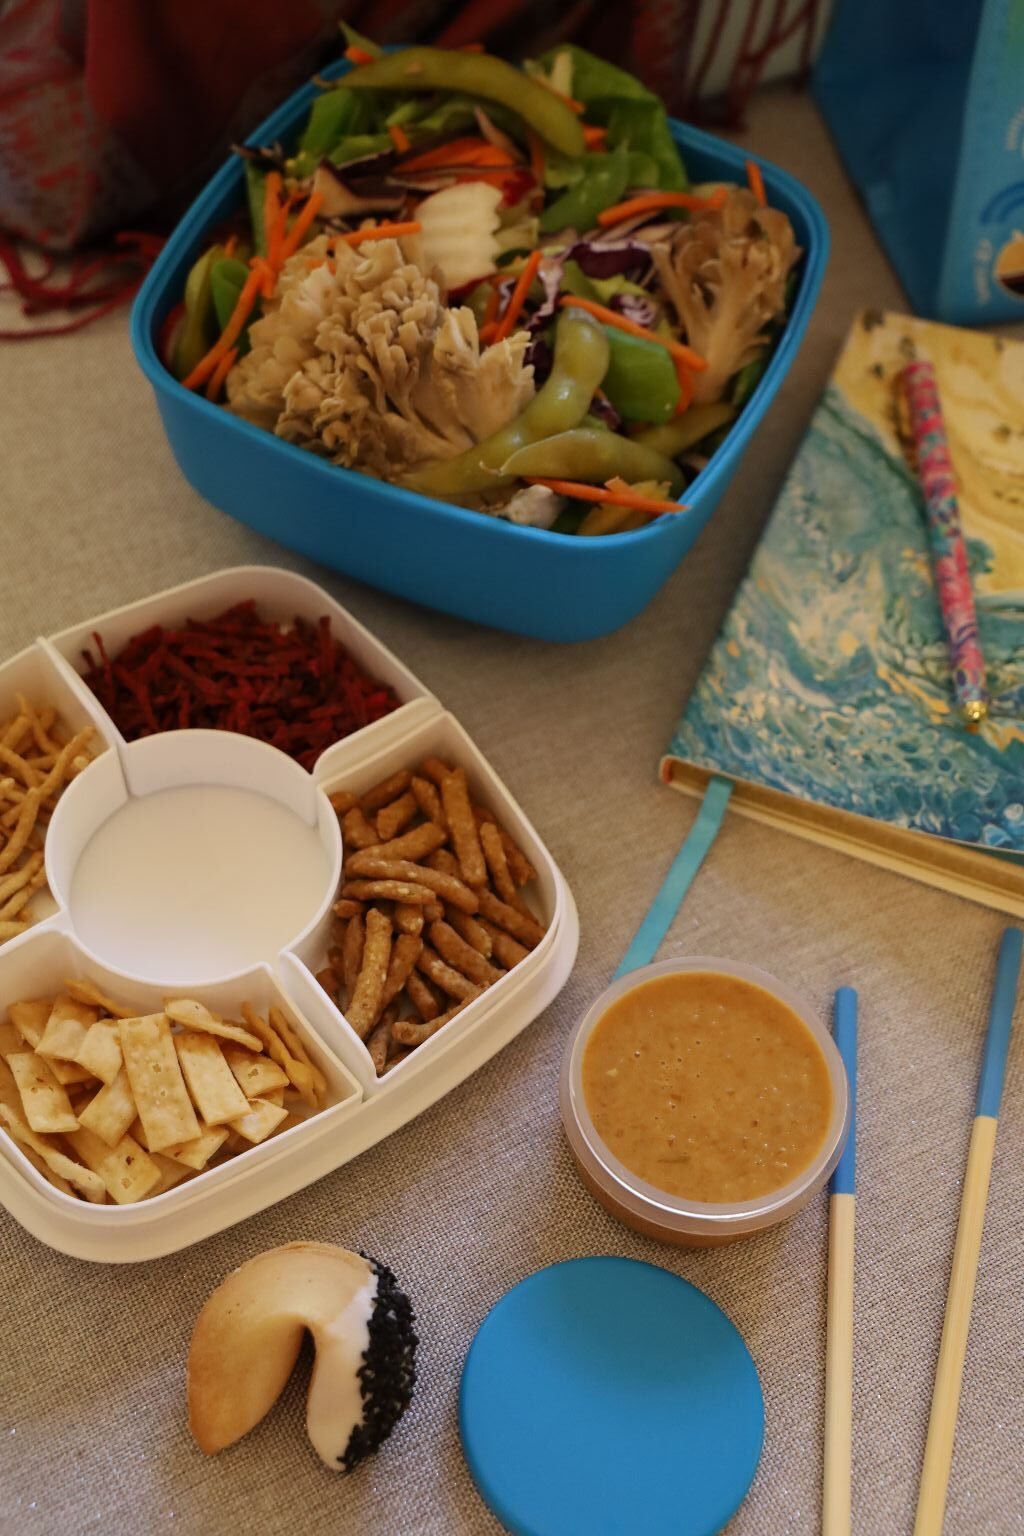
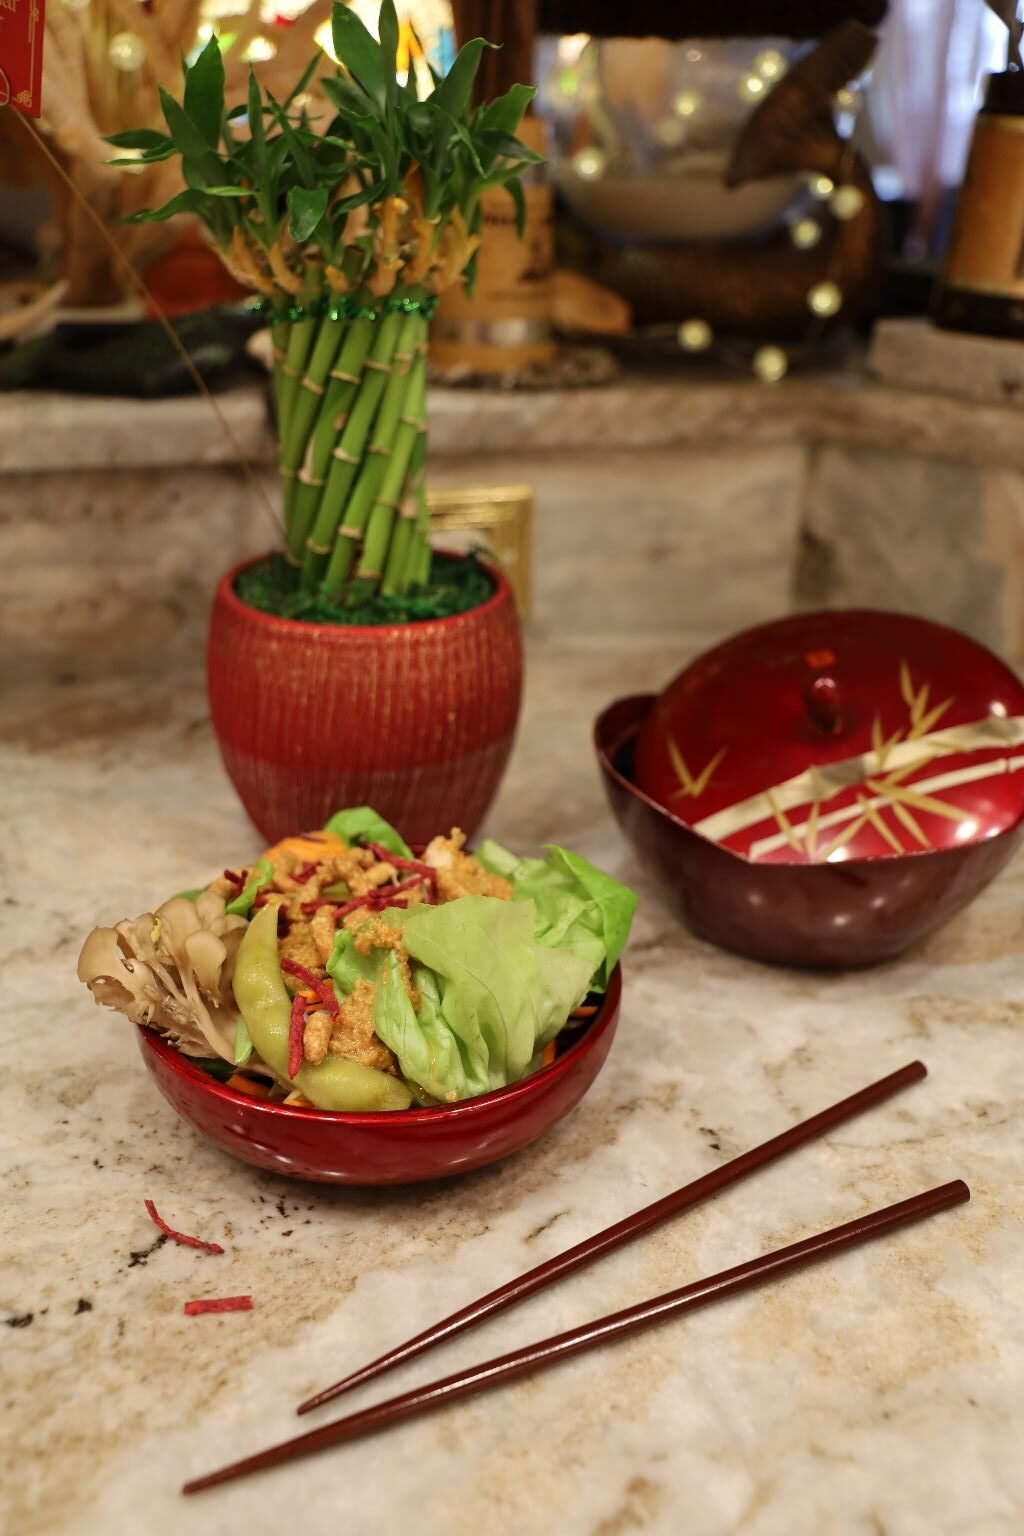
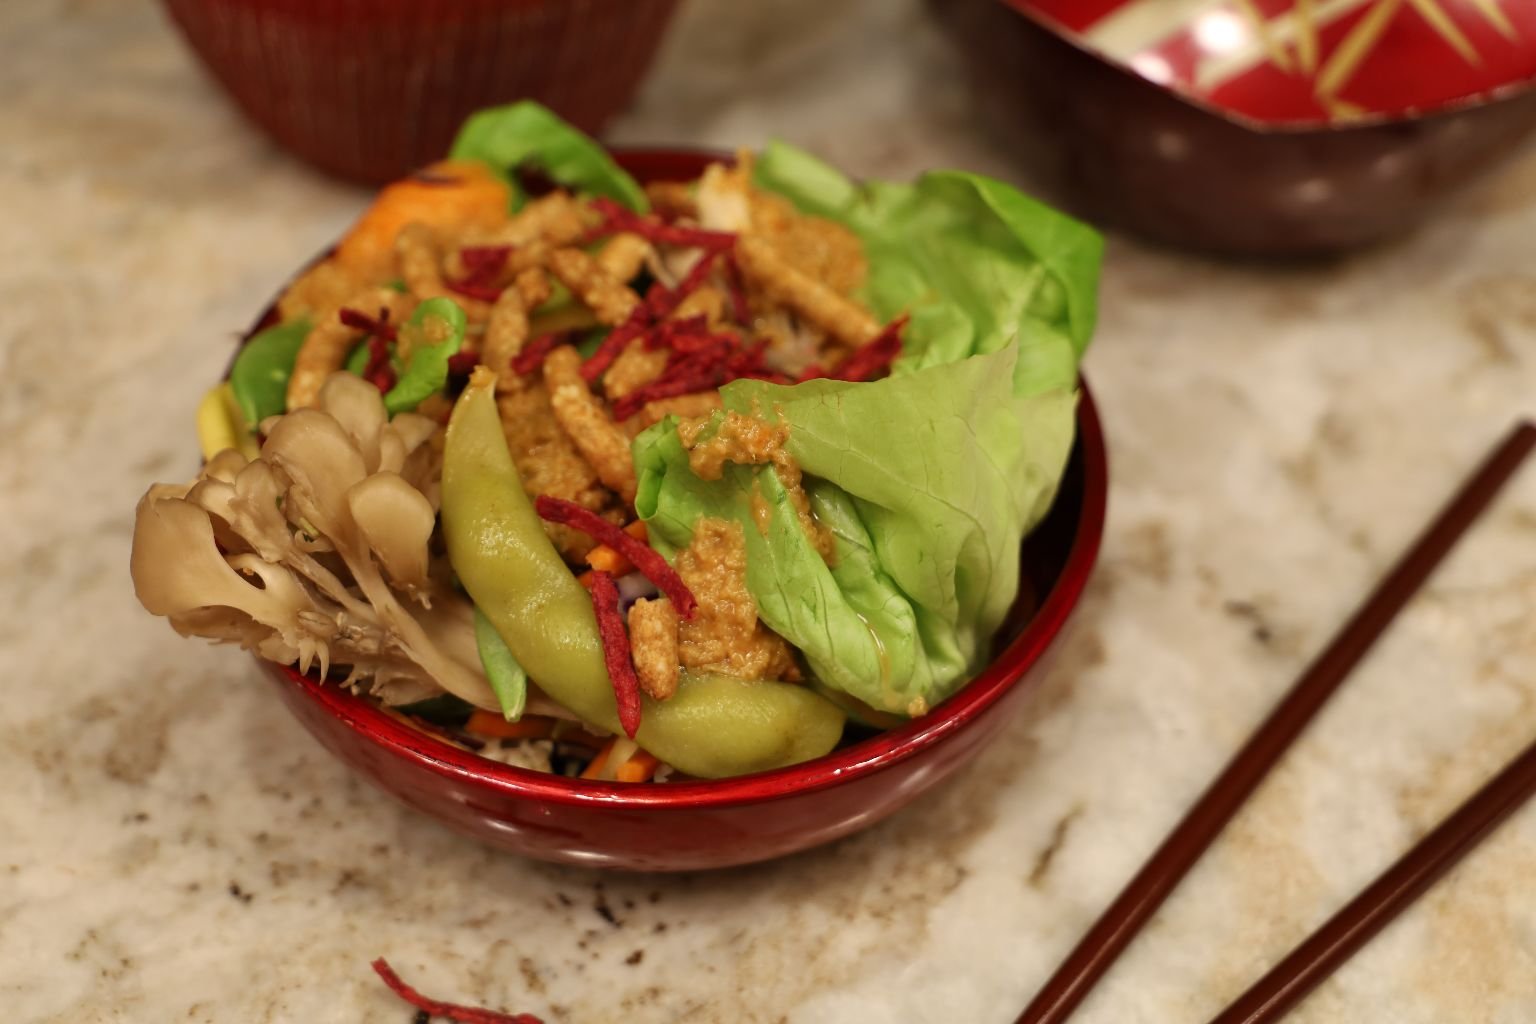
My Asian Salad (from above) To Go!
With Dressing And All The Crunchies!
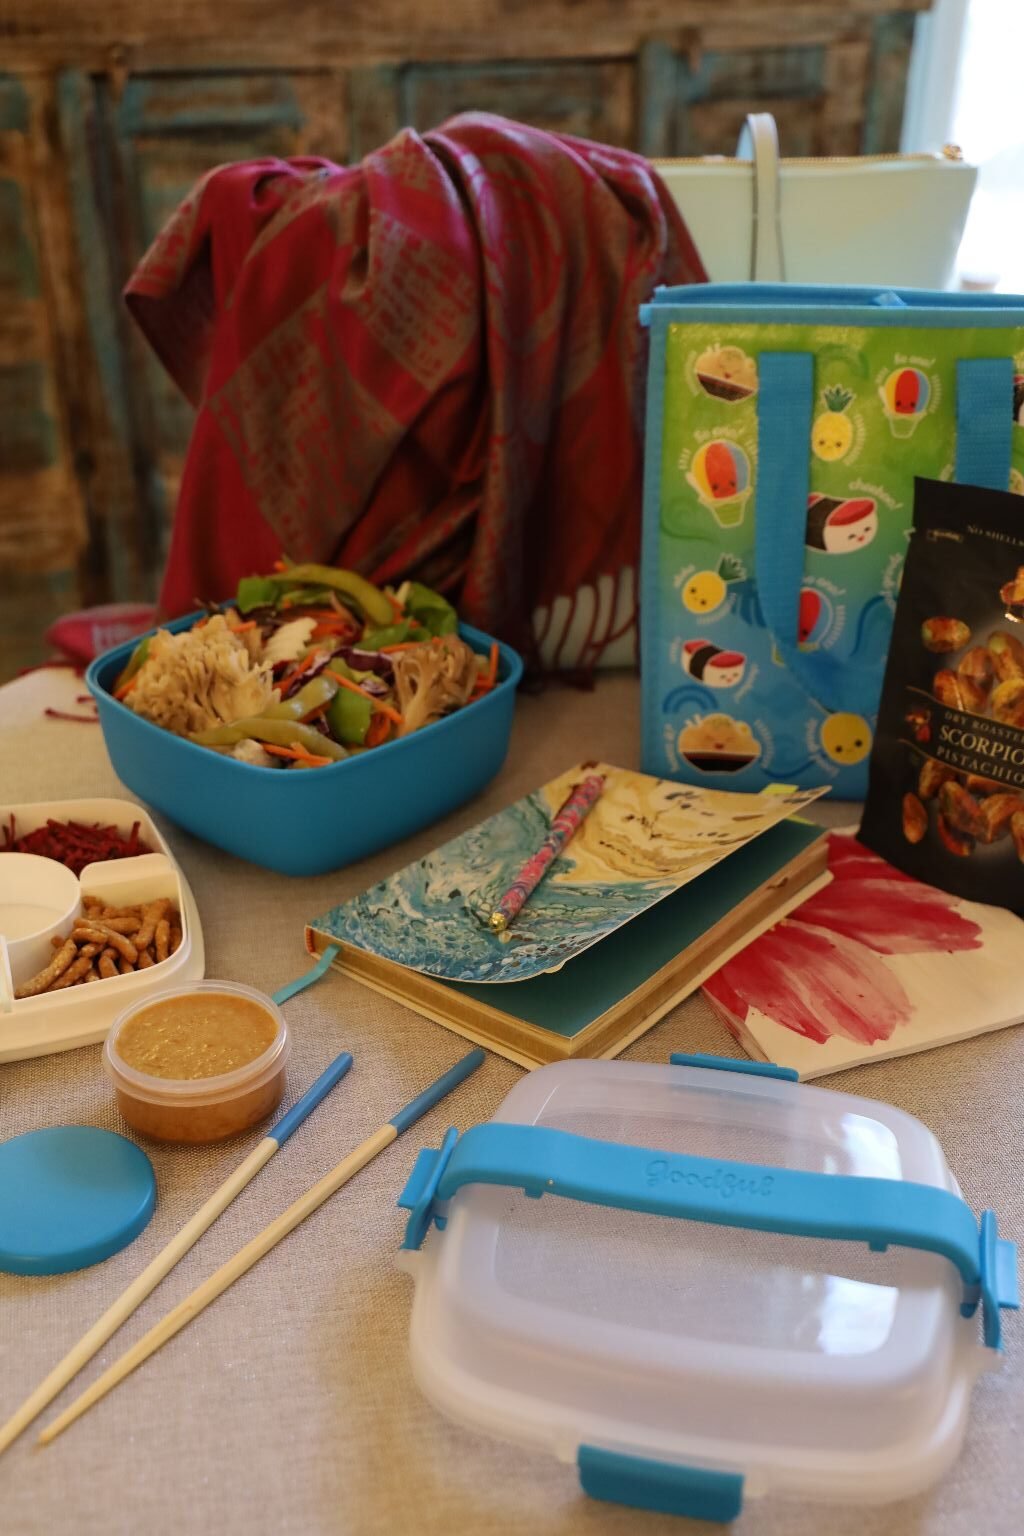
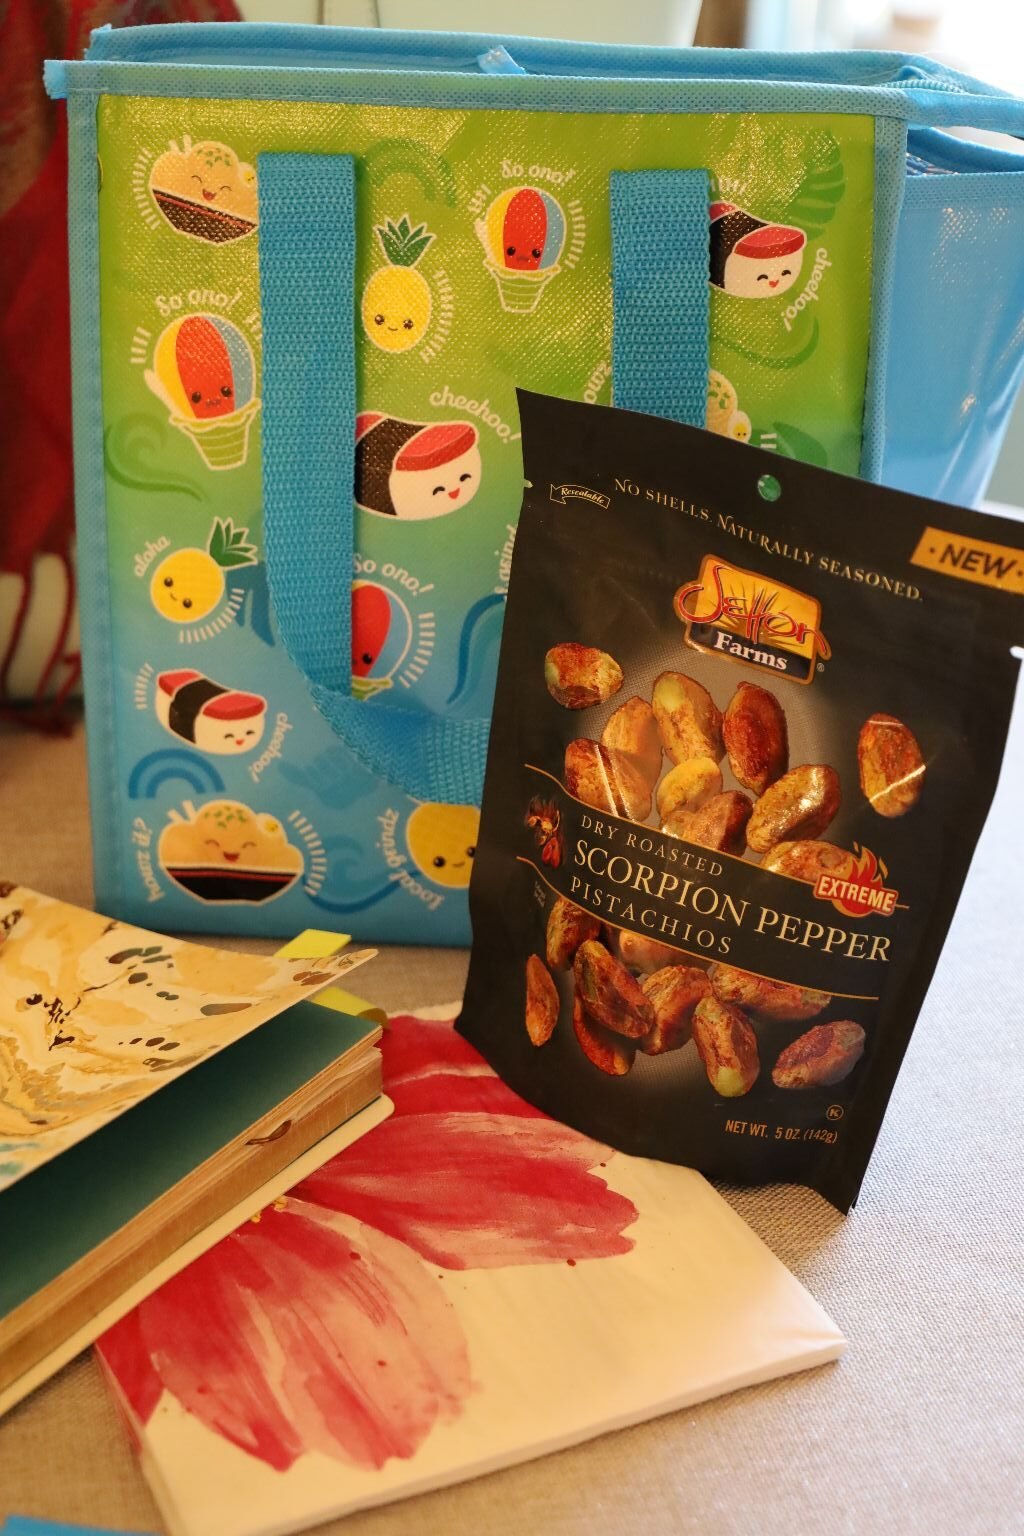
Sometimes a Snack of Scorpion Pepper Pistachio’s is a nice ‘out the door’ Treat!
—————————————————————————————-
The Take Out Line Starts Here
———————————————————————-
Asian Soup To Go
(I have that recipe above, and the link to click on for the Black Meatballs.)
——————————————————————————————————-
My Asian Salad, with a Ginger Dressing
————————————————————————————————–
While a lot of people may not think of taking a salad with them to eat in the car for lunch, I do.
It’s not only healthy for you, but delicious. I especially love that crunch, and the tanginess of the Ginger Dressing.
My Salad Ingredients:
1 Bag of Chopped Asian Salad, Readymade
Chopped Red Cabbage
Shredded Butter Lettuce
Stick Carrots
Sliced Crinkled Radish
Snow Peas
Crinkled Cut Multi-Colored Carrots
Jicama, Cut into Chunks
Mushrooms, of Your Choice
Ginger Dressing
————————————————————————————————-
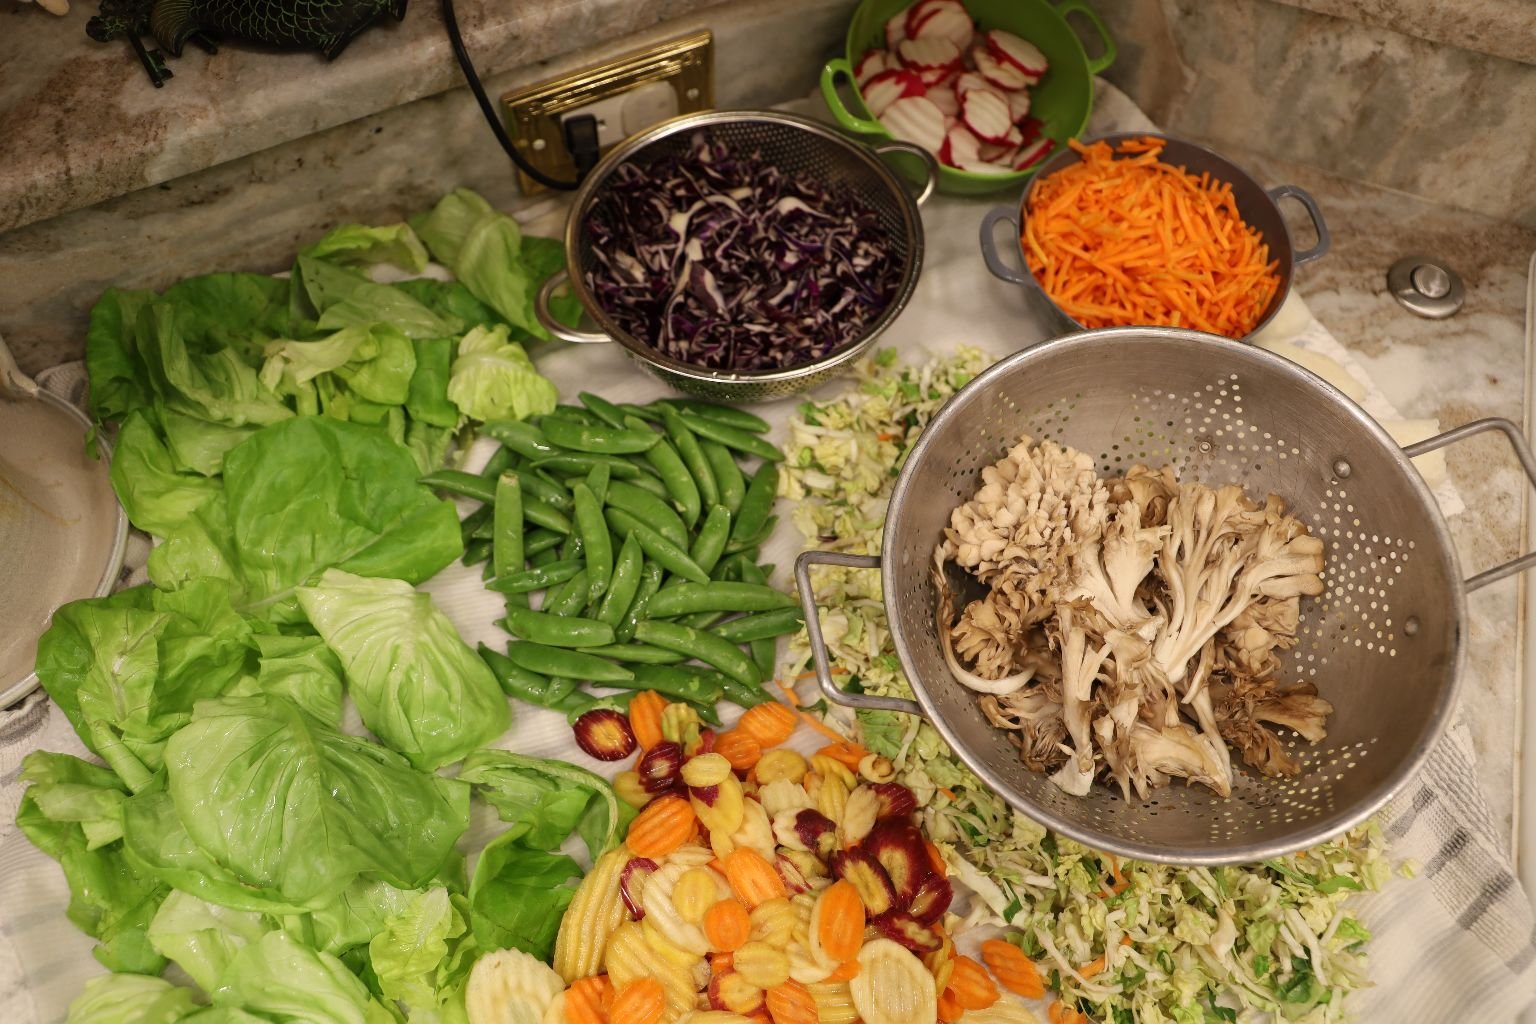
Everything Washed, and Drying
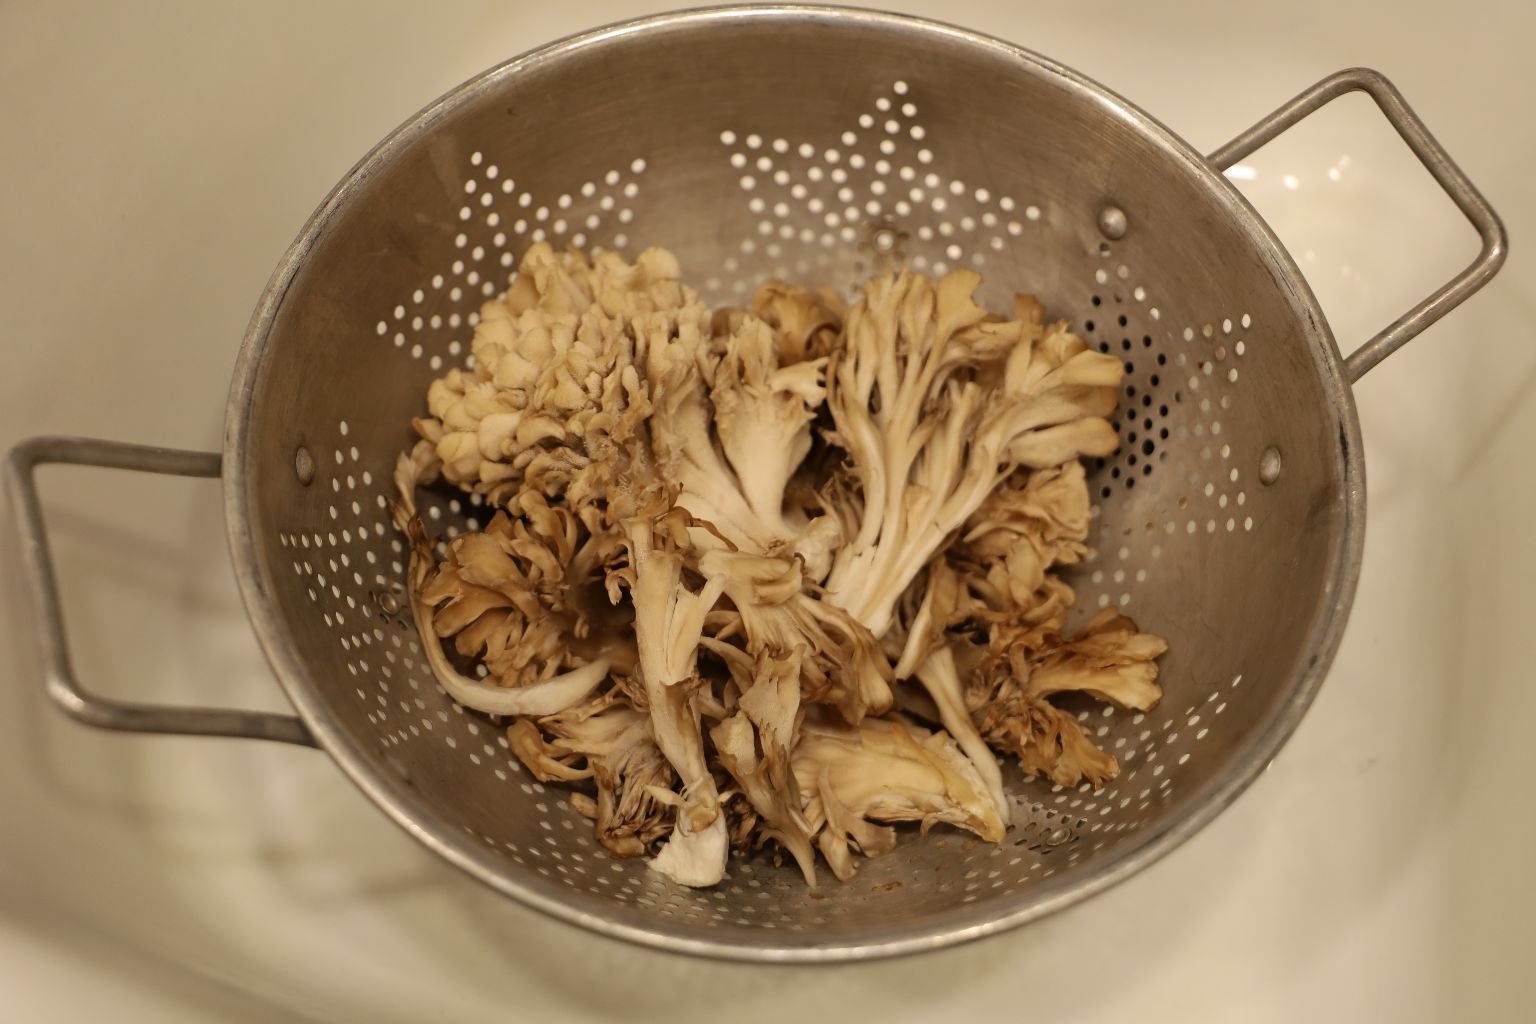
My Mushrooms, I purchased them from the Asian Supermarket
Everything Thrown Together in a Bowl For Dinner
————————————————————————————————–
Readying The Salad Leftovers For a Lunch Treat on the Road
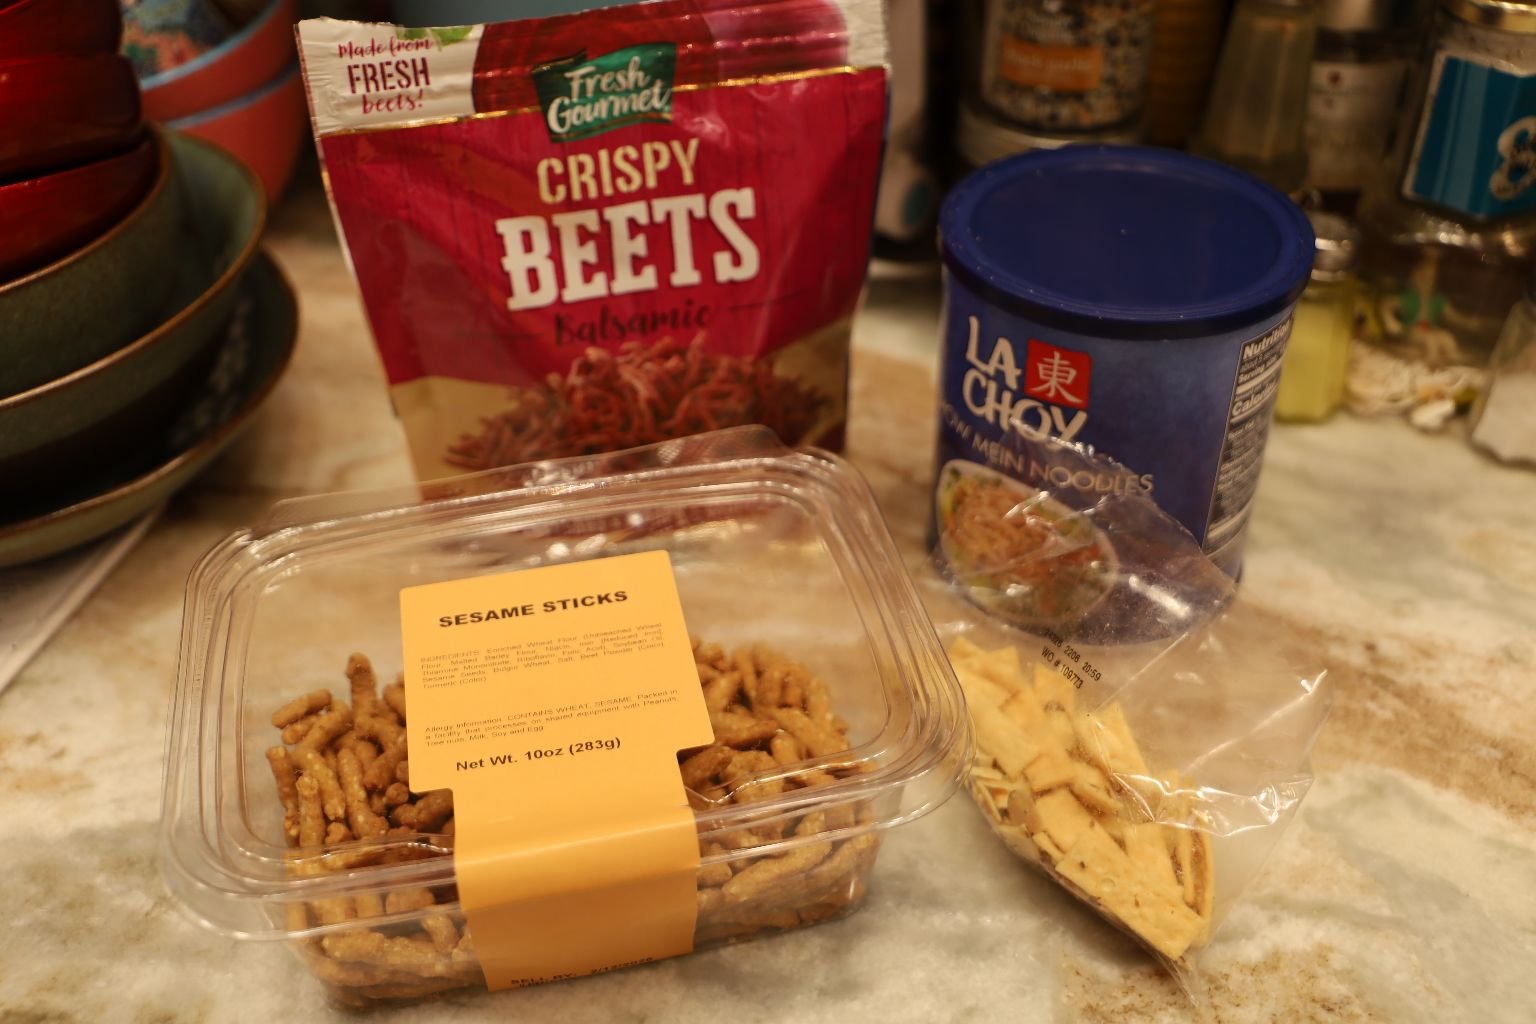
I LOVE the Crunchy Things!
Crunchy Beets
La Choy Chow Mein Noodles
Sesame Sticks
Crunchy Fried Won Ton
—————————————————————————————–
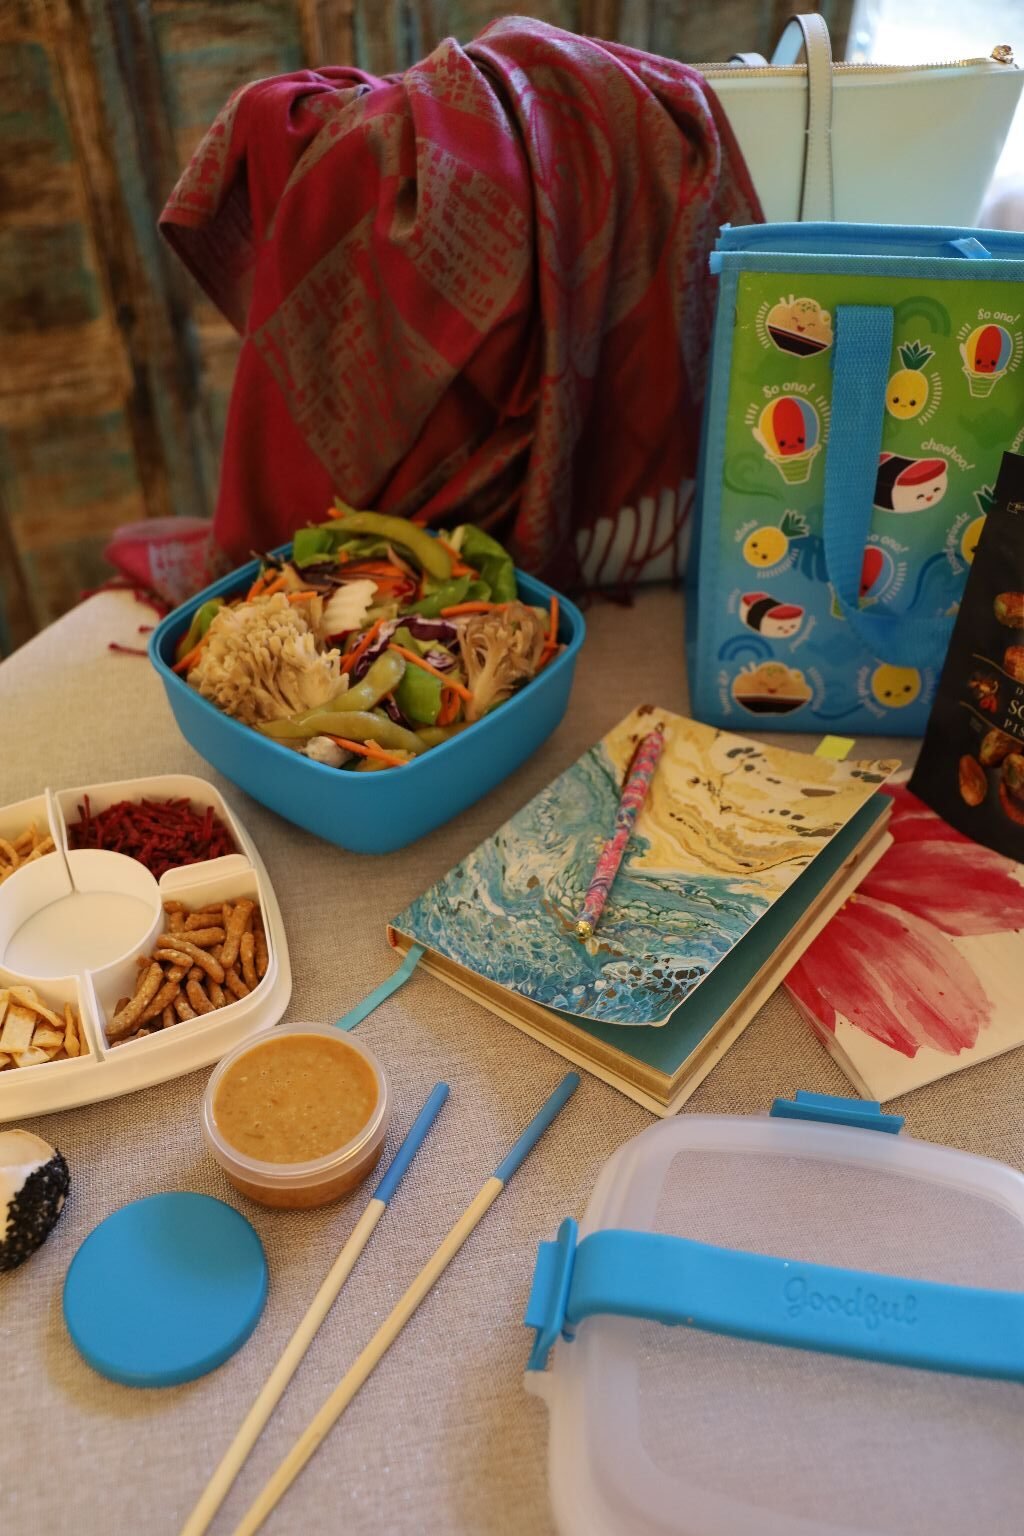

Throw Everything Together in a Lunch Tote, Add a few Fortune Cookies for Good Luck!
Don’t forget the Ginger Dressing!
——————————————————————————————
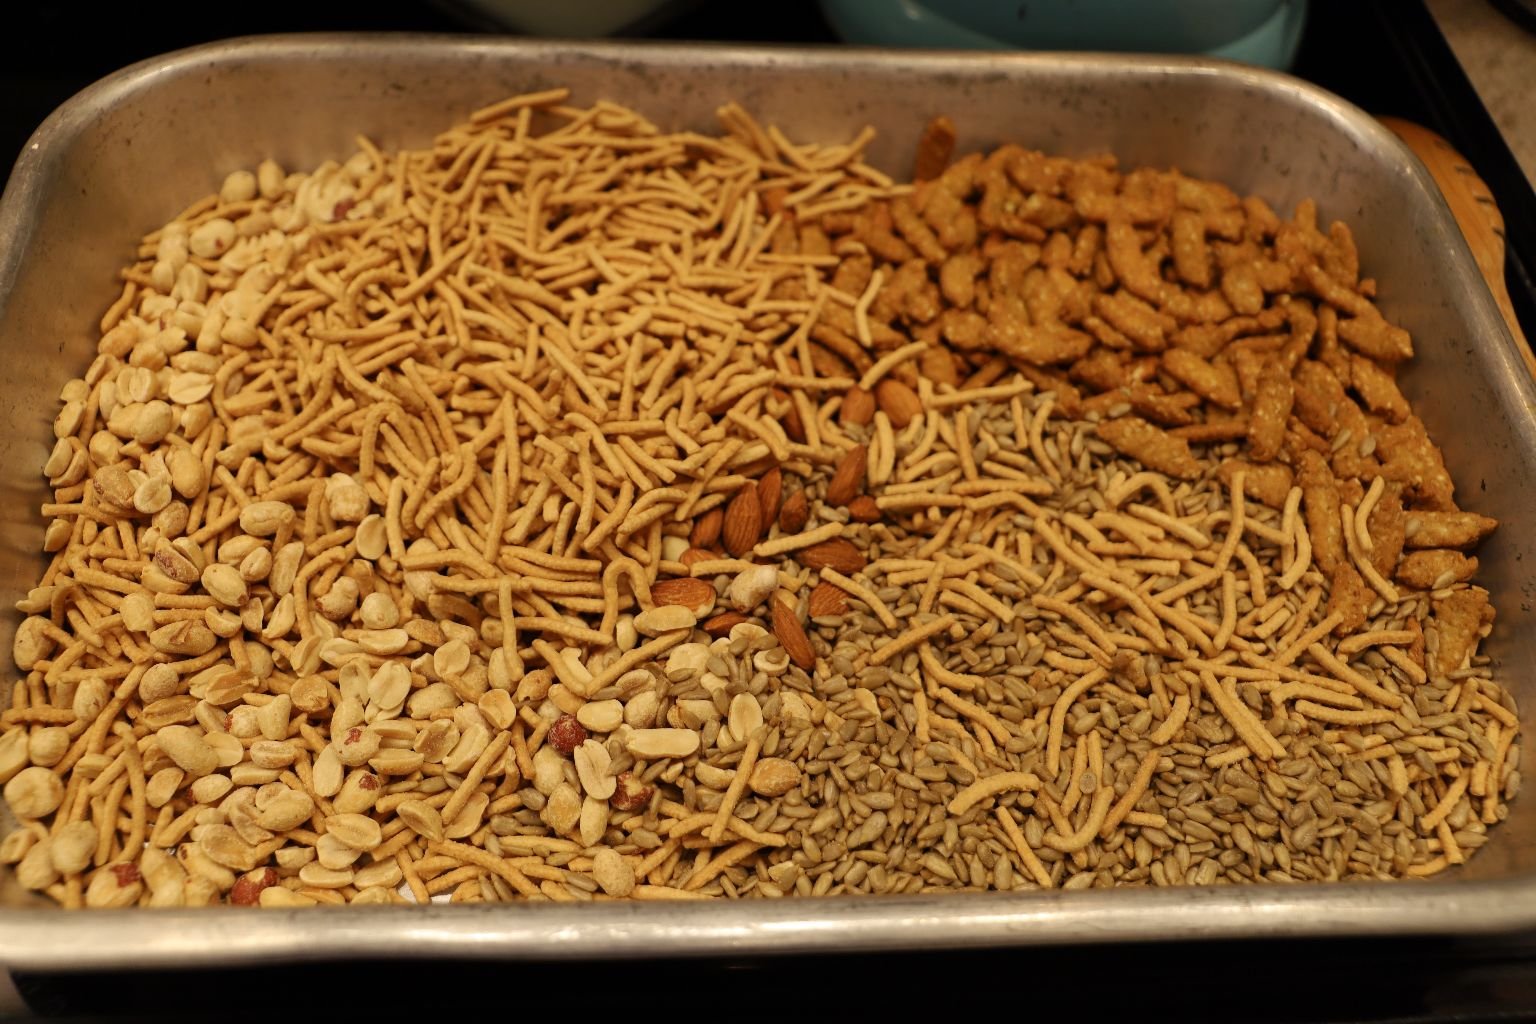
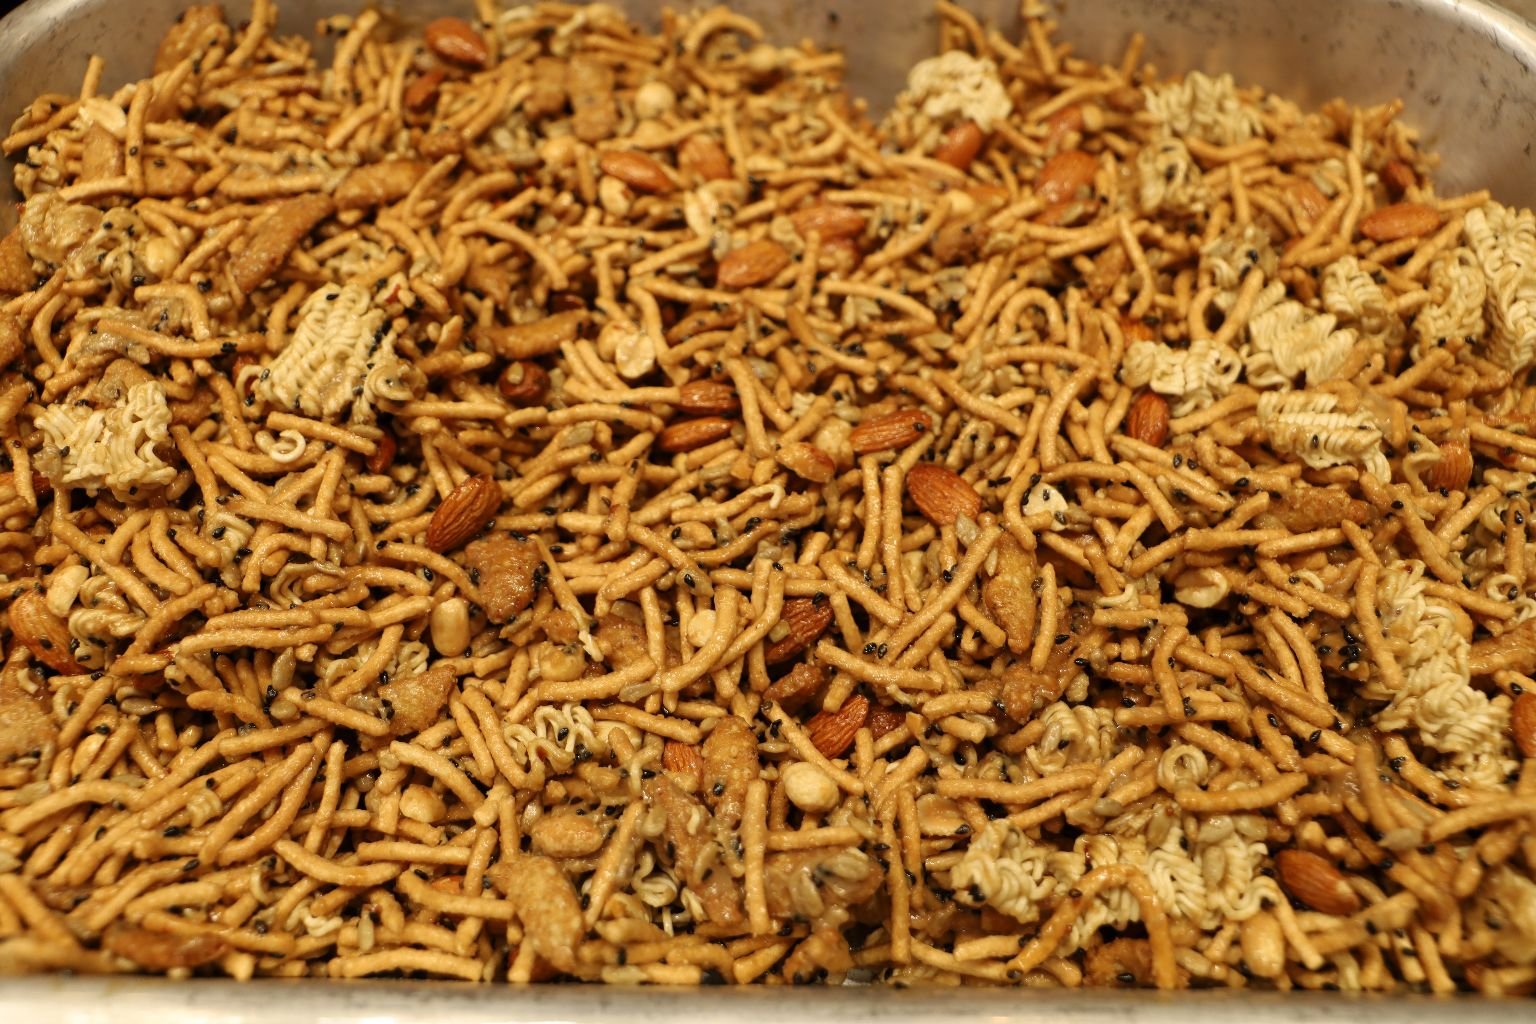
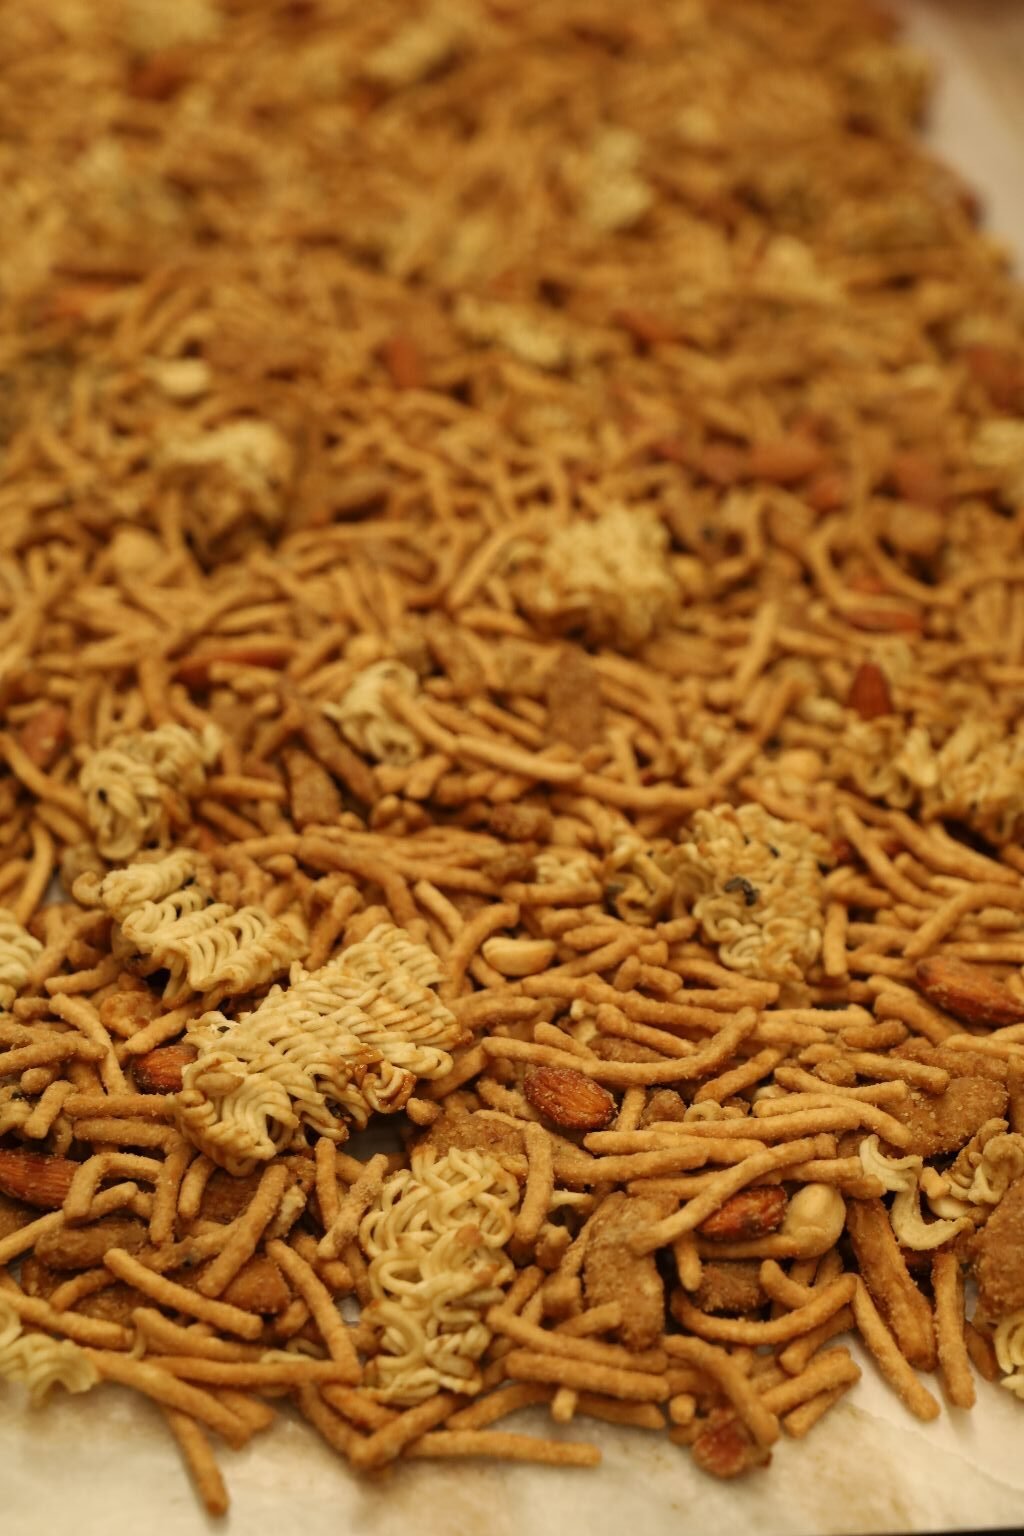
My Aloha Snack Mix
I wanted to create a snack mix which reminds me of Hawaii. After all, we lived in Hawaii for 13 years. Hawaii is still with us, we carry that Aloha Spirit every day. It may look Asian to you. Hawaii is made up of many different cultures, some Asian as well as Polynesian. I based this on what I think the average local Hawaiian resident would like to snack on.
————————————————————————————————–
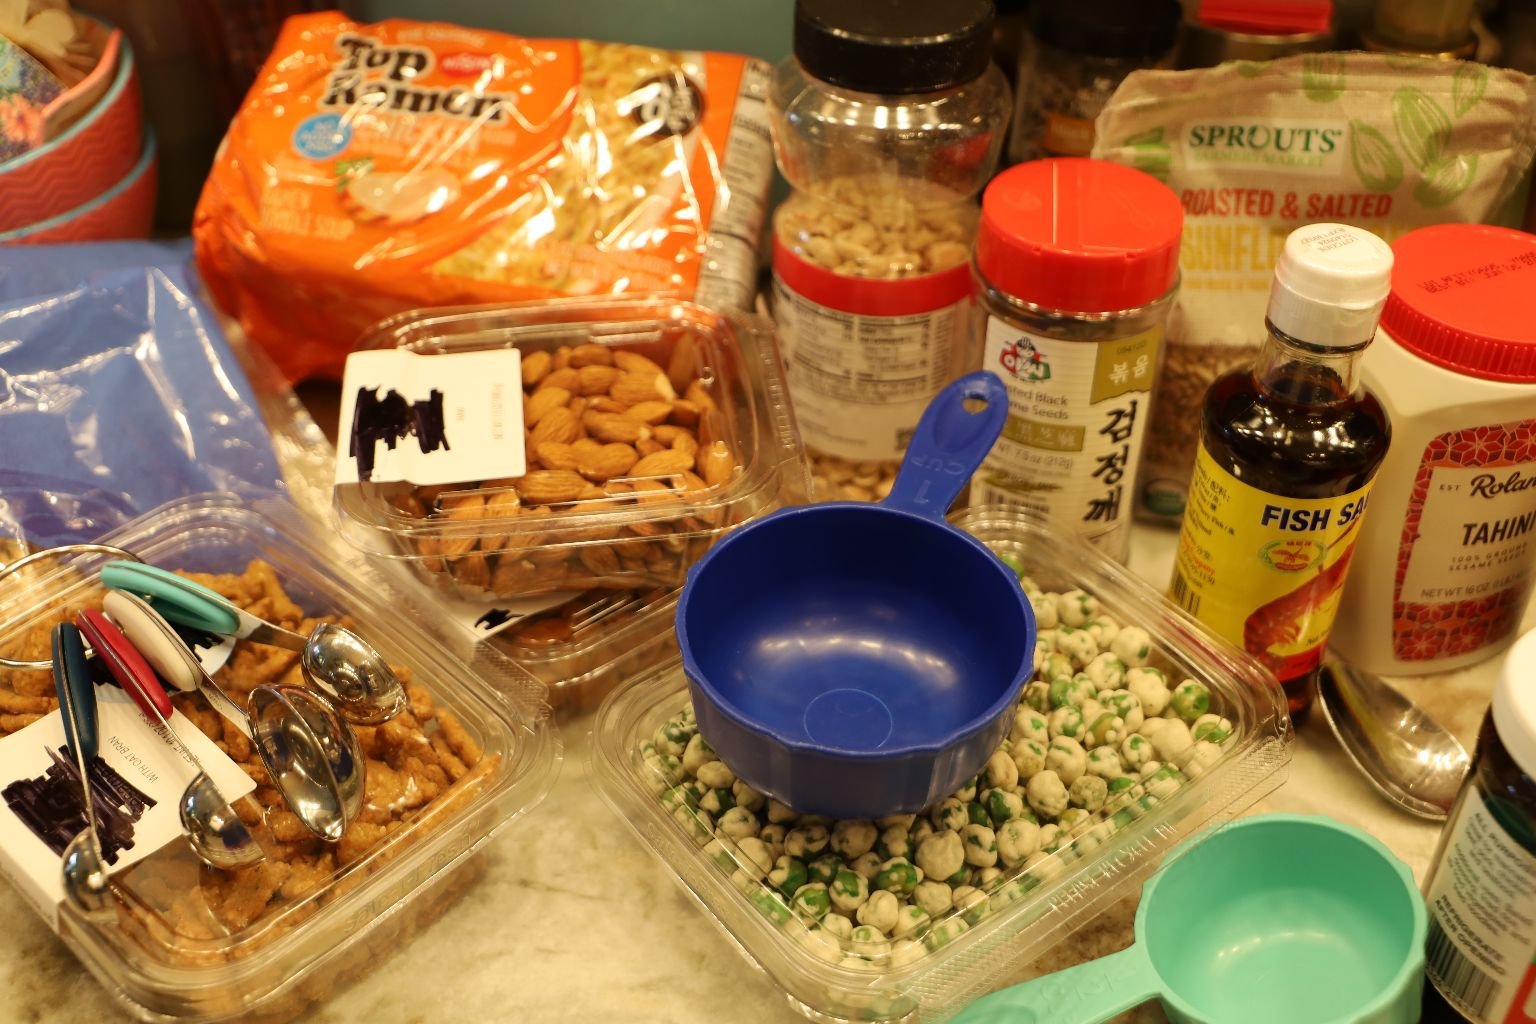
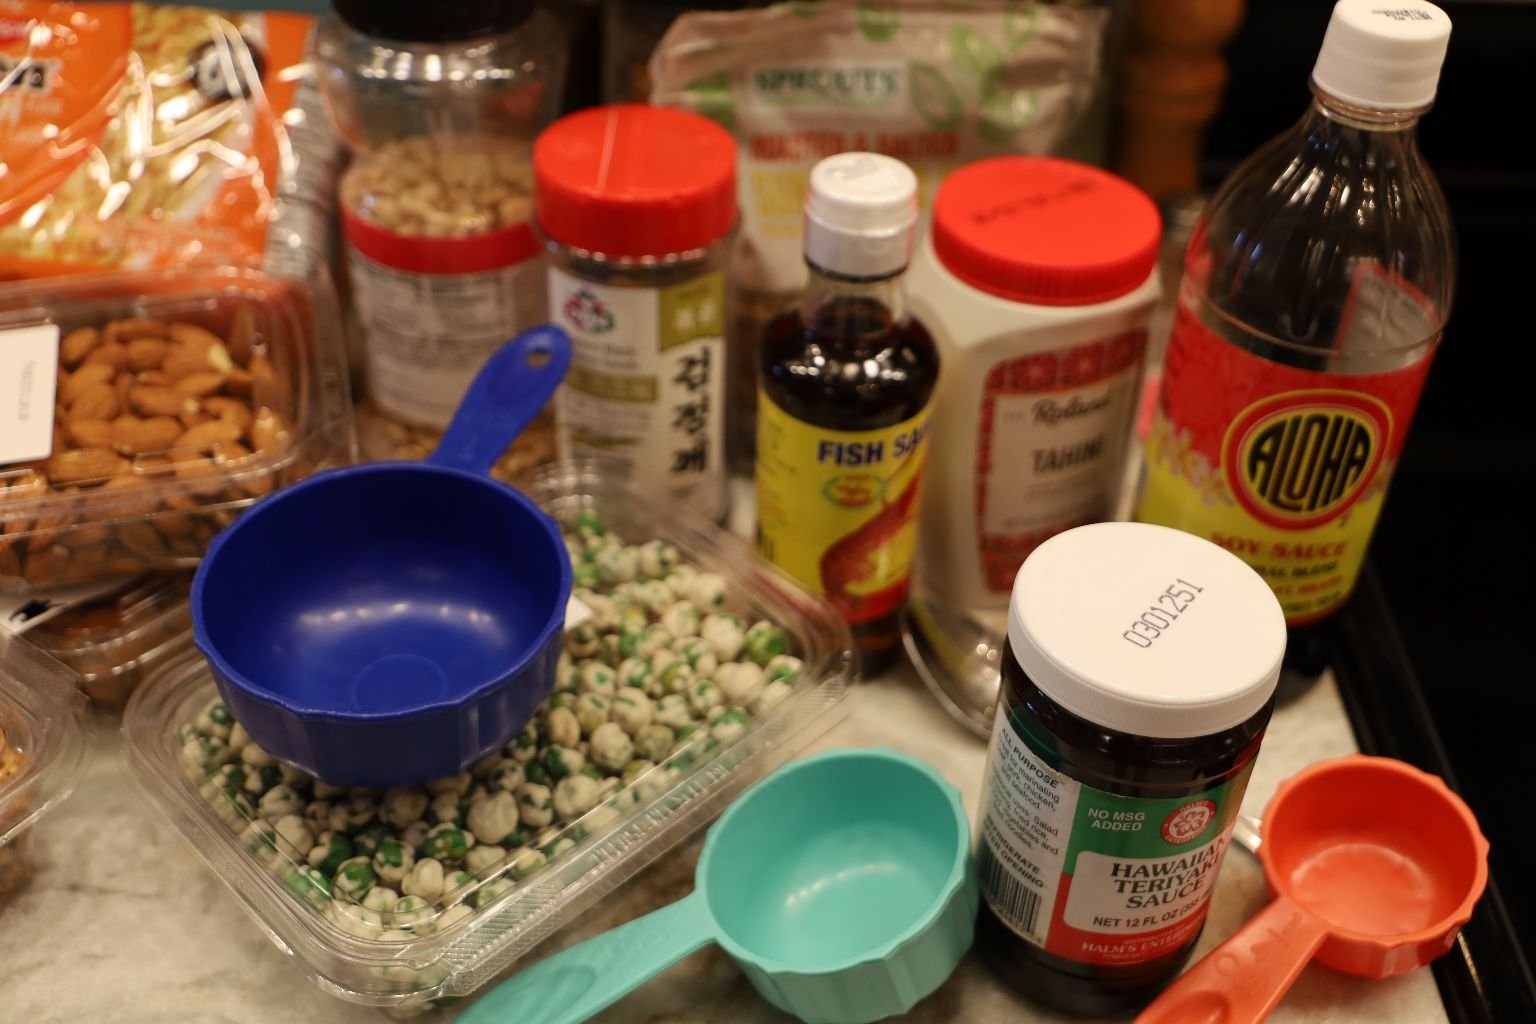
The Ingredients:
The ingredients are more of an Idea, and a Suggestion, but nothing is written in stone here. You can change things up a bit if you like.
I wanted to make this mix in the same style that I do when I would make my beloved homemade Chex Party Mix.
So, I am giving you the ideas, and you can go forward with the experiment.
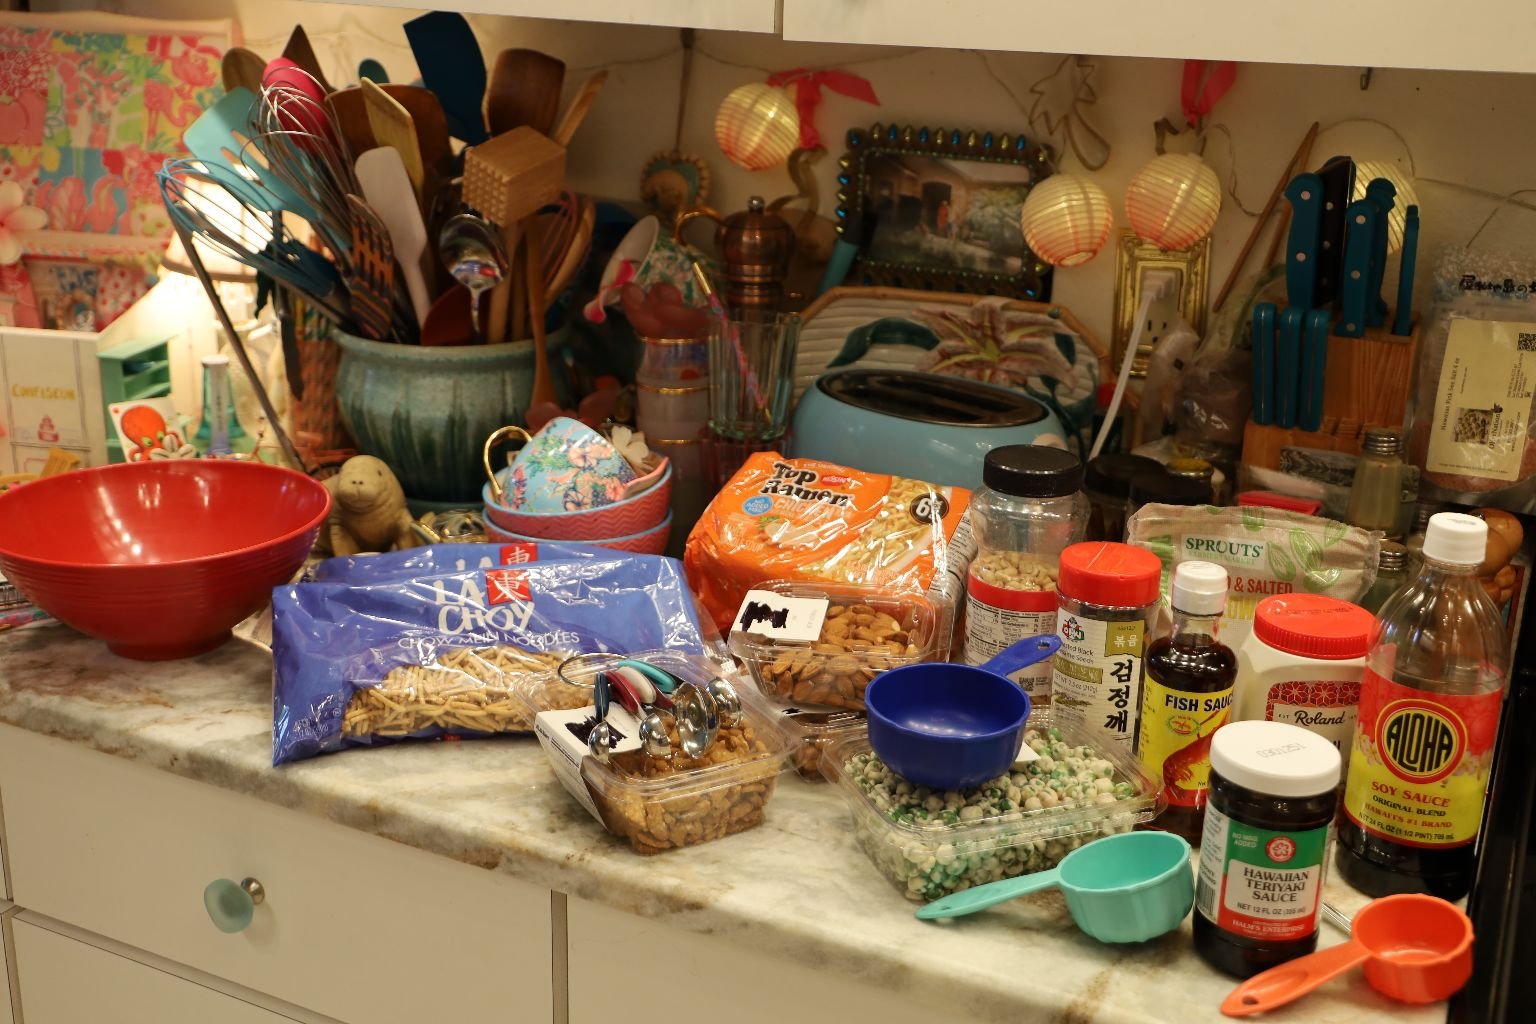
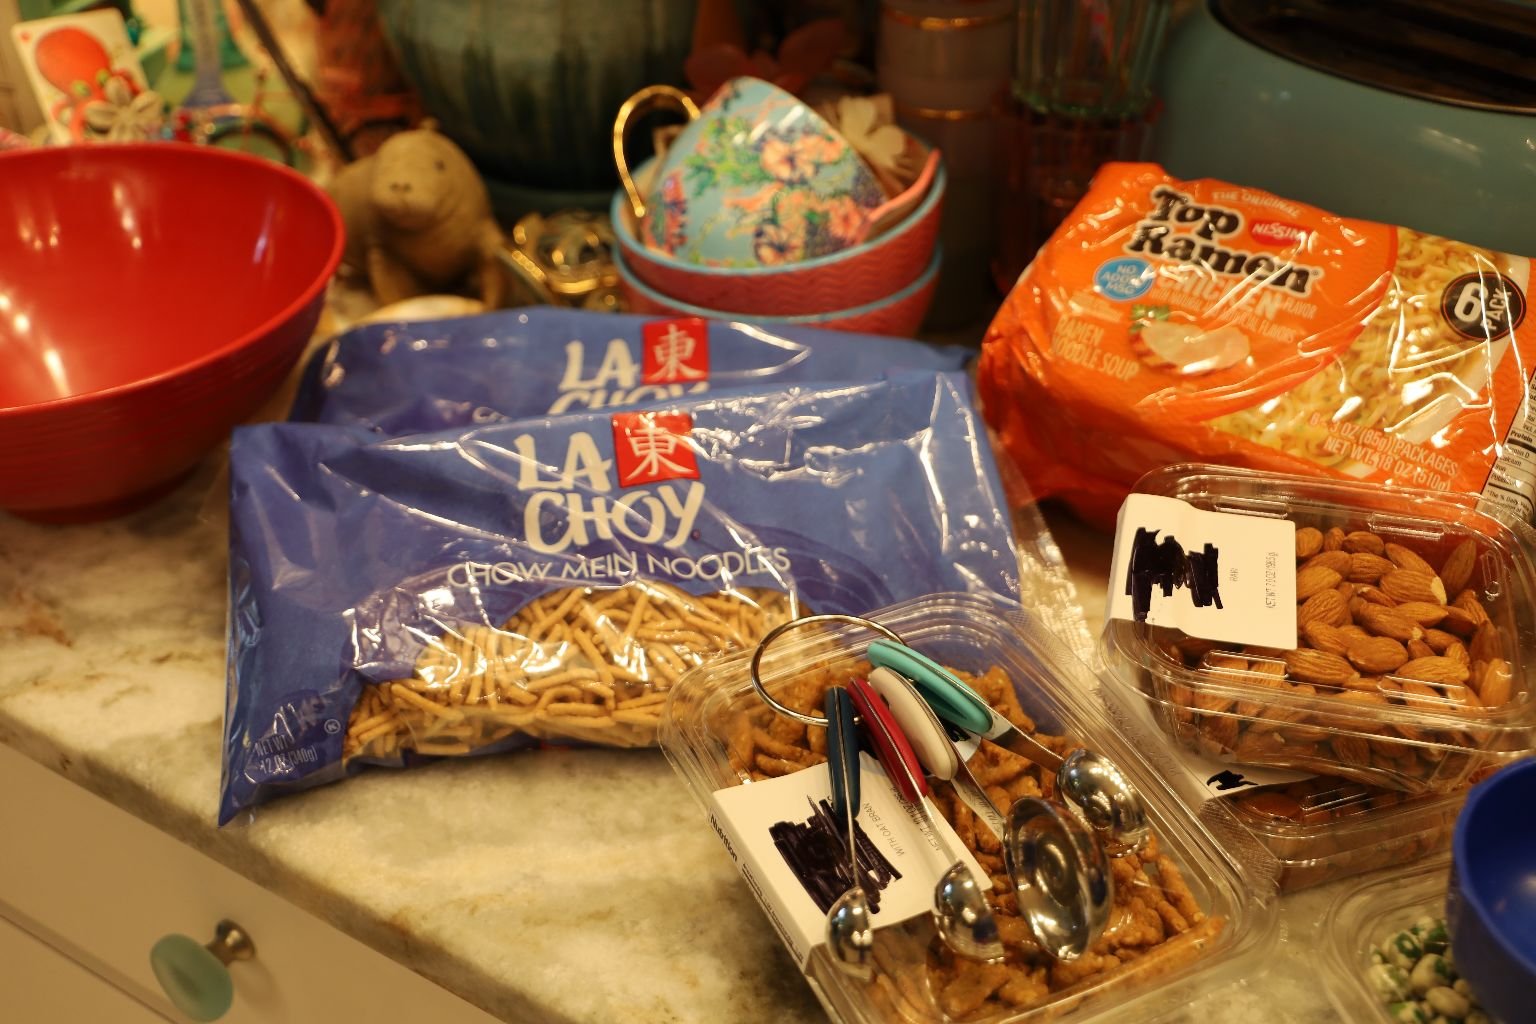
La Choy Chow Mein Noodles (I used a bag and a half. I believe the bags were about 16 oz. each.)
2, Top Ramen Dry Noodle Soups (I am using a Chicken Flavor, but not using the seasoning packet. I am only using the dry noodles.)
Plain Almonds
Sesame Sticks
Dry Roasted Peanuts
Sunflower Seeds
Black Sesame Seeds
(The amounts of the above ingredients are up to you.)
——————————————————————————
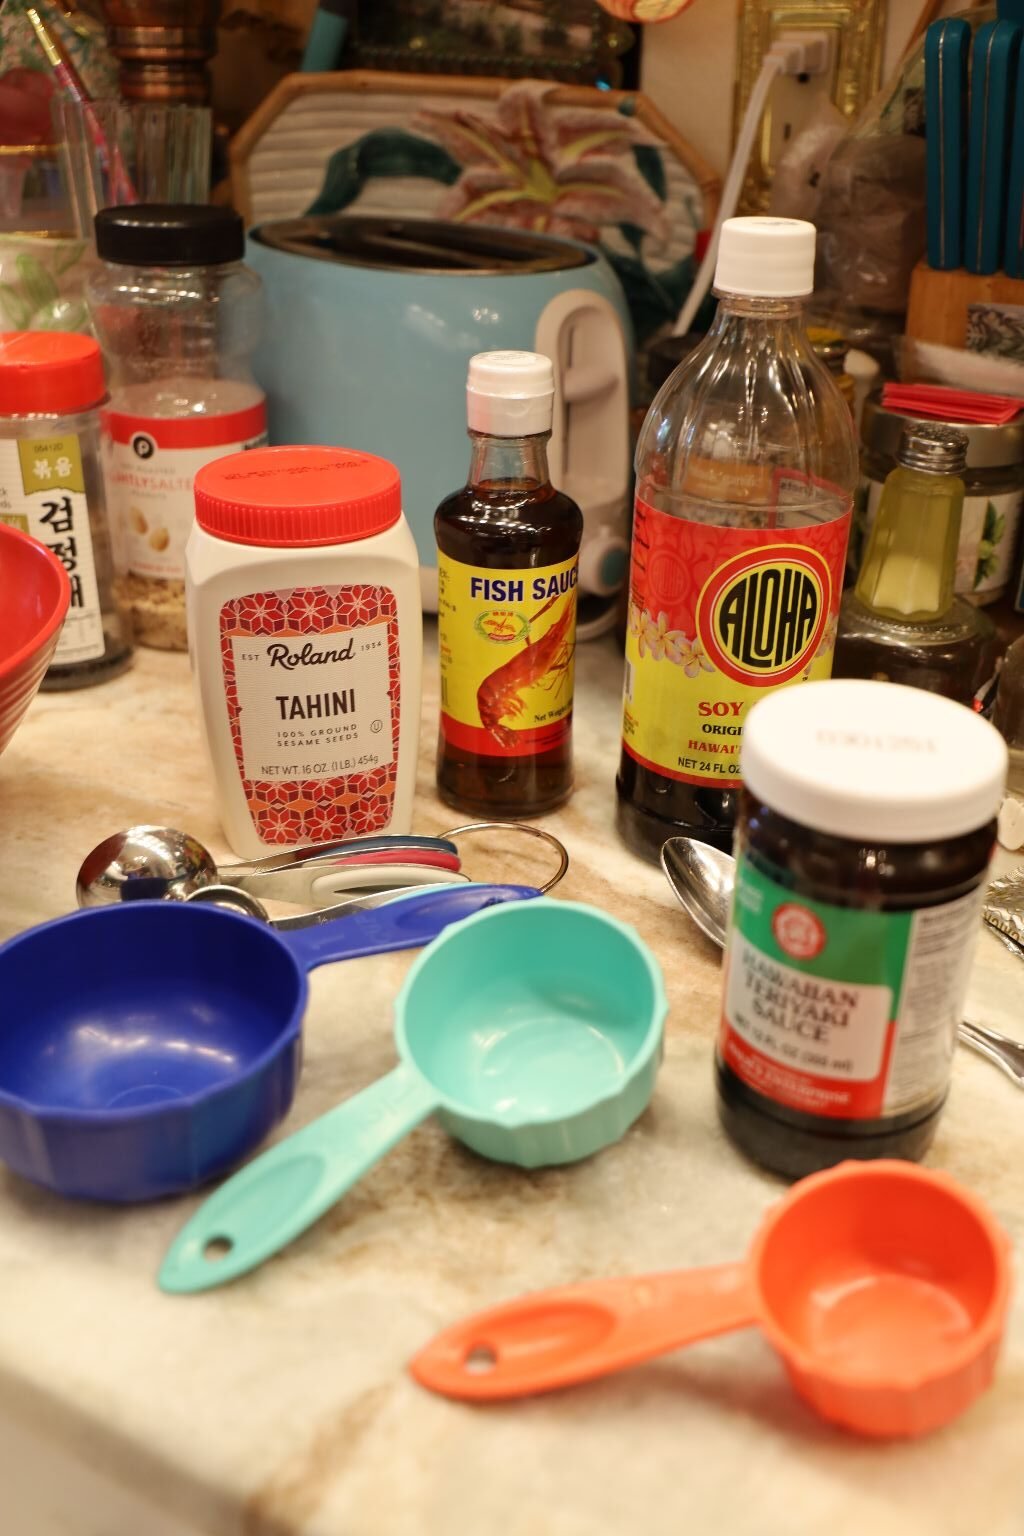
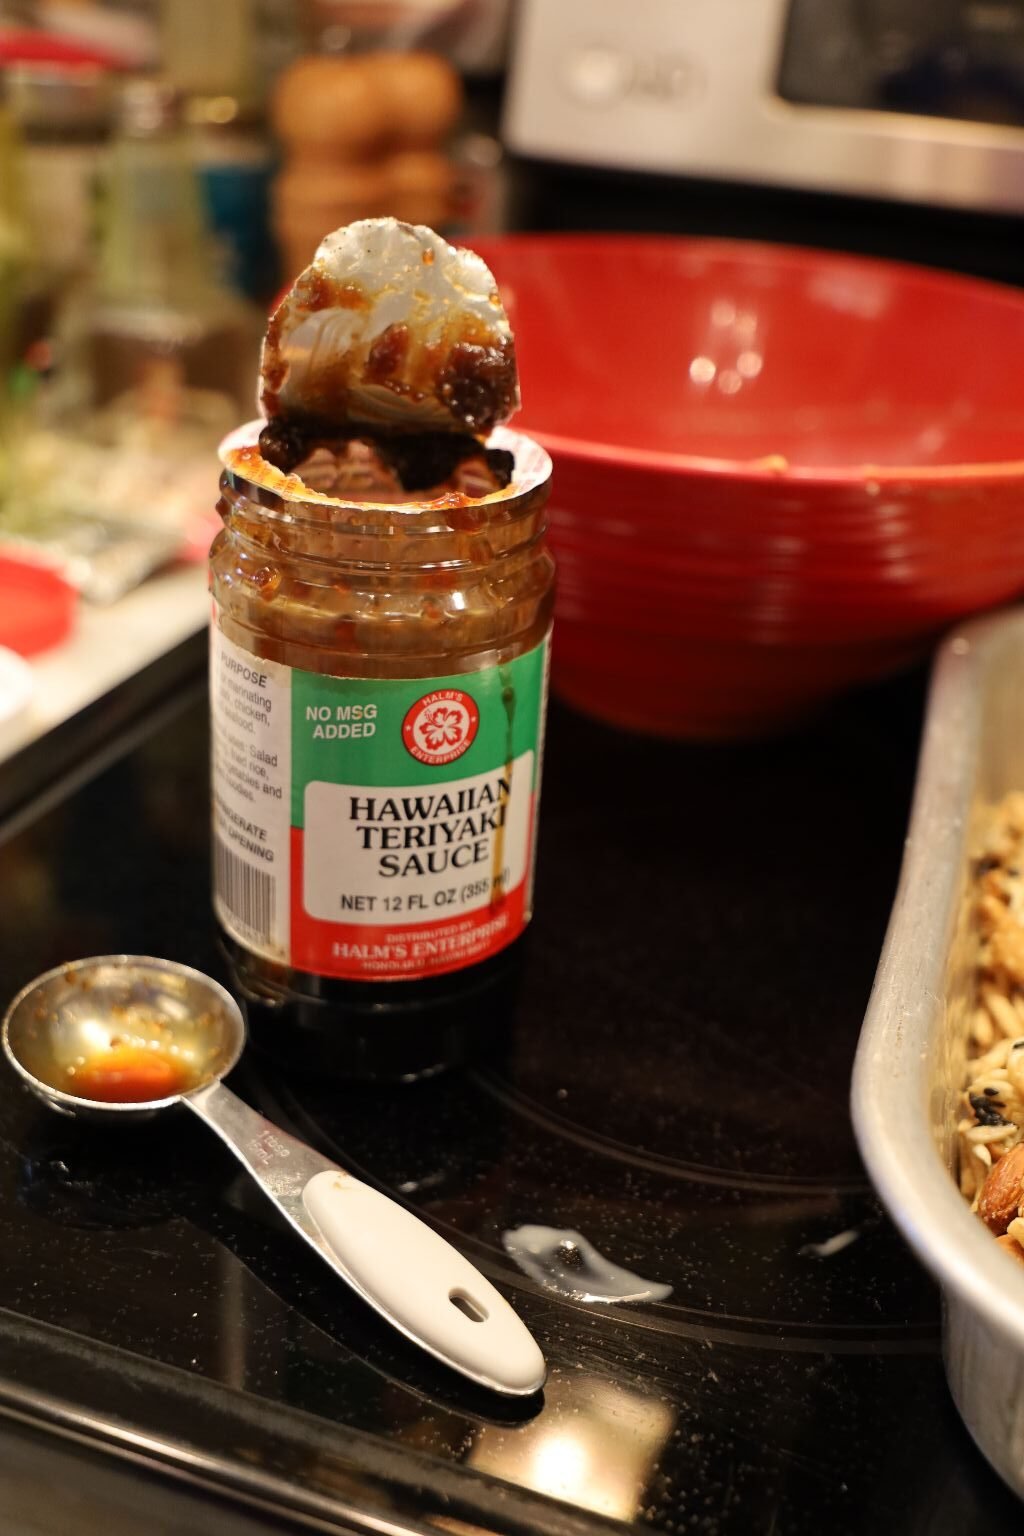
1, 1/2 Cups Tahini (Tahini is 100% Ground Sesame Seeds)
8 T. Fish Sauce
1/2 Cup, Aloha Soy Sauce
1/4 Cup Hawaiian Teriyaki Sauce
Water, To Help Thin Out The Wet Ingredients
(Wasabi Peas ended up being a Side, and not in the Mix)
———————————————————————————
————————————————————————————-
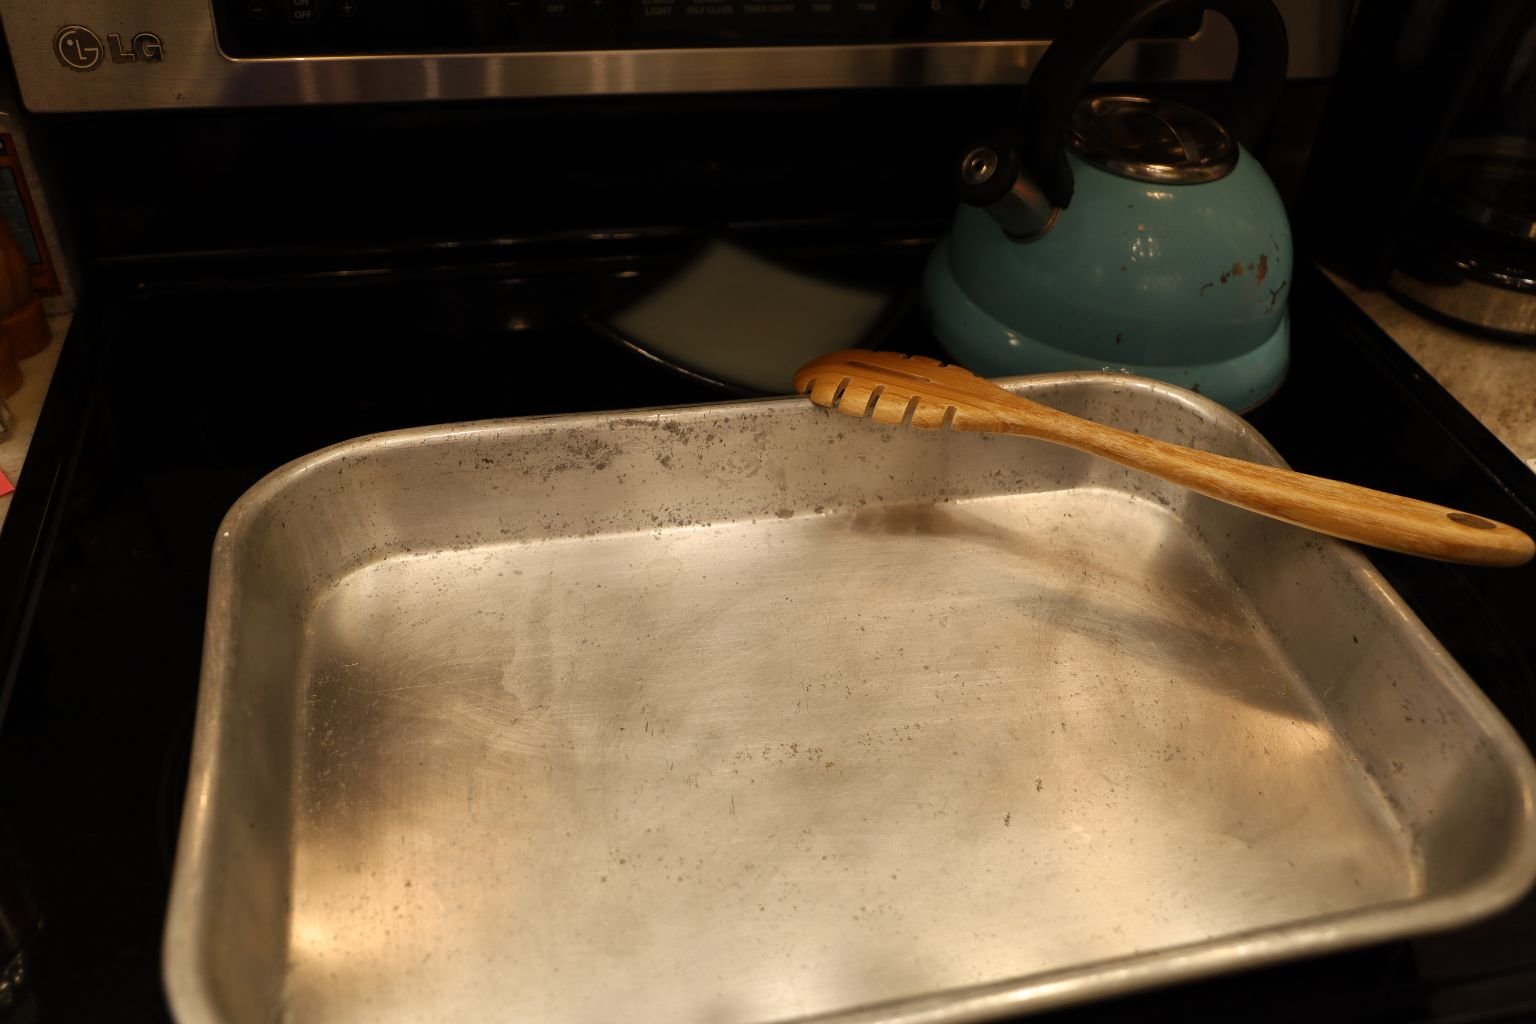
You will need a large baking pan, and a wooden spoon.
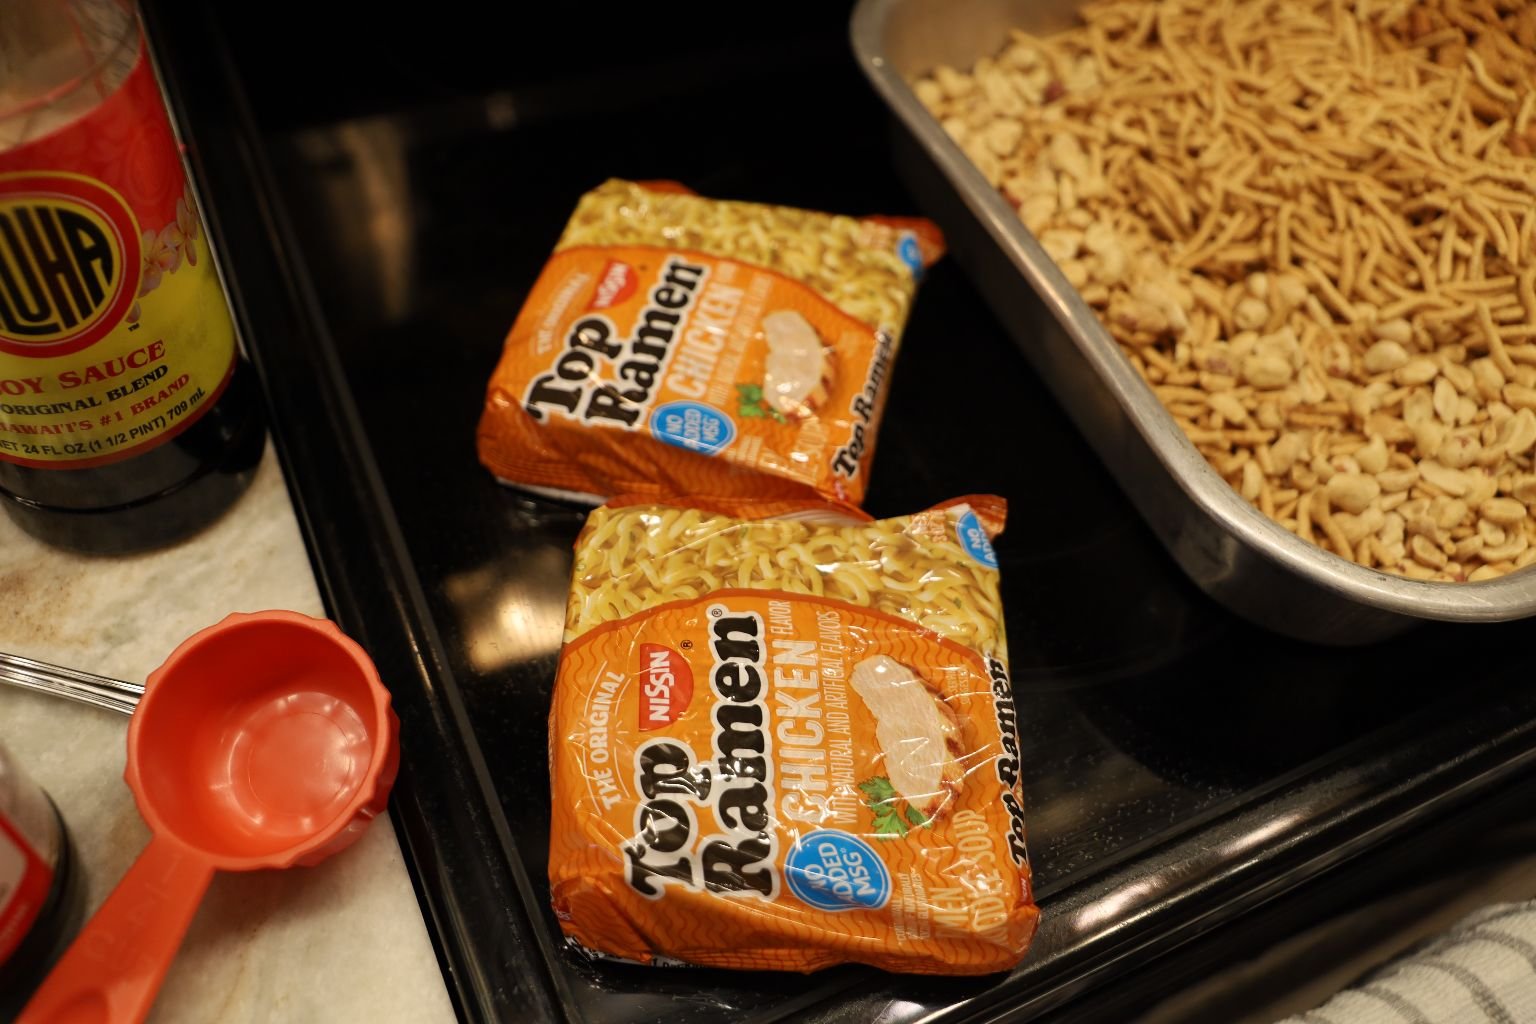
Adding Our Dry Ingredients First
Chow Mein Noodles, Sesame Sticks, Almonds, Dry Roasted Peanuts, Sunflower Seeds, and Black Sesame Seeds
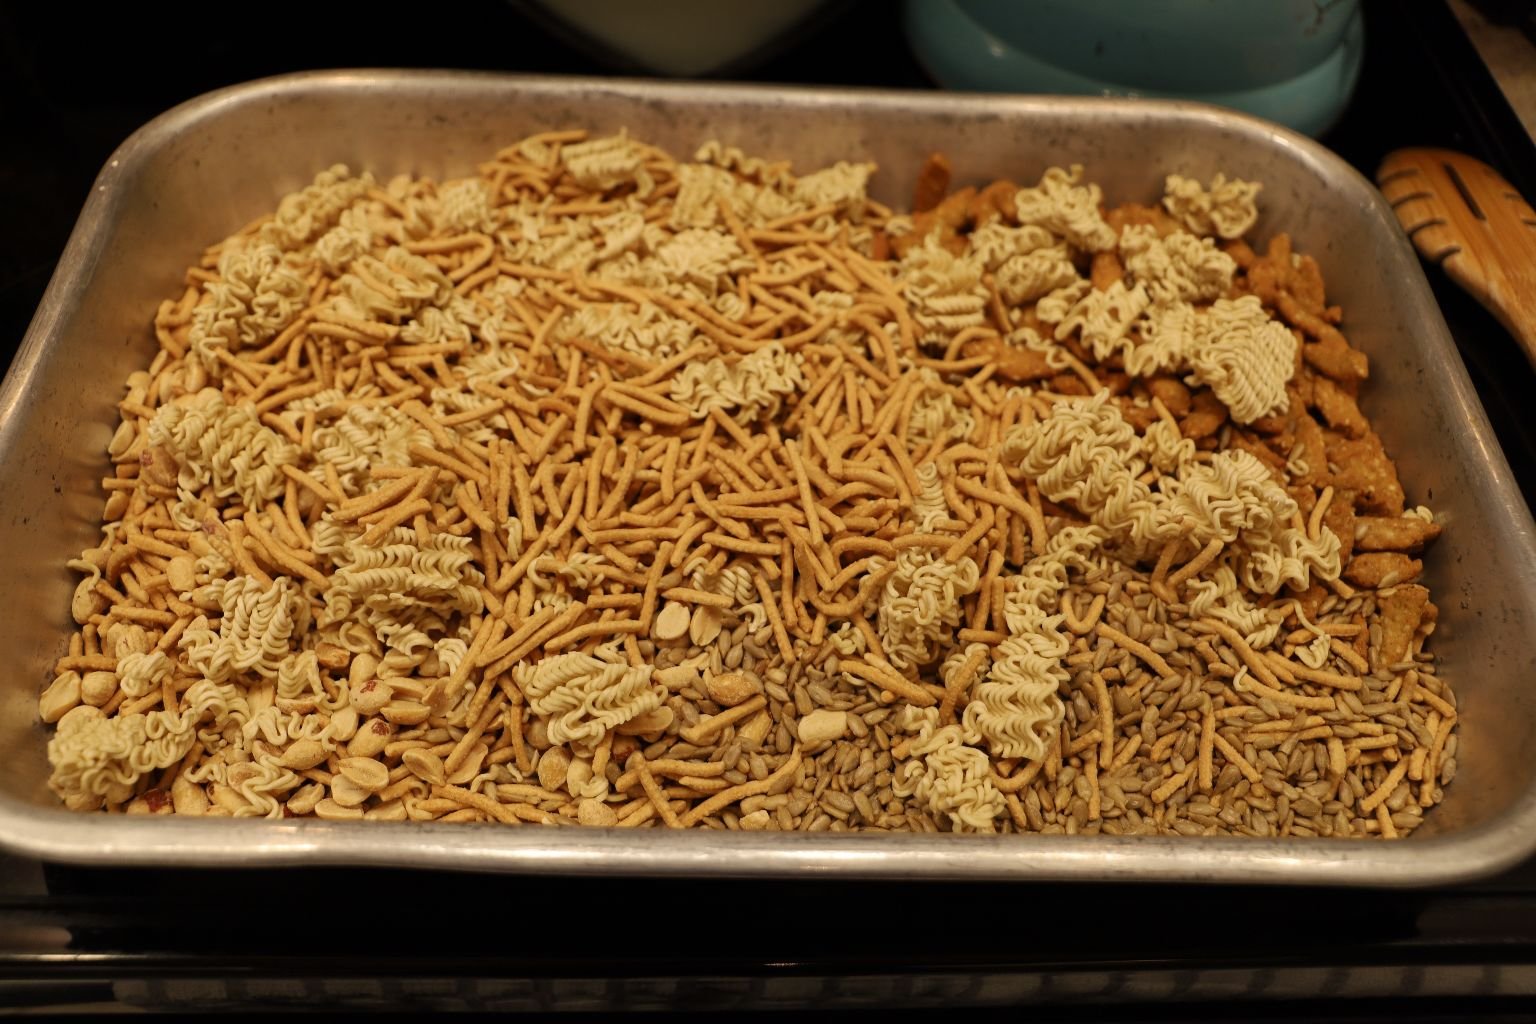
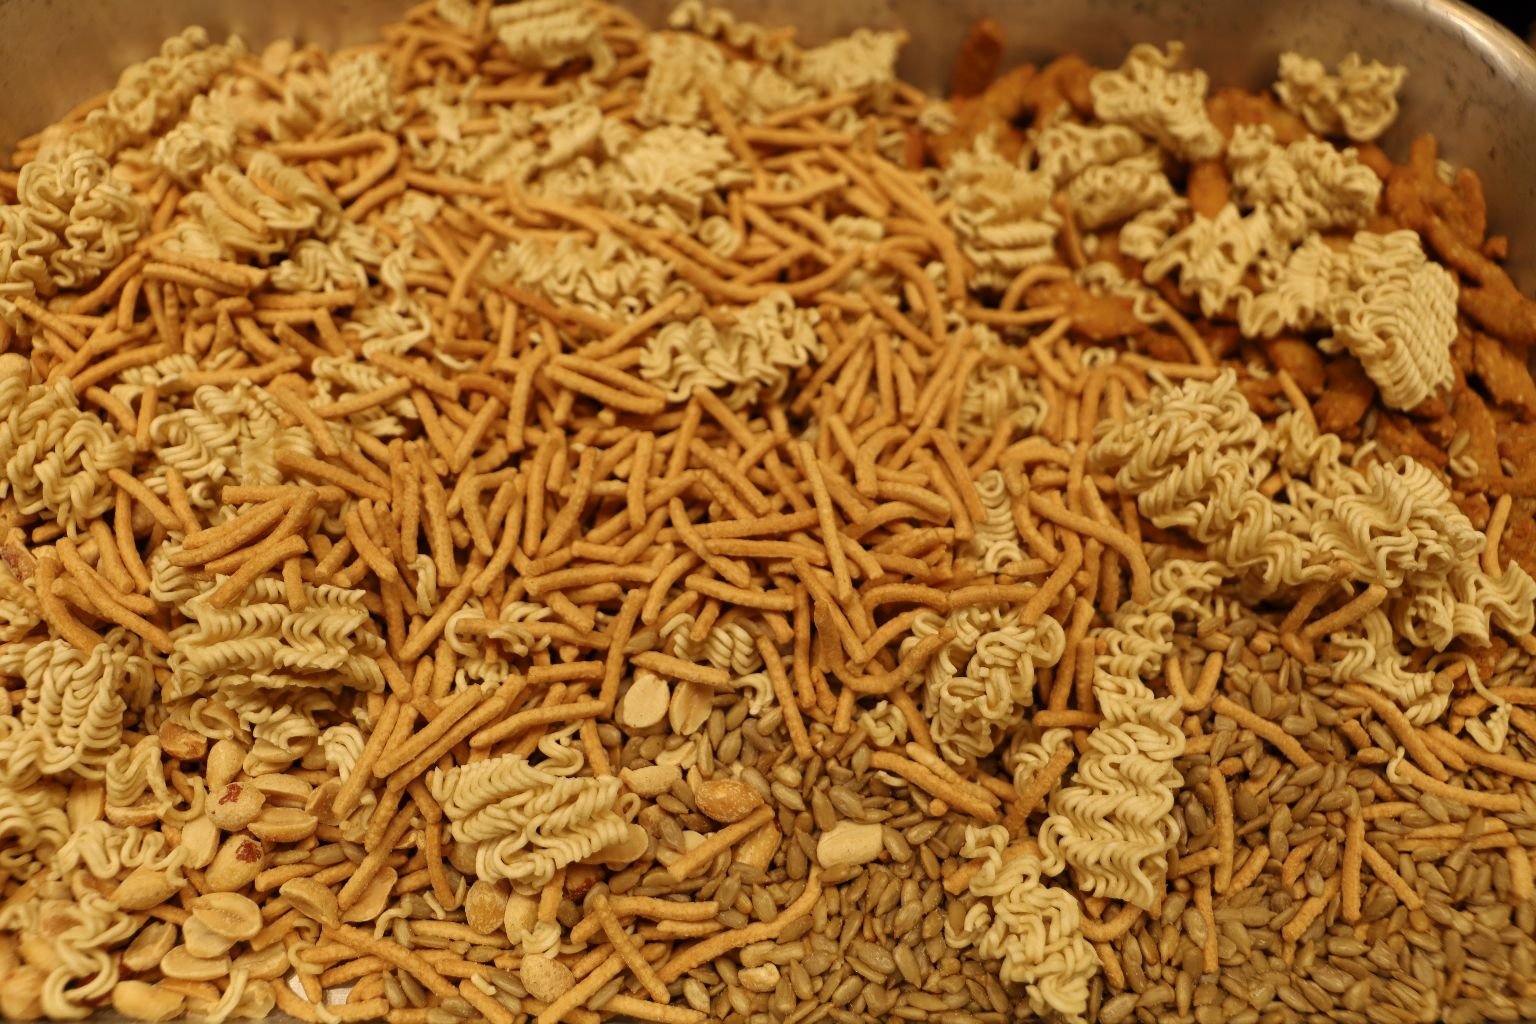
Break up your Top Ramen Noodles, and add to the Baking Pan
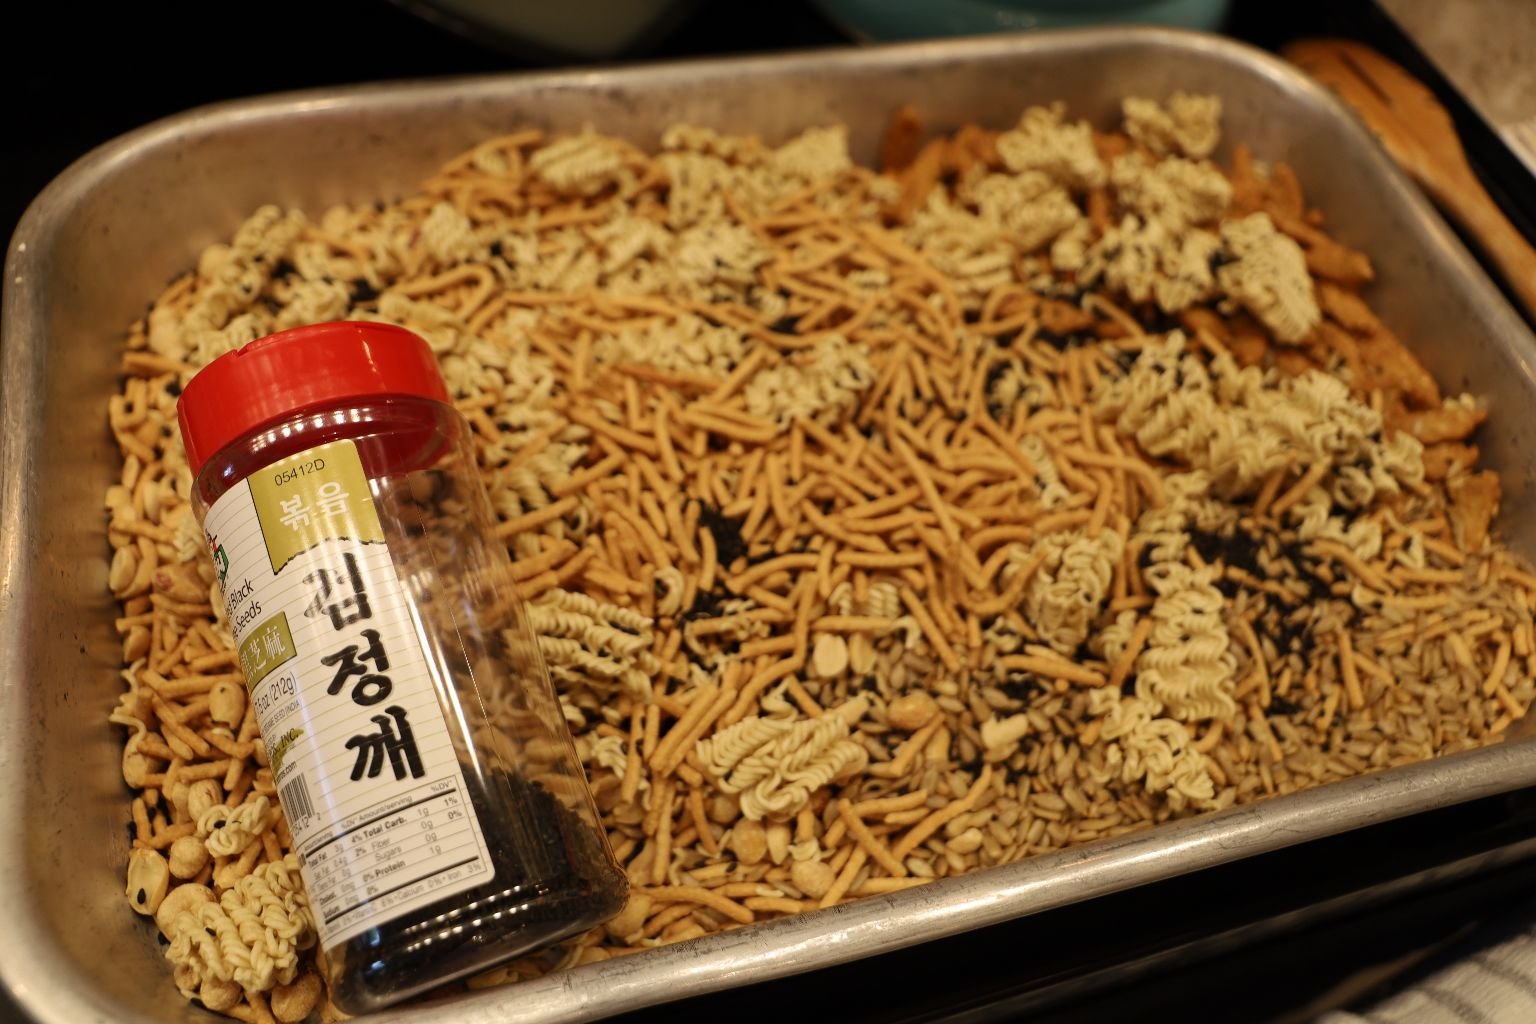
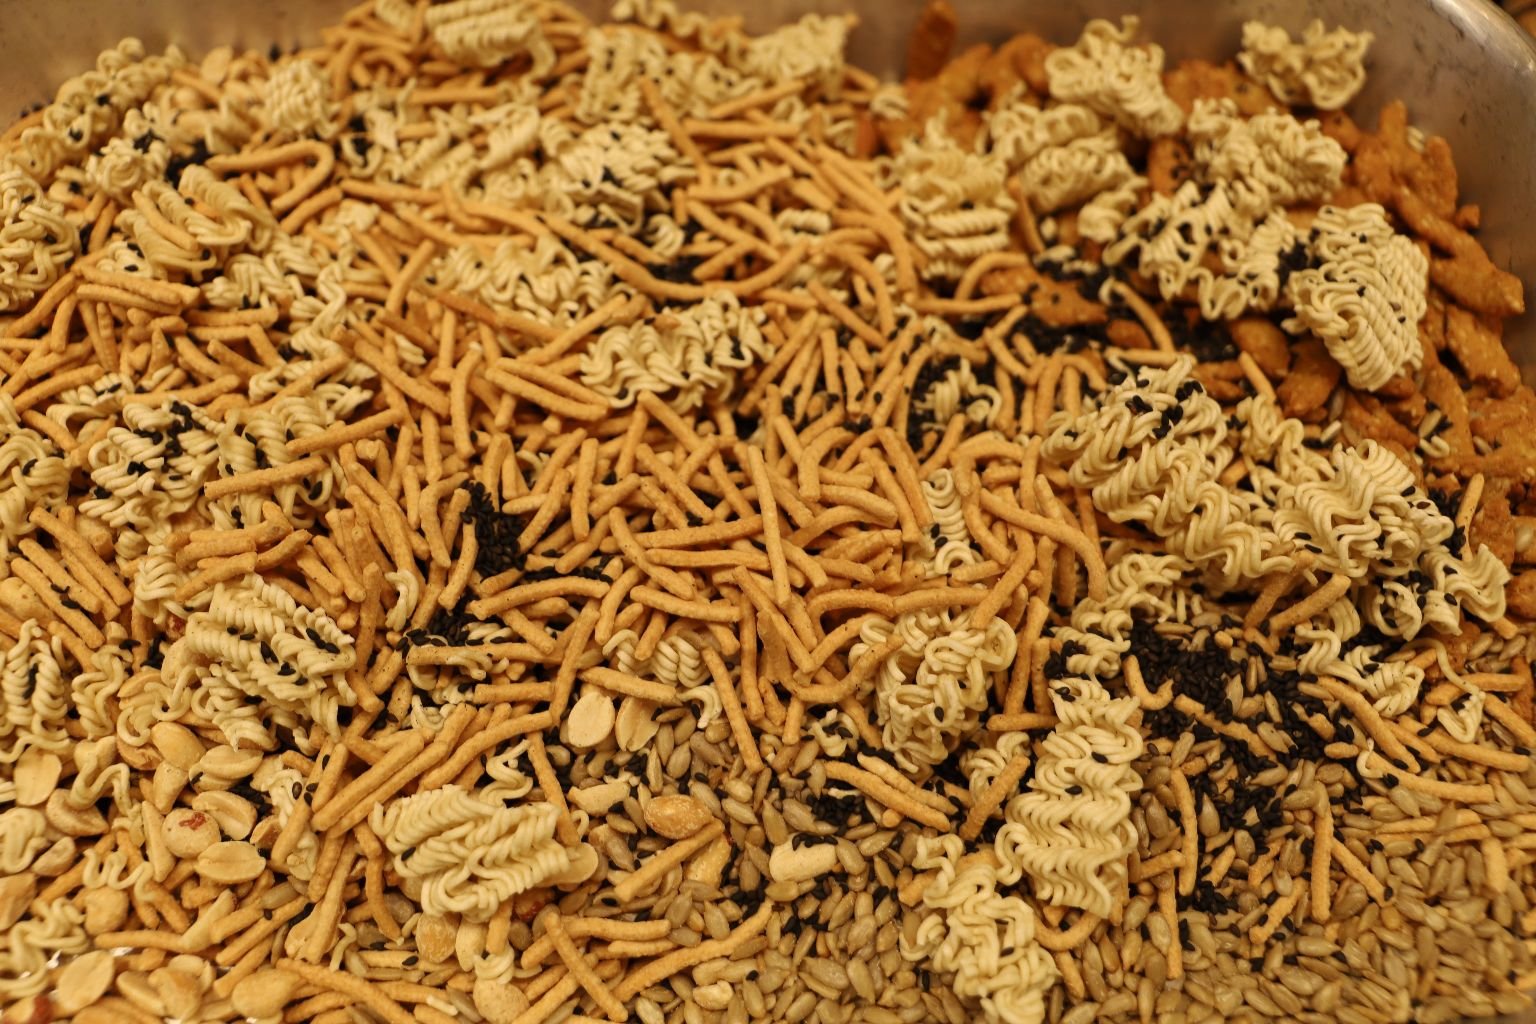
Black Sesame Seeds
The Amounts For All of the Above are up to You
—————————————————————————————————–
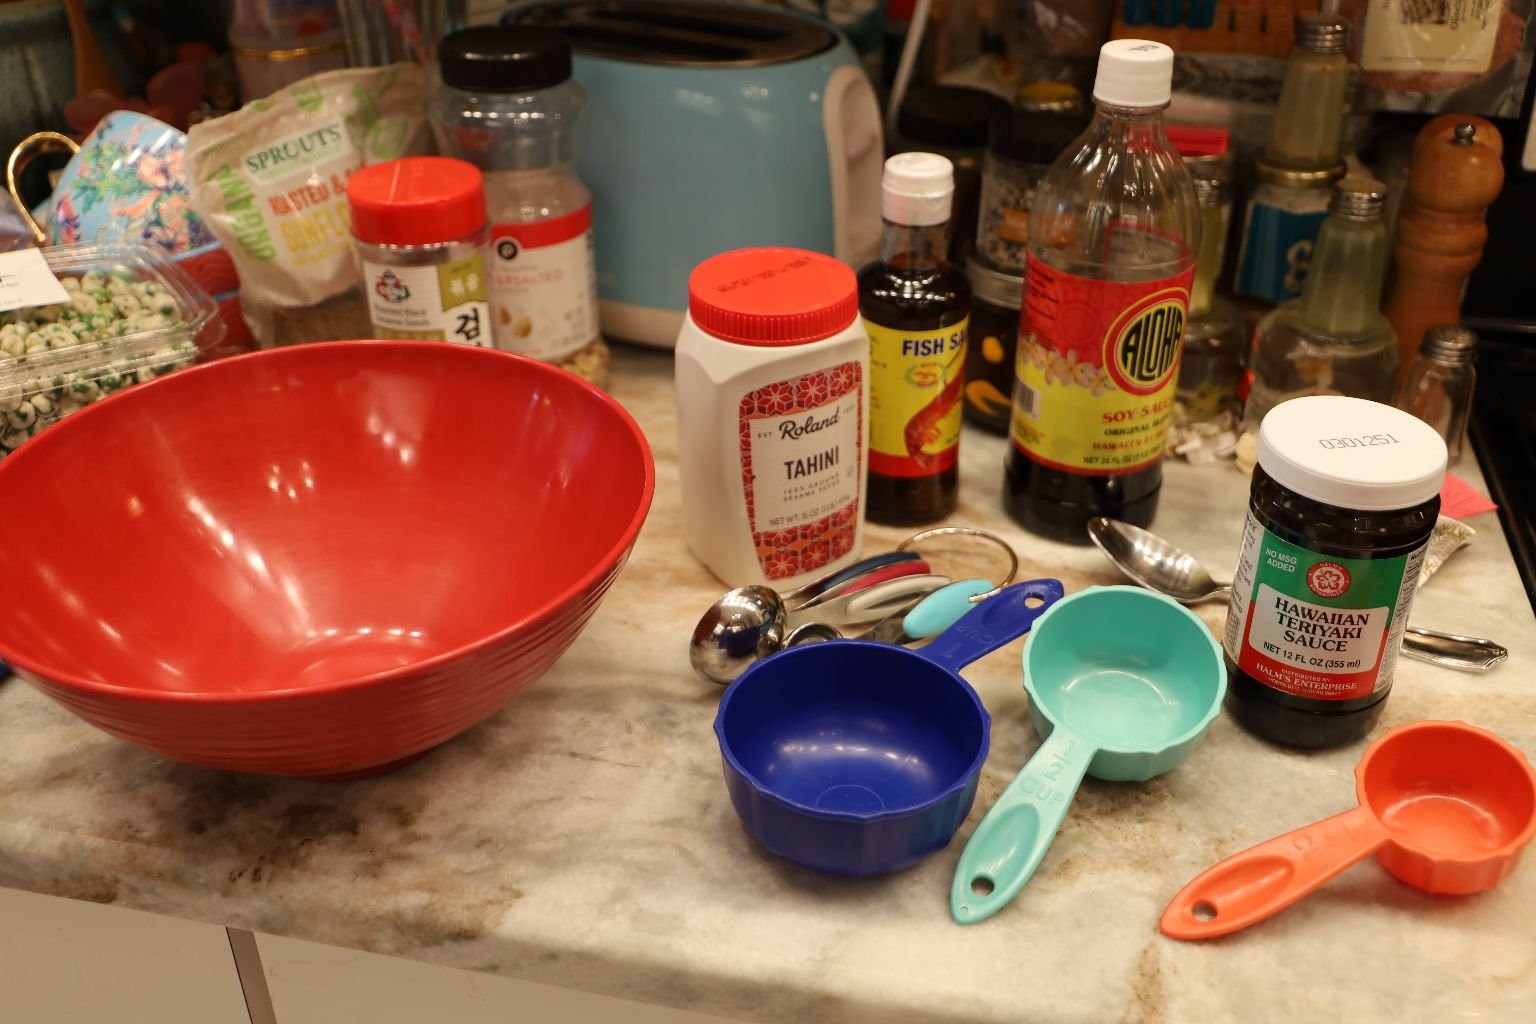
In a Medium Sized Bowl….
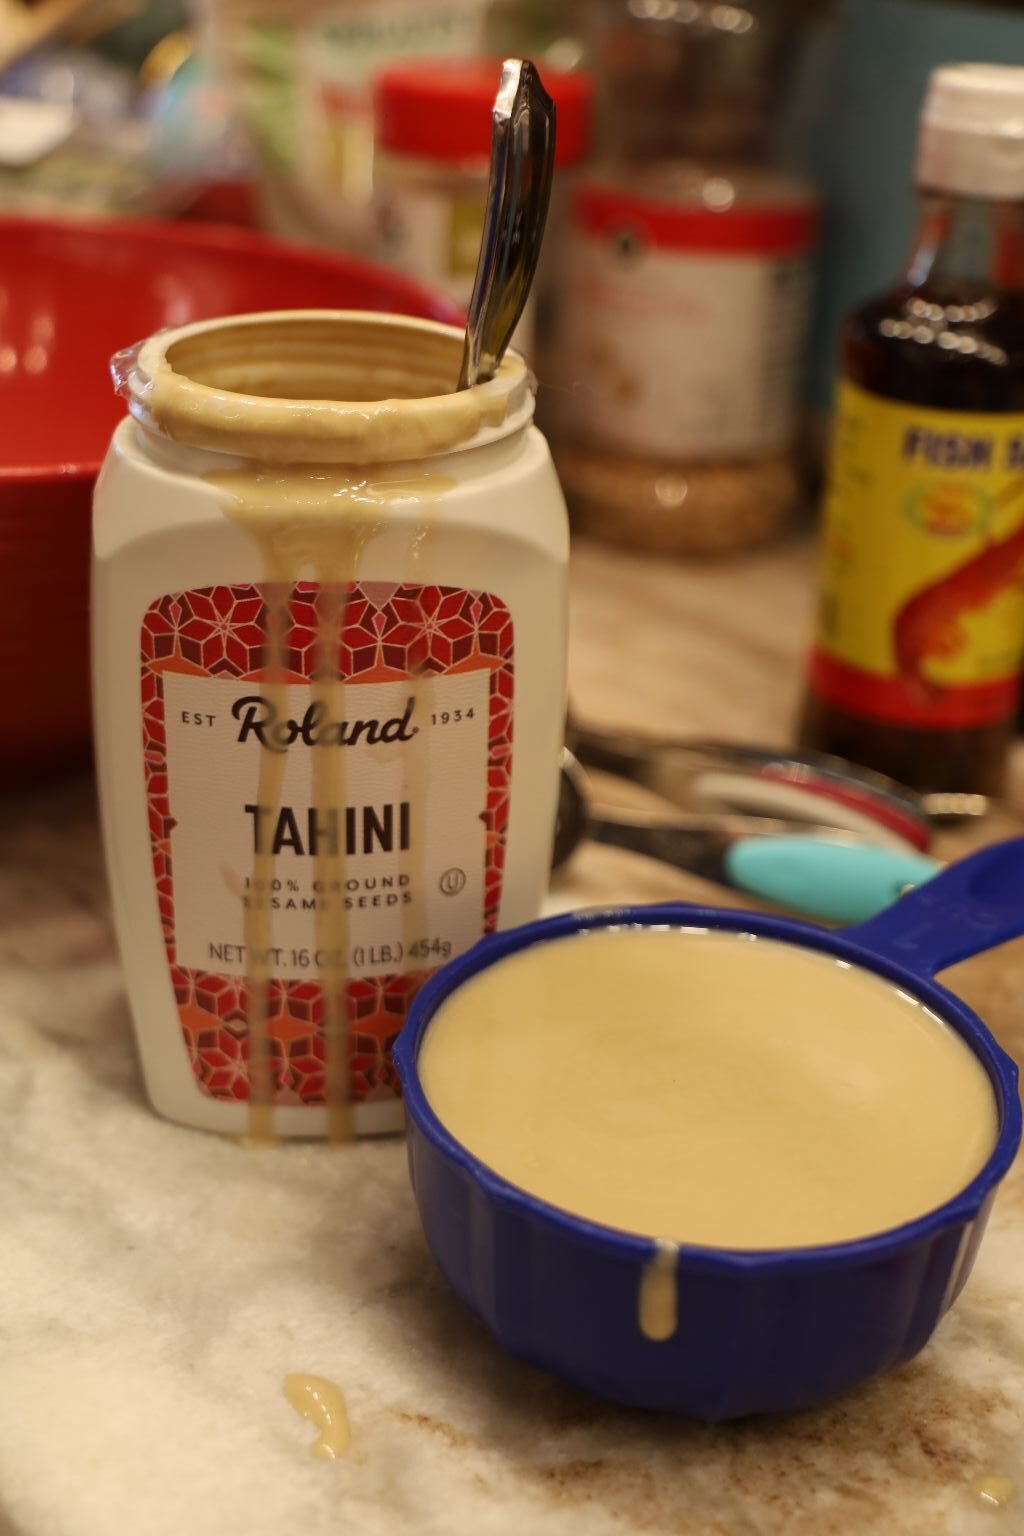
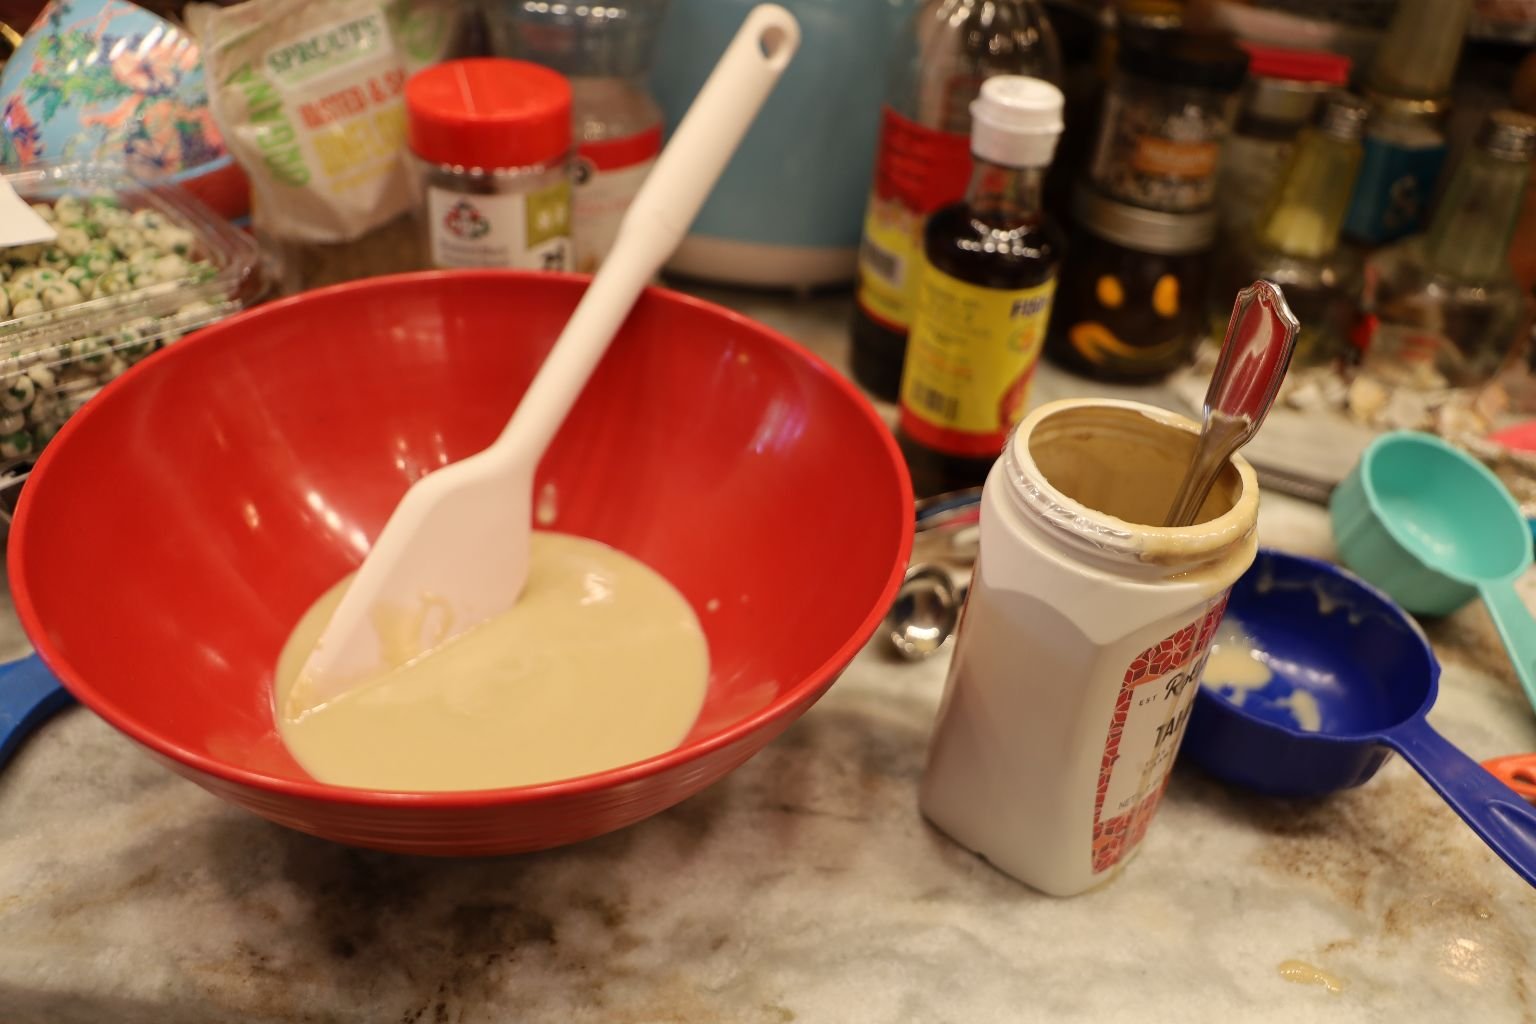
Adding 1 1/2 Cups of the Tahini
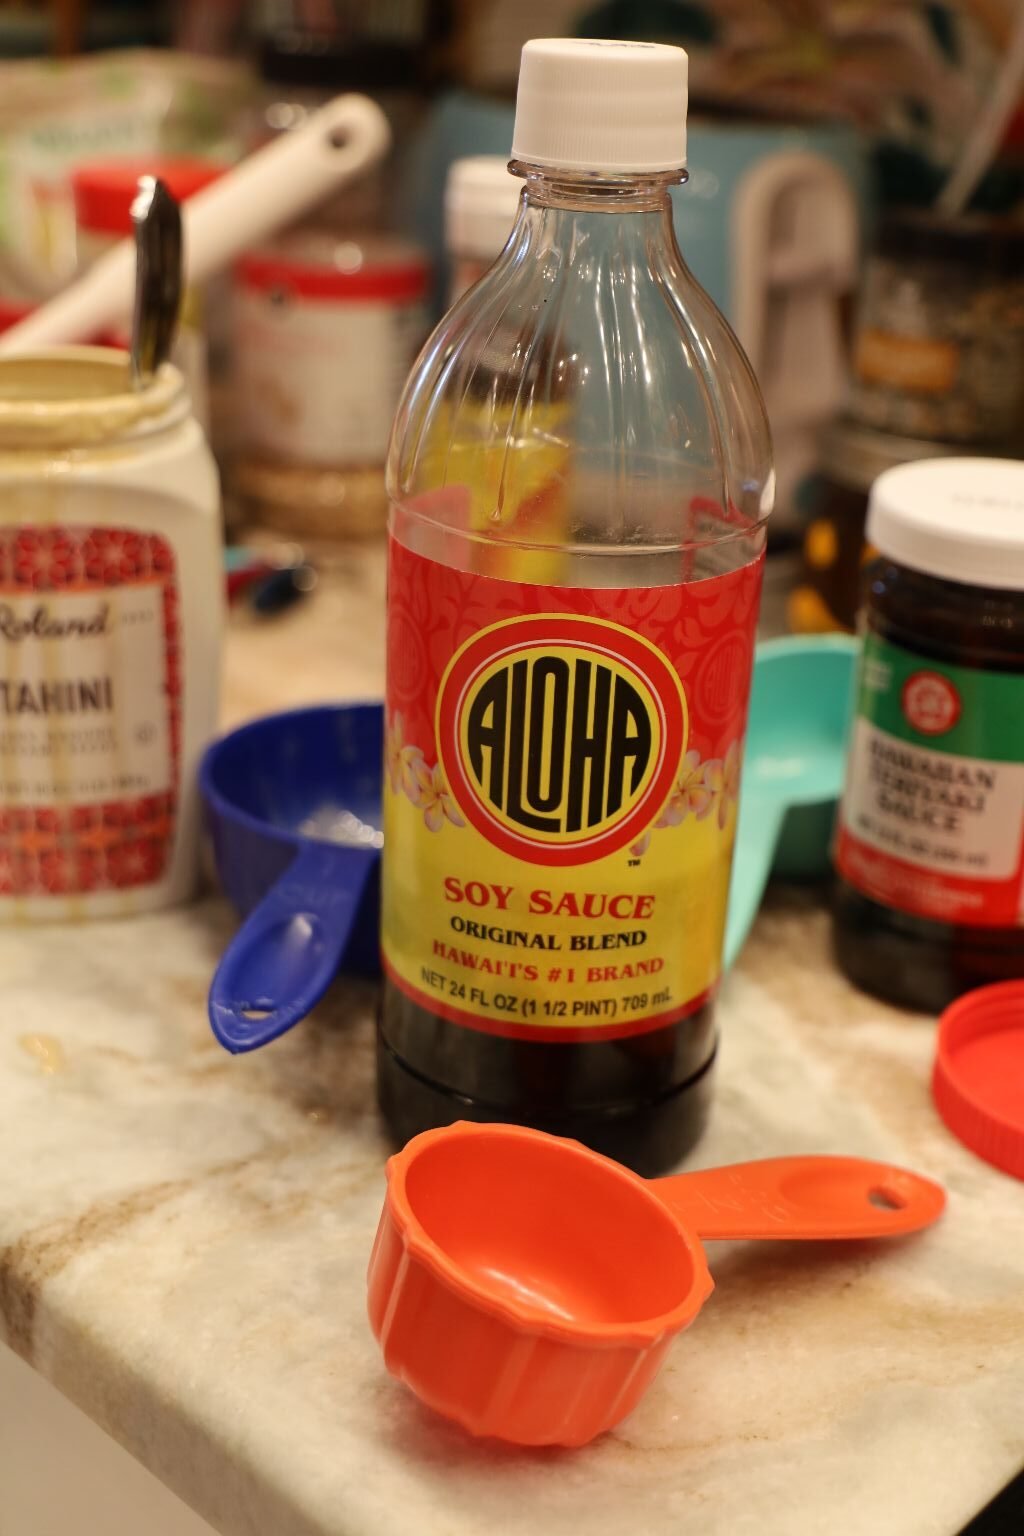

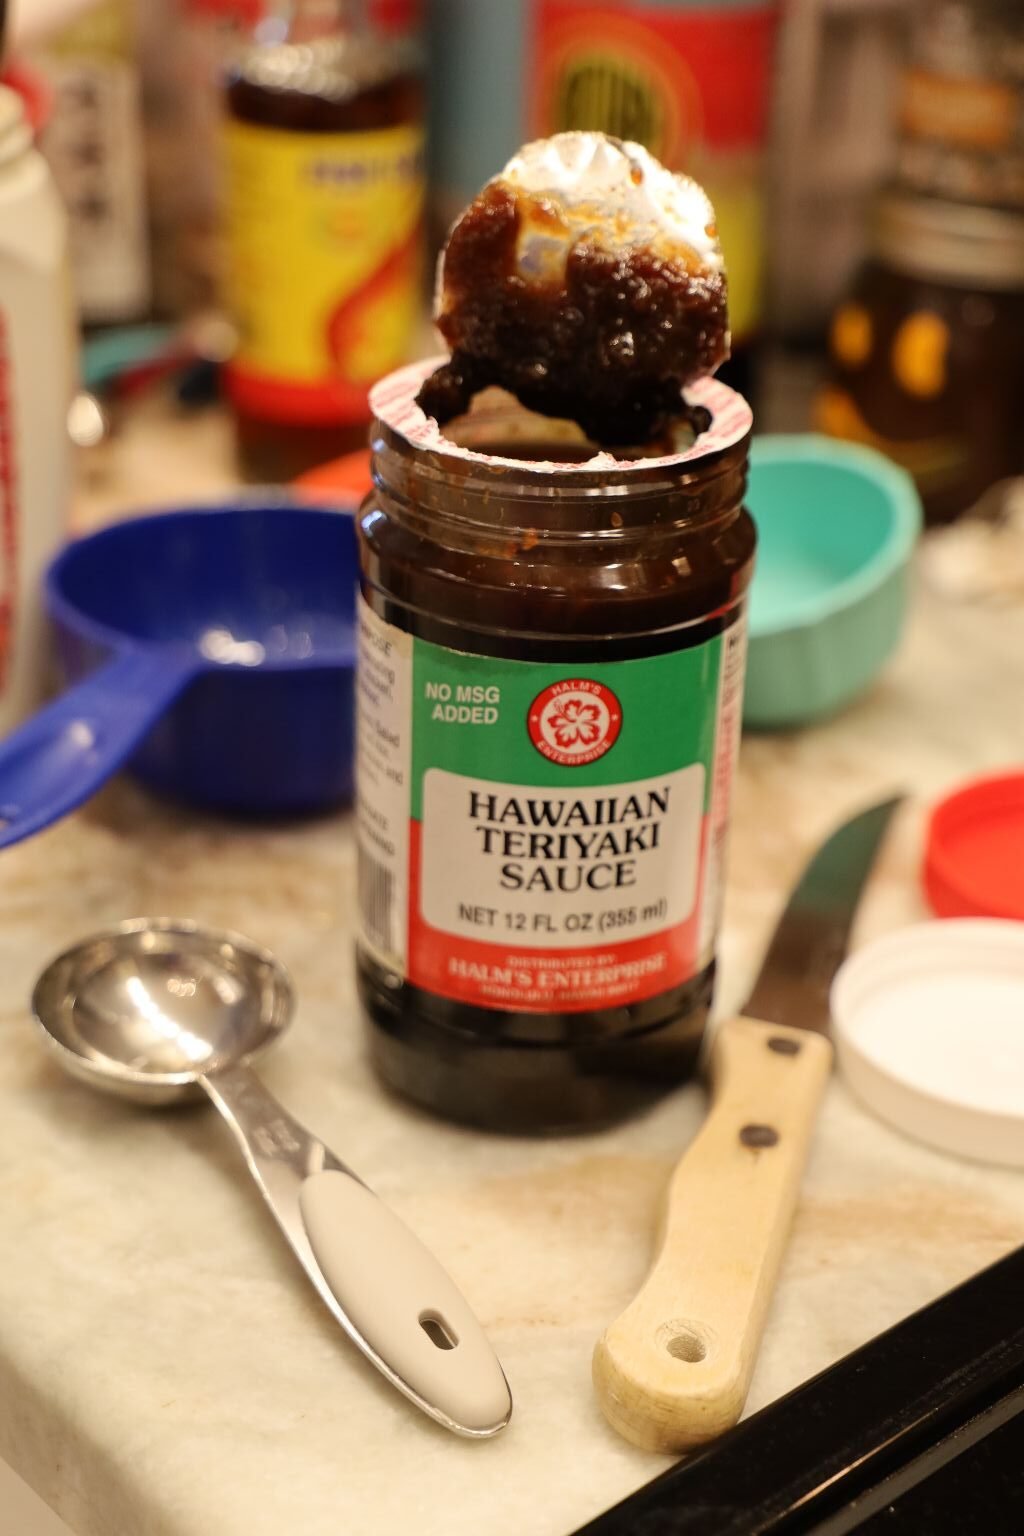
Adding 1/2 Cup of Aloha Soy Sauce, 8 T. of Fish Sauce, and 1/4 Cup of Hawaiian Teriyaki Sauce
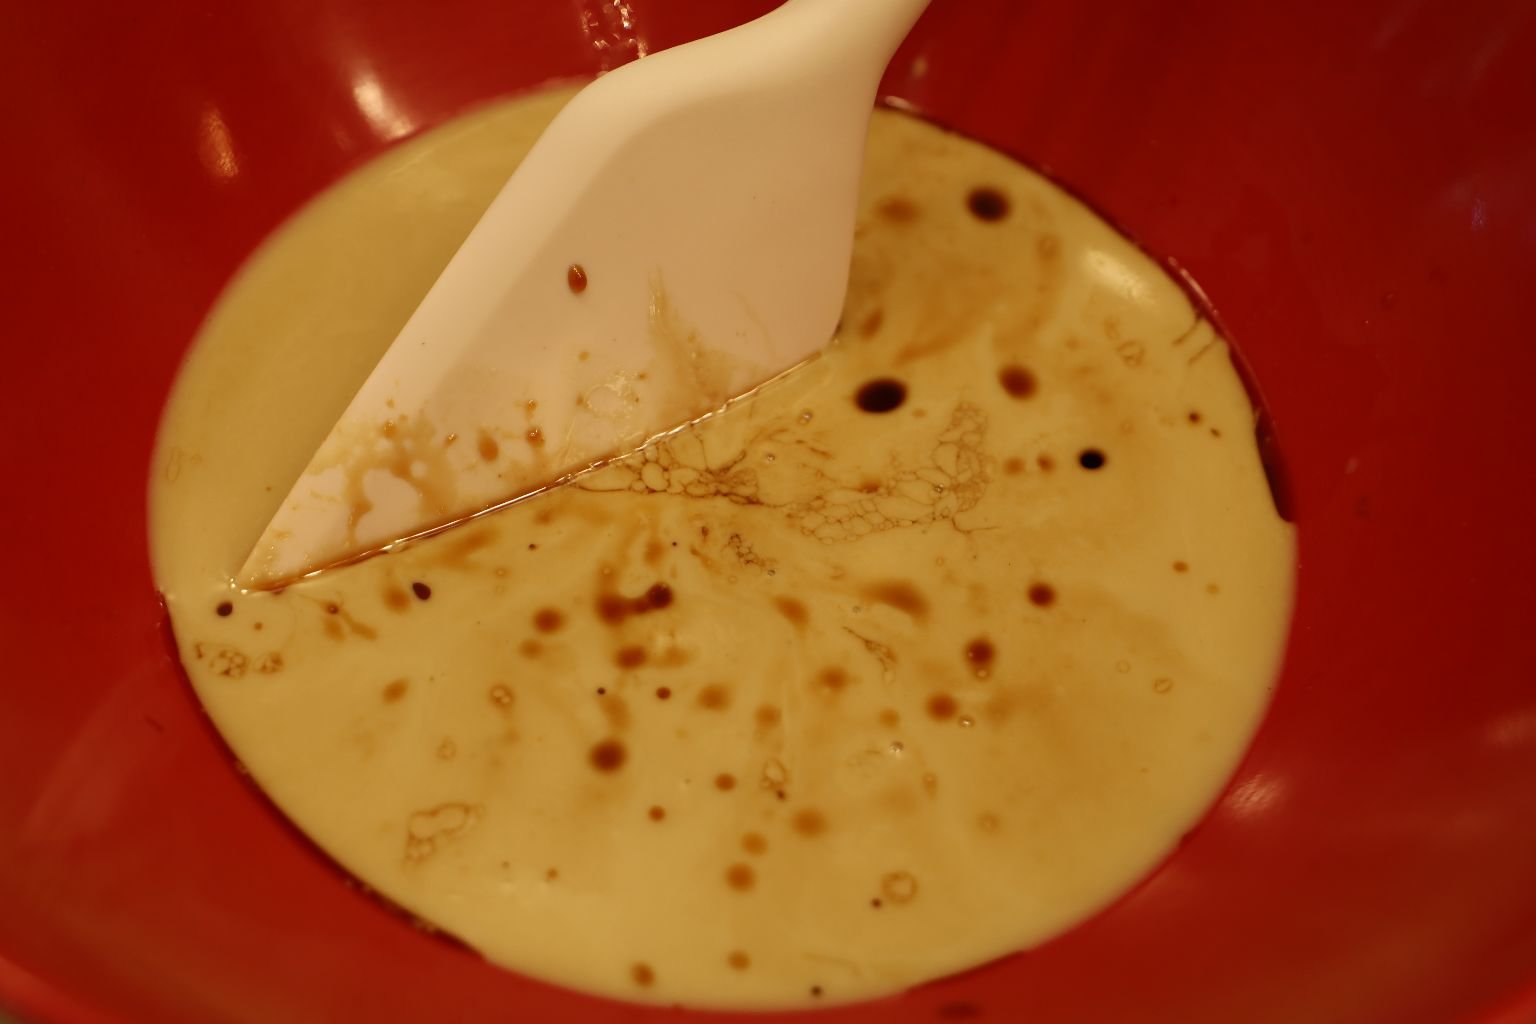
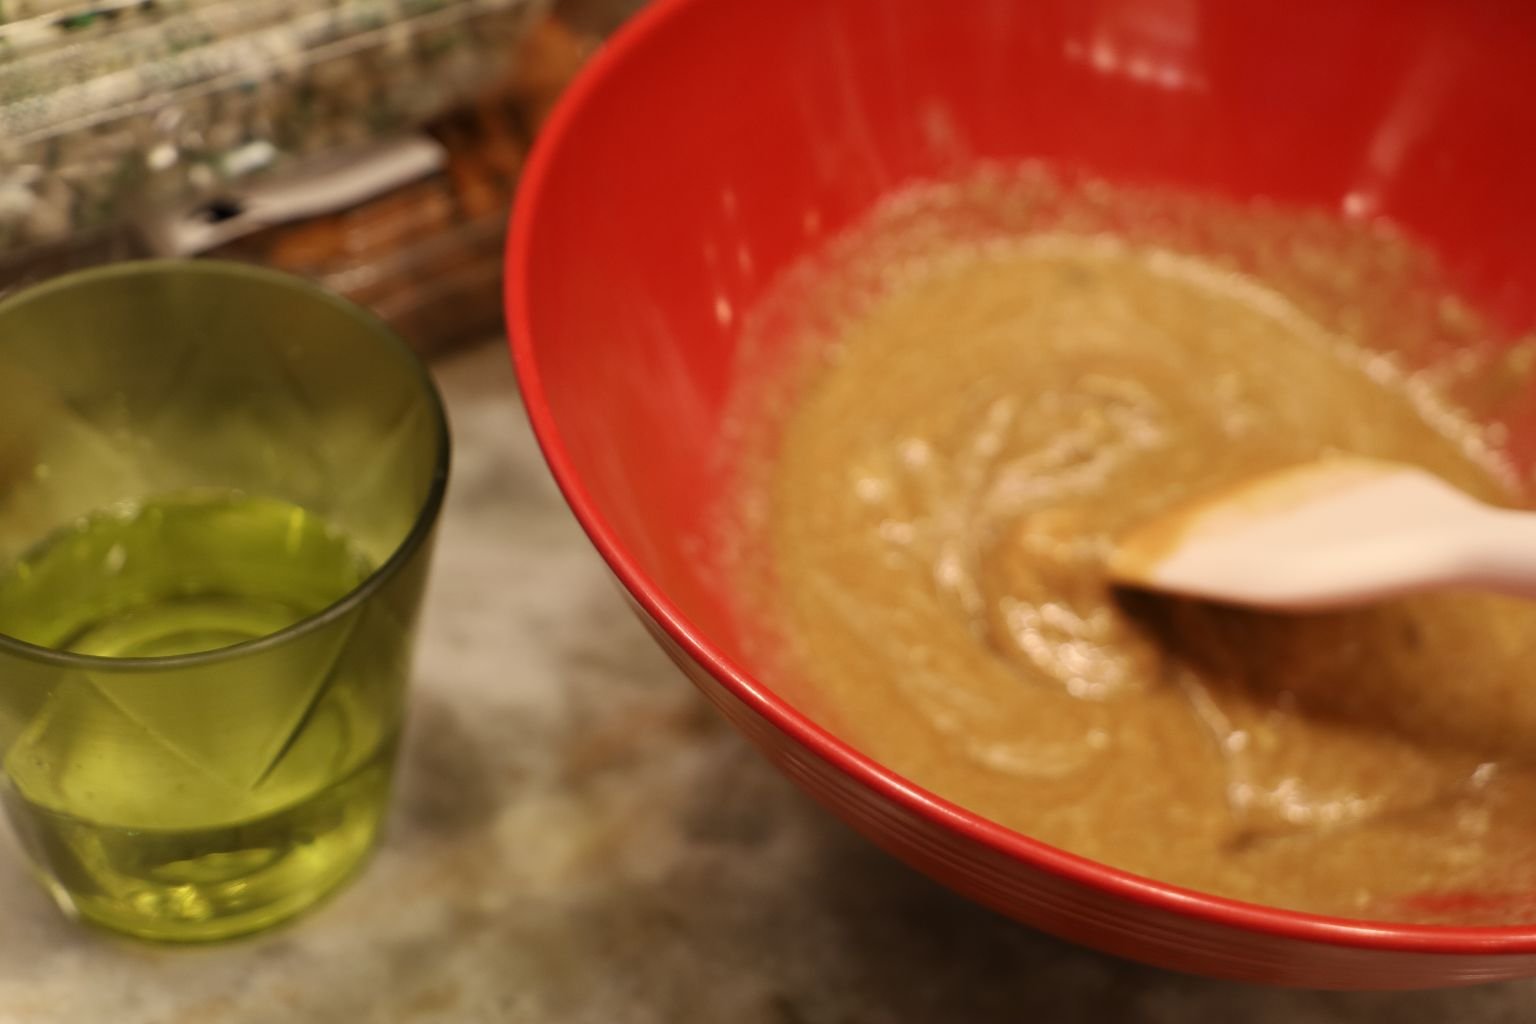
Stirring All The Wet Ingredients Together
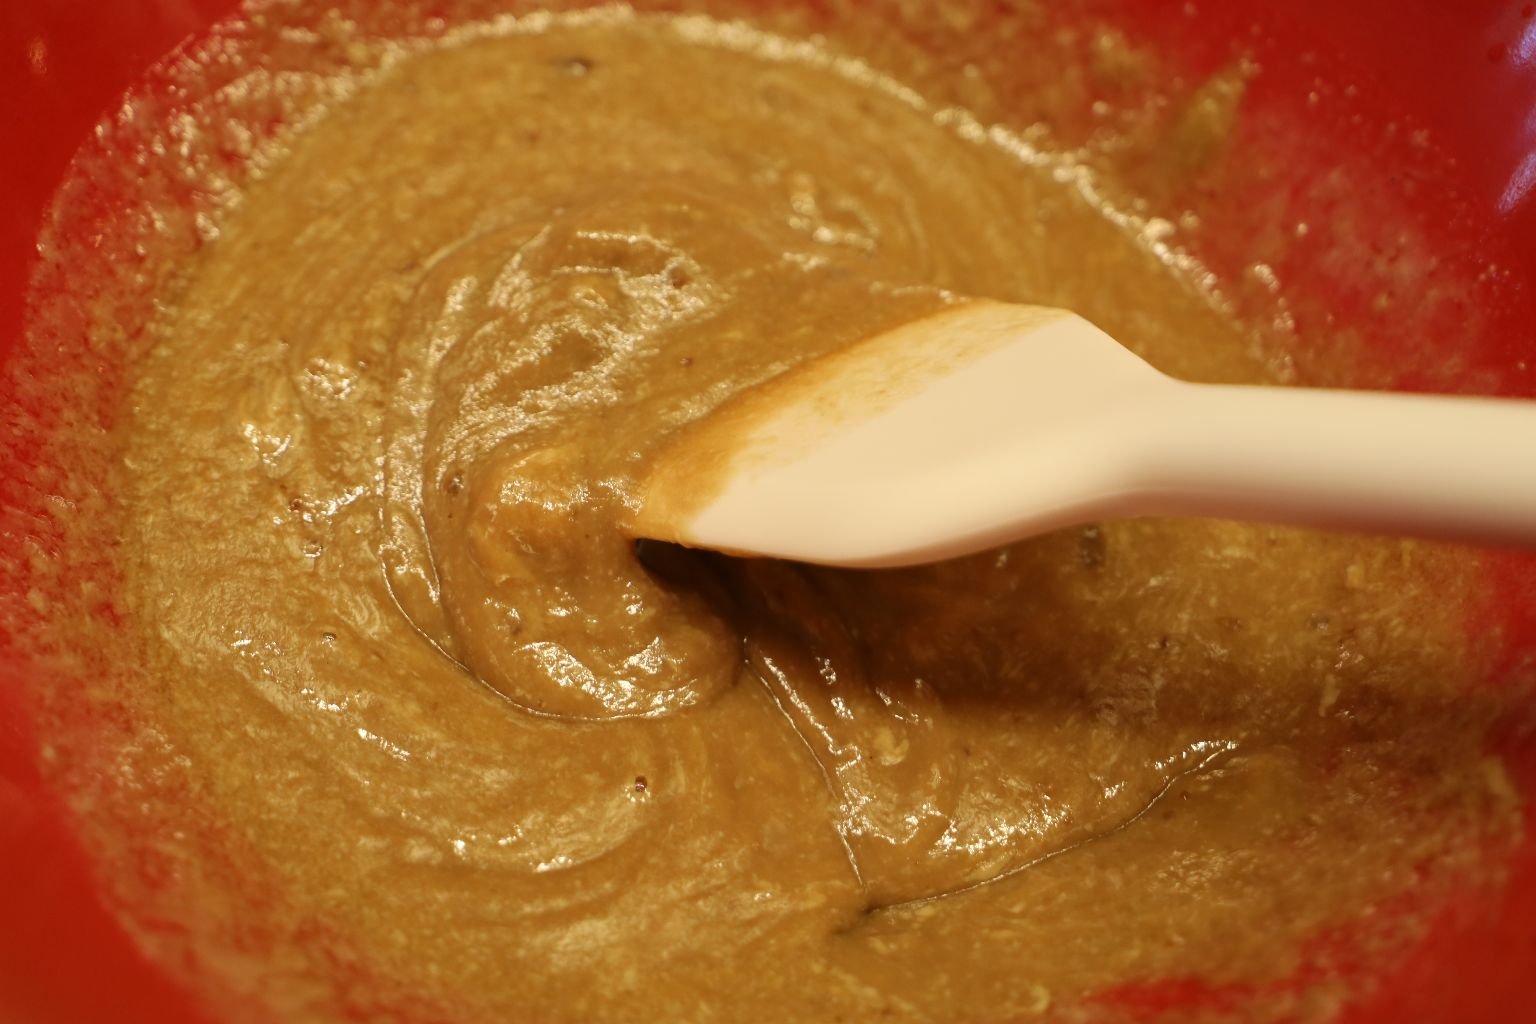

(I wish that I had thinned it out more than I did.)


The Sauce is Still a bit Thick
It was good though!

I was experimenting and adding more of this, and more of that.
However, I do give you the totals that I used in the recipe ingredients listed above.

——————————————————————————————
I Stirred Everything Together
Turn Your Oven on 250F
I decided to bake these along the same lines as I do when I make Chex Party Mix.


Into The Oven
Remove after 15 minutes and then stir together.
Then place the mix back into the oven for another 15 minutes.
Remove and stir together.
Then put it back into the oven for a last 10 – 15 minutes.
Remove and stir together.


Allow To Cool
I’m Cooling The Mix On Parchment Paper
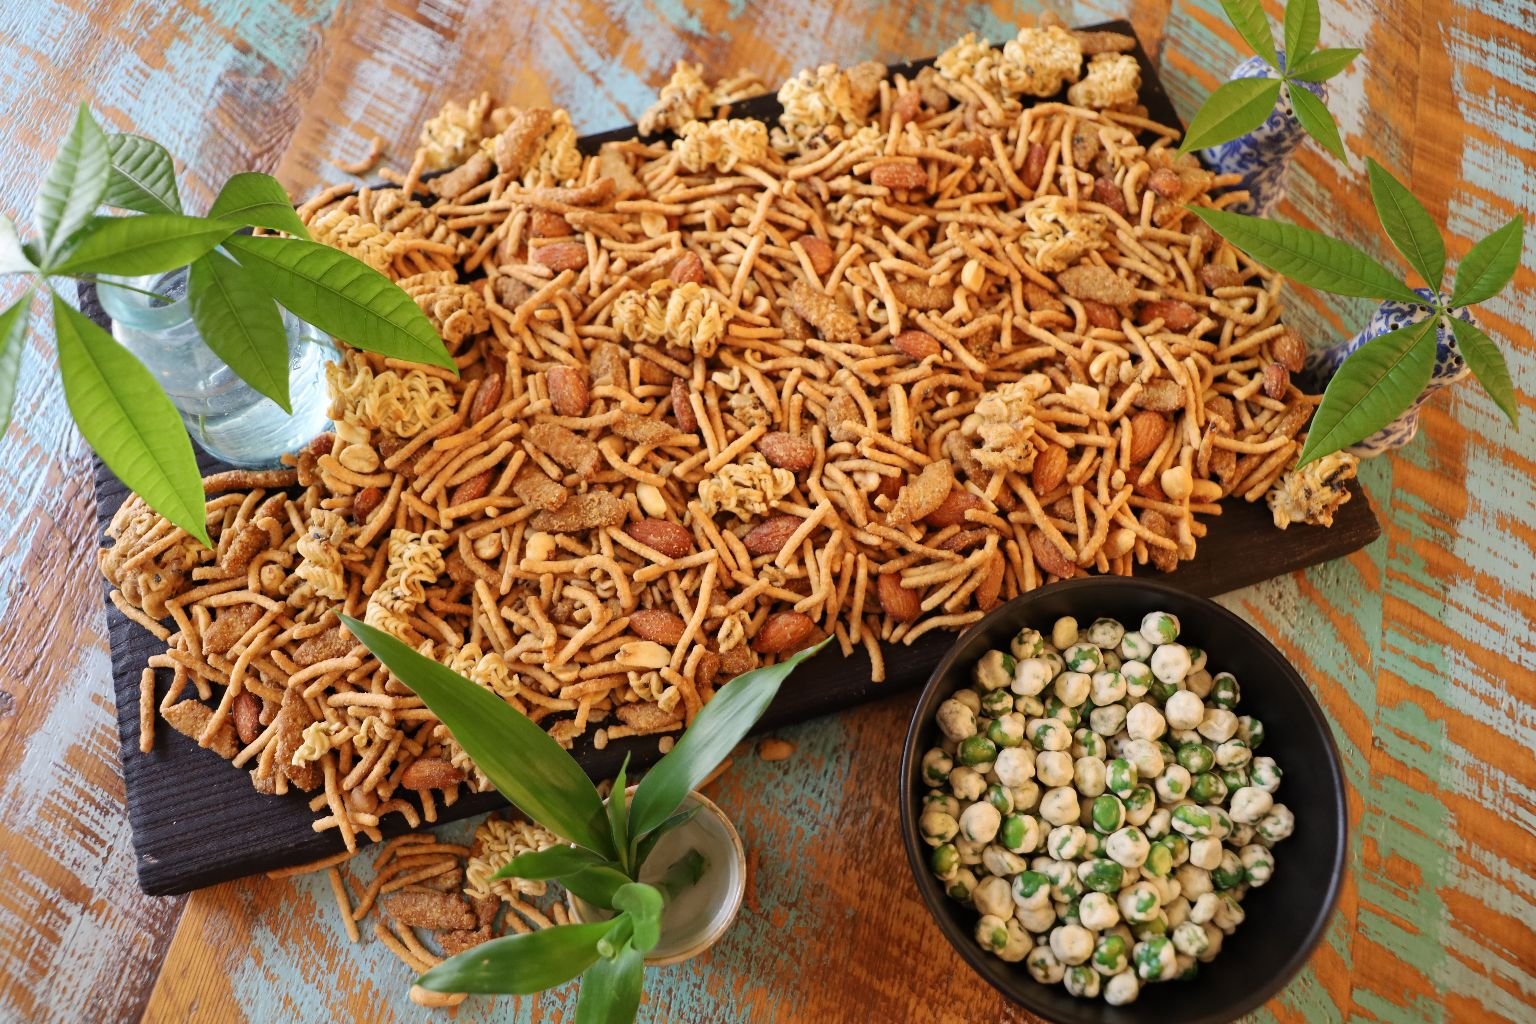
Aloha Snack Mix w/ Wasabi Peas on the Side
————————————————————————————-
If you would like to view our other Asian pages:
Click Here For: Whann Way Asian

AND,
Click Here For: Whann Way Asian, E Ho ‘Omau (Continues)
AND,
Click Here For: Julie Loves Asian

AND,
Click Here For: Asian Edible Gifts

AND,
Edible Gifts of the Asian Variety

(Note: Edible Gifts of the Asian Variety is the same post as Asian Edible Gifts. I have both listed here for accuracy, but one is a Page and the other is considered a Post. Confusing, I know.)
AND,
Click Here For: Our Asian Easter

AND,
Click Here For: Whann Way Sushi

AND,
Click Here For: My Love Affair With All Things Asian

AND,
Click Here For: Asian Steamed Buns: Bao and Manapua
AND,
Click Here For: Our Purple Sweet Potato and Taro Stuffed Steamed Buns and Asian-Pacific Sliders
AND,
Click Here For: Our Asian Inspired 4th. of July

AND,
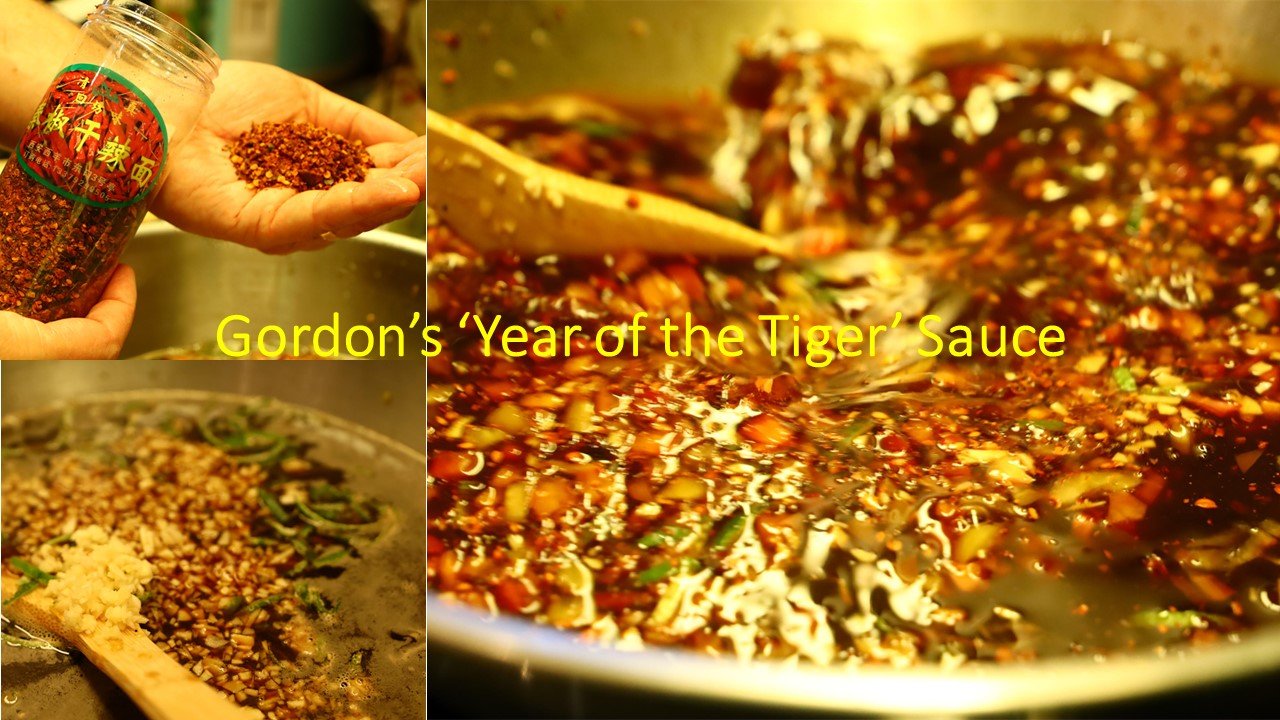
Click Here For: Gordon’s ‘Year of the Tiger’ Sauce and Nam Jim Jaew
AND,
AND,

AND,
Chisana Atsukau (Small Treats in Japanese

AND,

AND,
Japanese Girl’s Day (Hawaii Tradition)

AND,
Asian Eats (More Great Recipes to Enjoy)

AND,
AND,
AND,

AND,

———————————————————-

Welcome to the Enchanted World of our Backyard Fairies Legend has it that a Fairy (Faerie) is a Mythical Being with Magical Powers. They appear in Human Form, and can have a penchant for mischief, and trickery. The Fairy is …

“Izzy, Breakfast! Izzy, Snack! Izzy, Juice! Izzy, Lunch!” Tutu Sometimes breakfast is as quick as fresh Blueberries, String Cheese, Banana Muffin, Celery with Peanut Butter, and Crinkle Cut Carrots ——————————————————— When Isabelle was born and I started becoming her main …


“I don’t promise to forget the mystery, but I know I’ll have a marvelous time“
Nancy Drew

————————————————————————————–

CURRENTLY ON A STAKE OUT, CHECK BACK LATER

Meet Brodie and Mackenzie December 2024 The Proposal Bok Tower Gardens, Lake Wales, Florida Champagne and My (Julie) Former Engagement Ring My Ring Has Never Looked More Beautiful 🙂 Mackenzie and her Twin Sister Susannah ——————————————————— When I first met Mackenzie …

(Note Update April 10, 2025: If this harassment continues, or more damage is done to our property, then I will reveal their names here, and getting the police involved.) “The pen is mightier than the sword.” Edward Bulwer-Lytton ————————————————————————– Write it all …
Coming The Year of the Snake

——————————————————————————-
Kung Hei Fat Choy
(Happy New Year)
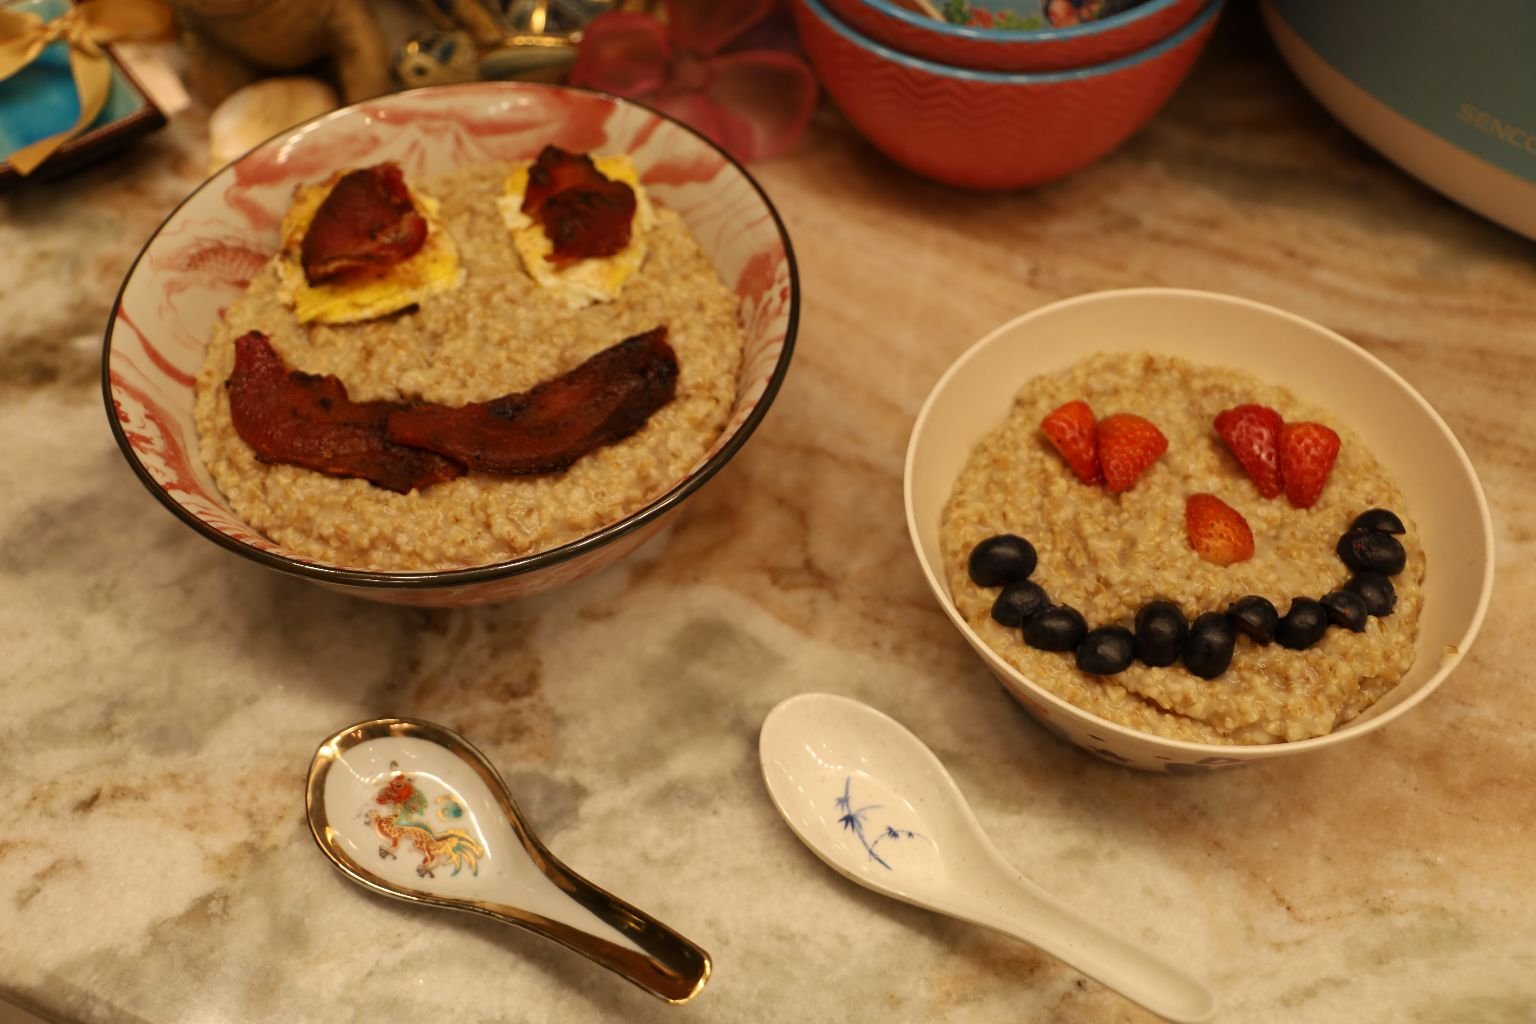
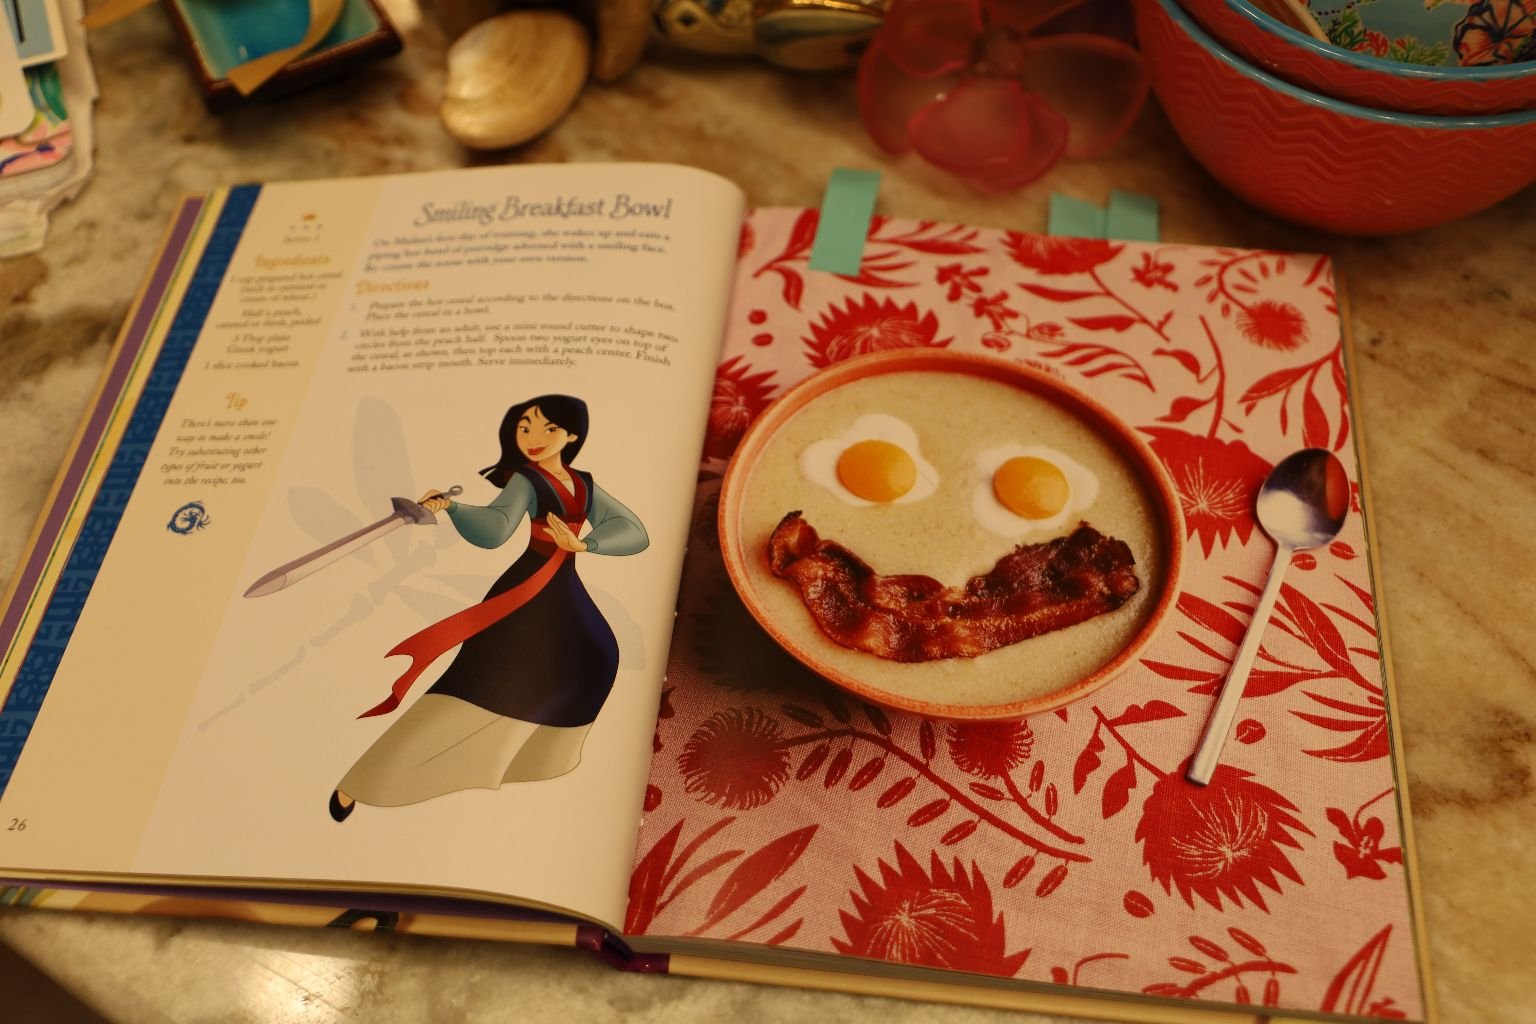
Channeling Mulan For Breakfast
———————————————————————————–

————————————————————————————————–
If you would like to view our other Asian pages:
Click Here For: Whann Way Asian
AND,
Click Here For: Whann Way Asian, E Ho ‘Omau (Continues)
AND,
Click Here For: Julie Loves Asian
AND,
Click Here For: Asian Edible Gifts
AND,
Edible Gifts of the Asian Variety
(Note: Edible Gifts of the Asian Variety is the same post as Asian Edible Gifts. I have both listed here for accuracy, but one is a Page and the other is considered a Post. Confusing, I know.)
AND,
Click Here For: Our Asian Easter
AND,
Click Here For: Whann Way Sushi
AND,
Click Here For: My Love Affair With All Things Asian
AND,
Click Here For: Asian Steamed Buns: Bao and Manapua
AND,
Click Here For: Our Purple Sweet Potato and Taro Stuffed Steamed Buns and Asian-Pacific Sliders
AND,
Click Here For: Our Asian Inspired 4th. of July
AND,
Click Here For: Gordon’s ‘Year of the Tiger’ Sauce and Nam Jim Jaew
AND,
AND,
AND,
Chisana Atsukau (Small Treats in Japanese
AND,
AND,
Japanese Girl’s Day (Hawaii Tradition)
AND,
Asian Eats (More Great Recipes to Enjoy)
AND,
AND,
AND,
AND,
———————————————————-

Dear Dairy… Olive Films (I just liked the logo.) Today I rearranged the cans in the pantry and dusted them off while wearing my new full skirt I sewed last week for the church picnic, and the pearls that my husband …
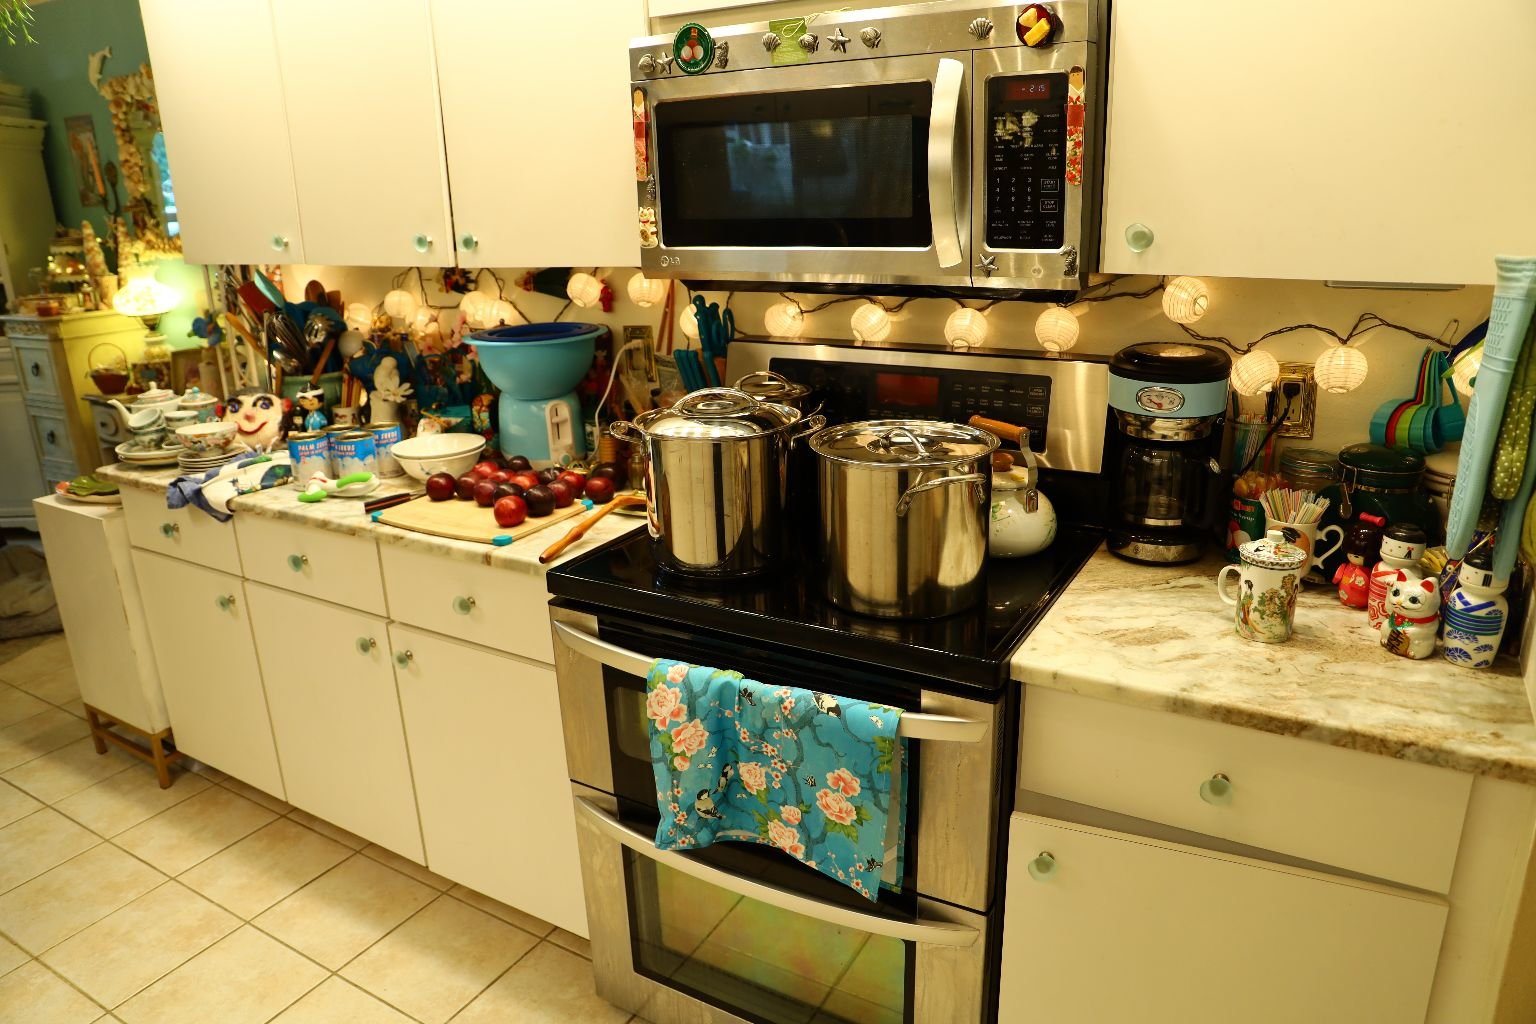
Julie In The Kitchen Aloha In Florida (As Always) You can take the family out of Hawaii, but you can’t take the Hawaii out of the family. 🙂 Gordon Making Our Macadamia Nut Mahi-Mahi on Asian Sesame Hash Brown Patties, with …
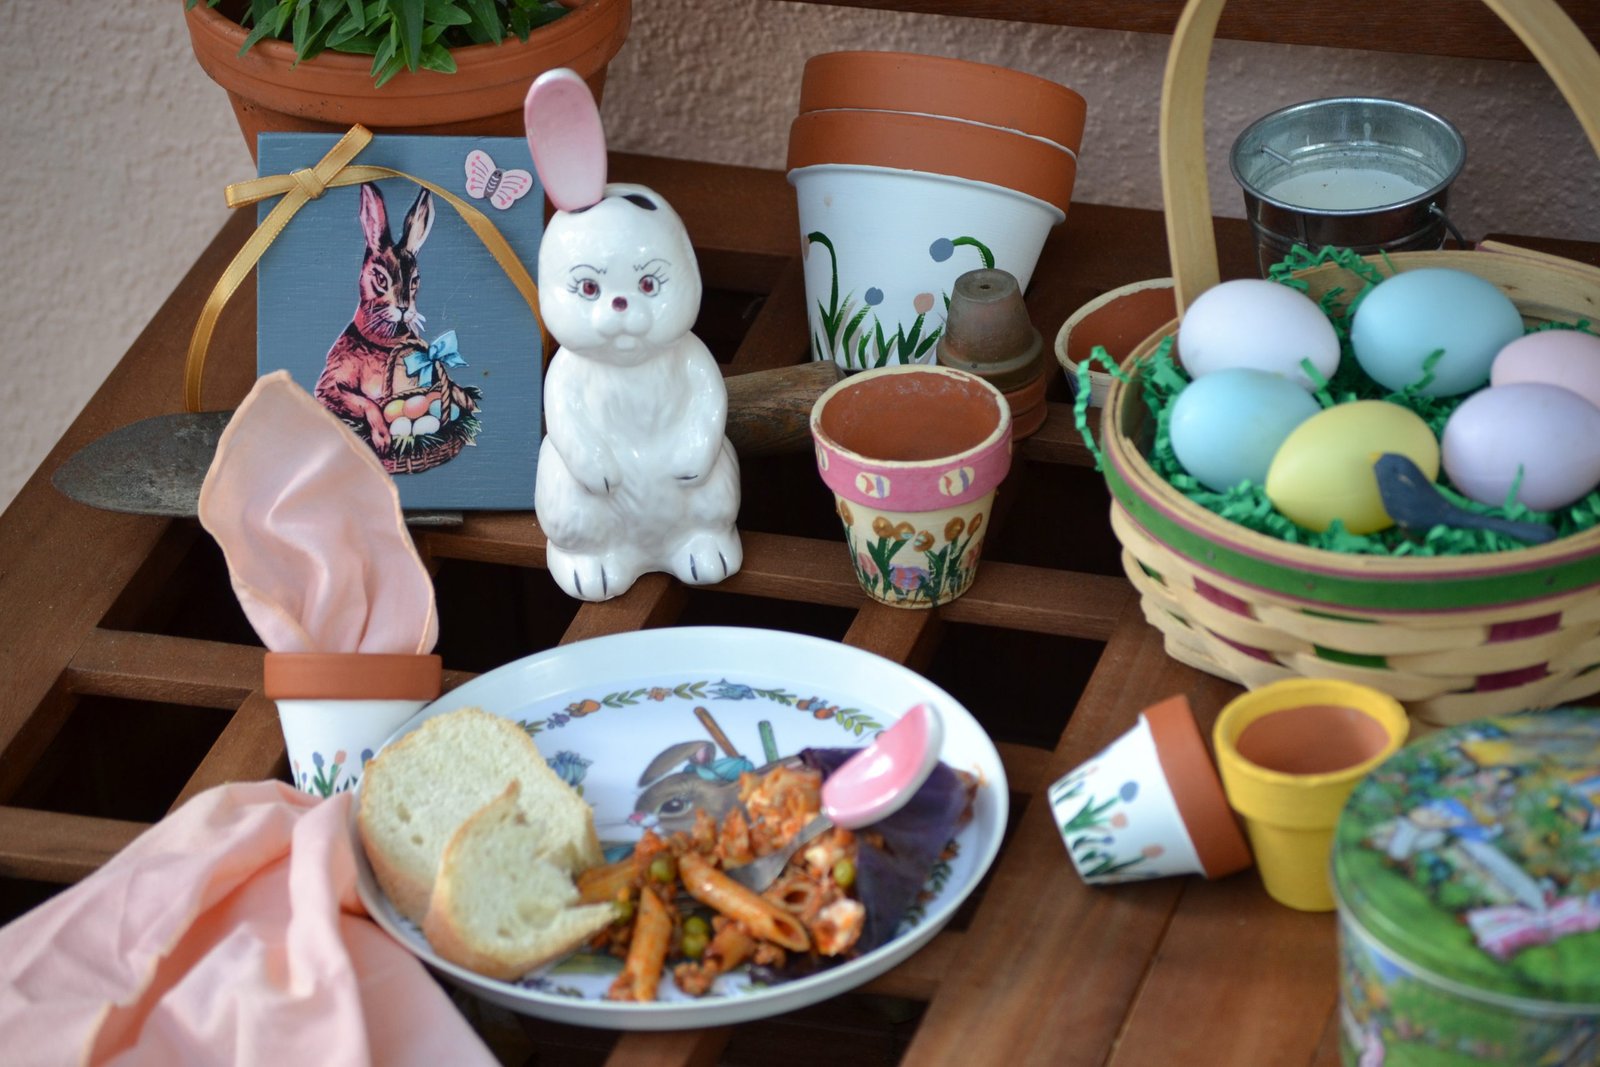
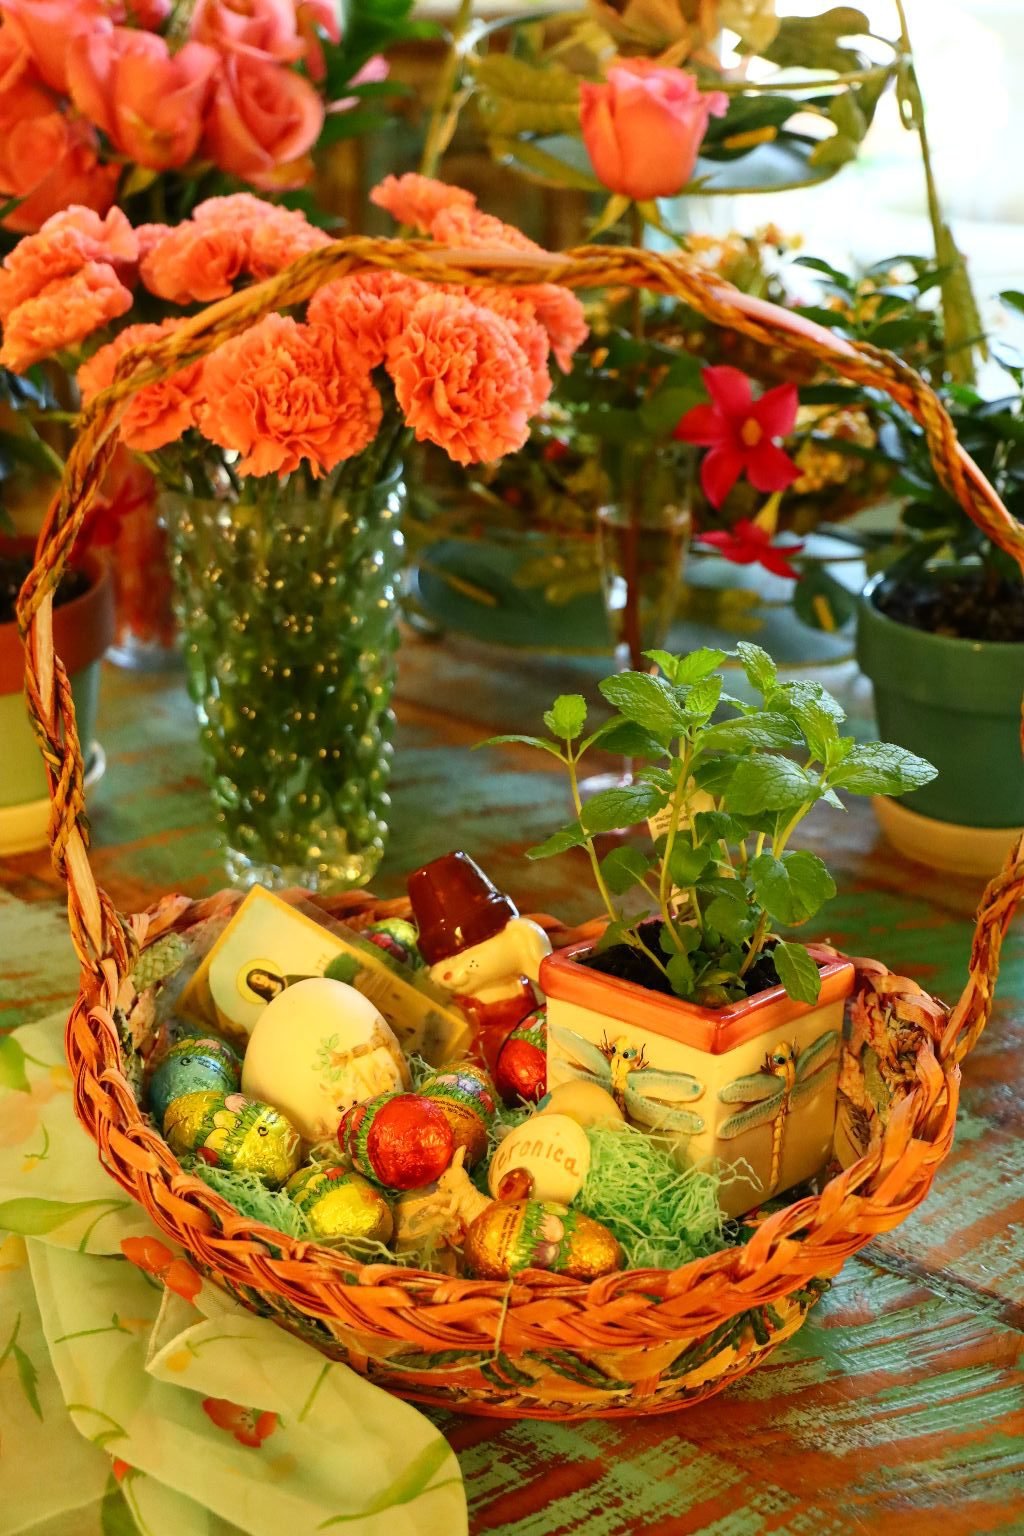
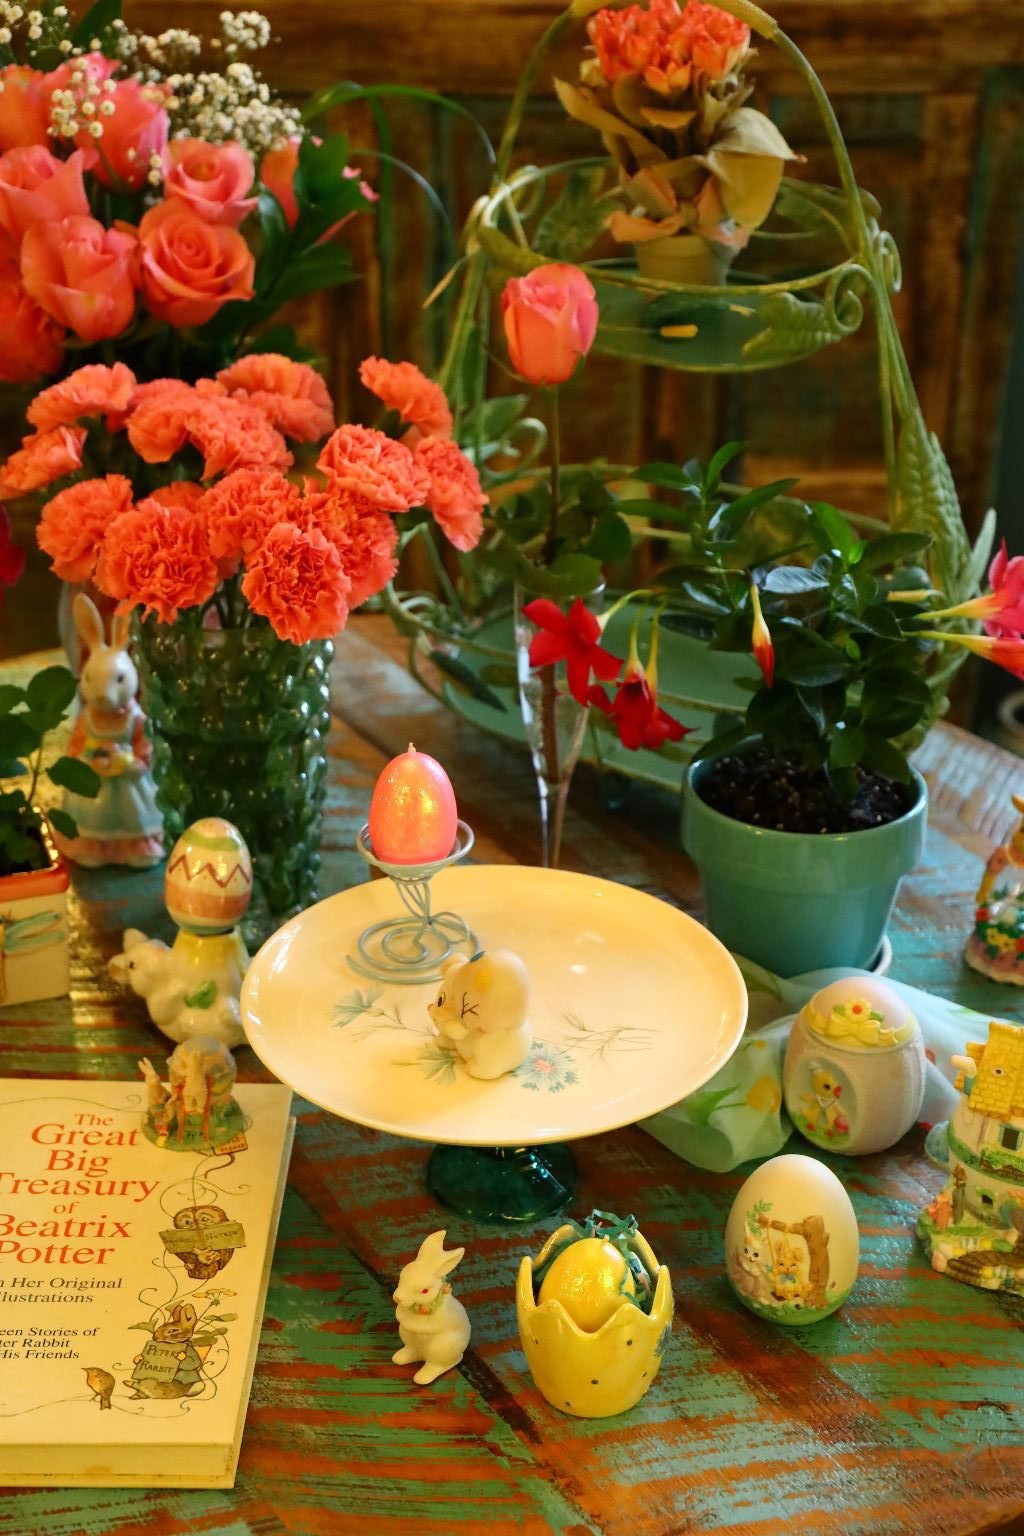
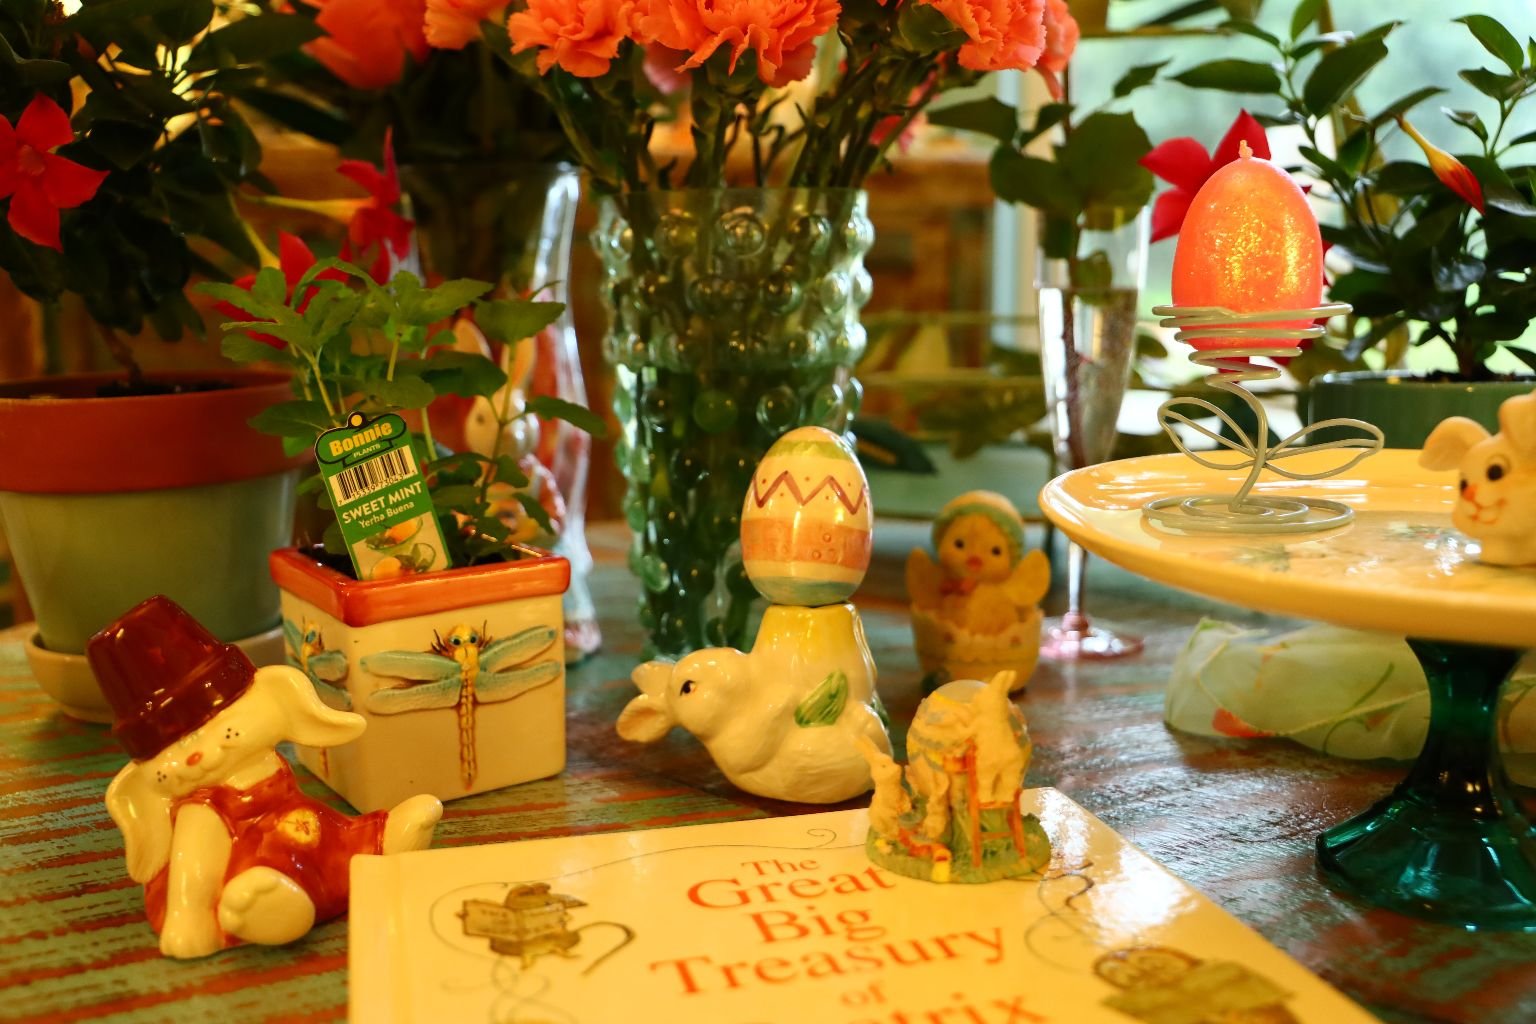
Creating Easter….

Creating Easter is just that. No matter how big, or small. Some Easter’s we have gone all out with an abundance of food and decor. And other’s were quite small and humble. It all seems to rely on how busy we are, how much time we have, if anyone is coming or not, and even, if we just feel like it.
This Easter, Gordon is working overseas and I am here at home by myself. I really didn’t feel like going all out. I just wanted to do a few simple and special things. That’s all.
In the future there may be more elaborate projects here, but for now this is what I have done.
Happy Easter to those who celebrate,
Julie
——————————————————————————-
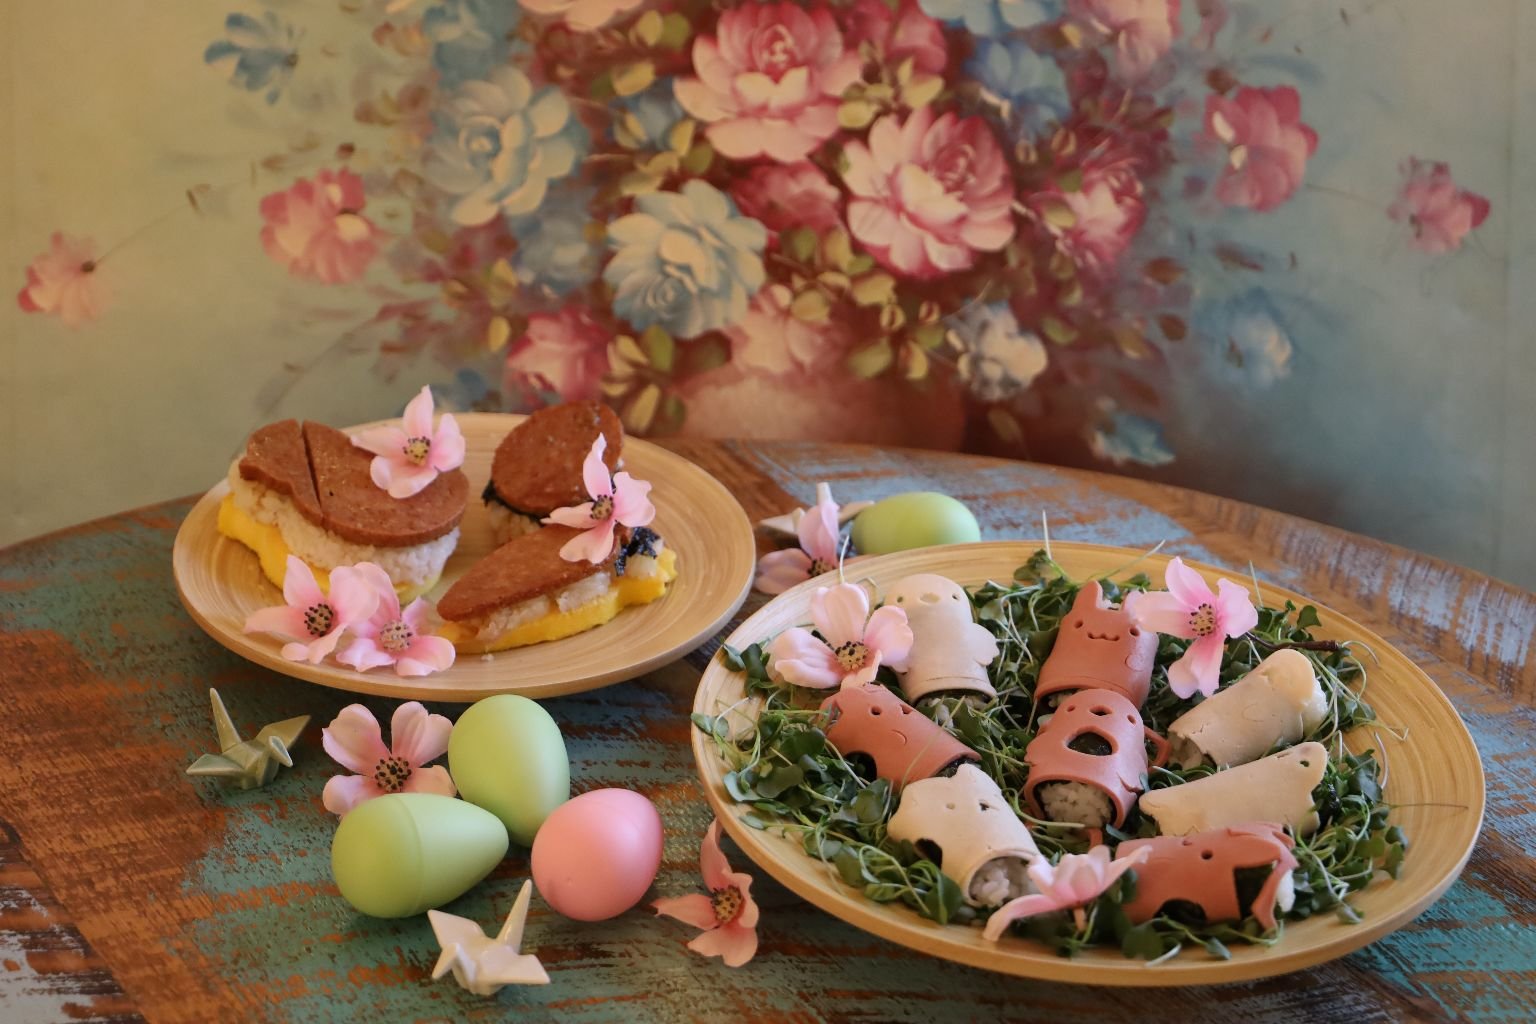
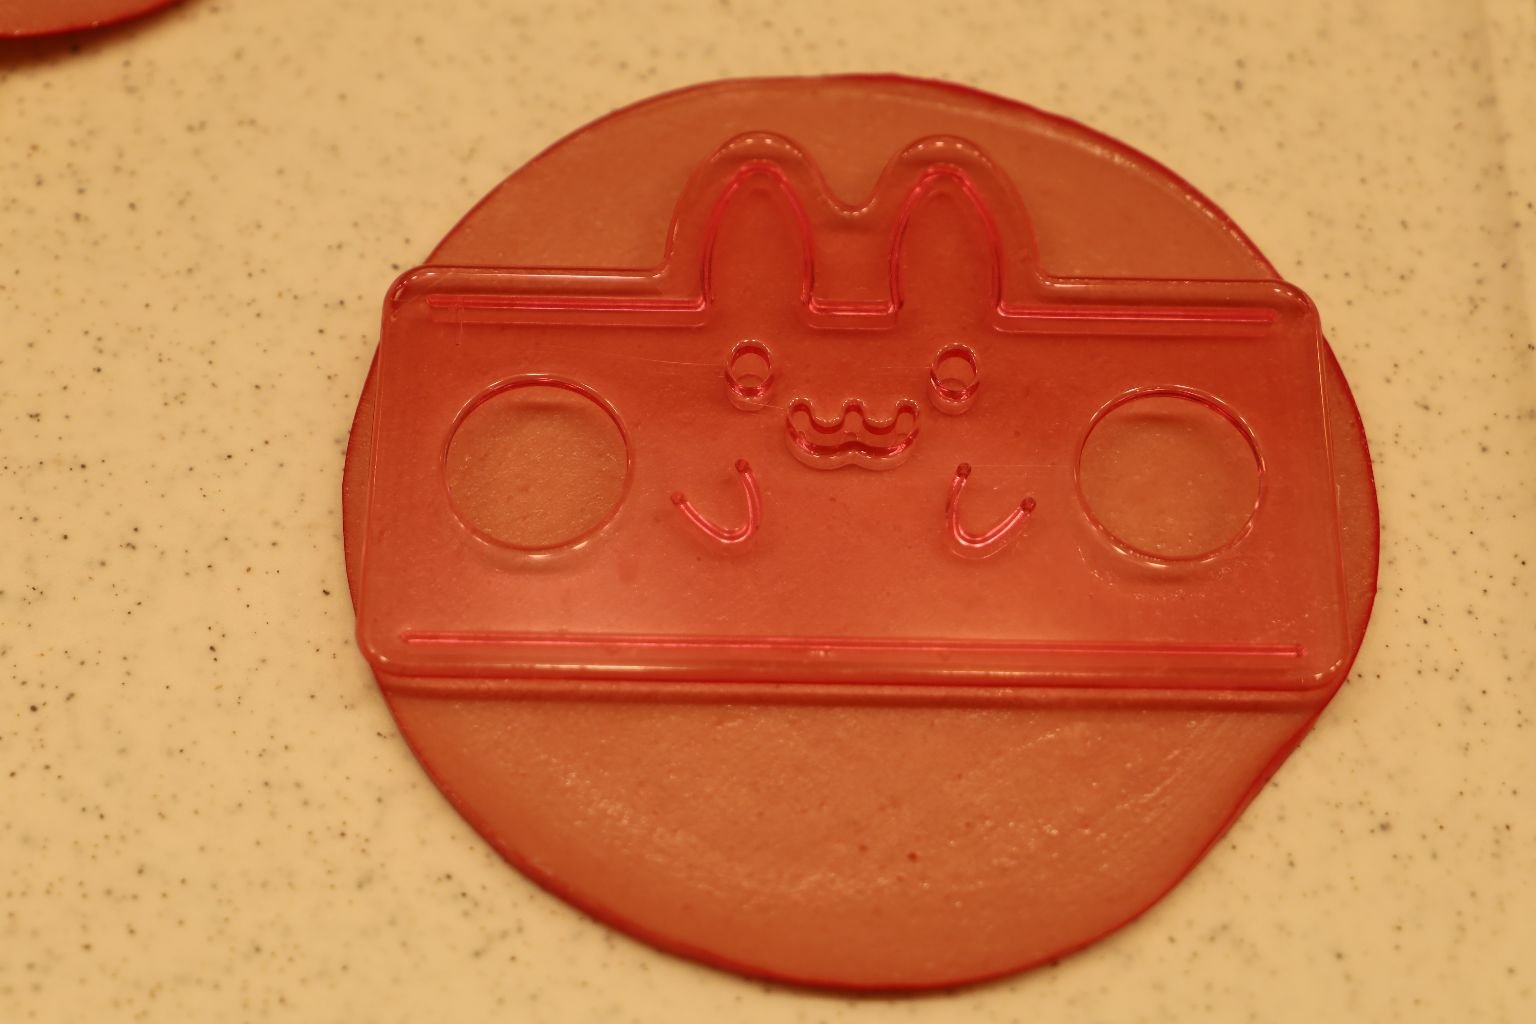
This is my Version of Creating Easter
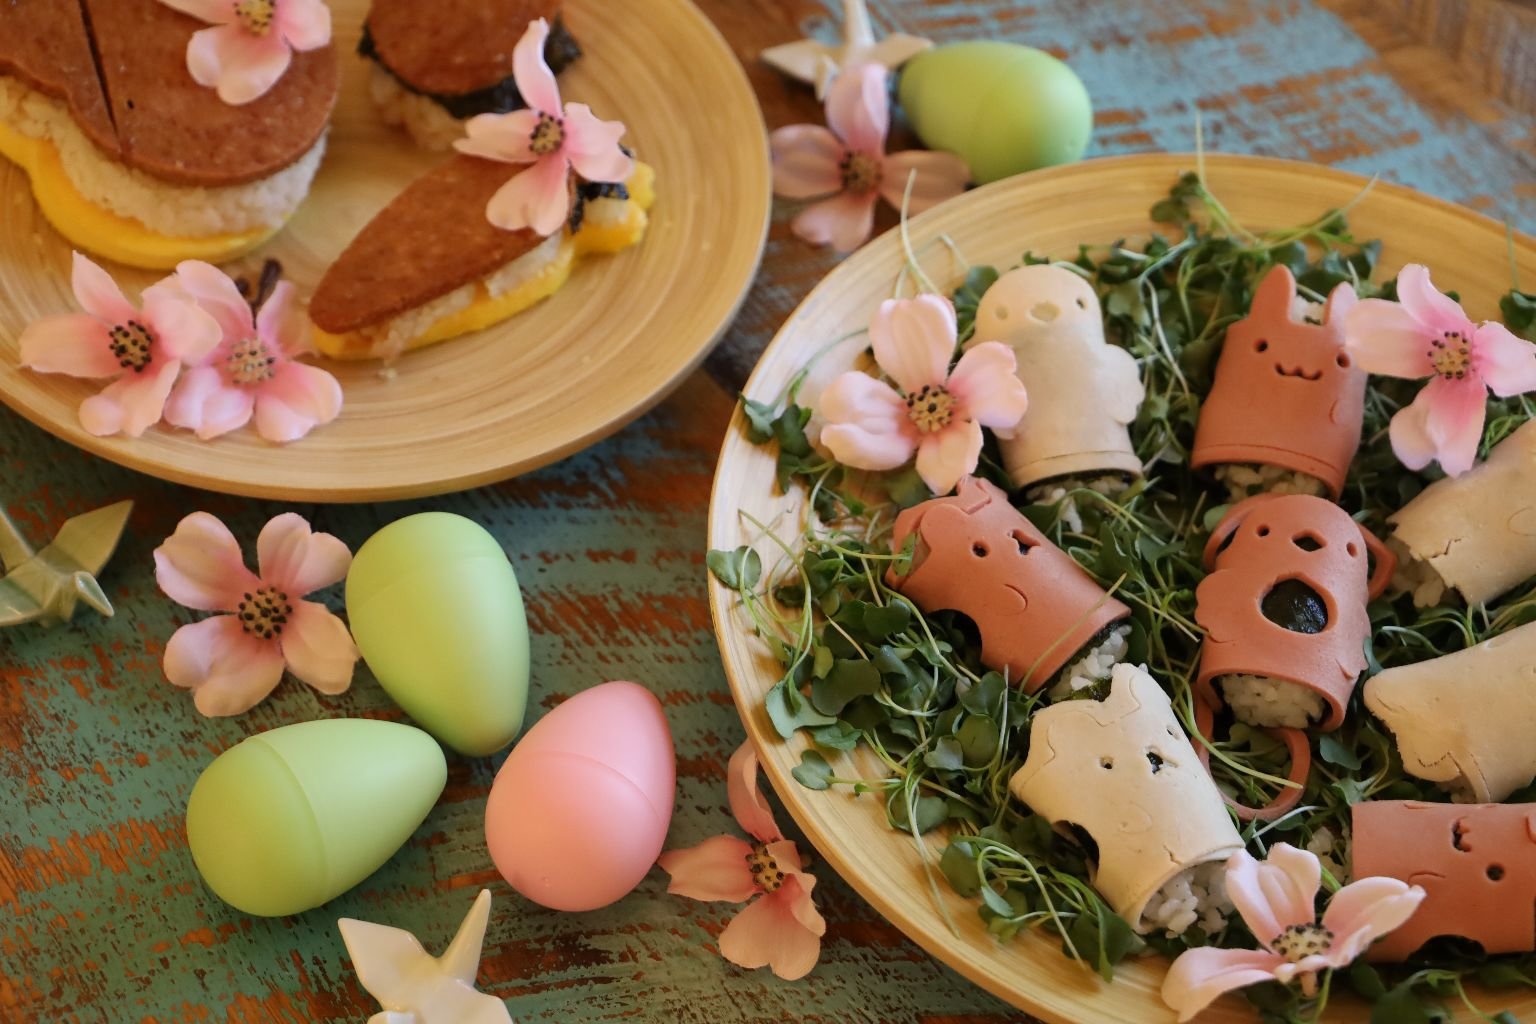
I Made These Beautiful Easter Treats Using the Molds From the Asian Supermarket
(Recipe Down Below)
——————————————————————————–
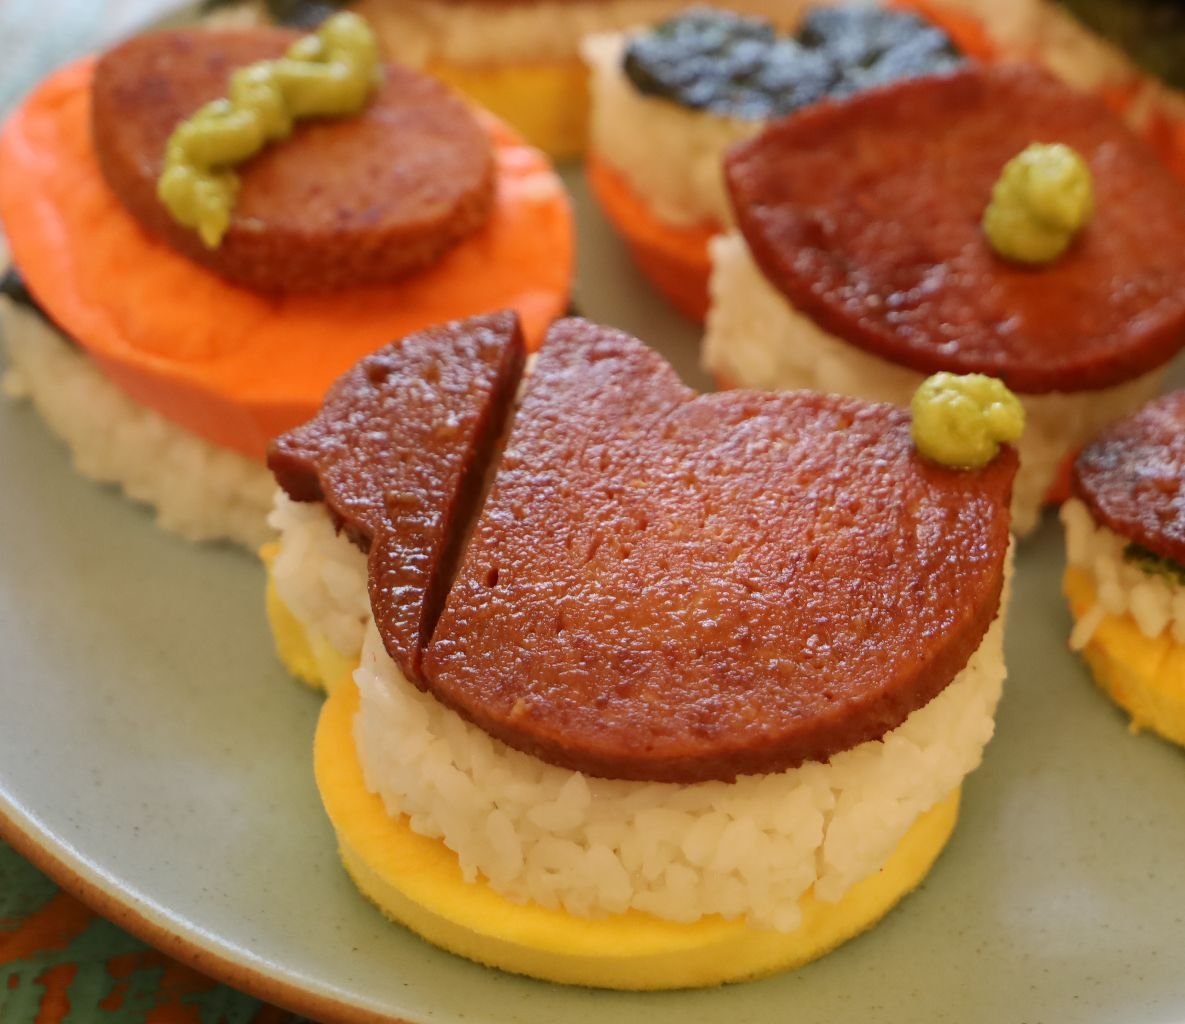
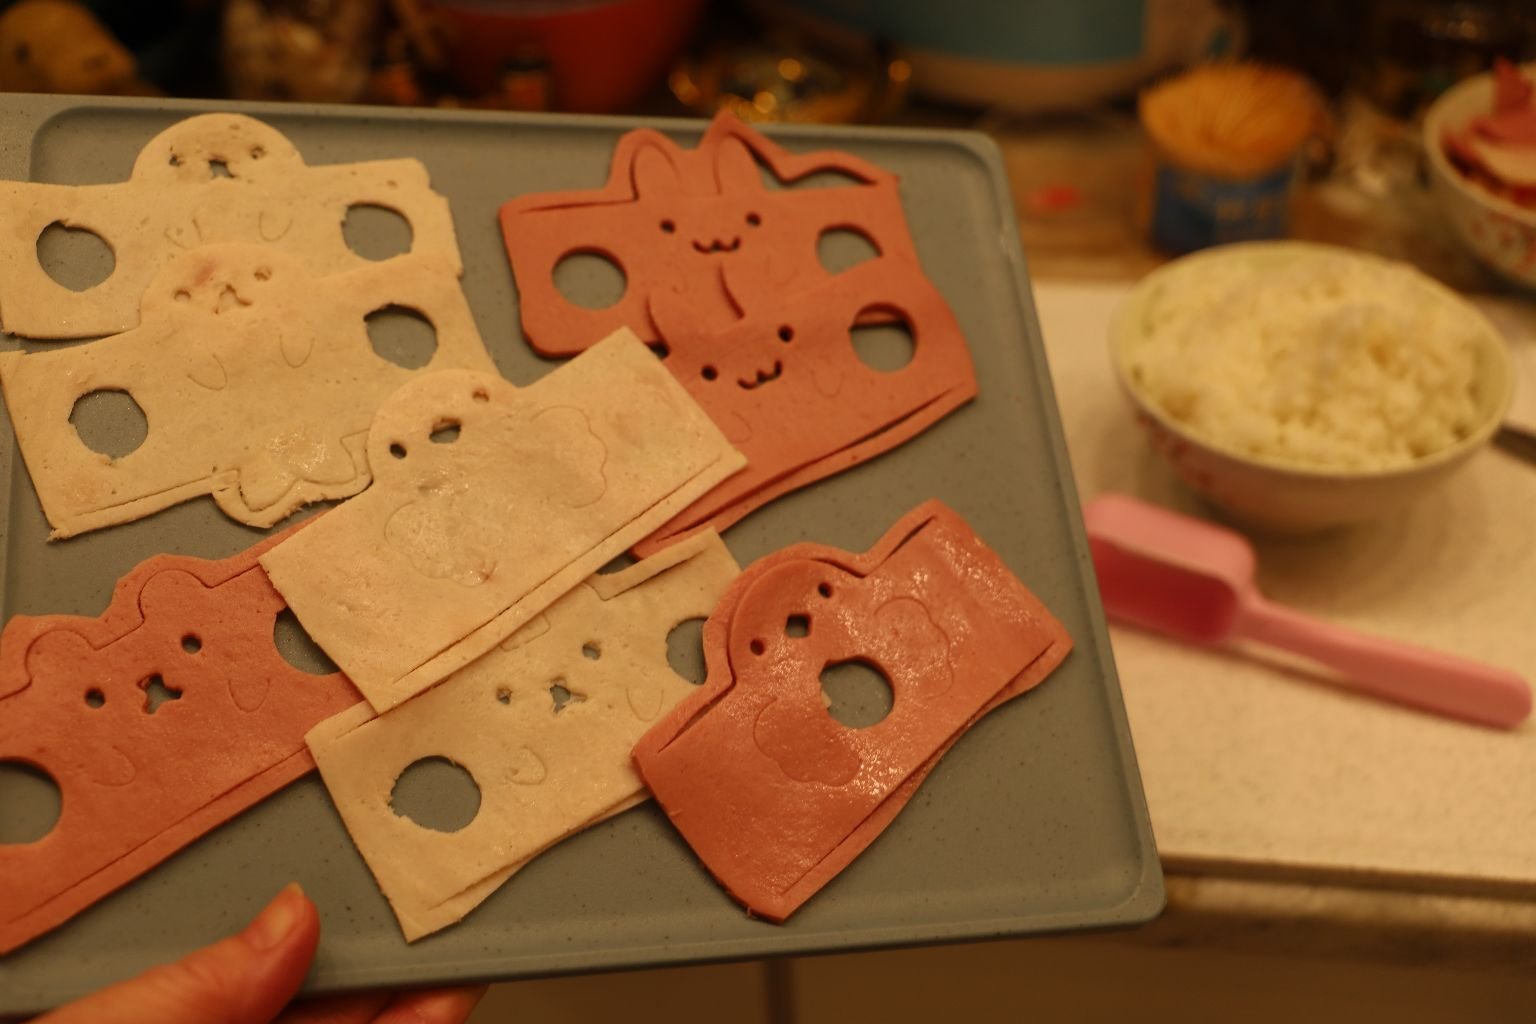
My Royal Egg/Sticky Rice/Teriyaki SPAM Treats
(Recipe Down Below)
——————————————————————————————
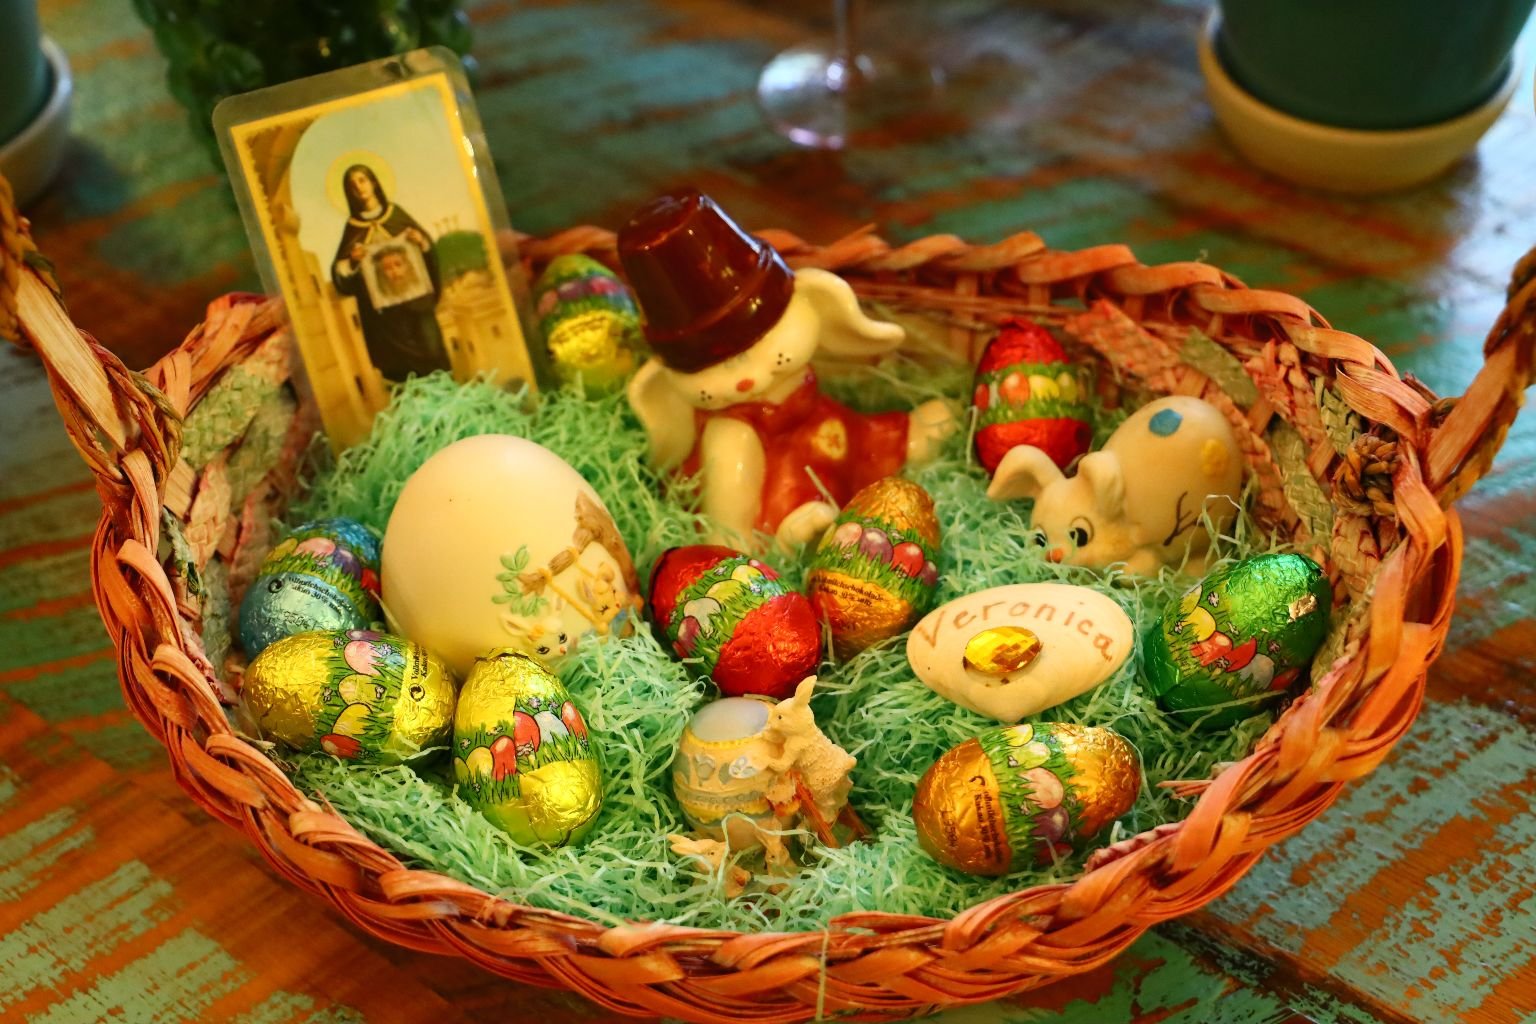
Starting with creating an Easter Basket for our Grand-Daughter, Peanuku
The Finished Easter Basket
—————————————————————————–
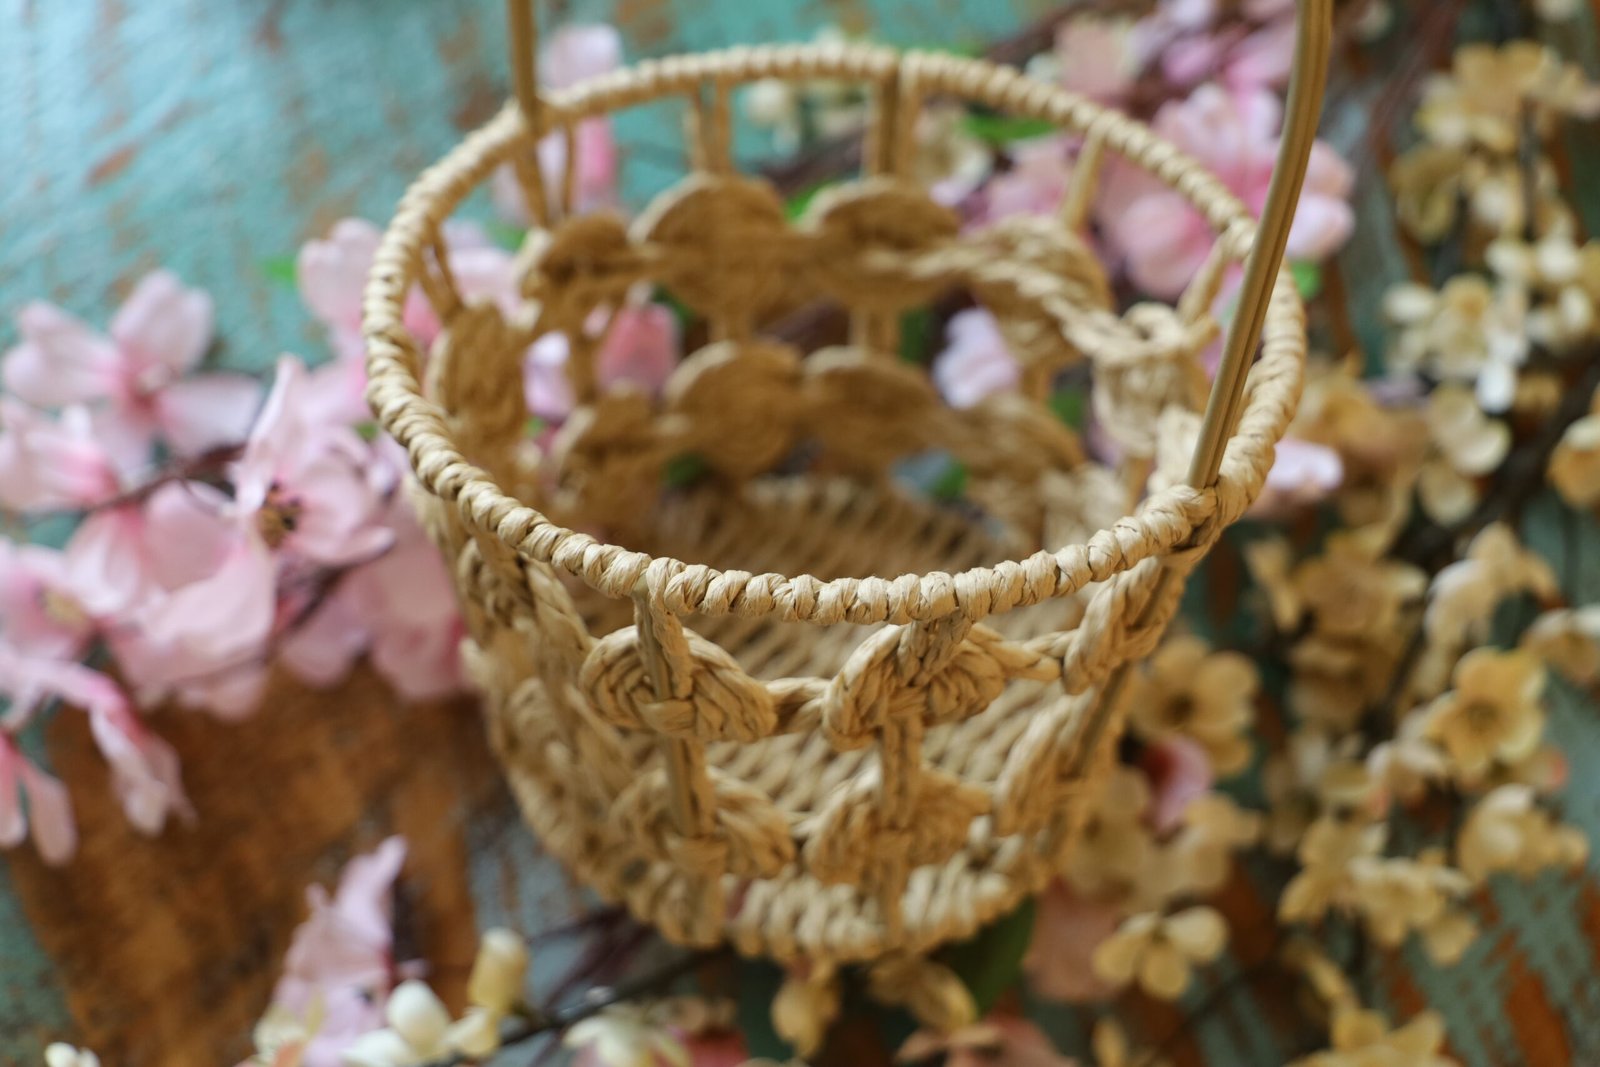
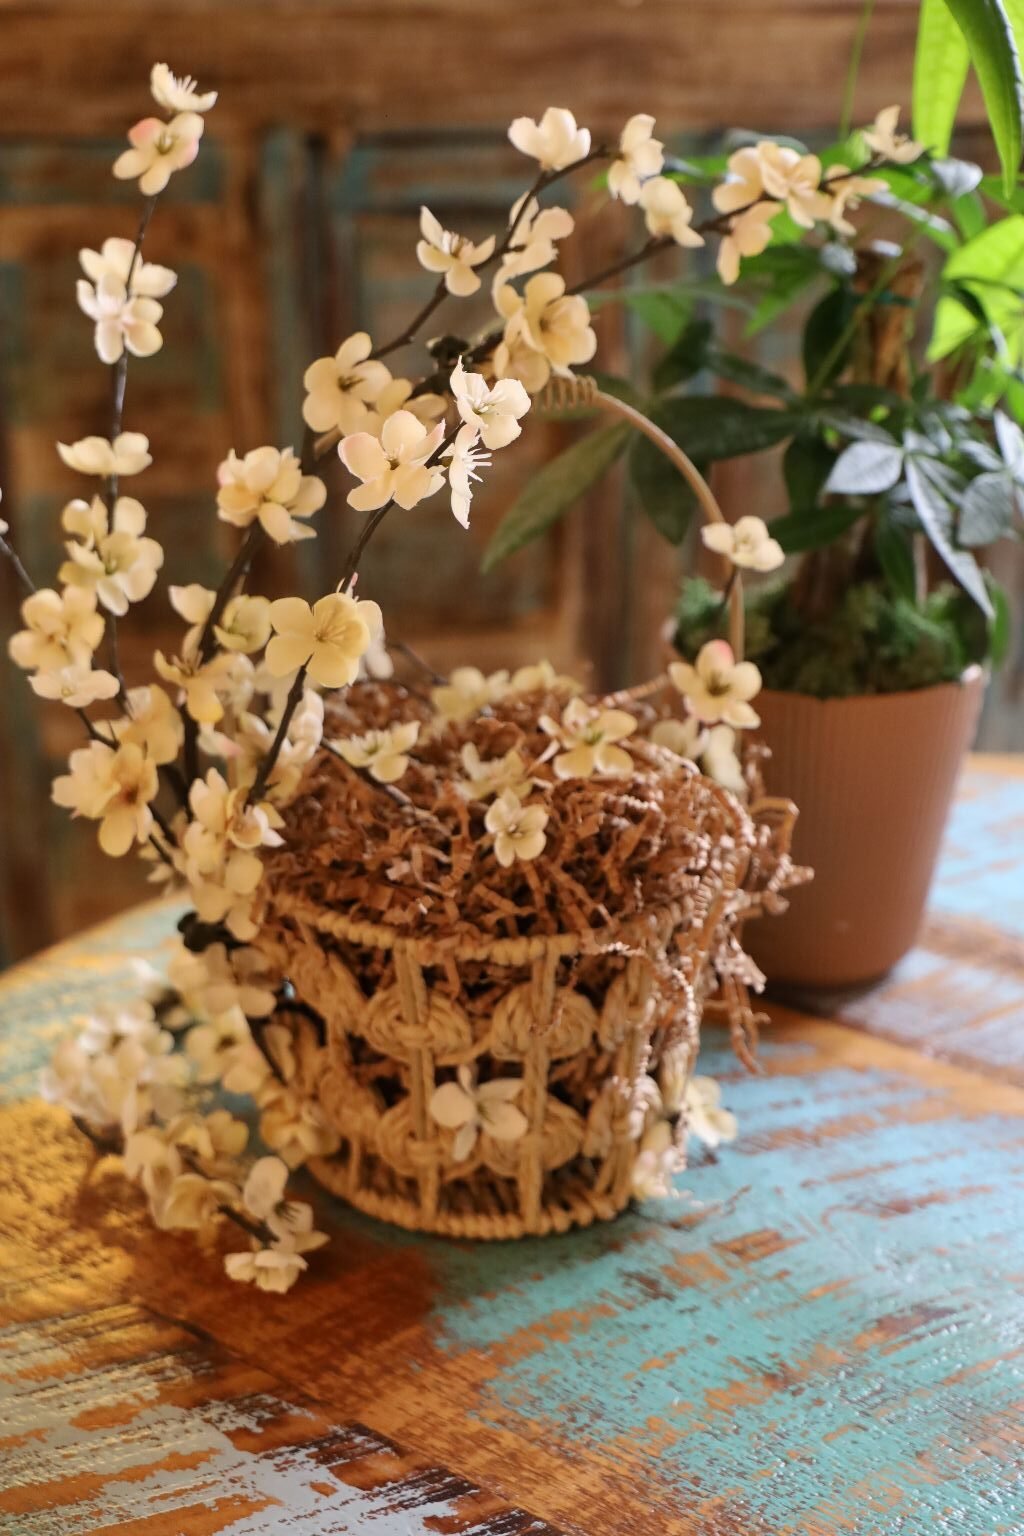
My Easter Crafty Table
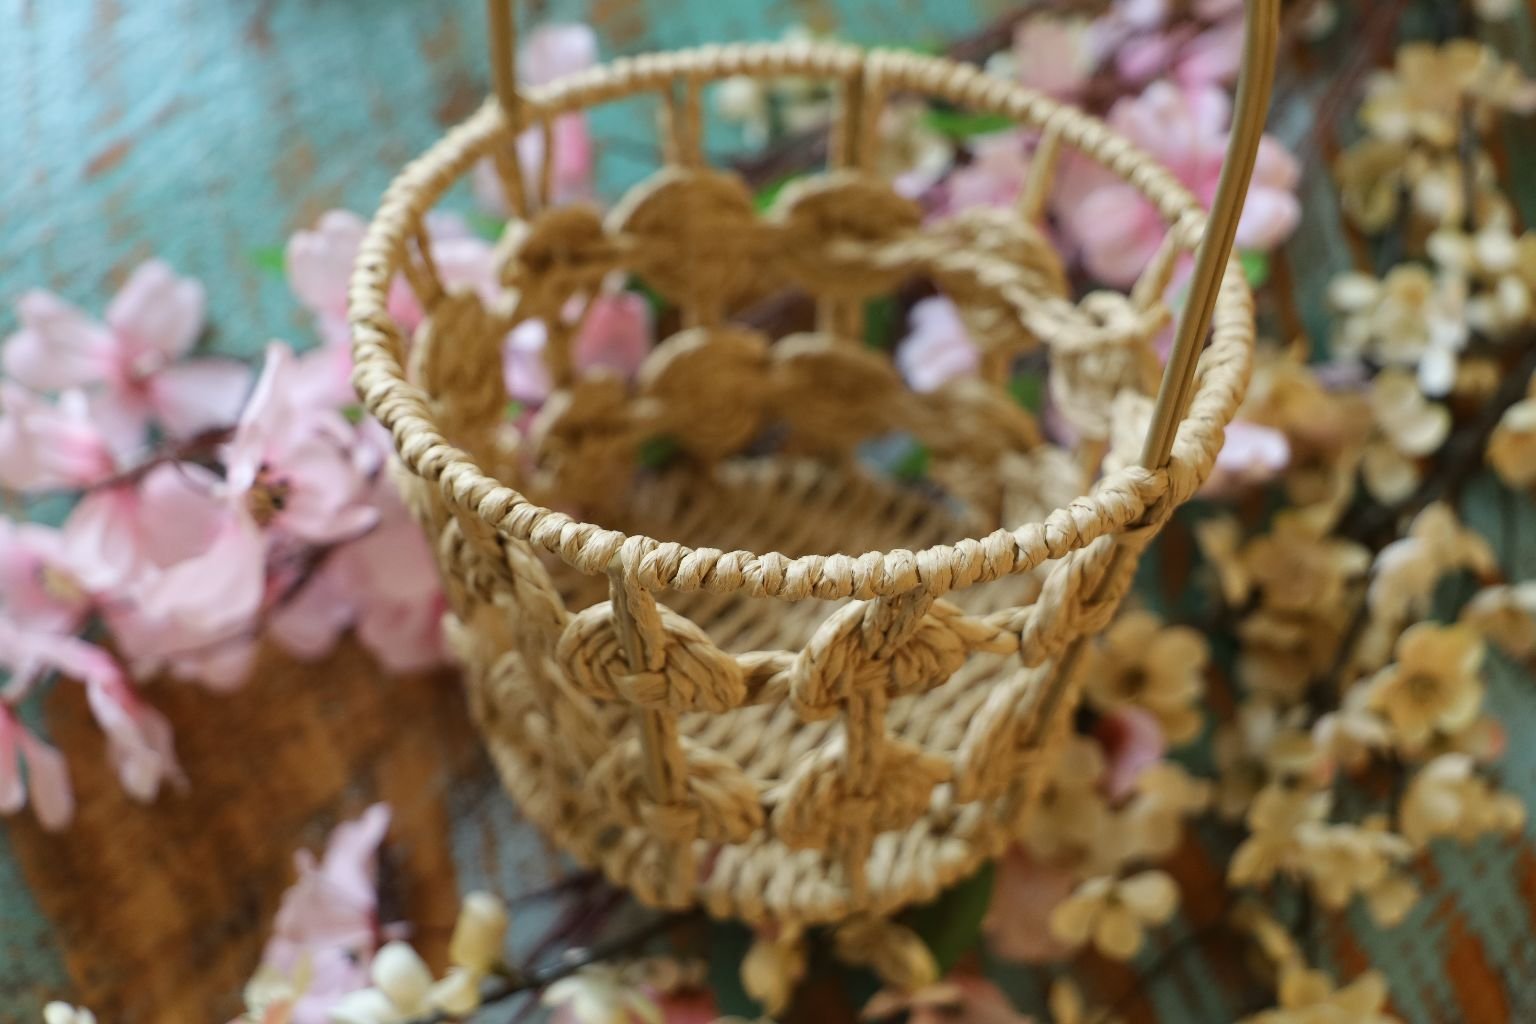
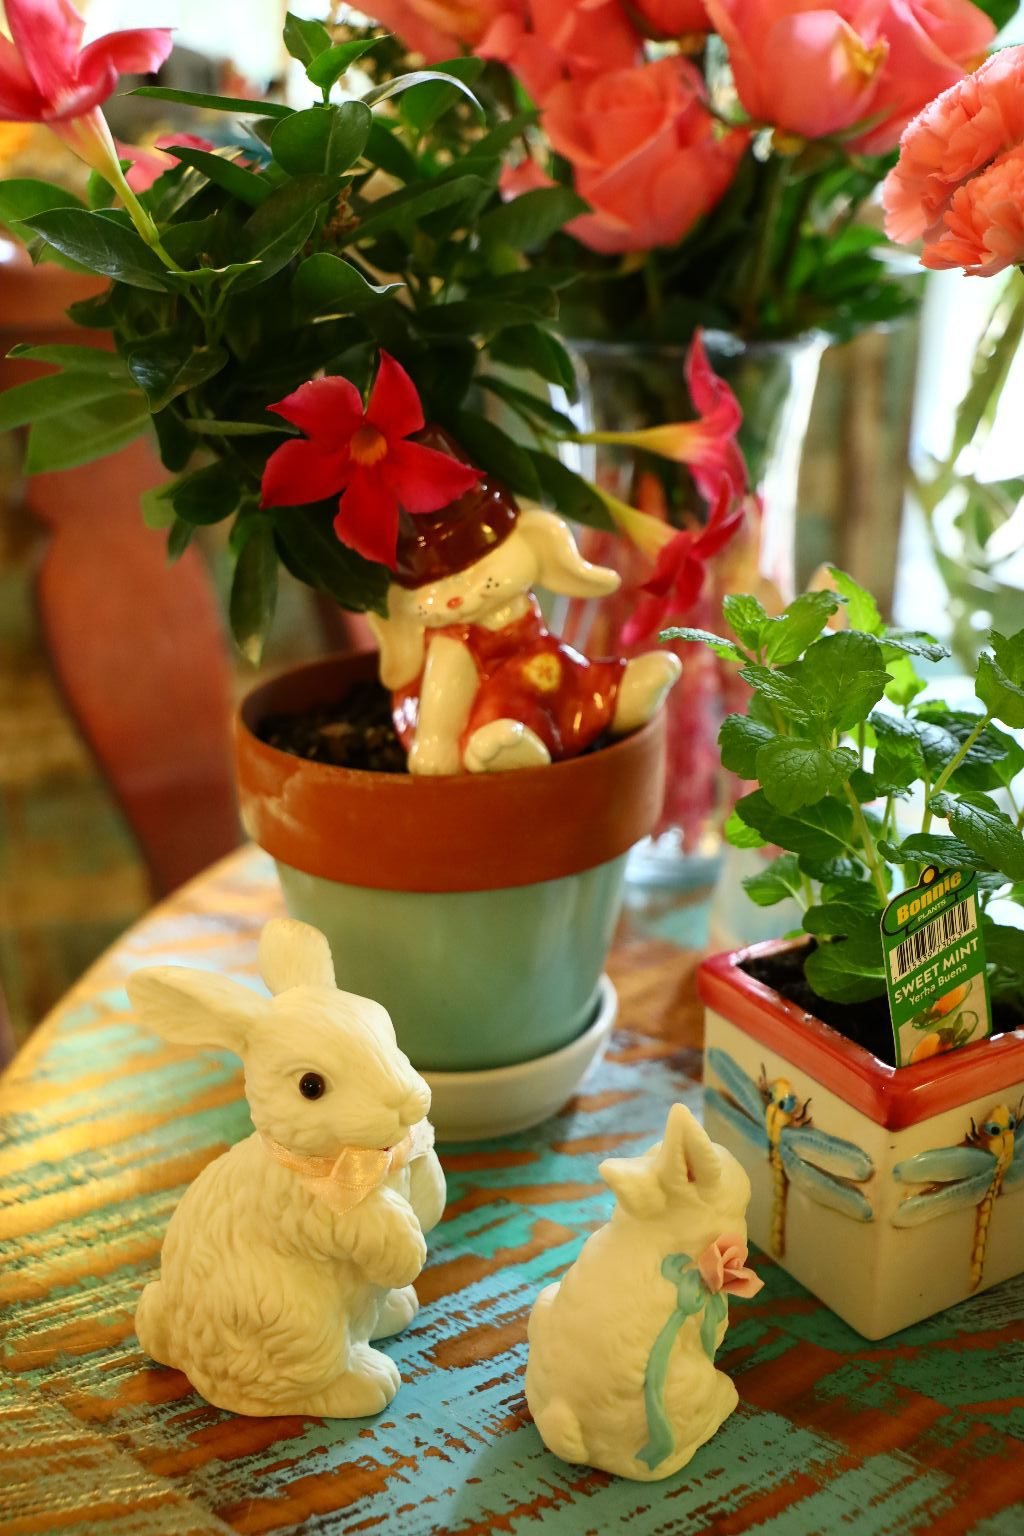
I purchased this basket at a local grocery store. I already had the artificial Cherry Blossoms.

I was originally going to hot glue these flowers onto this basket. However, I realized that all I needed were twist ties to adhere the stems of the flowers to the baskets, and some of these orchid clips that I had saved from past plants to clip the branch flowers onto the basket itself.
———————————————————————————–

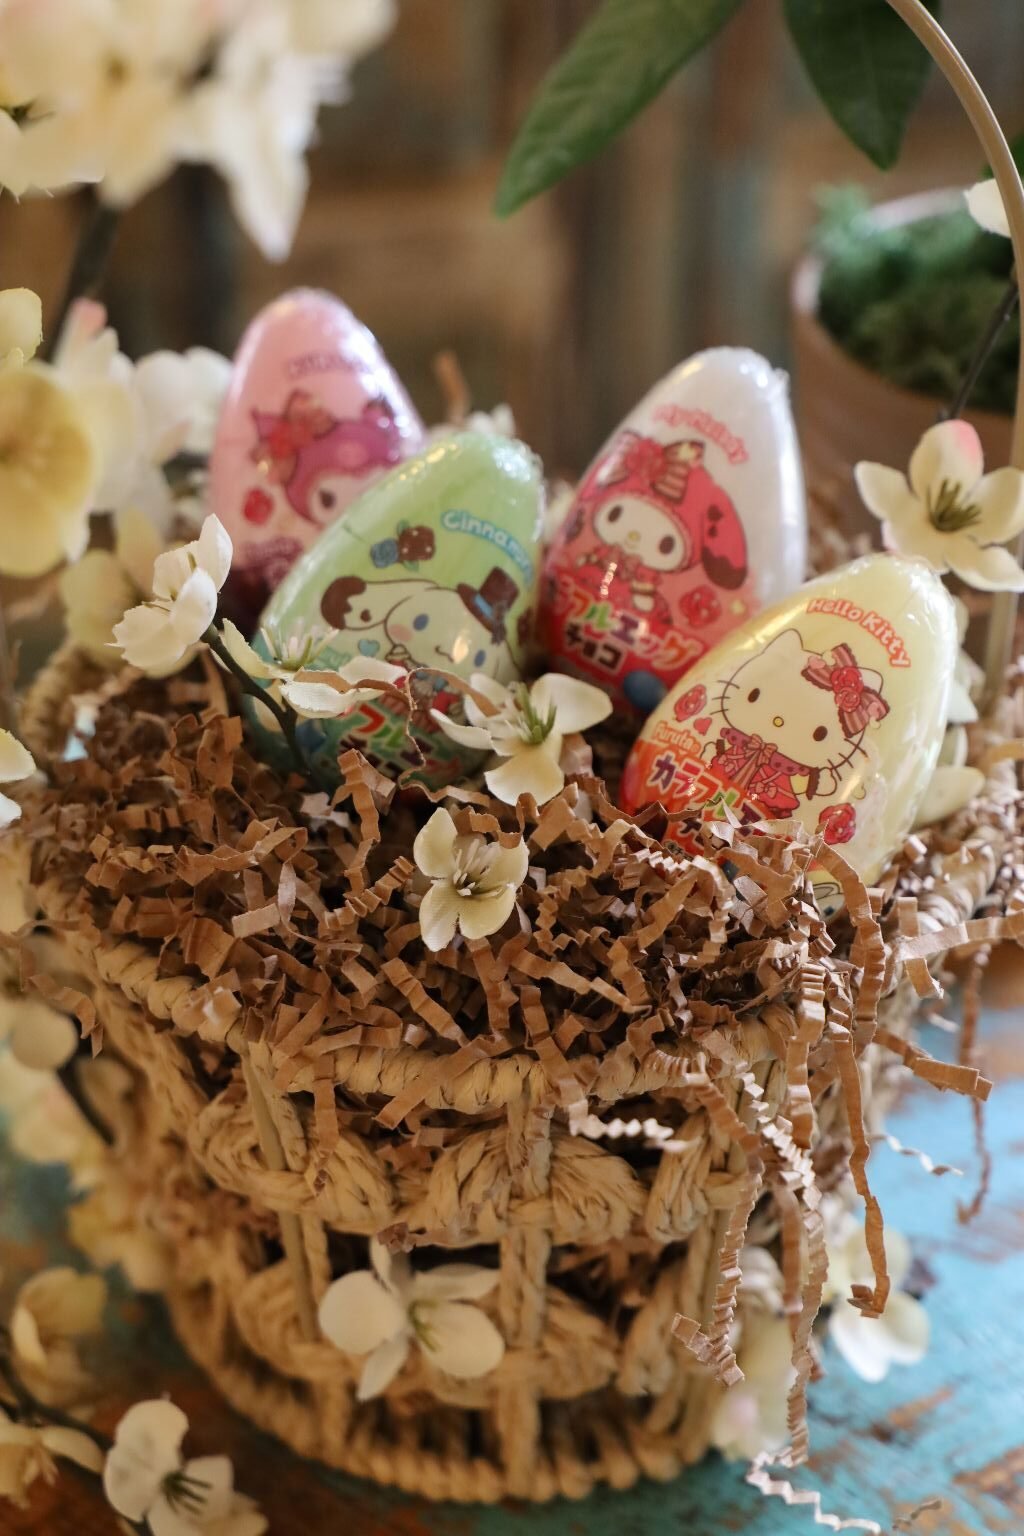
Candy Filled EGGS From The Asian Store
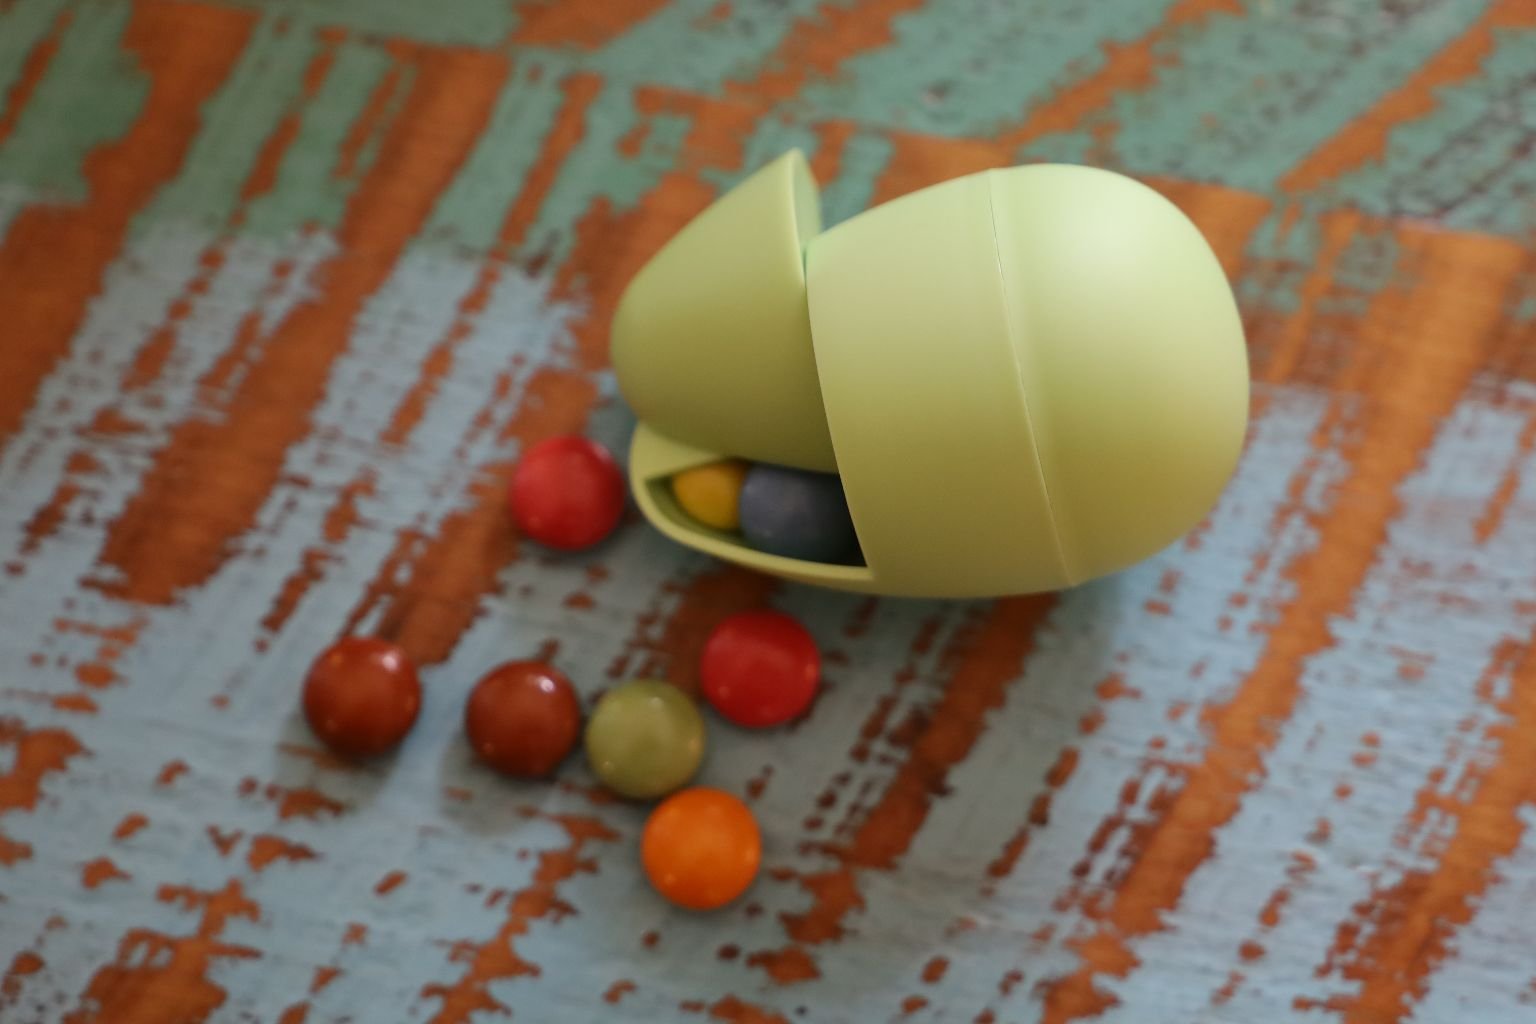
I LOVE These!
First of all, the candies inside far outweigh our traditional M&M’s.
Second, I love how the egg containers distribute the candies! The top part swizzles open so that a few candies can emerge at a time. This container is perfect for a toddler’s snack. The eggs will only pop out a few candies at a time, thus you don’t have to deal with a mess in the car or at home on the carpet. Once the candies have been eaten, they can be used to house Cheerios Cereal, or something like that. A healthy snack for kids. I say that we keep these egg containers for future use.
—————————————————————————————-
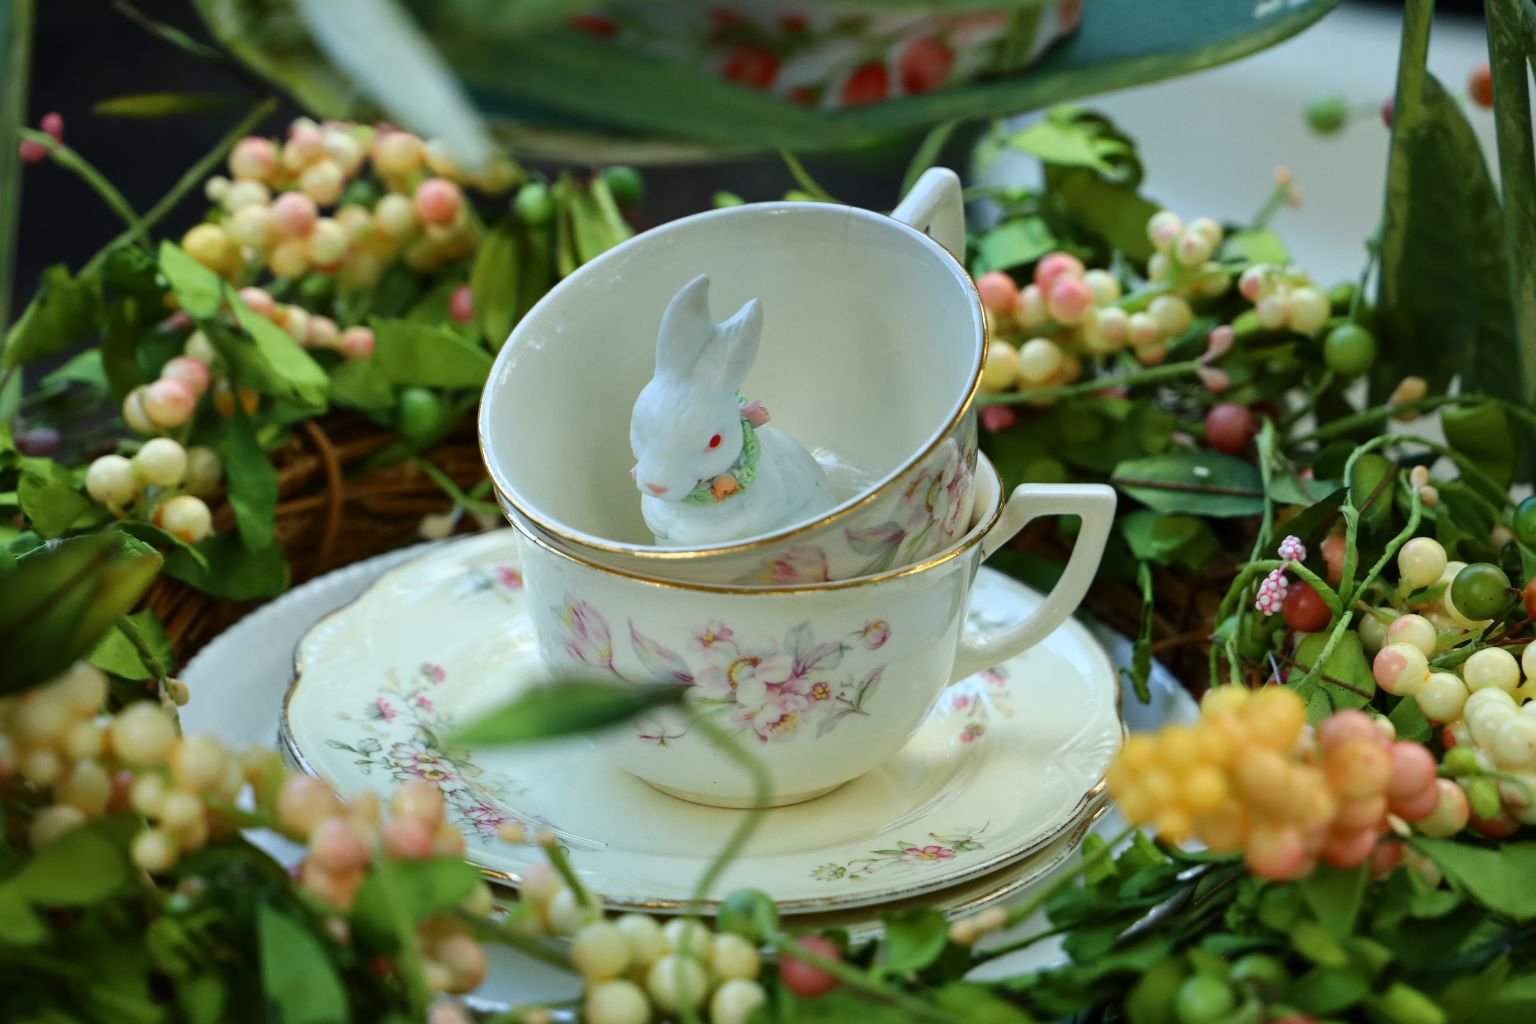
Peanuku’s Easter Basket


Peanuku is only 9 months old this Easter, 2024.
This Easter Basket is more about keepsakes, not something tangible she can consume.
The Eggs are delicious but more as a rattle for her to play with, and candies for me, and her parents to eat. 🙂
The bunny cup and spoon are more as a keepsake for her future from me, her Tutu. I picture her eating ice cream from it someday.
The Bunny Rookie Chopsticks are for her Chopstick’s training. I can picture us eating Chinese Take Out on the coffee table in no time at all!
———————————————————————————————–
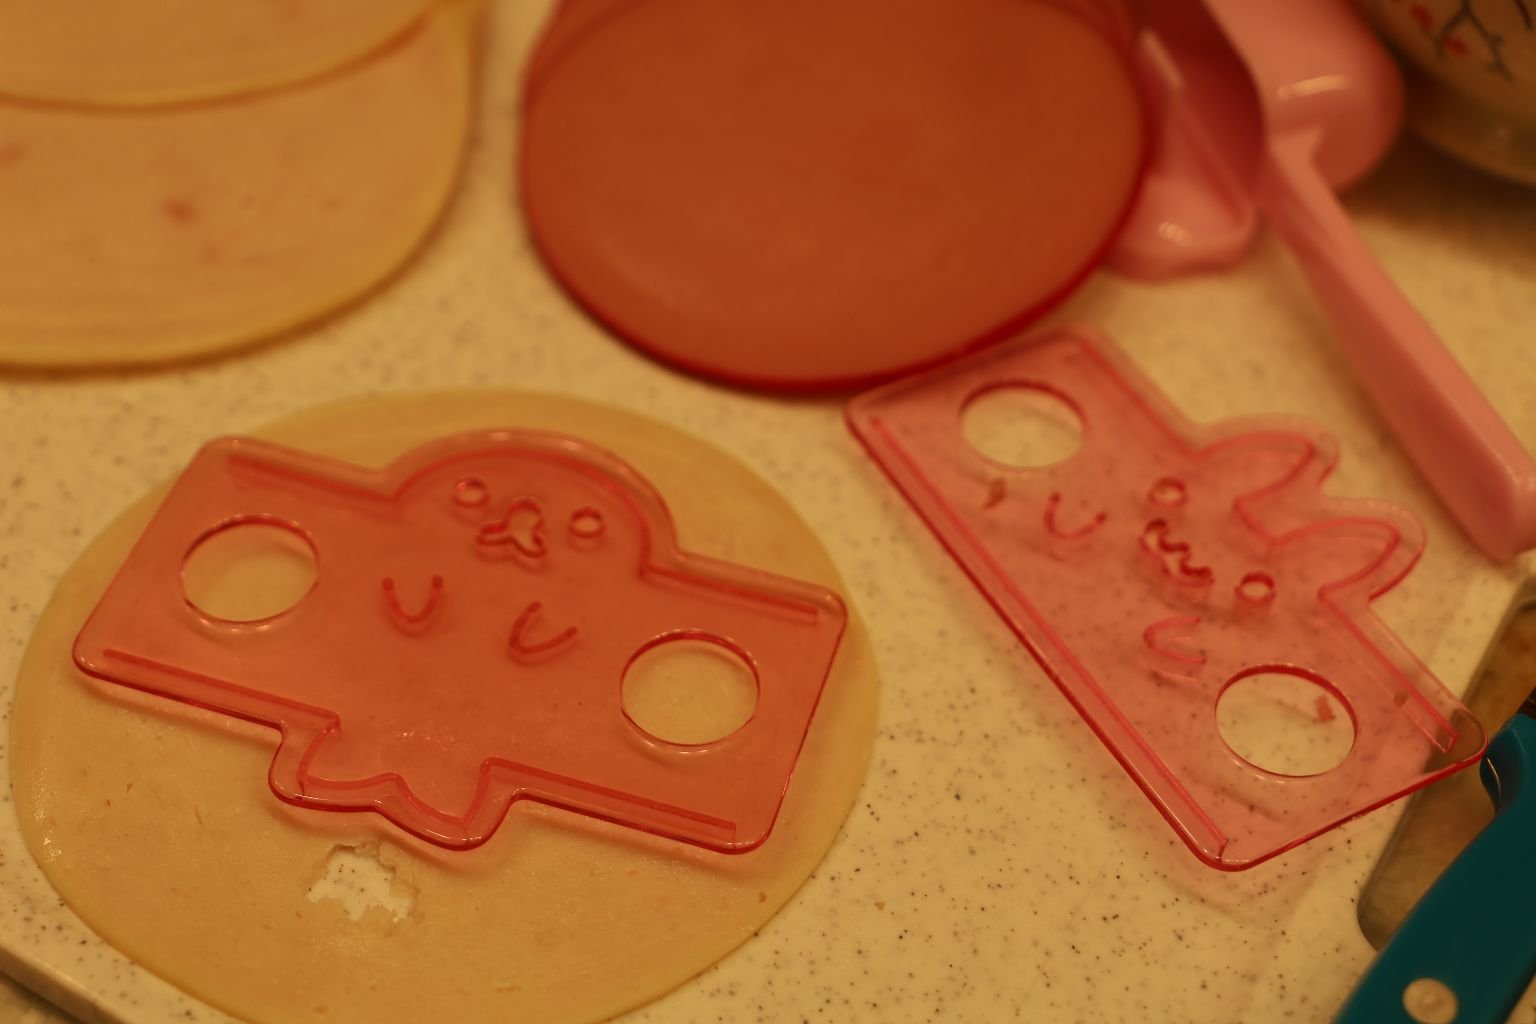
I Love the Food Molds From The Asian Store
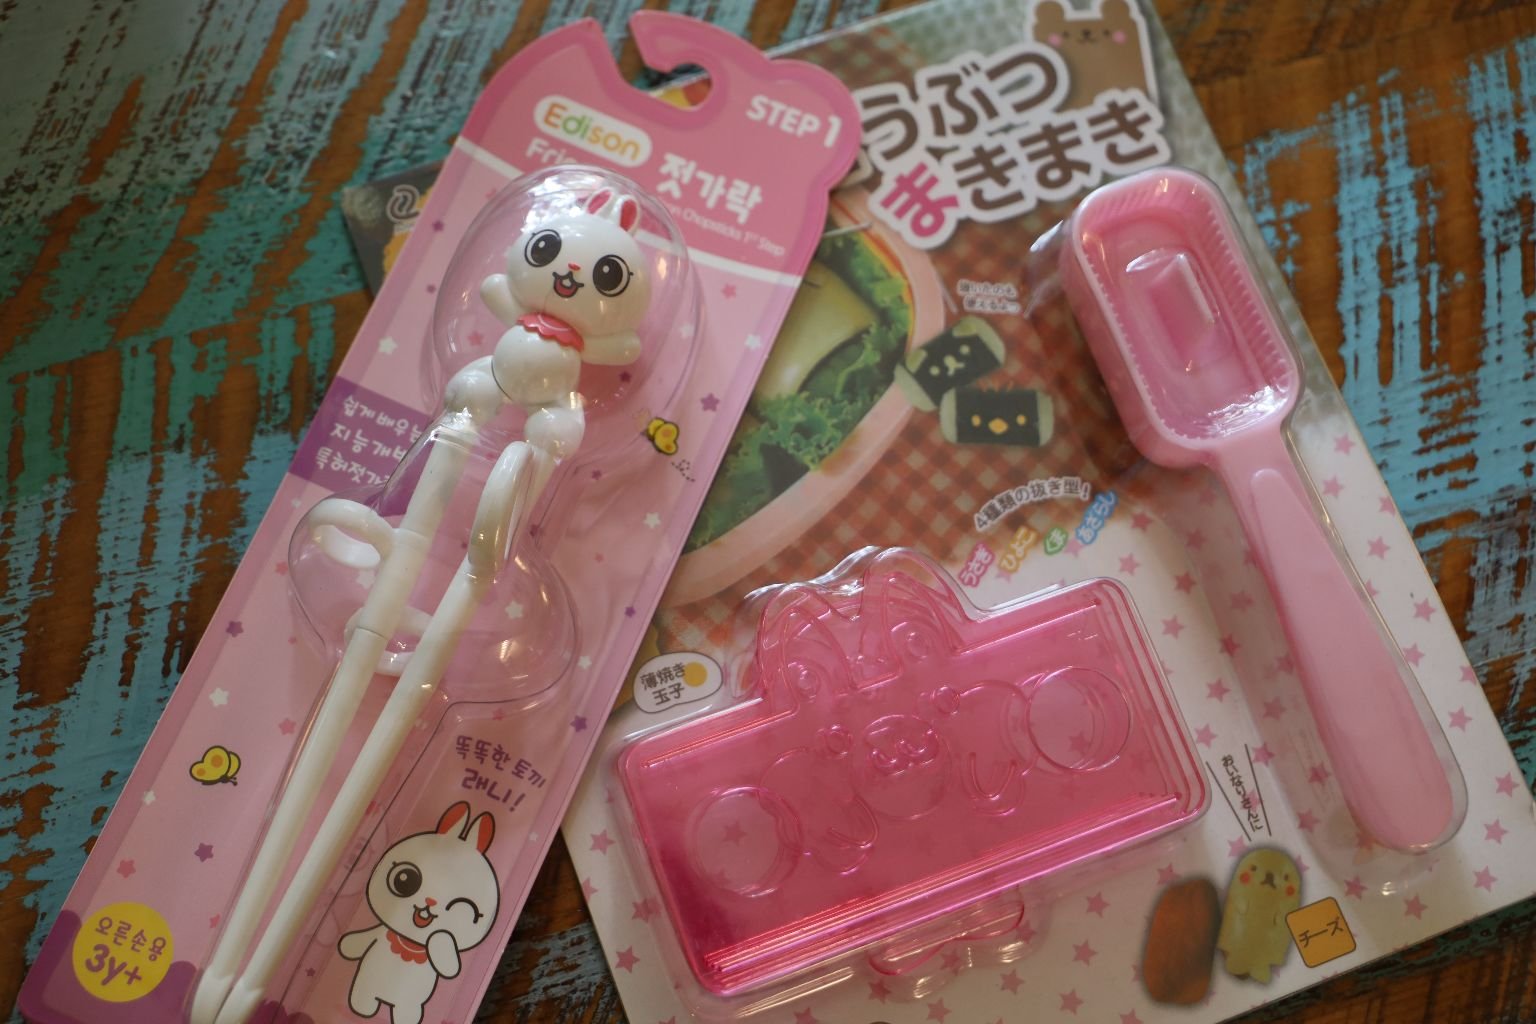
Luckily They Come With Photographic Instructions!
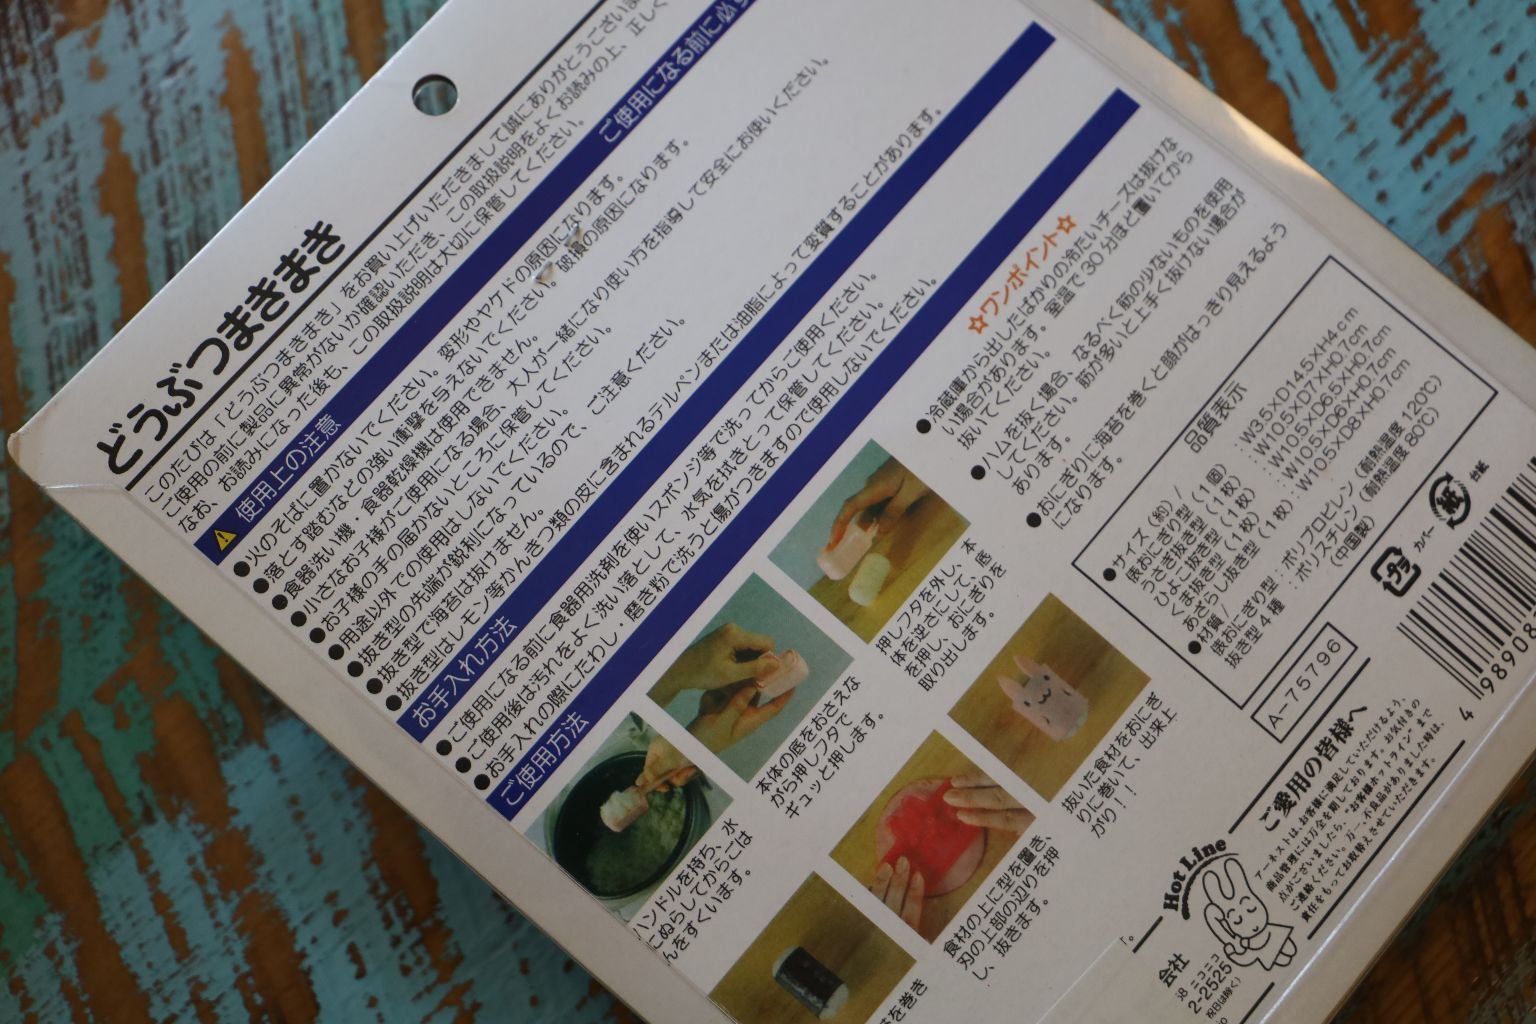
Seeing as how I cannot read Chinese!
—————————————————————————-

The Rookie Chopsticks For Children are Genius!
I Cannot Wait To Teach Peanuku How To Use Them
——————————————————————————
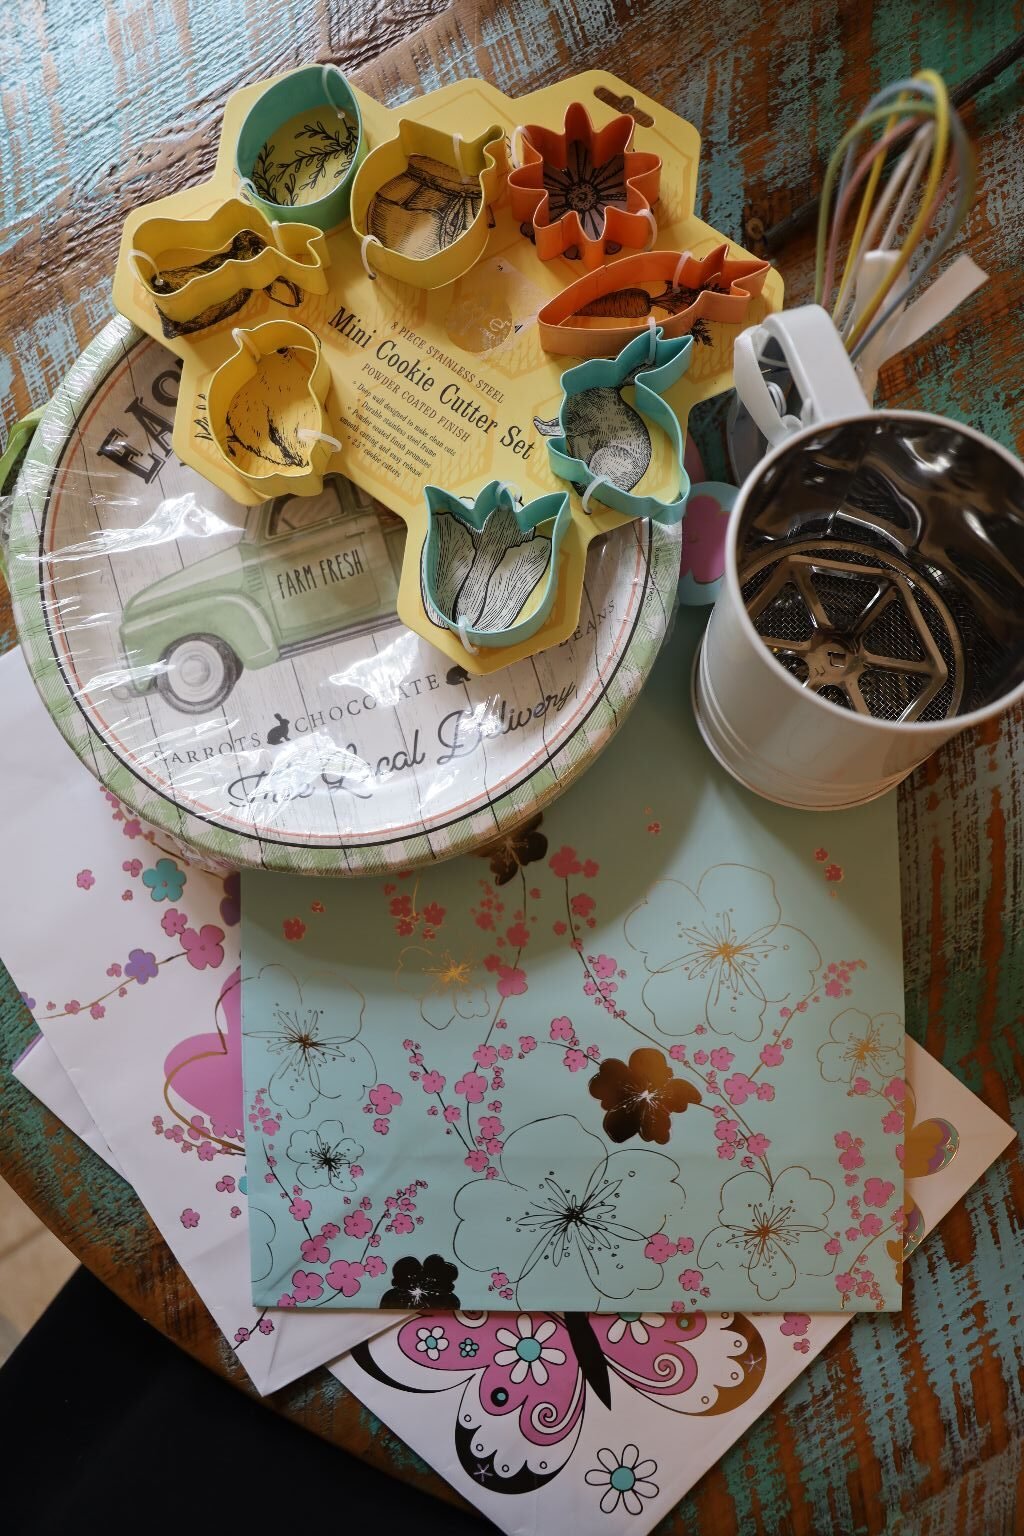
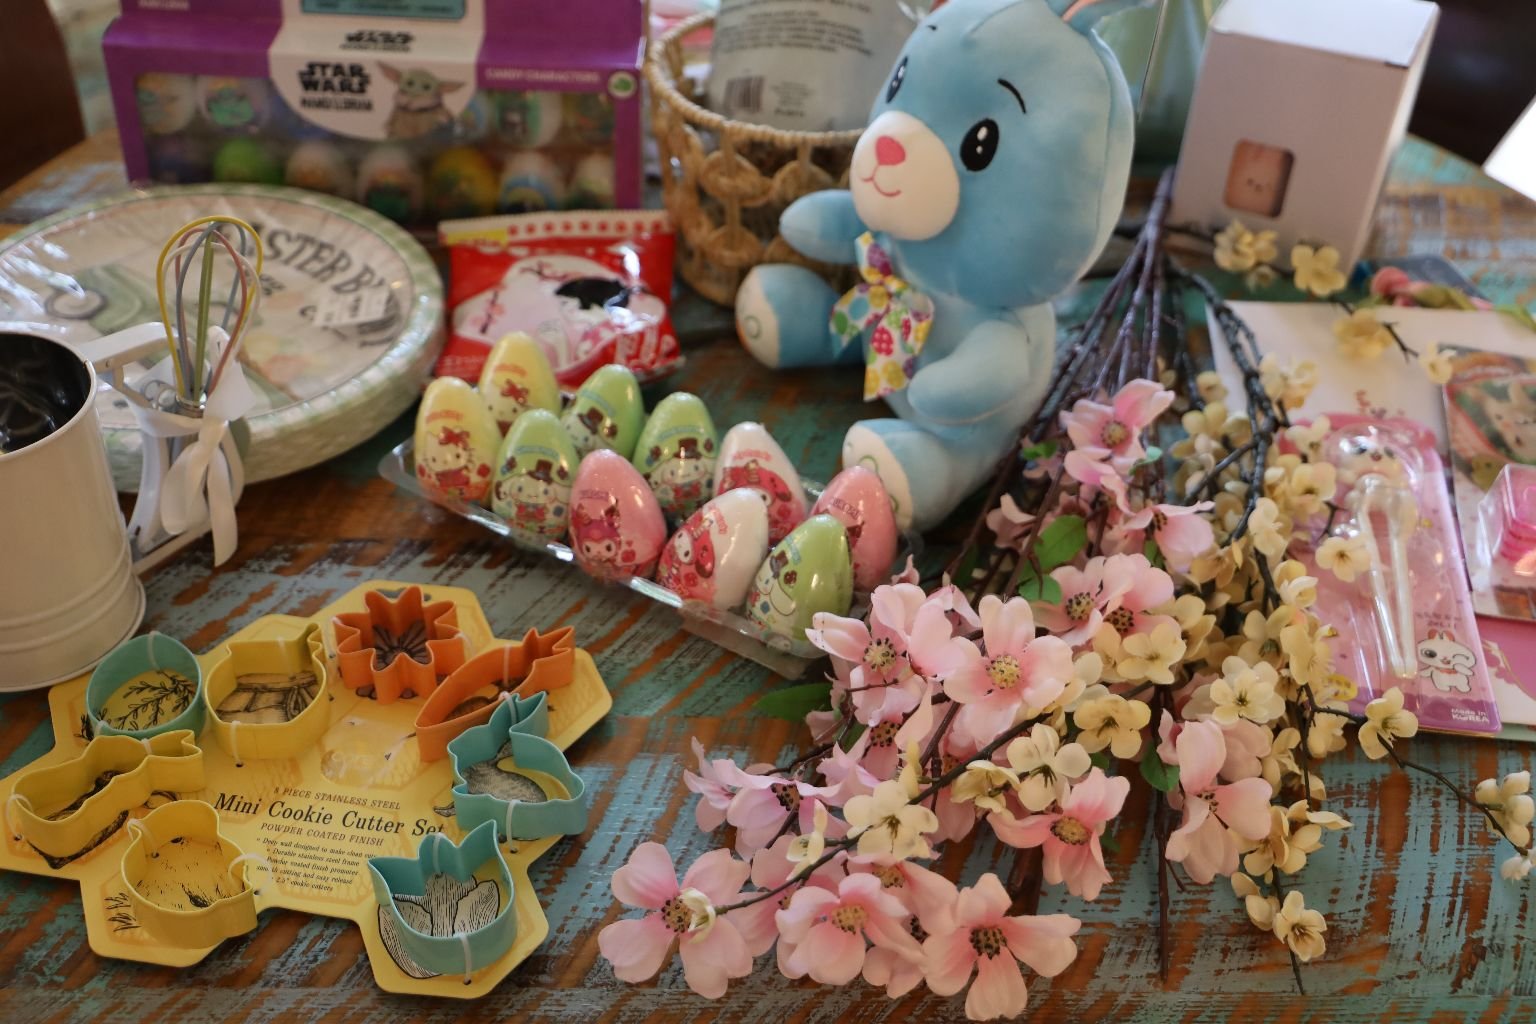
Veronica’s Easter Gifts
Easter Truck Paper Plates, Lovely Easter Cookie Cutters, and a Flour Sifter with Whisk
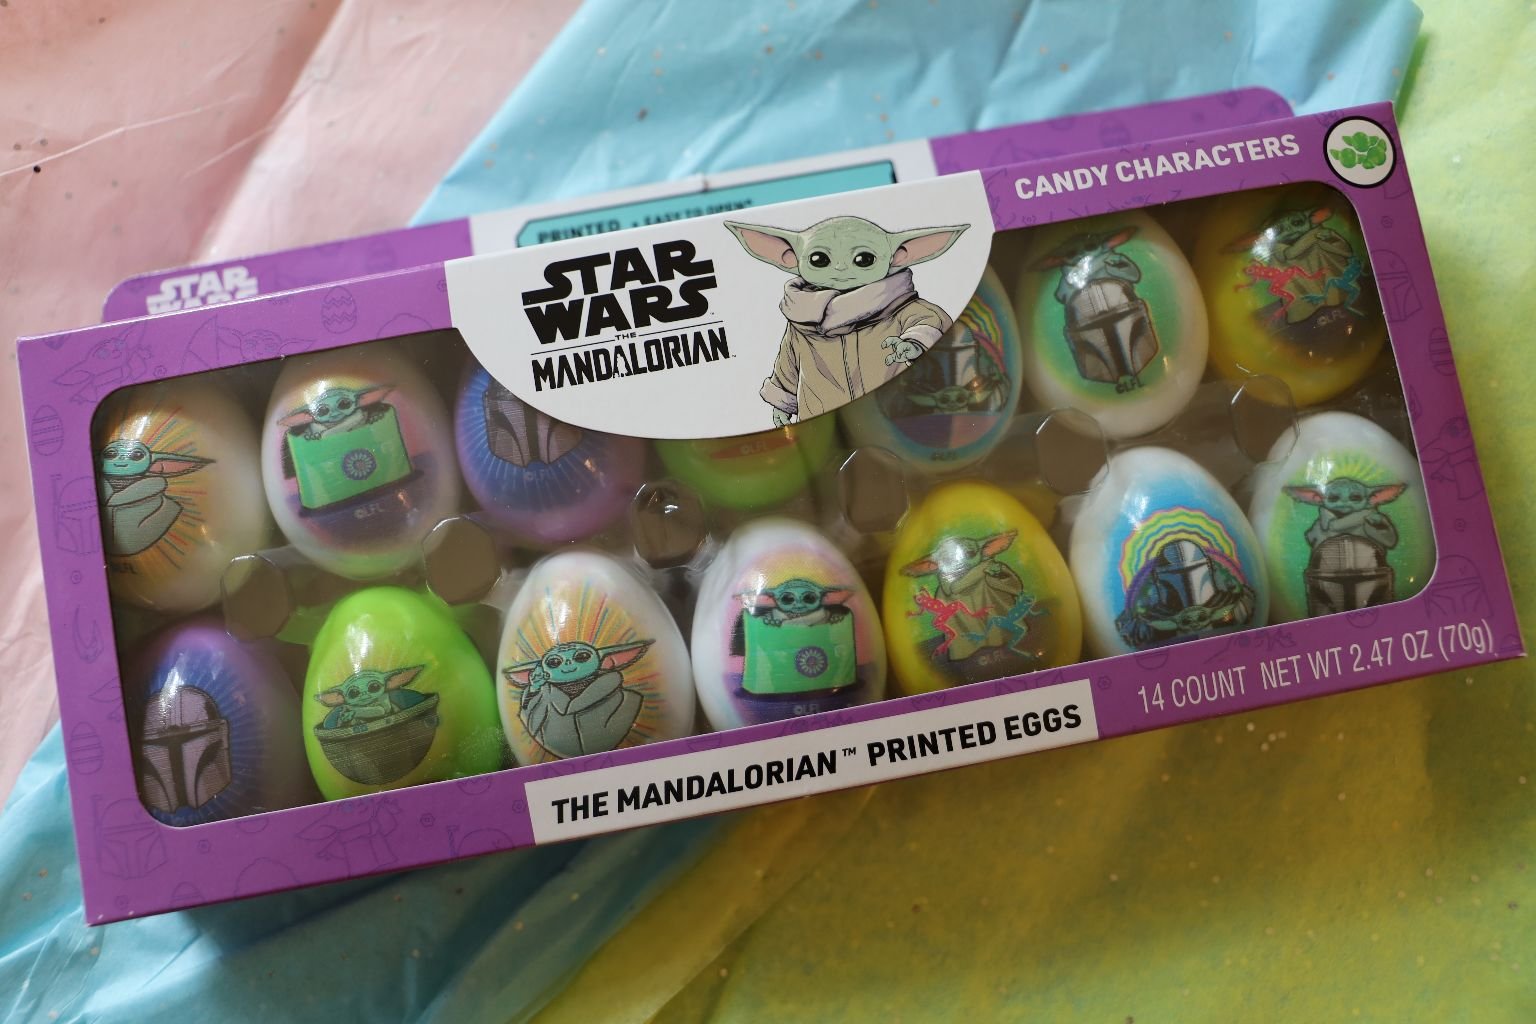
Veronica and Brian are huge fans of The Mandalorian, and Grogu
I found these eggs and knew they would love them!
———————————————————————————–
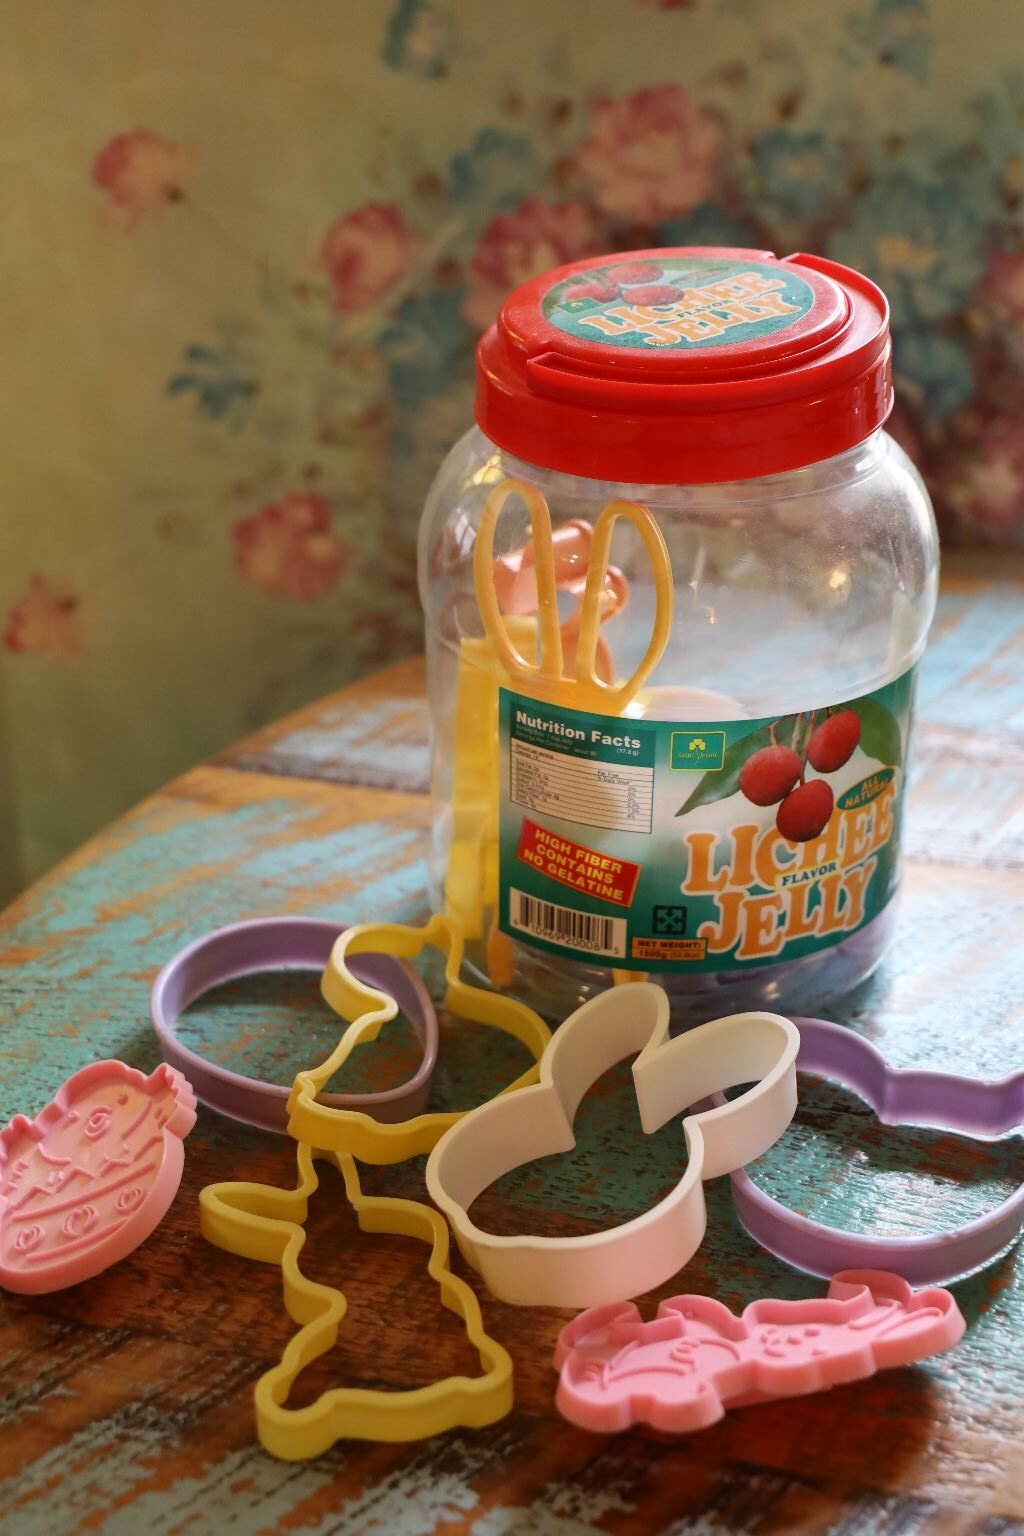
My Easter Cookie Cutters
(Looking forward to using them soon.)
——————————————————————————-
Peanuku’s Easter


Happy Easter Peanuku

Love, Tutu

May there be many more Easter’s for us to consume….
Tutu
———————————————————————————
Recipes Start Here
My Sunday Asian Kitchen
——————————————————————————————————–
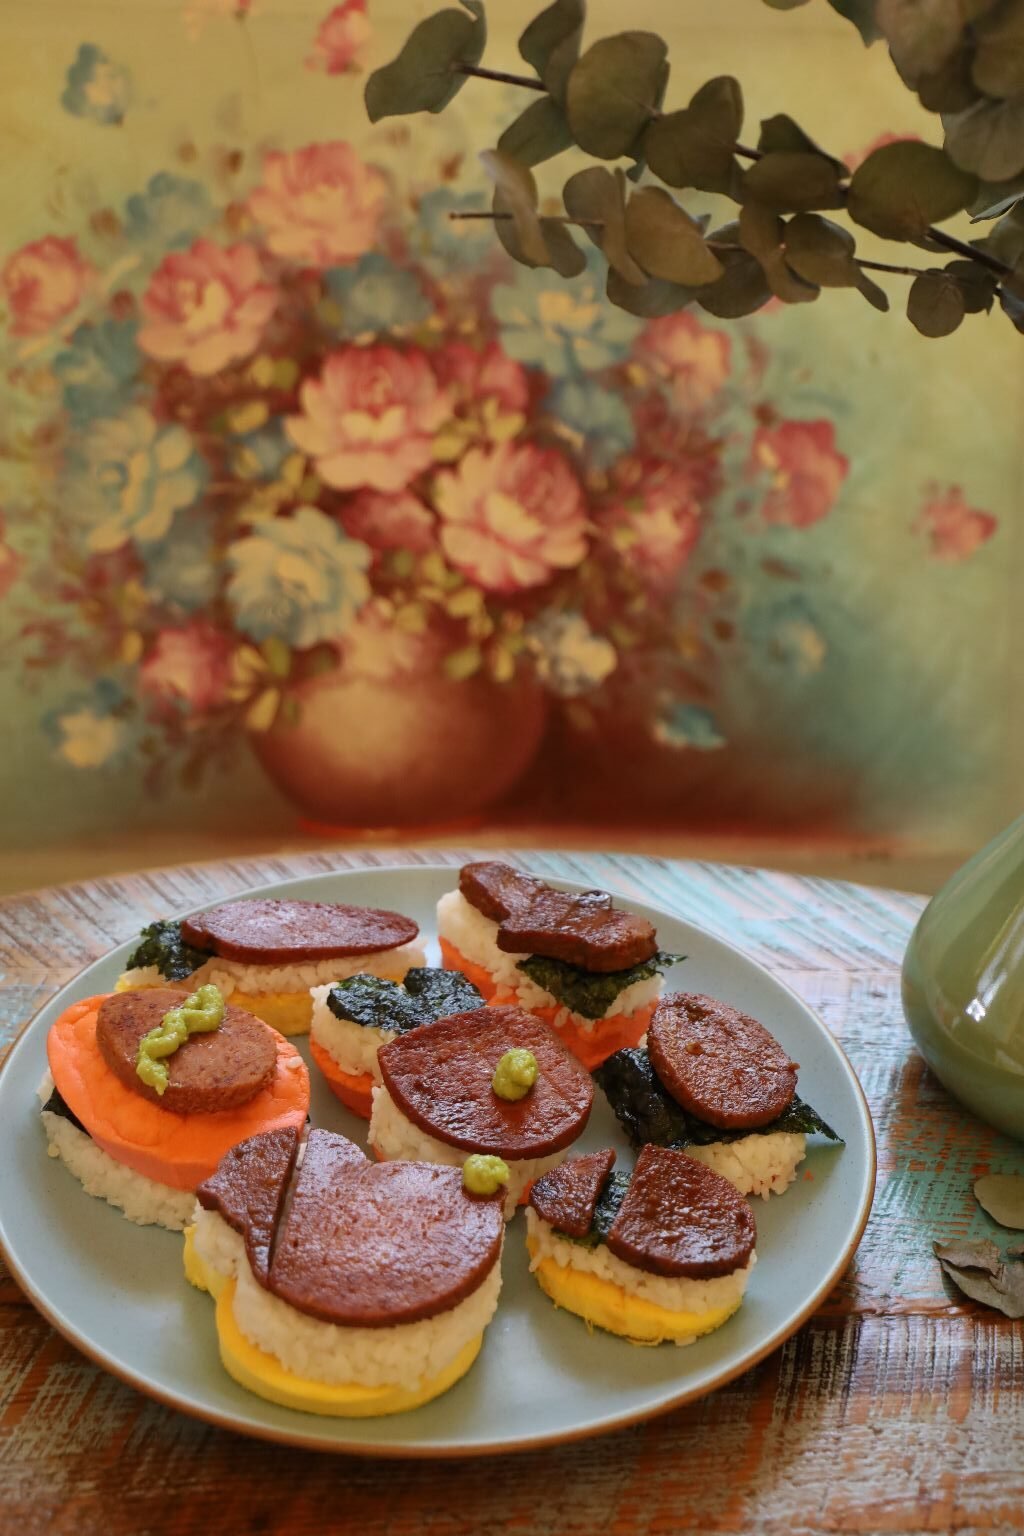
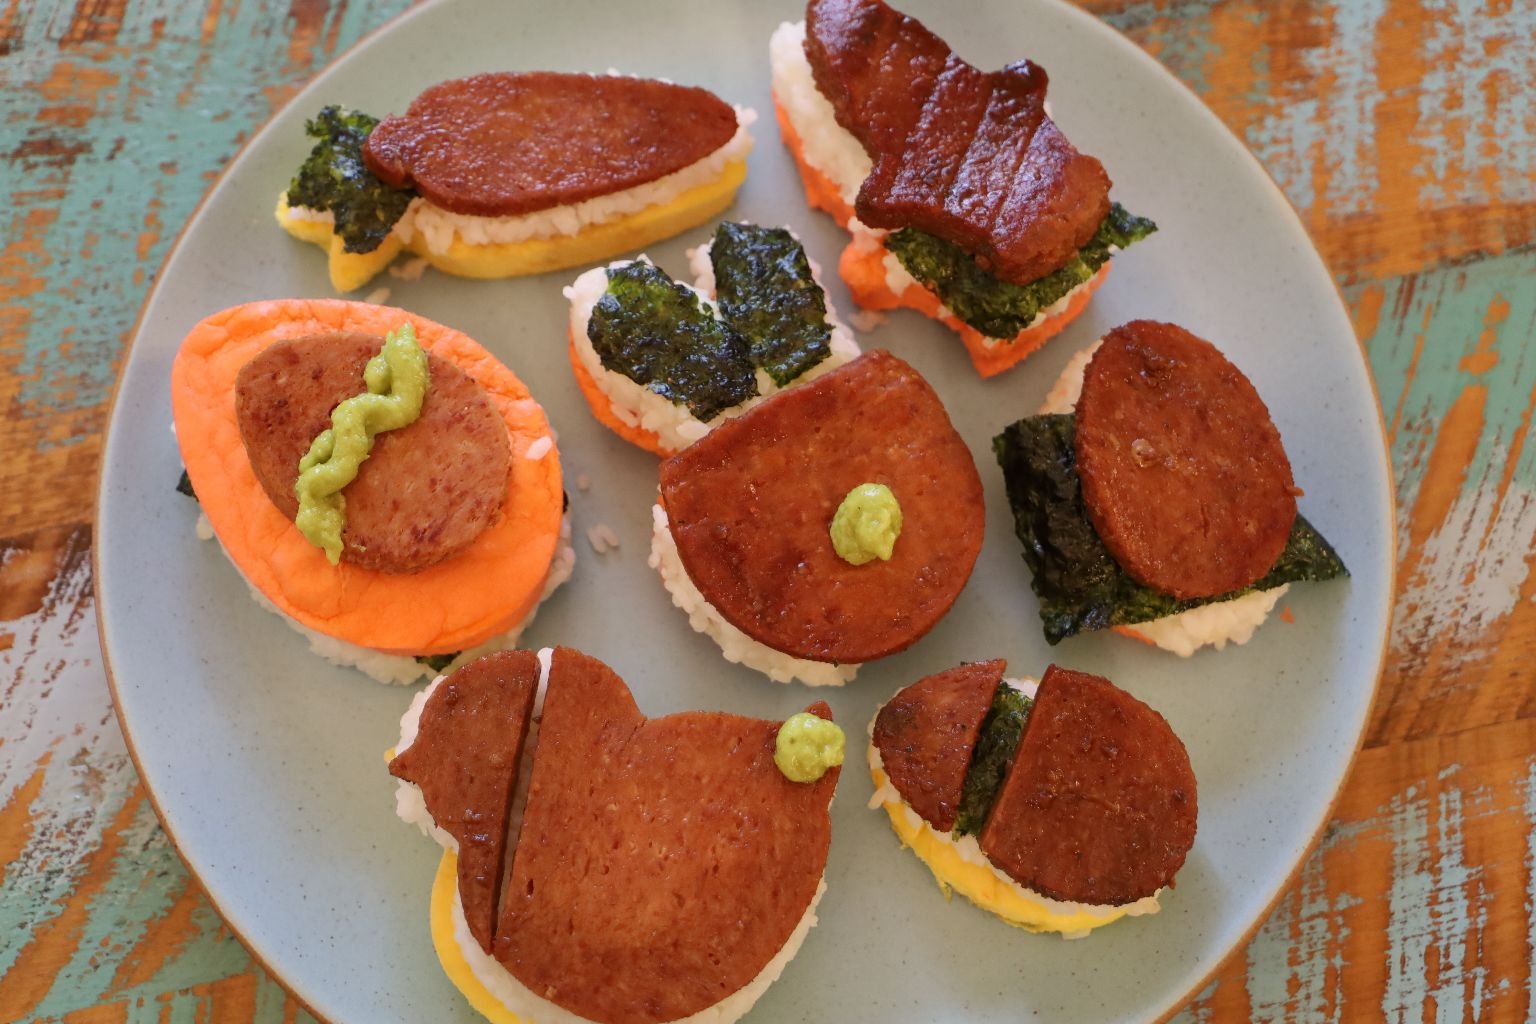
My Royal Eggs/Sticky Rice/Teriyaki SPAM Treats
w/ Touches of Seaweed, and Wasabi
Lovely For Easter, Can be Eaten by Hand or Cutlery
—————————————————————————–
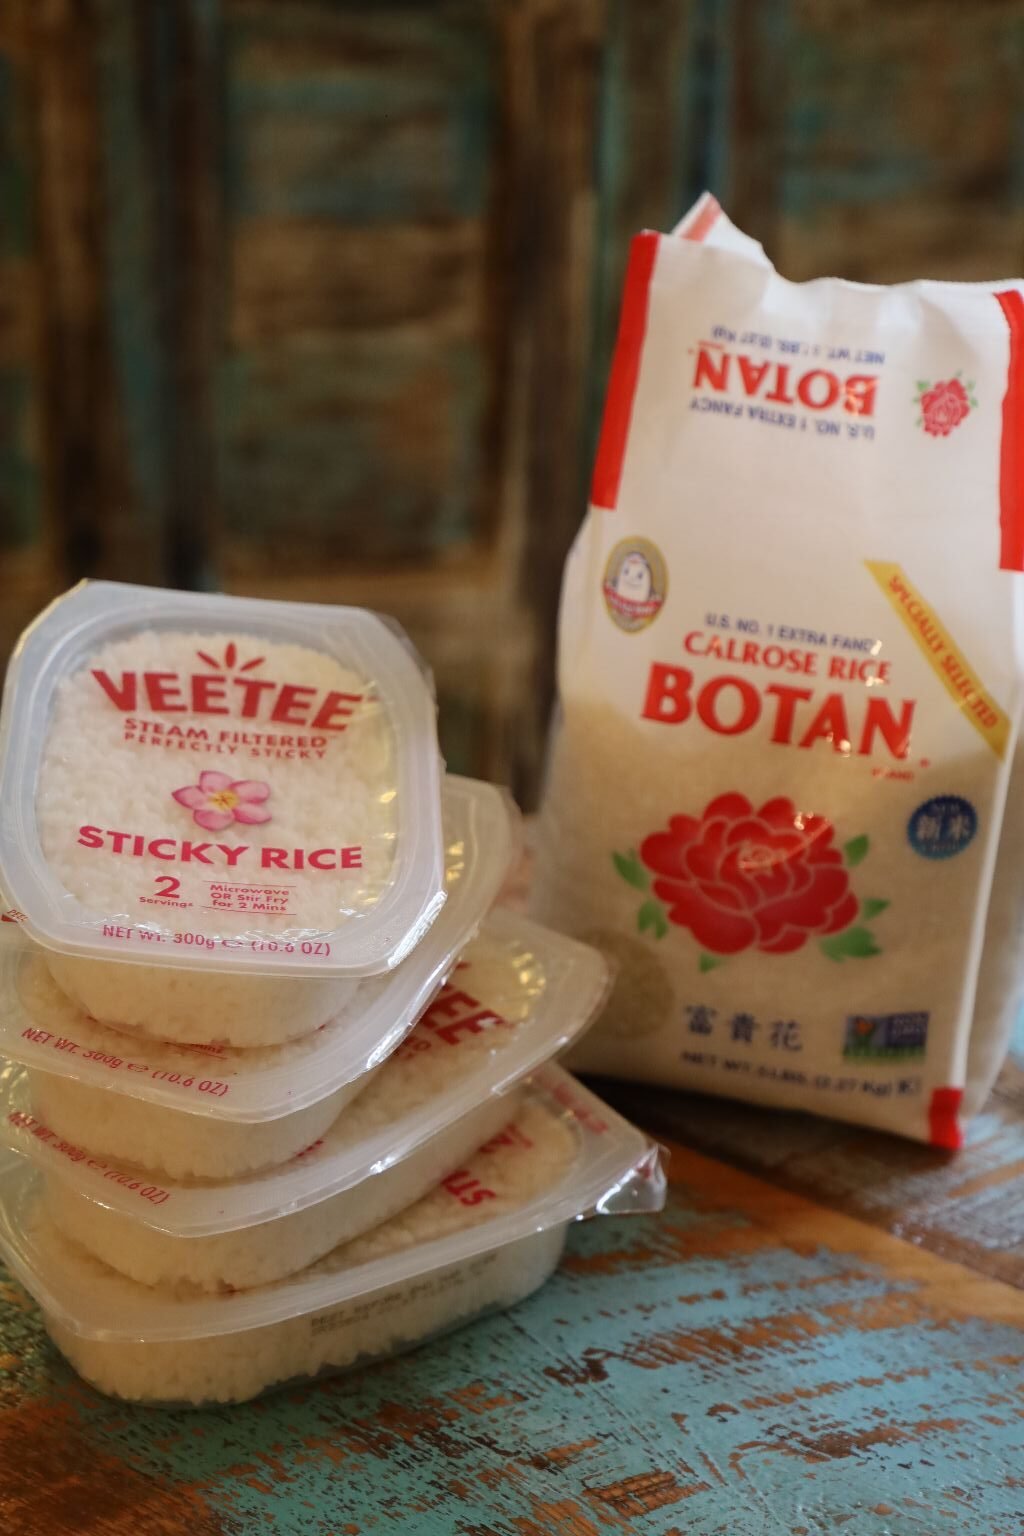
Botan Rice
Or,
Botan Prepared Sticky Rice
Or,
Any Sticky Rice That You Choose
——————————————————————————–
You Will Need Sticky Rice For This Recipe
Also,
Teriyaki SPAM
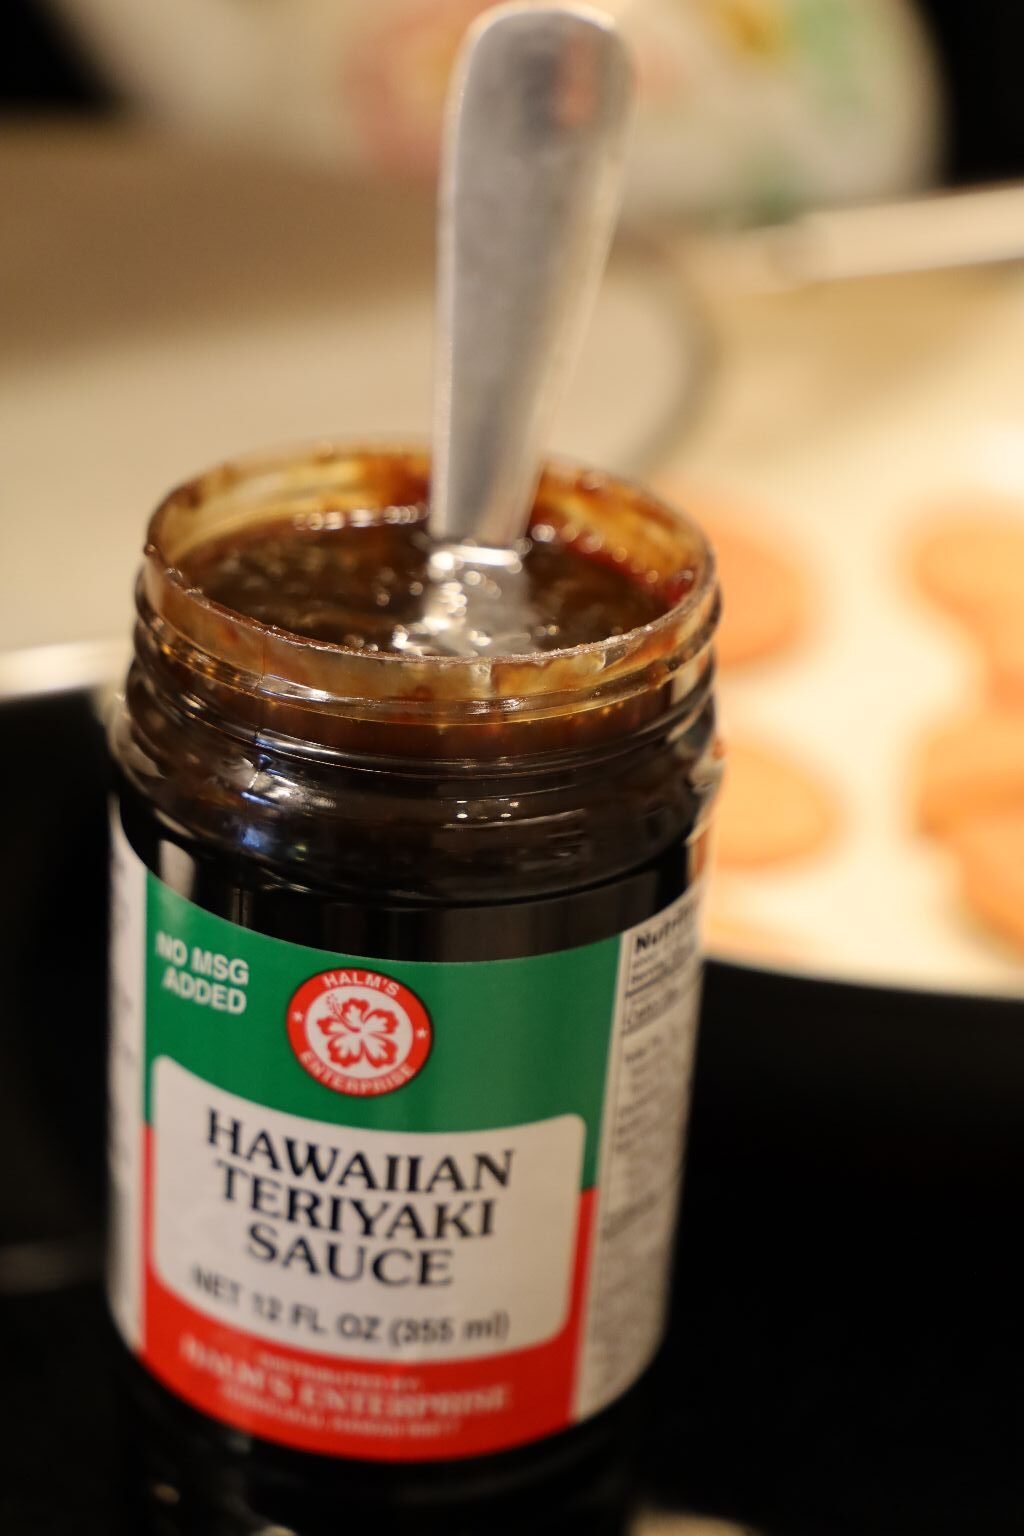
Hawaiian Teriyaki Sauce
And,
Cookie Cutters
———————————————————————————
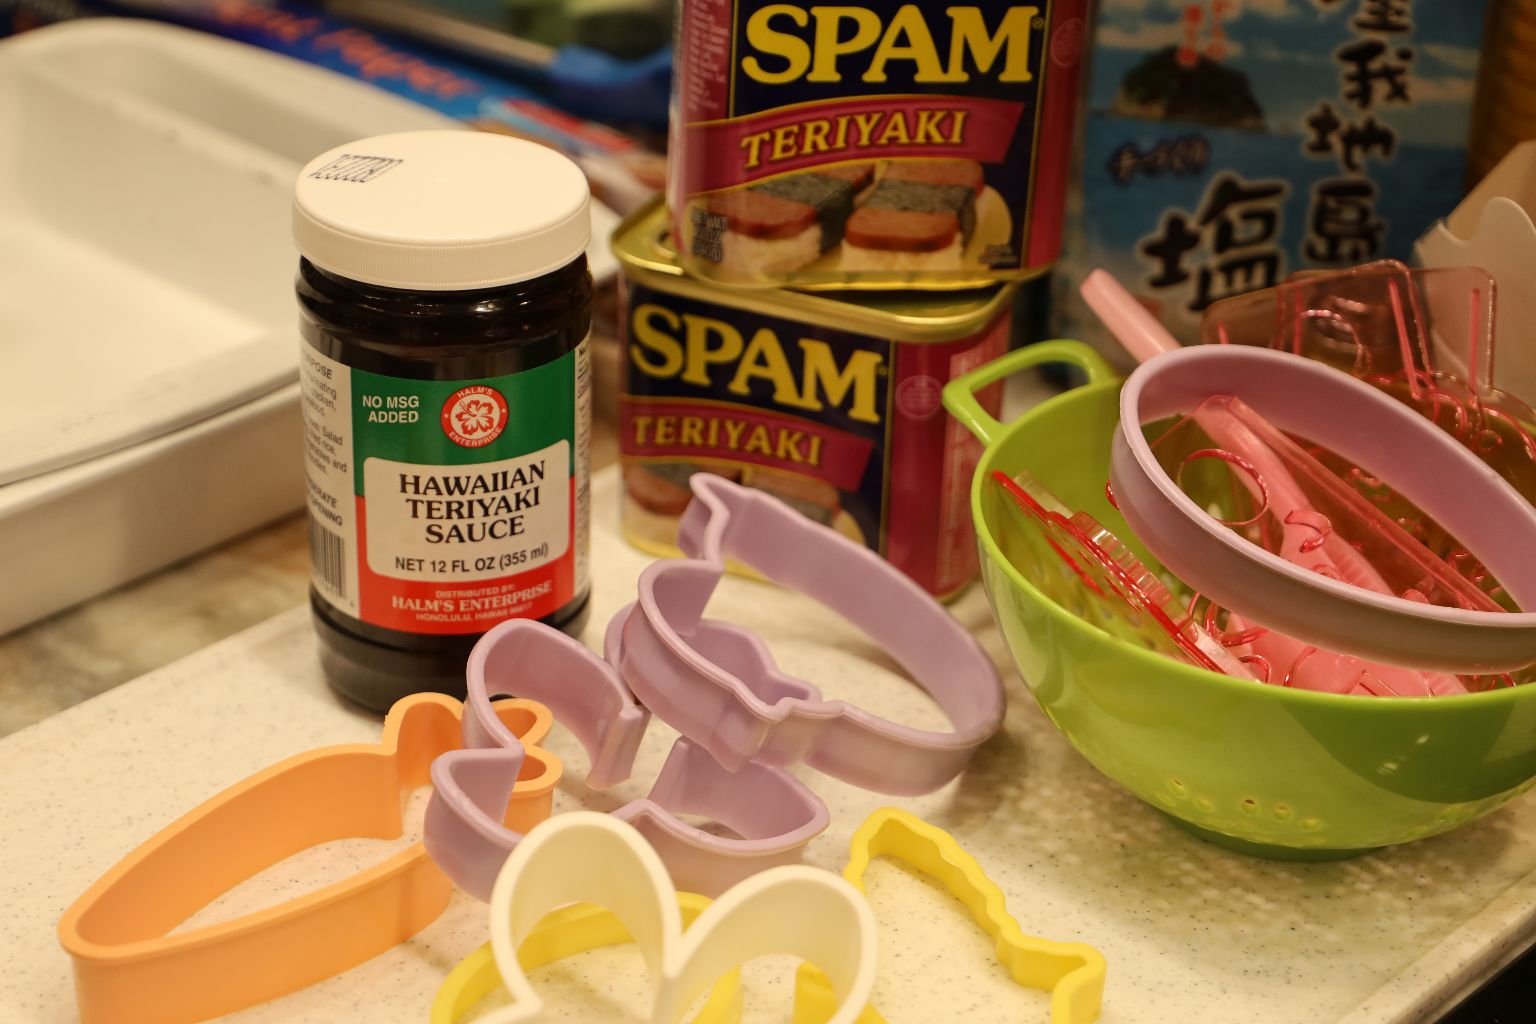
———————————————————————————
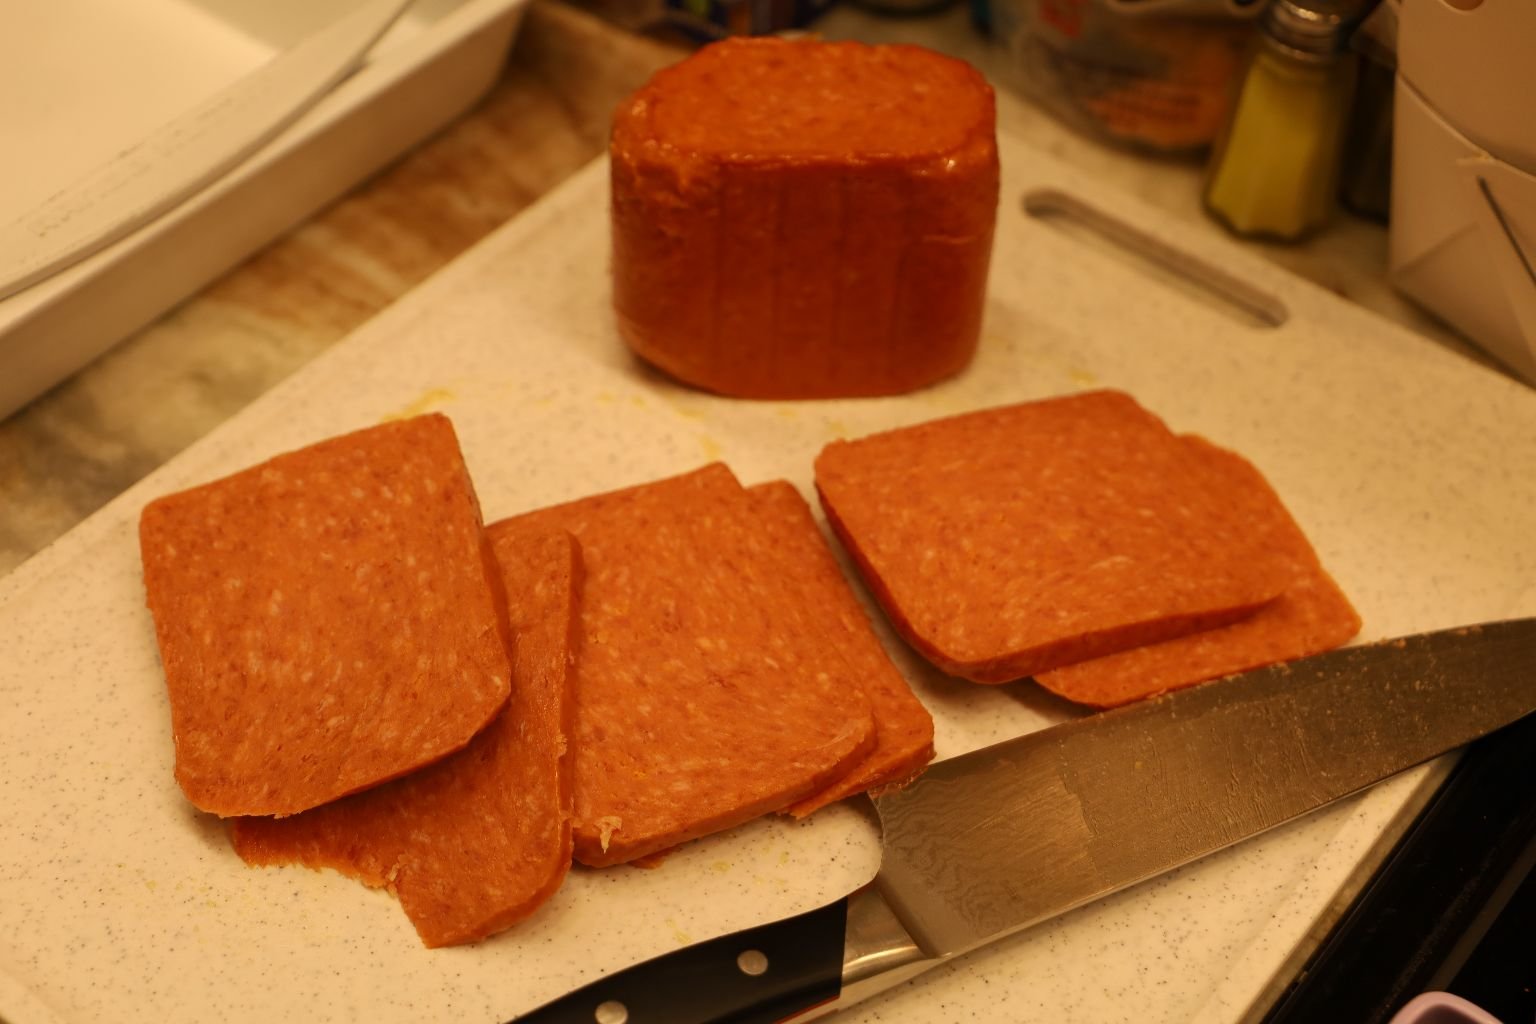
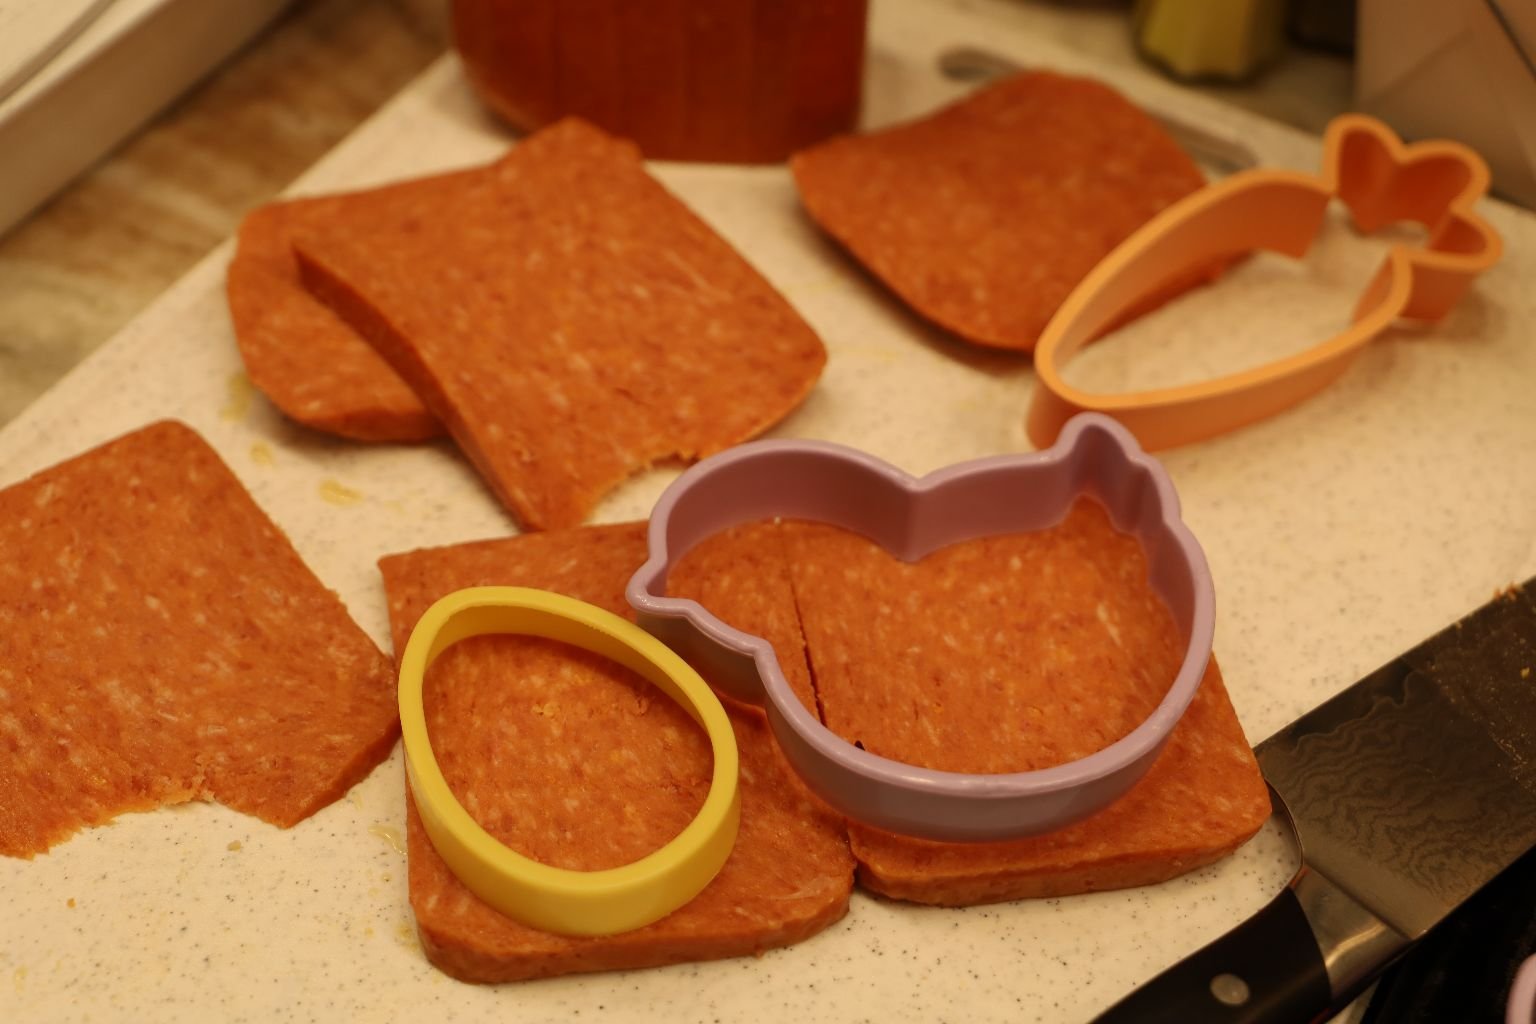
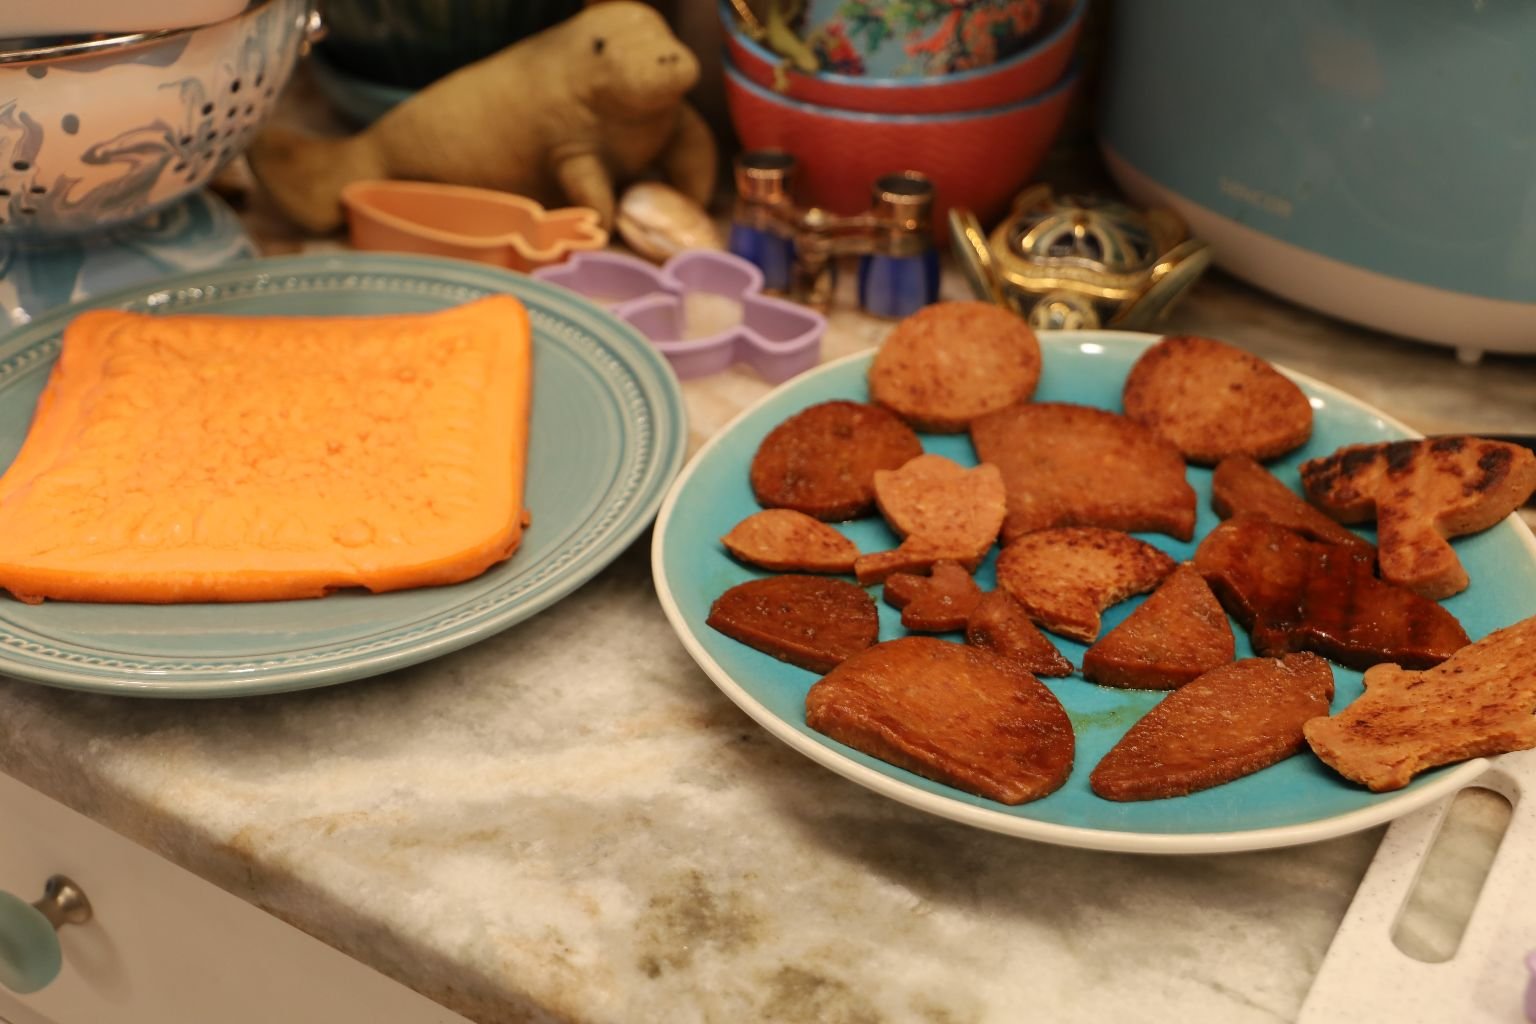
Slice the Teriyaki SPAM into slices, then use the Cookie Cutters to make shapes.
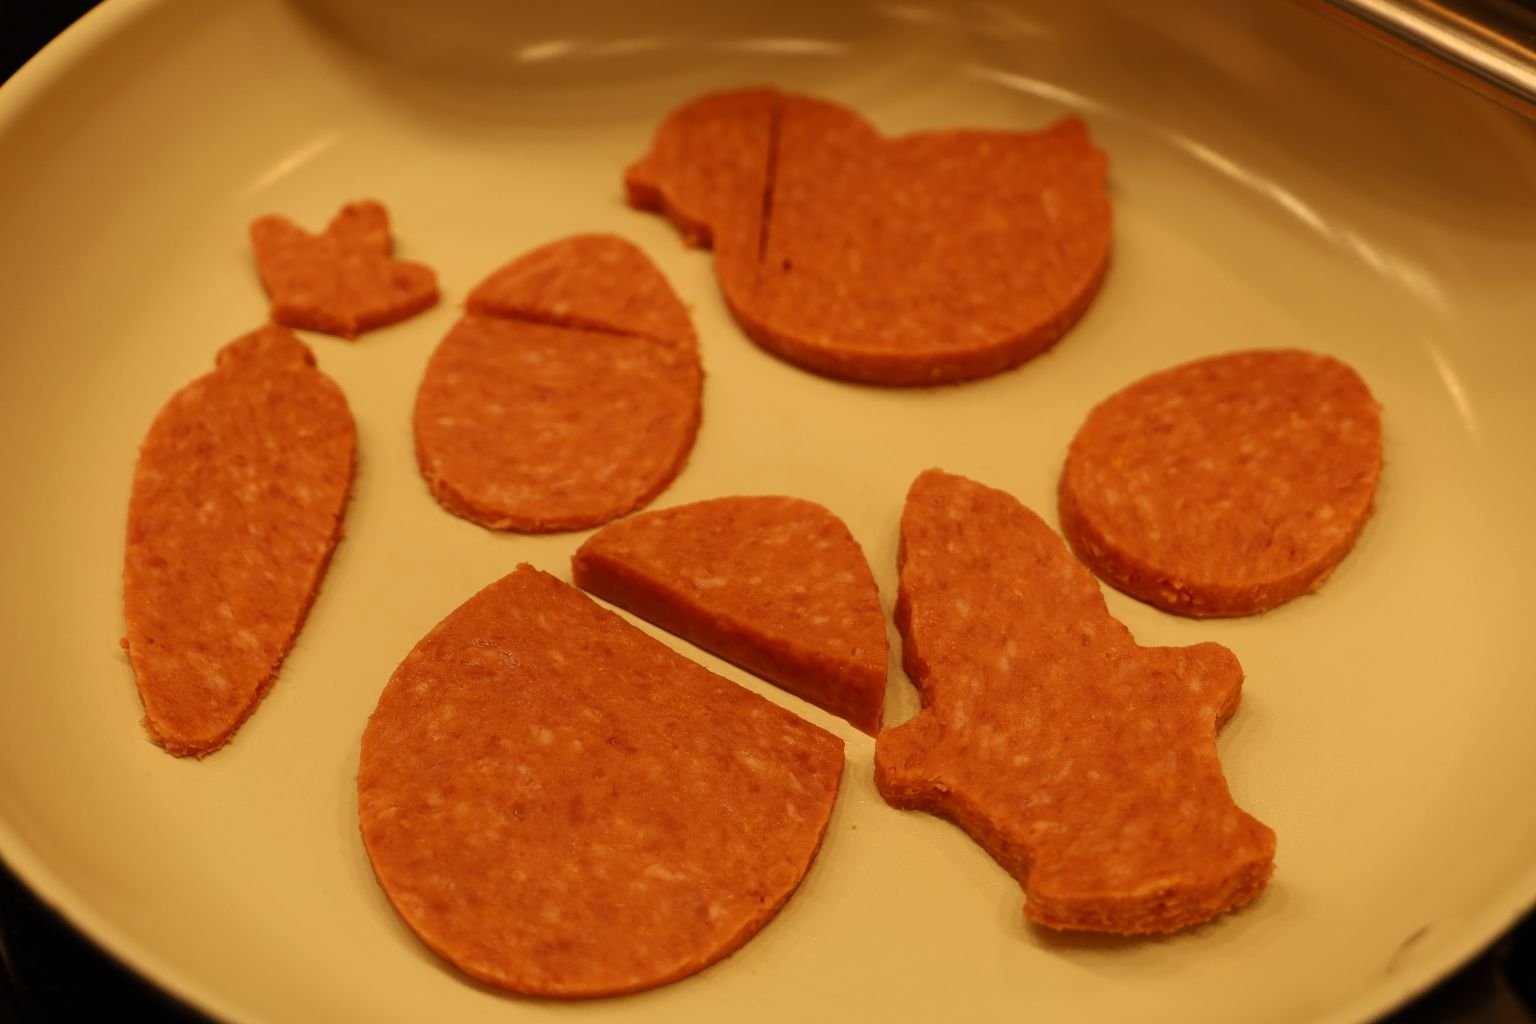
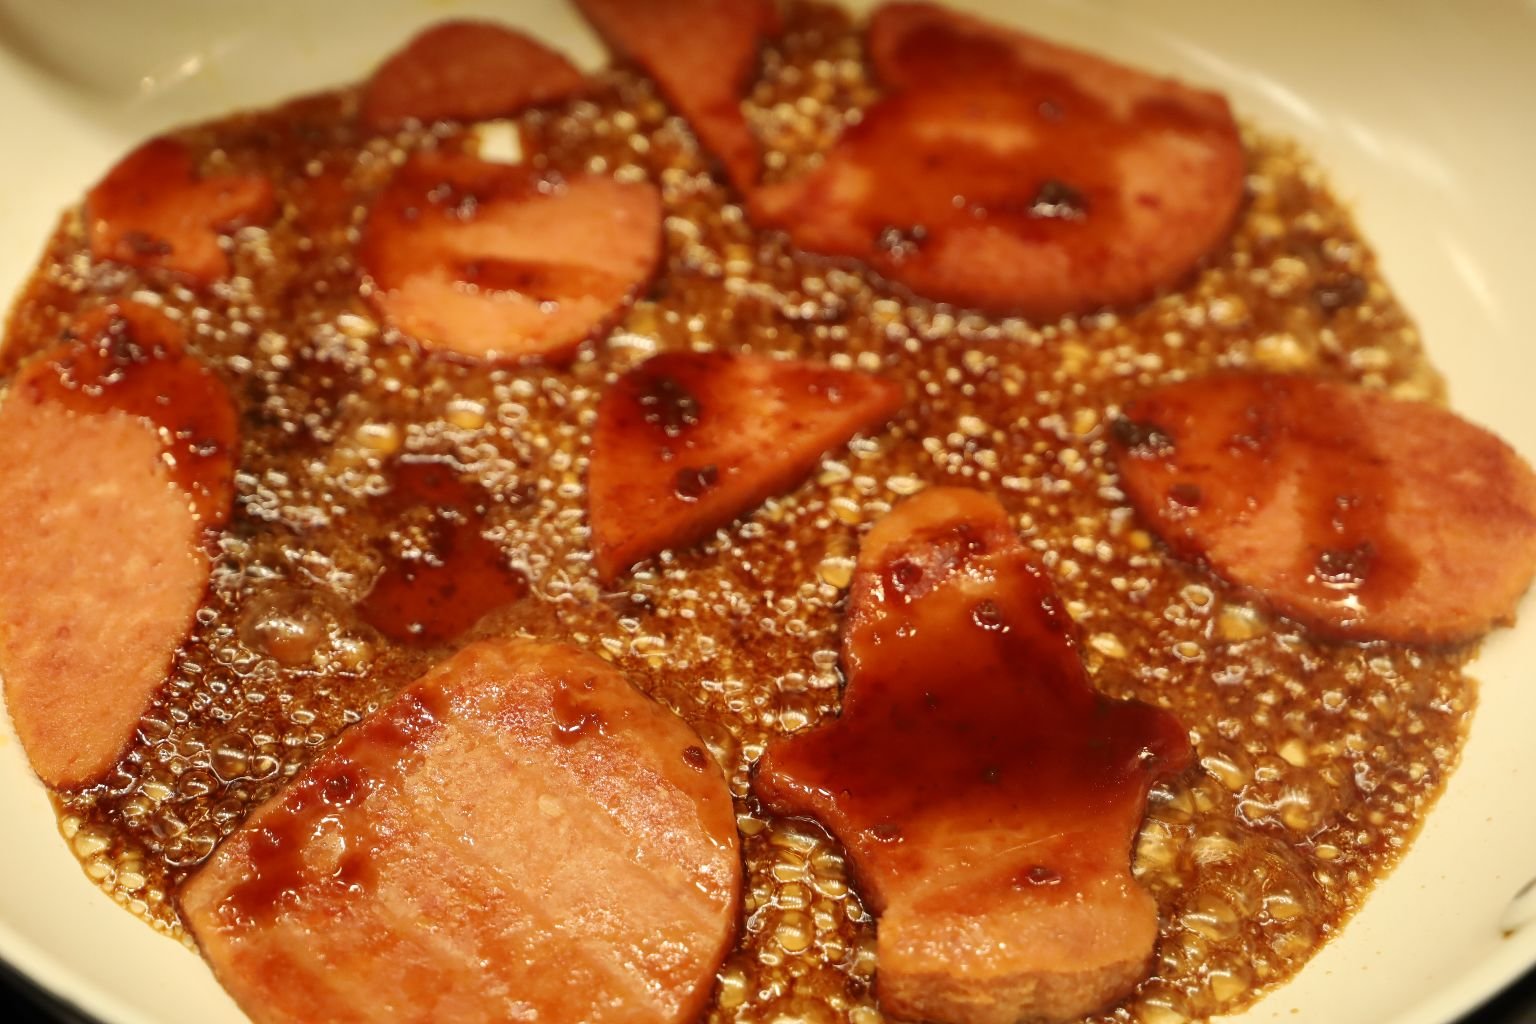
Now, place the SPAM into a pan and fry on a Medium-High Heat until nice and browned.
While adding your Hawaiian Teriyaki Sauce.
Just a spoonful here and there, to add the flavor.
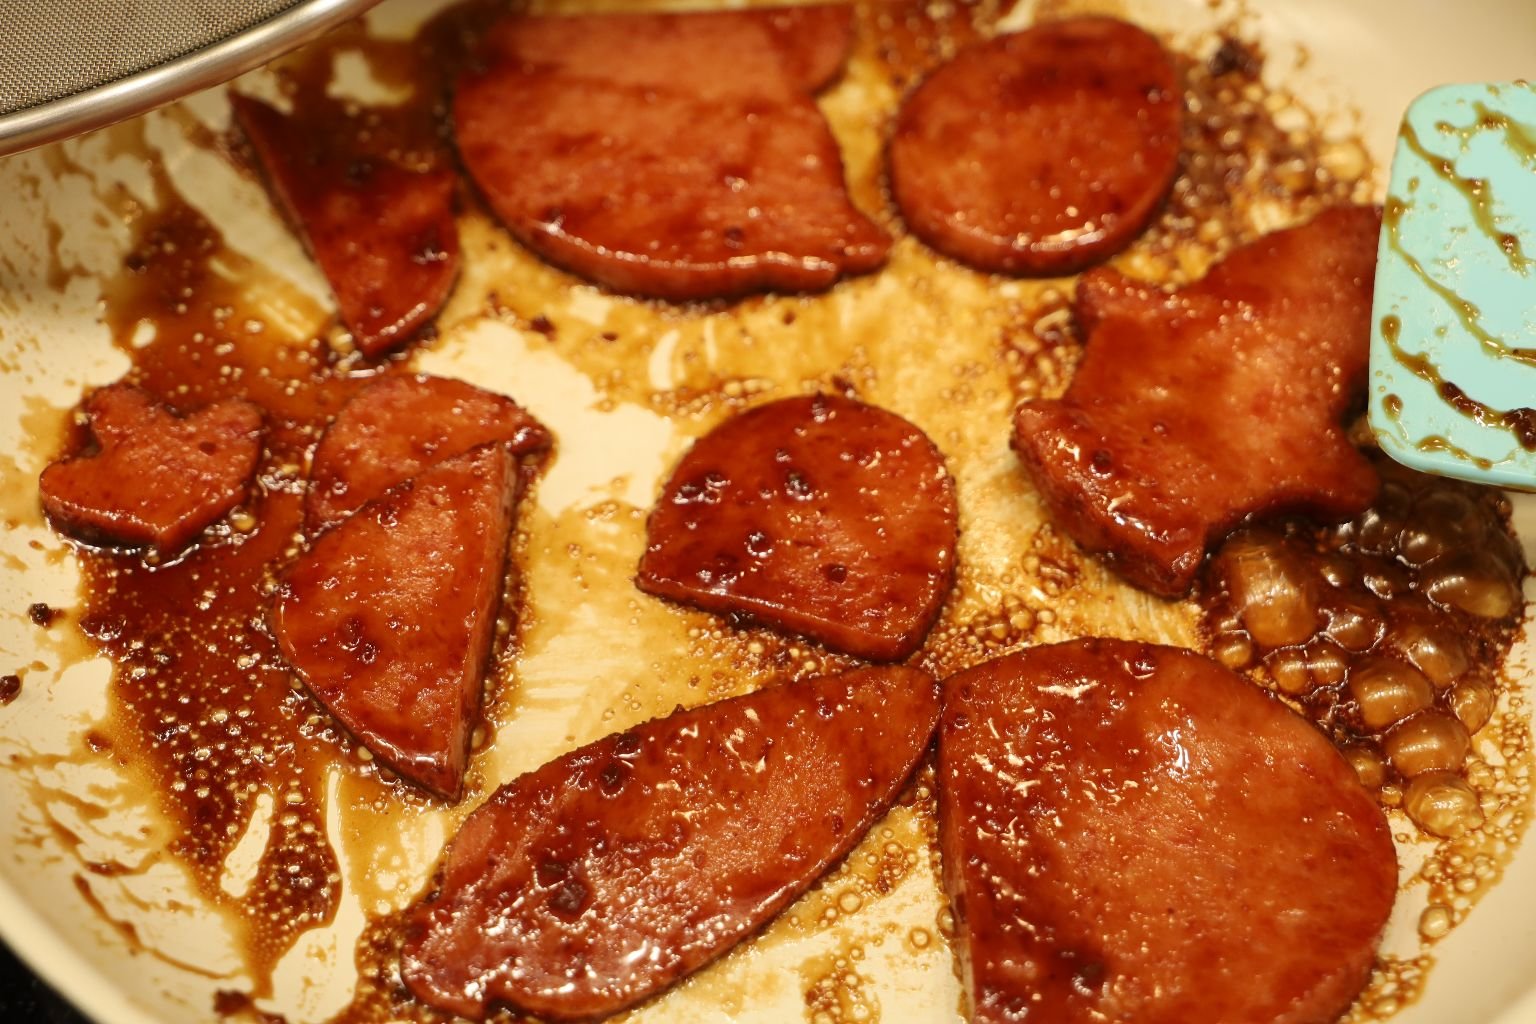
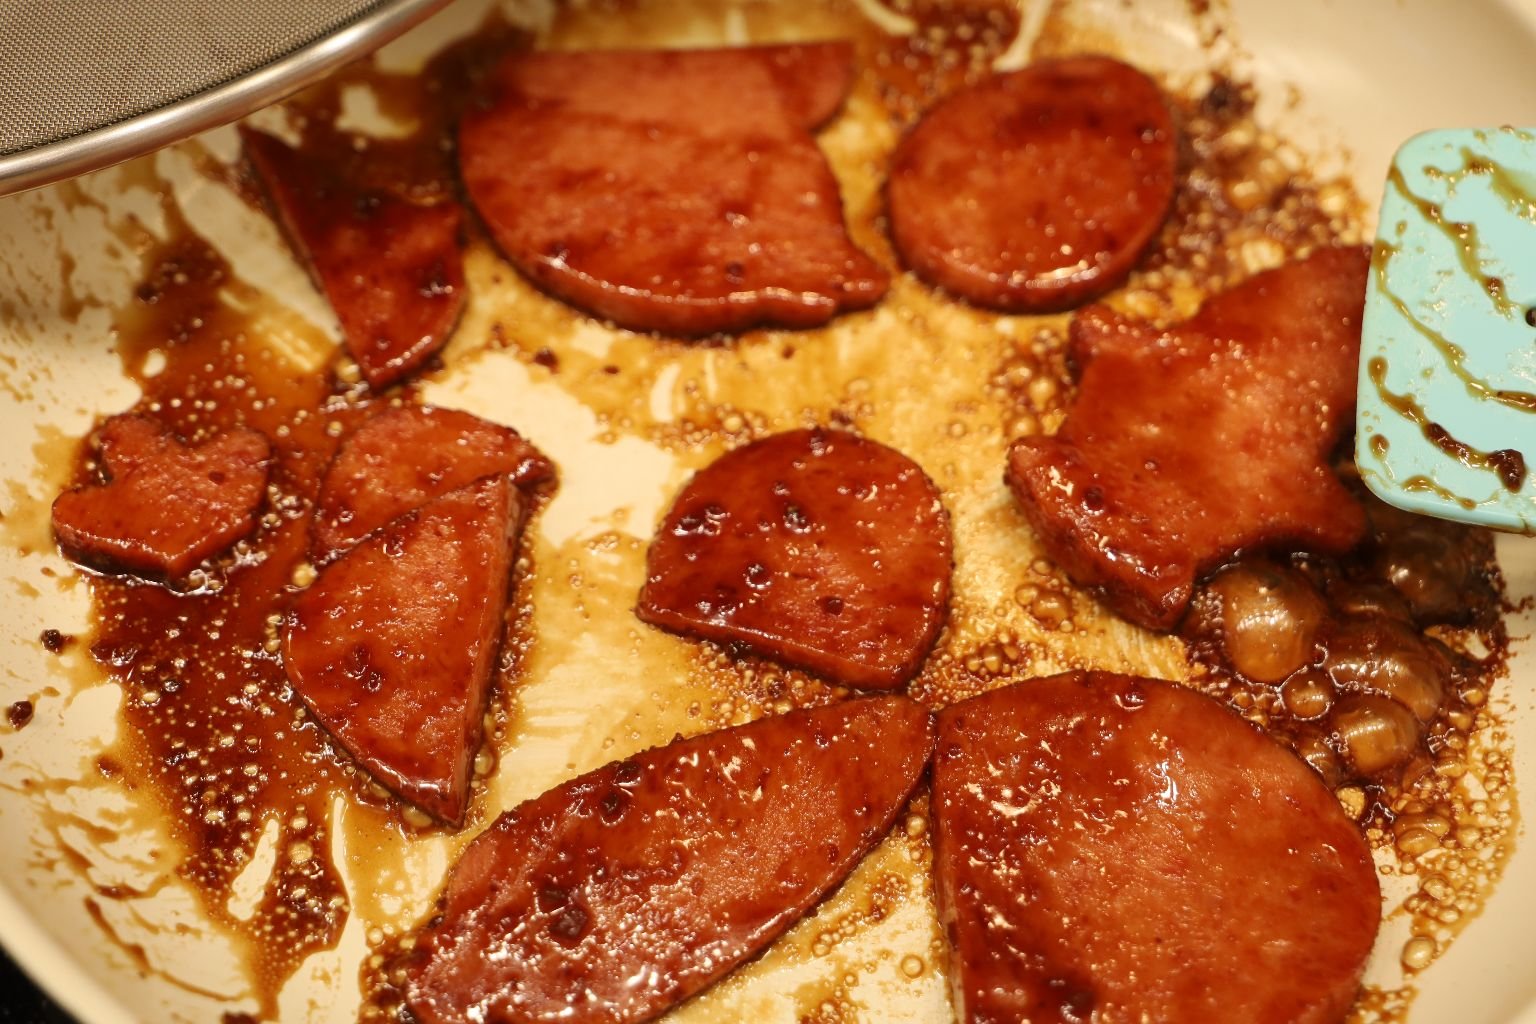
You can see the SPAM becoming caramelized in the Hawaiian Teriyaki Sauce.
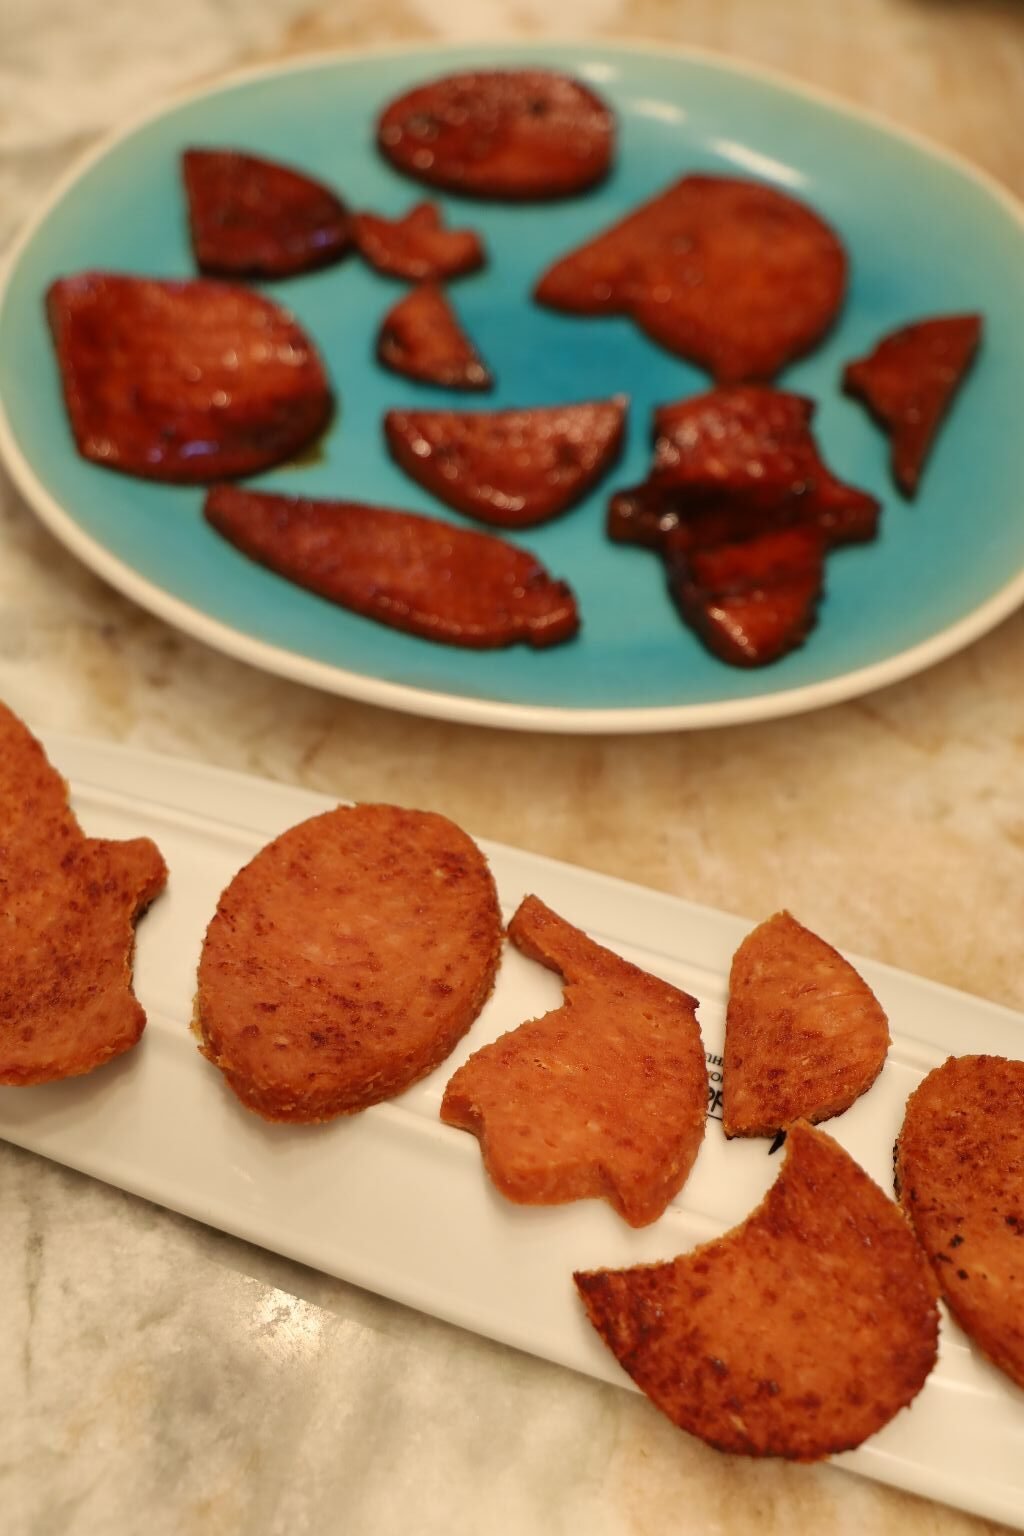
Place onto Paper Towels, and then onto a plate or tray, and set aside.
—————————————————————————-
Time To Make Our Royal Eggs
I love Royal Eggs! The great thing about them is that you can add anything you like to them, or keep them plain as is. I wanted these plain for what I had in store for them. I will give you a basic recipe and you can try them yourself..
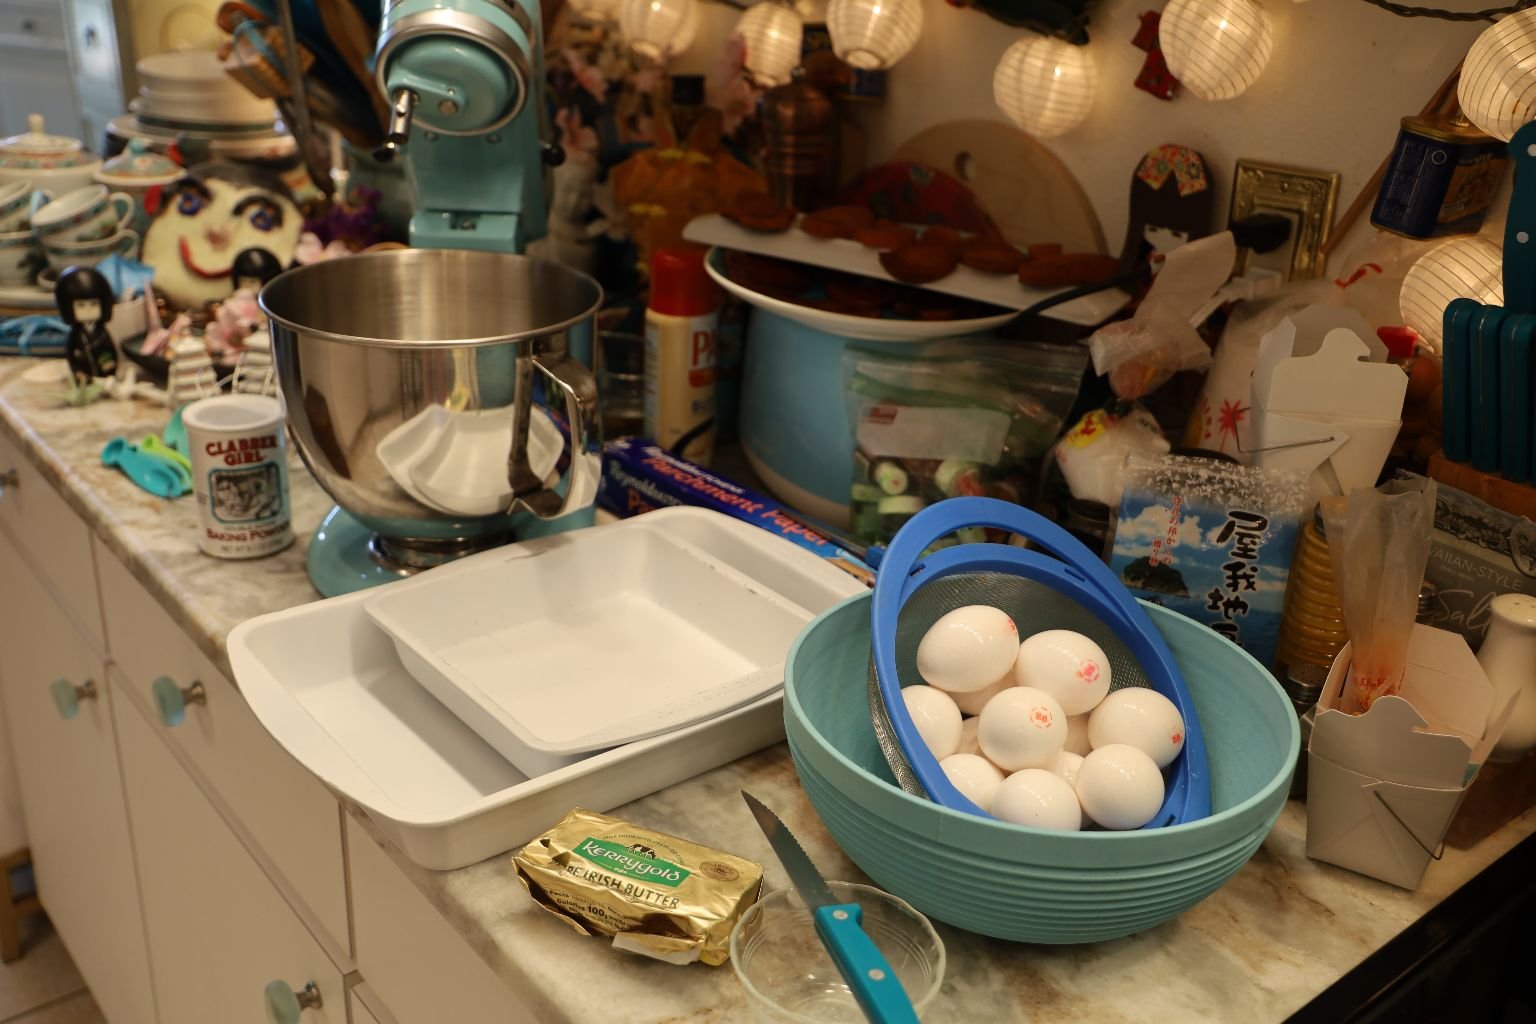
Ingredients:
12 Egg Yolks
2 t. Baking Powder
1 t. Water
1 t. Melted Butter
Parchment Paper
Cooking Oil Spray (I used a Butter Flavored)
8 or 9 inch Baking Dish
Larger pan for the Baking Dish to fit into as it will act as a water bath.
———————————————————————-
——————————————————————————-
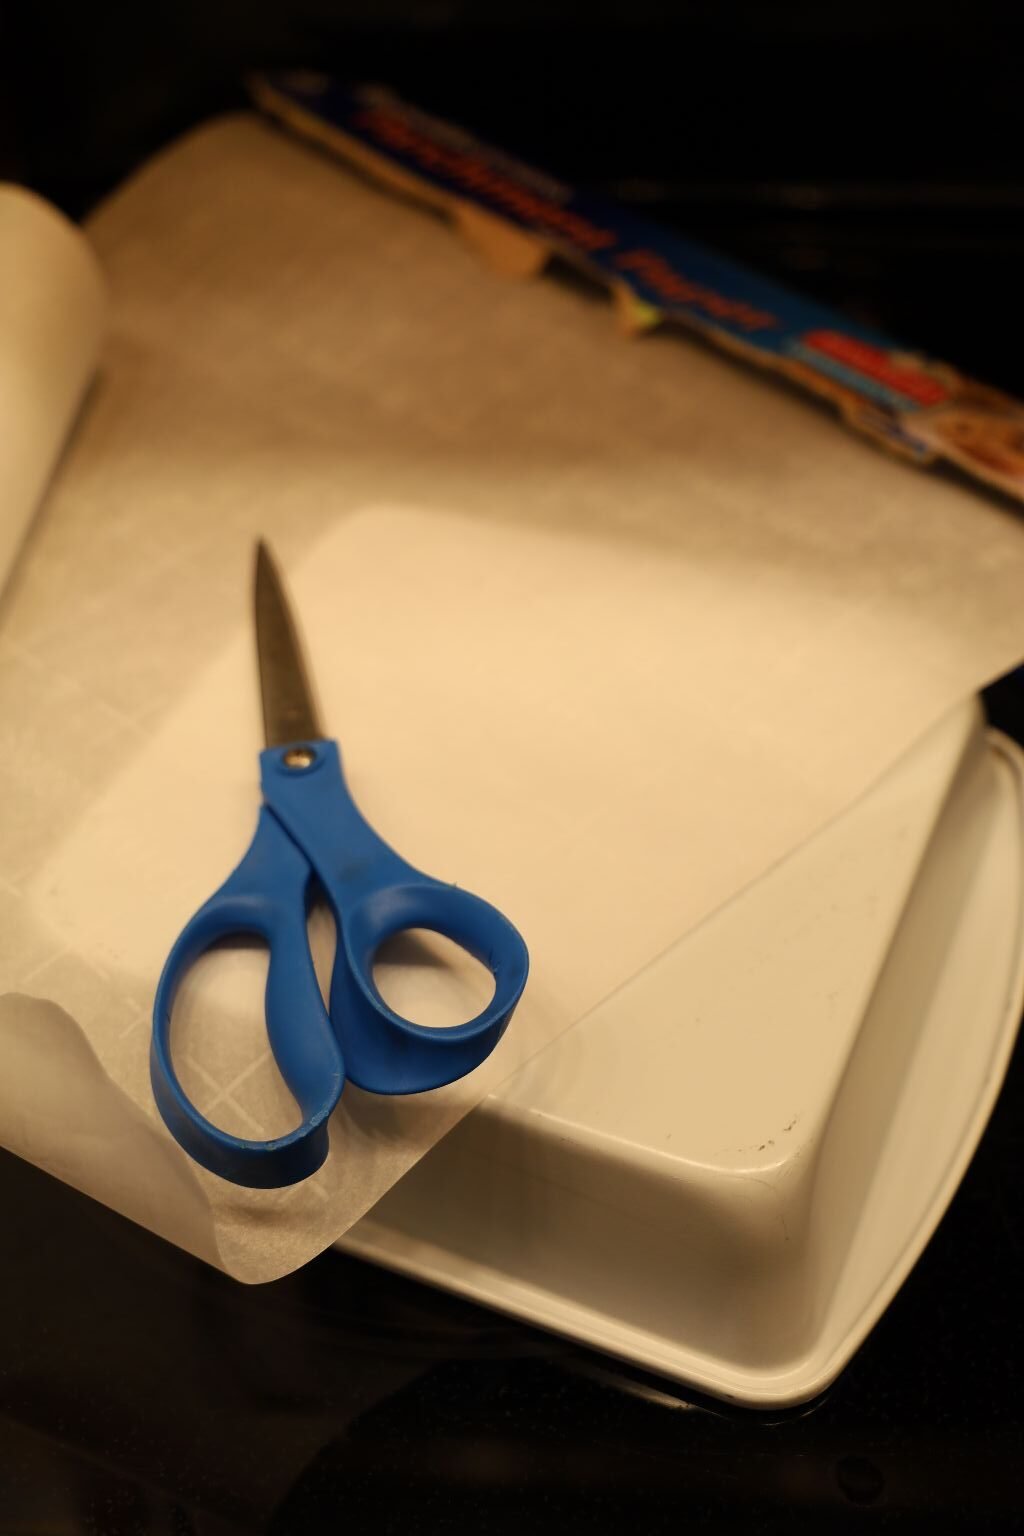
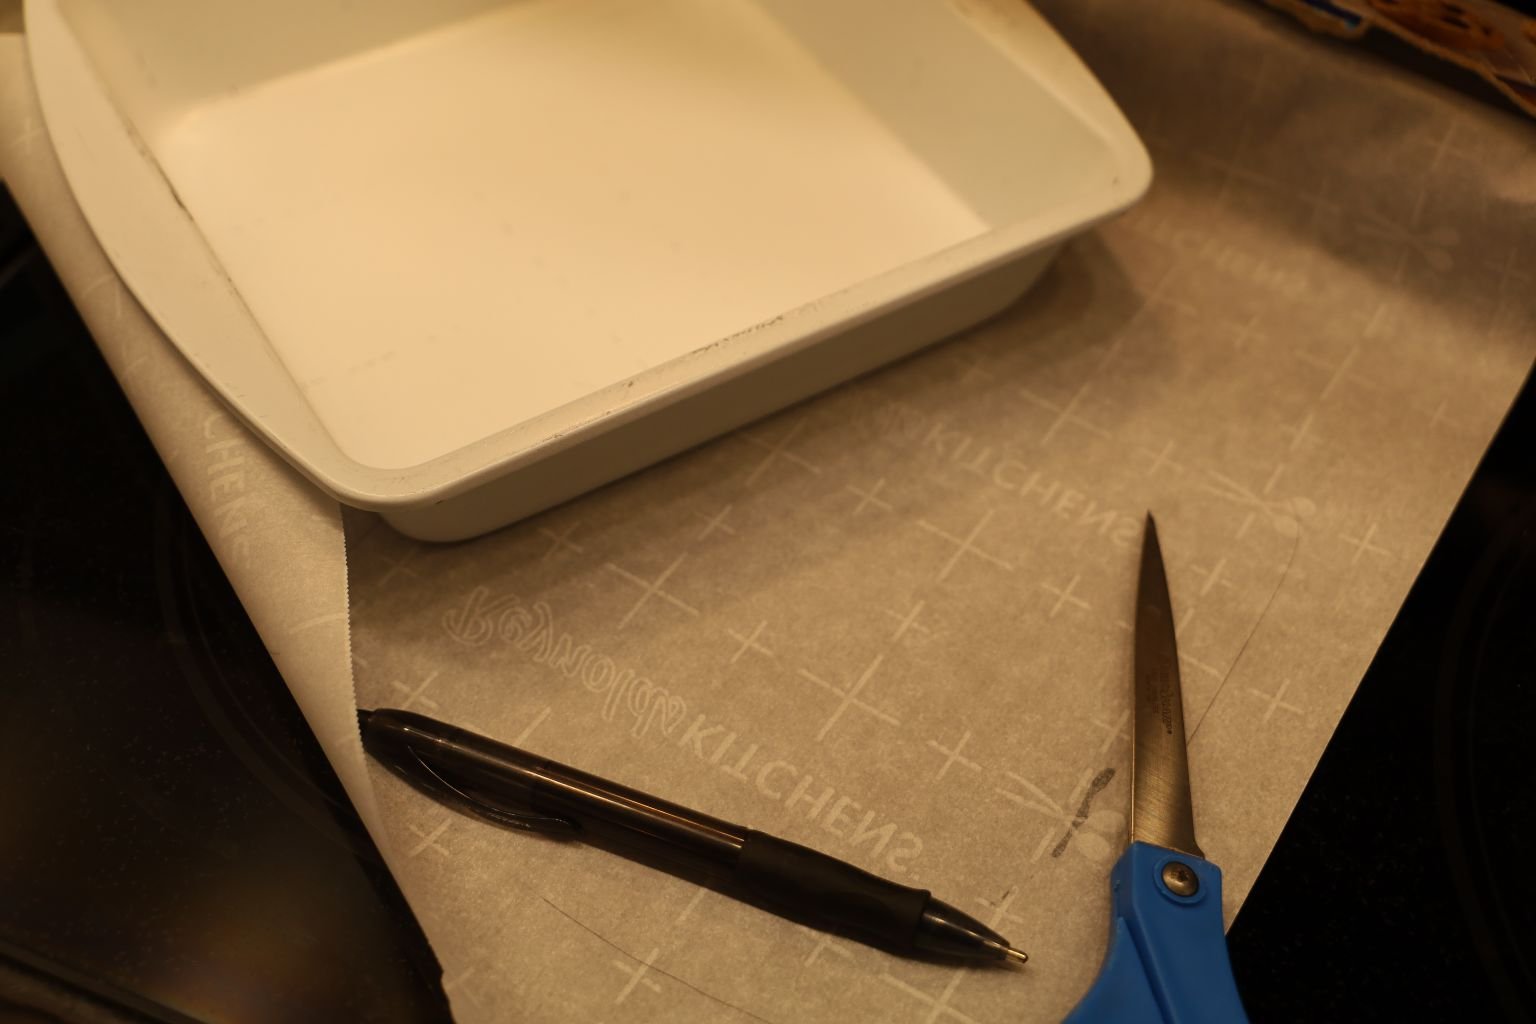
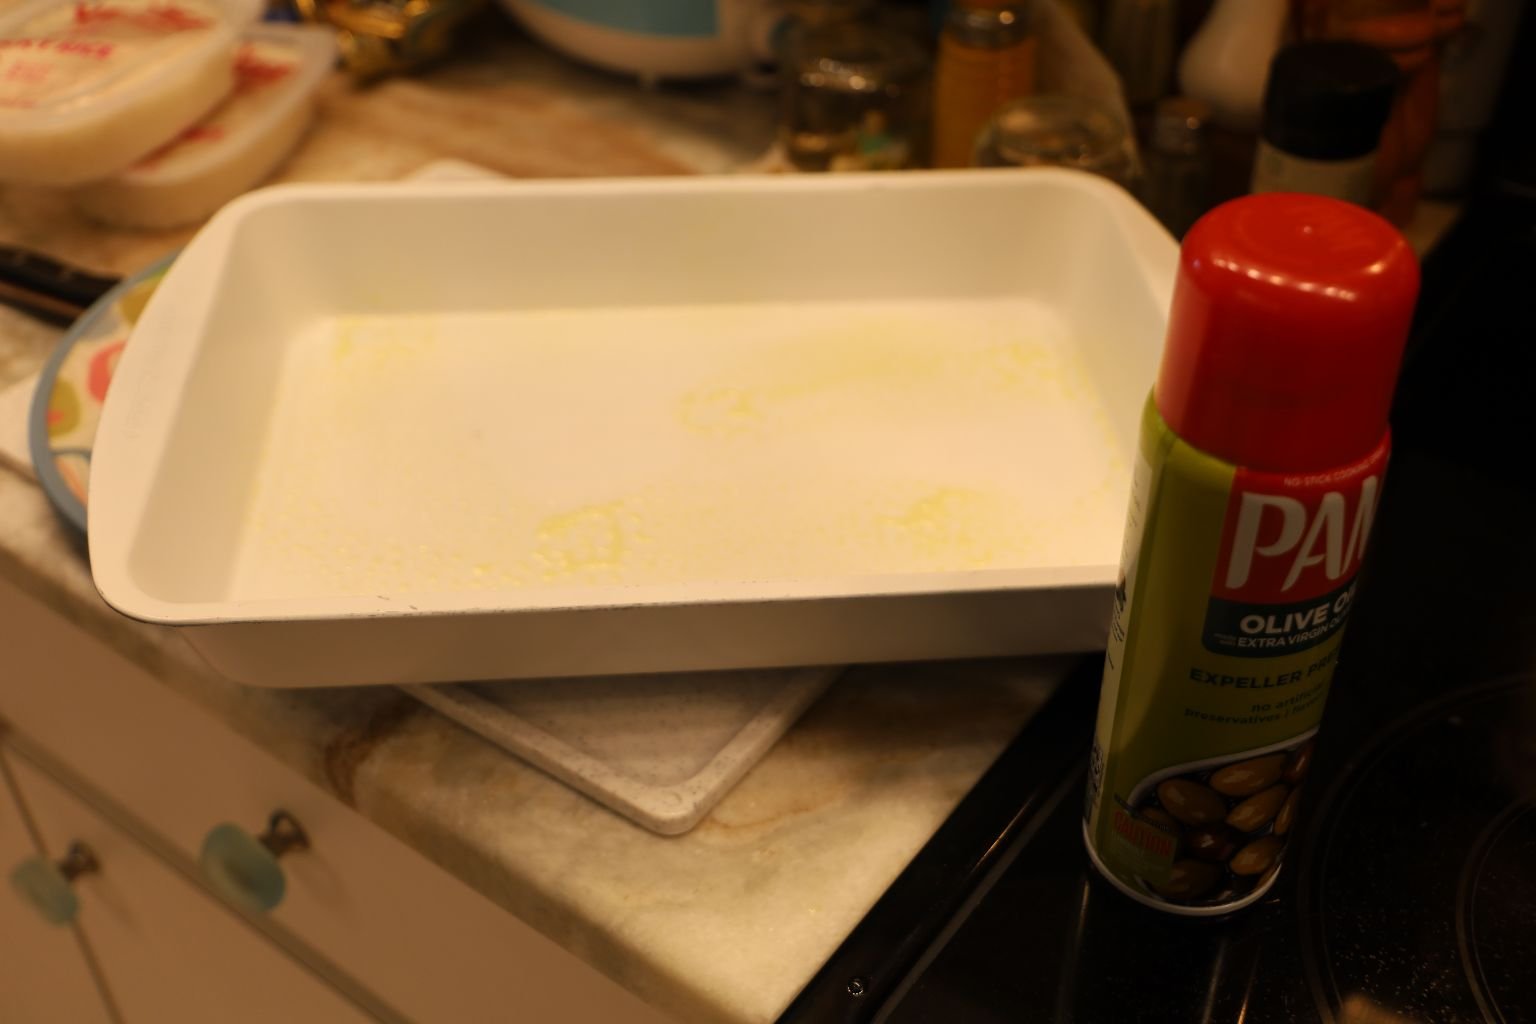
The first thing you need to do is to prepare your baking dish for the Royal Eggs.
You do this by placing a sheet of Parchment Paper down on a counter and drawing an outline of your baking dish on it with a pen or pencil, and then cut the shape out with your scissors.
You then use a Cooking Oil Spray and coat the Parchment Paper on both sides and then place it in your baking dish.
———————————————————————————
As you can see here, I placed my Baking Dish into a larger pan.
In that larger pan I will place BOILING WATER to come up half way.
So start your Tea Kettle now and get it to boiling.
——————————————————————————–
This recipe does requires a mixer.
Now it’s time to separate the Yolks from the Egg Whites. I set the Yolks in the bowl of my Mixer, and the White’s in another bowl to make my egg white omelet the following day. (Never throw the Egg White’s away.)
Beat Egg Yolks and Baking Powder until smooth and creamy.
Time to Melt the Butter in the Microwave
Then add the Water and Melted Butter and combine by using a spoon.
—————————————————————————
Now pour the mixture into your prepared Baking Dish.
LIKE SO……
————————————————————————————
Turn your oven on 325F and bring up to temperature. In the meantime, your tea pot should be piping hot by now so pour the boiling water in the pan all around your Royal Eggs.
Now place into the oven for about 15 minutes or until nice and firm.
—————————————————————————
When finished remove from the oven, then remove the eggs from the water bath and set on a cooling rack for about 10 minutes.
—————————————————————————————————
Next Batch of Royal Eggs (PINK)
I Did The Same Here As I Did above….
Food Coloring
You Can Use Any That You Choose
It is at this point that you add the PINK Food Coloring.
Bake, Just as Above….
Then Cool on a Cooling Rack
—————————————————————————————-
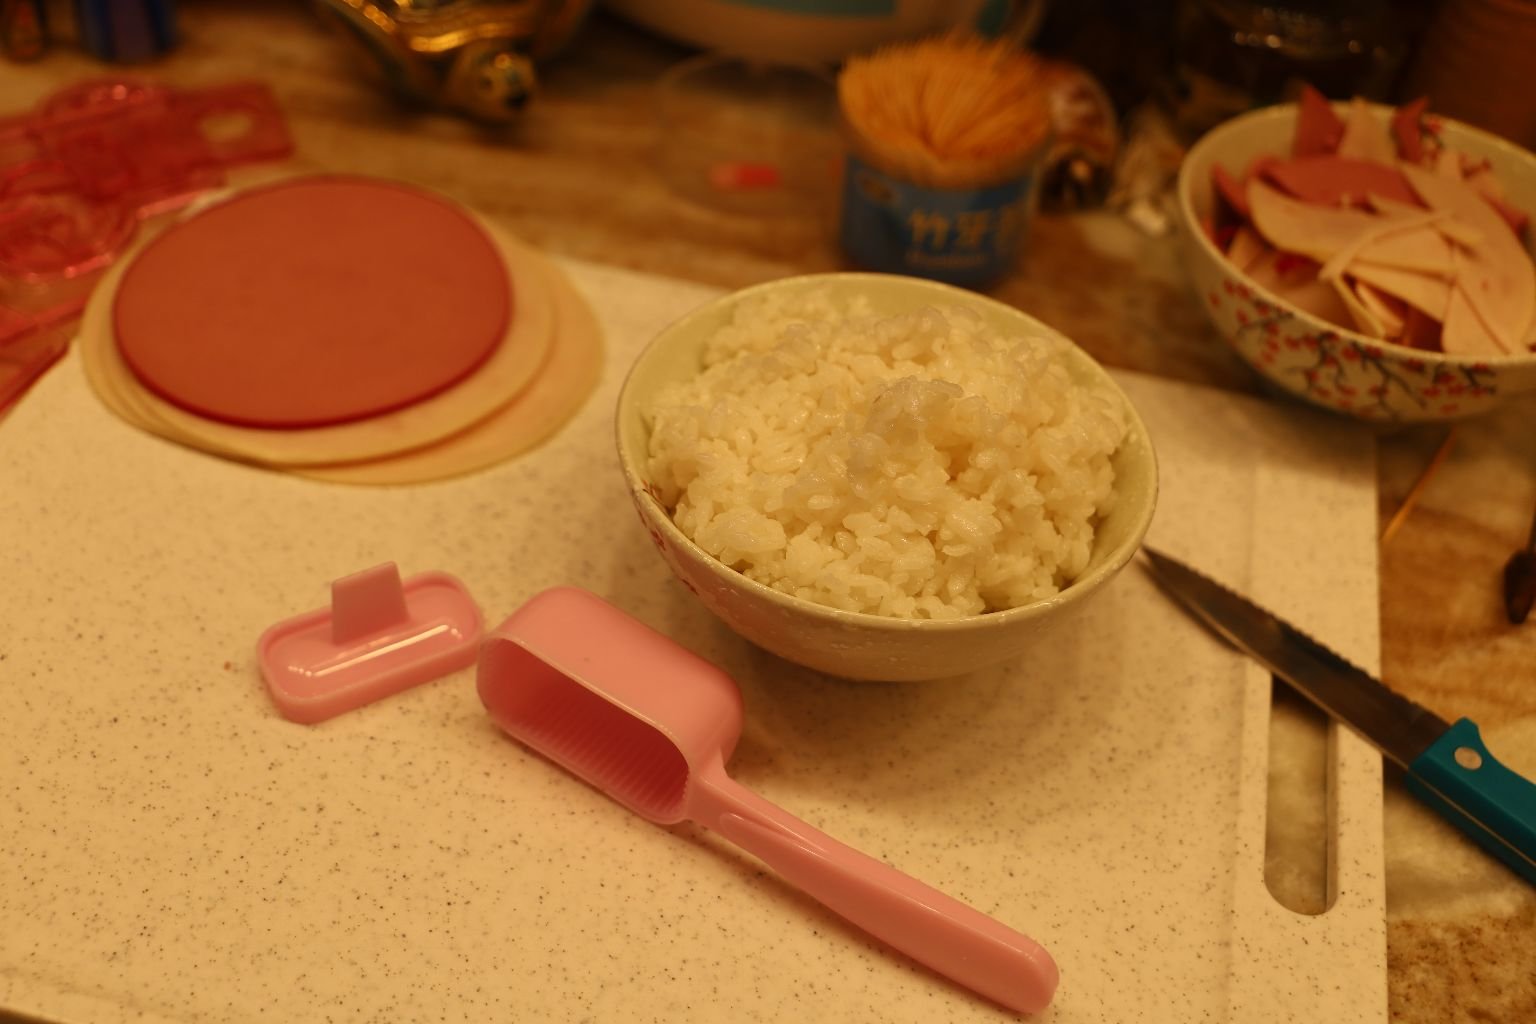
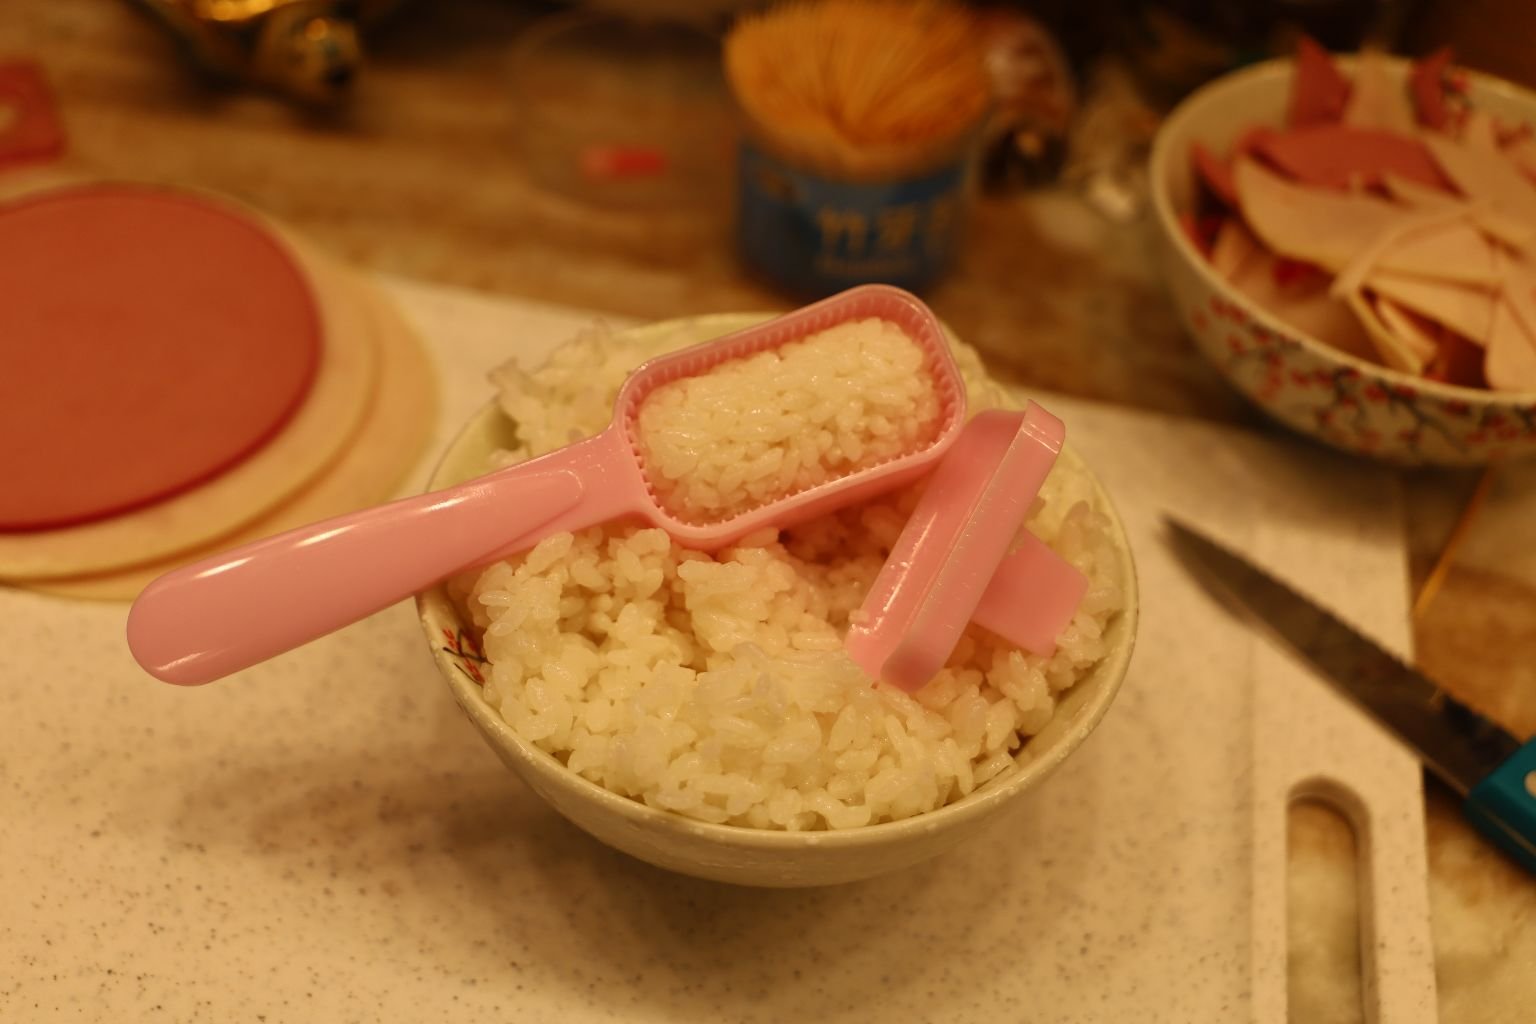
The Sticky Rice
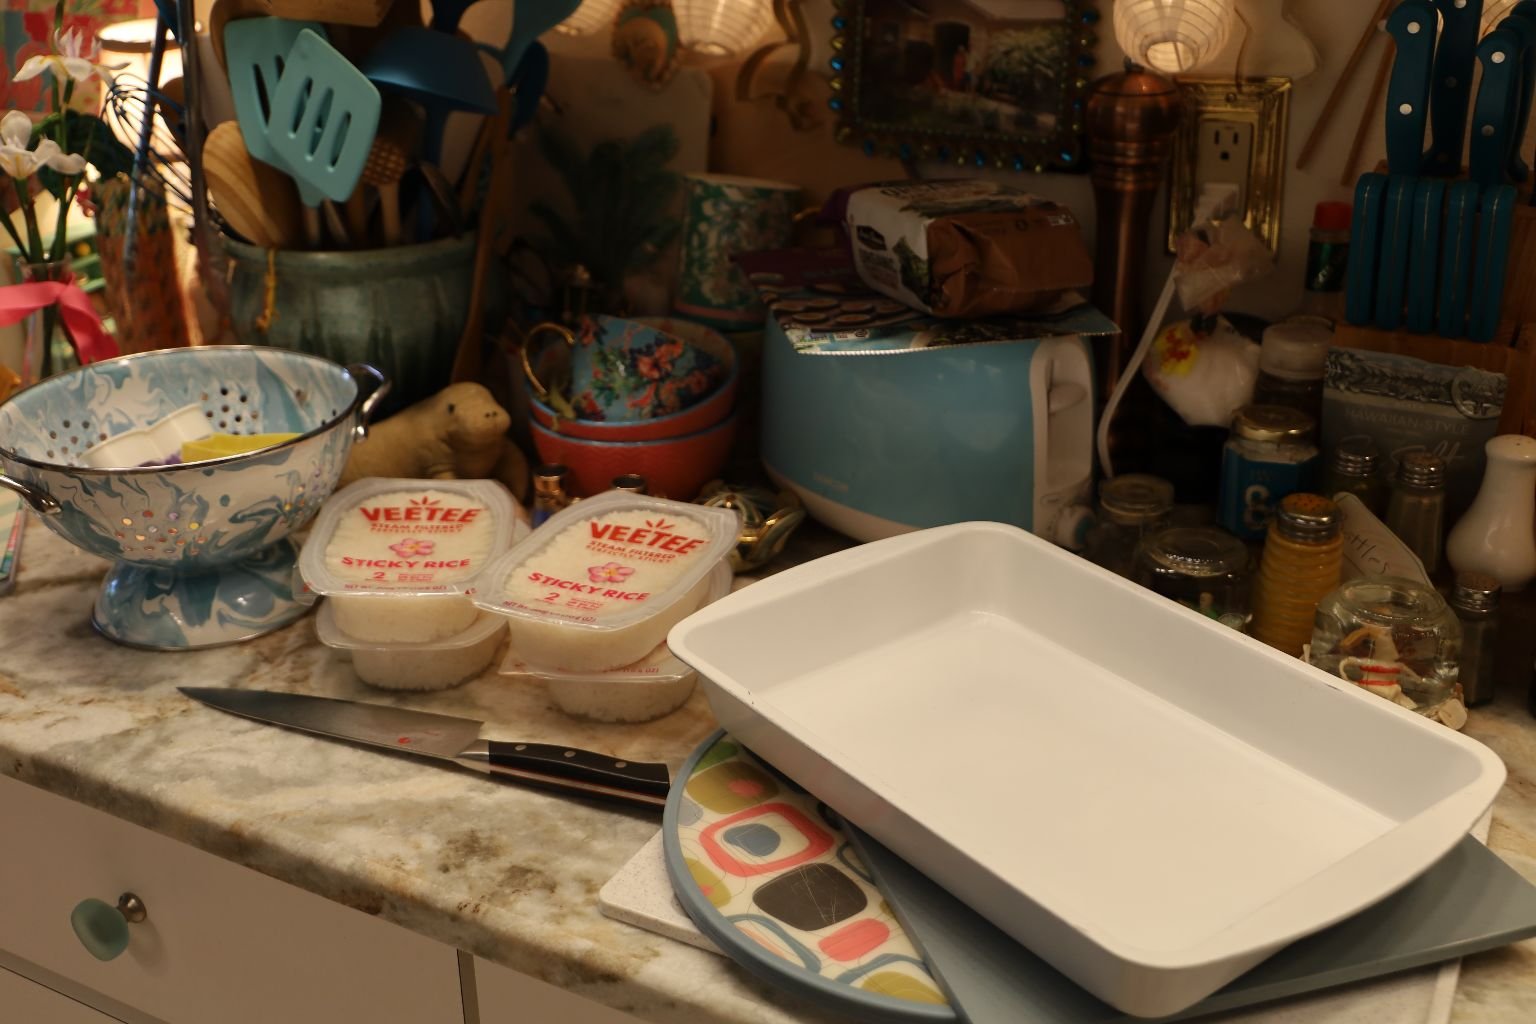
I know how to make Sticky Rice, we have made it many times in our Rice Maker. However, I was trying to find a shortcut here so I bought these Ready Made Sticky Rice products.
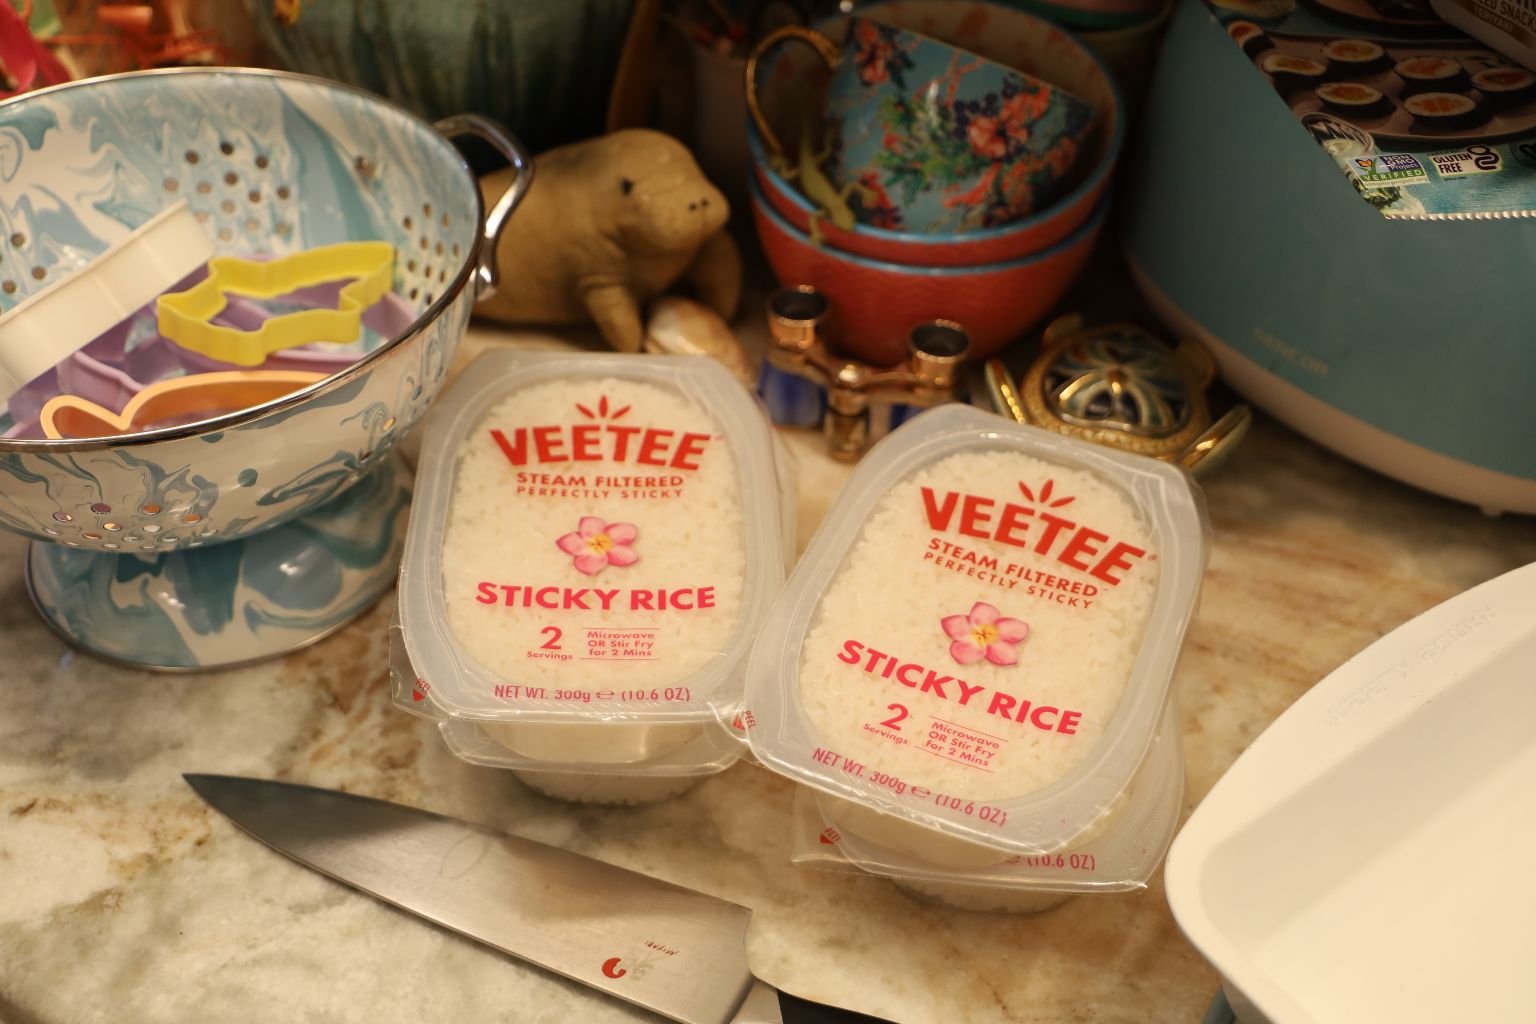
The package directions say to either heat them up in the Microwave, (which is dangerous to do with these types of plastic containers). or to Stir-Fry them in a wok, or Stove Top Pan….
I Decided To Use A Wok
I Am Preparing a Pan For The Sticky Rice Here
First, Spray a Light Coating of any Cooking Oil Spray…
—————————————————————————–
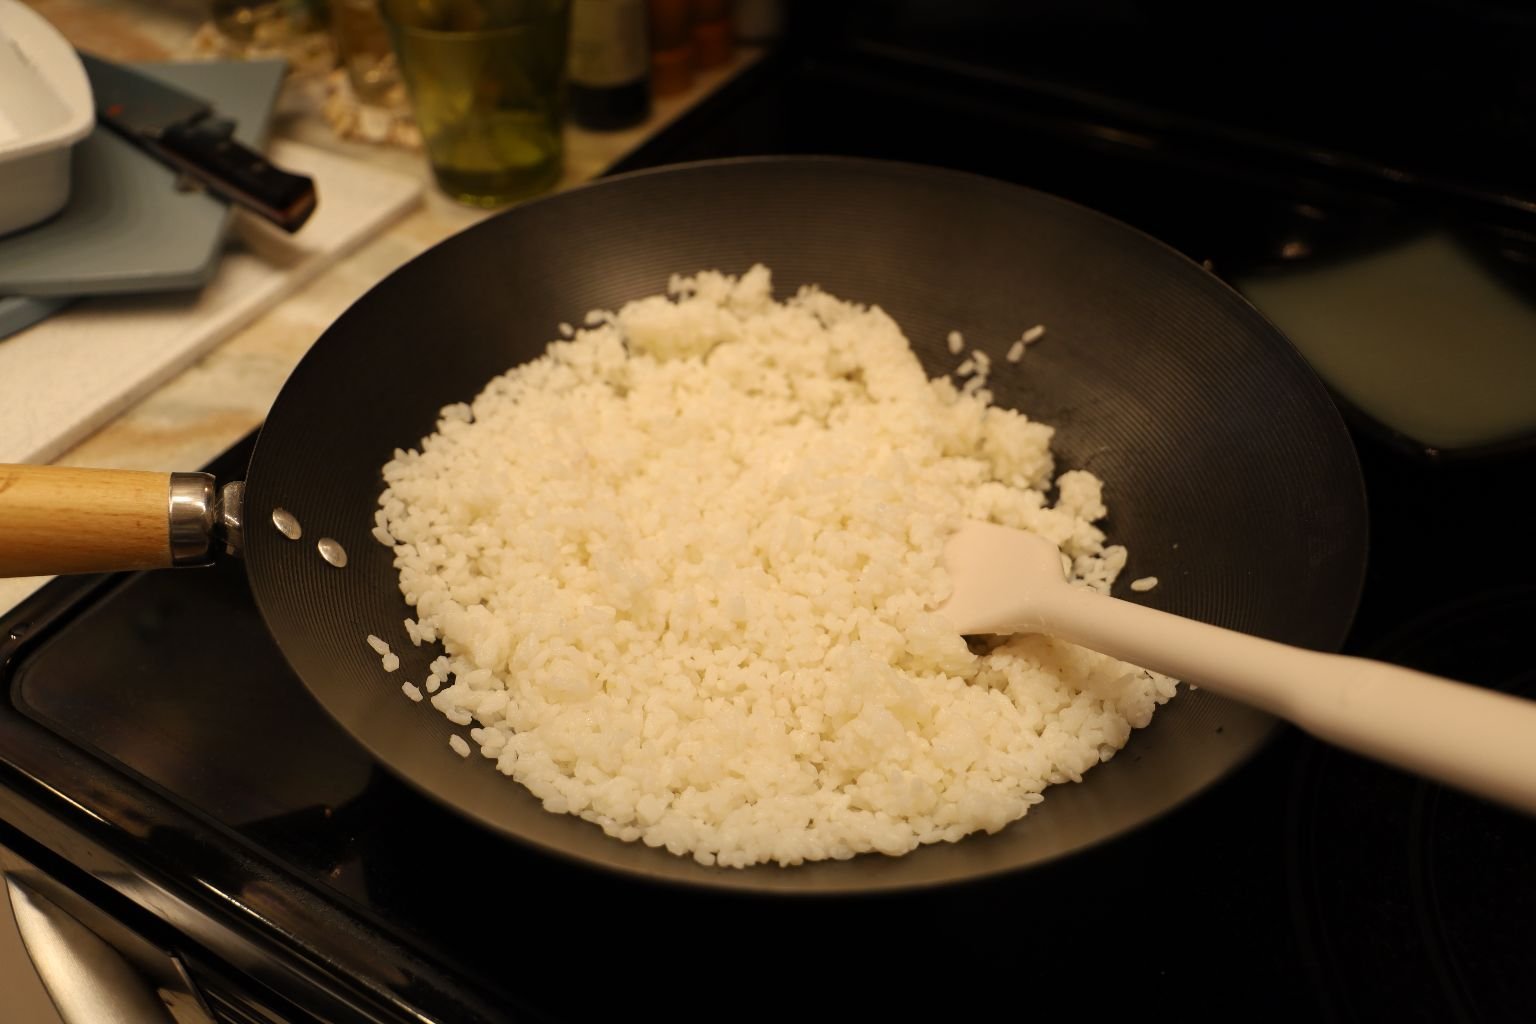

I Did Place the Sticky Rice Into A Wok with a Little Bit of Vegetable Oil, and Stirred it Around for a Few Minutes, Until Ready.
———————————————————————————-
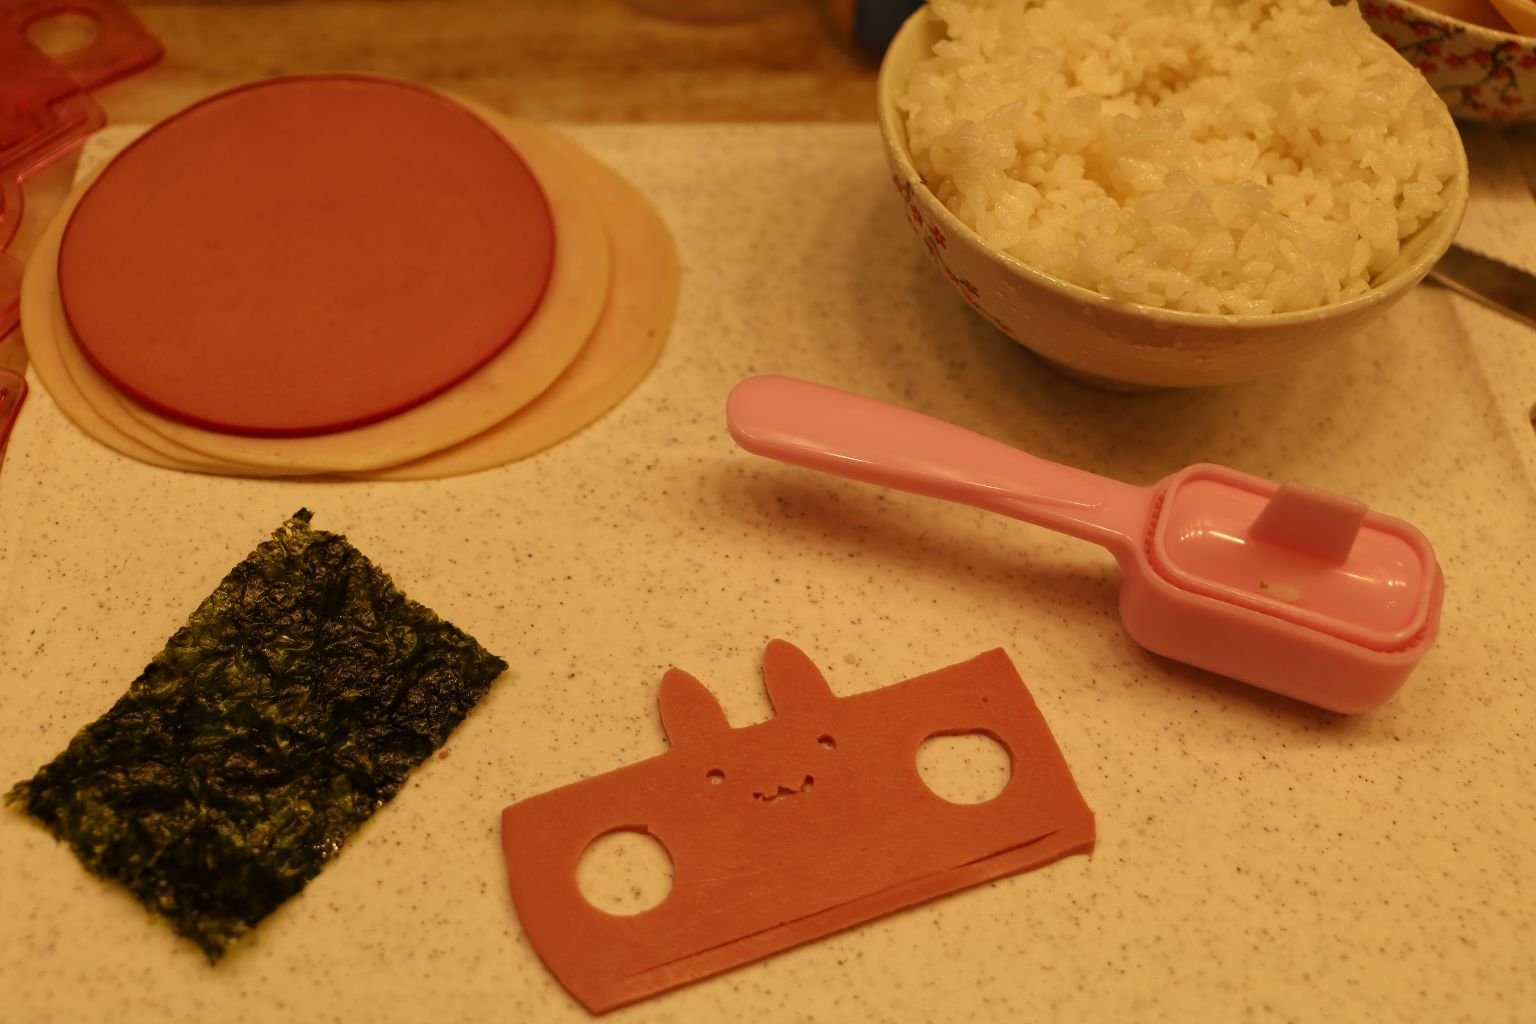
Making My Sticky Rice Shapes
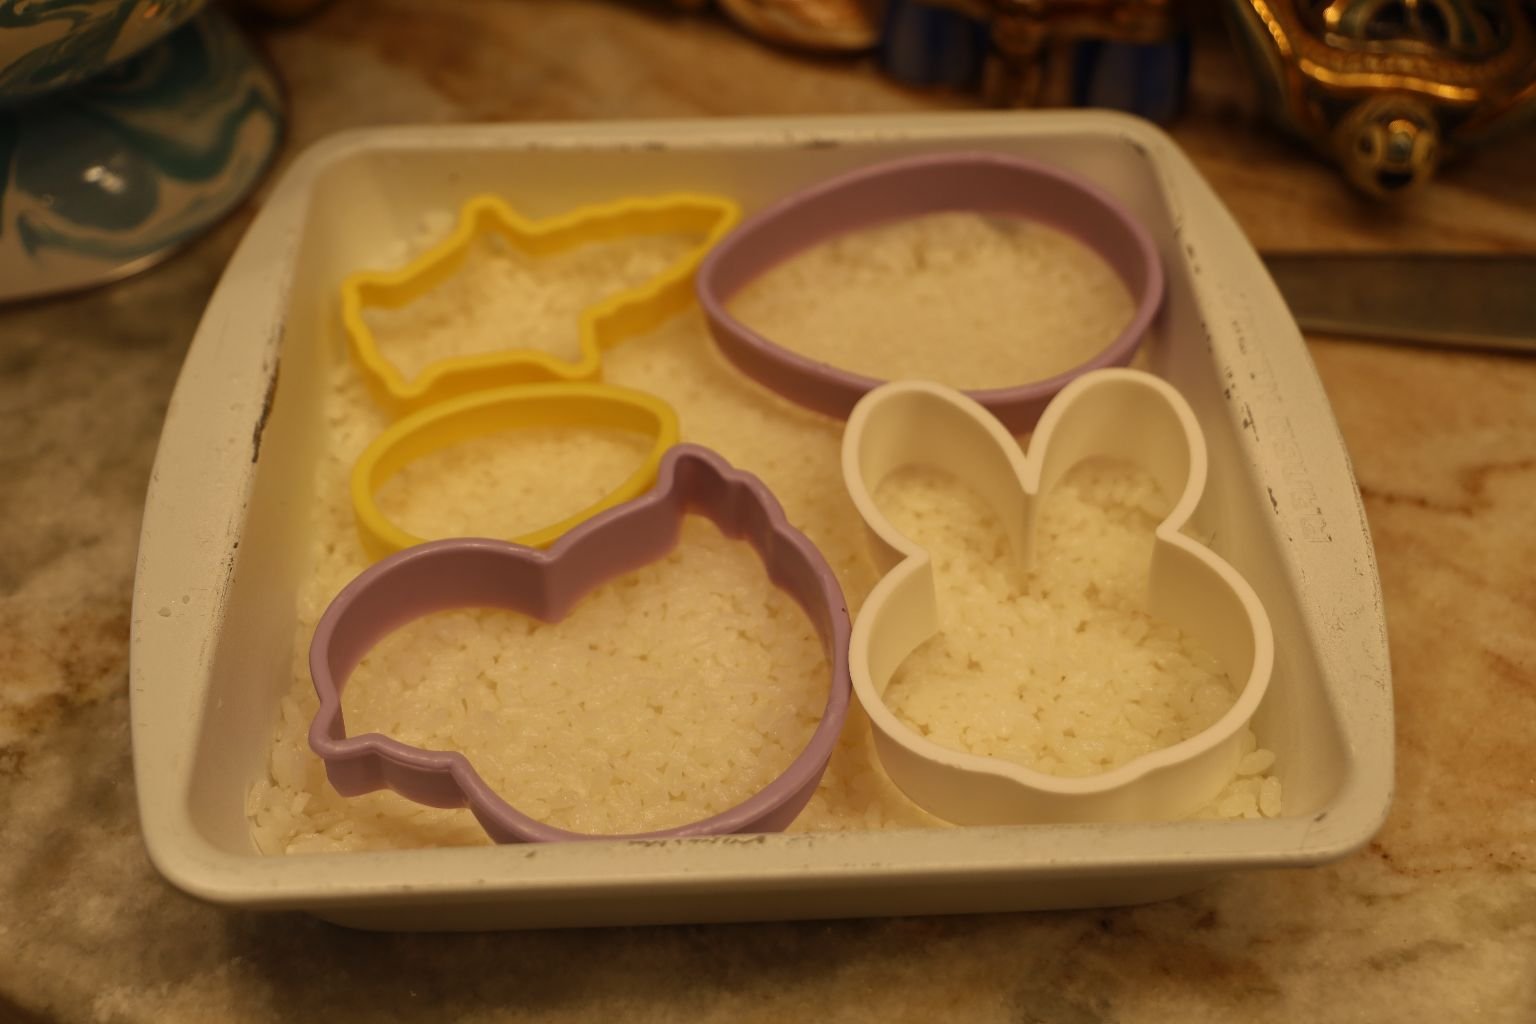
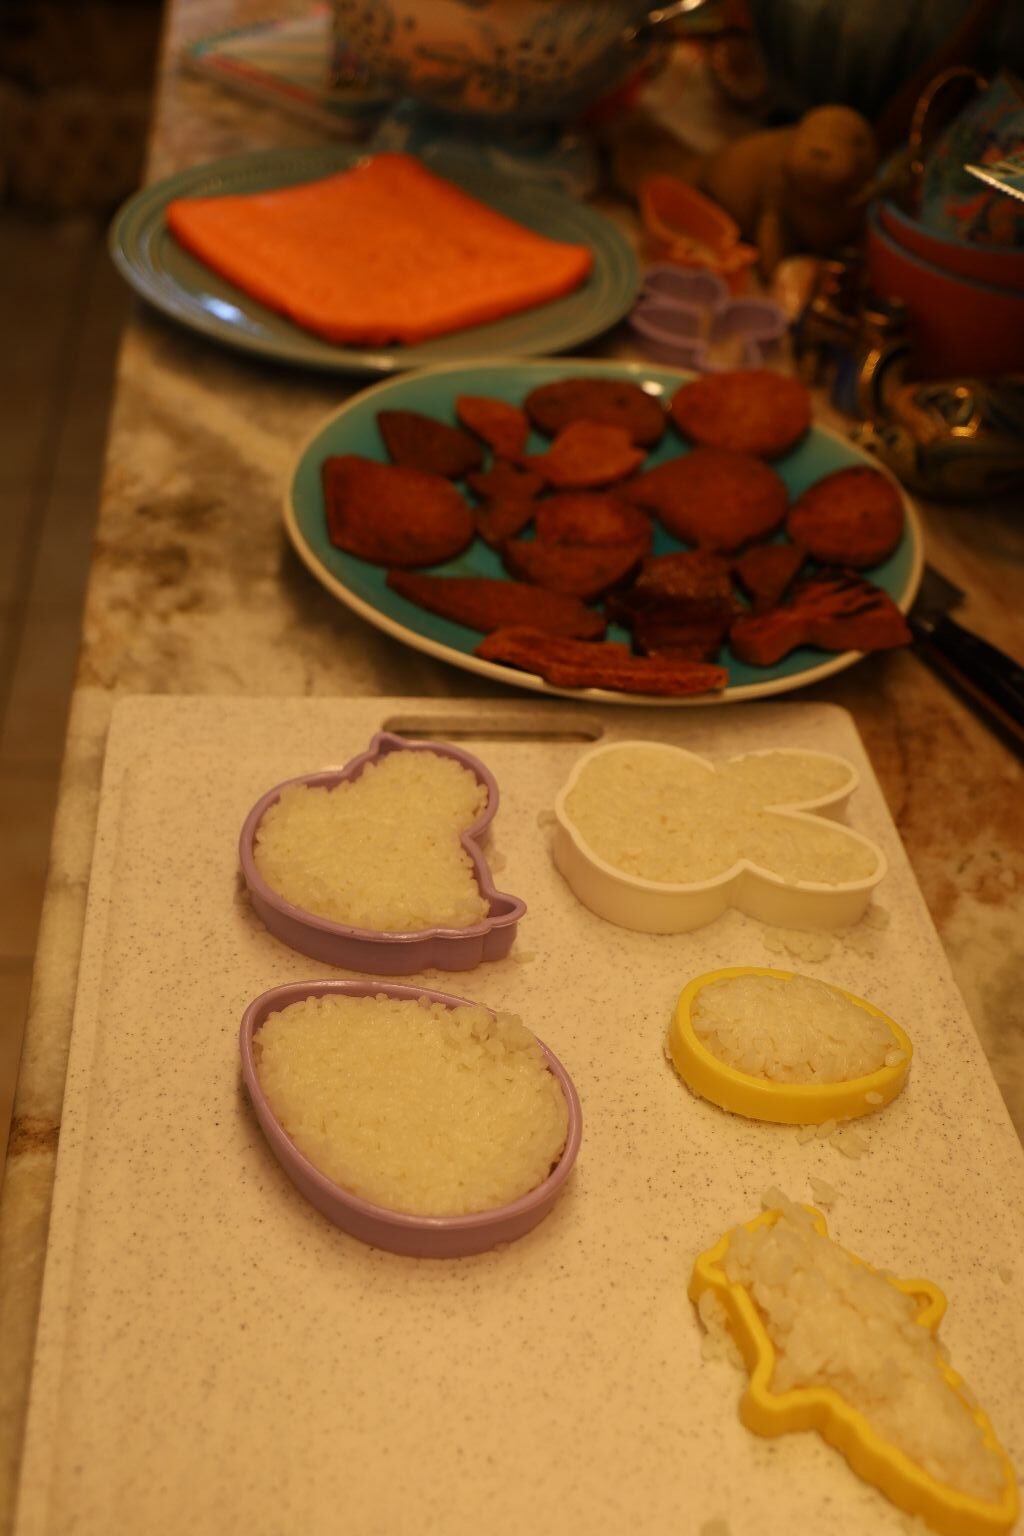
The thing about Sticky Rice is that it is Sticky and does very well in cookie cutter shapes or molds.
Here, I have made some nice Easter shapes for our Easter Treats.
Now It’s Time To Make the Shapes in the Royal Eggs


Like So….
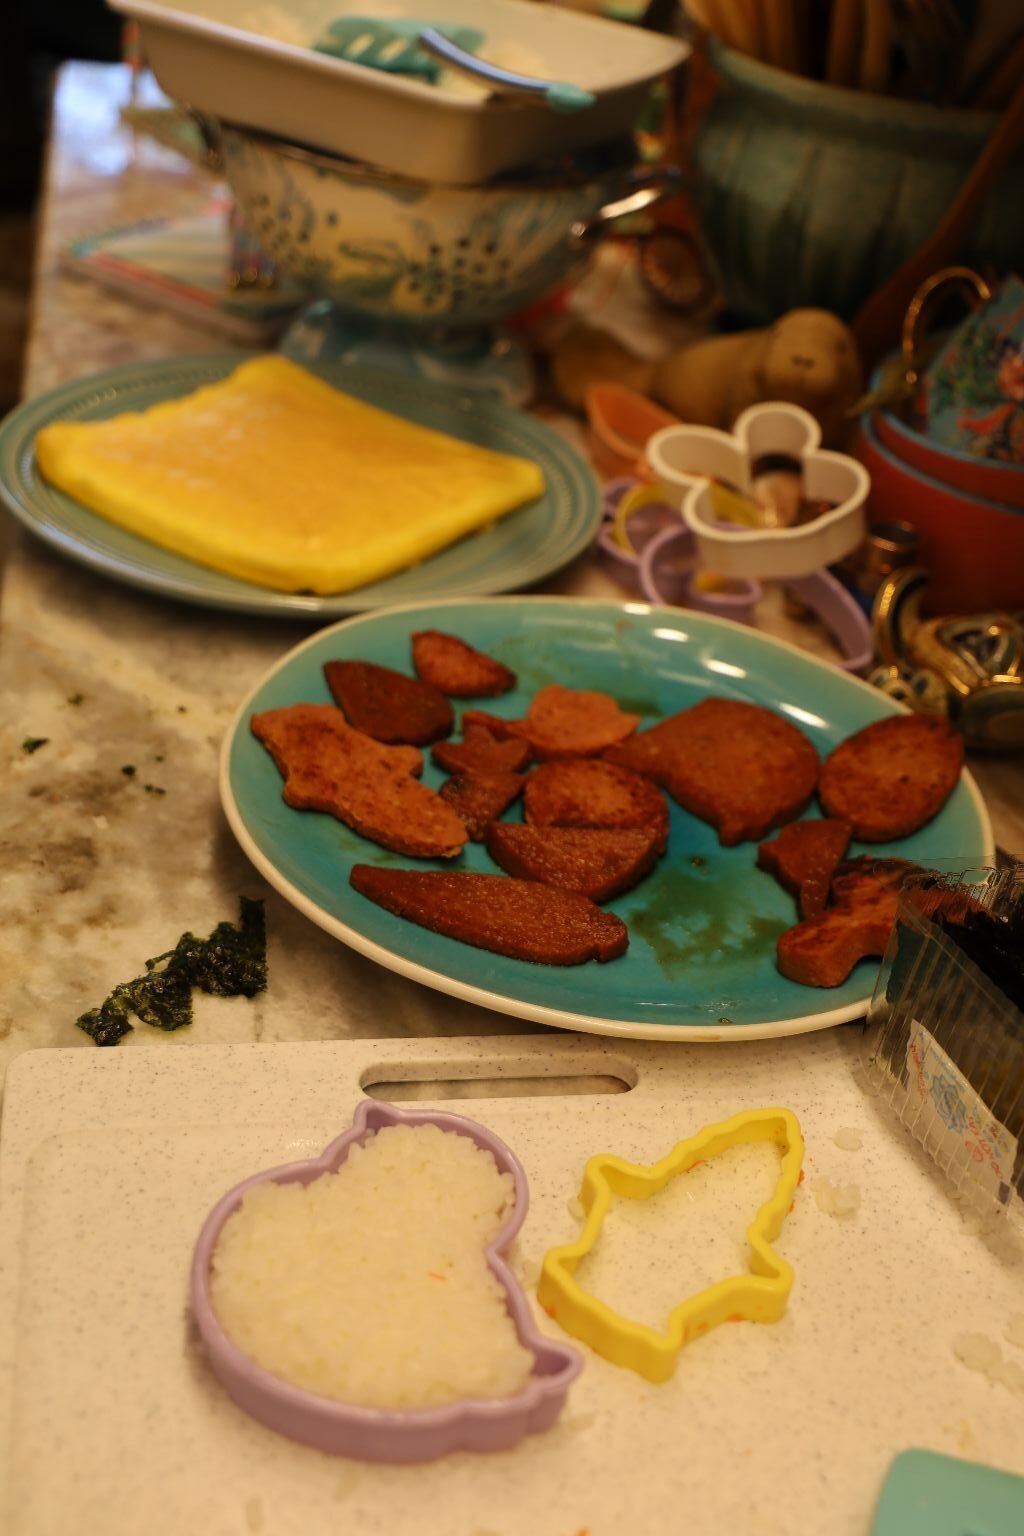
Now It’s Time To Put The Shapes Together
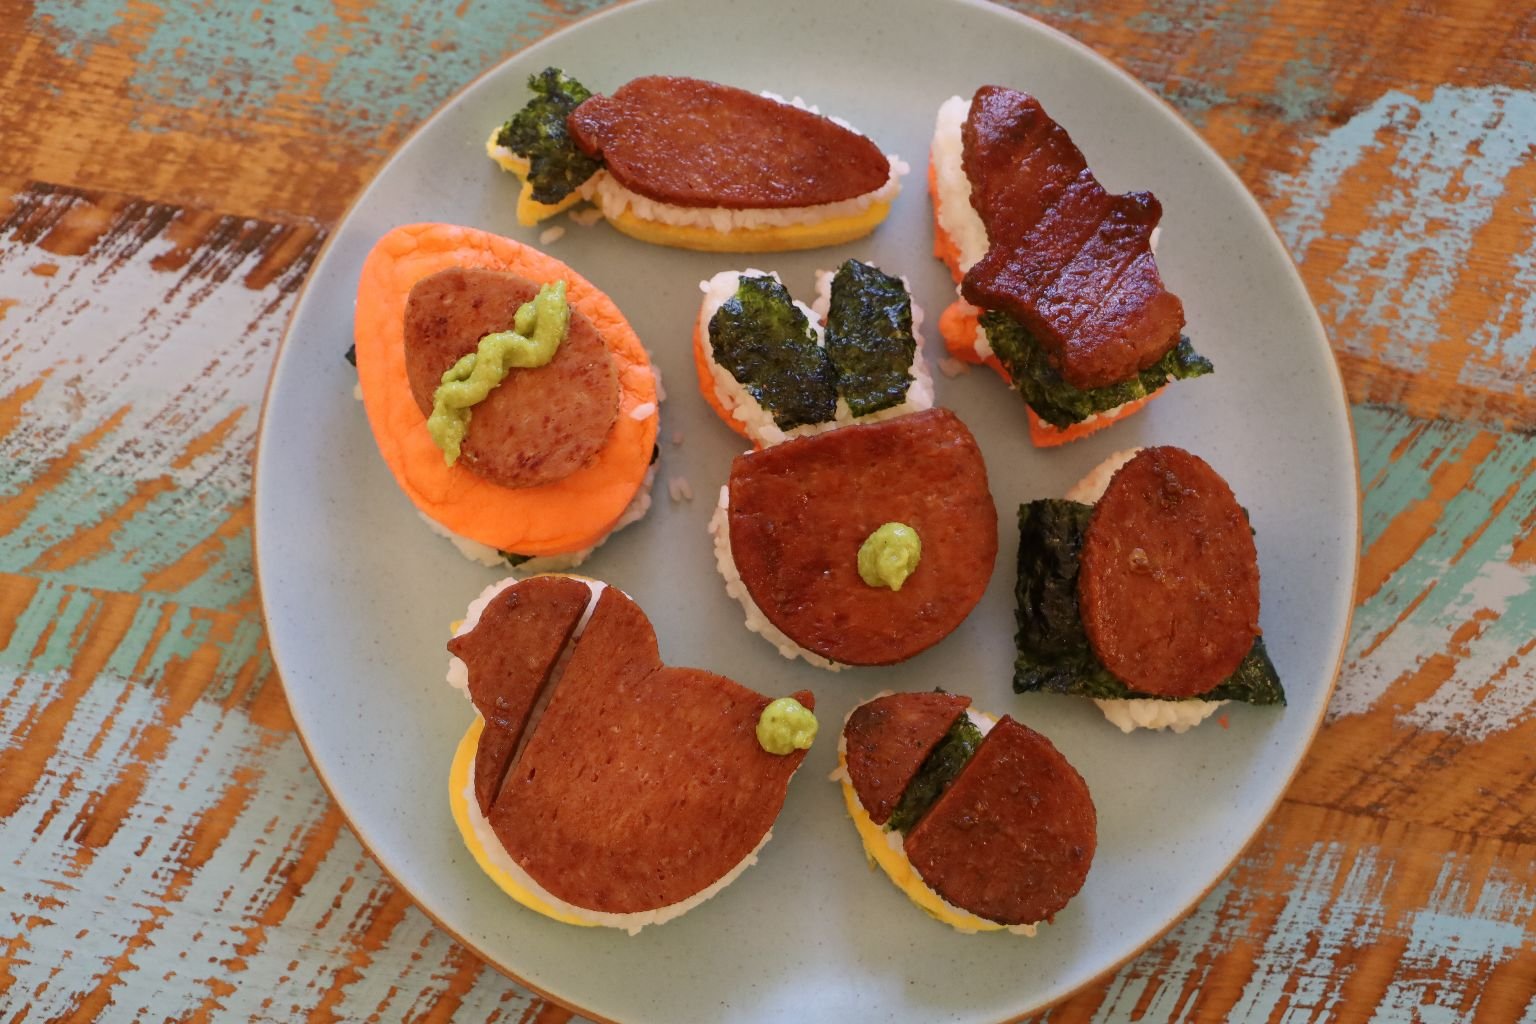

Try Stacking Them:
EGG,
RICE,
SPAM,
Sea Weed,
Wasabi…
Be Creative and use Your Imagination!
—————————————————————————–
Luncheon Molds Treats
————————————————————————————-
I found these great food molds at the Asian Supermarket and I really wanted to give them a try.
Although I could not read the Asian writing instructions, I did understand the photographic instructions.
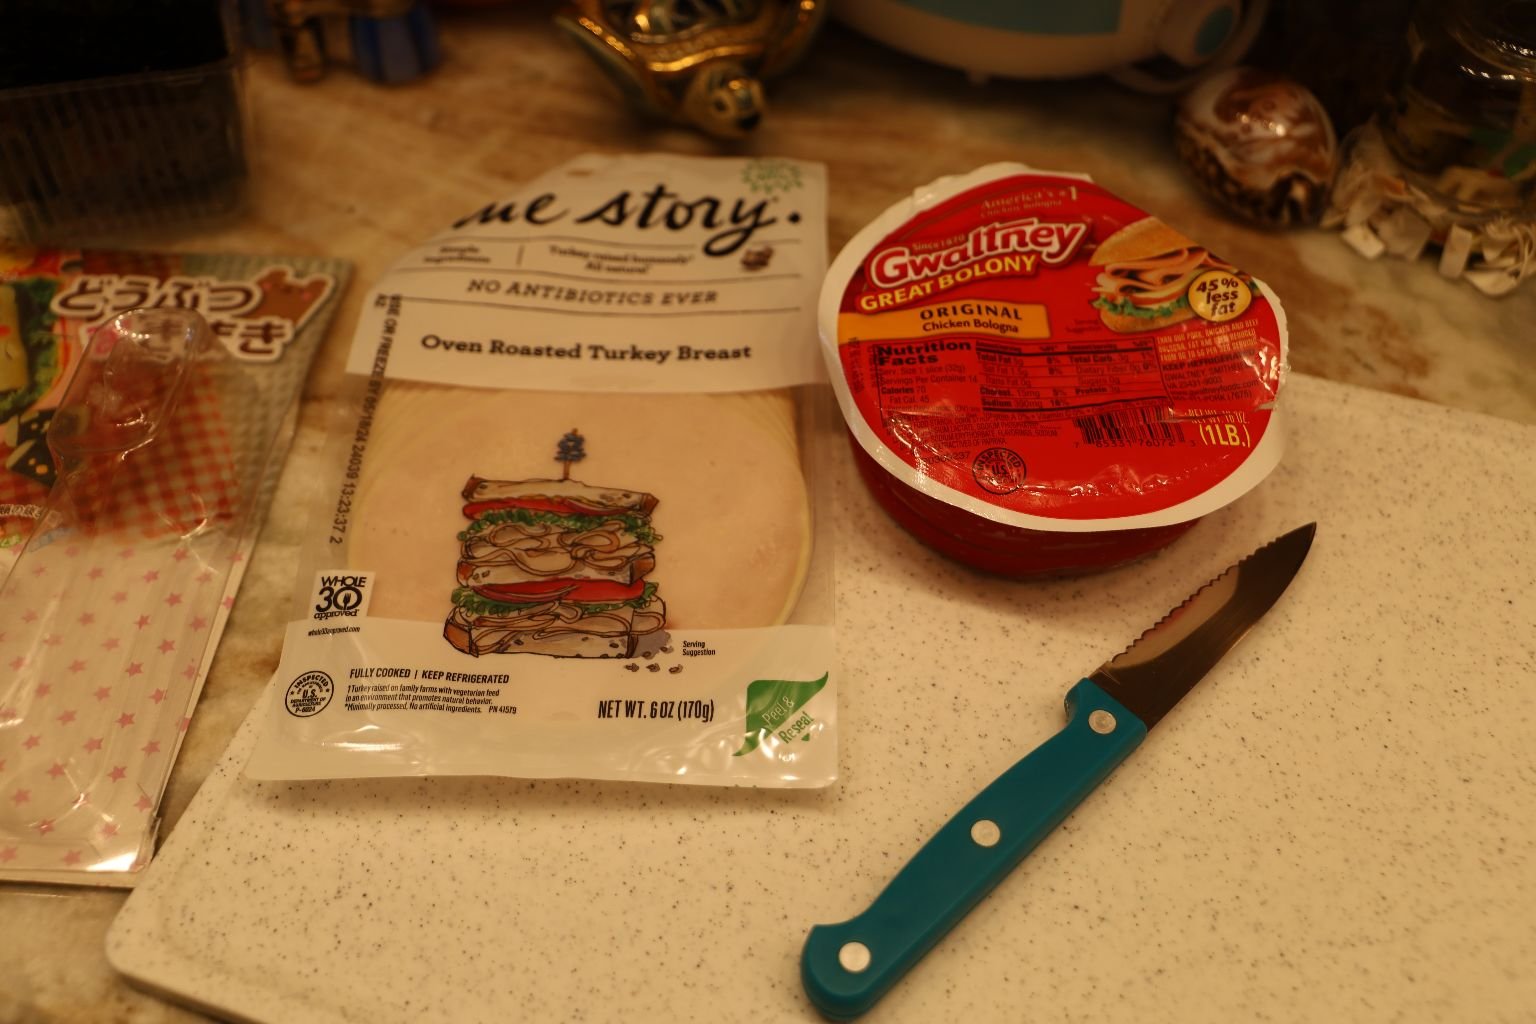
I knew that I wanted some meat, as in turkey and Bologna.
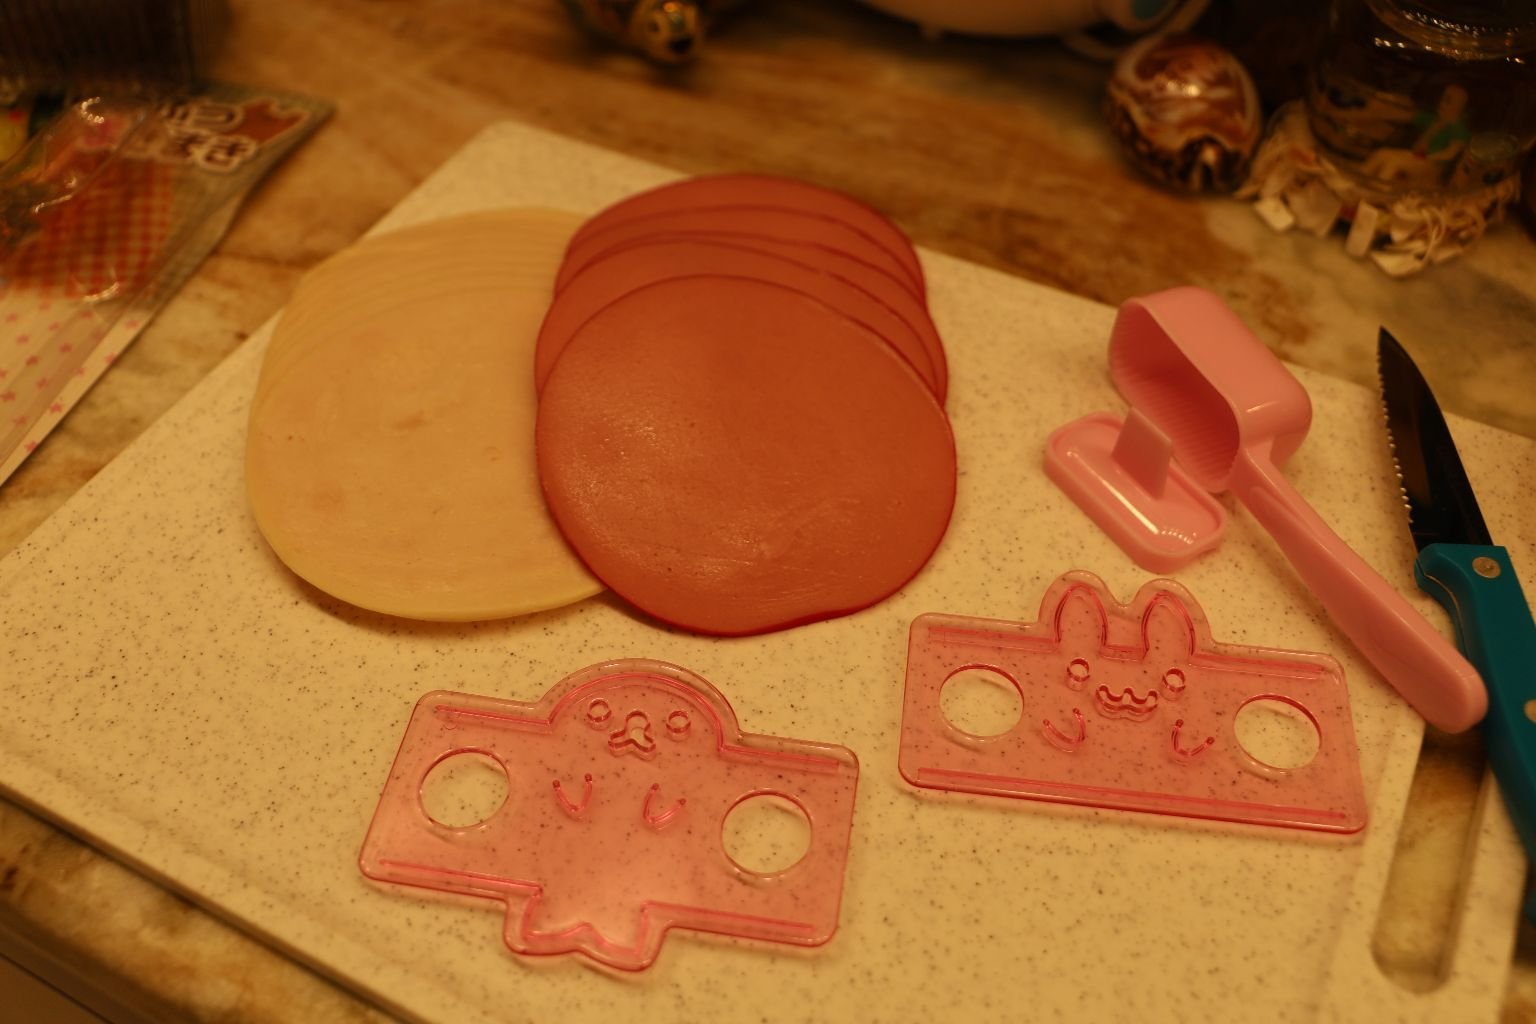
I placed one of the molds on top of a slice of Bologna, like so…
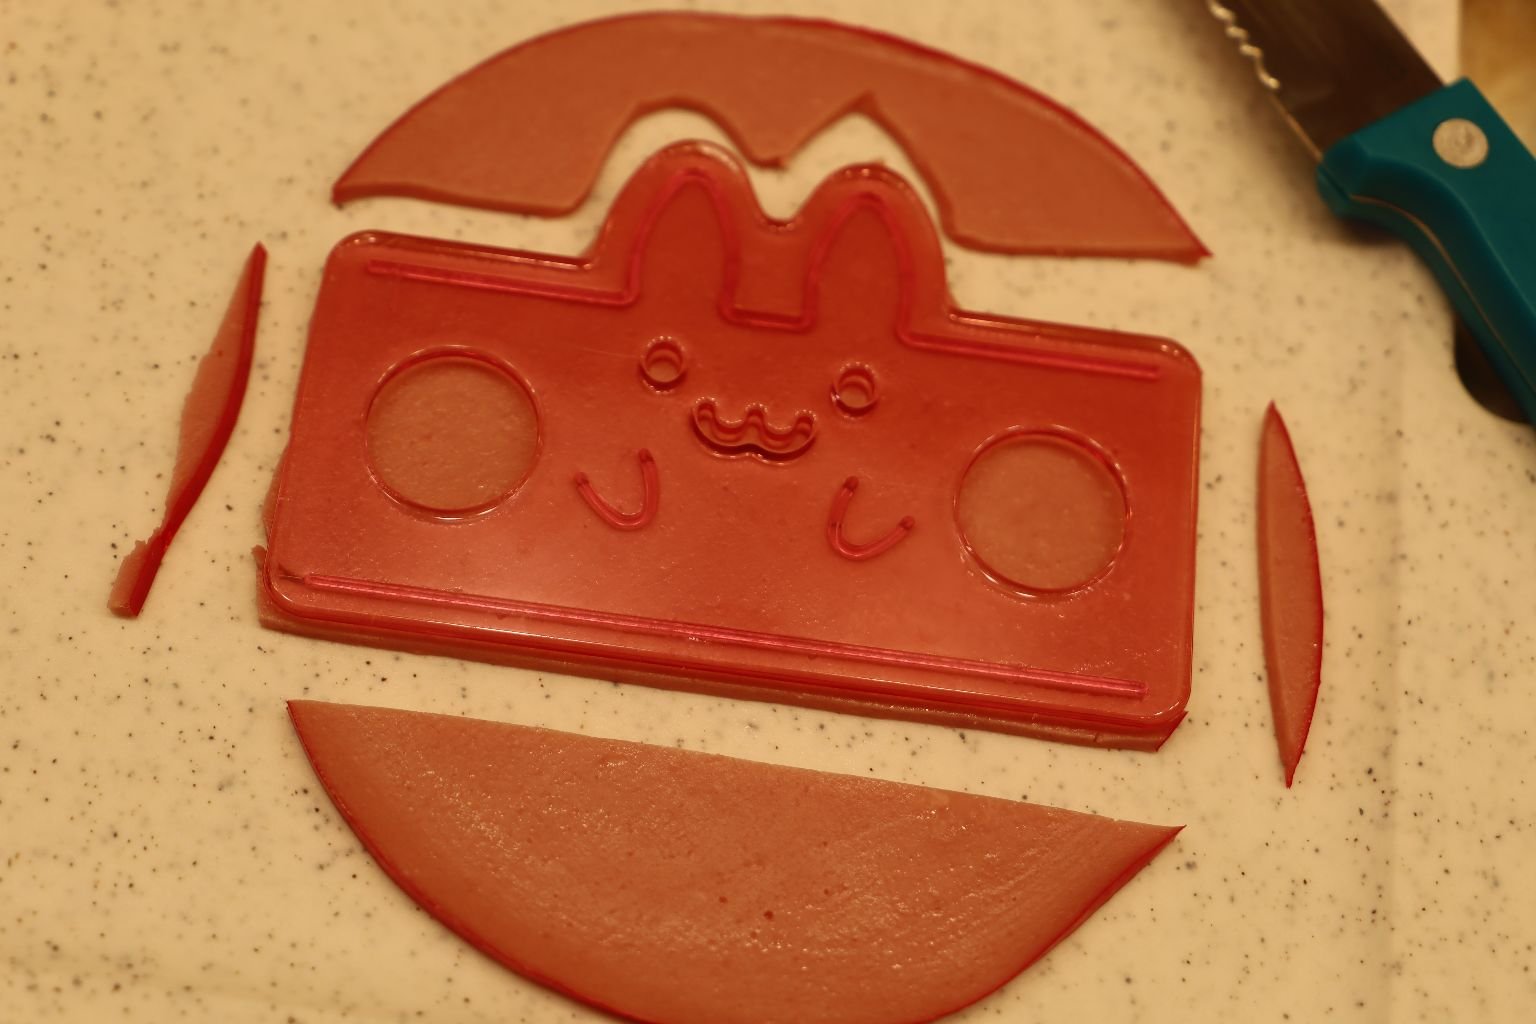
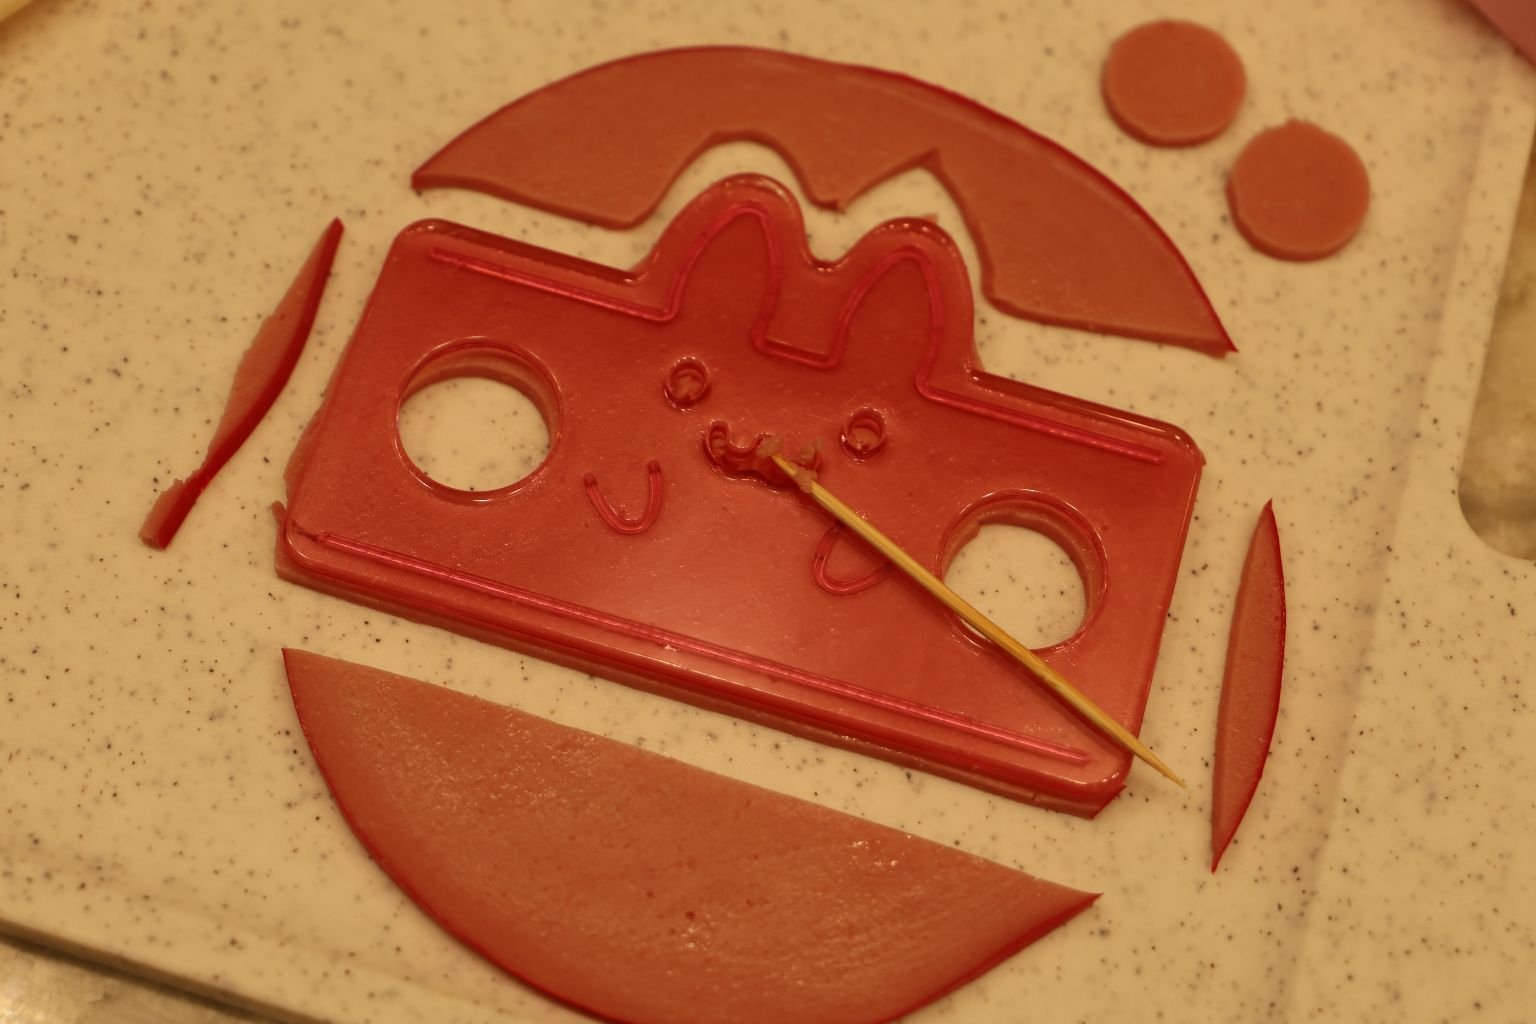
I then used a knife to cut around it, and even to cut out sections inside the mold.
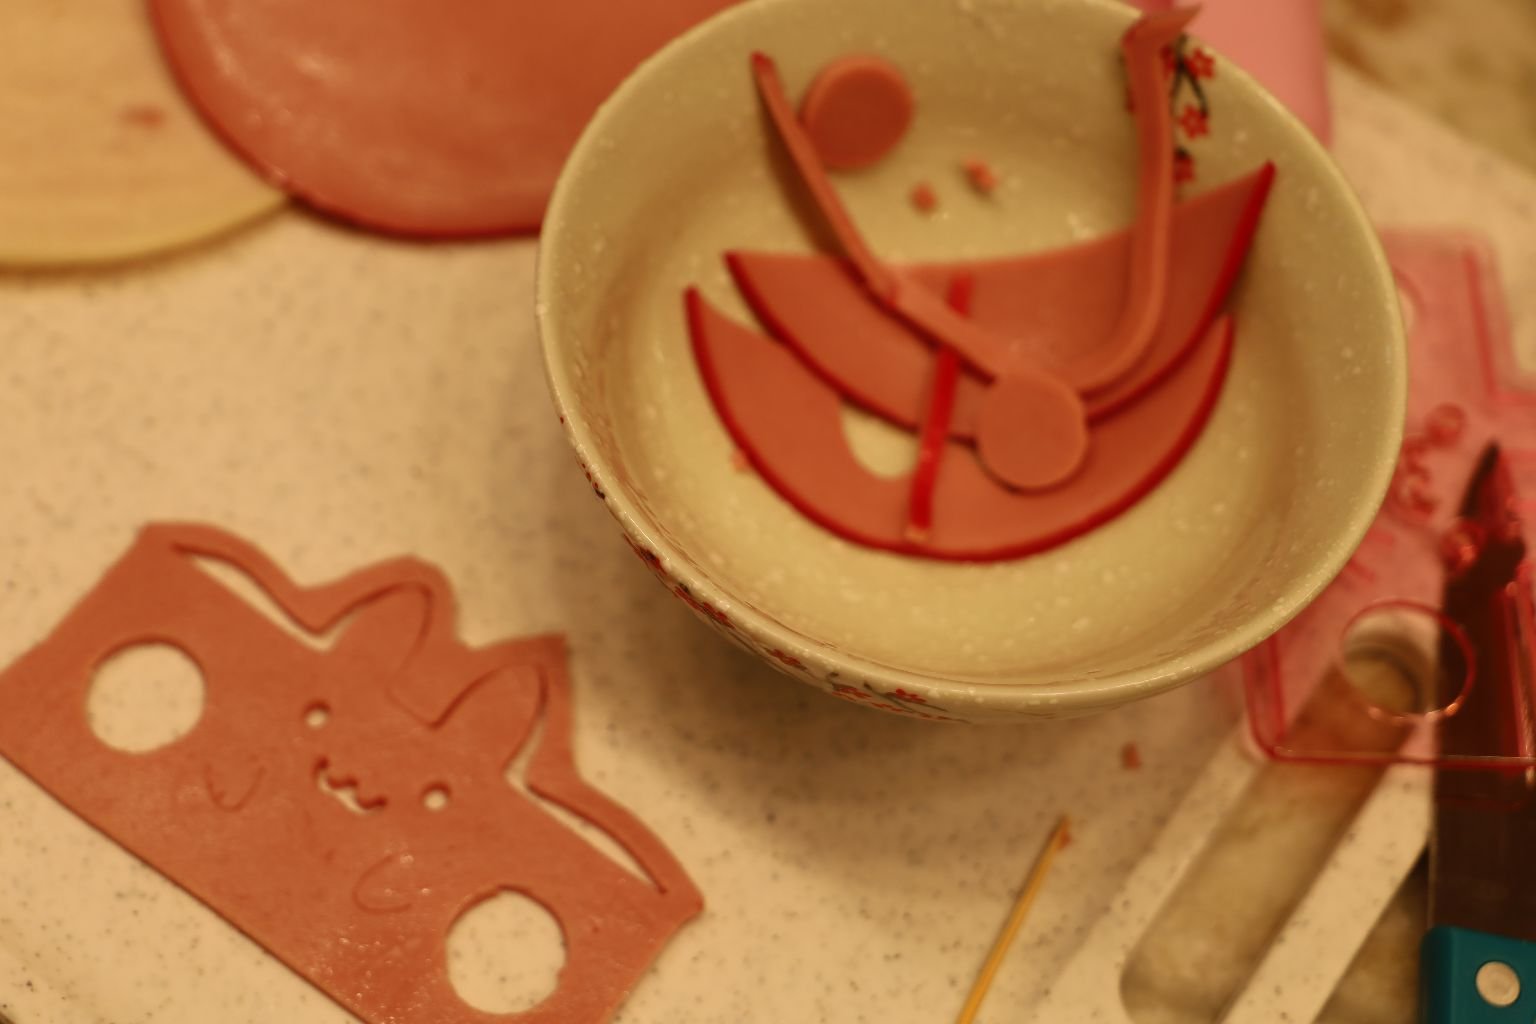
I placed the unwanted sections into a bowl to be eaten with my breakfast.
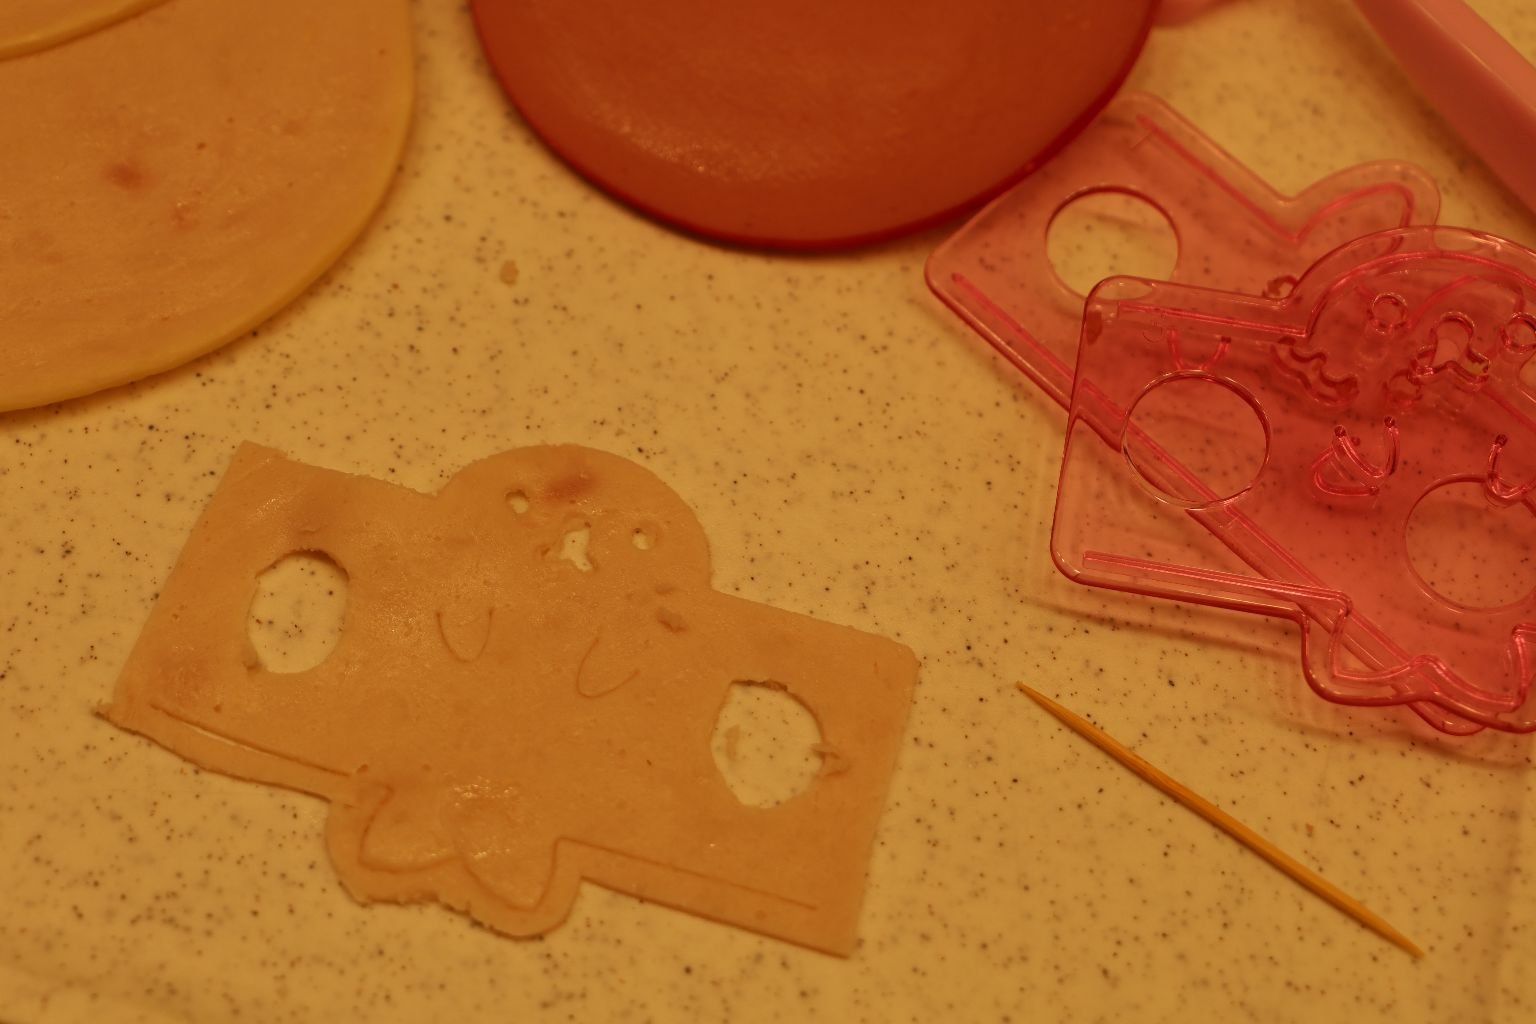
I did the same thing with the other molds. Here is some of the turkey I used.
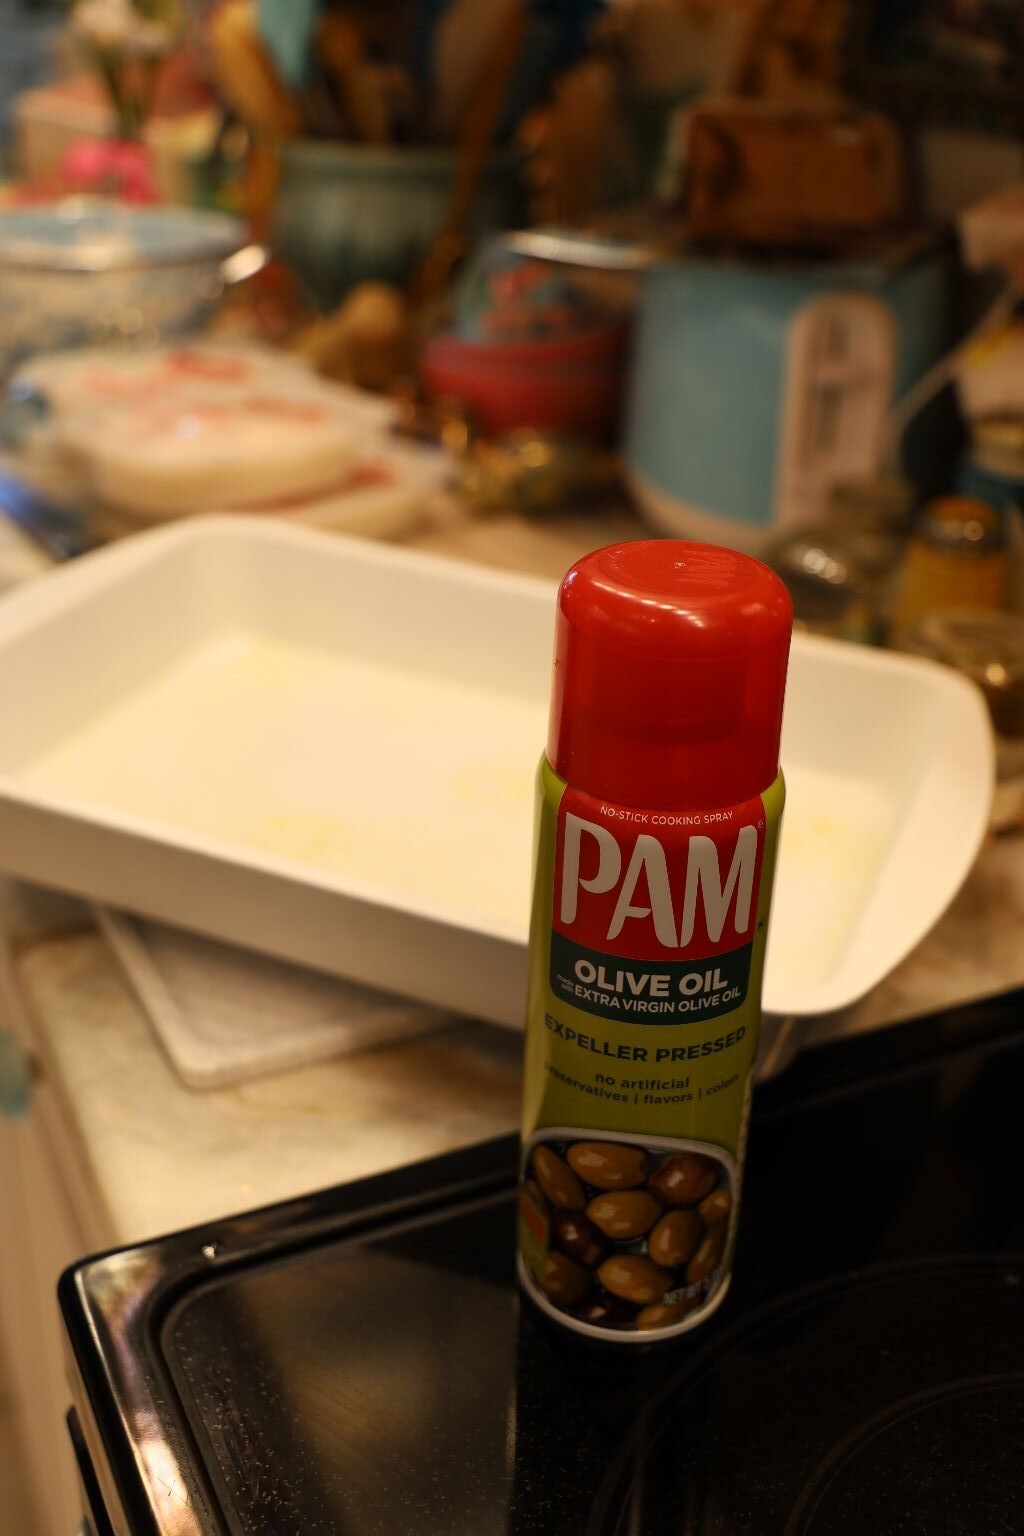
—————————————————————————–
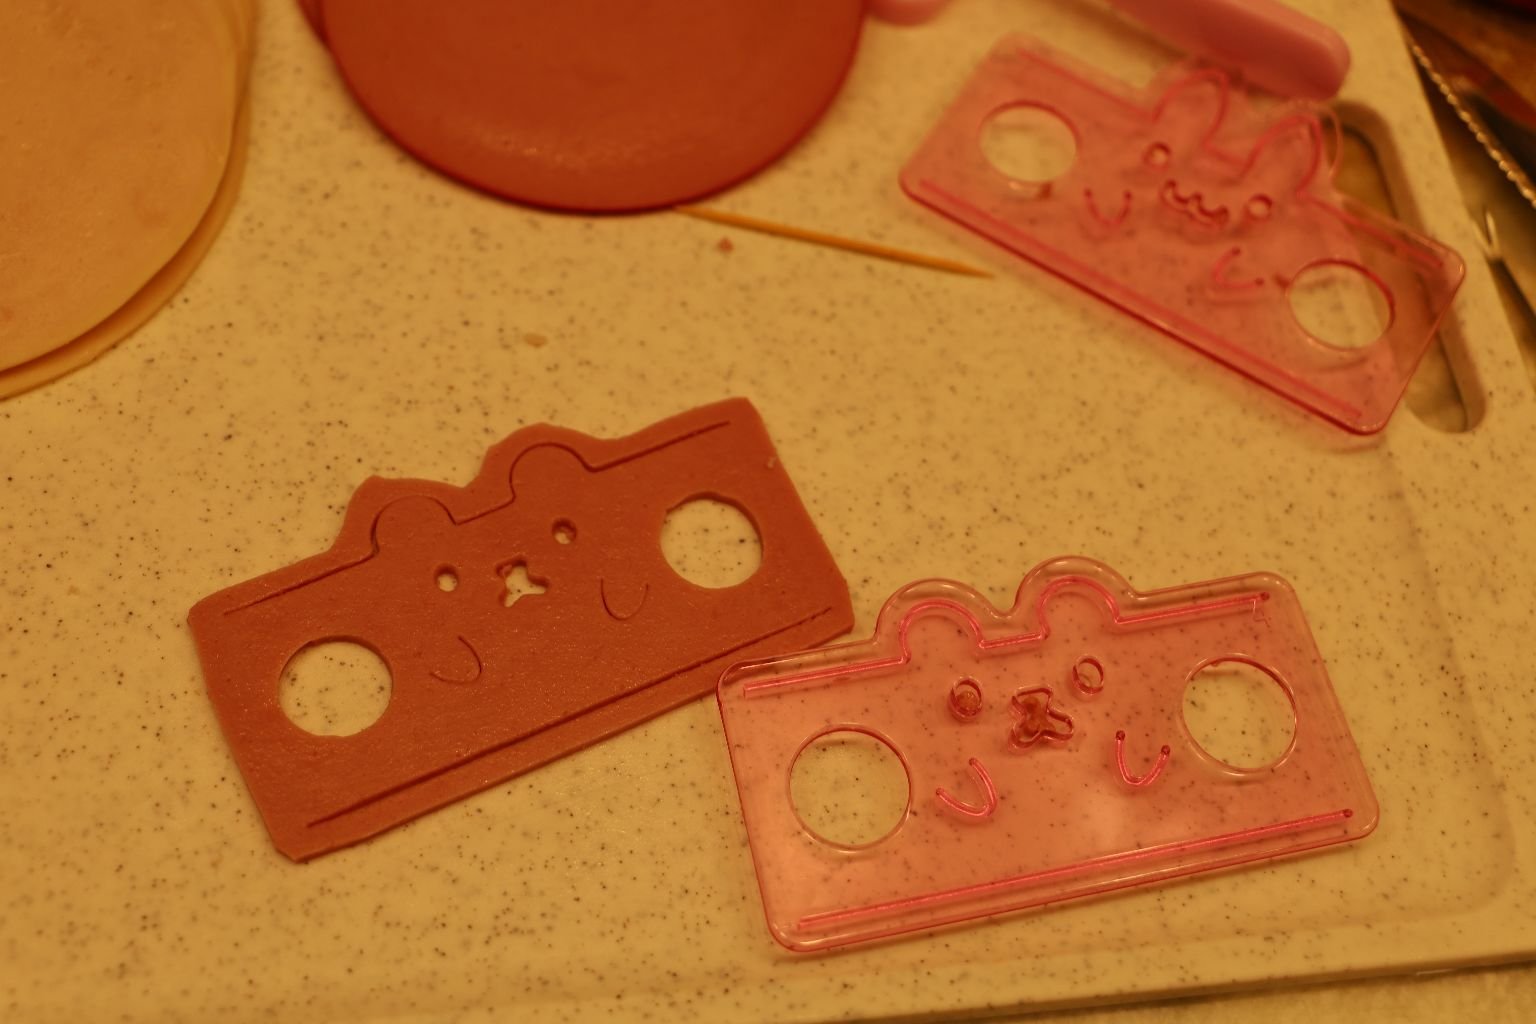
Time To Make Our Food Shapes
You will need some Sticky Rice for this.
You can see the pink rice mold that I have in the photo above, it will be perfect for the shapes we will be making.
Here are my Turkey and Bologna
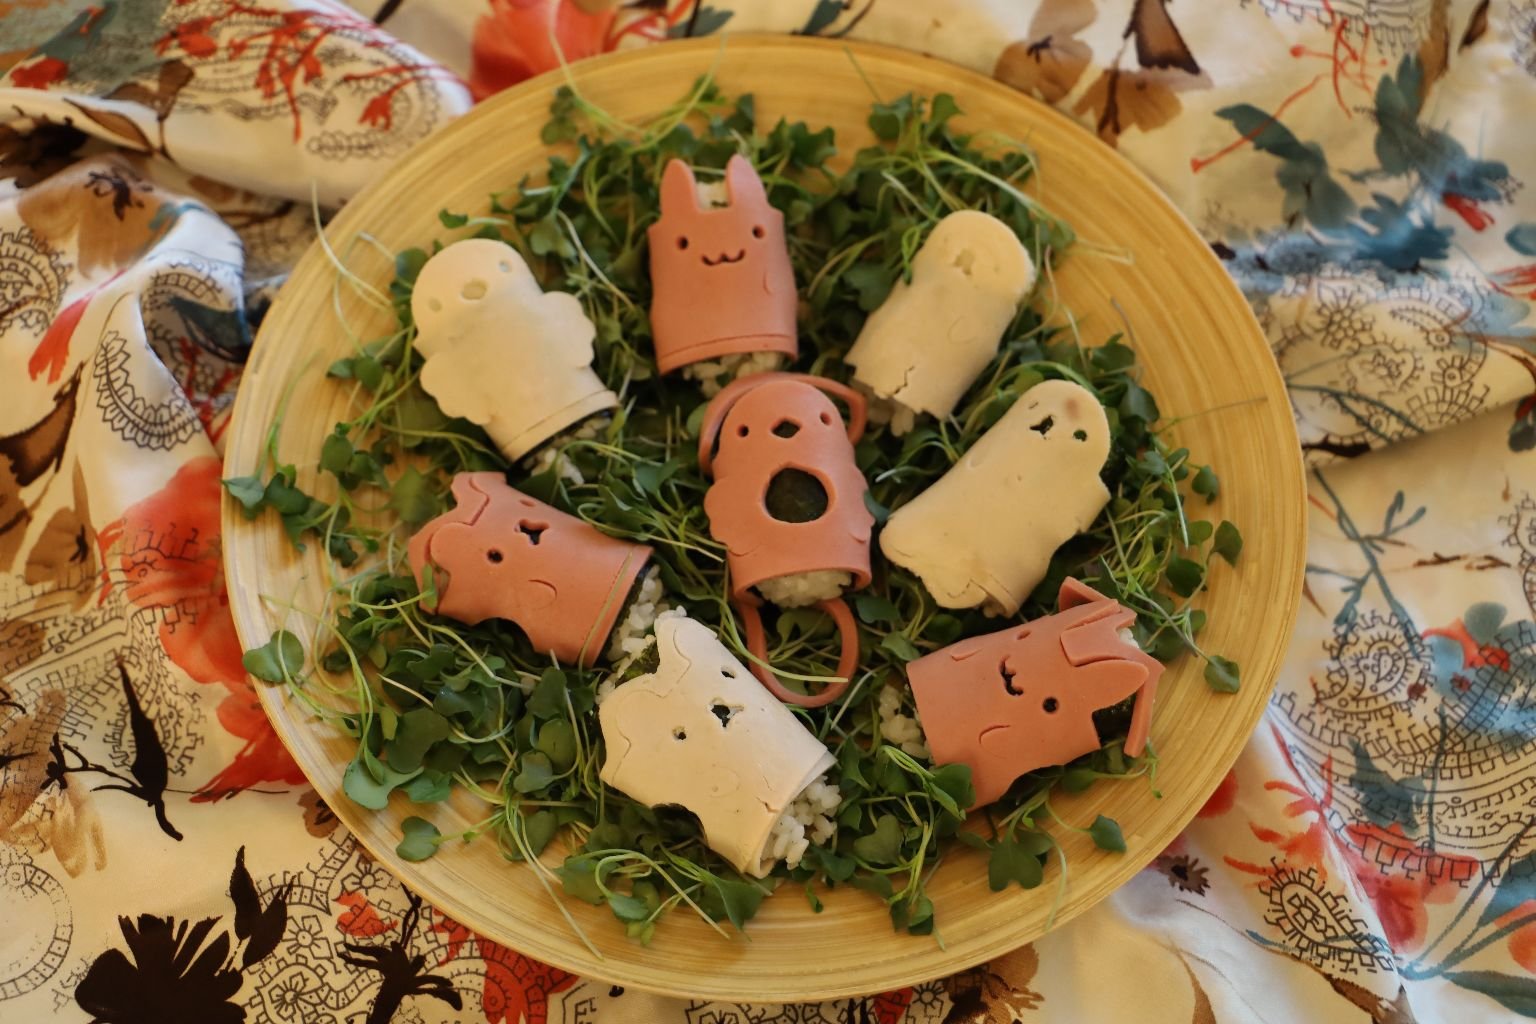
Just take a spoon full of Sticky Rice, and place it on top of a layer of Sea Weed, on top of the Bologna, or Turkey.

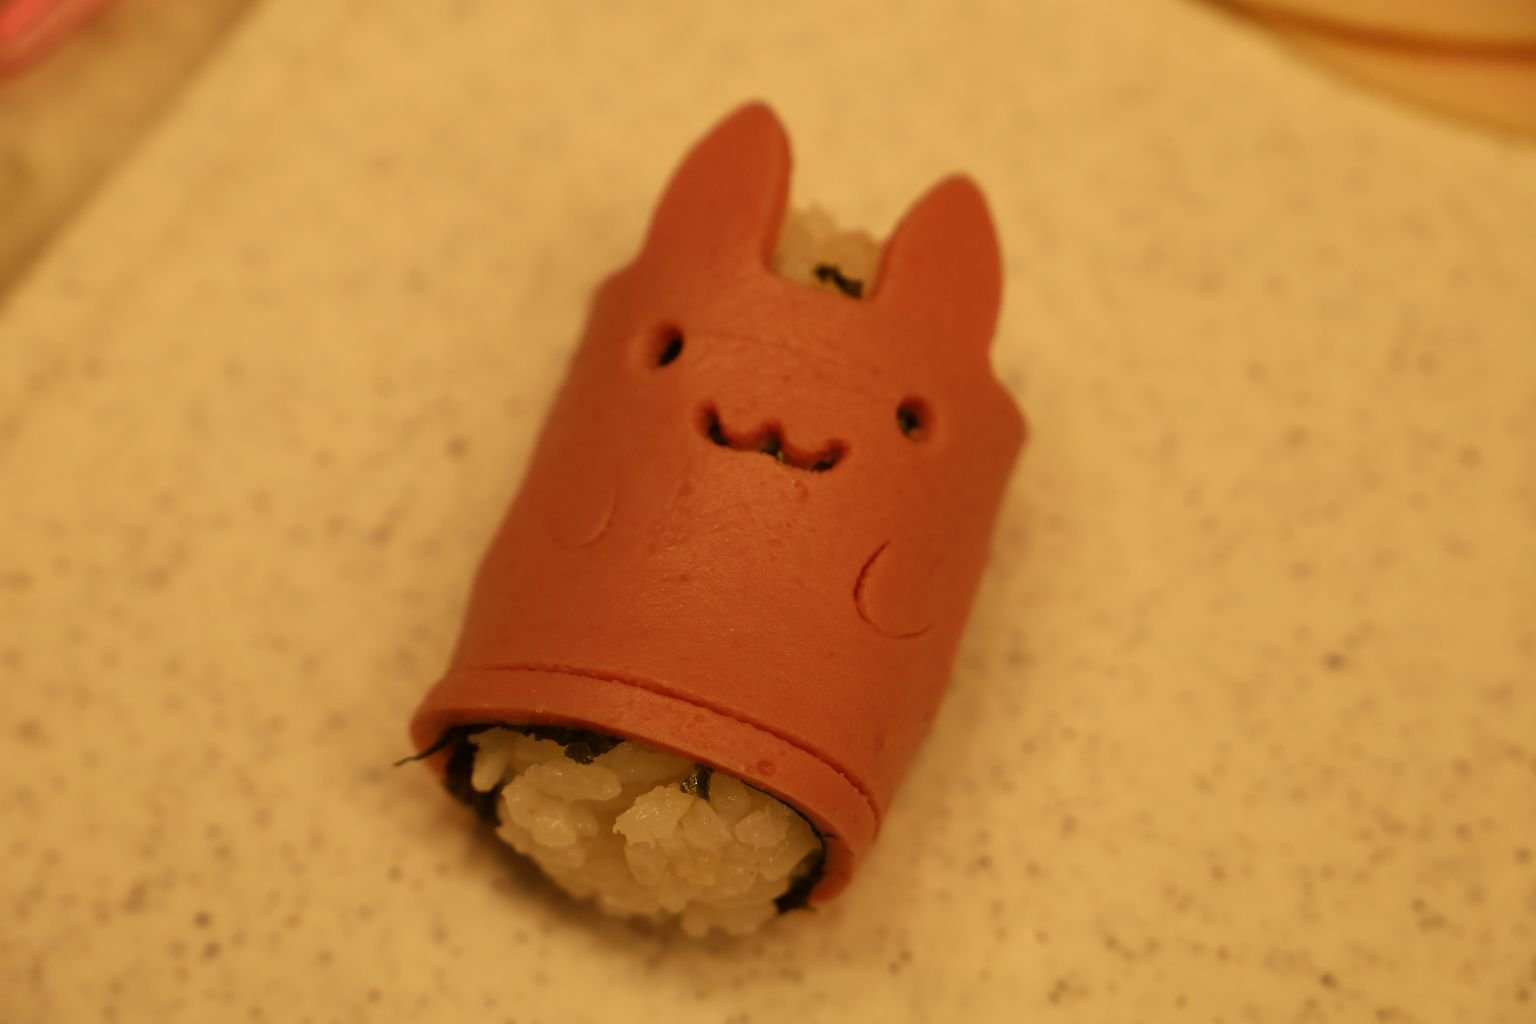
Now, Just Wrap It Up
The Perfect Toddler Food!
Do The Same To All and Place On To A Plate
You Can Place Them Onto A Bed of Greens, If You Like
———————————————————————————-
Not to Forget The Asian Supermarket Candy Treats….
Have Fun Creating Your Easter,
Julie
Easter, April 9, 2023 ——————————————————————— Experimenting With Our Easter Table ———————————————————————————– Our Easy Easter Table Vegetarian Normally our Easter’s are a bit more elaborate, however we had just hosted a big Baby Shower for our daughter and son-in-law two days prior, so this …

Kon’nichiwa (Hello) Yokoso Chisana Atsukau (Welcome to Small Treats.) Watashitachi Wa Anata Ni Motarashimasu Oishi Shokumotsu Atsukau (We will bring to you delicious food treats.) To Do Yatte Ni Tsukuru Karera (And, how to make them.) I’m sure that a lot …
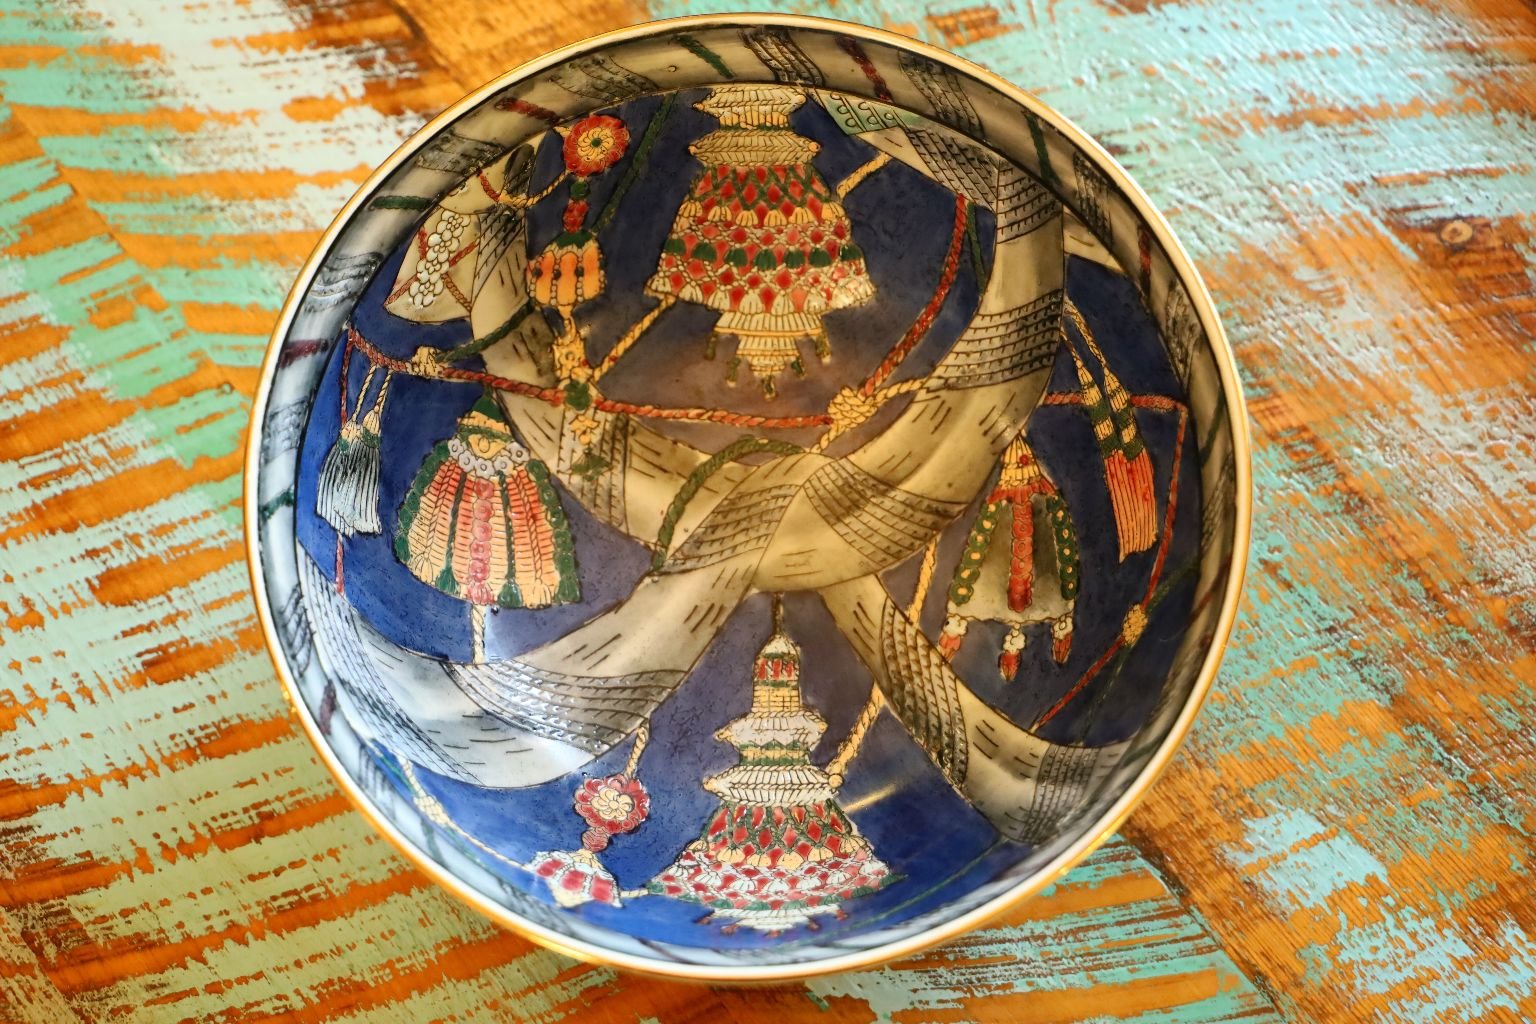
My Tassel Oriental Bowl
—————————————————————————–
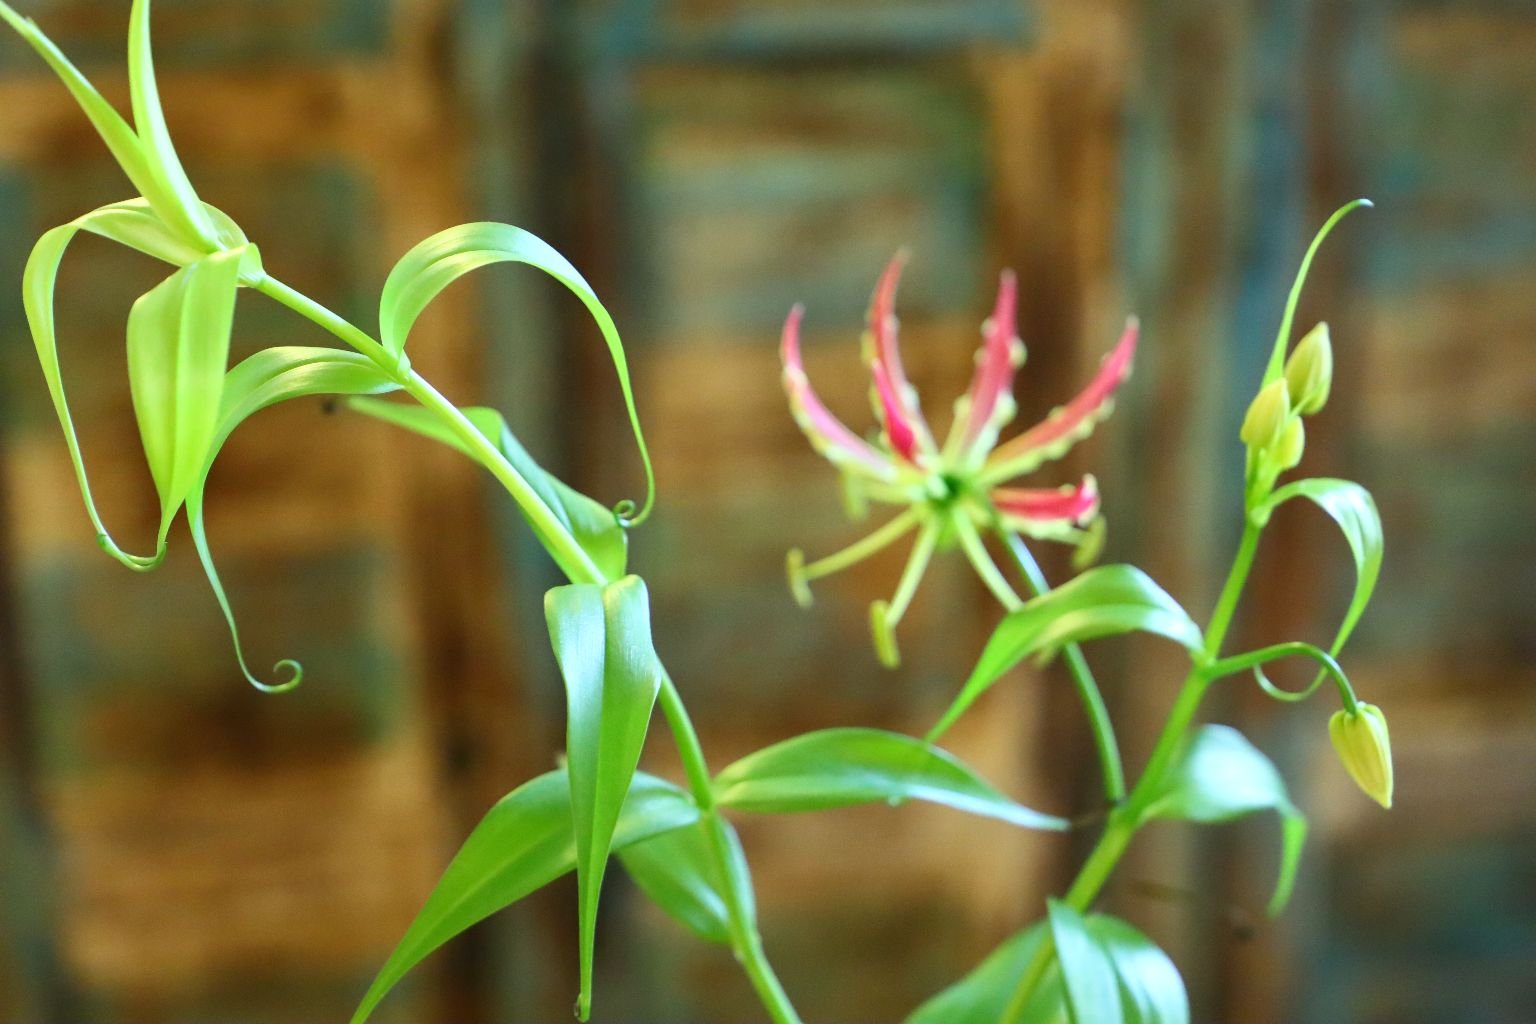
Glorioso Blossom
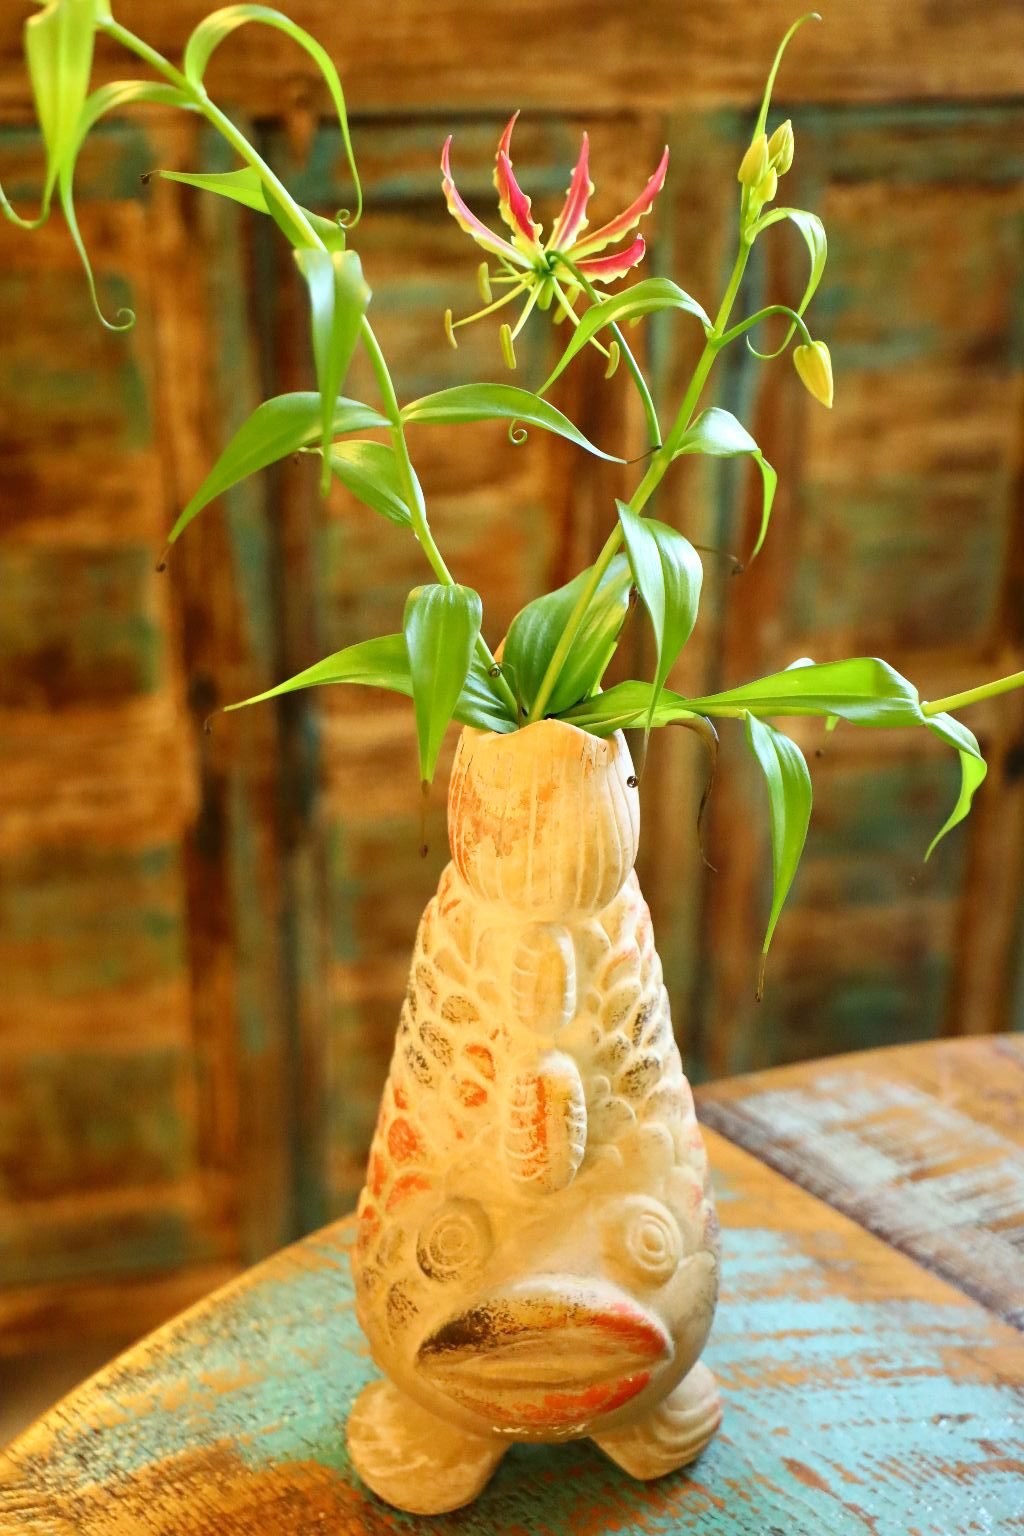
My Glorioso Vine in my Japanese Carp Vase
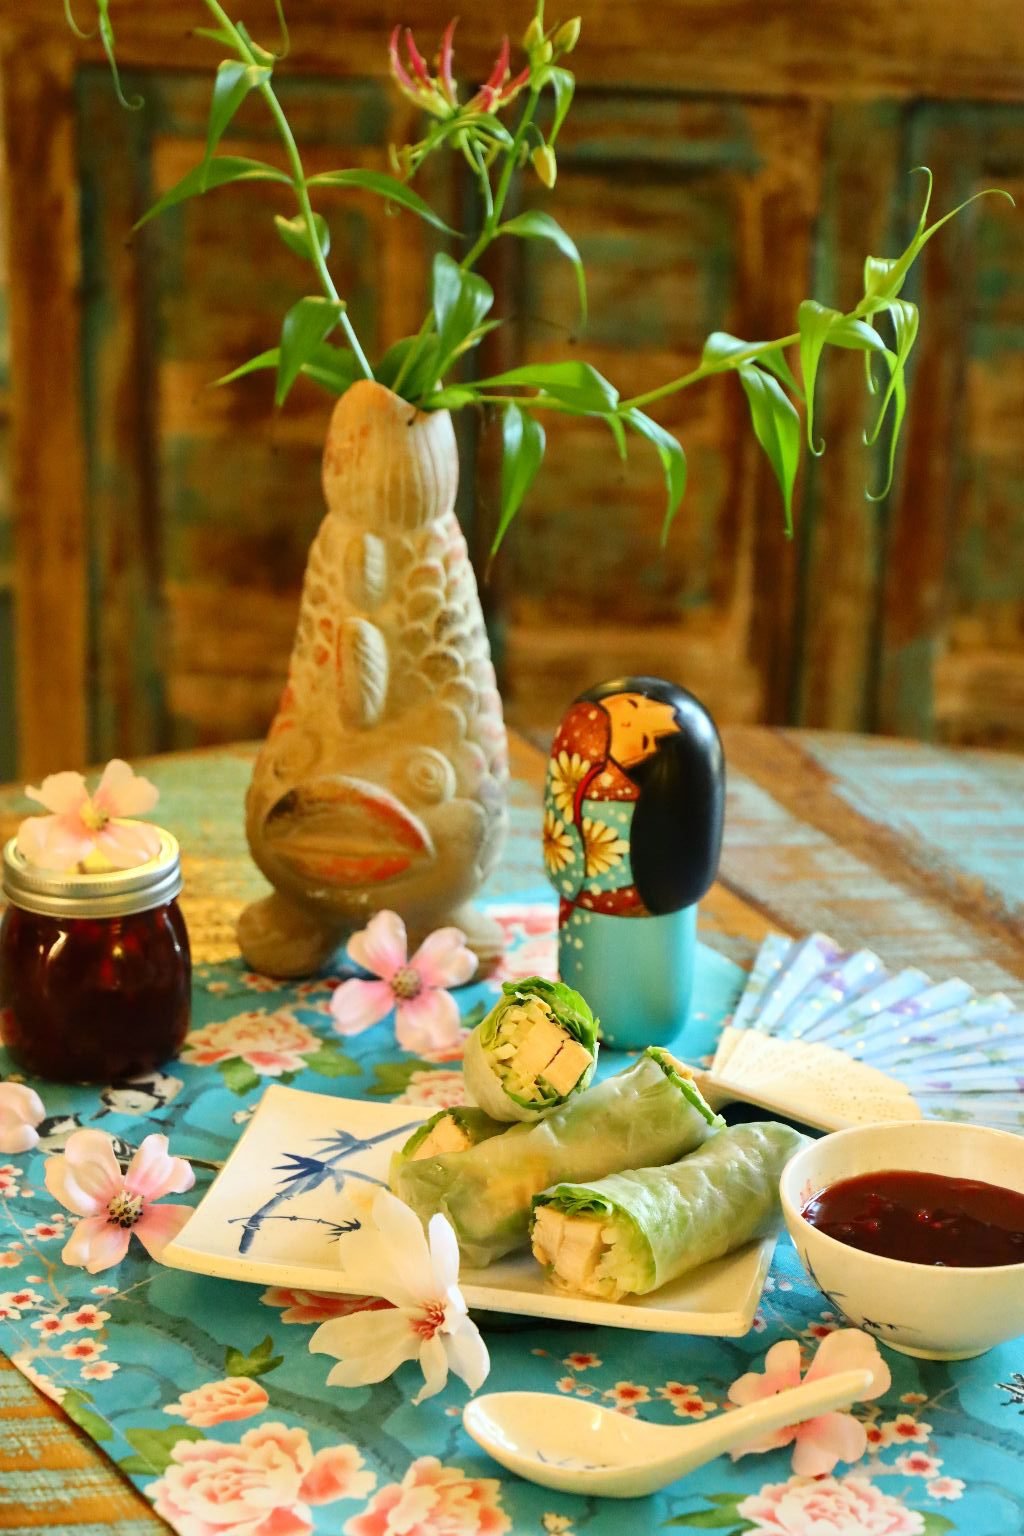
A Few Spring Rolls…..
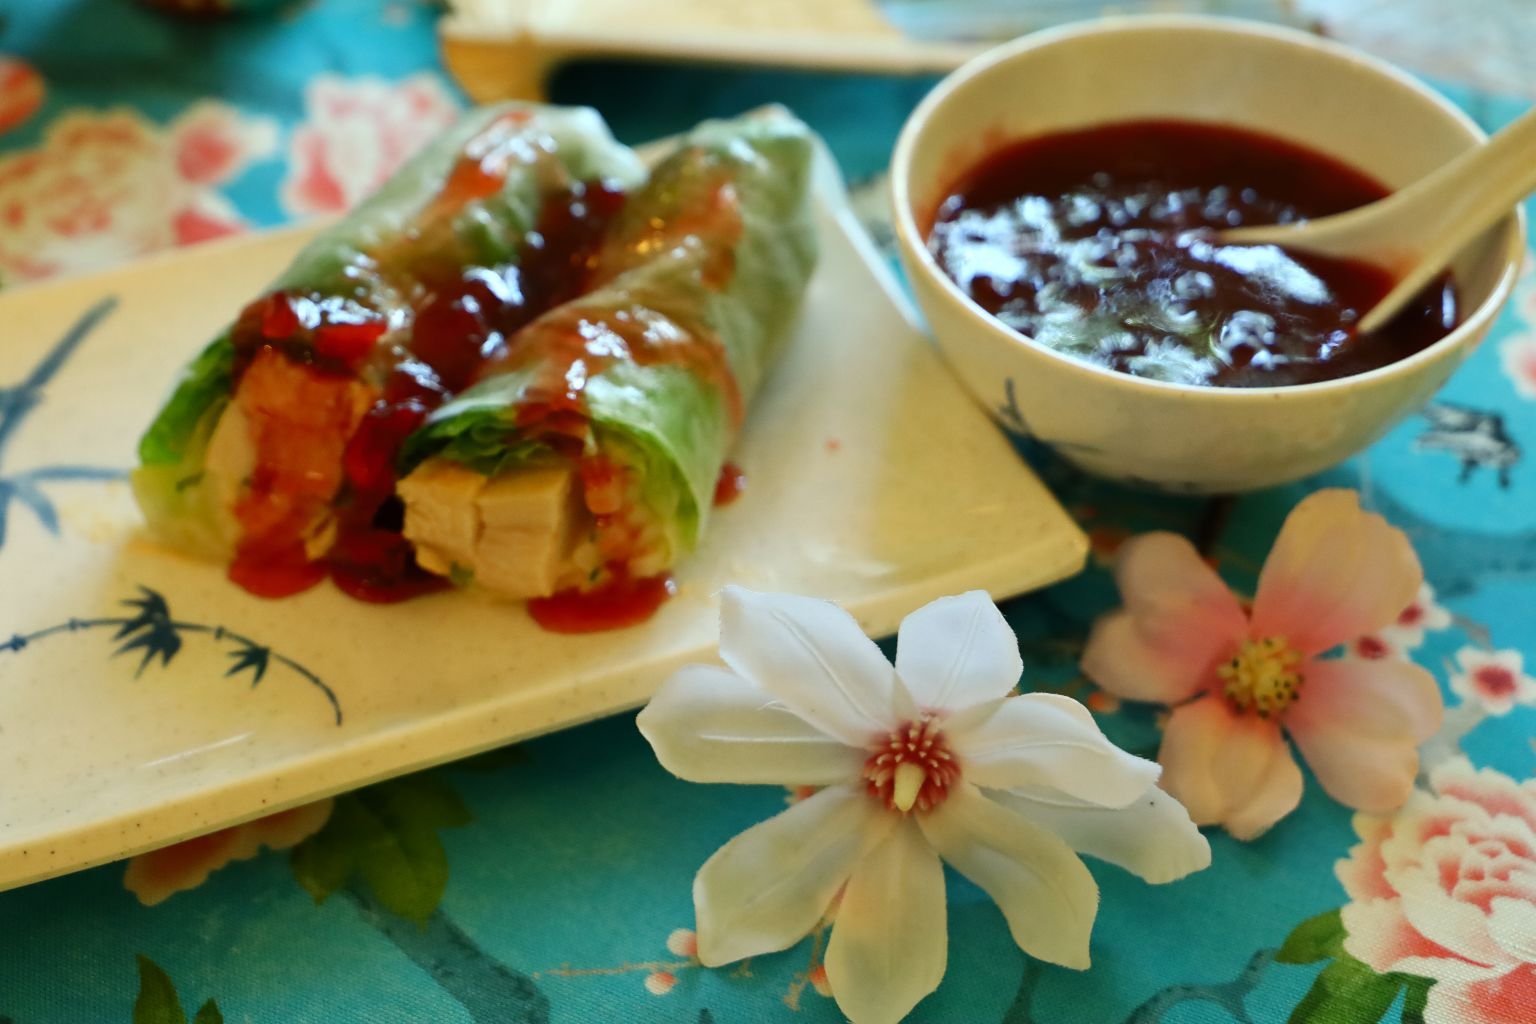
…doused in My Oriental Jezebel Sauce
An Excellent Ranchi (Lunch)
———————————————————————————
An Oriental Jezebel
A Marinade, A Glaze, and A Dipping Sauce
In fitting with my other Jezebel’s, I wanted to create one that depicted our Asian tastes.
I based this on my love for Japan. I also named this Jezebel, an Oriental Jezebel, because “Oriental” was the name given to the Japanese when I was growing up in the south. An ‘Asian Jezebel’ would have been a fine name, but it just didn’t fit my upbringing. I love the word Oriental and wanted it in the name of my sauce.
I’m very proud of this sauce, as well as all my other Jezebel’s. I hope you will enjoy making it as much as I did.
Arigato,
Julie Lancaster-Whann
————————————————————————————
I first have to give a background into our love of the Asian cultures. We lived in Hawaii for 13 years, both our children were born there. Hawaii has a very large Asian population and influence. Our children learned to celebrate Chinese New Year, and all of the Japanese holidays as well as other Asian holidays. Japan’s Girl’s Day and Boy’s Day were always favorites for Veronica and Brodie.
The little toy trinkets that you see in these photos belong to our children. I did use them here to showcase my Oriental Jezebel, but I have since passed a few things along to them.

In addition to my freely giving you my Oriental Jezebel Sauce recipe, we are also passing along a few recipes where you can use the Jezebel sauce.
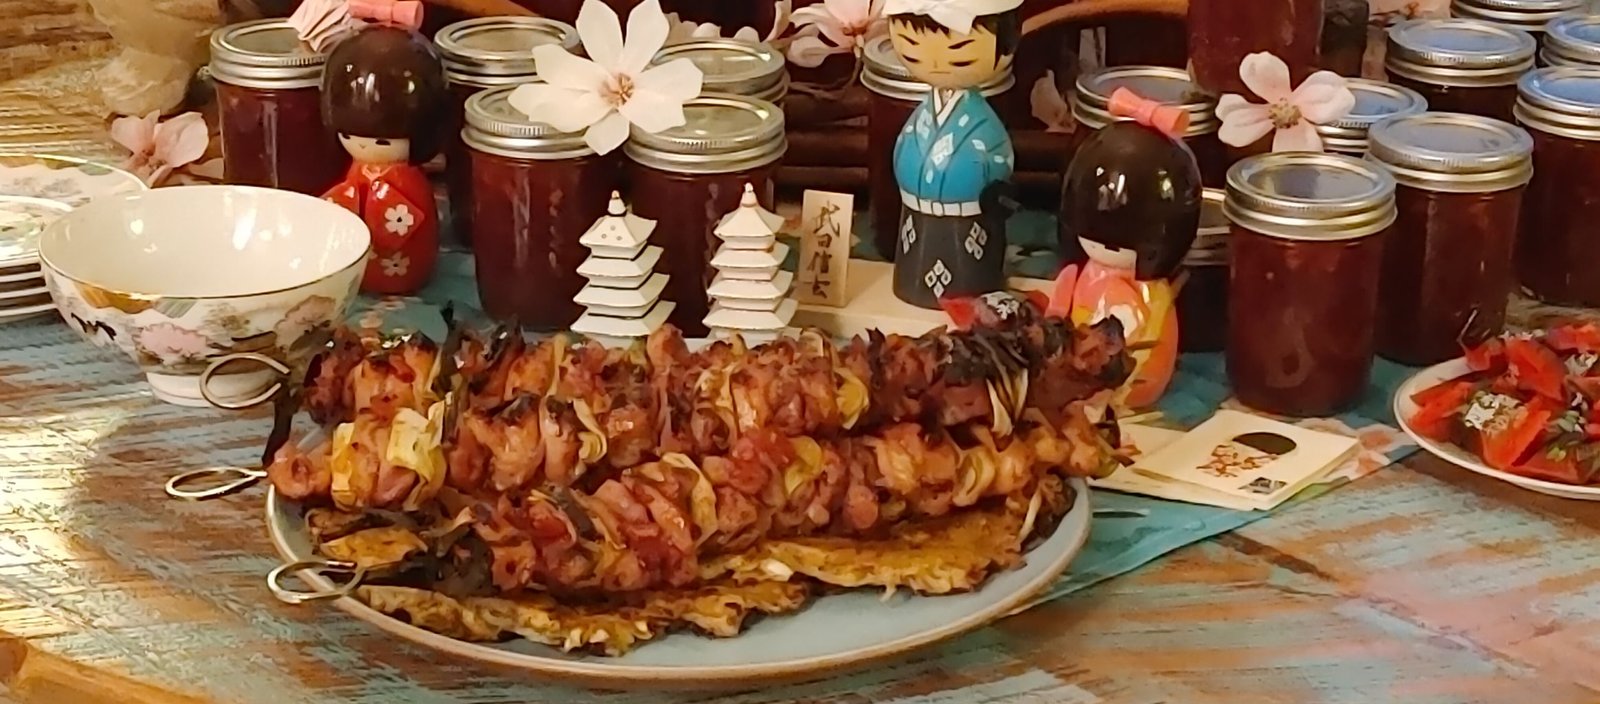
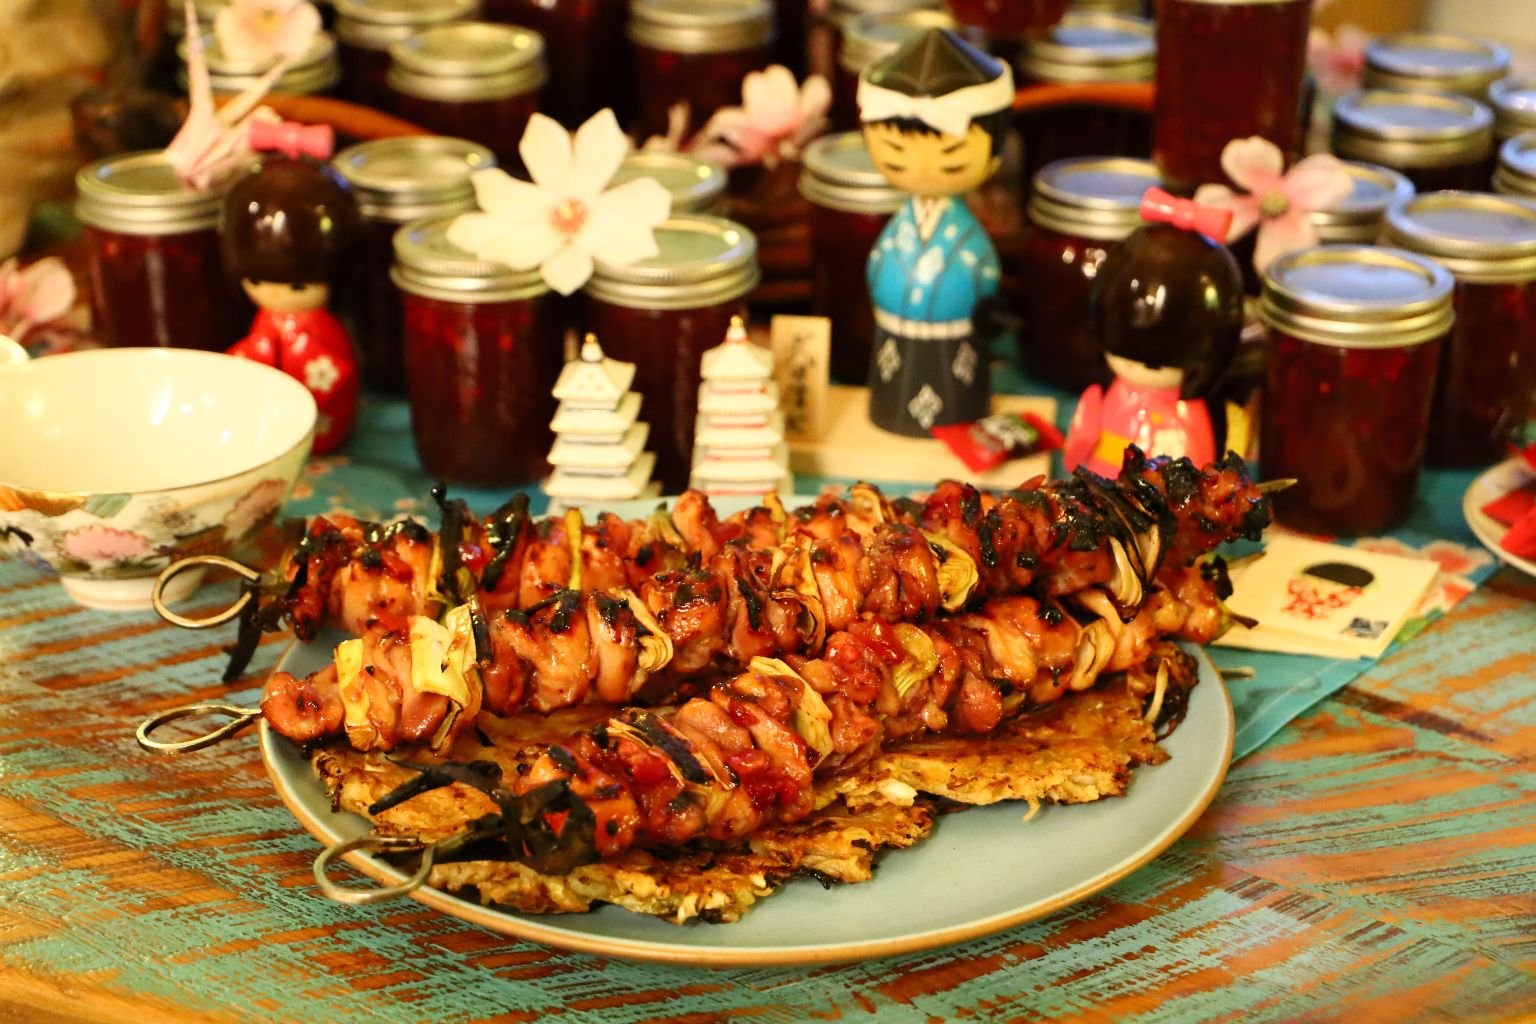
Recipe For Our Japanese Cabbage Pancakes and our Jezebel Skewers is Down Below

These Are Delicious Japanese Cabbage Pancakes
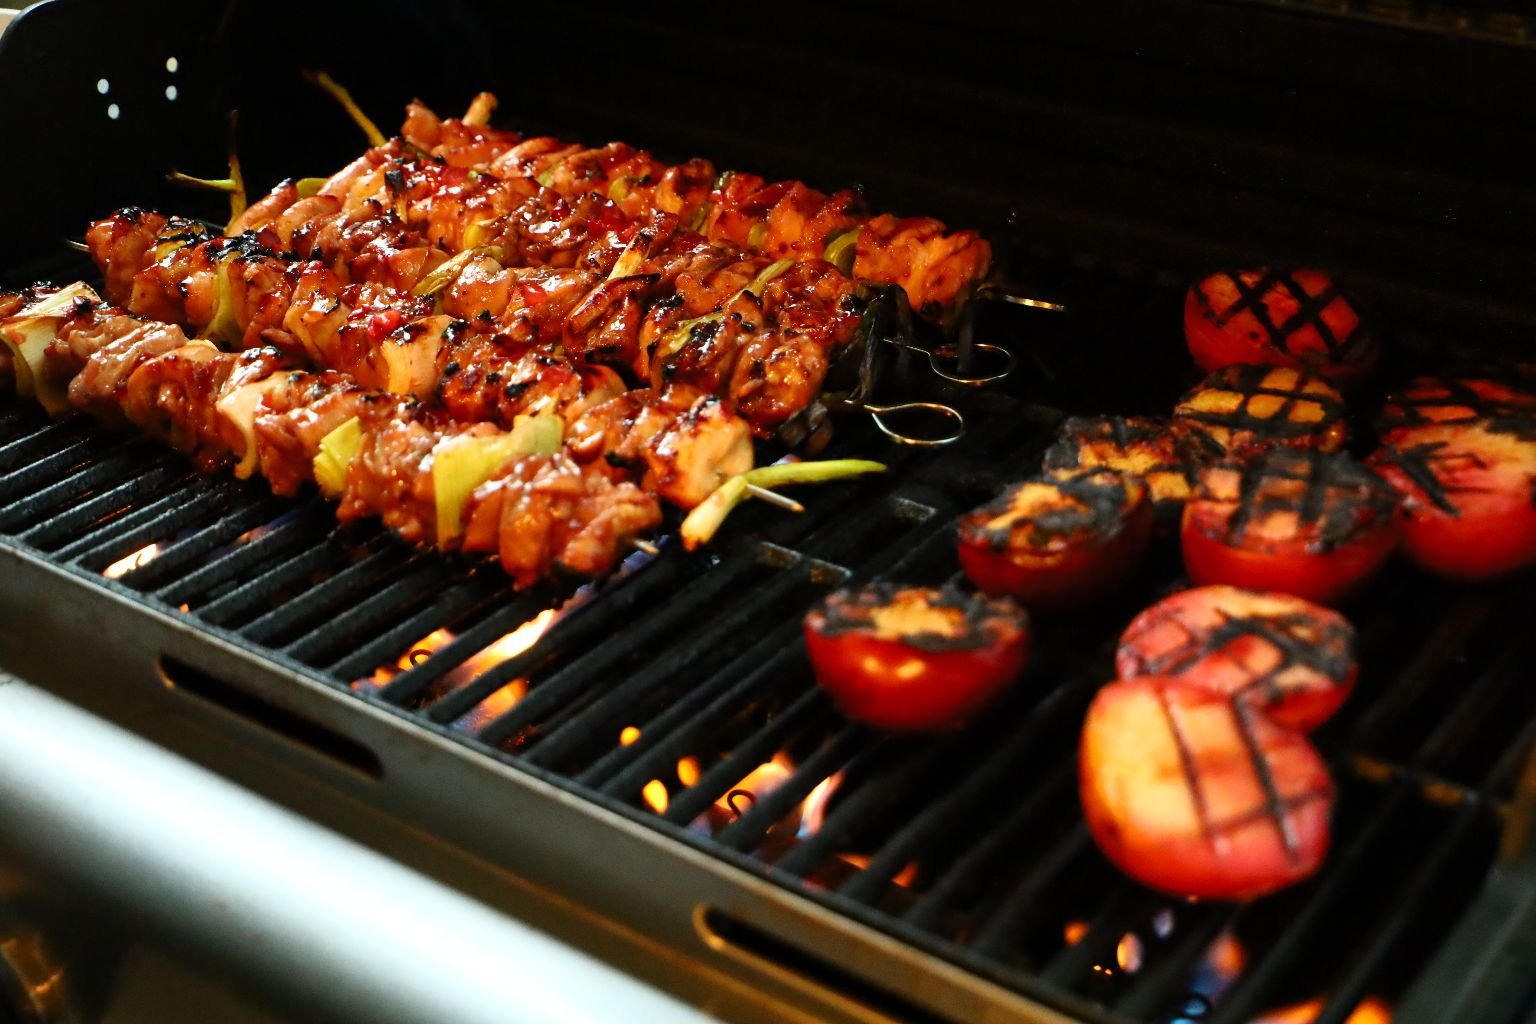
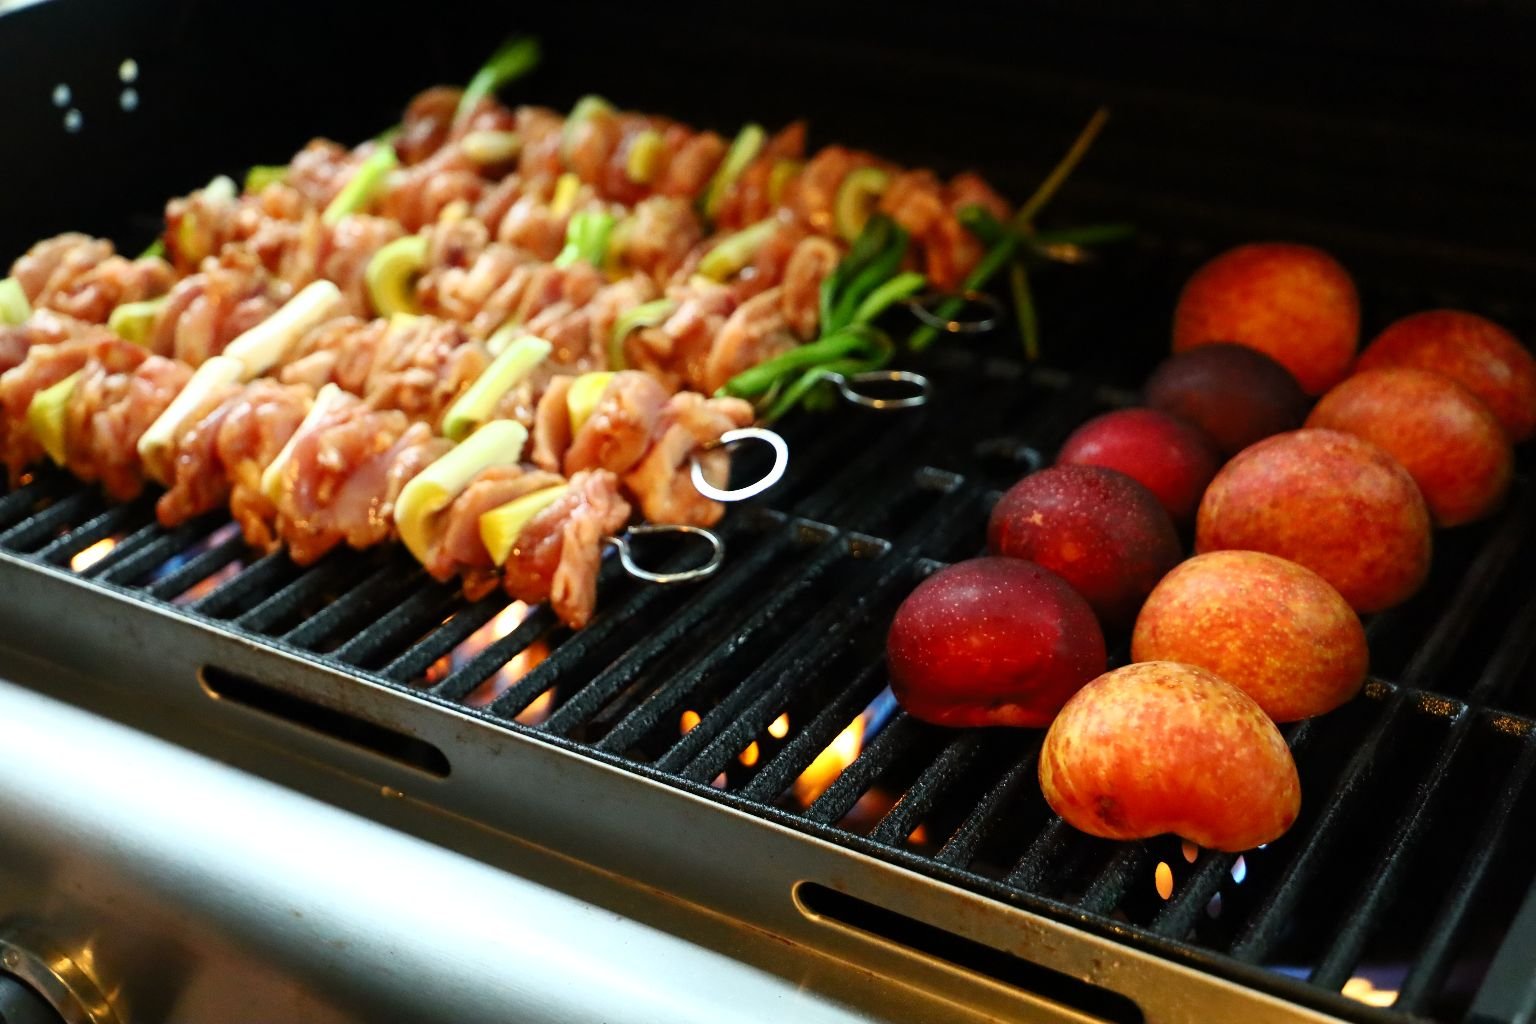
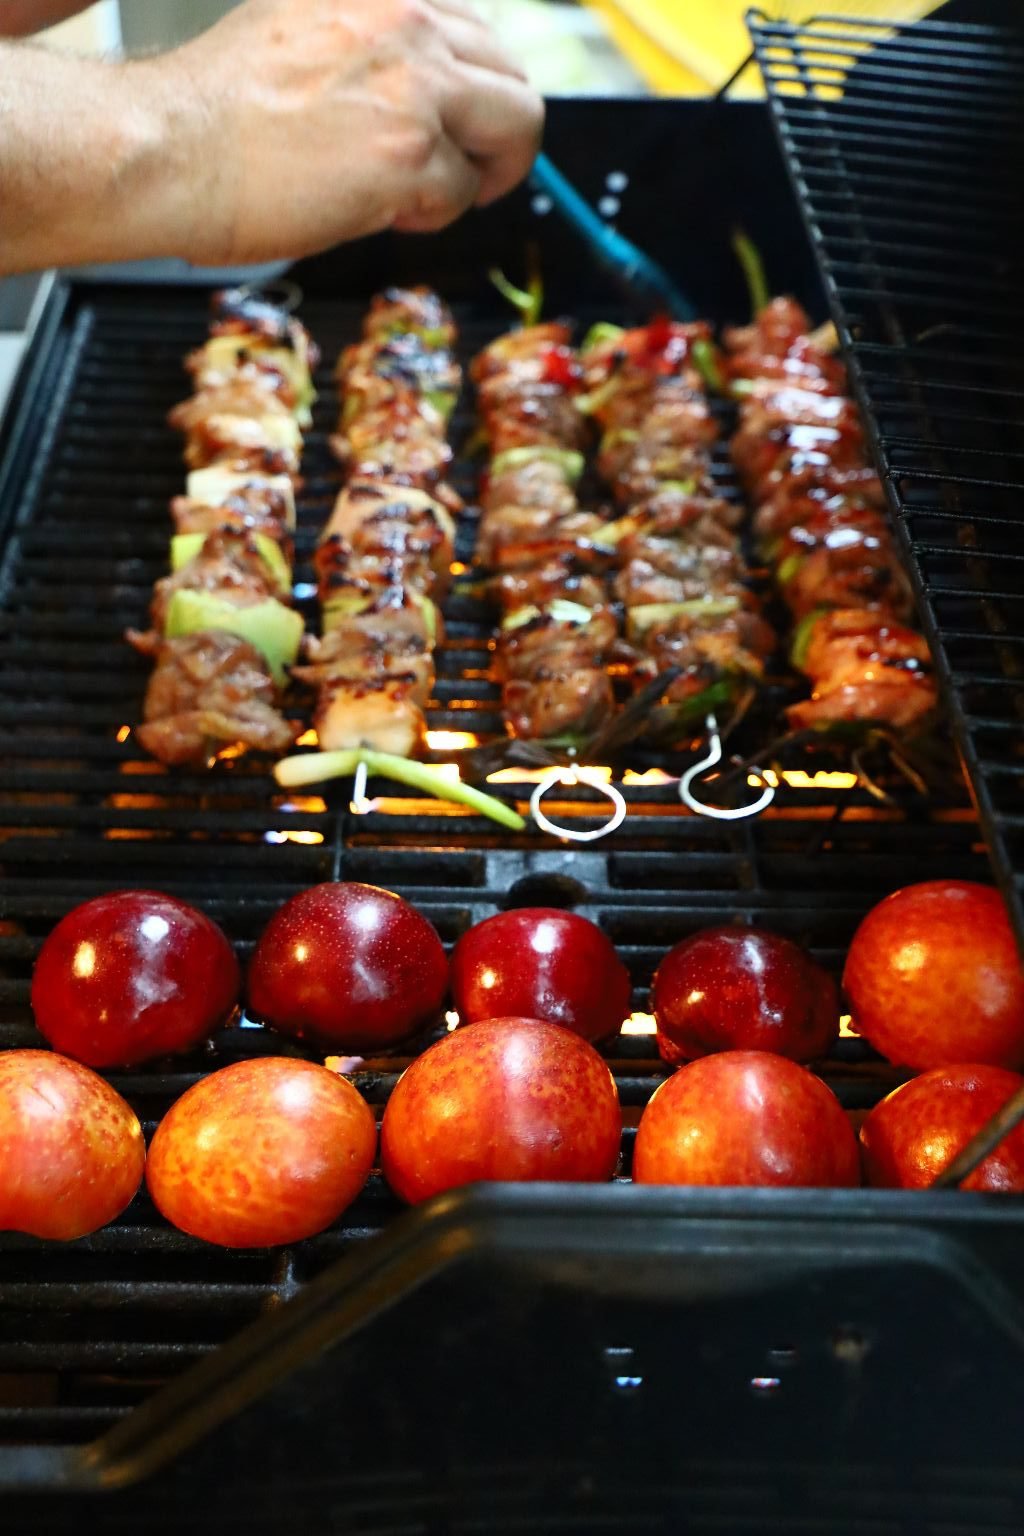
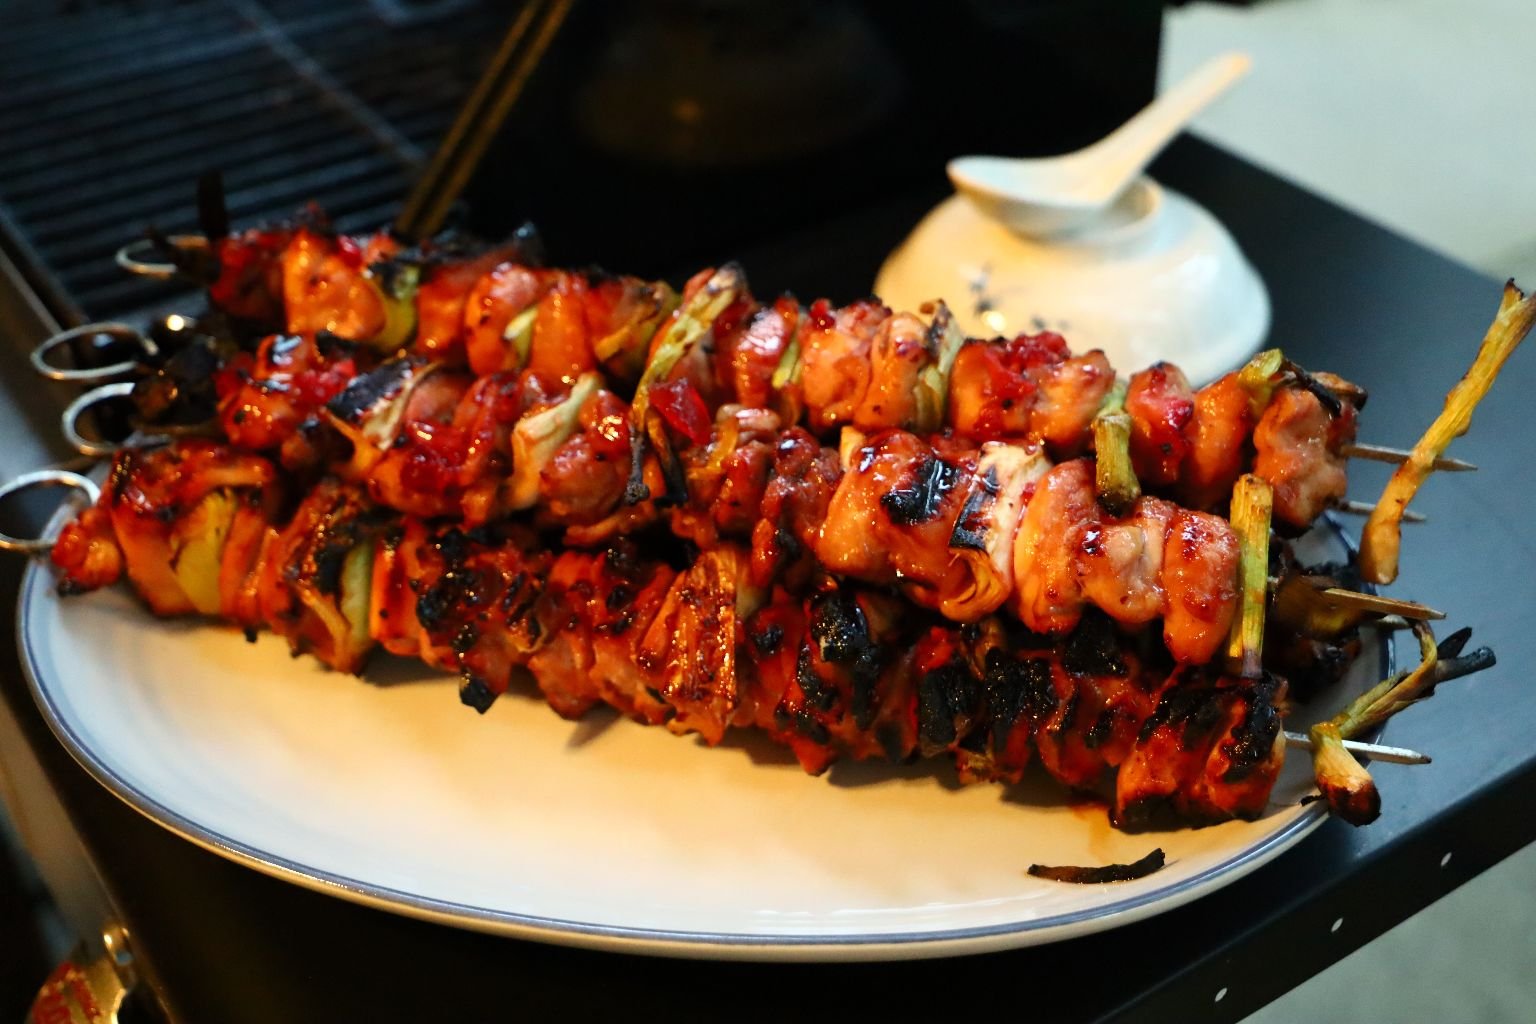
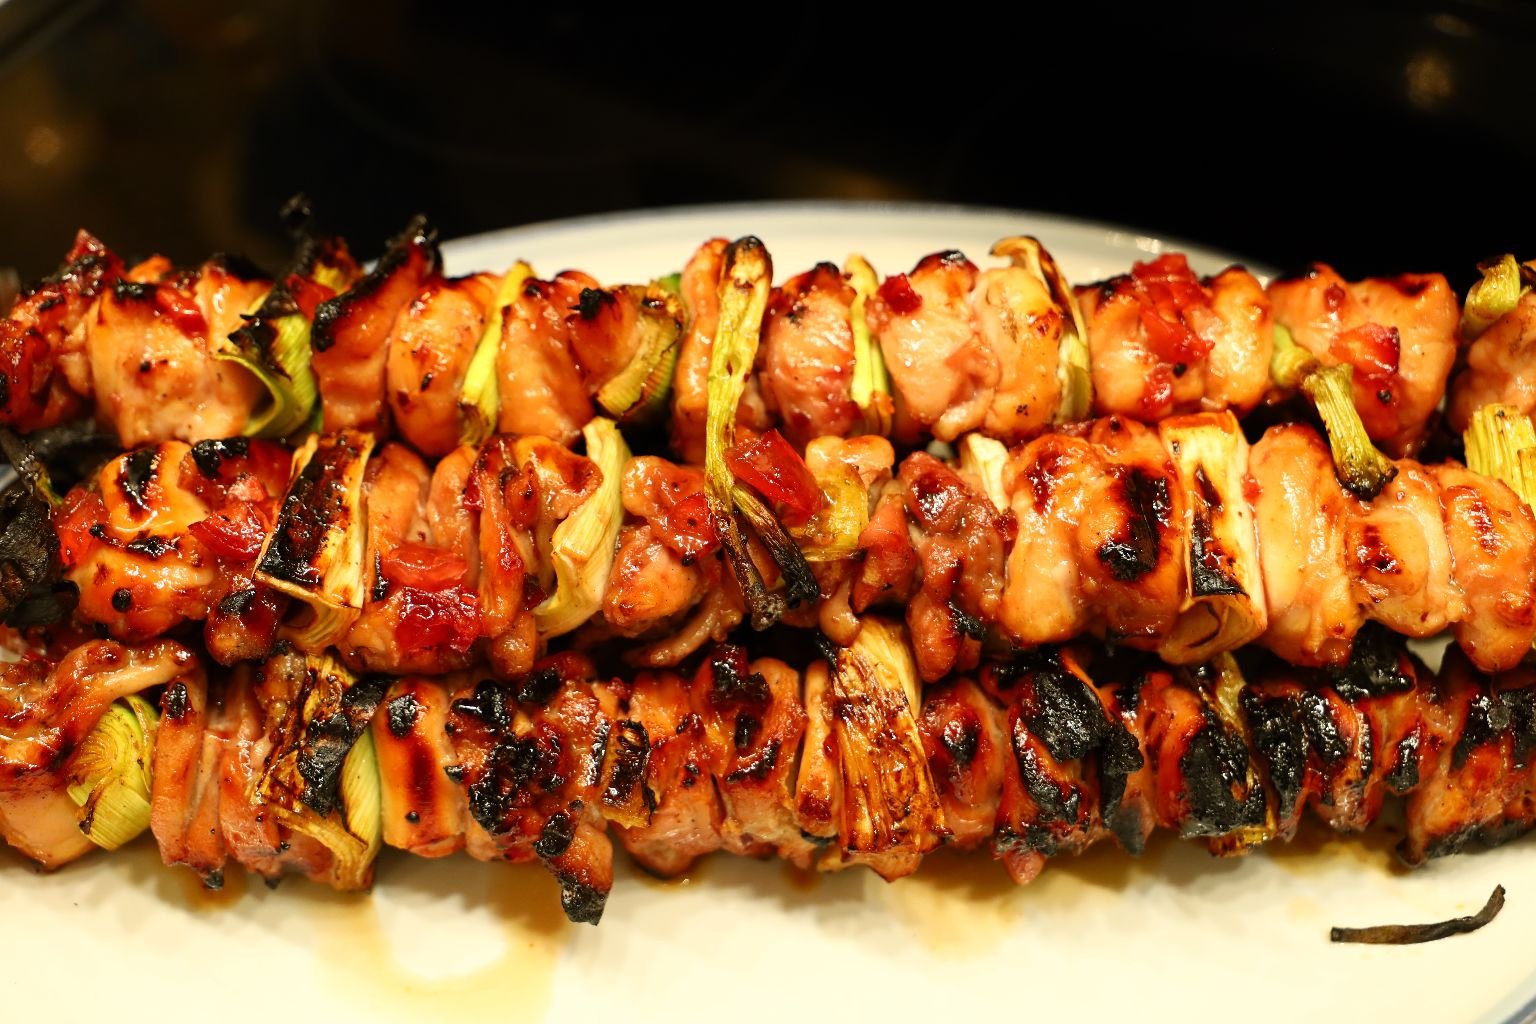
Gordon Grilling Our Oriental Jezebel Chicken Skewers
Also on the Grill are Plums
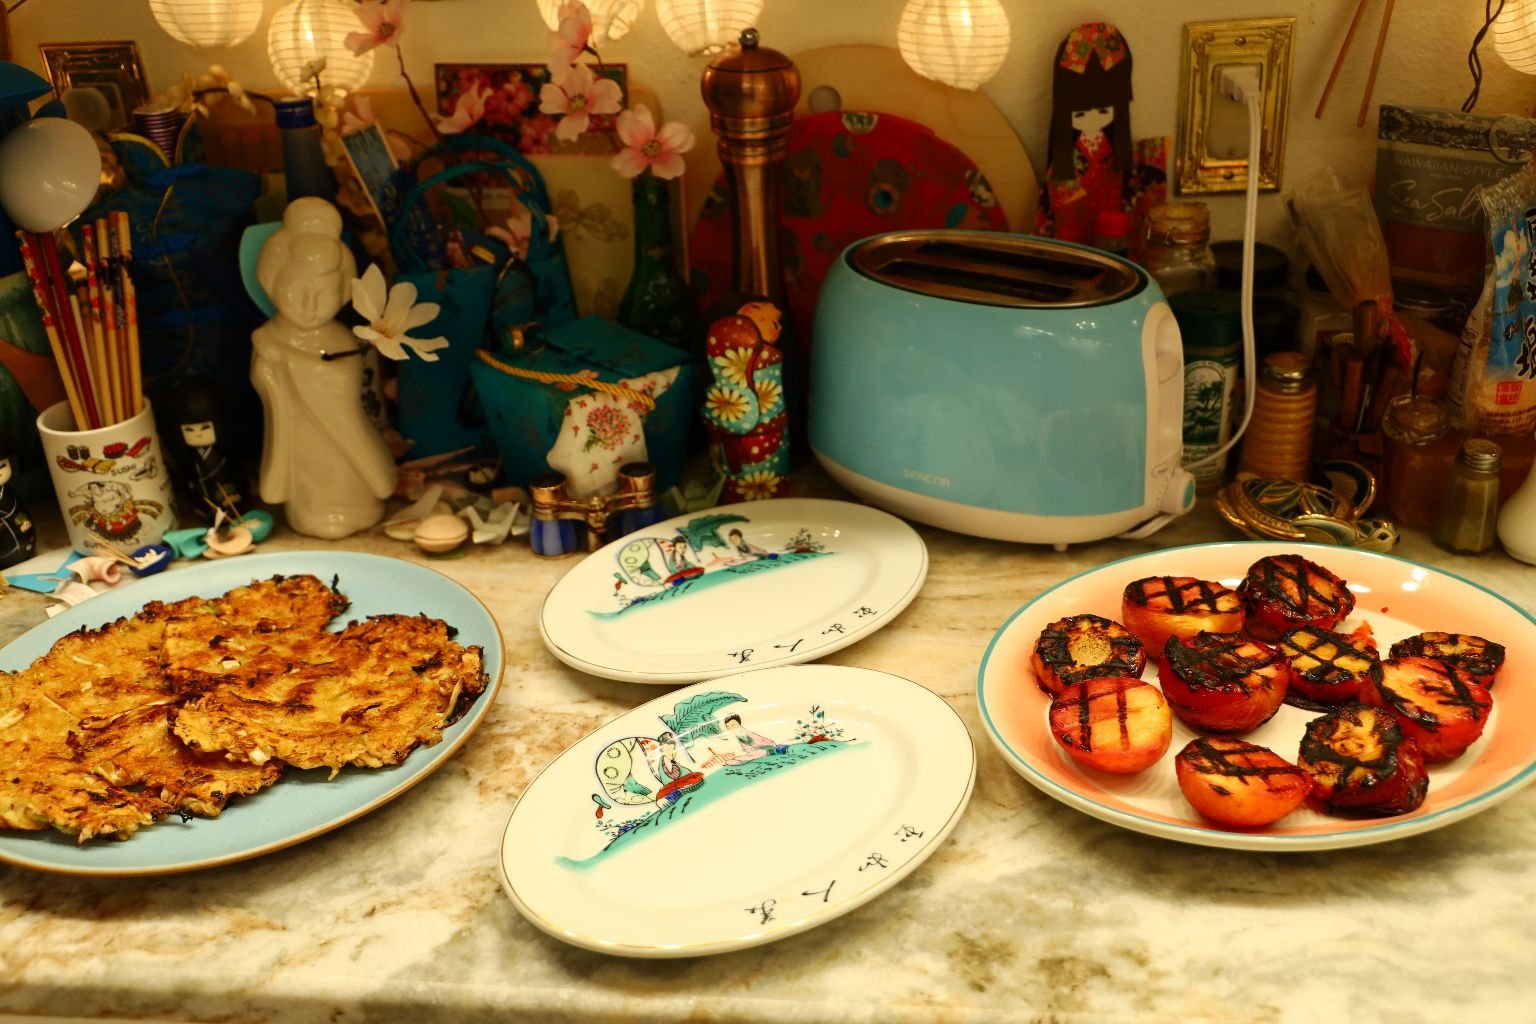
Ready to Serve Ourselves
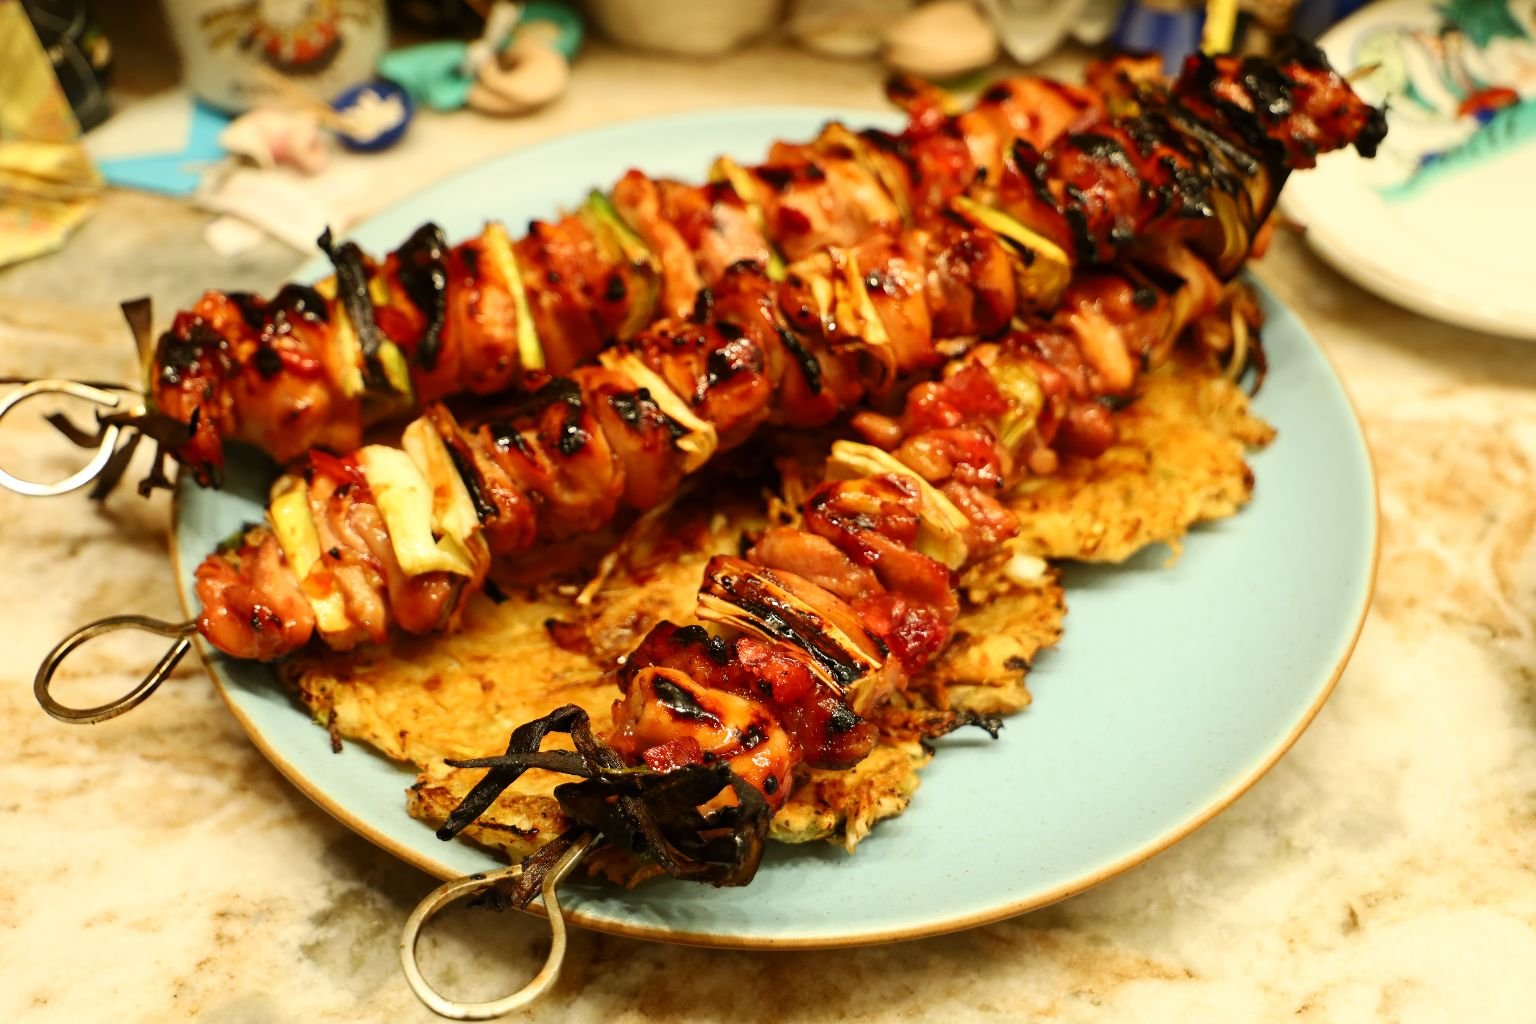
I Thought the Chicken Skewers Would Pair Well with the Cabbage Pancakes
This Was Such a Delicious Dinner
(Recipes Down Below)
—————————————————————————-
The Gift of Oriental Jezebel
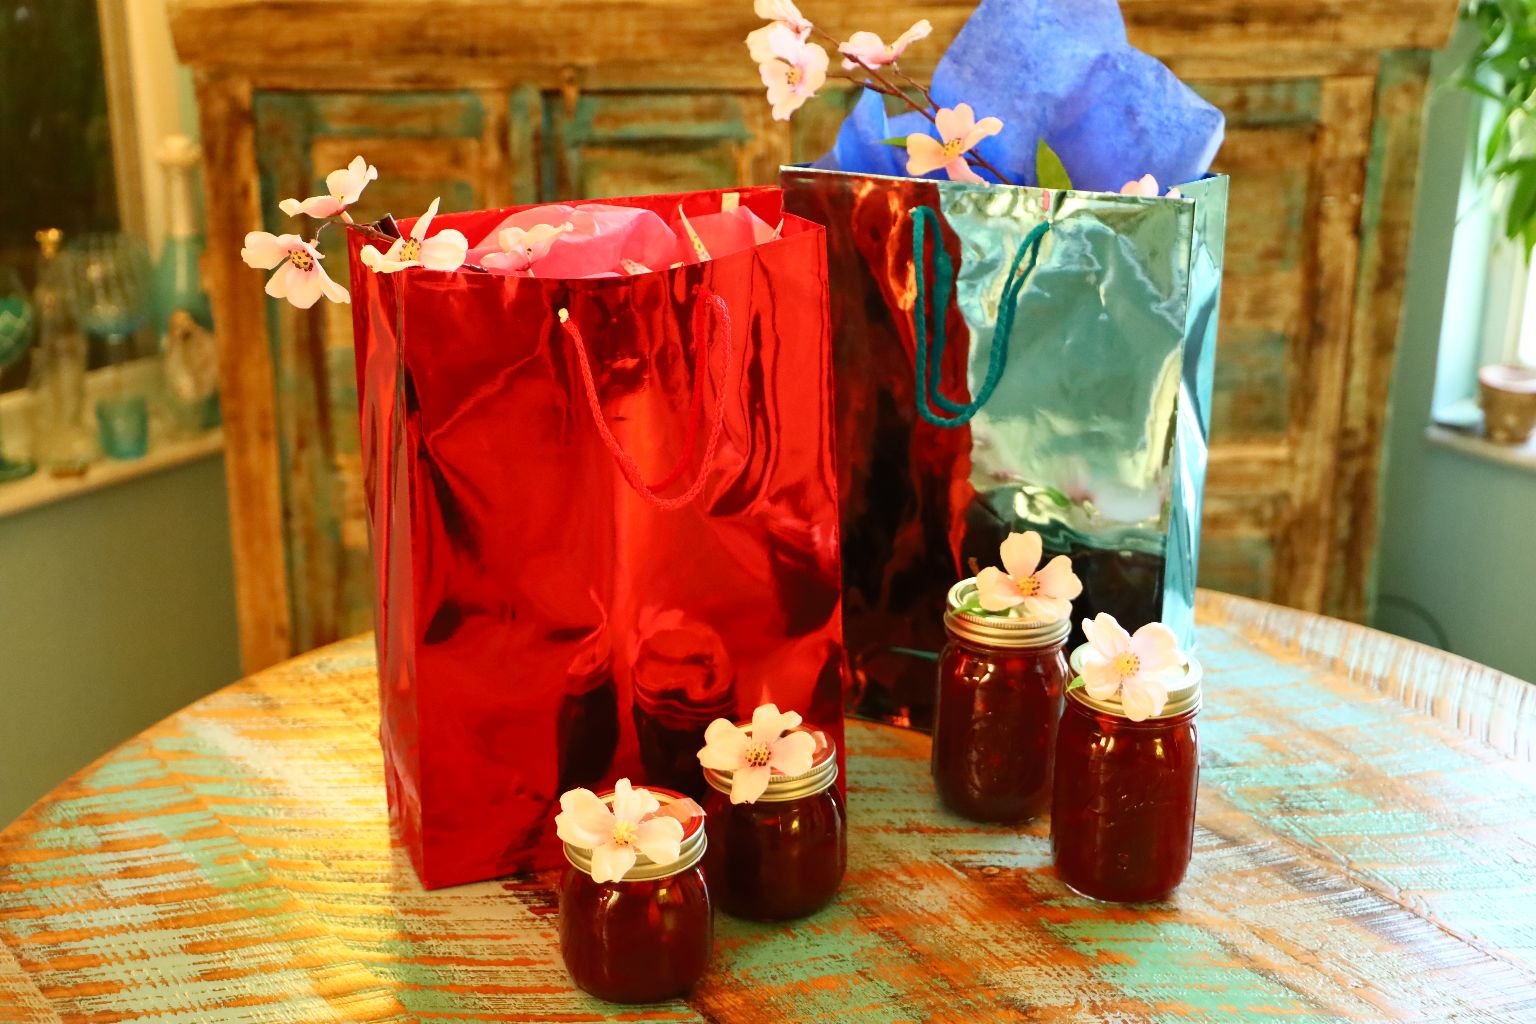
Whenever we create something new, we love to incorporate it into a theme of gifts to give our children.
For example, whenever we hit the Asian Supermarkets for our favorites, we always pick up a few extras to give to our children.
I also love incorporating some of their childhood favorites into the gits. (I’m trying to get rid of some things around the house and pass them on without them being able to object.) 🙂
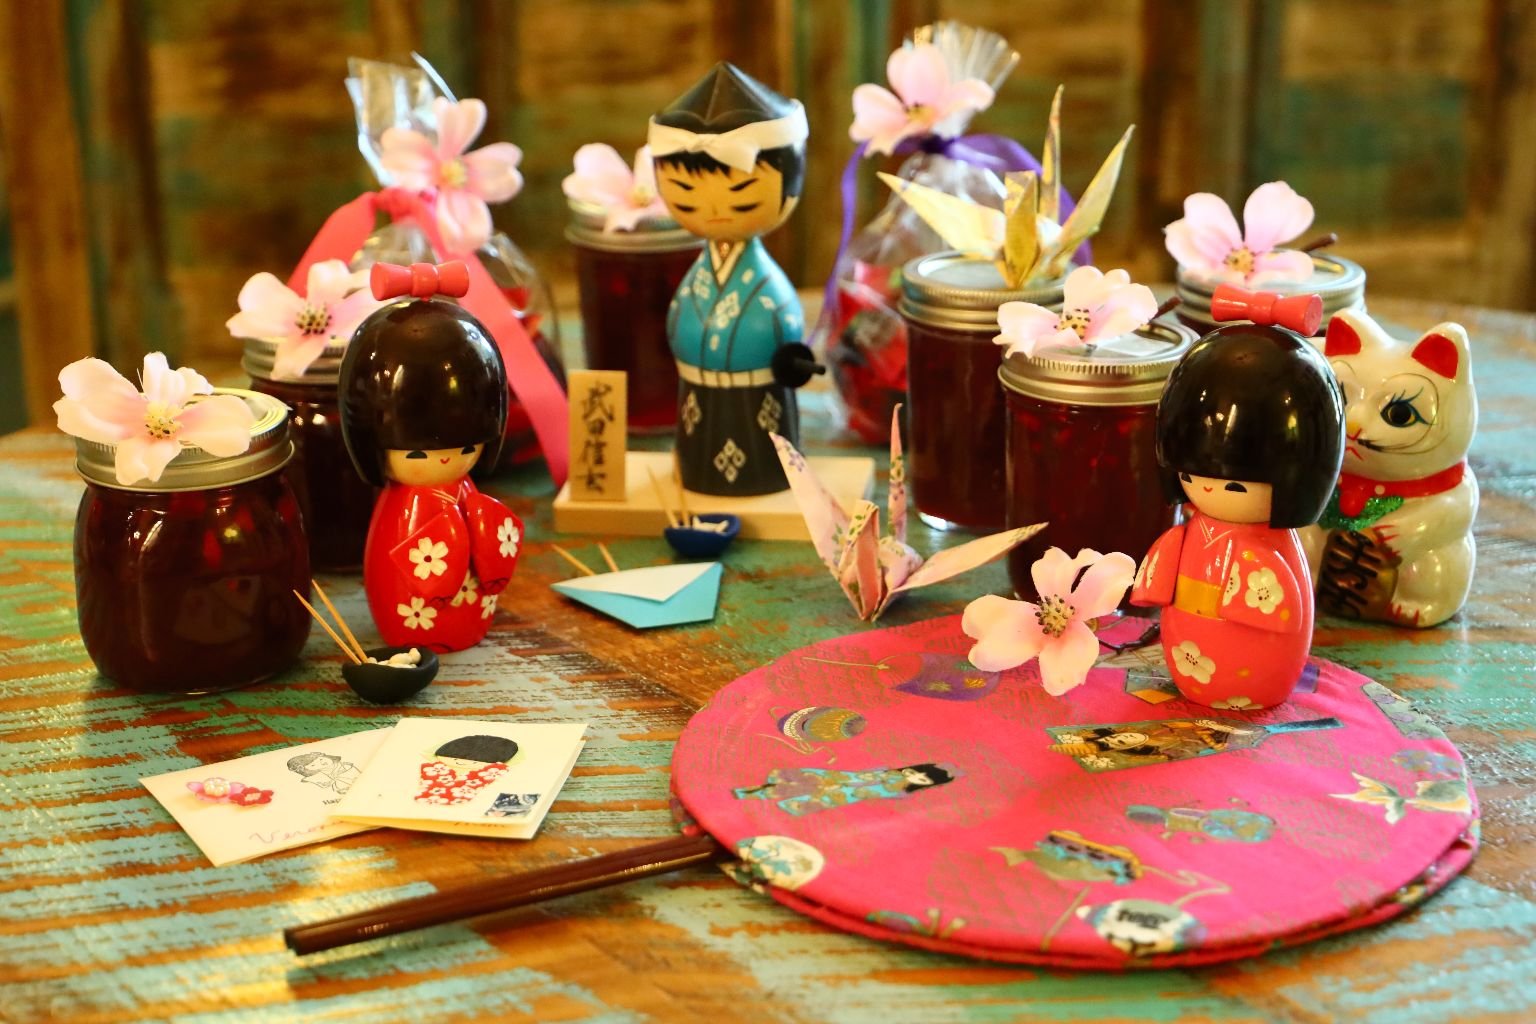
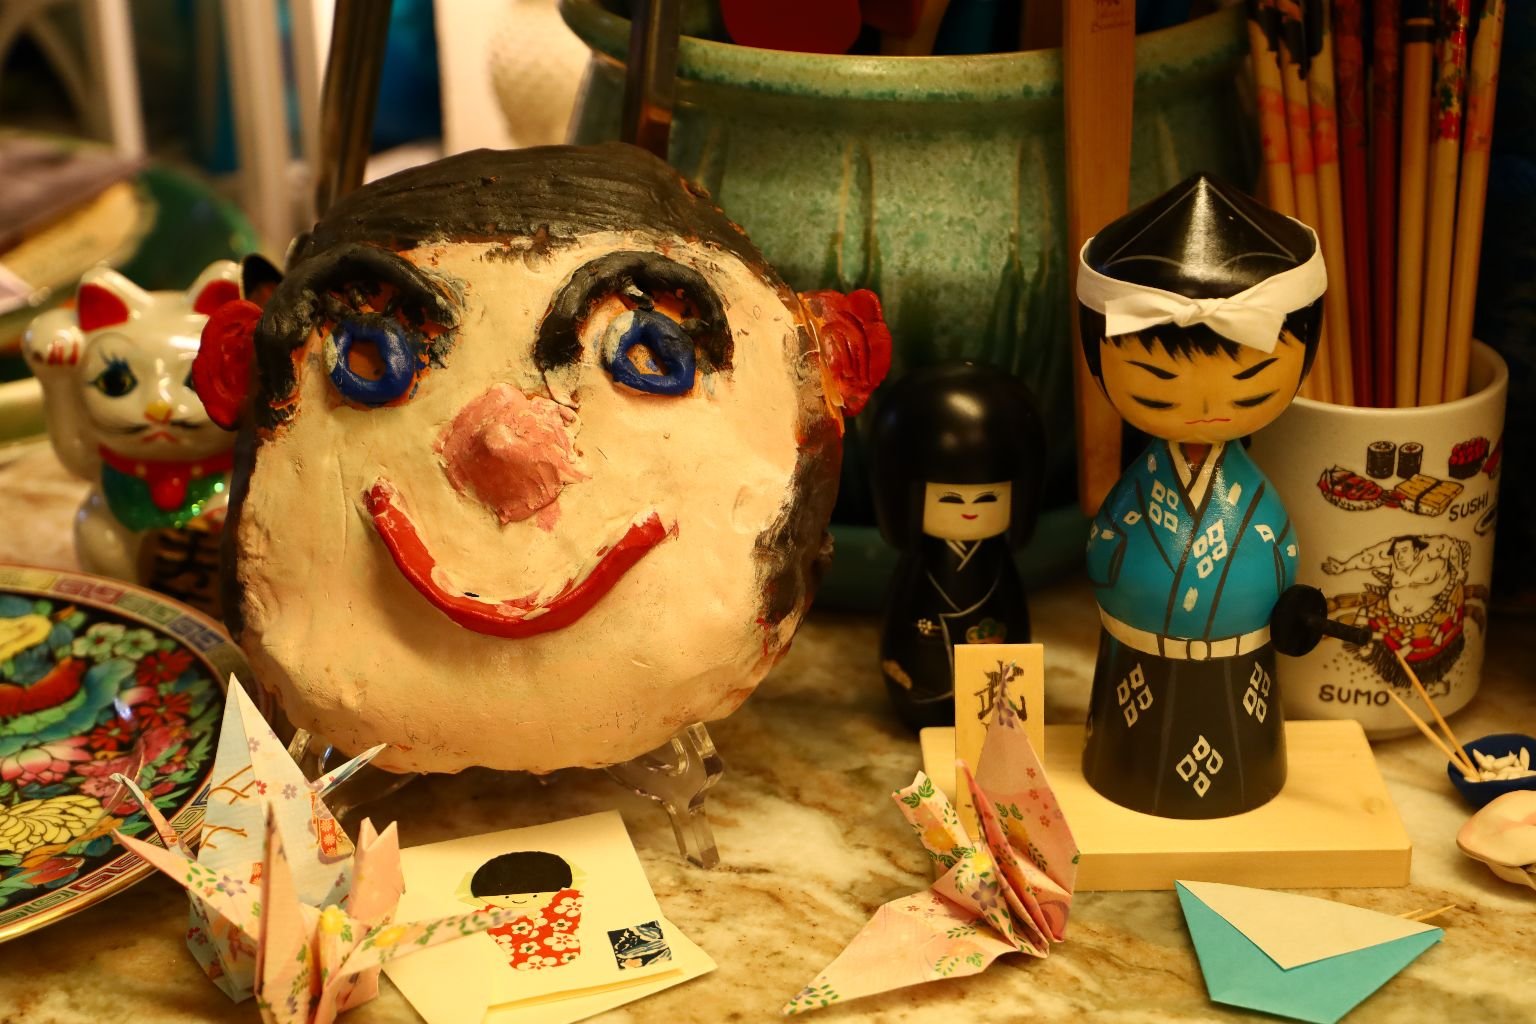
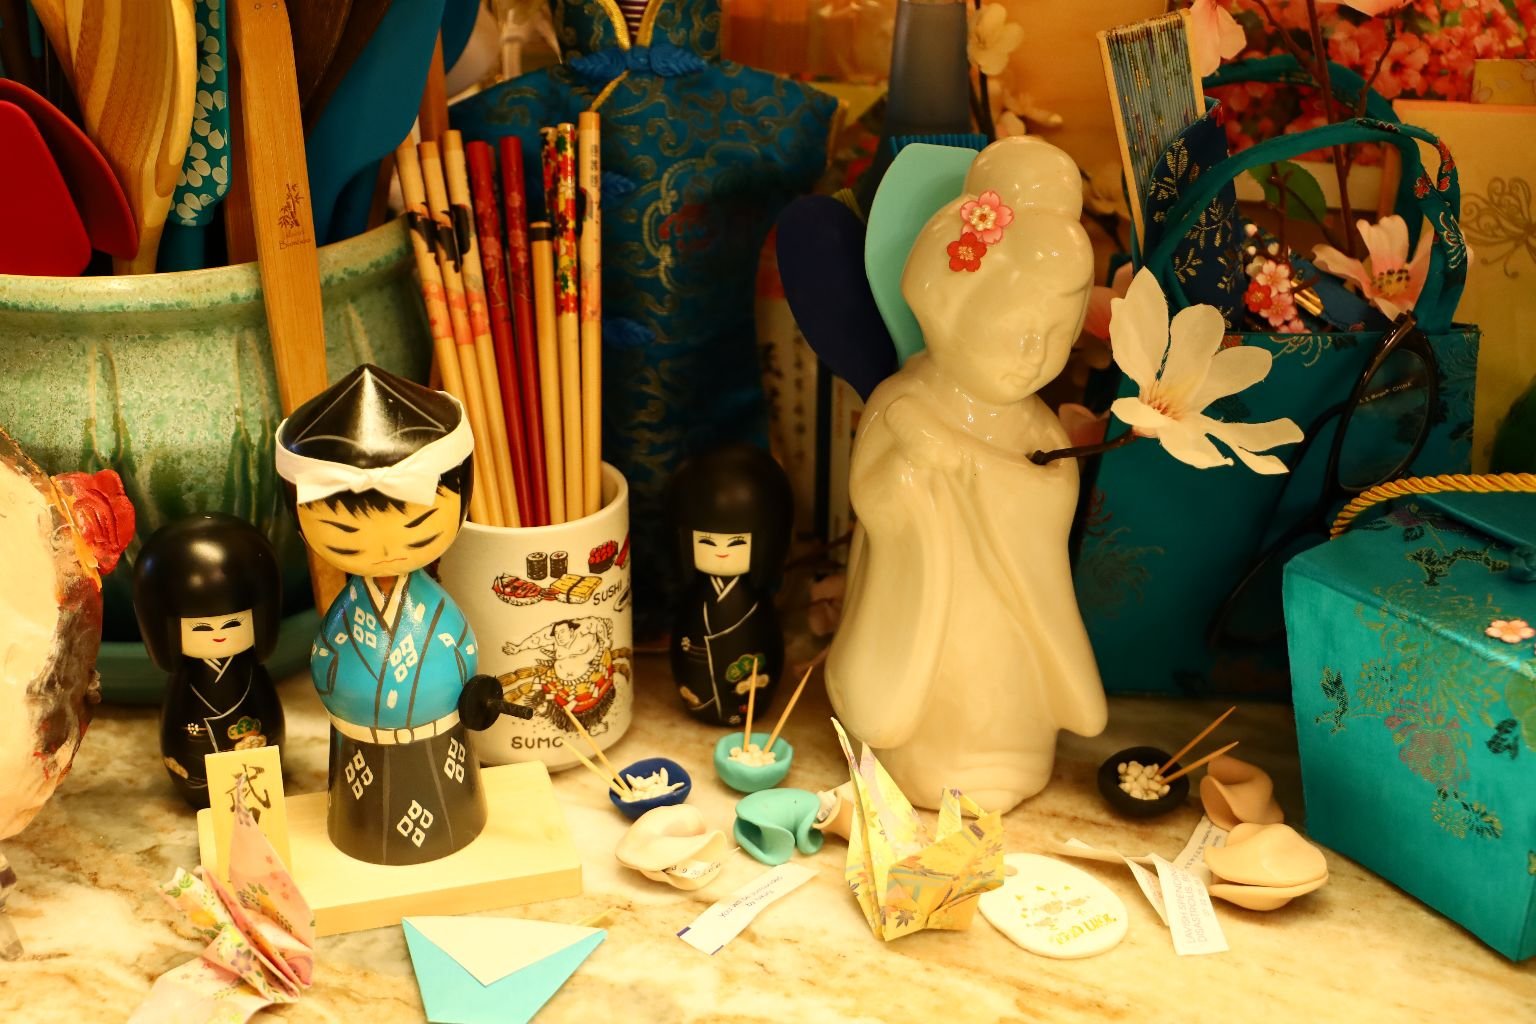
The cute collectibles you see above, along with some Origami Cranes Veronica made as a child, a Lucky Cat, and the pretty pink fan I had my Girl Scouts make when we lived in Hawaii with chopsticks as the handle.
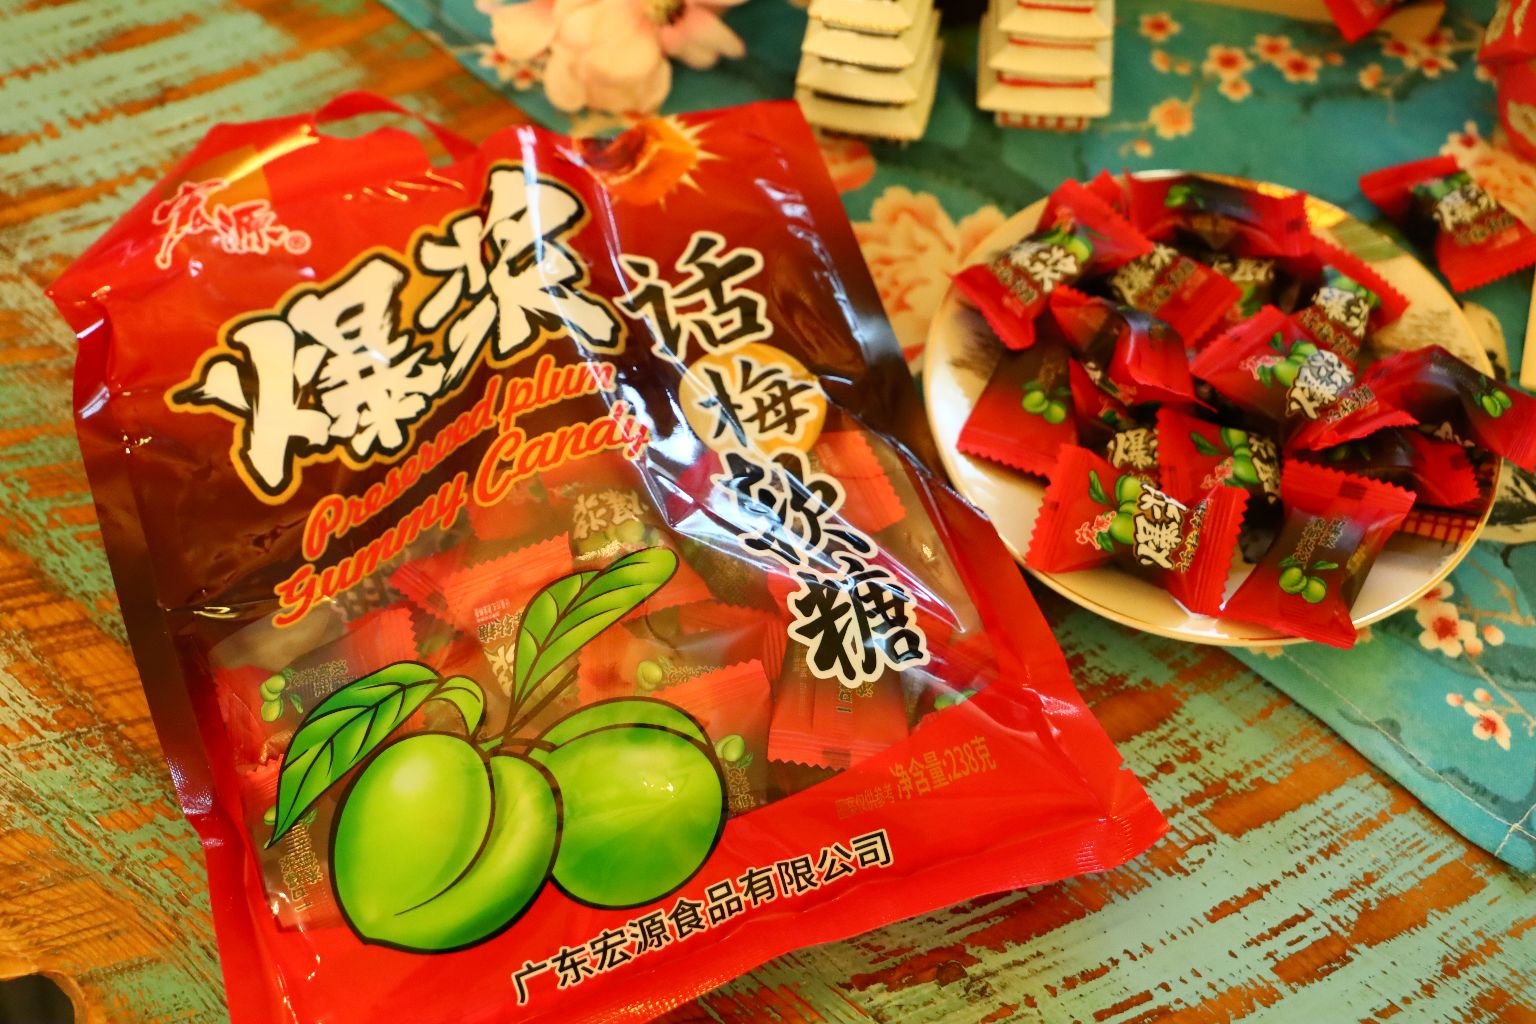
Plum Gummies
You know anything gummy is going to be good!
——————————————————————————————-
Thrift Store Find
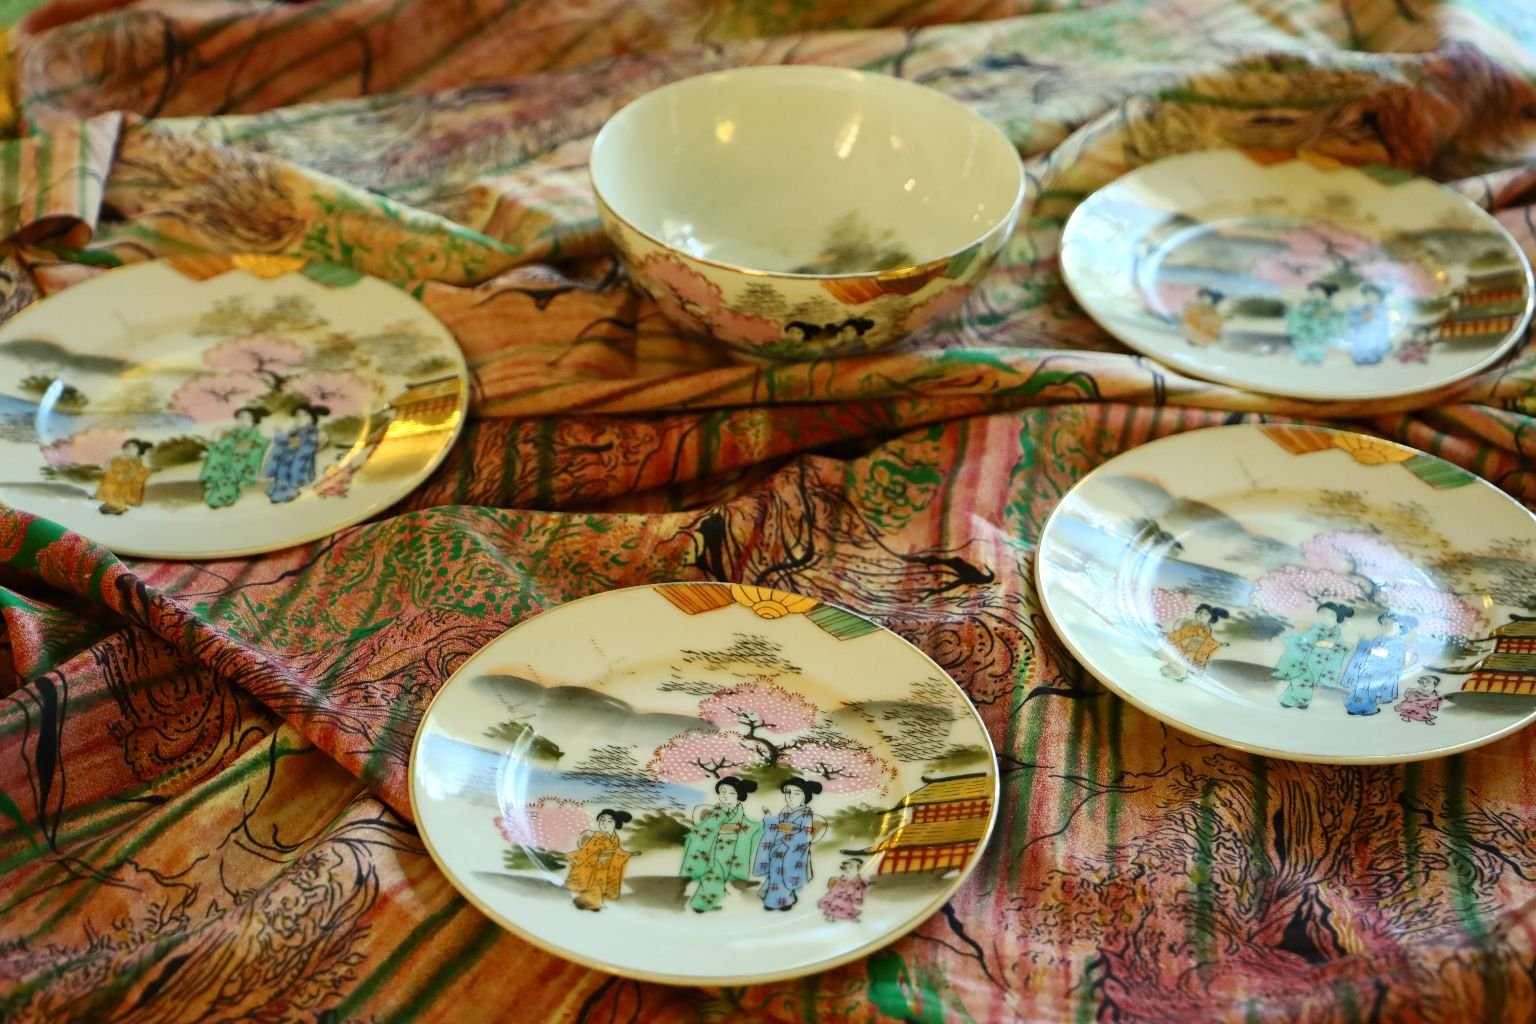
I am always on the lookout for treasures.
I came across these plates and one bowl at a local thrift store.
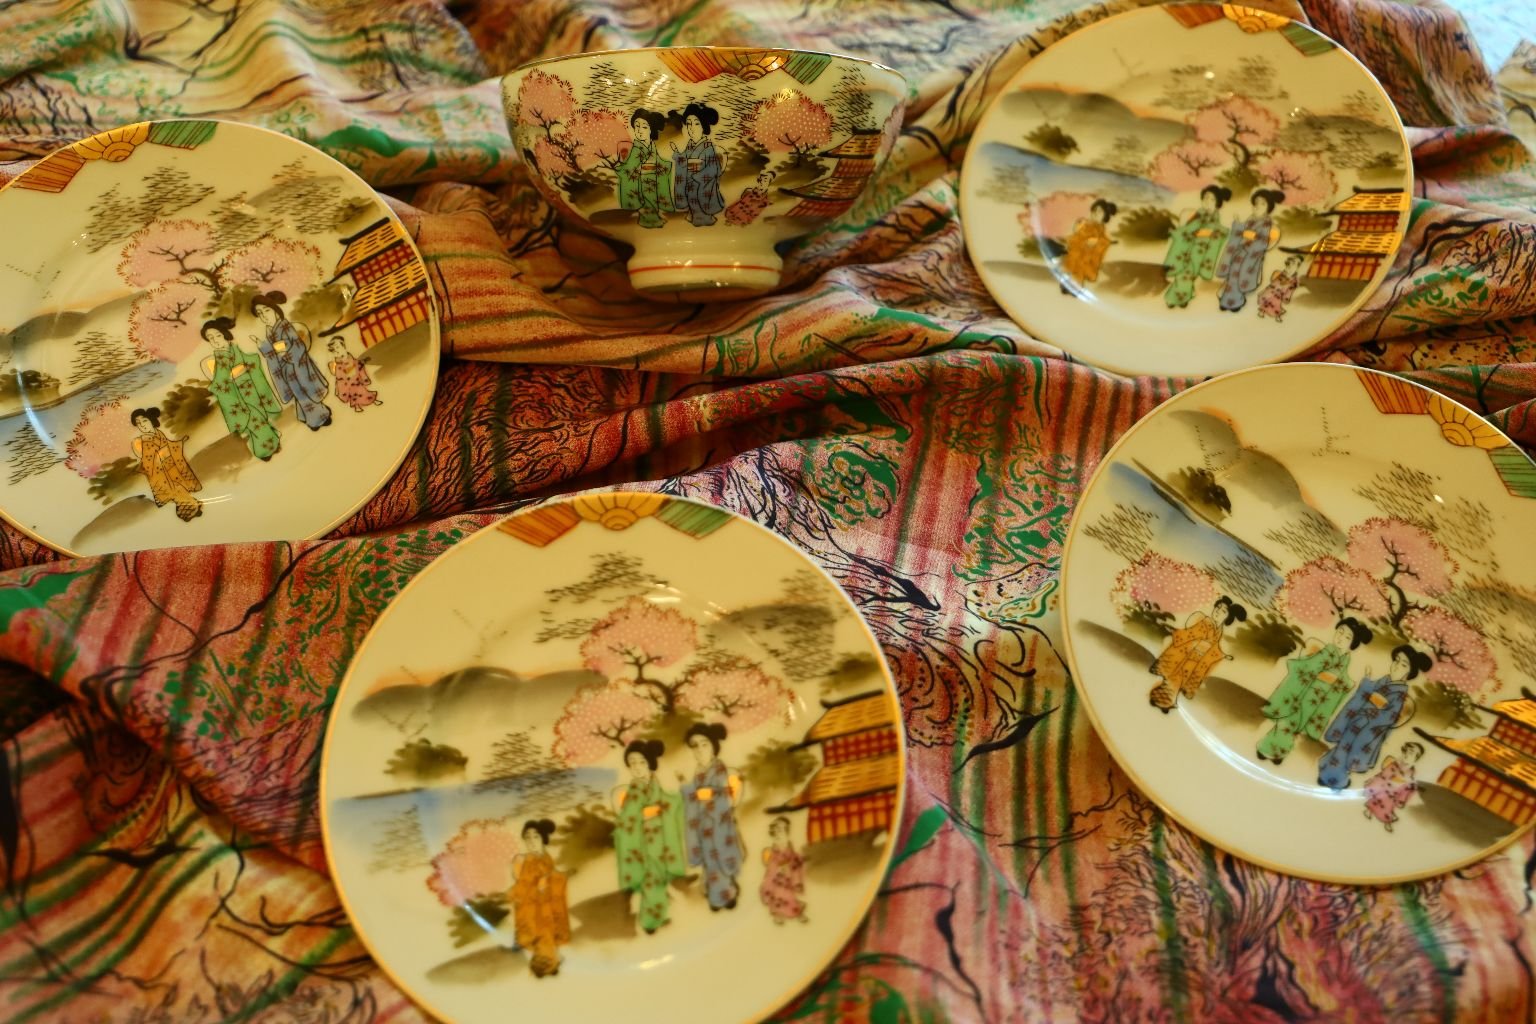
Beautiful Hand Painted Japanese Geisha’s
—————————————————————————–
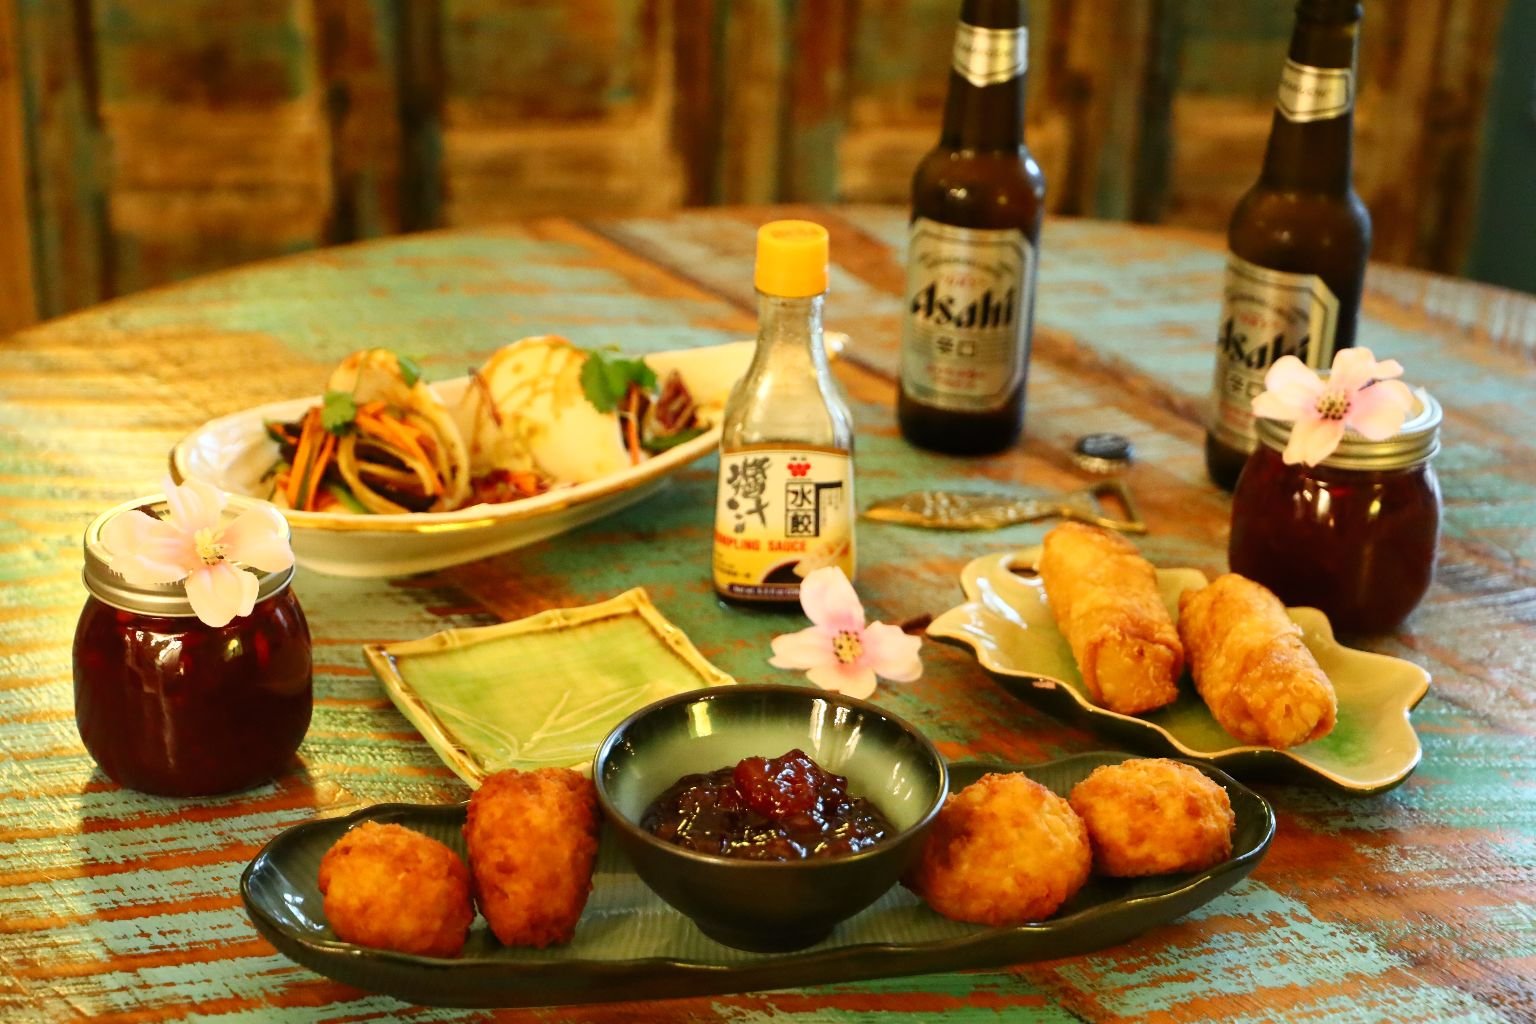
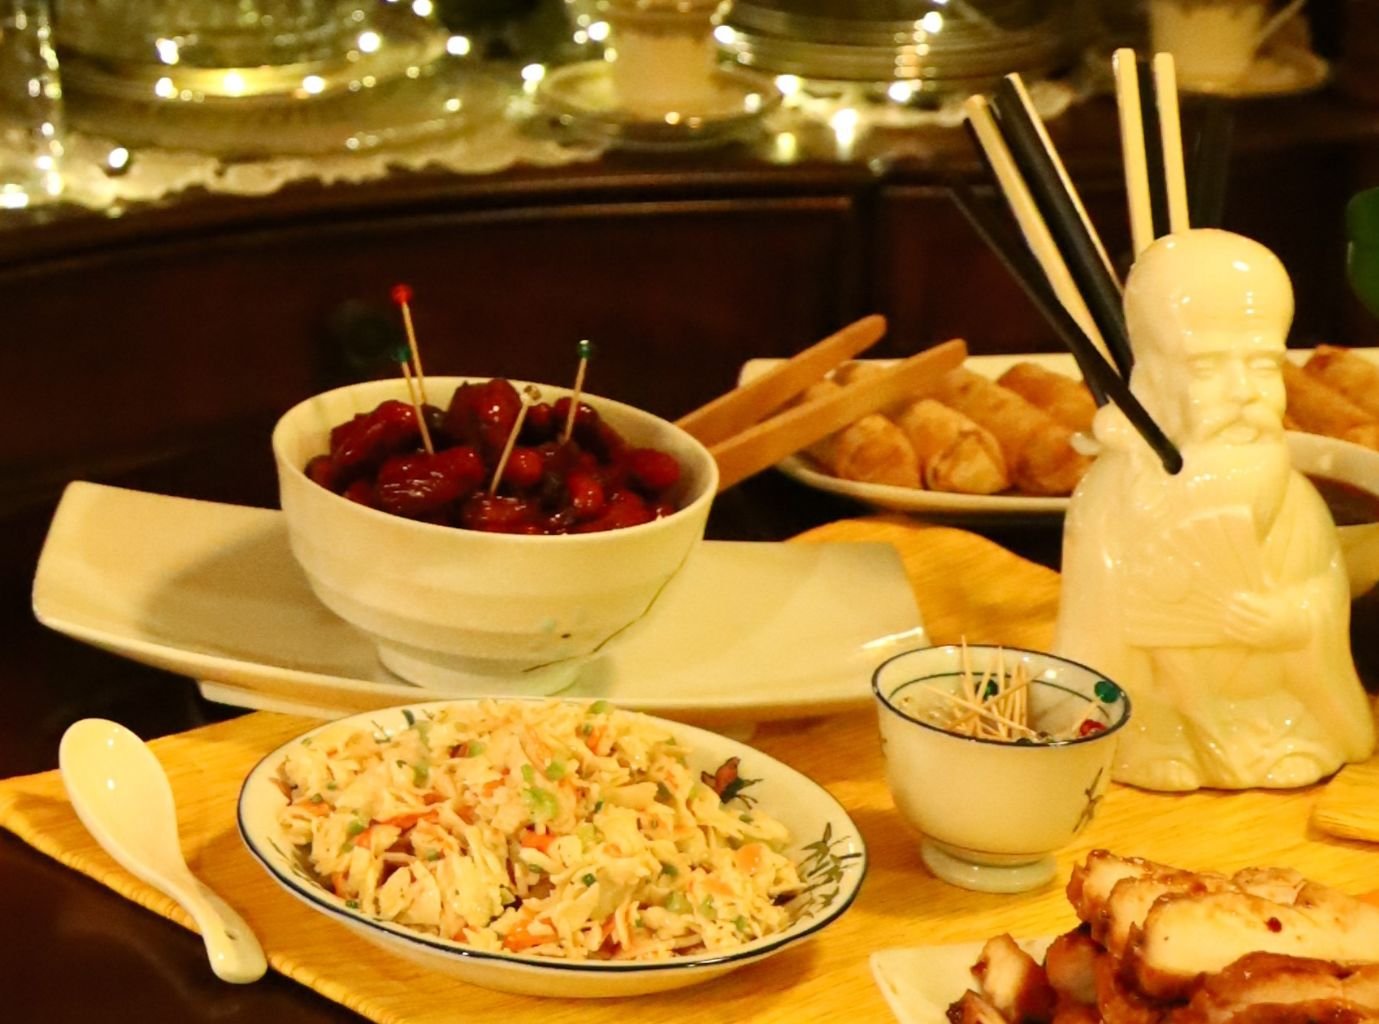
The food you see above, and below, we purchased from the Asian Supermarket and Stein and Vine.
We have Asian Taco’s, Egg Rolls, and Chicken Balls and Julie’s Oriental Jezebel
My Oriental Jezebel was Excellent on the Asian Taco’s (Center) from Stein and Vine
My Cute Blue Bread Round I Just Added Because It’s Cute 🙂
These are the kinds of foods I love to buy ready made from the Asian Supermarket Kitchens
And then I add my Jezebel Sauce
This is a Favorite Dinner of Ours
(Rice, Egg Rolls, and Pot Stickers with a Dipping Sauce)
————————————————————————-
An Oriental Jezebel Cocktail Sausages
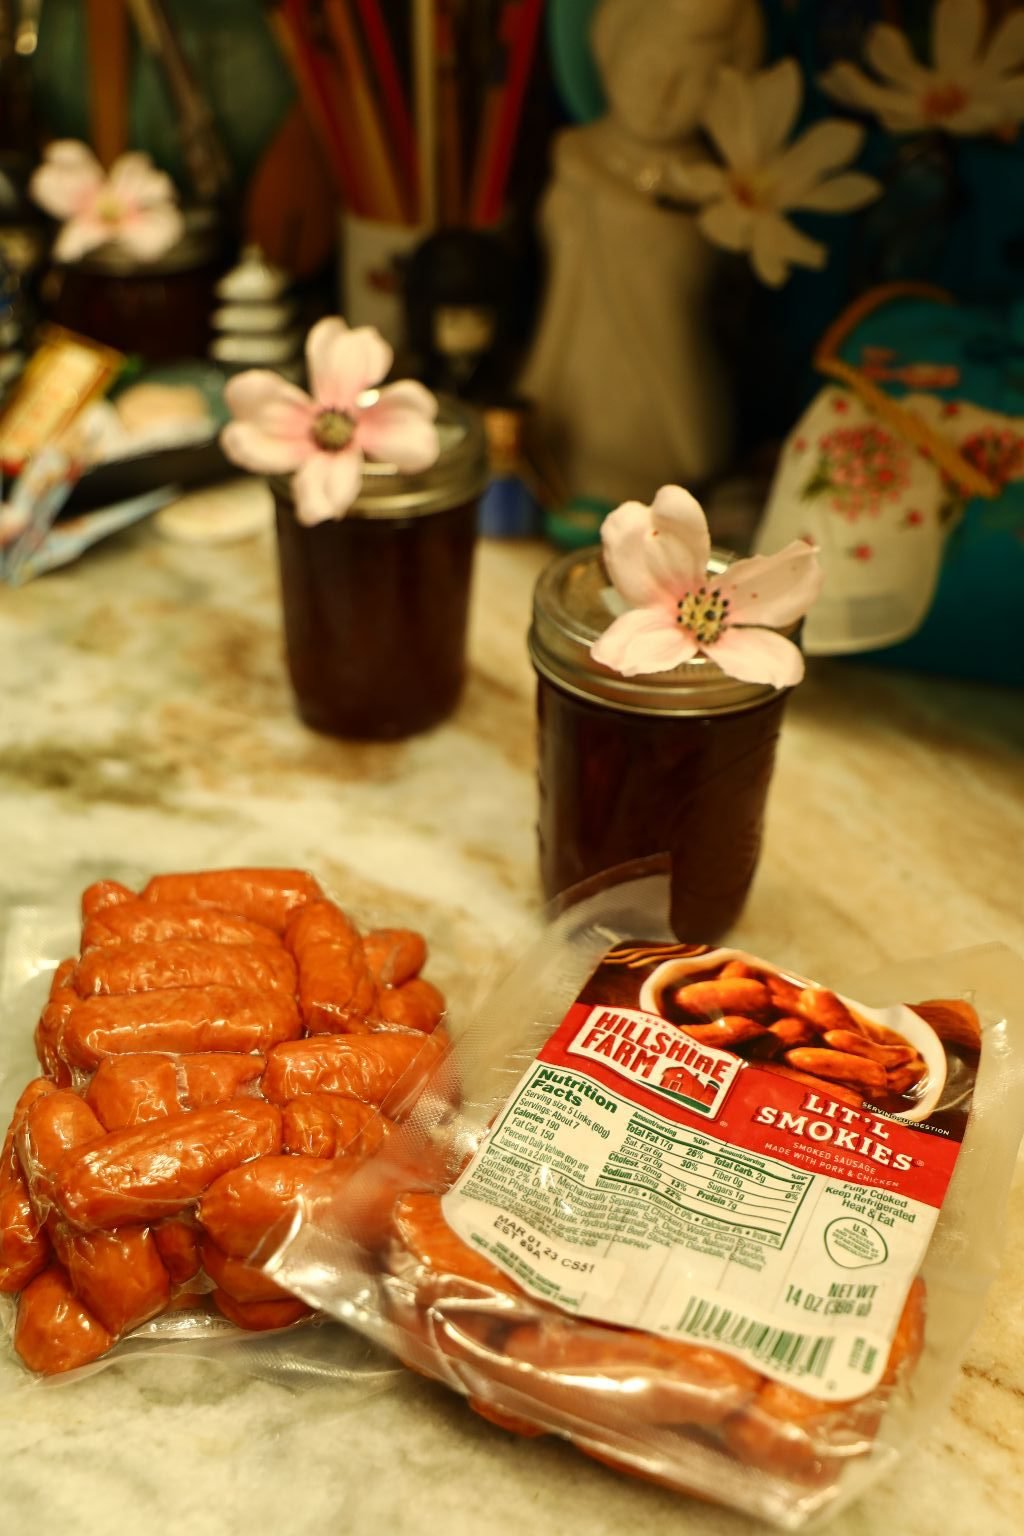
Here is the only recipe I am adding up here. The rest will be down below.
But these, are going to be the Big Hit at every single party or occasion you may have.
Everyone loves sausages! And everyone loves a sweet, baked, plumped up sausage! These could not be EASIER!
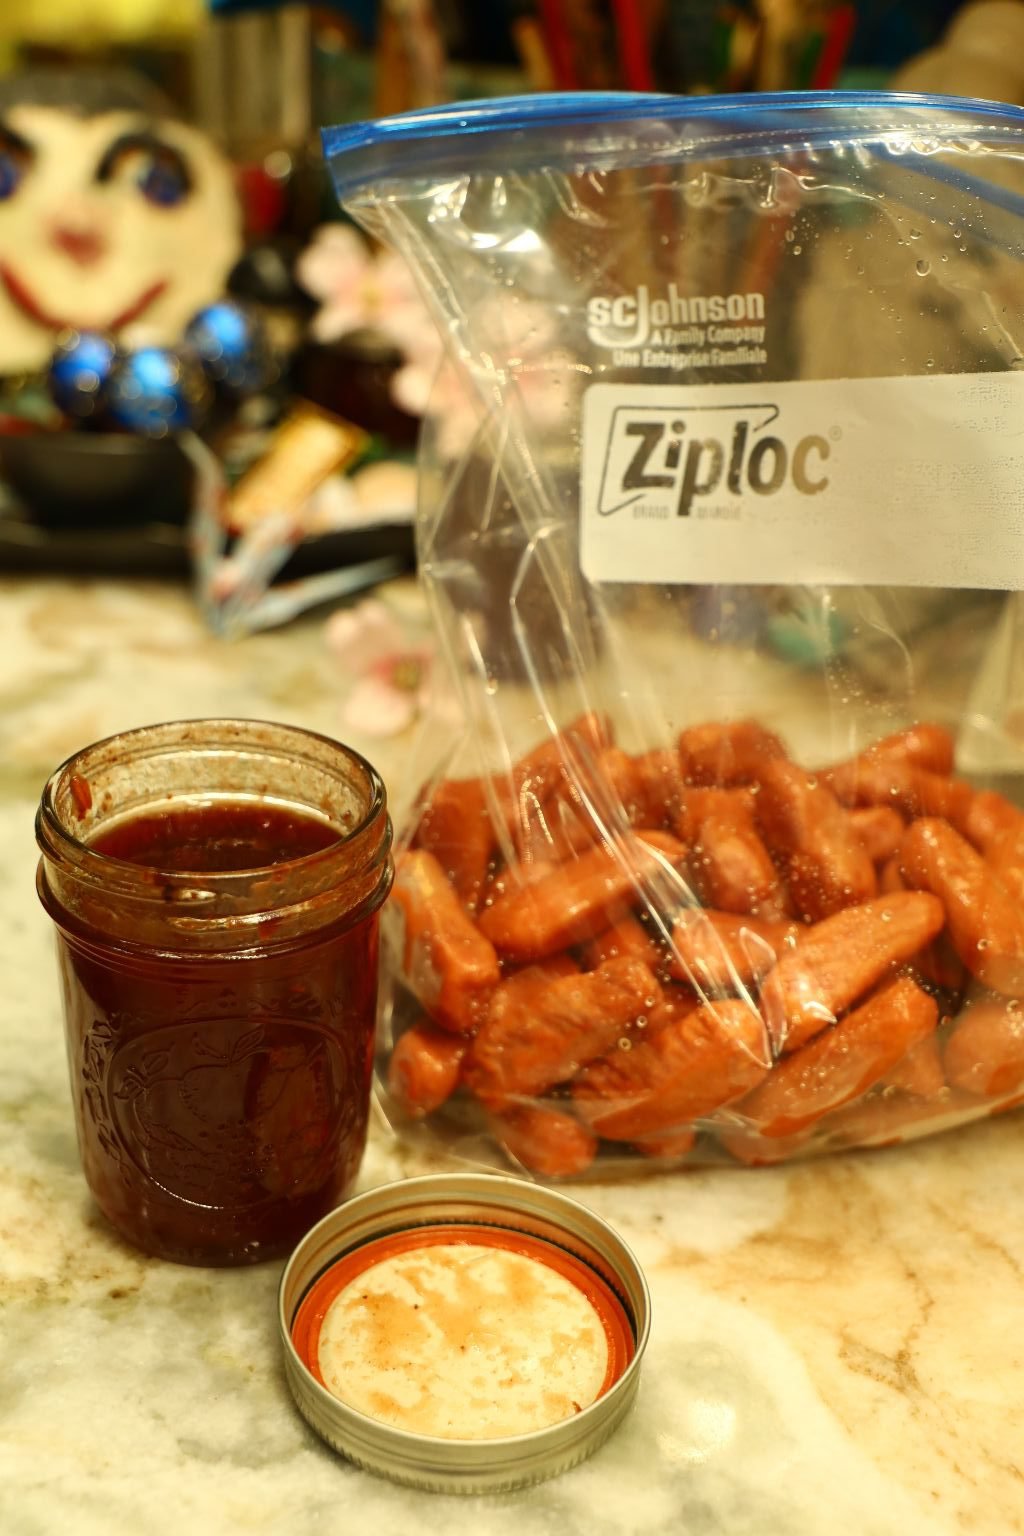
These Actually Took 2 Small Jars of Oriental Jezebel to Make
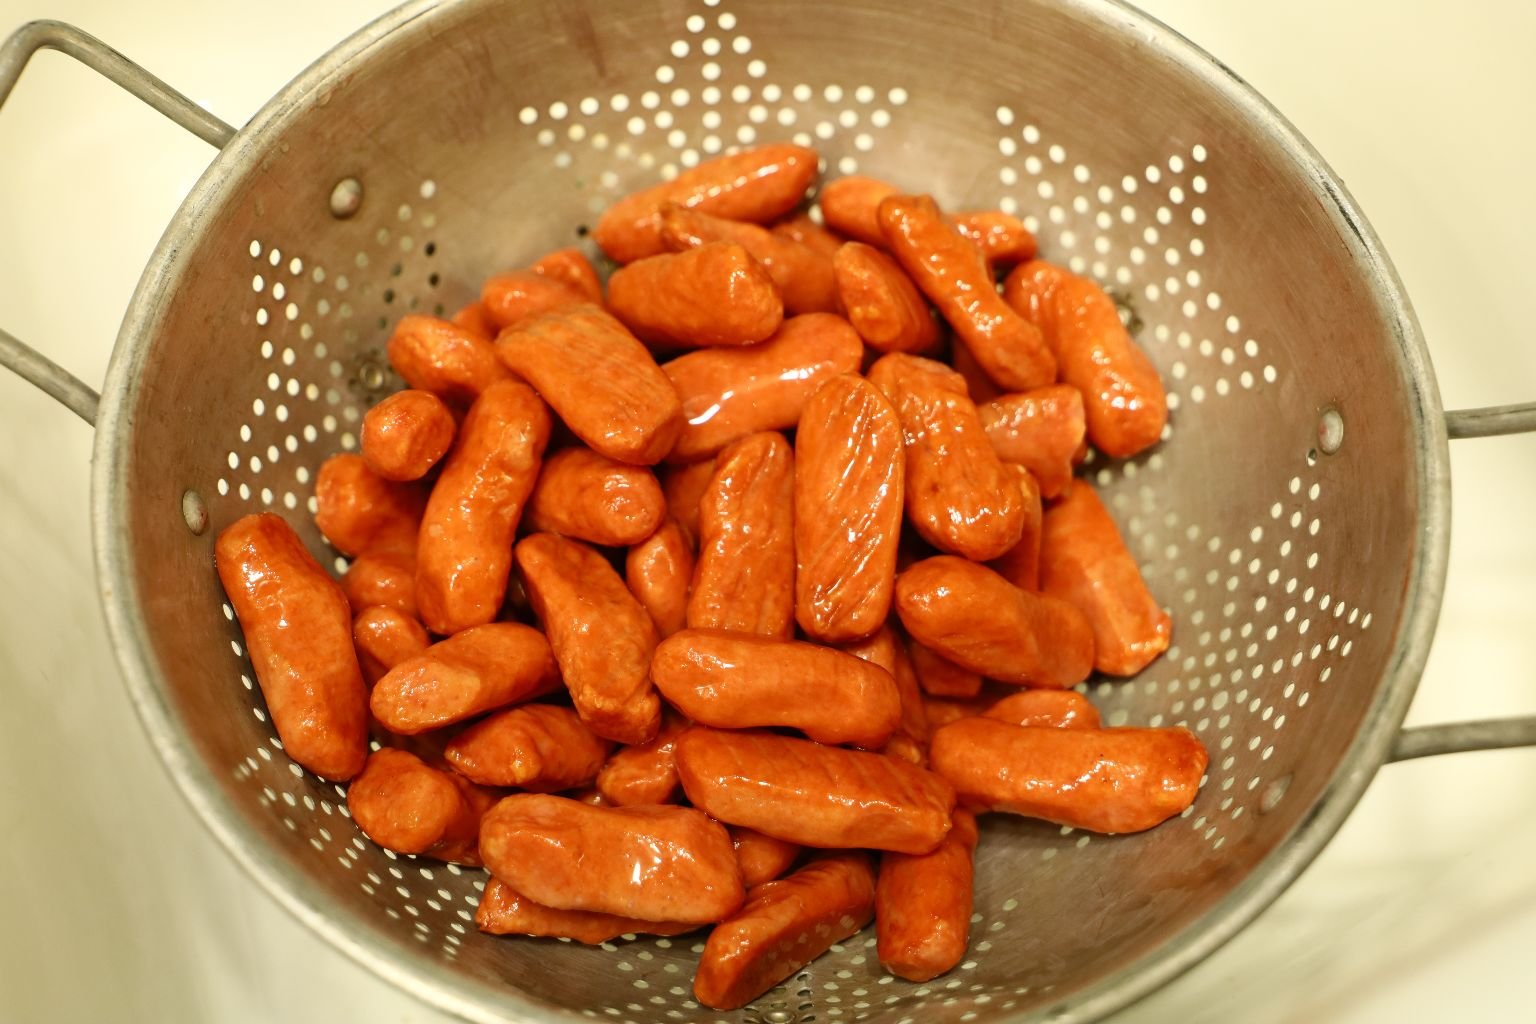
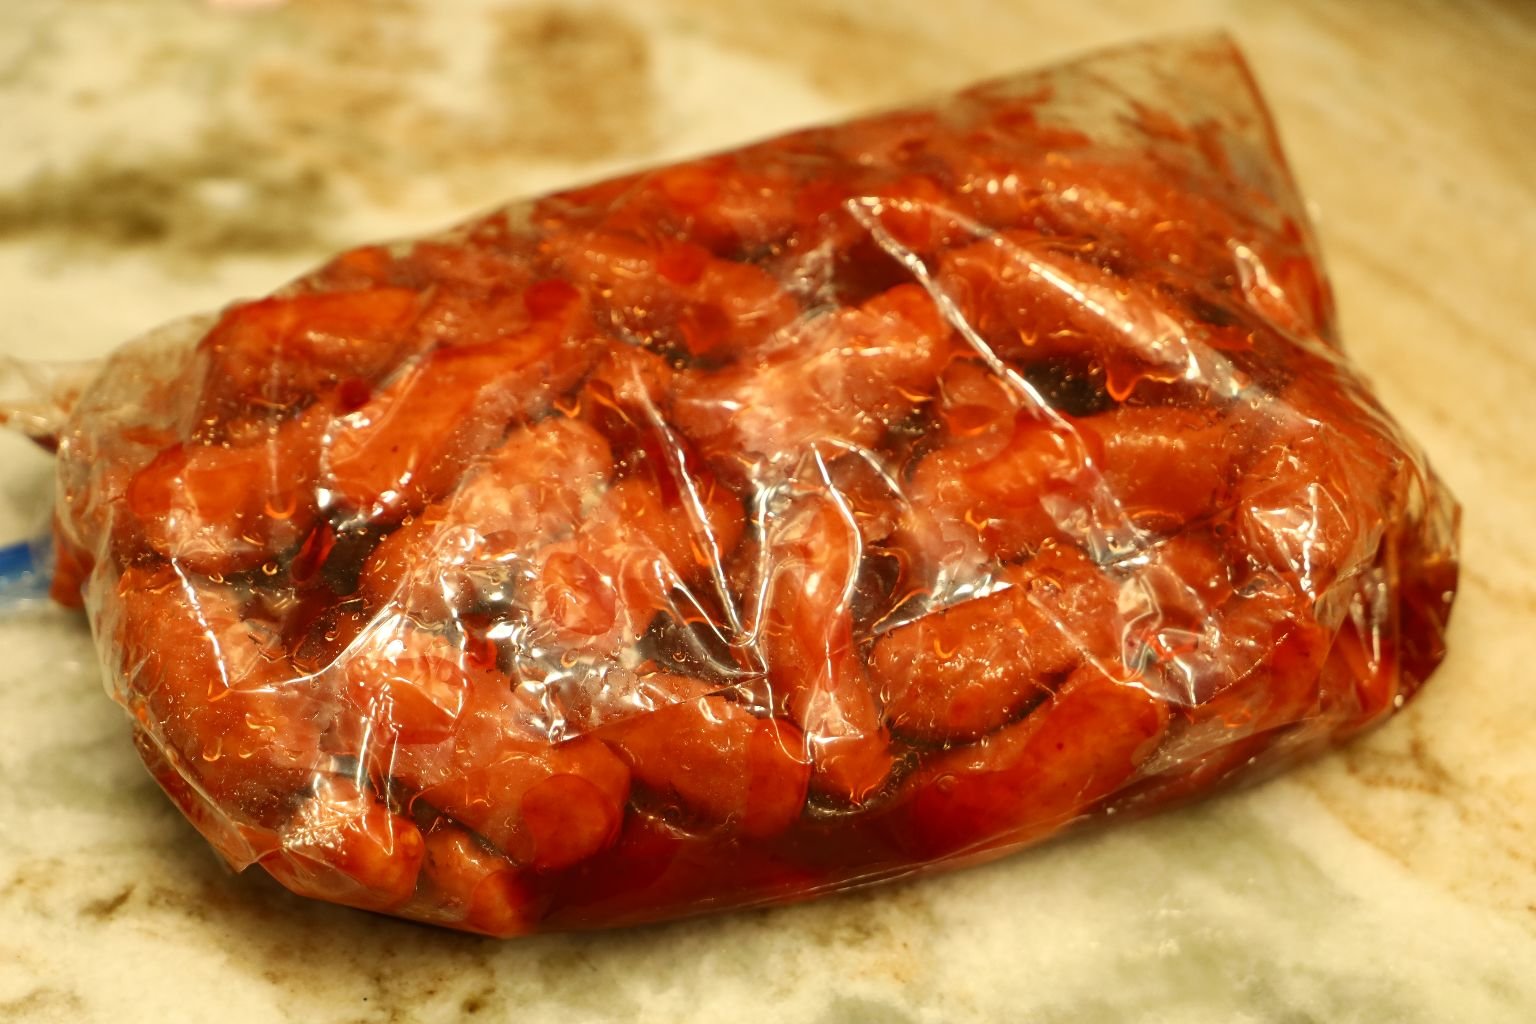
You first want to drain the packages of sausages into a colander and then place them into a ZipLock Baggie. Now pour in enough of the Oriental Jezebel to coat all the sausages in the baggie. Let them marinate overnight or for about two days. When you are ready to cook them, drain the marinade out of the sausages into a colander, and then place the sausages into a baking dish.
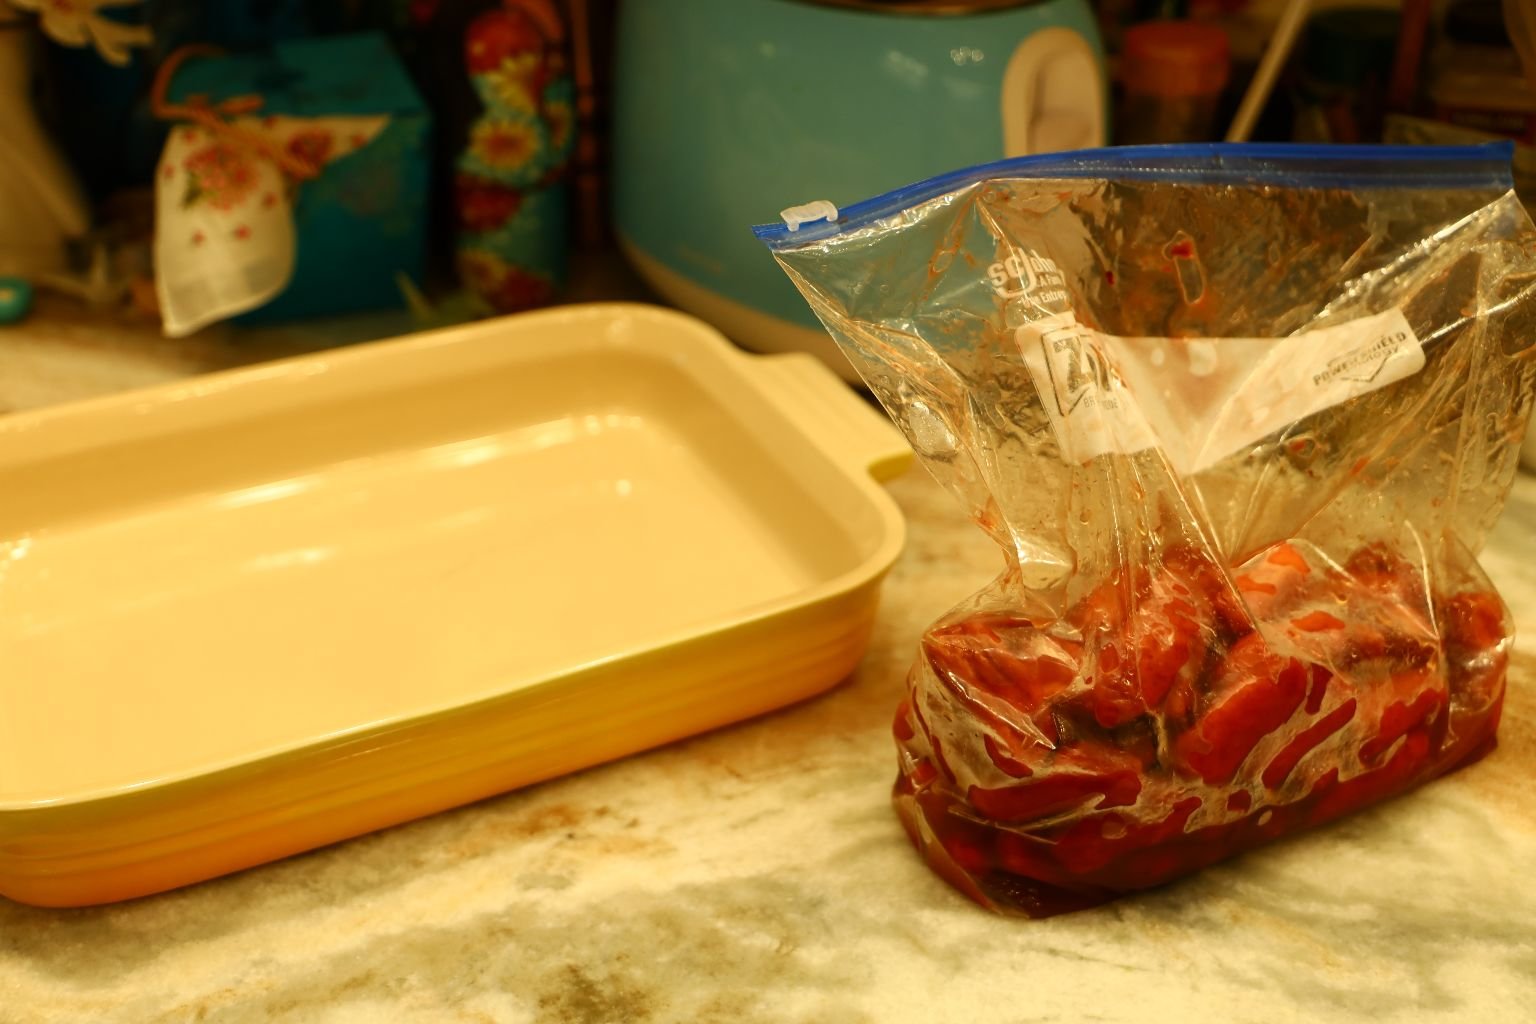

Turn the oven on 400F and place the sausages into a baking dish, like so.
You then want to pour more of the Oriental Jezebel on top of the sausages. I opened another jar for this.
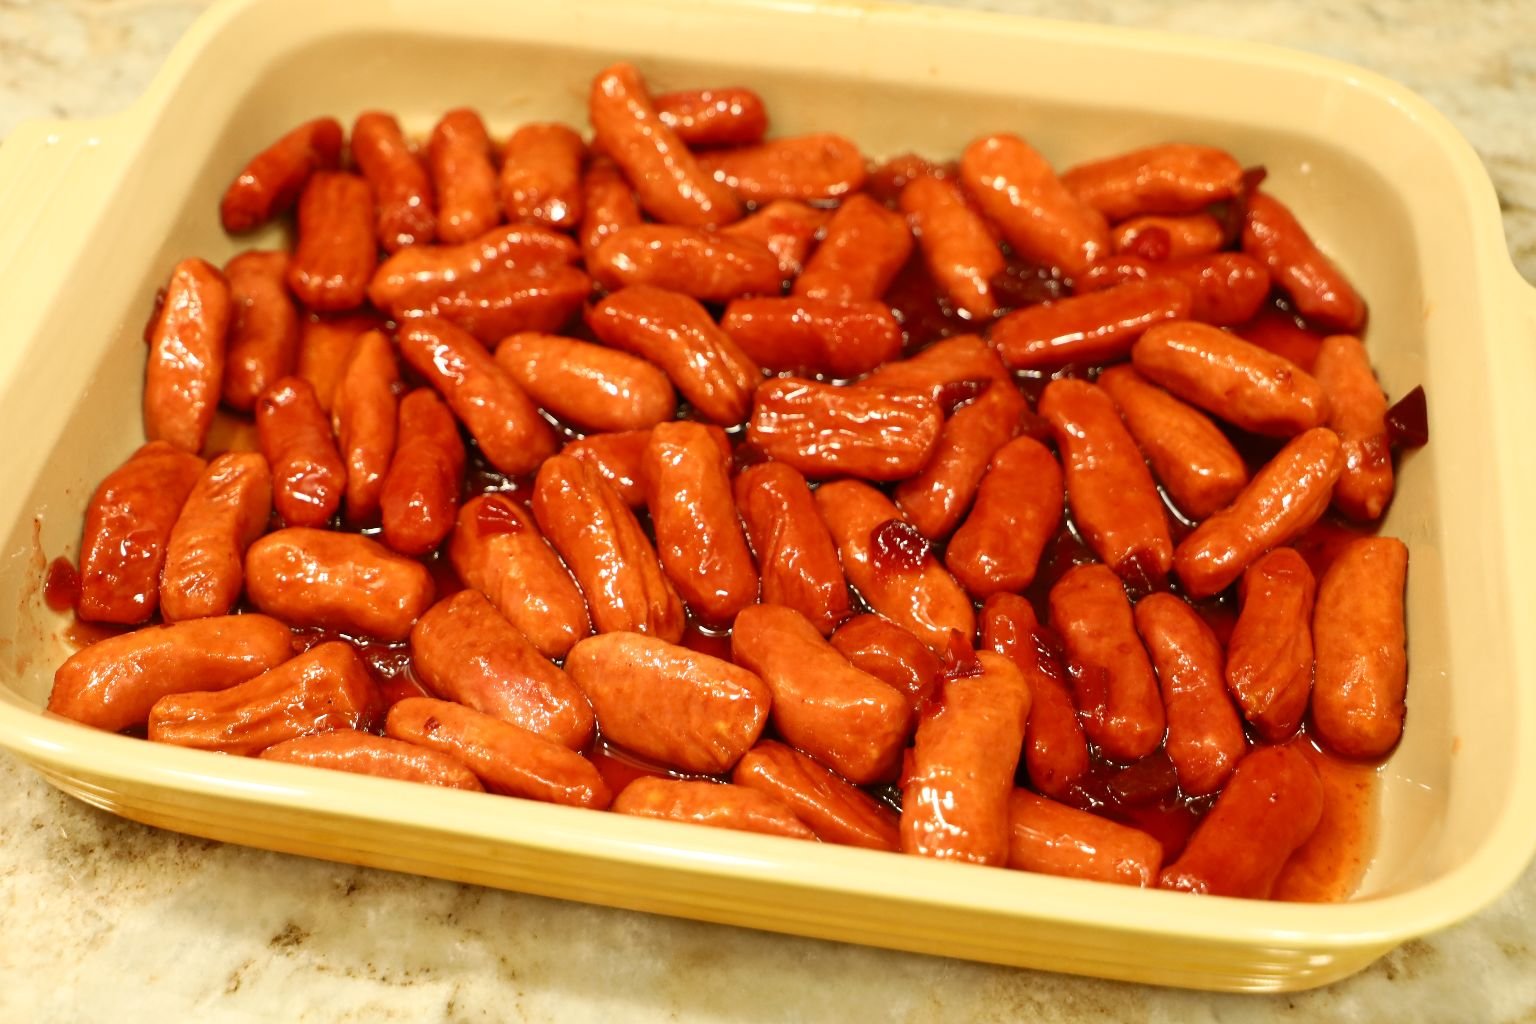
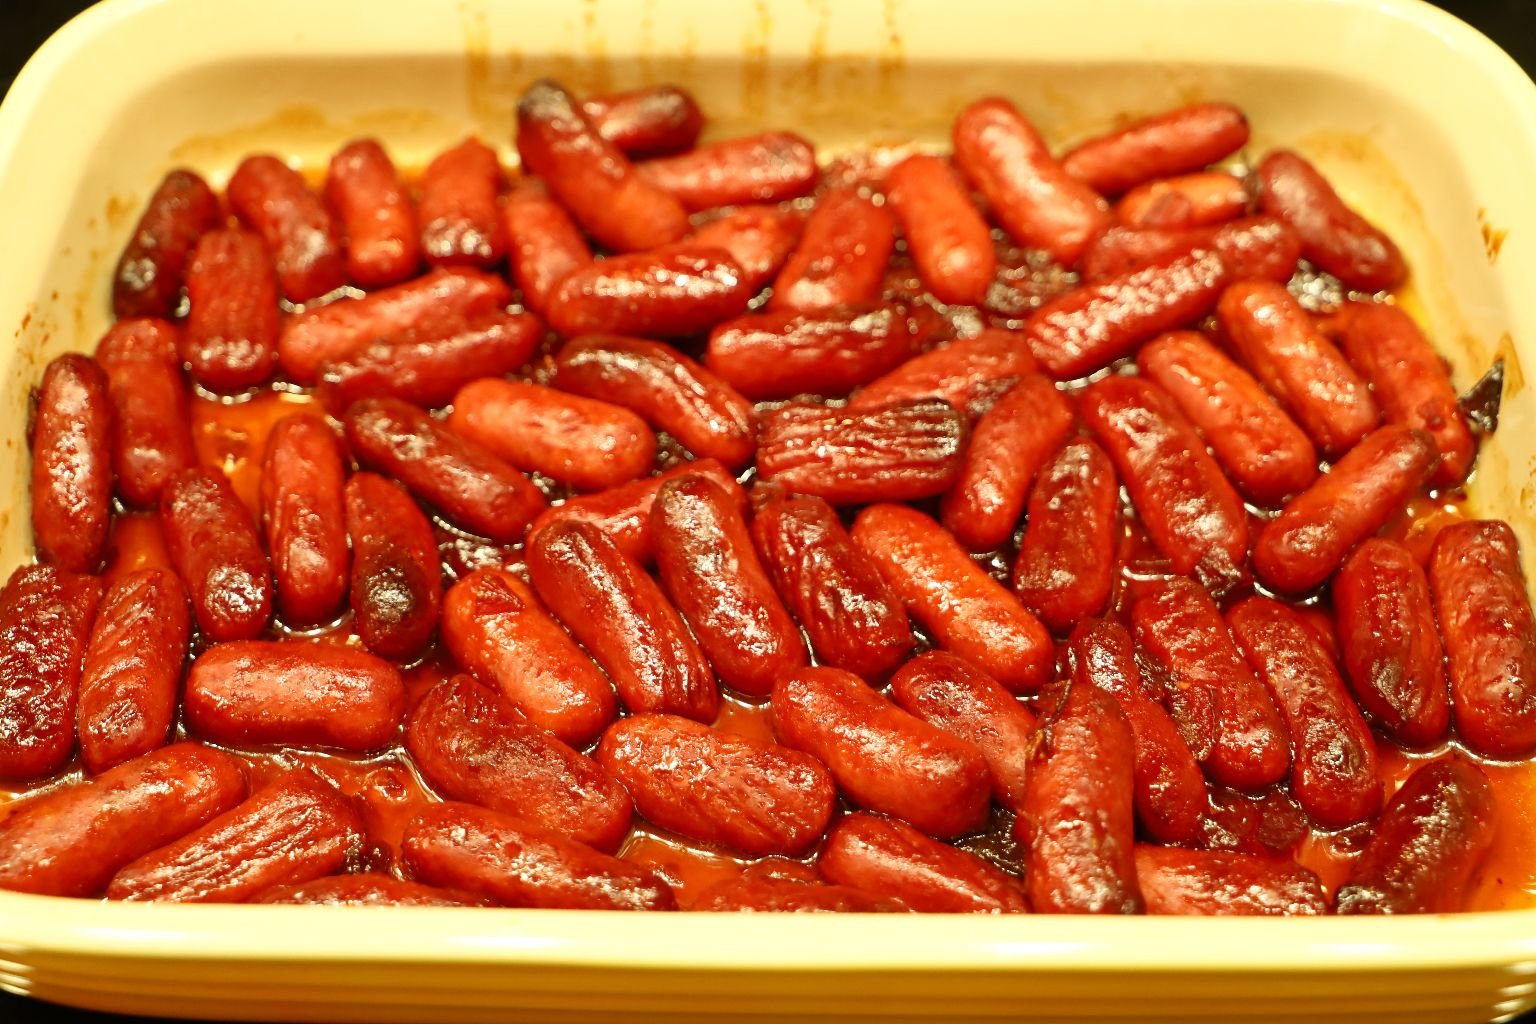
Before Baking, After Baking
These took about 40 minutes to bake. I wanted them plumped up and a bit caramelized.
The Cocktail Sausages Were Probably The Most Popular
—————————————————————————
—————————————————————————-
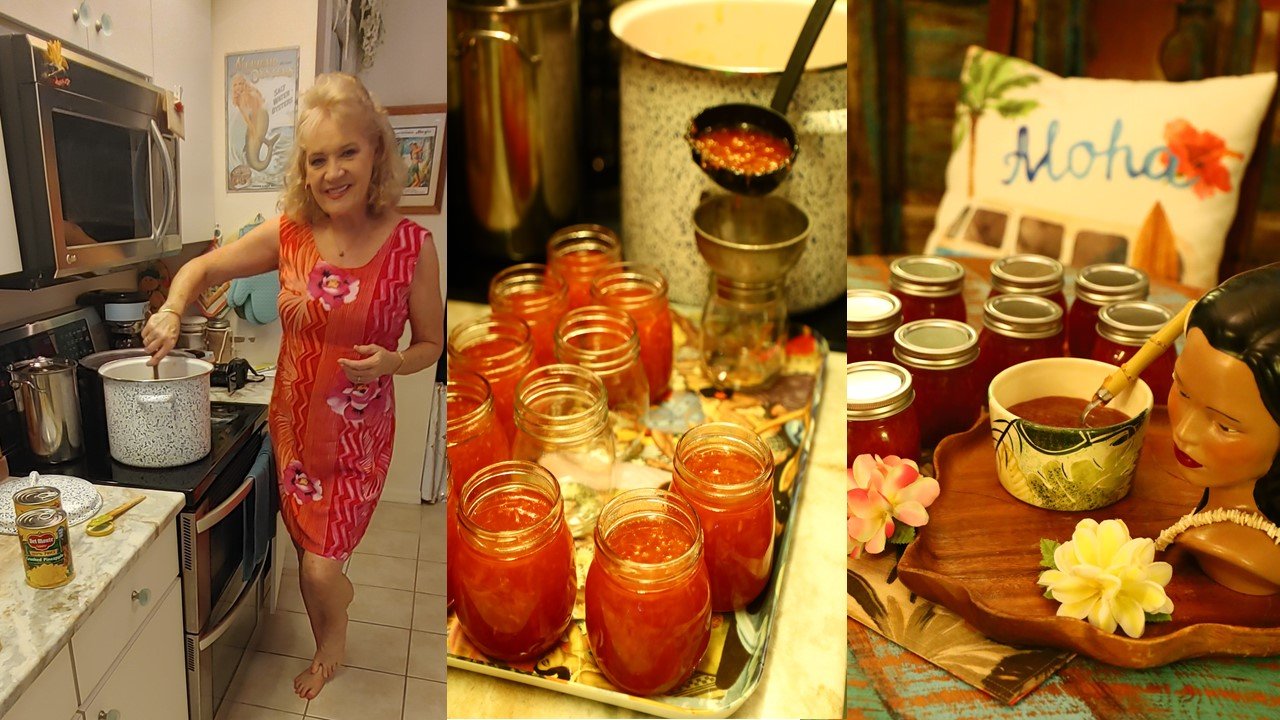
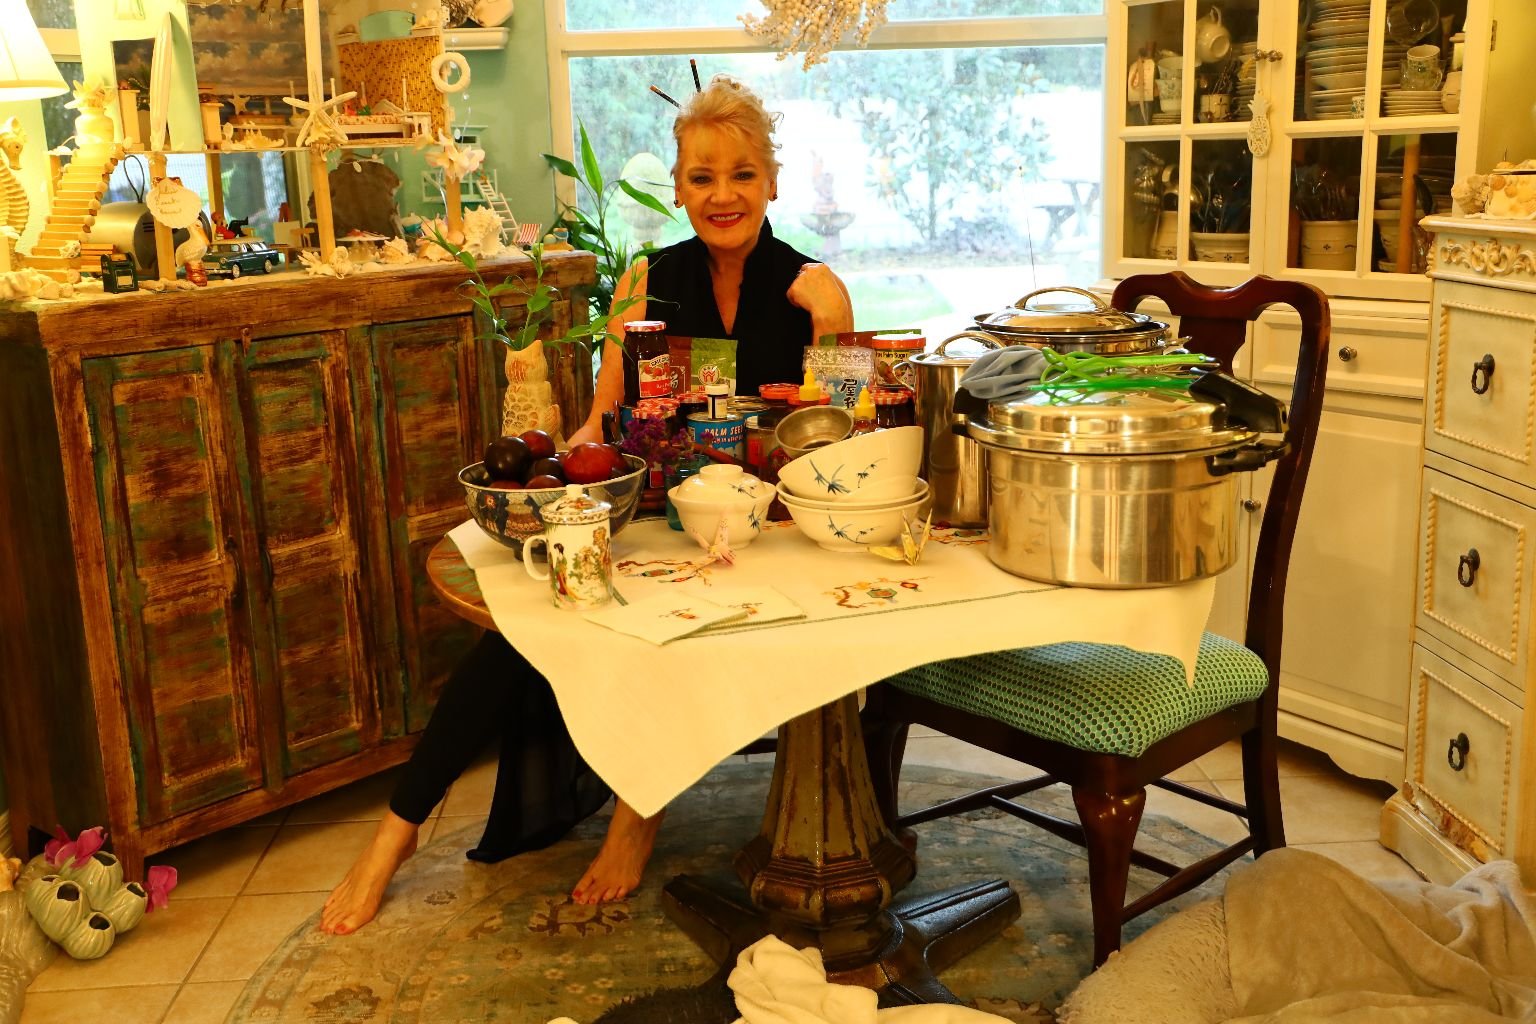
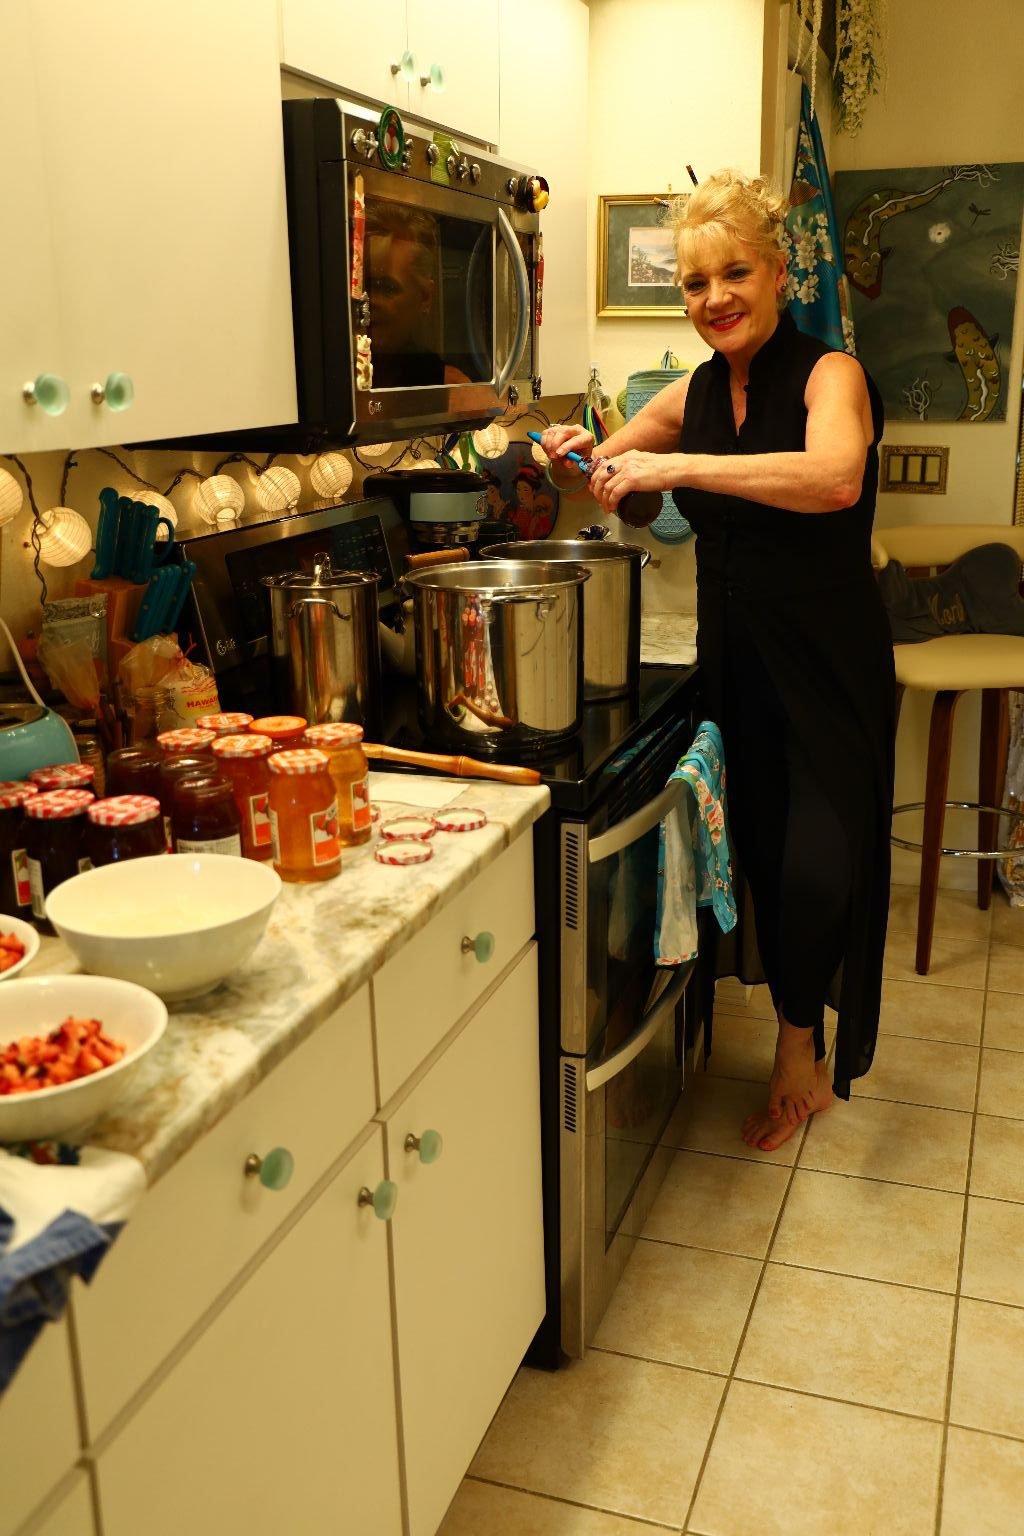
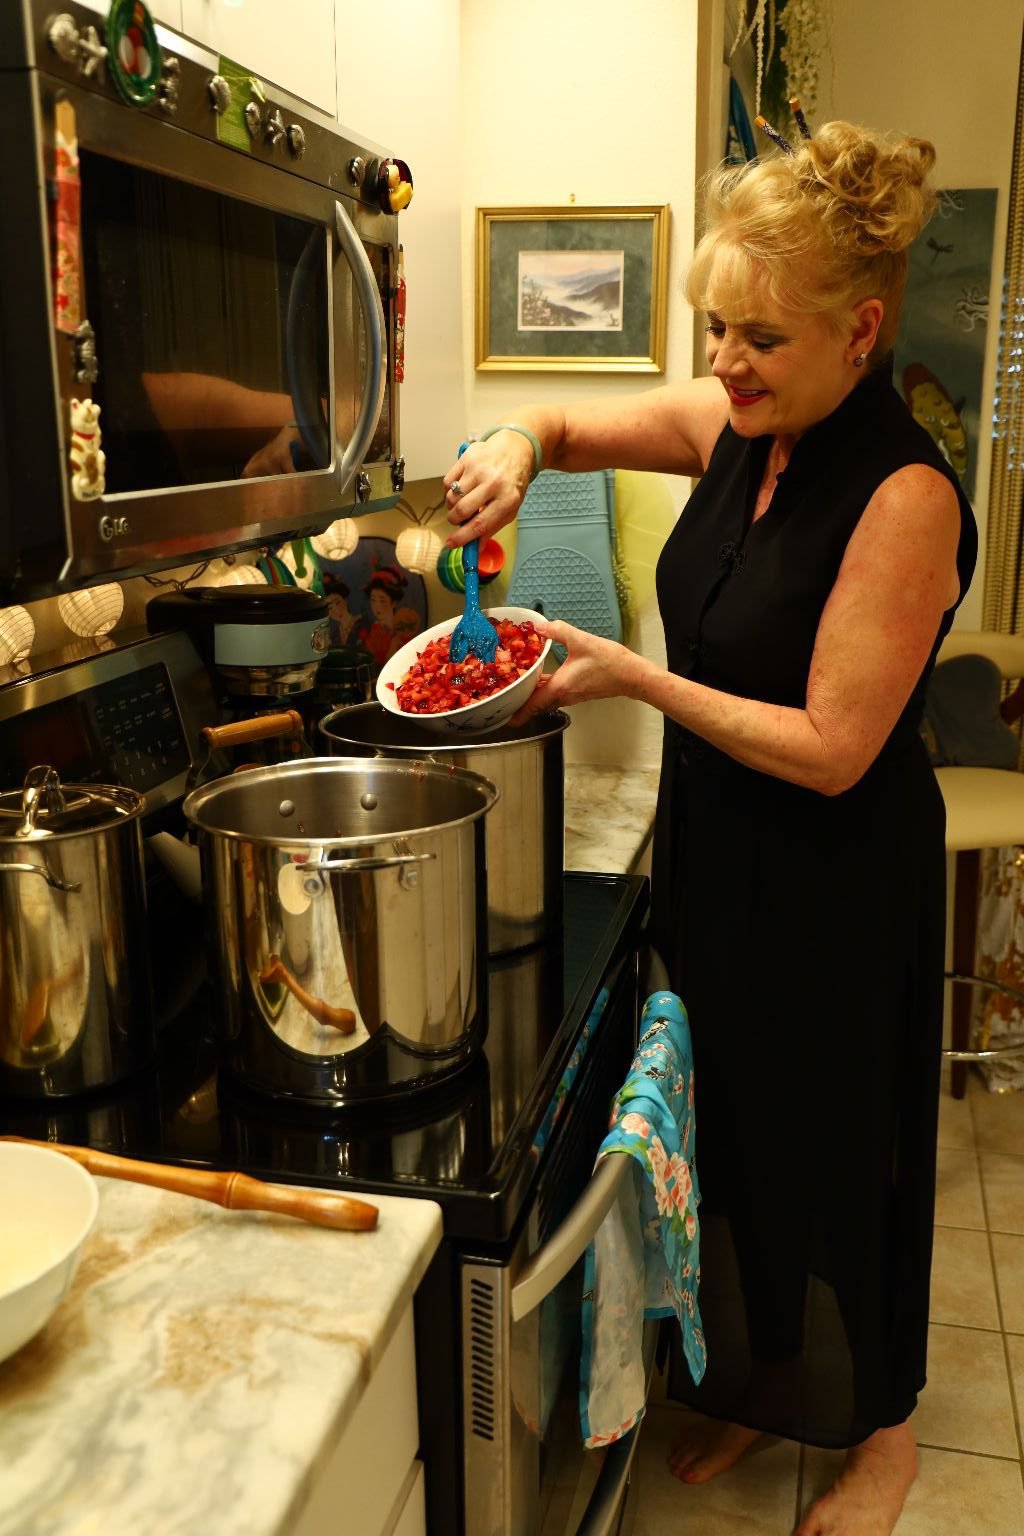
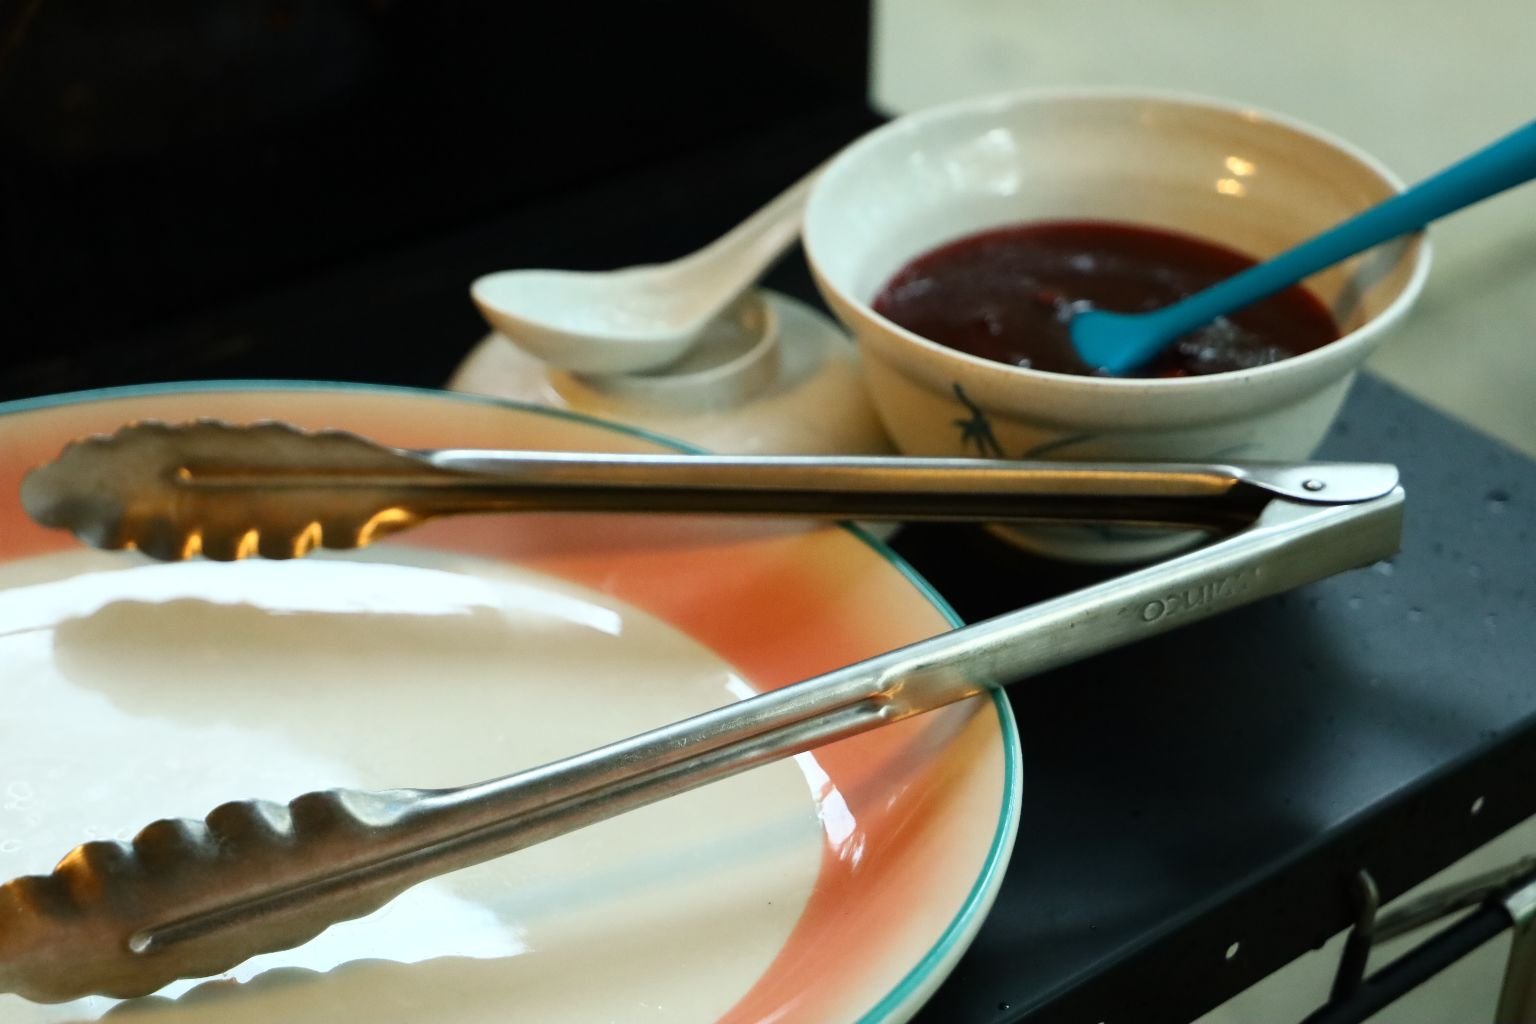
Time To Make My Oriental Jezebel Sauce
————————————————————————————-
In My Oriental Themed Kitchen

—————————————————————————————
—————————————————————————————-
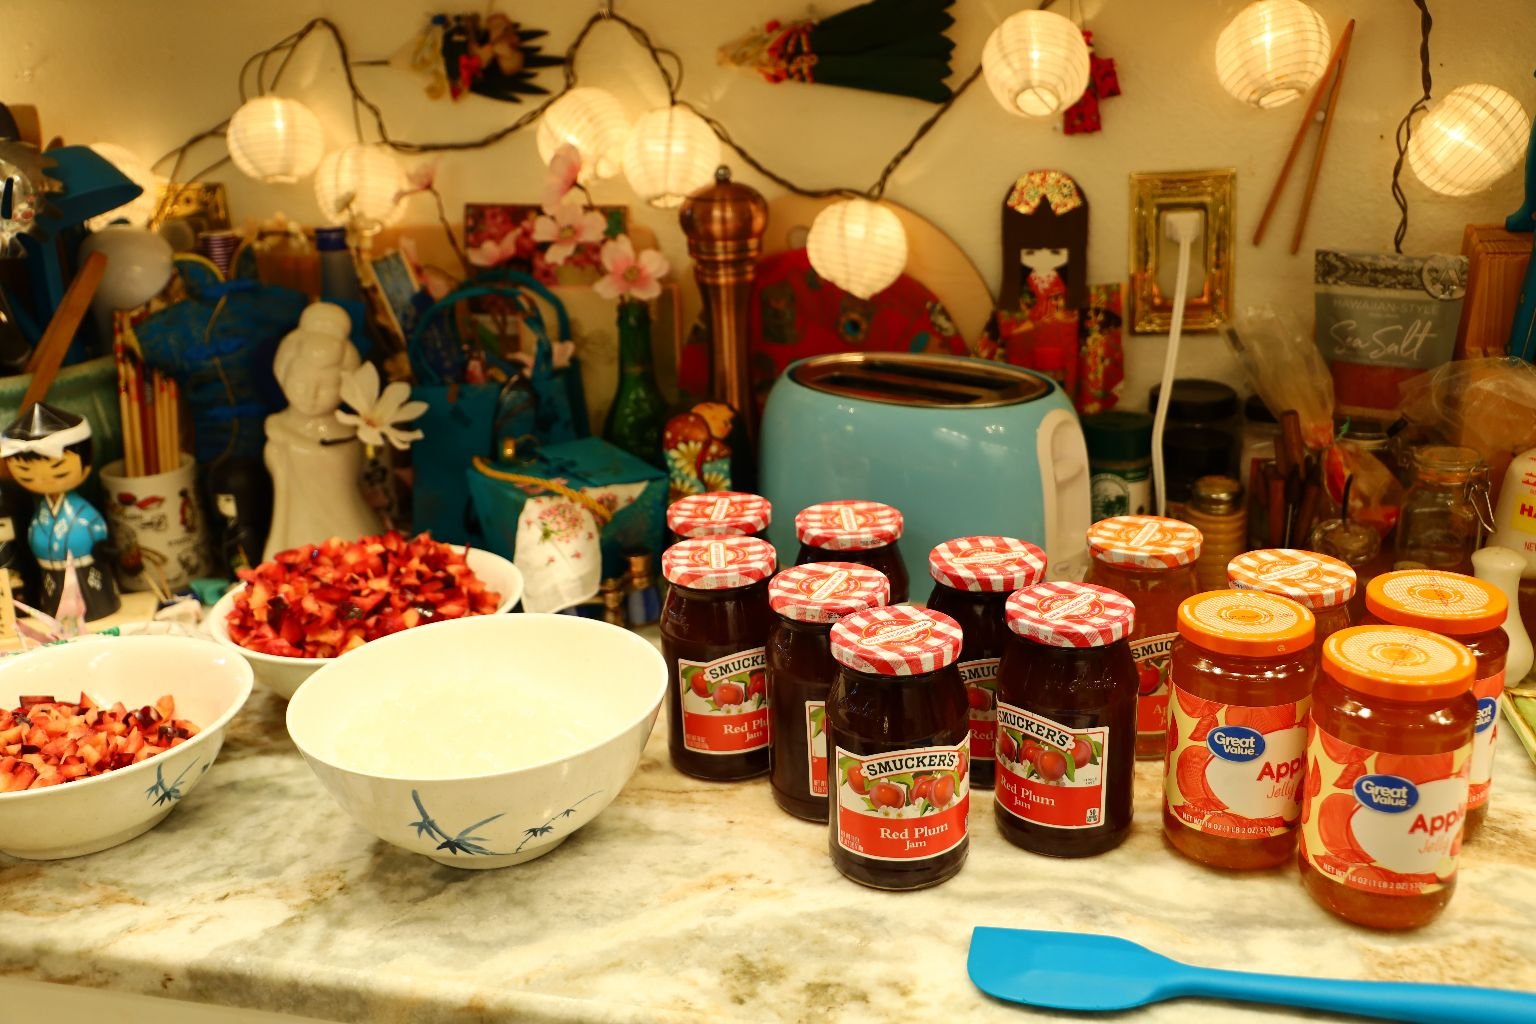
All of my Ingredients and Supplies
NOTE: I have more ingredients pictured than I used. Sometimes, I don’t know exactly how much of one thing or another that I will want to use, but I always make sure I have plenty of everything.
I usually start shopping for any big canning project we will be doing about a month in advance.
Sometimes it take a while to find all that you will need for any large project.
This is Plum Based
The Ingredients:
7, 18 oz. Jars Red Plum Jam
5, 1 1b. Jars Apple Jelly
2, 20 oz. Cans of Palm Seeds in Heavy Syrup (Drained and Chopped into Small Pieces)
1, 10 oz. Yellow Sriracha Chili Sauce
Any Chinese Mustard, About 5 -6 Ounces
4 T. Wasabi Paste
2-3 T. Chinese Red Pepper Flakes (or any Red Pepper Flakes you desire.)
4-5 t. of Asian Sea Salt (or any you desire.)
4 T. Raw Cane Sugar
———————————————————————-
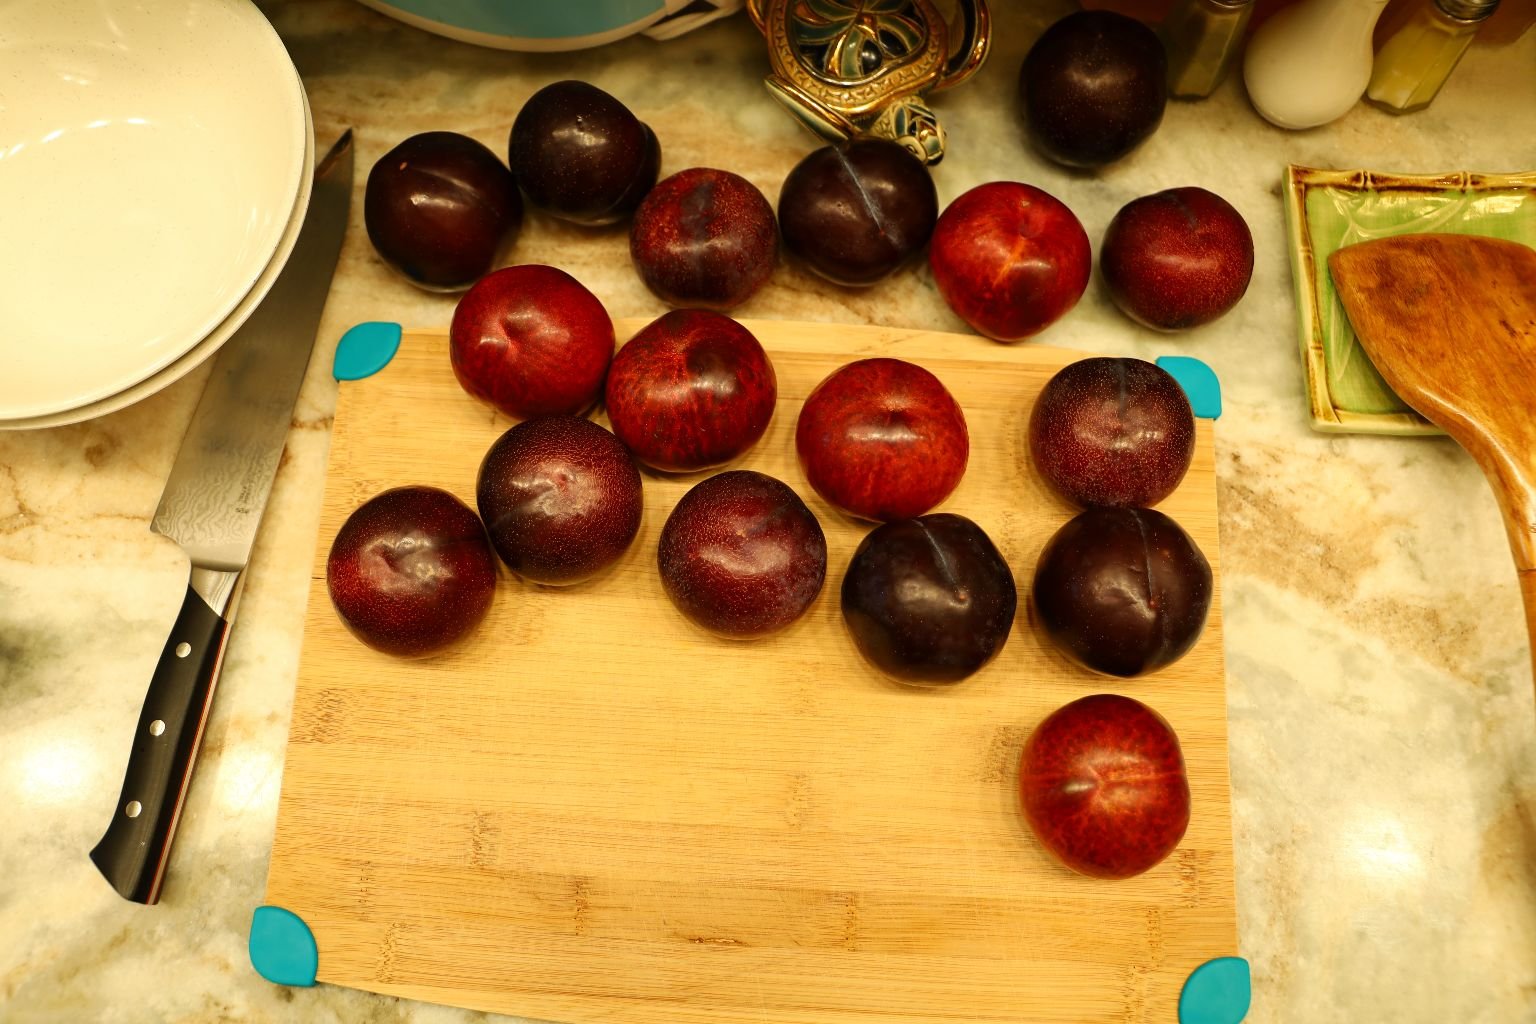
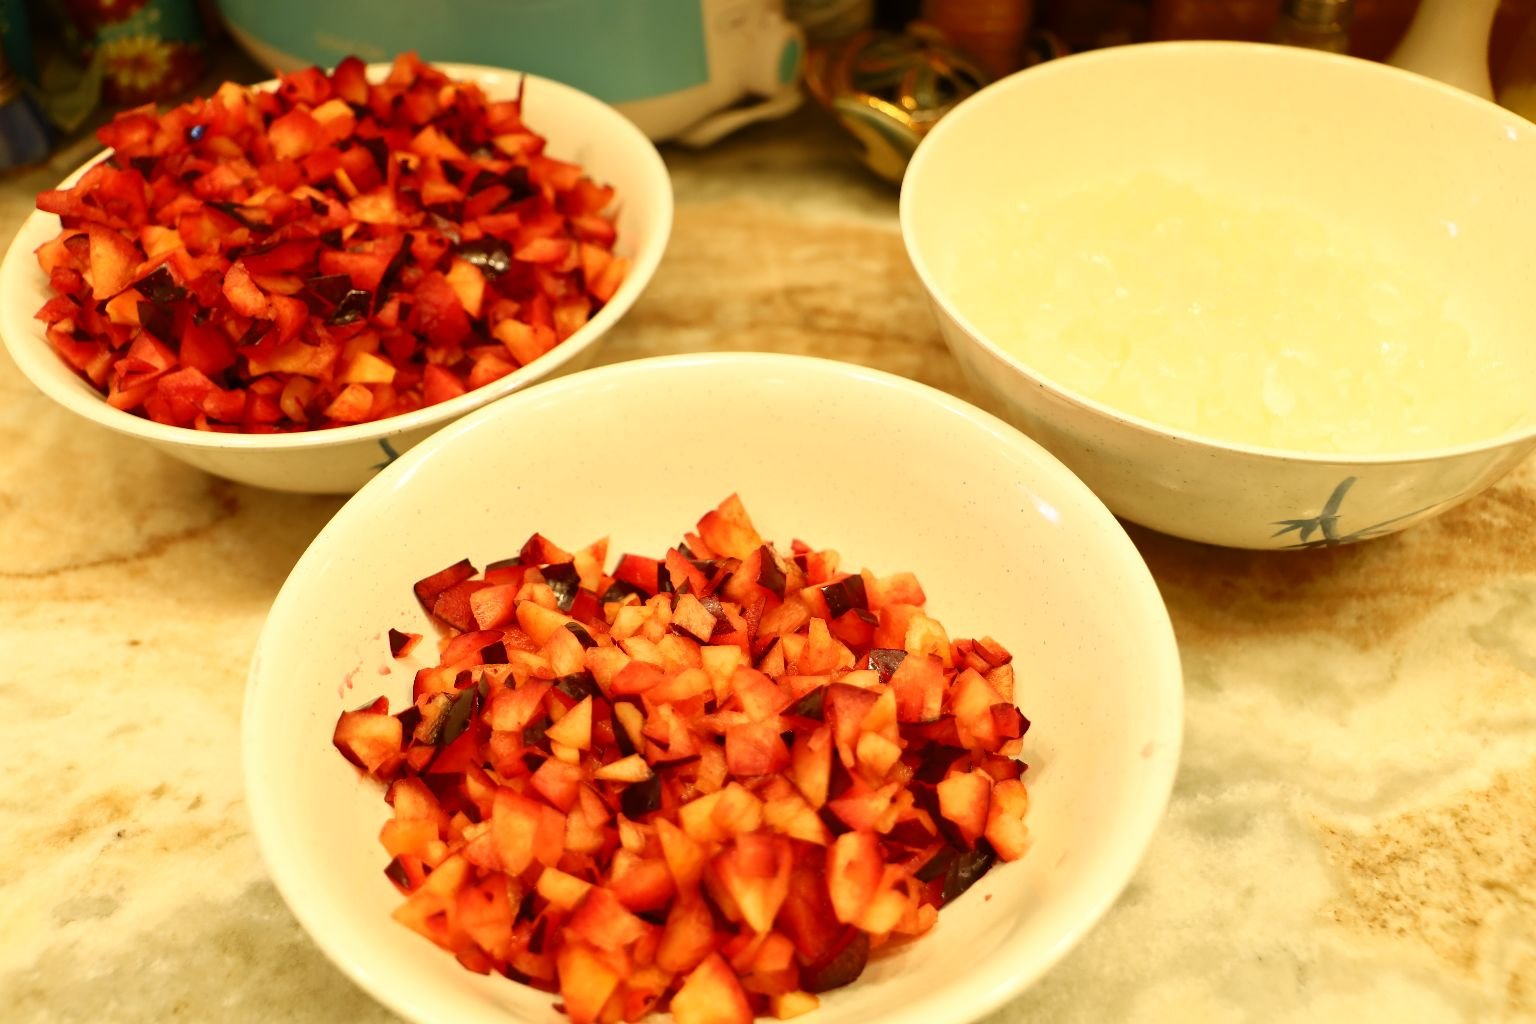
Fresh Plums, Chopped into Small Pieces
(About 13-16)
Everything is Cleaned, Washed, and Ready!
————————————————————————–
Kore o Yarou
(Let’s do this)

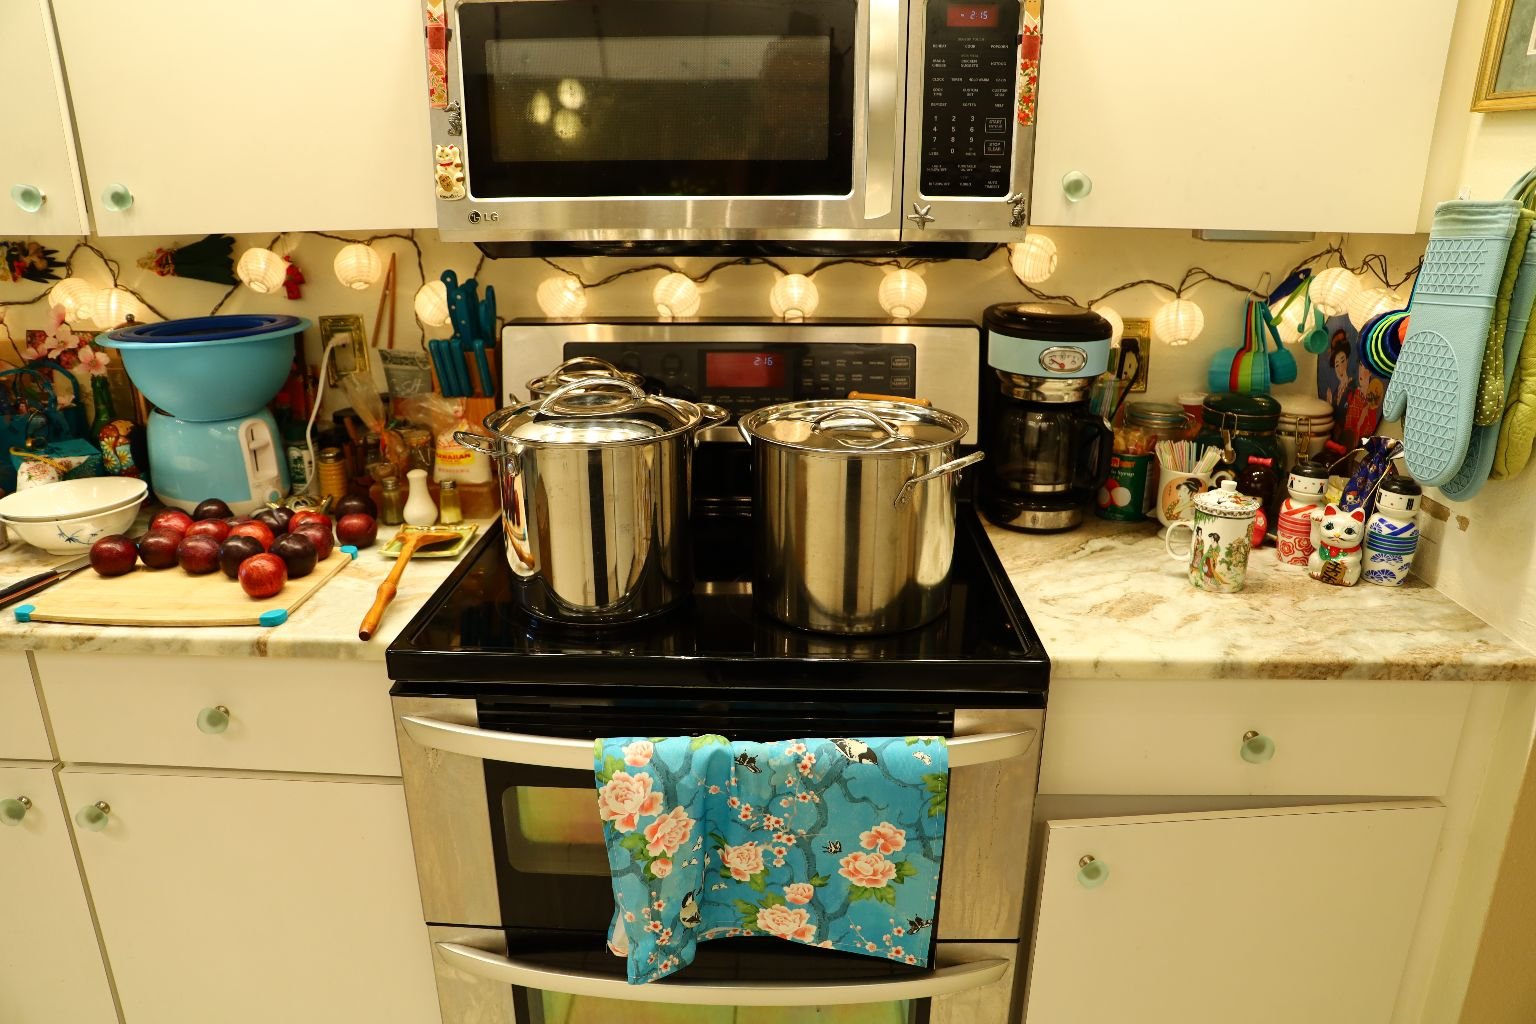
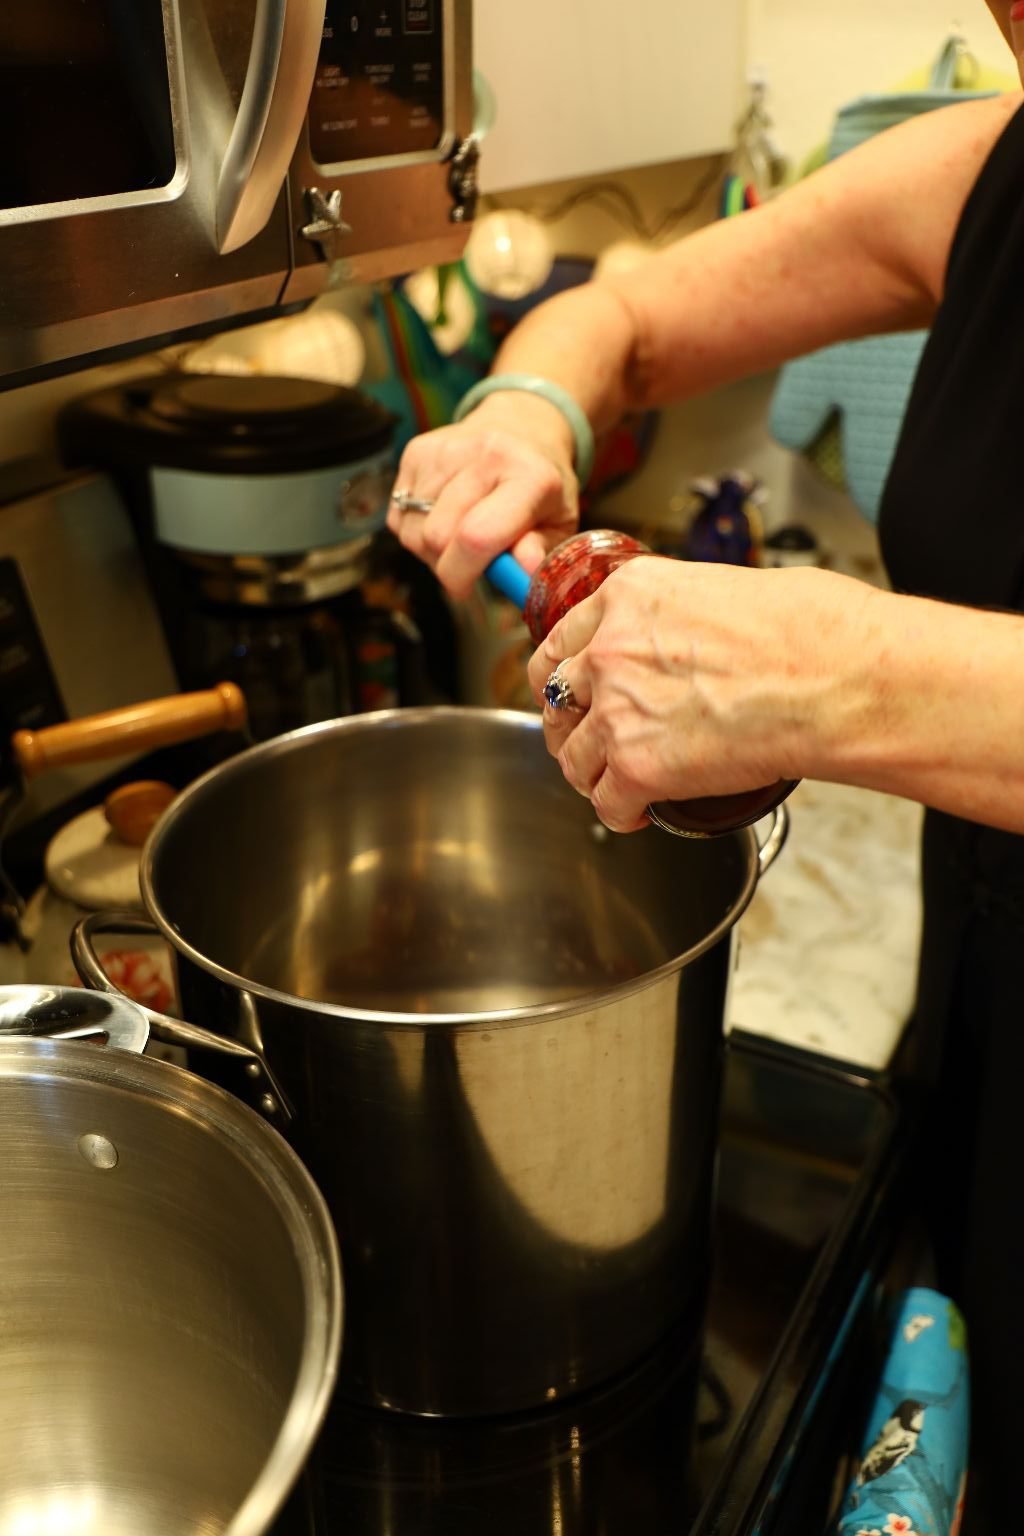
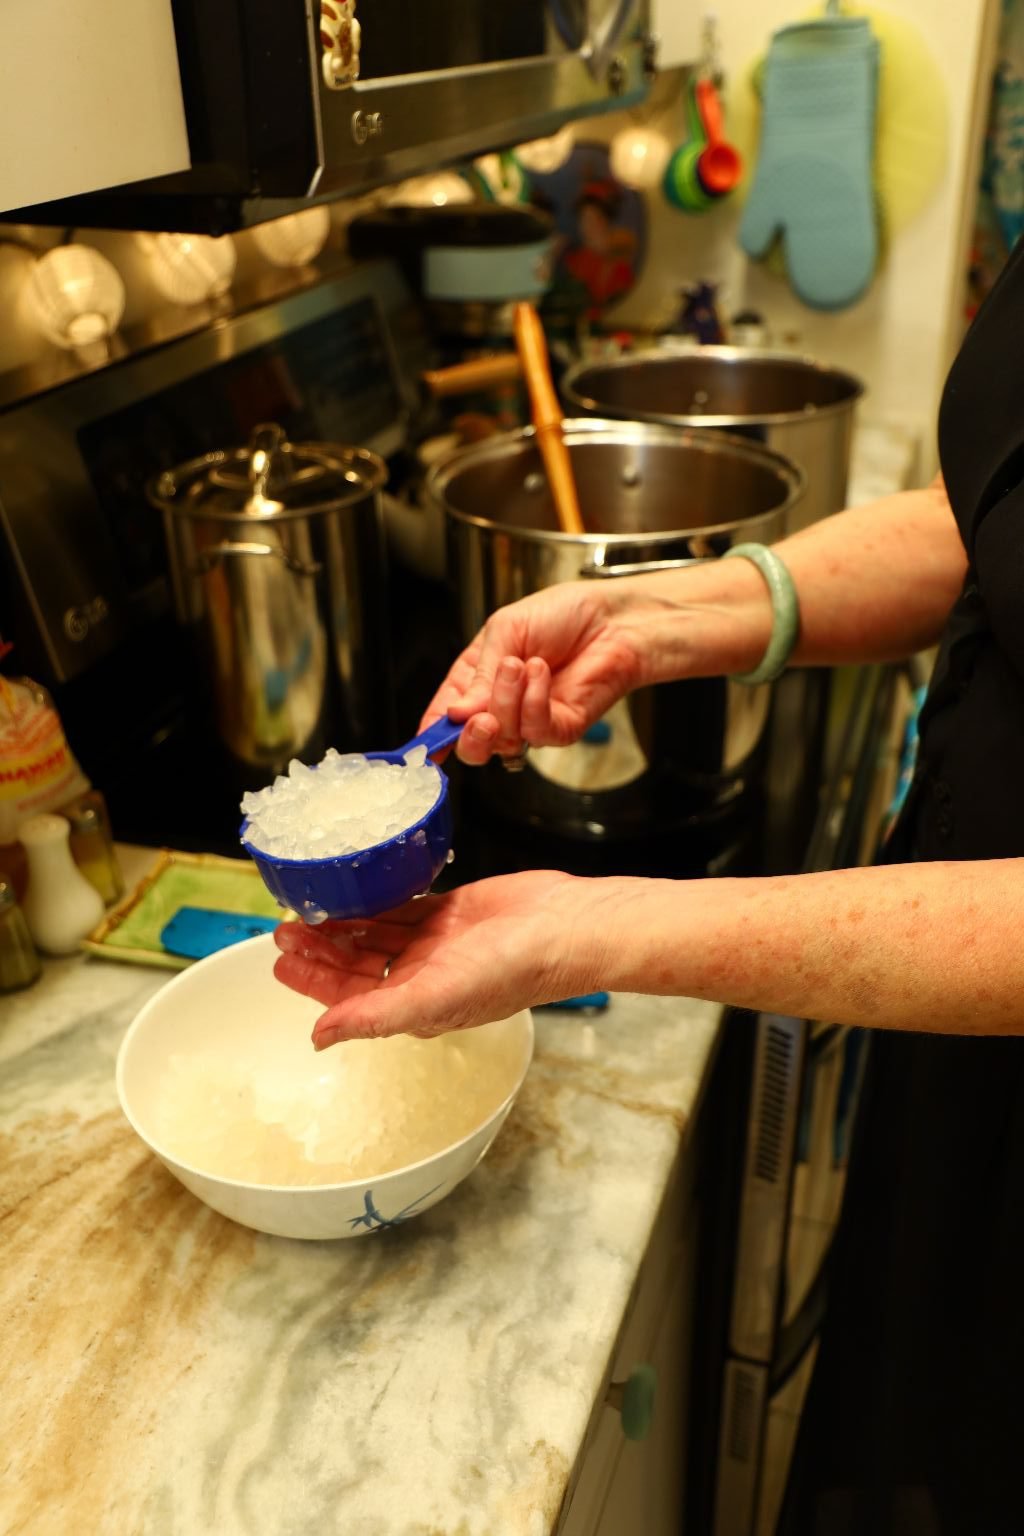
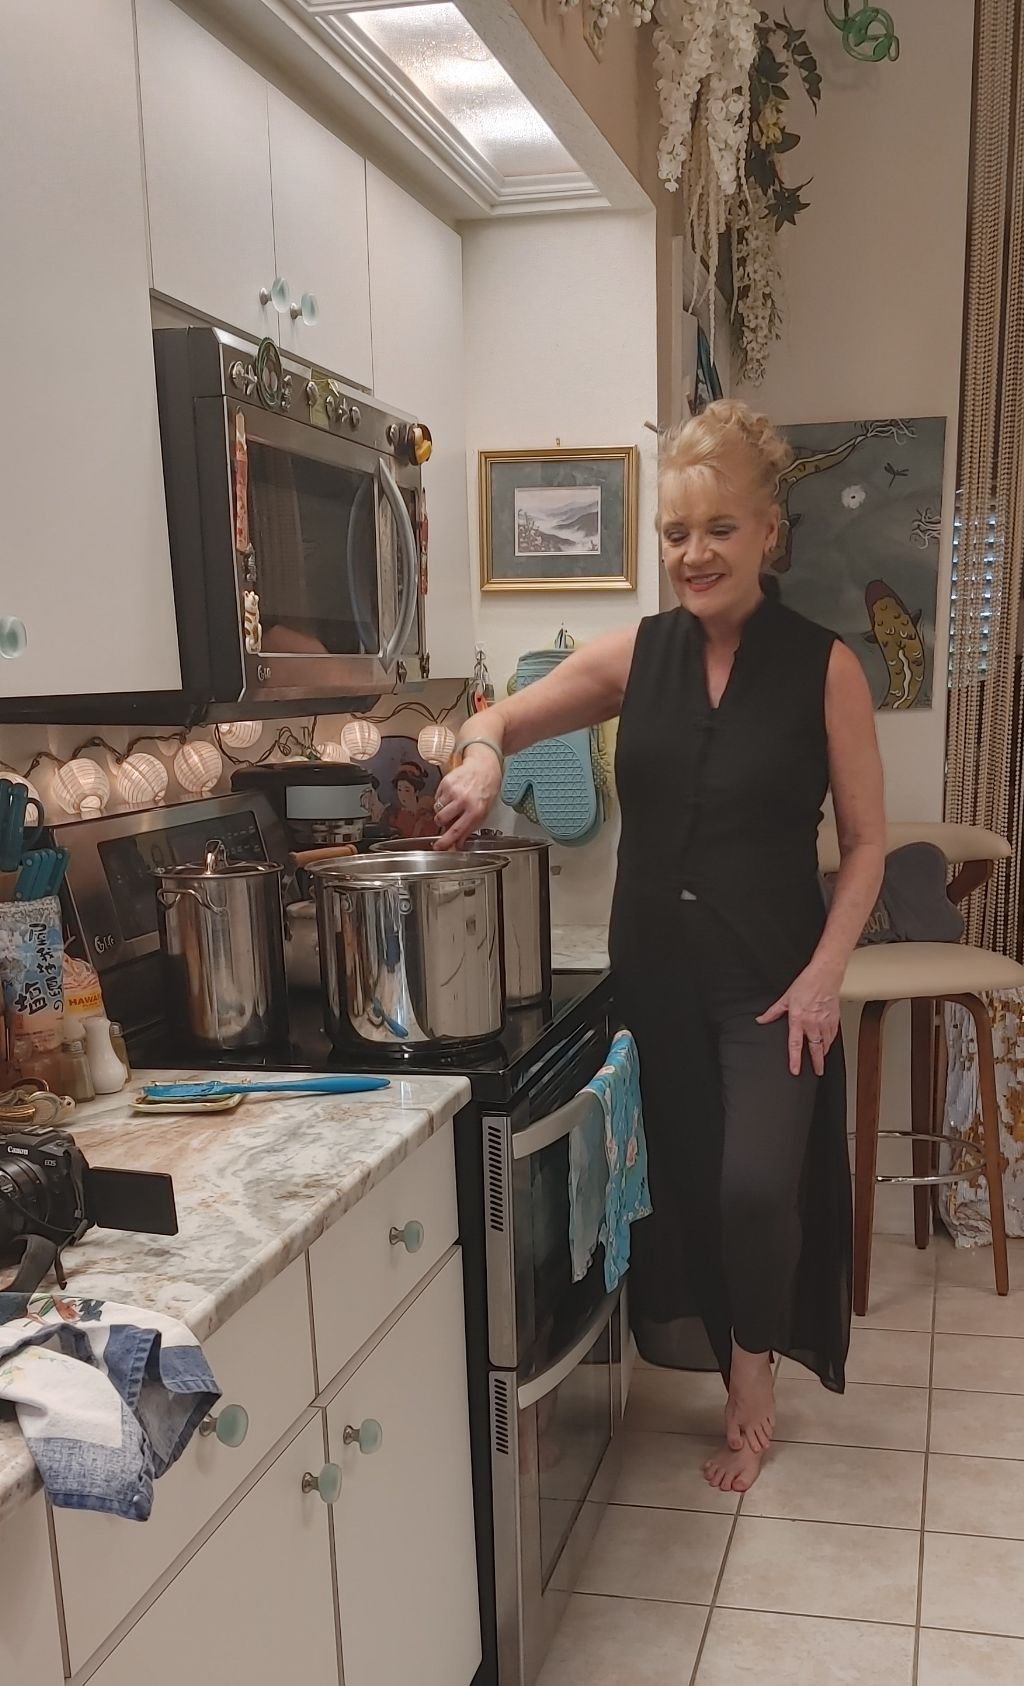
I’m going to be using these two big pots to cook my Oriental Jezebel in.
I will divide all the ingredients that I have listed above between the two pots.
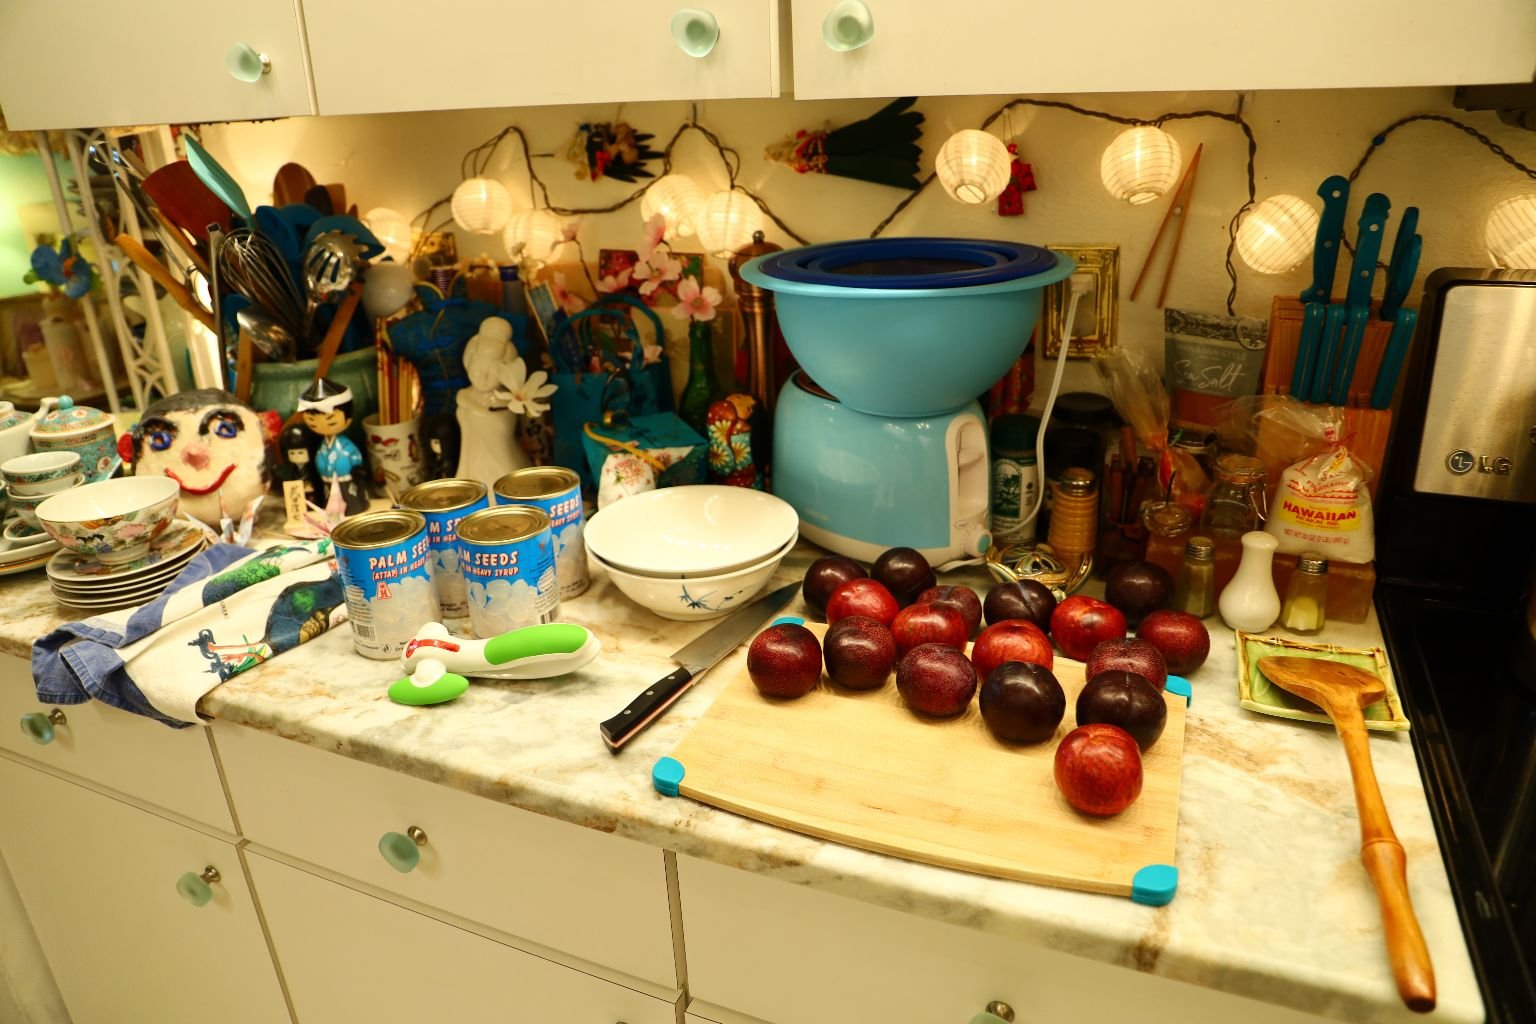
The First Thing I Will Do Is Chop The Plums
———————————————————————————
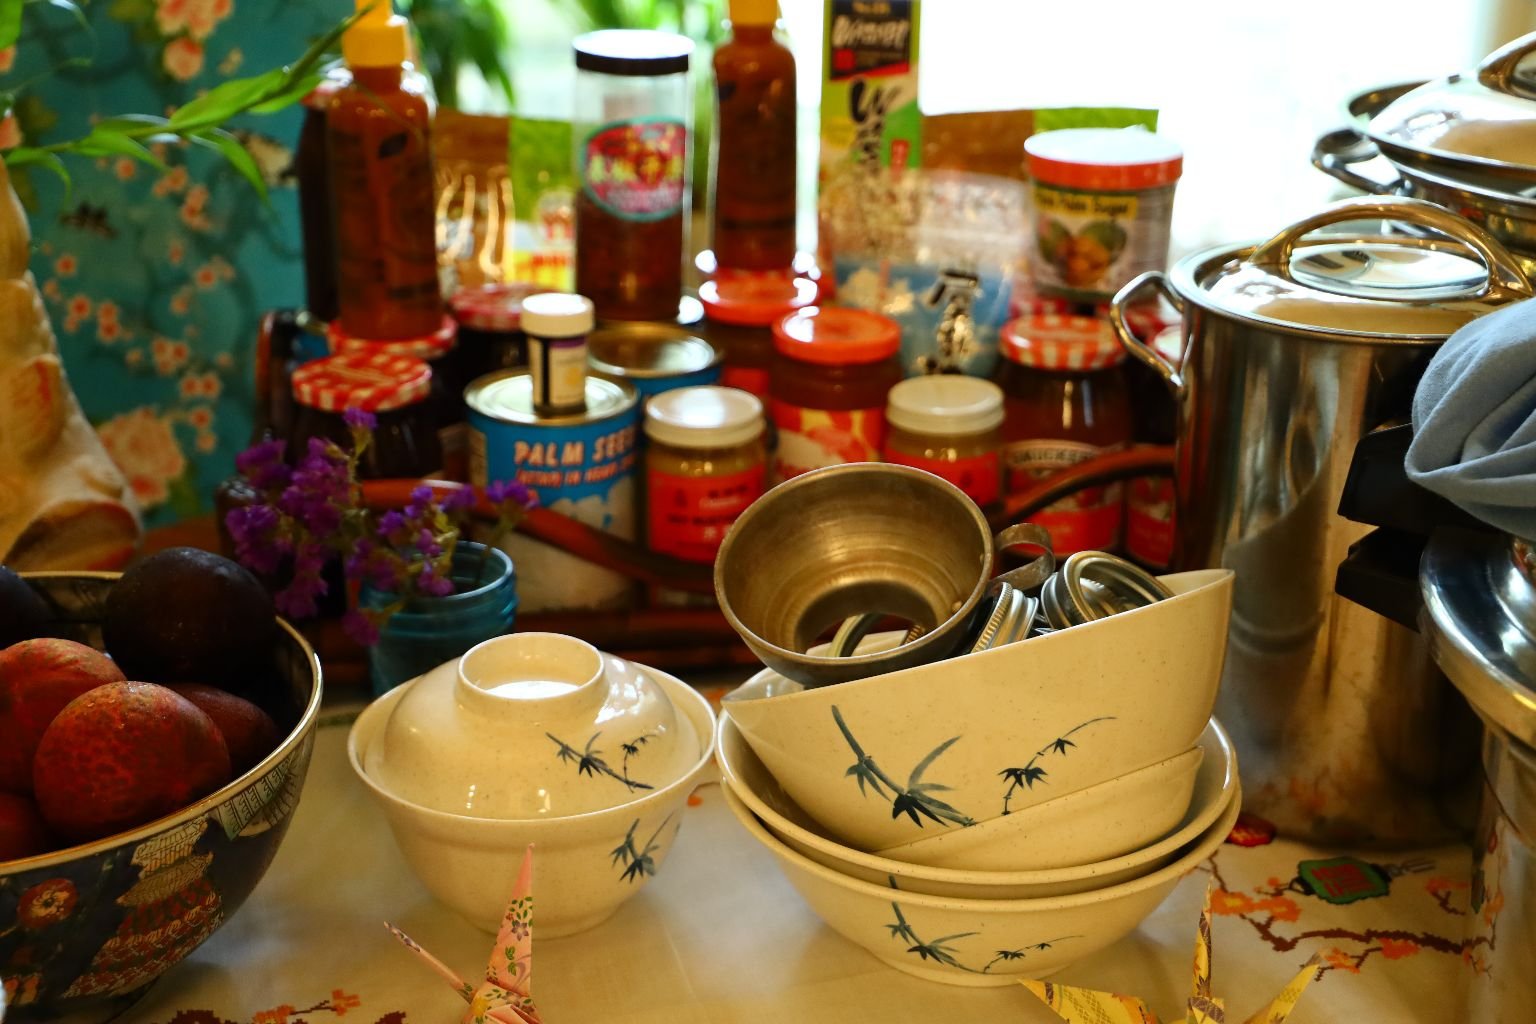
Prior to starting this project, the day before, I ran all my jars though the dishwasher that I would be using for this Jezebel. I then placed them onto the dish rack above, for when I need to use them.
————————————————————————————
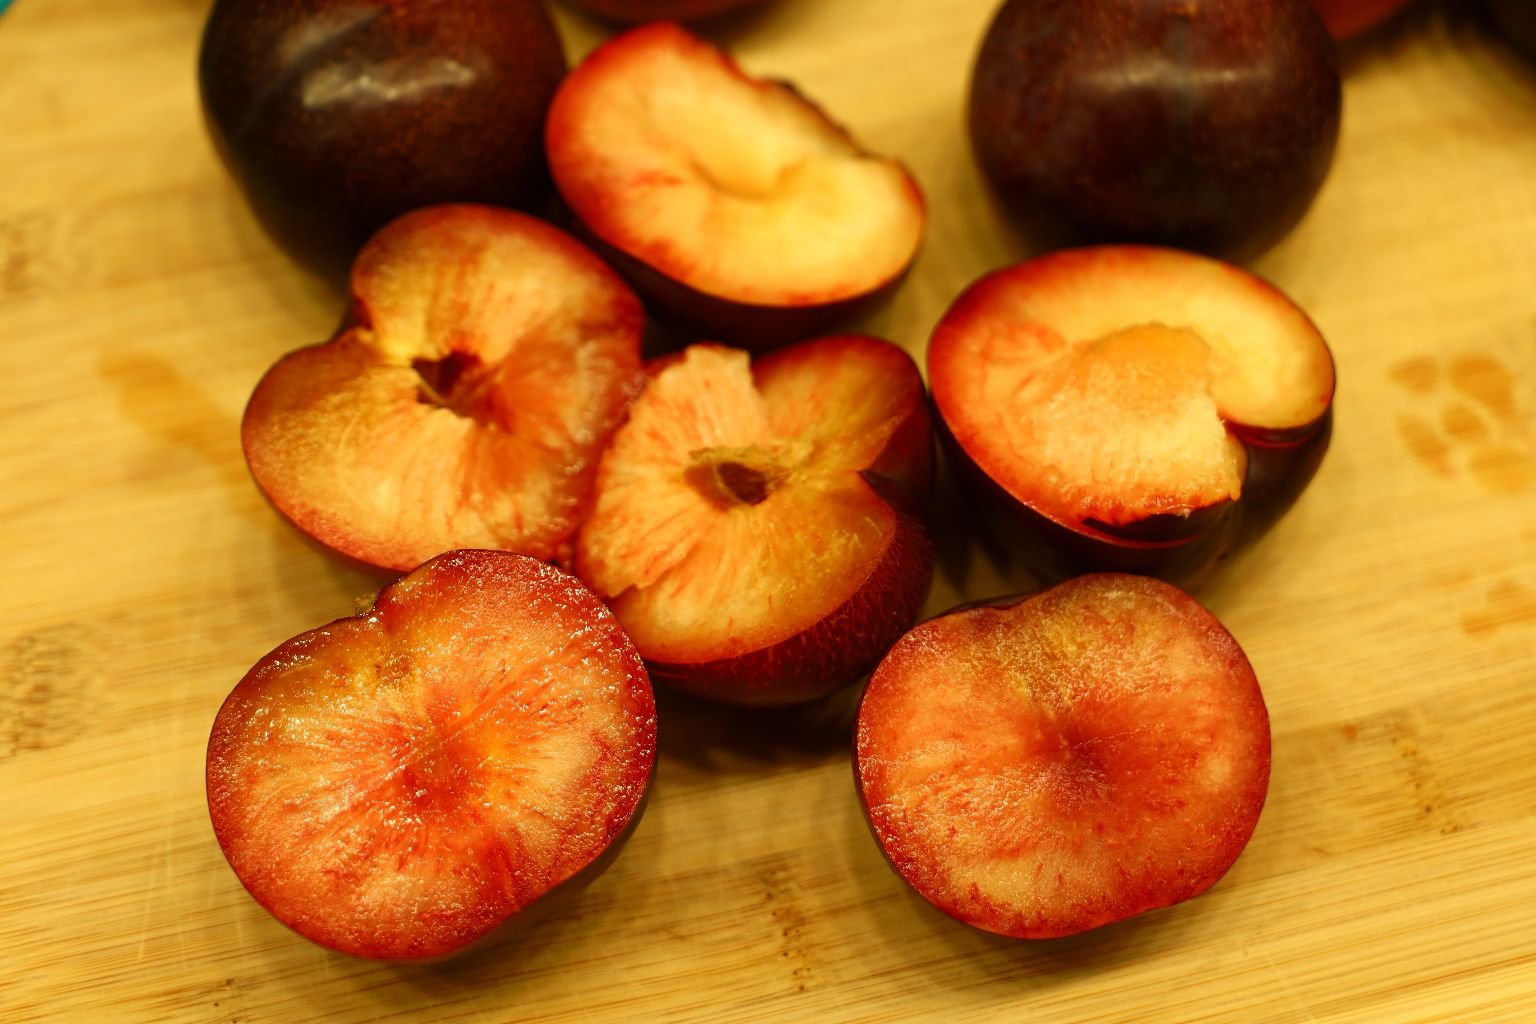
Removing the Seeds and Chopping the Plums
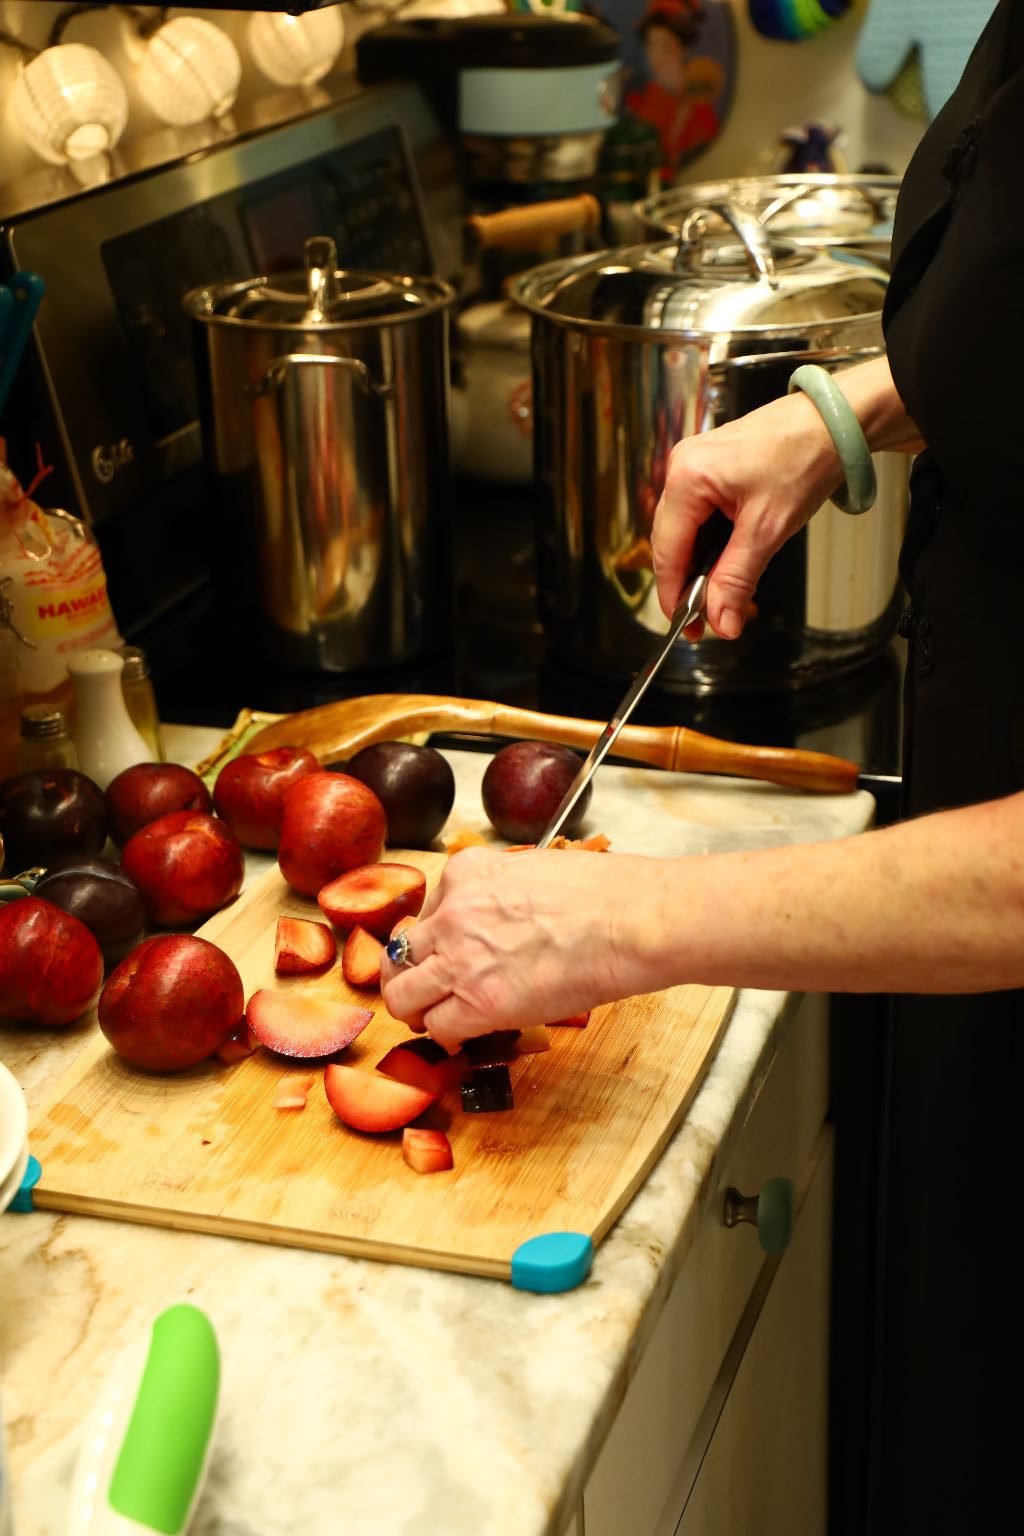
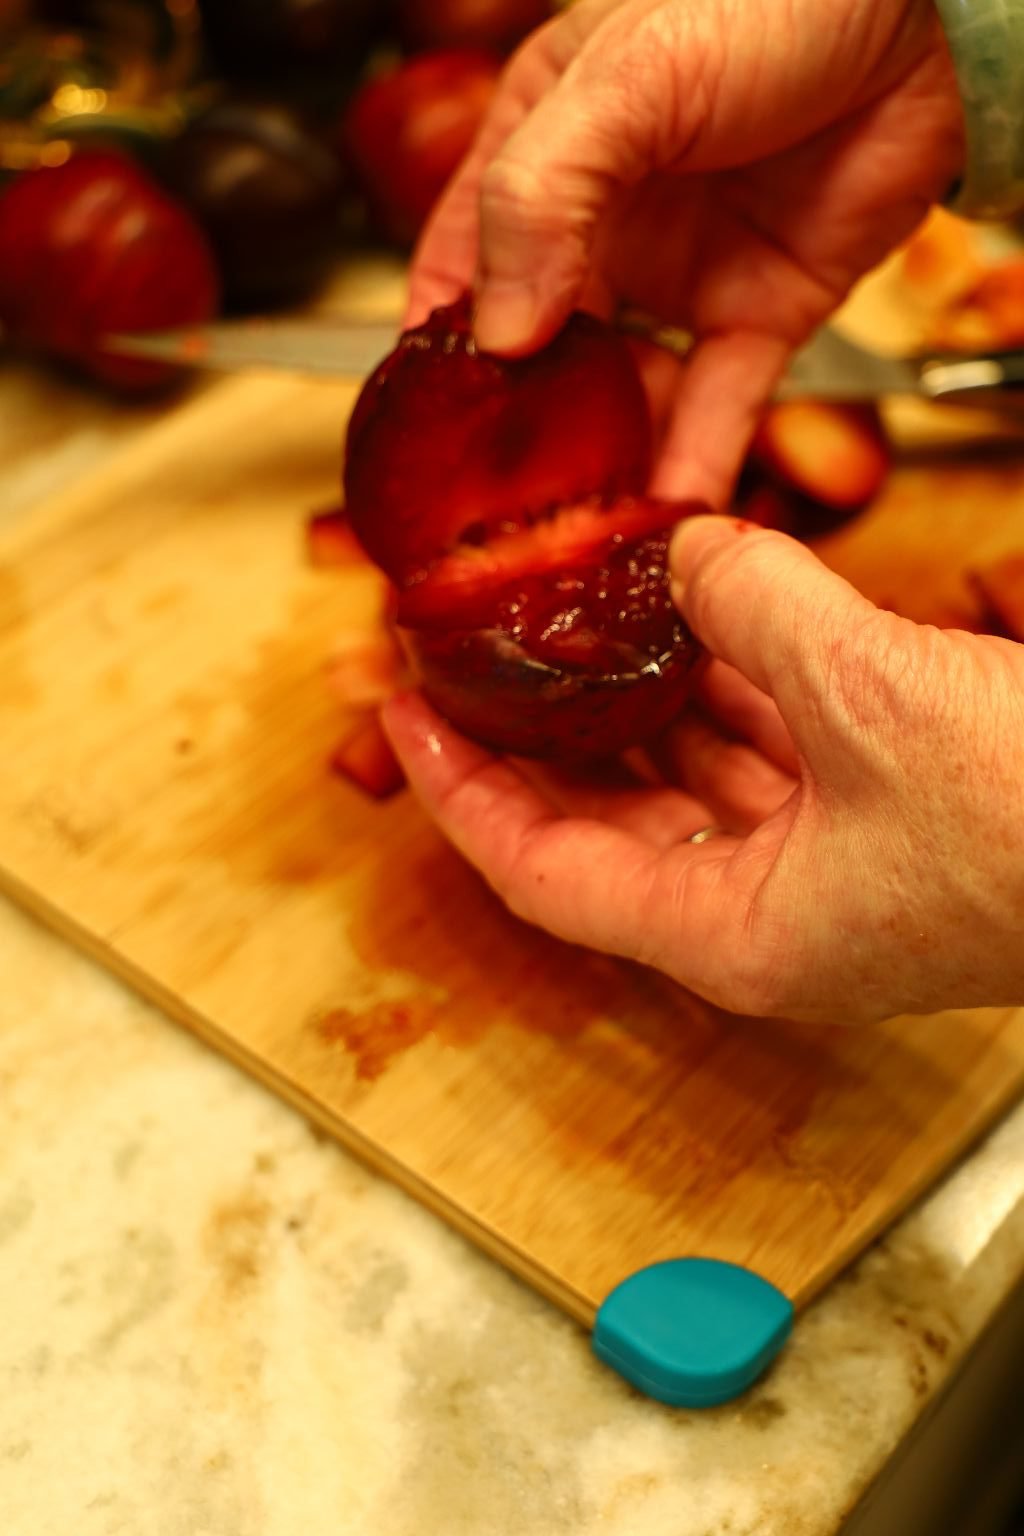
——————————————————————————————-
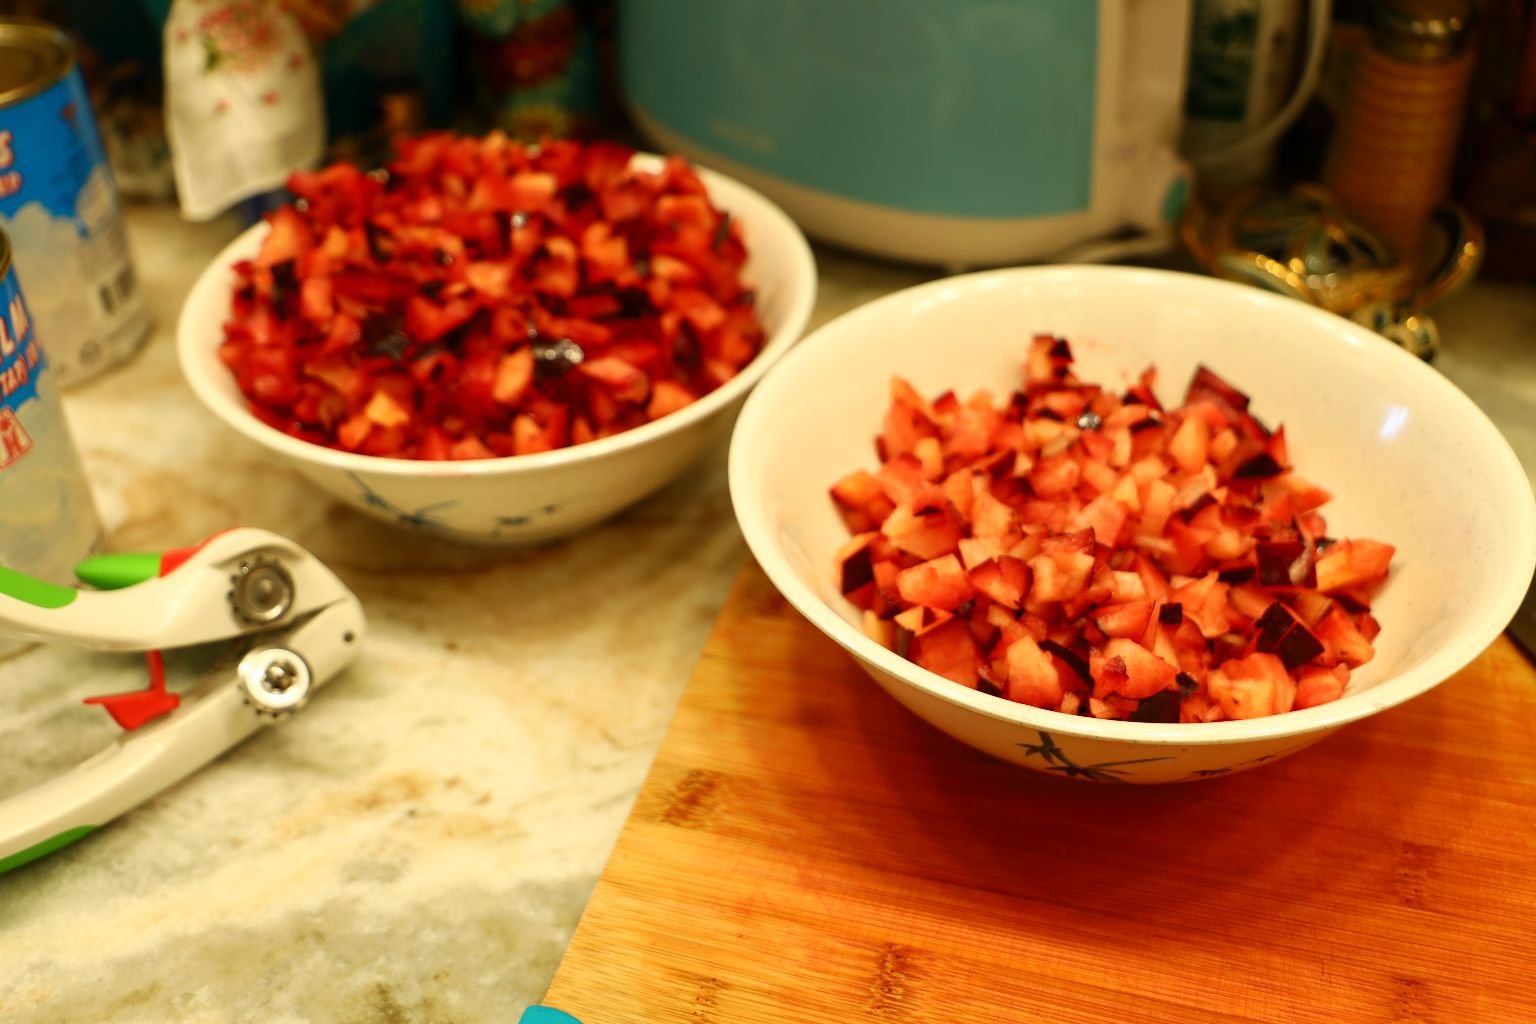
Place the Chopped Plums into Bowls and Set Aside
———————————————————————————–
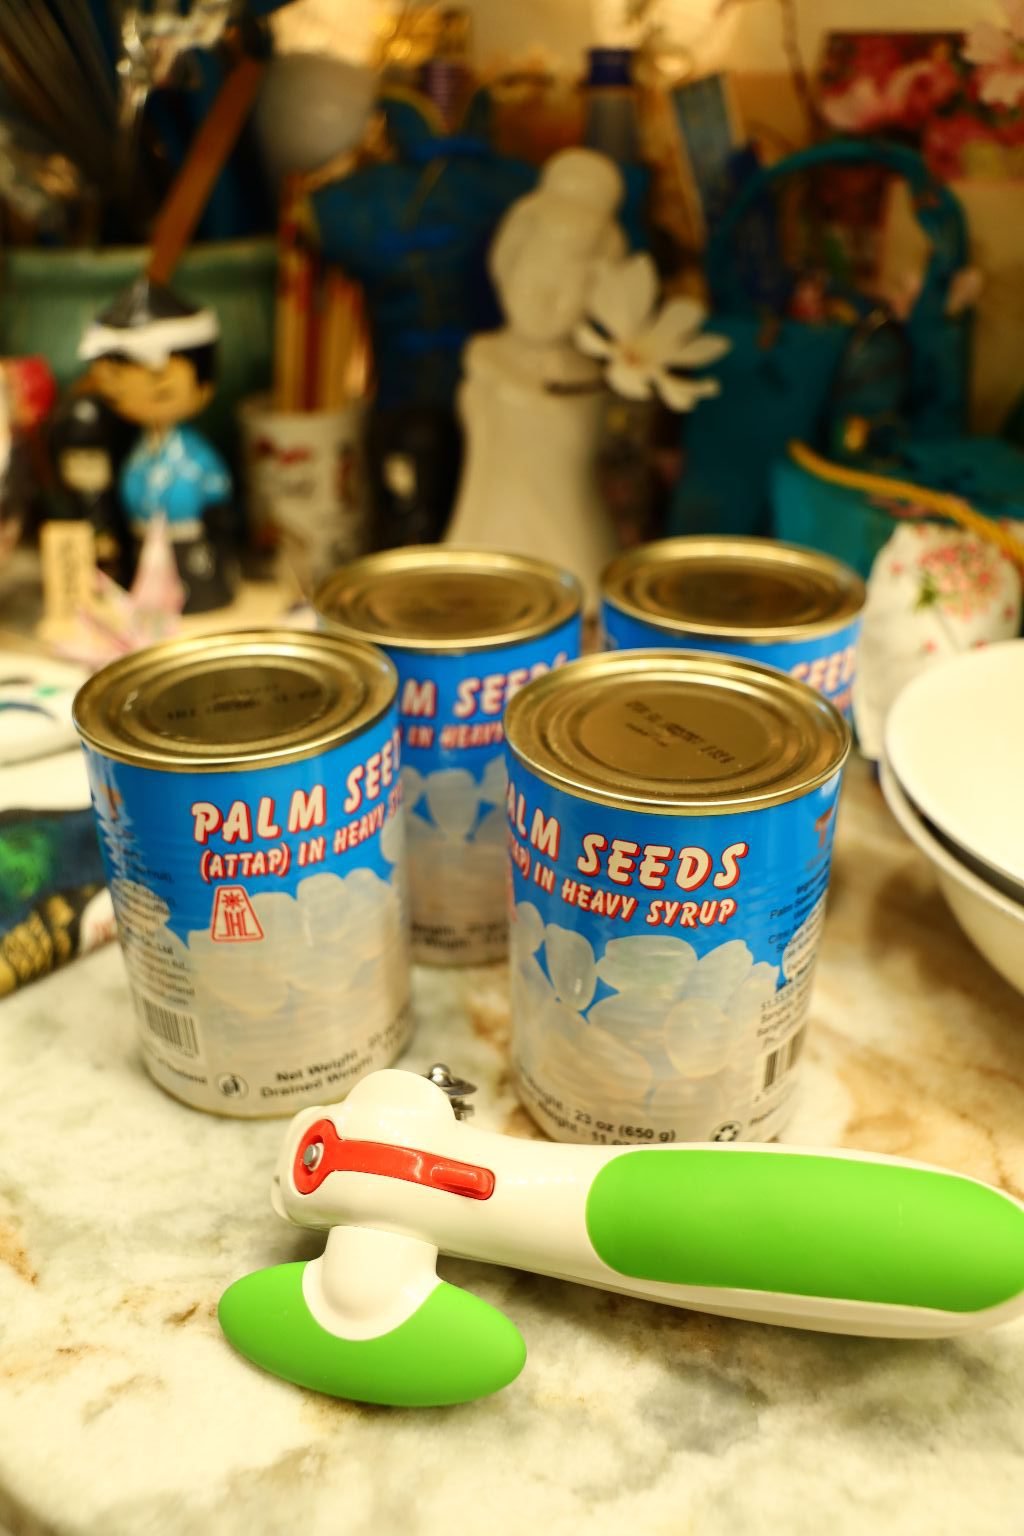
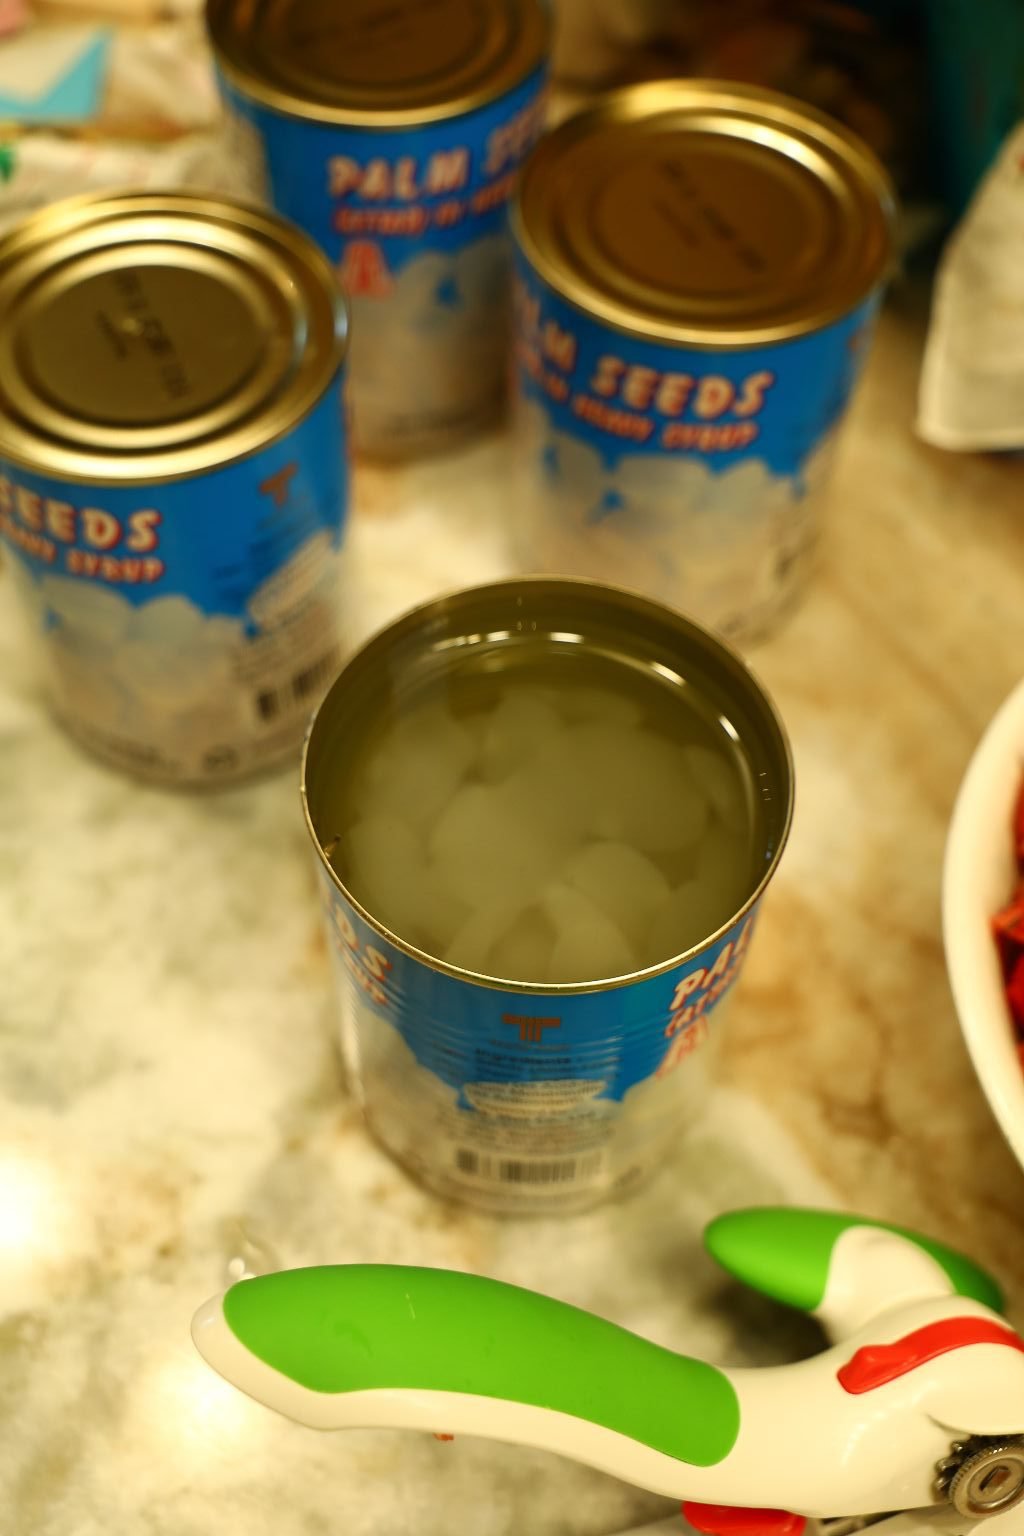
Palm Seeds
(The immature fruits of the Mangrove Palms)
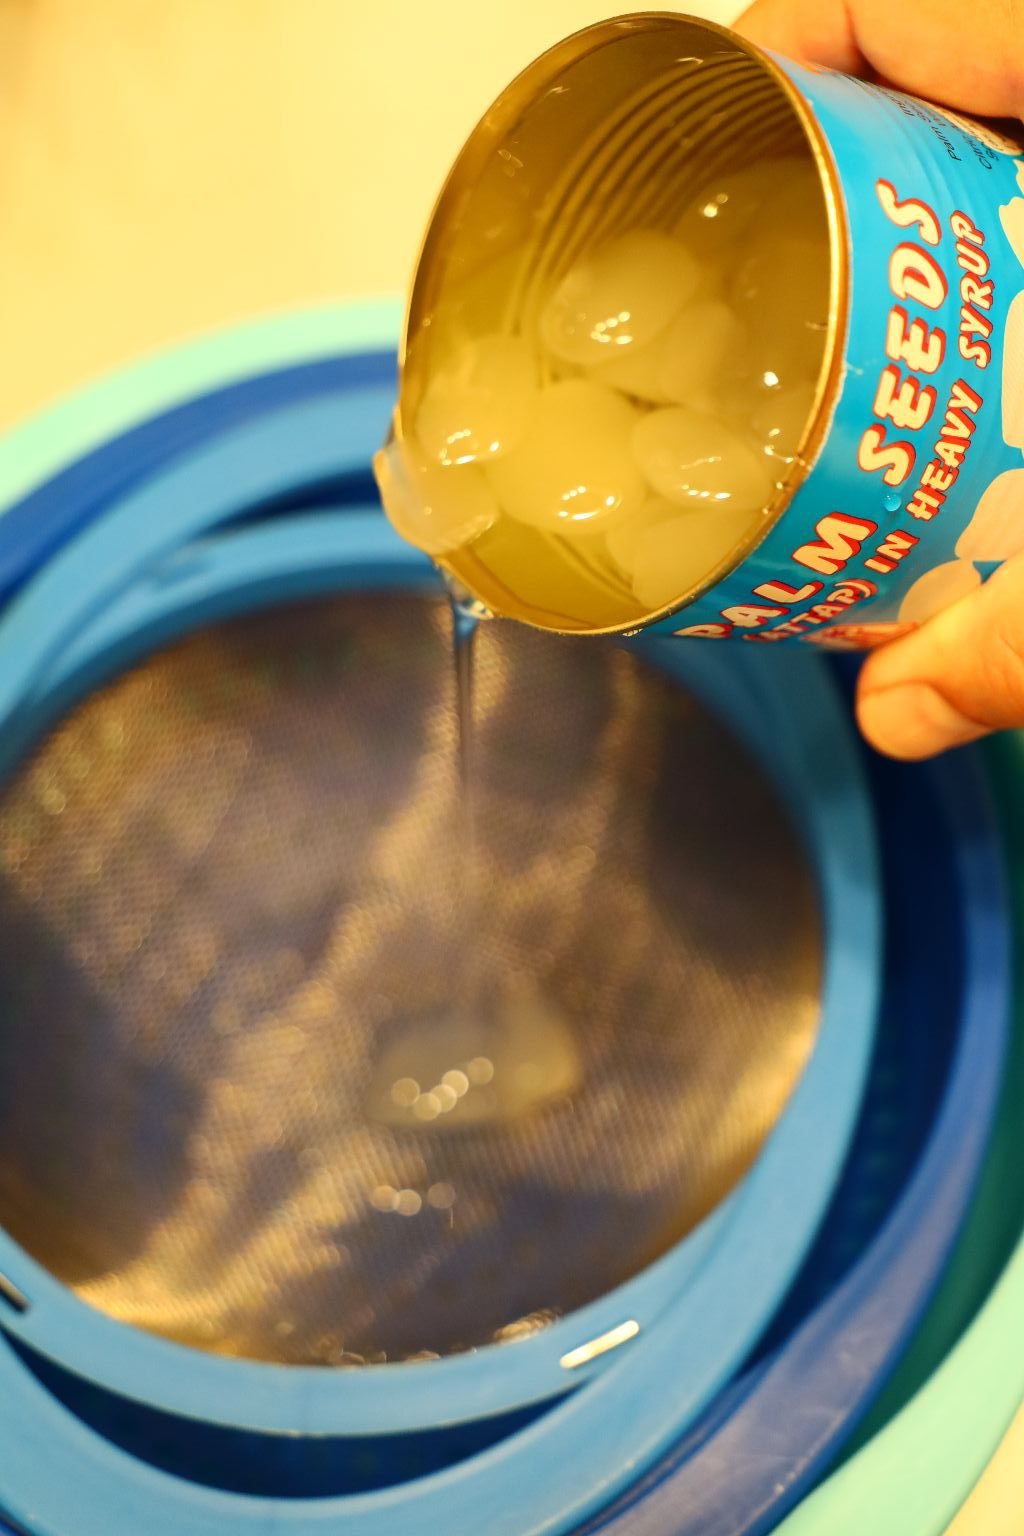
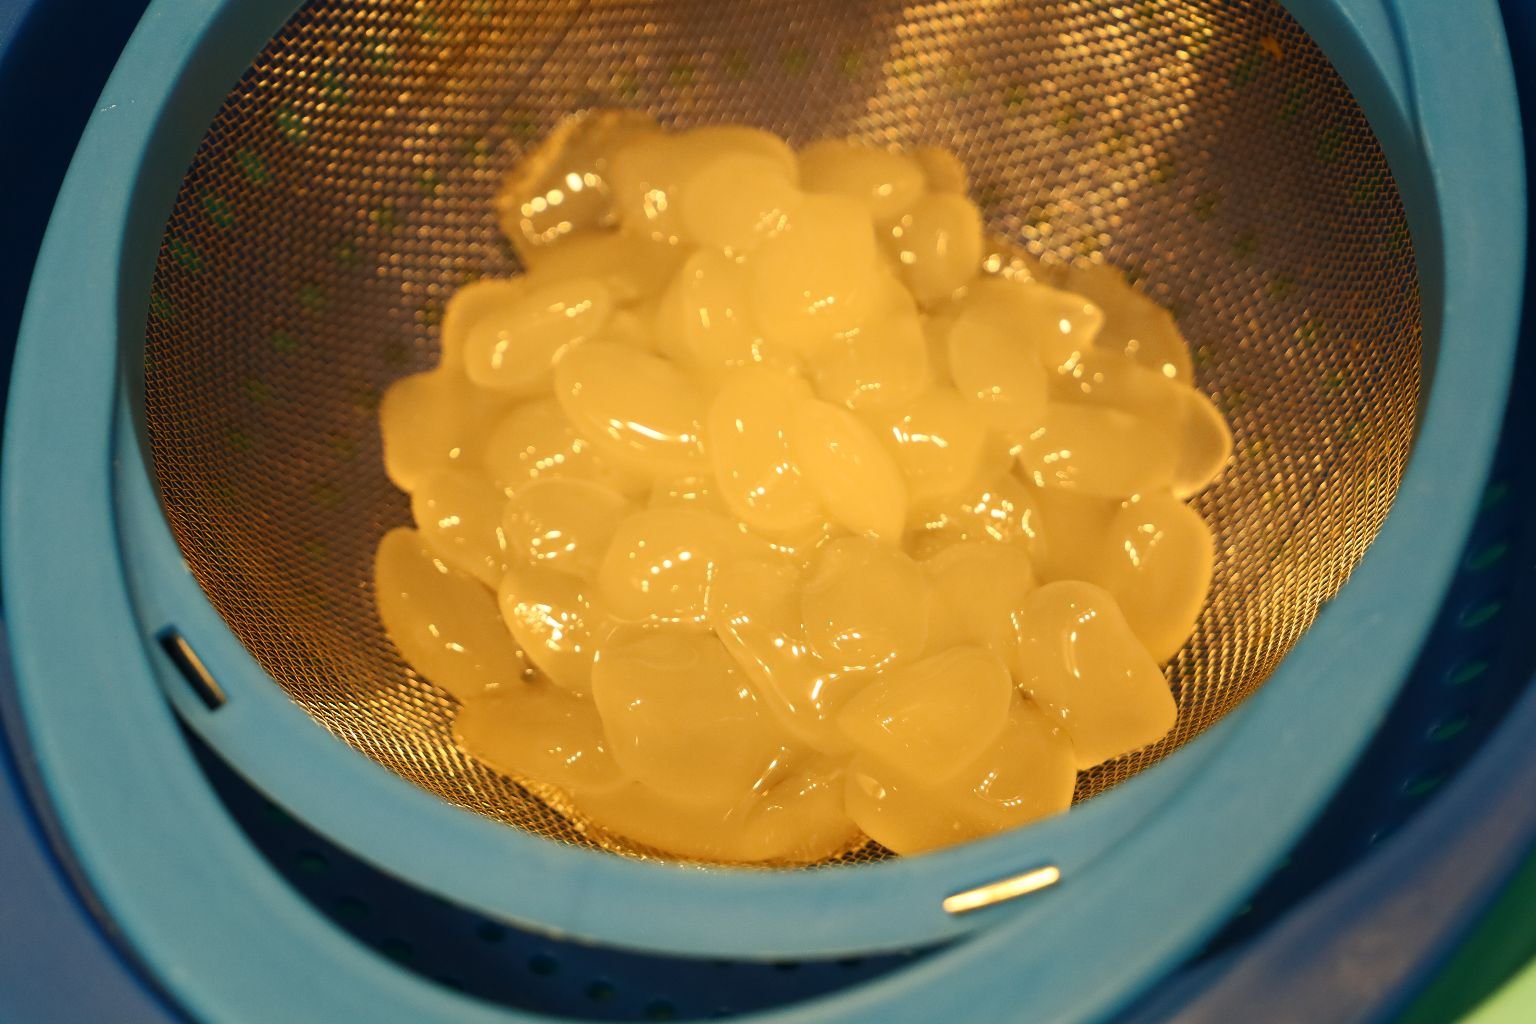
Palm Seeds come packed in a heavy syrup. I didn’t want the syrup in my Jezebel so I drained two cans into a colander and rinsed with water.
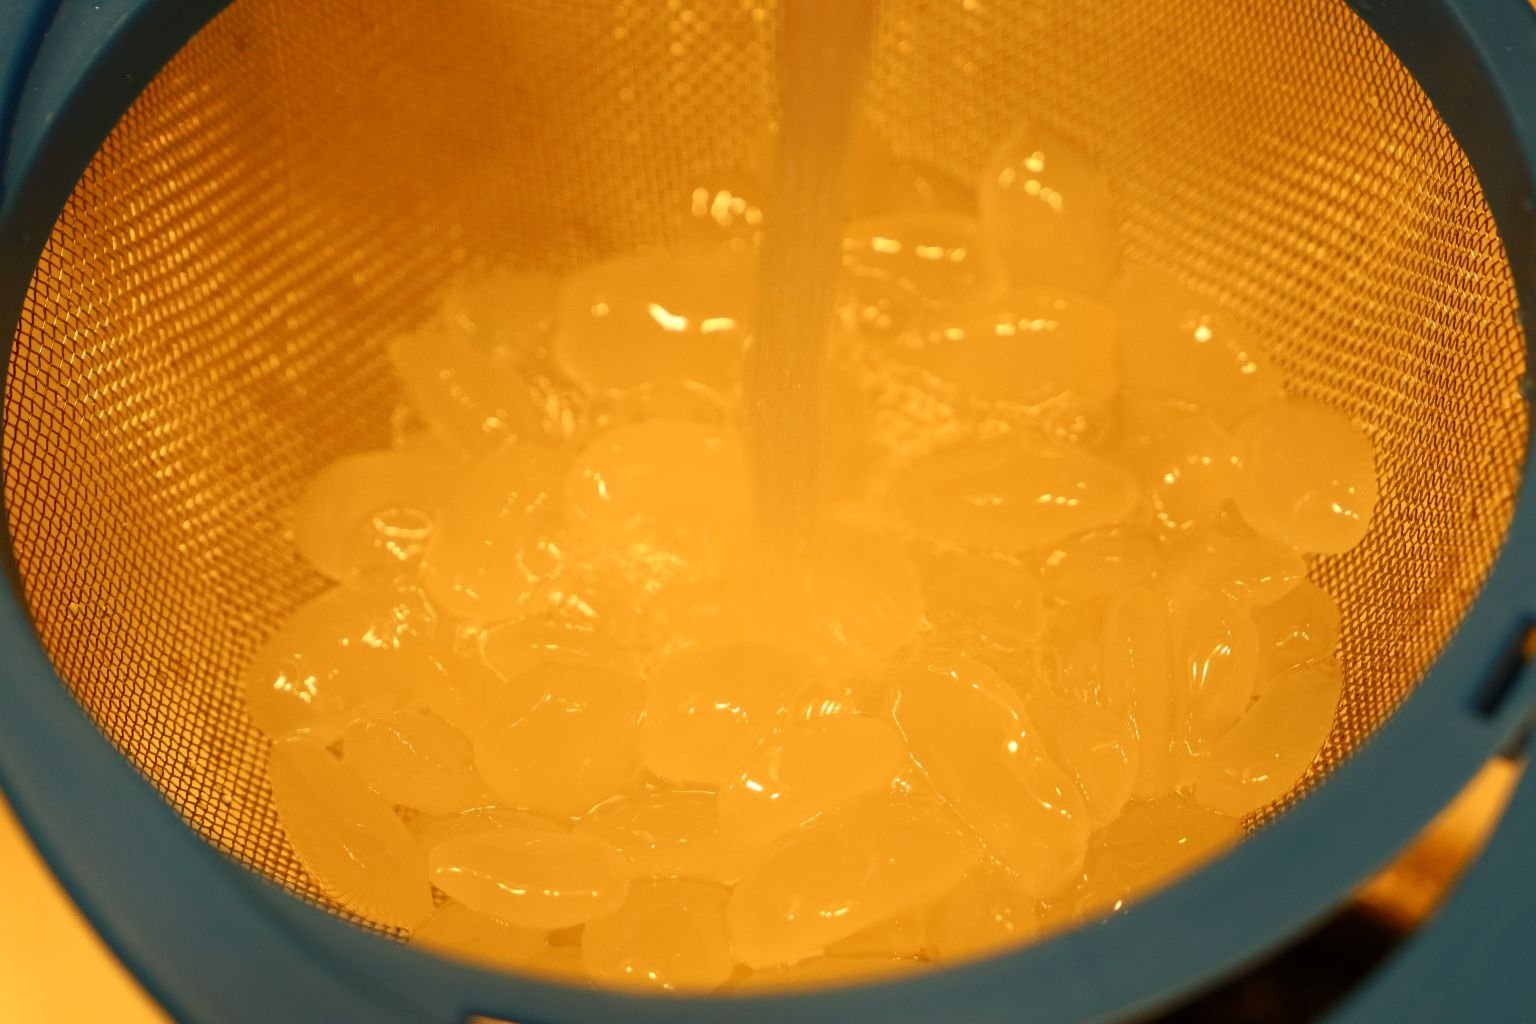
The Seeds are packed with water as it is. Which is why cooking time on the stove top should be a bit longer to have time to evaporate all of this water inside the seeds.
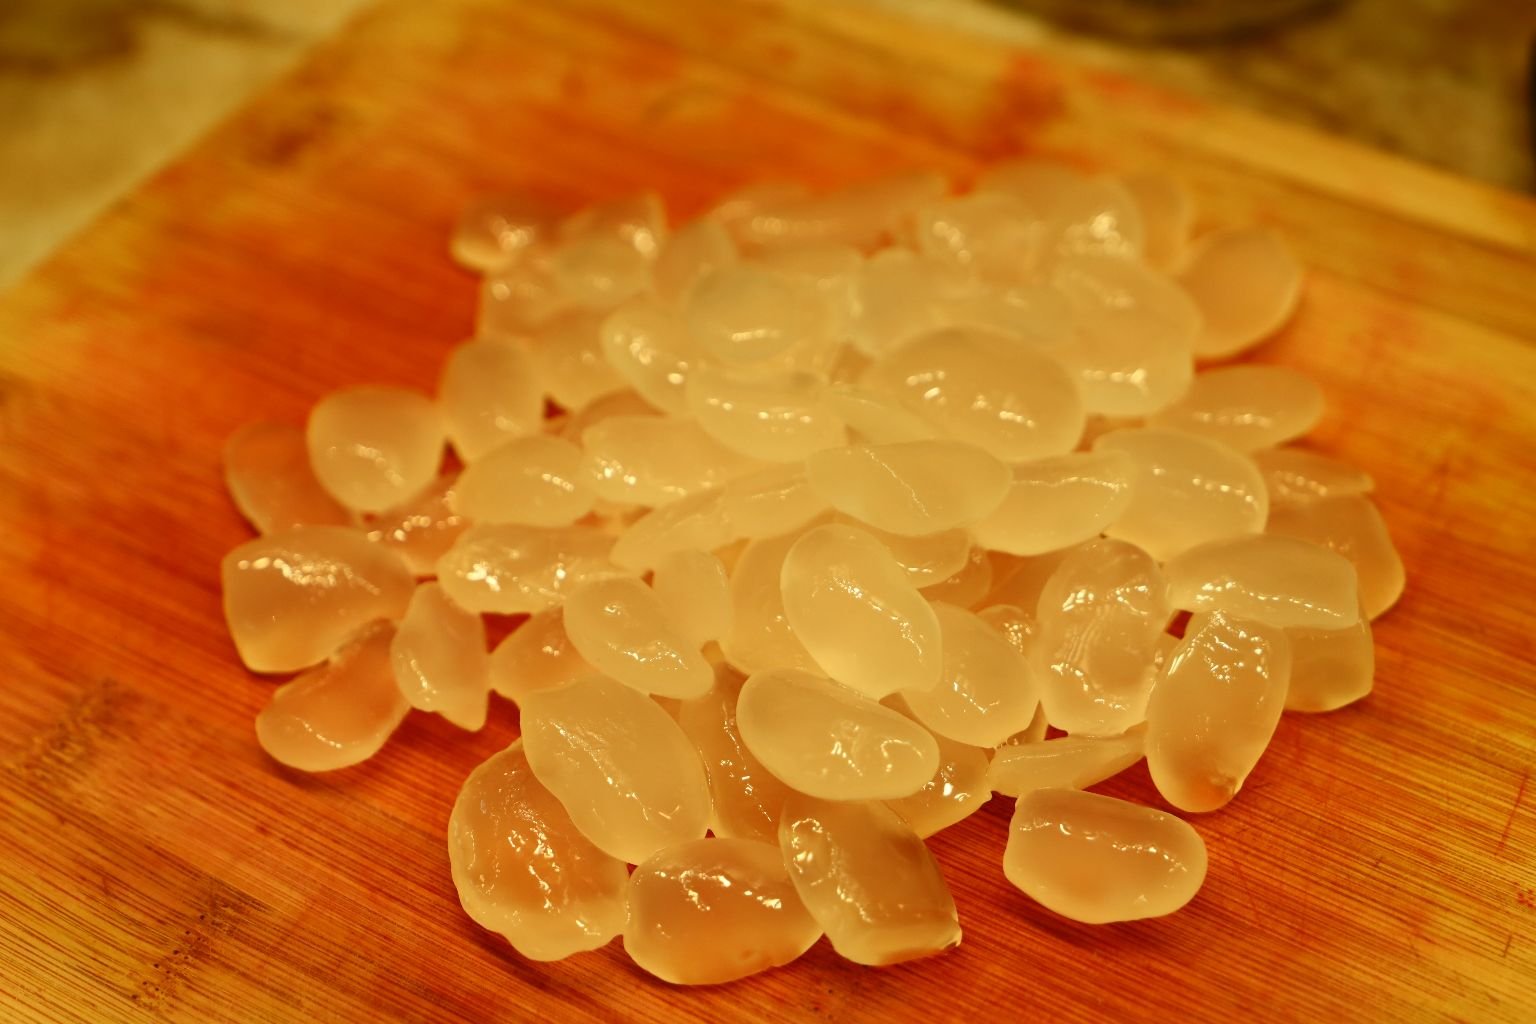
Placed onto a Cutting Board…
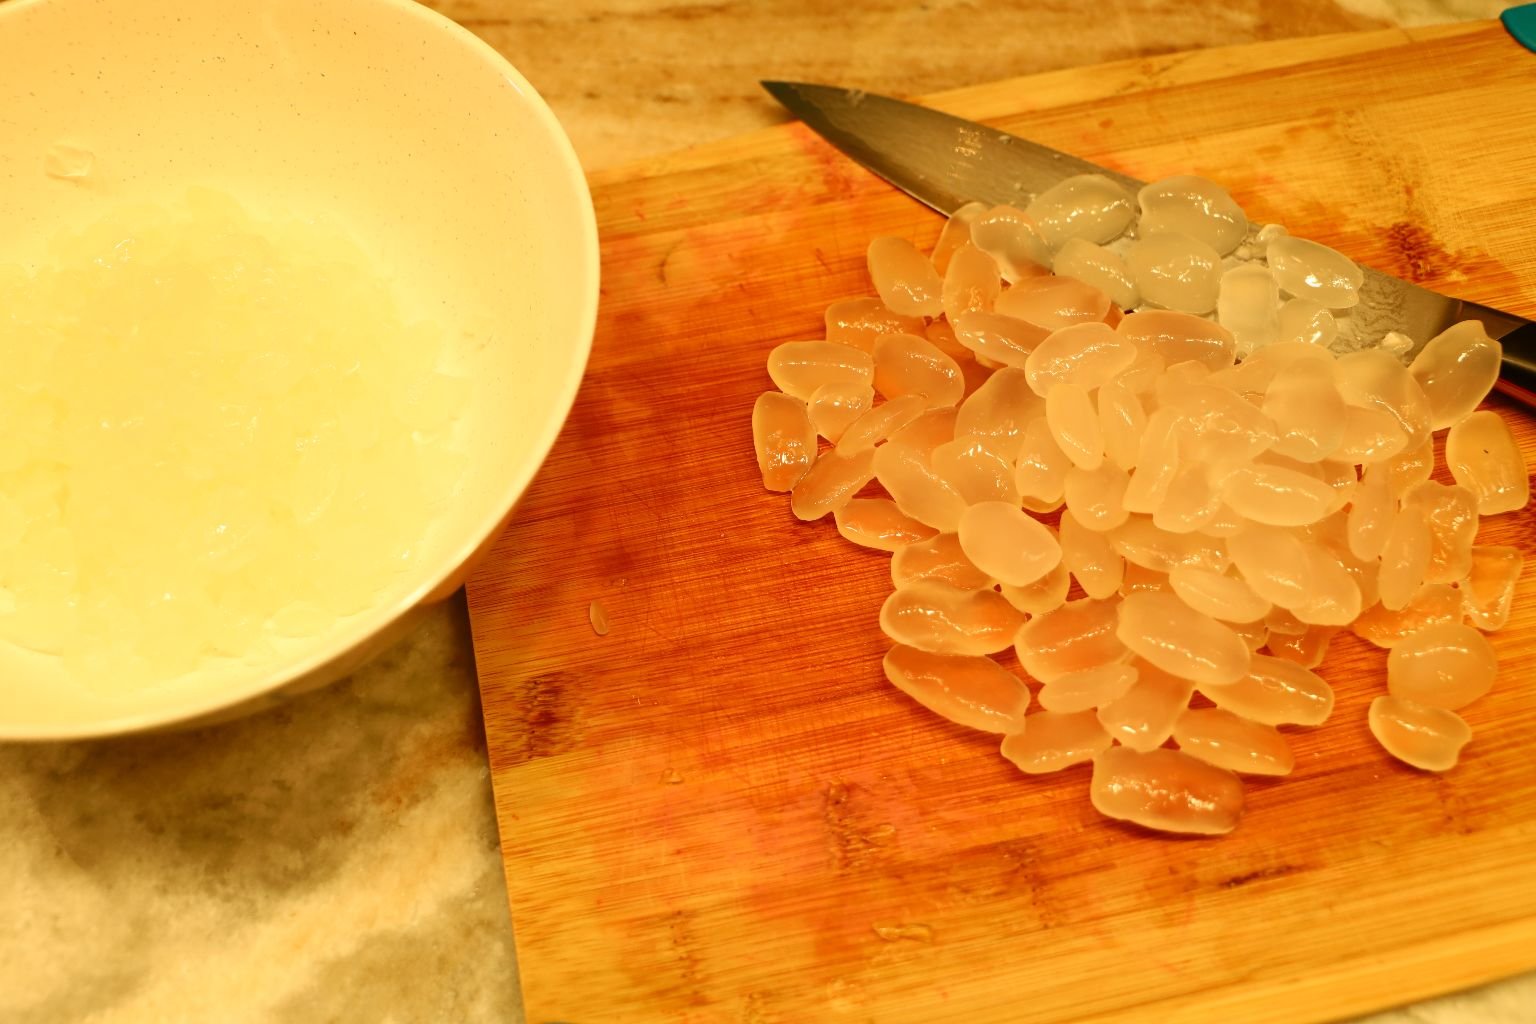
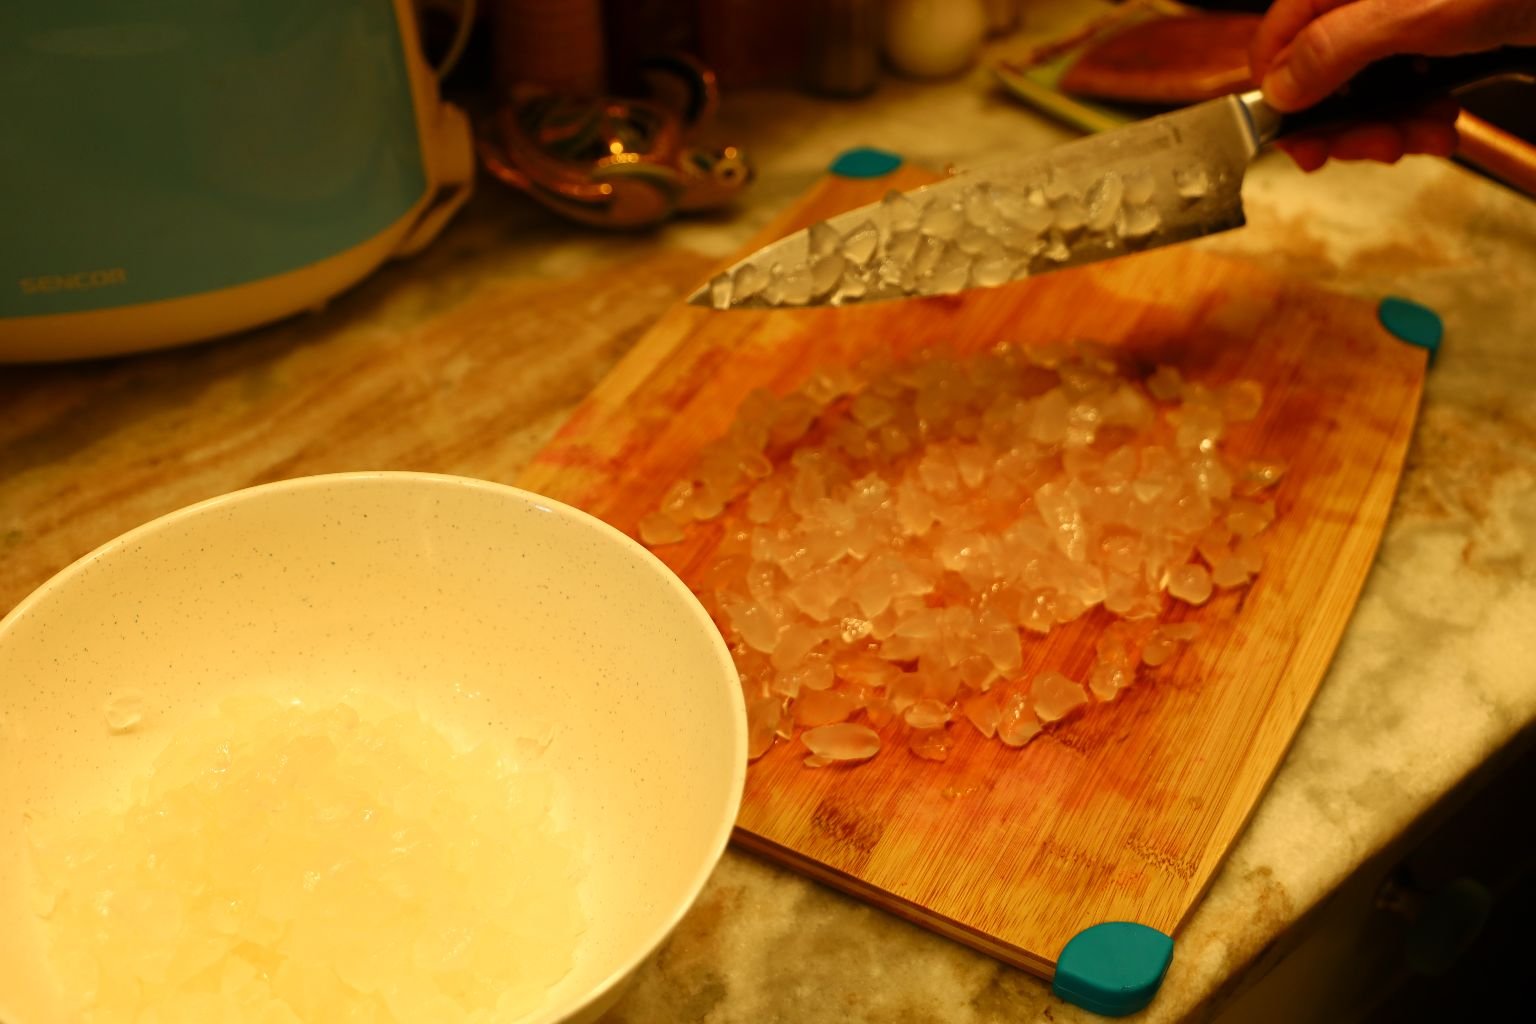
…and Chopped into Small Pieces. Then Placed into a Bowl.
————————————————————————-
Turn The Stove Top on a Medium-Low Heat
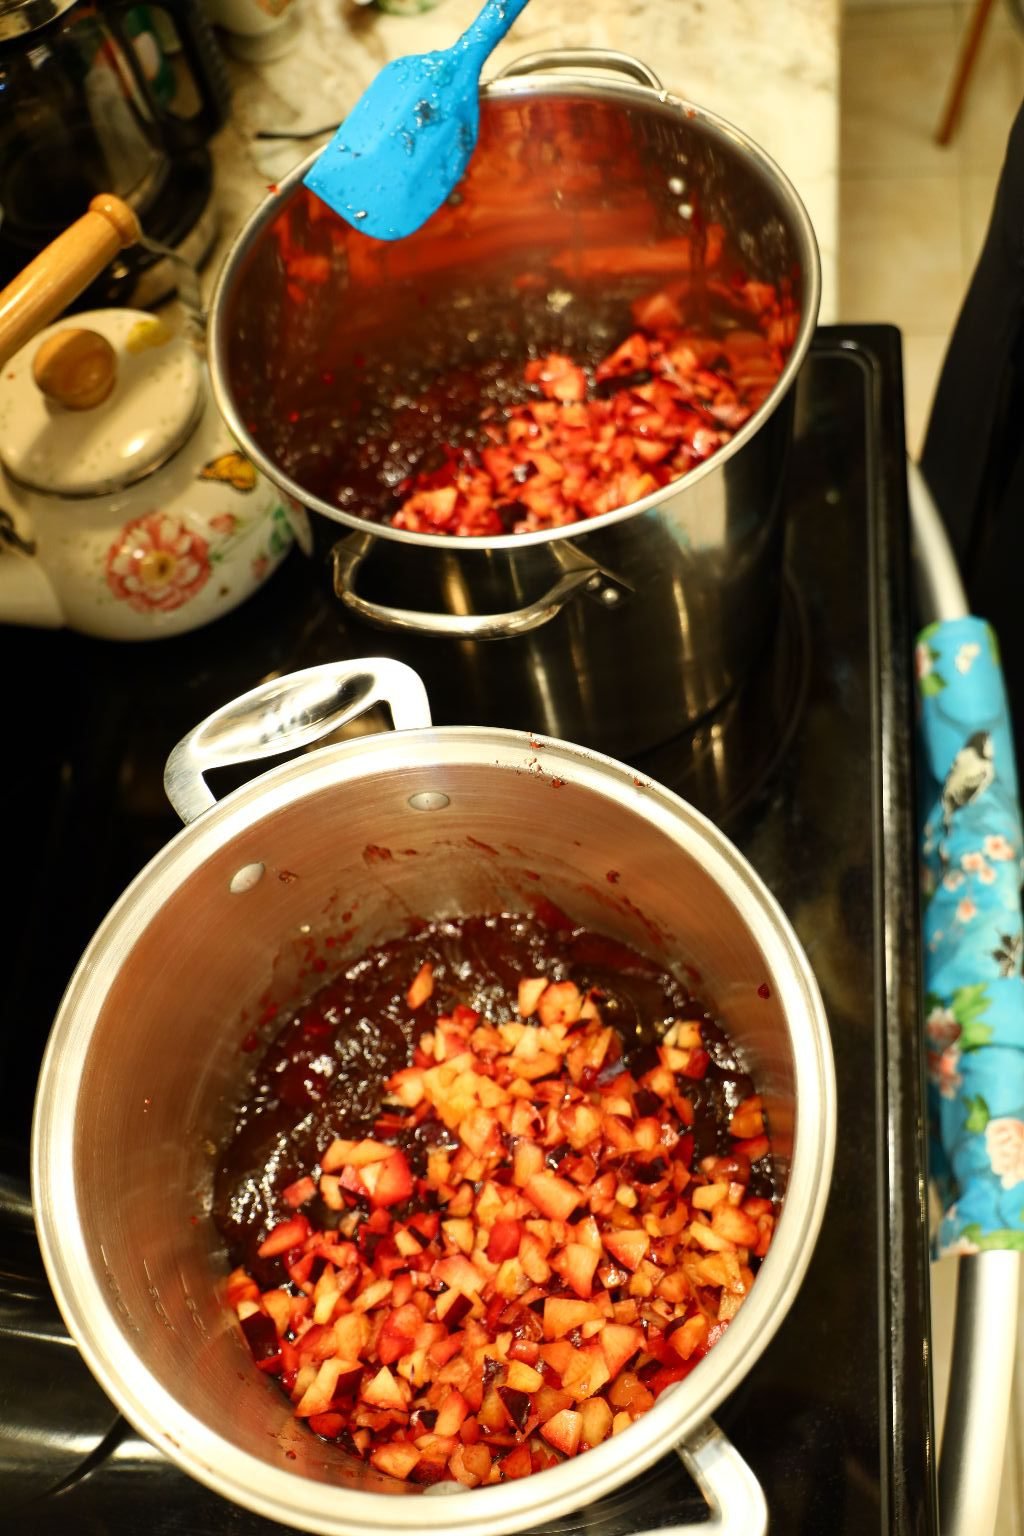
With Everything Chopped and Ready it’s Time to Do This!
The first thing I am going to do is to divide the jars you see above, into two pots.
These are the Red Plum Jams, and the Apple Jelly

Like So….
Time to Add my Chopped Plums into Both Pots
————————————————————————————-
—————————————————————————–
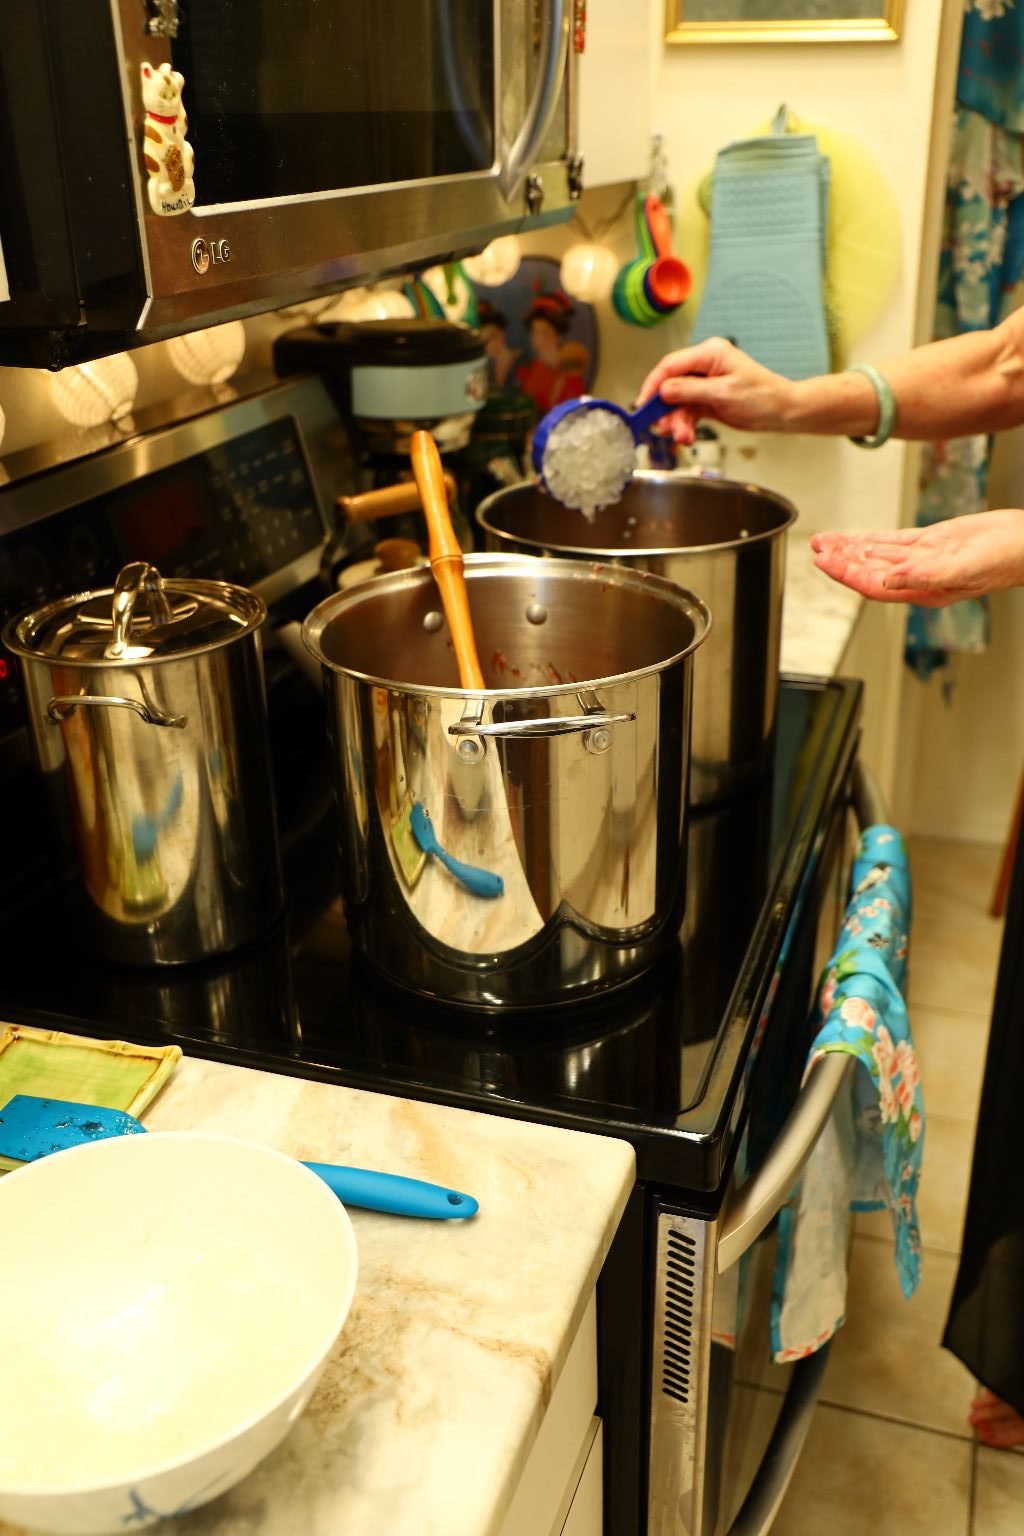
I am now evenly distributing the Palm Seeds Between Both Pots
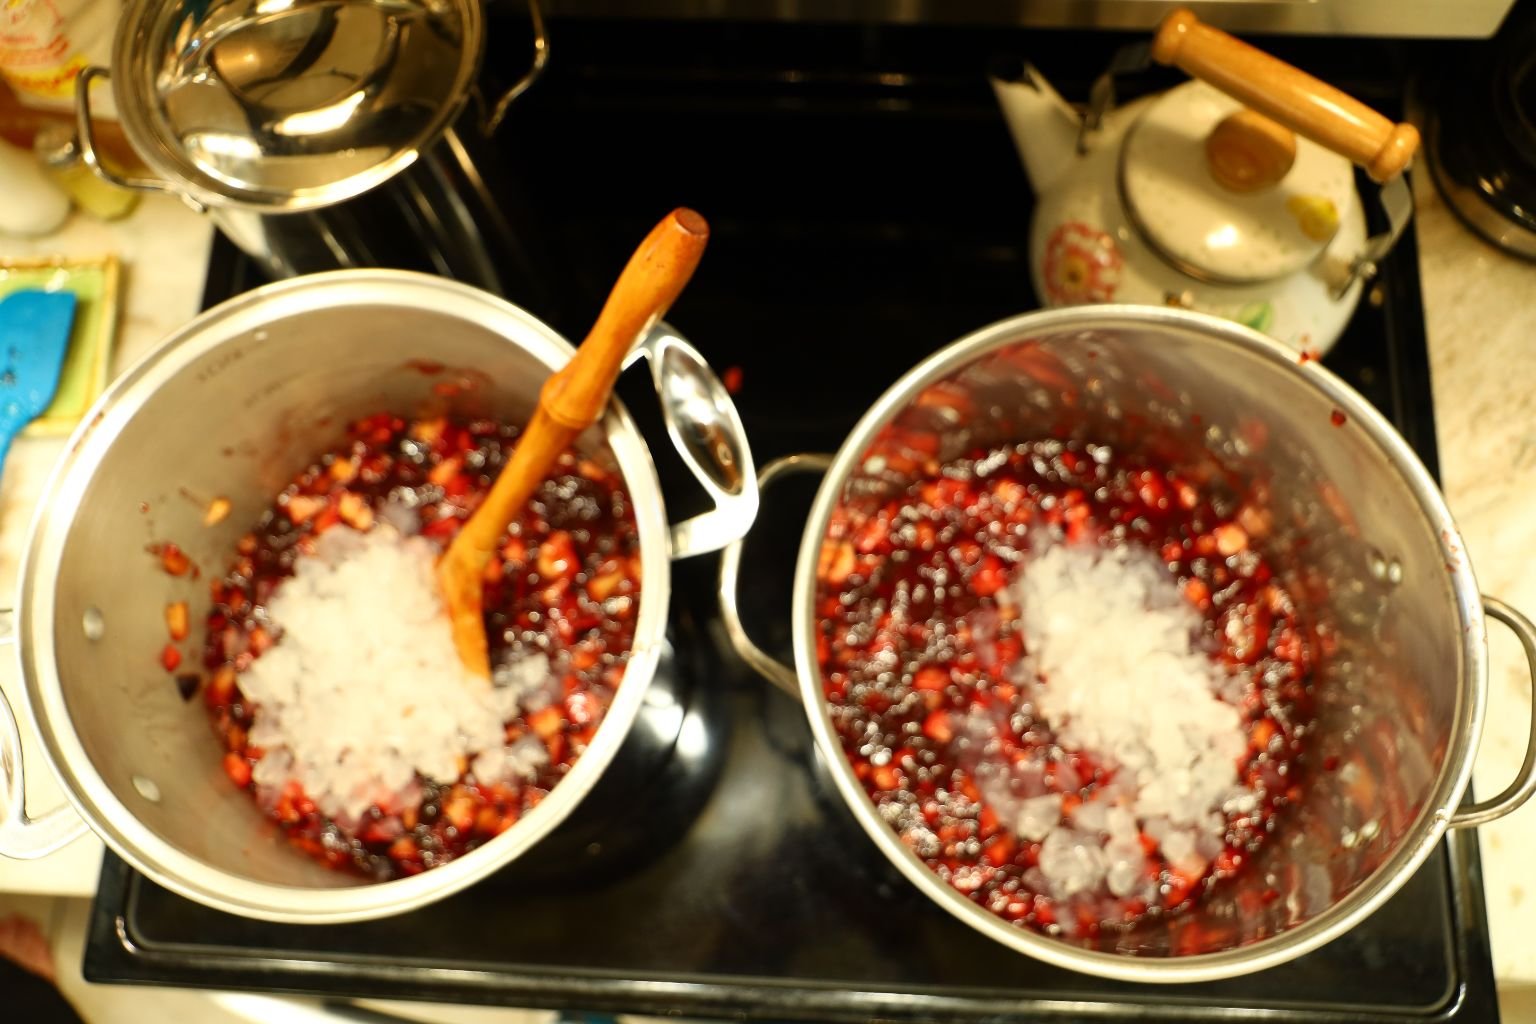
——————————————————————————
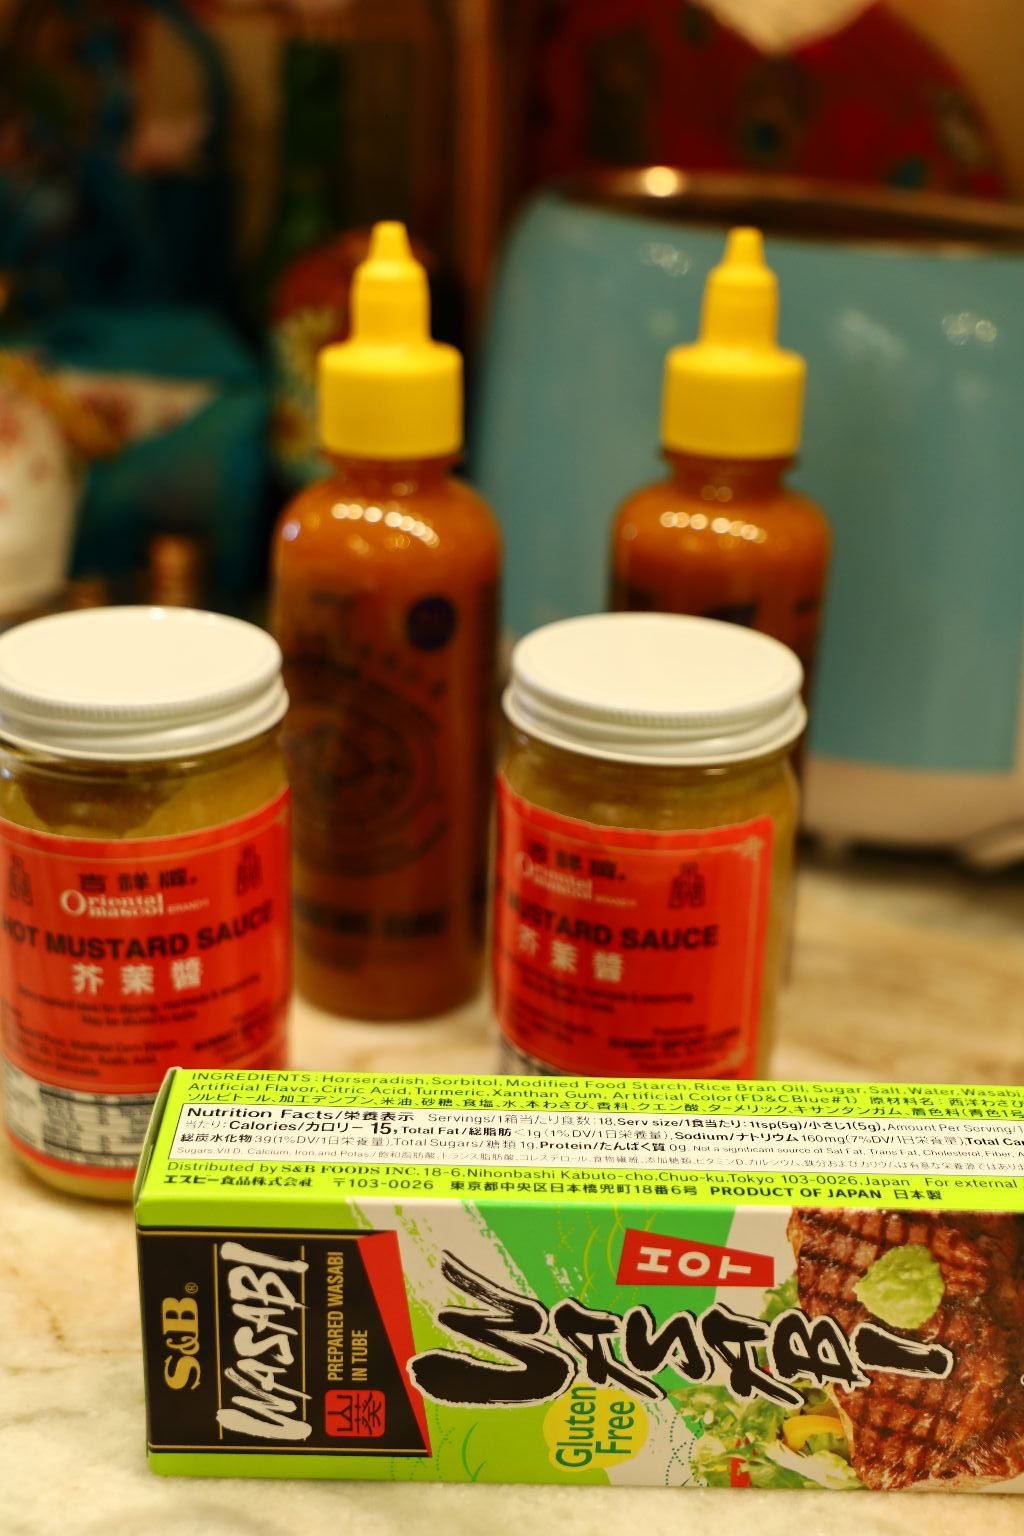
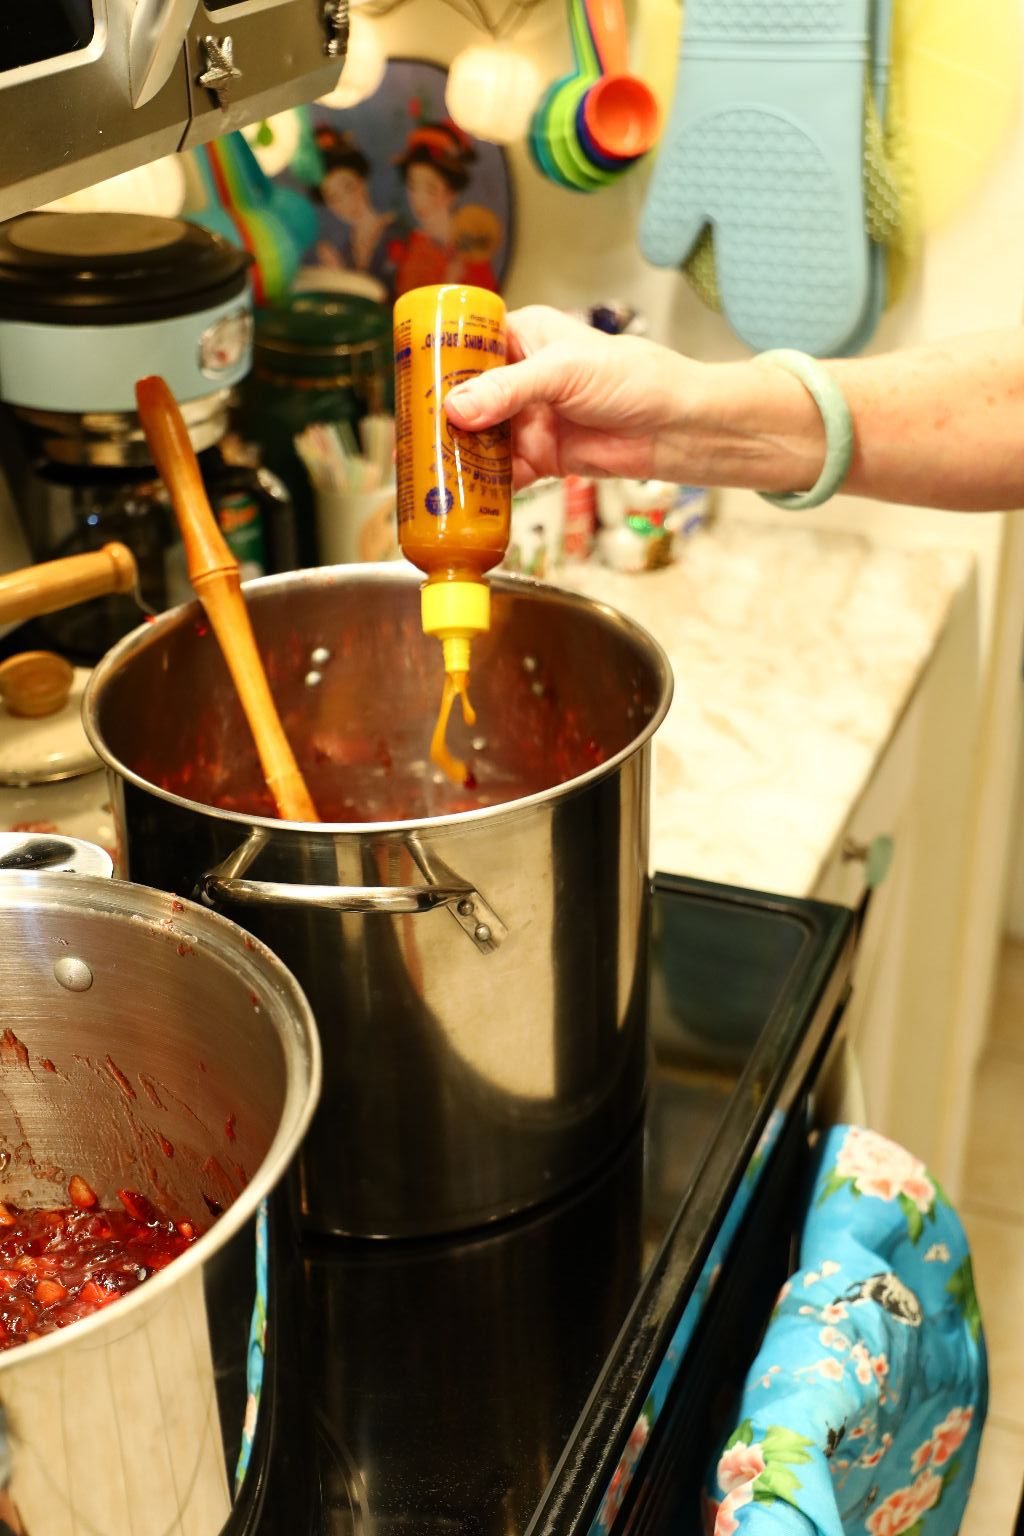
Now it’s time to add the Yellow Sriracha Chili Sauce.
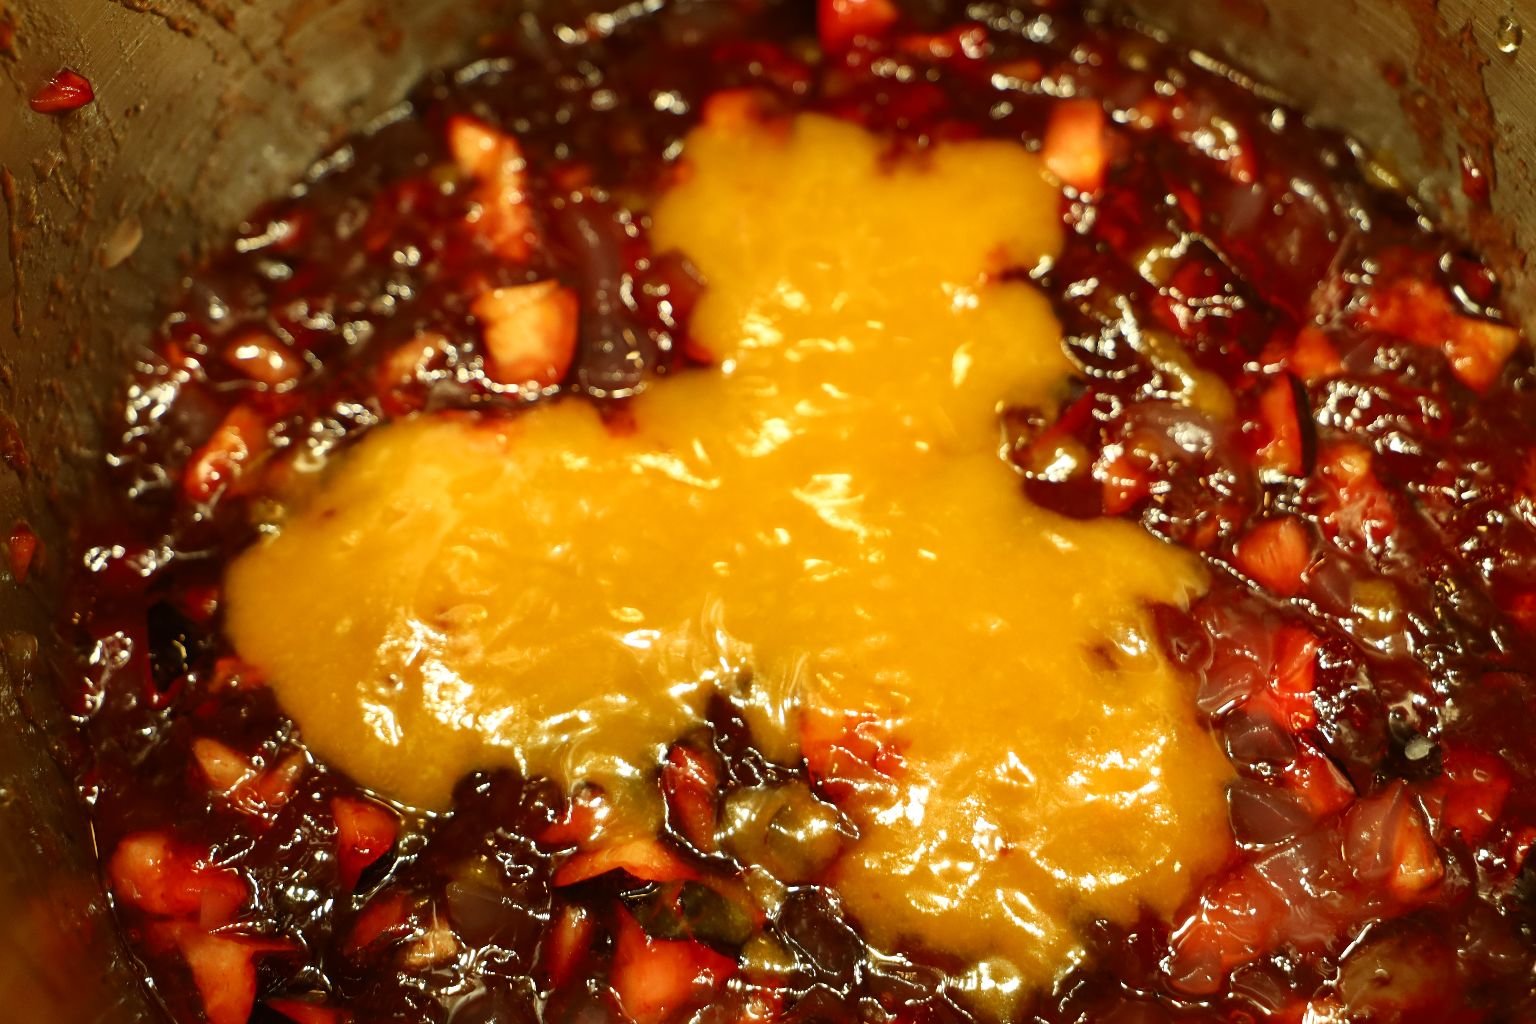
I pretty much used the entire 10 ounce bottle between both pots.
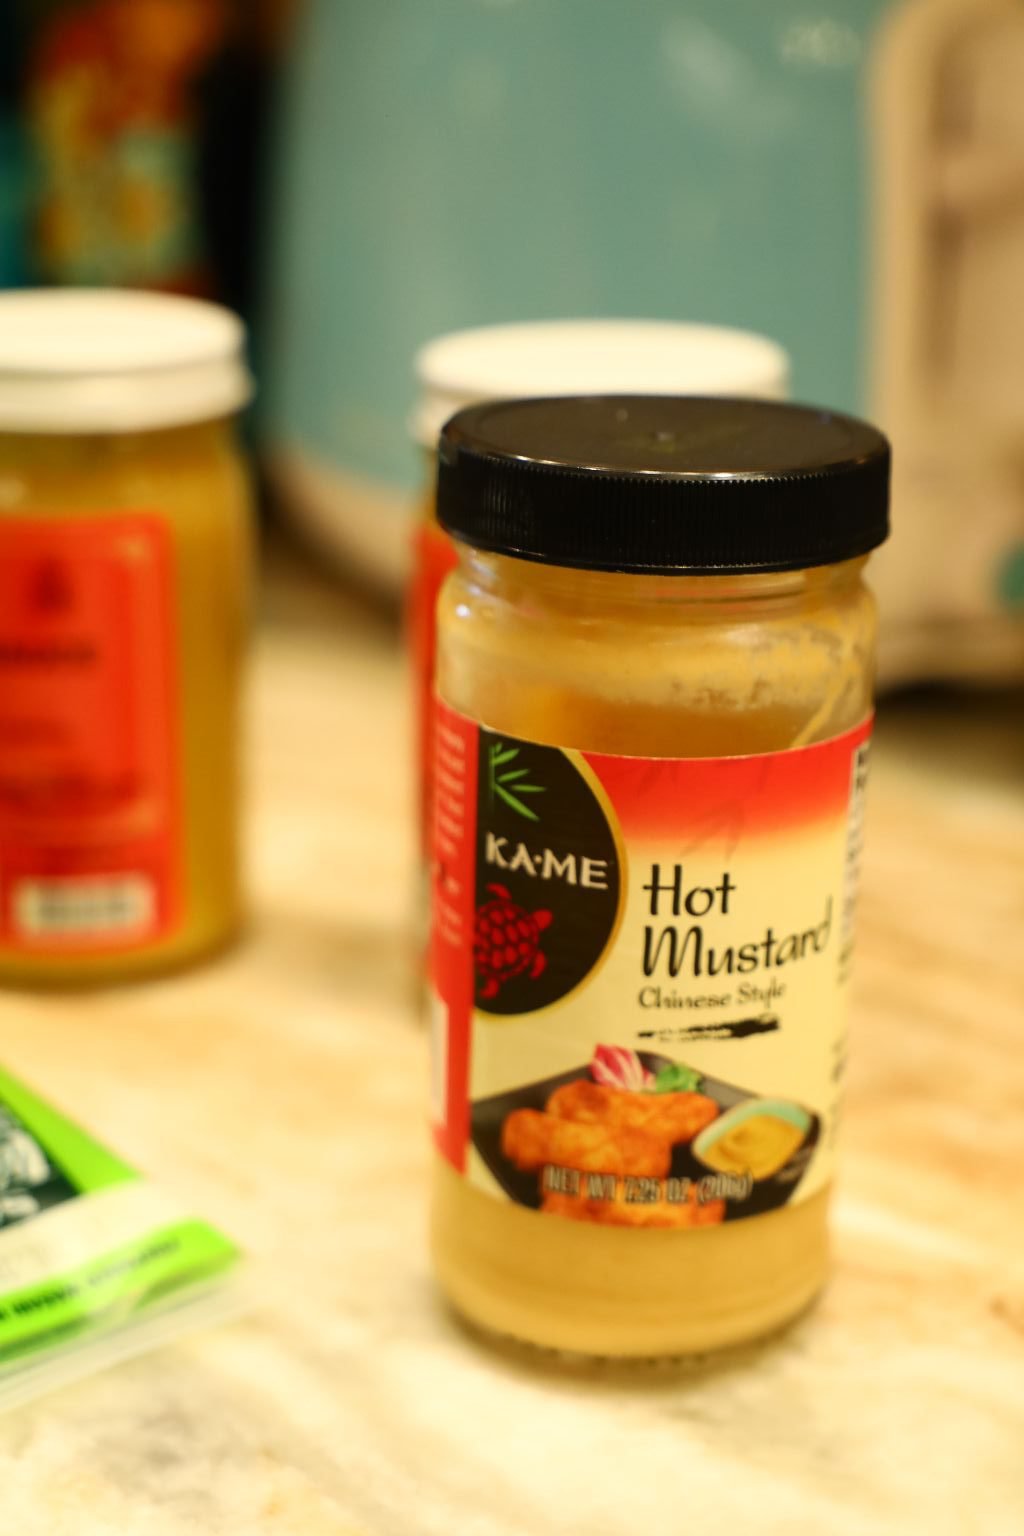
I then added some Chinese Hot Mustard between both pots.
All of this is to TASTE!
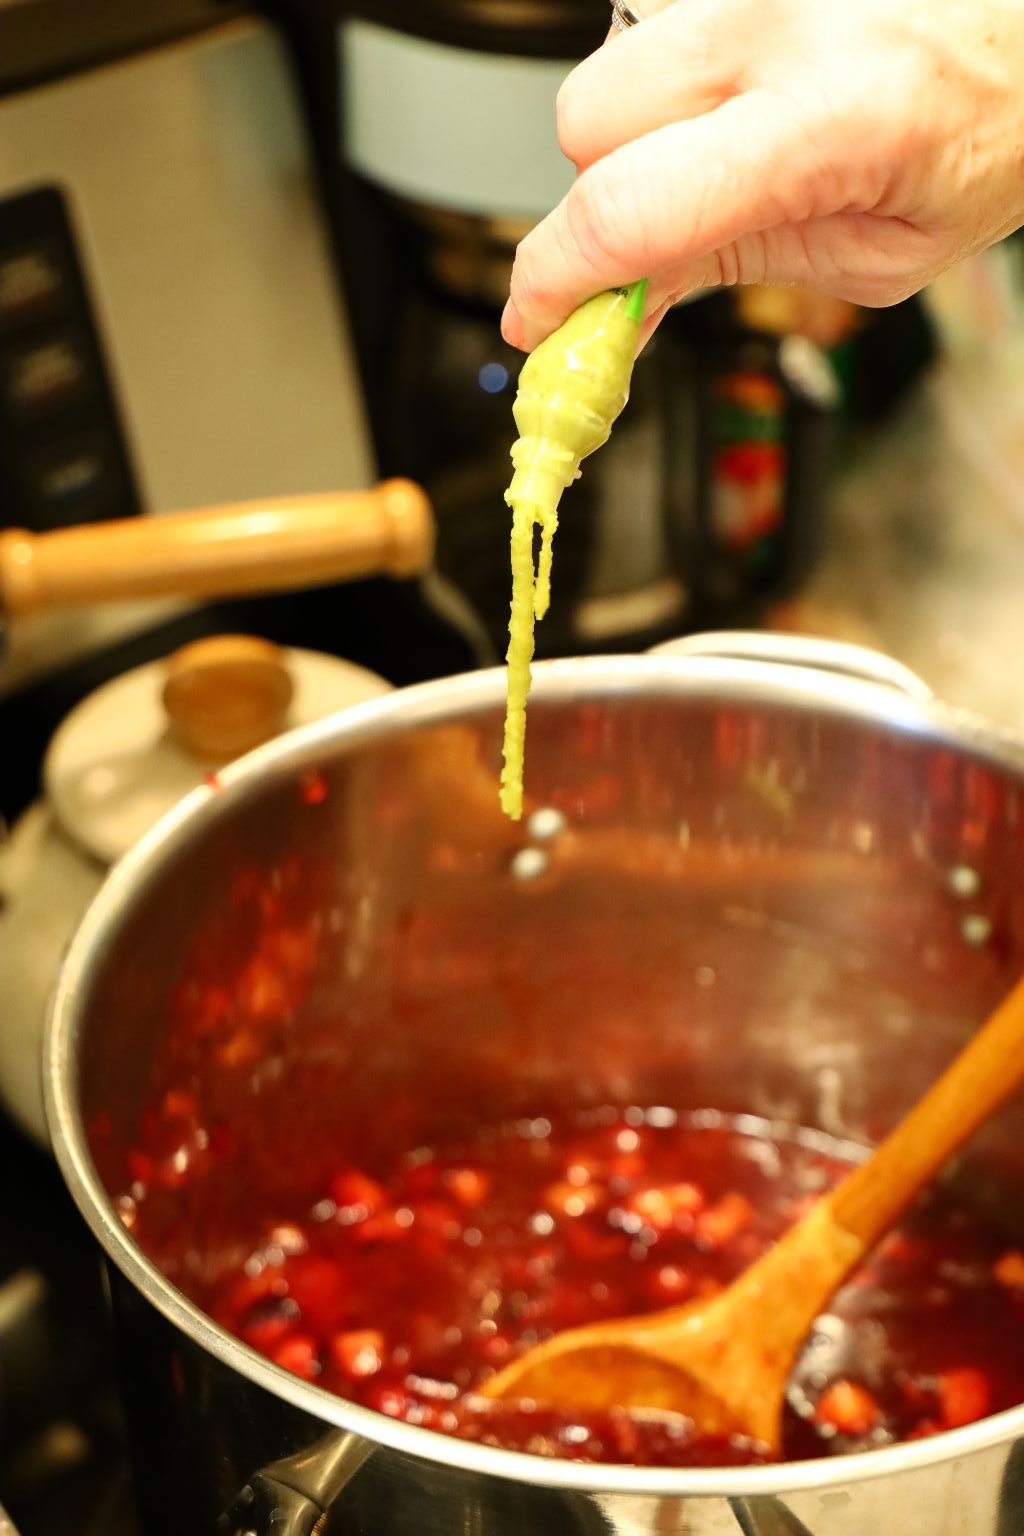
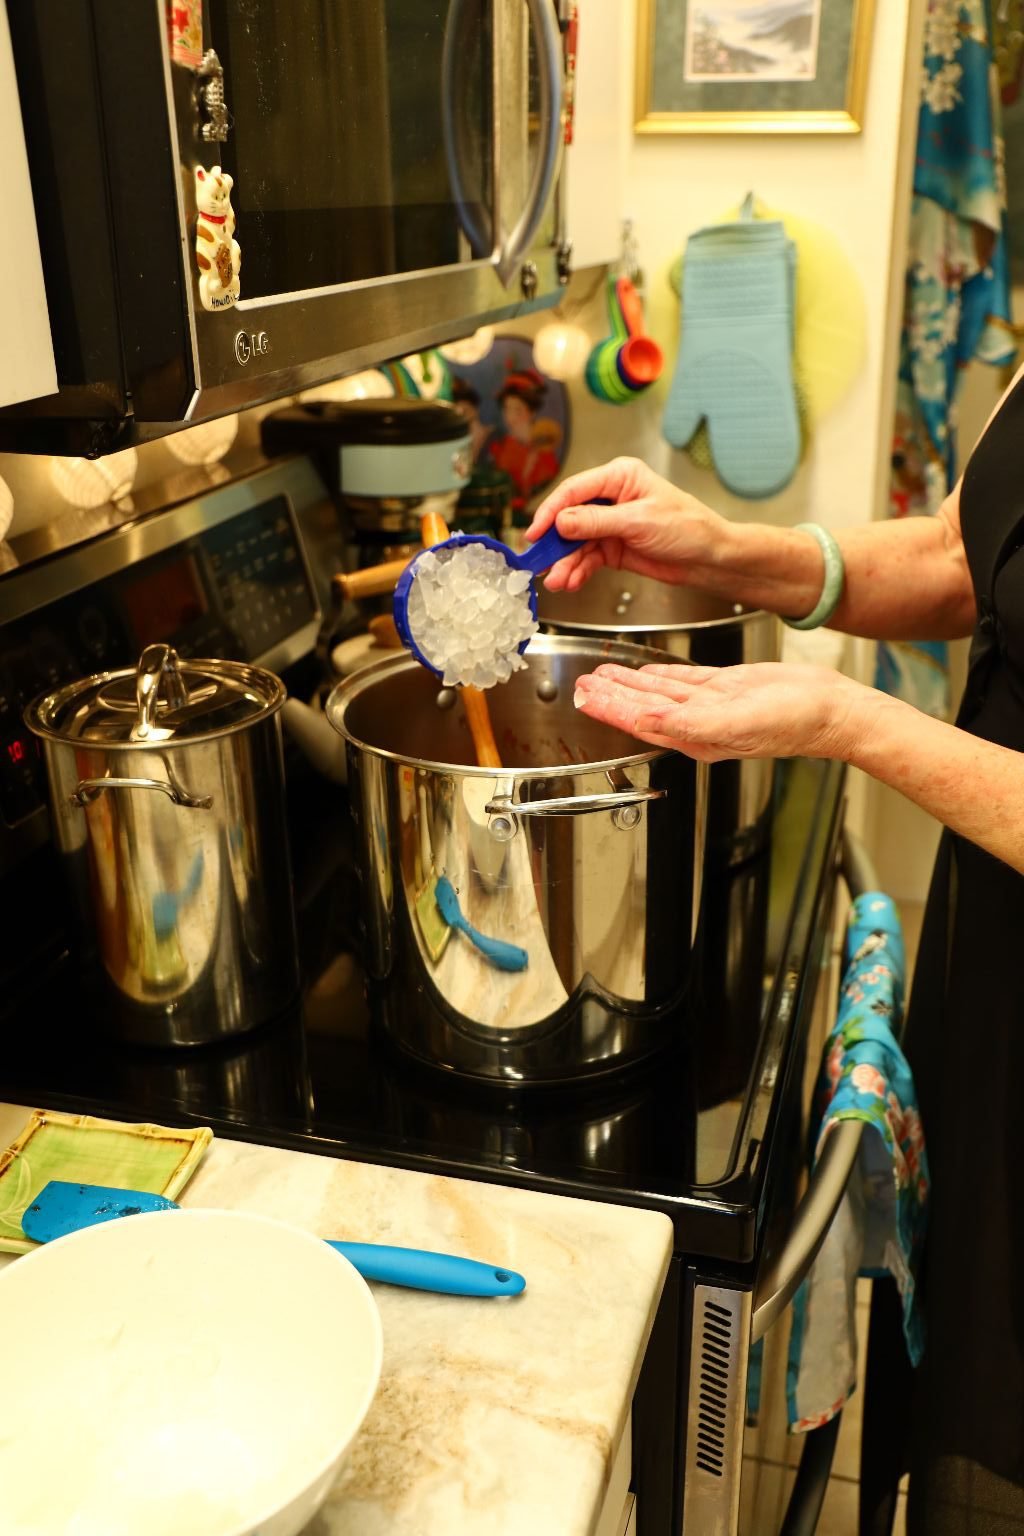
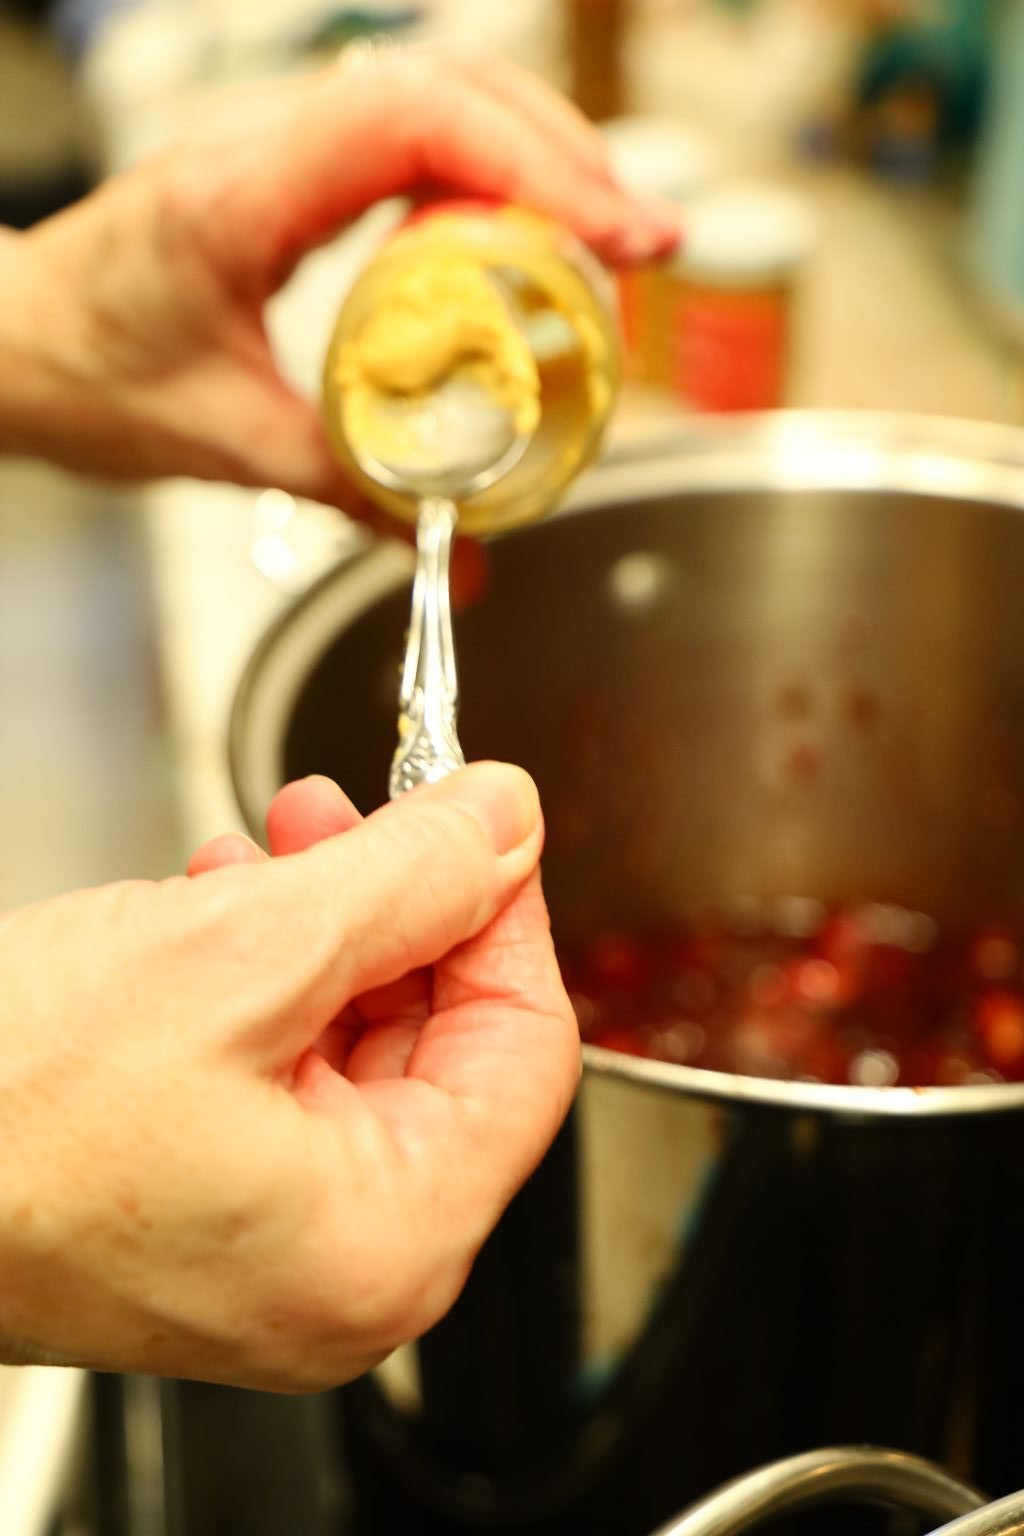
Now For The Wasabi Paste
————————————————————————————-

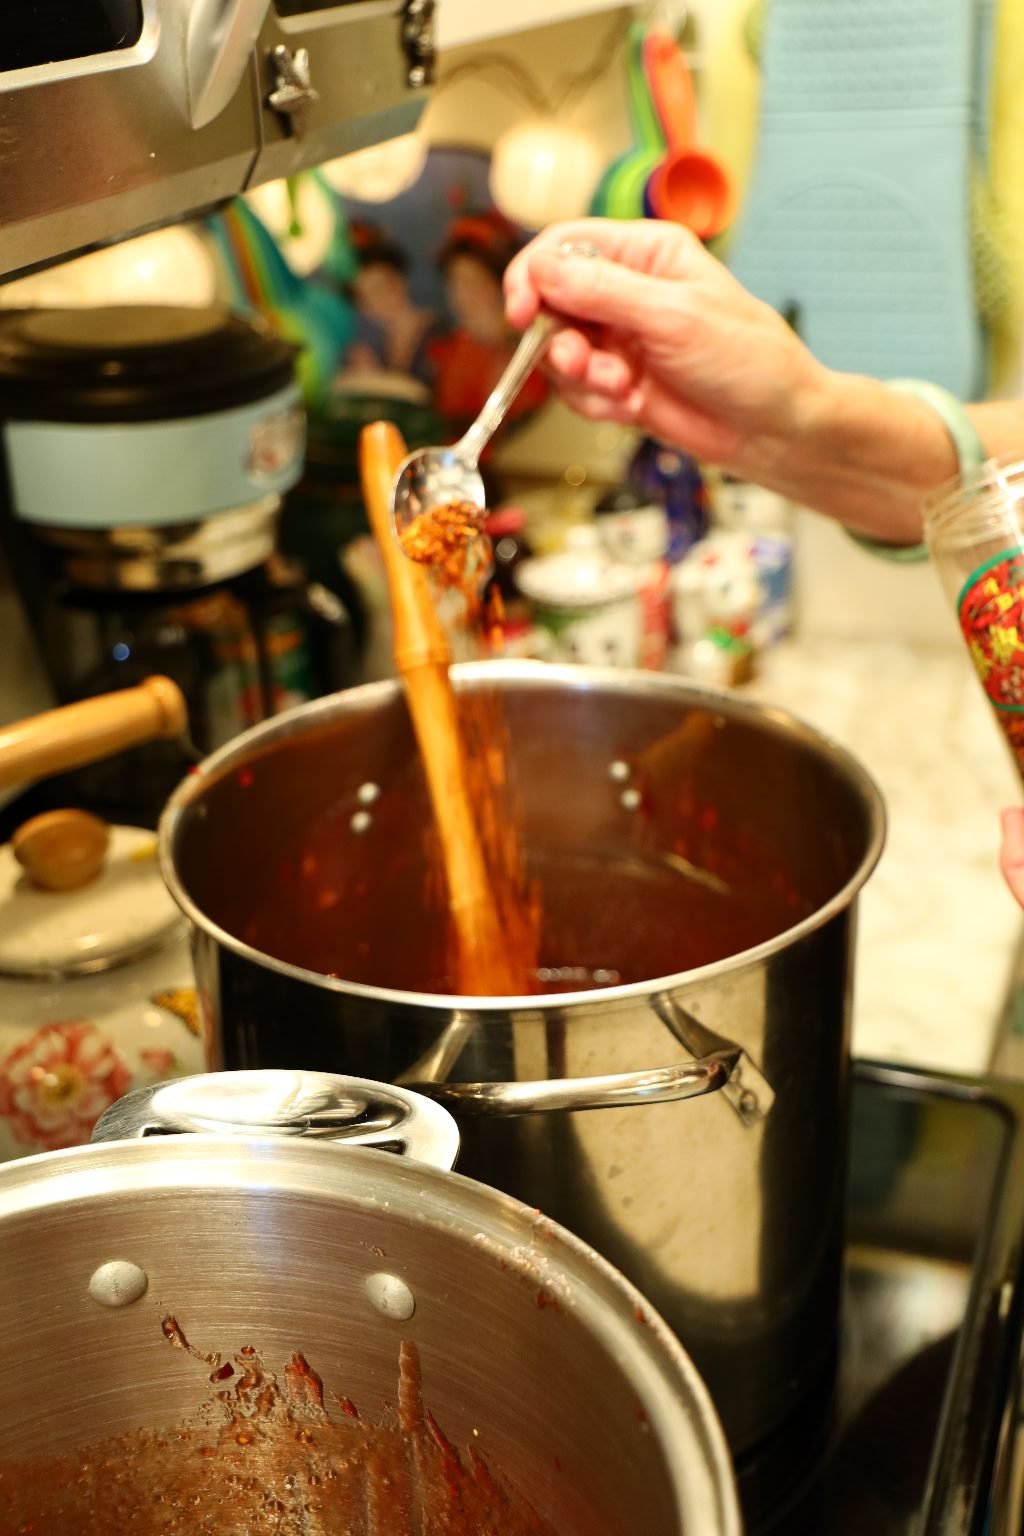

The Chinese Pepper Flakes Come Next
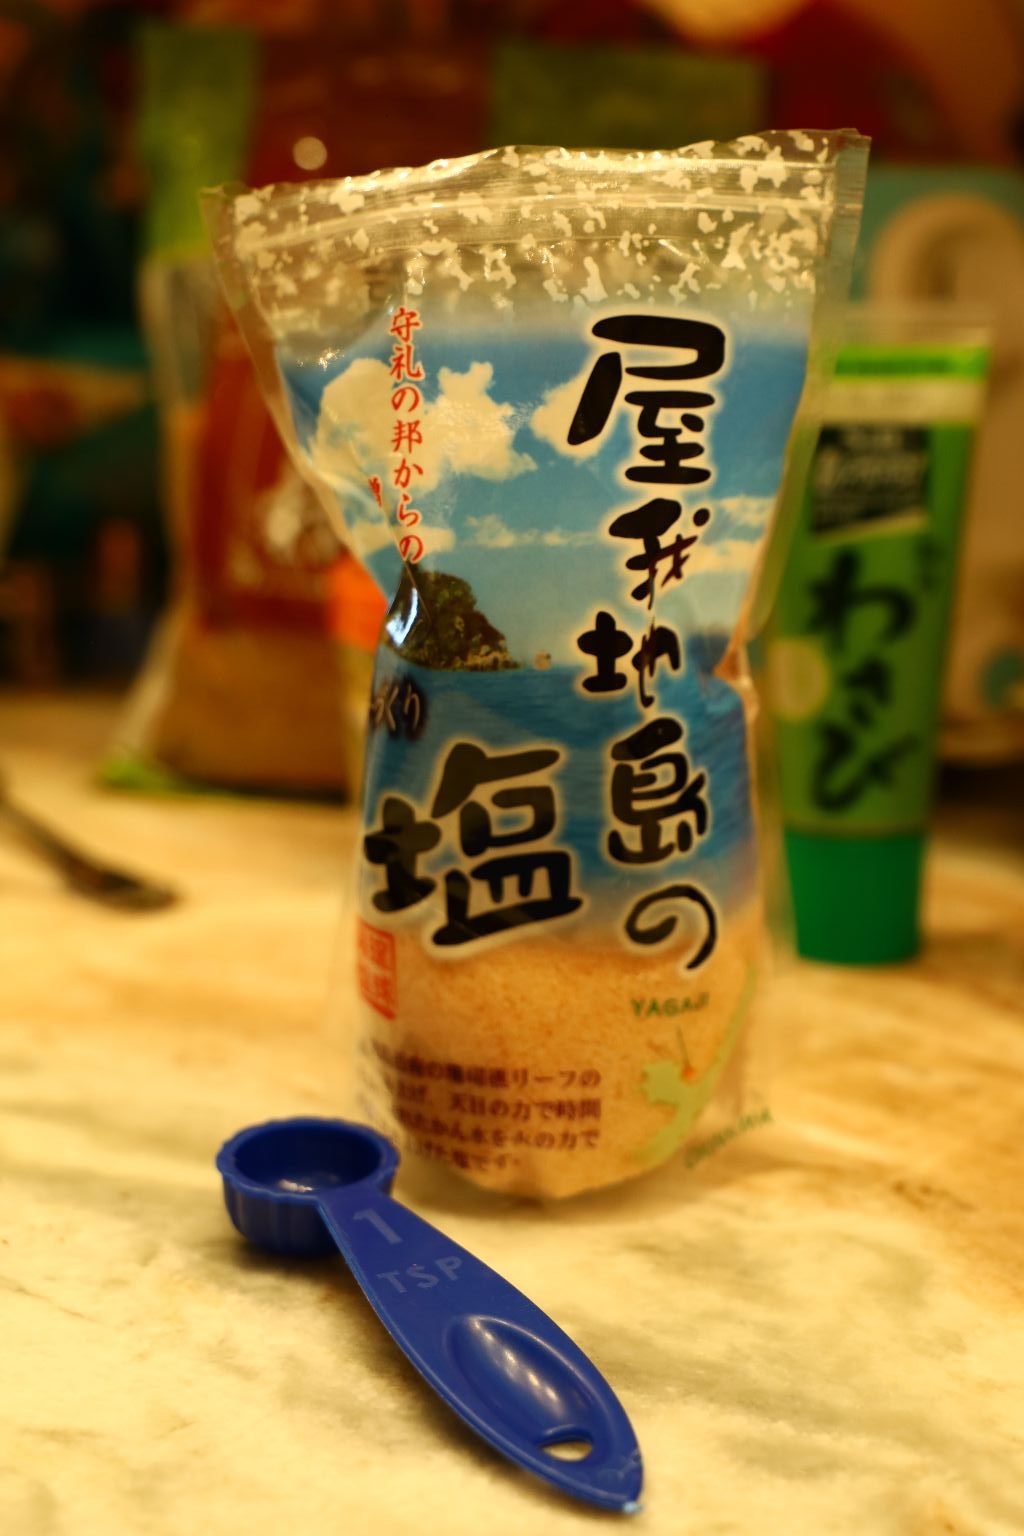
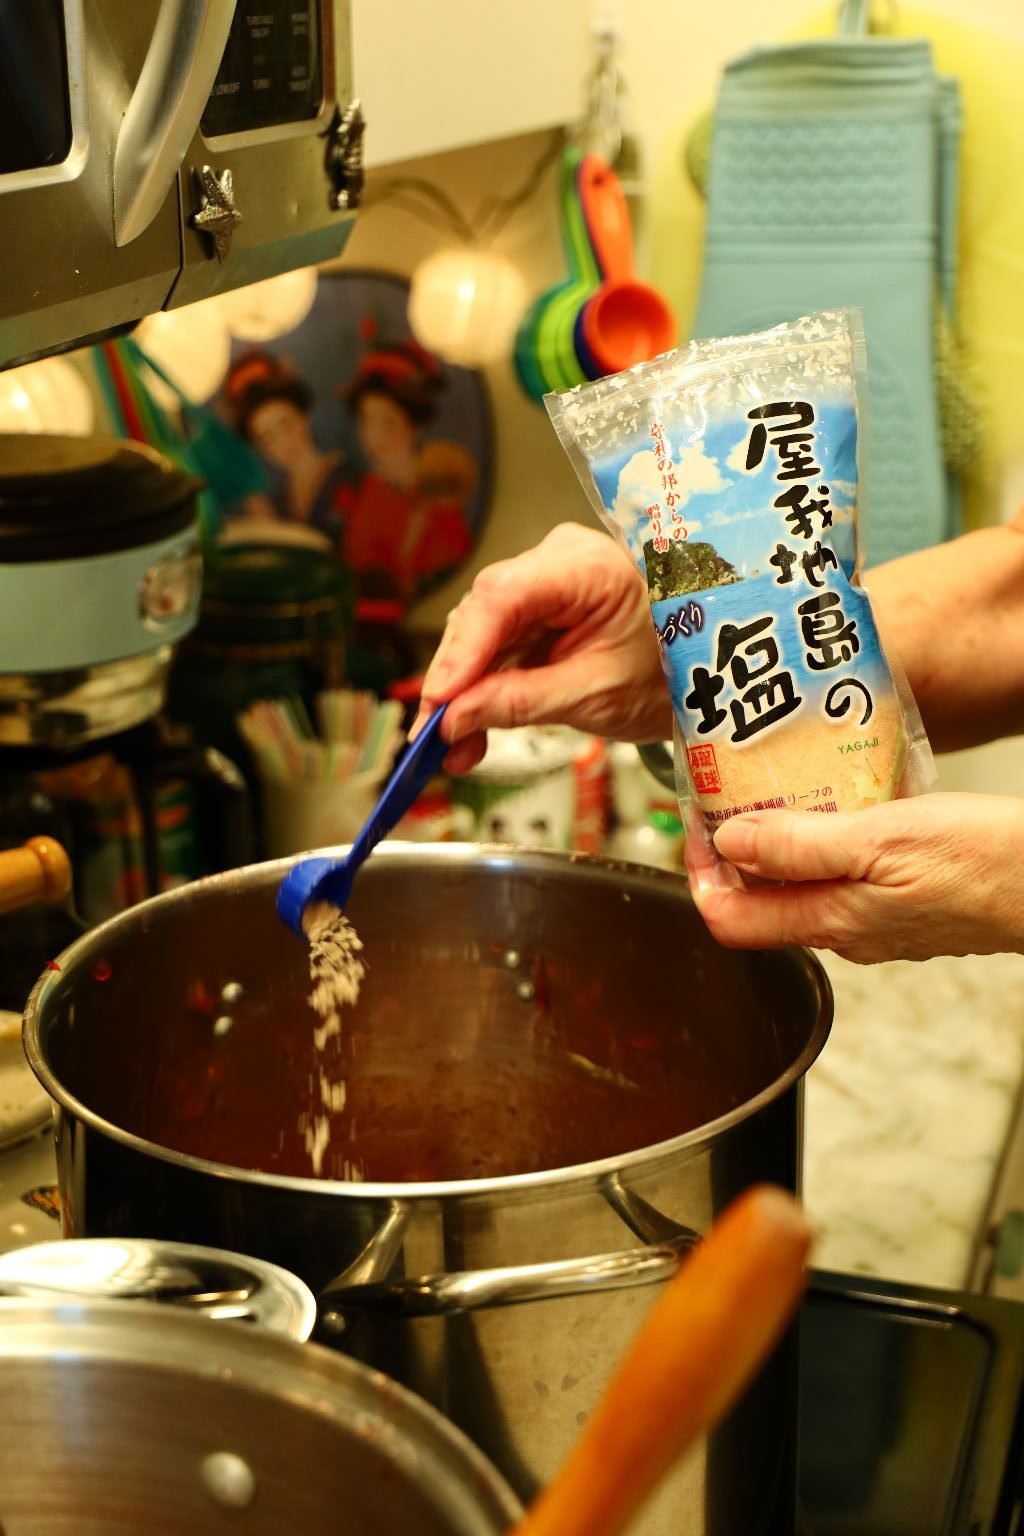
Now, It’s Time To Add Our Asian Salt
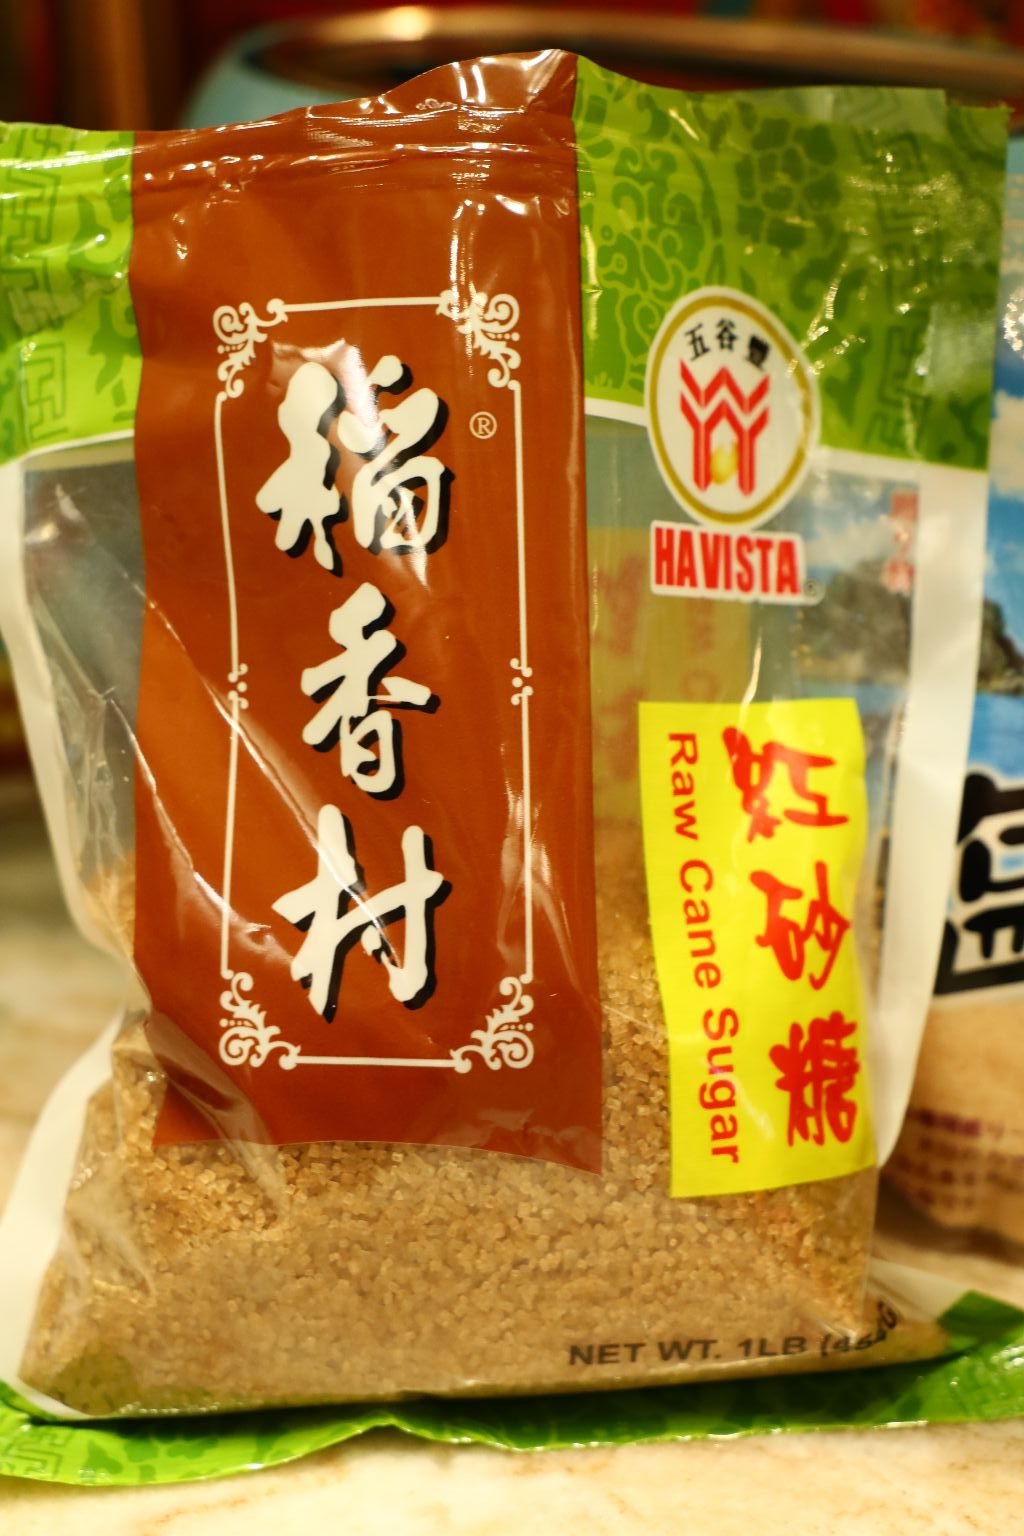
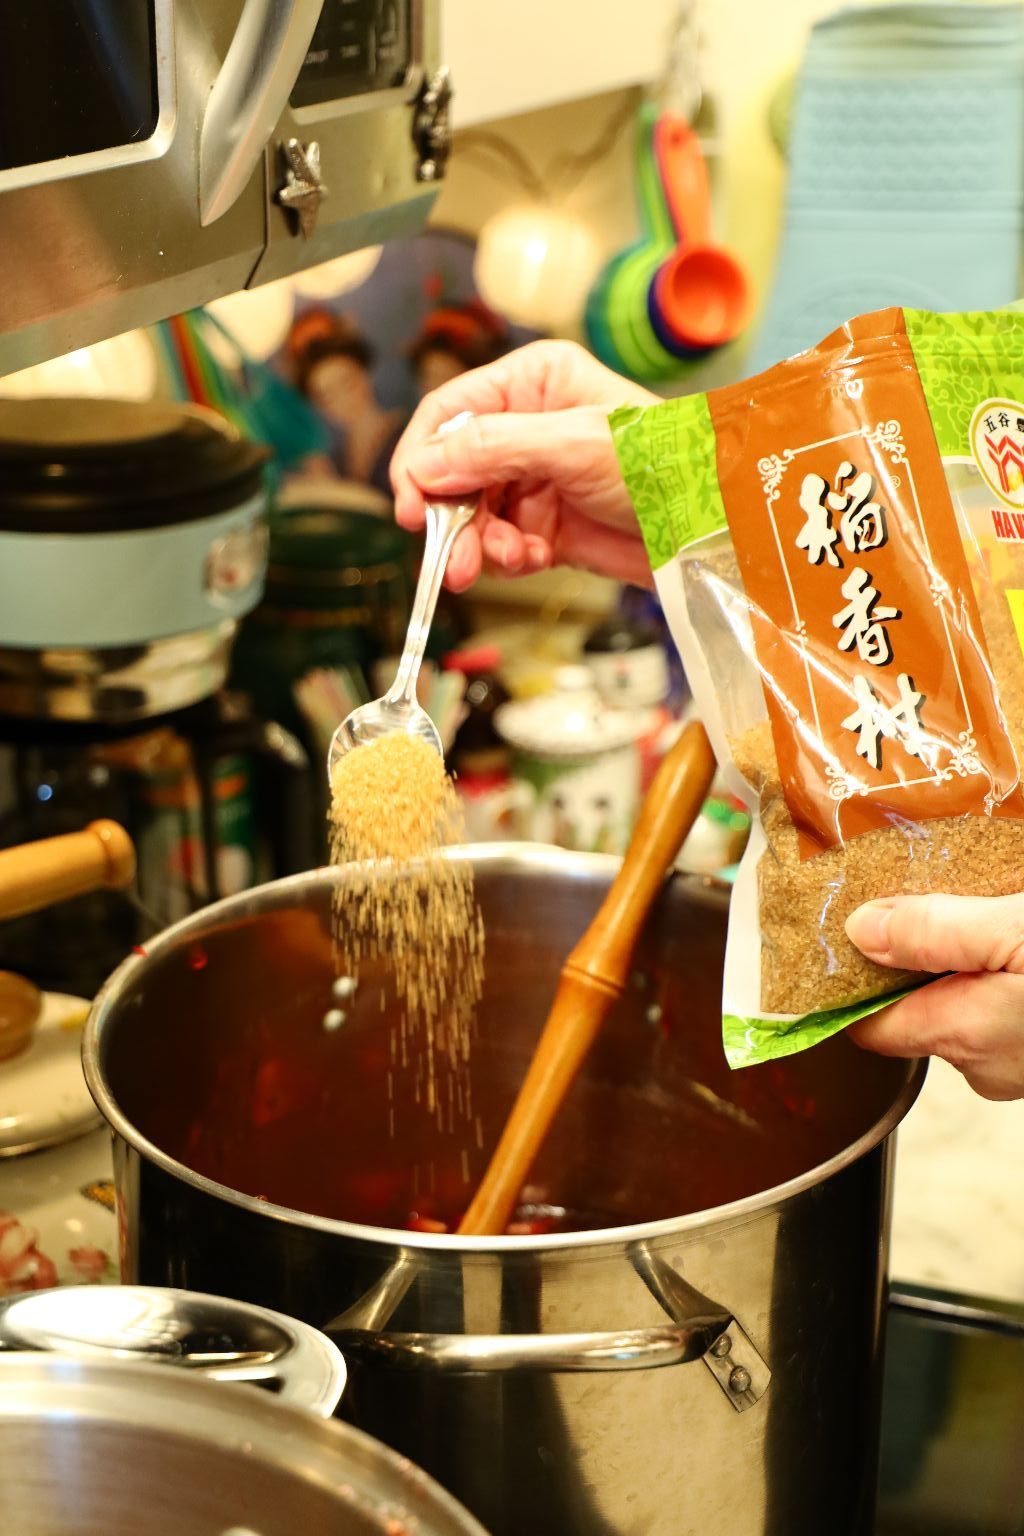
Also, Our Raw Cane Sugar
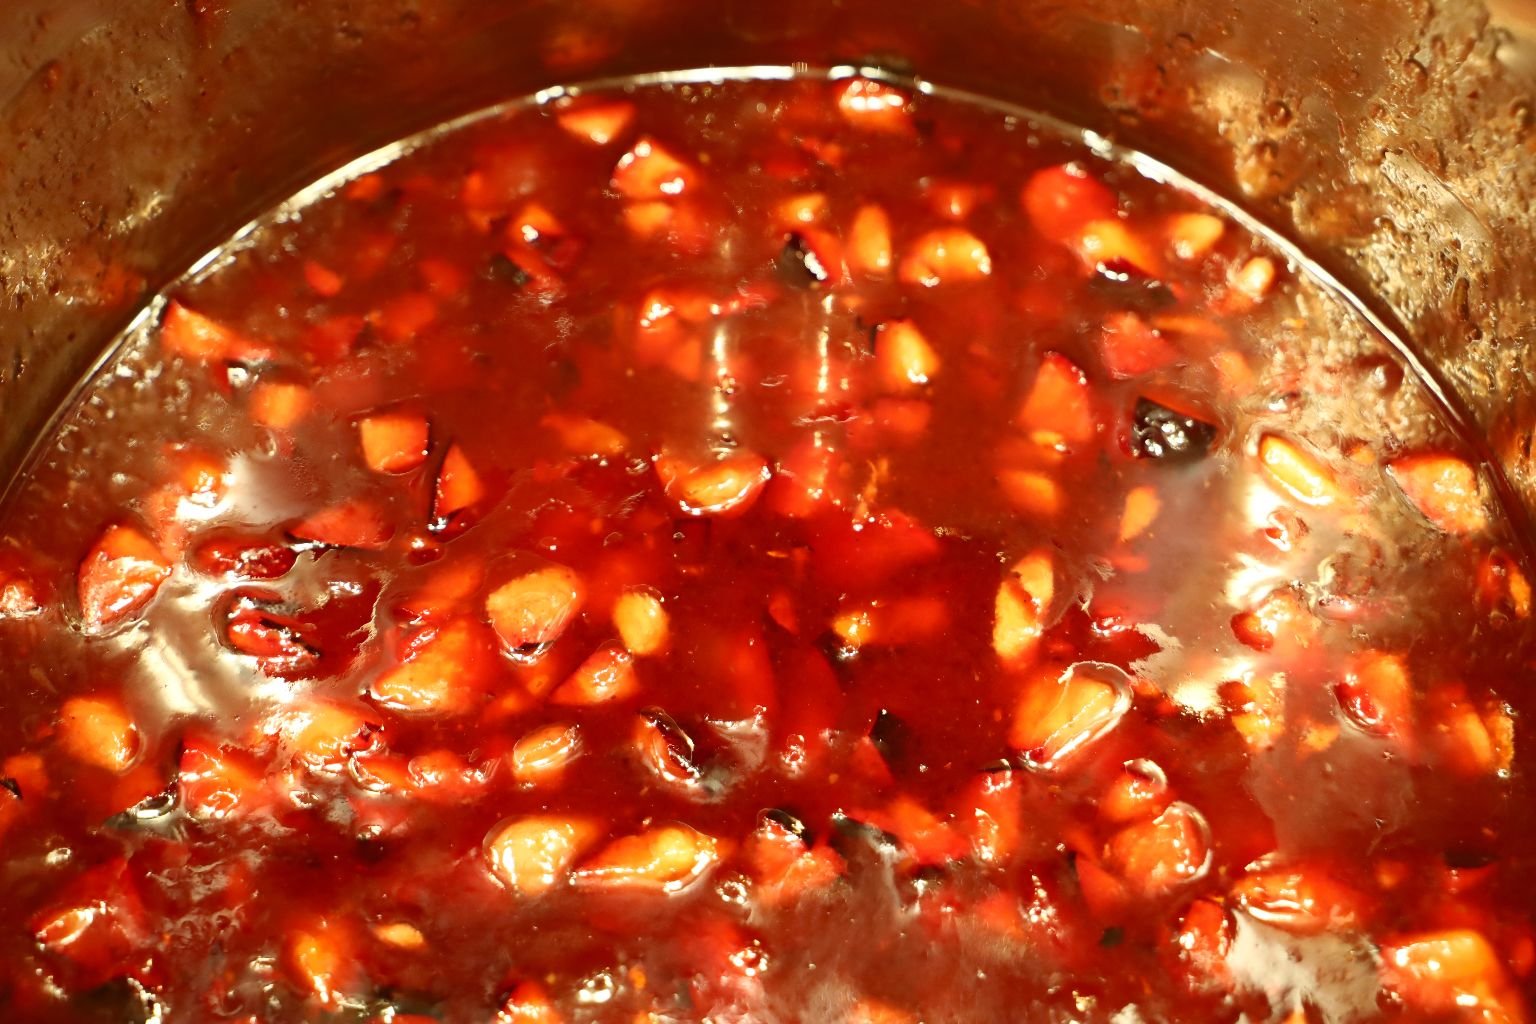
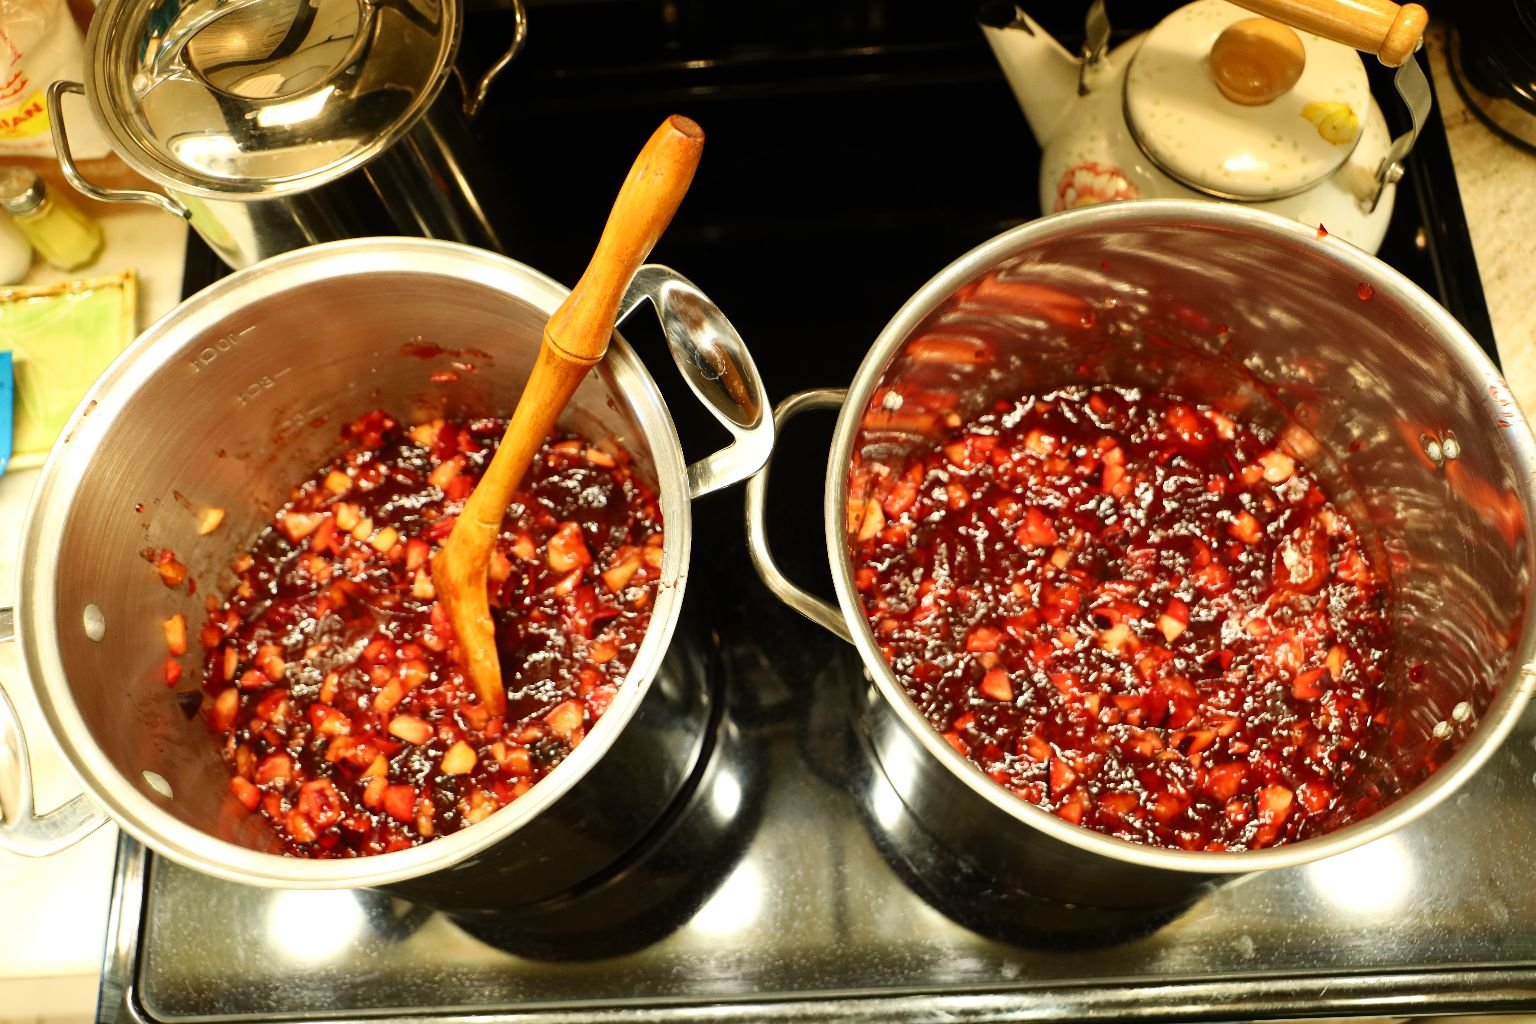
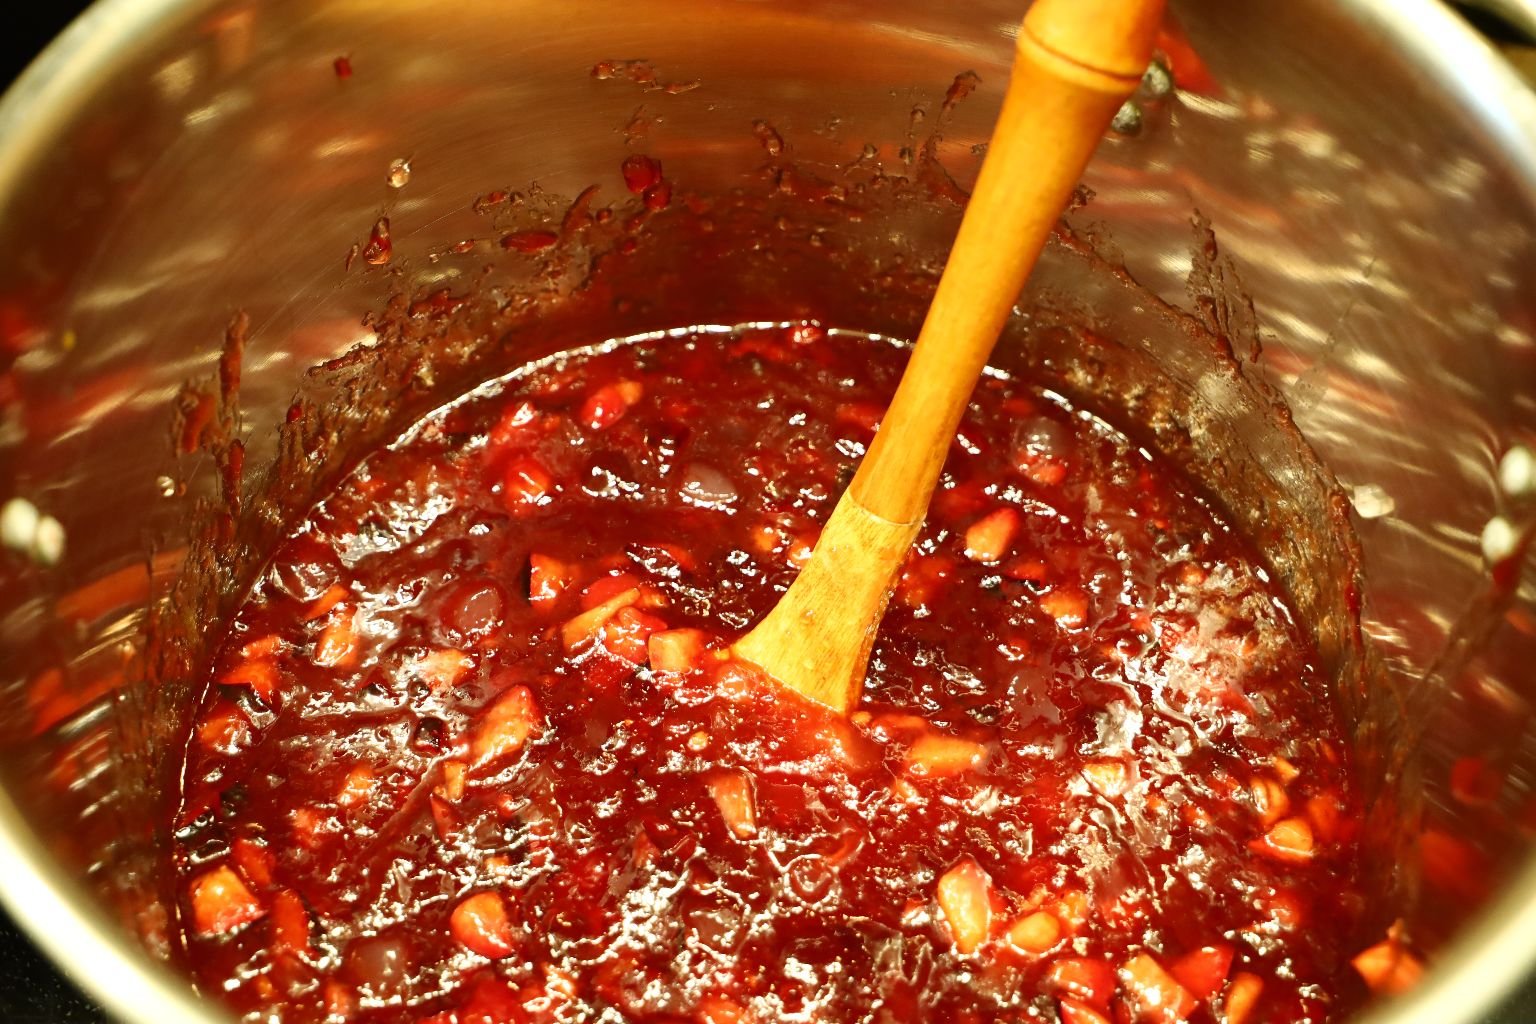
Simmering Away….
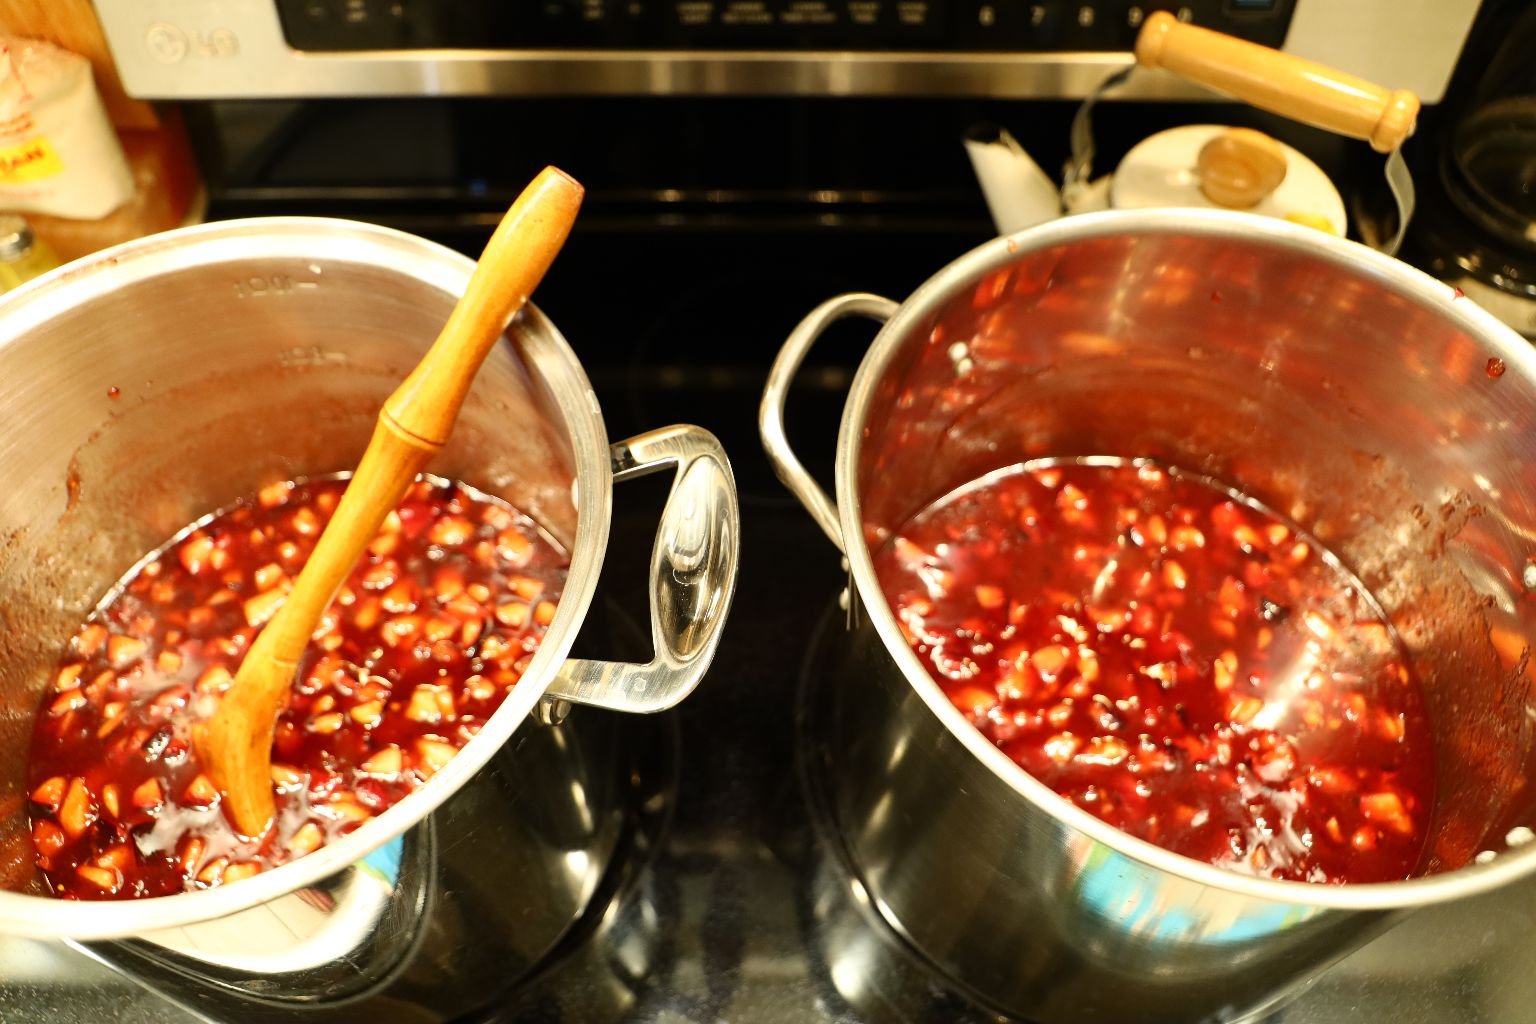
You do want this to thicken up.
The Palm Seeds added extra “water” to the ingredients.
Therefore, just let it simmer on a low boil removing that extra liquid and thickening up for as long as possible.
Me, Stirring Occasionally
———————————————————————–
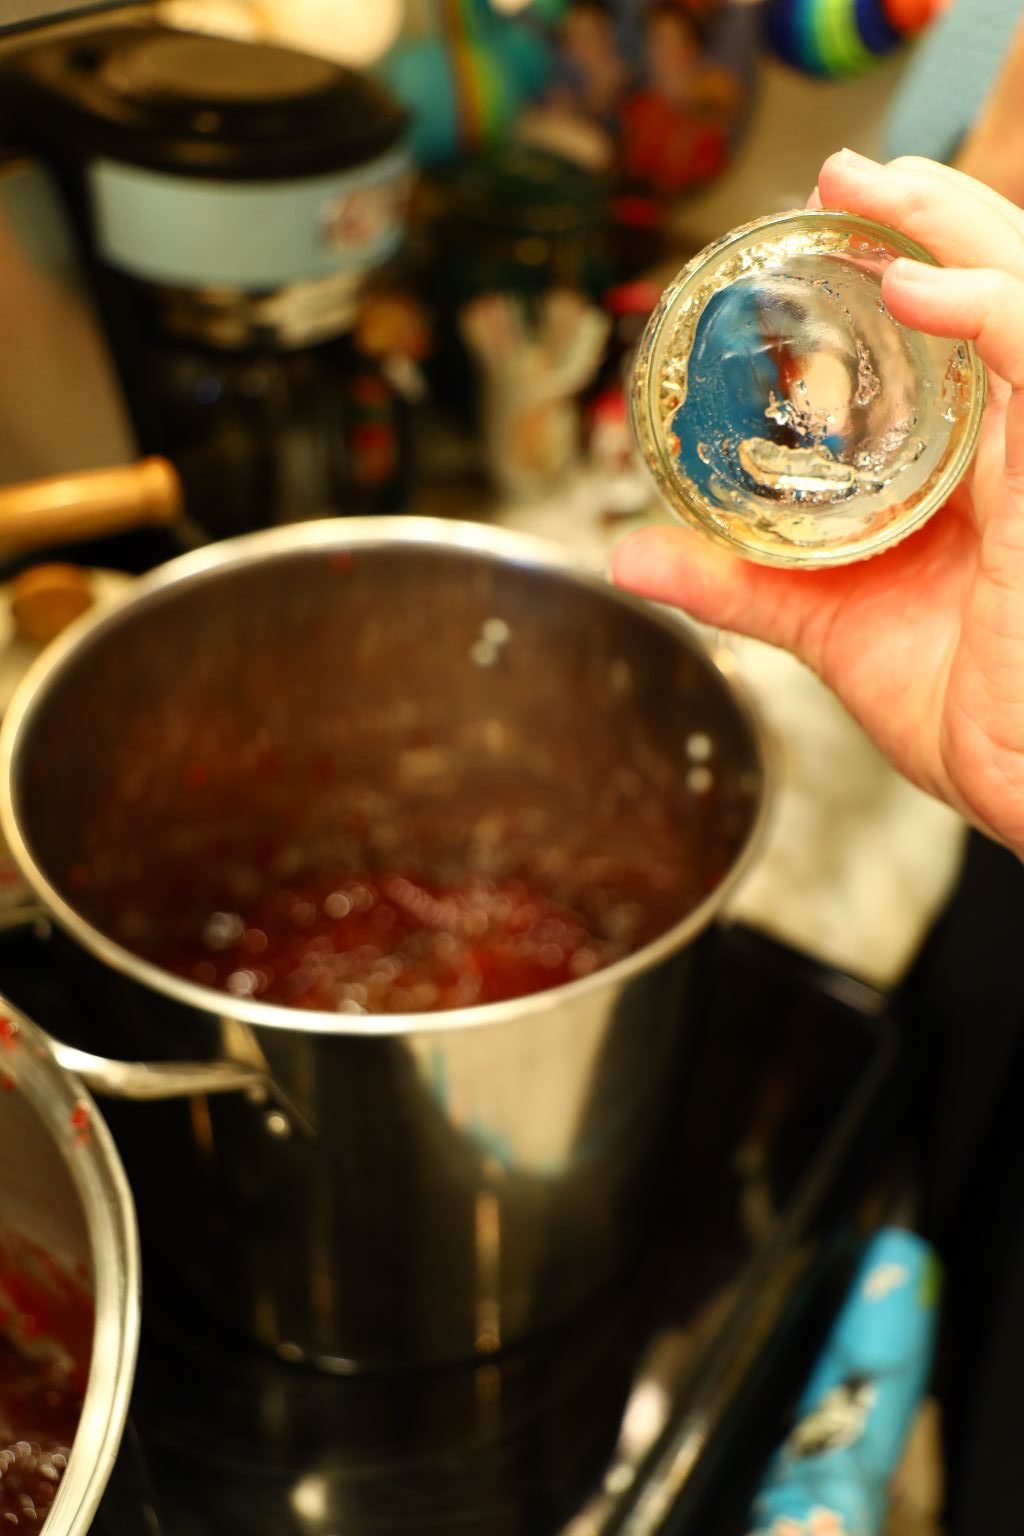
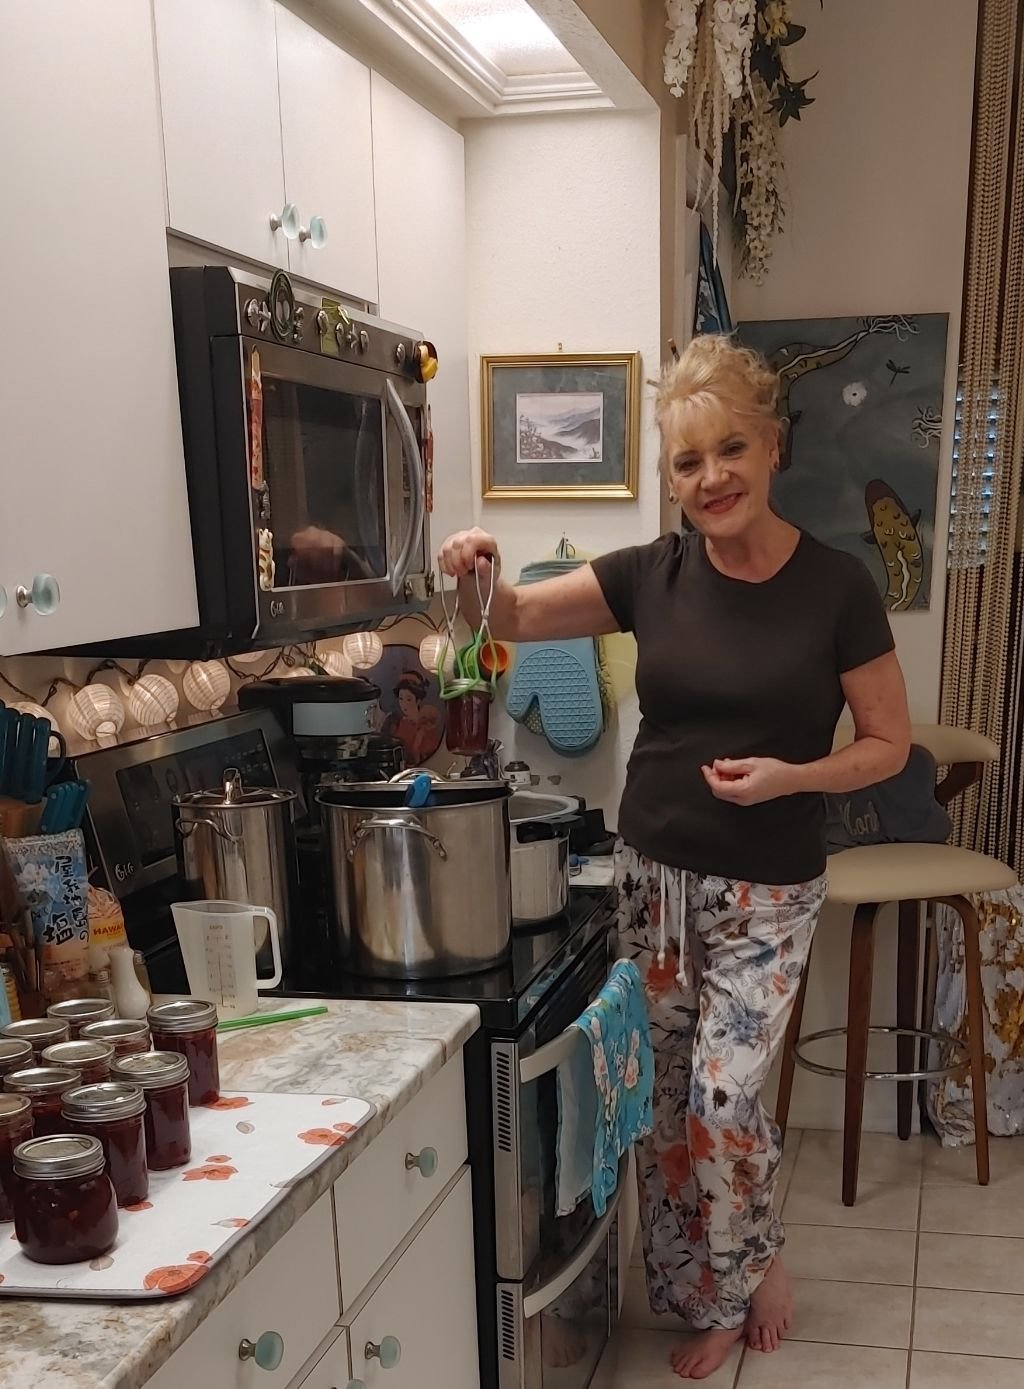
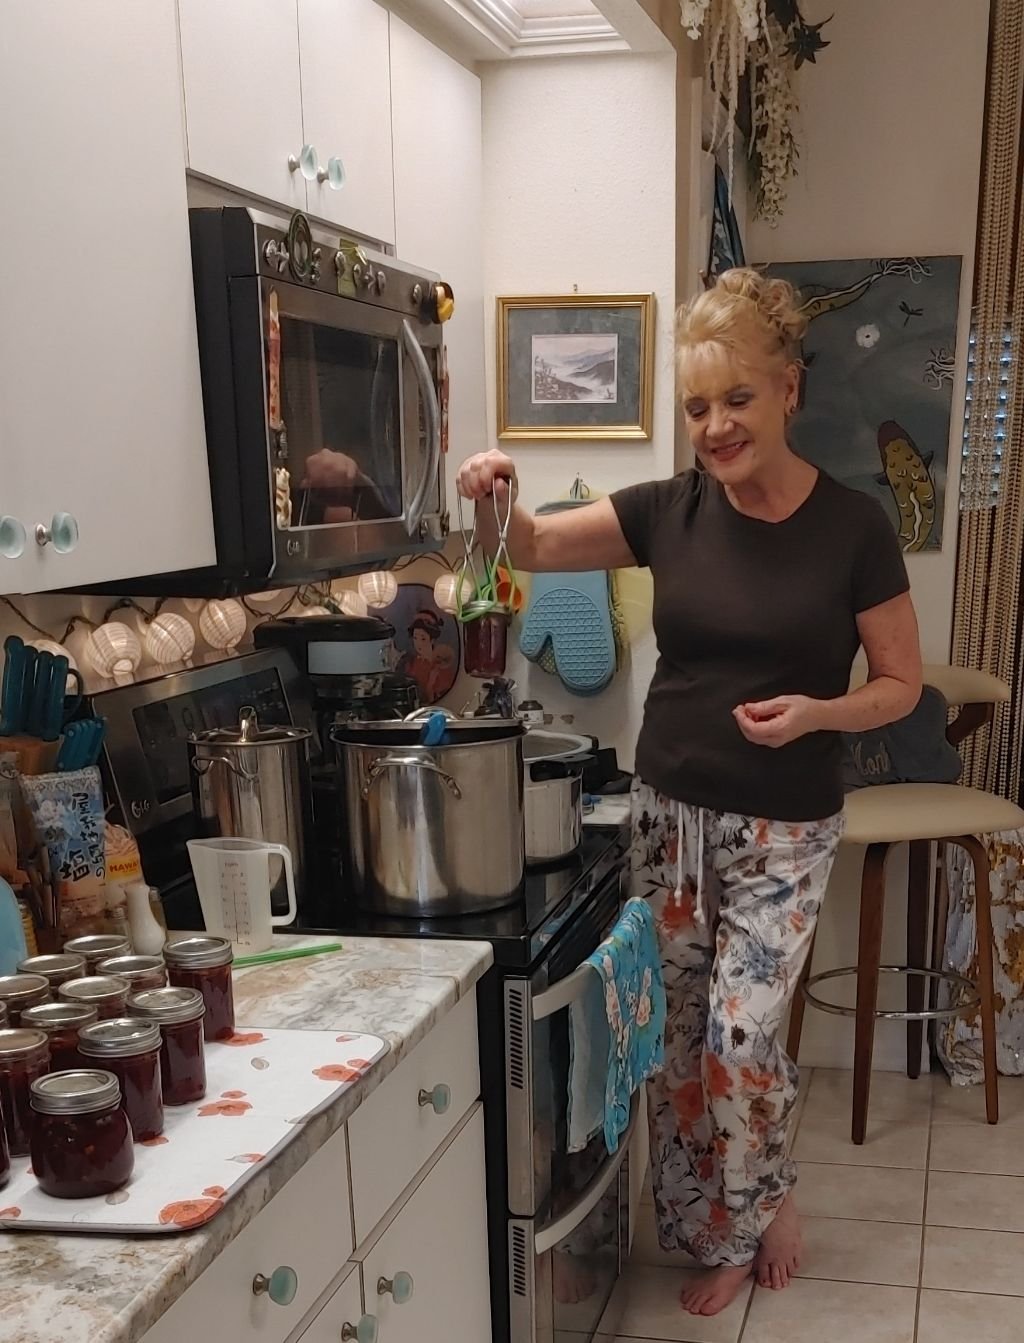
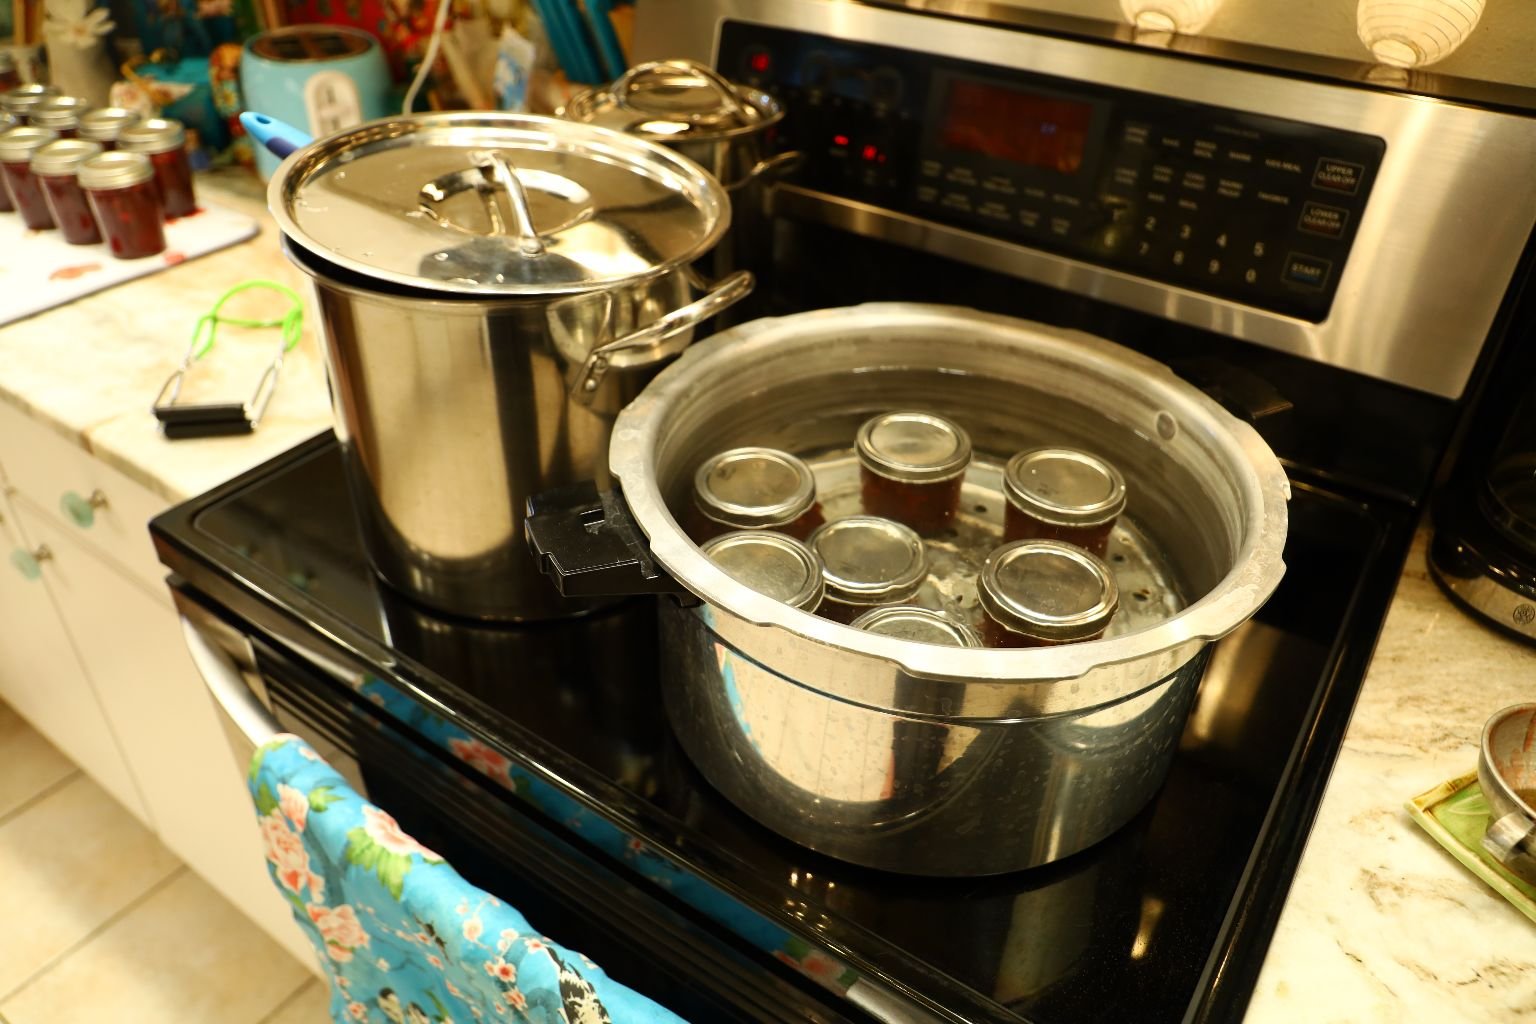
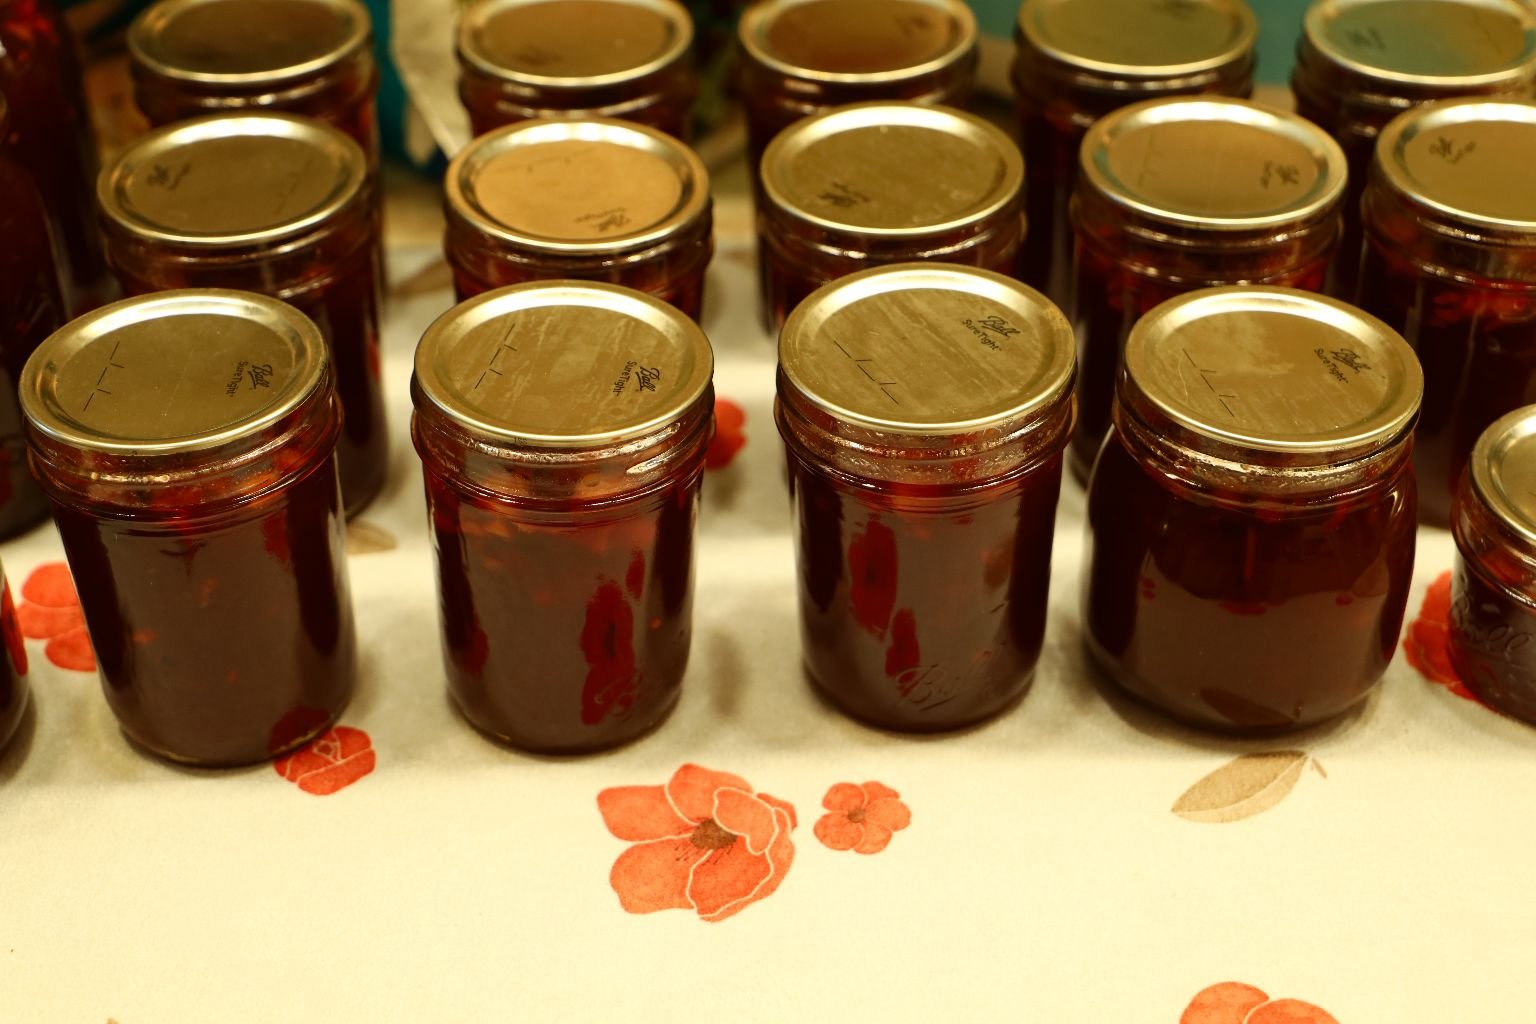
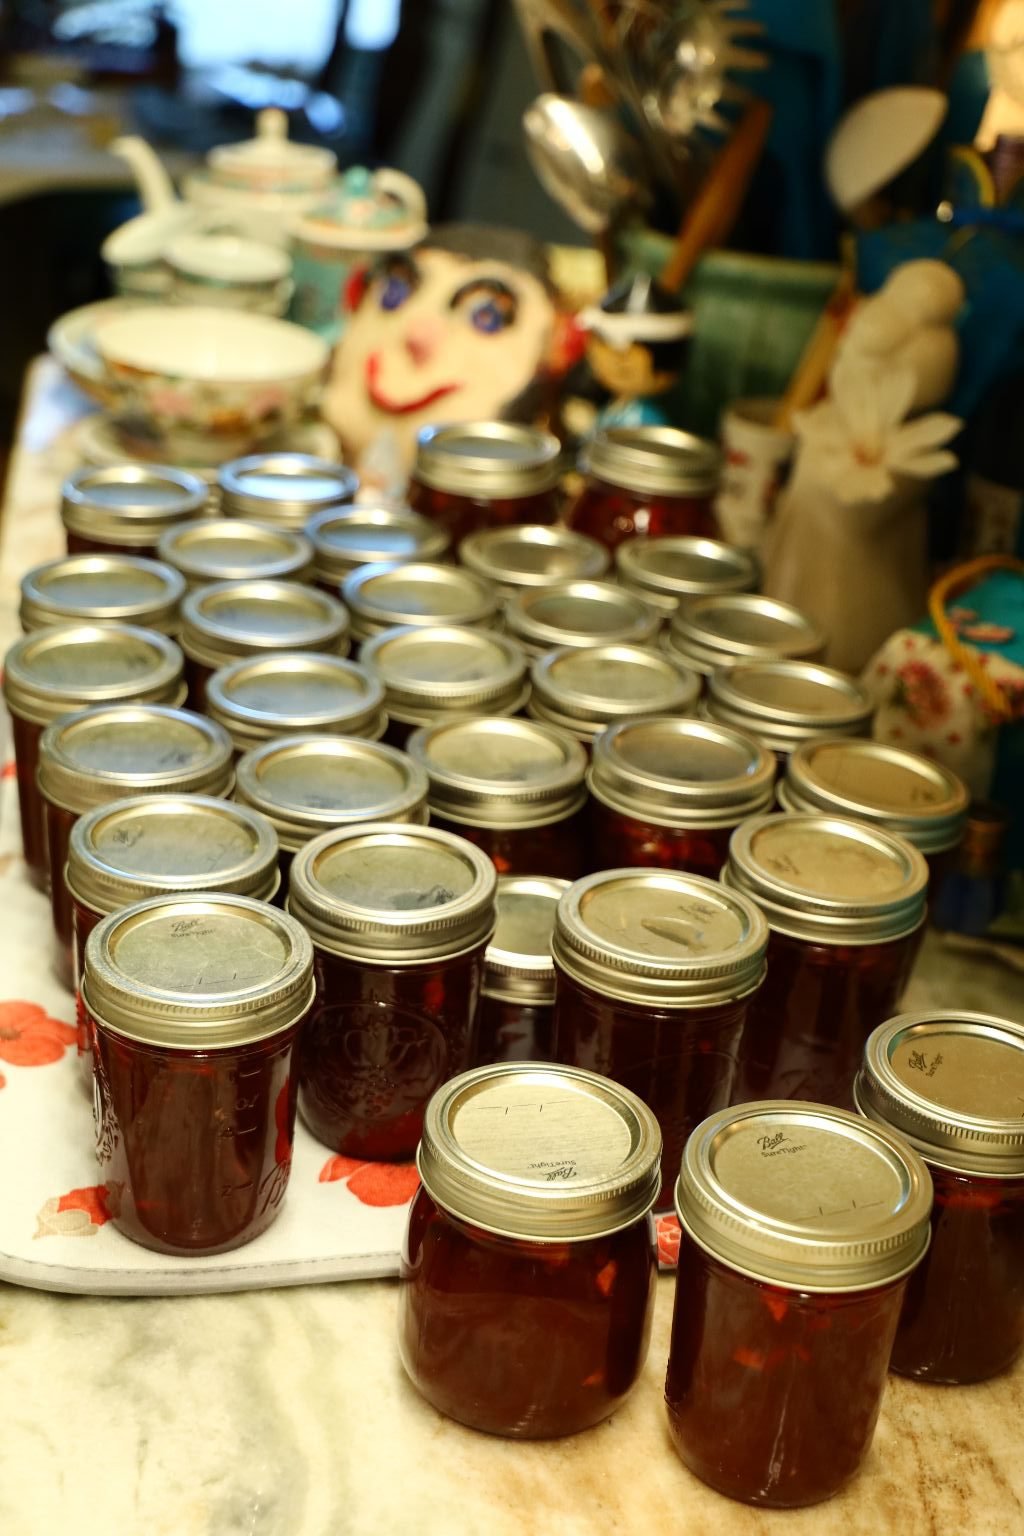
When Thickened, Time to Can….

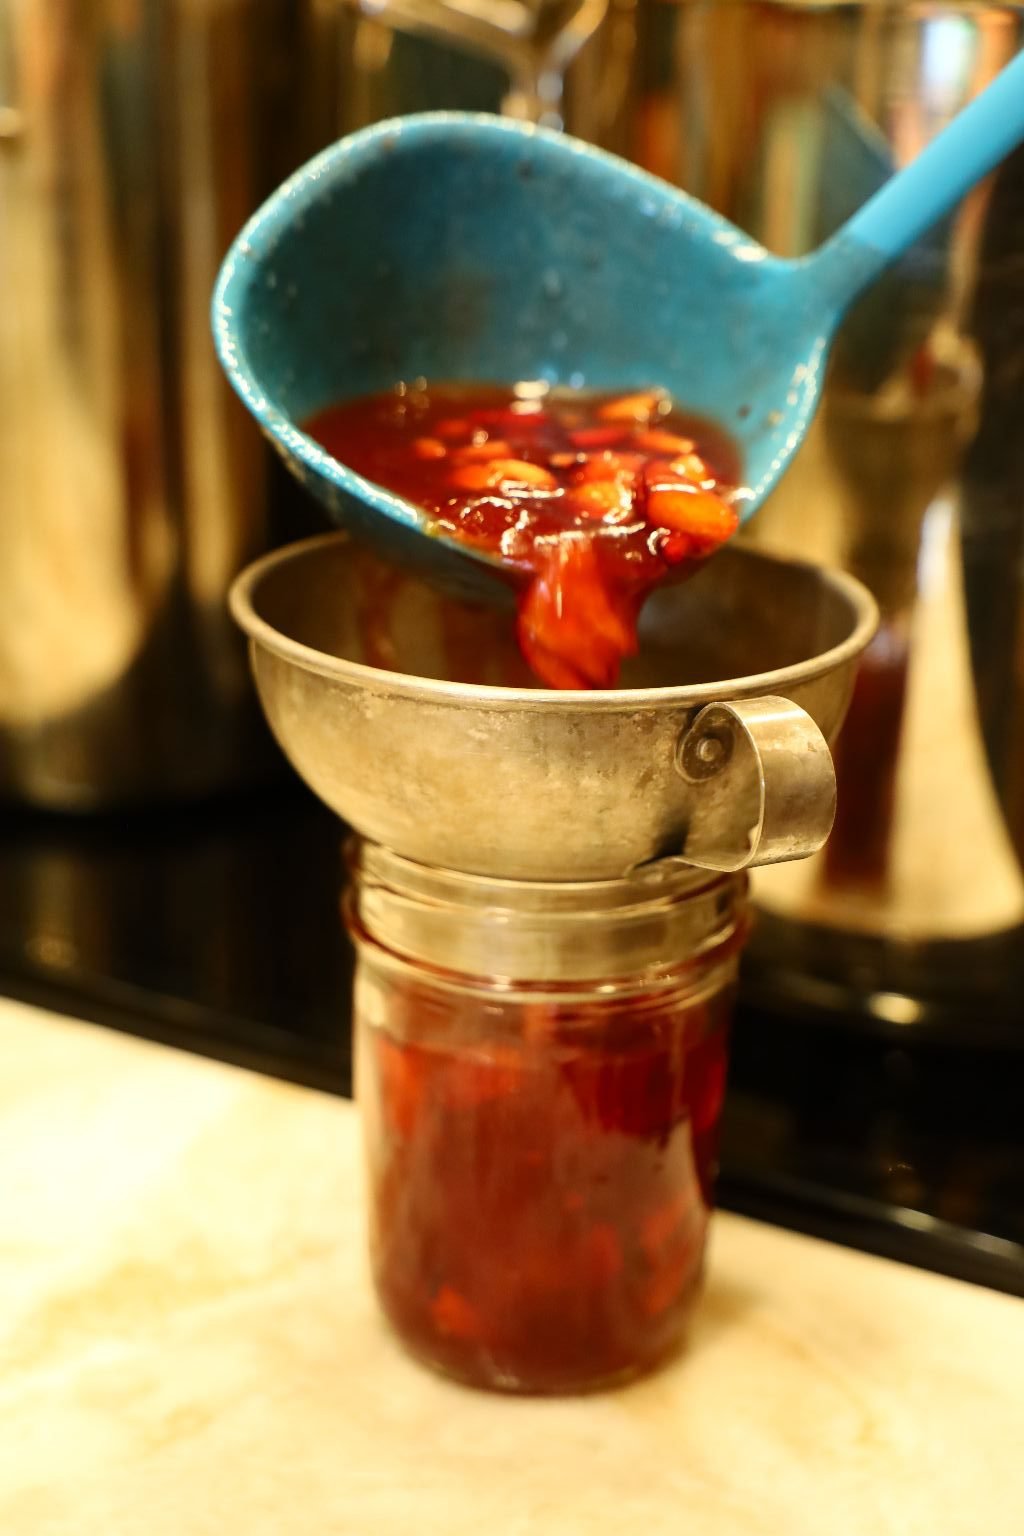
Use your dishwasher to clean and sanitize your jars. When ready, use a funnel and fill the jars with the Jezebel leaving about 1 inch of head space, which is the space from the top of the sauce to the top of the jar. This space is needed to create a vacuum when the jars are in the boiling water.

————————————————————————————————
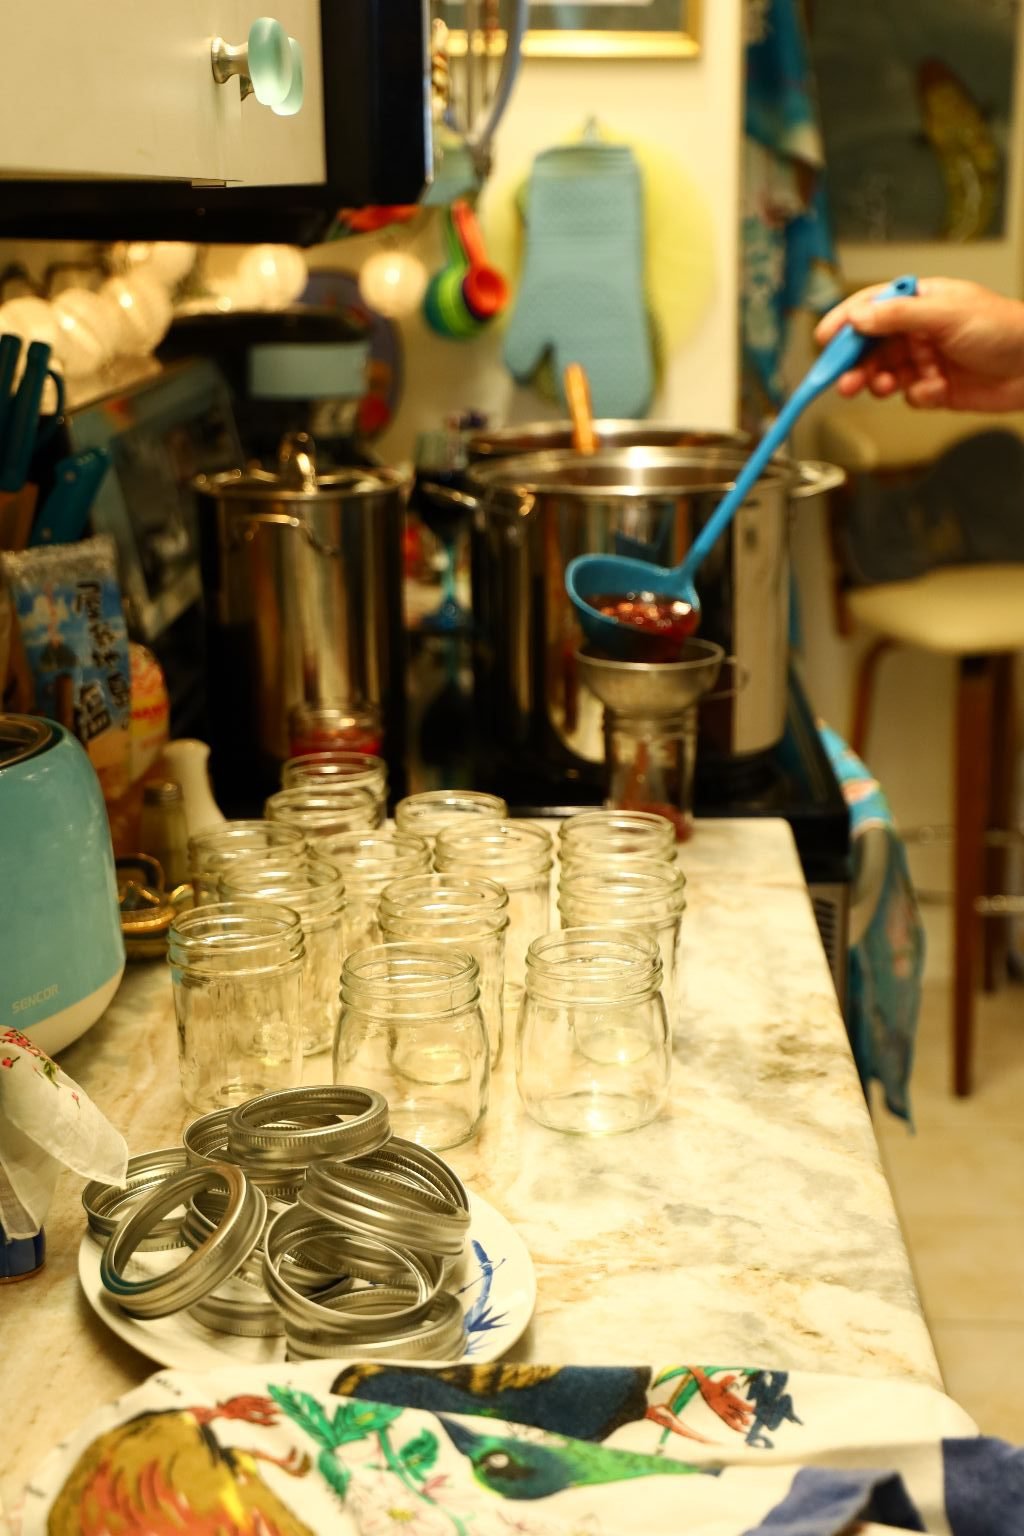
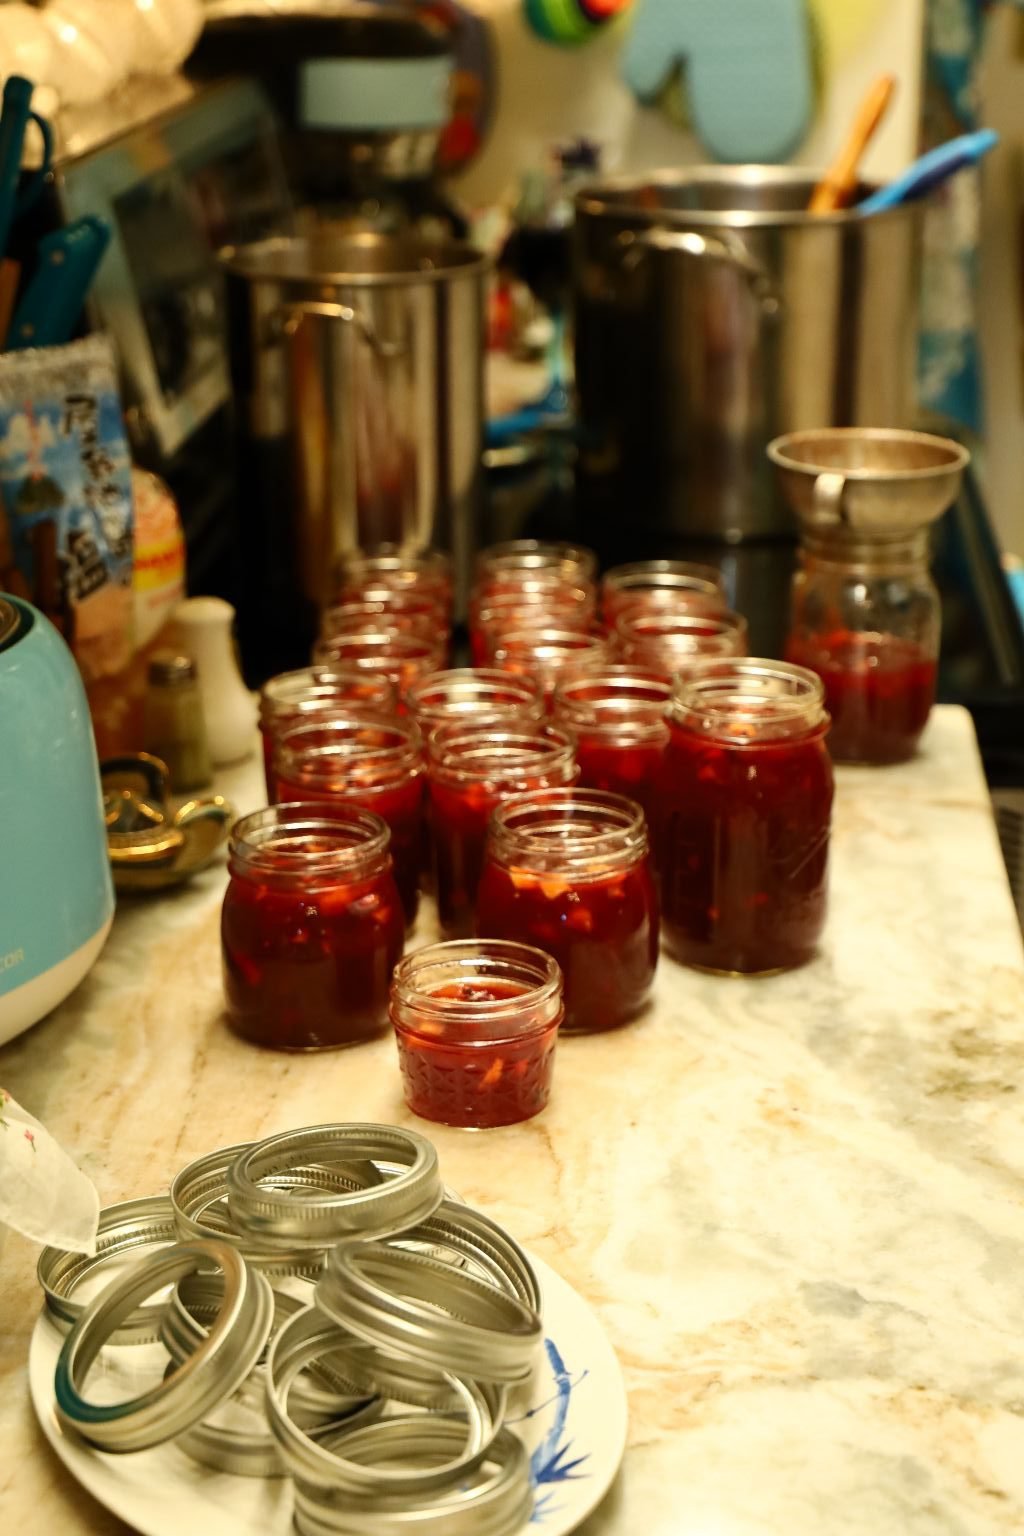
Repeat this step for all the jars until you run out of Jezebel.

————————————————————————————-
————————————————————————————-
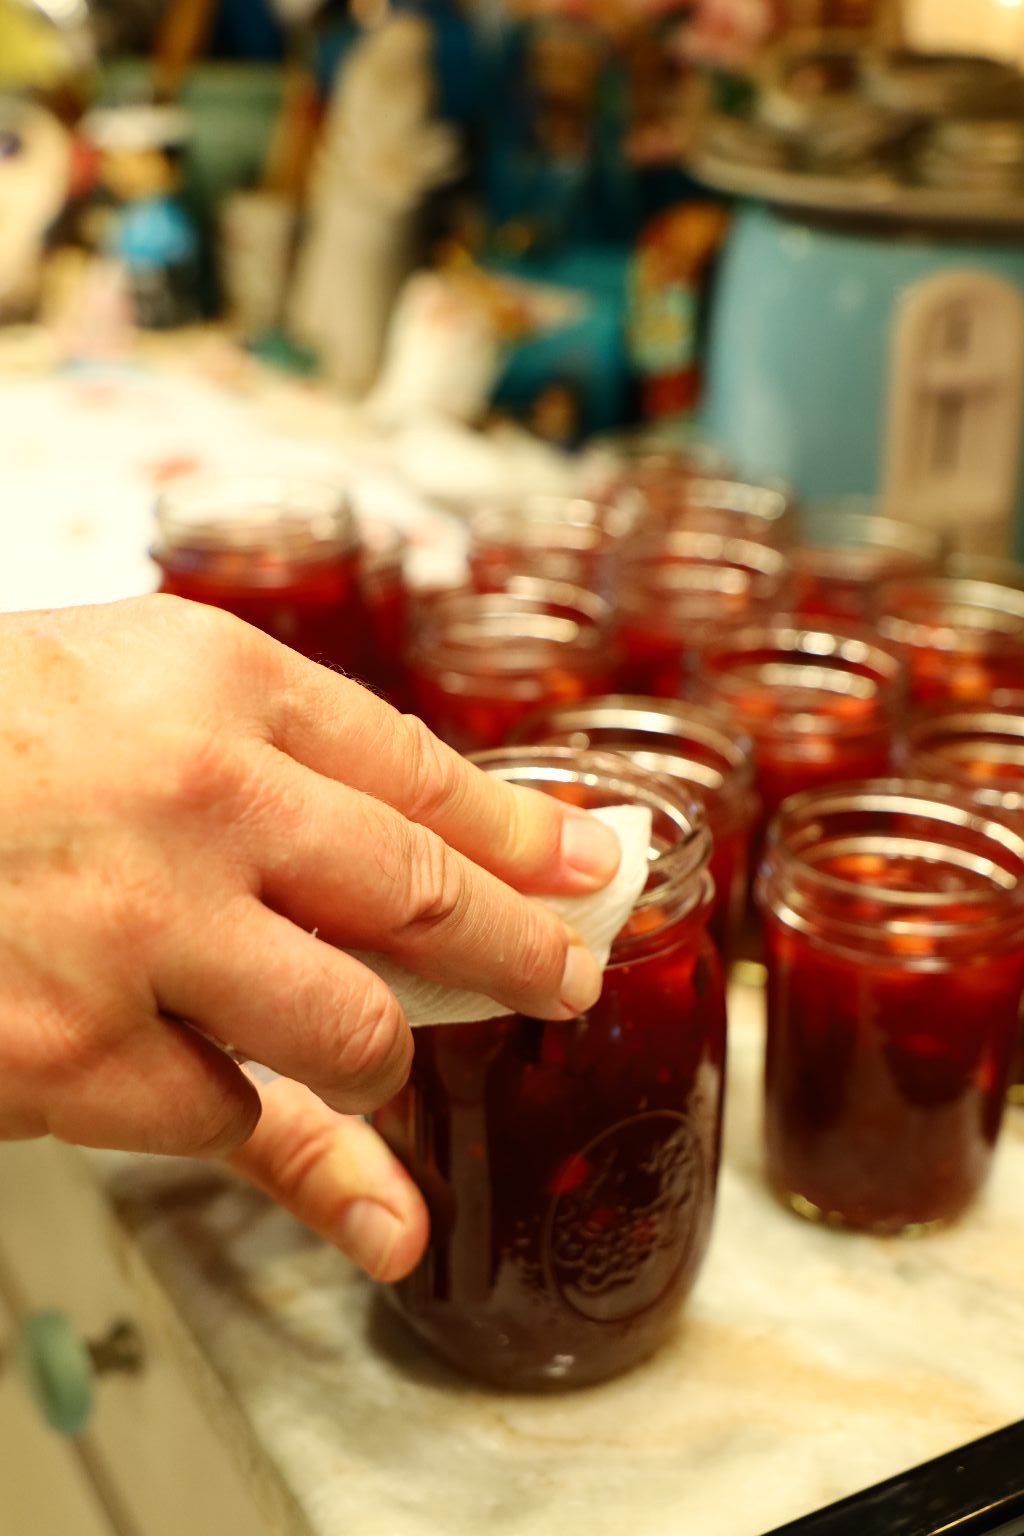
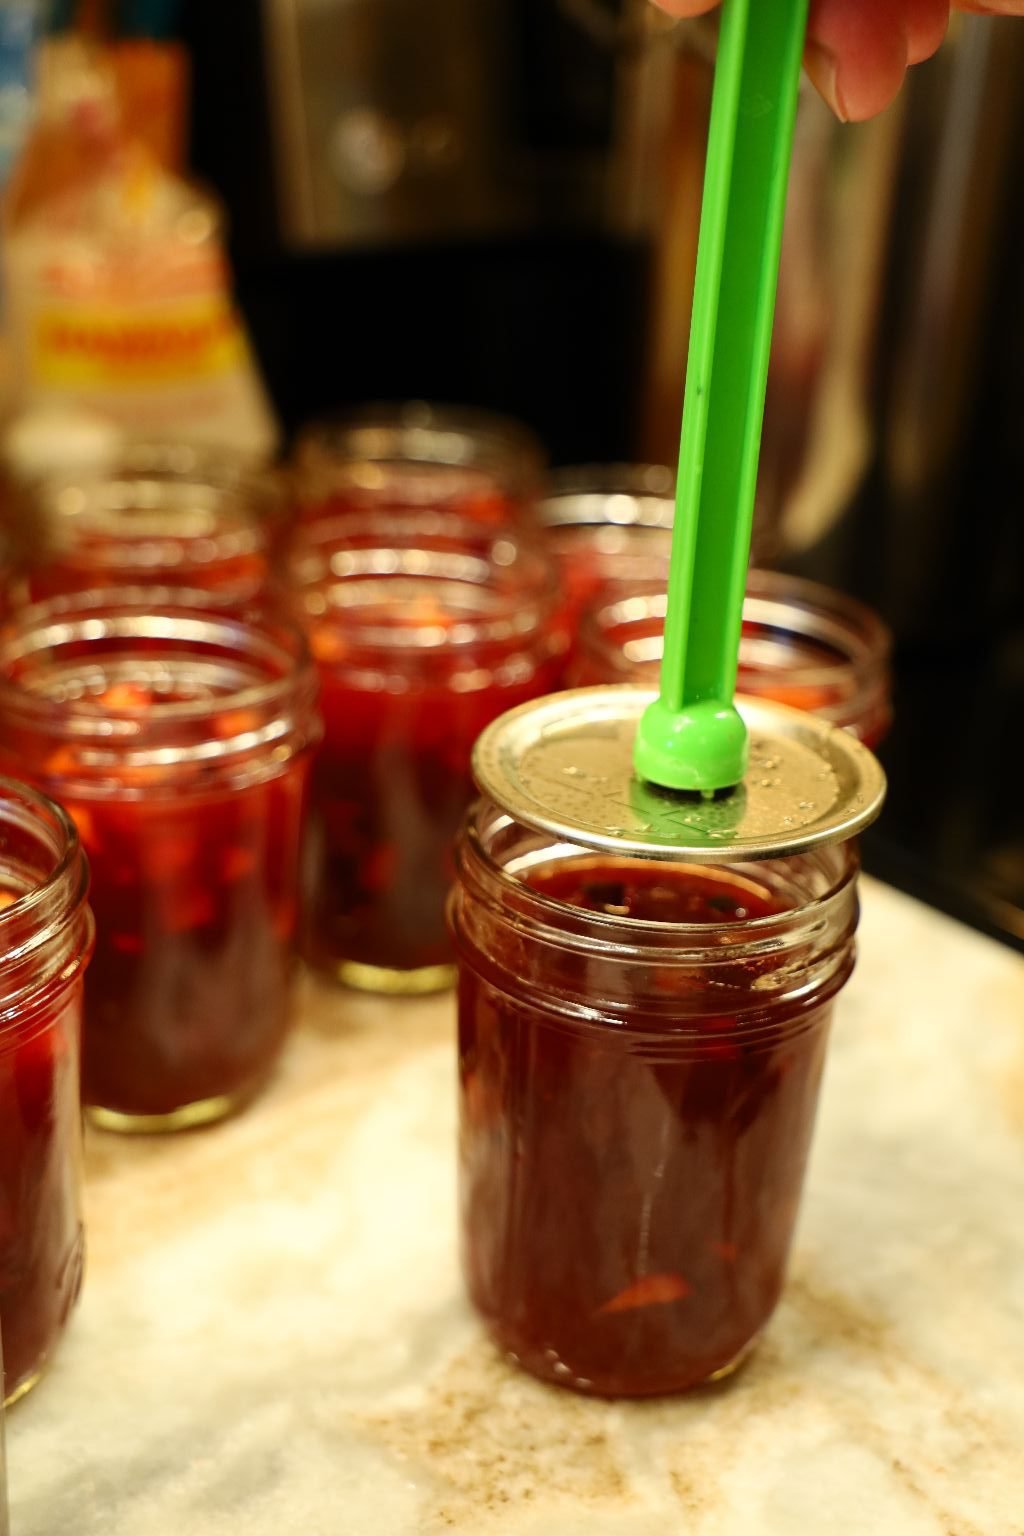
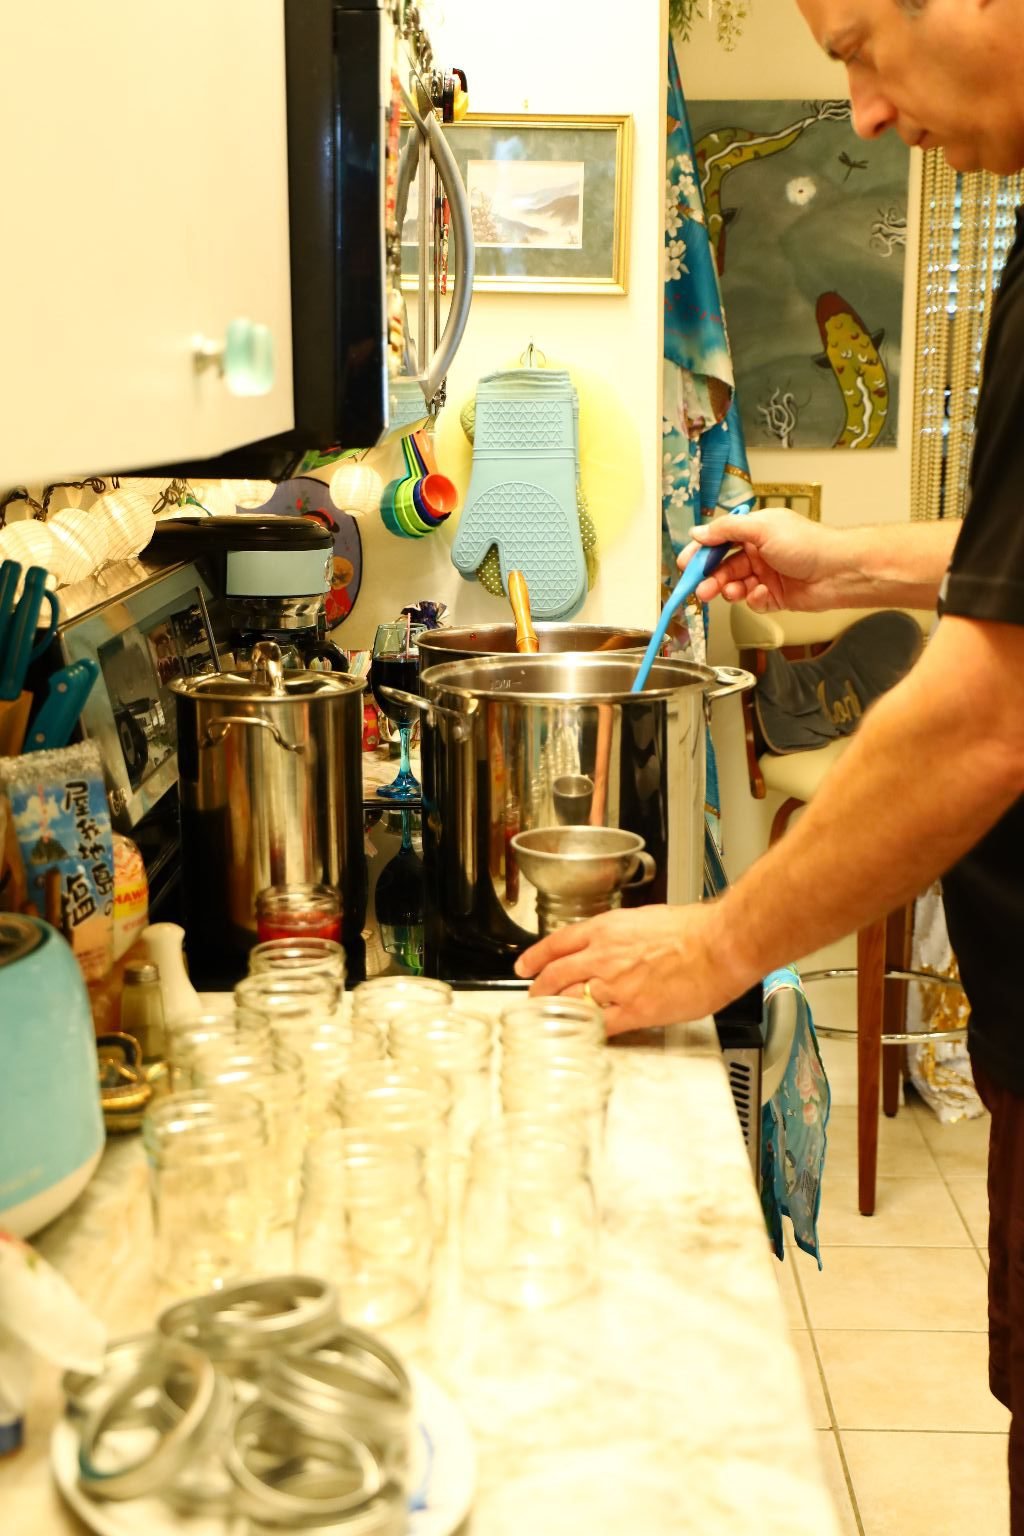
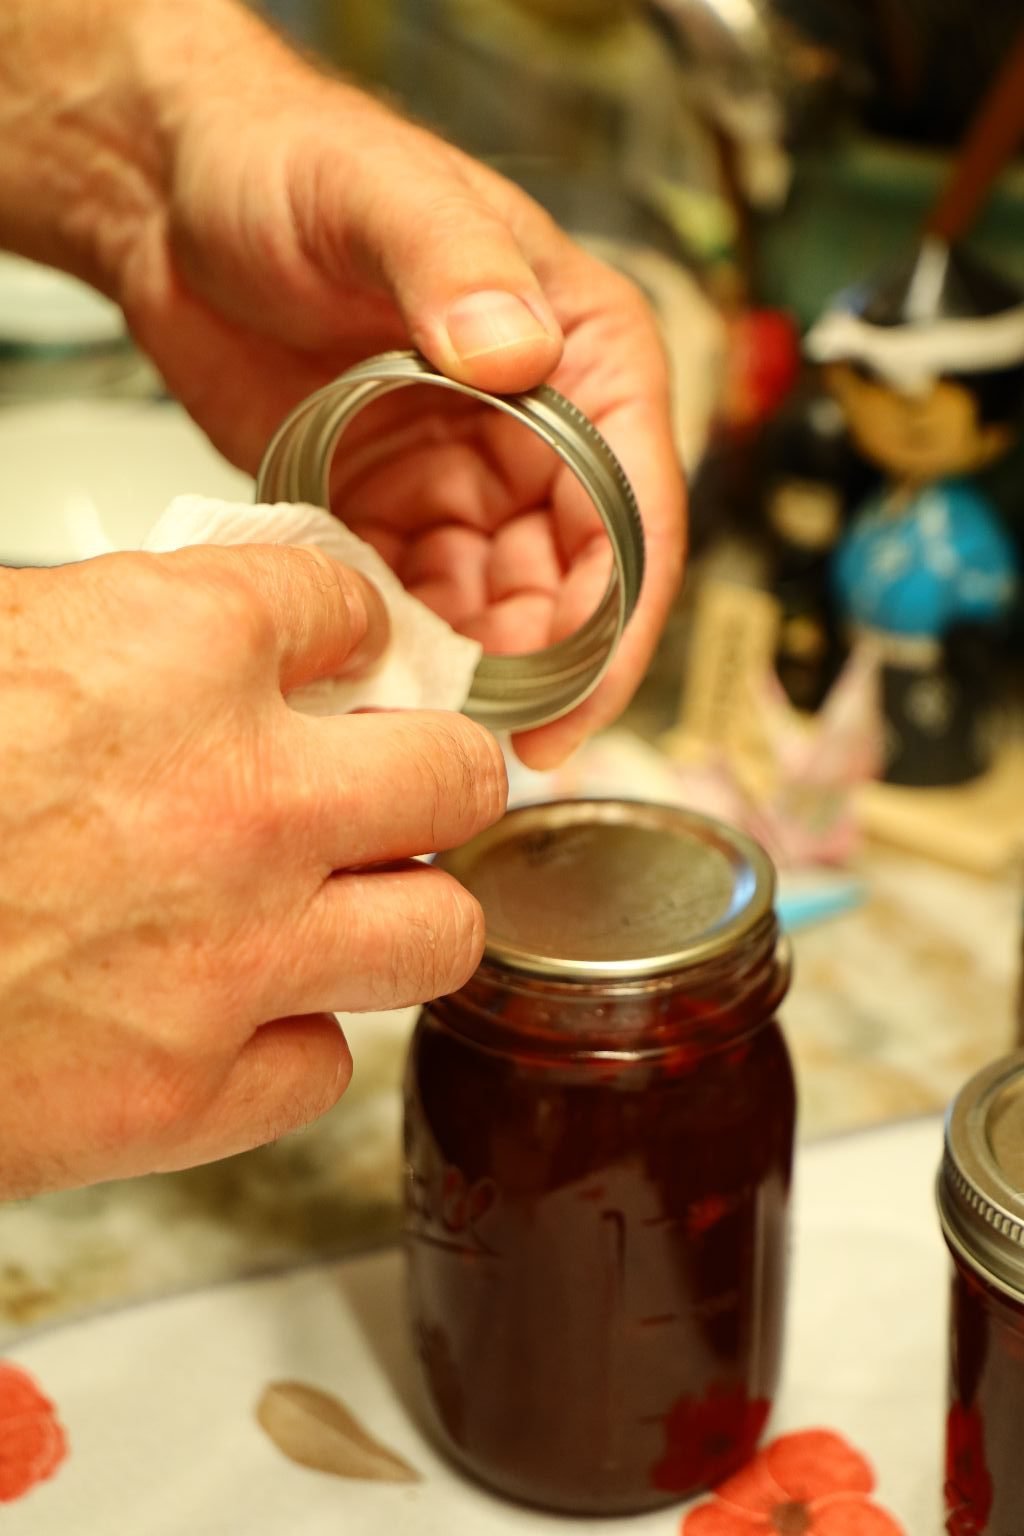
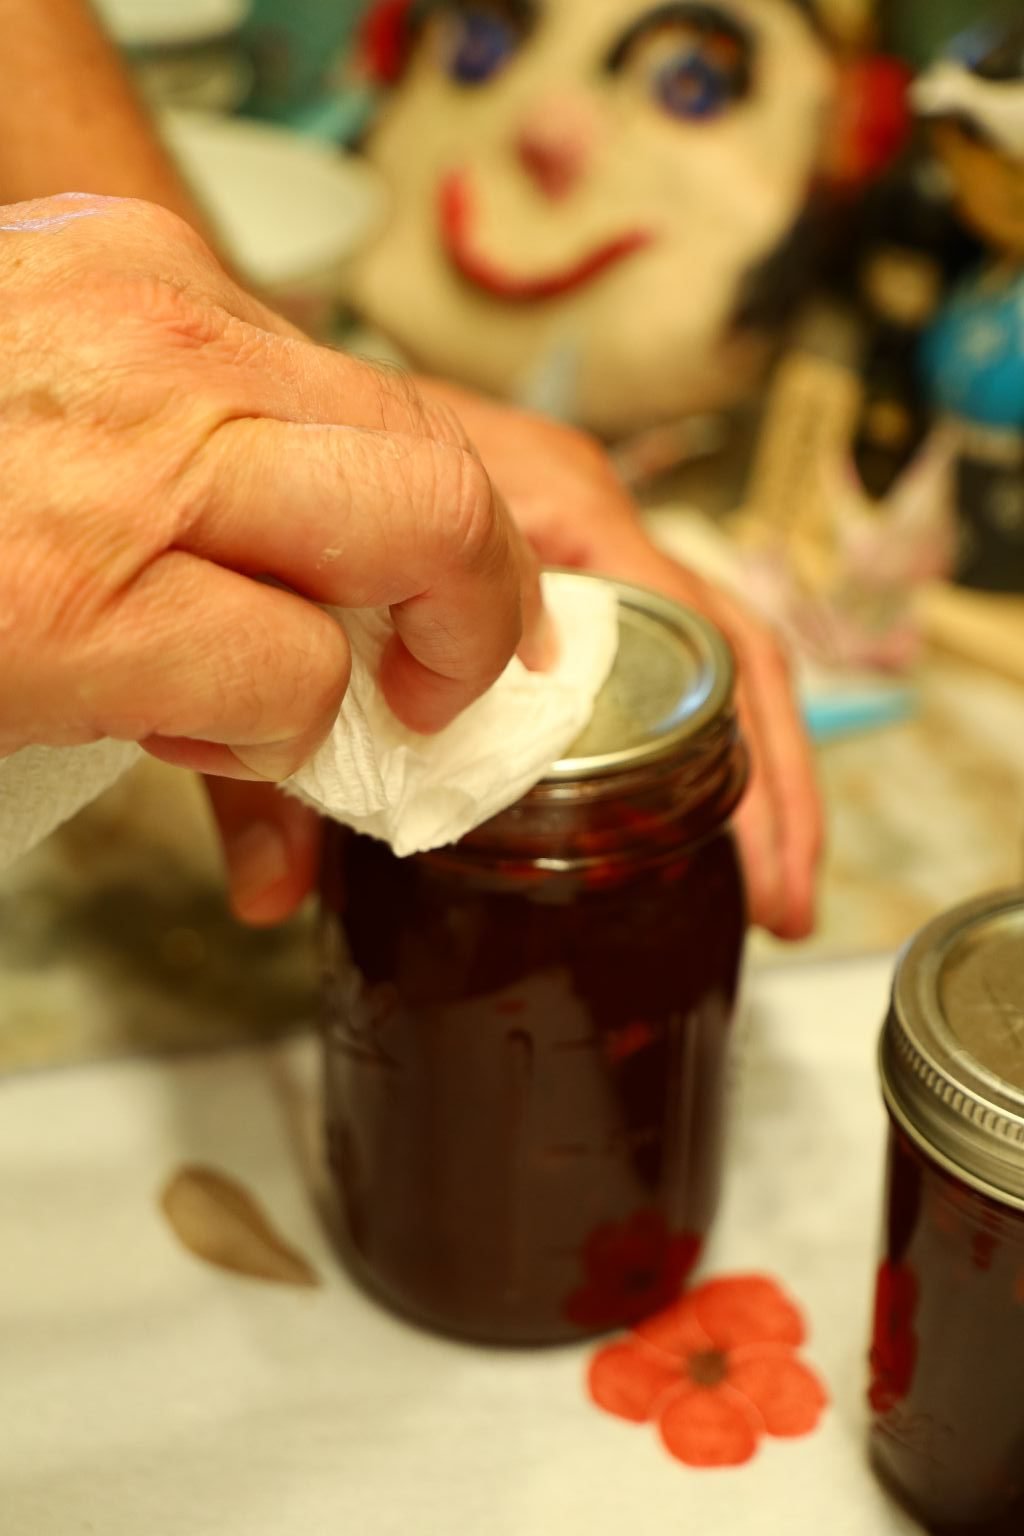
Wipe the top of the jar clean with a wet paper towel. This will create a good seal between the lid and the jar. Place your lids into a pot of almost boiling water to begin to soften the rubber seal. After the lids have been in the almost boiling water for about 5 min. they are ready to be placed onto the jar. Use a magnetic rod to retrieve the lids and place the lid on top of the jar. This also keeps everything sanitary.
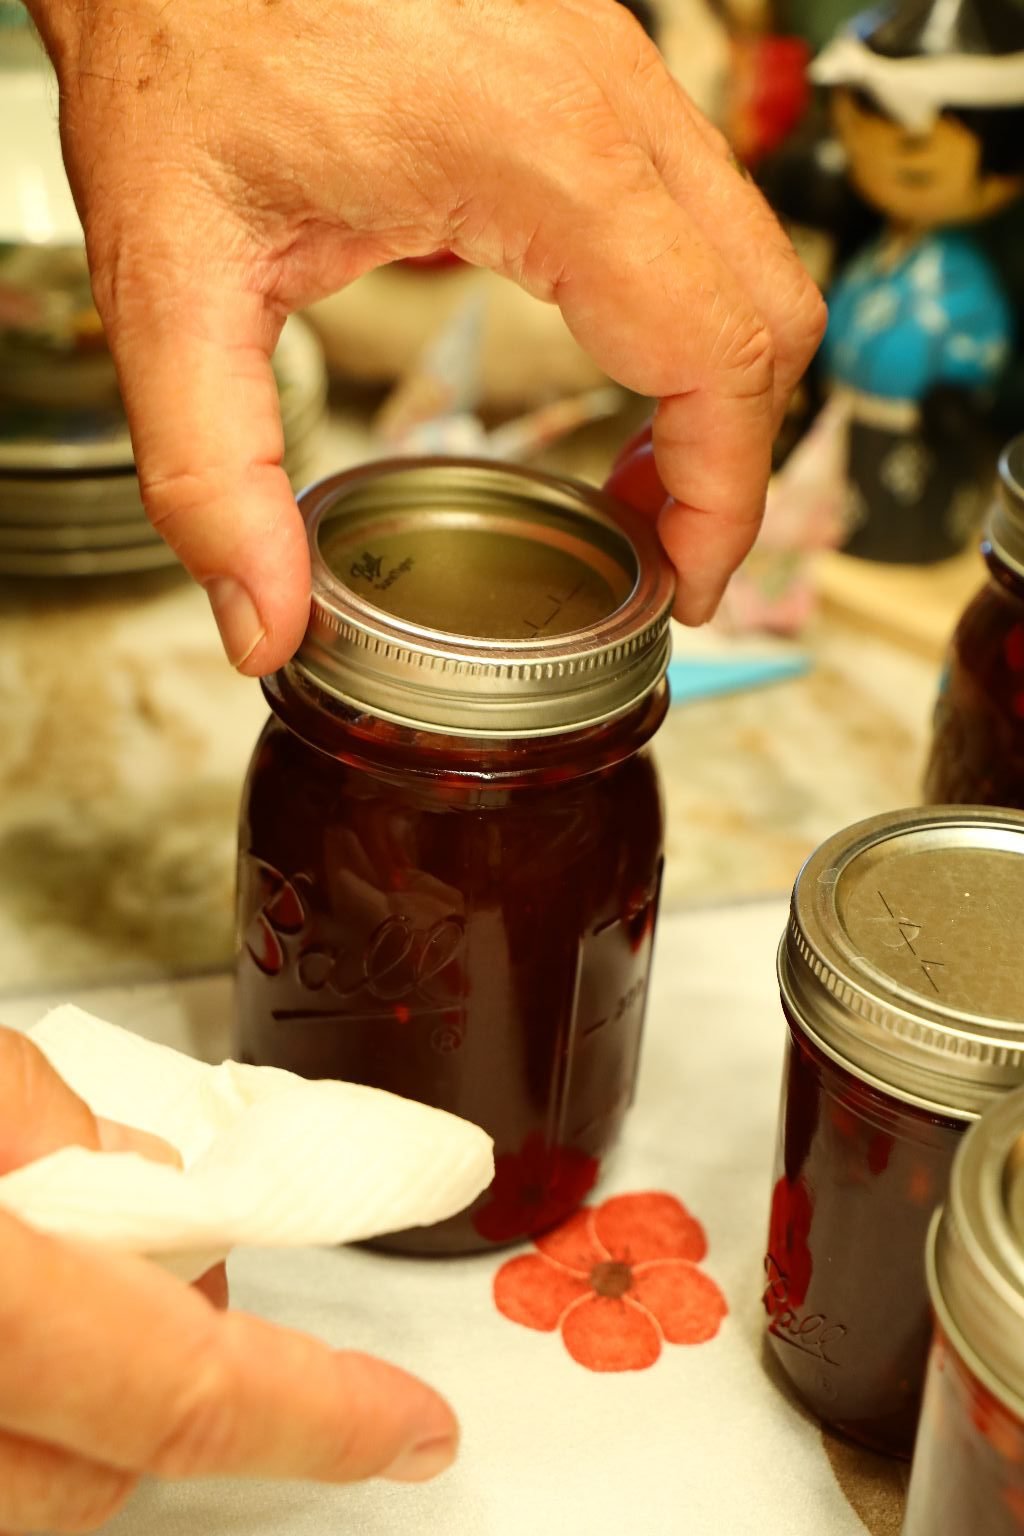
Place the ring around the jar just snug and not tight which will allow the air to escape creating a vacuum.

Place the closed jars under water where you should see bubbles leaving the jars.
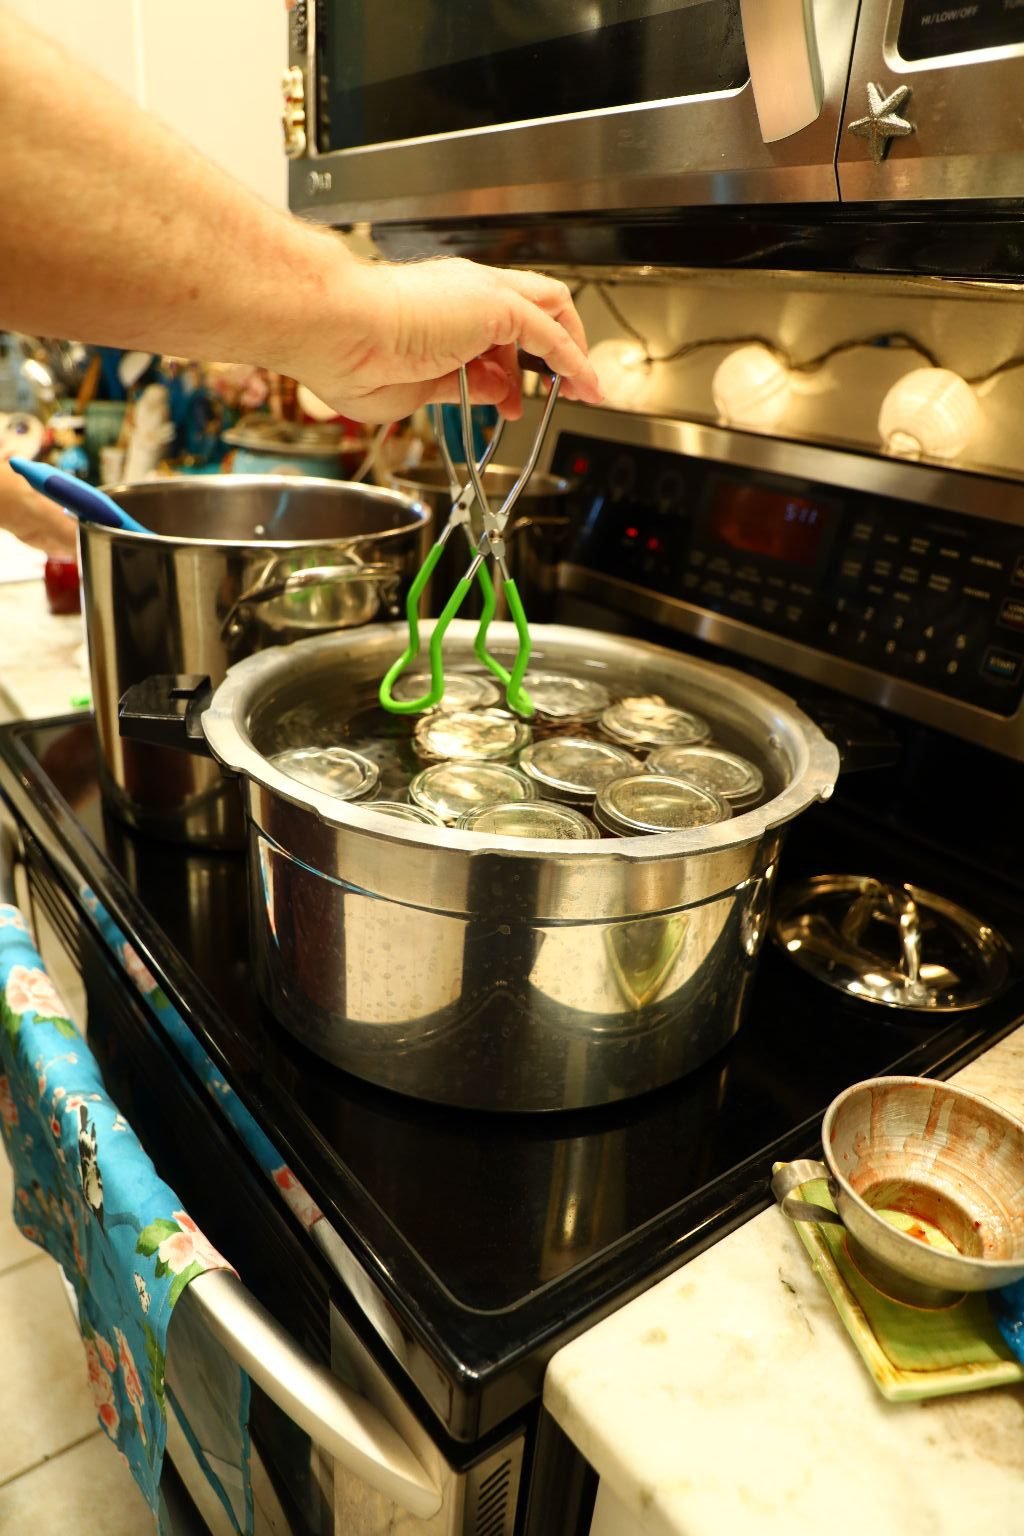
Boil the jars for 15 min. This is the canning process.

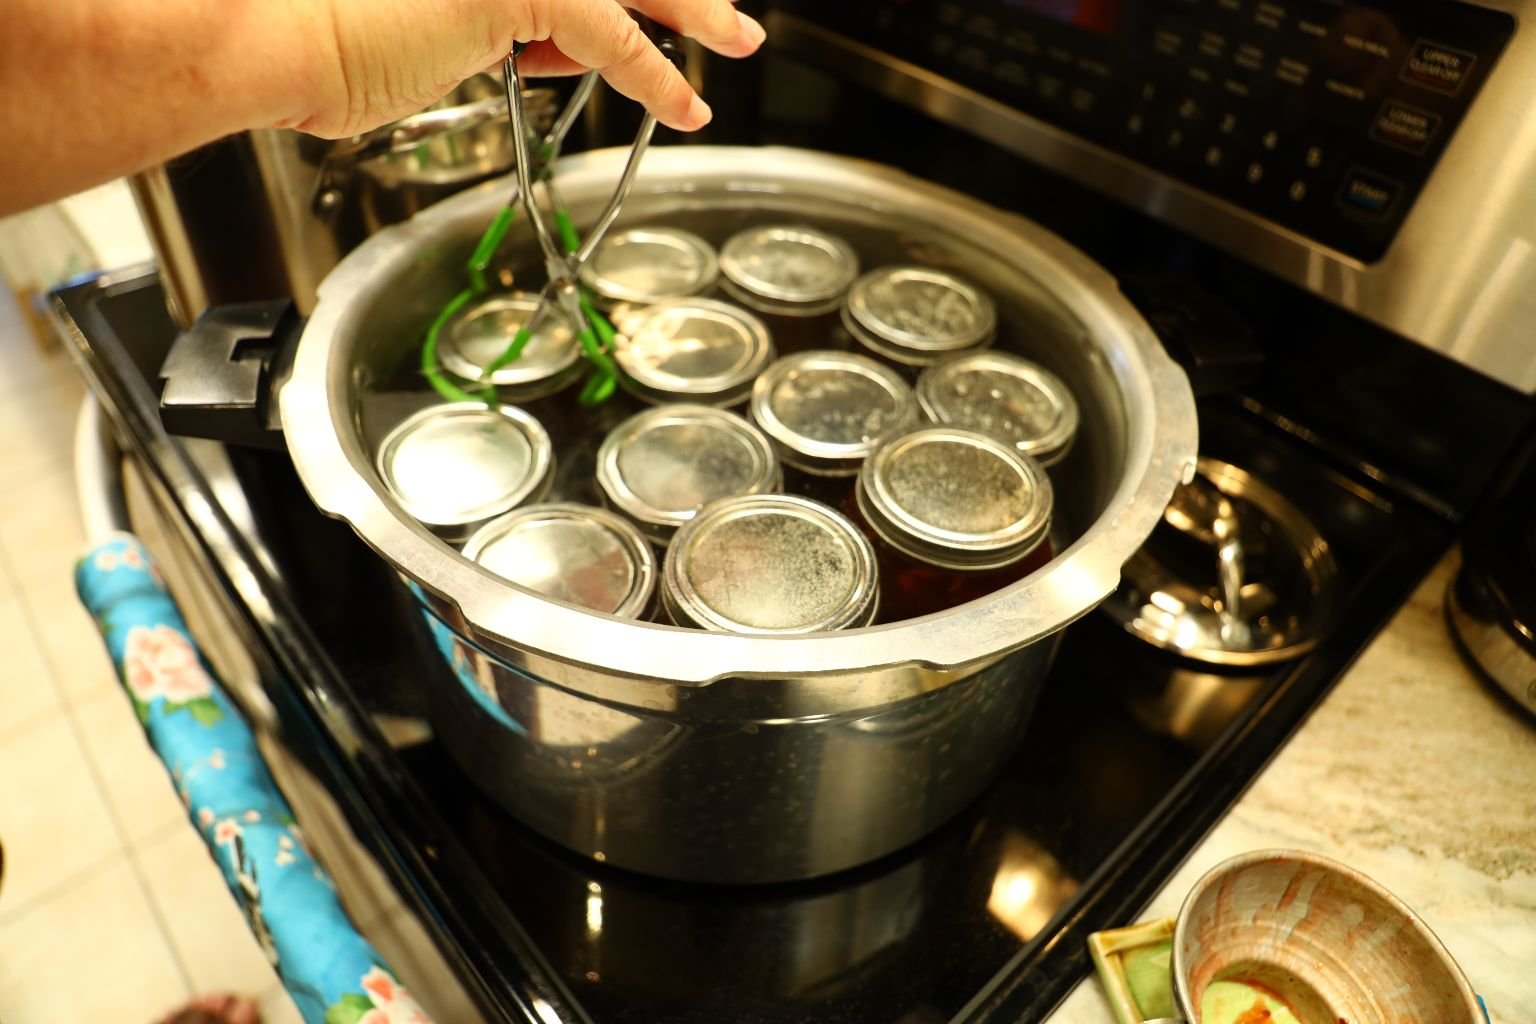
When 15 min. are done, remove the jars with the tongs and place on a hand towel to cool.
You should begin to hear the jars pop as the vacuum pulls the lid down. Some jars don’t have a button top and will not pop, but will be in the down position. Any jar that didn’t pop, or any lid not in the down position needs to be re-done. It could be that the jar didn’t have a good seal, or there isn’t enough head space. Use a new lid, check the seal by wiping the top of the jar, and remove a touch of the sauce. Place the jar back under water and boil again for another 15 min. until sealed.
——————————————————————————
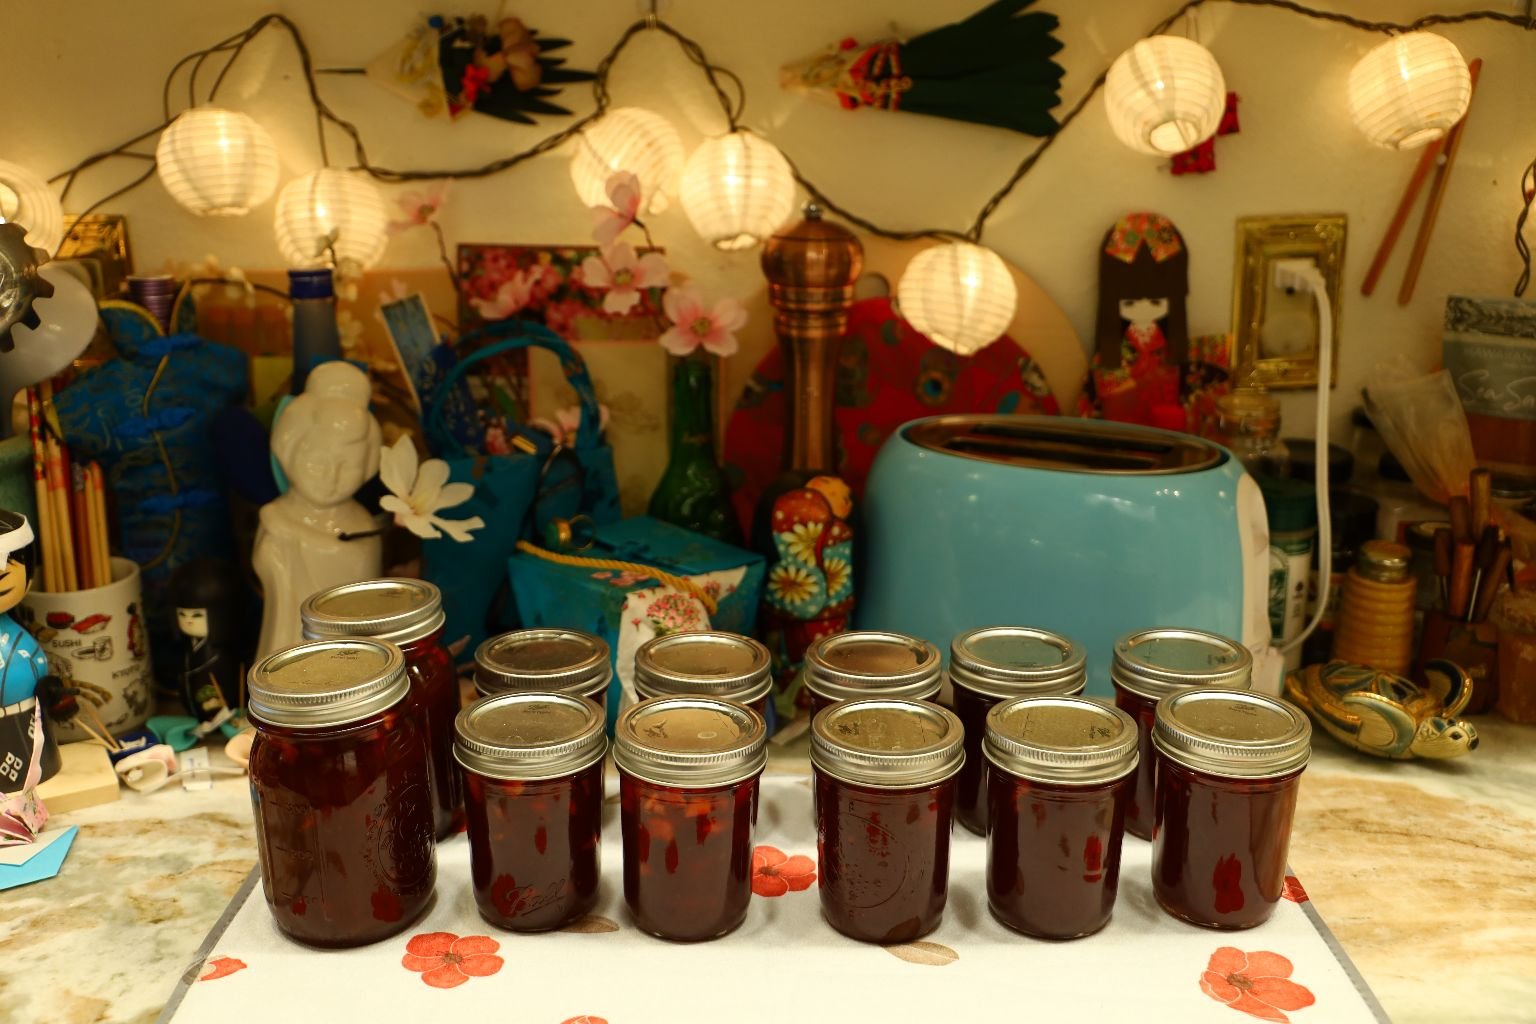
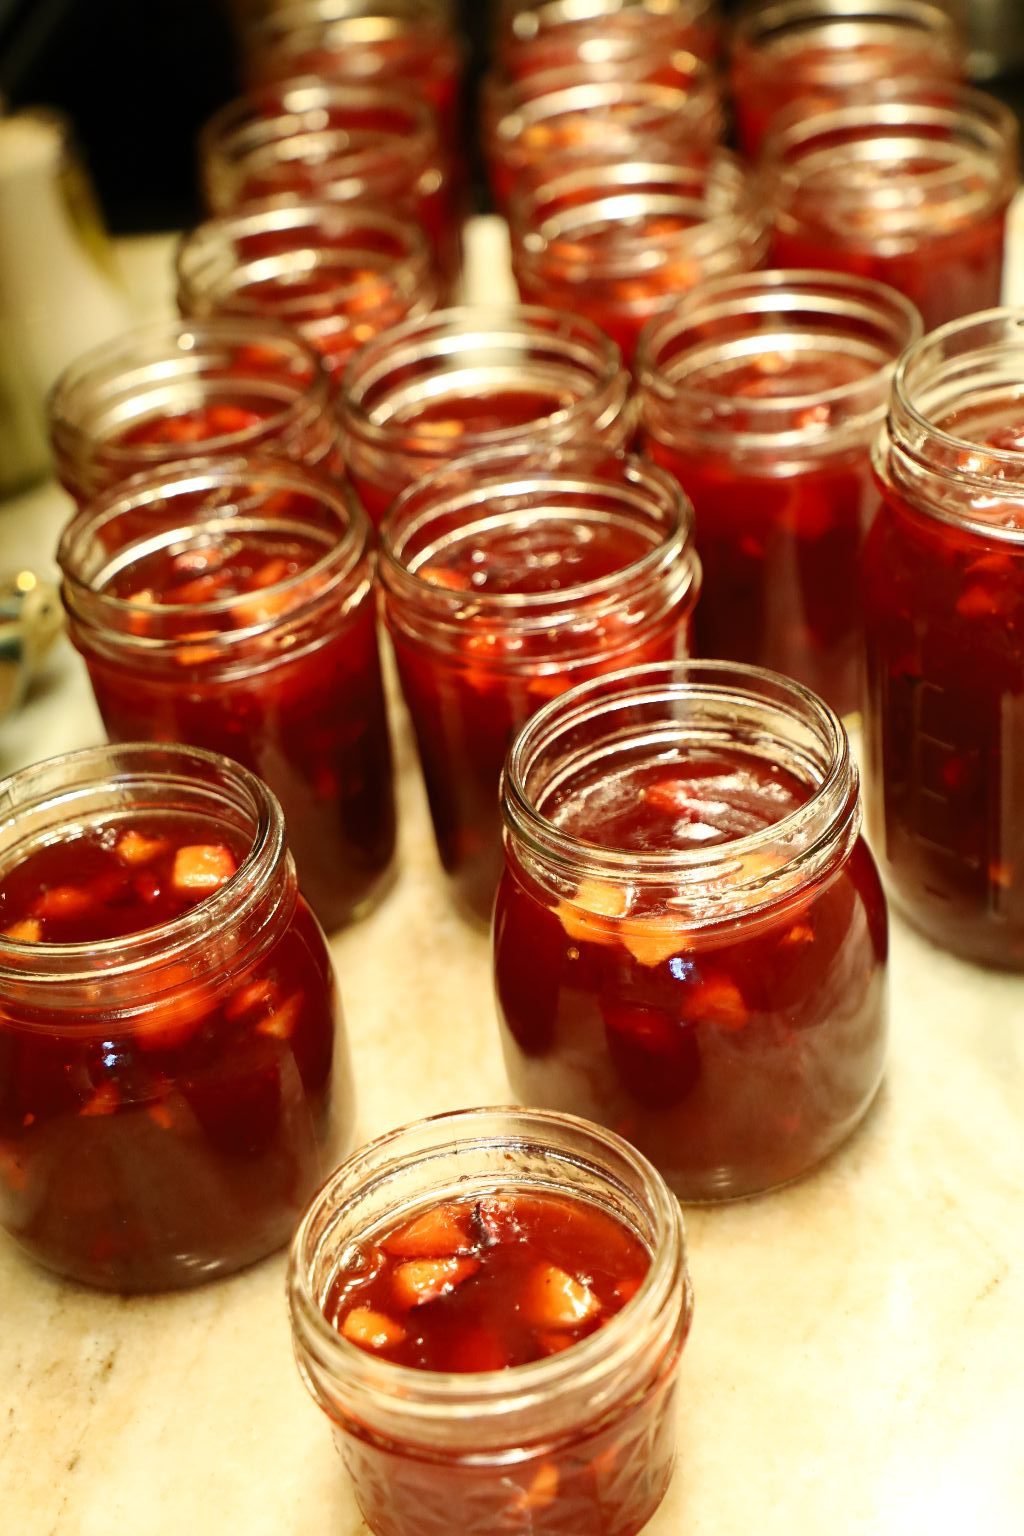
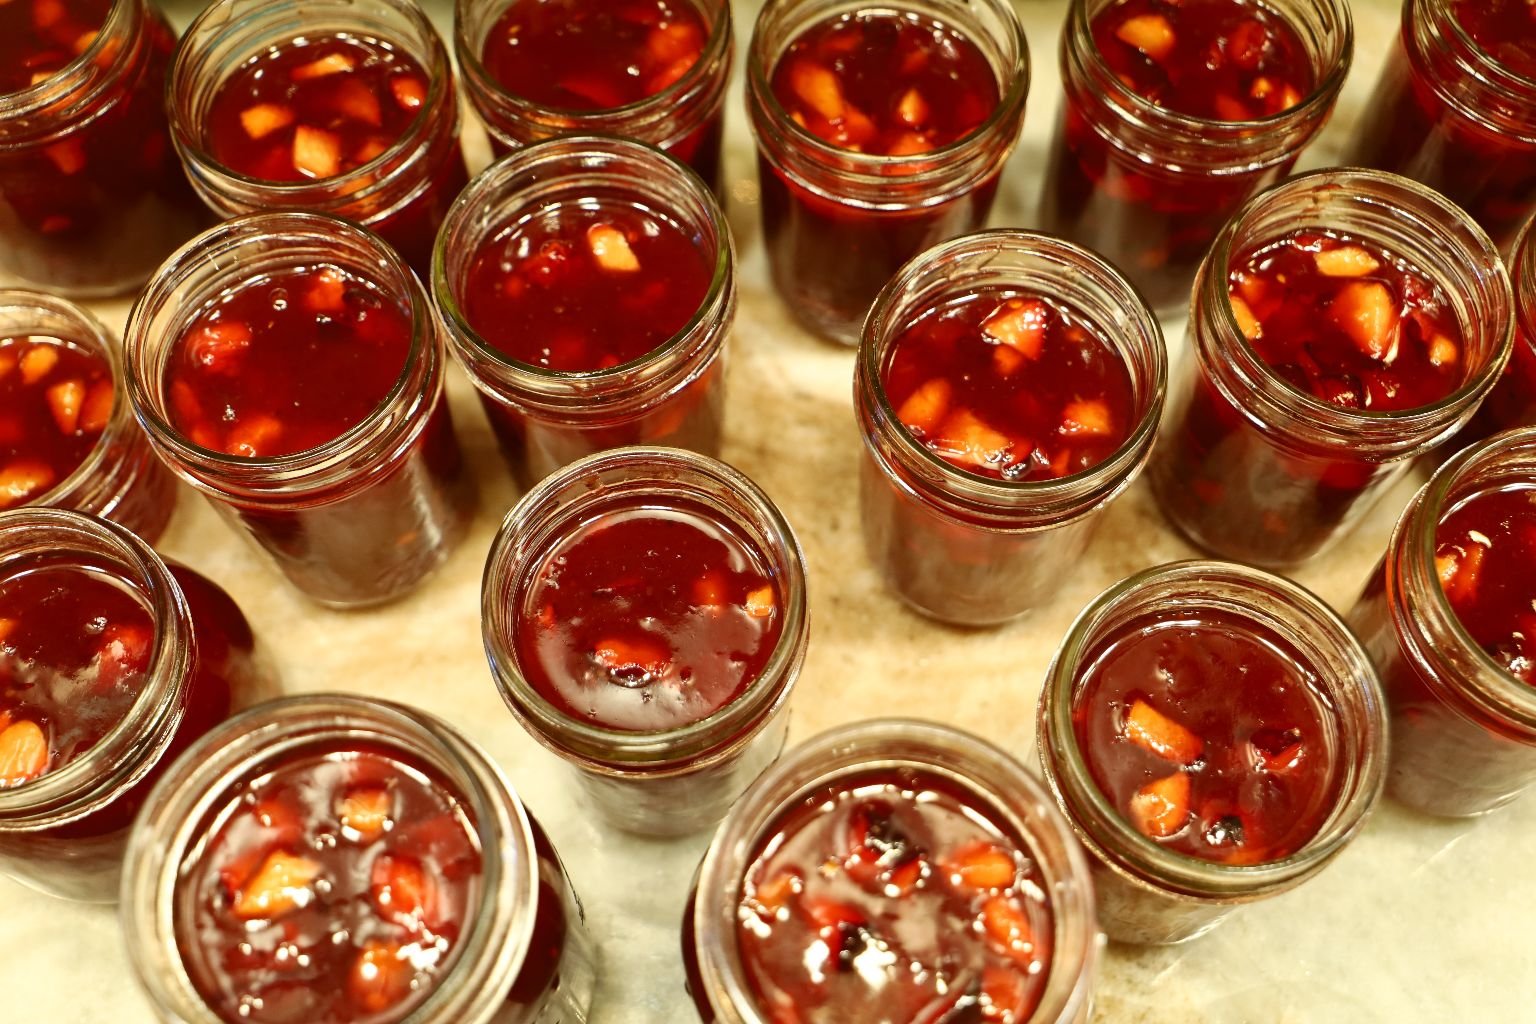
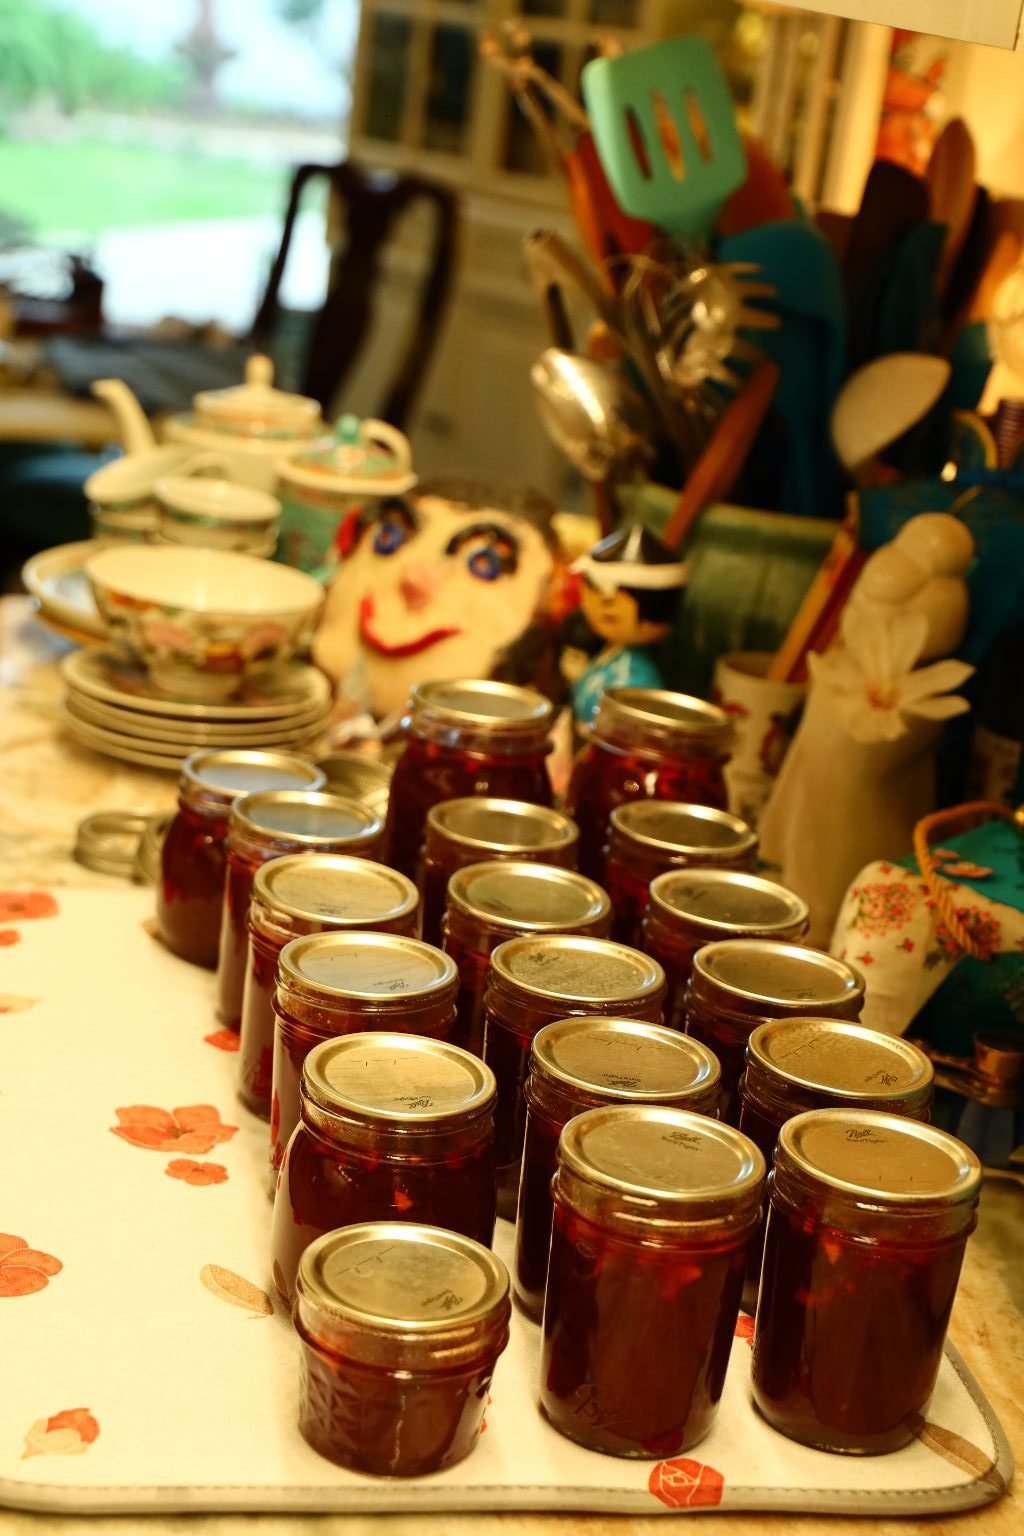
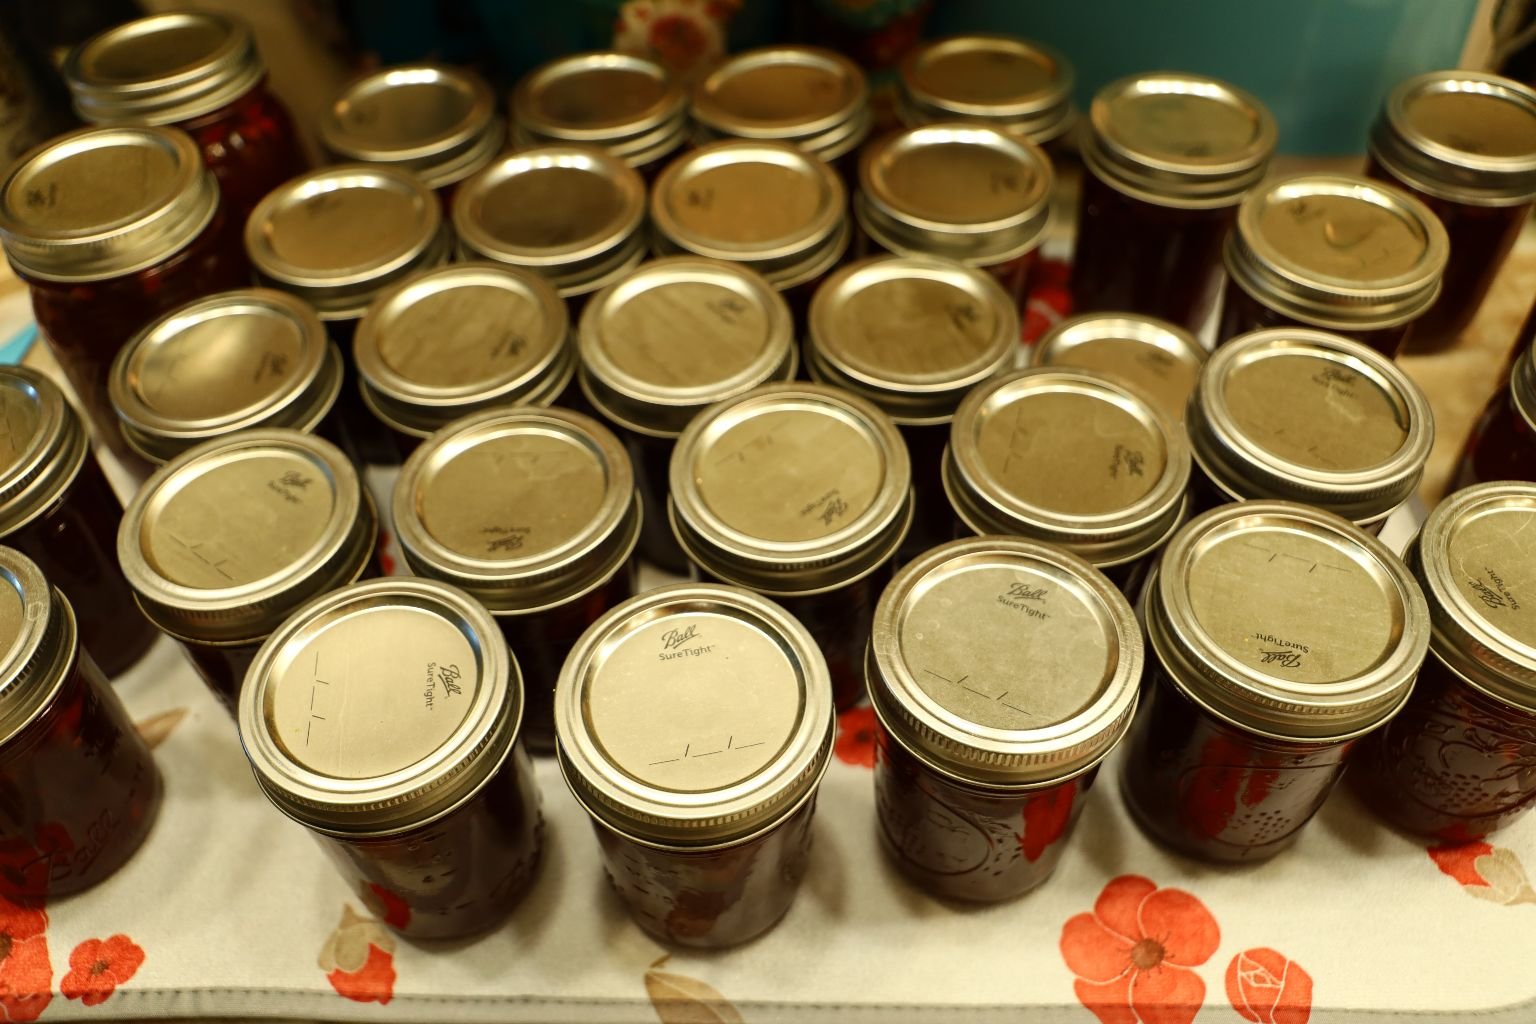
These Jars Are Cooling
Repeat the process with all the jars.
When the lids have popped remove the ring. The ring will now only be used to protect the lid from coming off if it were to get hit by something. The ring does not keep the lid sealed. Here I am removing the ring to wipe away and excess water. If this is not done, the ring and lid might begin to rust.
Repeat this process for all the finished jars.
Just to Reiterate…
If a jar doesn’t pop and seal, remove the lid, remove some of the Jezebel, clean the top of the jar, get a new lid and place the ring on as done before. Process the jar again for 15 min. as before. This usually fixes the problem. The issues could have been a bad or broken rubber seal, not enough head space, or something could have been blocking the rubber seal.
———————————————————————————-
——————————————————————————
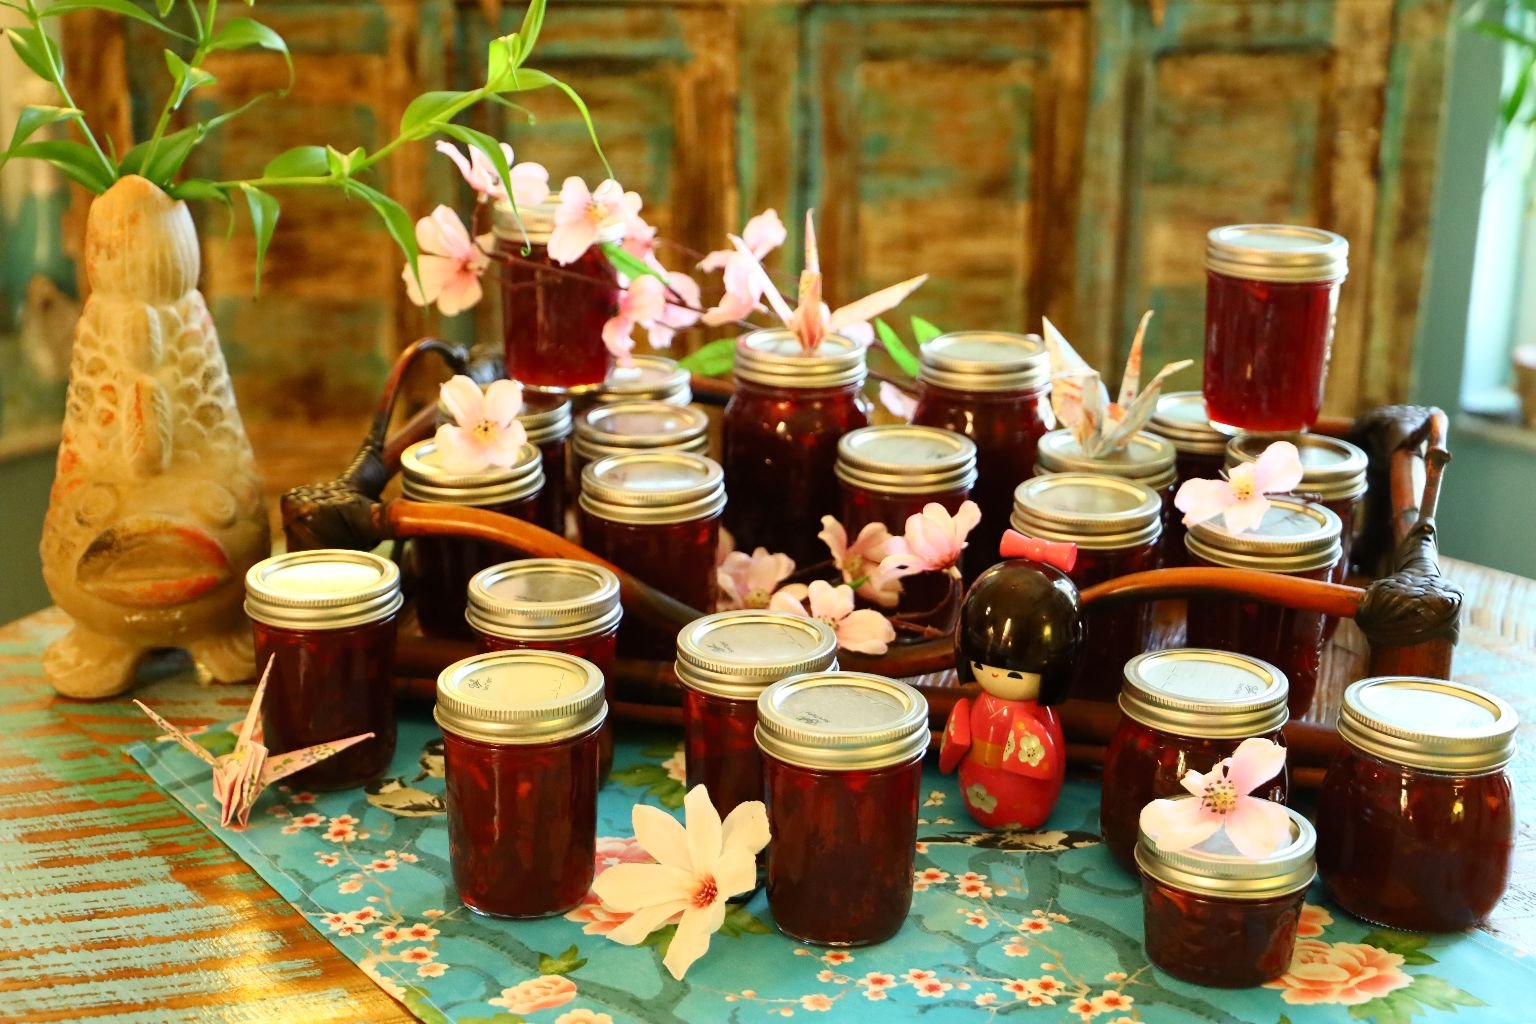
A Very Nice Edible Gift
————————————————————————-
Also Check Out My:
Click Here For: Julie’s Jezebel Sauce
AND,
AND,
AND,
An Old Florida Jezebel (Sauce)
AND,
One HOT Jezebel for Breakfast (Sauce, That is.)
AND,
Click Here For: More of Julie’s Jezebel Recipes to Enjoy
AND,
AND,
——————————————————————
RECIPES START HERE
Oriental Jezebel Chicken Skewers with Leeks and Spring Onions…
..Atop Japanese Cabbage Pancakes


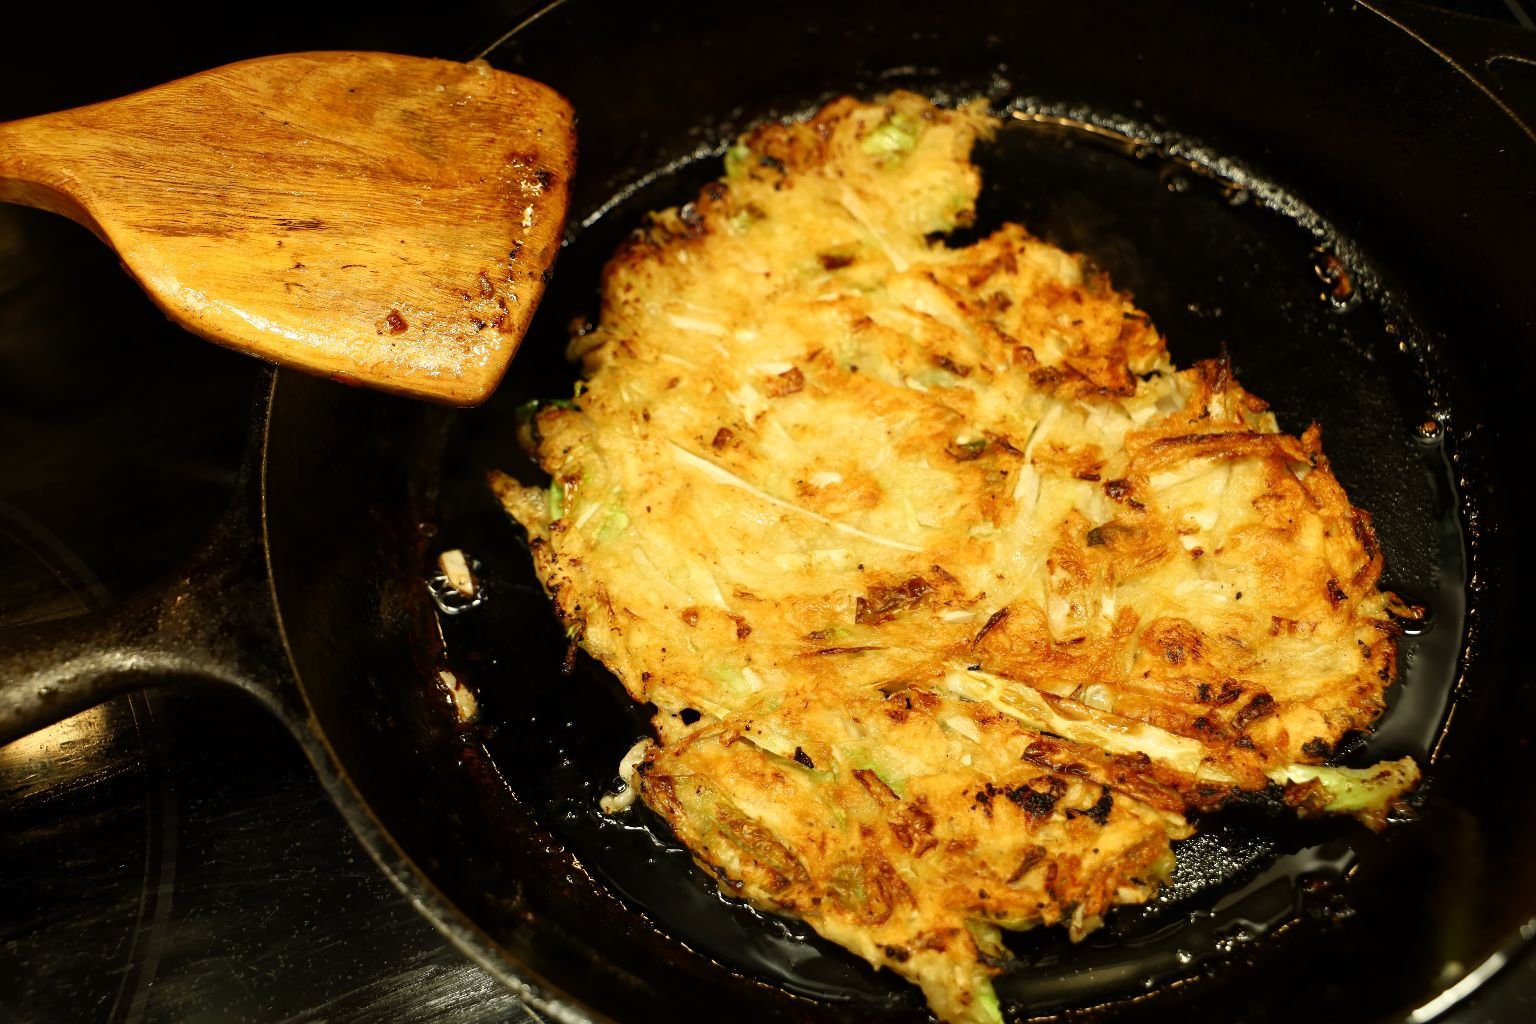
Gordon Frying our Japanese Cabbage Pancakes
The Pancakes with our Grilled Plums
Ingredients:
1 Lb. Chicken Thighs
1 Lb. Chicken Breasts
2 Leeks – cleaned and sliced into 2 inch sections
3 Green Onions – sliced into 2 inch sections
~1 1/2 Cups Julie’s Oriental Jezebel Sauce
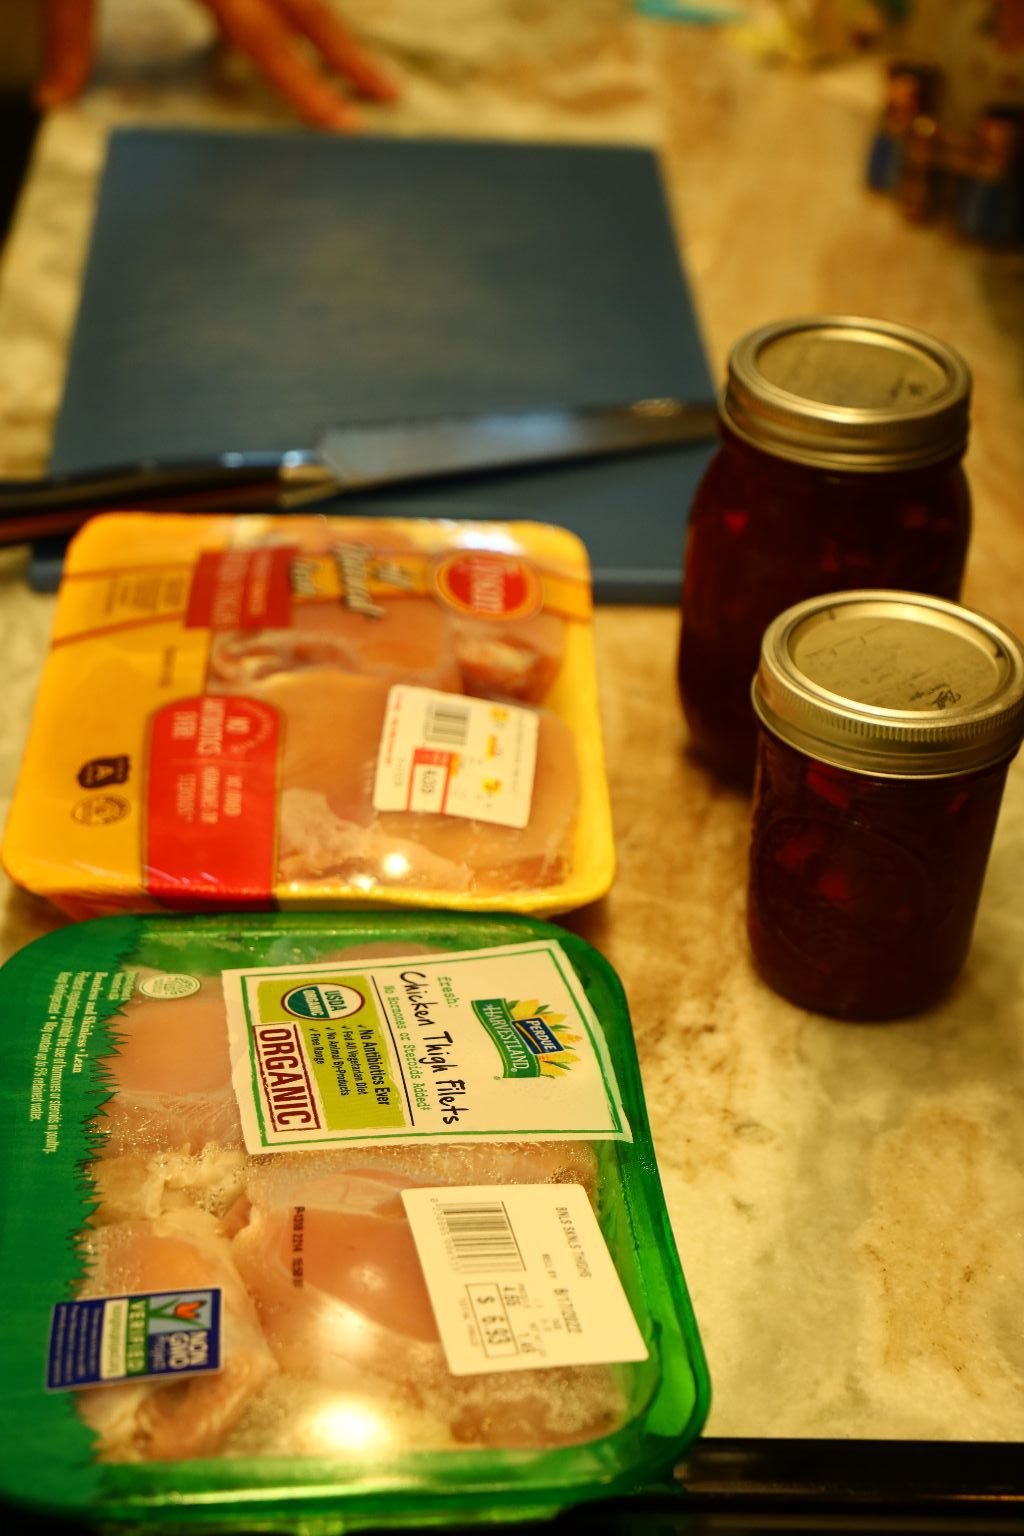
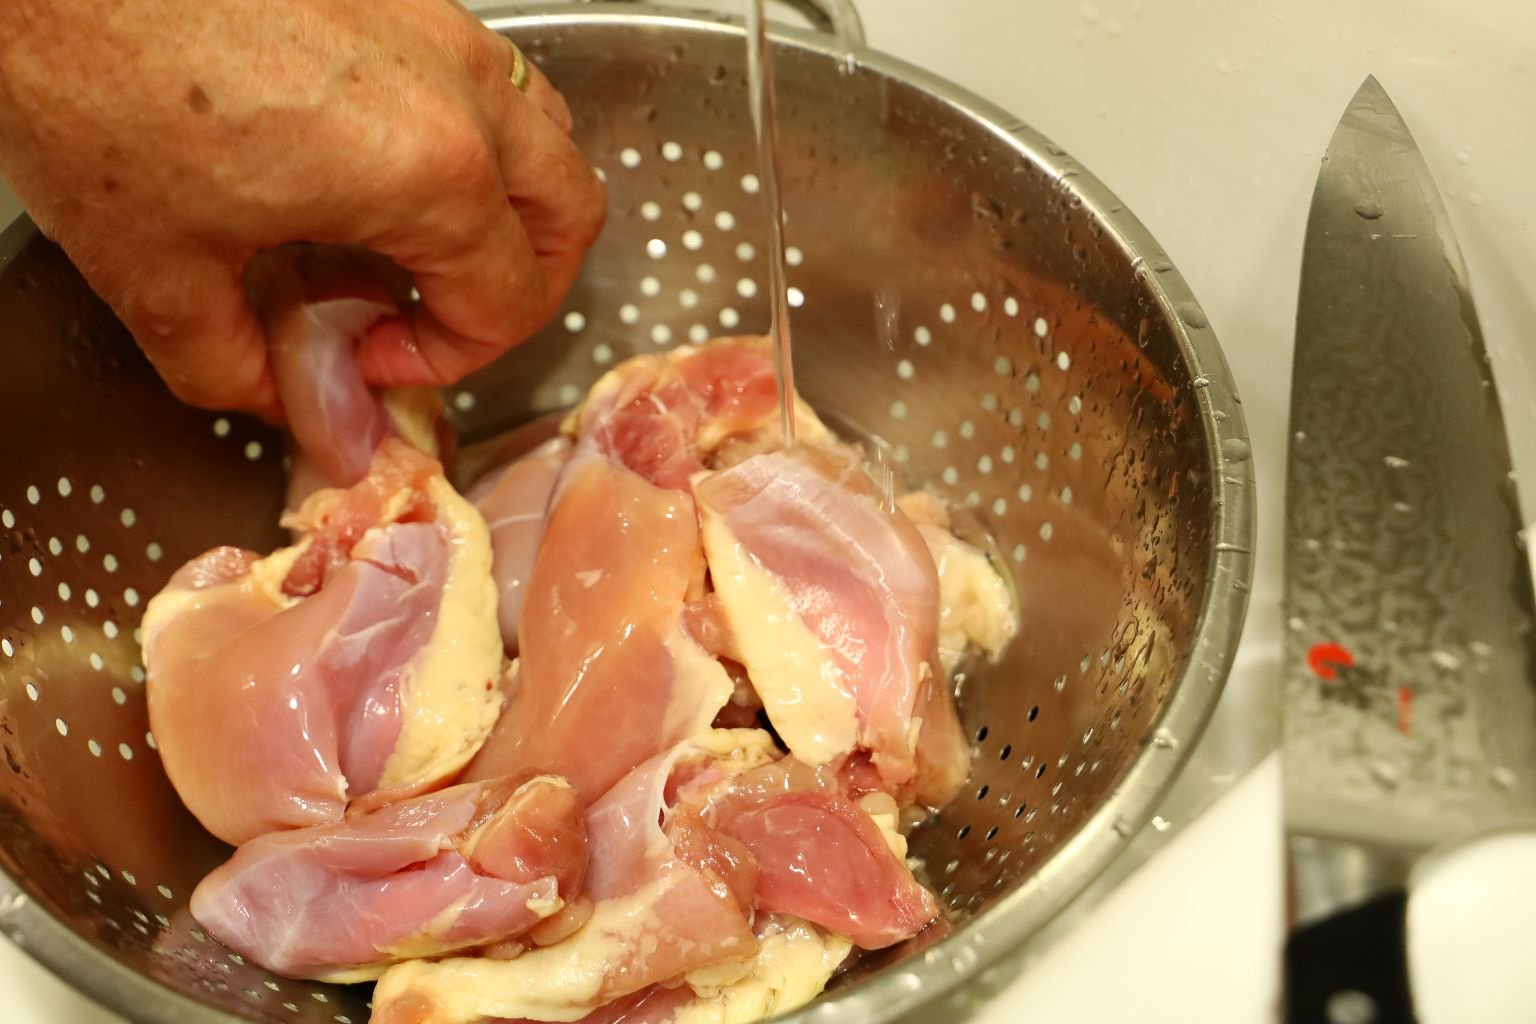
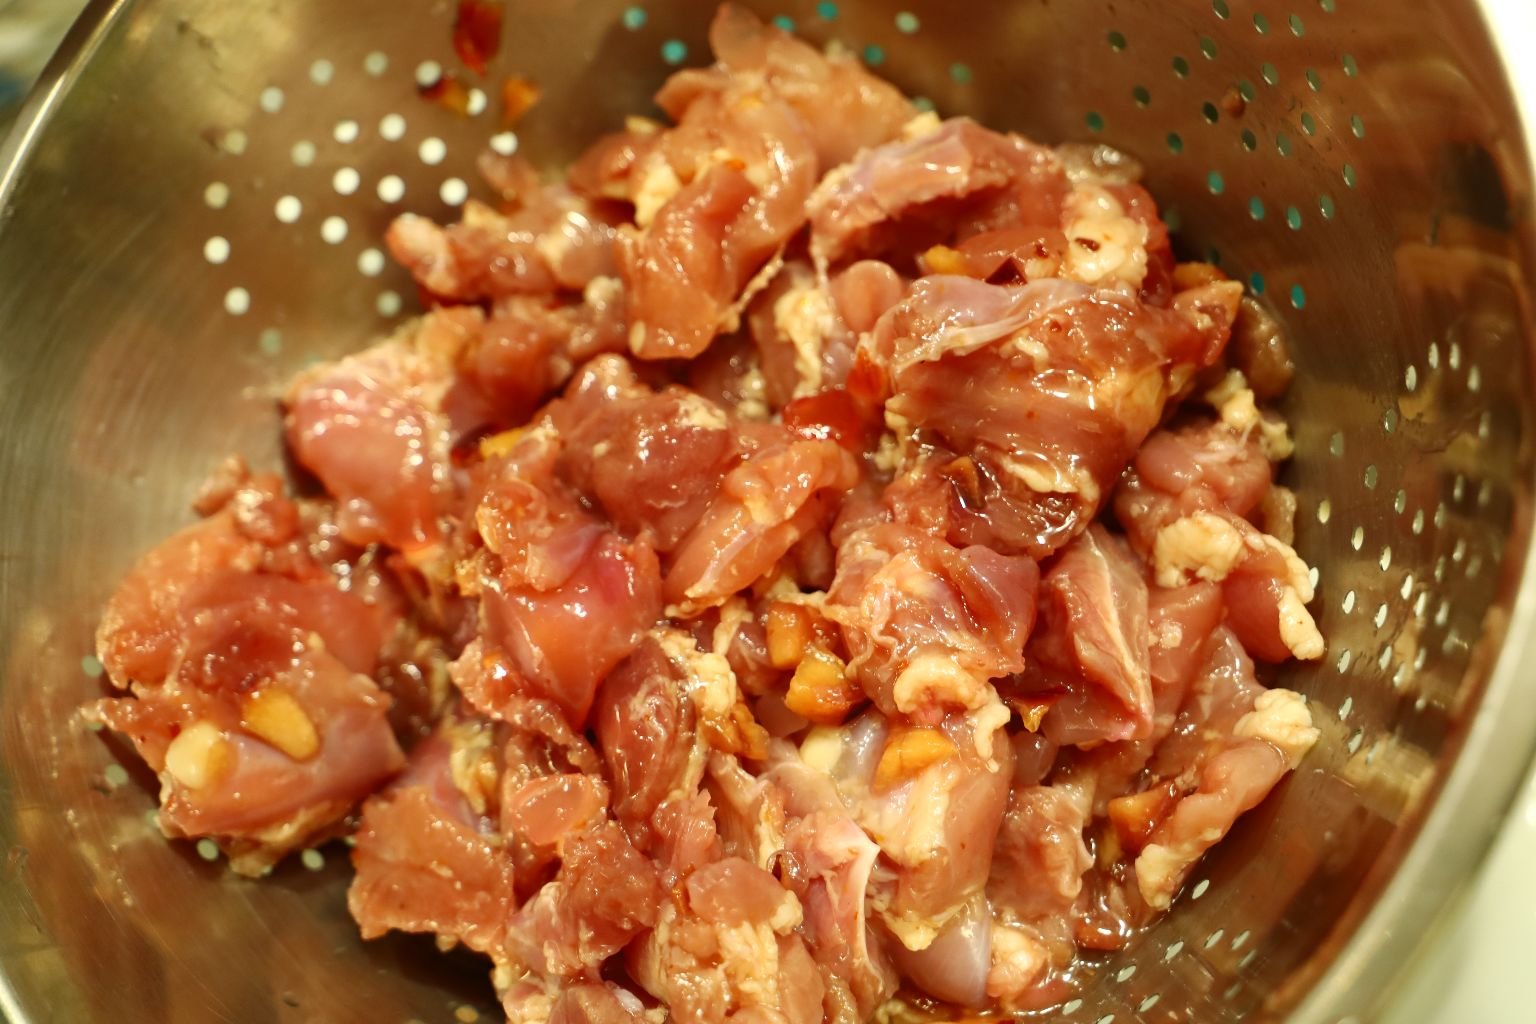
Here I am washing the Chicken to remove any bone fragments, blood and any other things that might be on it.
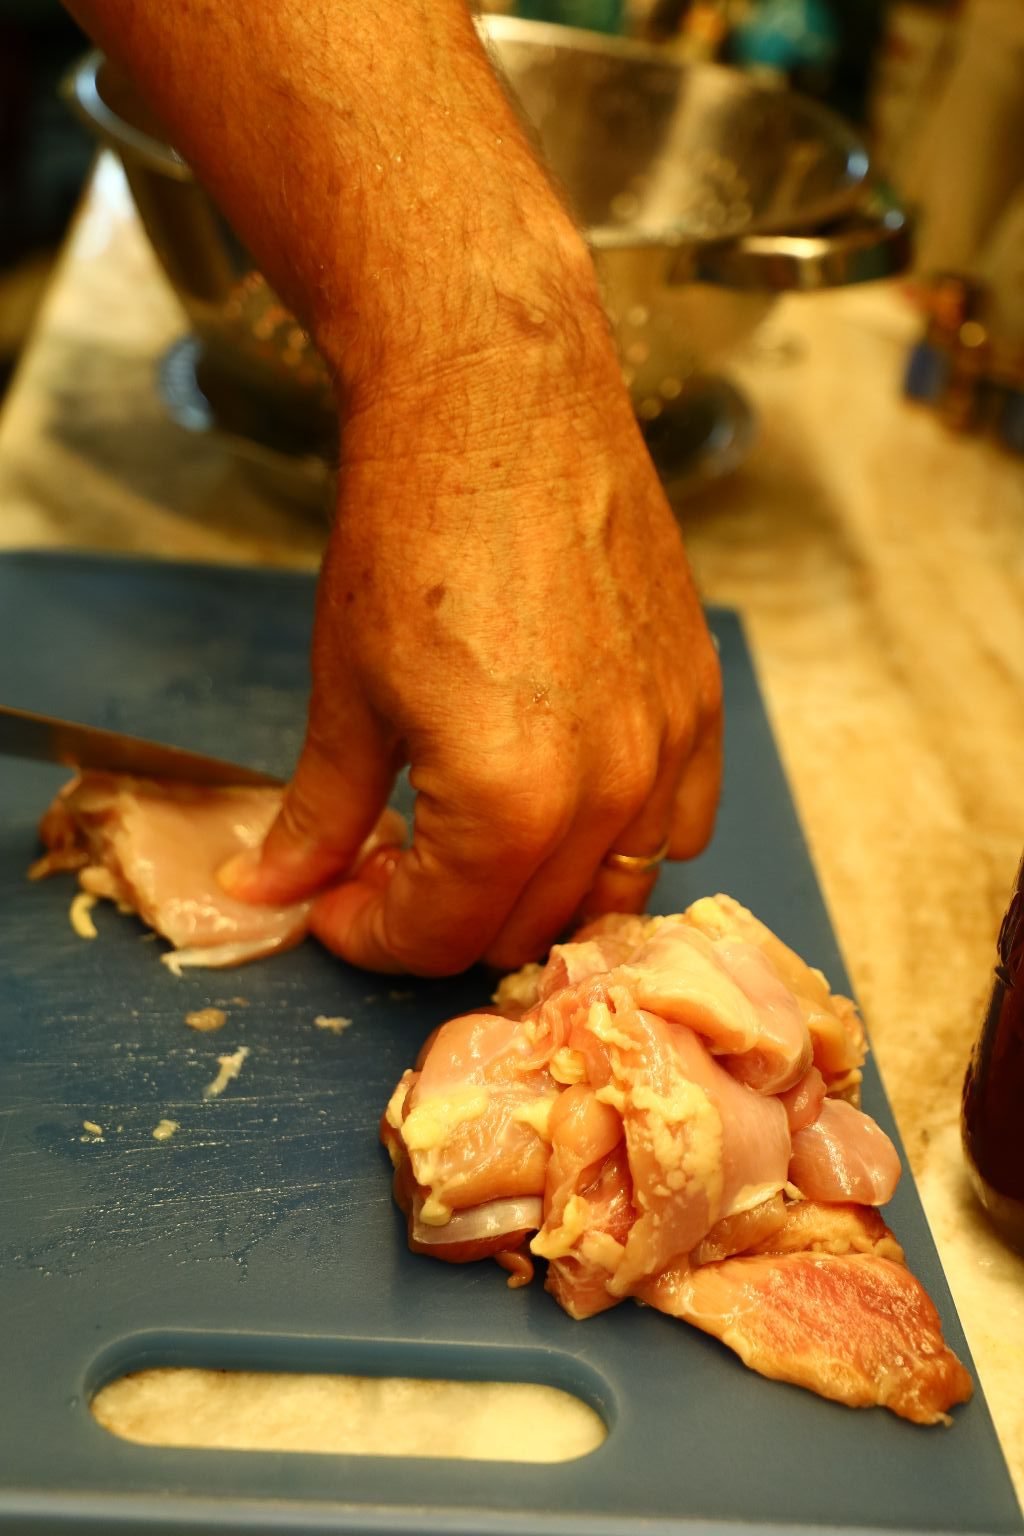
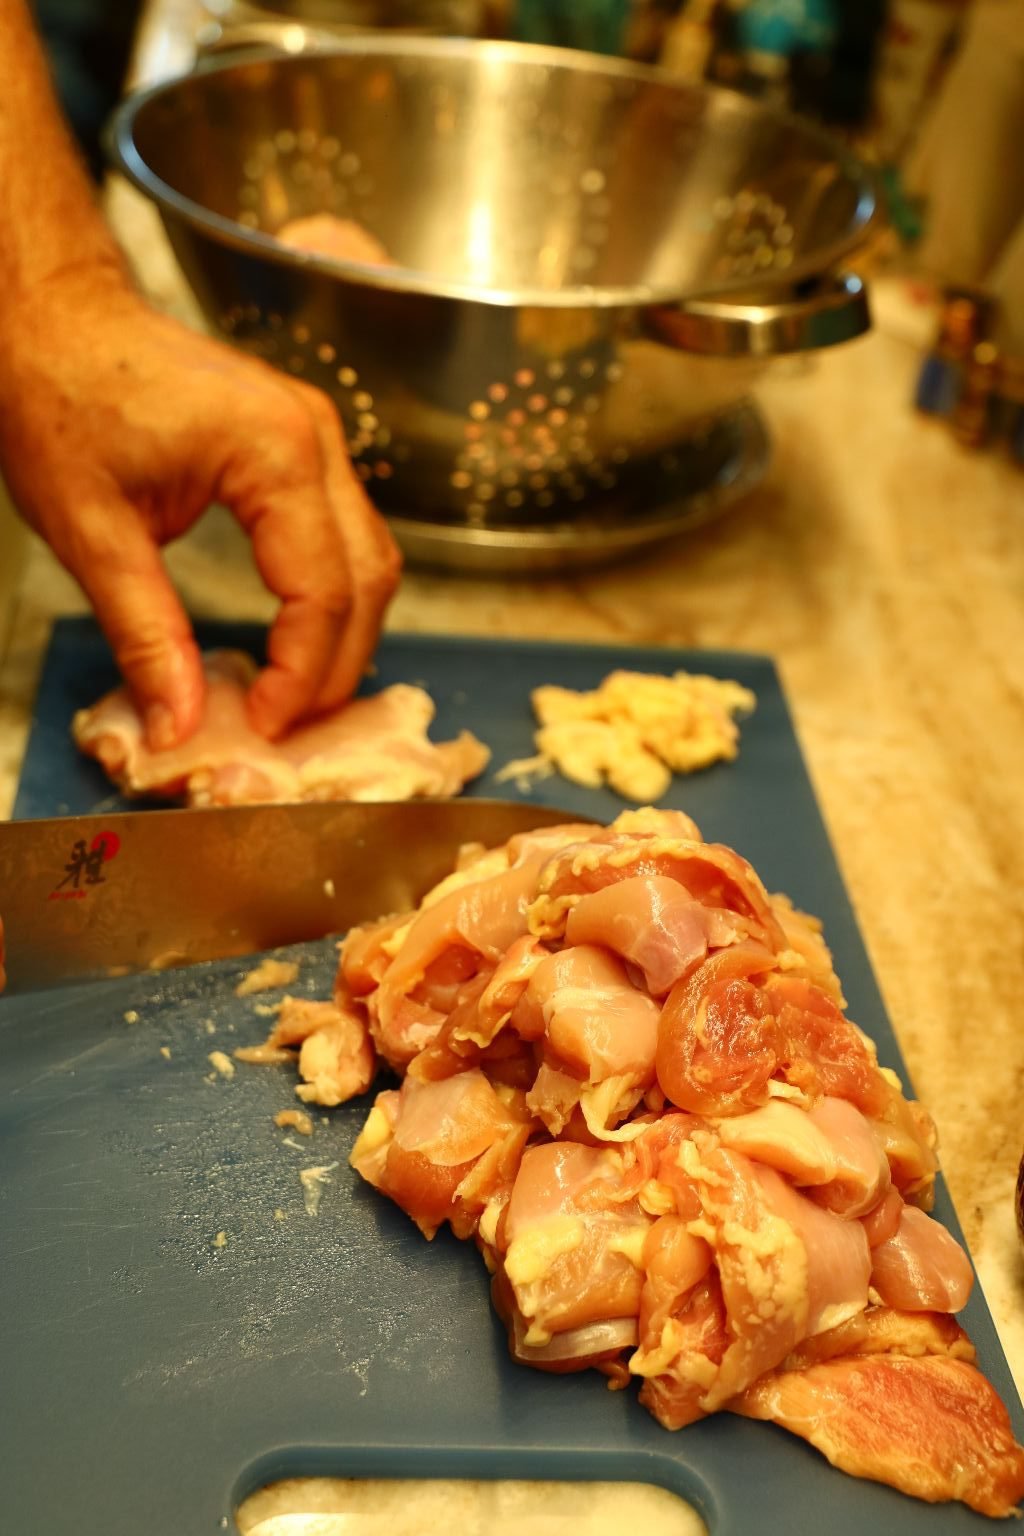
Now, remove the excess fat on the Chicken Thighs using a sharp knife.
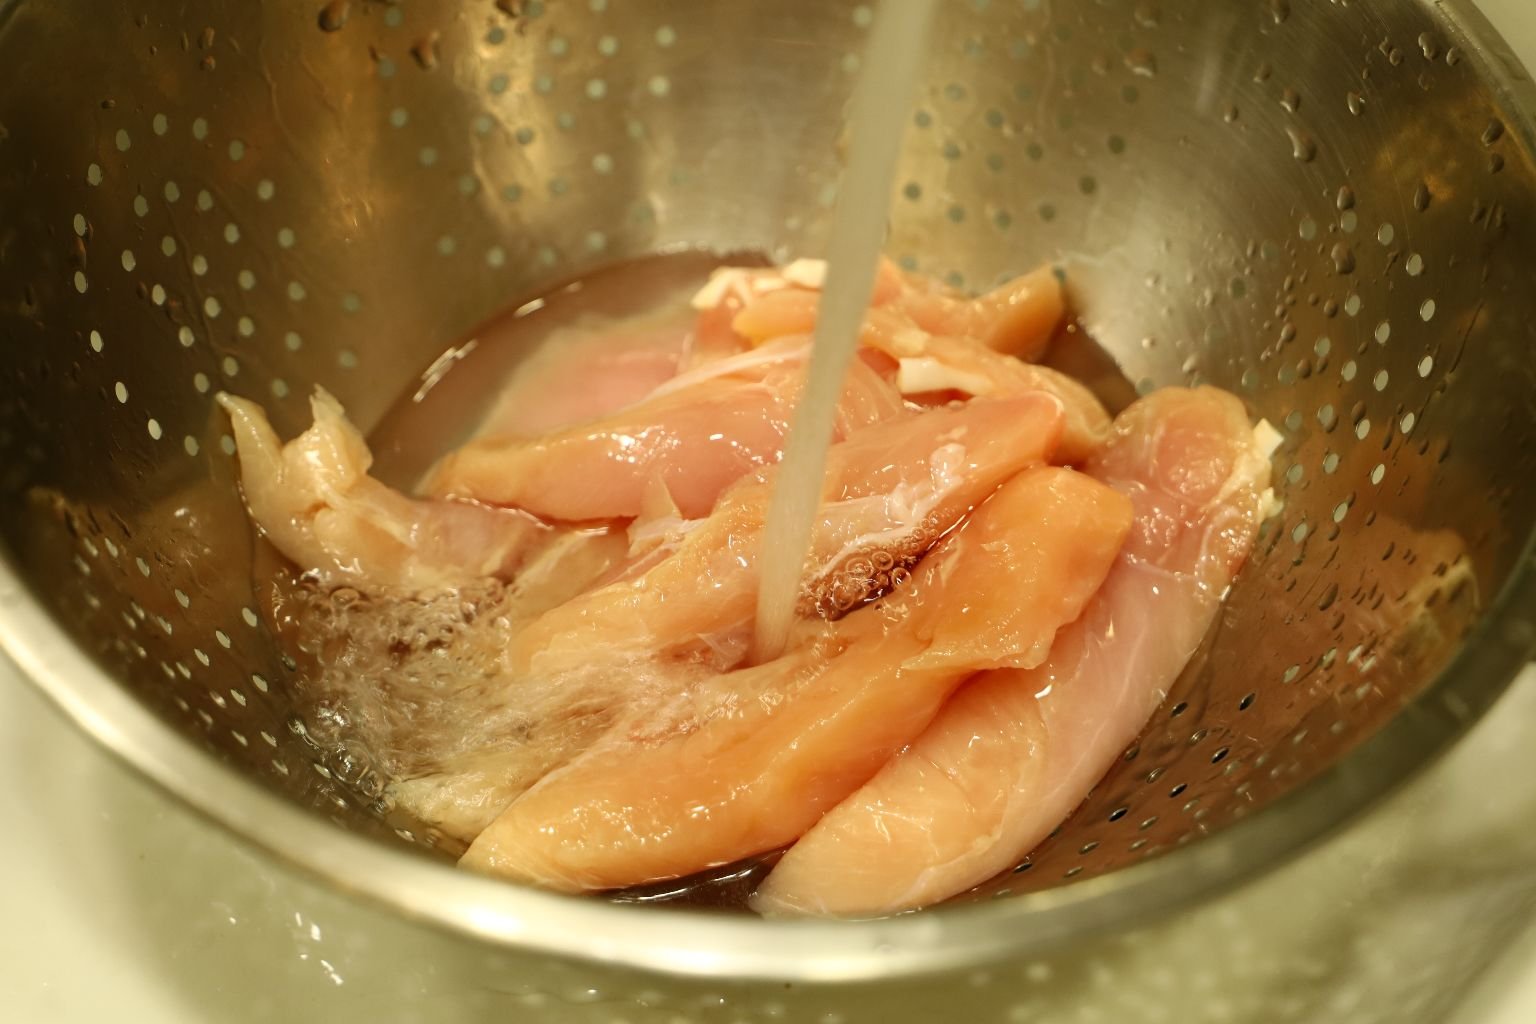
Here I am washing the Chicken Breasts.
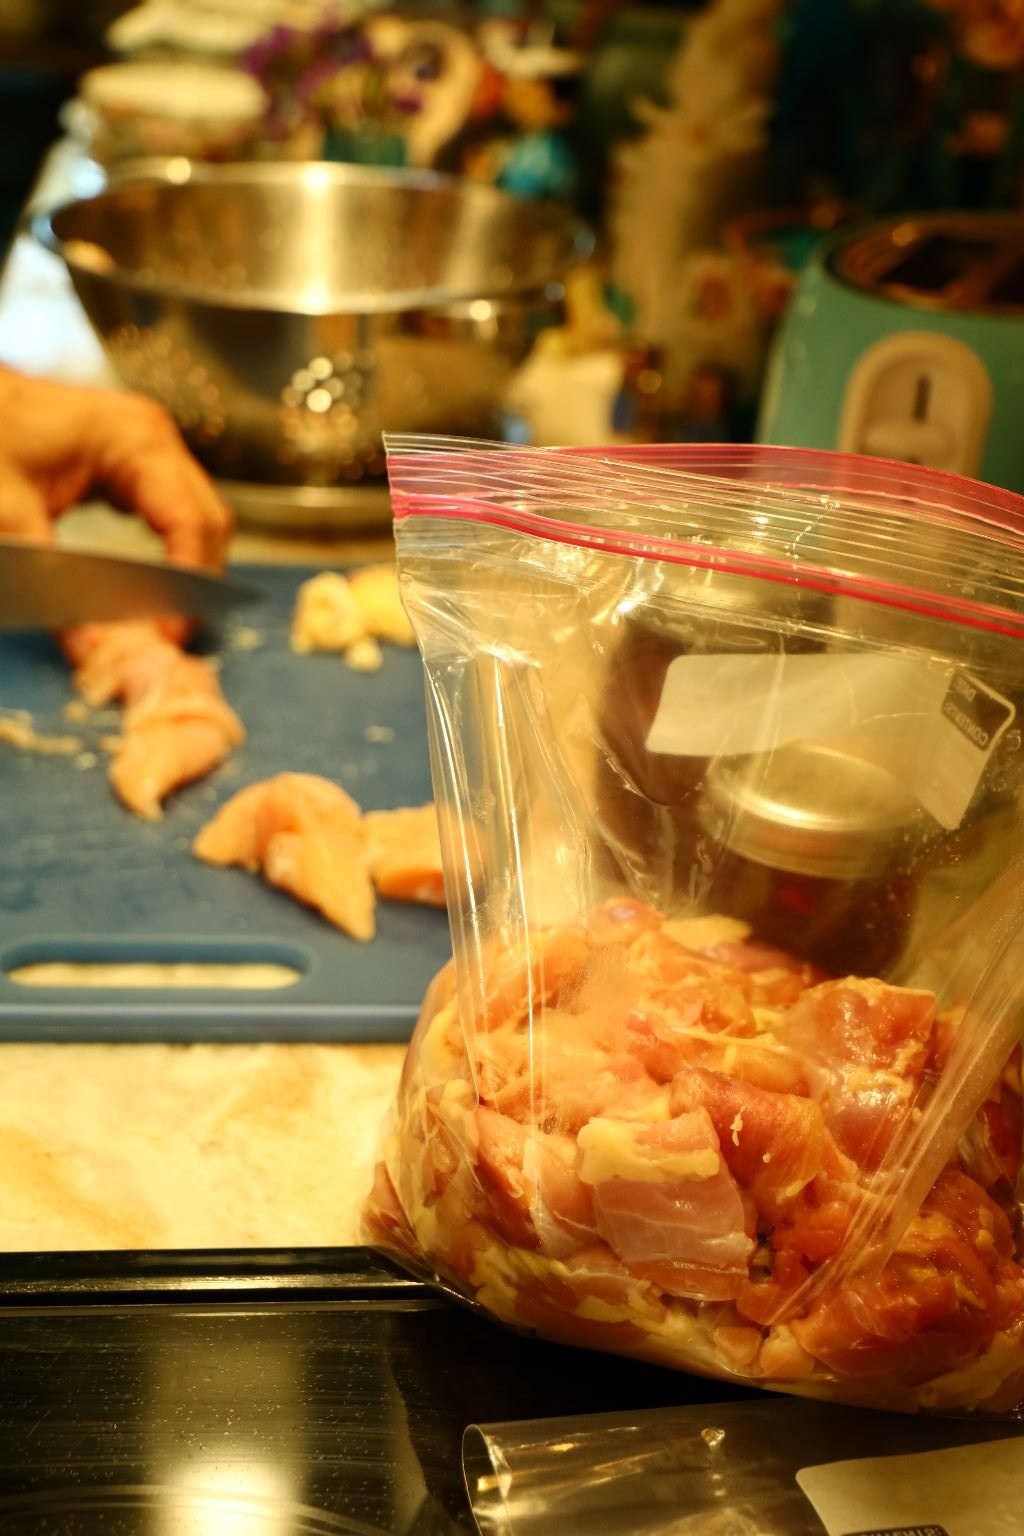

After you remove the excess fat, place the chicken in a large zip lock bag.
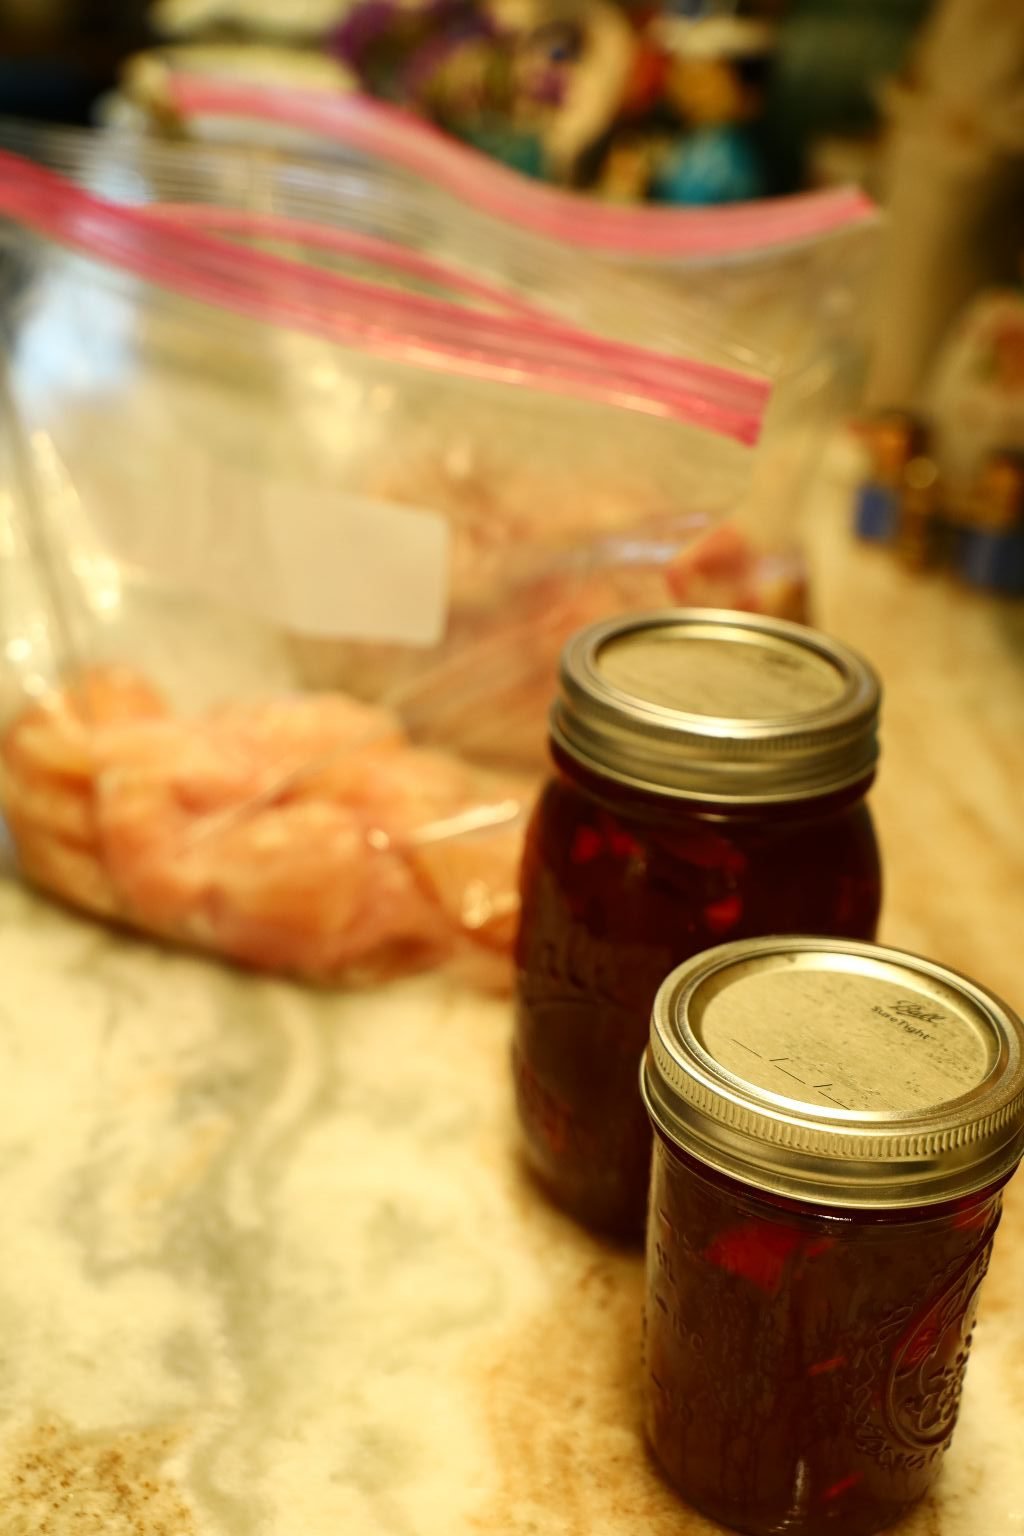
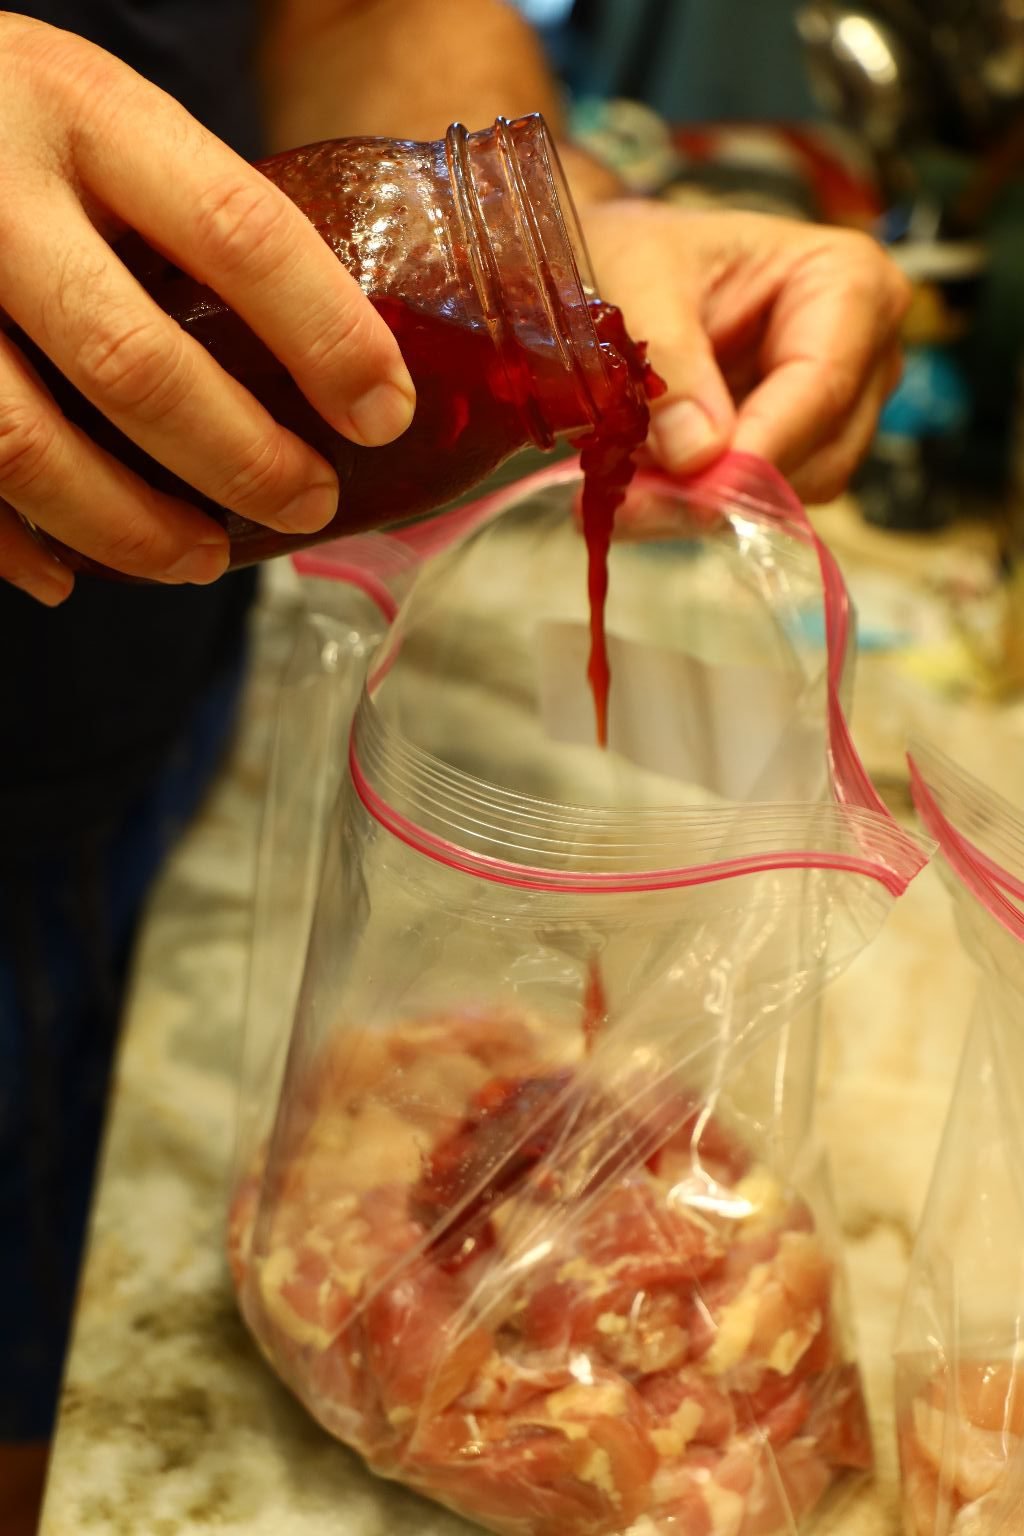
Now, add your Oriental Jezebel Sauce to the Chicken in the bag.
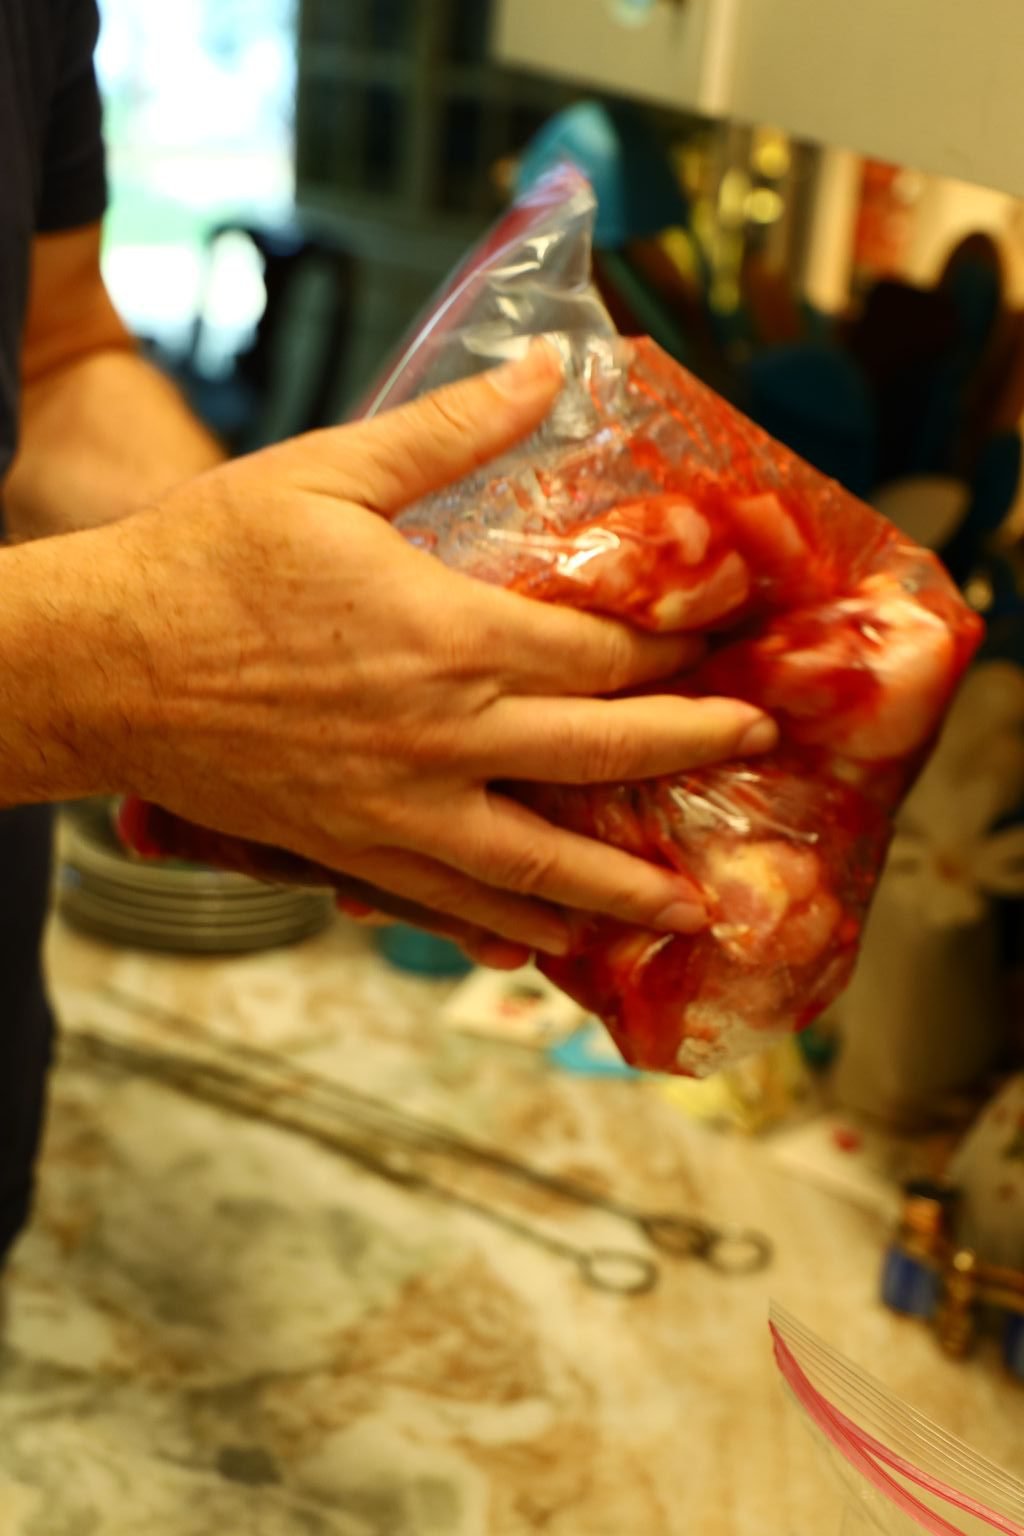
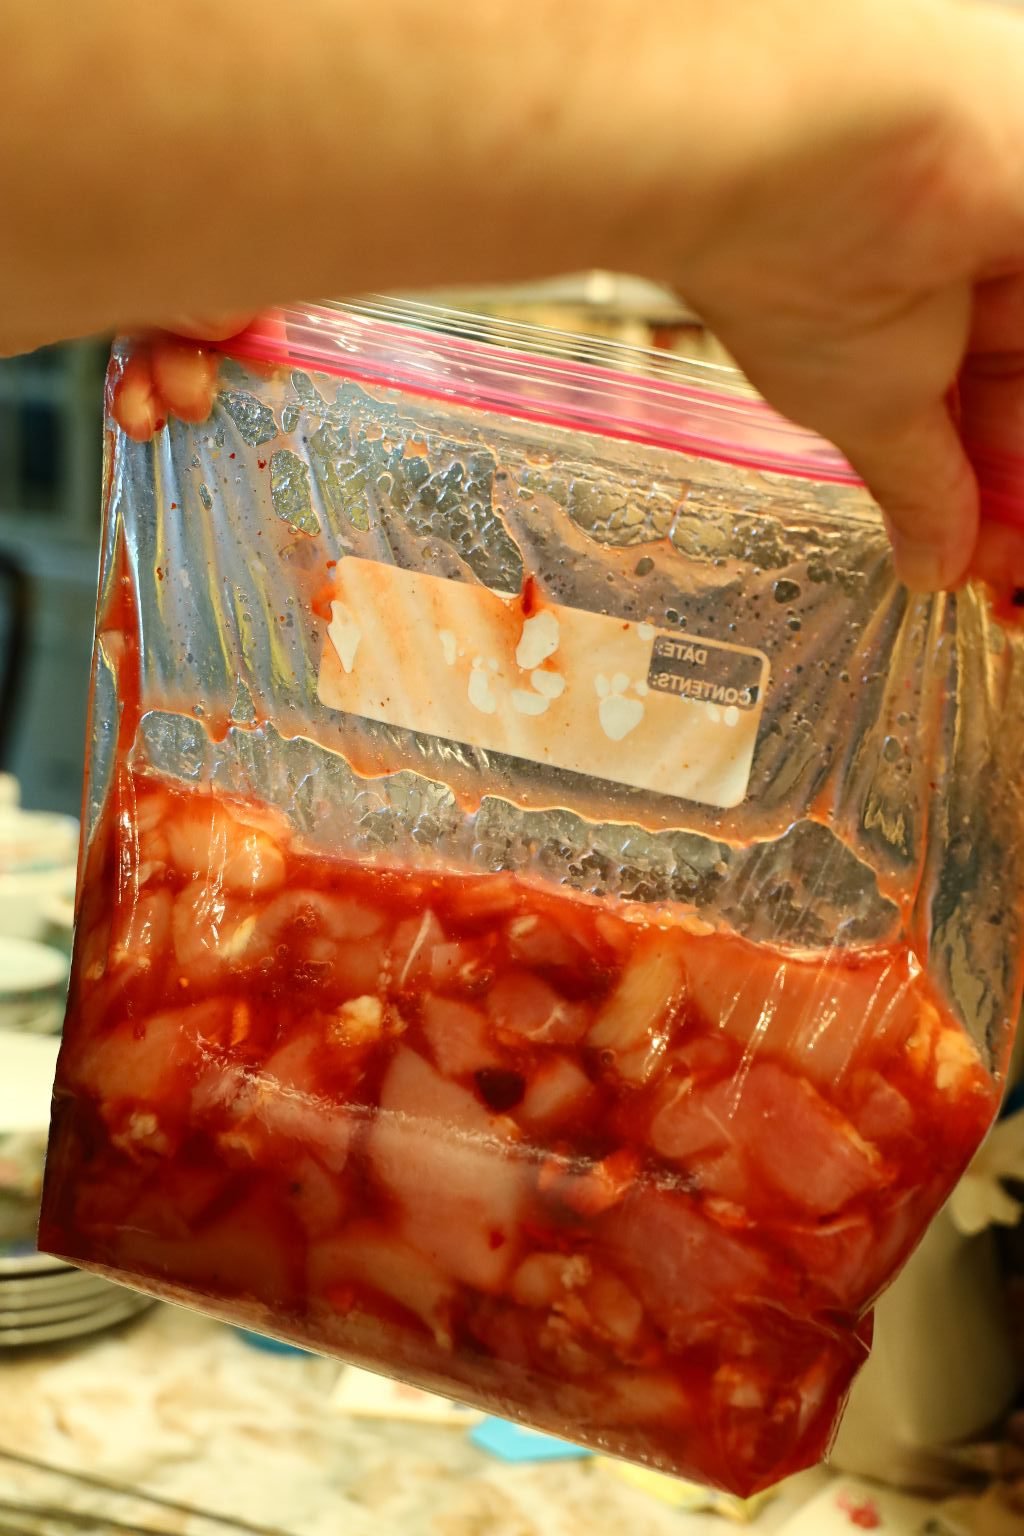
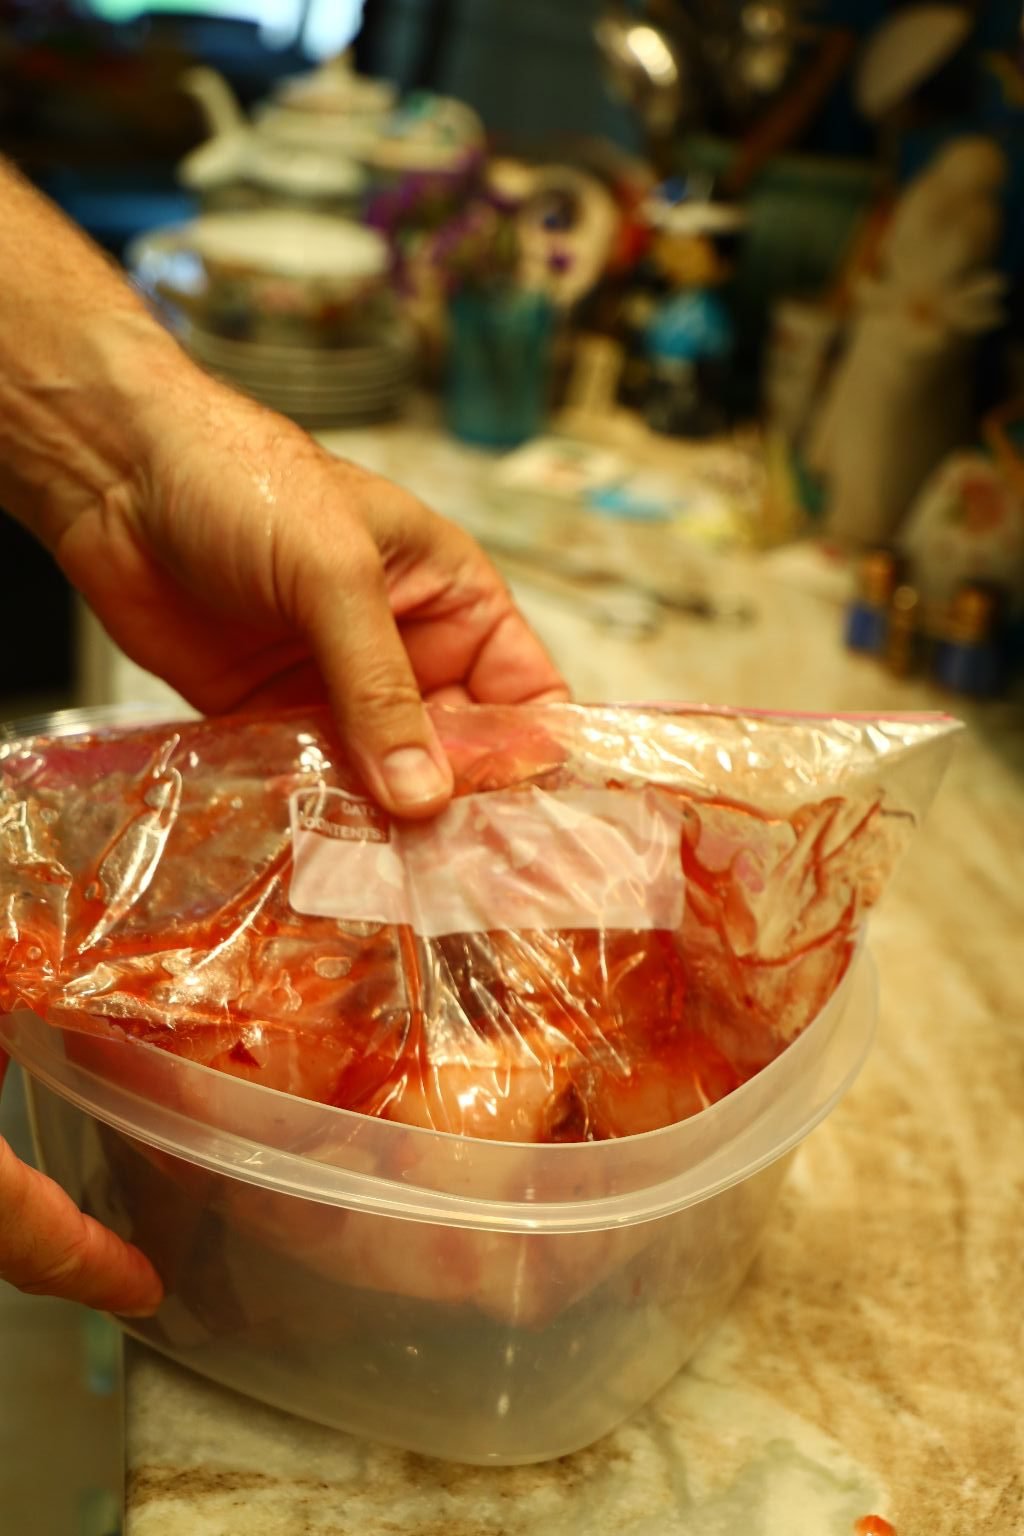
Close the bag leaving a little bit of air, then mix the chicken and the Jezebel sauce. When mixed together well, place the bag on a flat surface, open the bag and remove the air by folding the bag over itself, keeping the chicken on one side and the unused closable side of the bag on the other. As you lift the bag up, you should see a vacuum within the bag as seen in the middle picture. This will also help to force the marinade into the meat. Lastly, place the bag into a container so if the bag breaks, the sauce will not run all over your refrigerator. Place the Chicken in your refrigerator.
While the Chicken is Marinating Overnight…
——————————————————————————–
Time To Make The Japanese Cabbage Pancakes
Ingredients:
3 Cups All Purpose Flour
2 Eggs
1/2 Tbsp. Sea Salt
1 tsp. Freshly Ground Pepper
1 Green Onion – Sliced
2 Tbsp. Sukiyaki Sauce
~1 Cup Water
~ 1 1/2 Cups Shredded Cabbage
2 Tbsp. Peanut Oil – to fry the pancake
Add more Sukiyaki Sauce at the end
————————————————————————
Add your Flour to a medium sized bowl.

Crack your eggs into a bowl…
and scramble them with a fork. Add your eggs to the flour.
——————————————————————————-
Julie Microwave Selfie
(I love how clear my desk lamp showed up in the photo.)
————————————————————————————–
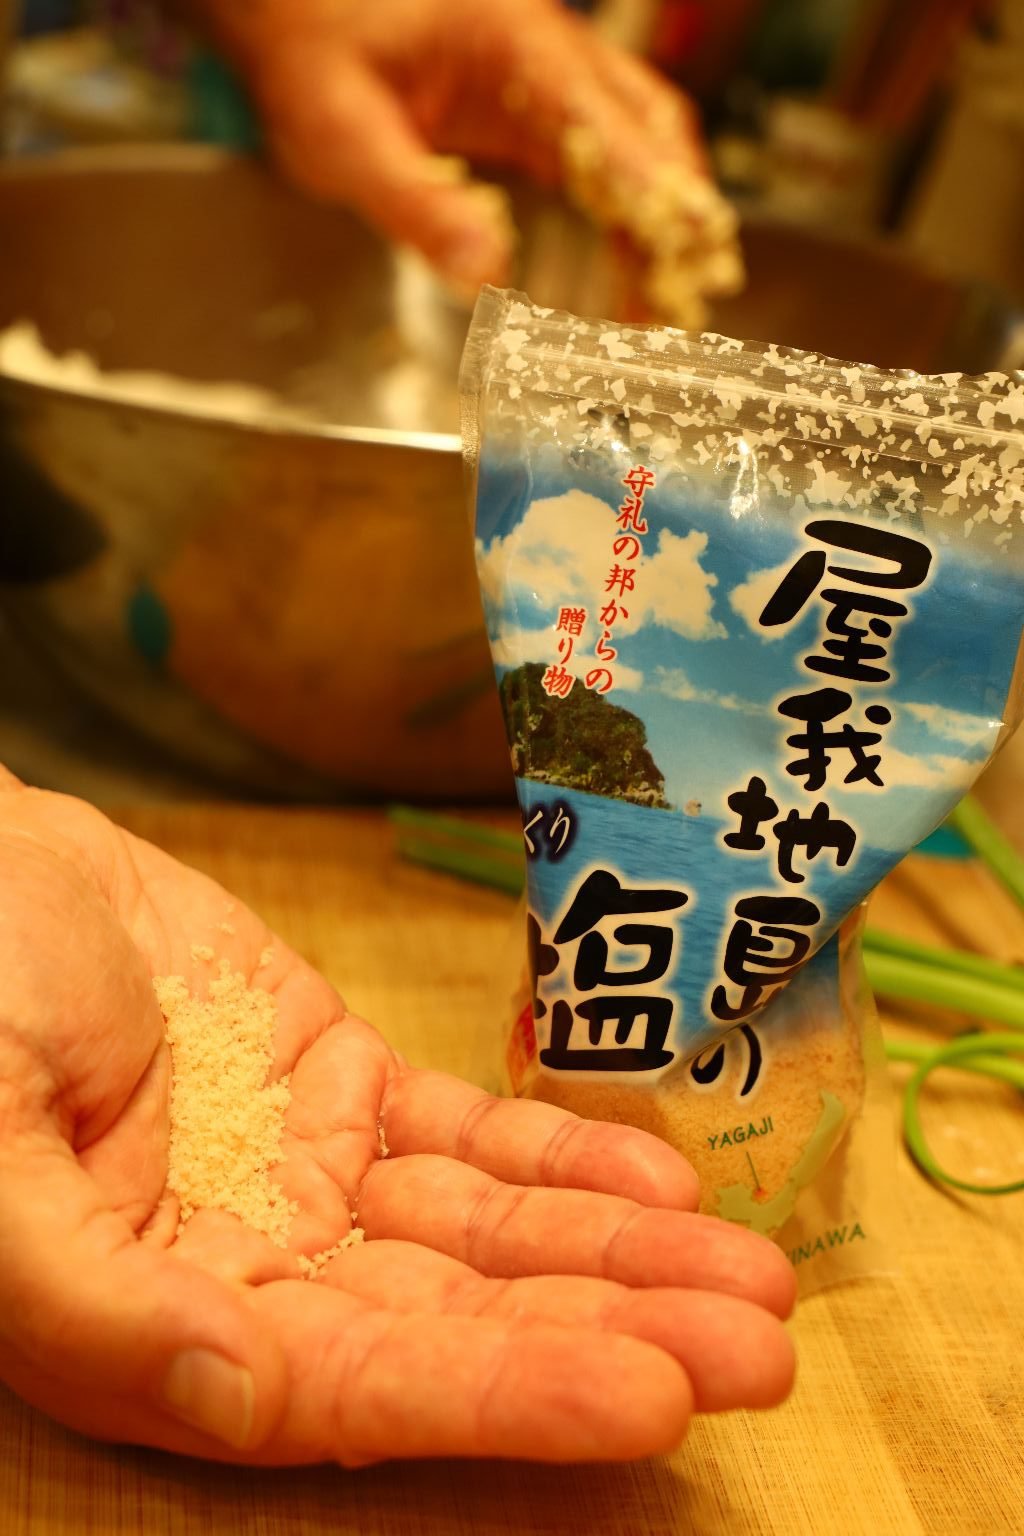
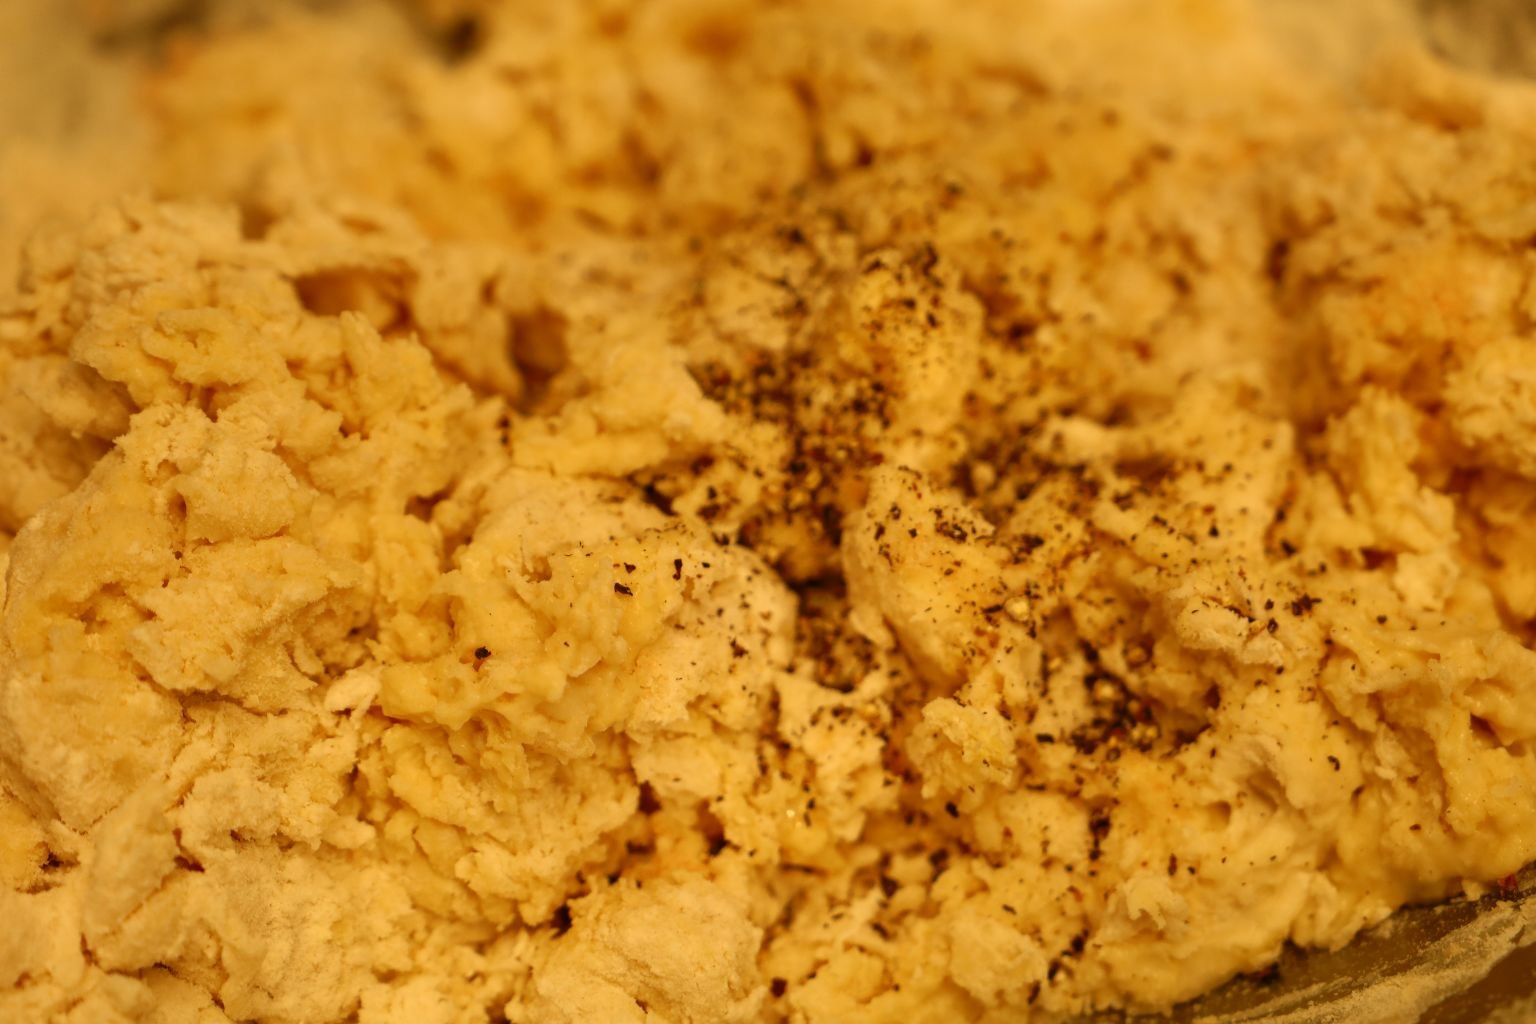
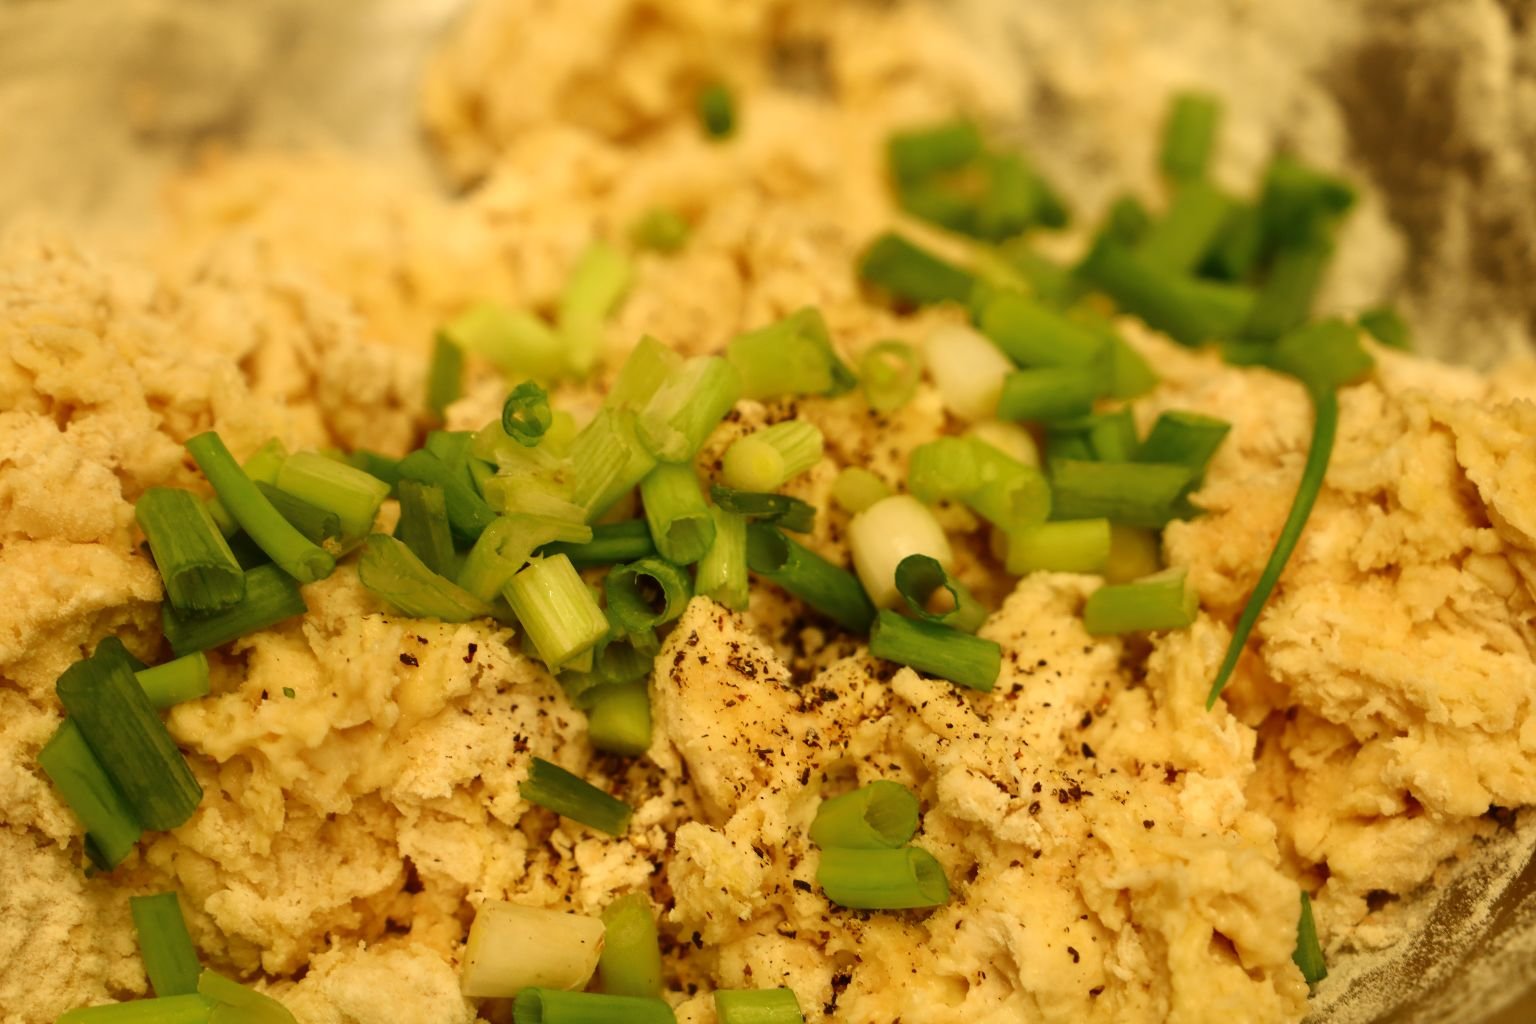
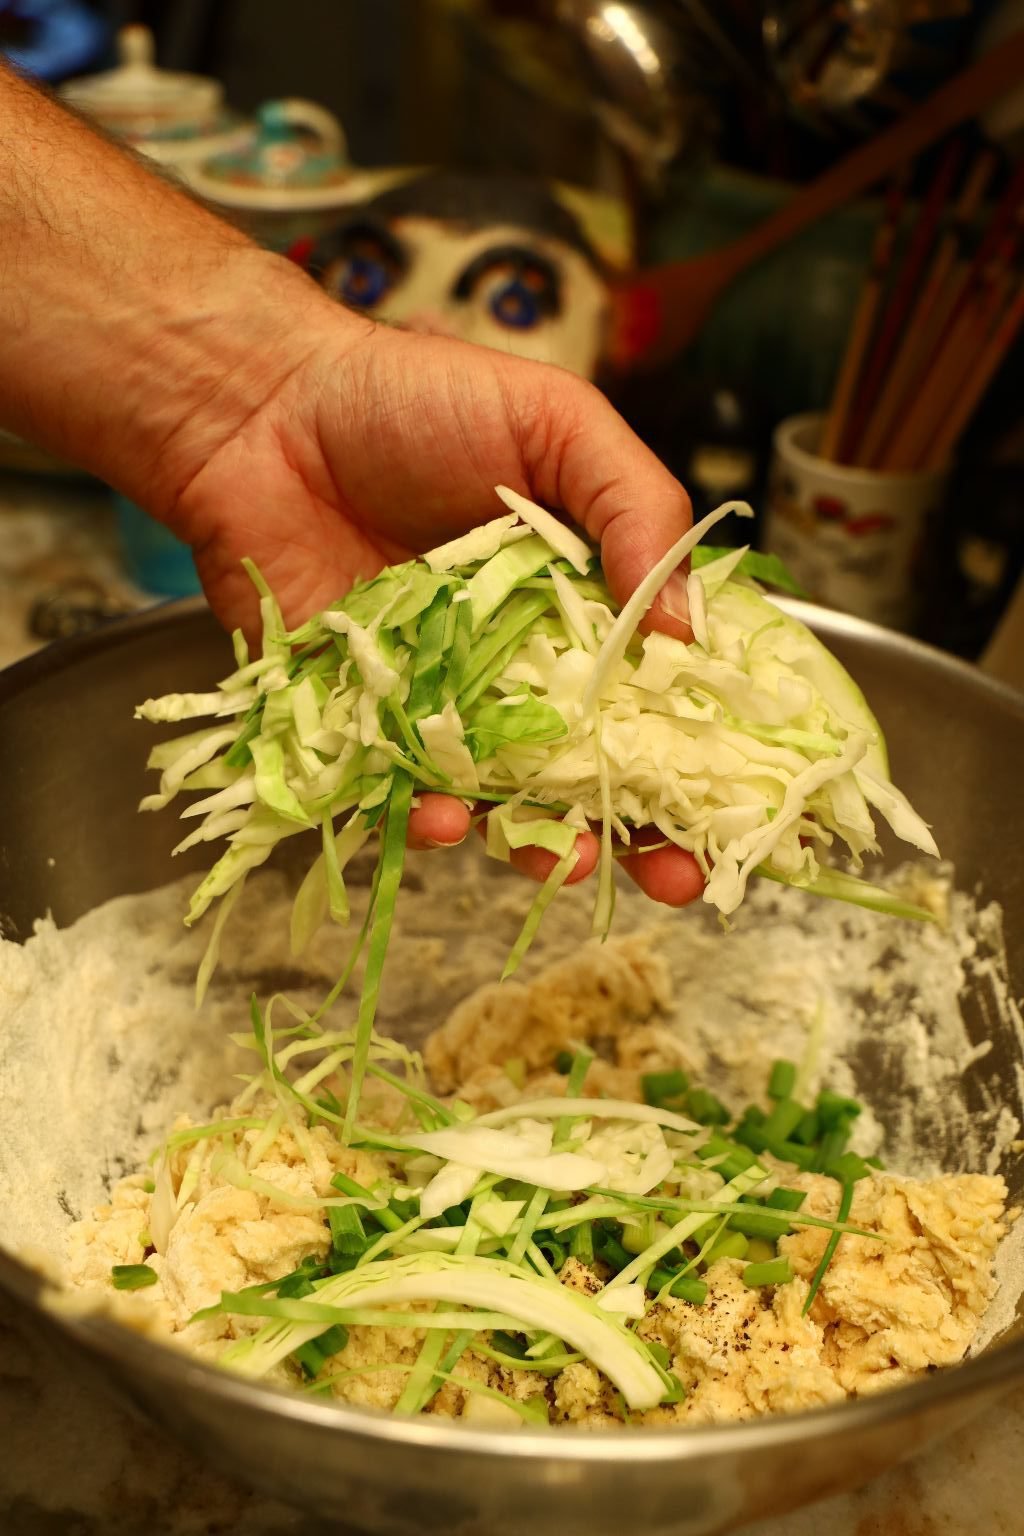
Now, add your Sea Salt, Freshly Ground Black Pepper to the bowl and mix with a whisk.
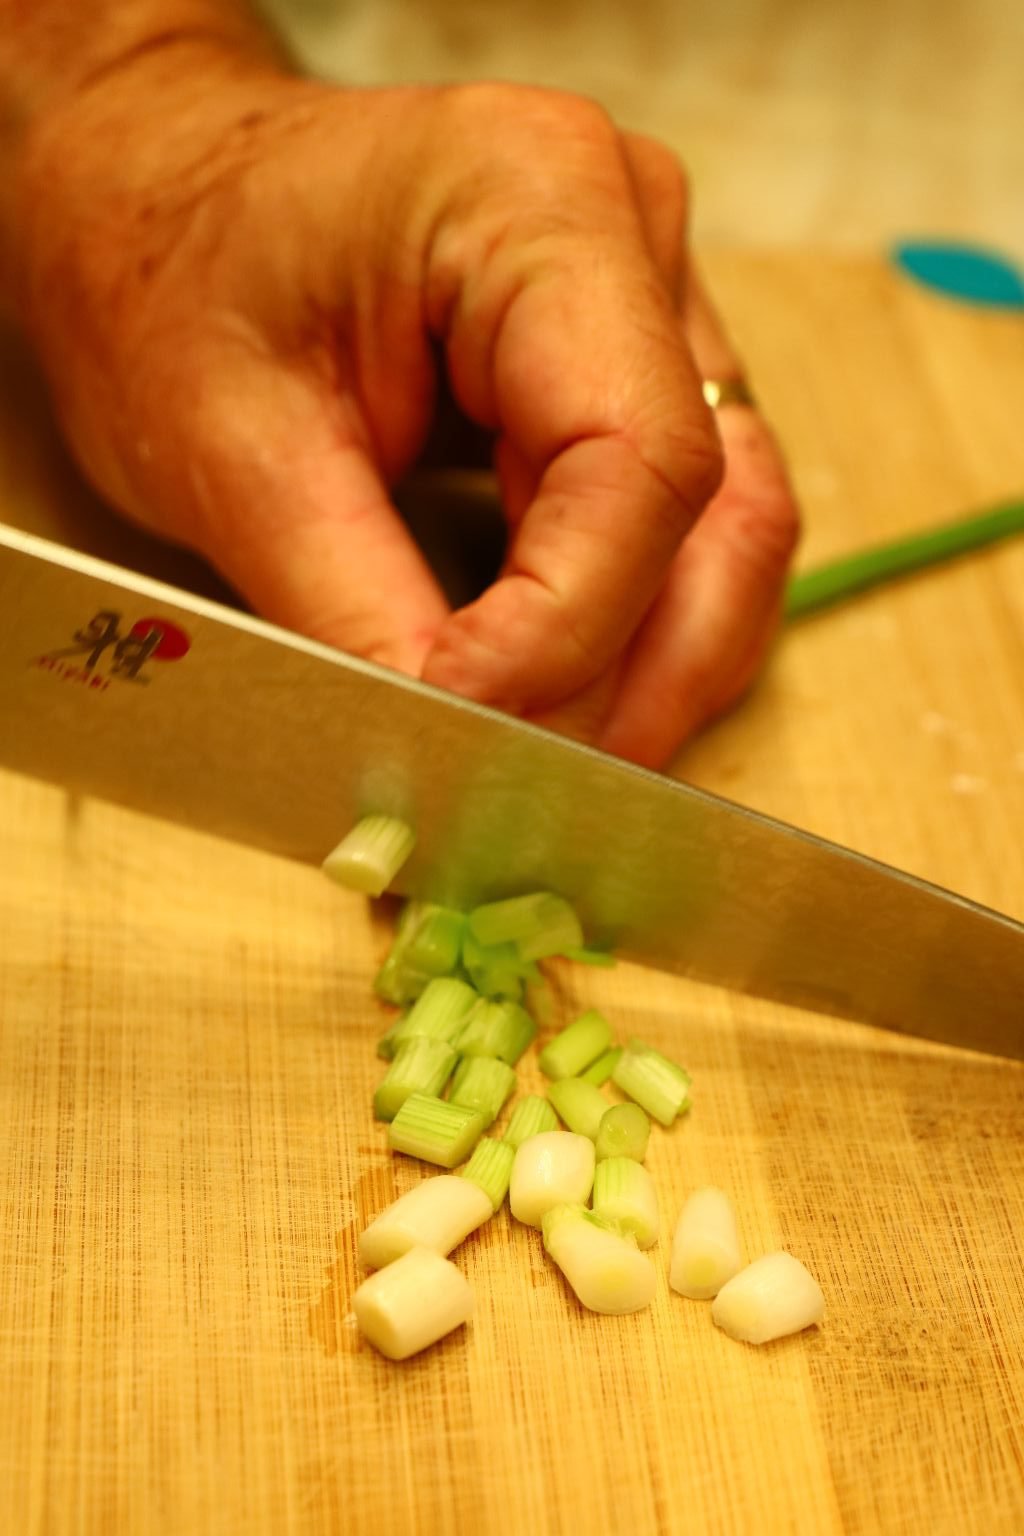
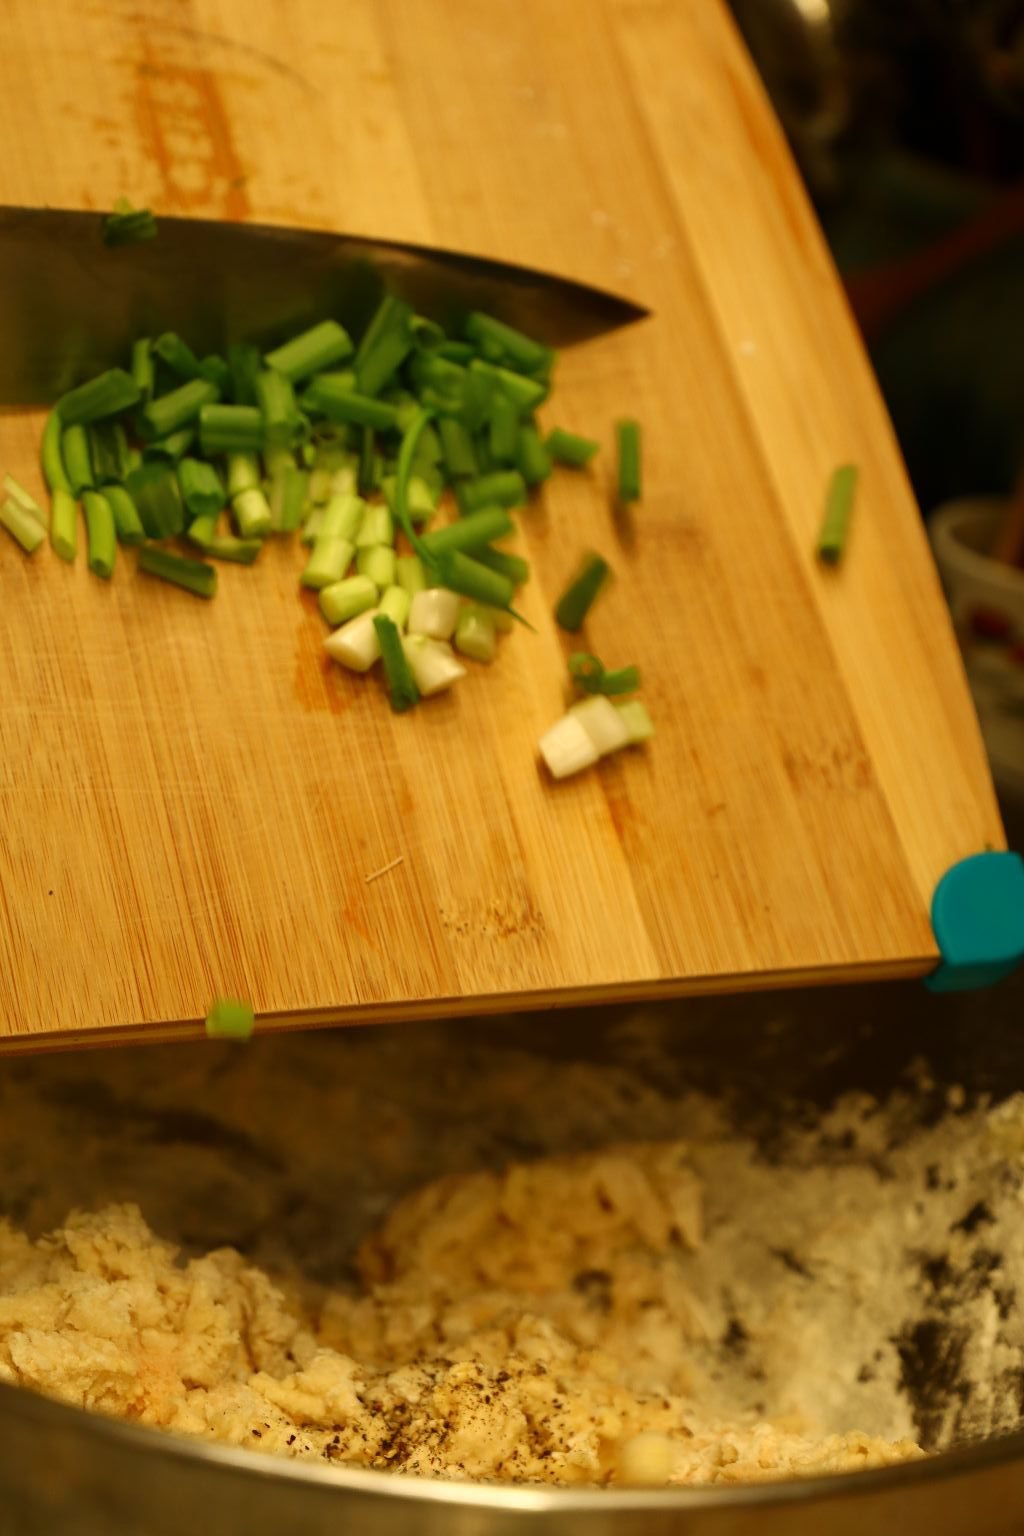
Slice your Green Onions then add them to the bowl.
———————————————————————————–
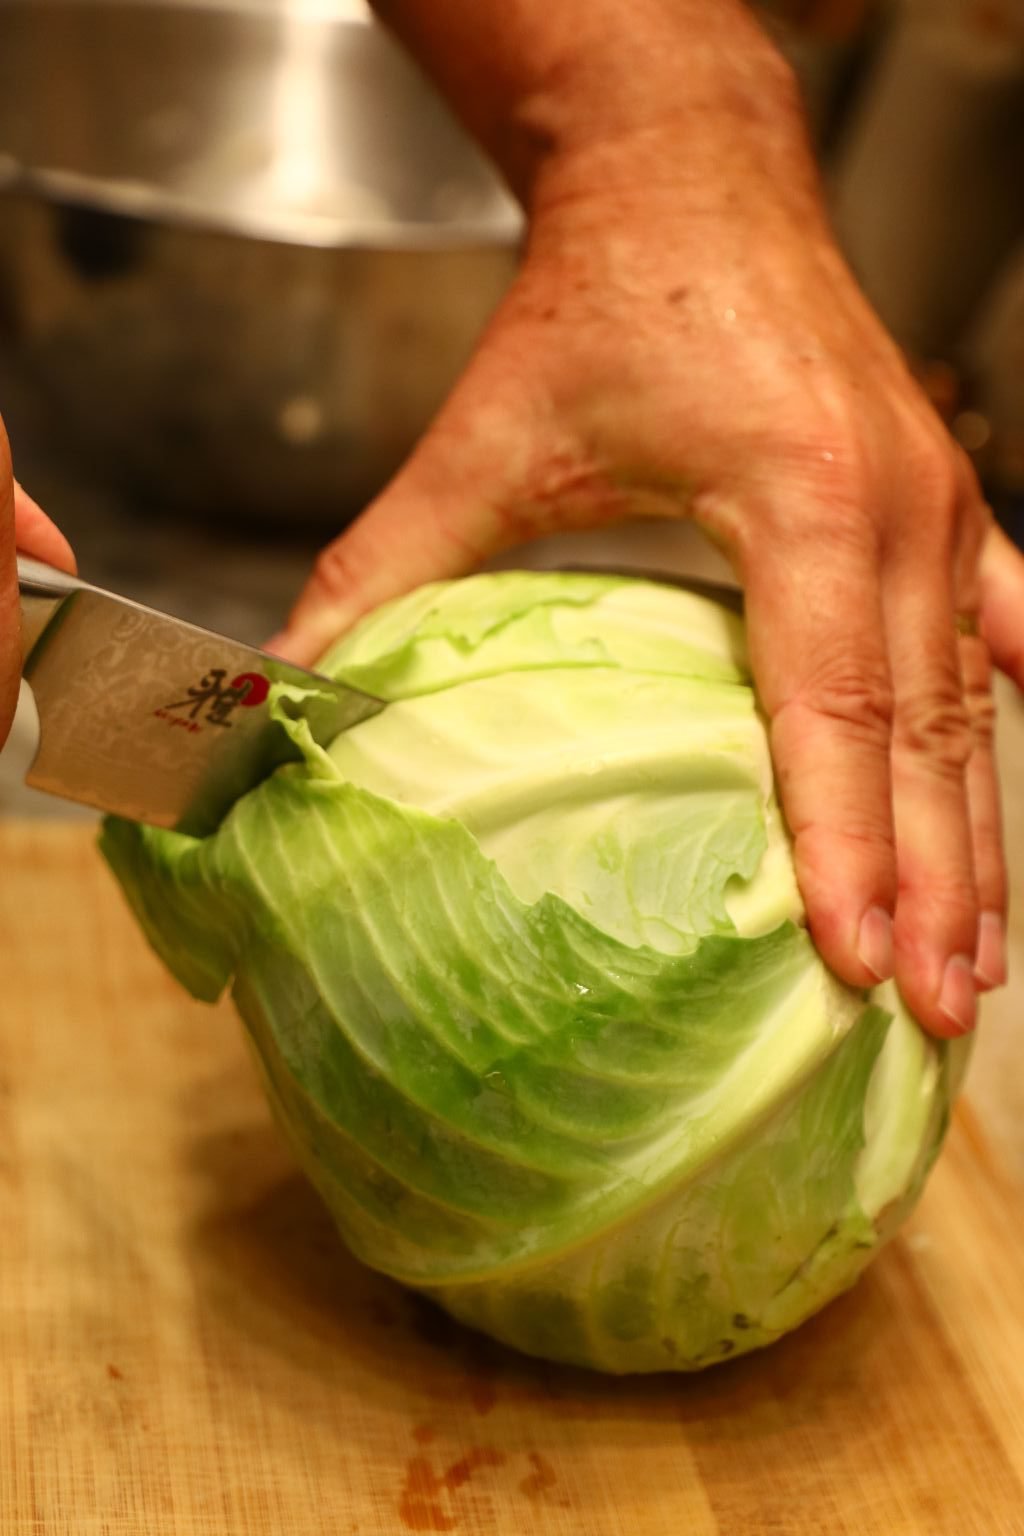
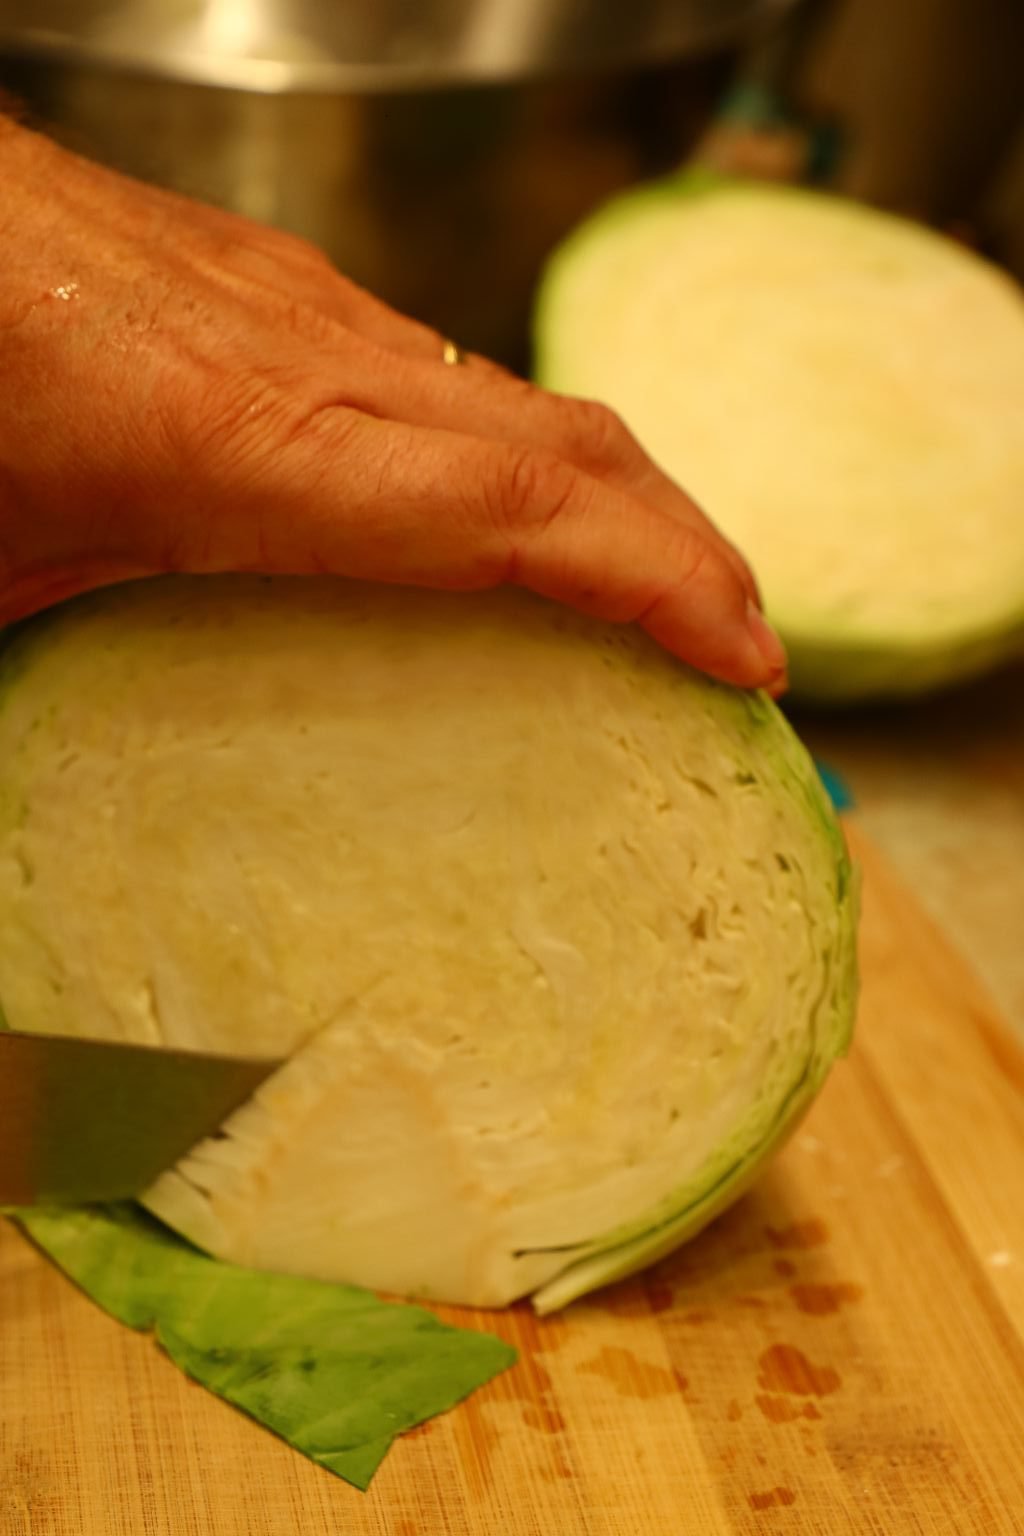
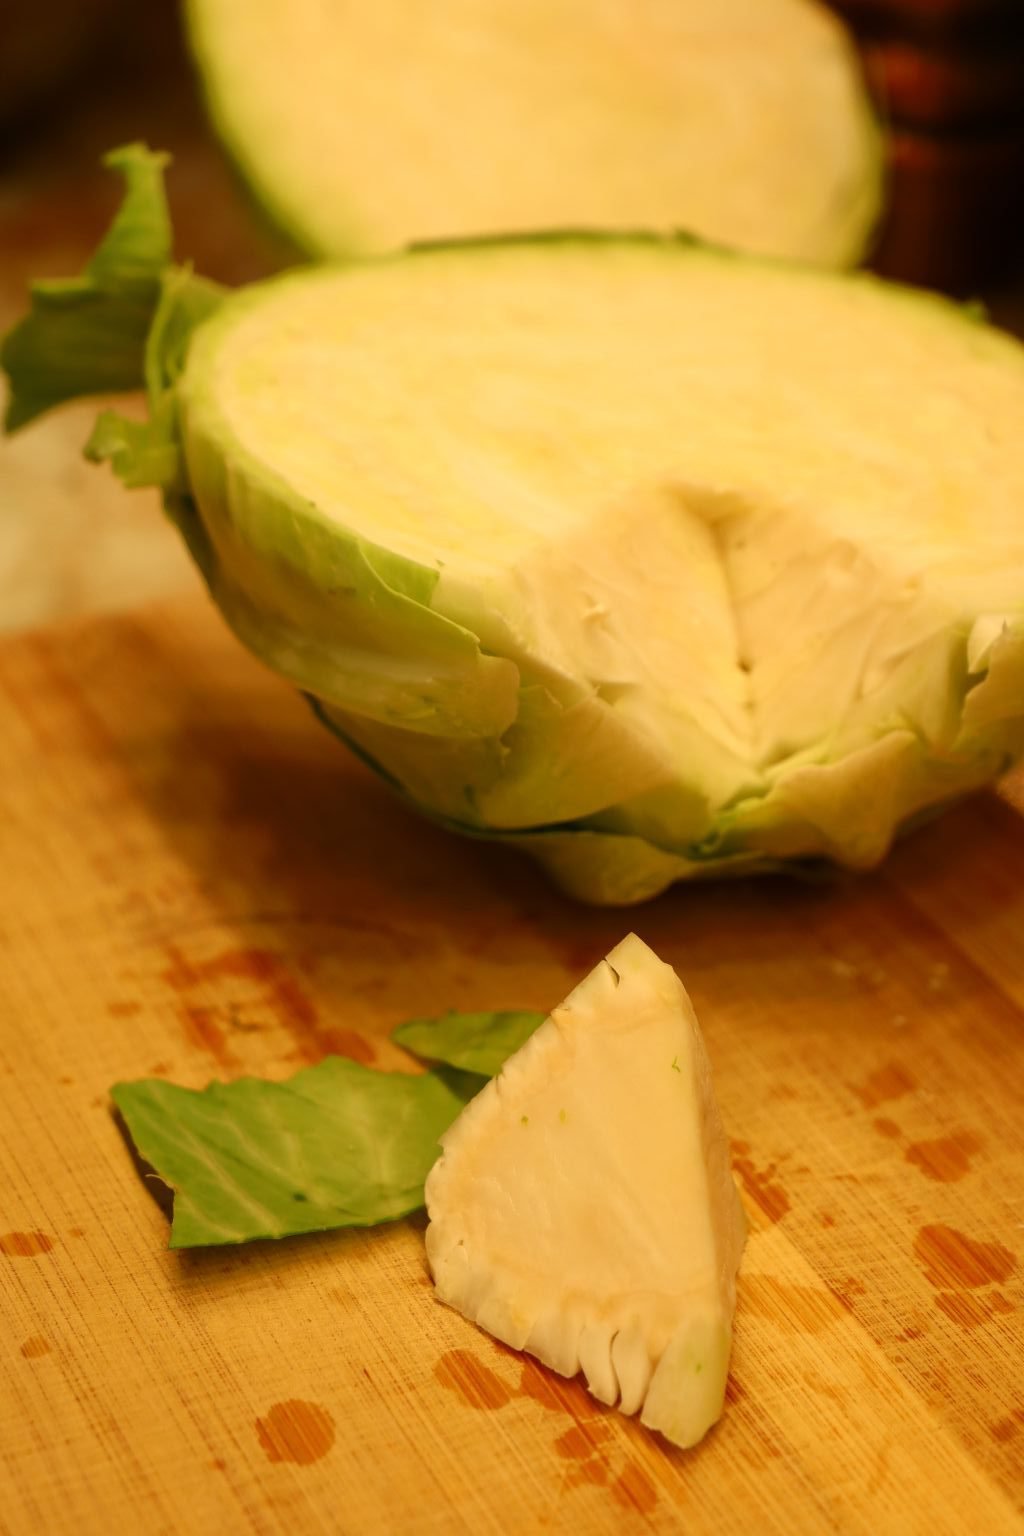
To prepare the Cabbage, slice it in half then remove the core using a triangular cut.
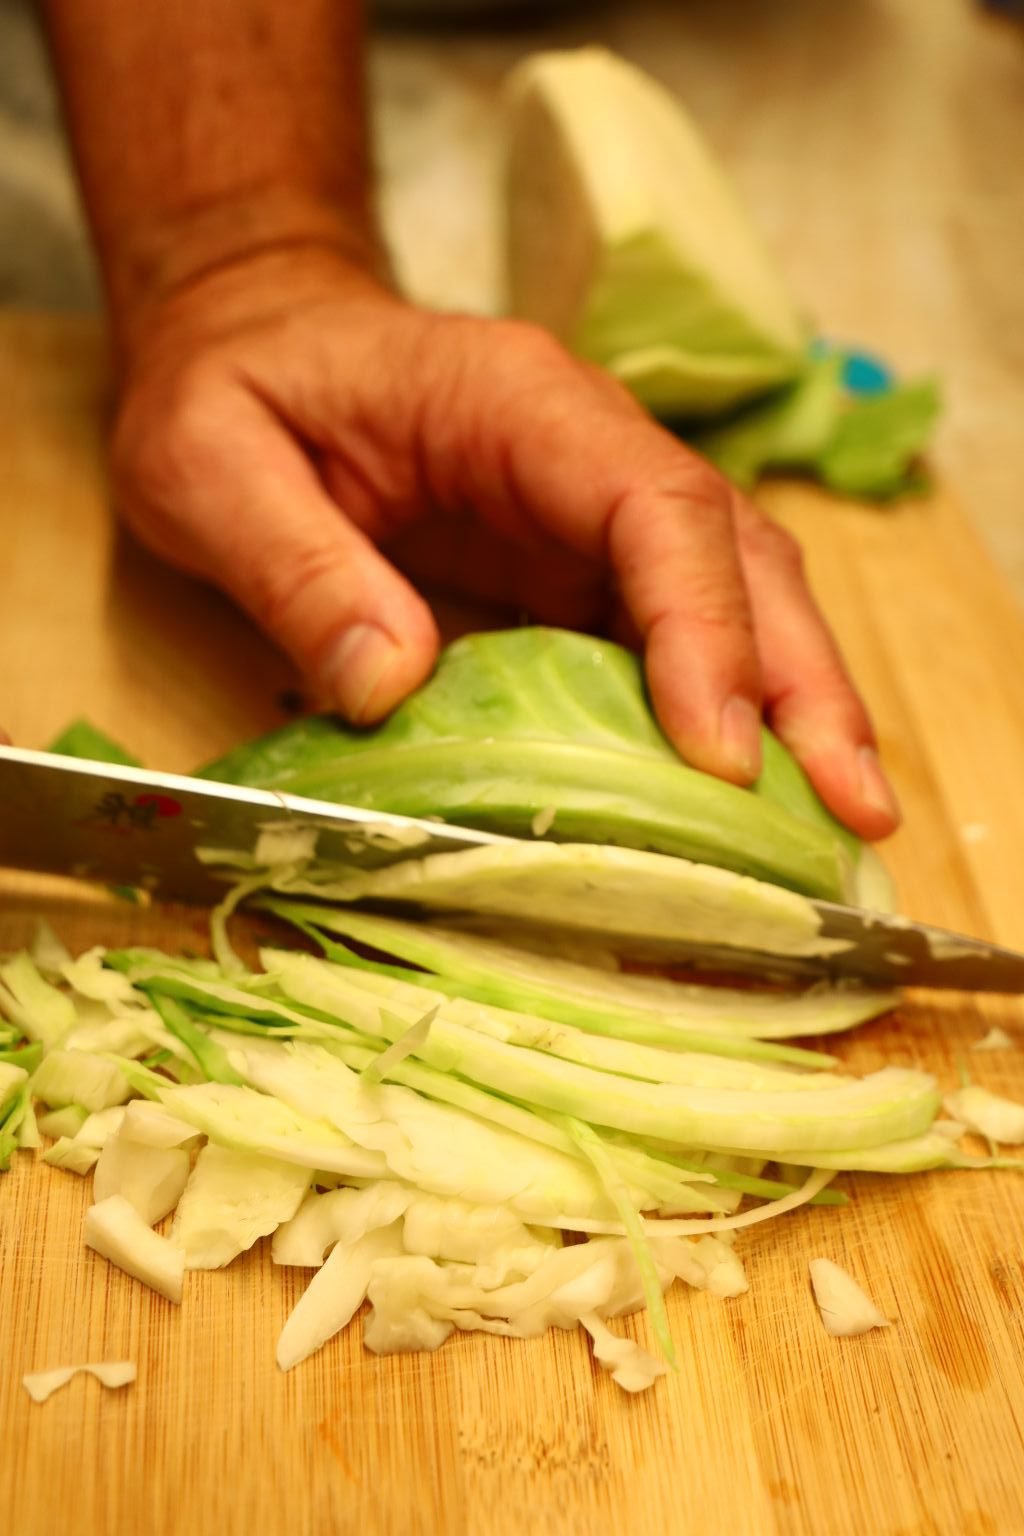
Shred your Cabbage using a sharp knife as shown.
Add about 1 1/2 cups of Cabbage and ~1 Cup of water to the mixture.
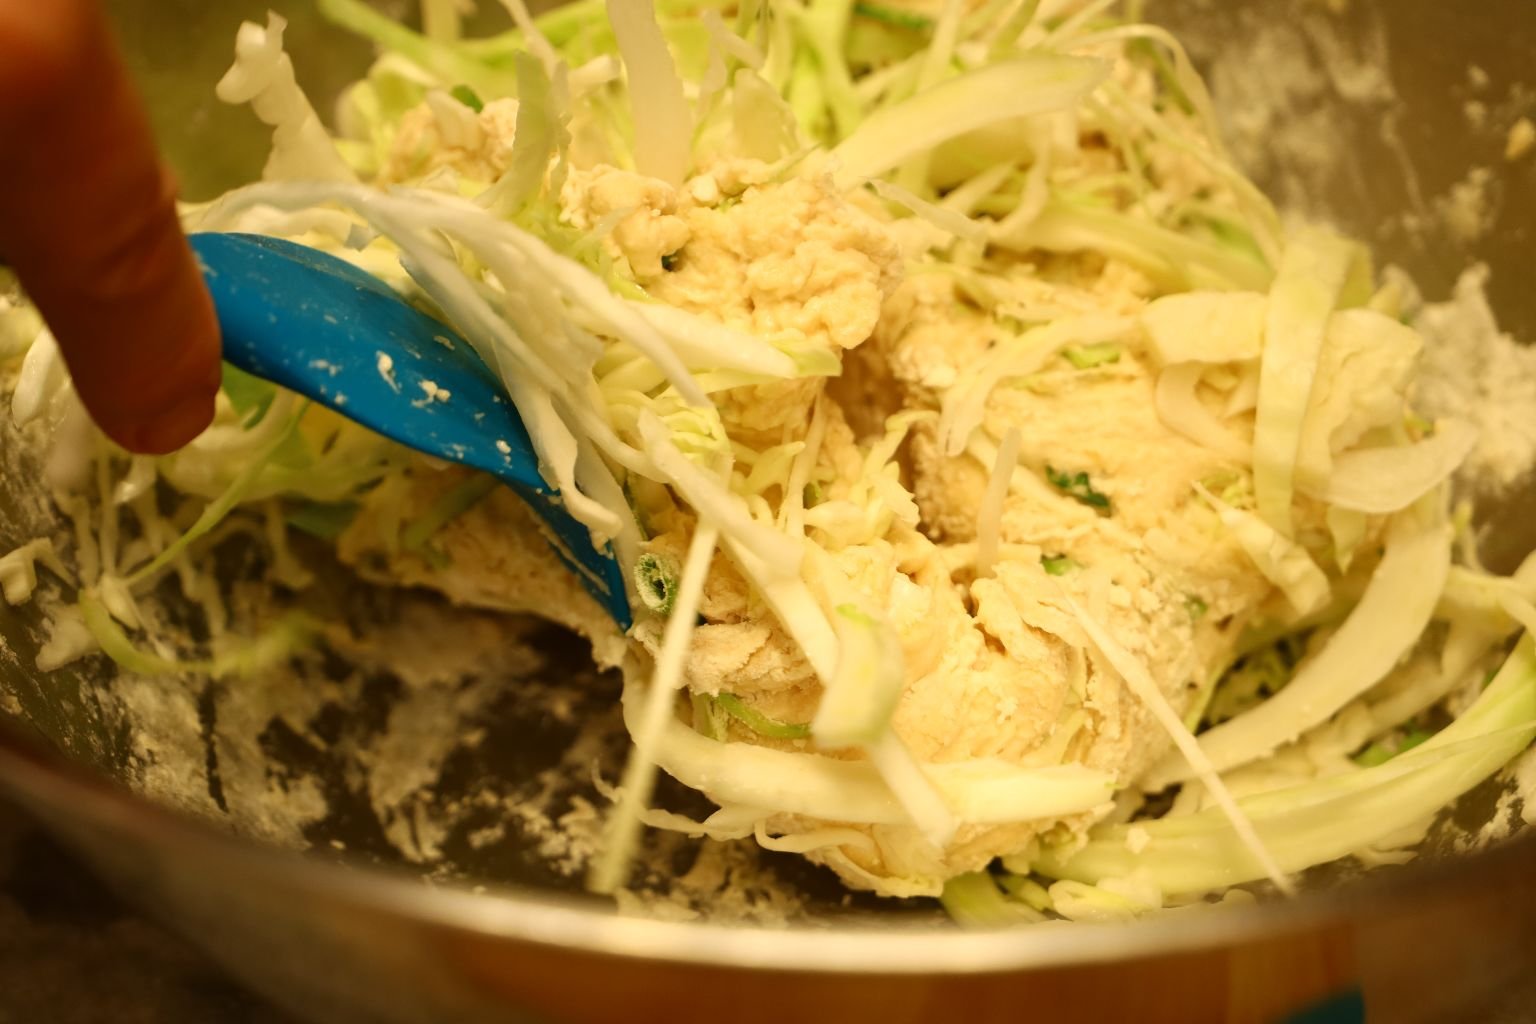
Press the Cabbage into the Pancake batter using a spatula.
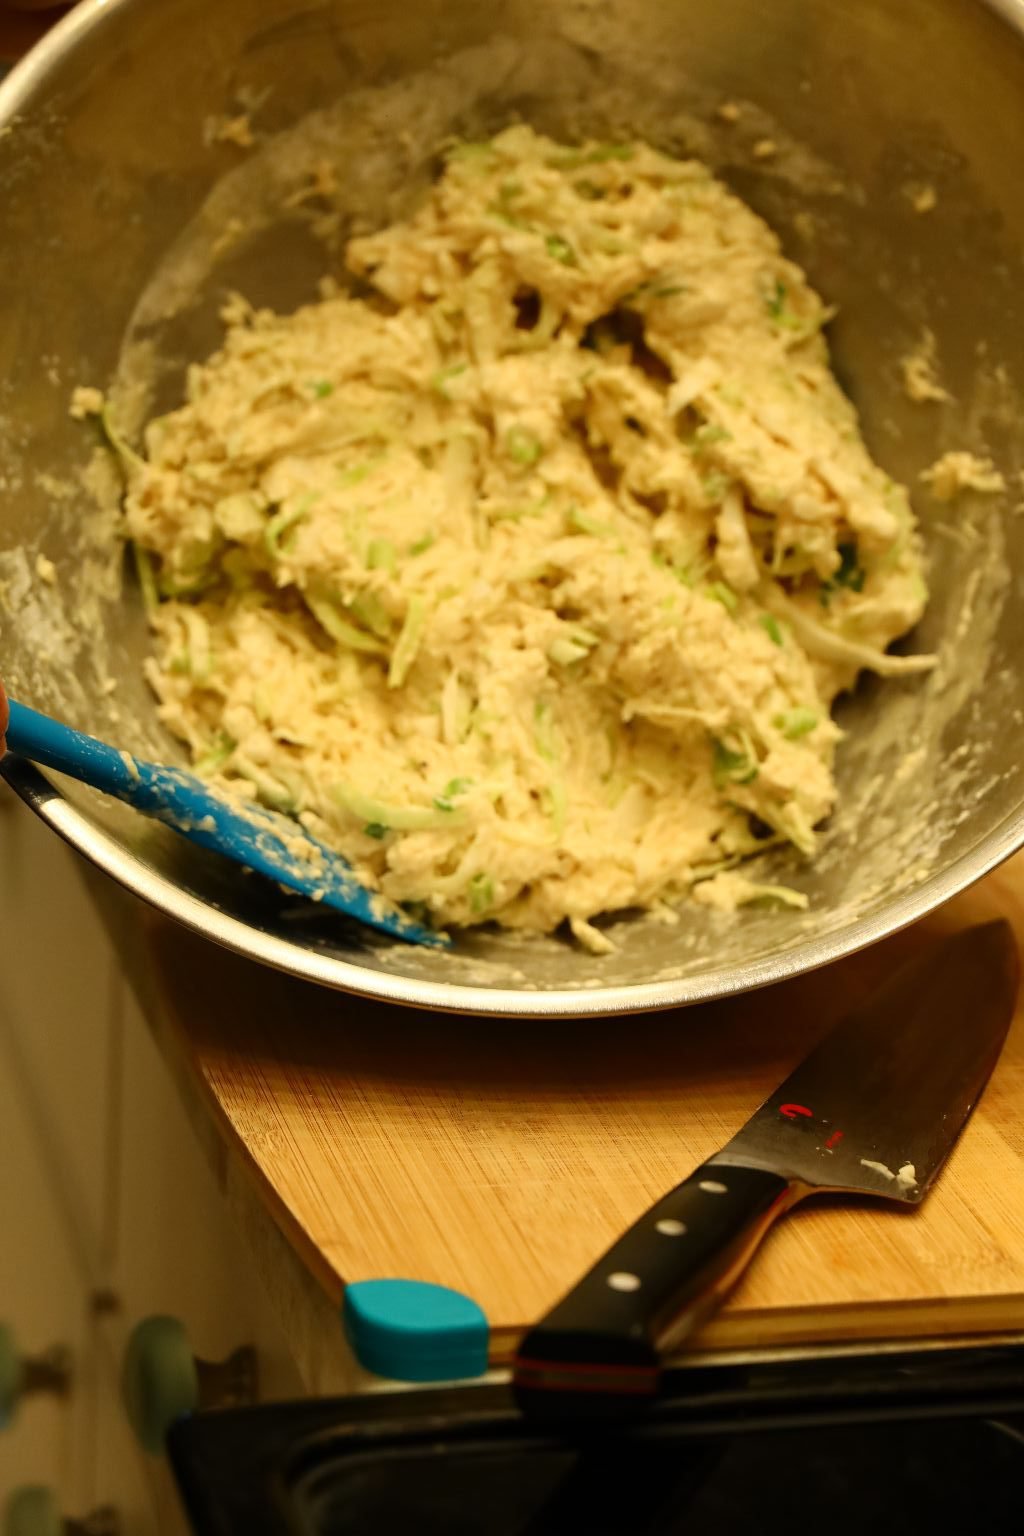
The mixture will be firm and thick

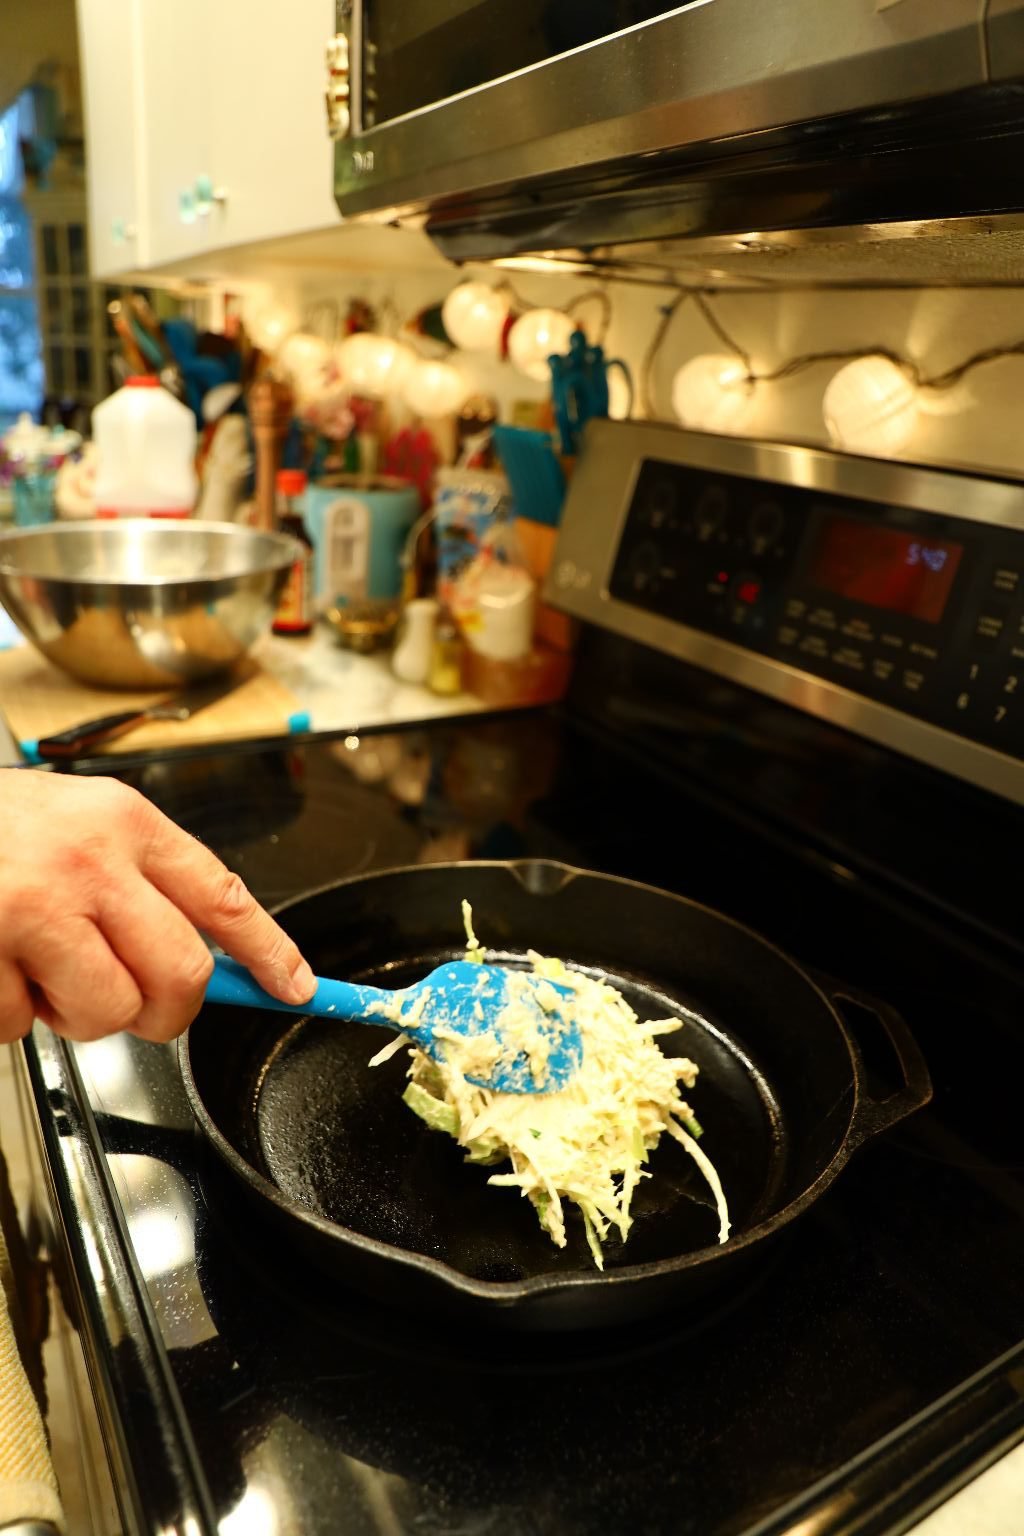
The best way to cook the pancakes is to use a cast iron skillet as it keeps the heat, making the pancake cook evenly. Add about 2 Tbsp. of Peanut Oil to the skillet and heat to medium high heat. When the pan is of temperature, add about 1 Cup of the batter to the pan.
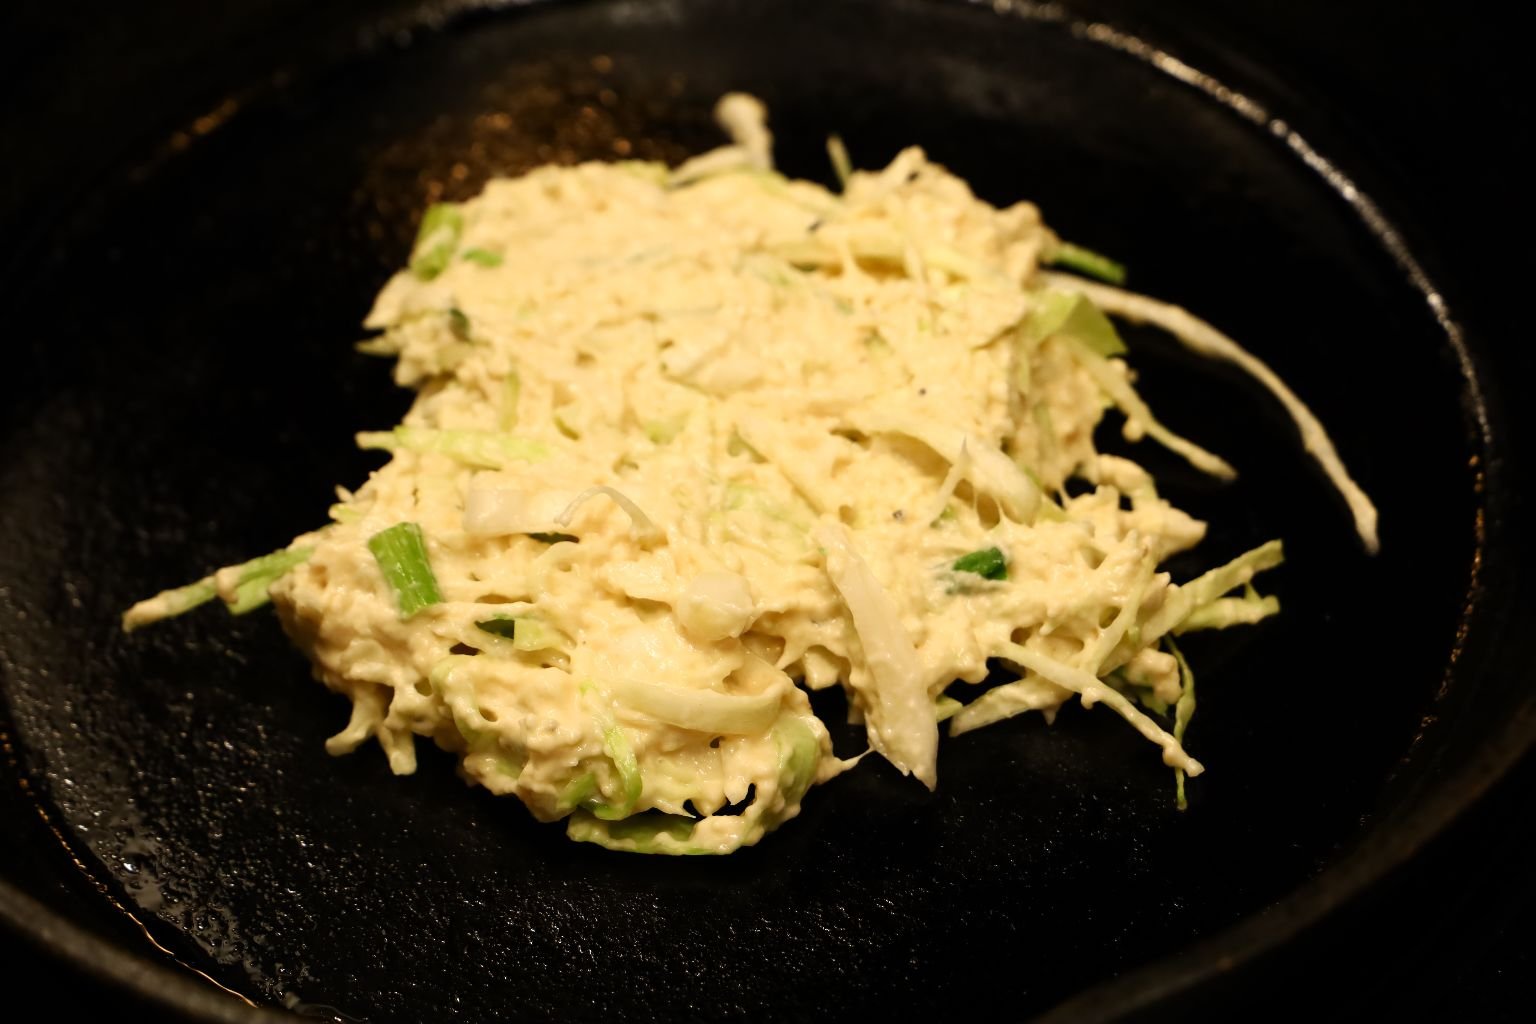
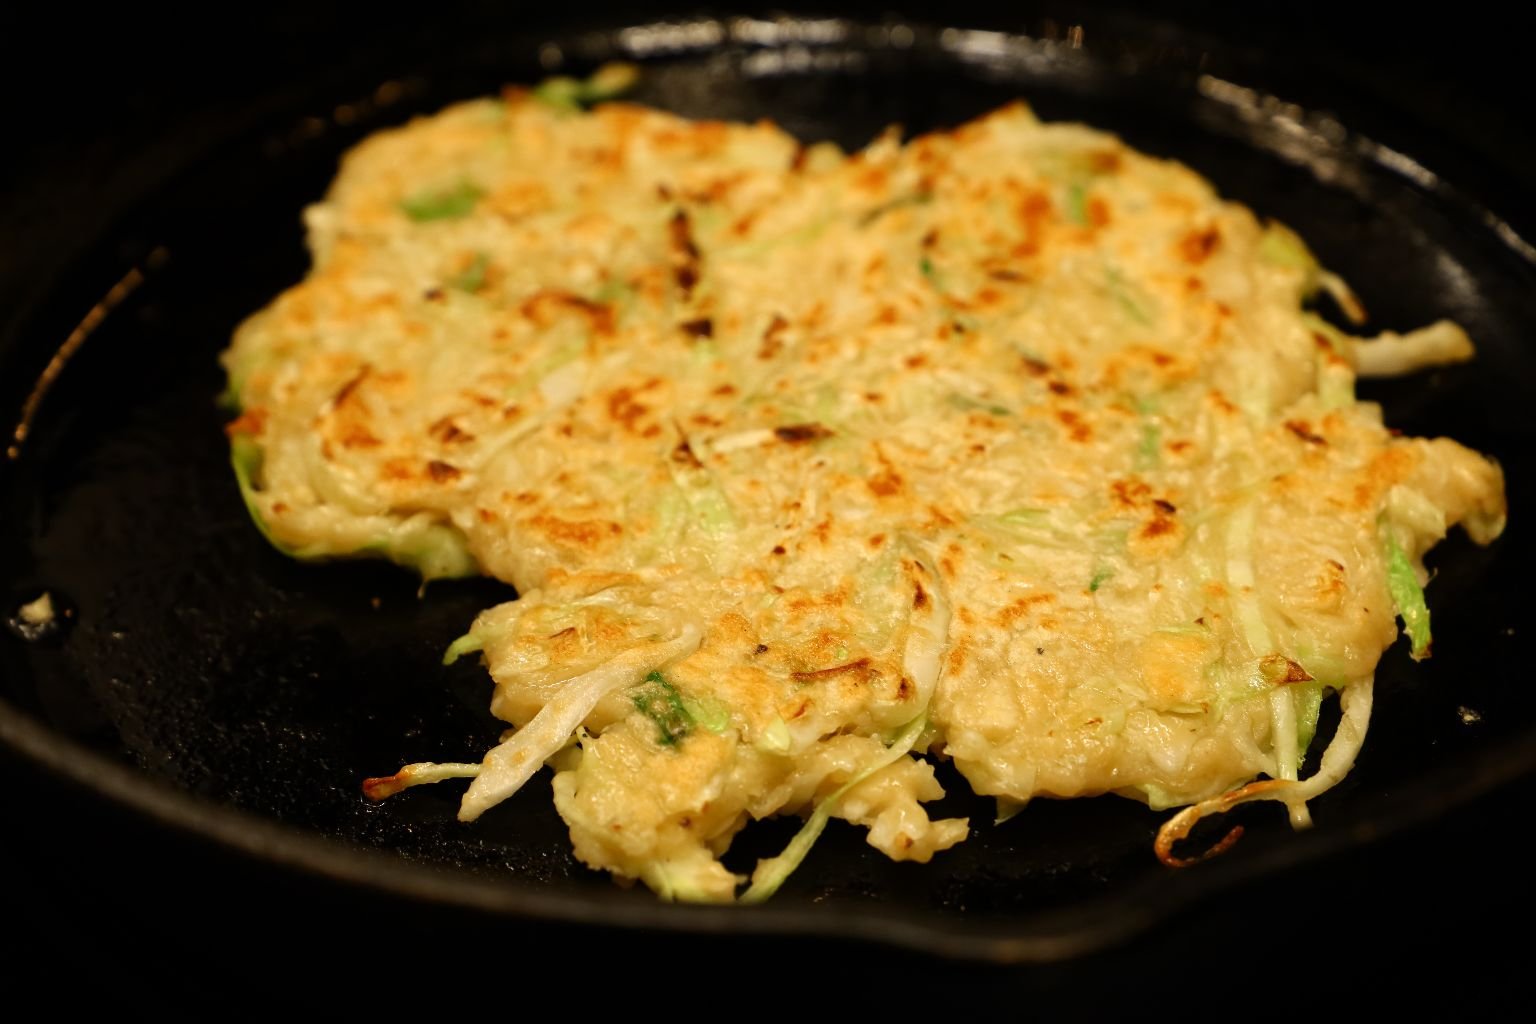
Cook the pancake for about 3 min. or until the pancake begins to brown as shown.
When browned to your liking, flip the pancake over.
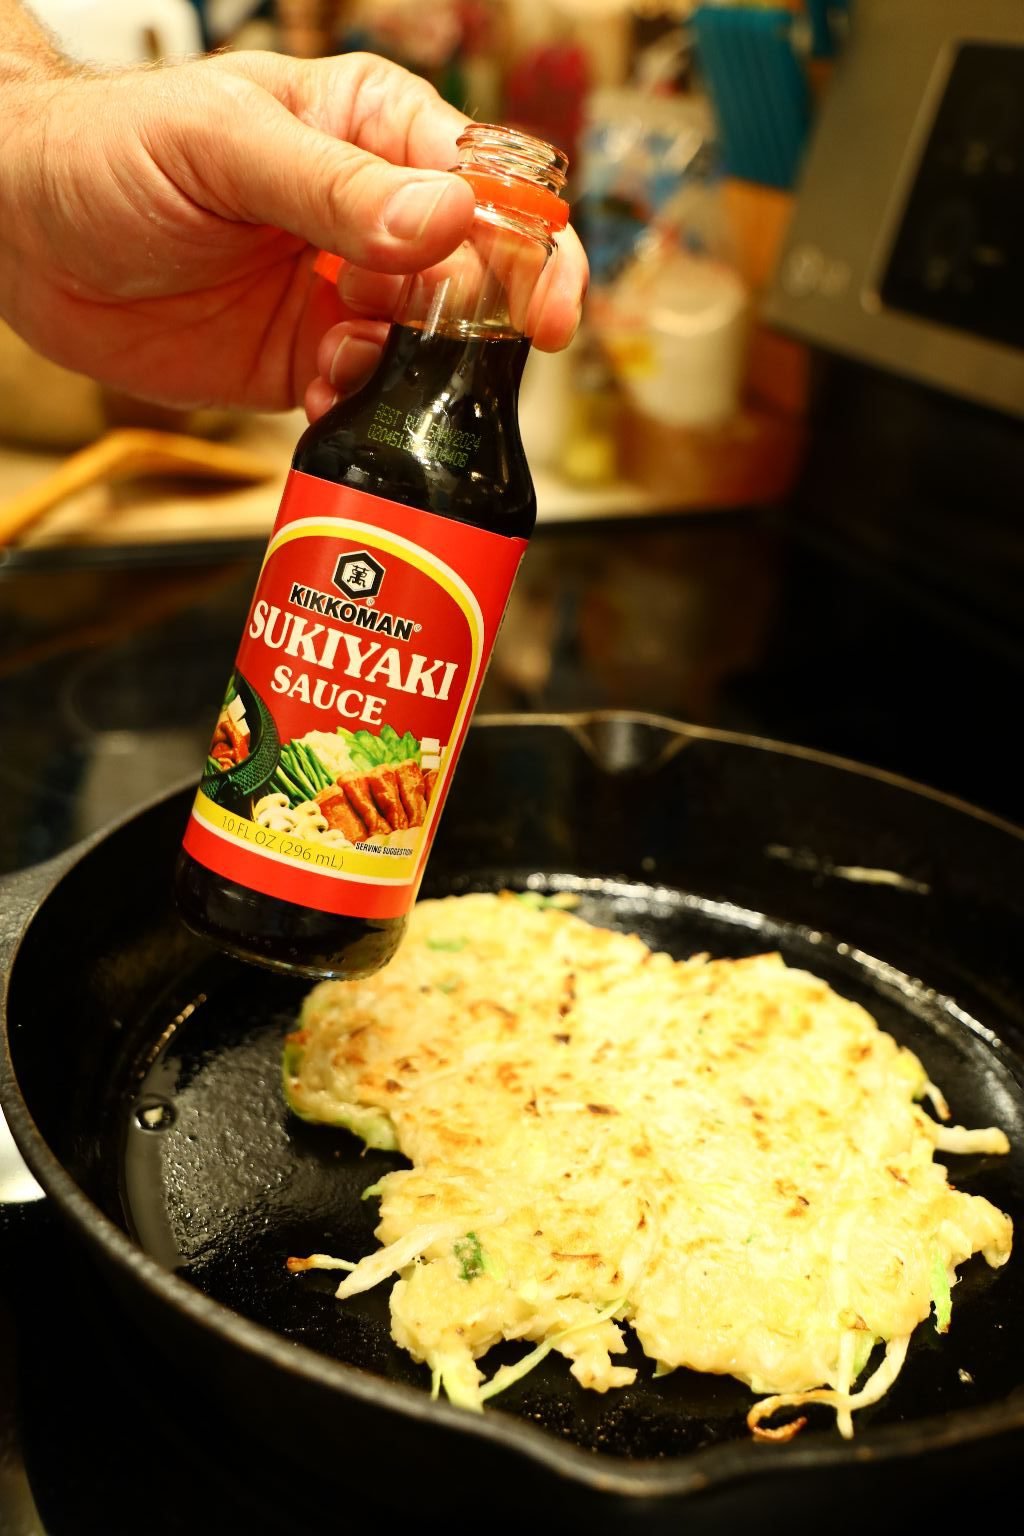
Add about 1 Tbsp. or more of the Sukiyaki Sauce to the top of the pancake.
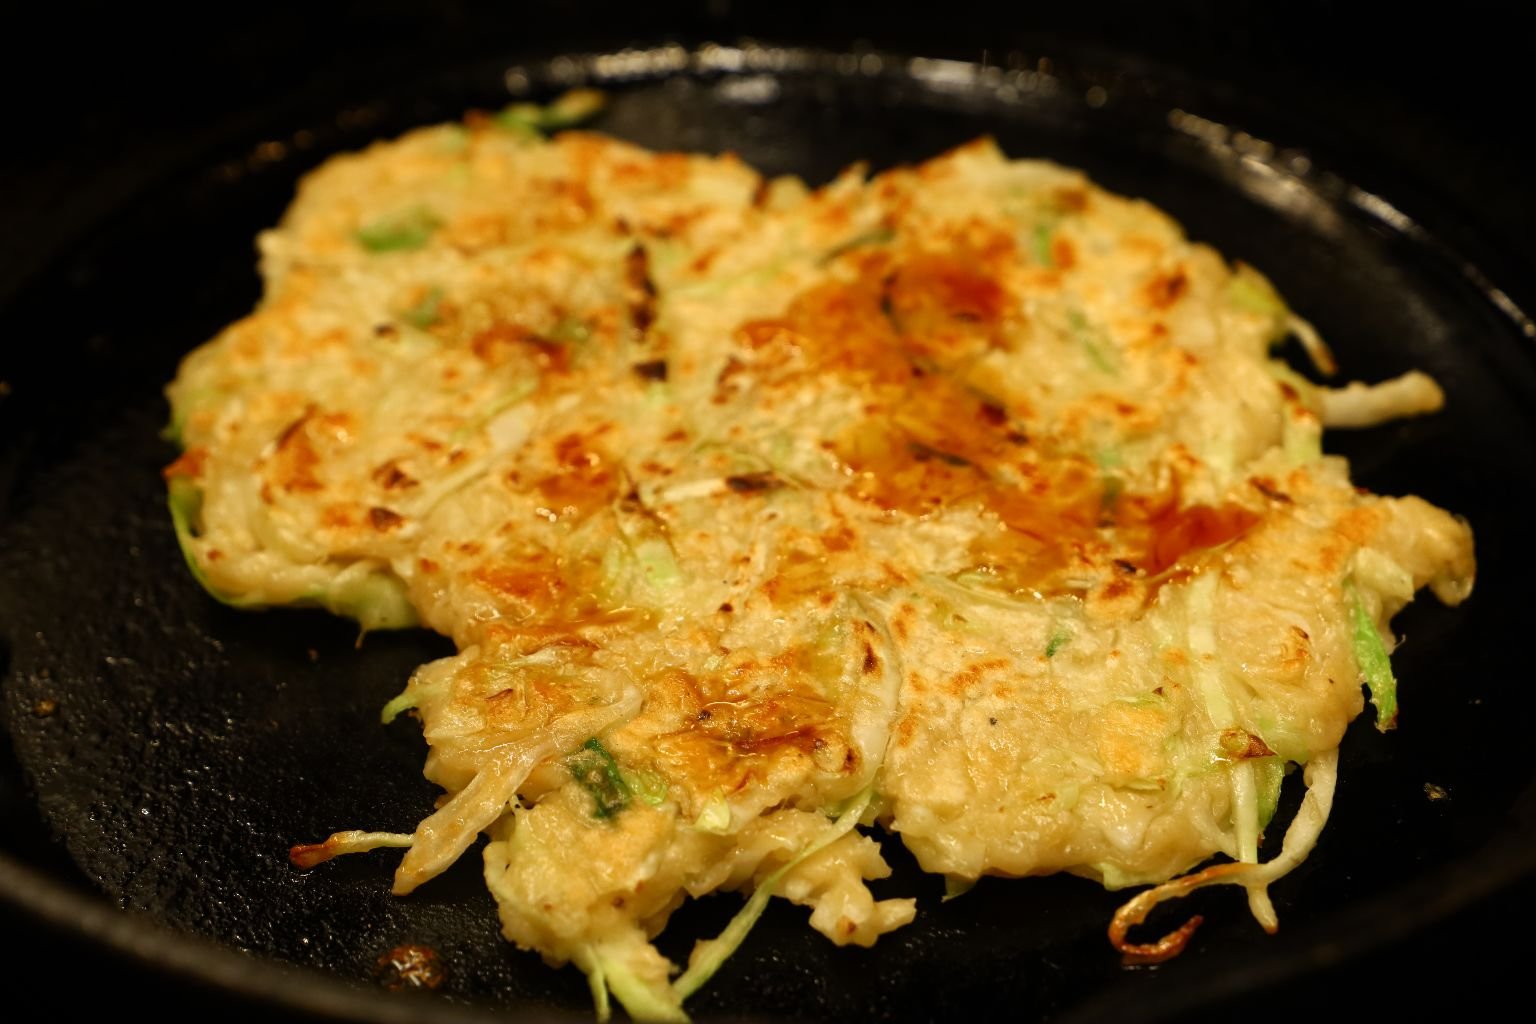
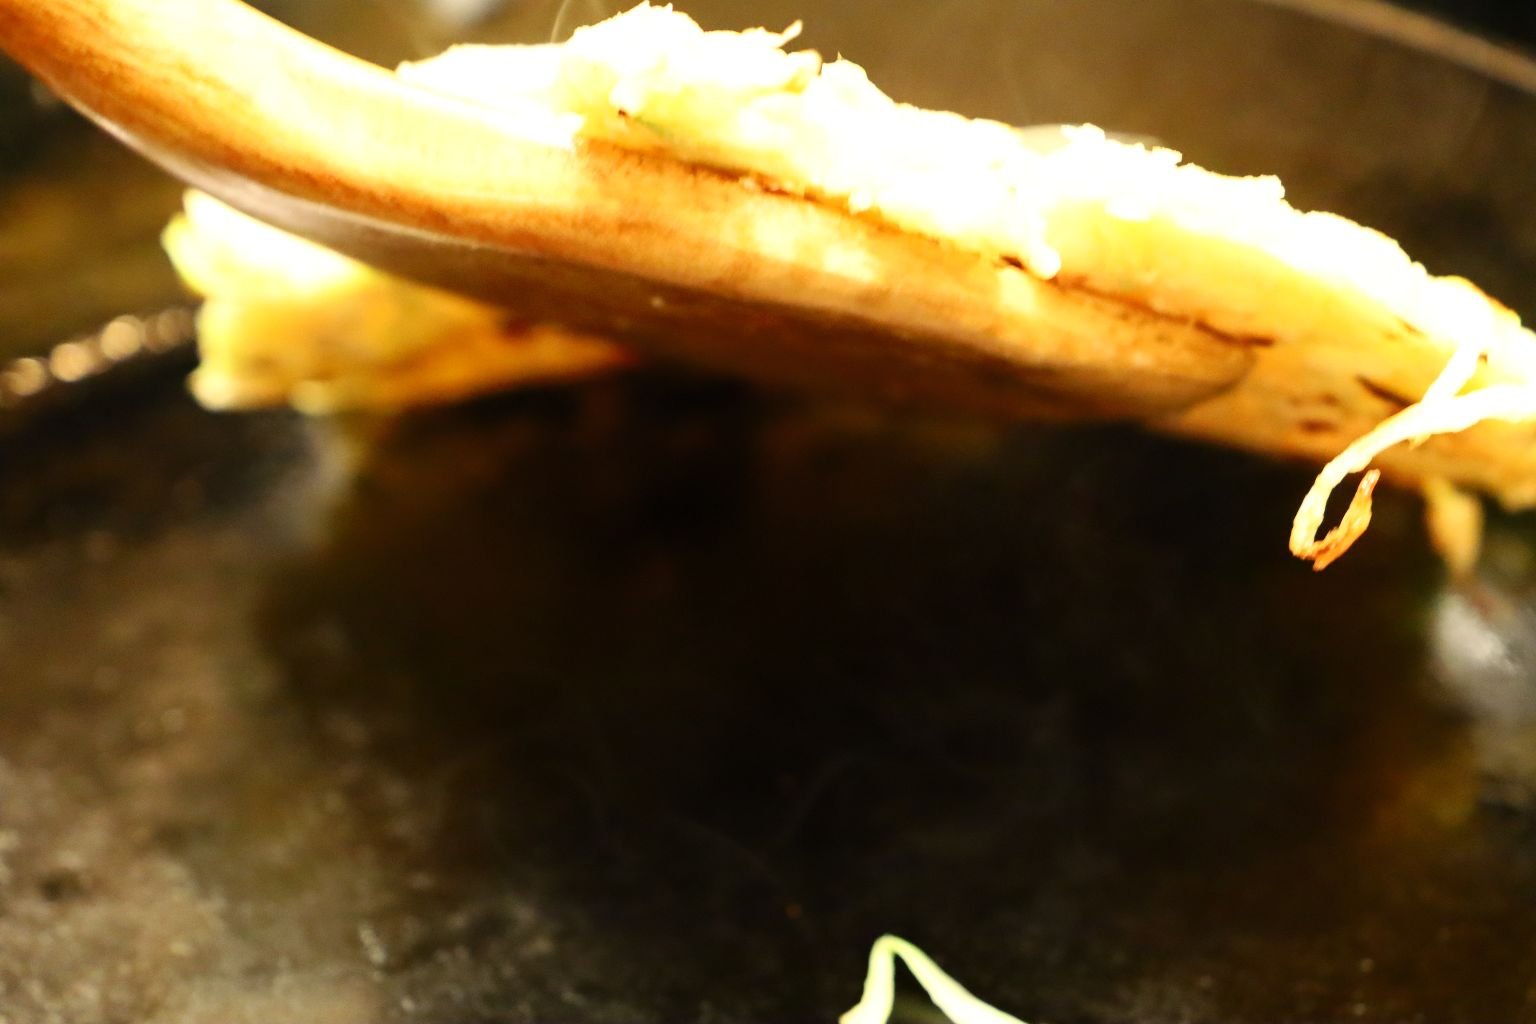
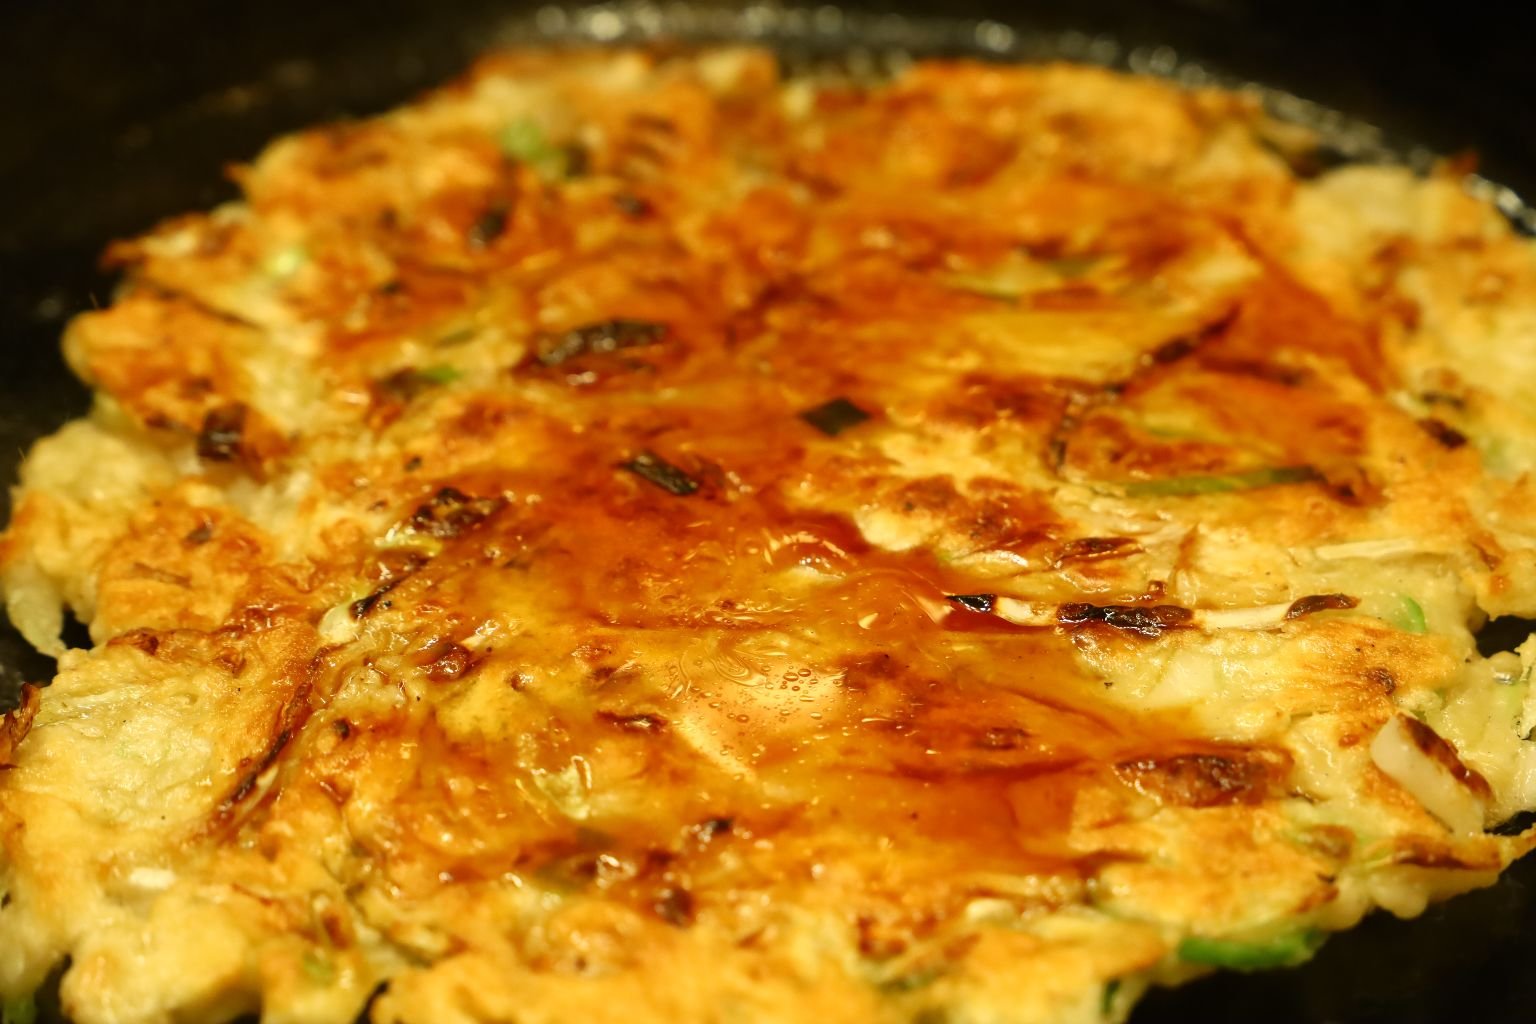

Here I flipped the pancake over to ensure it was browned well. When done remove a place on your plate then add more Sukiyaki Sauce to taste.
—————————————————————————-
PLUMS
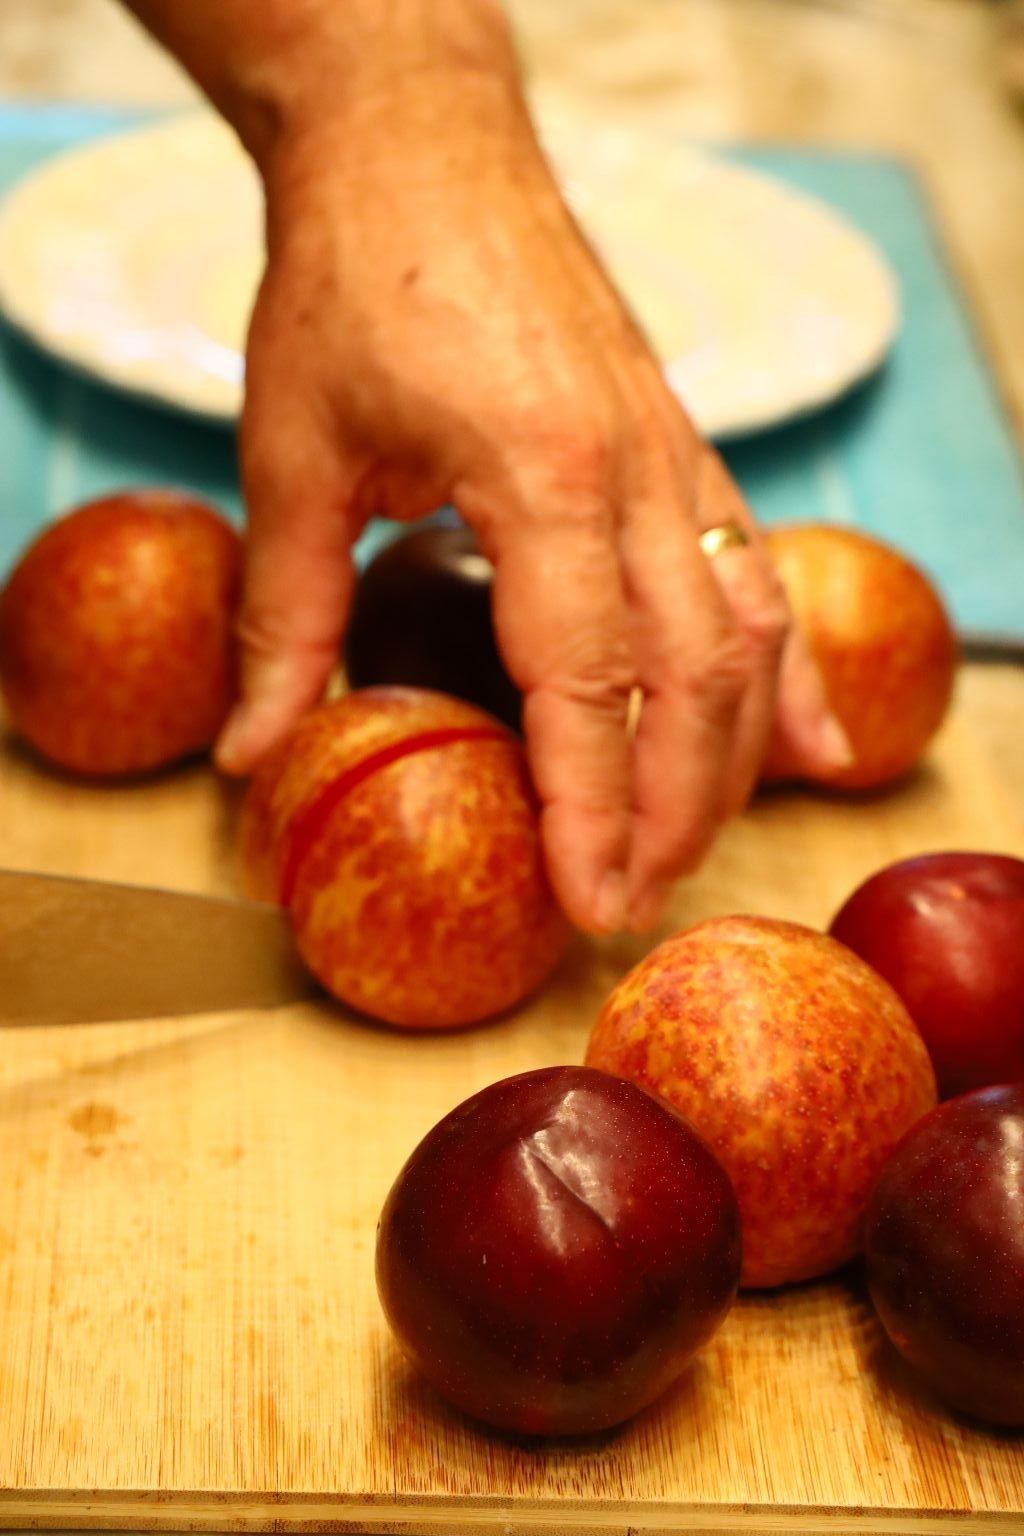
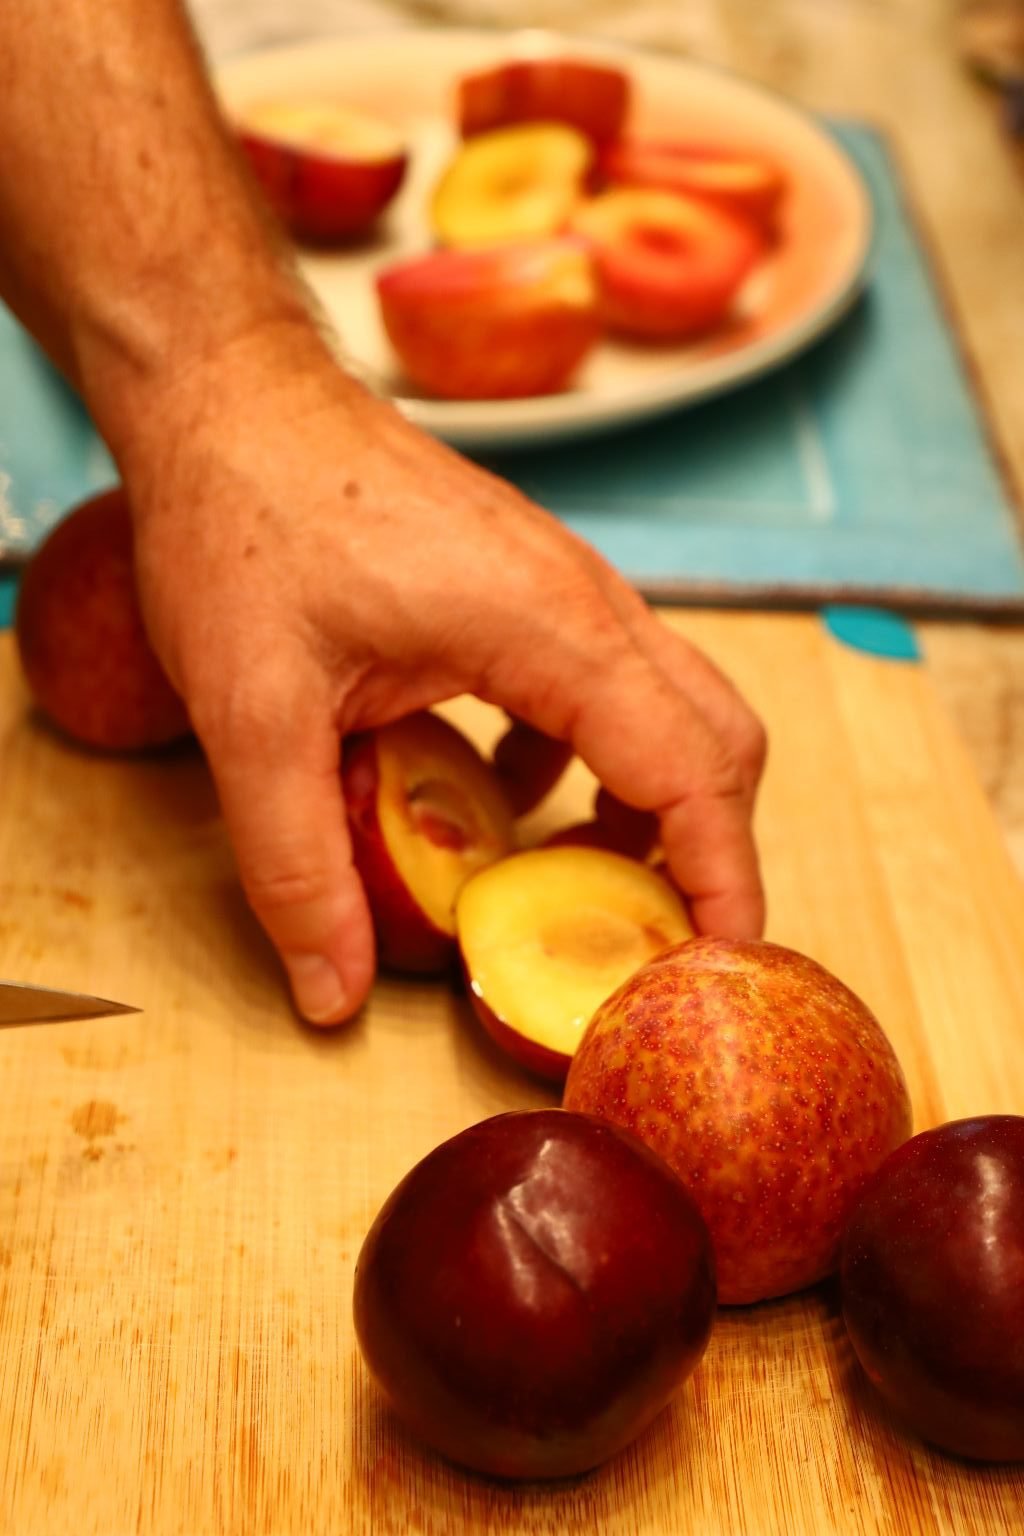
Grilled Plums are great and compliment this fruity Jezebel sauced Chicken.
Simply slice the Plums in half and remove the inner pit/seed.
Then set aside until we grill.
———————————————————————————–
Time To Skewer The Chicken
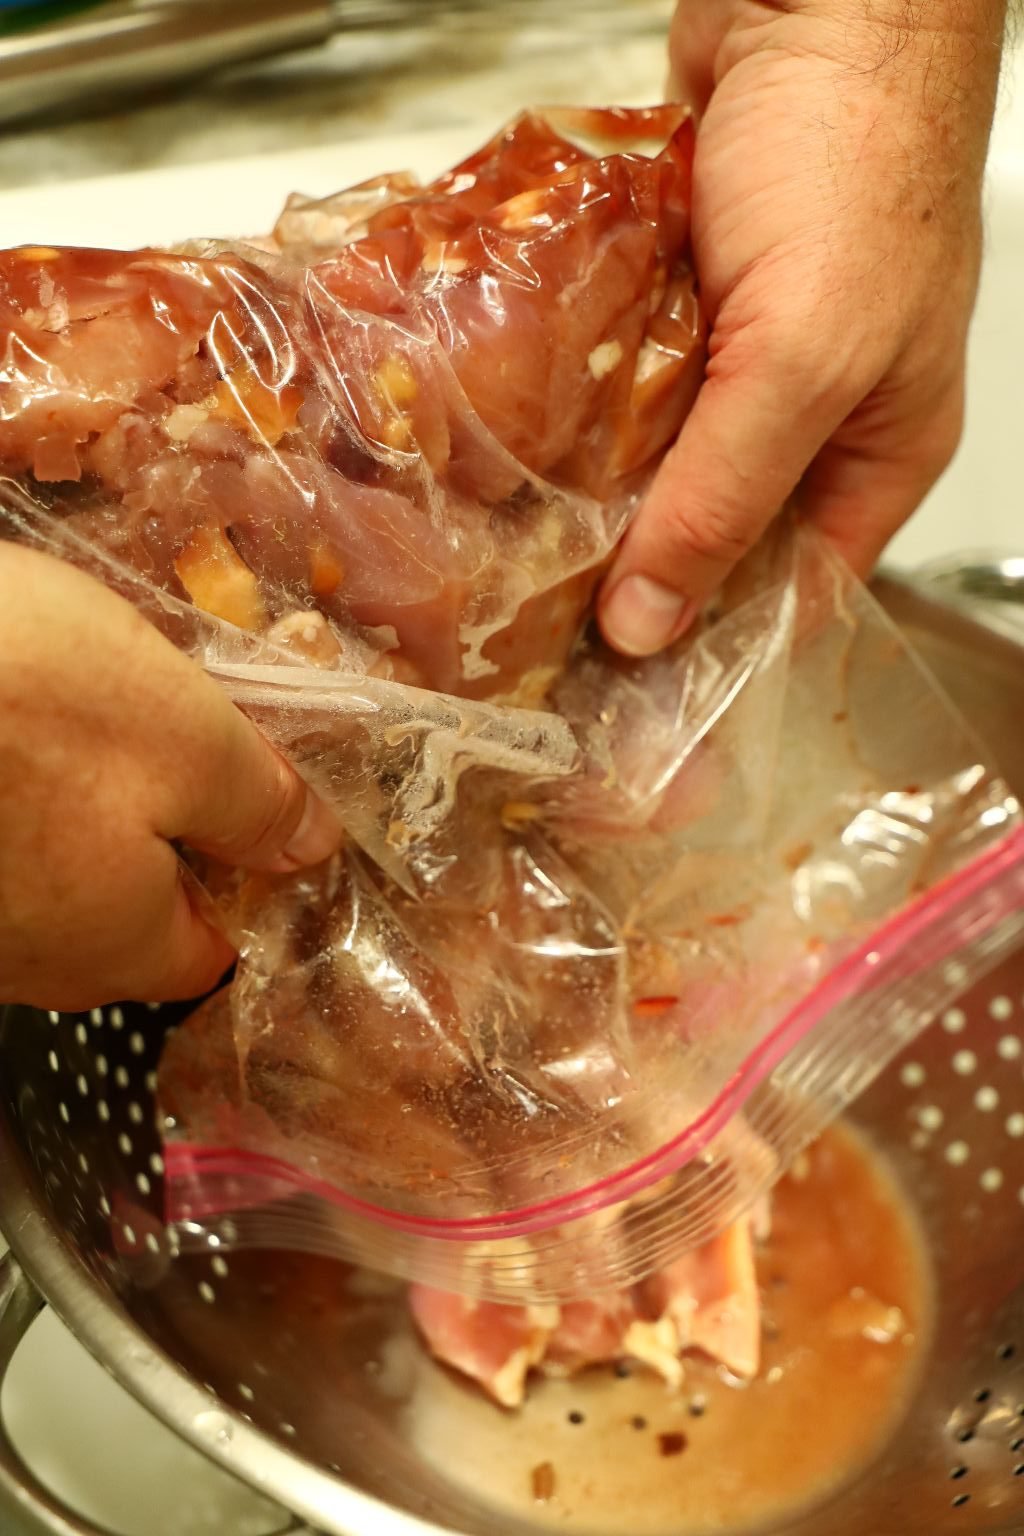
Here the Chicken has marinated overnight.
Remove the excess sauce by pouring the Chicken into a colander.
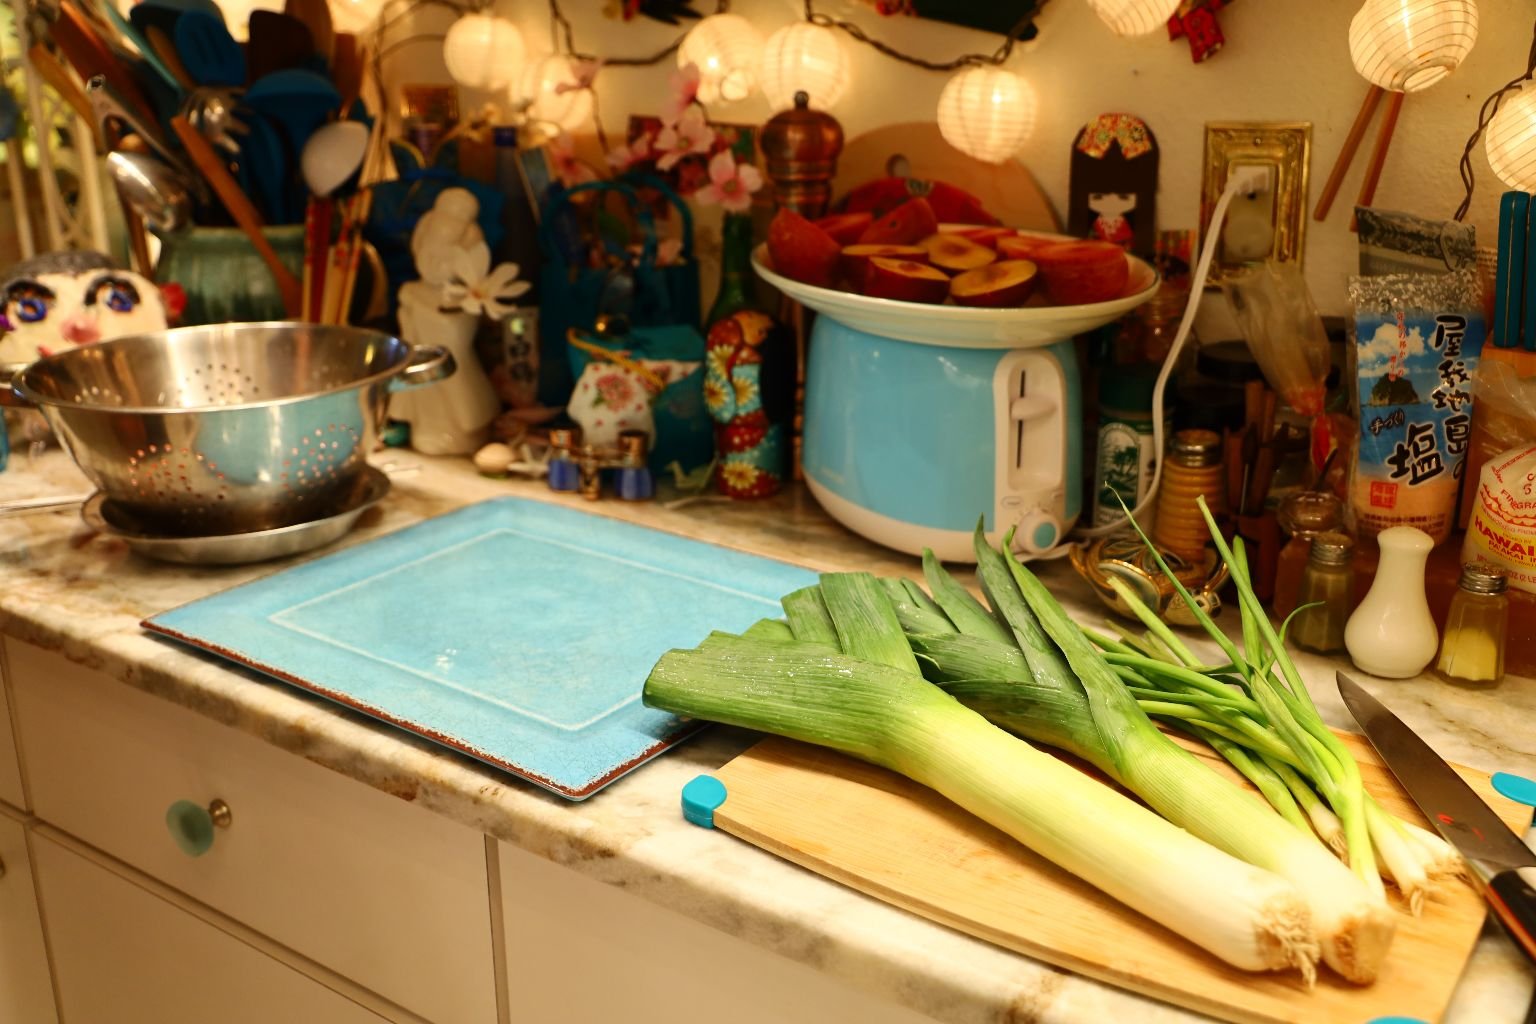
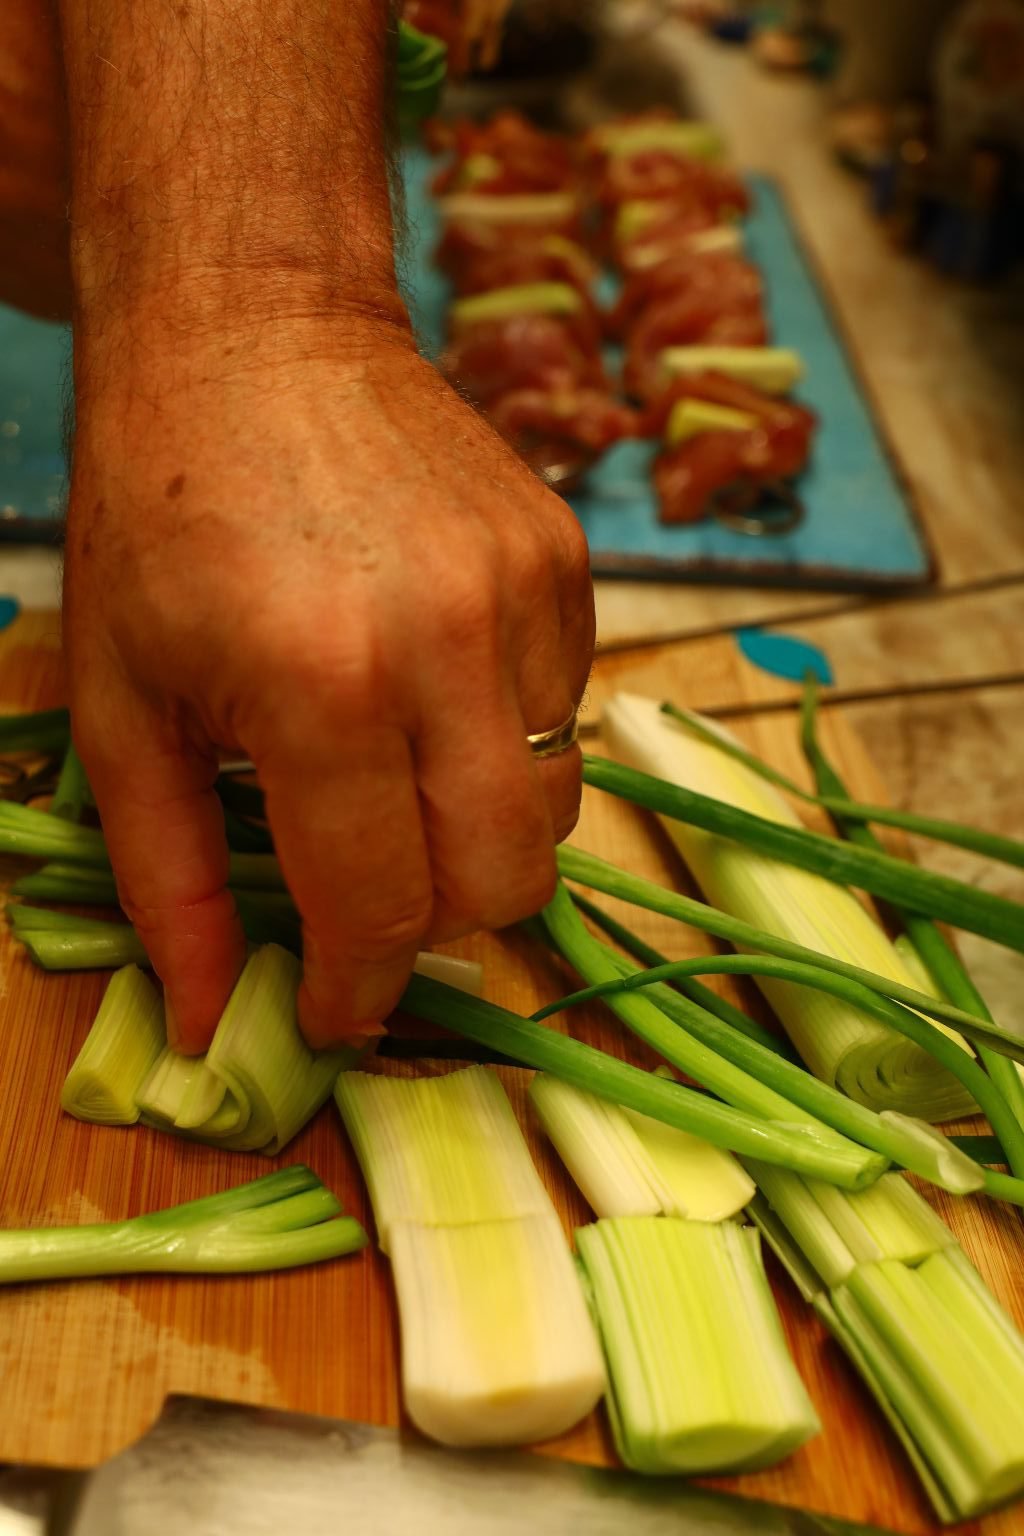
Preparing your Leeks!

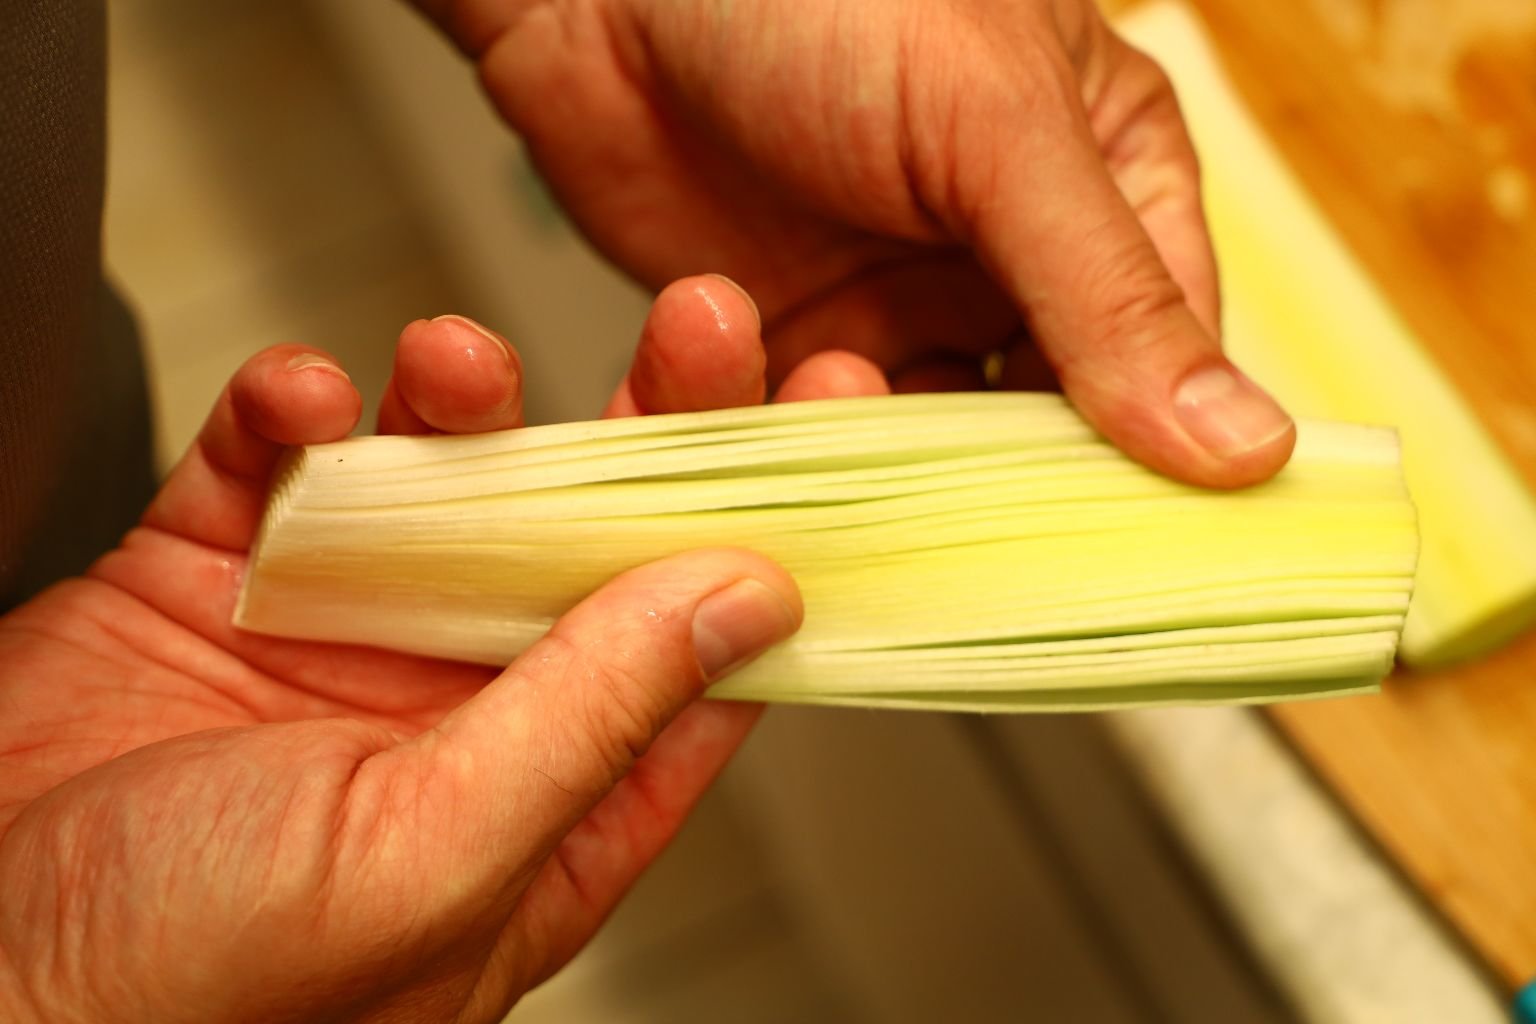
Leeks are grown in a very sandy soil which makes its way into the Leek and needs to be removed.
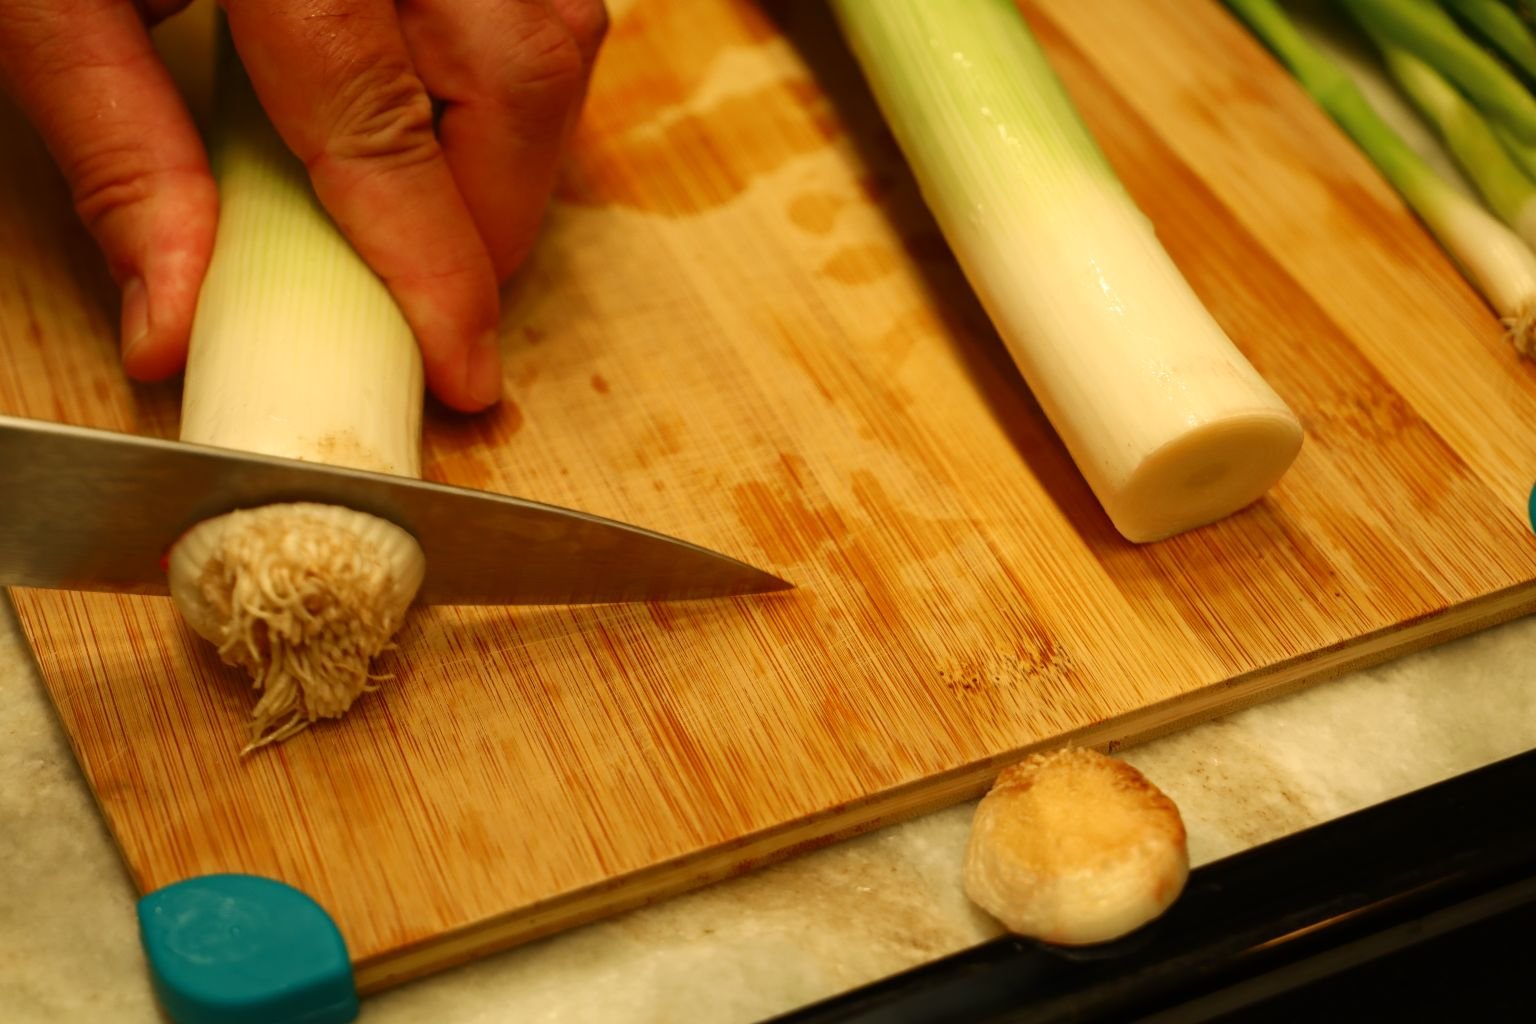
Start by slicing off the root end of the leek then slice off the green leaves at the top of the Leek as shown.
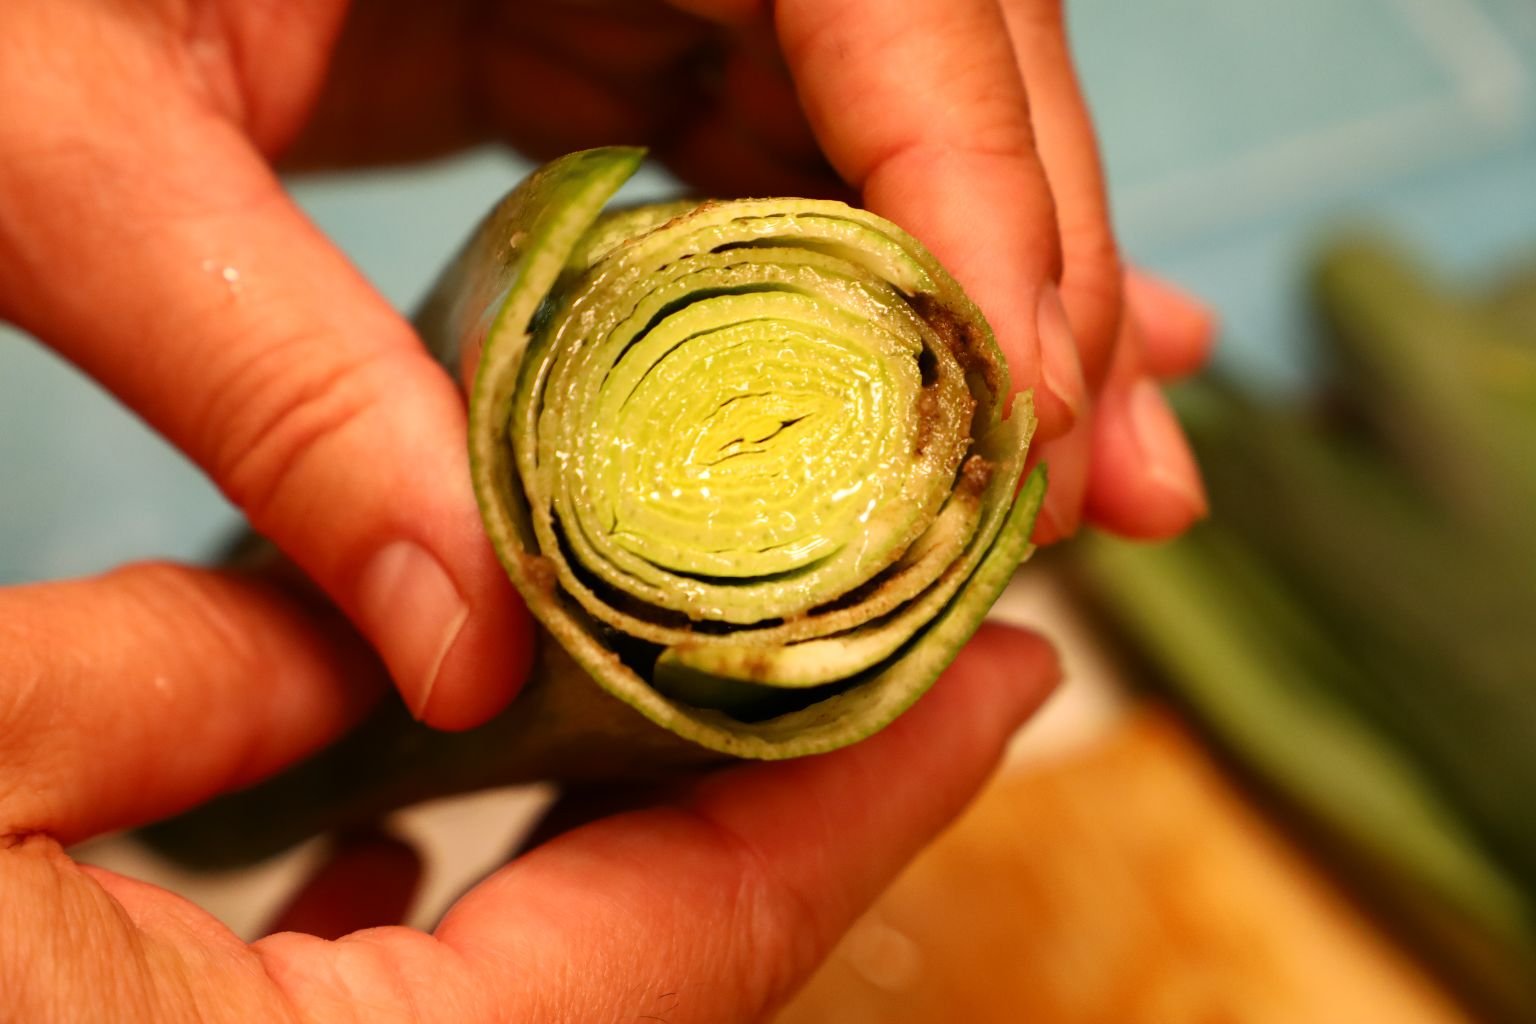
Here your can see the dirt inside the green section of the Leek.
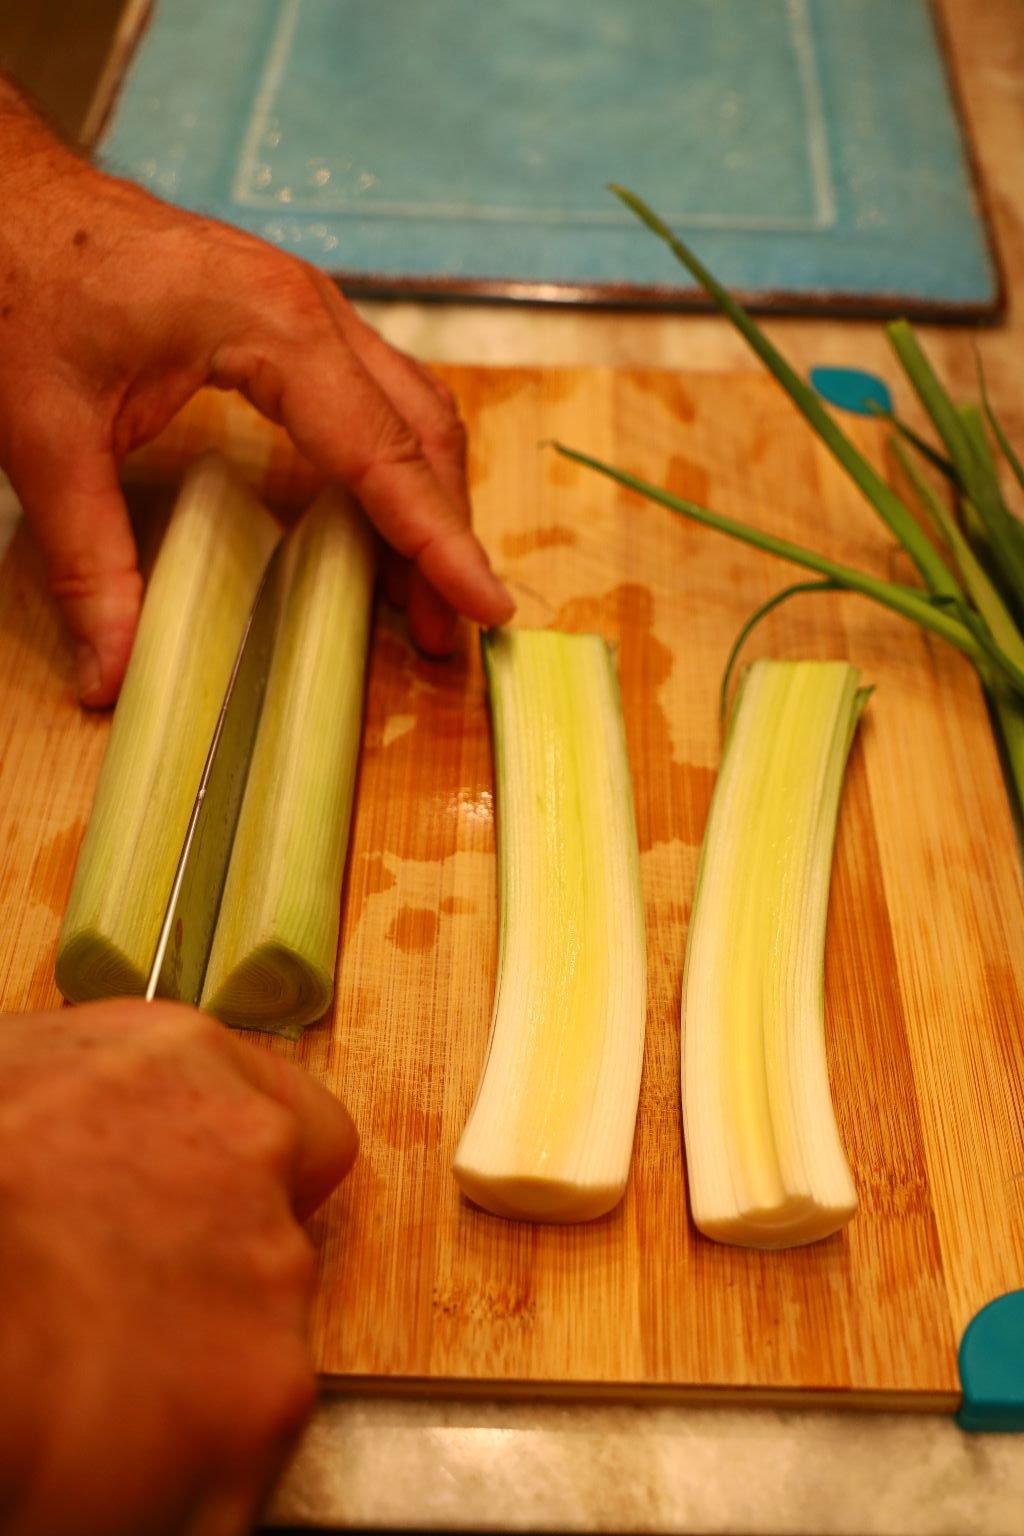
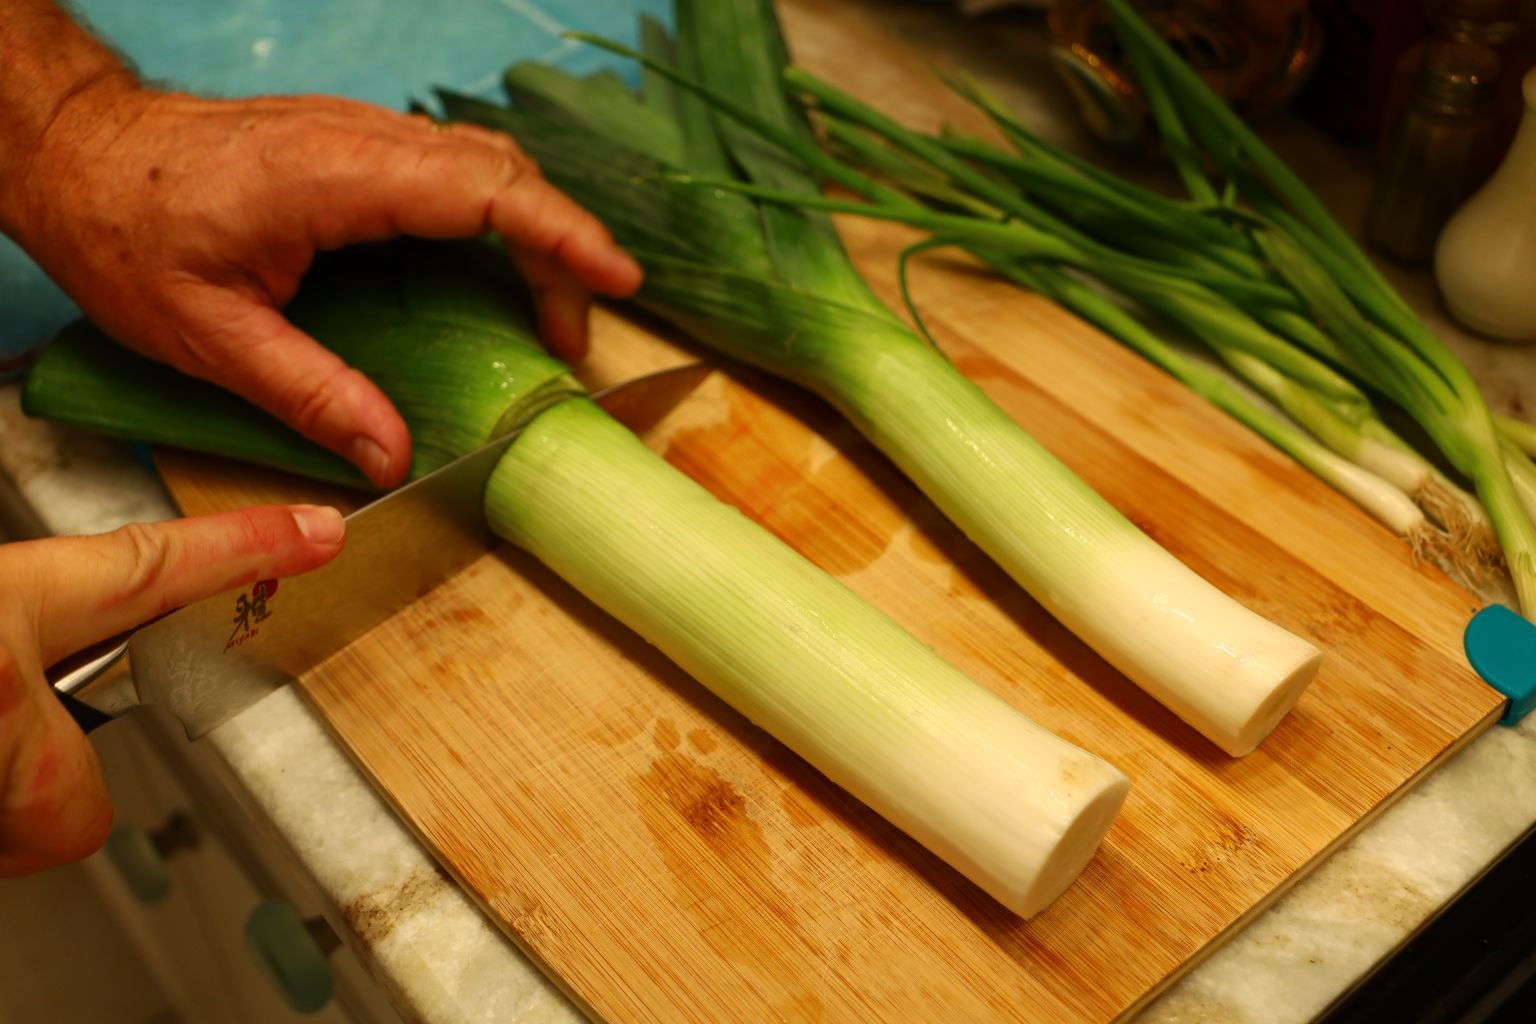
Slice the Leek in half …
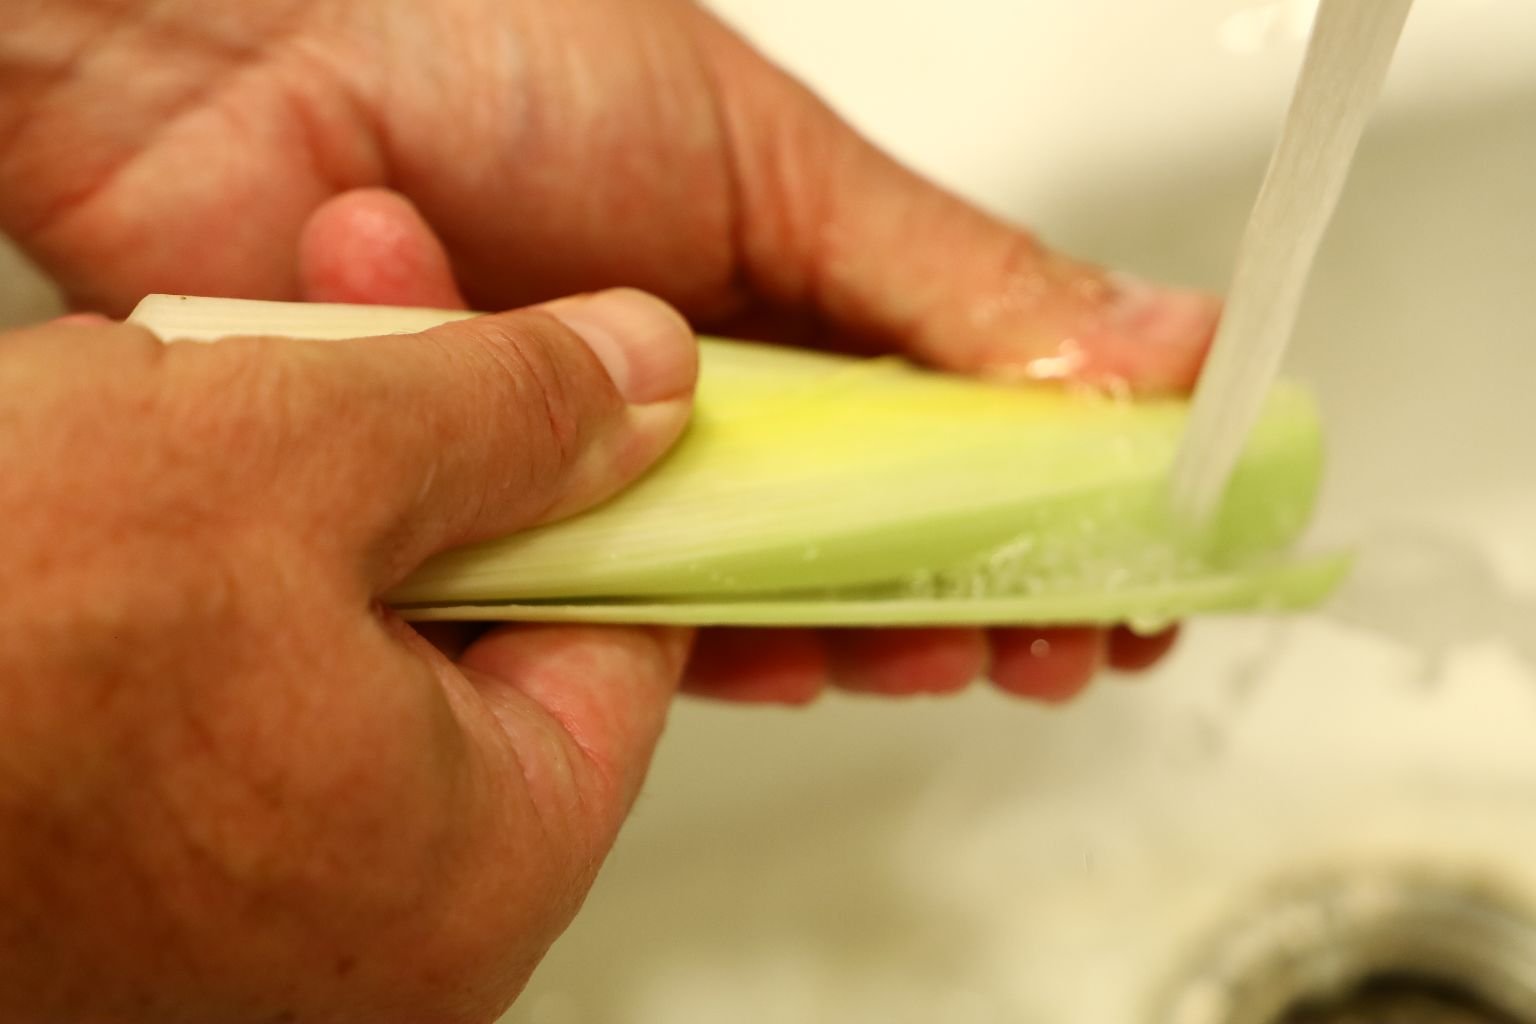
then remove the sand and dirt using running water starting at the root end moving toward the green leafy end fanning the sections apart.
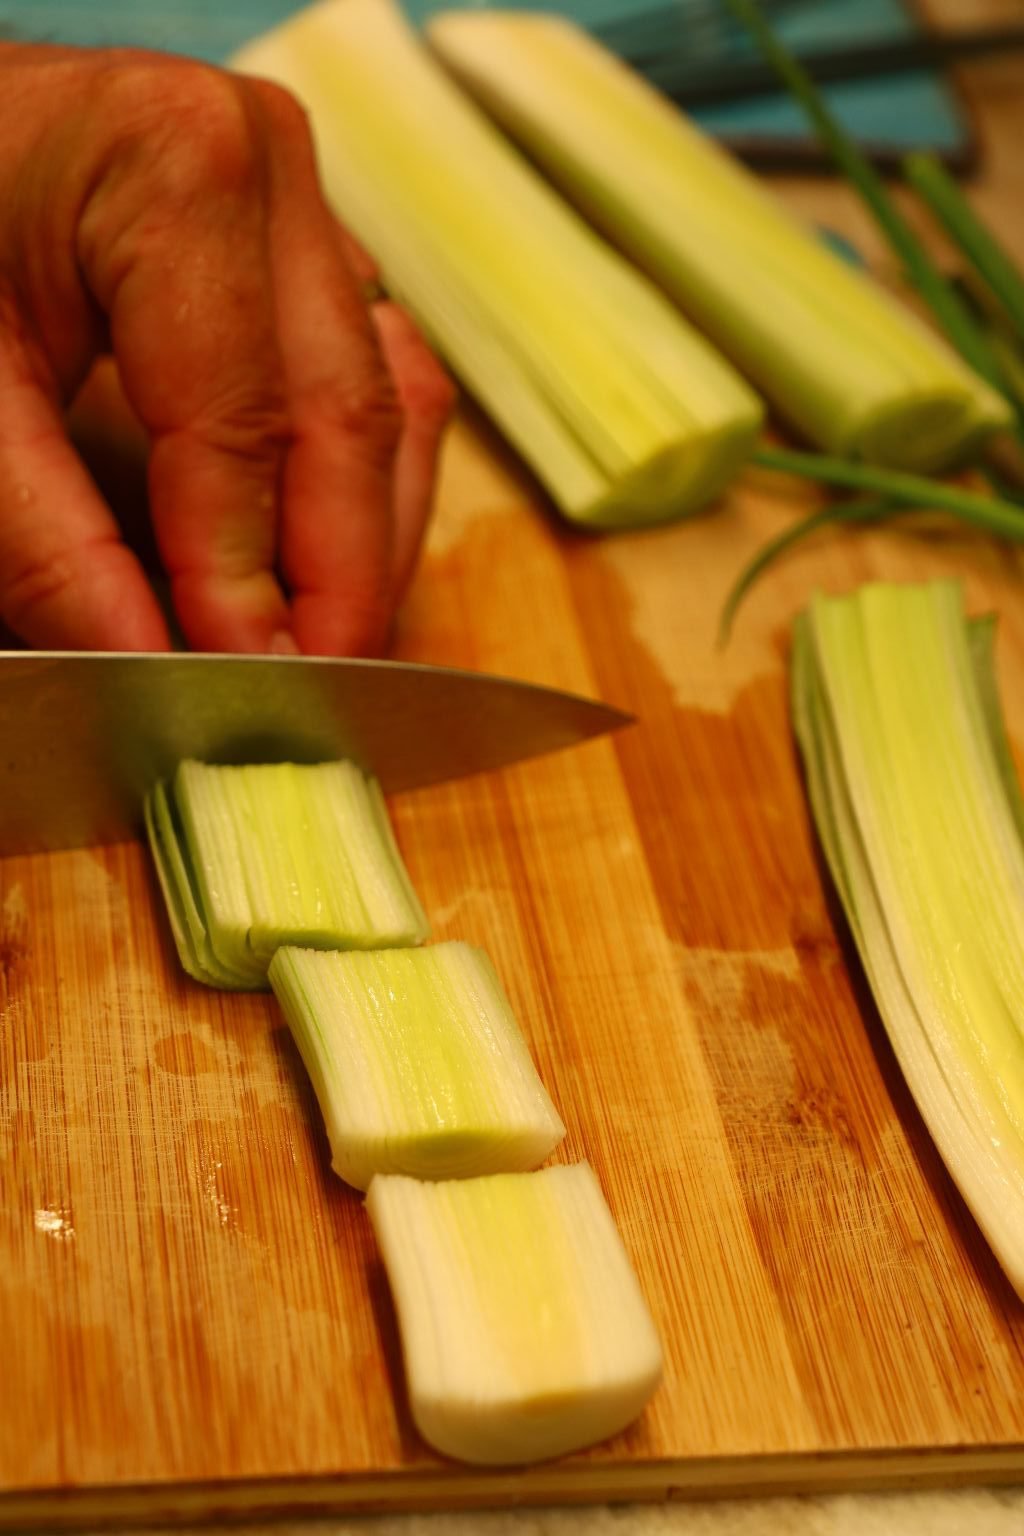
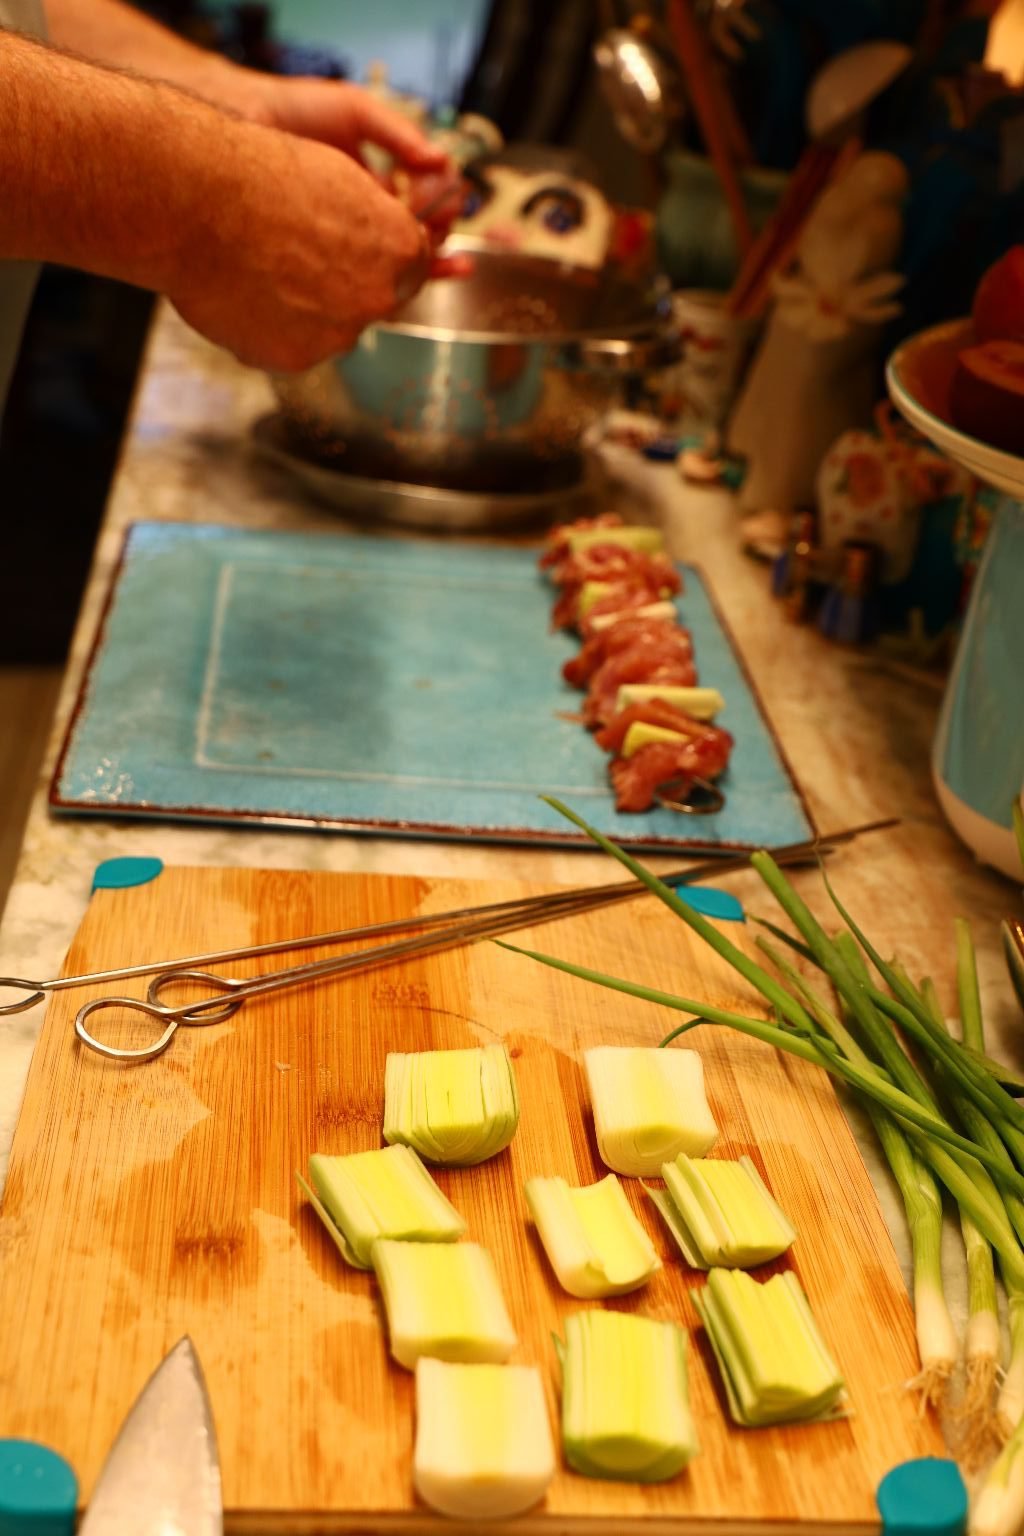
Once your Leeks have been cleaned, slice them into ~2 inch sections as shown.
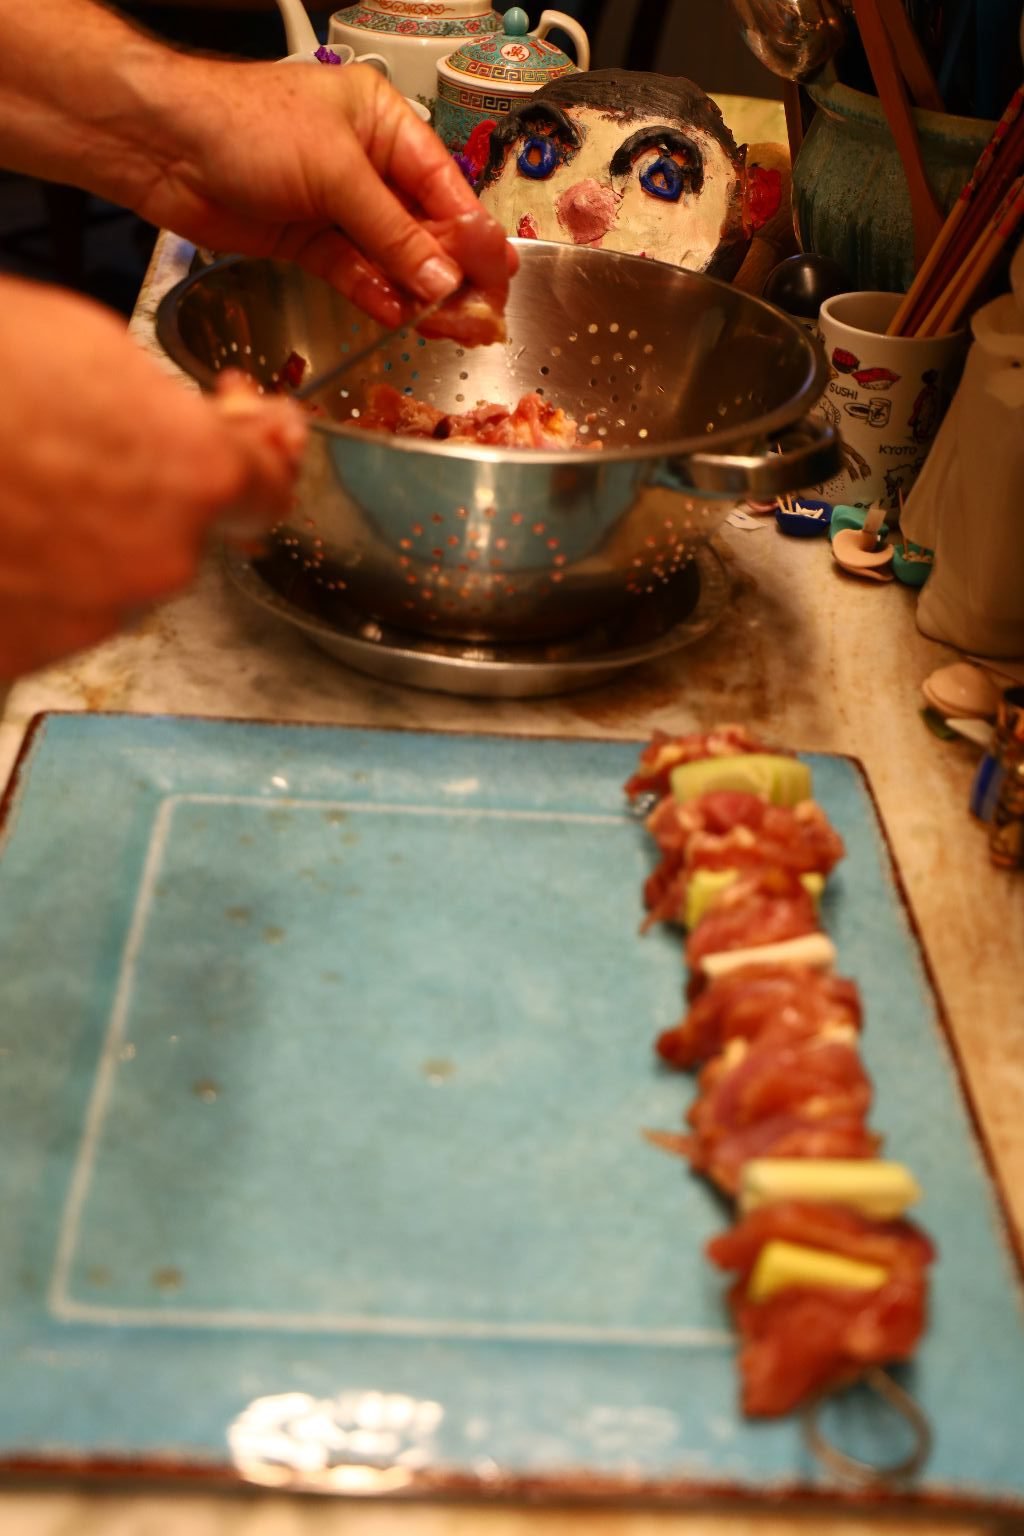
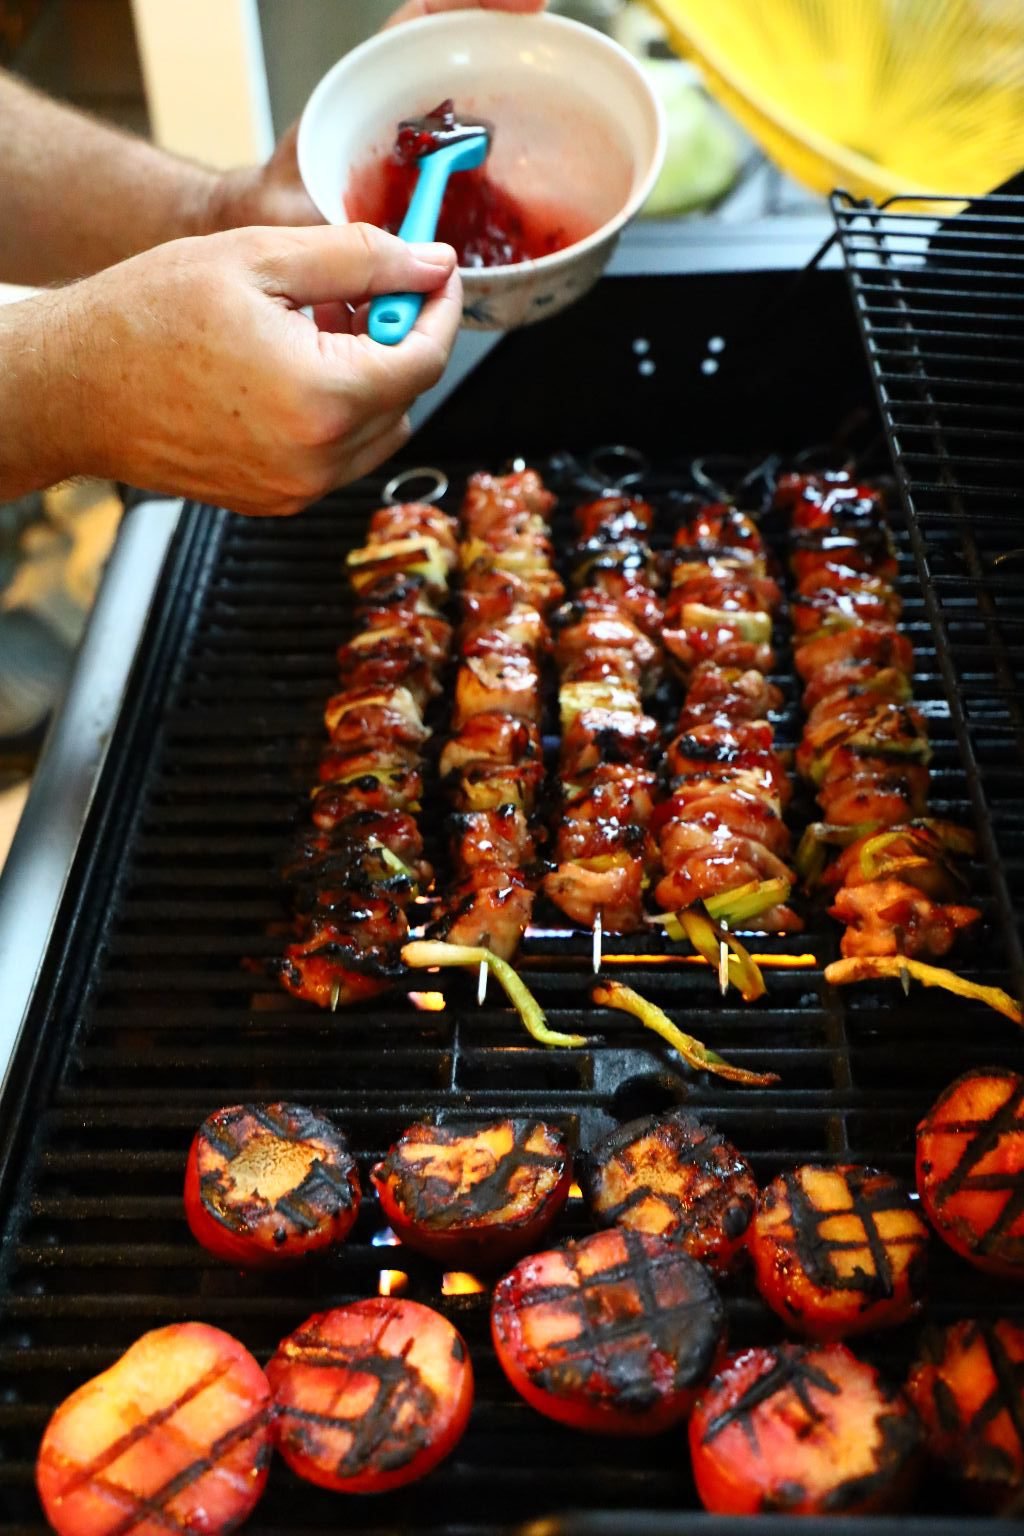
Skewer your Marinated Chicken, Leek sections and Green Onions.
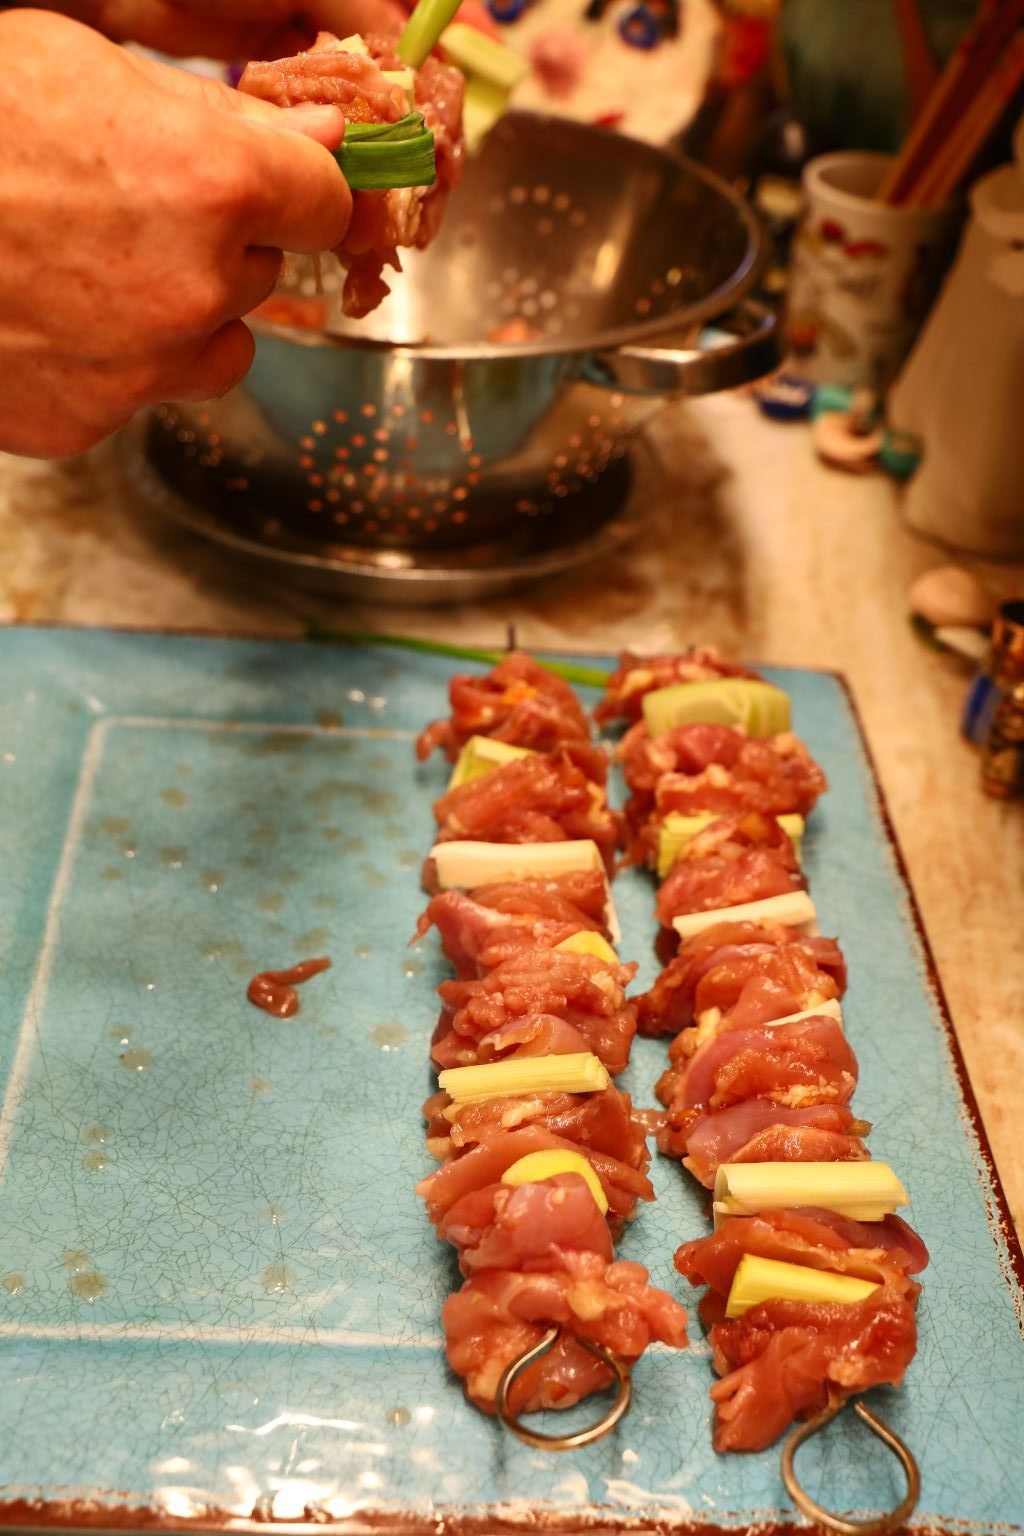

Here you can see a few skewers of all the ingredients.
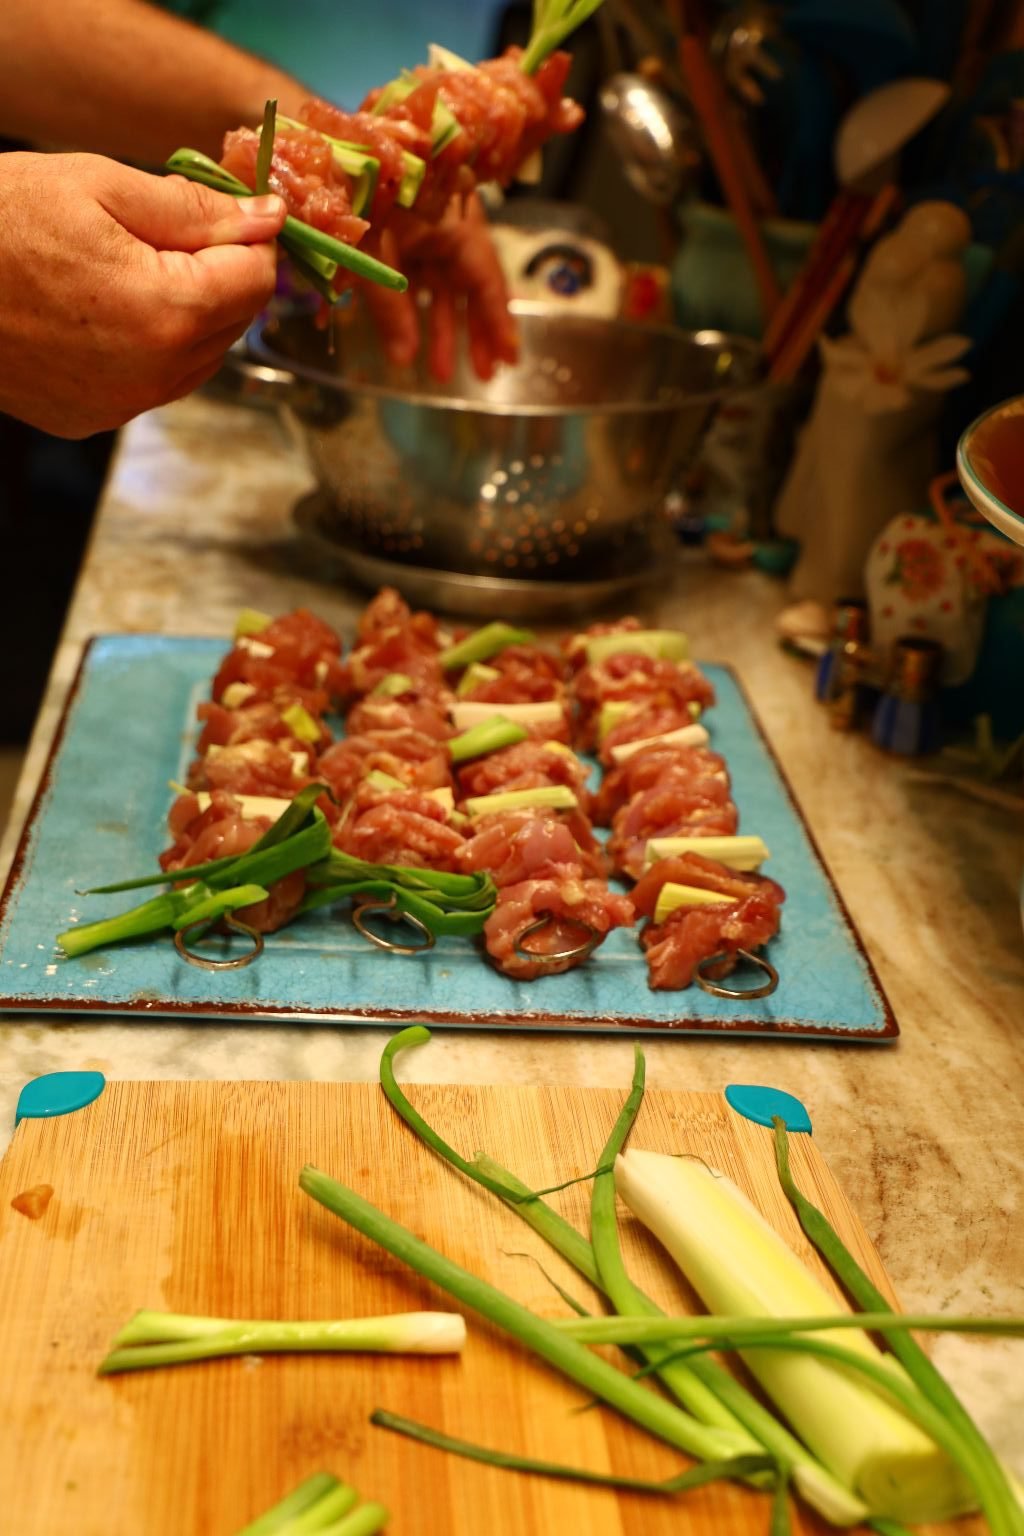
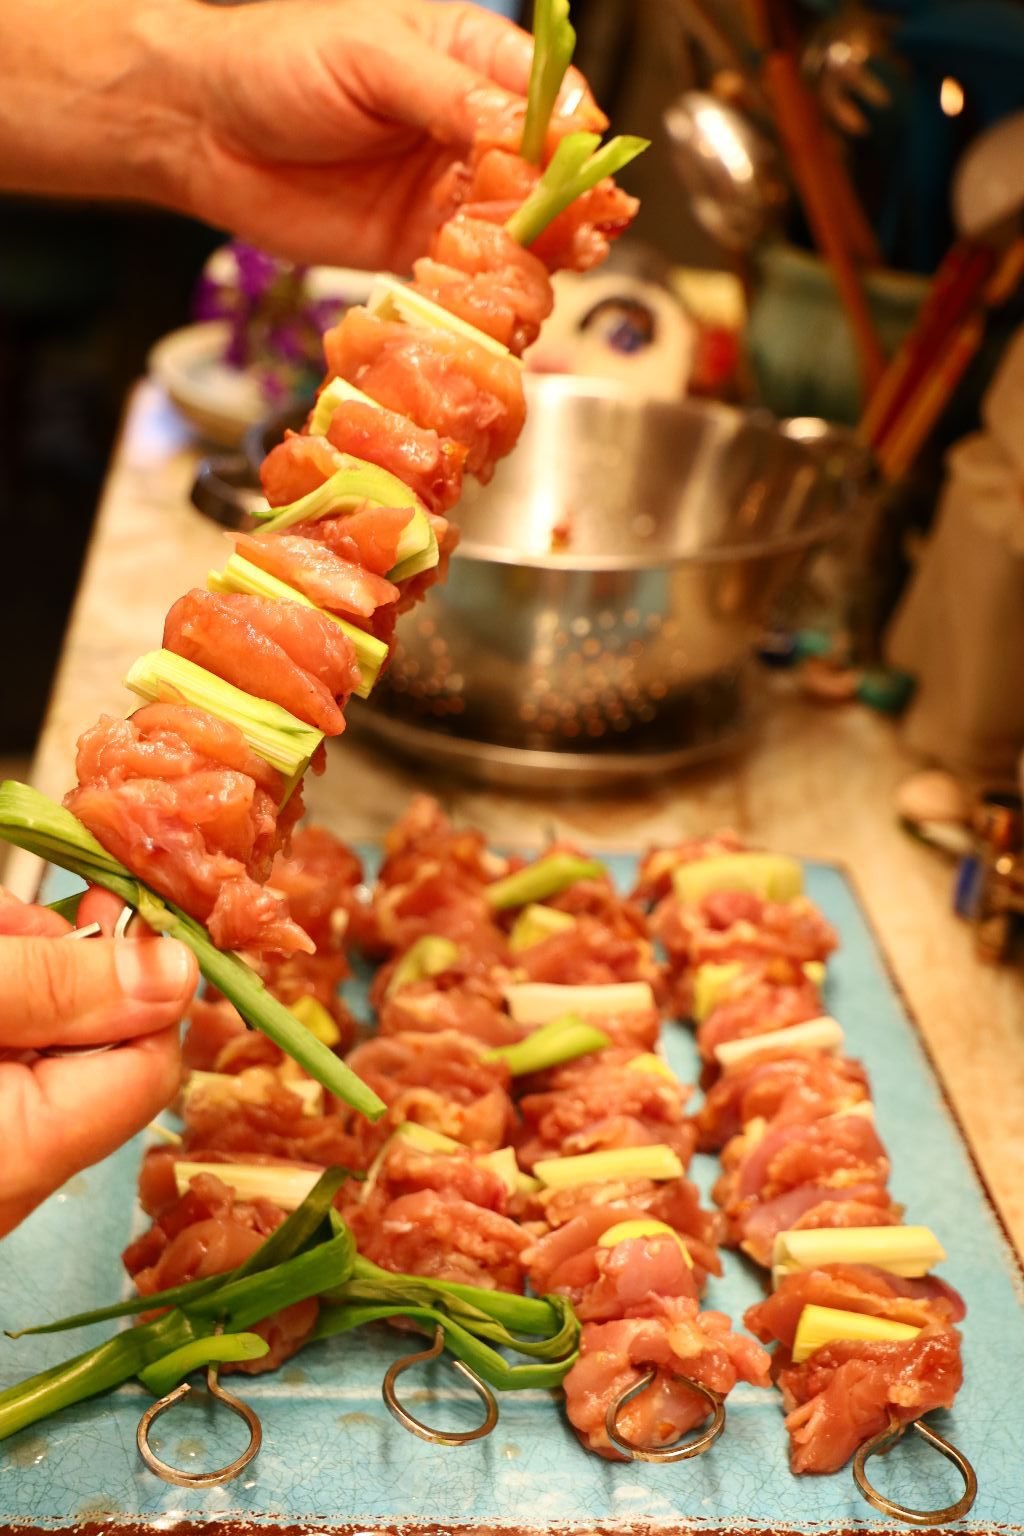
Continue to skewer the ingredients until all the them are used.
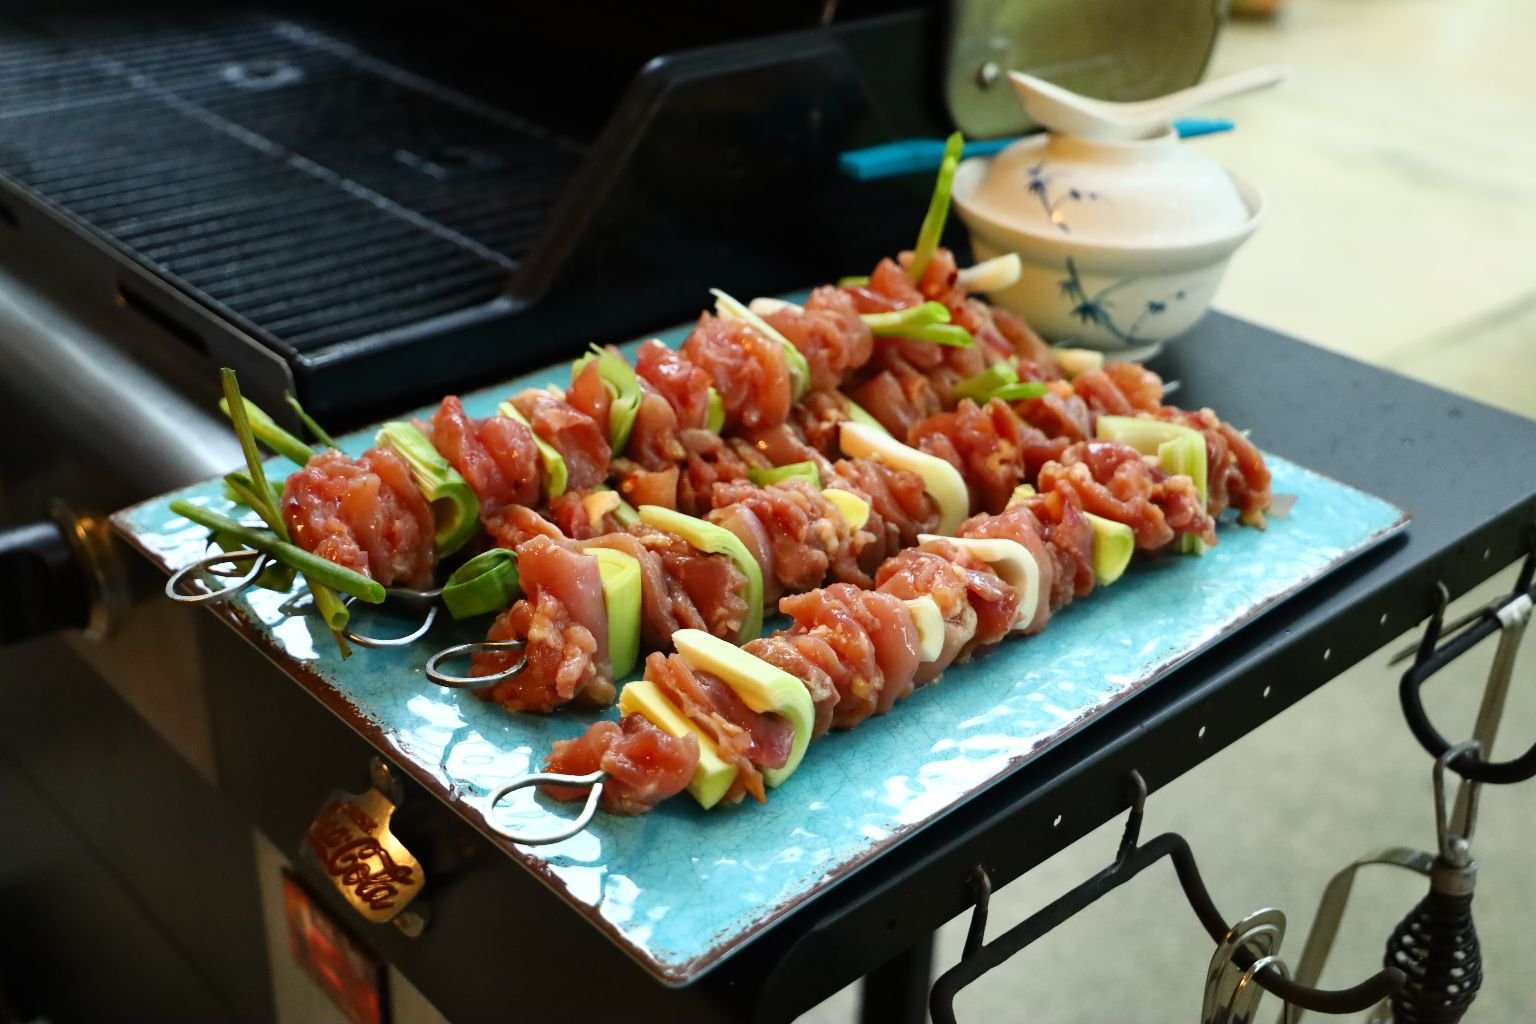
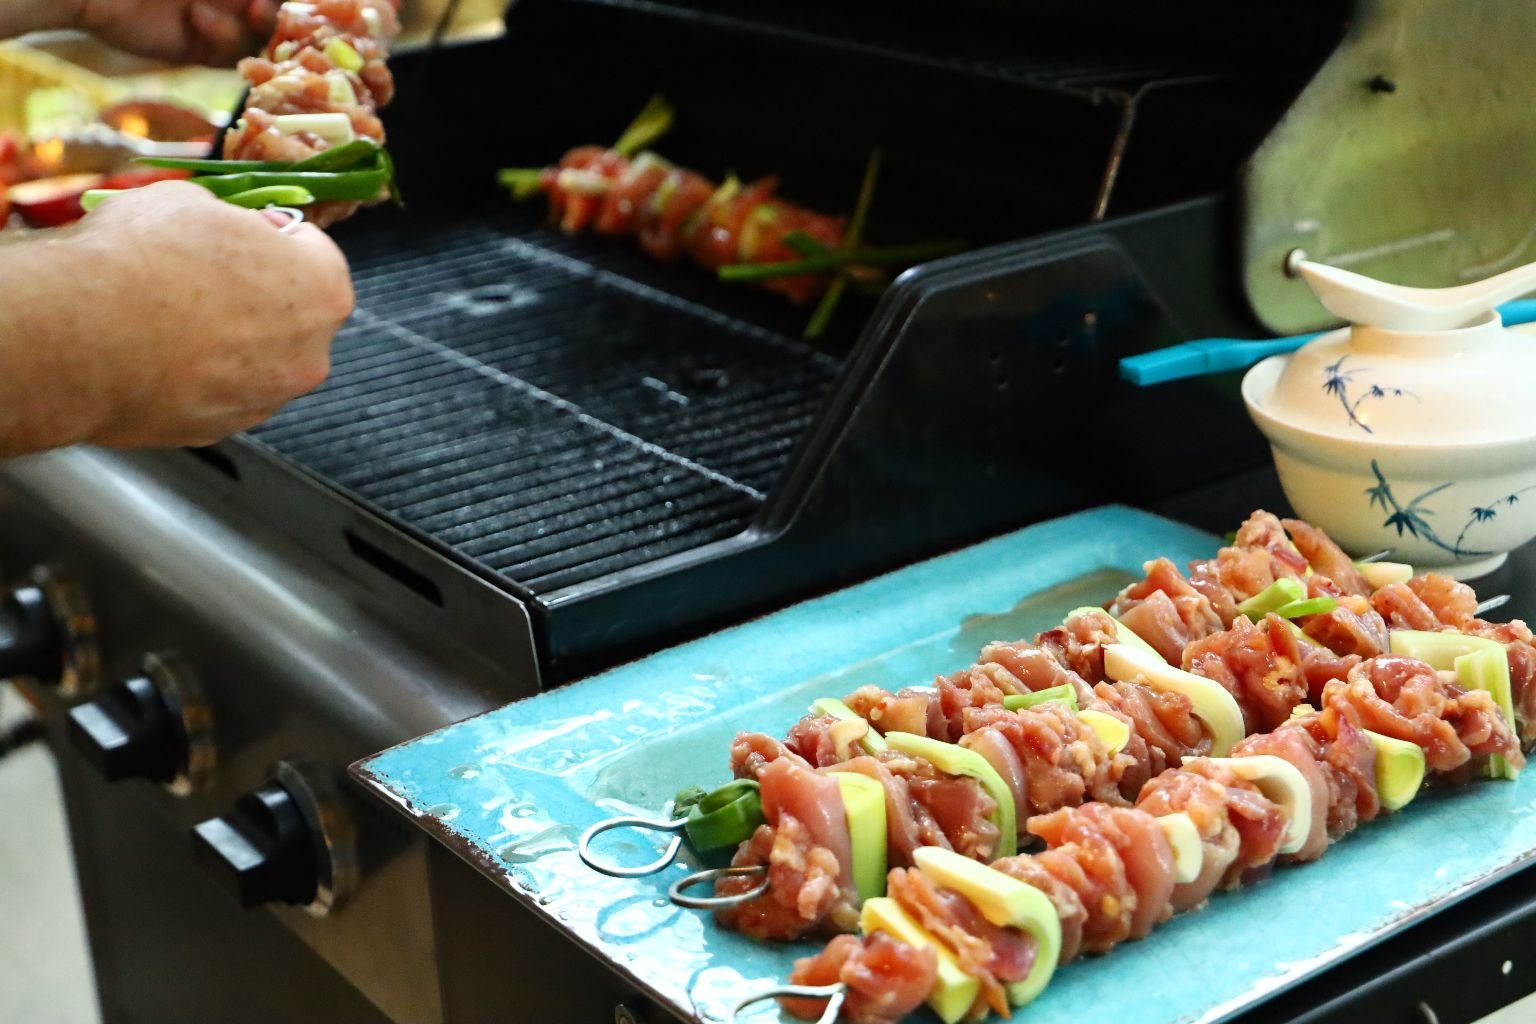
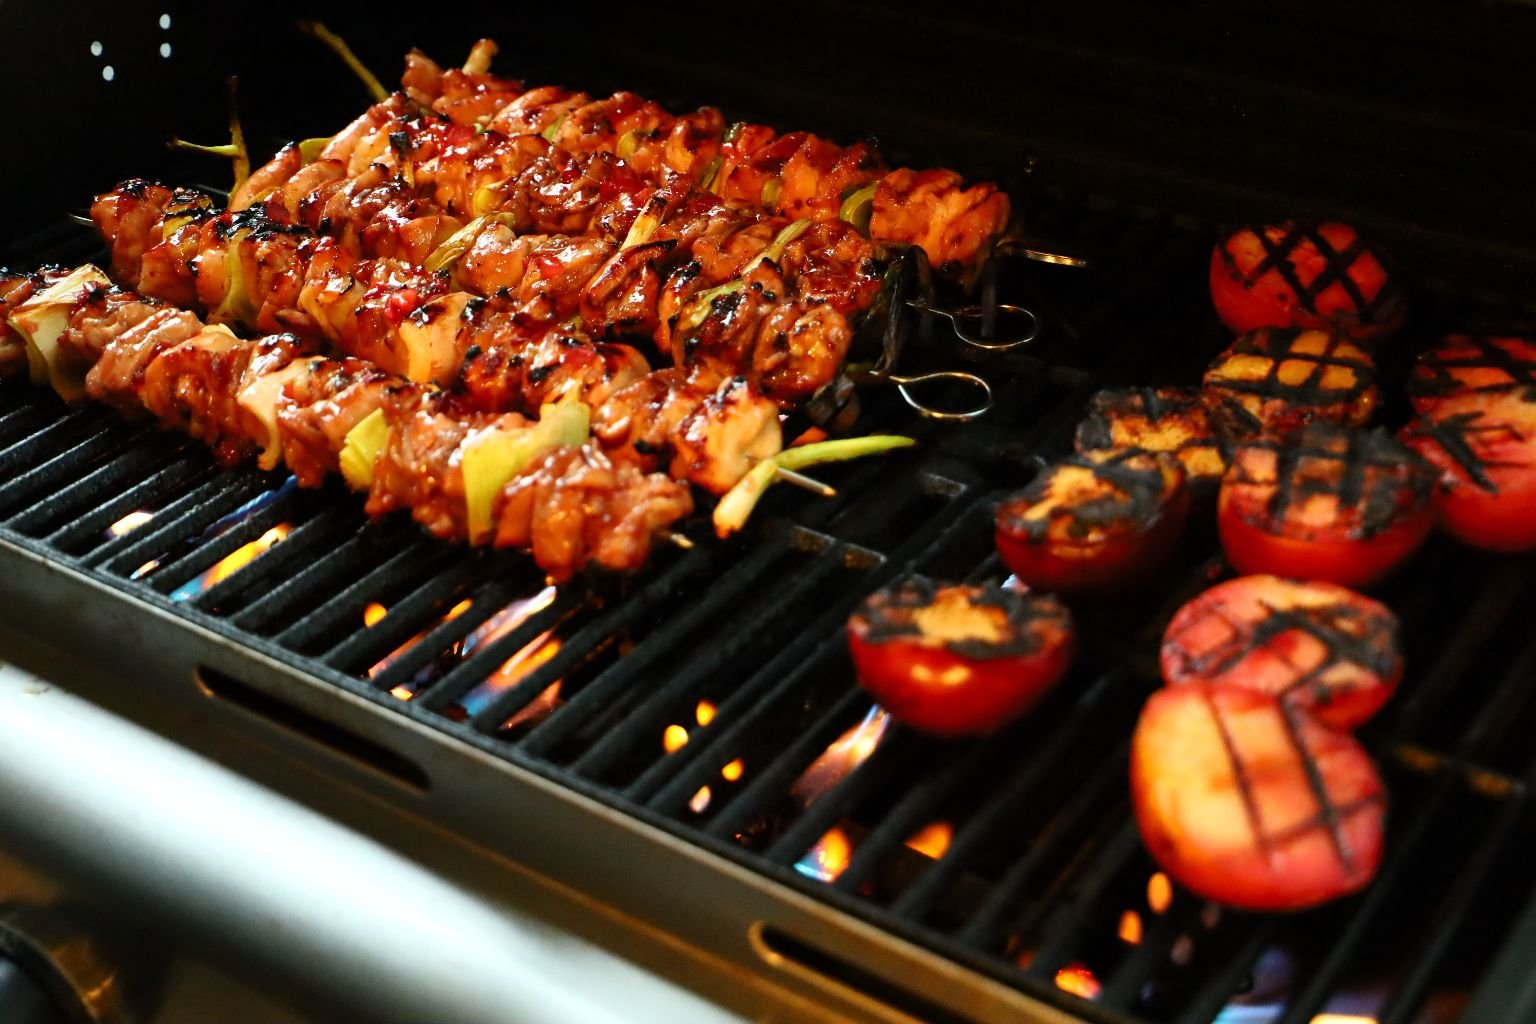
Turn your grill on high for about 5 min. and close the lid. When done, clean your grill with a wire brush to remove any excess food particles then spray with a high heat cooking spray. Now, that your grill is hot and ready, lower the heat to medium high and place your skewers on the grill.
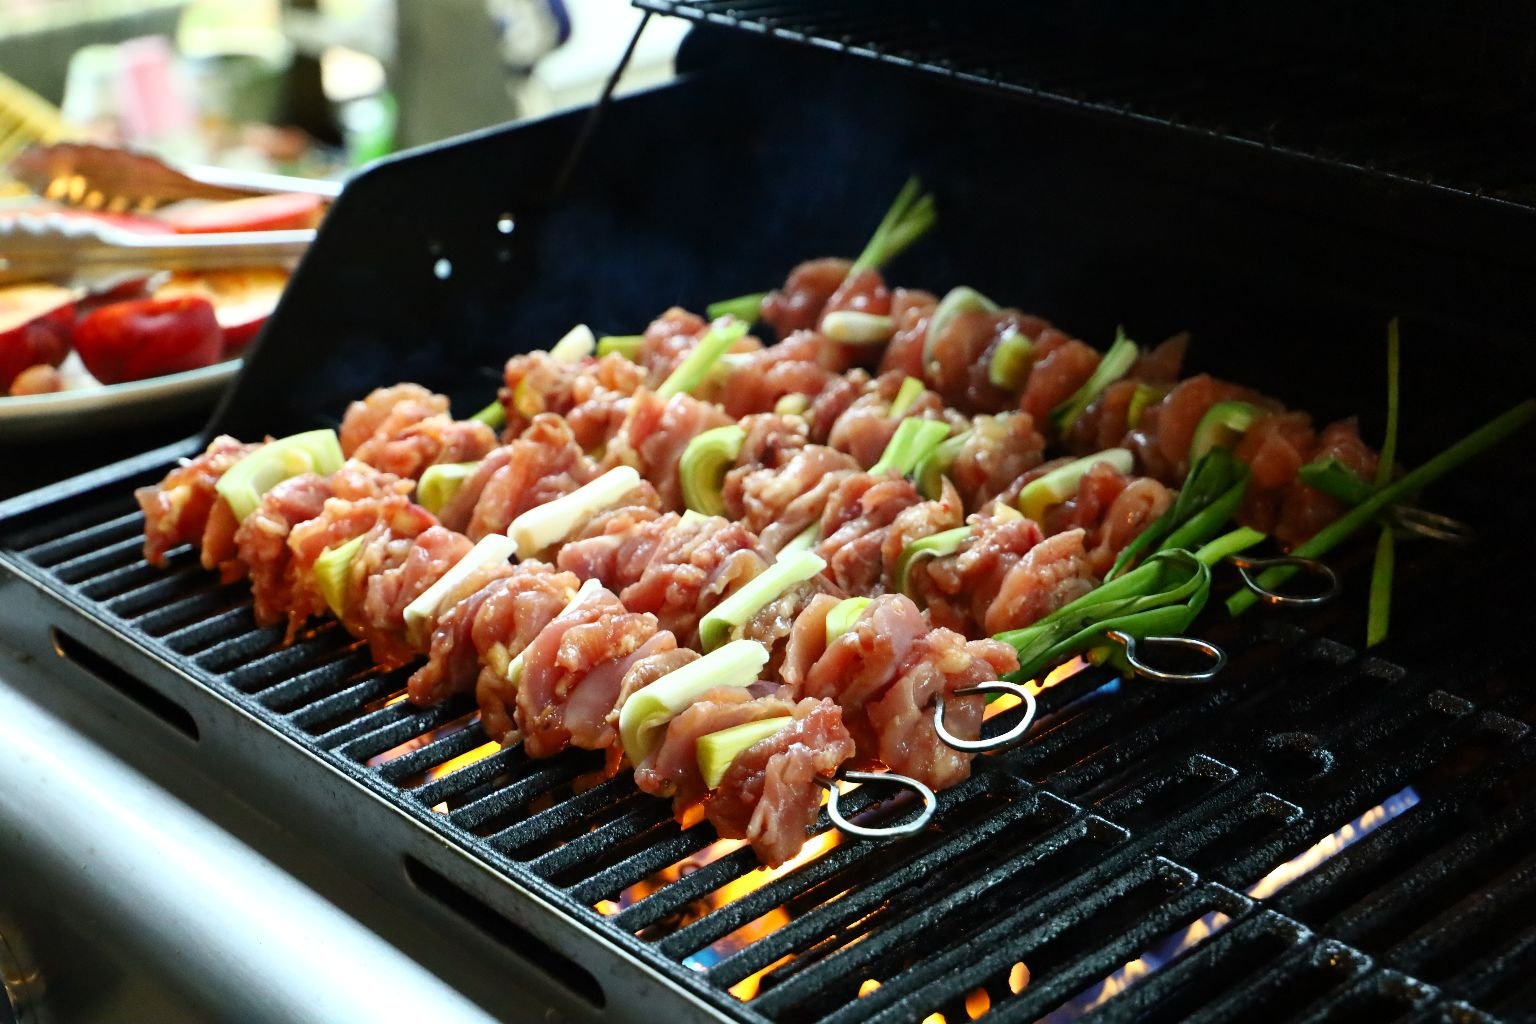
Here all the skewers are on the grill.
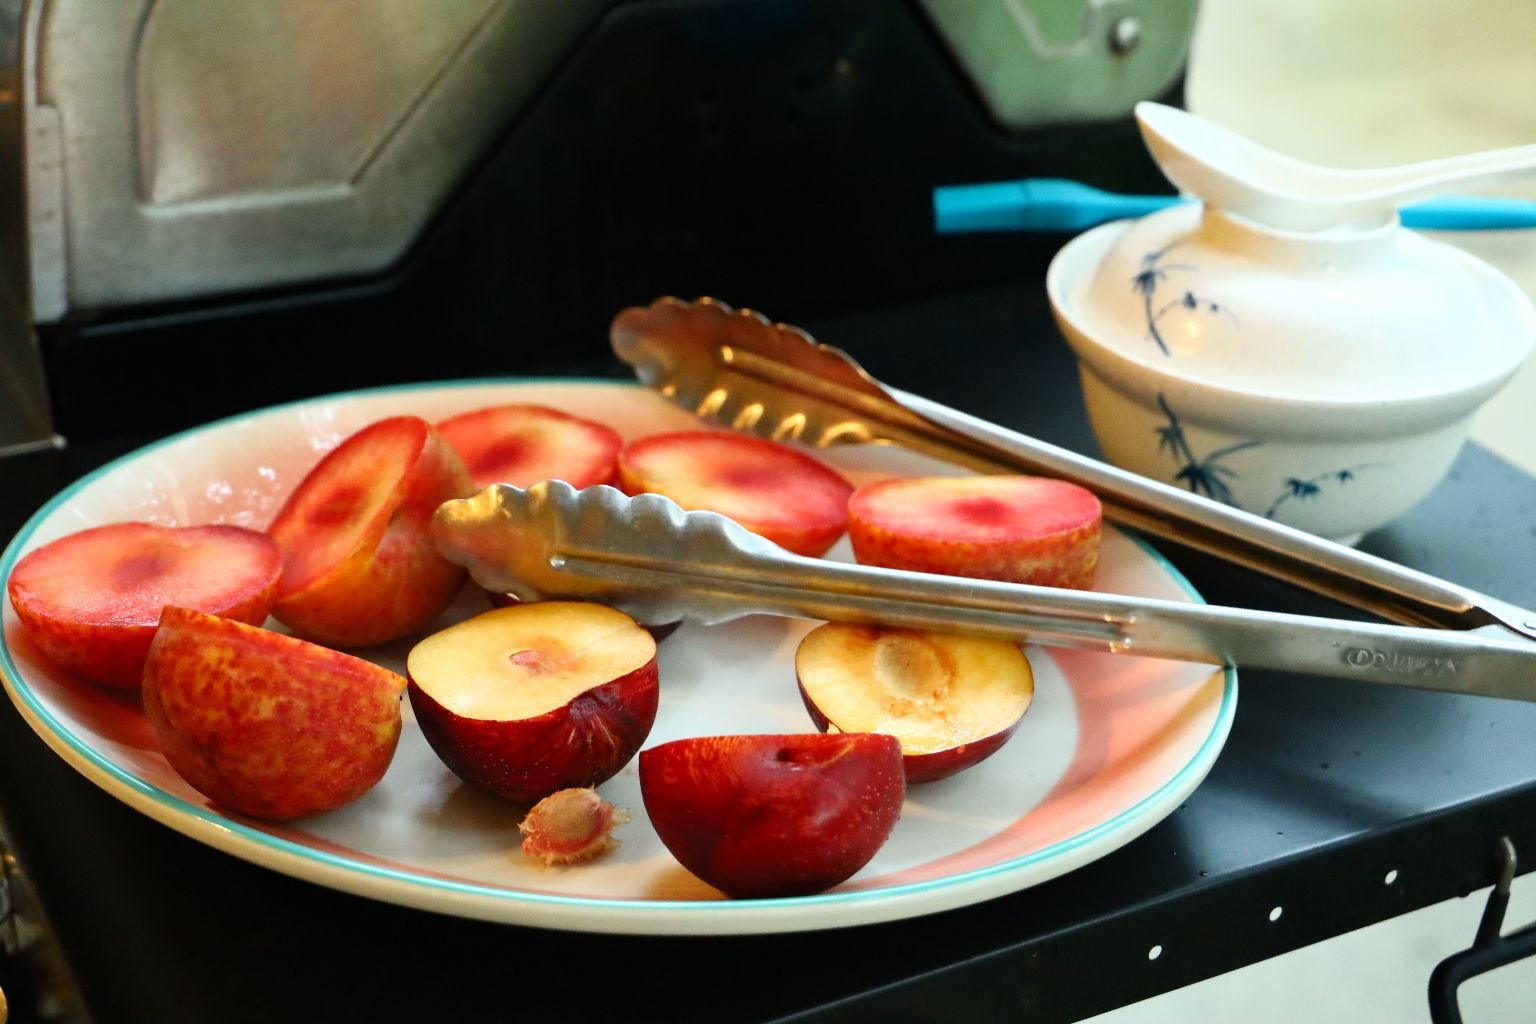
Here are the sliced Plums.
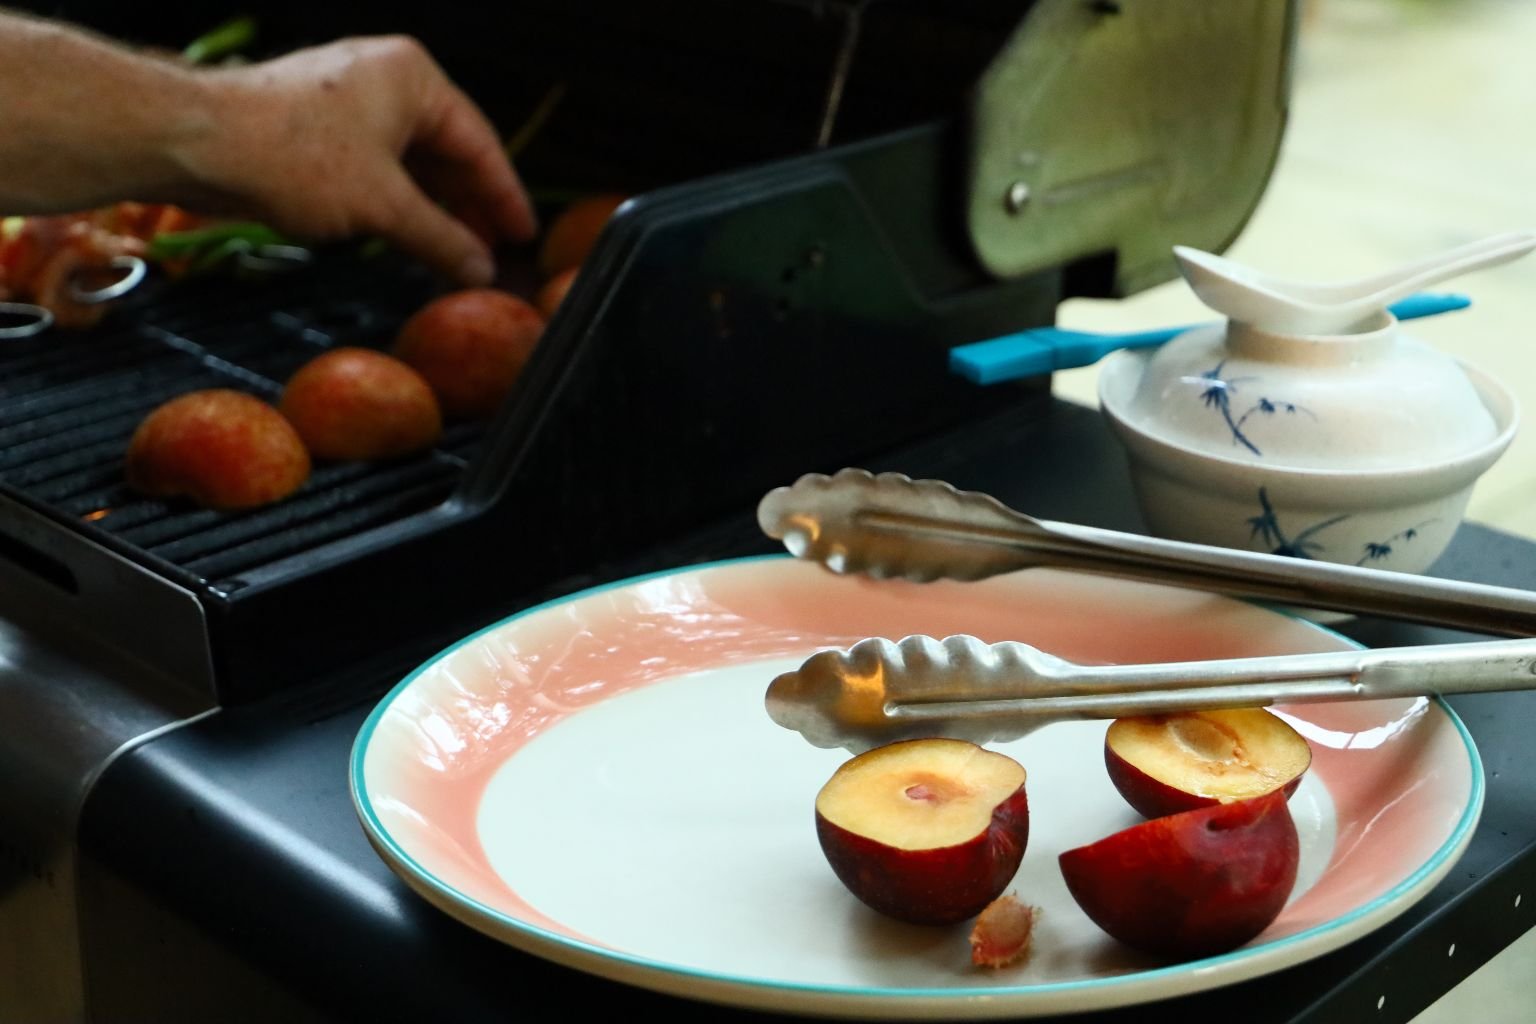
Place them on the grill cut side down.
——————————————————————————–
———————————————————————————
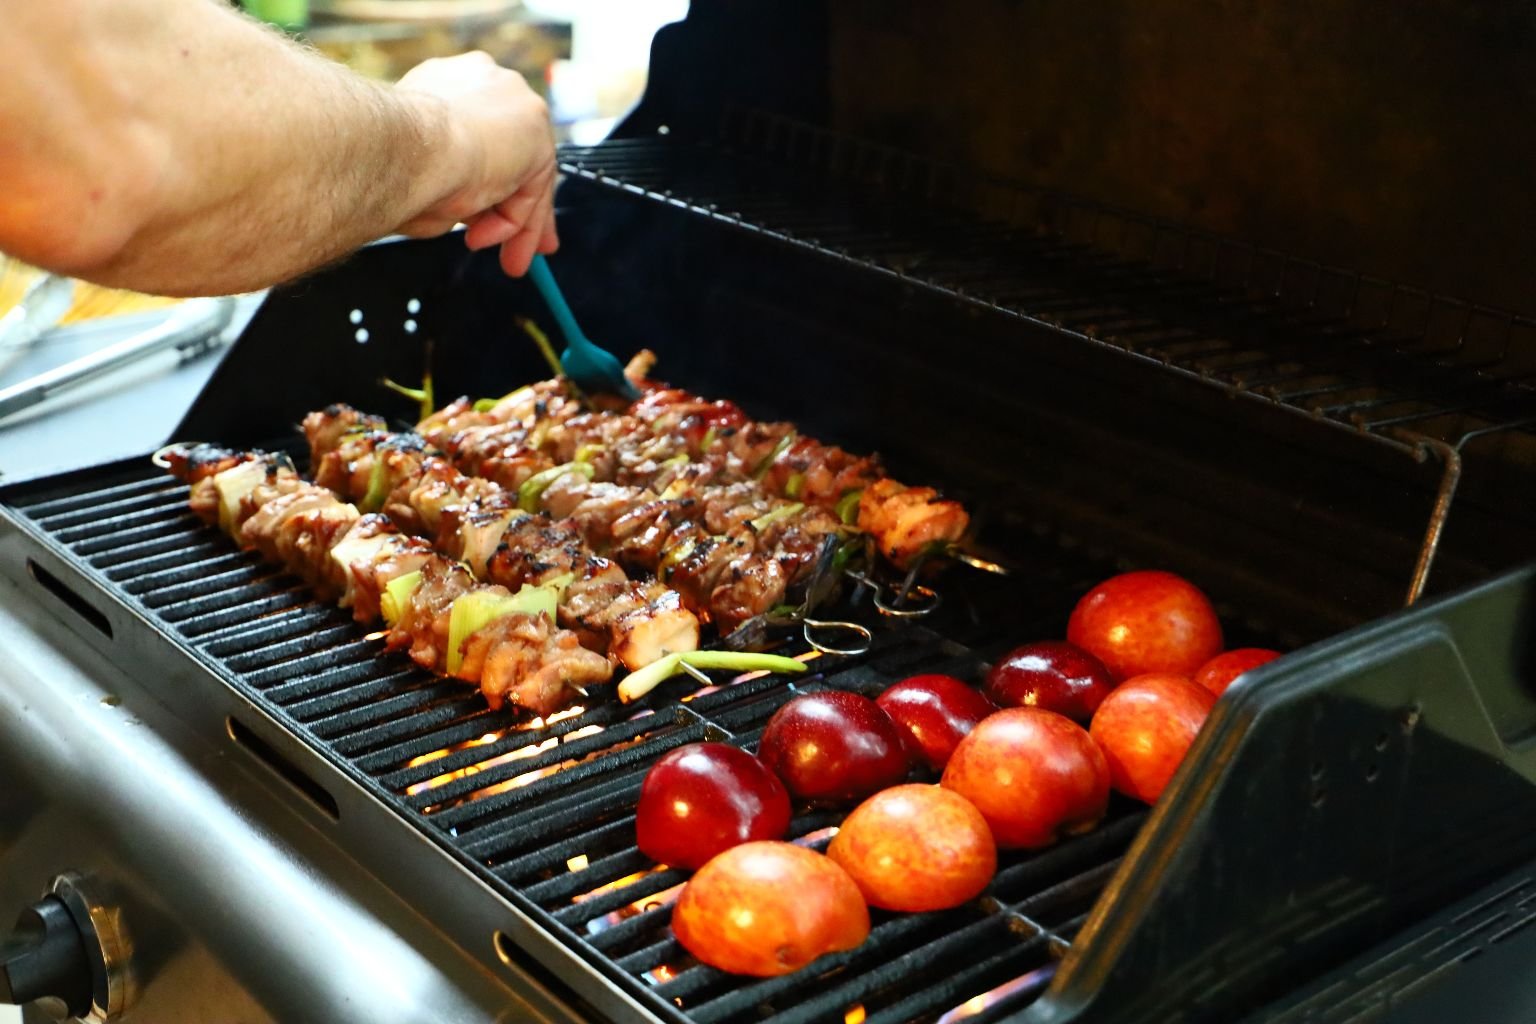
After about 8 min., turn the skewers completely over over and grill the other side. Now, brush the meat with Julie’s Oriental Jezebel Sauce.
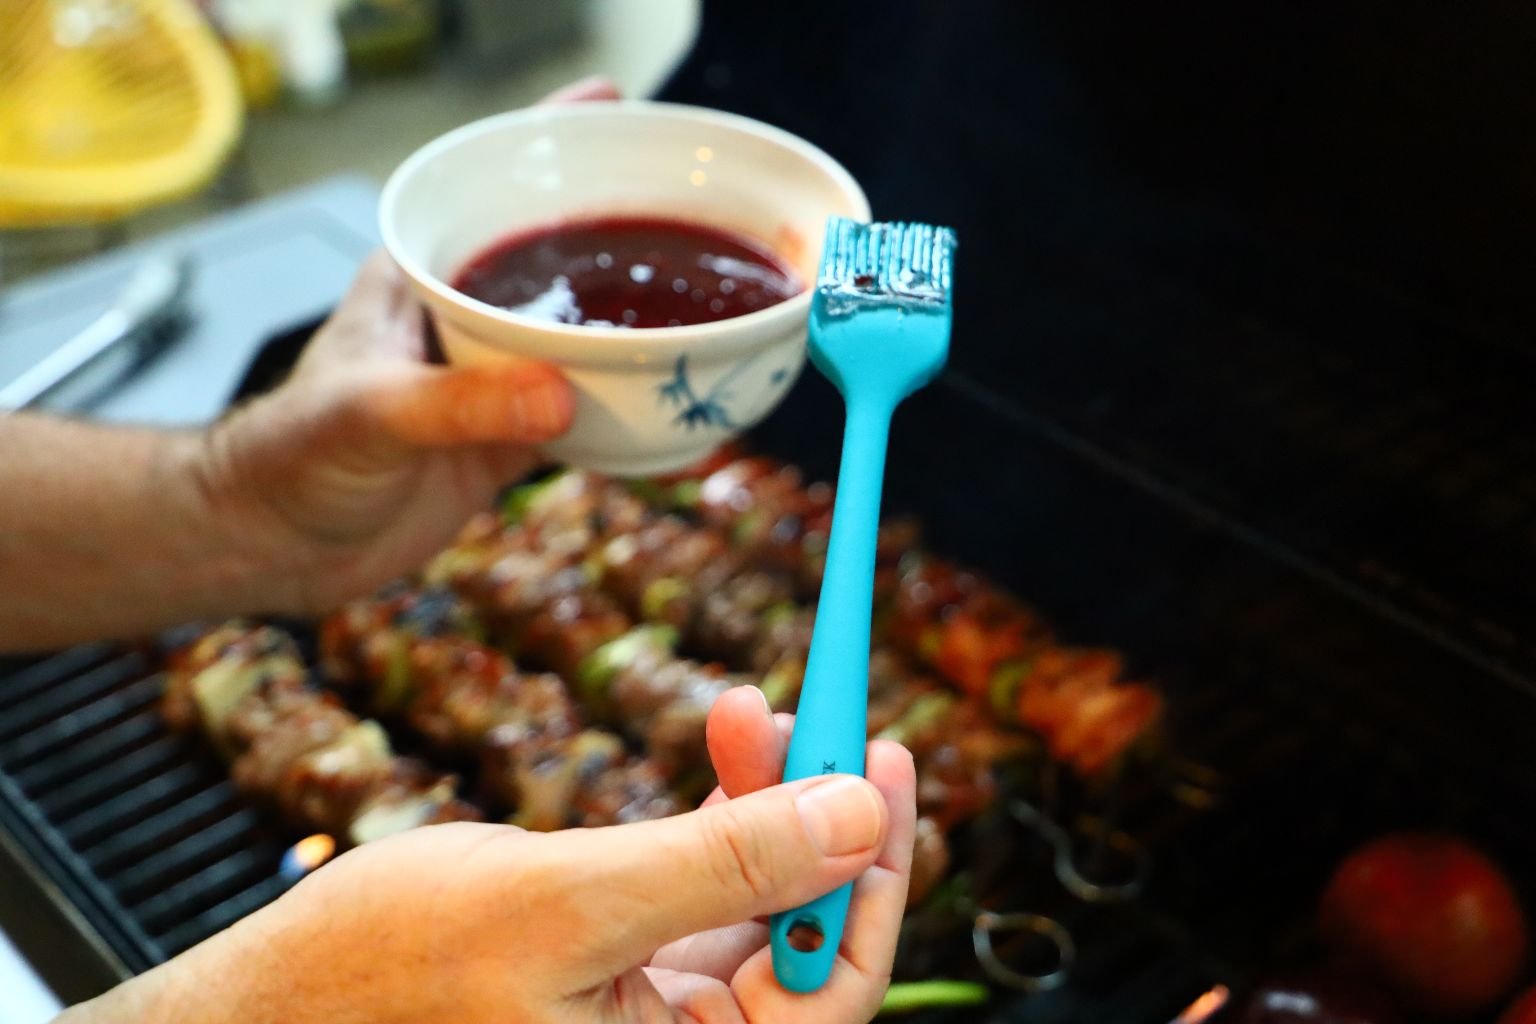
The Sauce is a Marinade, a Glaze, and a Dipping Sauce, after all.
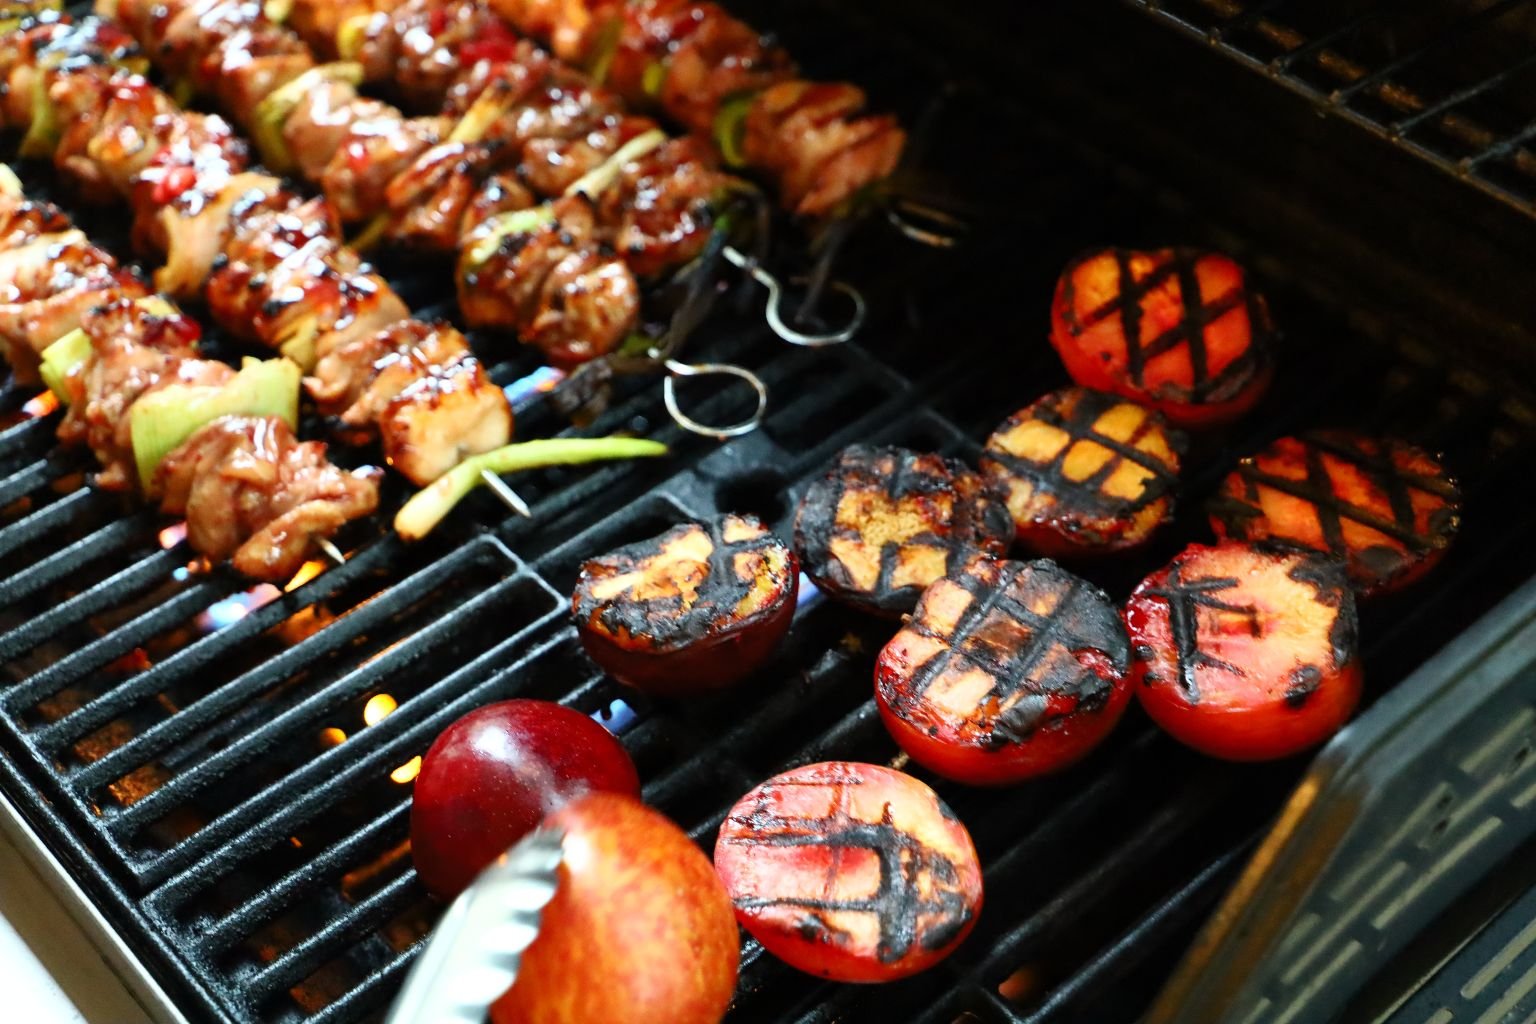
Turn your Plums over when they get a little soft and grill marks appear.. about 8 min. grilling time.
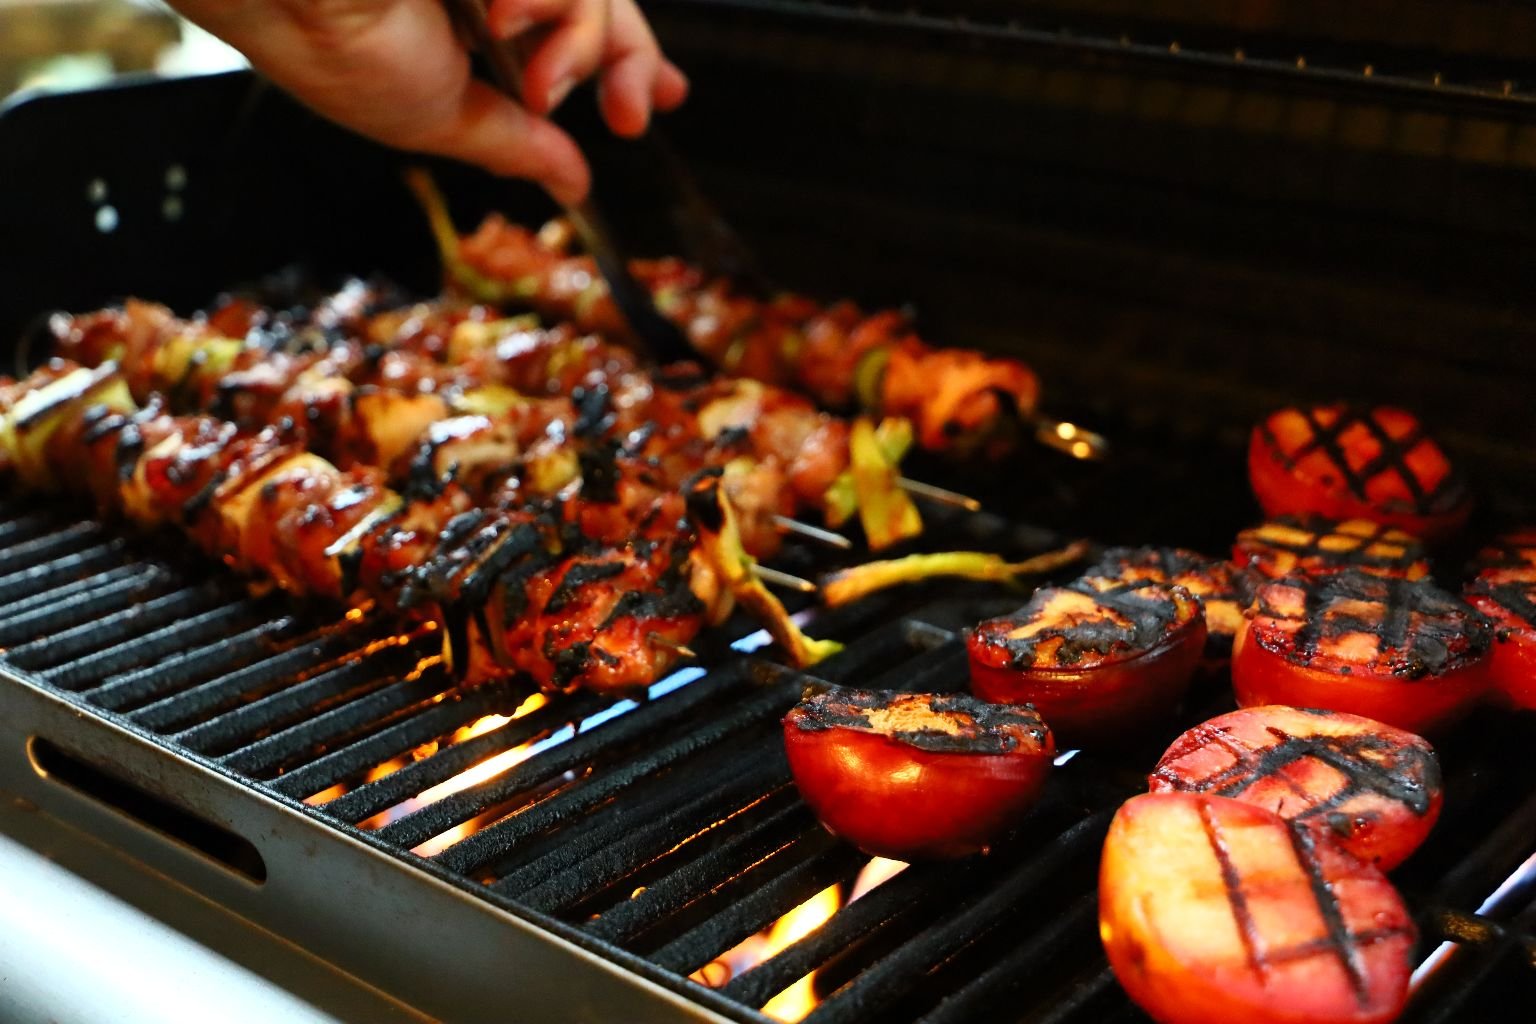
Turn the skewers one quarter of the way and grill for about three minutes and brush on some more Oriental Jezebel Sauce.
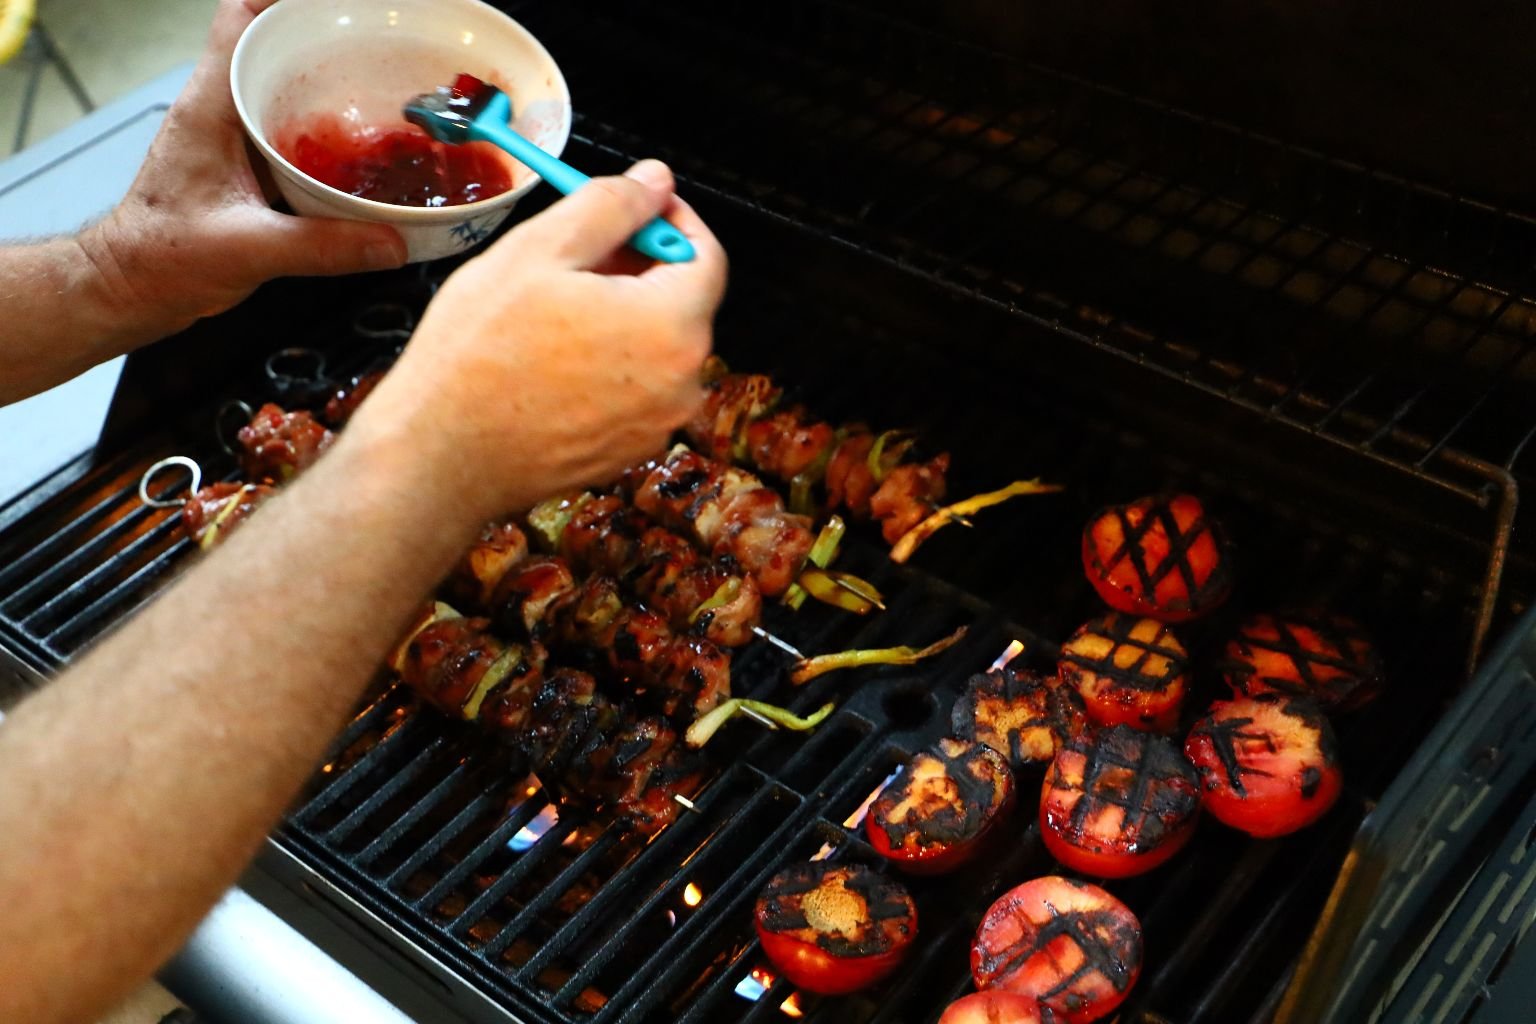
When done turn the Chicken over to the last uncooked side and grill for about another two minutes, brushing on more Oriental Jezebel Sauce.
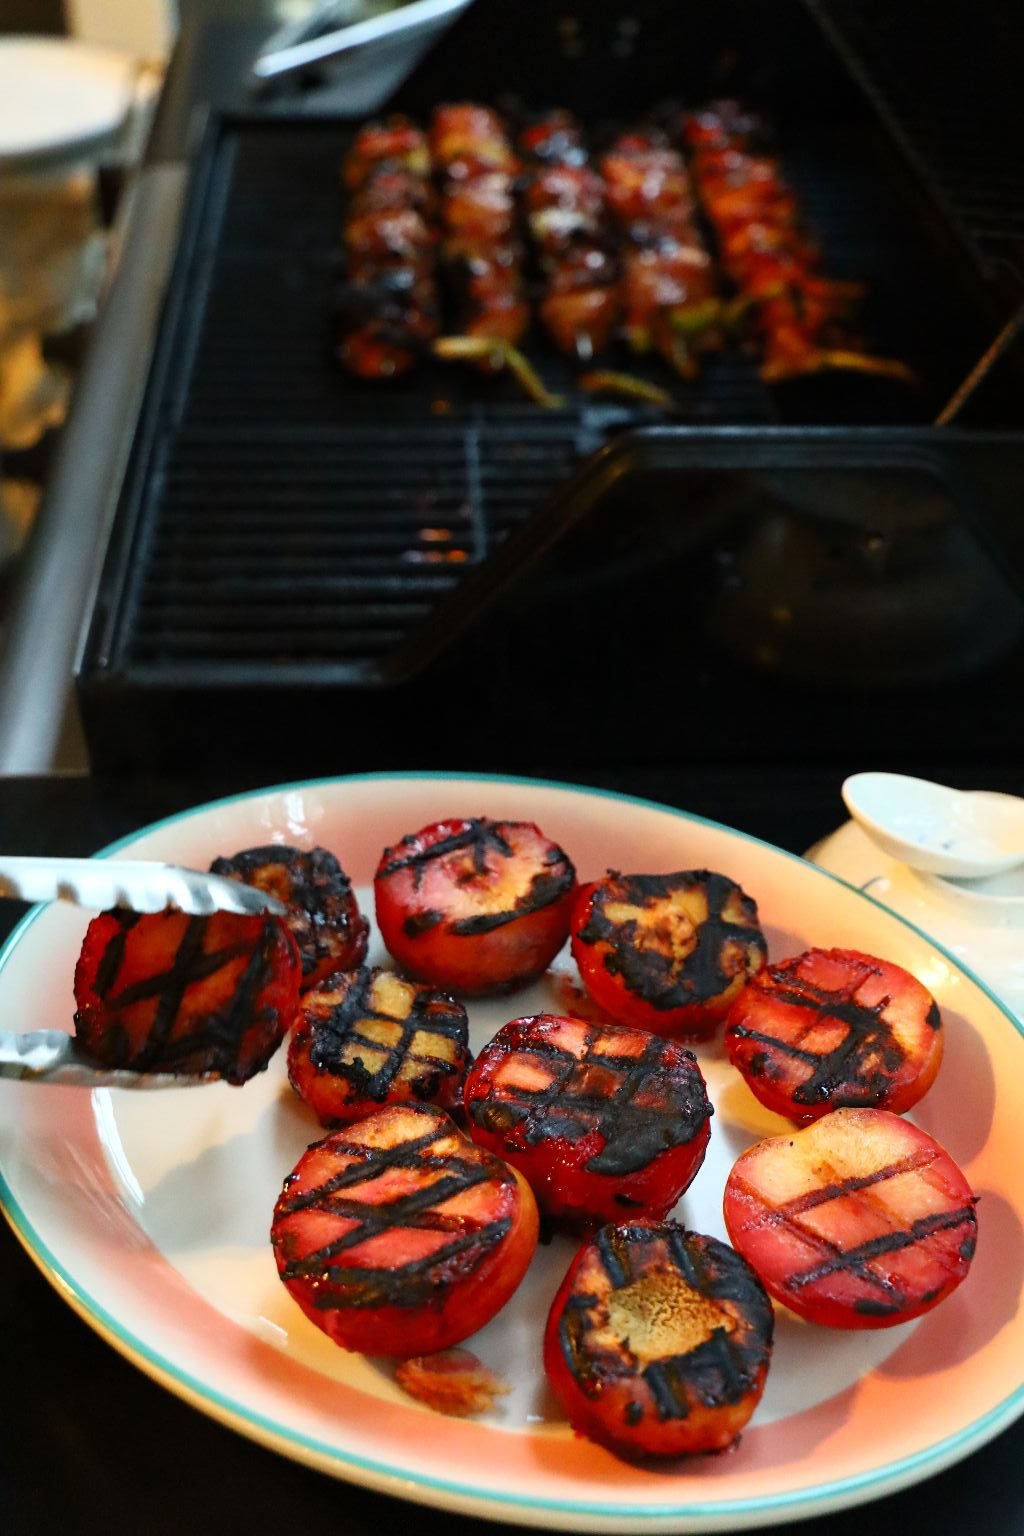
Remove the plums after about 3 more minutes grilling time, keeping them firm to the touch.
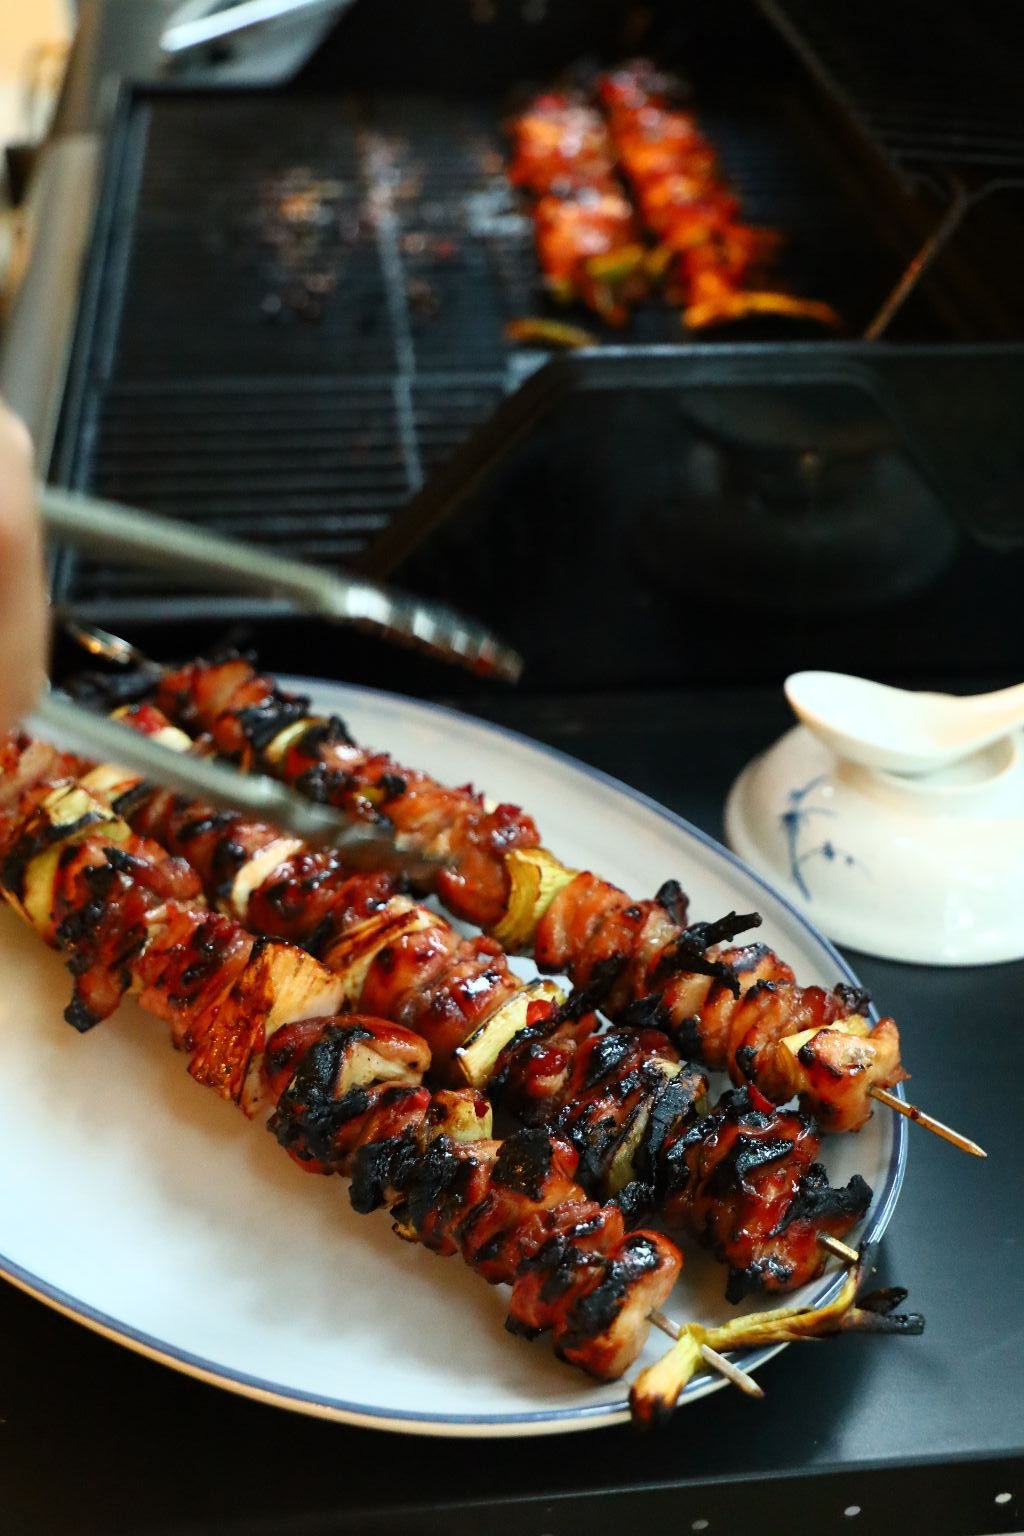
When the skewers have finished grilling, remove and plate as shown so the meat can rest.
Letting the meat rest for about 8 min. will allow the super heated juices to go back into the center keeping the meat nice and juicy.
Plate your grilled and pan fried items and dig in!
Itadakimasu
(I receive this food, in Japanese.)
——————————————————————————
If you would like to view our other Asian pages:
Click Here For: Whann Way Asian
AND,
Click Here For: Whann Way Asian, E Ho ‘Omau (Continues)
AND,
Click Here For: Julie Loves Asian
AND,
Click Here For: Asian Edible Gifts
AND,
Edible Gifts of the Asian Variety
(Note: Edible Gifts of the Asian Variety is the same post as Asian Edible Gifts. I have both listed here for accuracy, but one is a Page and the other is considered a Post. Confusing, I know.)
AND,
Click Here For: Our Asian Easter
AND,
Click Here For: Whann Way Sushi
AND,
Click Here For: My Love Affair With All Things Asian
AND,
Click Here For: Asian Steamed Buns: Bao and Manapua
AND,
Click Here For: Our Purple Sweet Potato and Taro Stuffed Steamed Buns and Asian-Pacific Sliders
AND,
Click Here For: Our Asian Inspired 4th. of July
AND,
Click Here For: Gordon’s ‘Year of the Tiger’ Sauce and Nam Jim Jaew
AND,
AND,
AND,
Chisana Atsukau (Small Treats in Japanese
AND,
AND,
Japanese Girl’s Day (Hawaii Tradition)
AND,
Asian Eats (More Great Recipes to Enjoy)
AND,
AND,
AND,
AND,
———————————————————————–
EASTER 2022 The green cup in the photo above is a handmade ceramic cup, probably made by a child. It was found in a box in the attic of my son’s girlfriends house. I spotted it and saw a treasure! She …

(I took the photo above when we first moved to Hawaii in 1986. This is Diamond Head side of the island.) We sure do miss riding around the island playing tourists. ————————————————————– ALOHA! May Day is Lei Day When I was a …

Happy Easter Everyone!
Welcome to our Artsy Easter
(We shot this in 2021)
This Easter is actually based on cleaning out the attic and going through many storage containers in our attic, in an attempt to get rid of some of this and pass it on to our daughter and son.

My Purse, and a few Pretty Pots and Sweets
This is Veronica’s Old Easter Basket
I filled it with some Chocolate Eggs and a few of her past Easter Collectibles.
An Old Dragonfly Pot of Mine
(I’ve discovered that it is easier to get rid of things when you disguise them as a gift.) 🙂
Veronica’s Beatrix Potter Book and some of her Collectibles
Veronica’s Bunny She Painted in Hawaii
As a Girl Scout outing we went to a pottery painting class and each girl picked out something to paint, the items were then fired. Veronica chose this bunny. When I initially told her that I had some Easter things to pass on to her from her childhood, she wasn’t interested. That is when I took a photo of this bunny and sent it to her explaining that since she wasn’t interested in any of this then perhaps some little girl at Goodwill, will.
It was then that she wrote back, “BUNNY! I REMEMBER BUNNY! I WANT BUNNY!”
(Yeah, we mom’s know just what buttons to push.) 🙂
Needless to say, she ended up taking everything that I wanted her to.

Veronica’s collection started with me buying her a few things each year for Easter. My mother also started giving her keepsakes so that she could have a nice collection to display every year, even bringing them into her adult life. Perhaps even passing them down to her children.
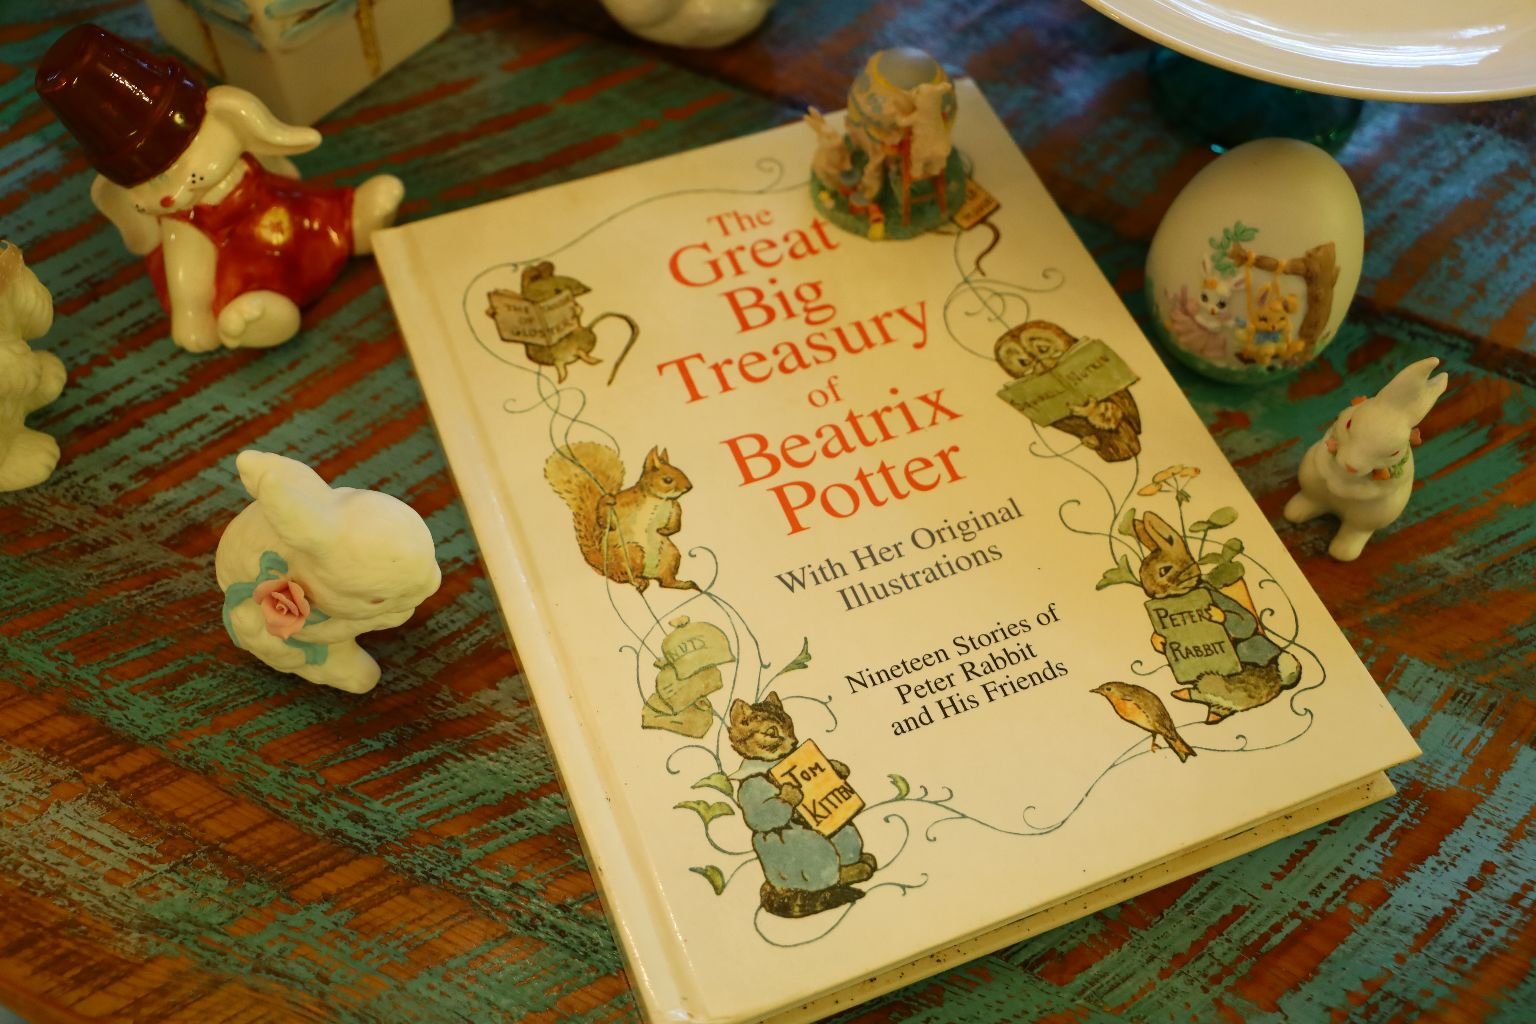
I believe it was my mother who bought her this book.
We Also Have a Thing for Marshmallow Eggs
—————————————————————
————————————————————–

This Beautiful Book was also Veronica’s
———————————————————————
Sugar Free Peeps
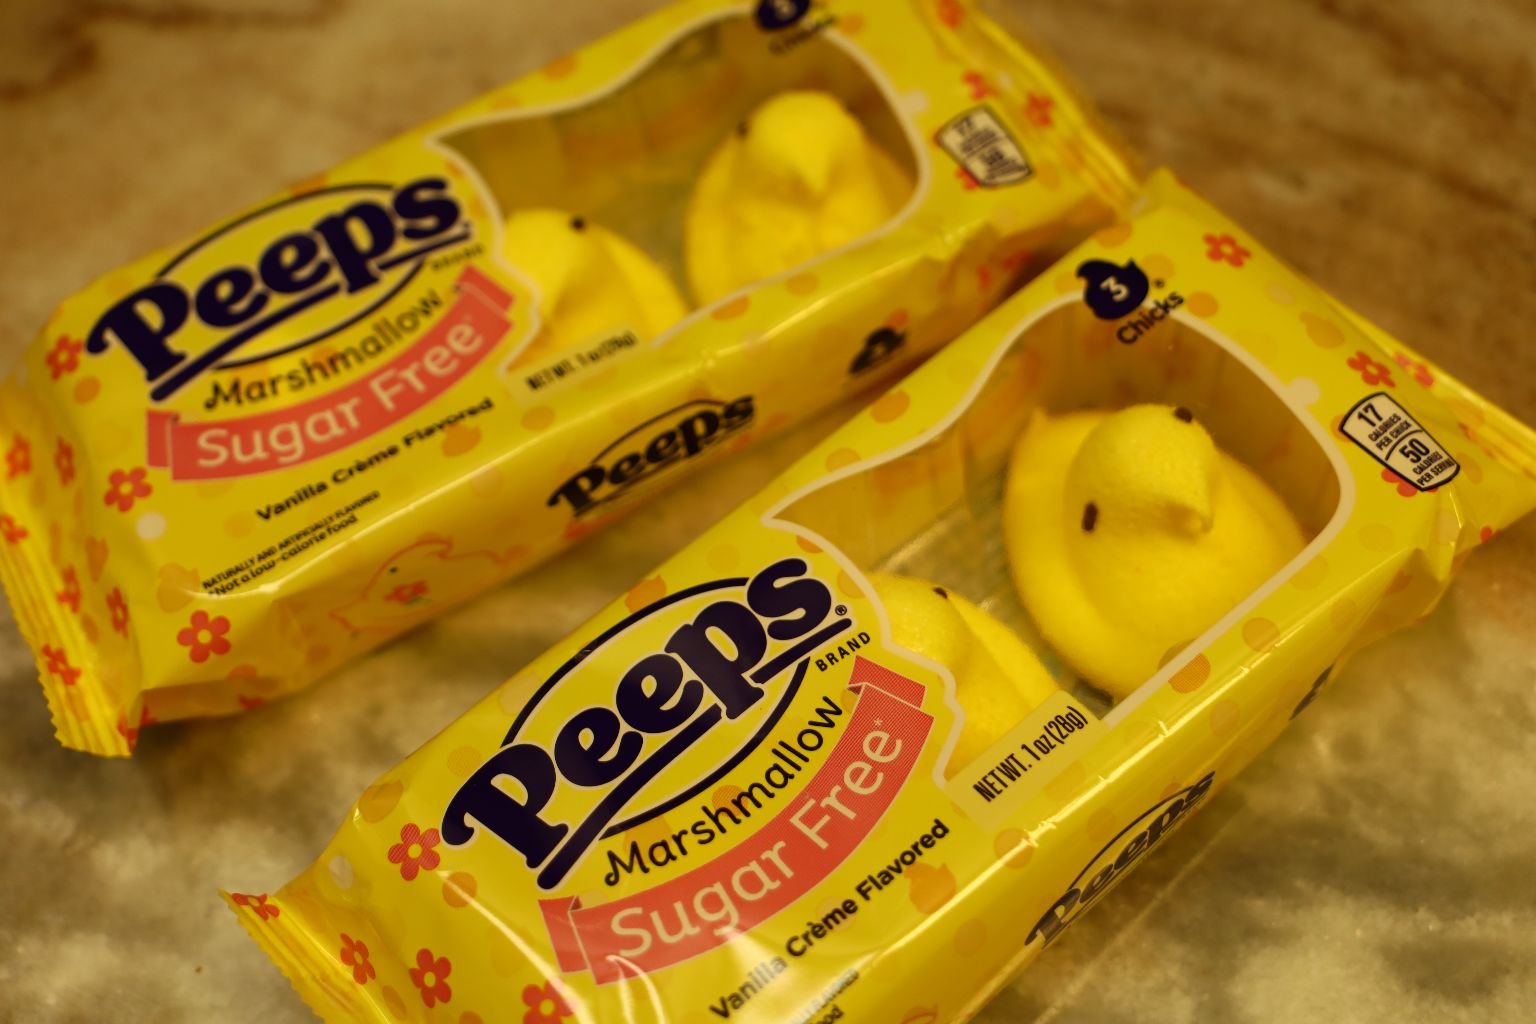
This is MY Easter Treat!
Some people can’t stand Peeps. I however, grew up on them every Easter because my mother loved them. Although they didn’t have the ‘Sugar Free’ variety back in the day, they do now!
Hence, my special Peeps Sweets!
————————————————————————-


Enjoying Everything Easter and PINK!
———————————————————
Easter Morning

Good Morning and Happy Easter
How About an Easter Bunny Eggy in a Basket?
(For those of you that don’t know what ‘Eggy in a Basket’ is, it is a fried piece of toast with a cooked egg in the center of it. Sometimes, a cookie cutter is used to create a shape for the center of the bread. Here we used a rabbit shape. It is actually quite good and enjoyed by both children and adults alike.)
——————————————————–
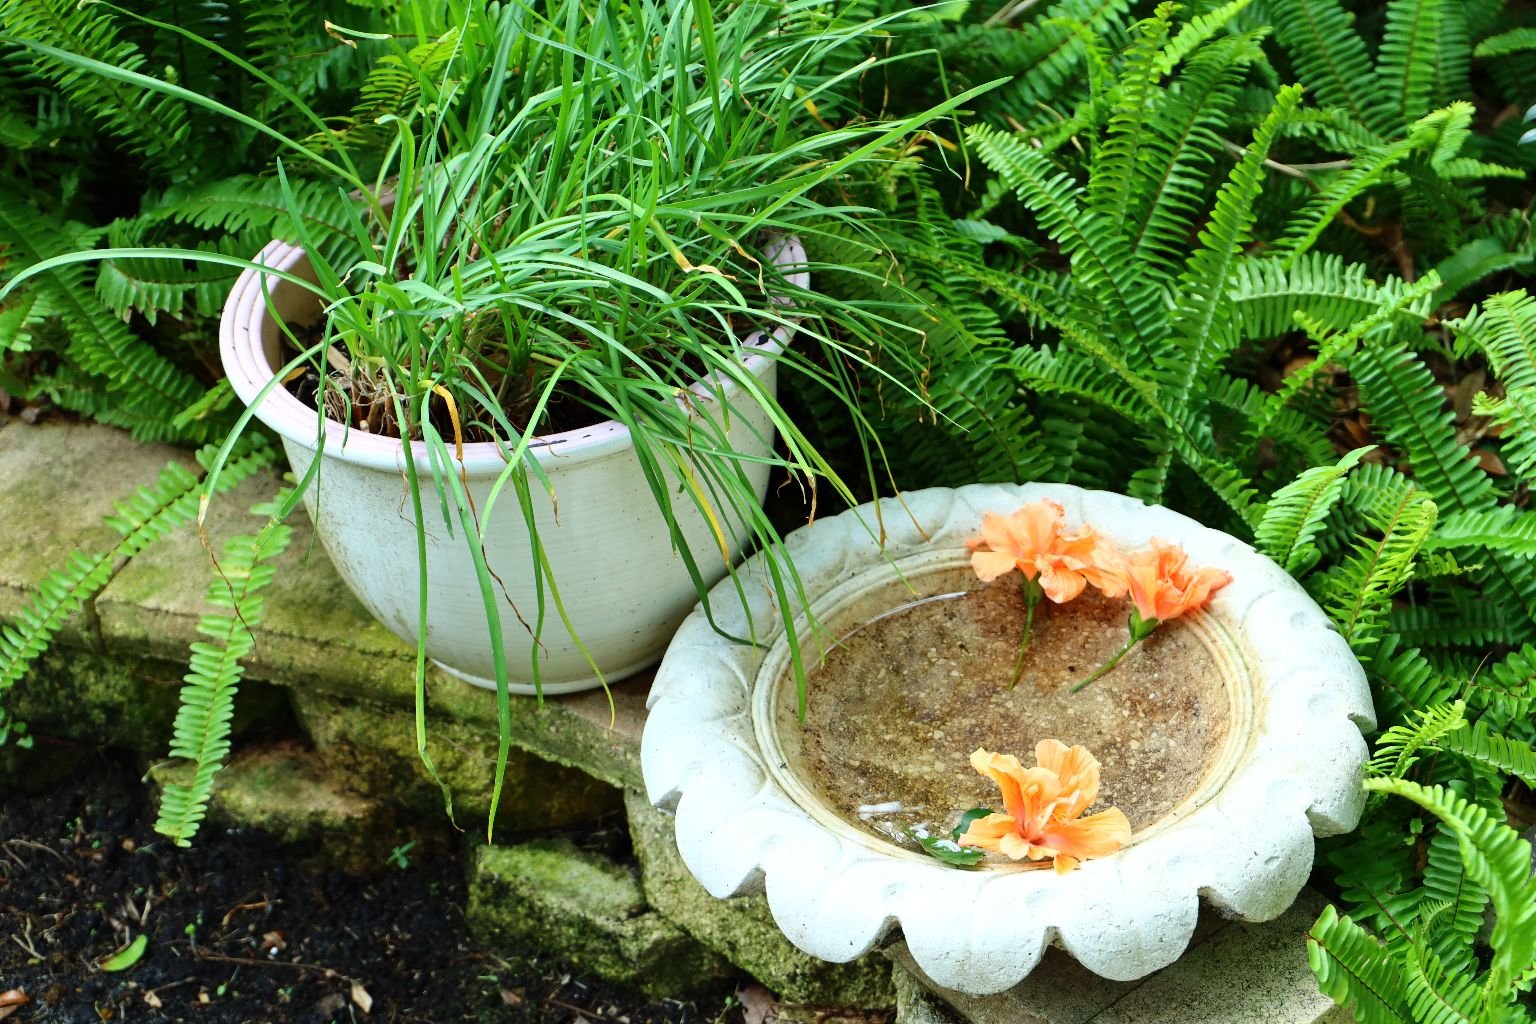
Wild Garlic Chives Growing for Easter
————————————————————
SPRING IS HERE

We love our backyard and spend as much time as possible out here. Especially around the holidays where we can really make an effort to spruce up the place with plants and pots.
——————————————————————-
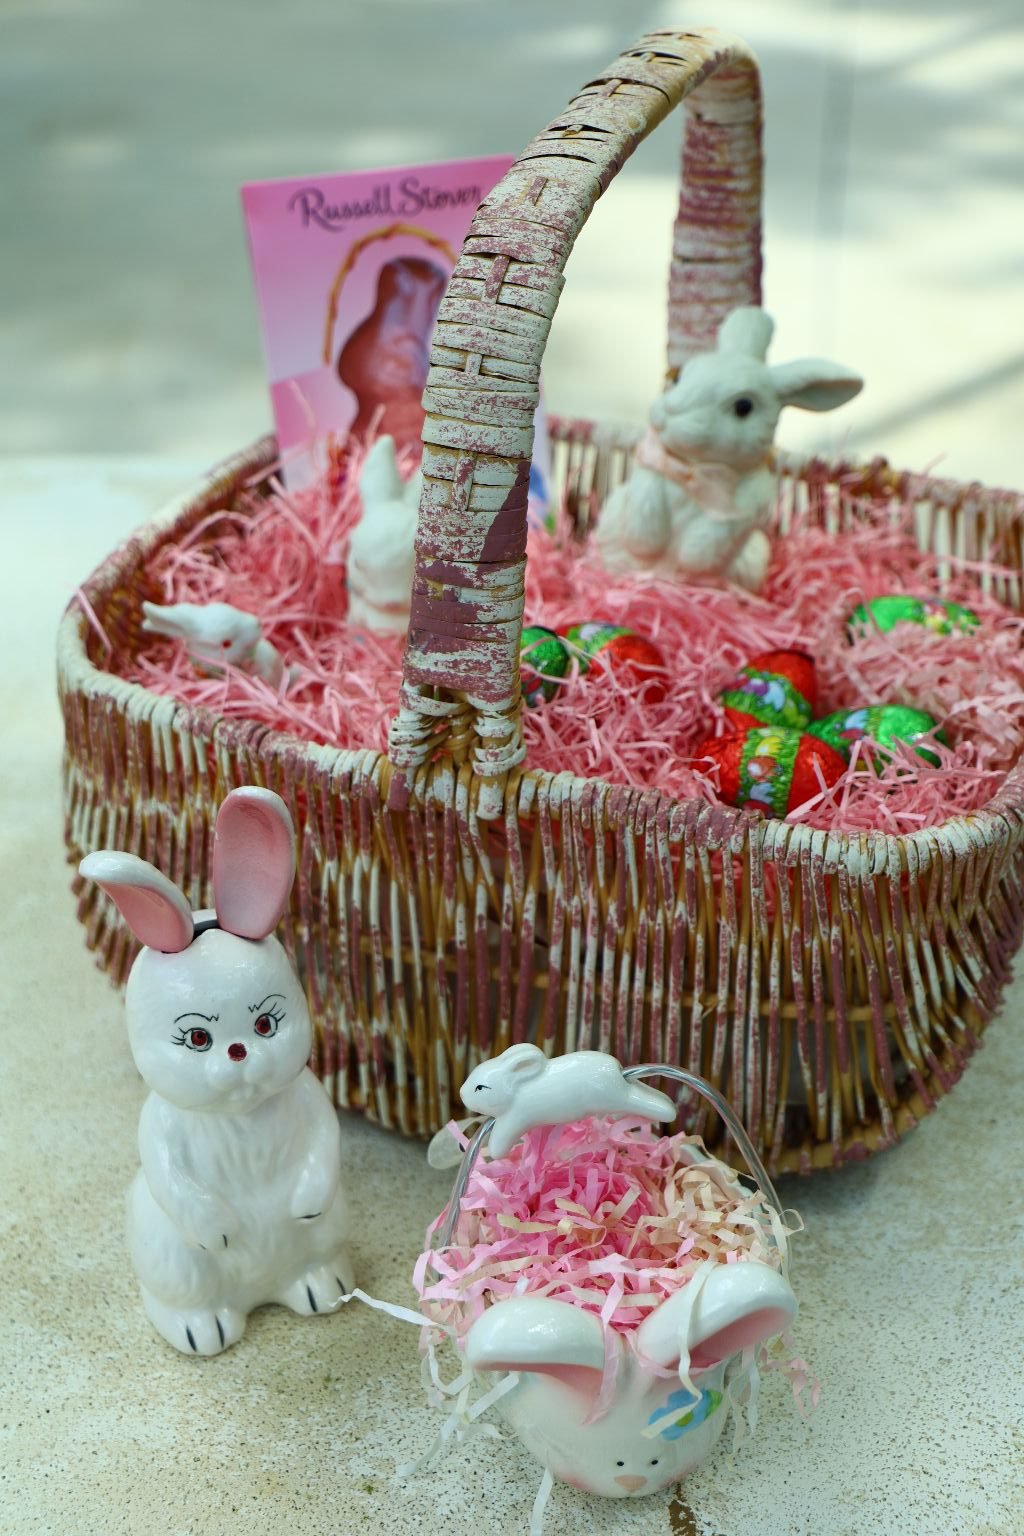
Here is yet another one of Veronica’s Easter Baskets
When our children were young we didn’t have a lot of money. I bought these very cheap baskets and spray painted them white. I then used a sponge and dabbed some pink paint all around it to give it that look. I did the same thing for an Easter basket for Brodie, except I used a blue paint to dot around the basket for him.
She remembered the basket, and happily excepted it.
—————————————————————-
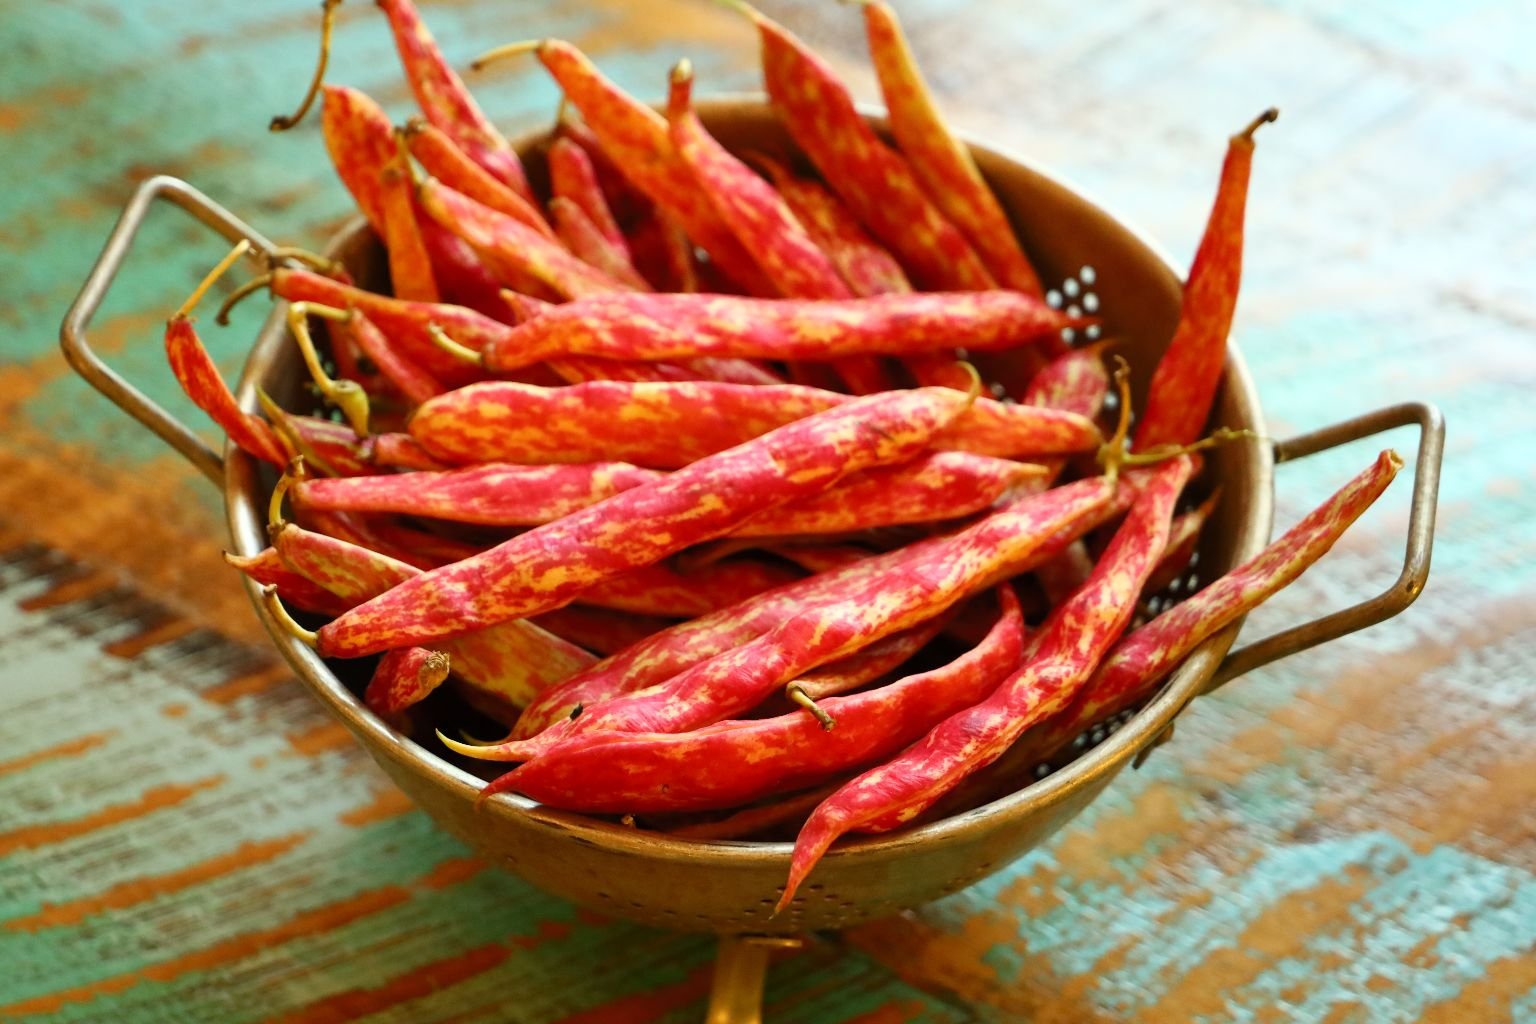
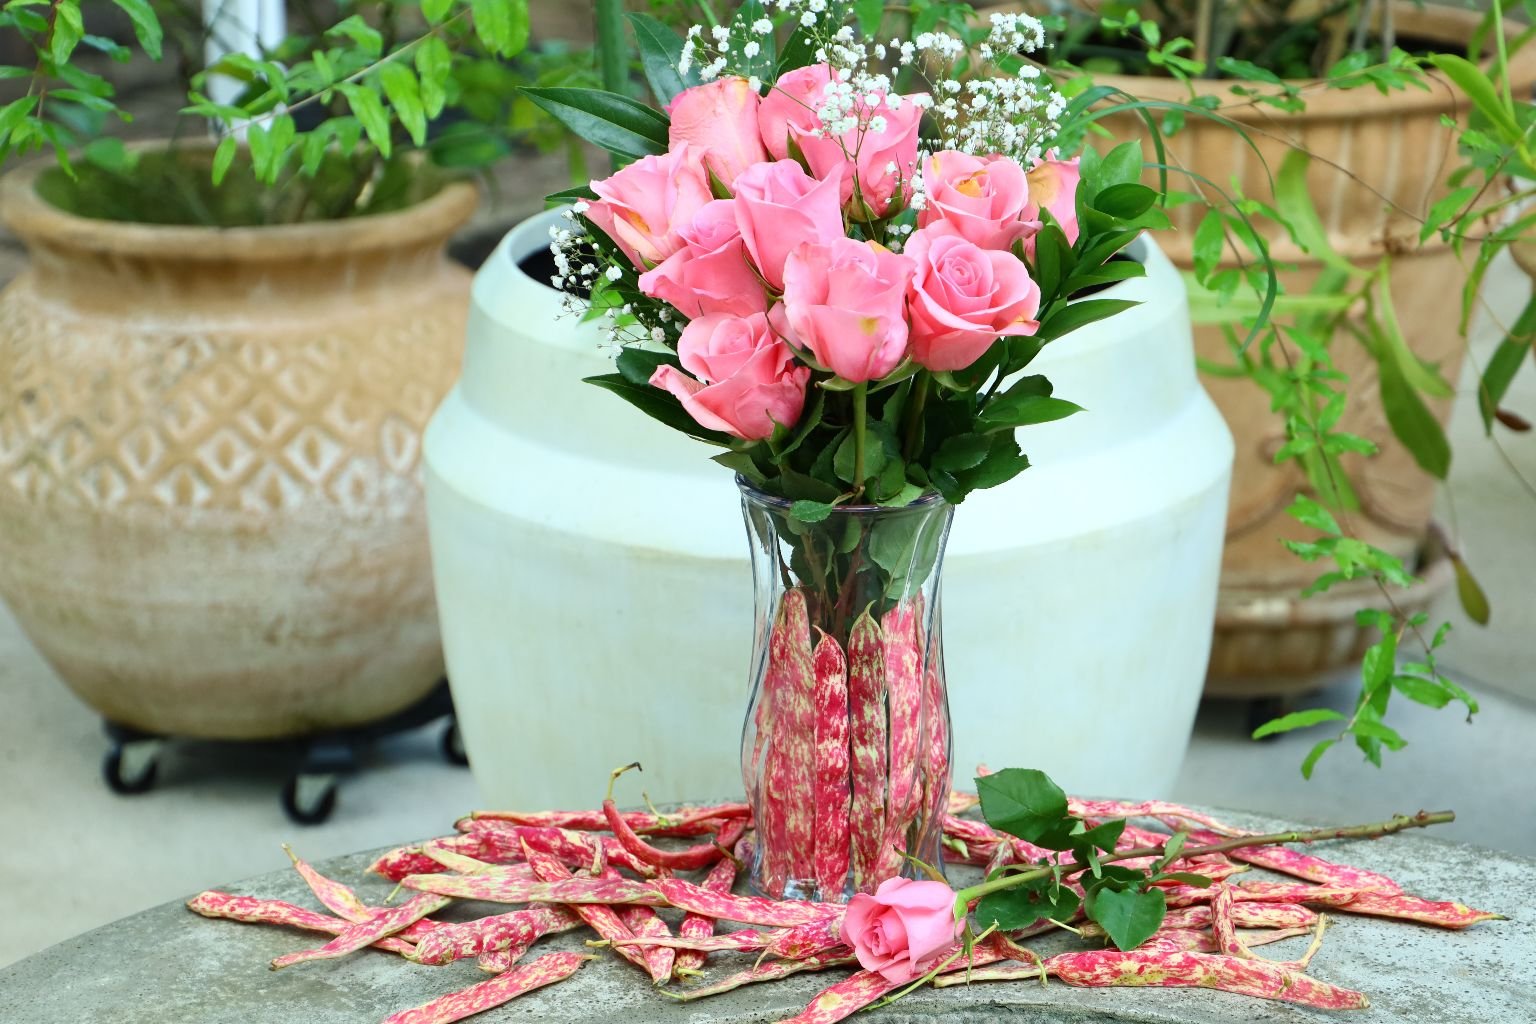
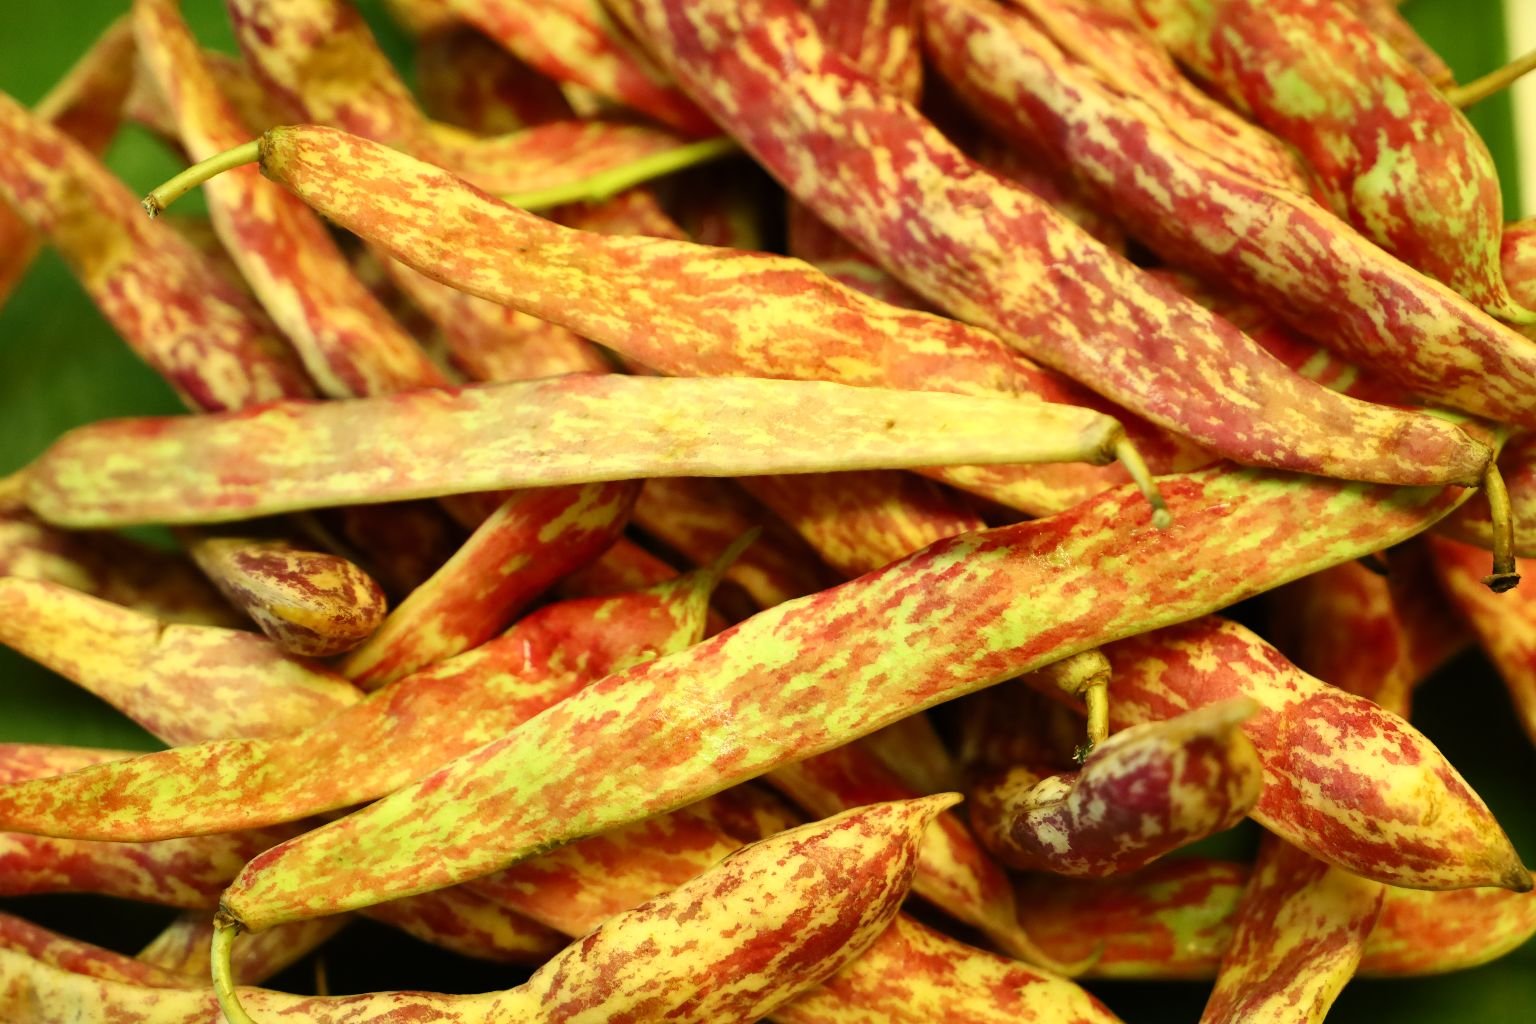
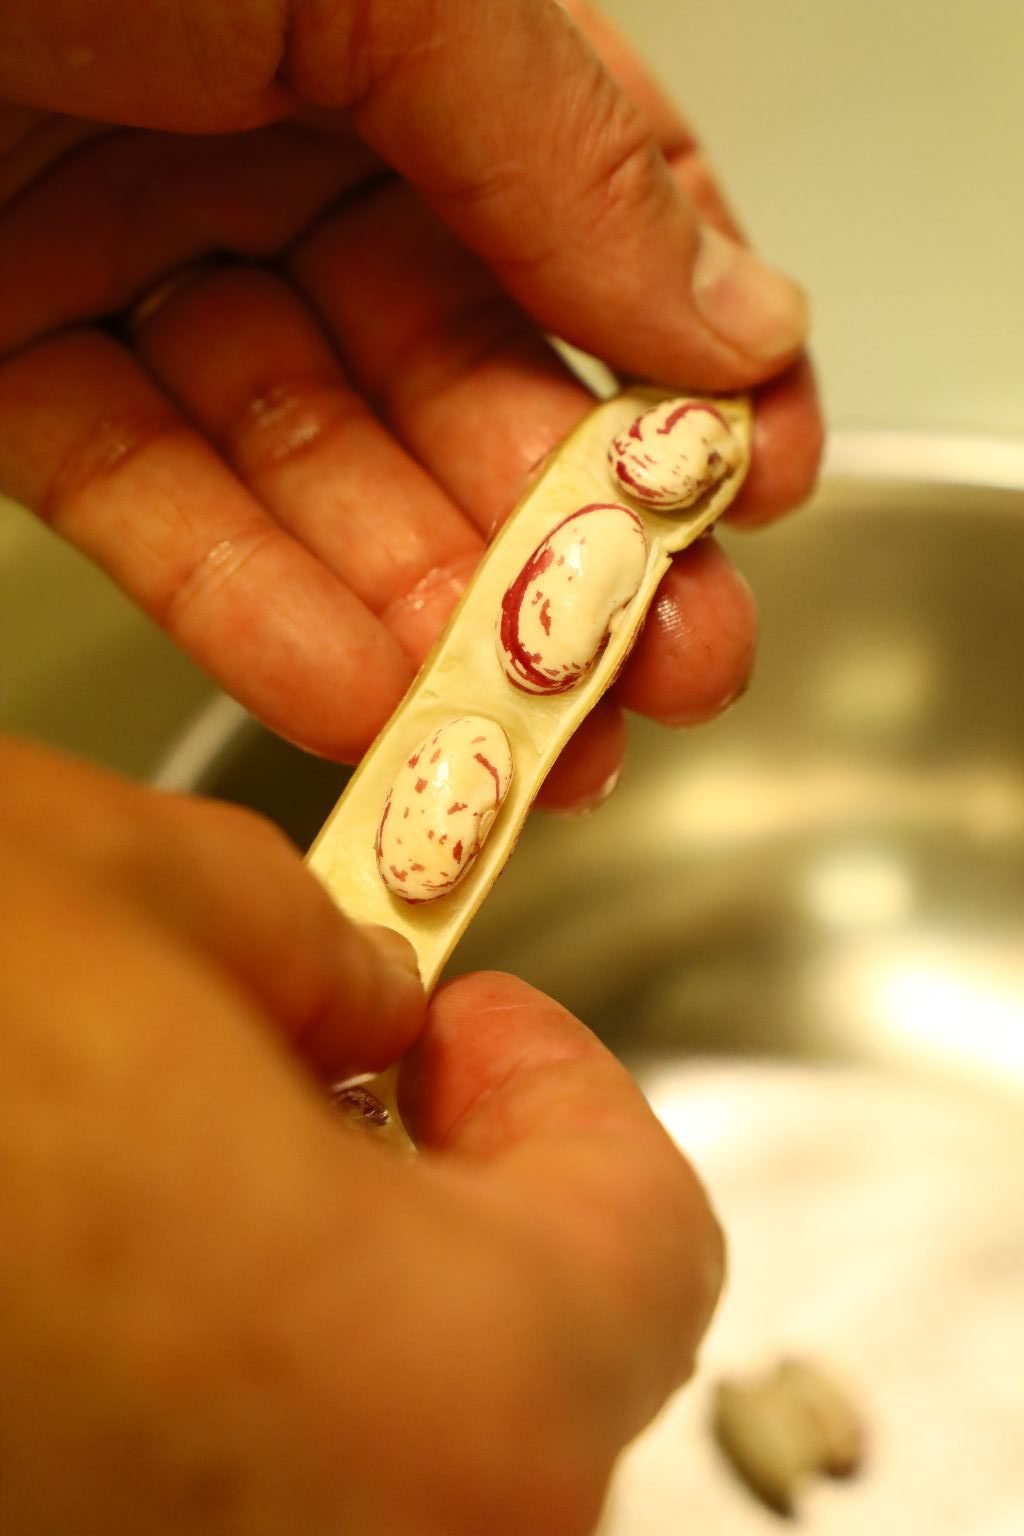
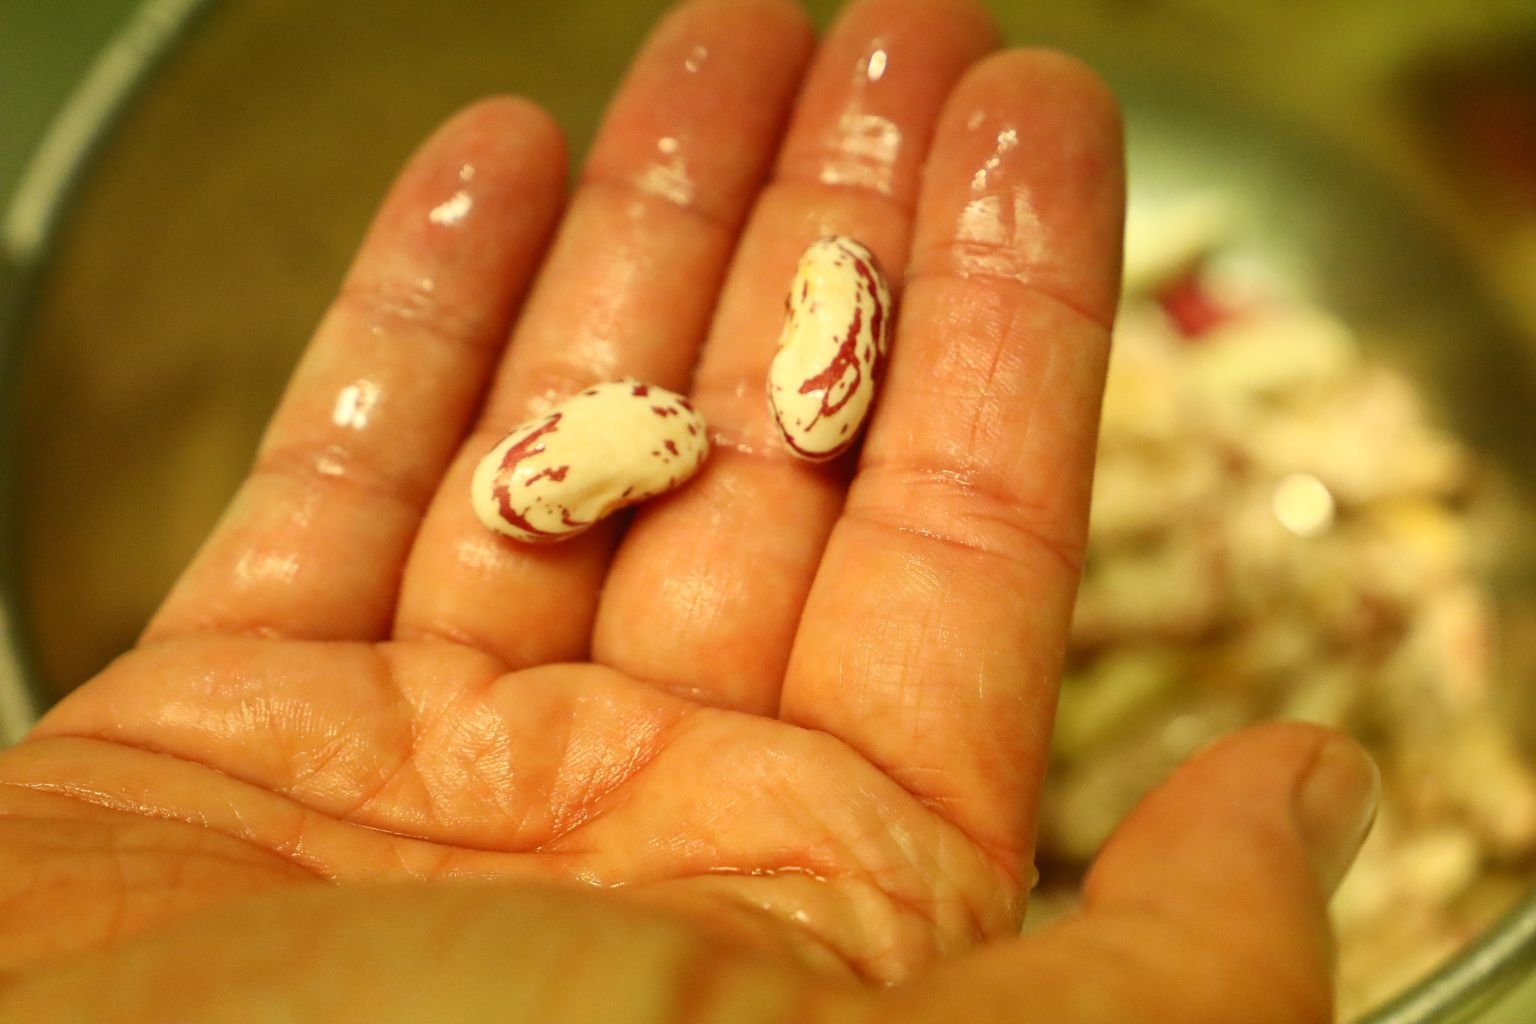
Cranberry Beans
These beans were far too beautiful to just eat. I loved how long they were. I envisioned placing them into a clear glass vase with pretty pink roses in the center with the beans surrounding them. Kind of like a craft project. So, I put a glass in the center of the vase and filled it with water for the roses. But before I added the roses, I placed the beans all around the glass, then inserted the roses. I loved it!
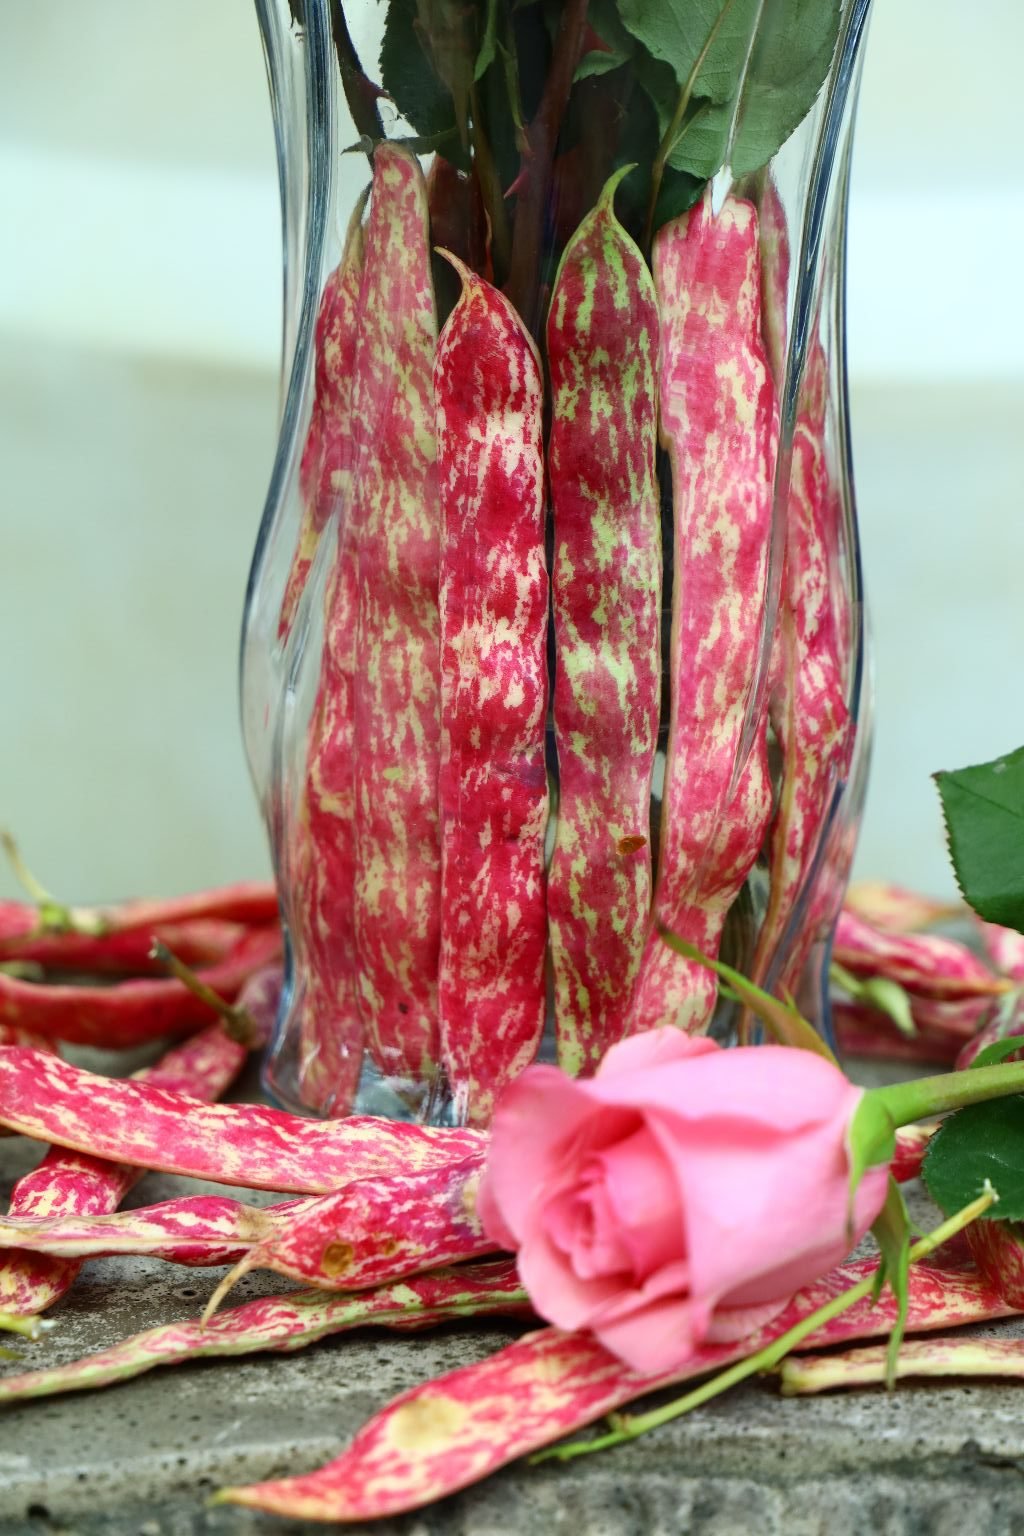

You Can See The Results Here

————————————————————–
—————————————————————–

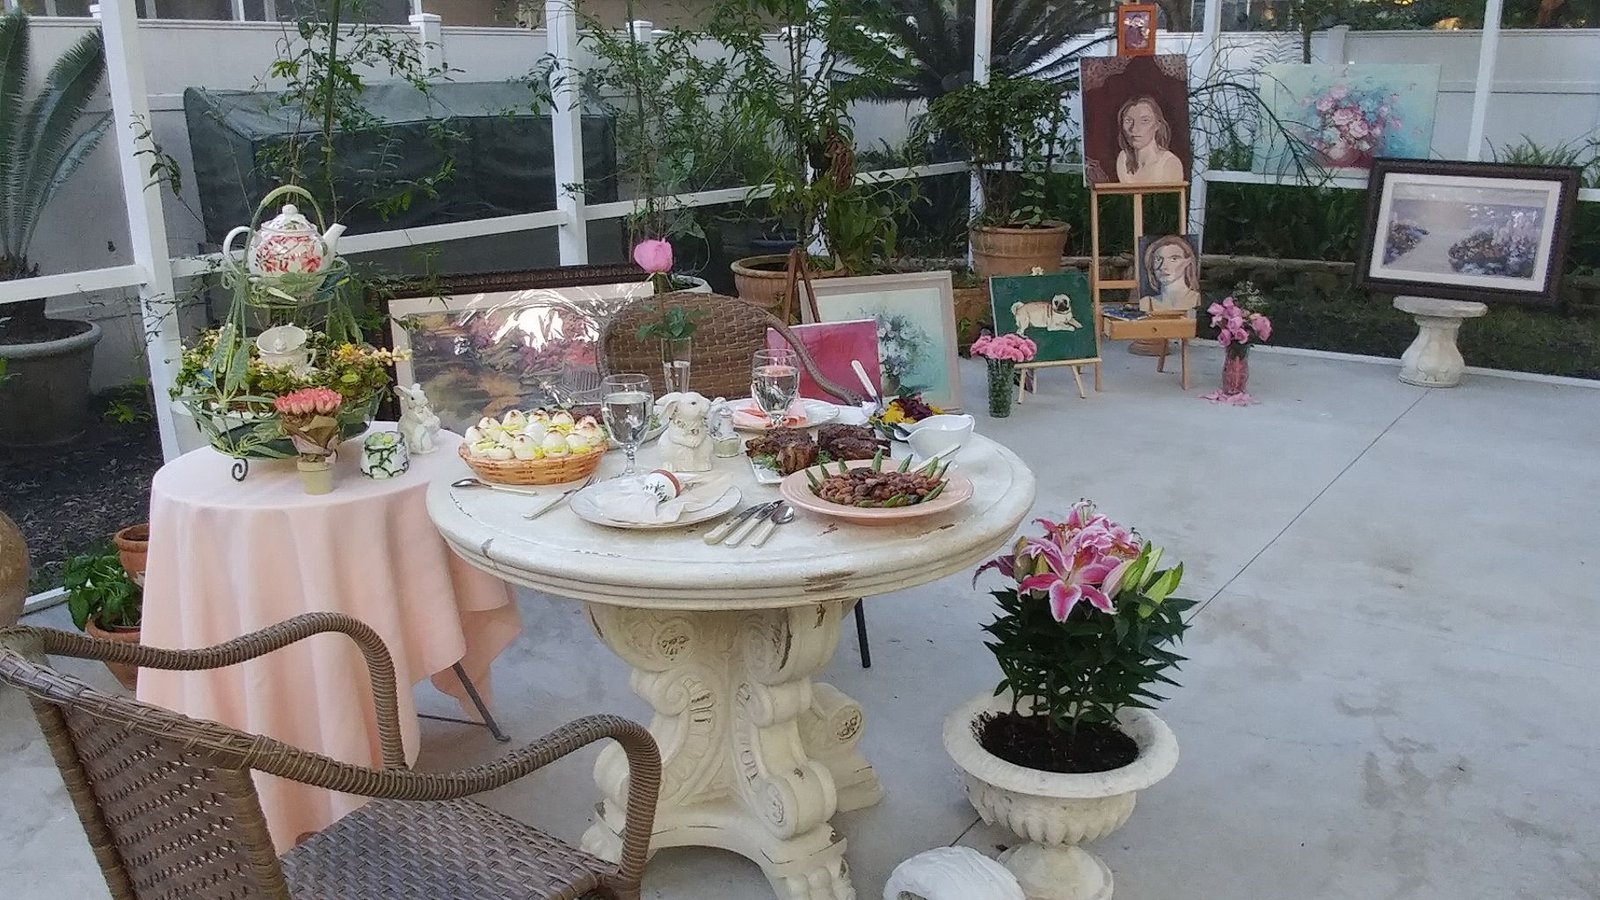
It’s About Time to Set up For Easter Dinner
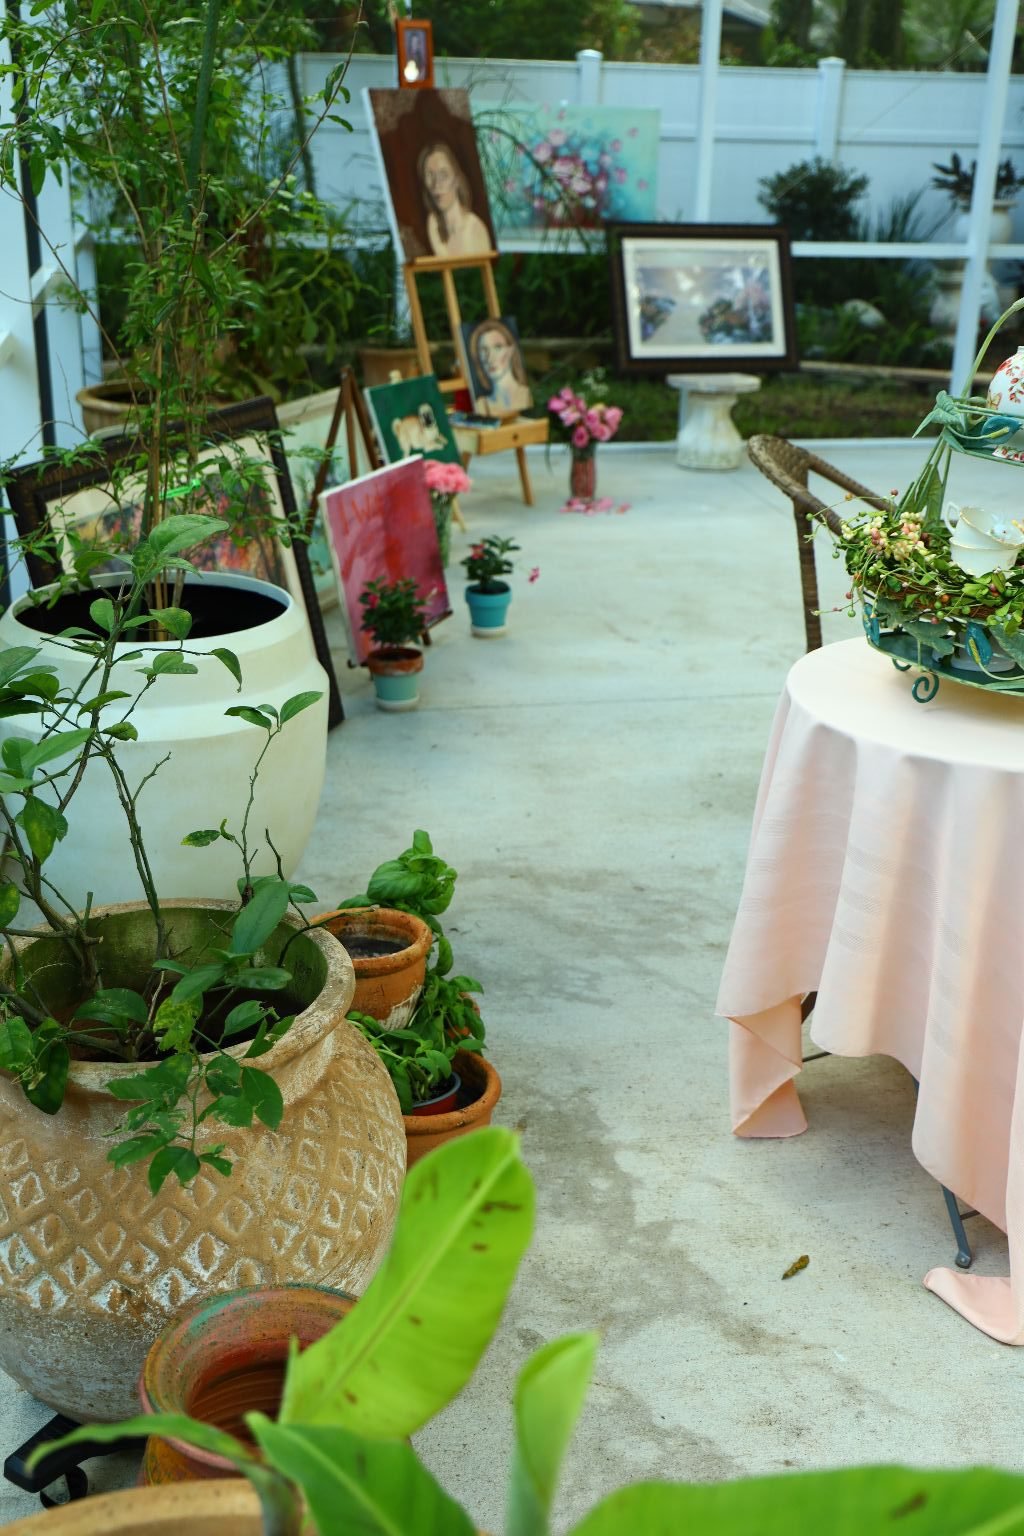
We pulled out what prints and paintings that we had stored in the attic and brought them down to display. When Veronica moved out years ago she took her really nice paintings with her. These are some that she left behind. They are from her earlier days. She has come quite a long way since then. Fine Arts Major that she is. 🙂

————————————————————
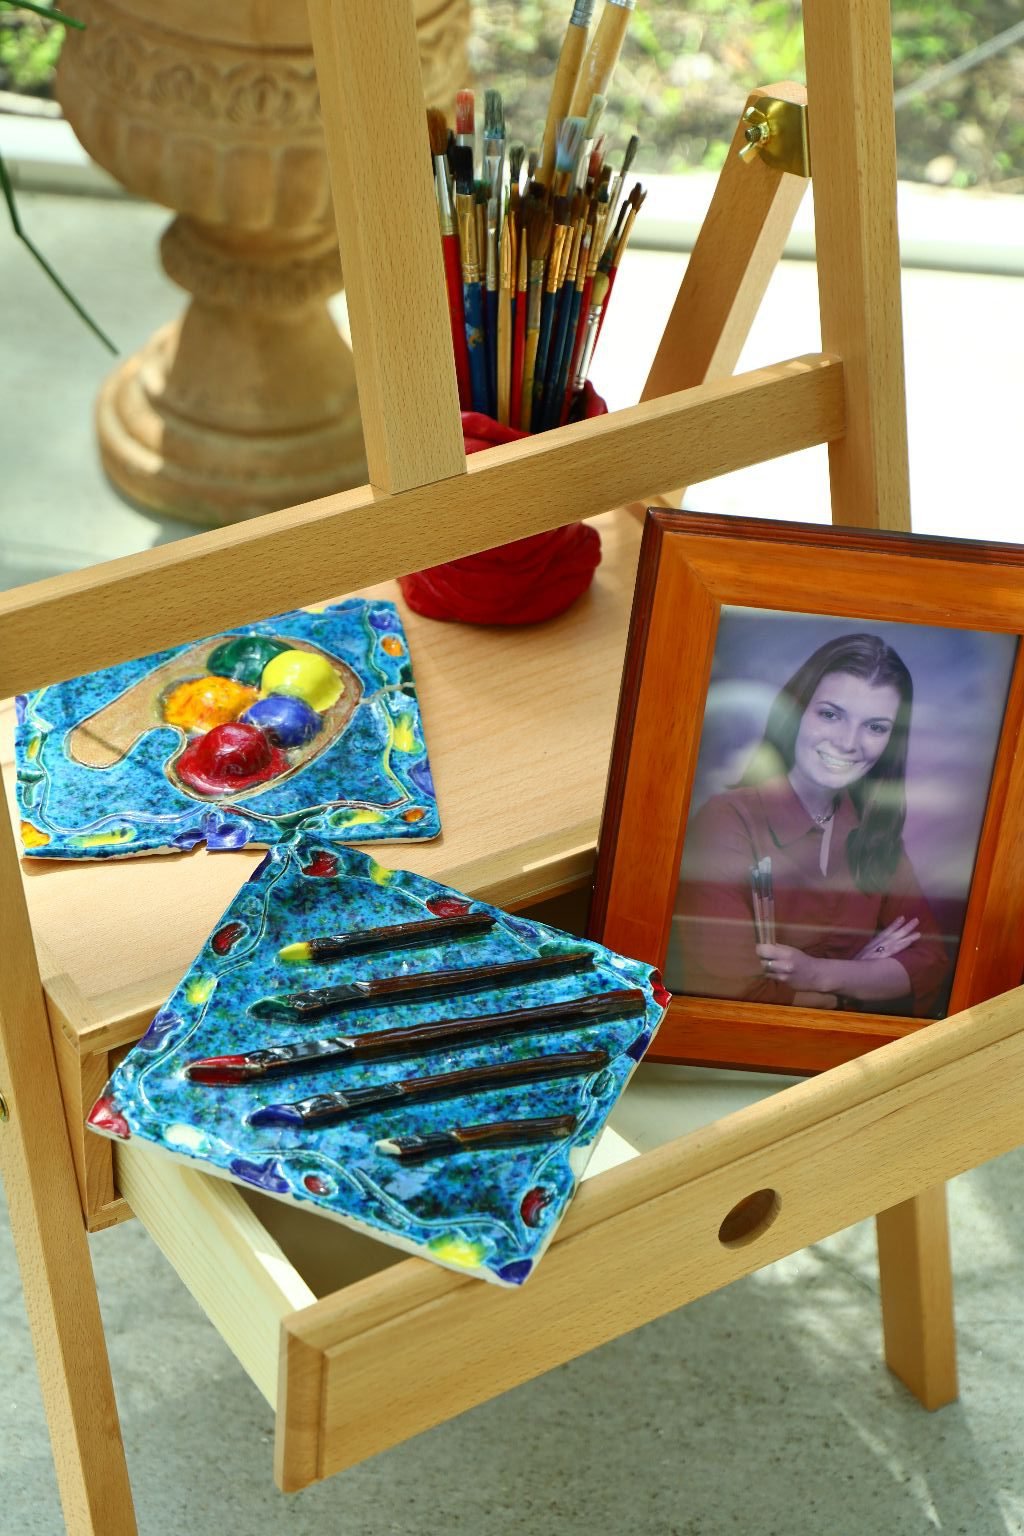
Veronica was thrilled that we also found her old artist tiles that she made from years ago in the attic. She created them, painted them, and then had them fired.

More Self Portraits of our Family Artist

—————————————————————-

The Painting on the Left is of my Monk 🙂

—————————————————————
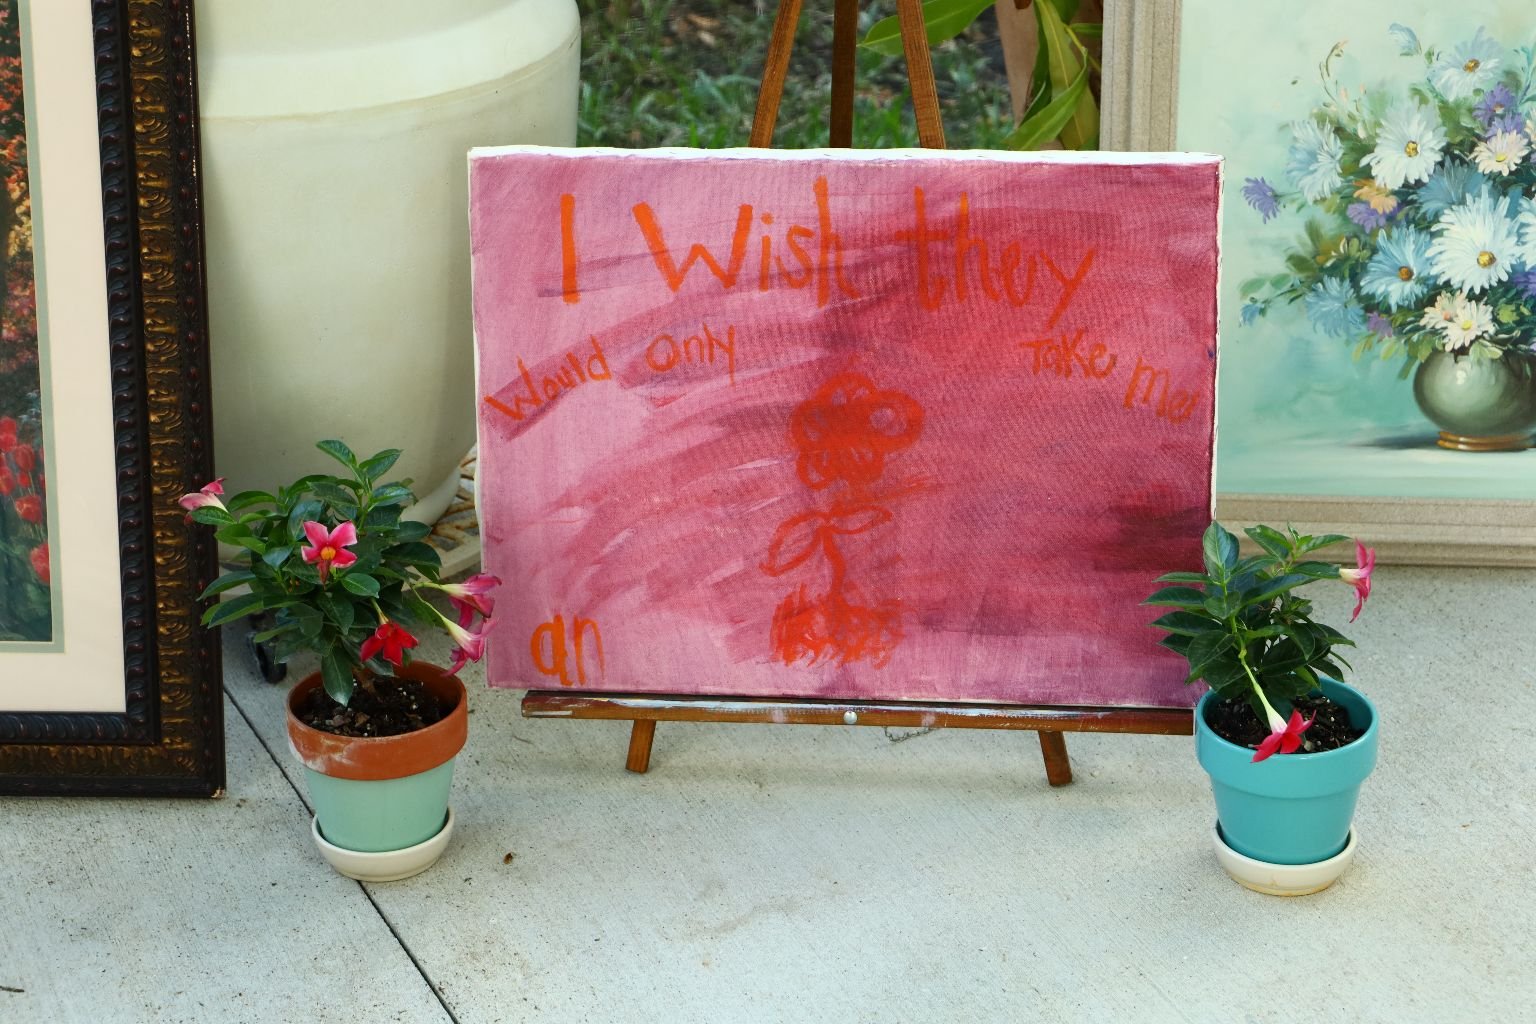
Veronica’s Creepy Painting
(Veronica swears that she didn’t paint it. She thinks a friend of hers from the past painted it. It isn’t hers or Brodie’s handwriting, so perhaps so.)
——————————————————————–

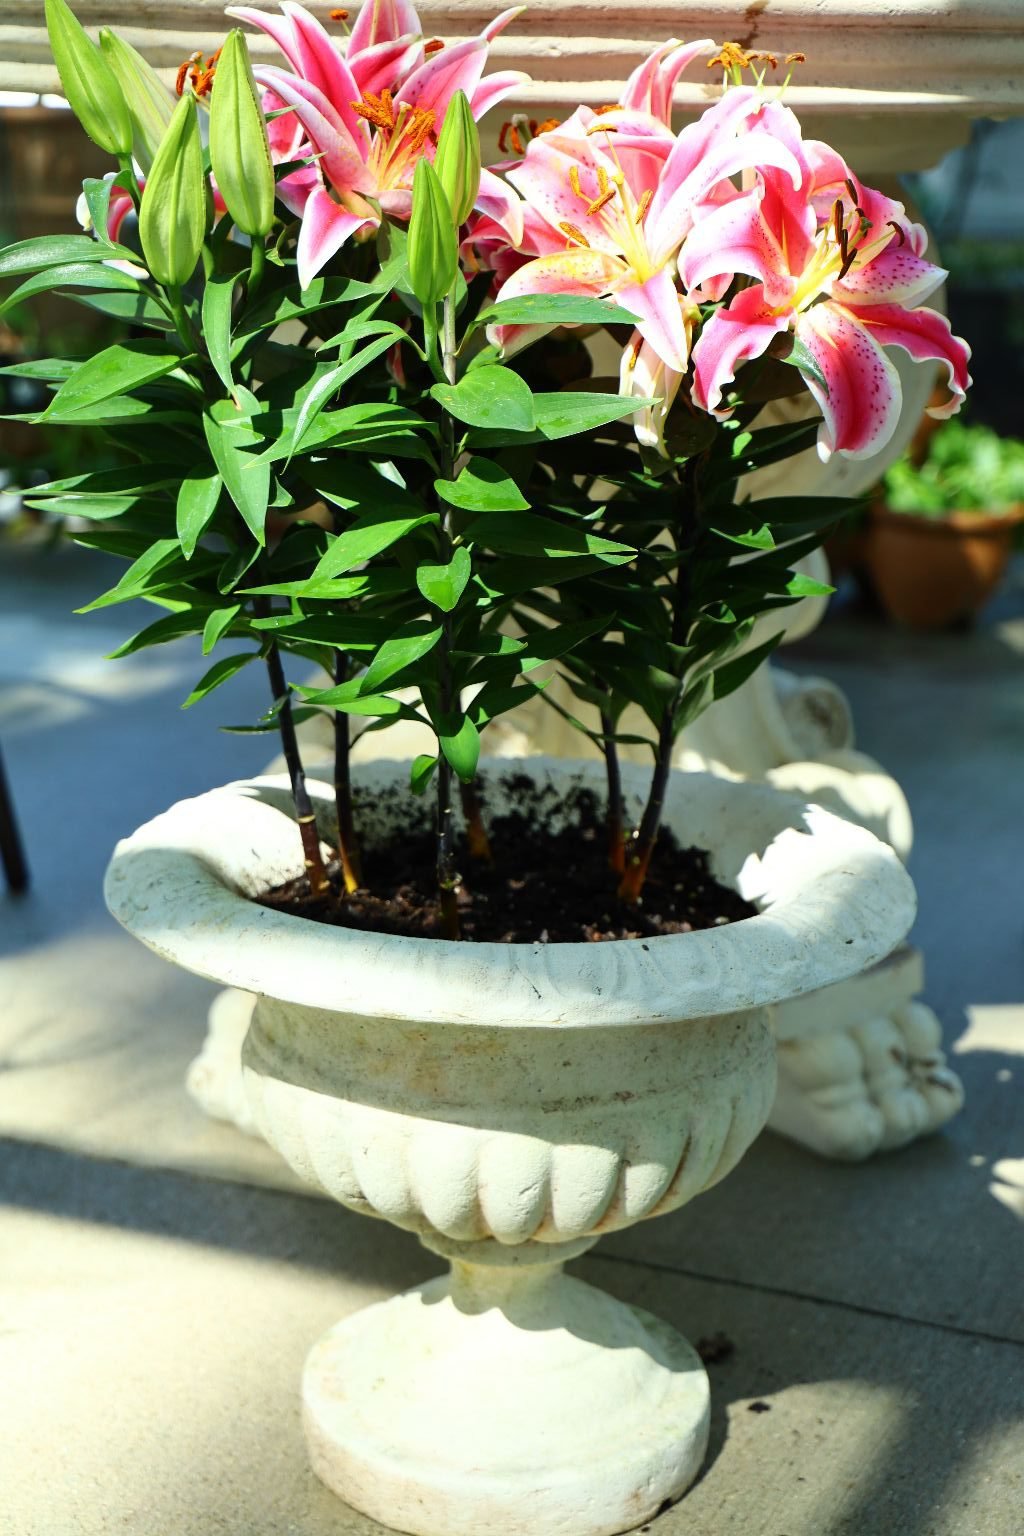
Oriental Lilies
—————————————————————-

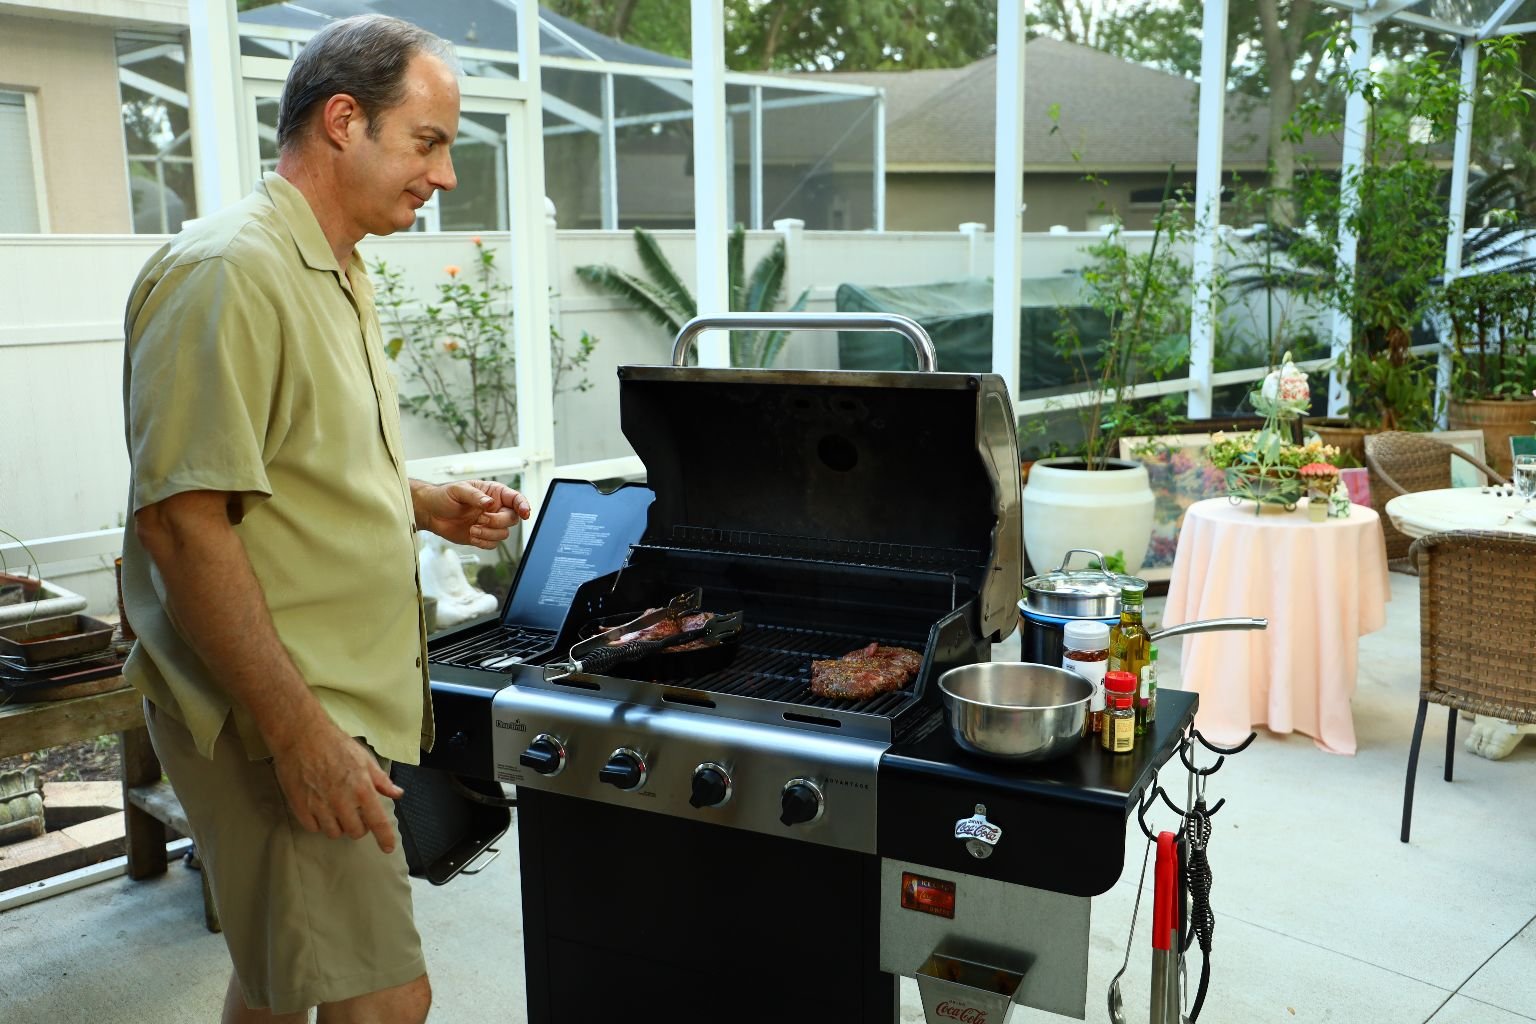
Gordon Grilling our Delicious Lamb
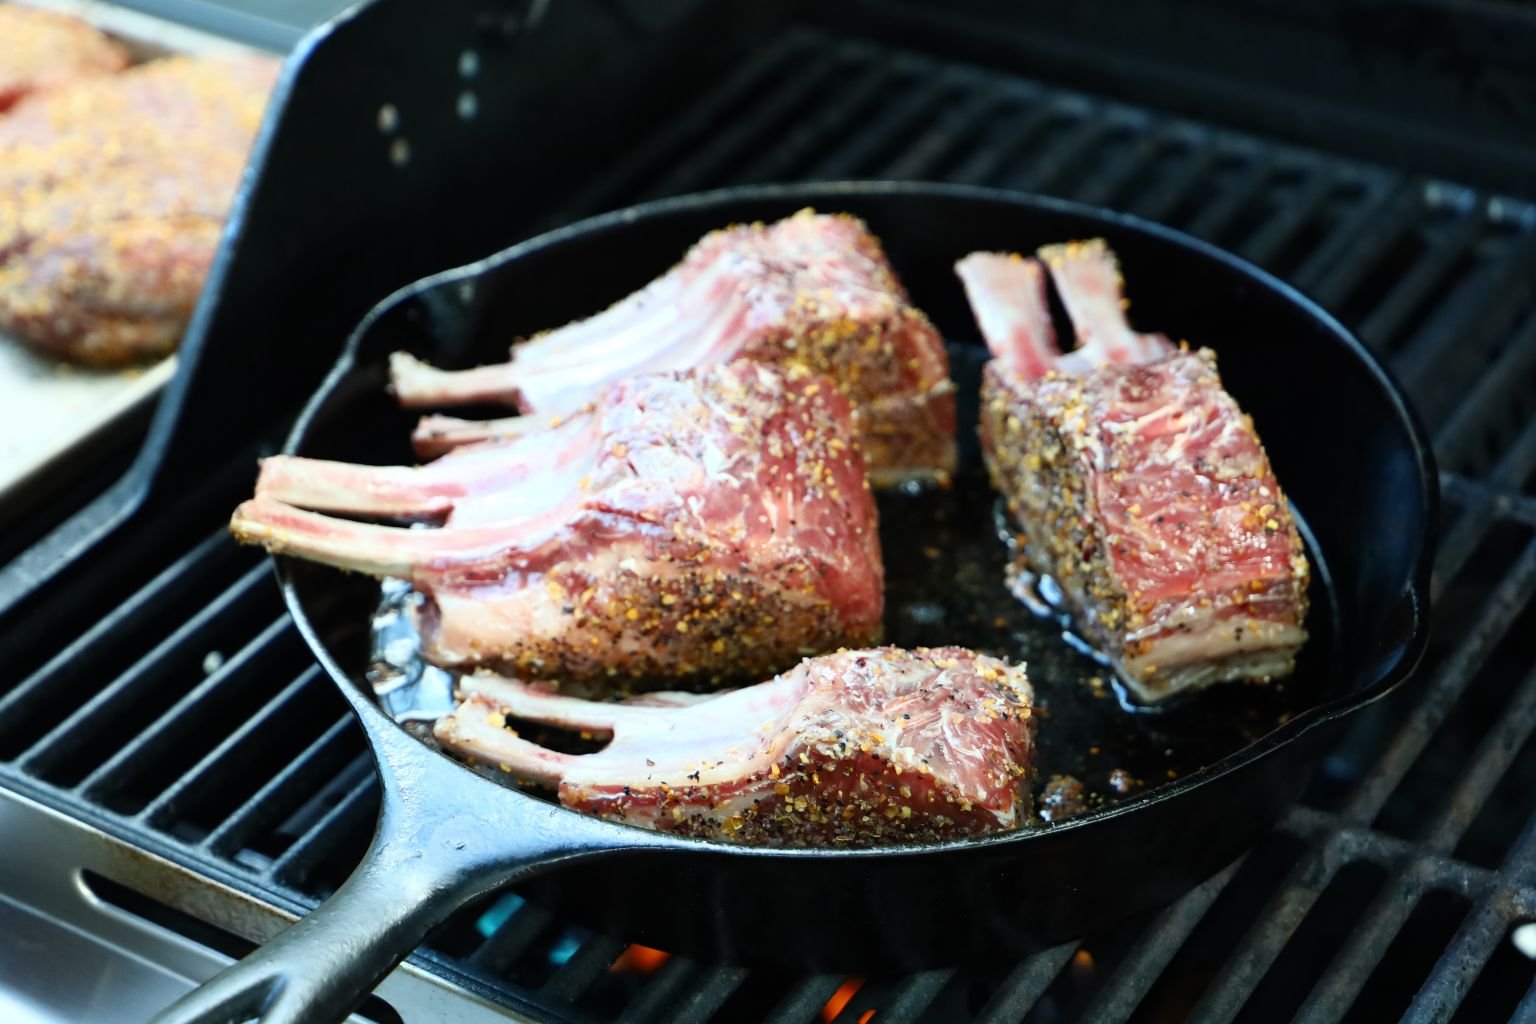
This was truly a very delicious meal.
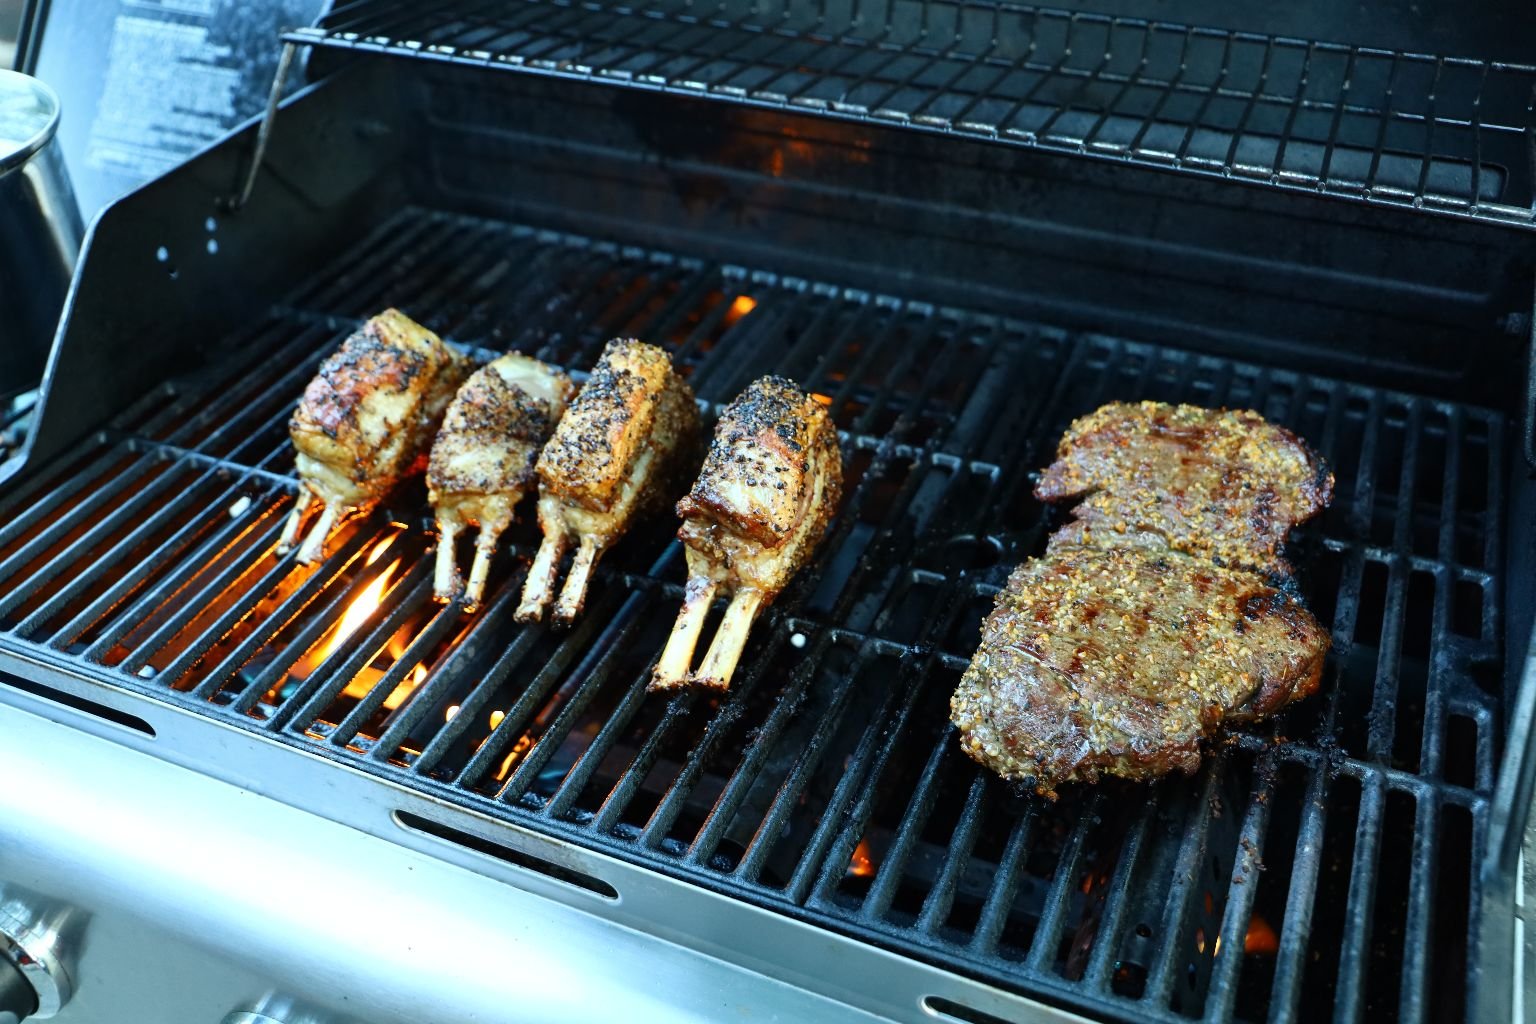
We don’t eat lamb that often so this was very special.
The Aroma Was Amazing
————————————————————————–
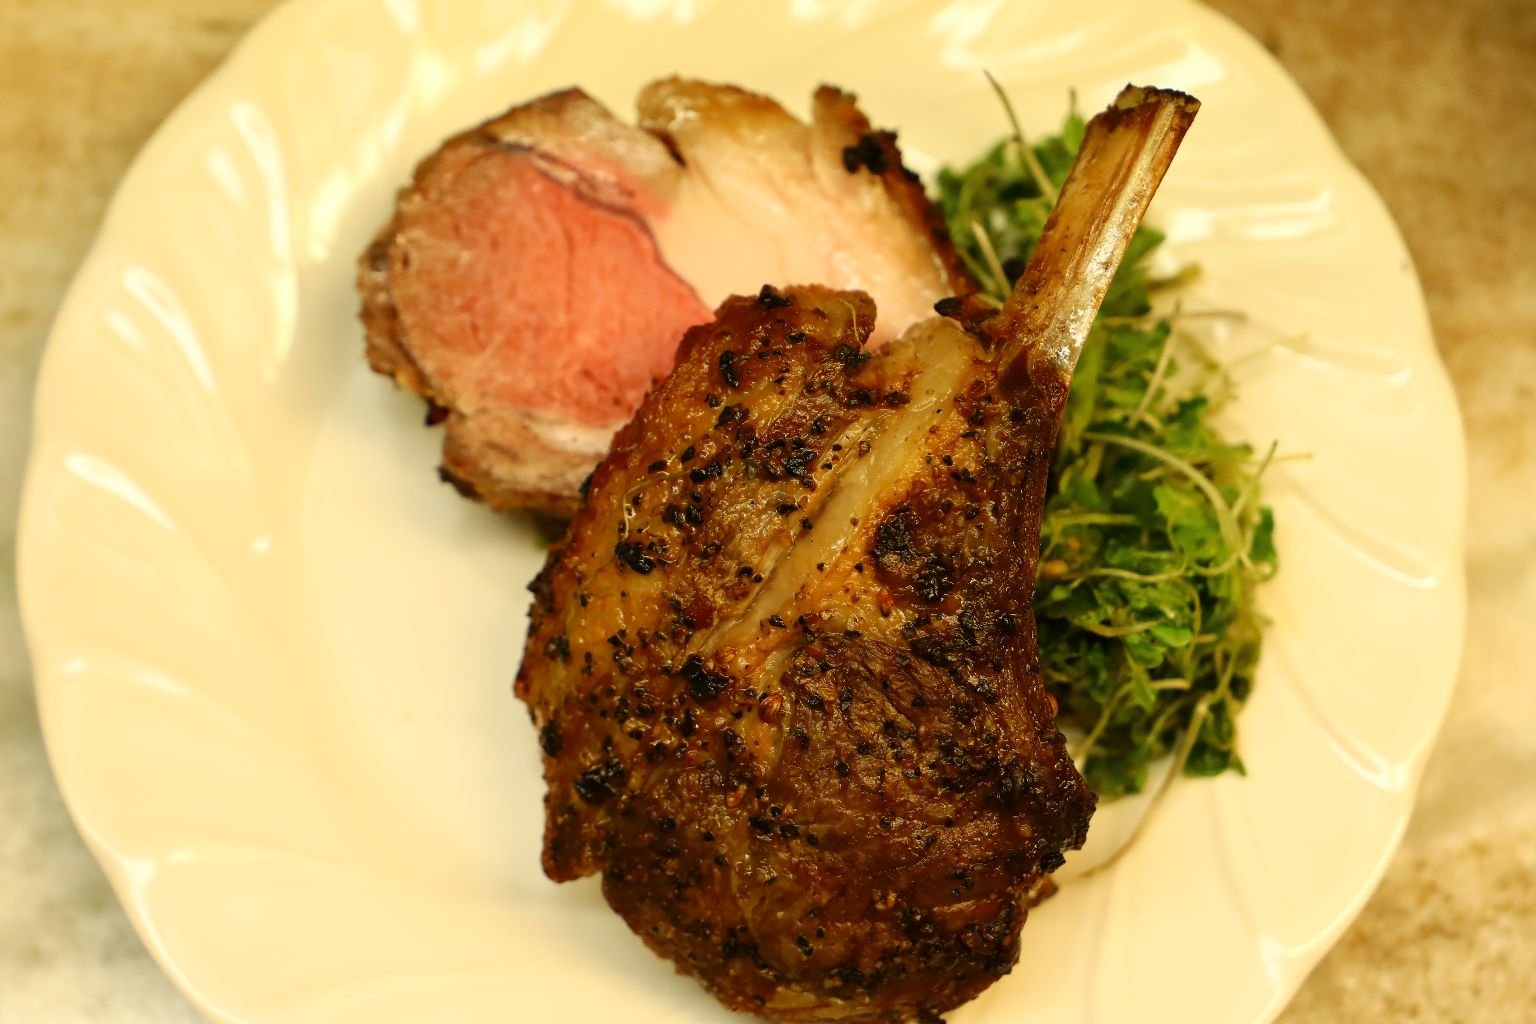
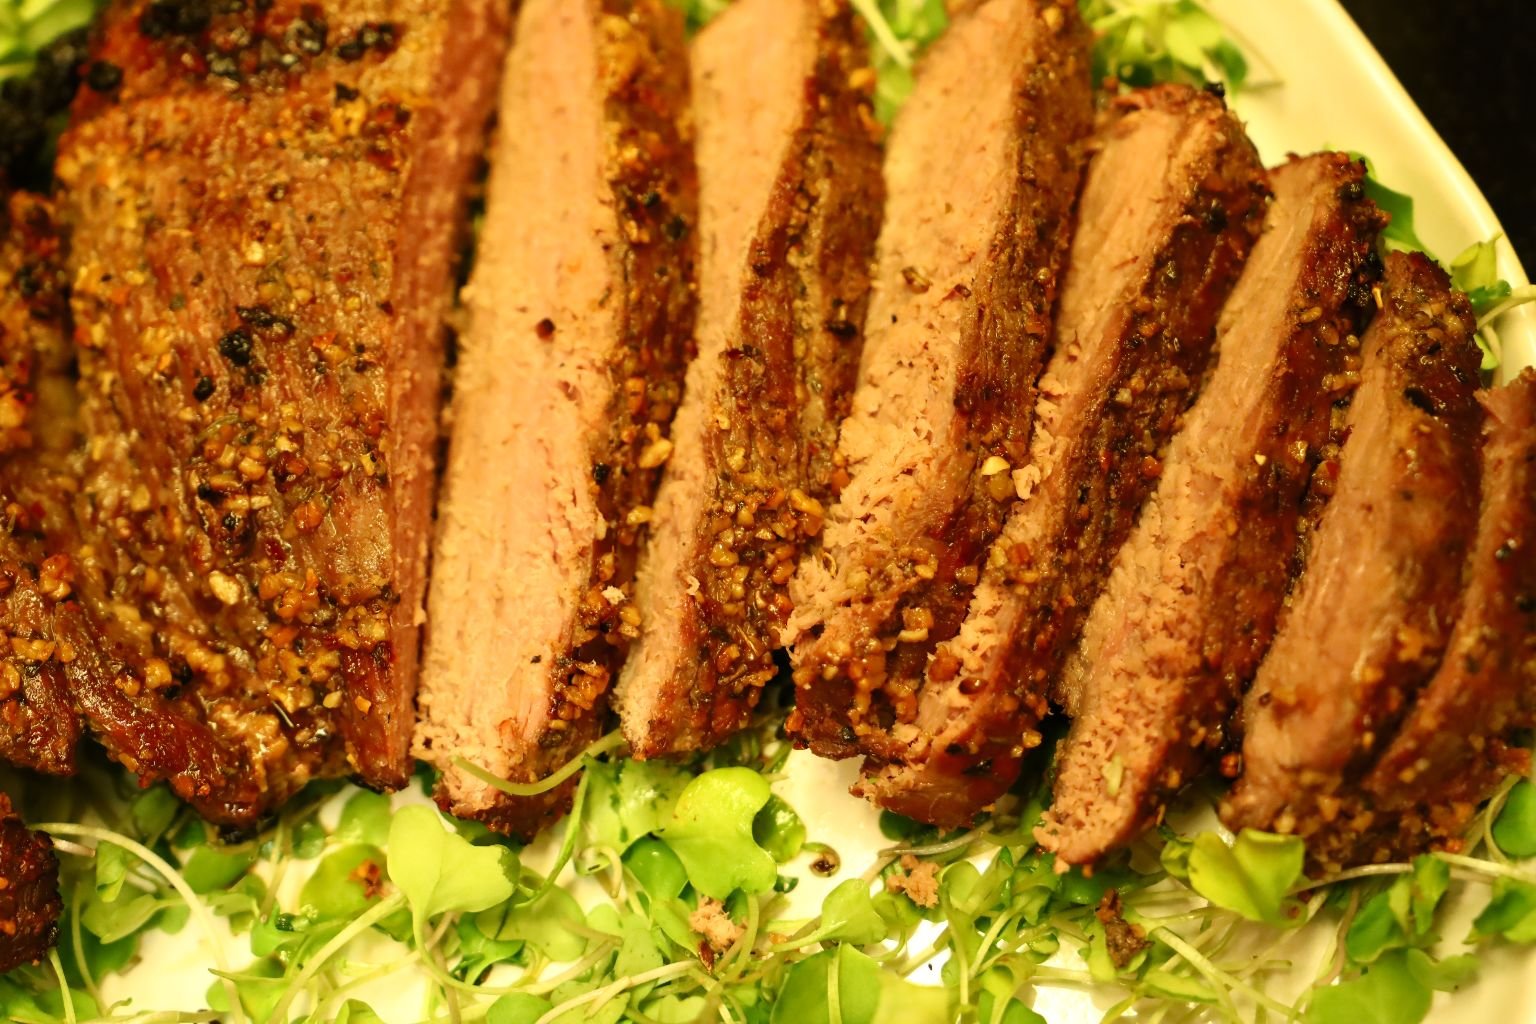
You Can See How Pretty The Lamb Is Here
——————————————————————–
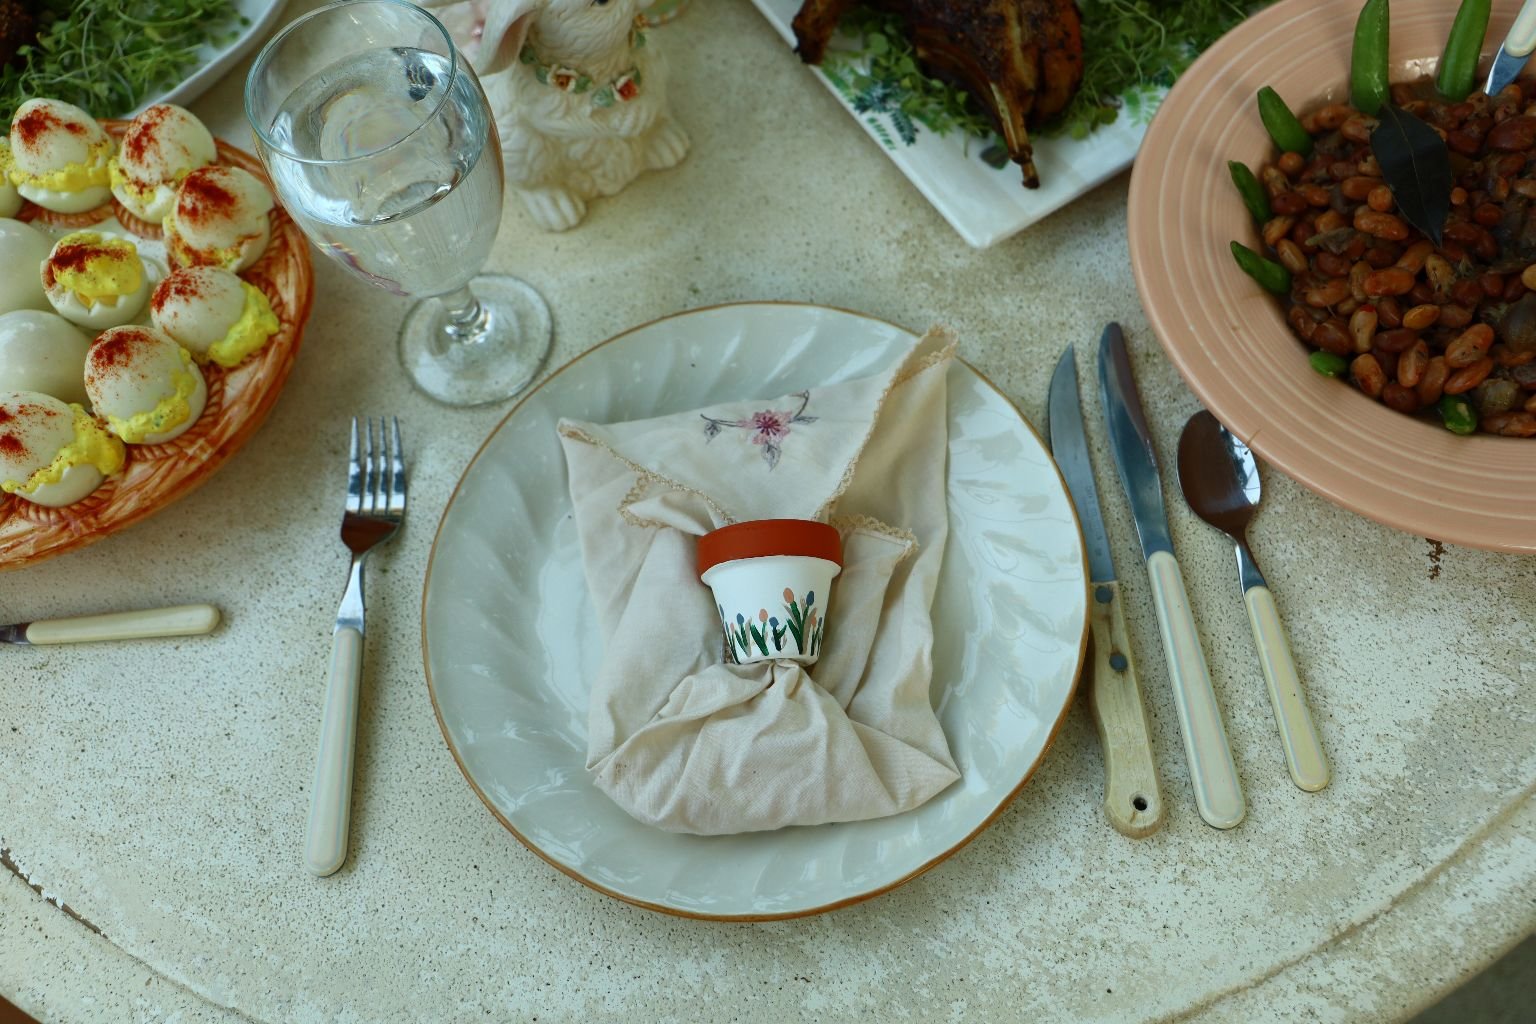
It just isn’t spring without some little flower pot in sight.
This one is being used as a napkin ring. I painted it many years ago, and several more like them.
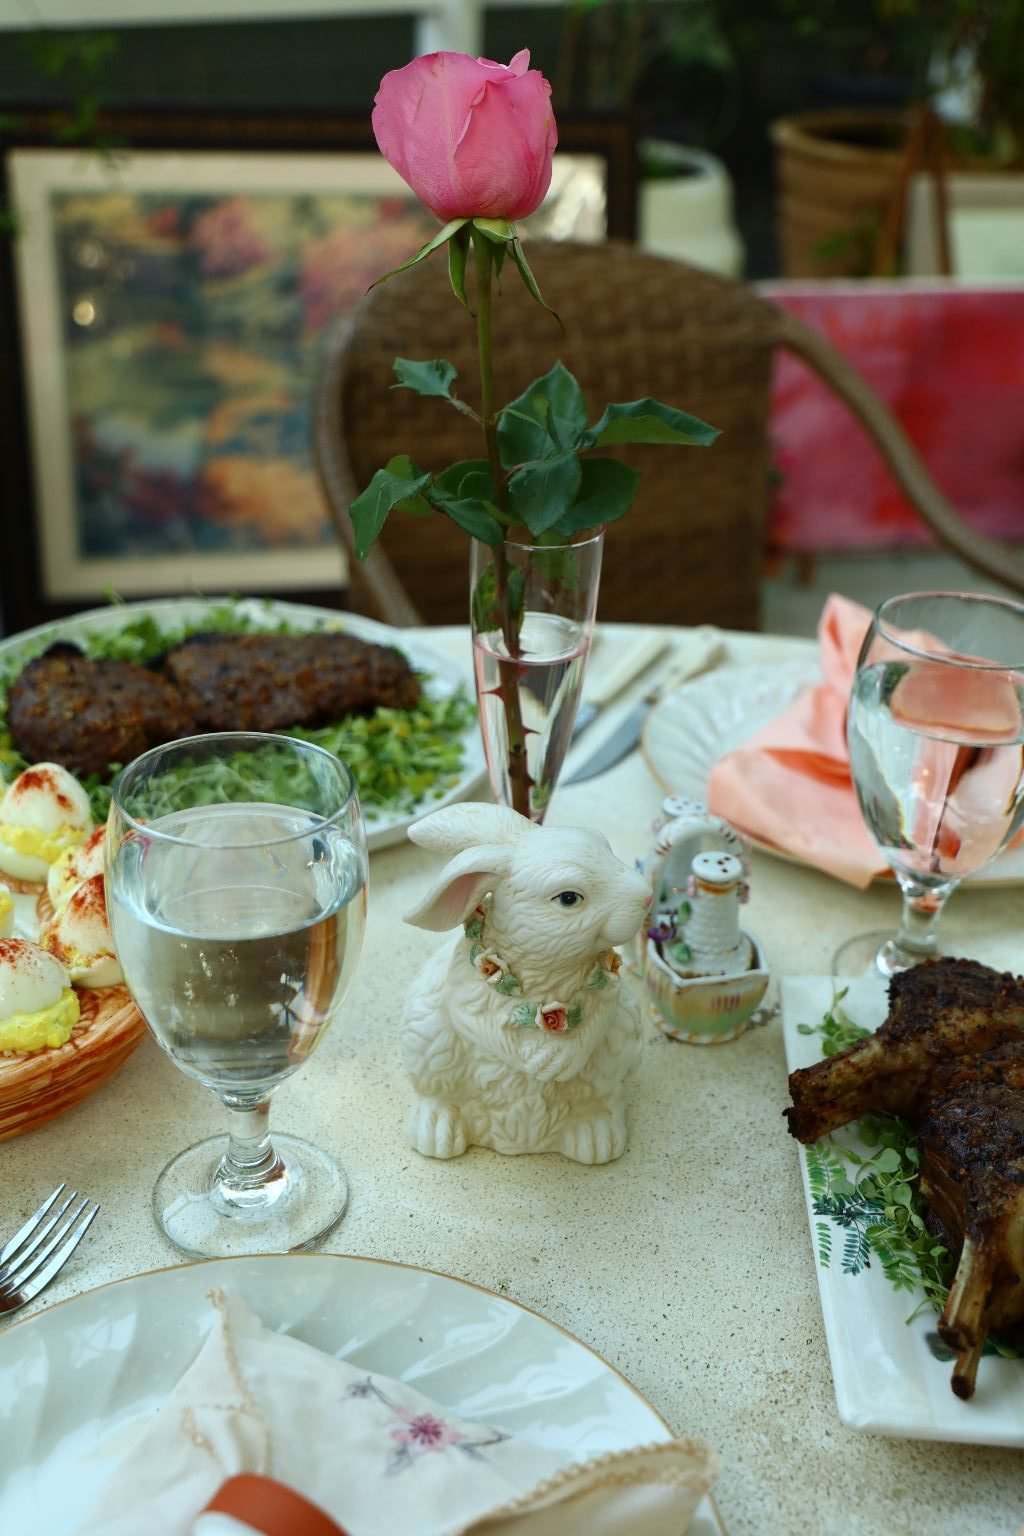
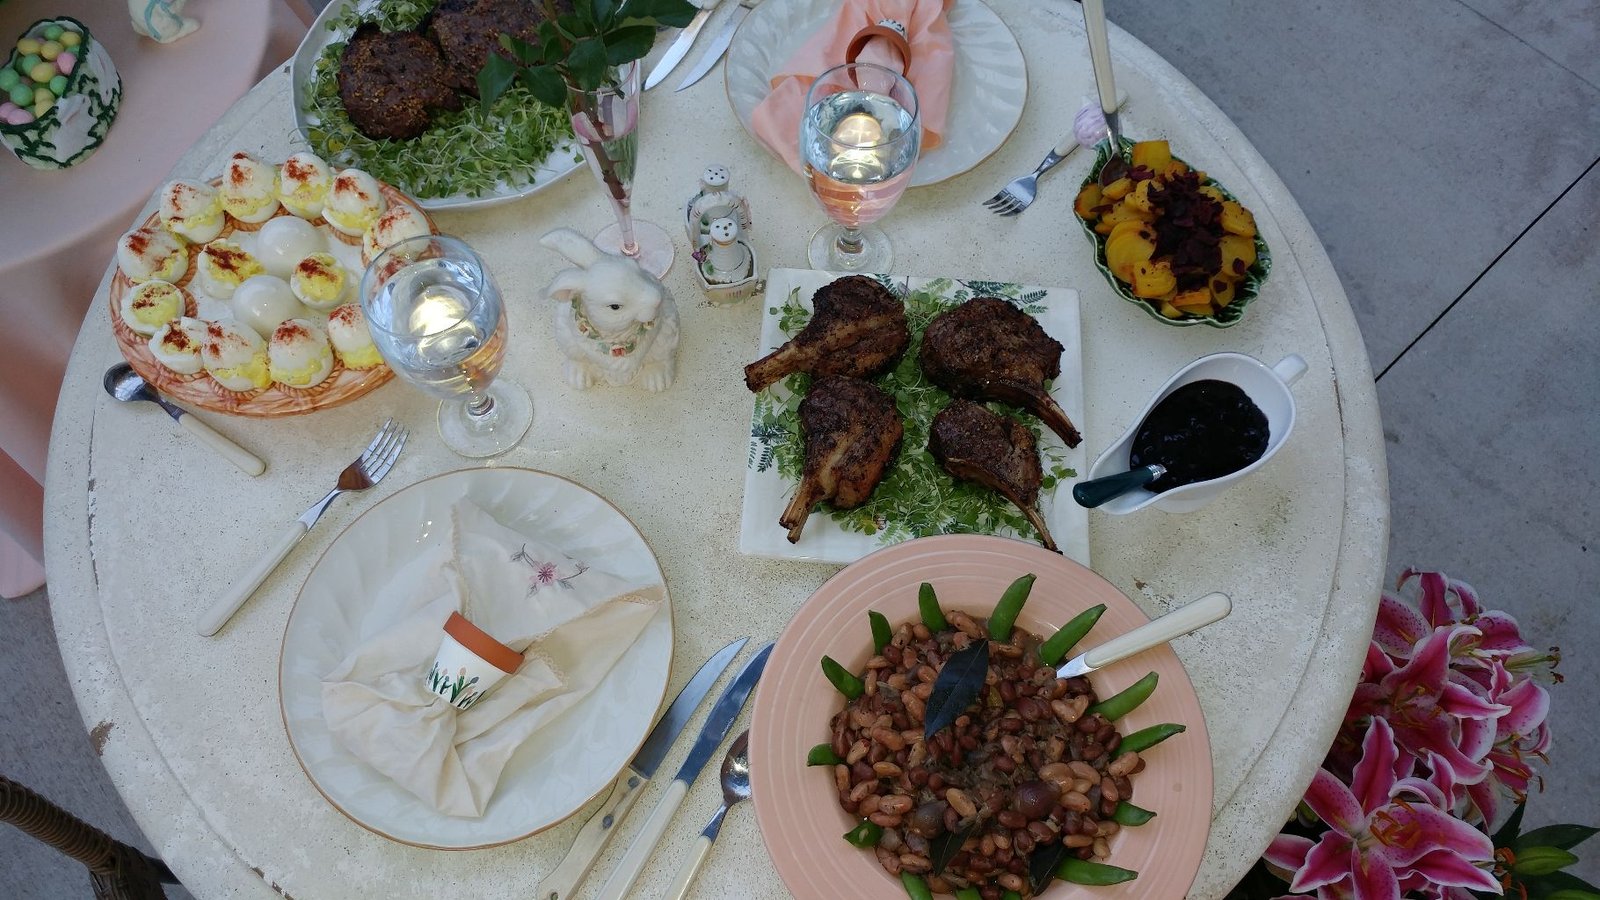
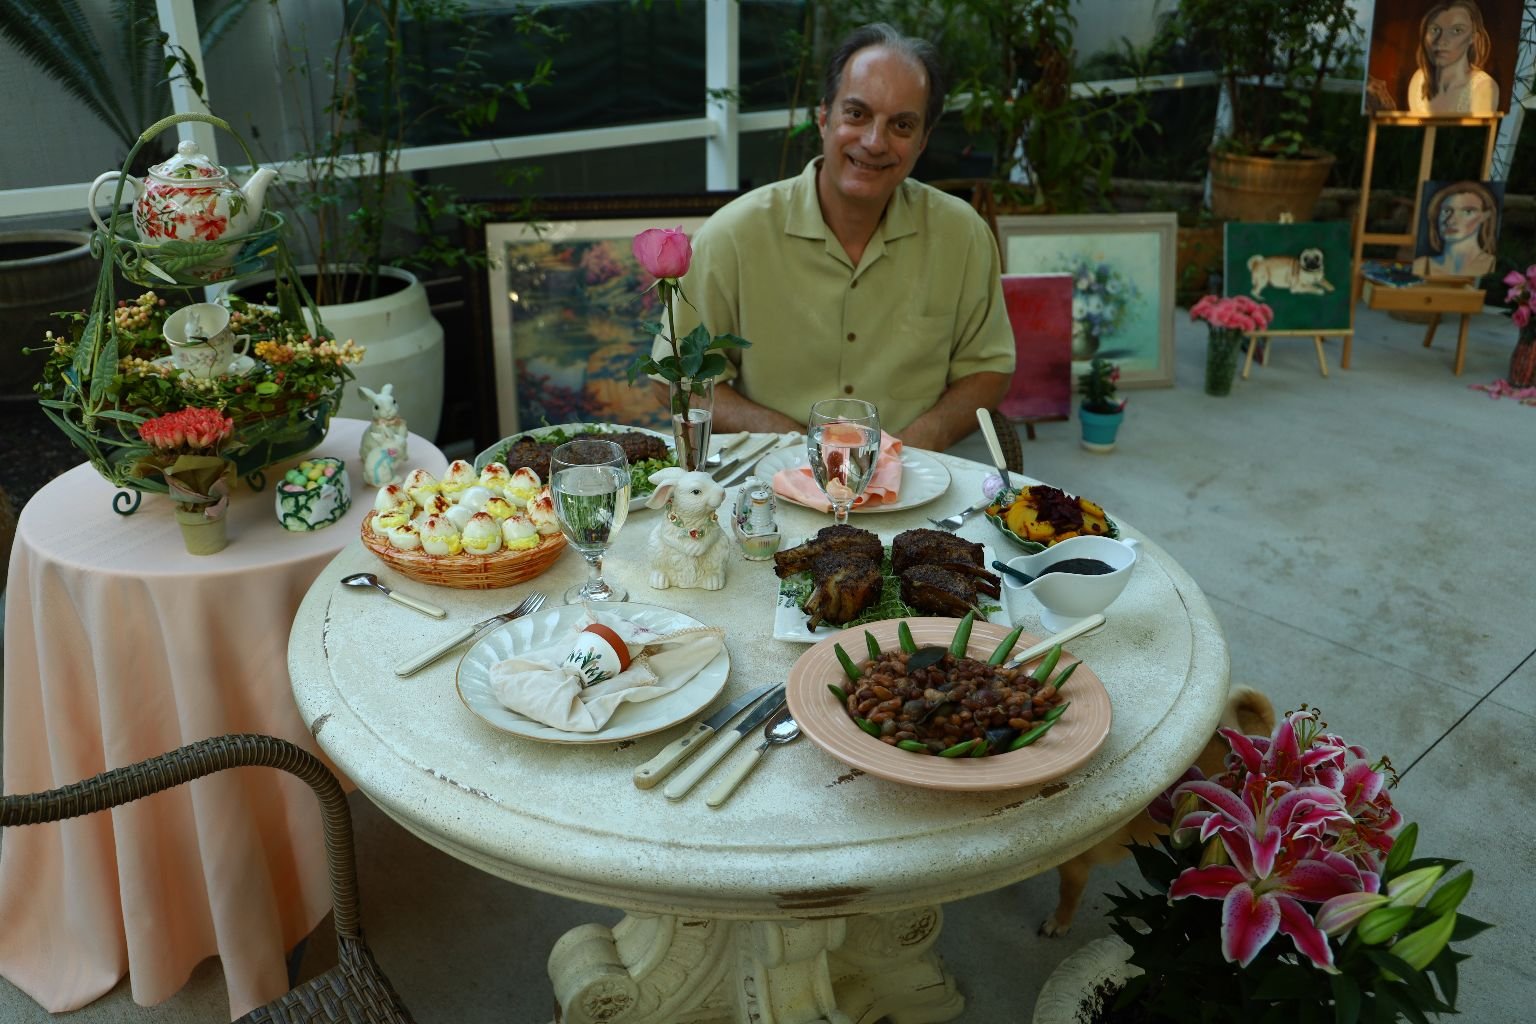
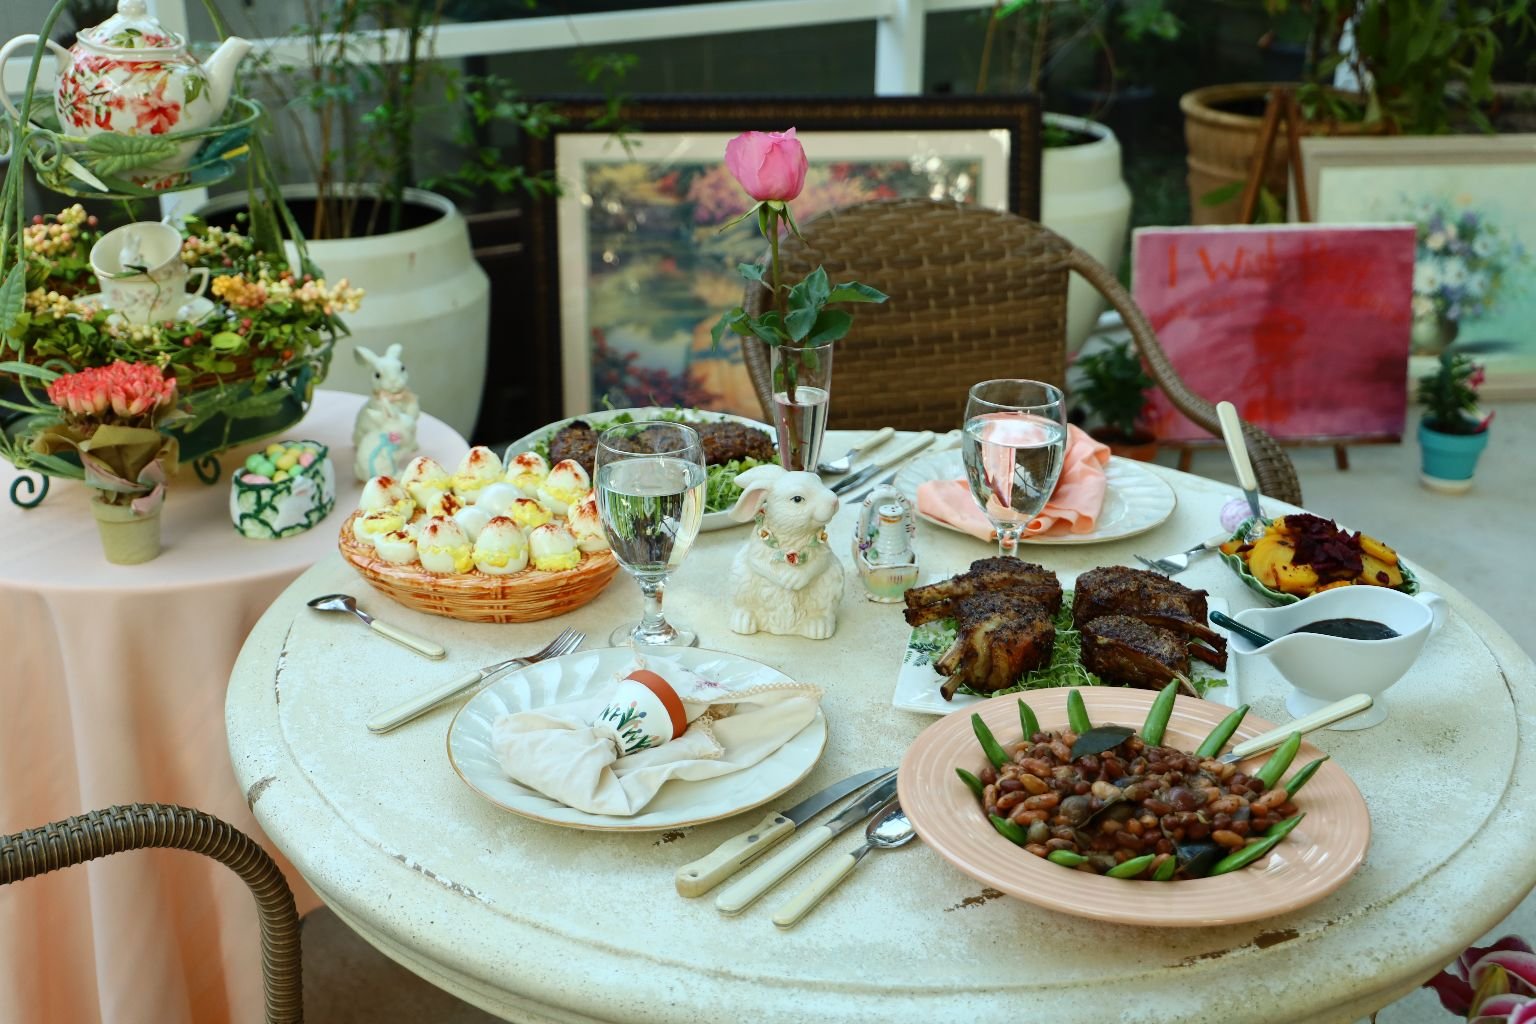
Our Beautiful Artsy Easter Table

It Was Just The Two of Us This Year
——————————————————————
Just a Few of My Favorite Easter Things
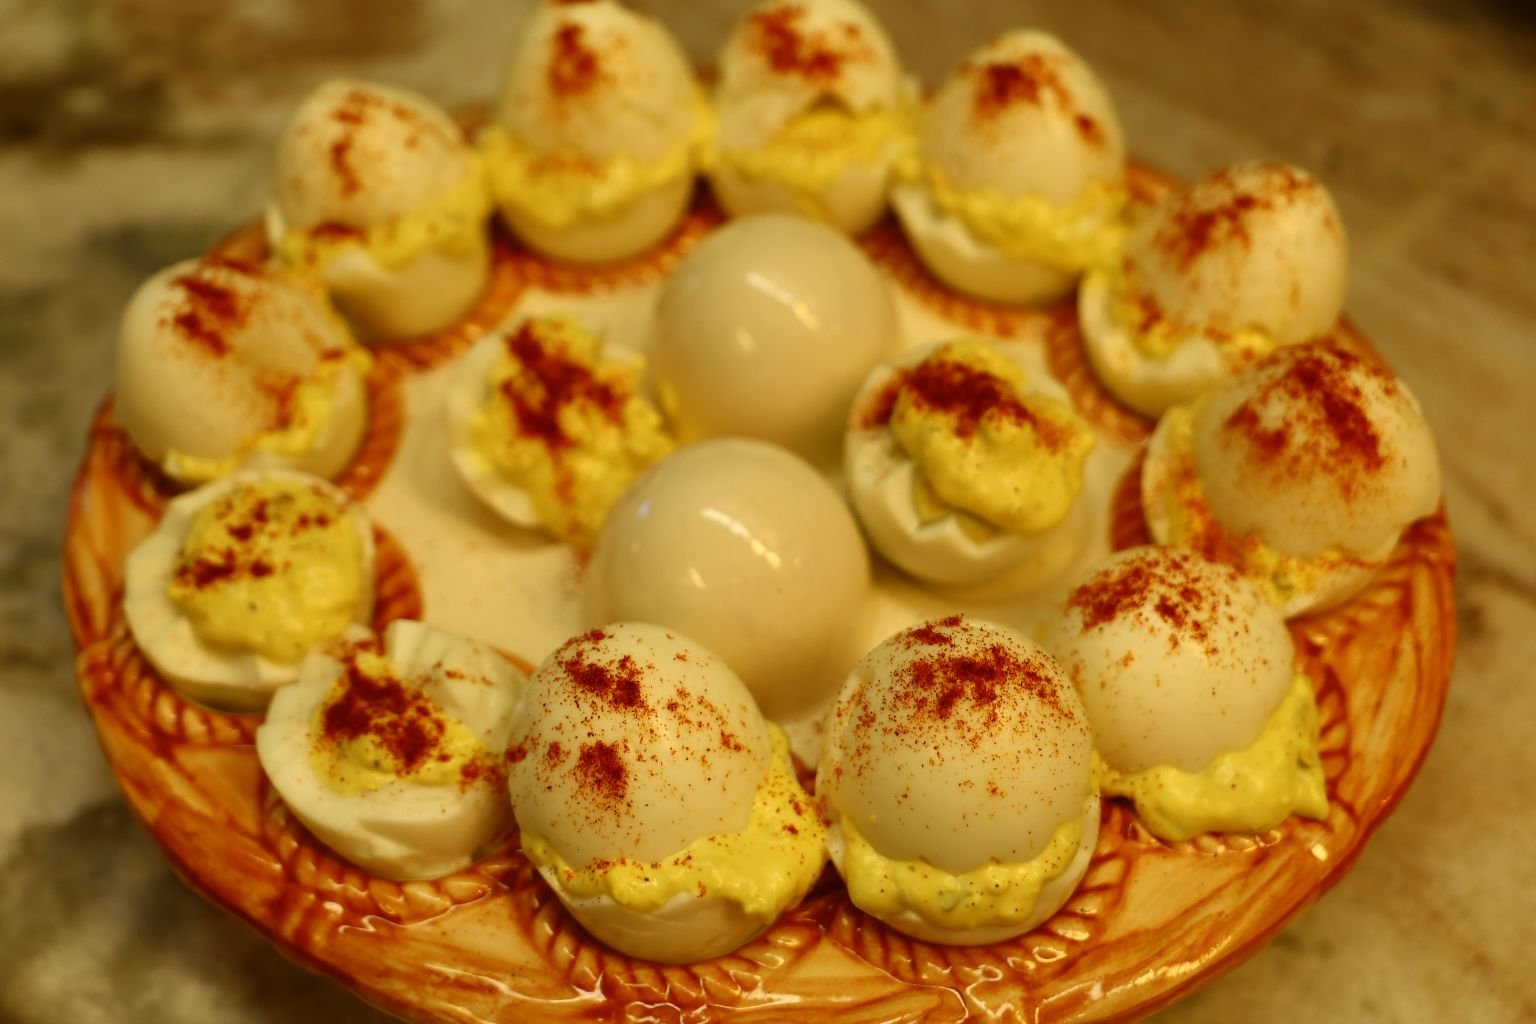
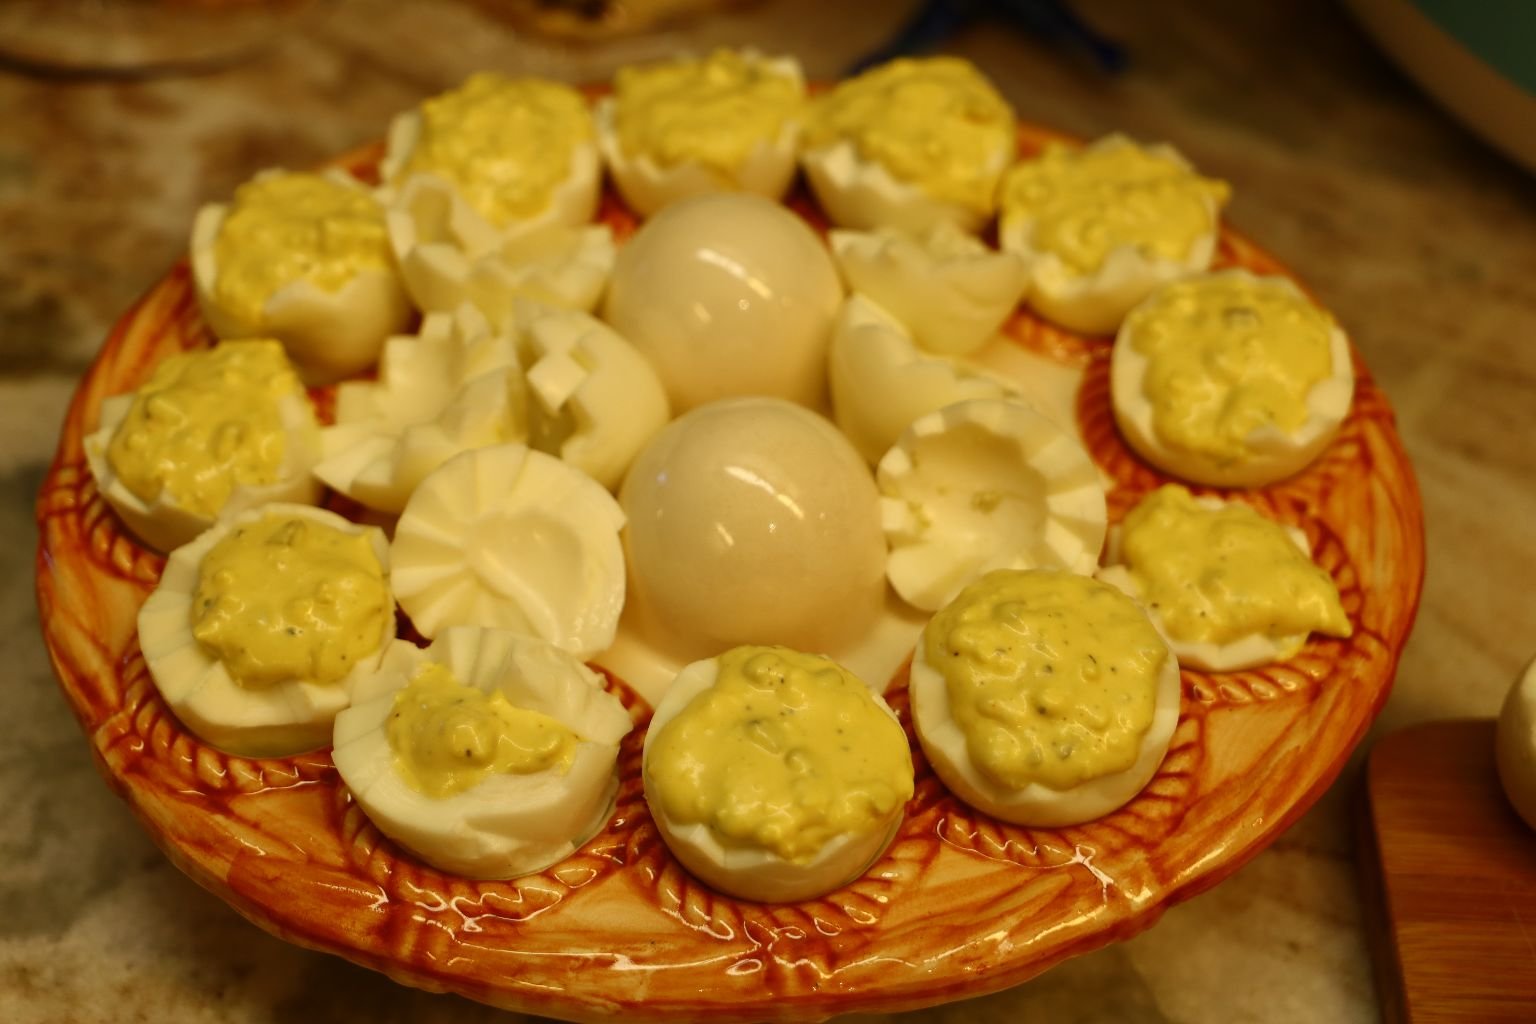
It Just Isn’t Easter Without Deviled eggs
This year I tried to make them look as if they were two halves of an Egg with a Chick Hatching.
————————————————————-


It’s Time to EAT!
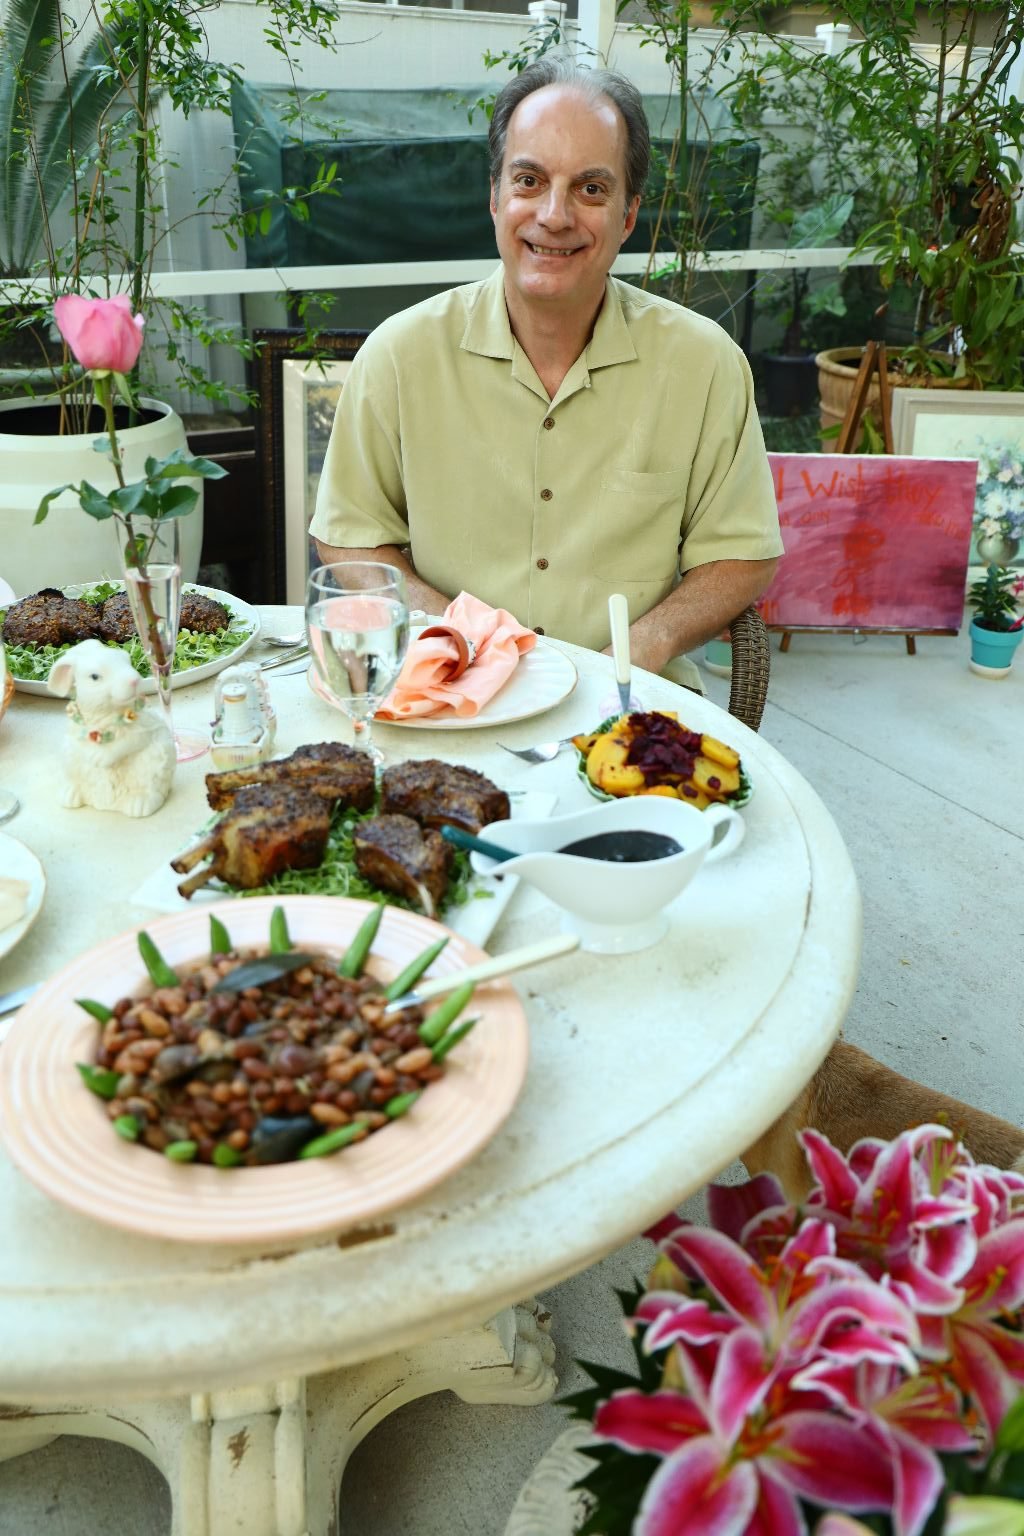
Gordon Did an Amazing Job on Everything
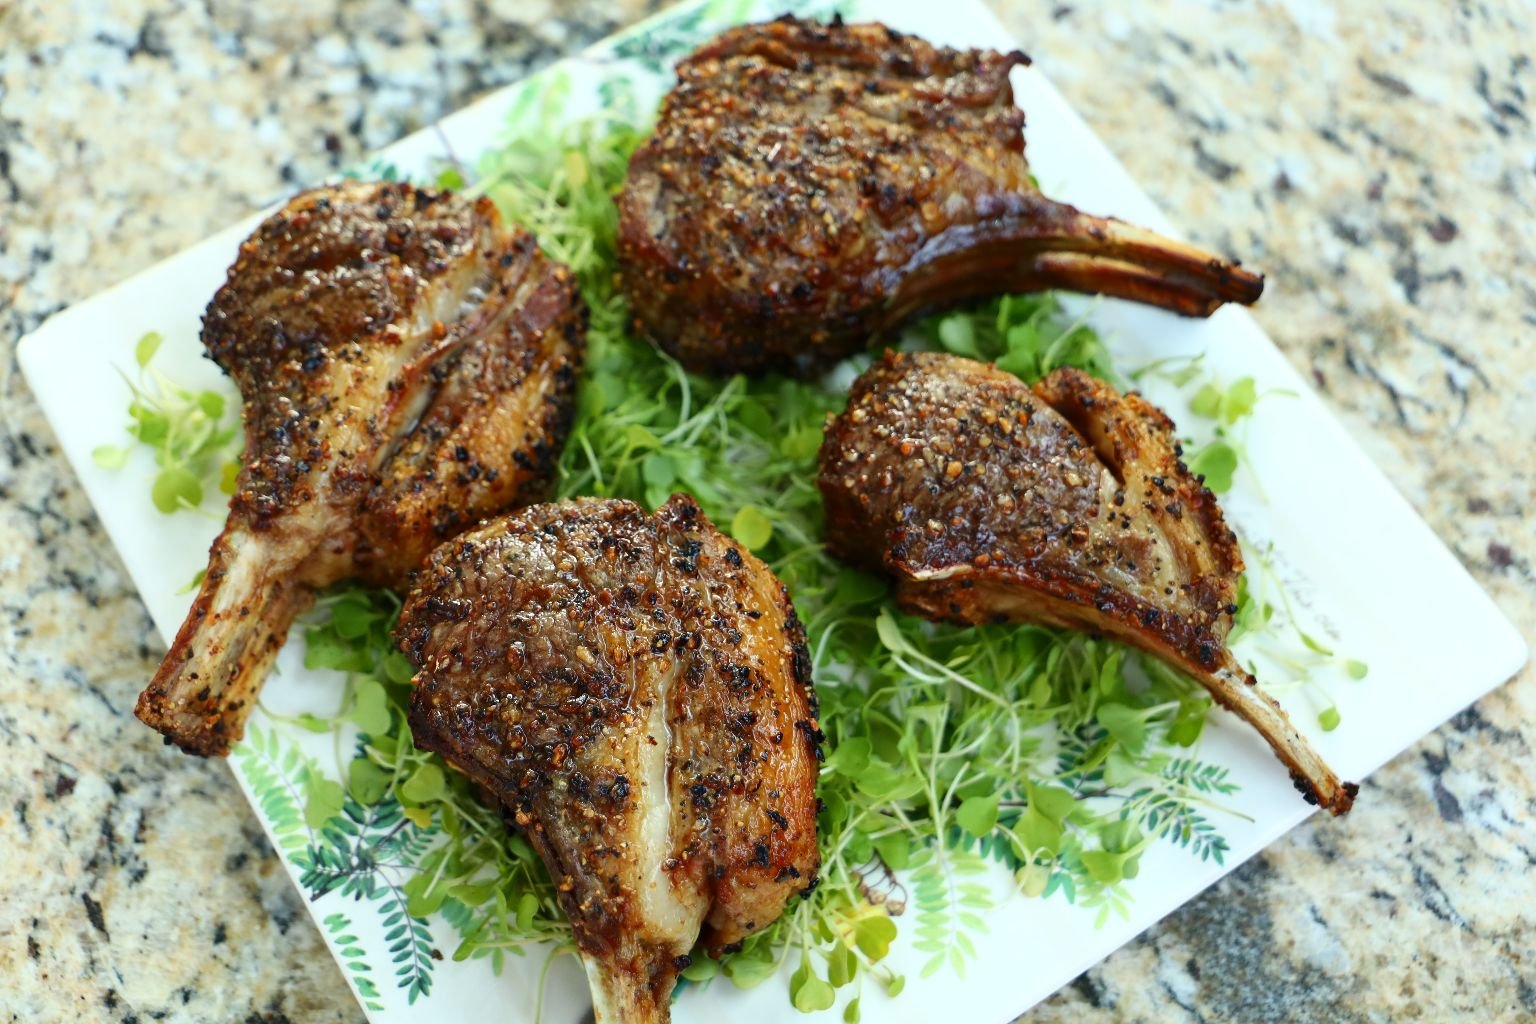
Our Delicious Lamb, Plated
———————————————————————
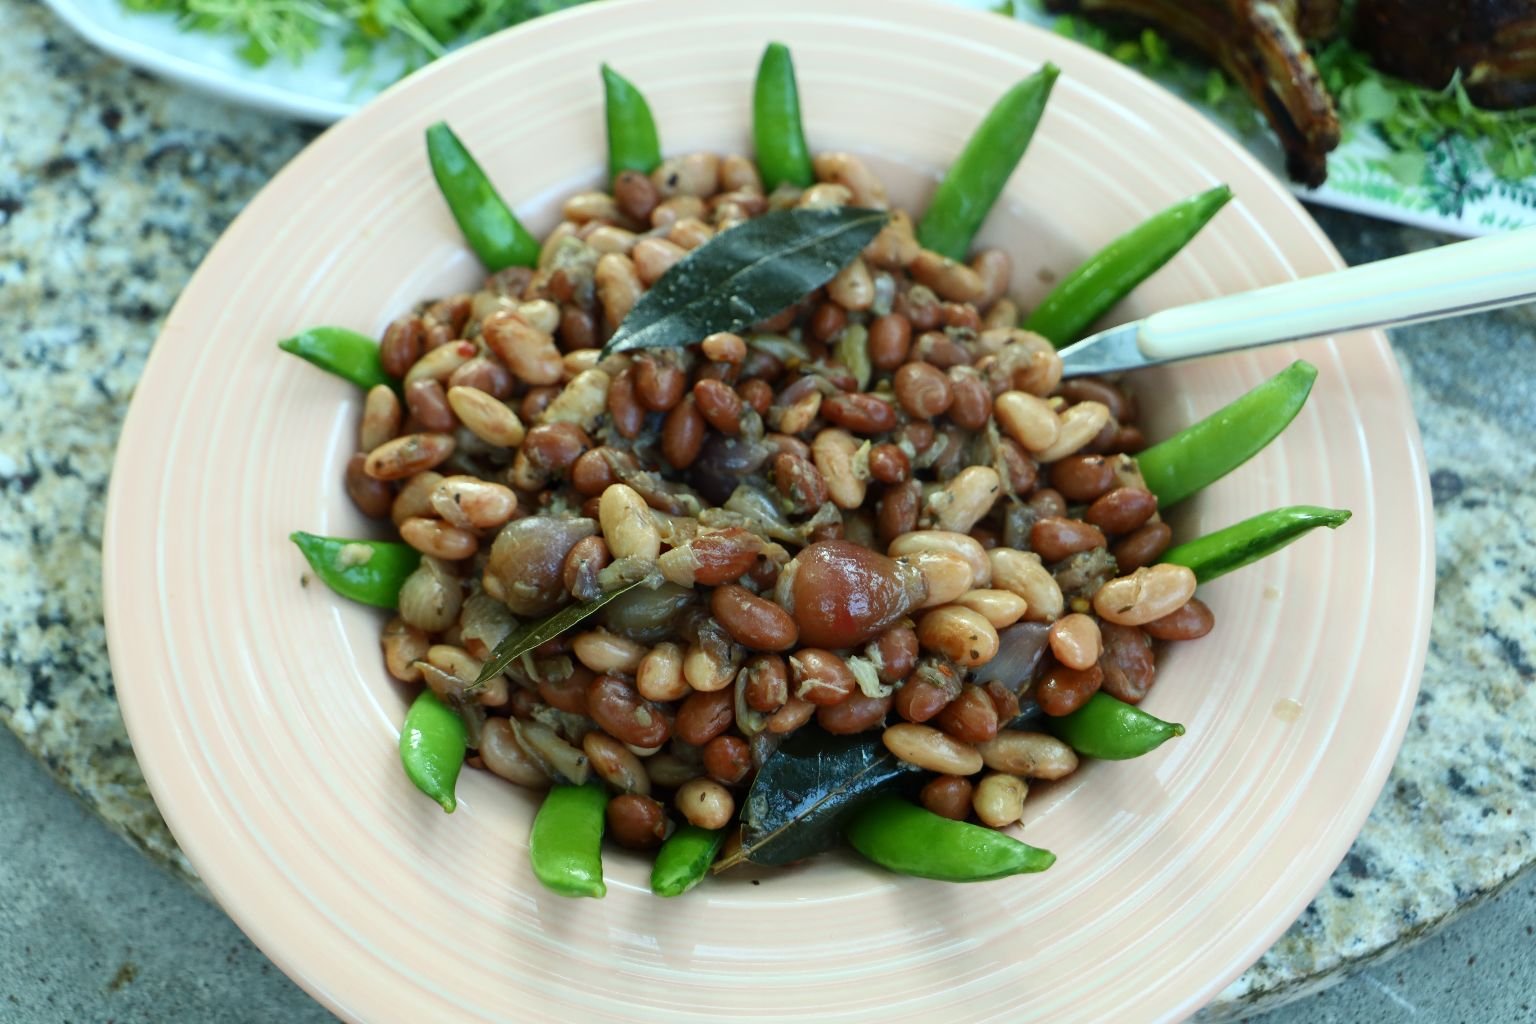
Our Cranberry and Roman Beans with Pearl Onions
The one thing we forgot to place on the table was our delicious Carrot Slaw.
Oh well, we usually forget something. 🙂
———————————————————
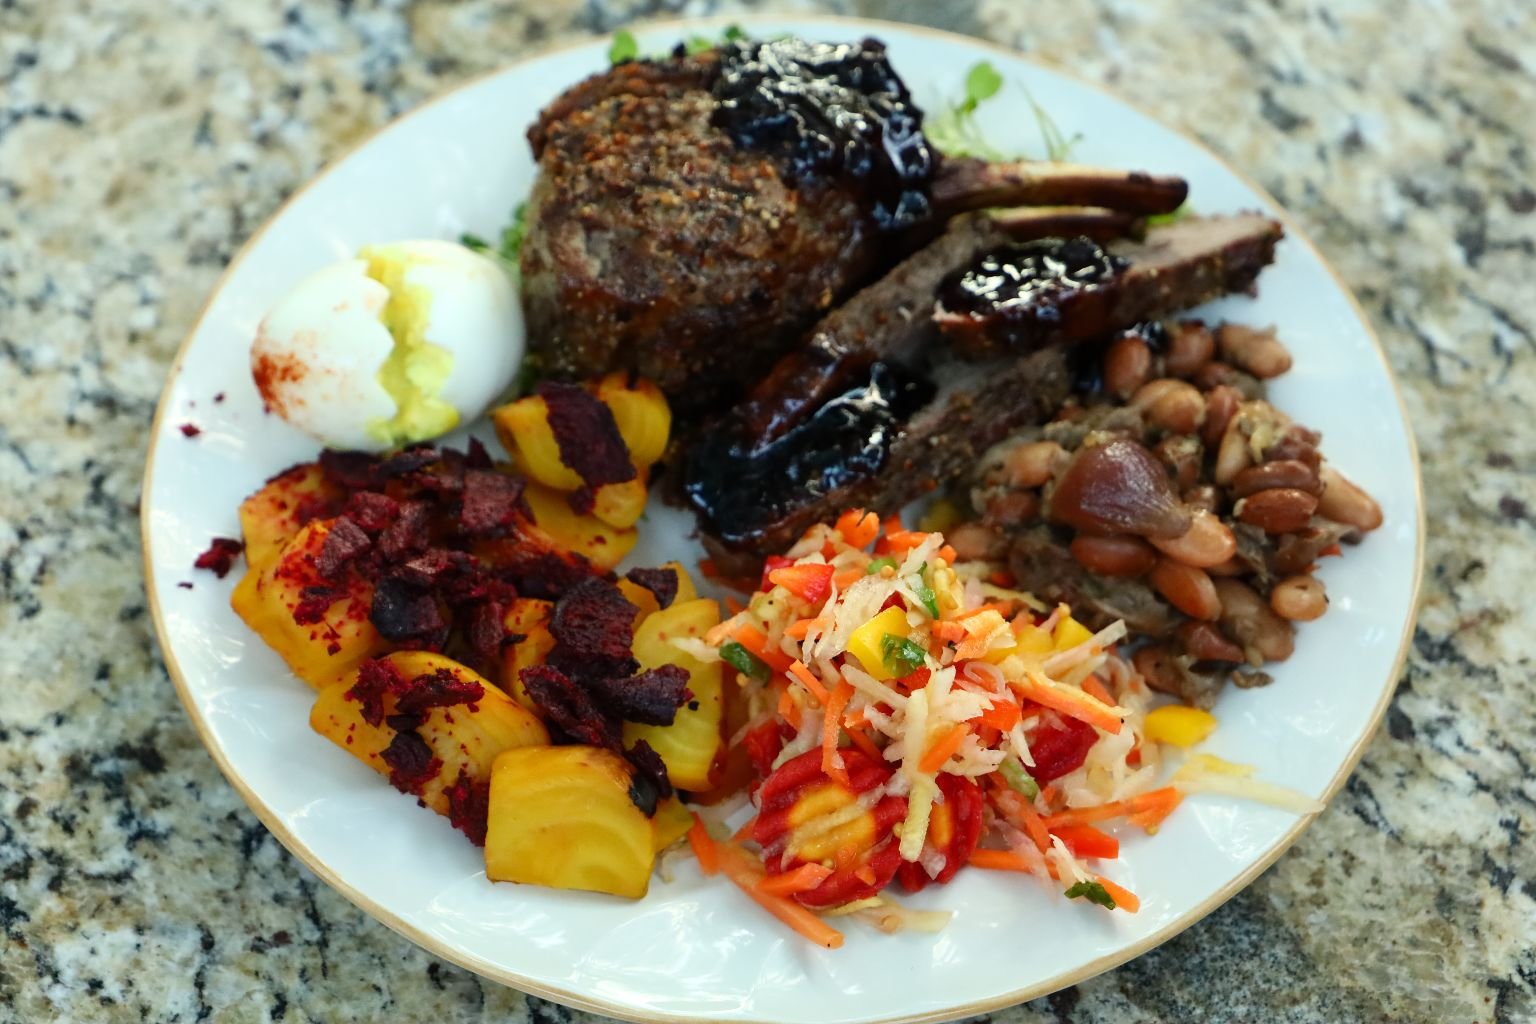
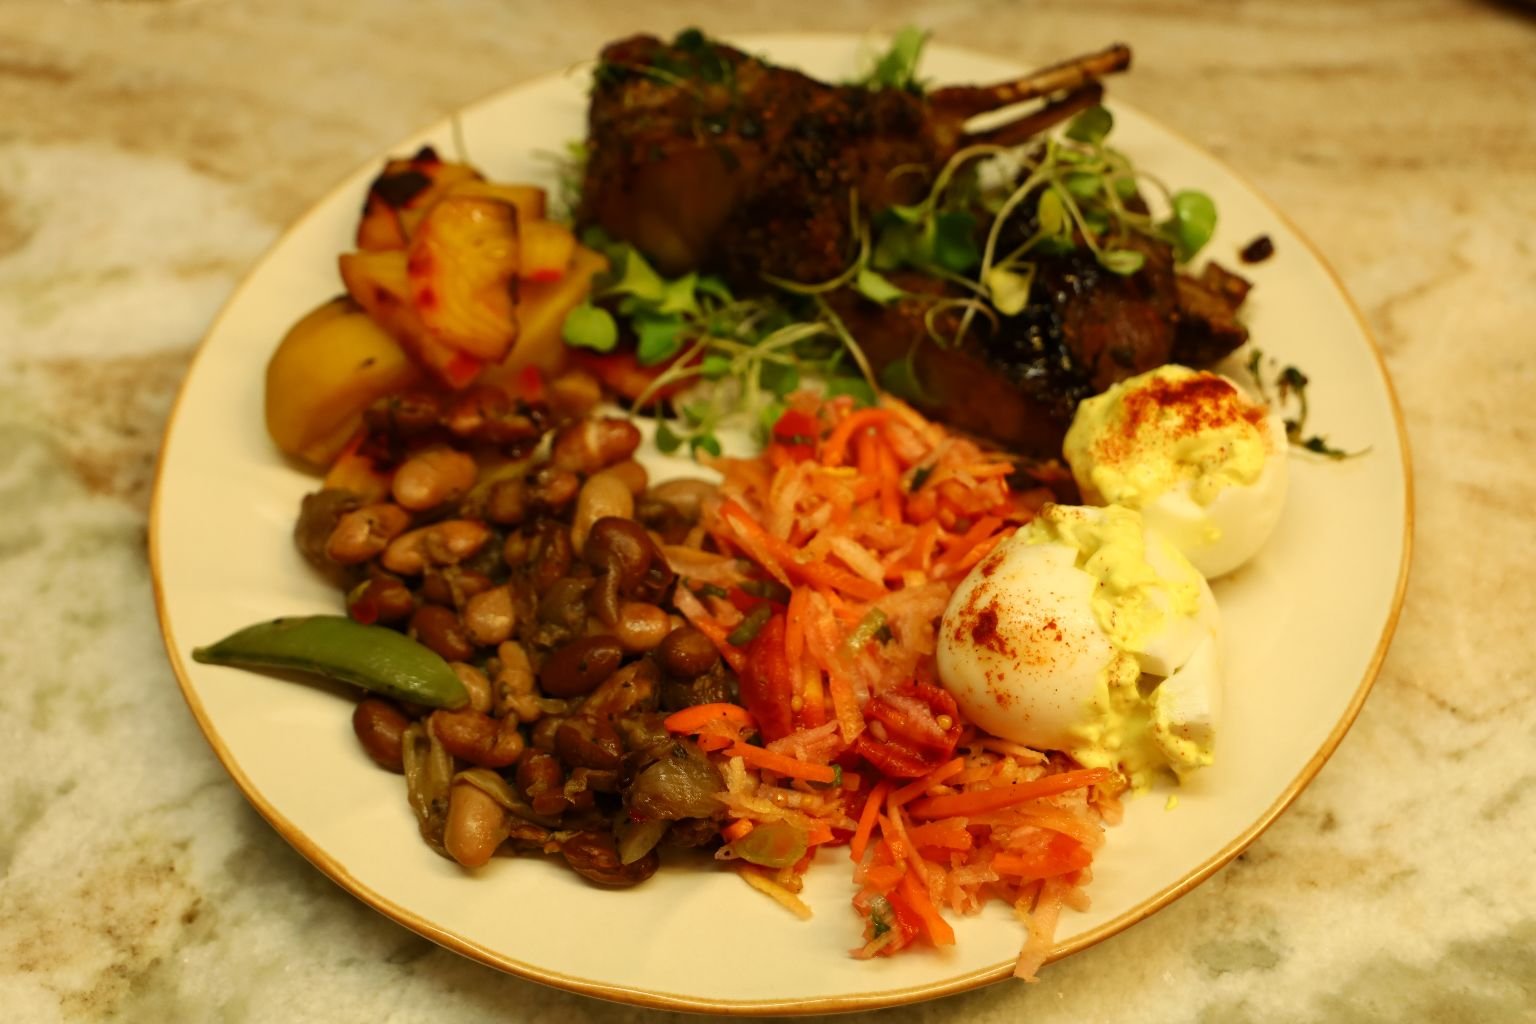
Our Easter Dinner Plates
After we took pictures we did remember the Carrot Slaw.

Happy Easter
Julie and Gordon
—————————————————————

—————————————————————
Let’s Not Forget Dessert
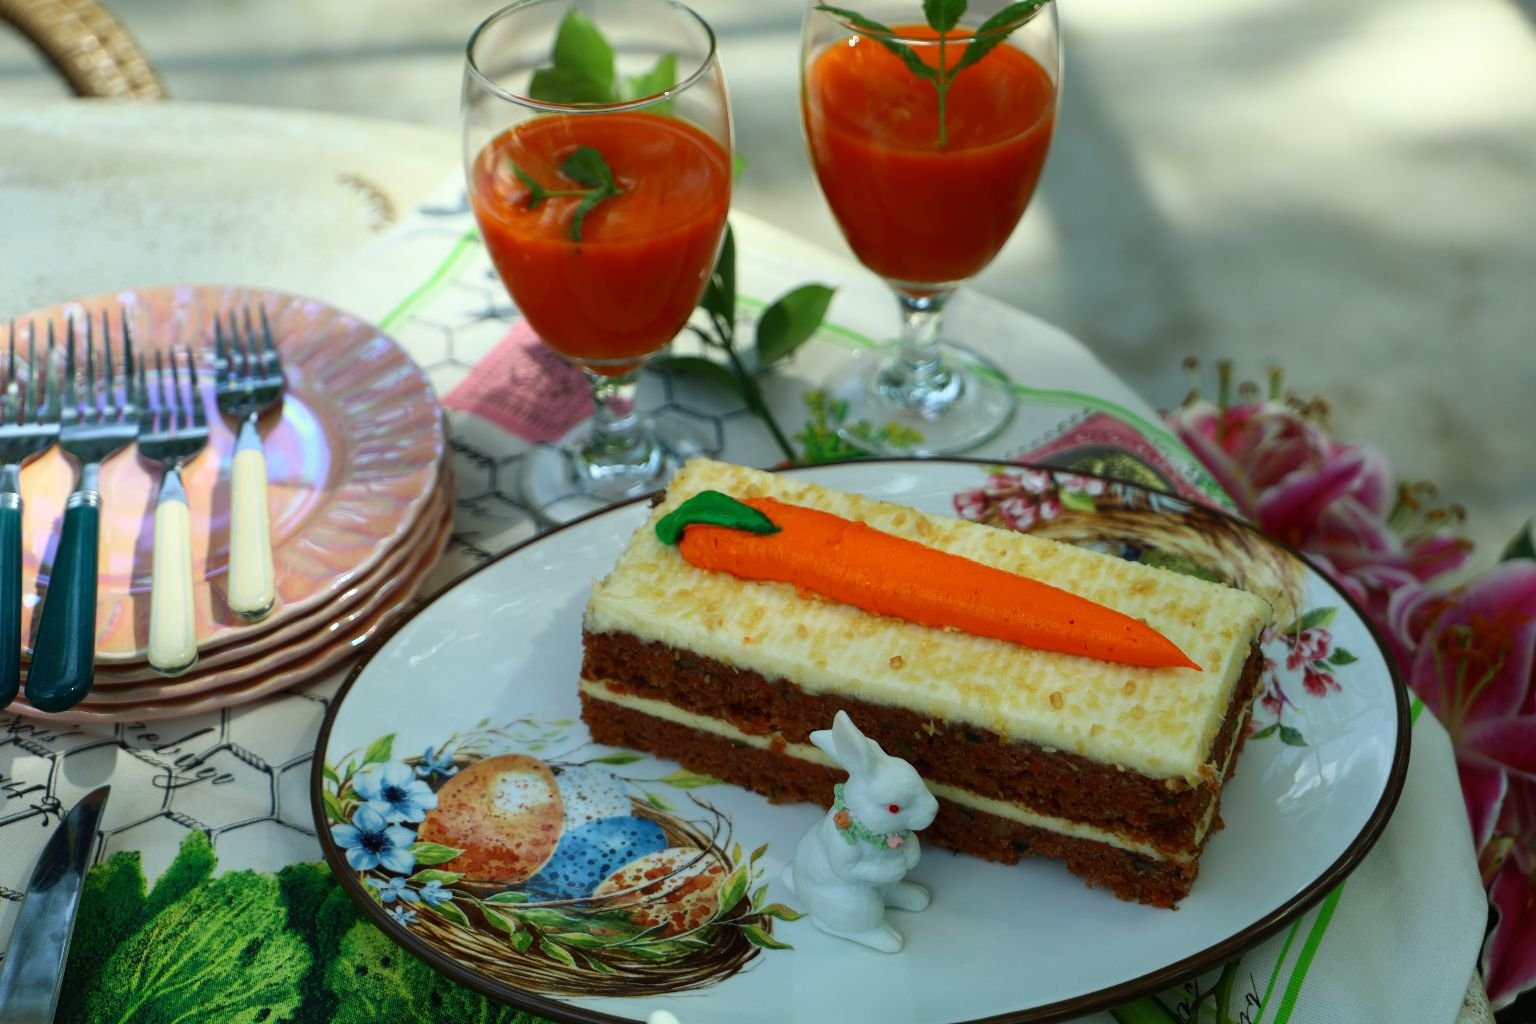
This is actually just a Carrot Cake that I purchased from our local grocery store.
It was delicious! In addition to some Carrot Juice.
——————————————————
Another Tasty Easter Under Our Belts
See ya’ Next Year!
Julie and Gordon
———————————————————————
Recipes Start Here
Julie’s Deviled Eggs
To me, there is no Easter without them.
We will always have Deviled Eggs at every Easter no matter what other foods that we may create and serve.
But, this year I did do them a bit different. At least in appearance.
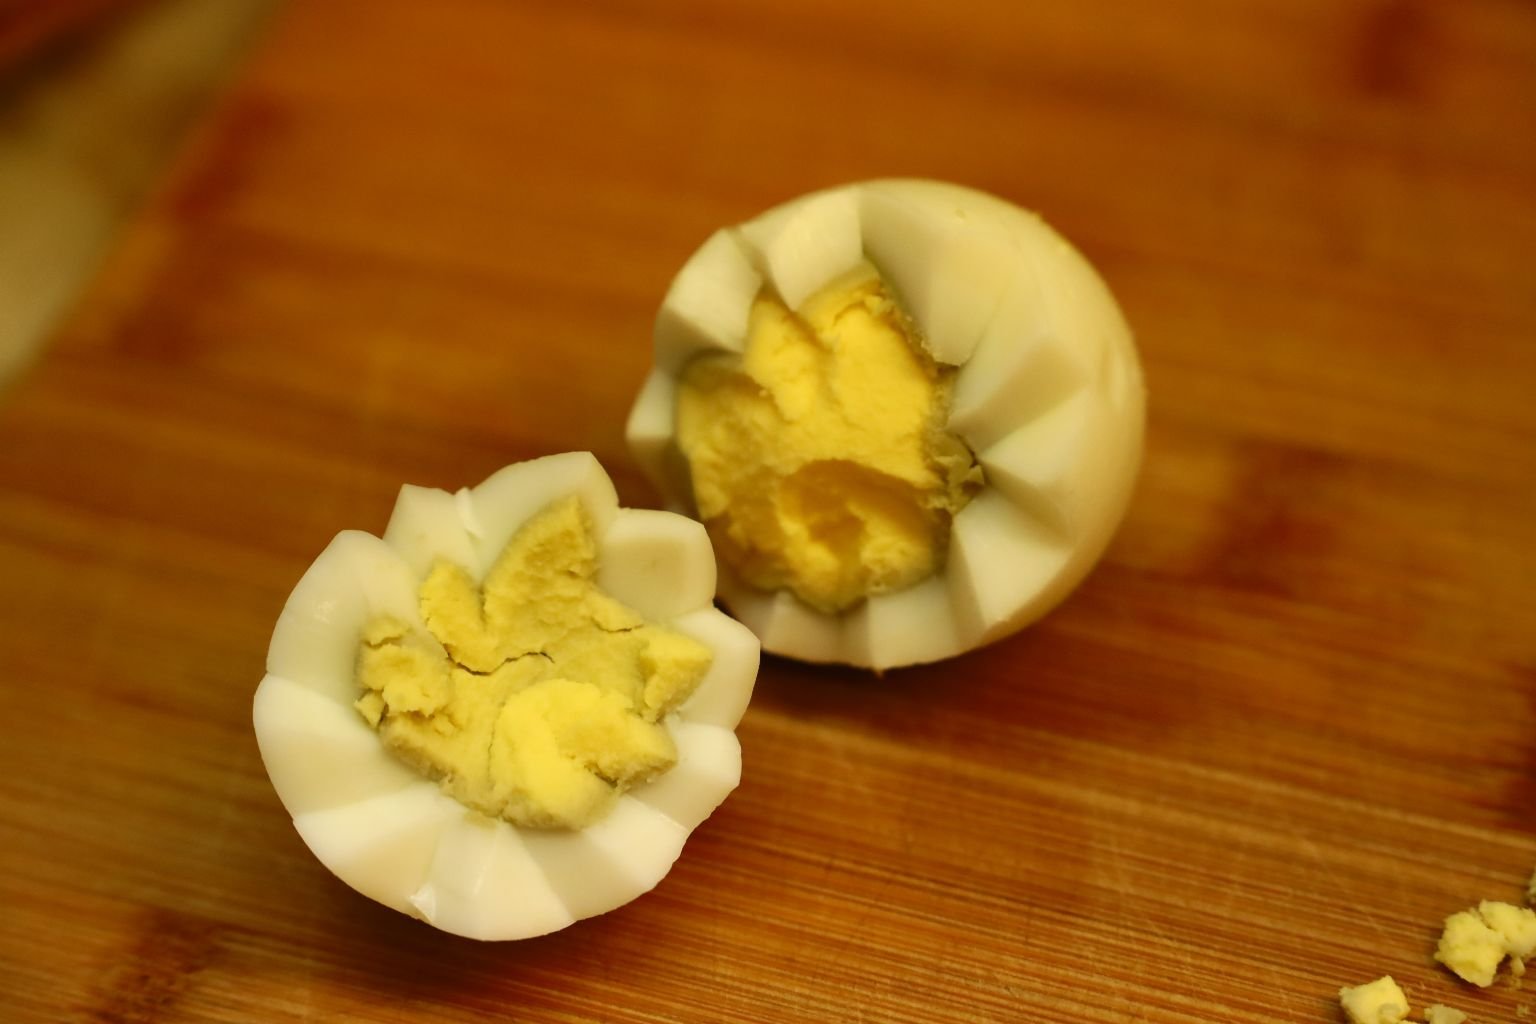
Notice the cut marks? I wanted to make the eggs look as if a chick is hatching from them. So, I used a paring knife to cut zig-zaggy cuts. I then squeezed the yellow yolks out of them and placed them into a bowl, while leaving the egg whites to place into an egg plate. I love this egg plate as it looks like a basket. The indentations are also smaller and round, so that the eggs can stand on end, and not lay flat.
I have given my Deviled Egg recipe so many times on this website but, I will add it yet again for those that are just now finding our website Easter post.
All that I do is to boil eggs in a pot of water for about 15 minutes on a high heat. I then remove them and place them into a bowl of cold water to stop the cooking process. Usually, I place them into the refrigerator overnight and make them the following day once they are nice and cold.
It is best to use eggs that are over a week old in your refrigerator as once they are boiled they are much easier to peel.
I then peel the outer shell and discard it, keeping the hard boiled egg intact. In this case, I used the paring knife to create a zig-zaggy pattern and then removed the yellow yolk and placed it into a bowl. I then placed the egg whites into an egg plate.
Like So…..
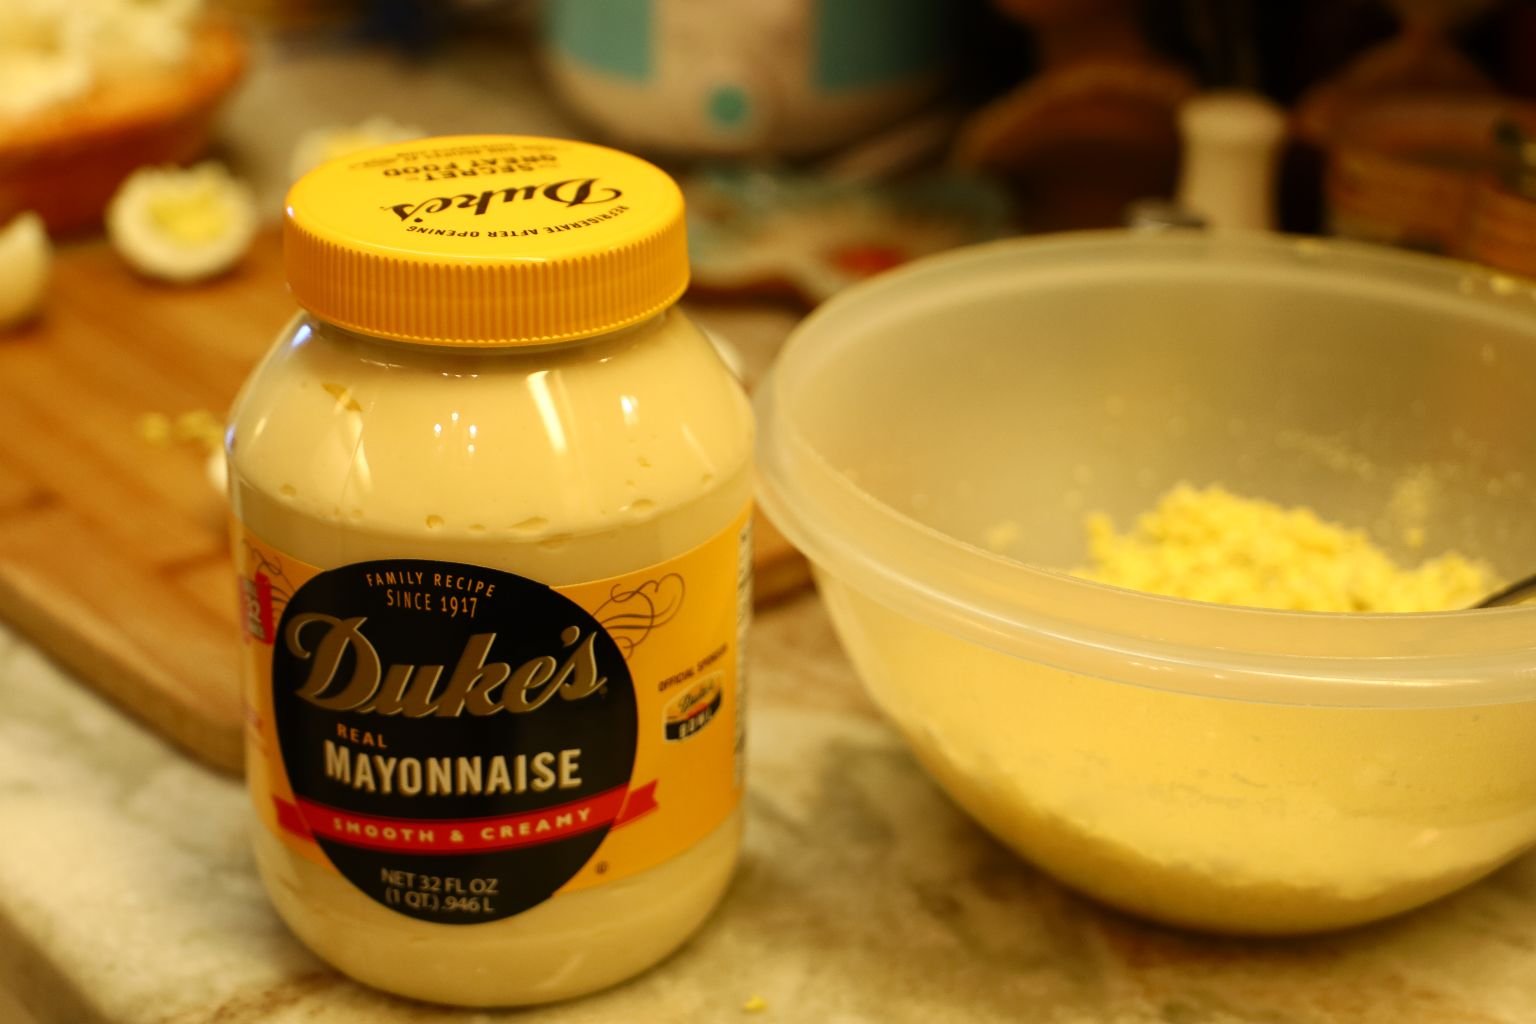
In order to make the filling, I use the yellow yolks, mayonnaise, yellow mustard, freshly ground black pepper, Tabasco sauce ( a few dashes), spoonfuls of pickle relish, and even some sweet pickle juice to add some flavor. Sometimes I add some Turmeric, it gives them a vibrant golden color. Turmeric also kills cancer cells.
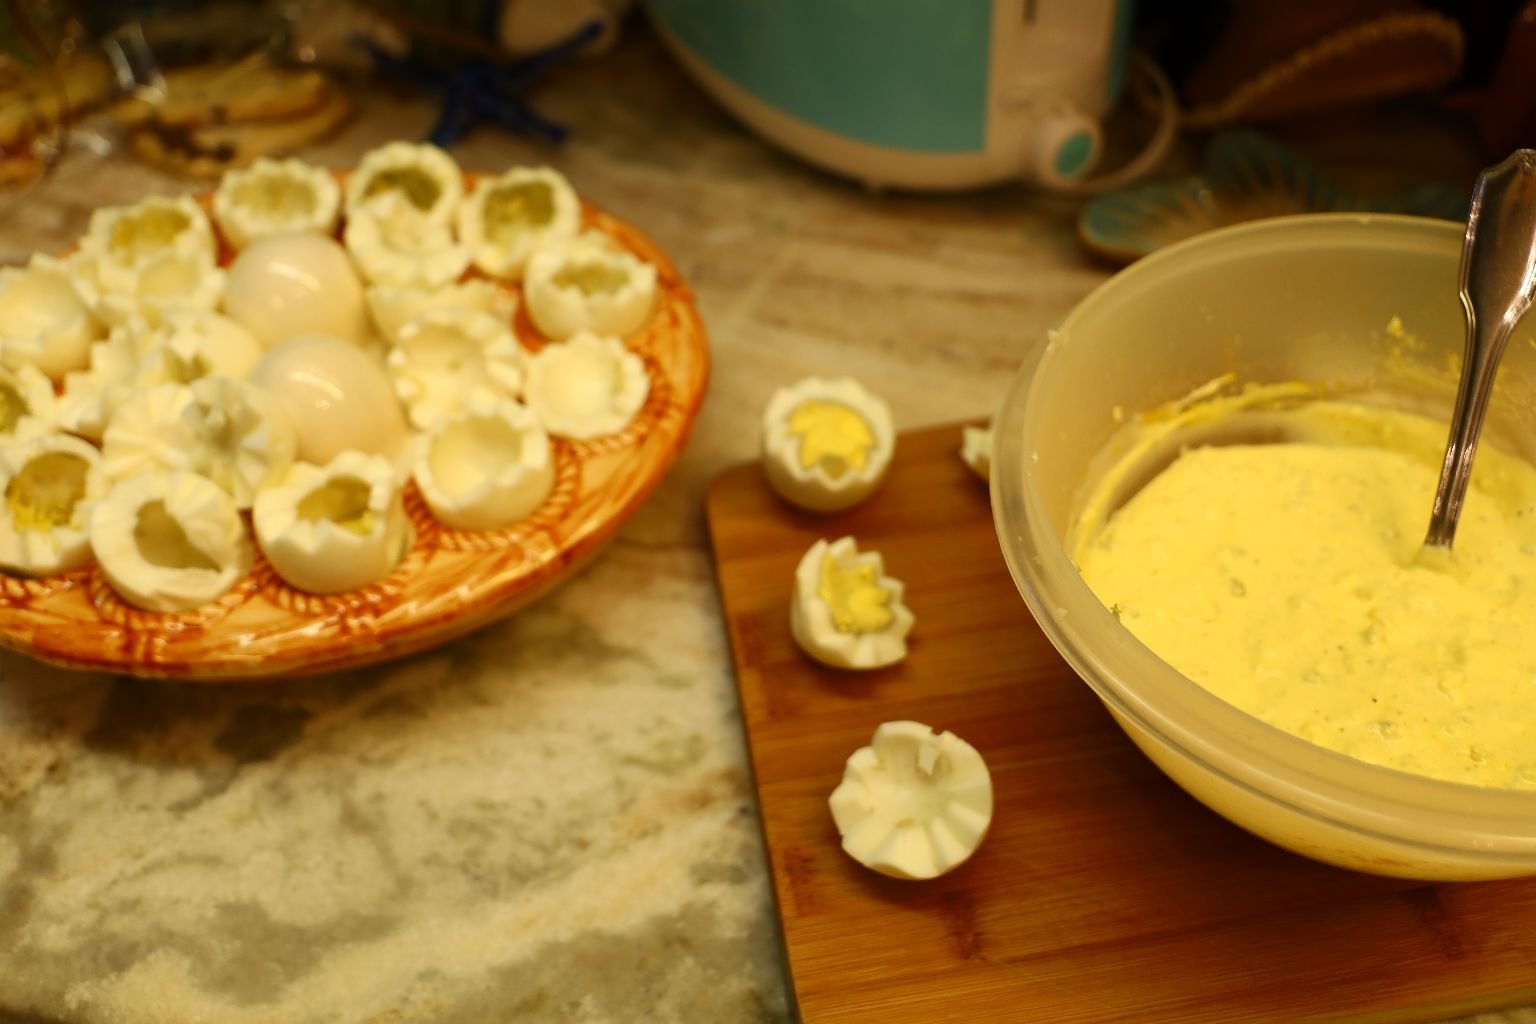
I then just stir it all together and then place into the empty egg whites.
I may not make the most beautiful of Deviled Eggs, but they are delicious!

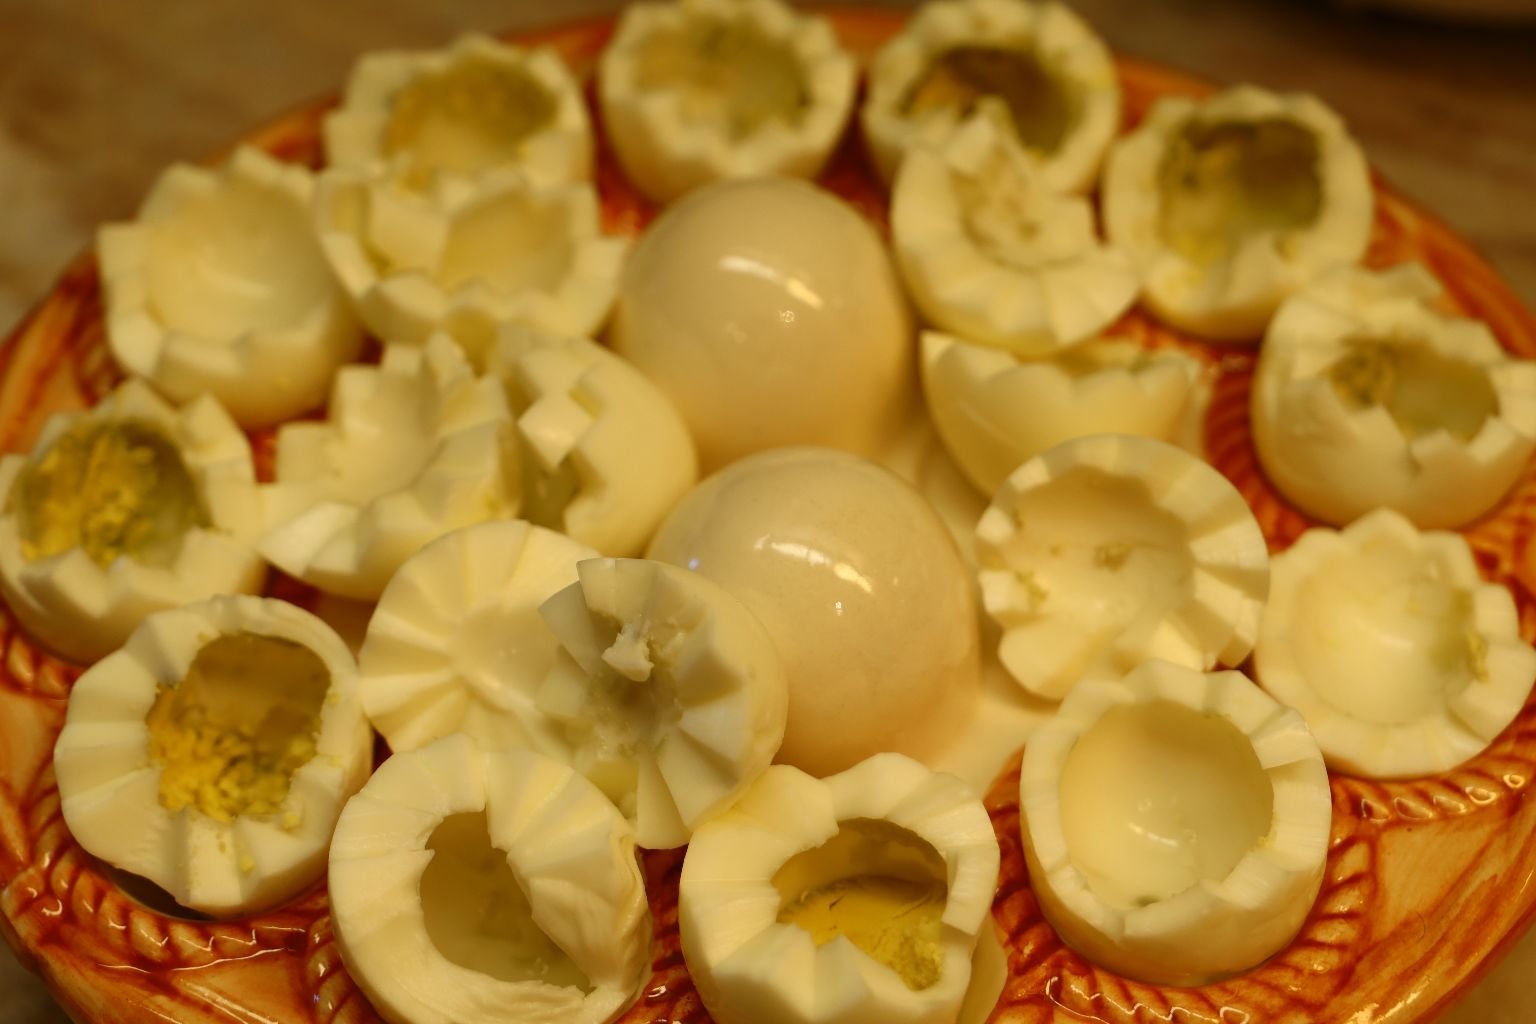
Here I Added the Egg Tops
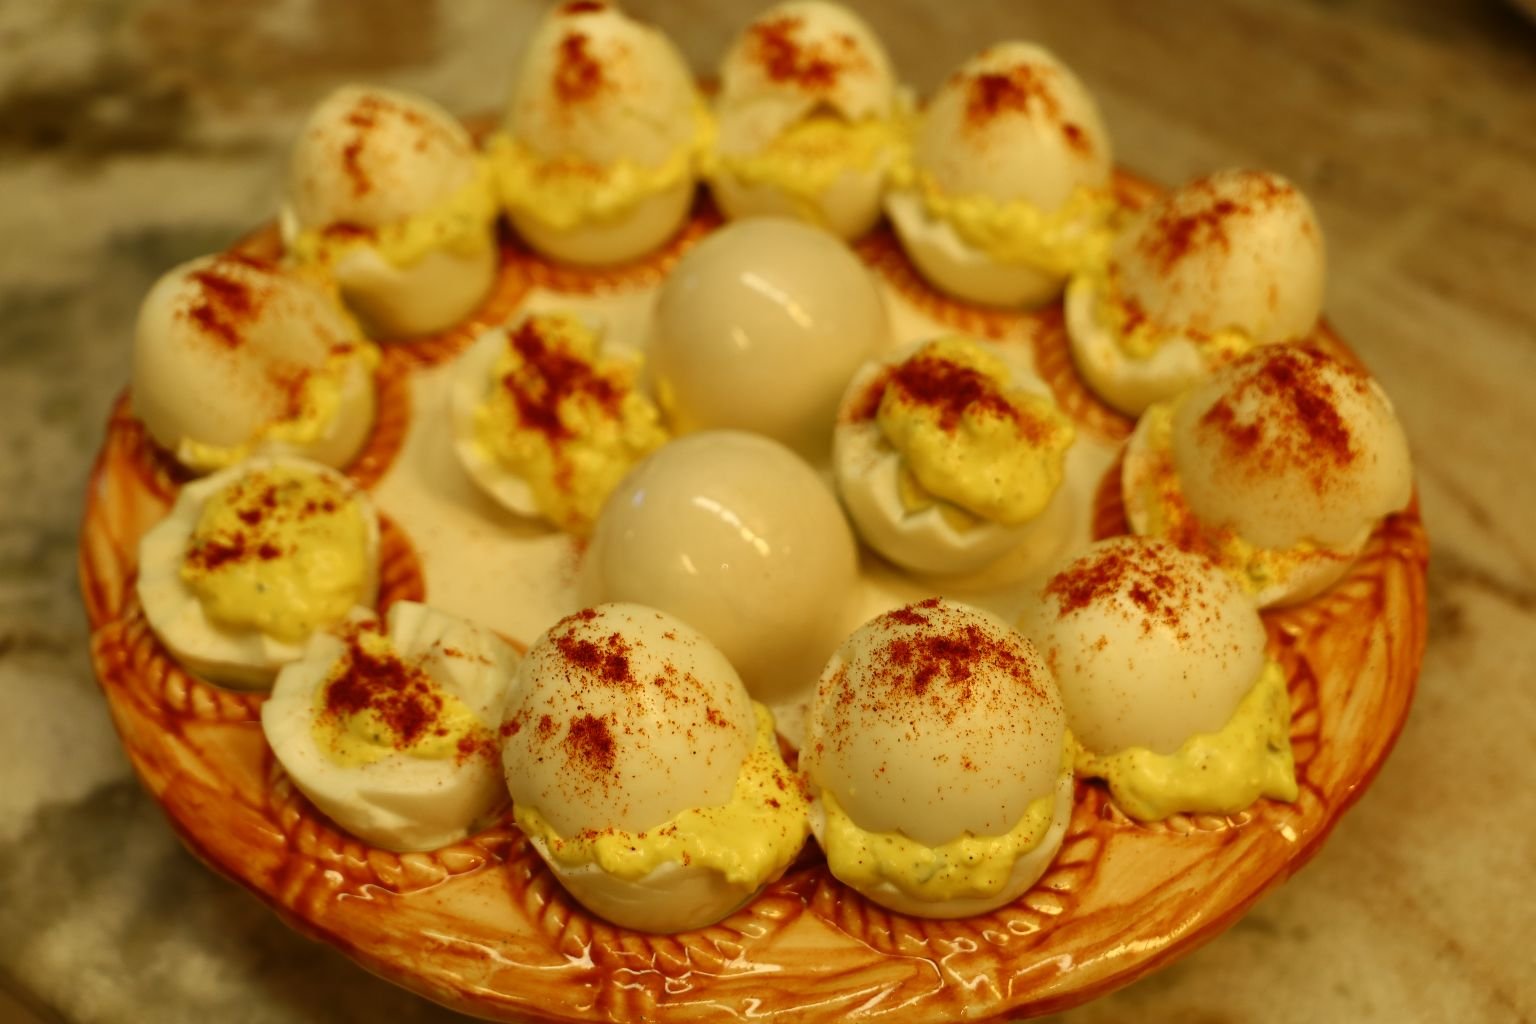
Dot With a Sprinkling of Paprika
———————————————————————
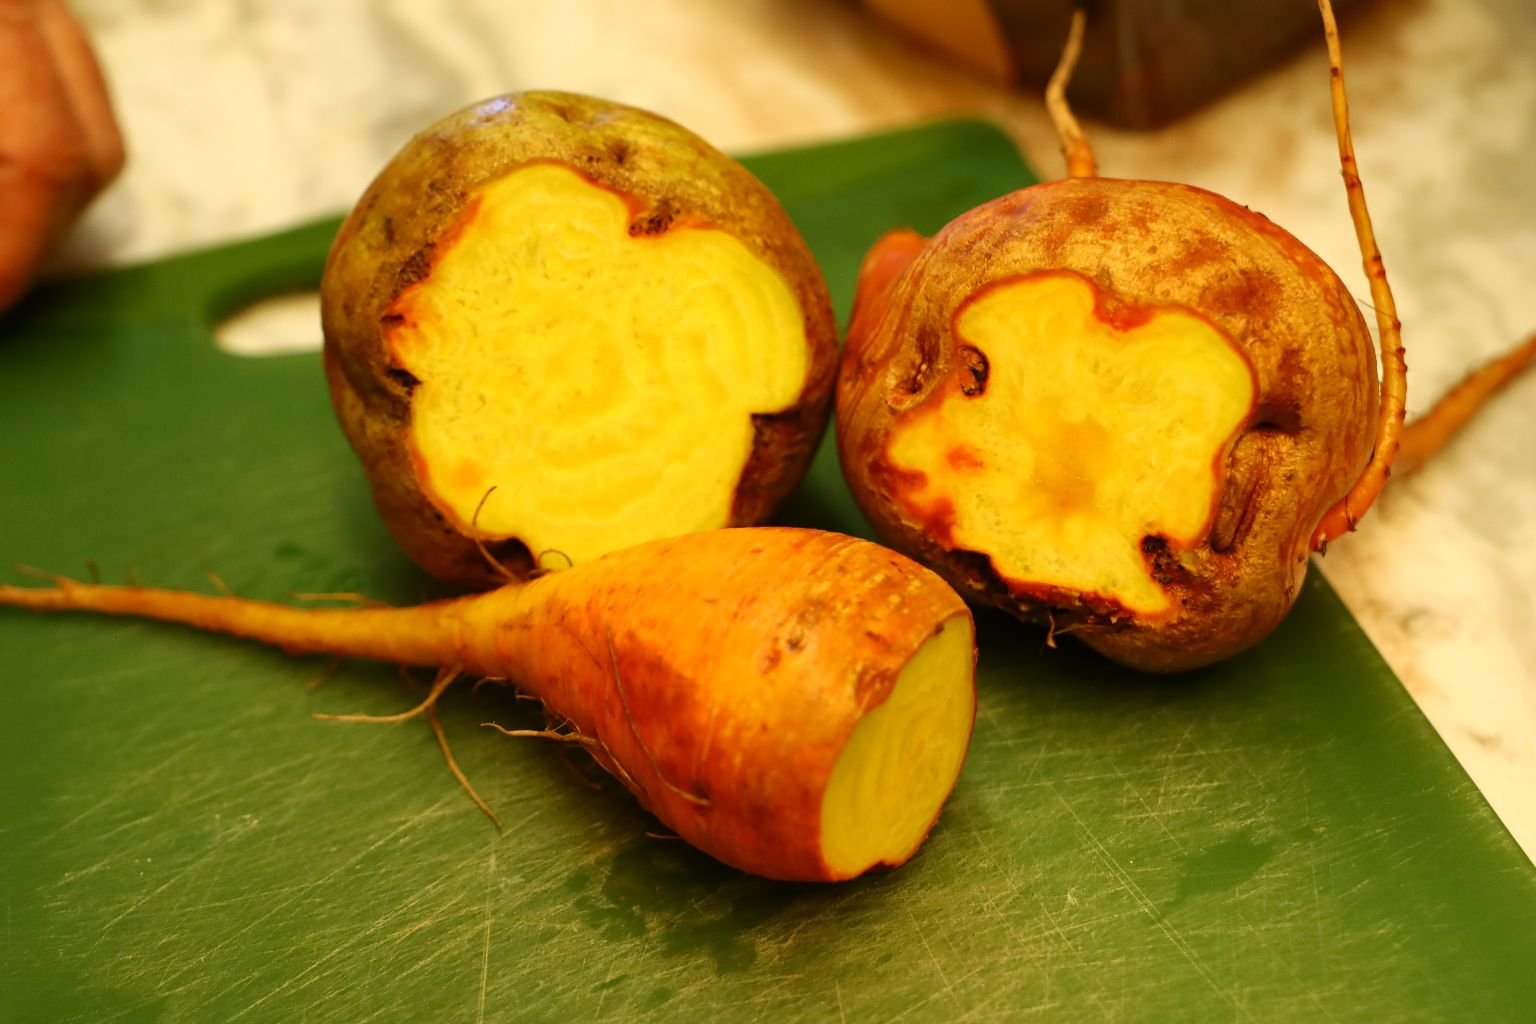
Baked Golden Beets

Above is the beautifully displayed baked Golden Beets.
They are garnished with Red Beet chips.
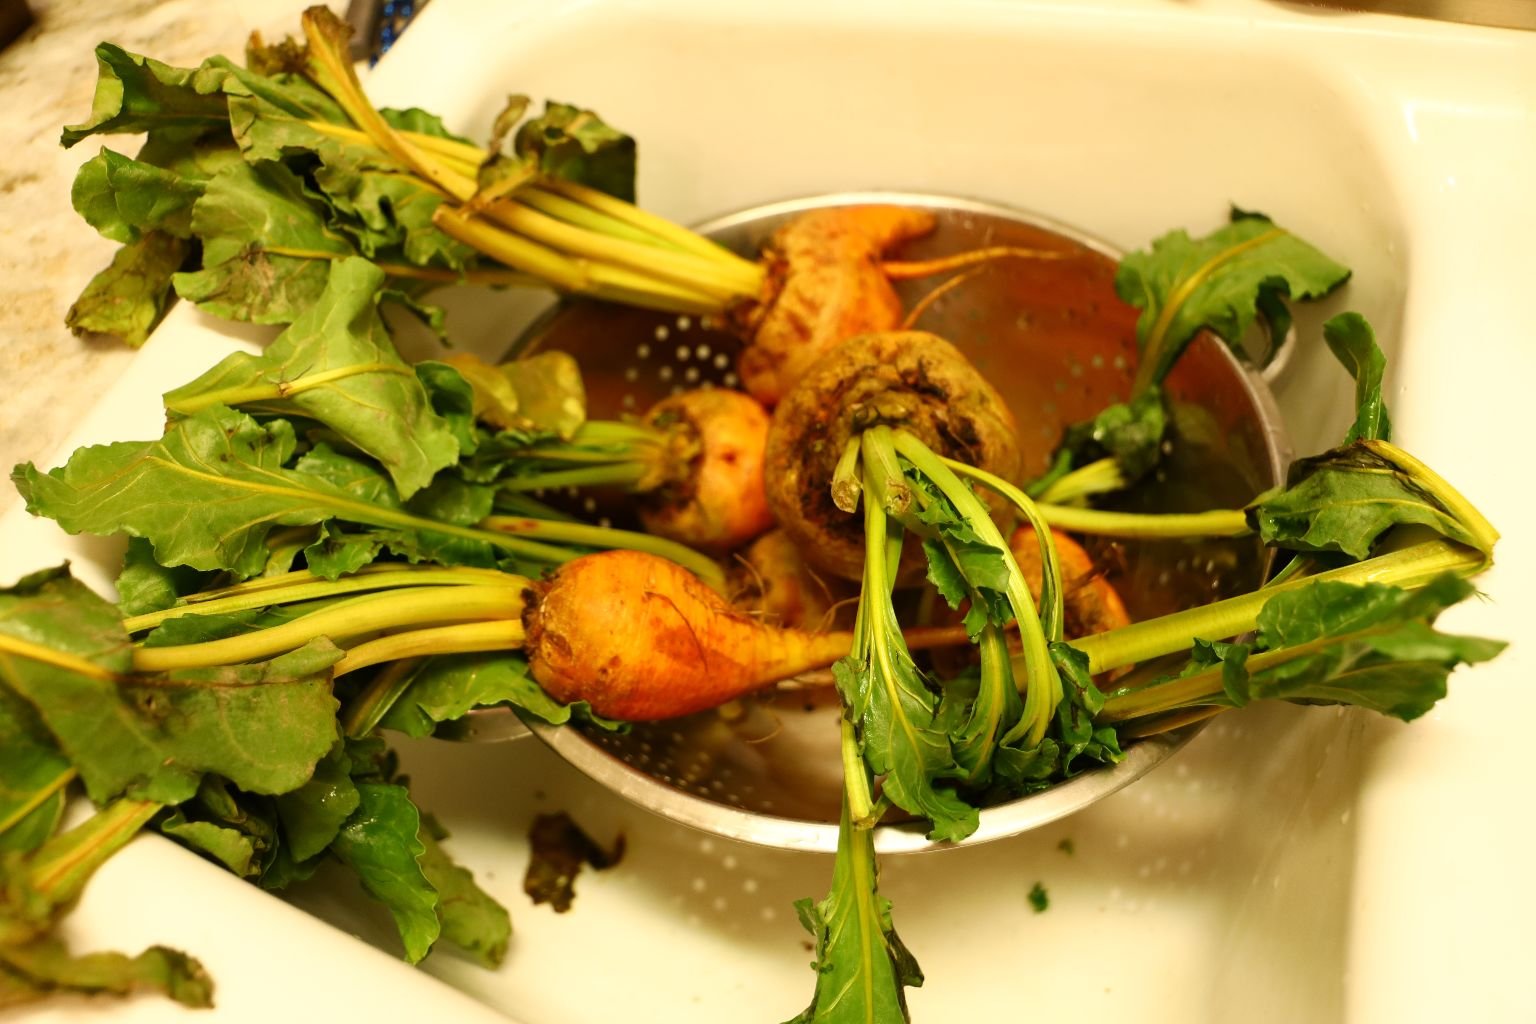
Here are the Golden Beets as we bought them with stems attached.
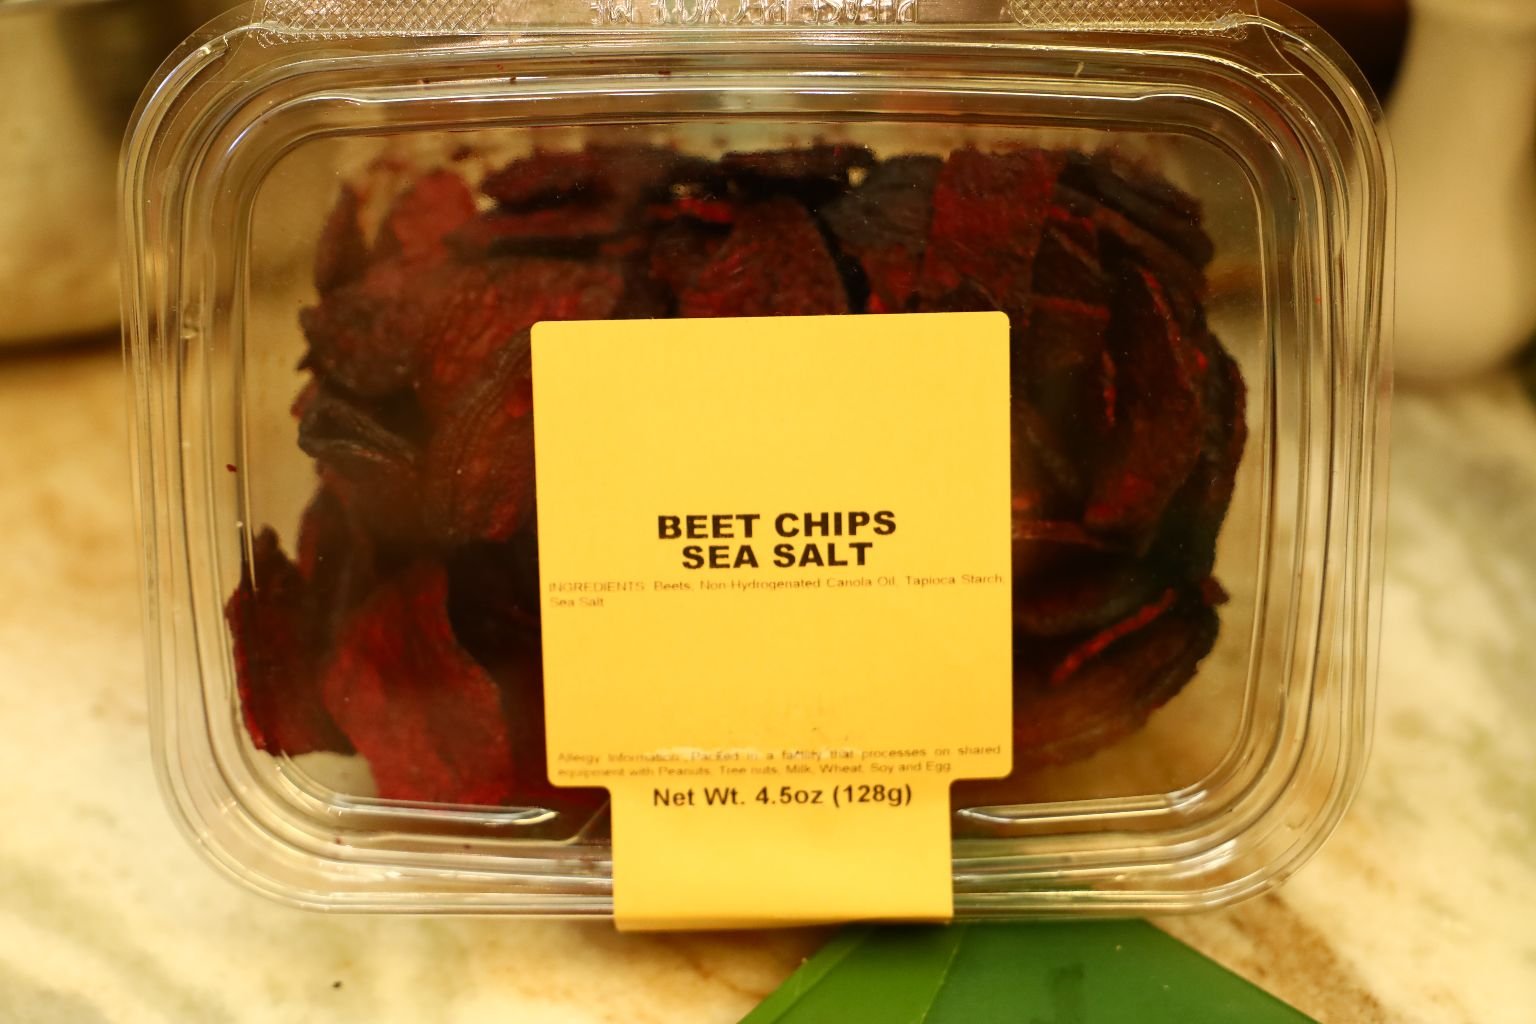
Shown are some dried Red Beet chips we used as a garnish.
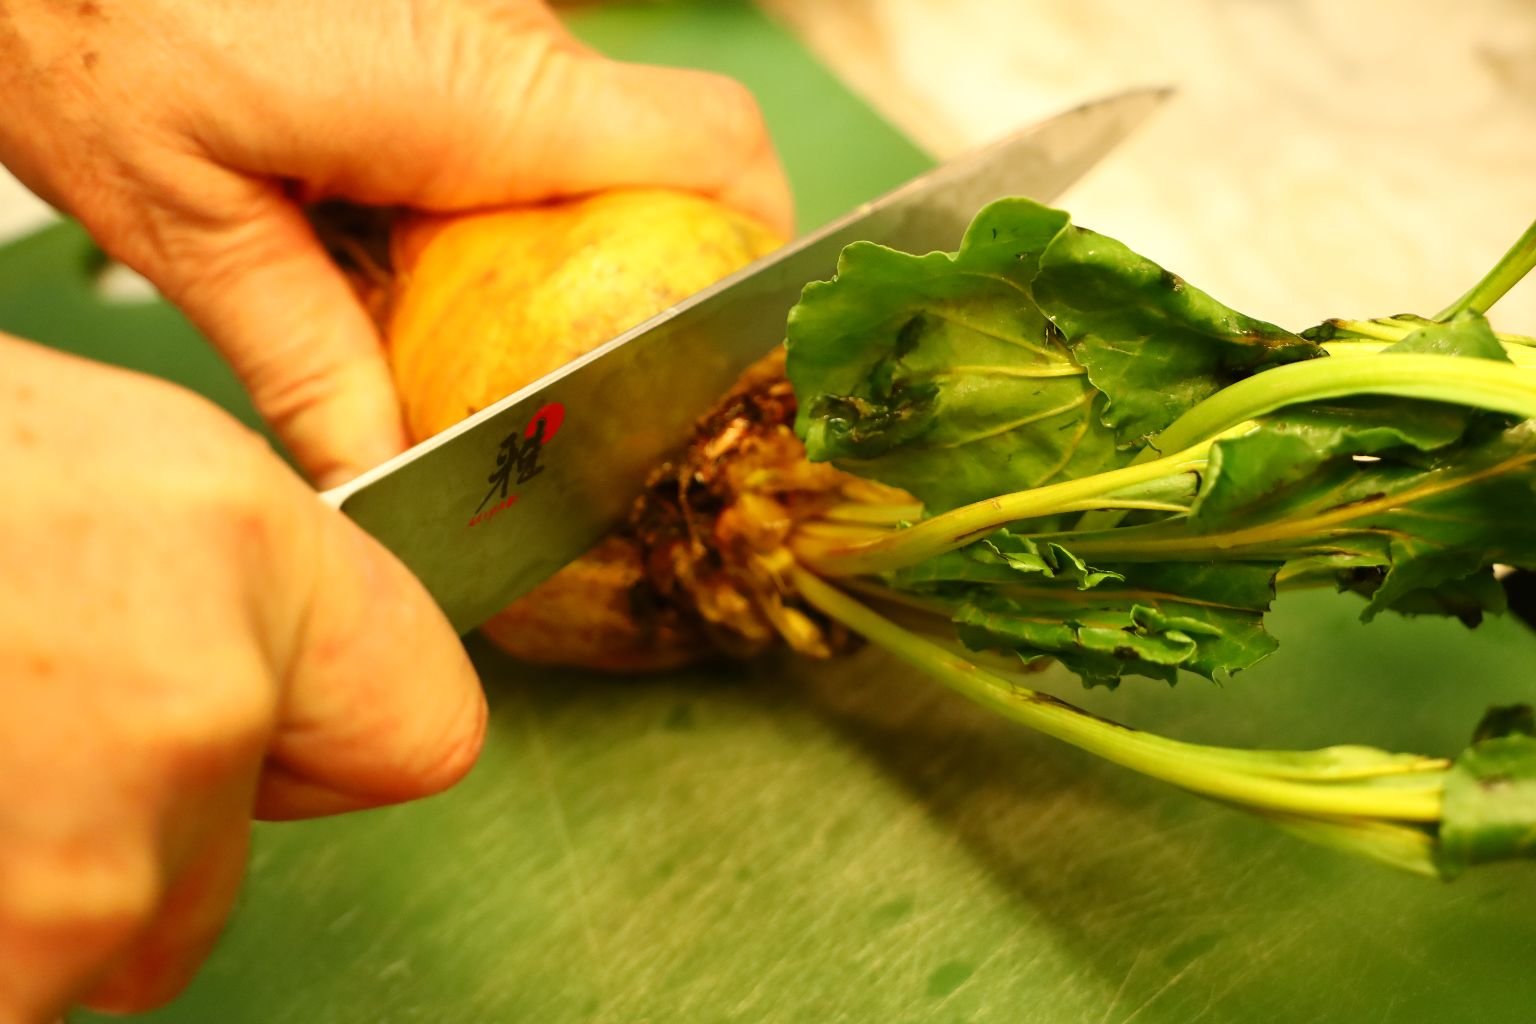
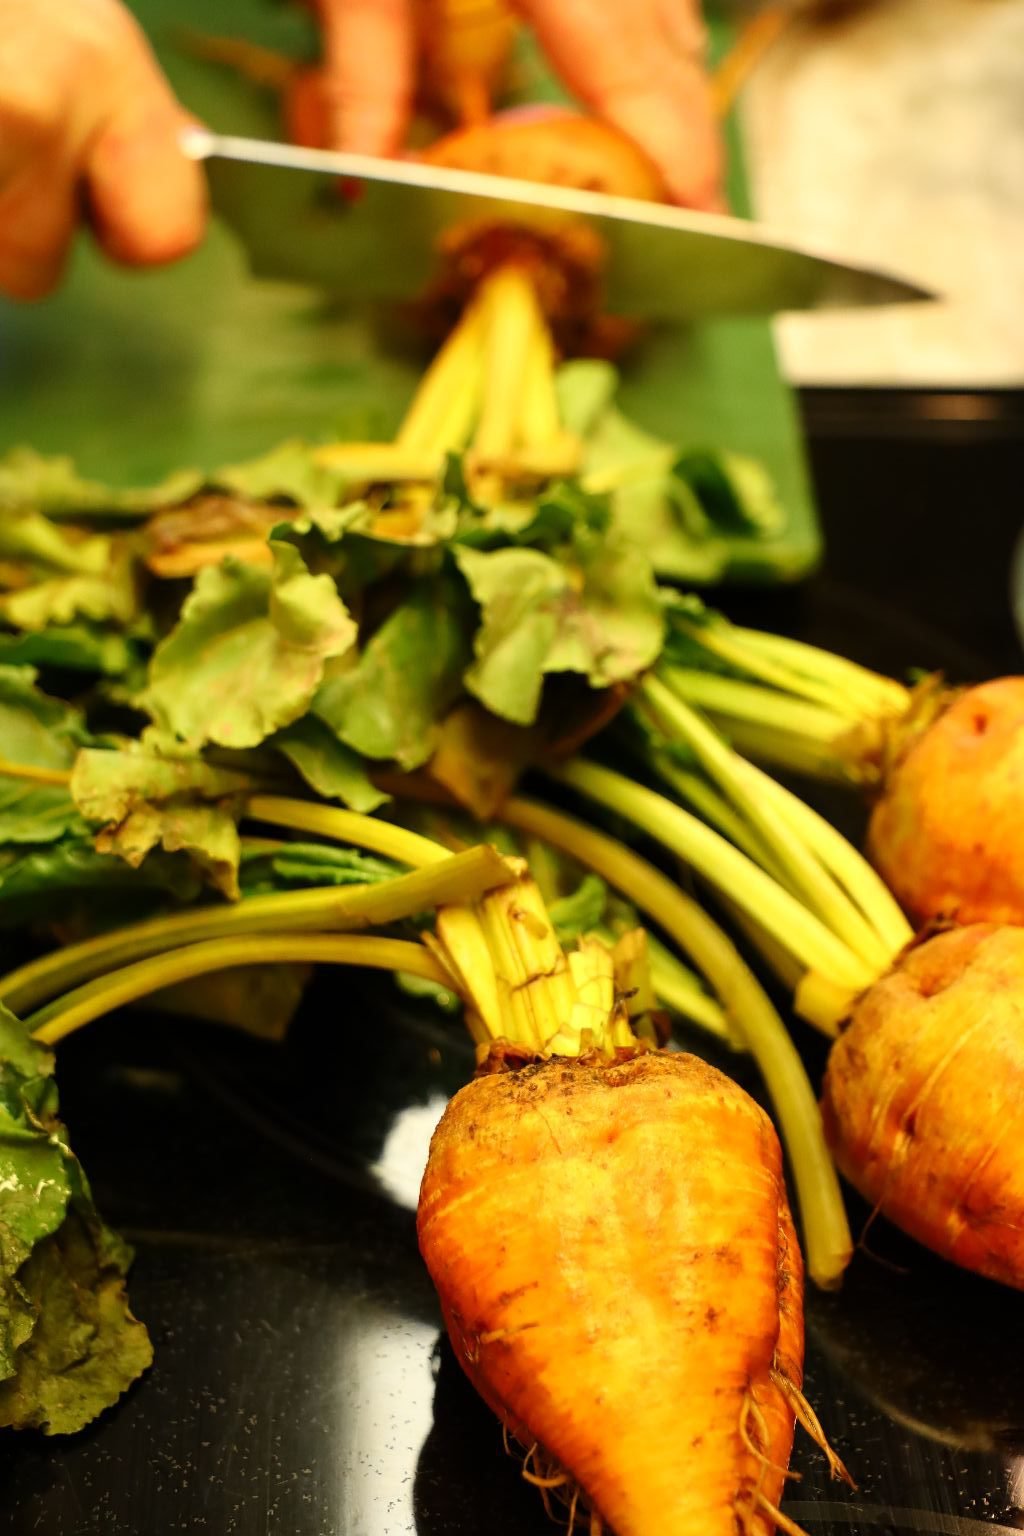
To begin, slice off the stems and the upper part of the beet.
Displayed are what they should look like.

Now, peel off the outer skin of the beet.
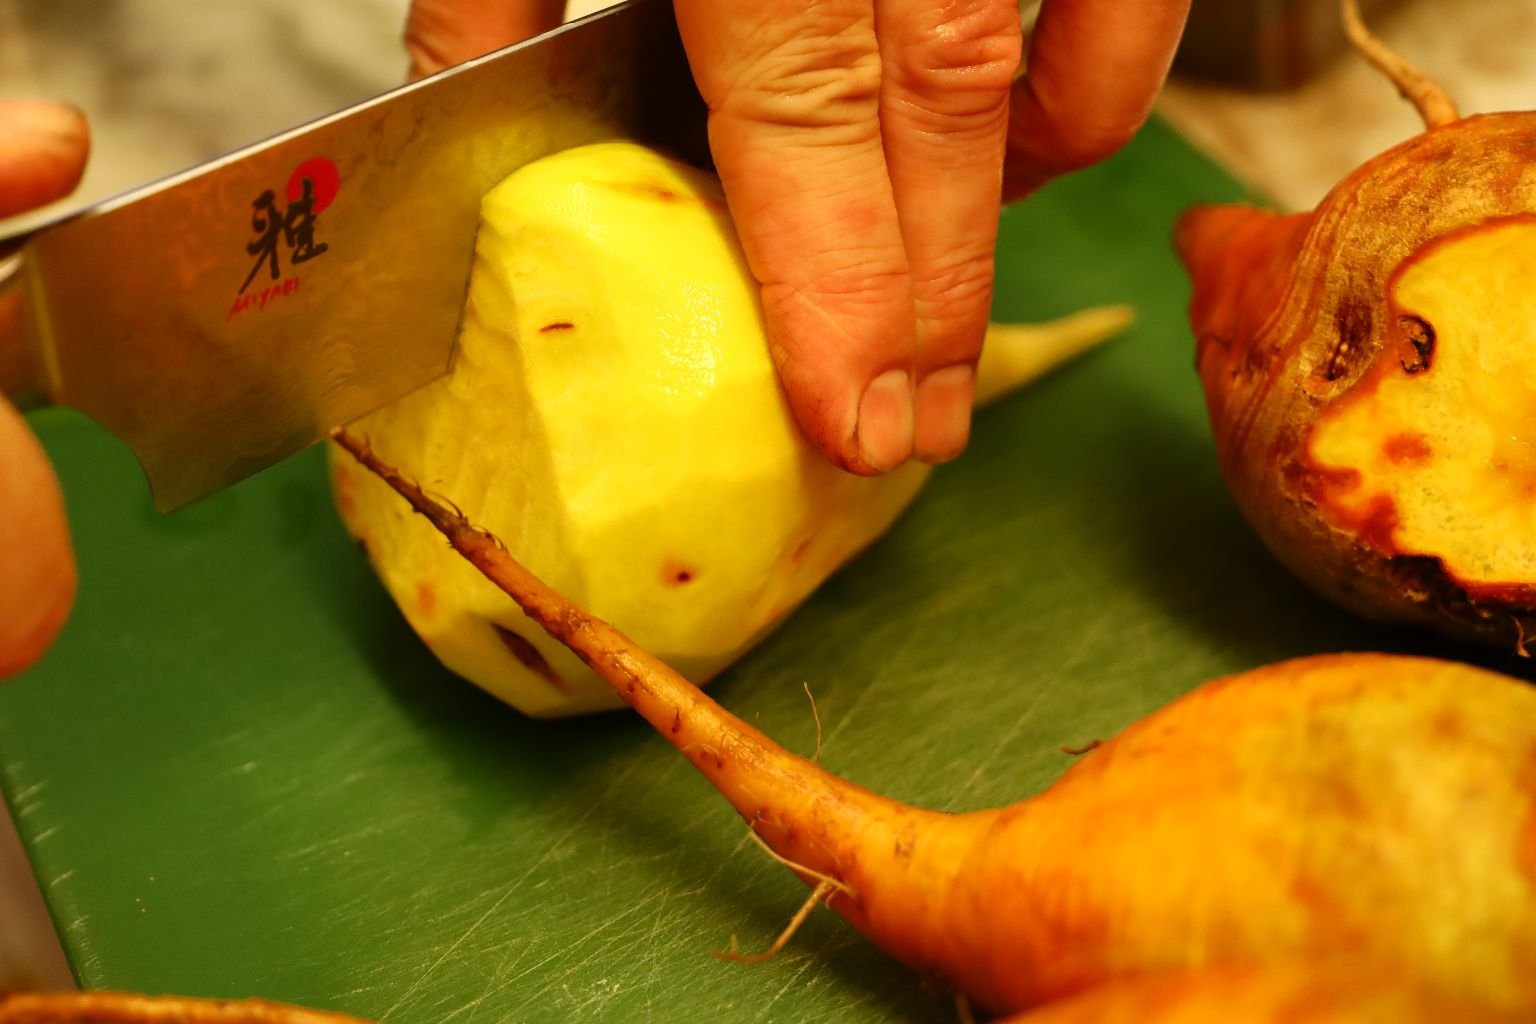
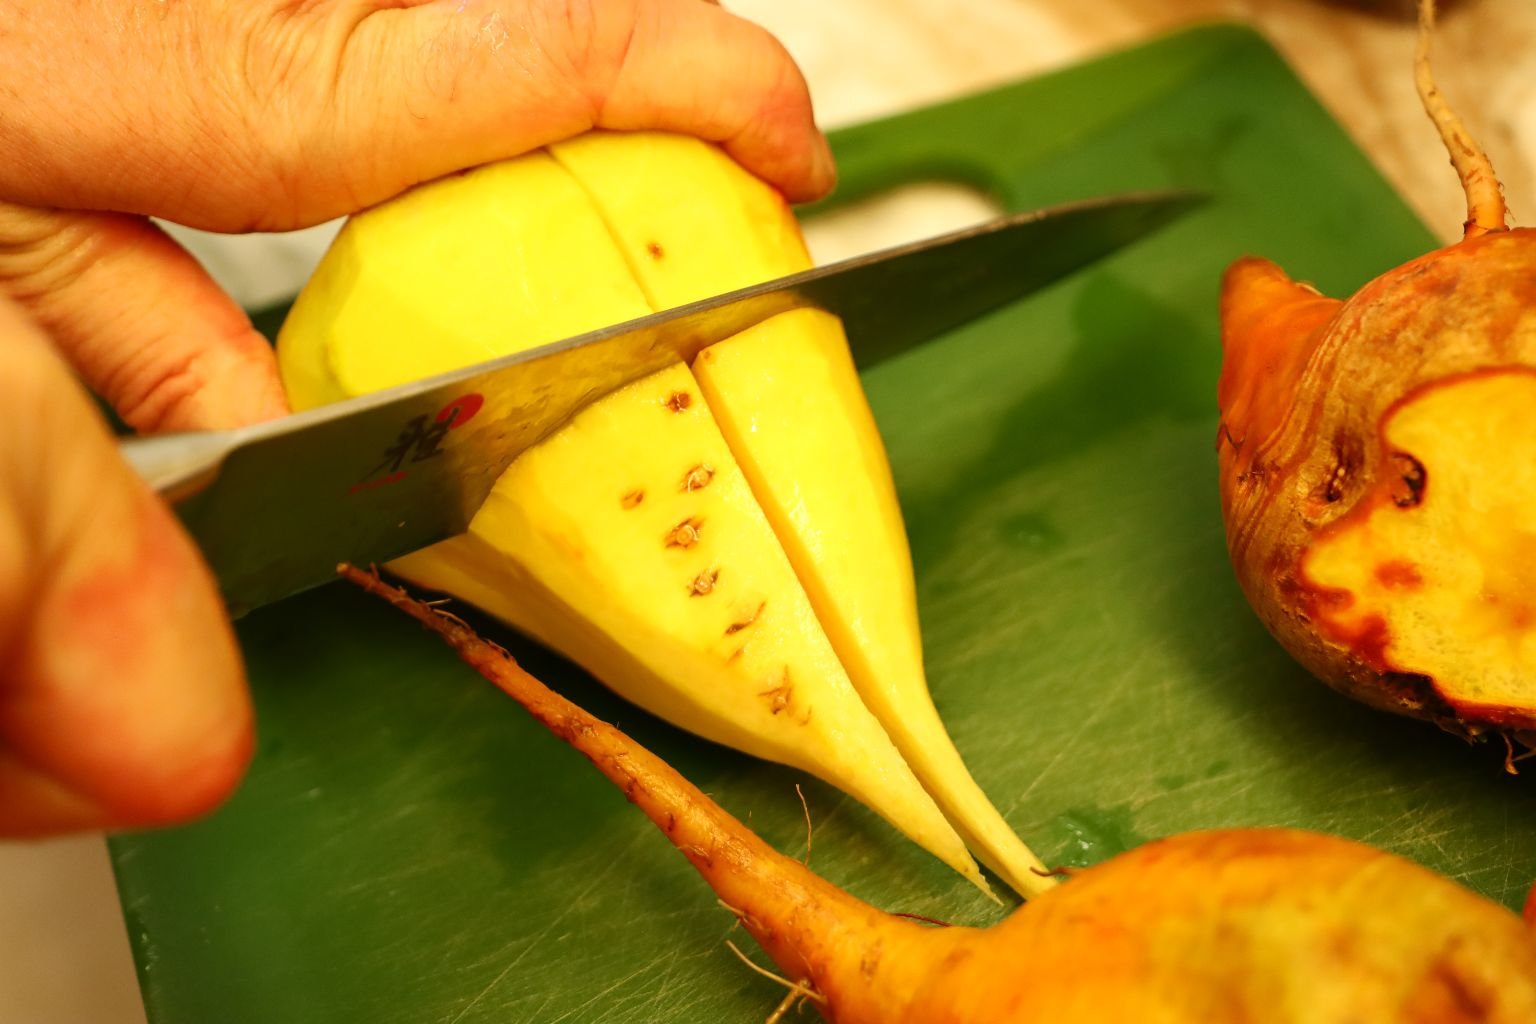
Slice the beets into quarter sections trying to keep them all about the same size for even cooking.
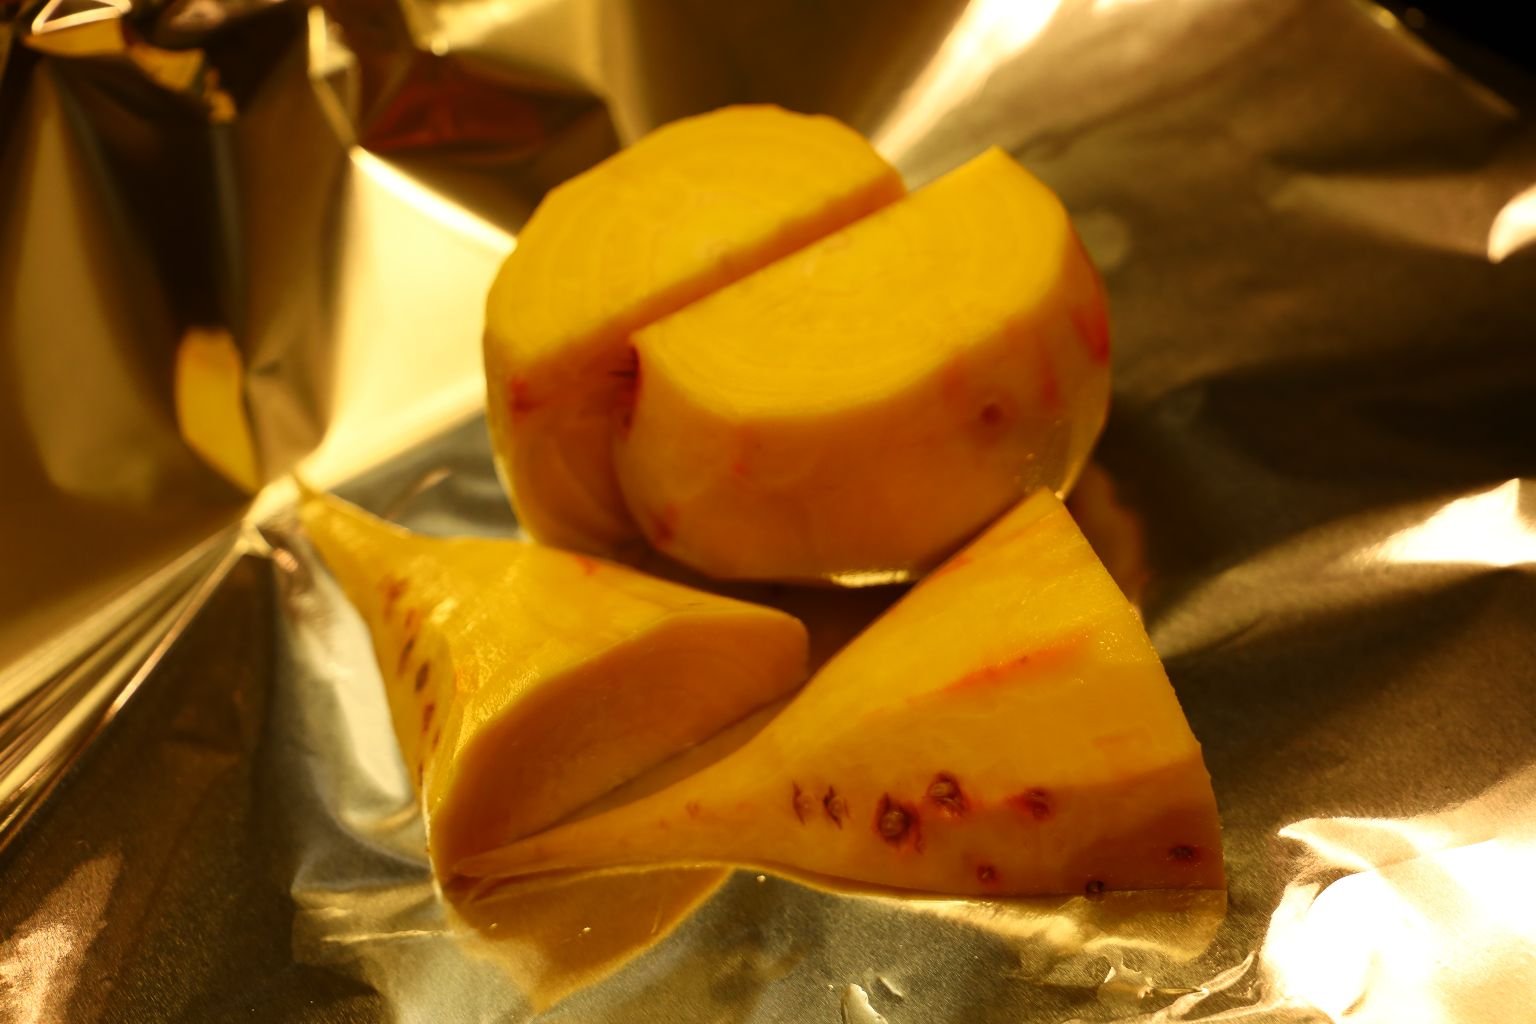
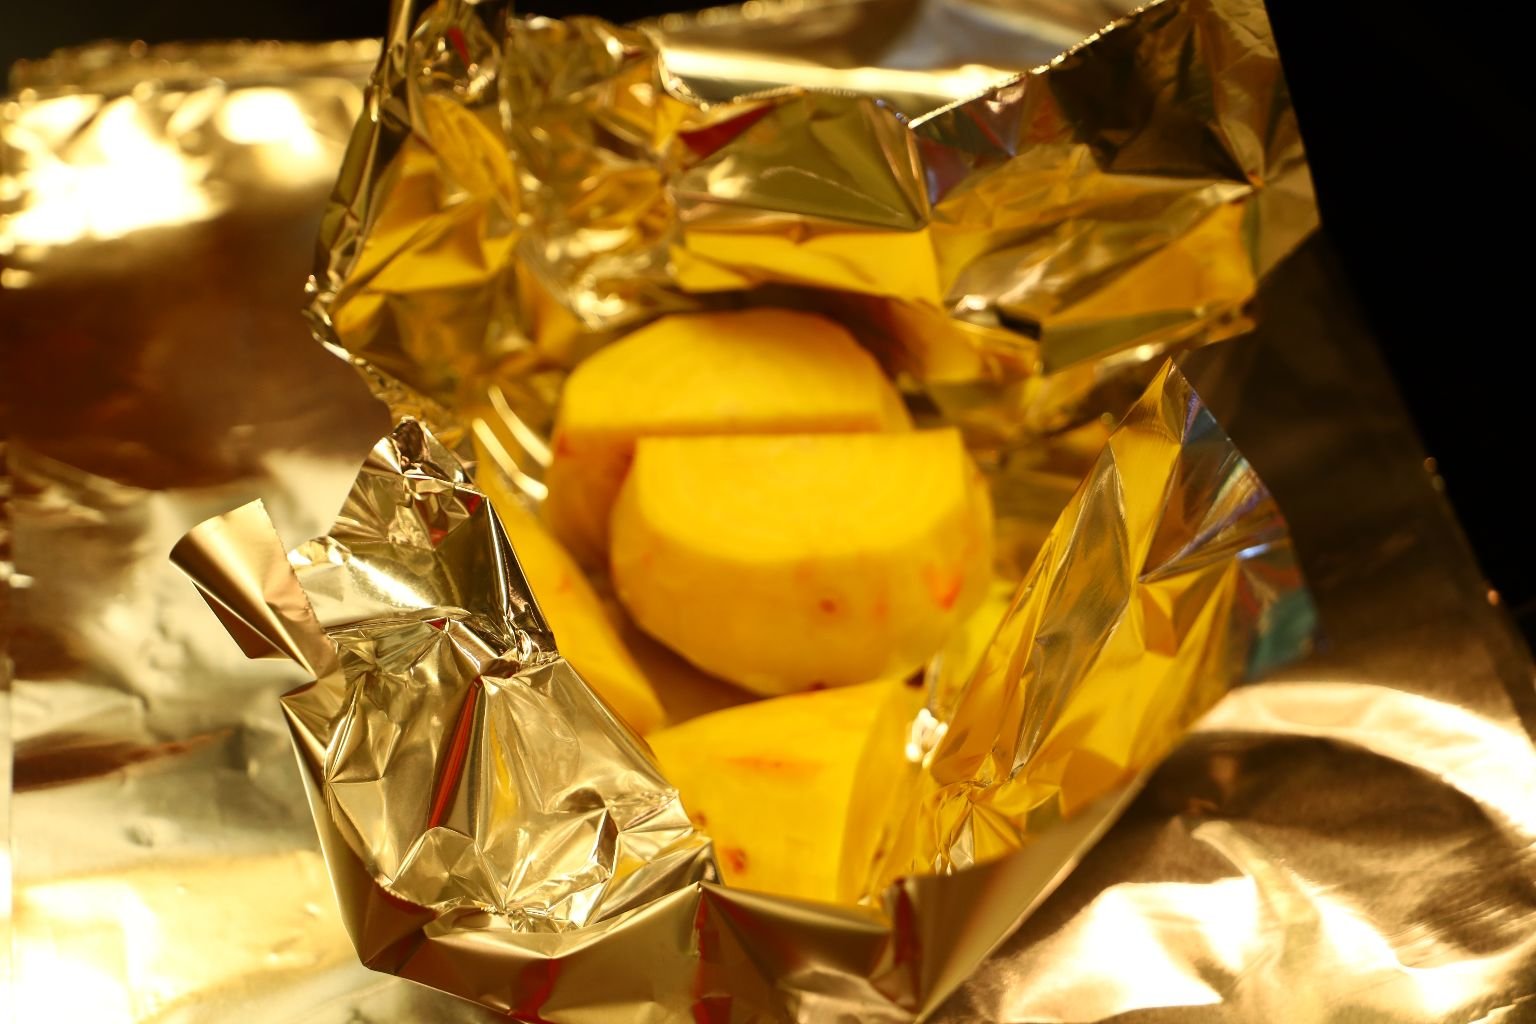
Wrap the sectioned beets into aluminum foil adding a touch of water then seal the pouch tightly.
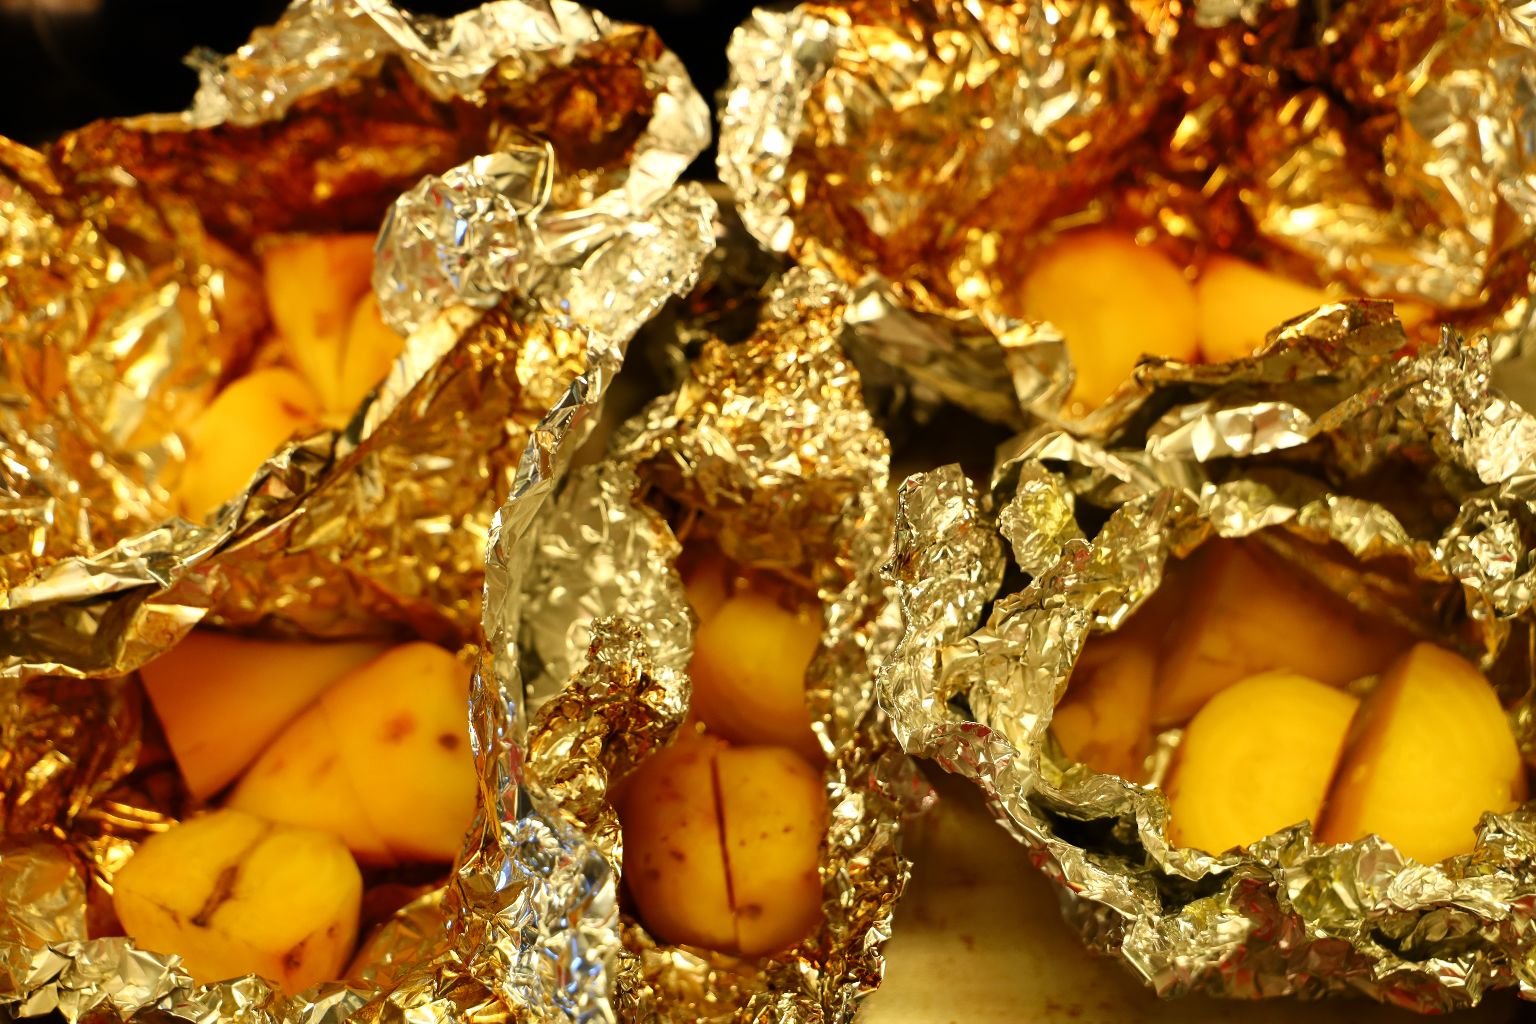
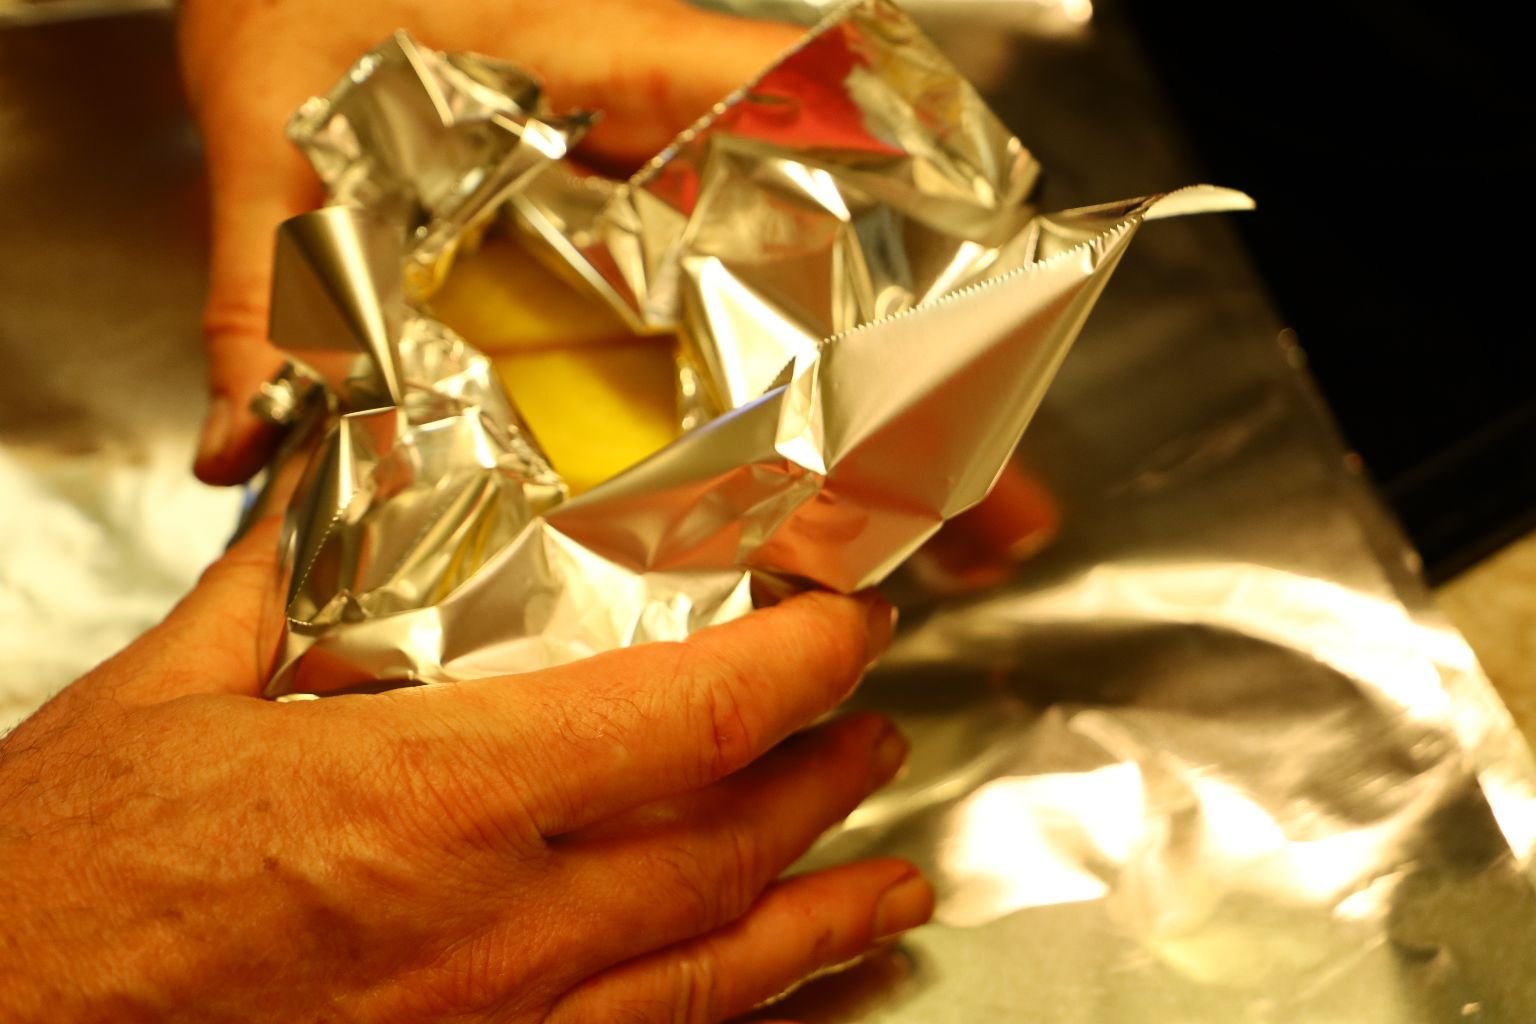
Bake the beets in your oven for about 45 min. at 400’F or until fork tender.

Remove the beets from their pouches when cool to the touch.
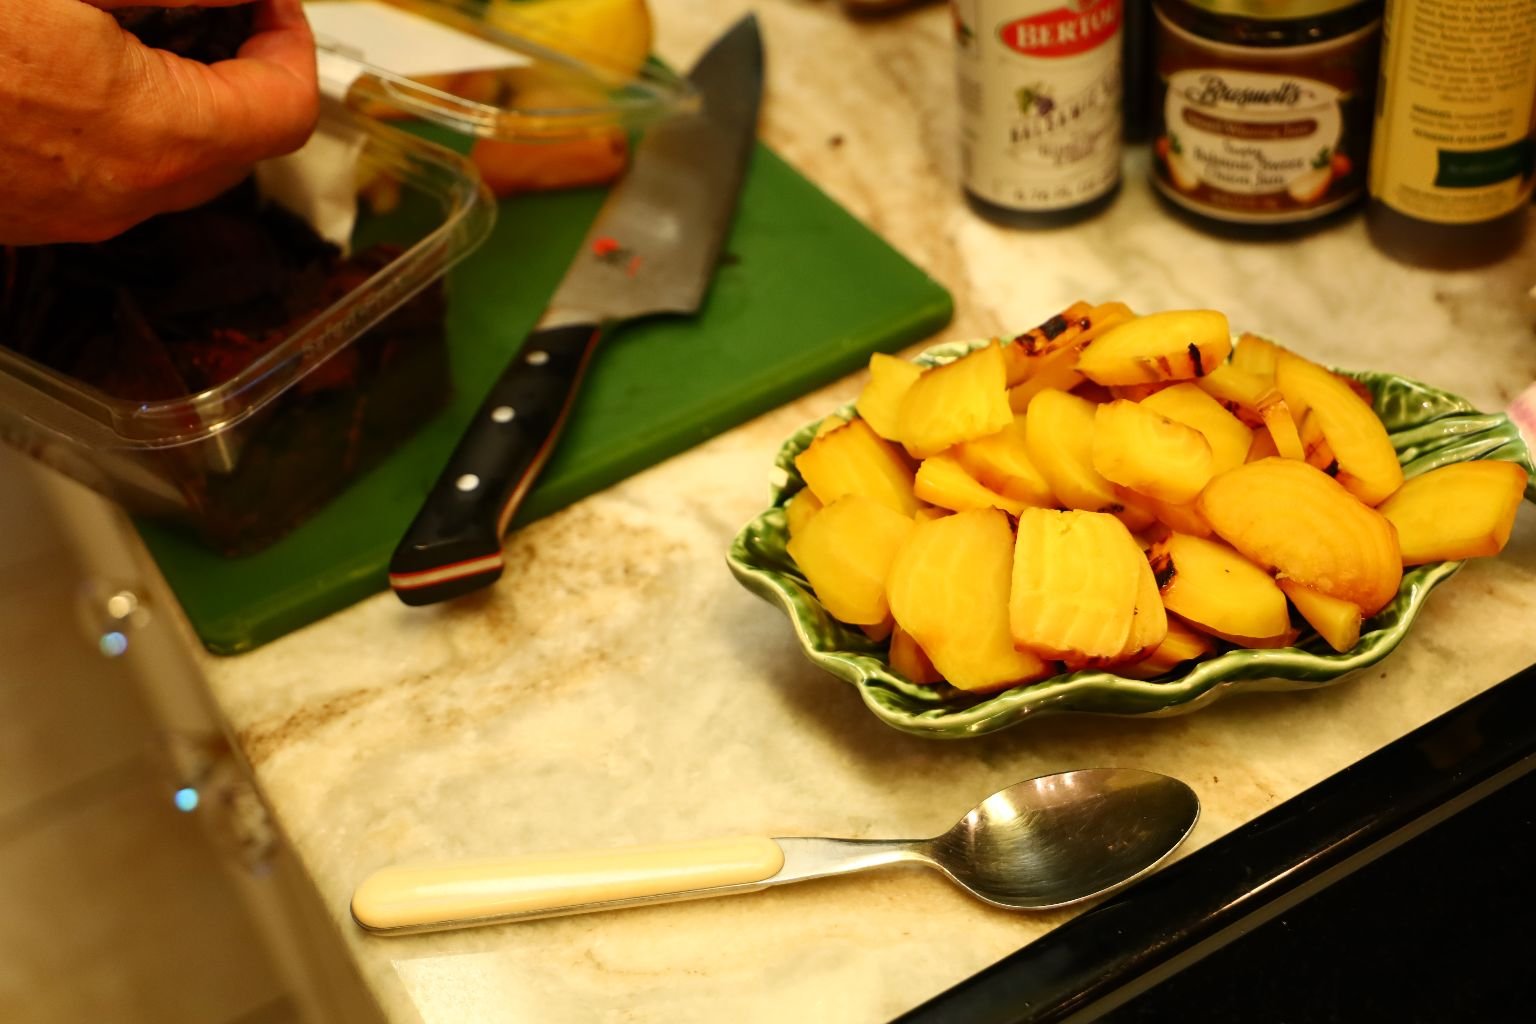
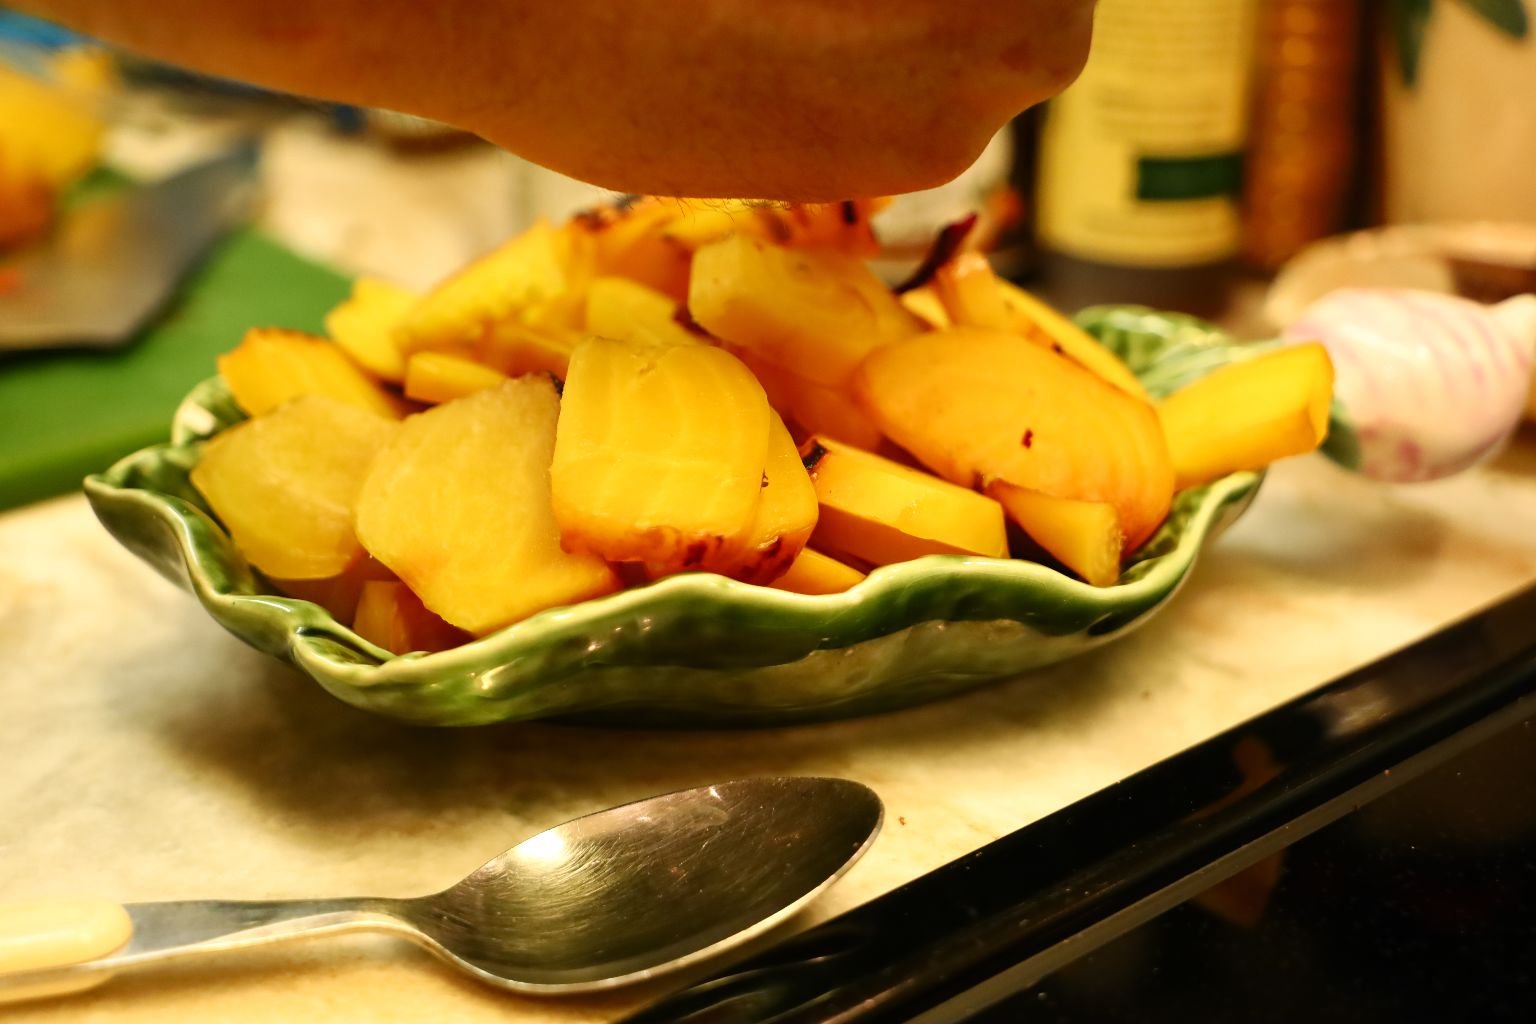
Slice the beets into more manageable pieces and top with some of the dried Red Beets that have been crushed into smaller pieces.
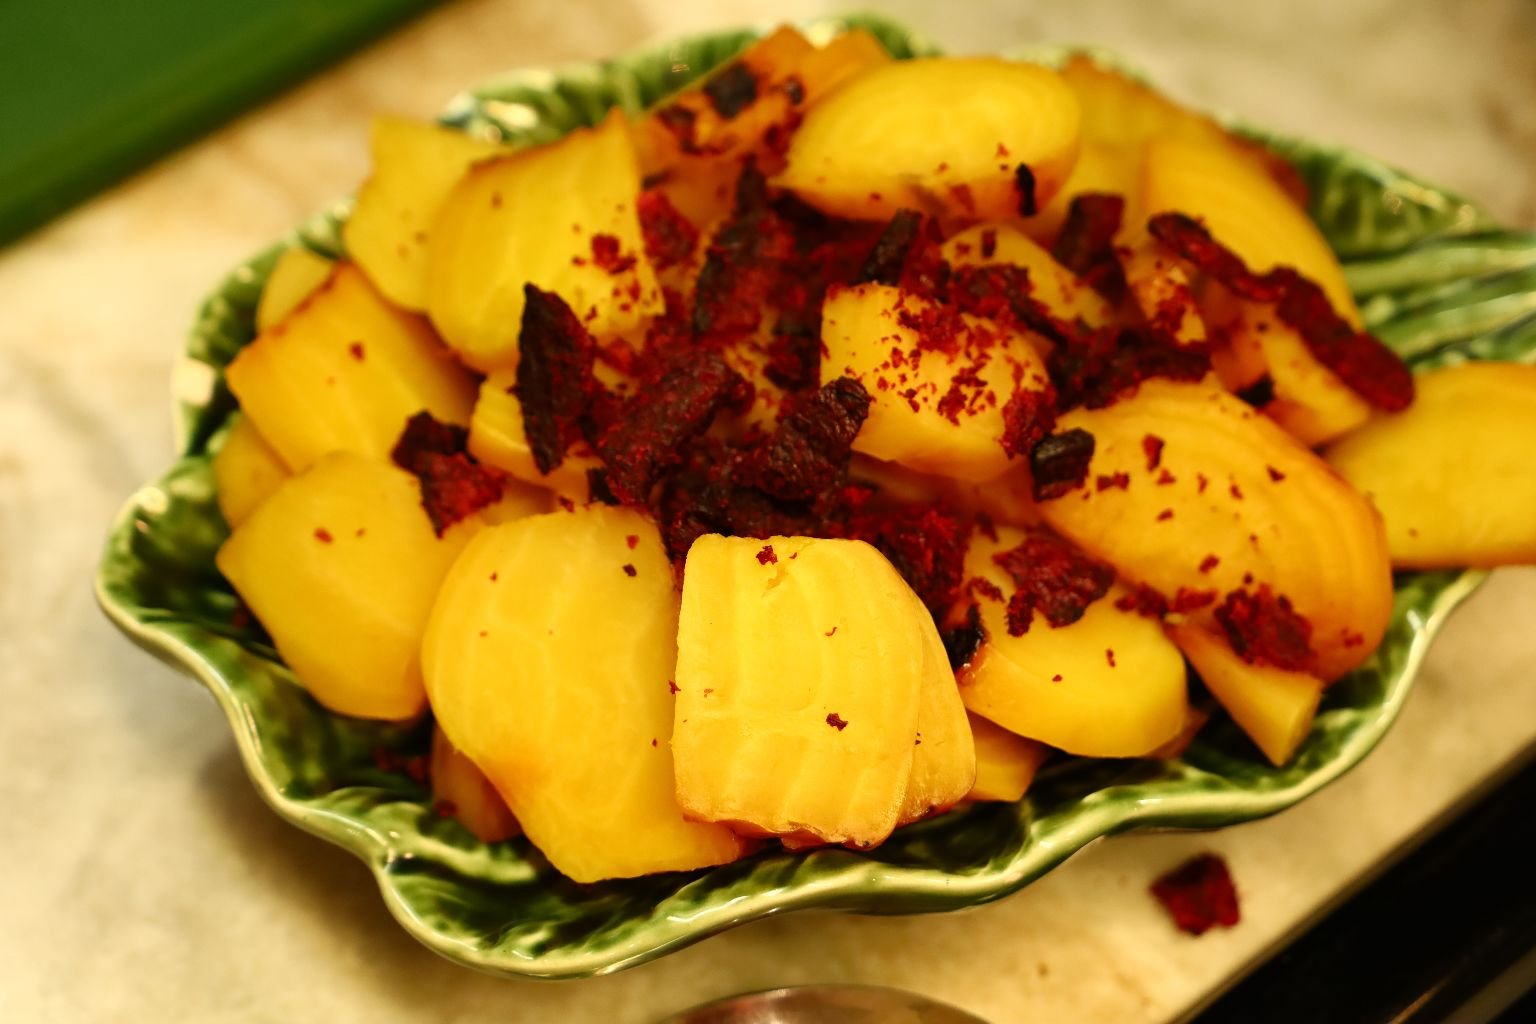
This is a great side dish for any occasion.
————————————————————-
Our Easter Carrot Slaw
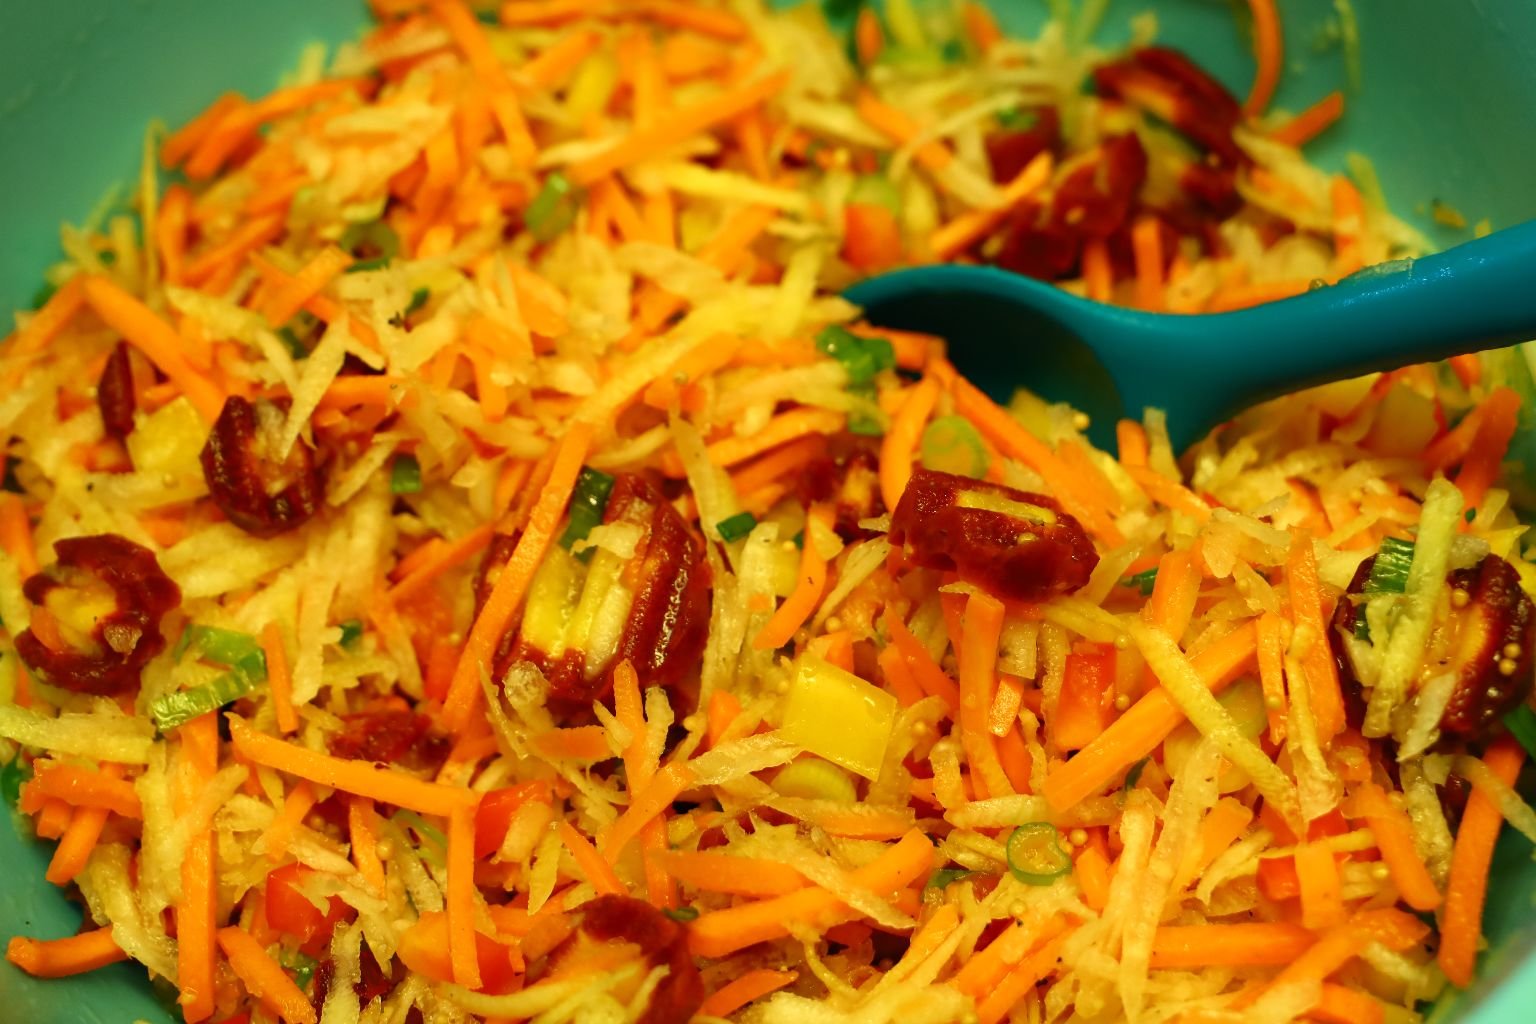
——————————————————–
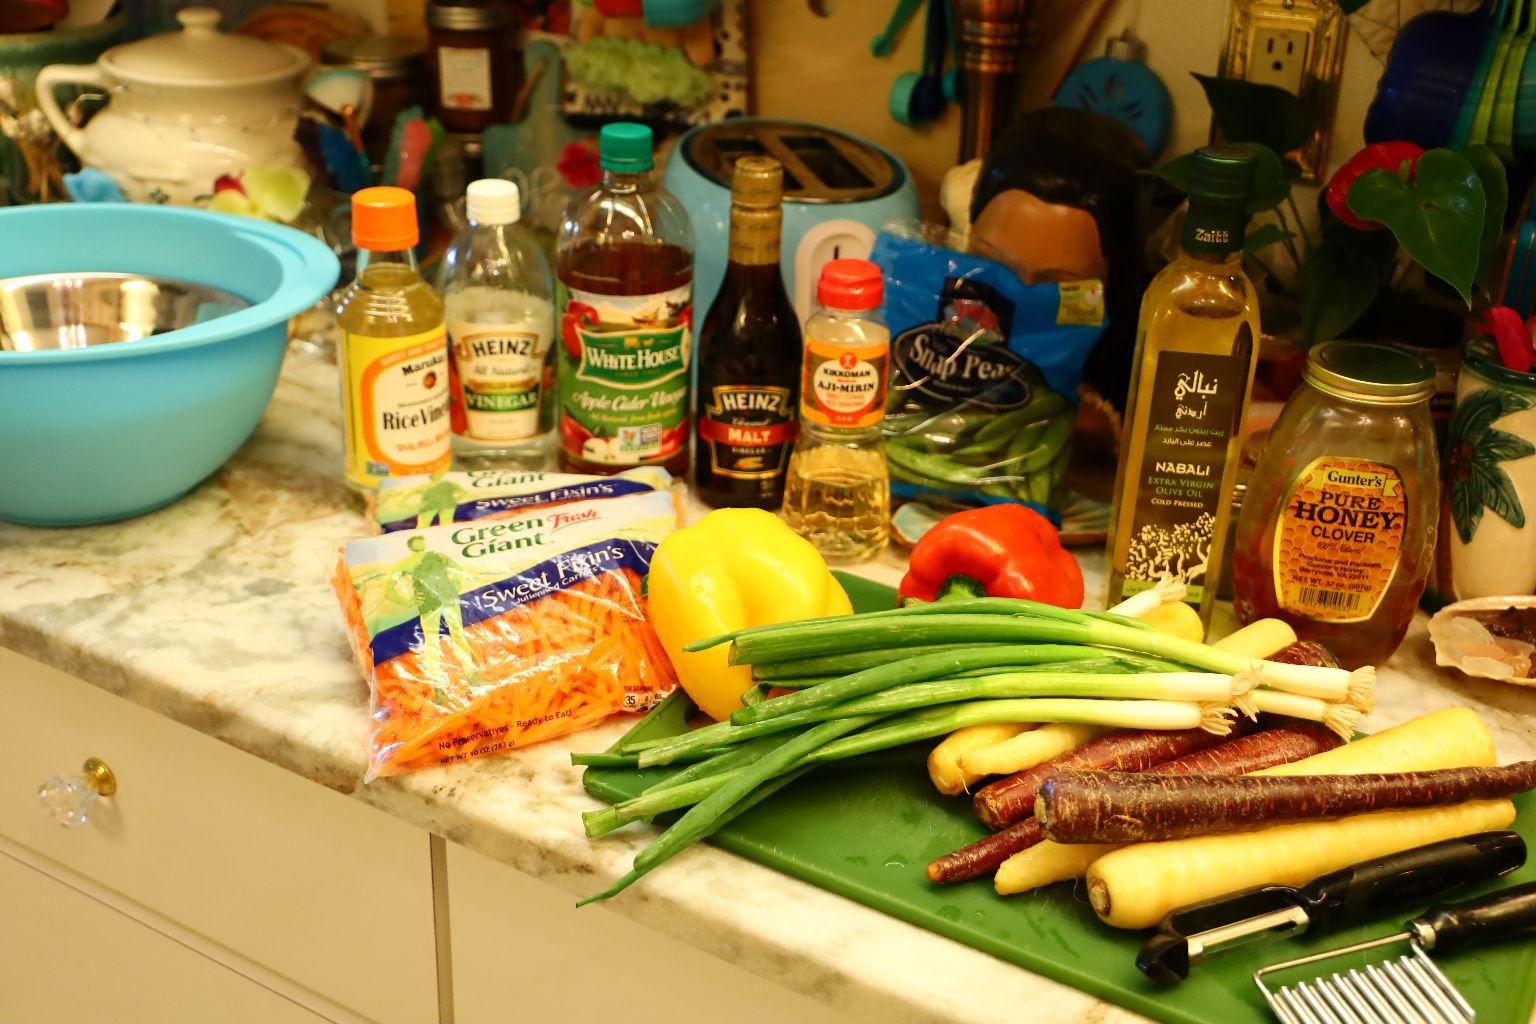
Ingredients:
1 10 oz. Bag Carrot Sticks
2 Lg. Purple Carrots – peeled and sliced
2 Lg. Yellow Carrots – peeled and shredded
1/2 Yellow Bell Pepper – diced
1/2 Red Bell Pepper – diced
3 Green Onions – sliced thinly
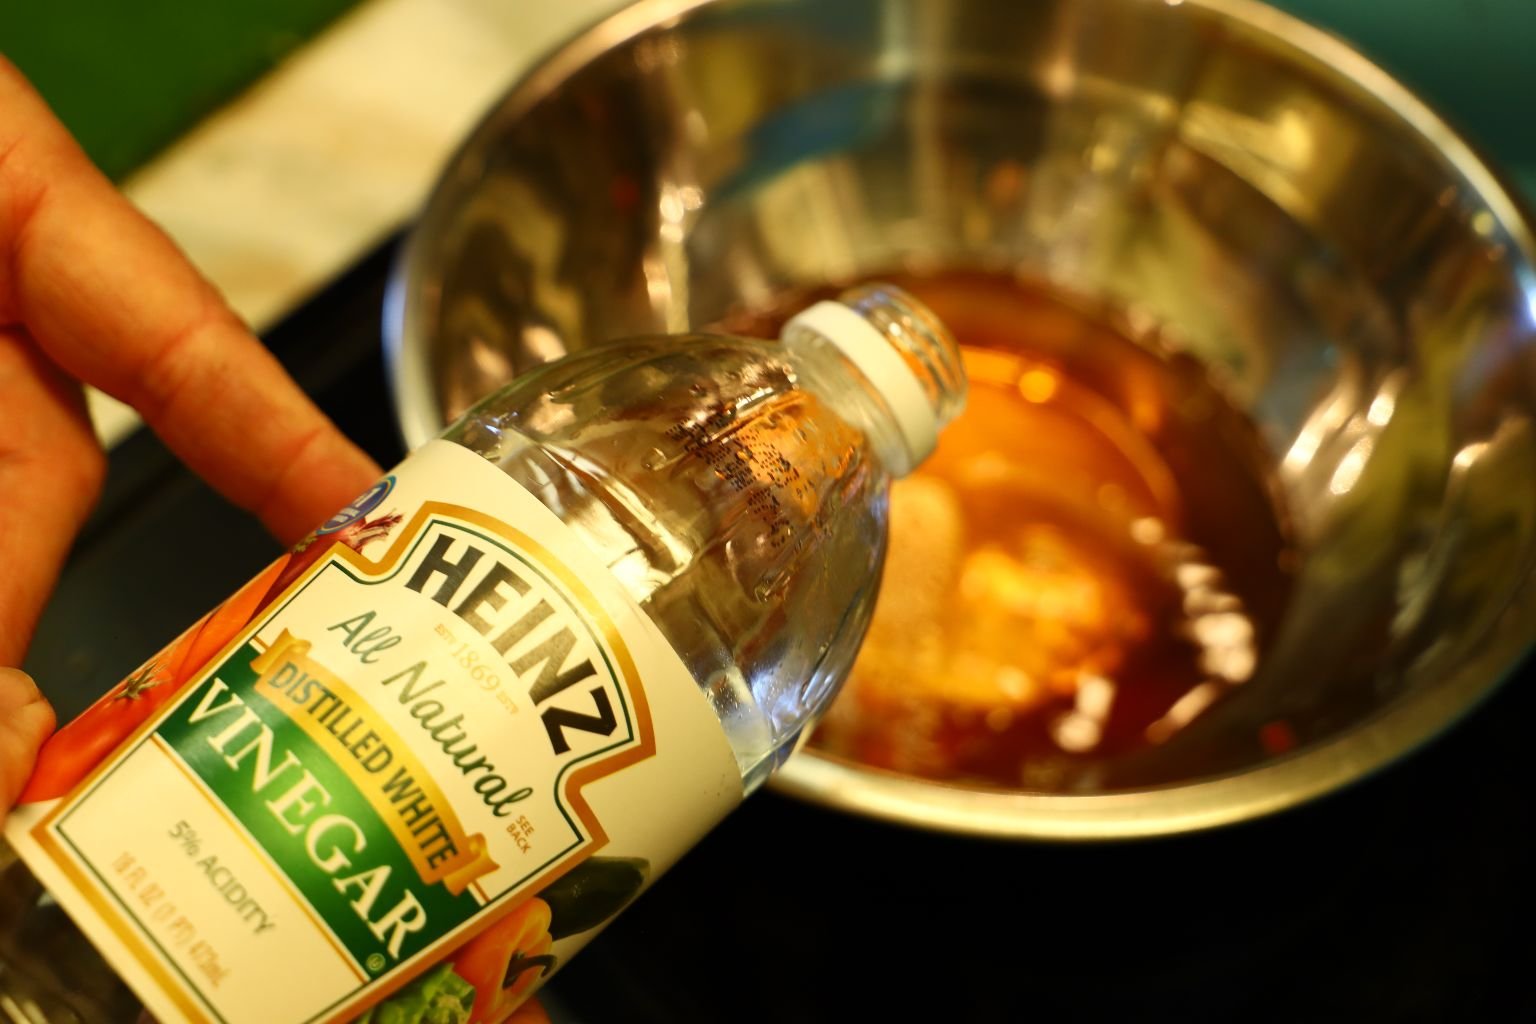
~1/4 Cup Malt Vinegar
~1/4 Cup Cider Vinegar
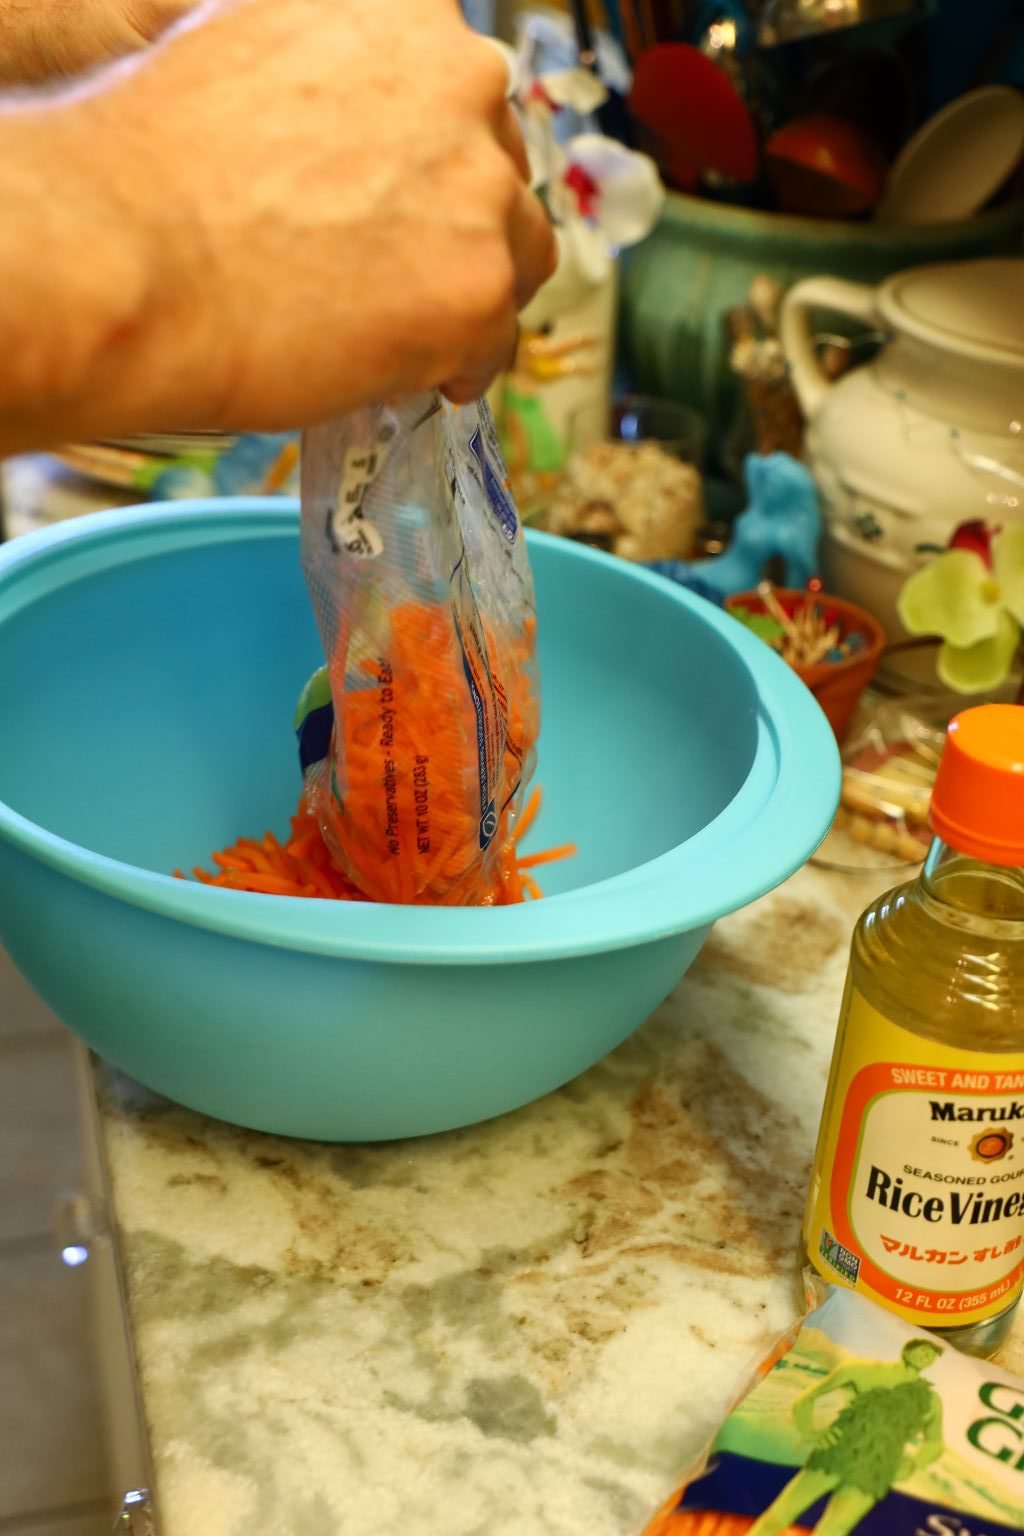
~1/4 Cup Rice Vinegar
~1/4 Cup White Vinegar
2 Tbsp. Aji-Mirin Sweet Cooking Rice Seasoning
2 Tbsp. Honey
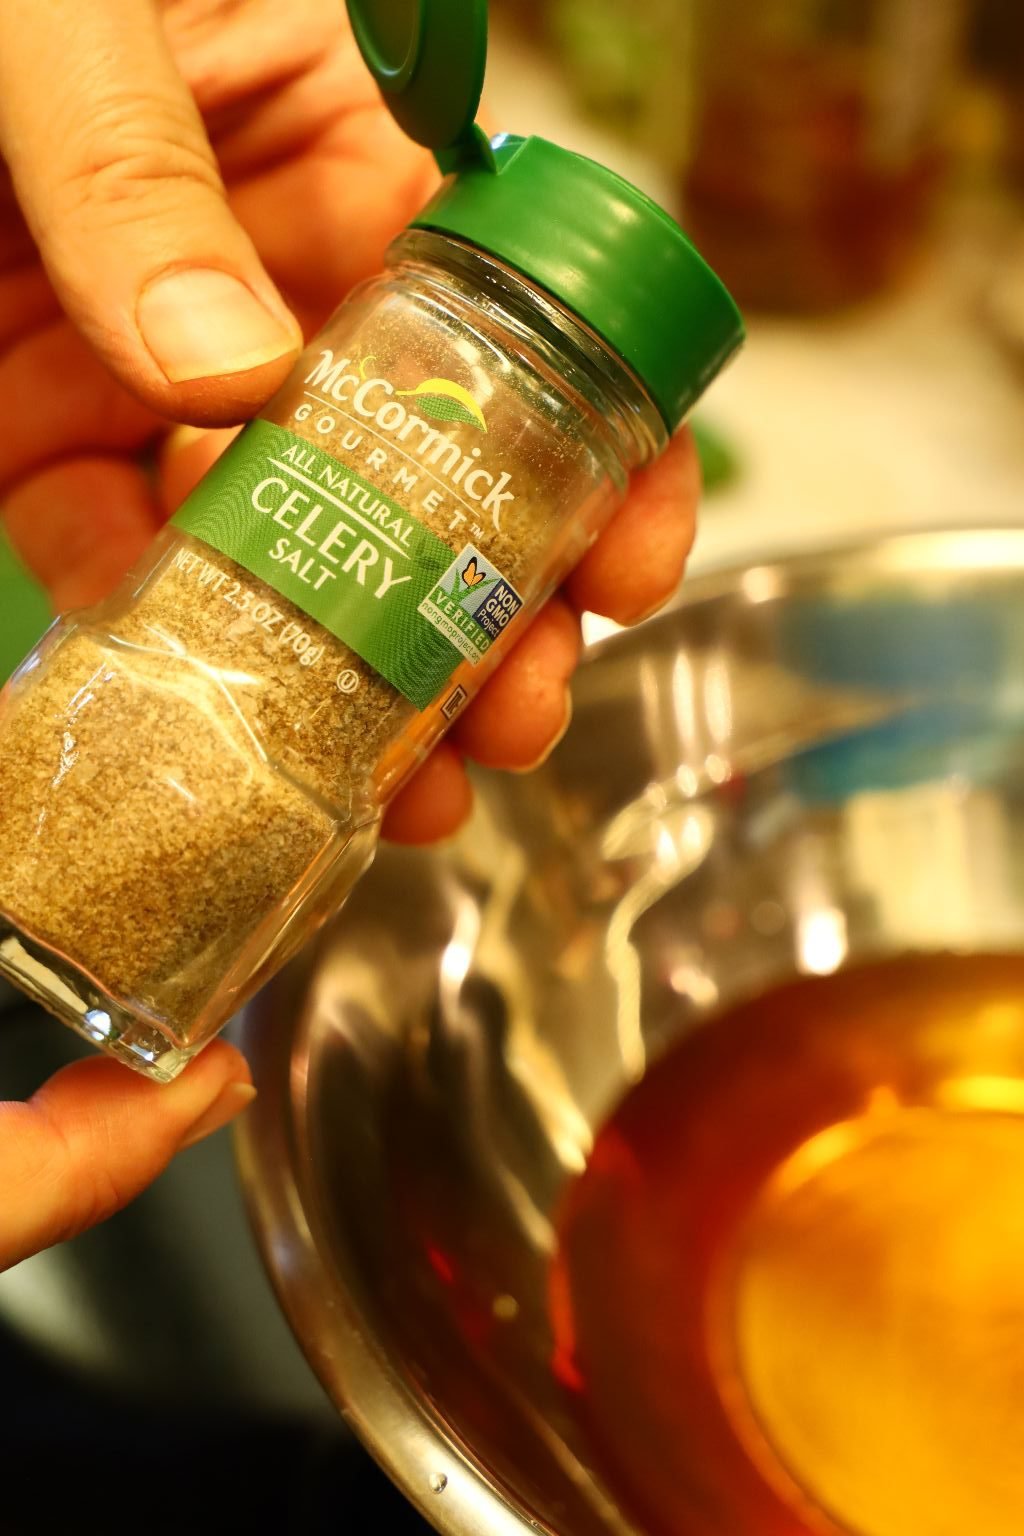
1 Tbsp. Celery Salt
1 Tbsp. Mustard Seeds
2 Tbsp. Olive Oil
Freshly Ground Pepper to taste
——————————————————————

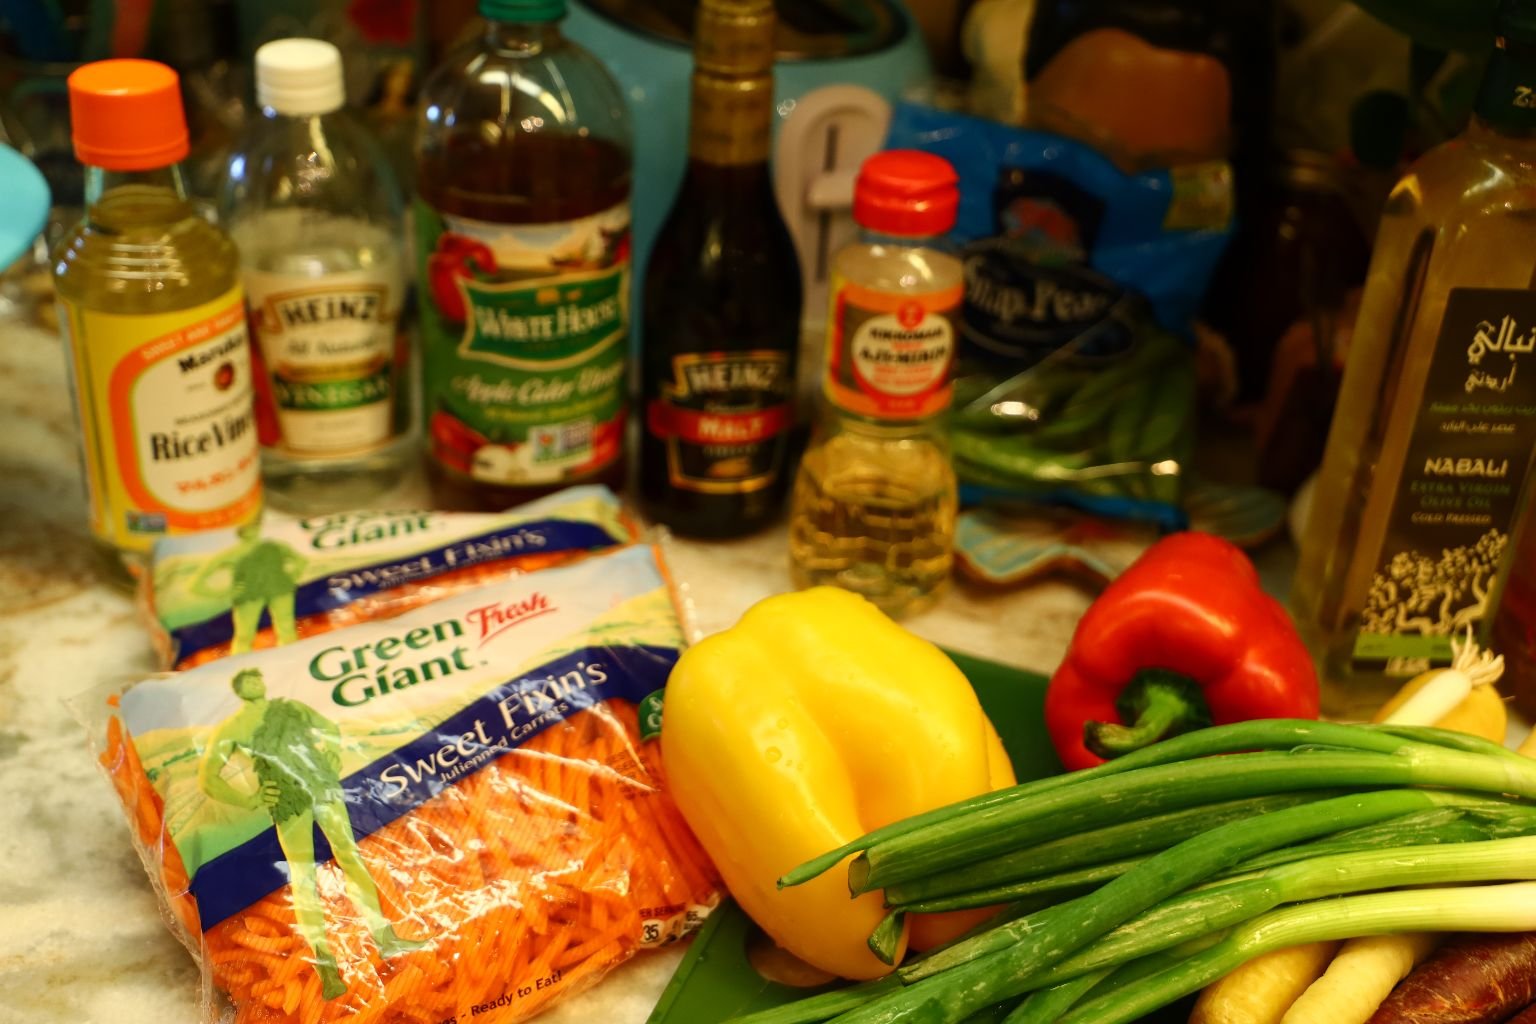
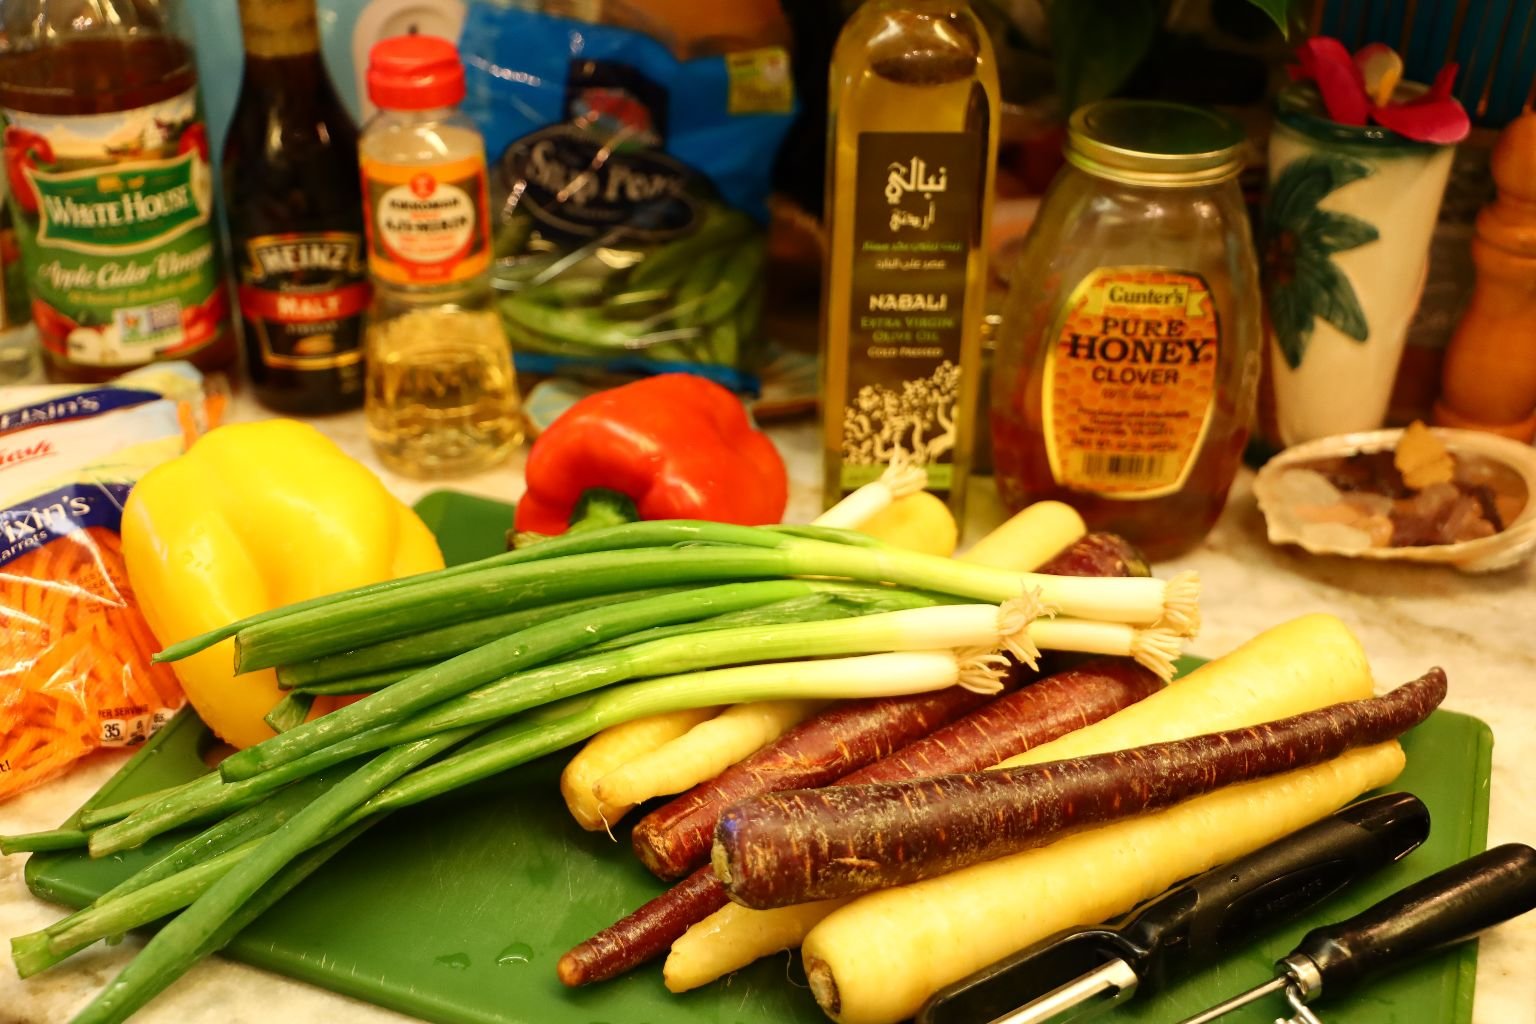
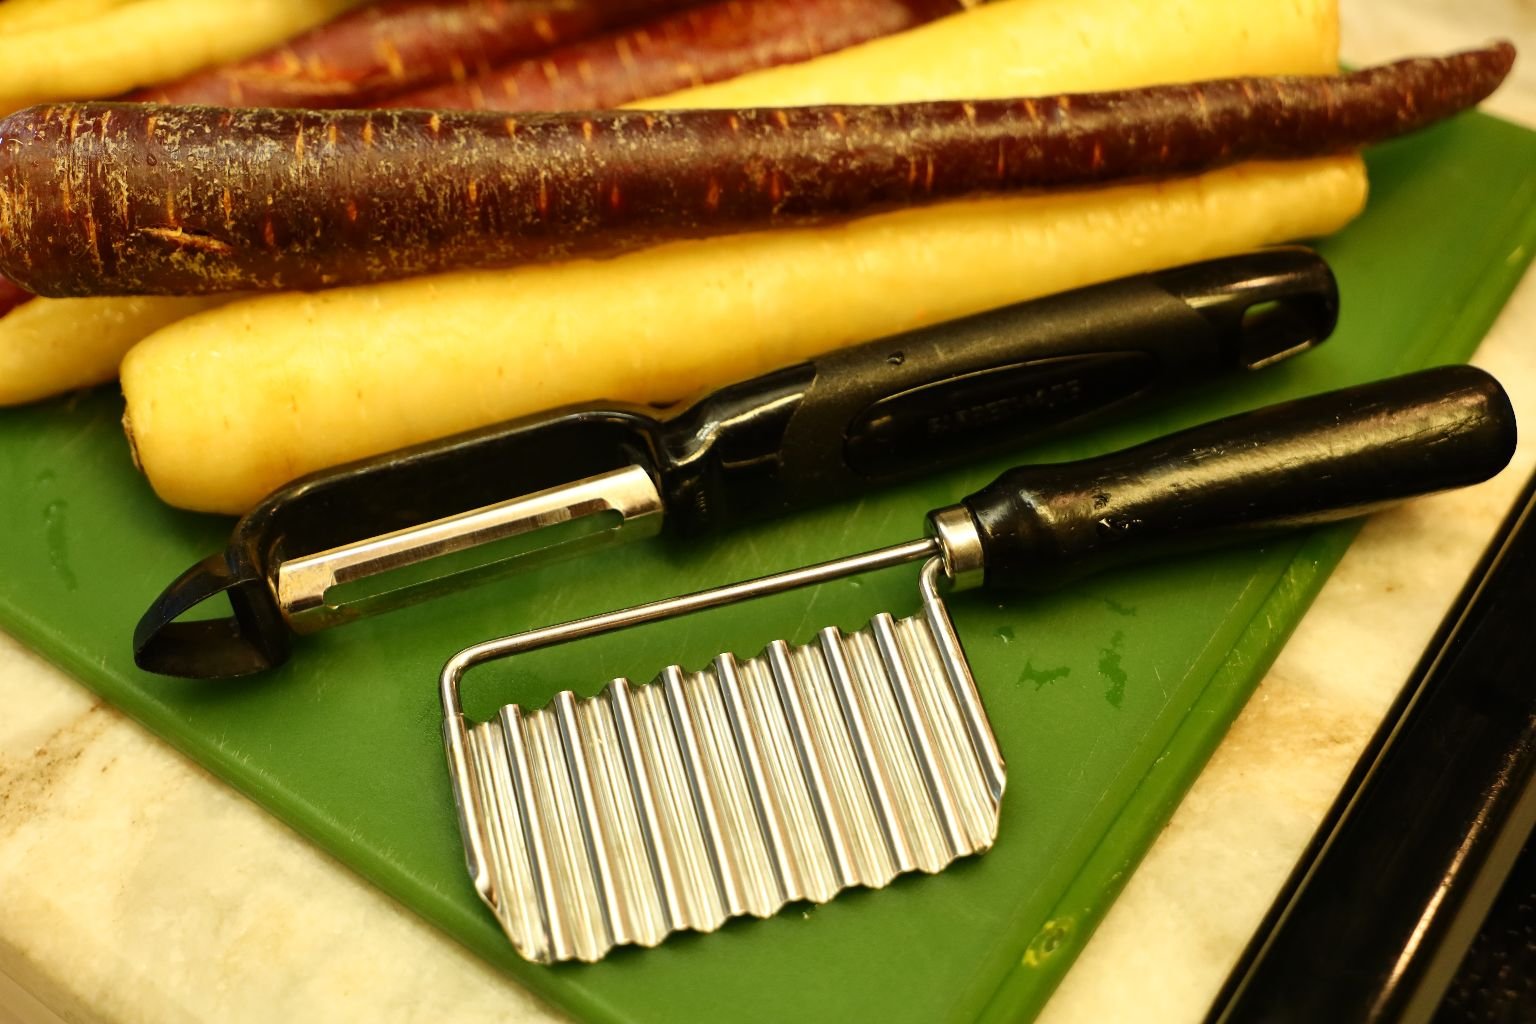
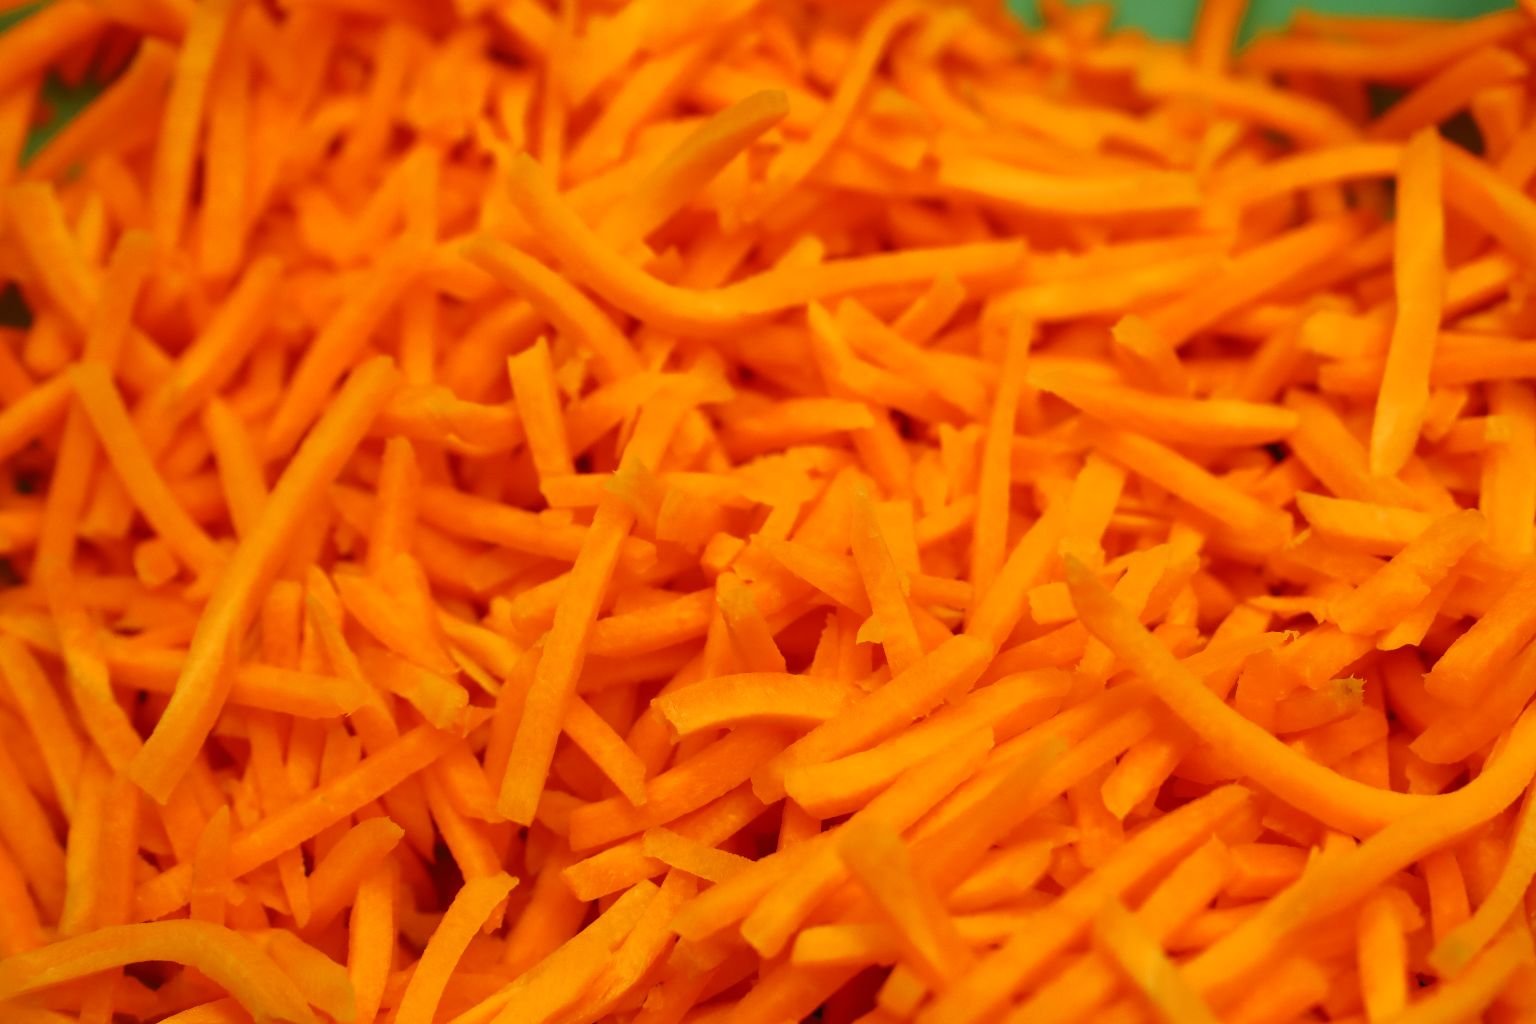
The Crinkle Cut slicer makes great crinkle cut carrots.
Empty the bag of carrot sticks into a large bowl.

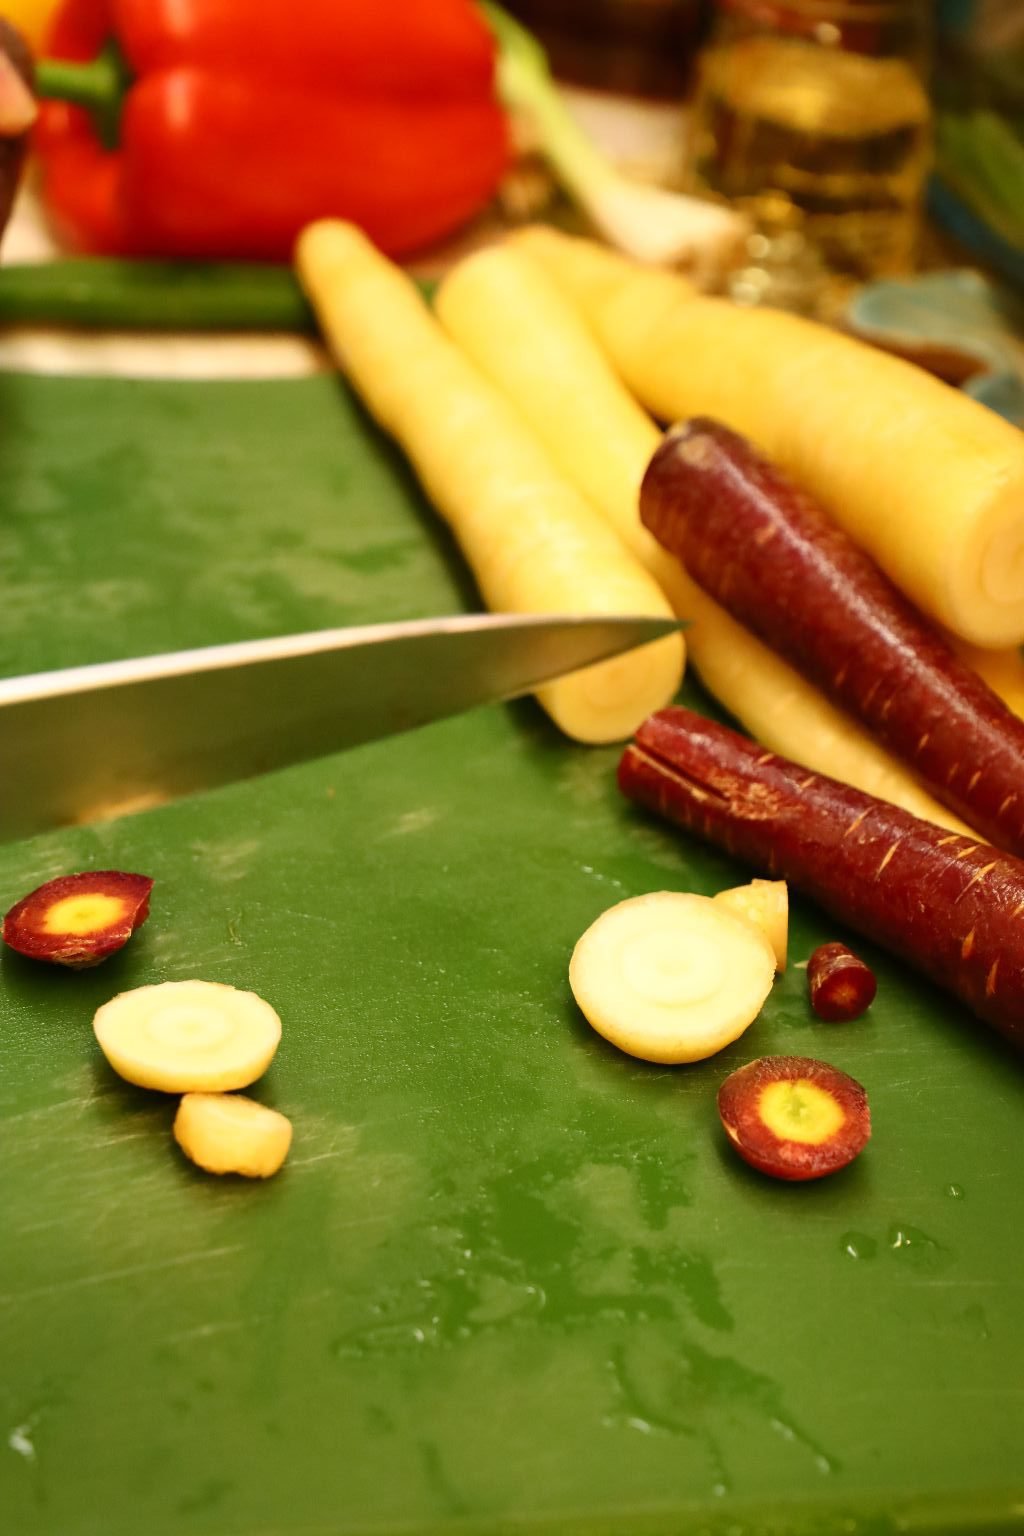
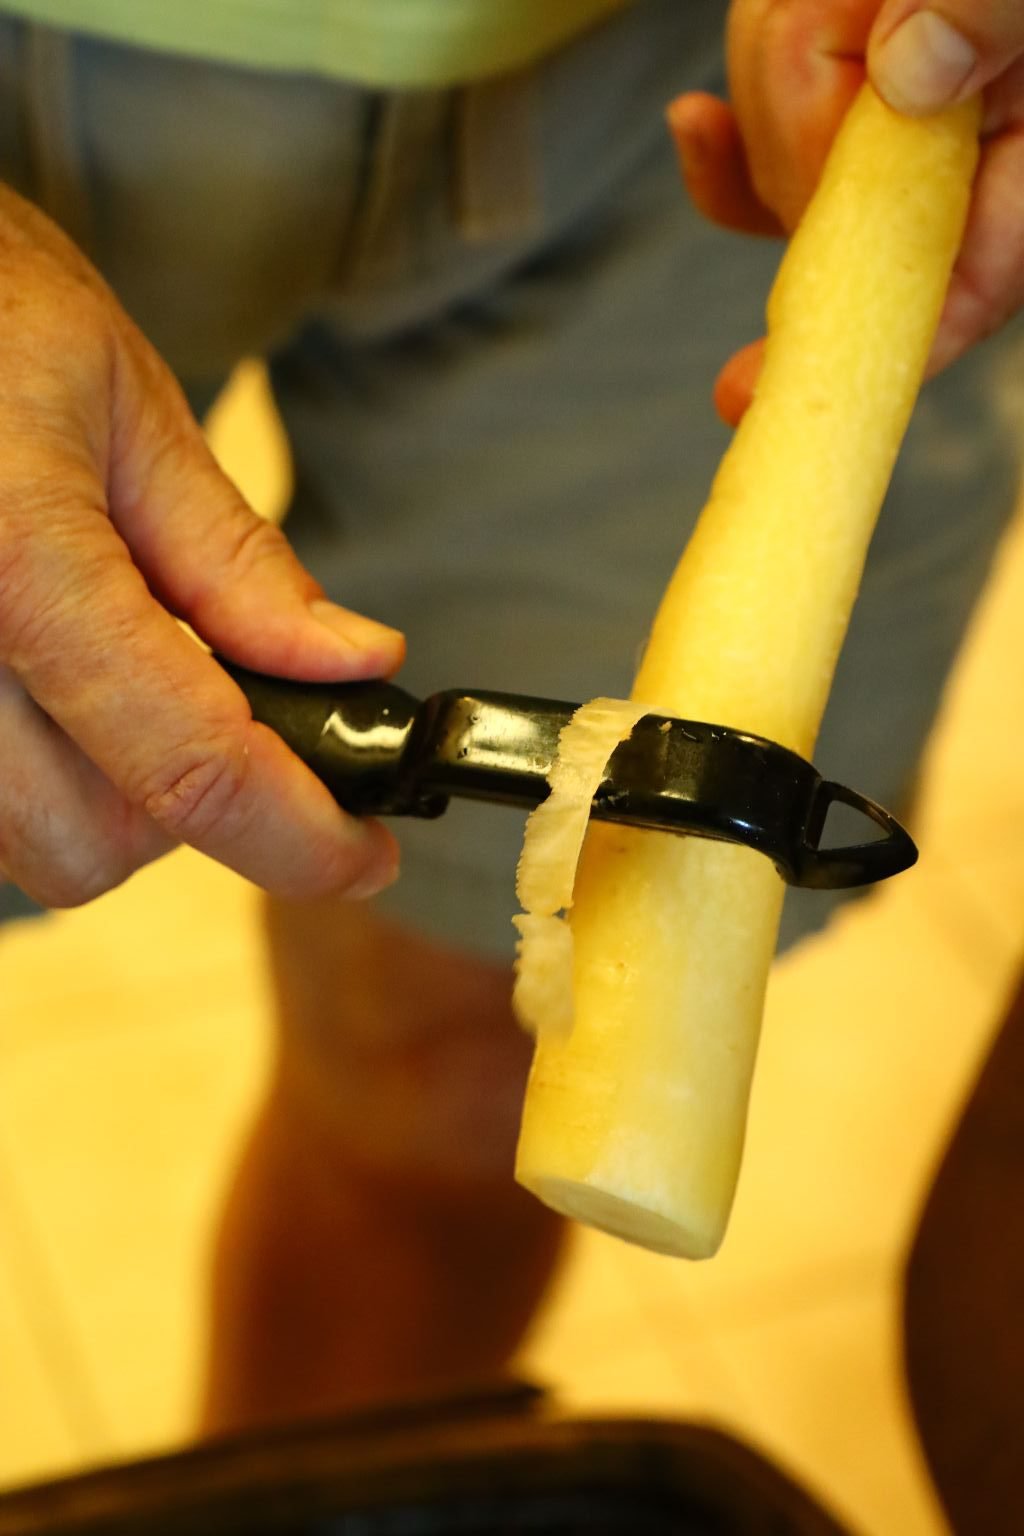
Peel the carrots to be used being sure to slice off the ends as shown.
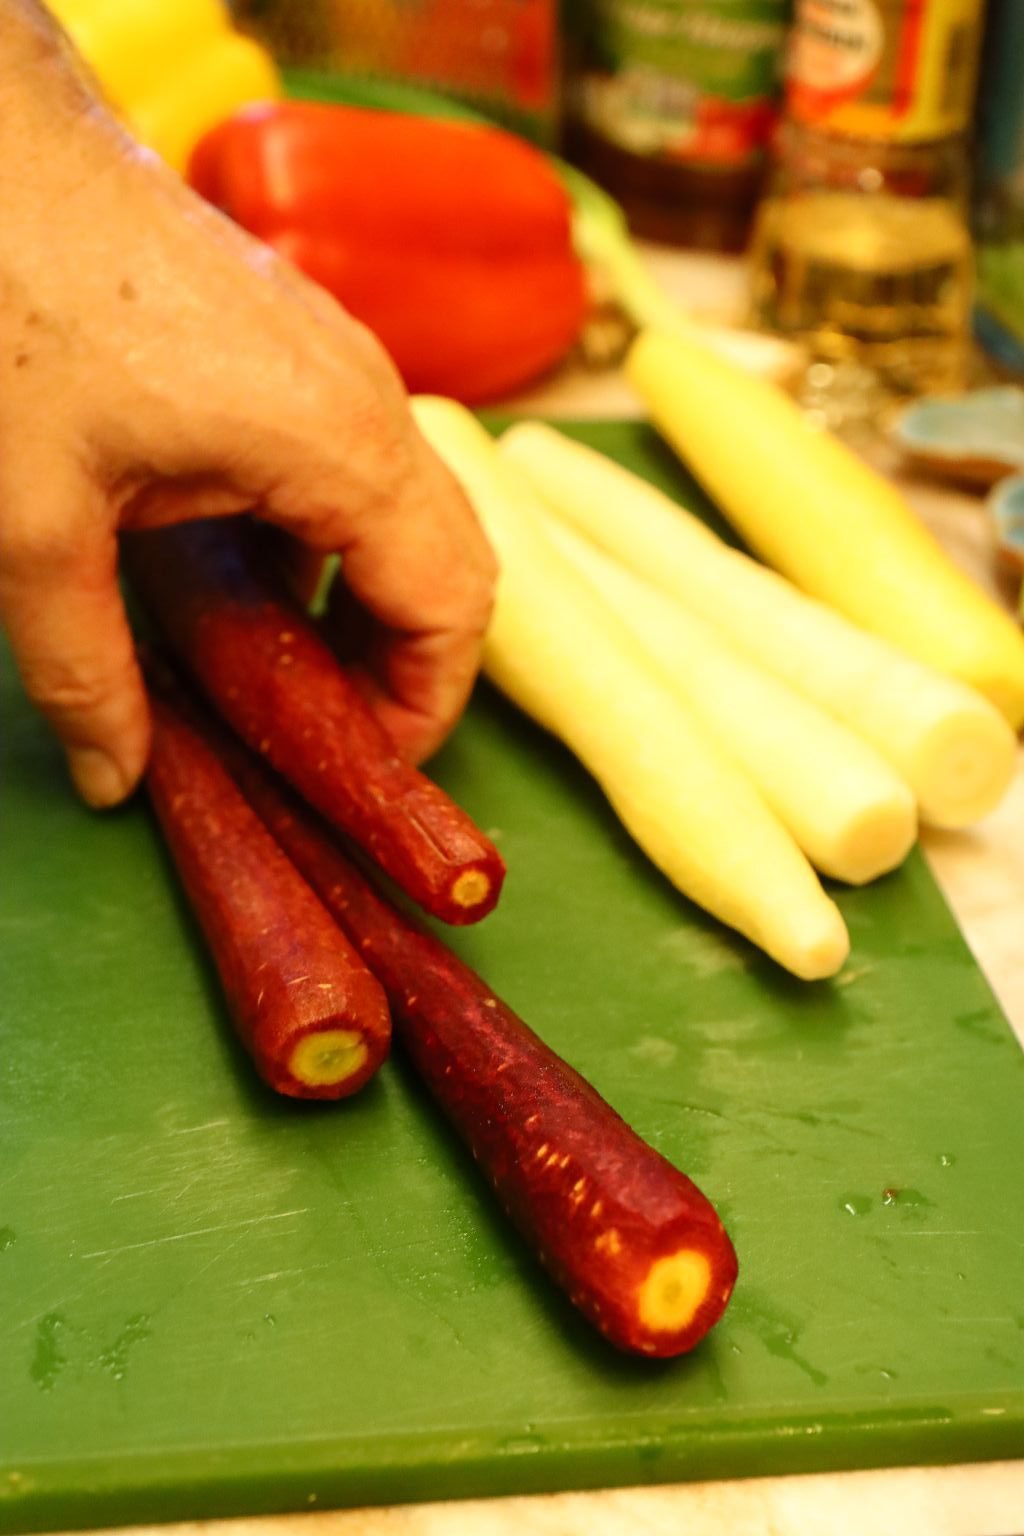
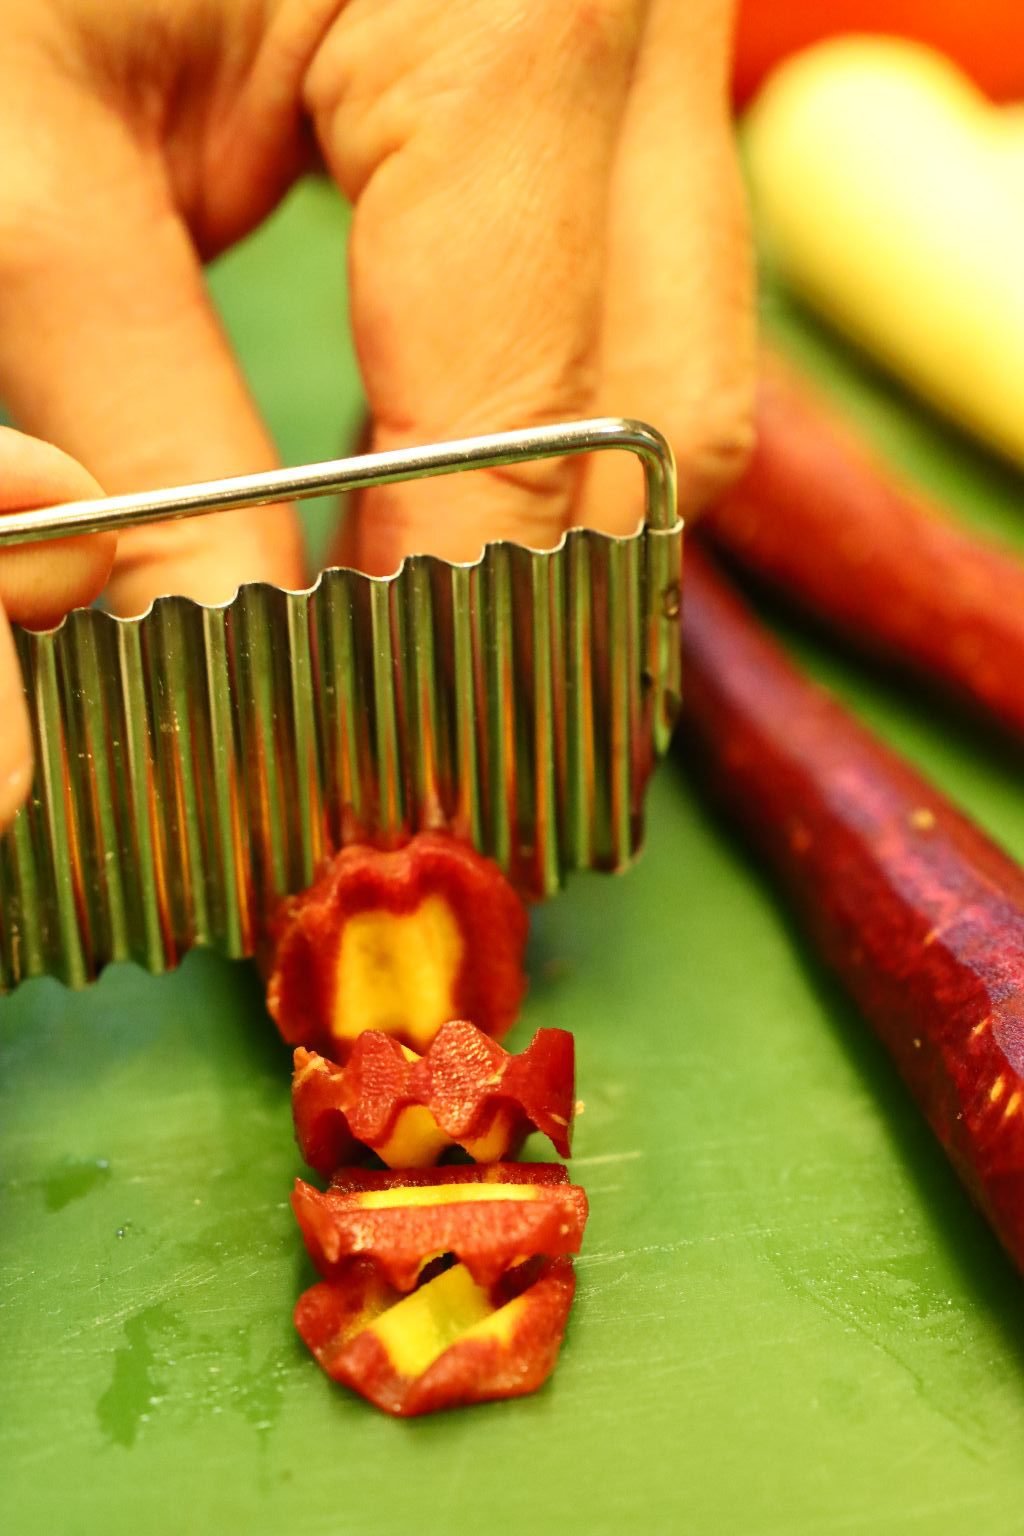

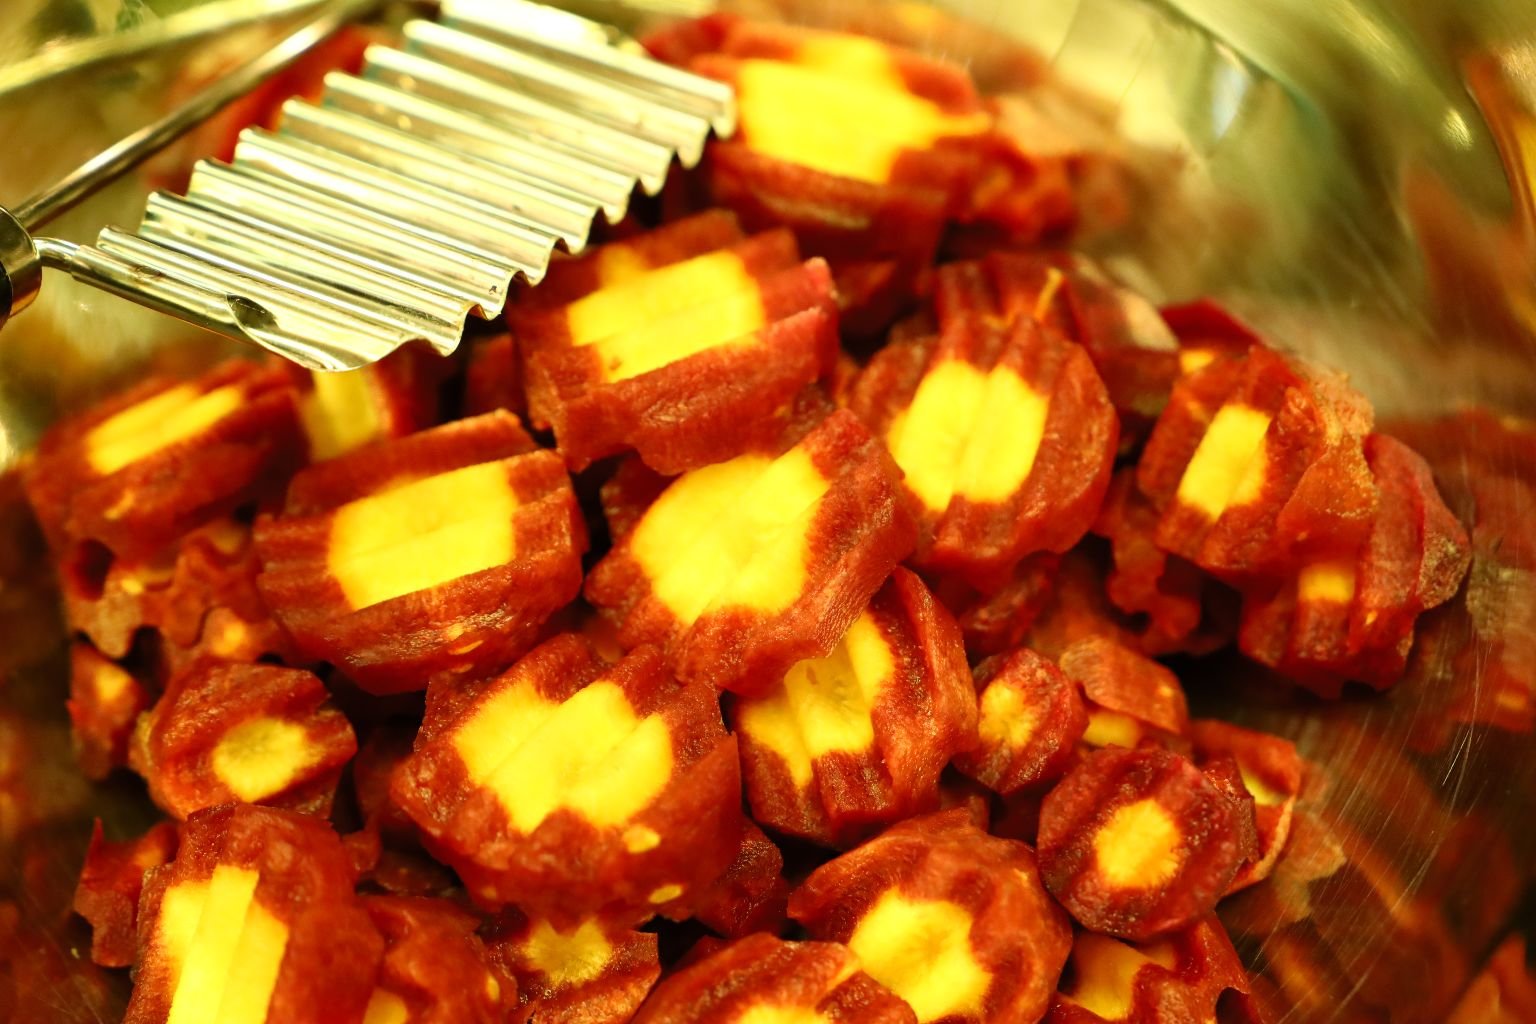
Use the Crinkle Cut Tool to Slice the Purple Carrots
We placed them in their own bowl to set them aside.
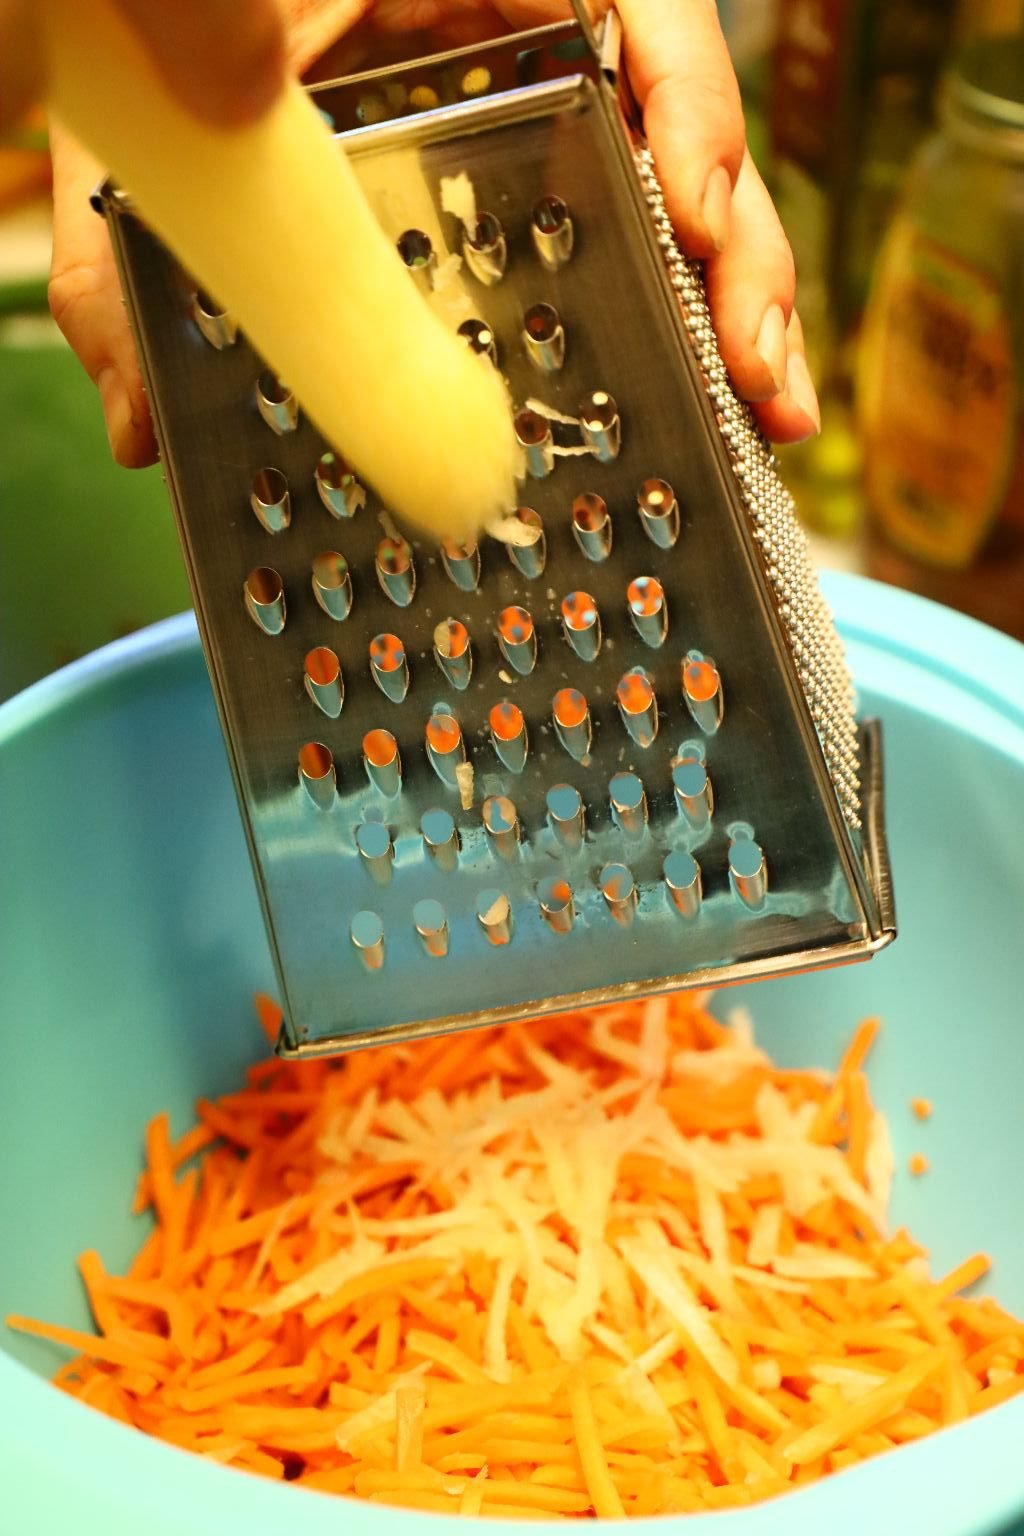
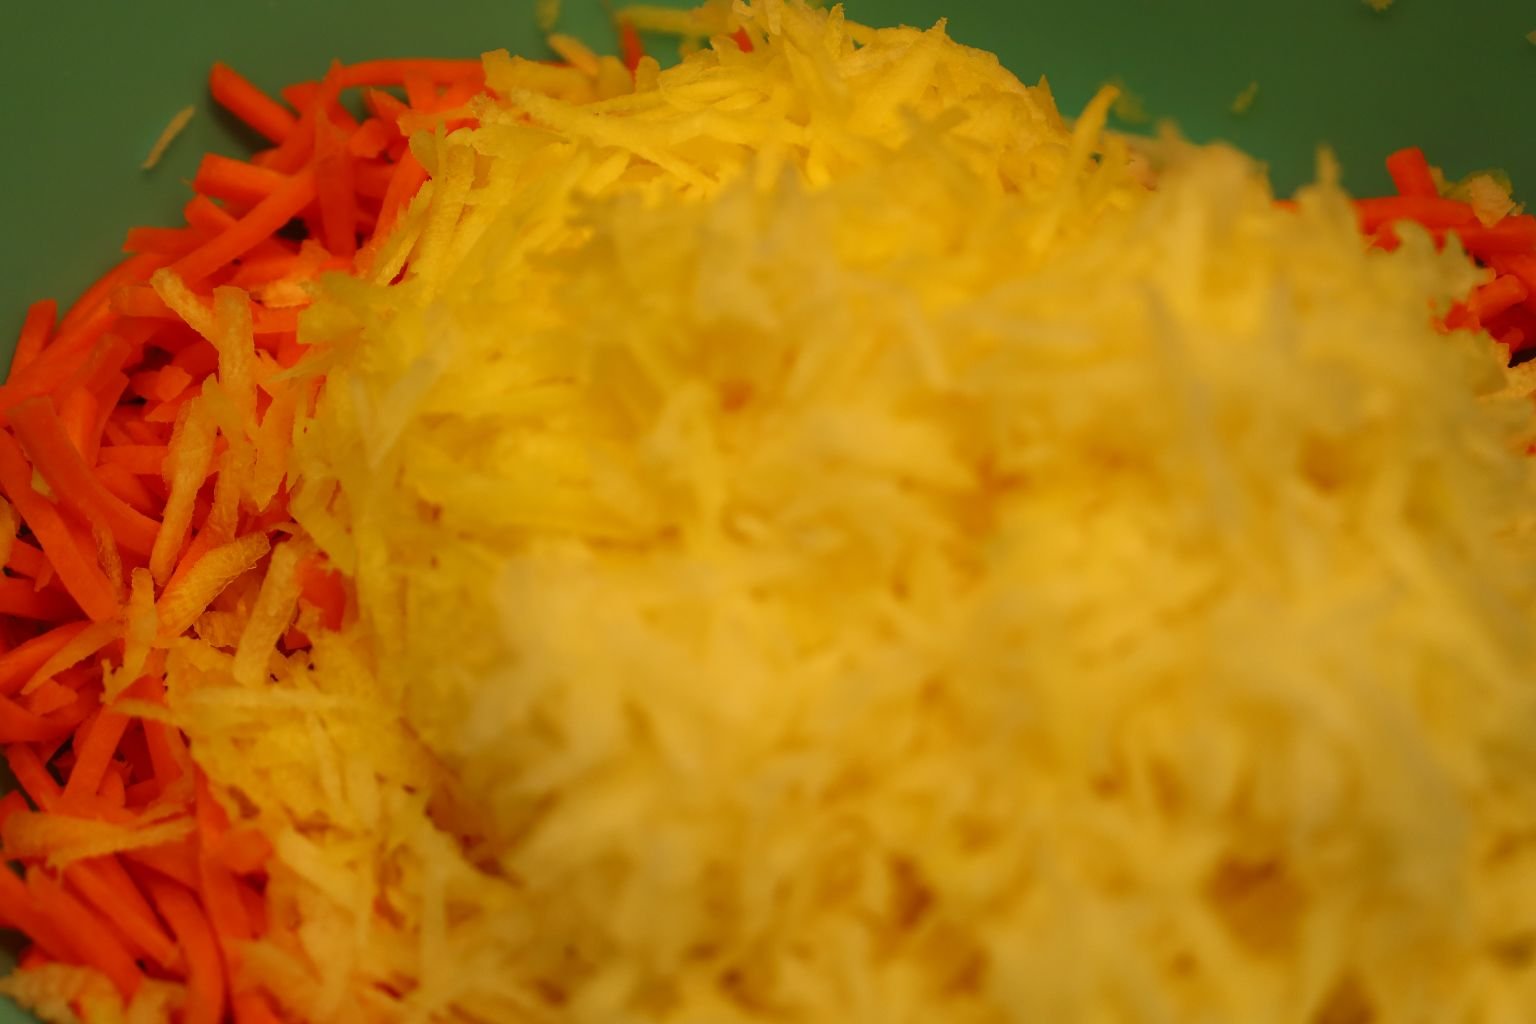
Now it’s time to shred the Yellow Carrots into the bowl.
——————————————————————–
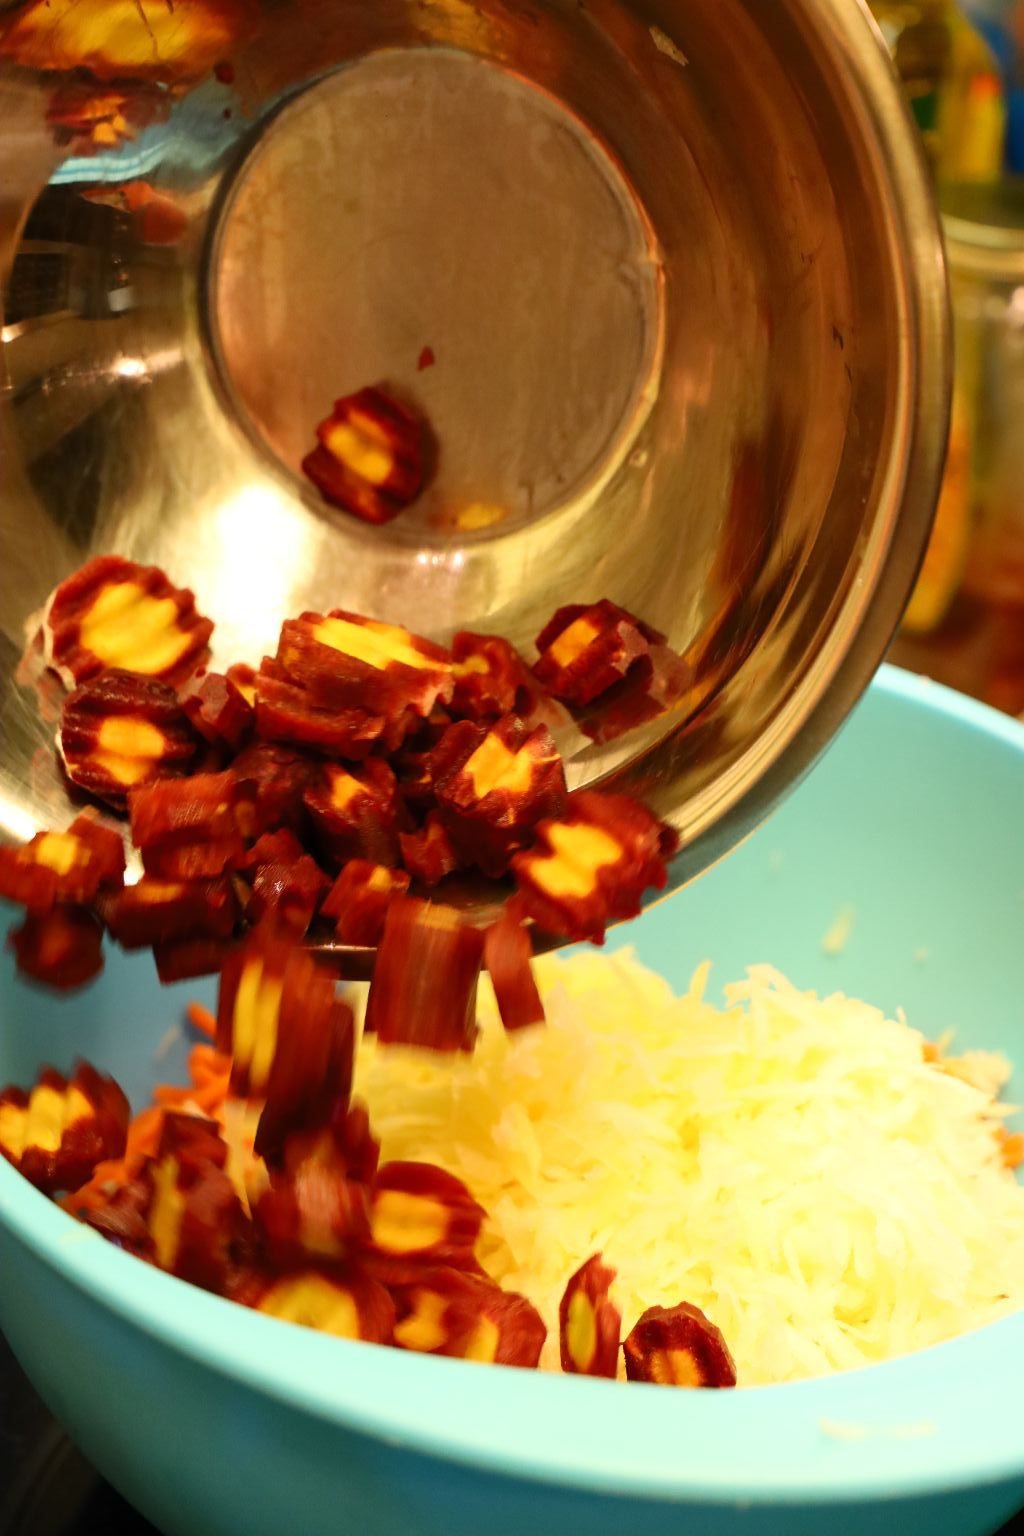
Now add the Crinkle Cut Carrots to the bowl.

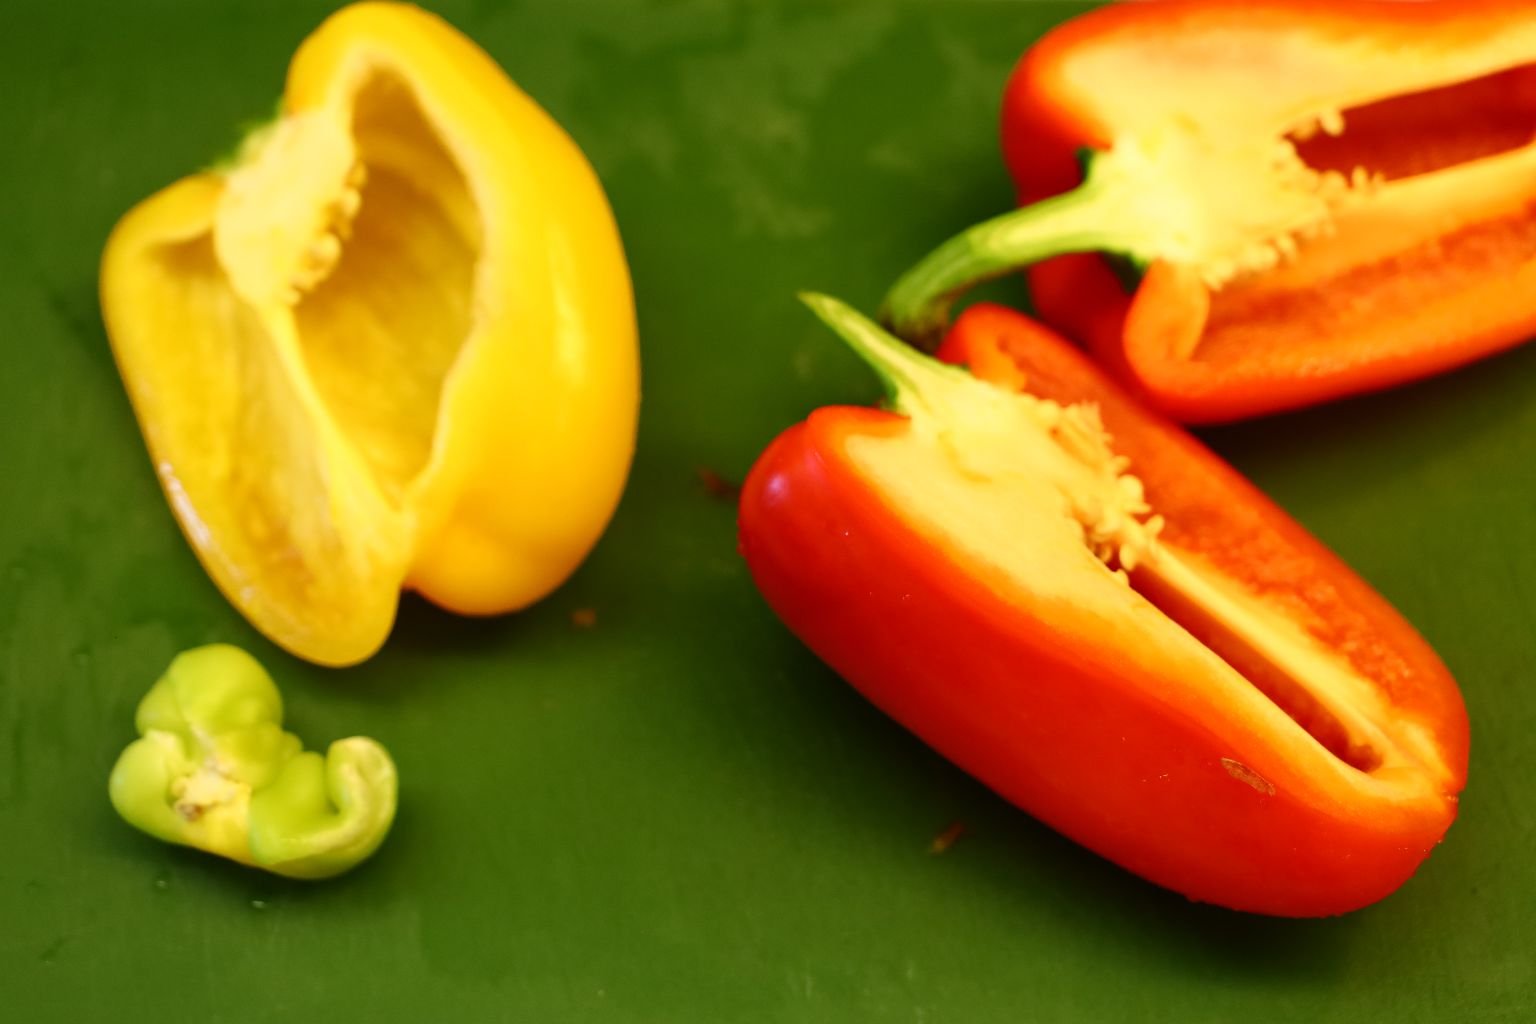
Slice your bell peppers in half and remove the stems and seeds.
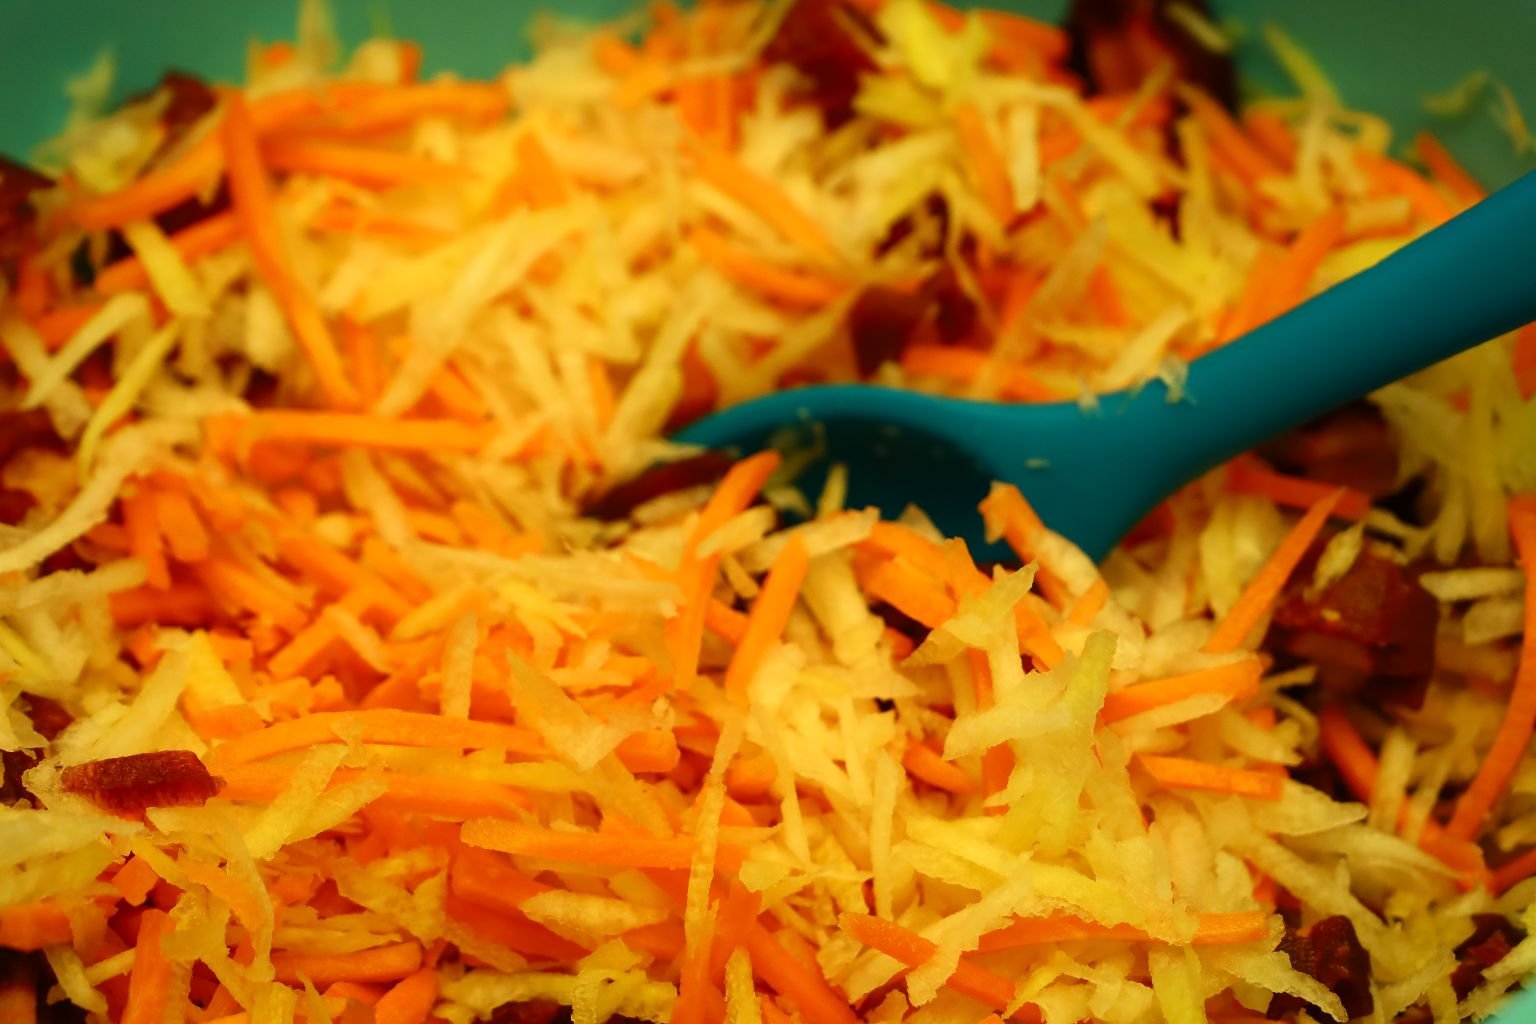
Mix the carrots in the bowl together.


Slice, then dice the Yellow Bell Pepper as shown.
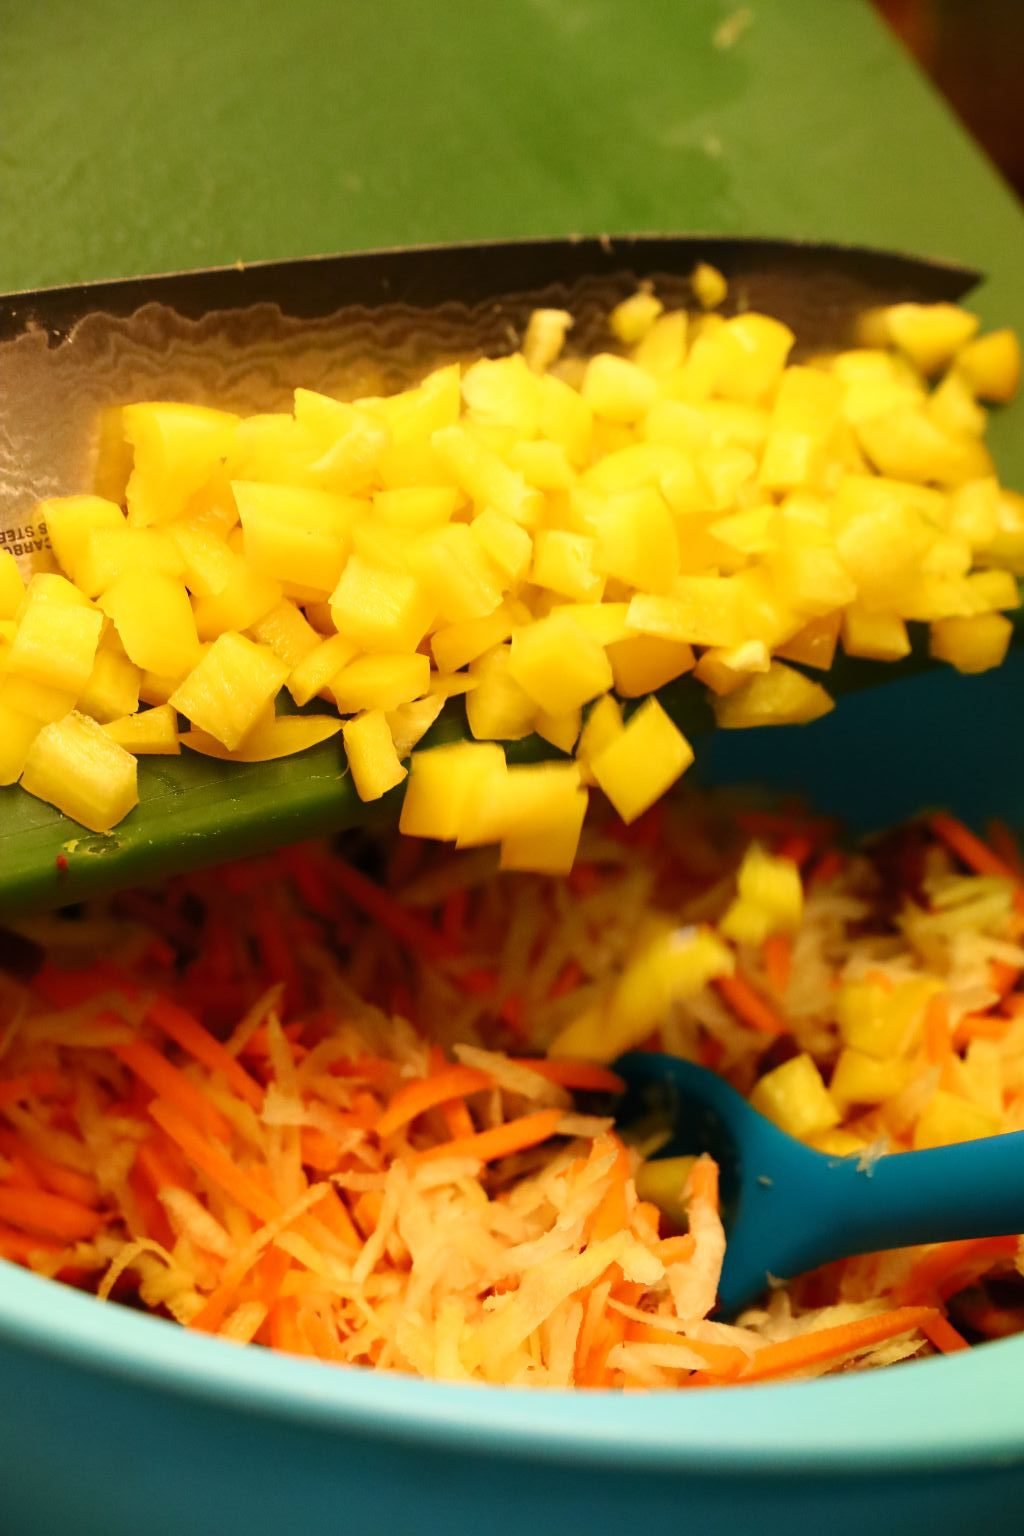
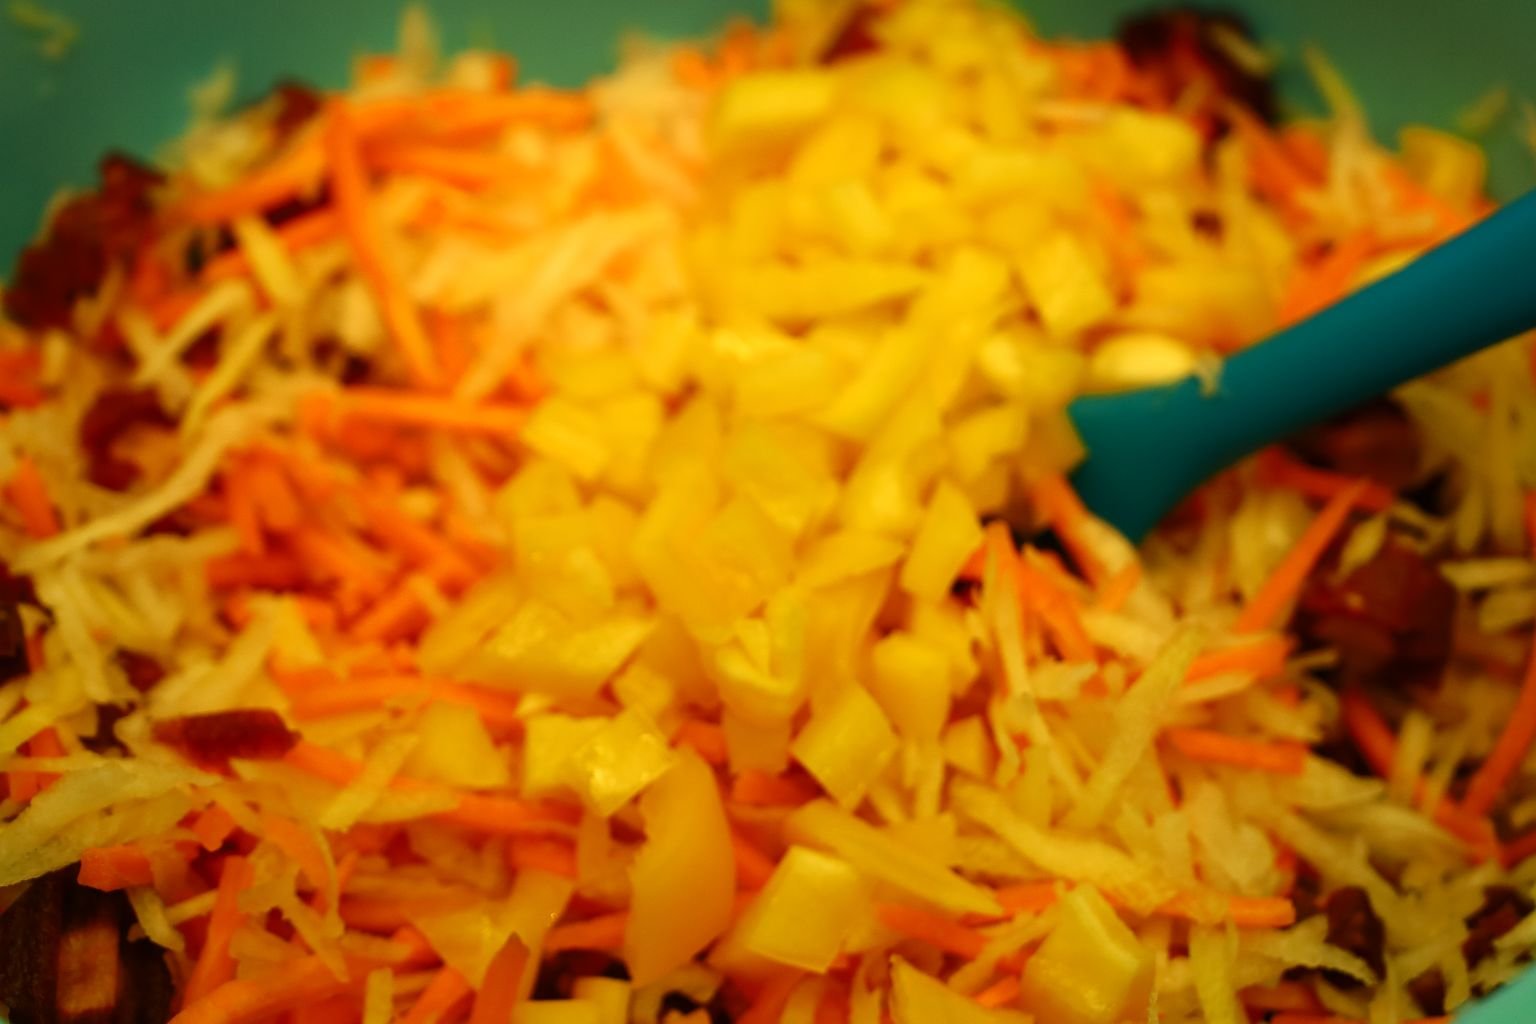
Add the Yellow Bell Pepper dices to the other ingredients.
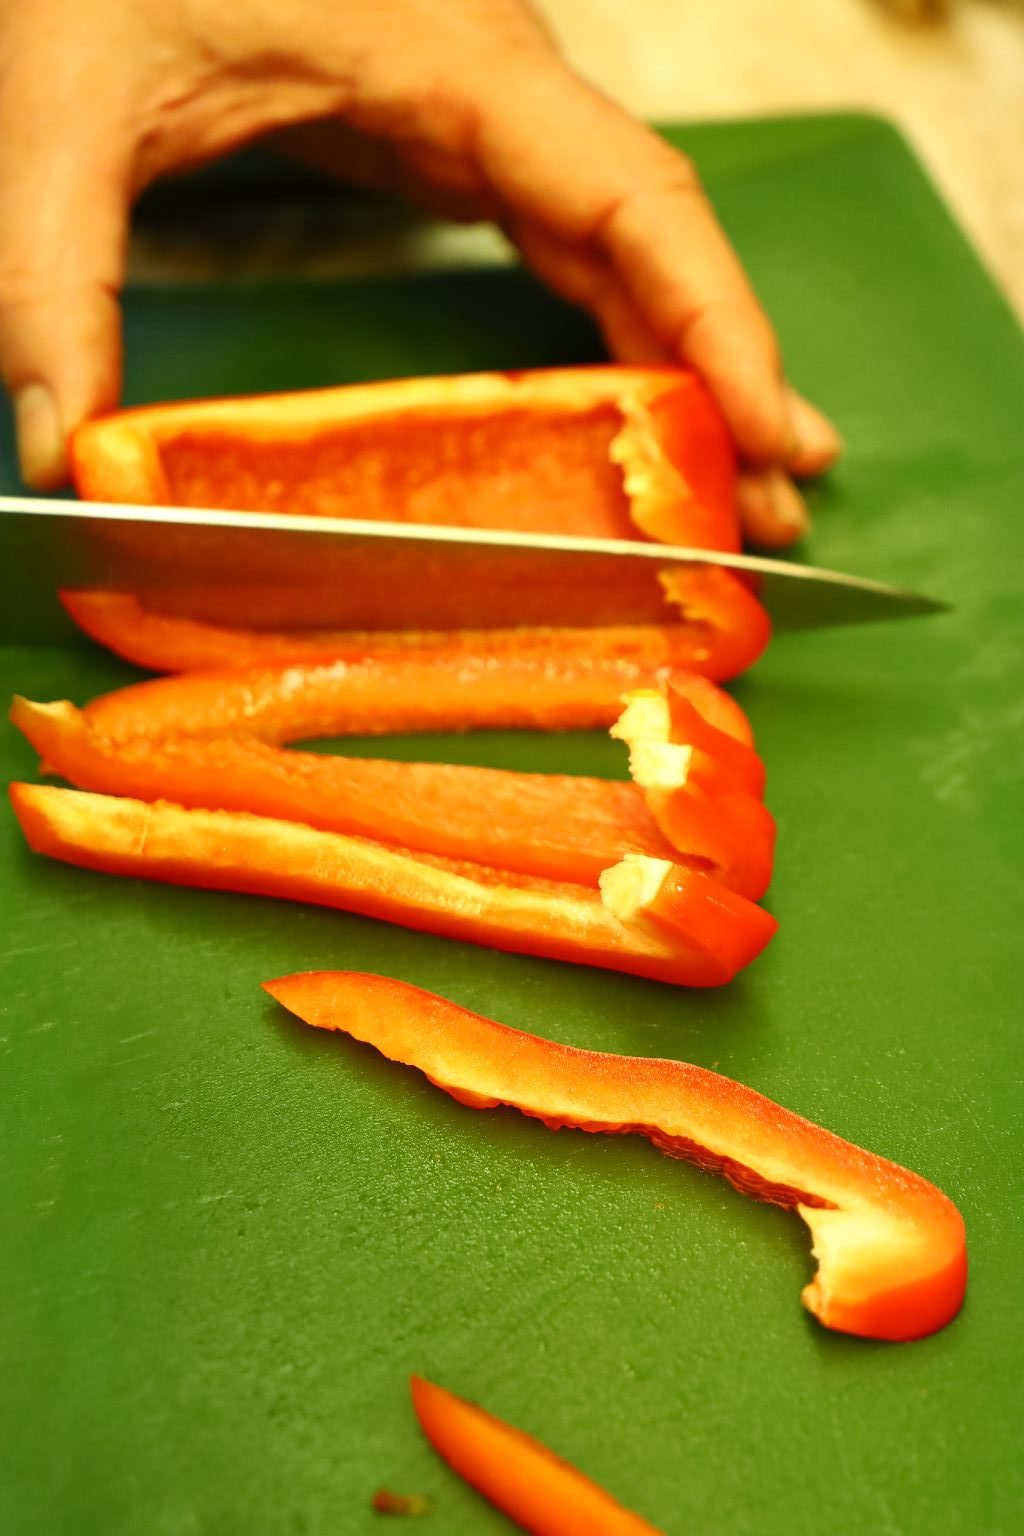

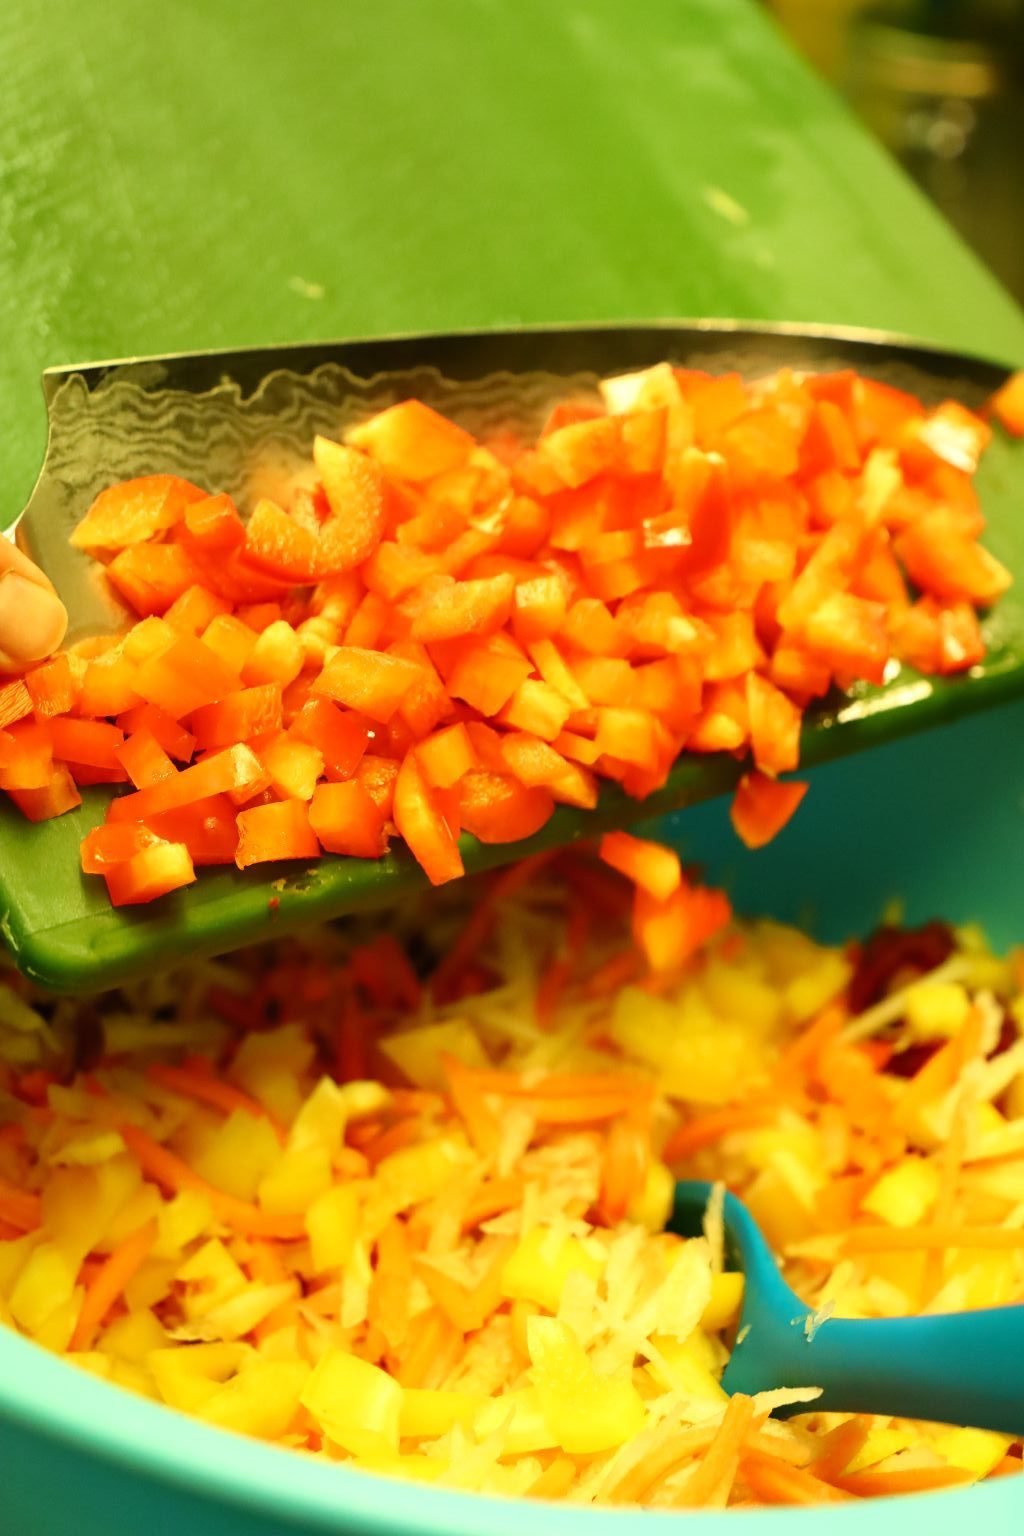
Do the same with the Red Bell Pepper.
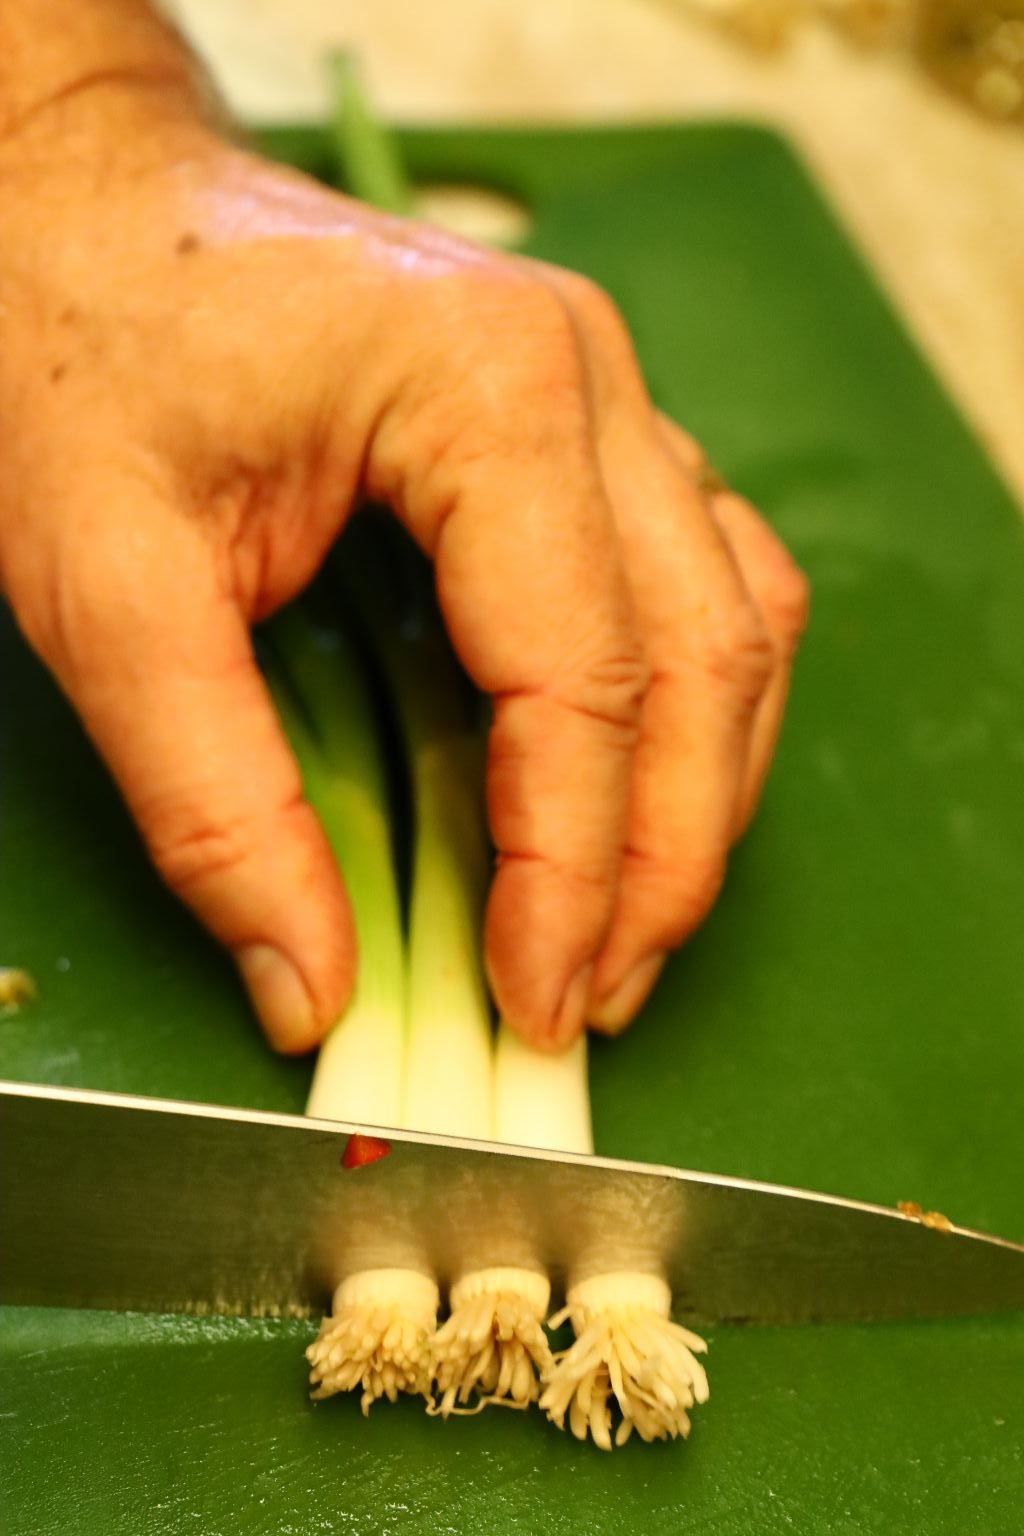

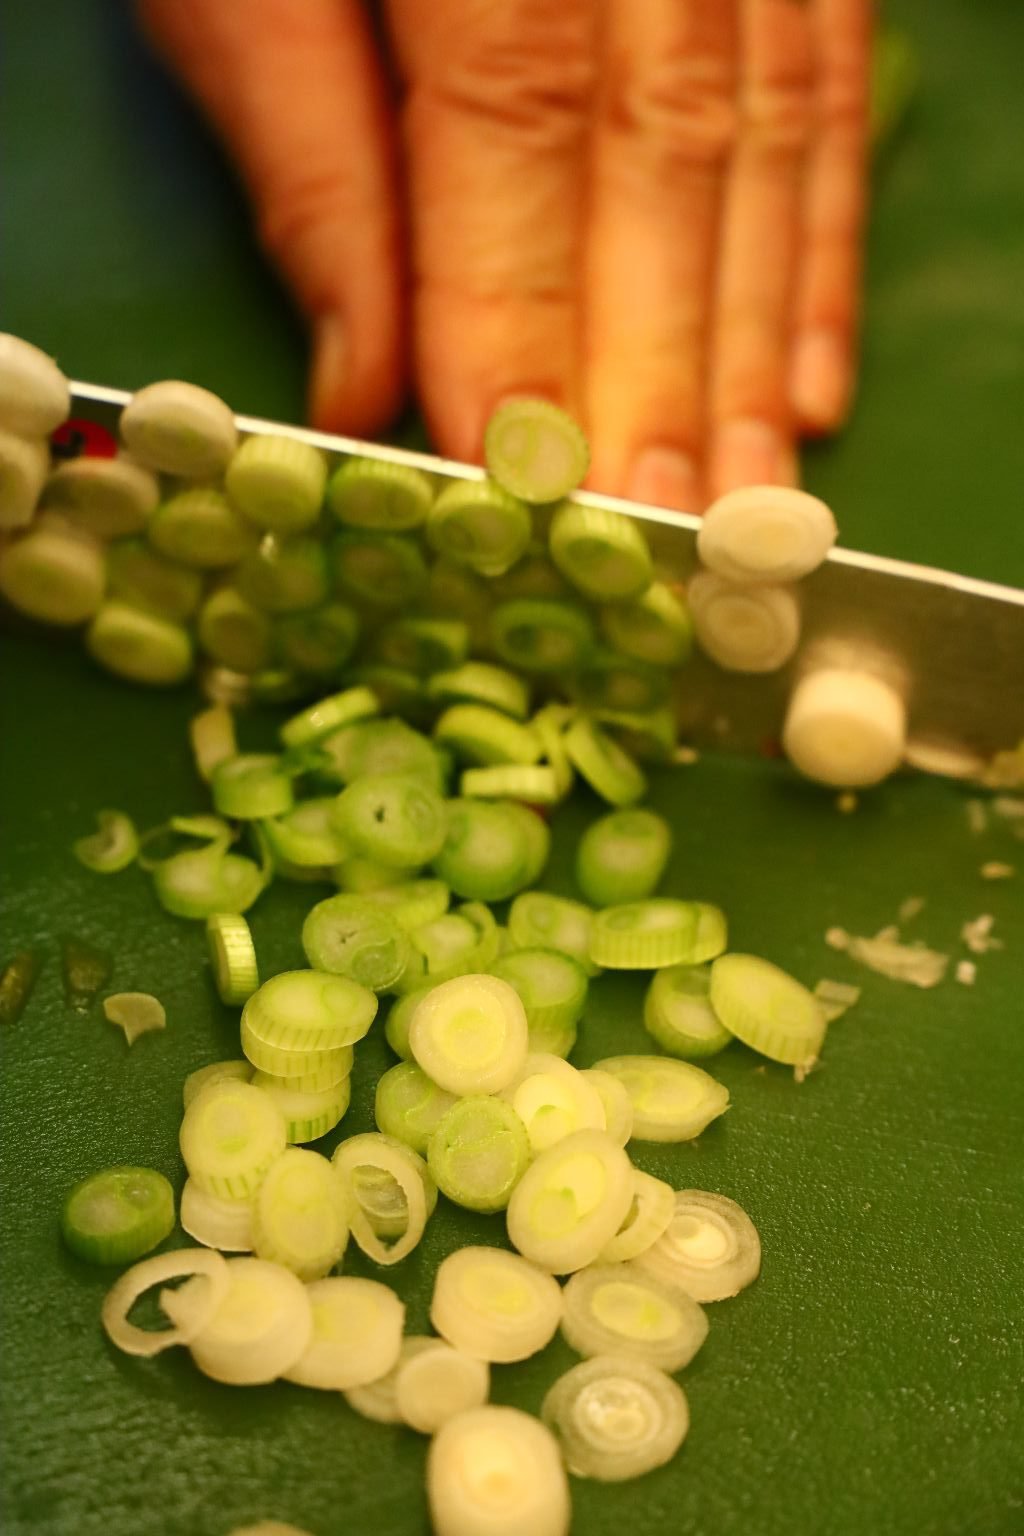
Slice off the root ends of the green onions then slice it thinly as shown.
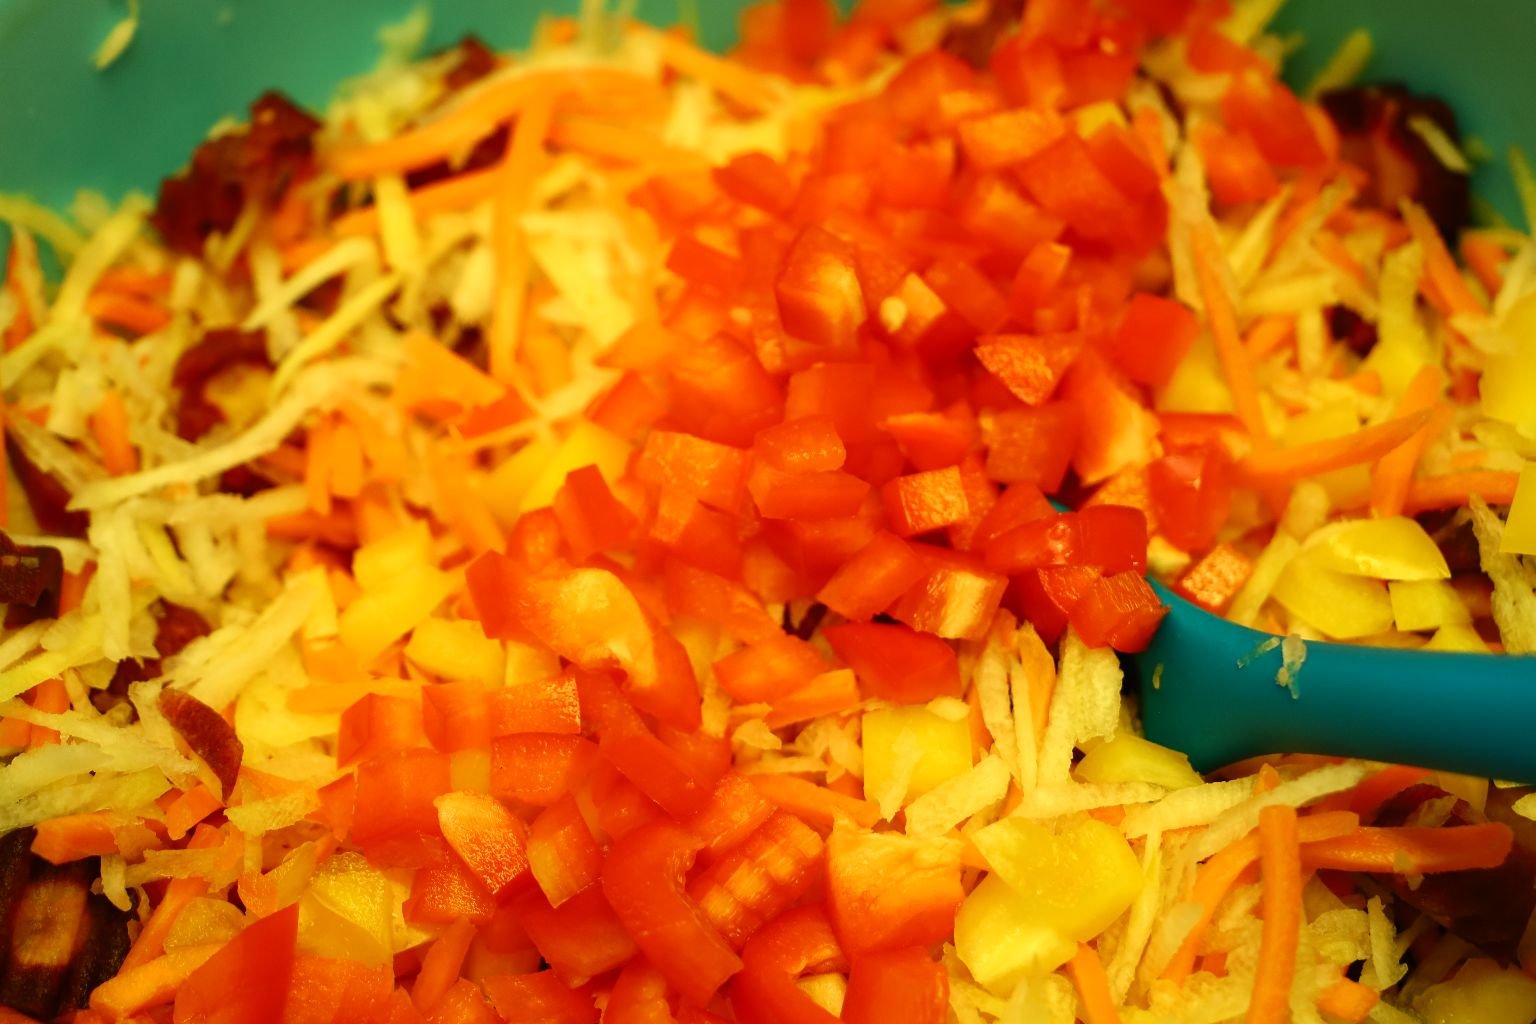
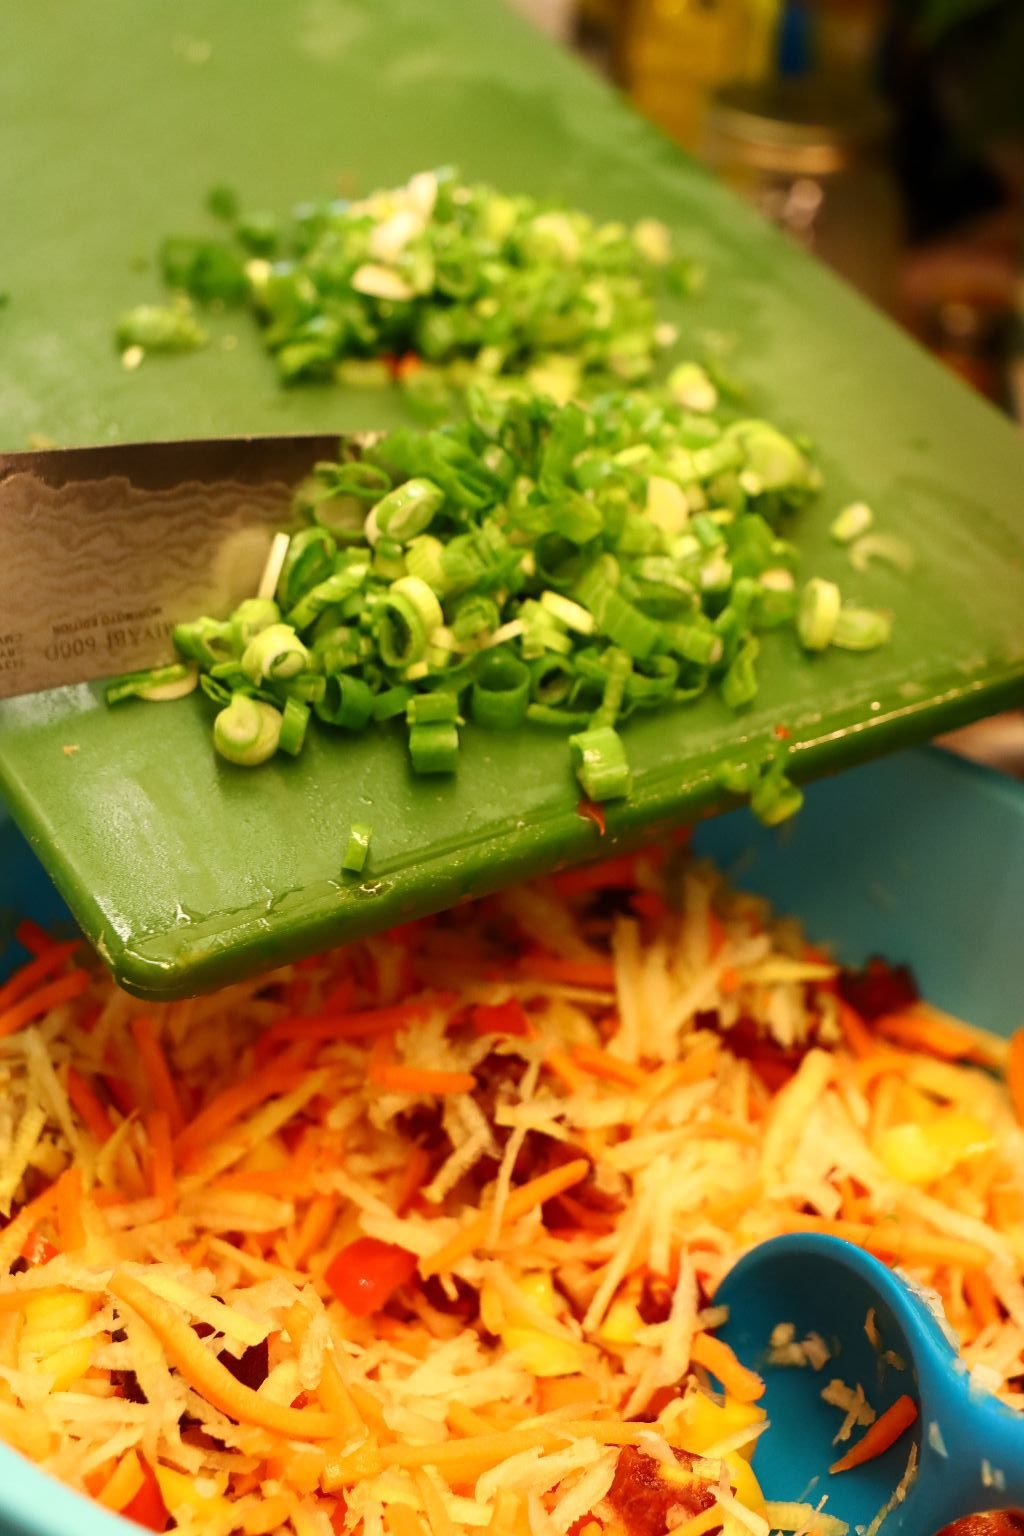
Add the onions to the bowl.
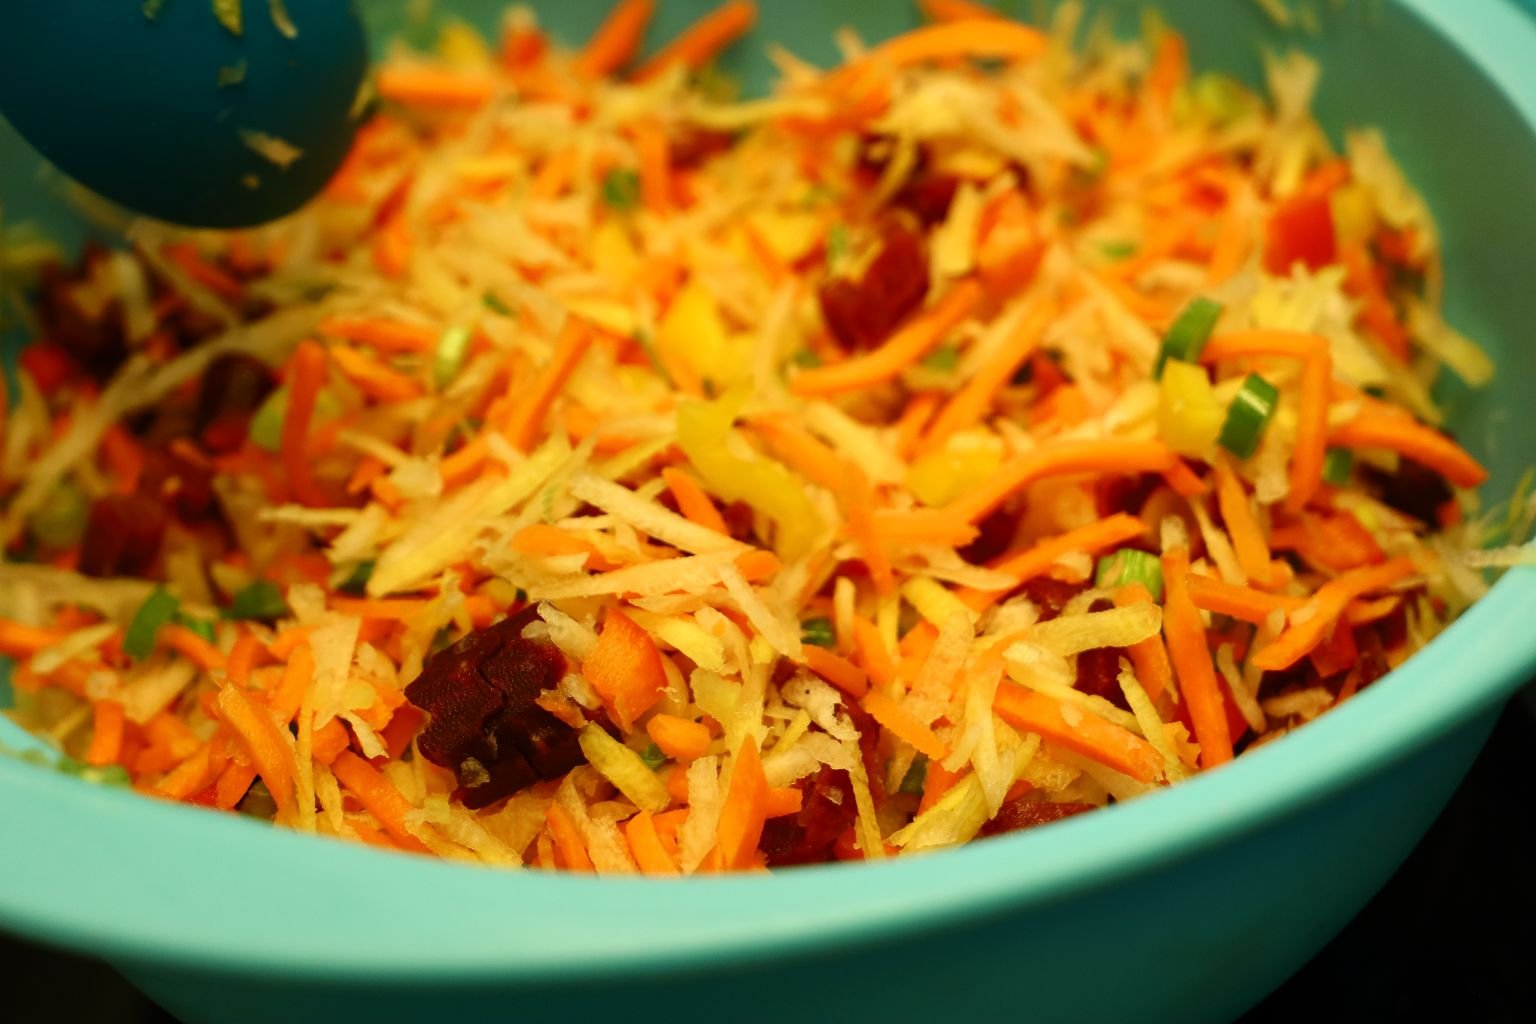
Mix all the ingredients.

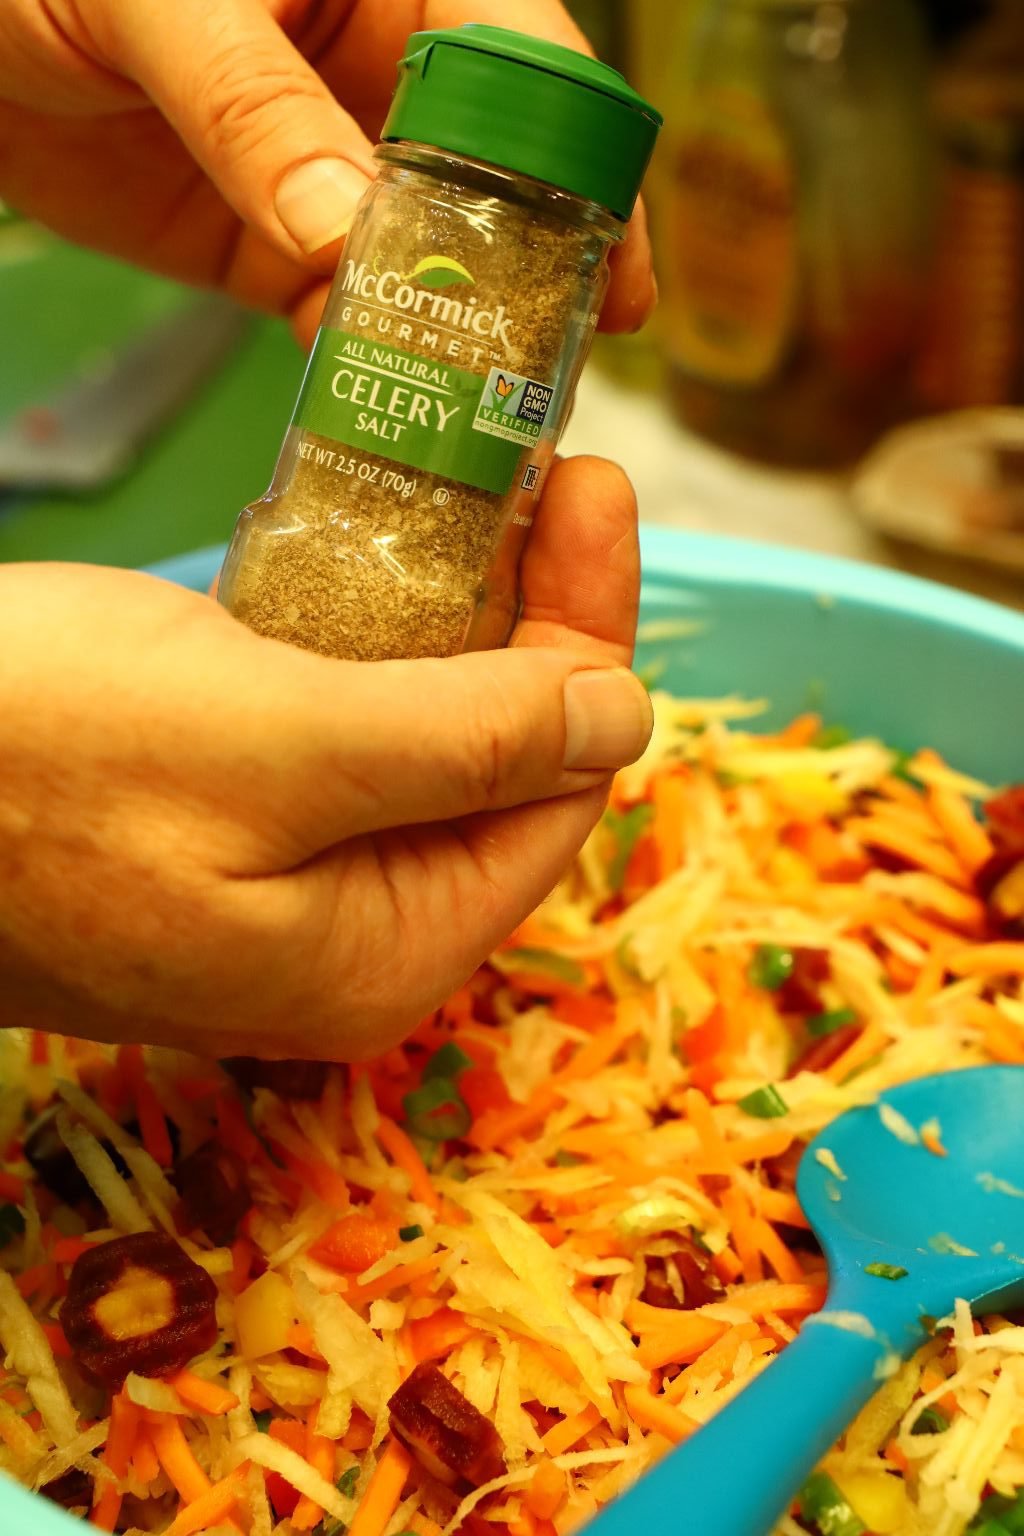
Here are our mustard seeds and celery salt we used.

Love Ya Gordon! 🙂
————————————————————-
Time to Make the Dressing
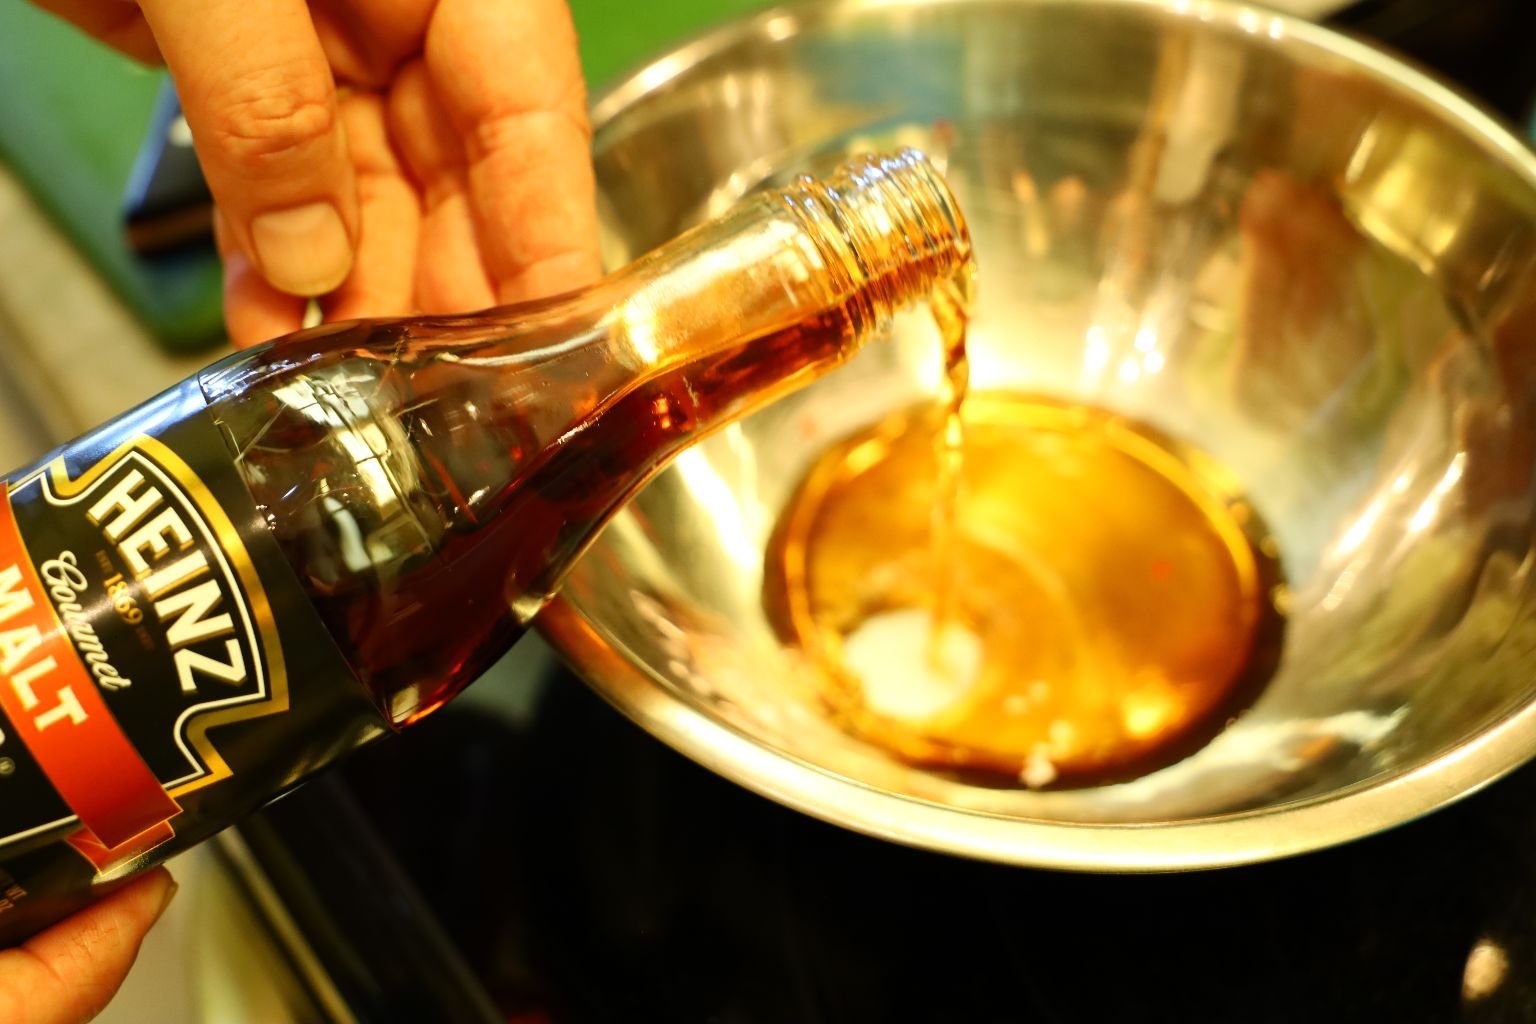
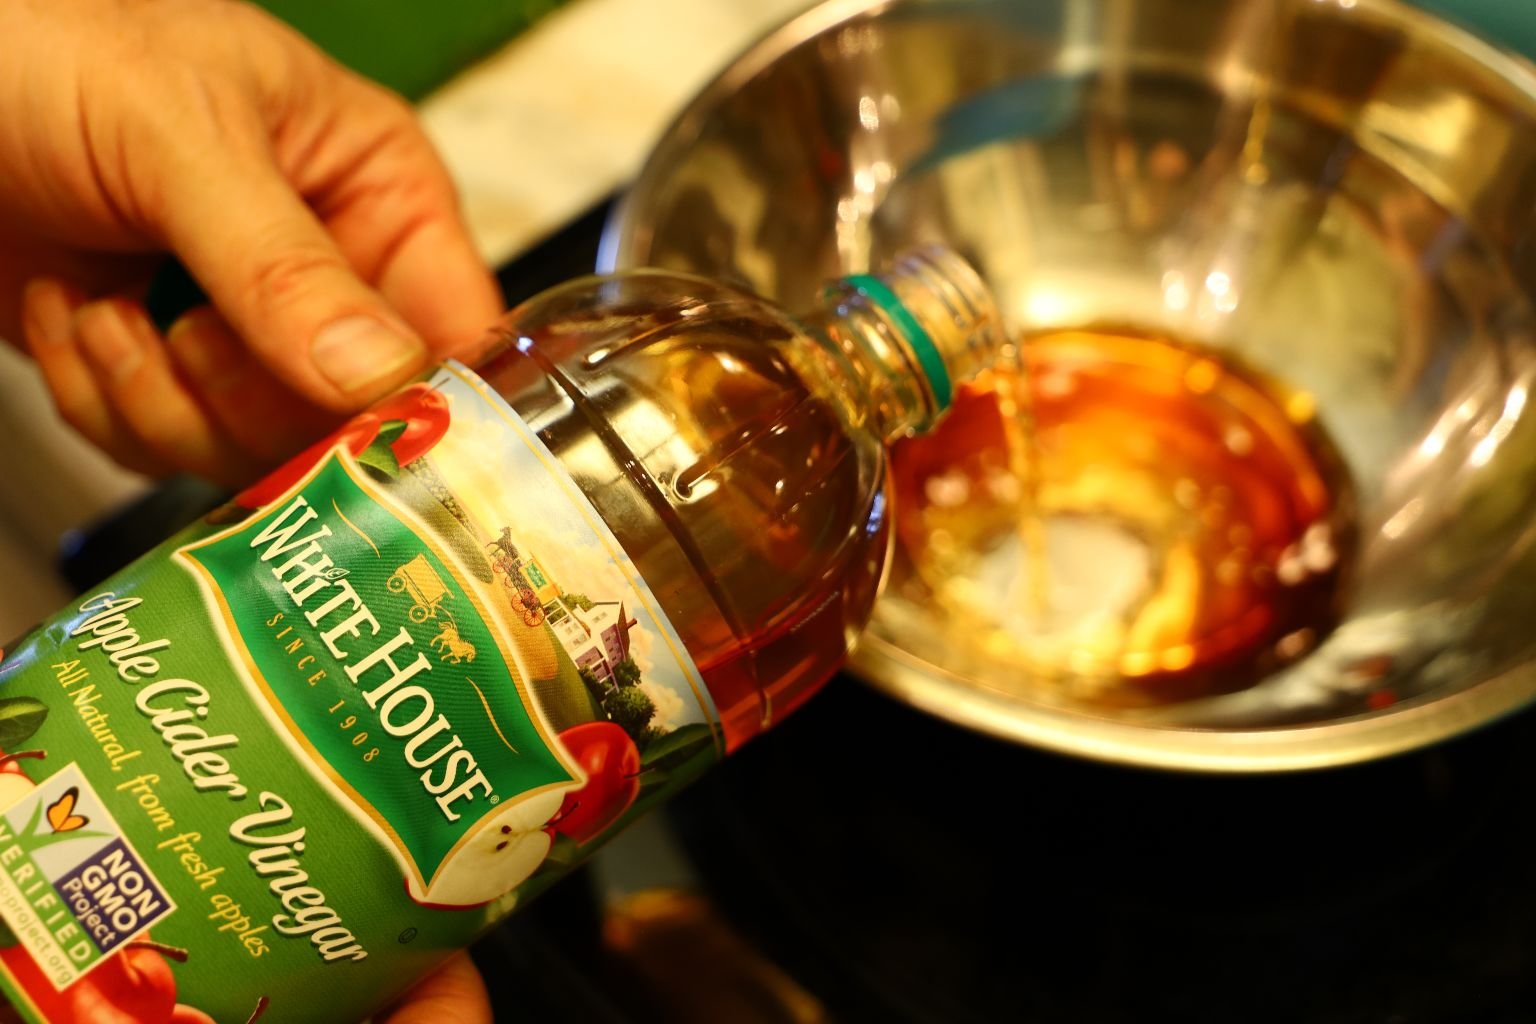
Place the Malt Vinegar, and Cider Vinegar’s to a medium sized bowl.
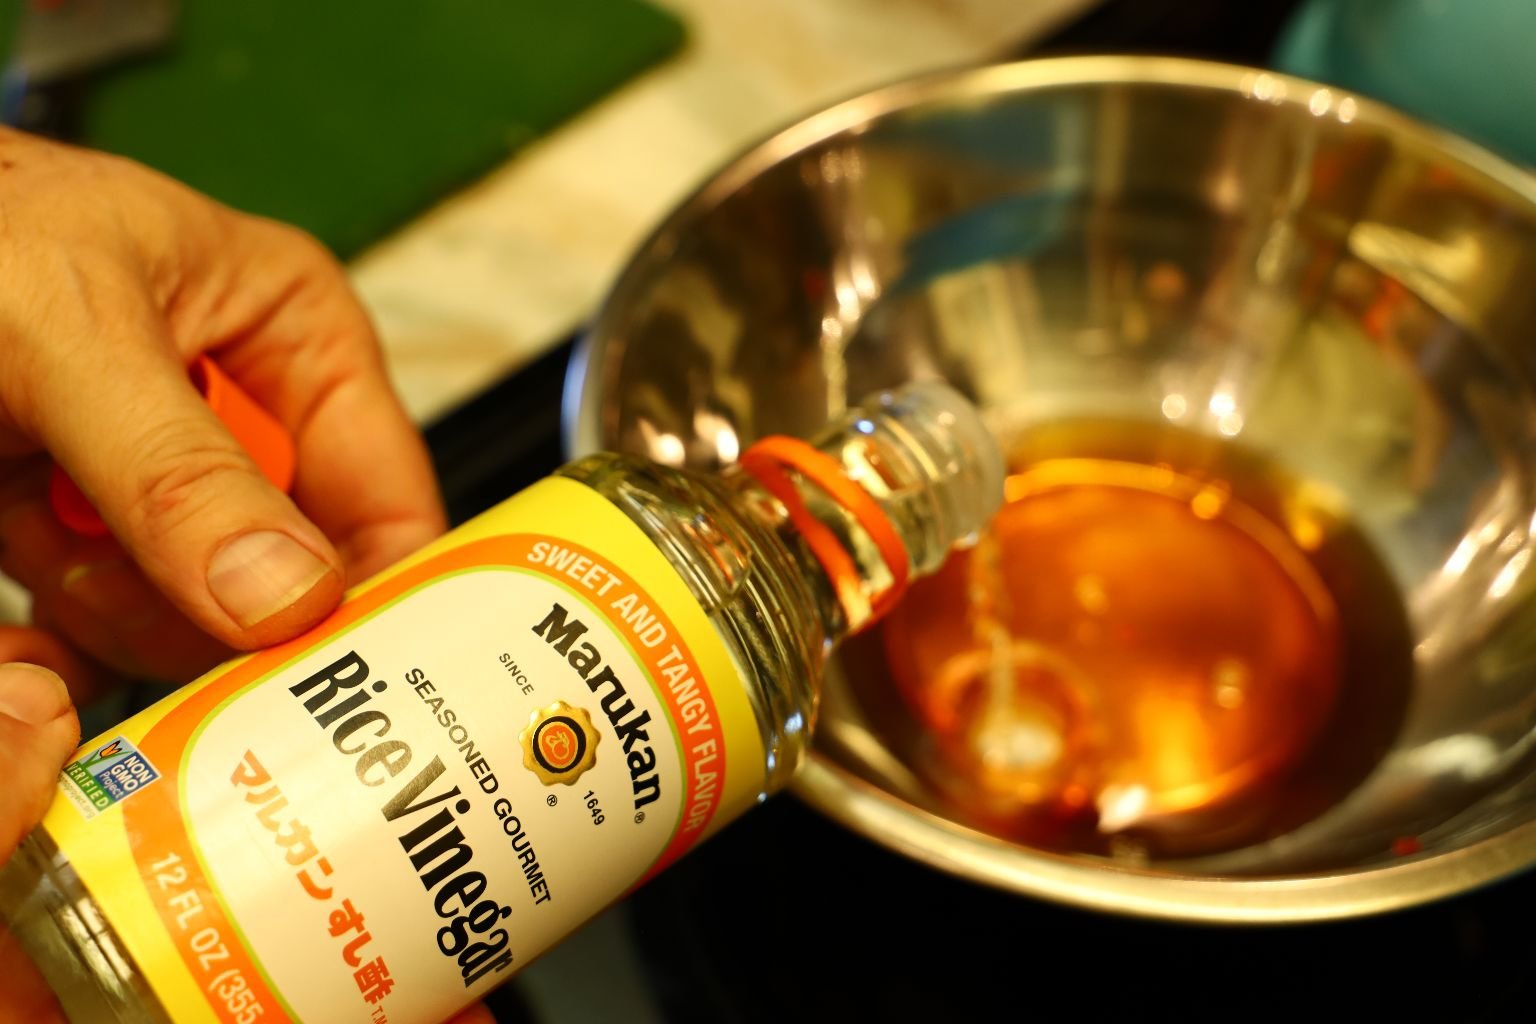
Then add your Rice, and White Vinegars to the bowl.
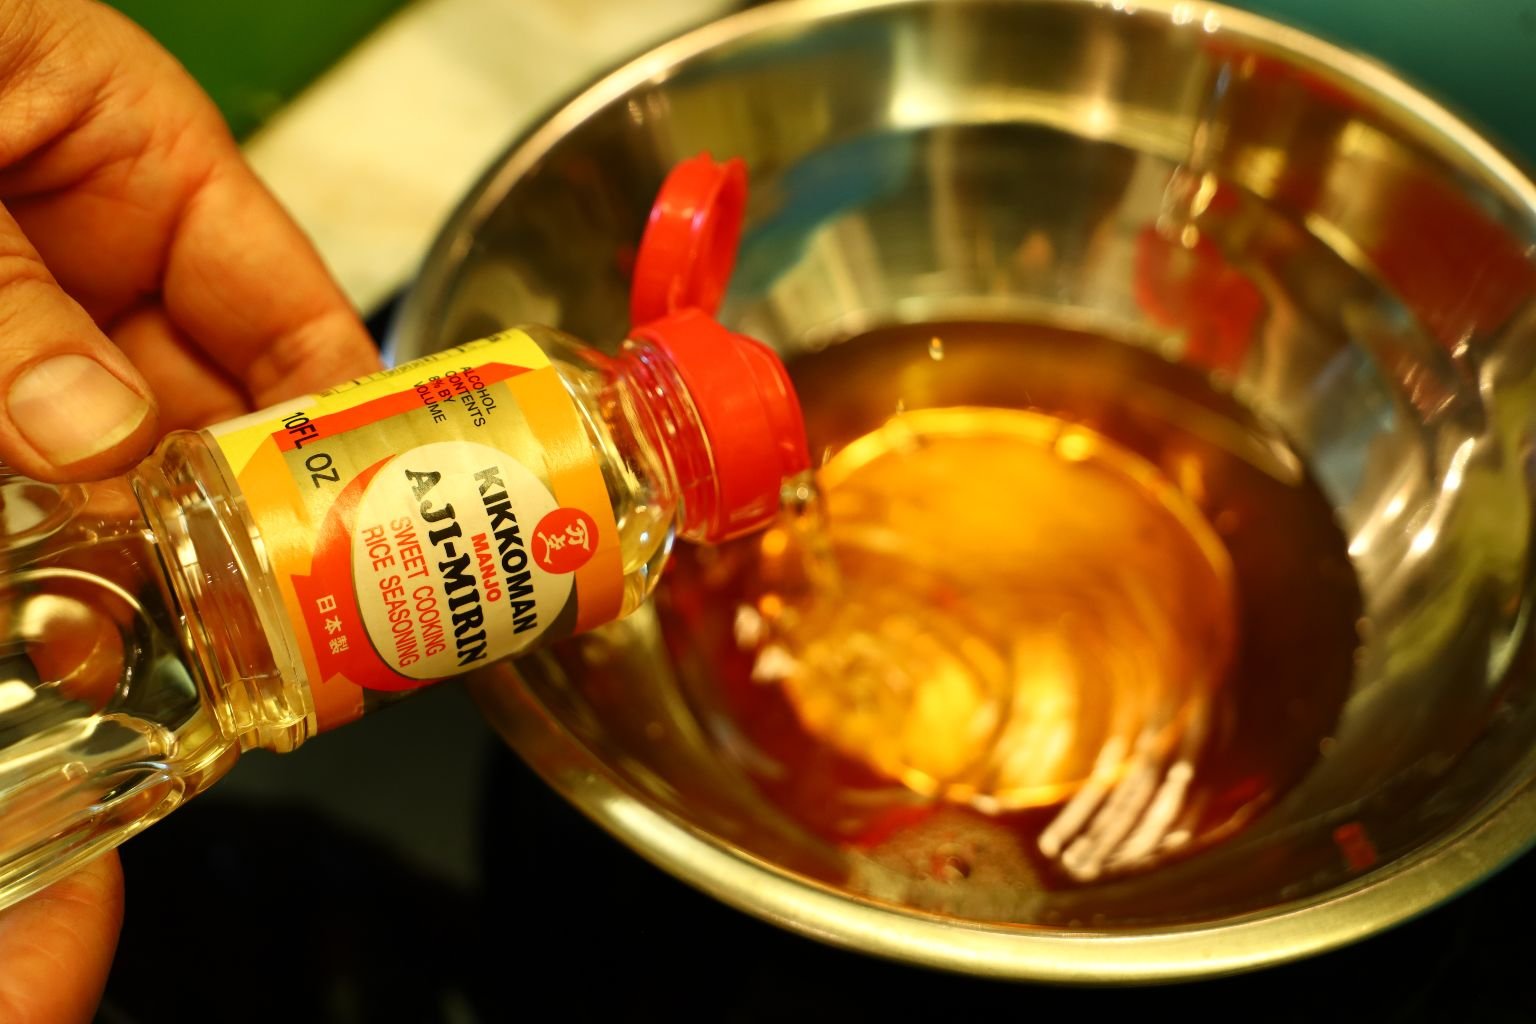
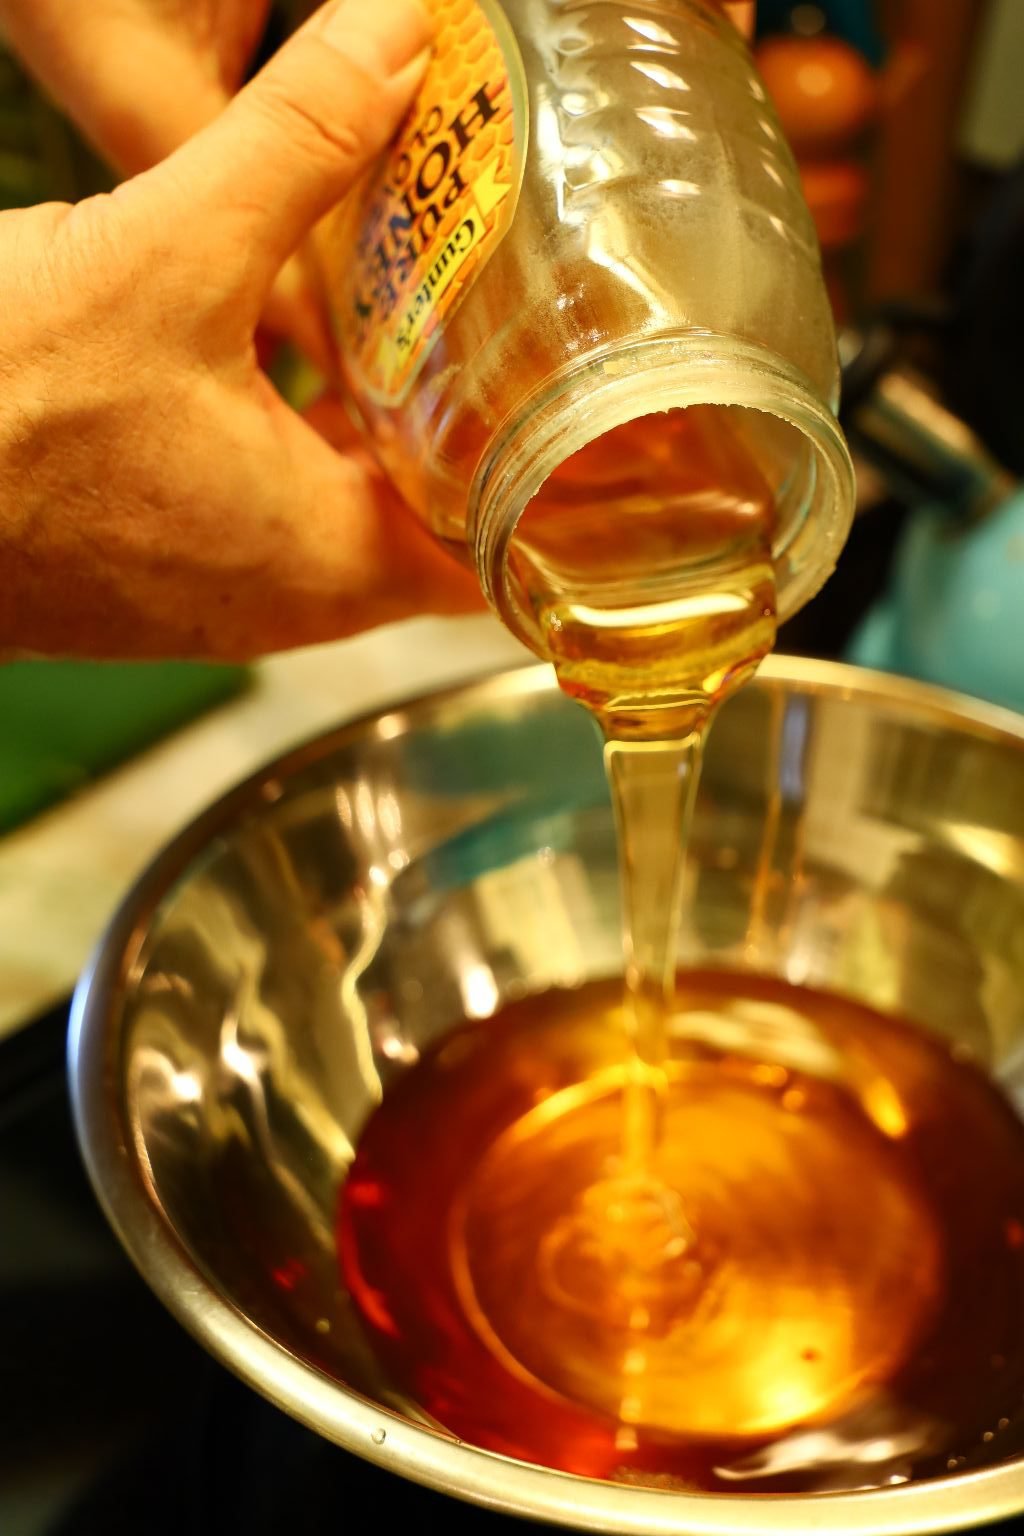
Now, add the Aji-Mirin and honey to the bowl.
Beautiful Golden
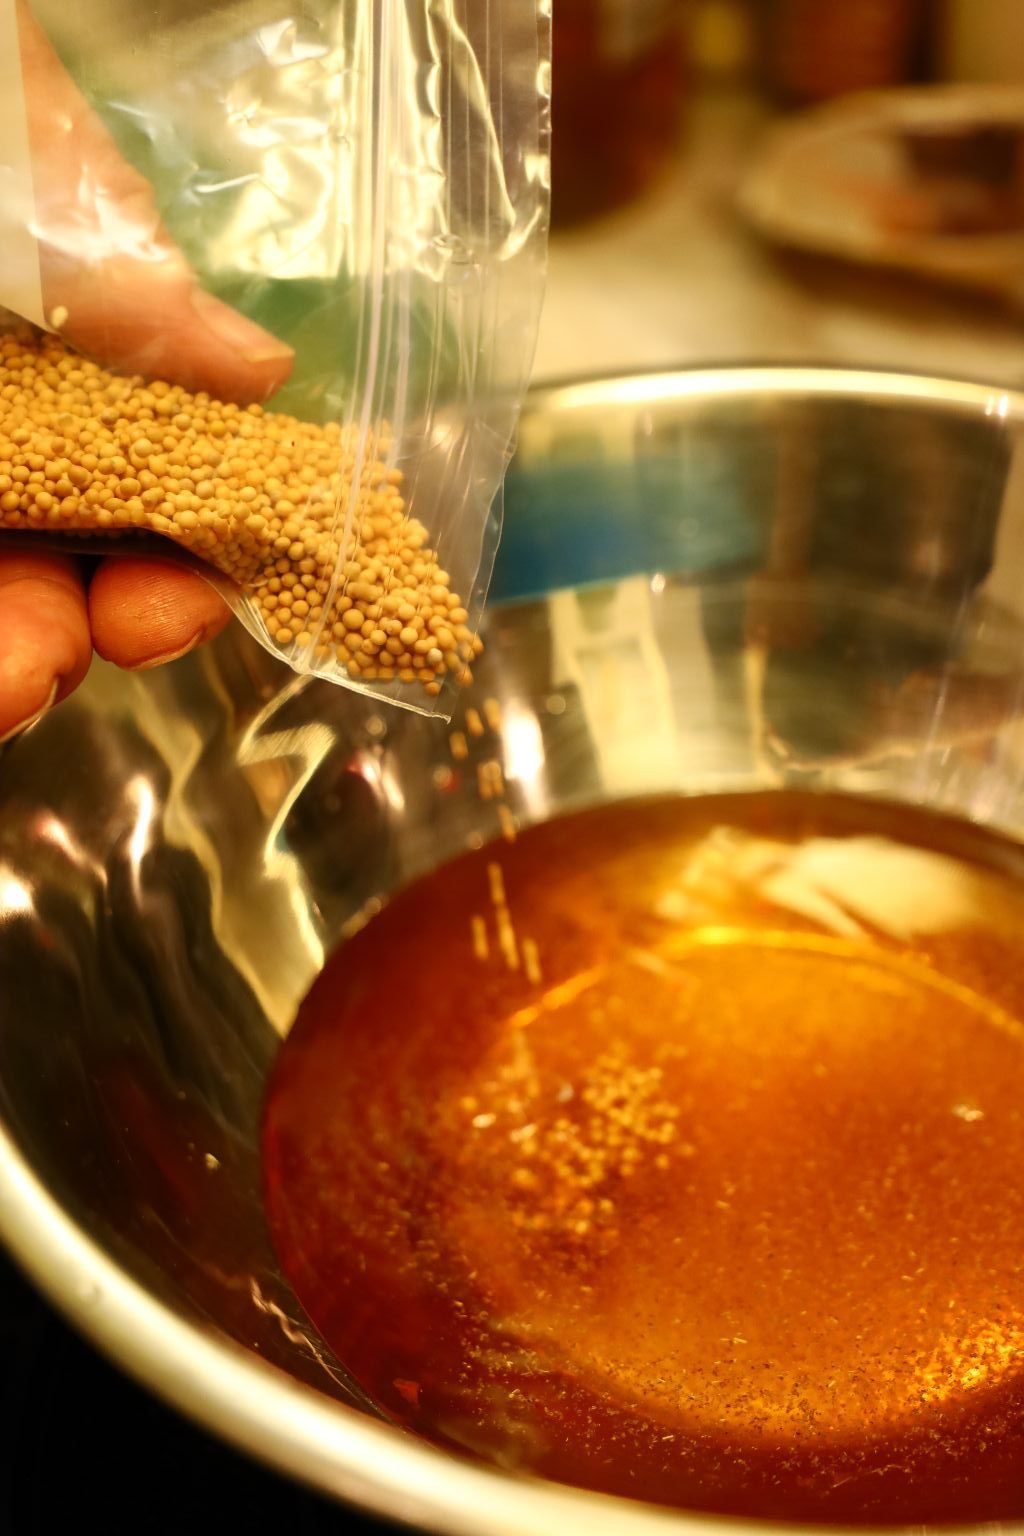
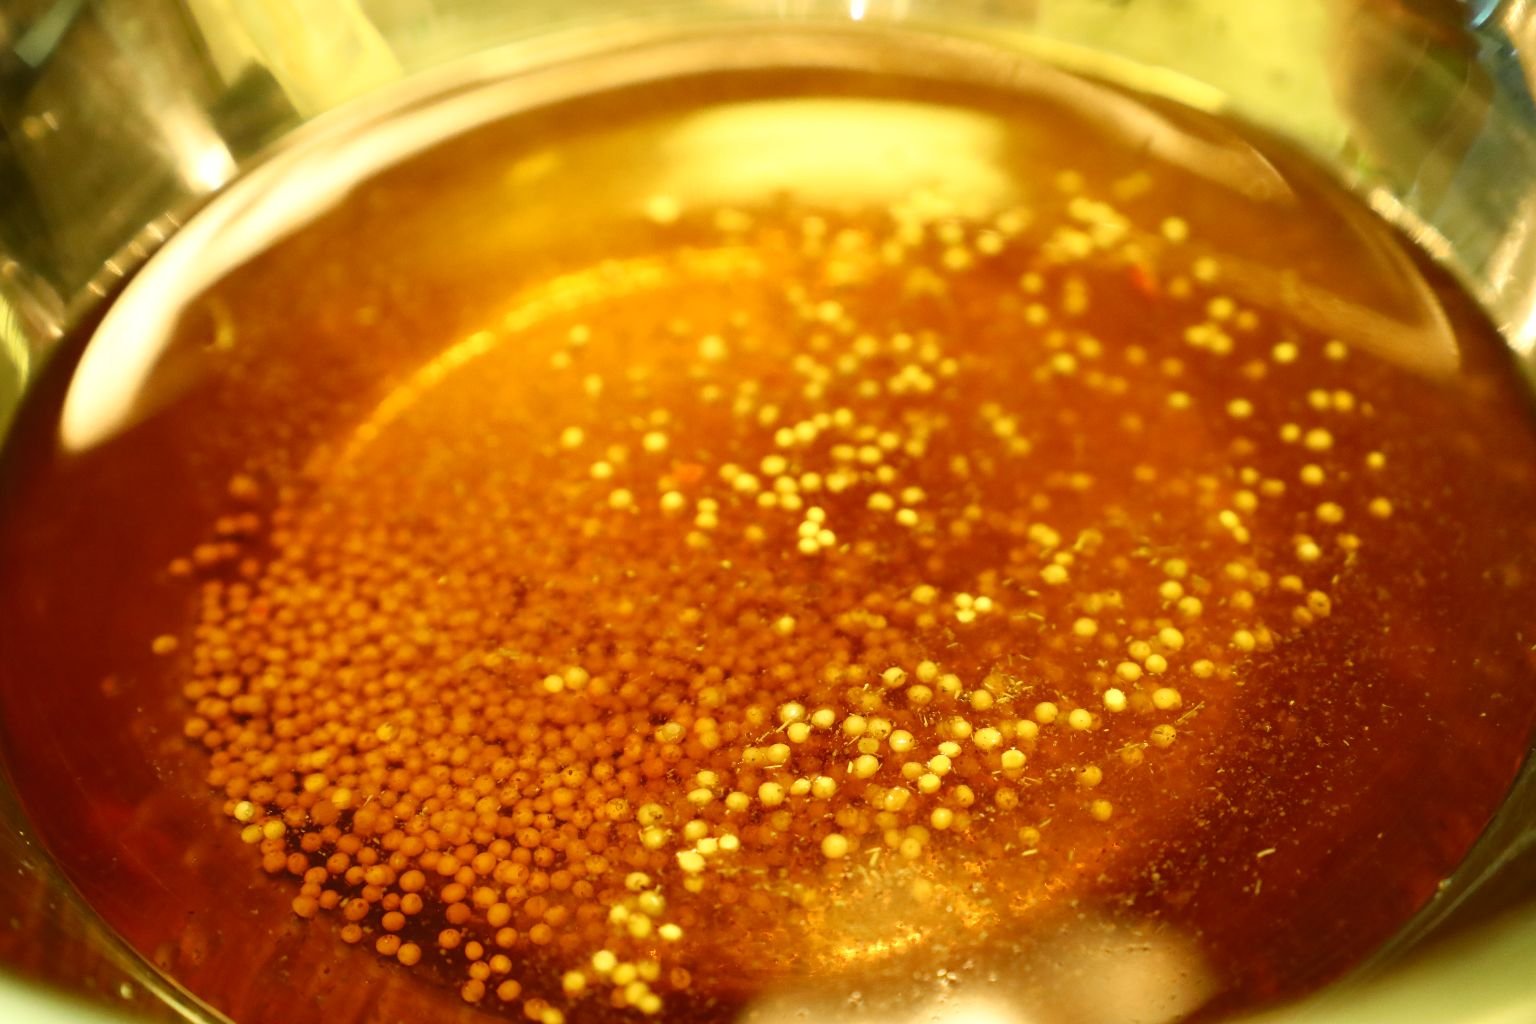
Time to add your celery salt and mustard seeds to the bowl.
—————————————————————

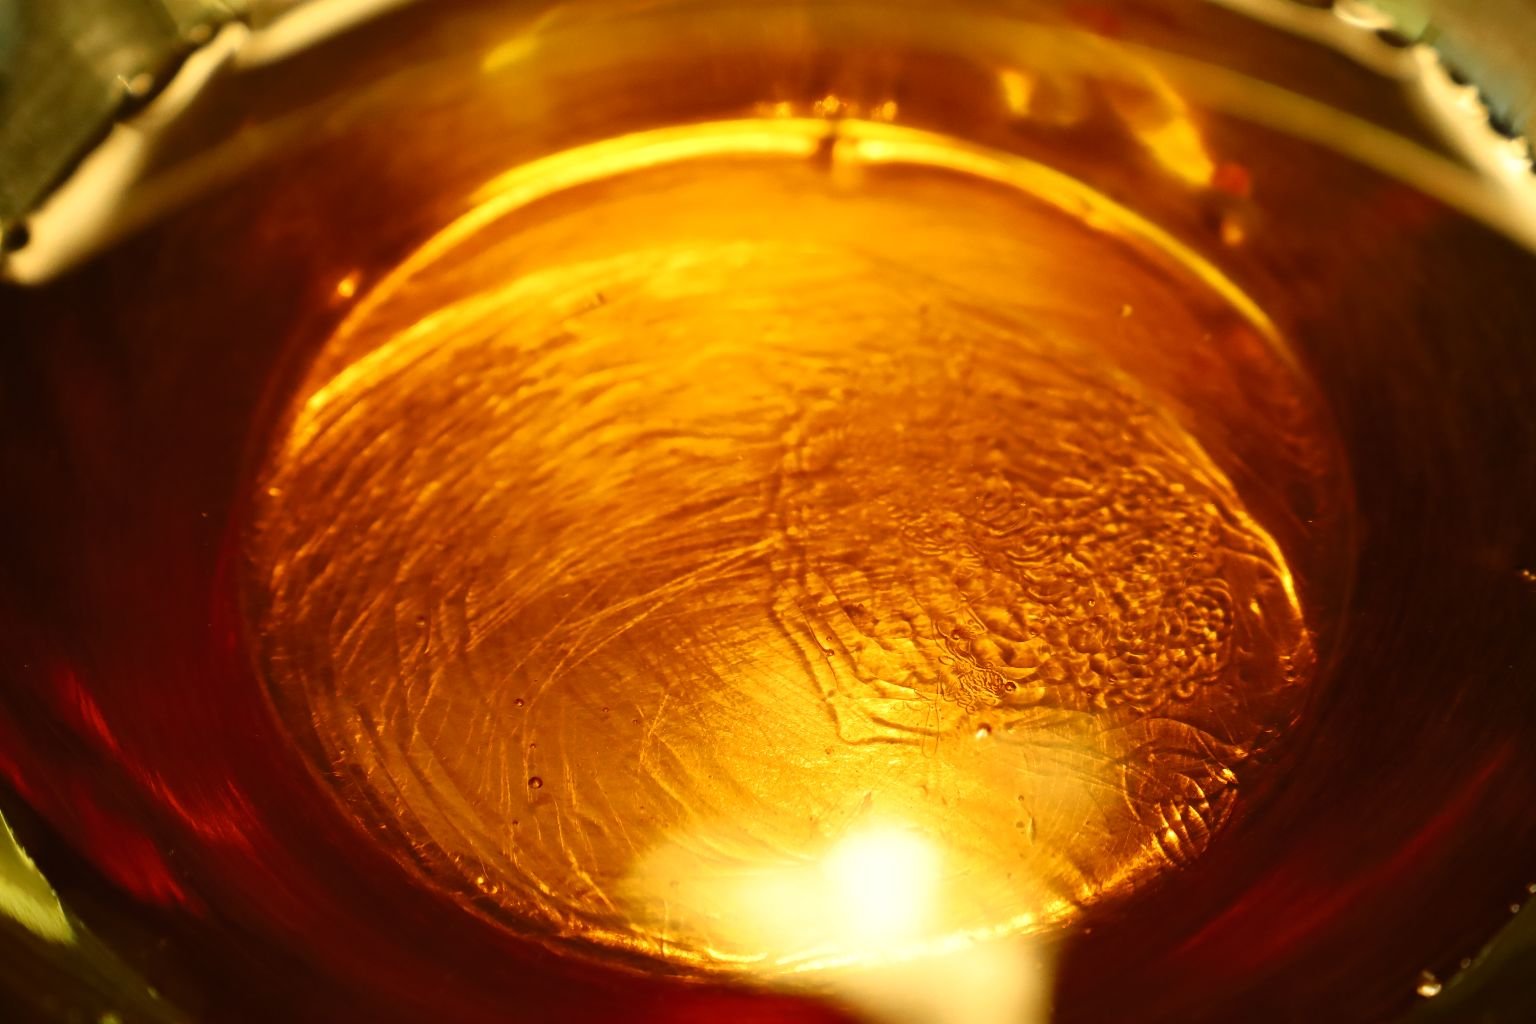
Then add your Olive Oil ….

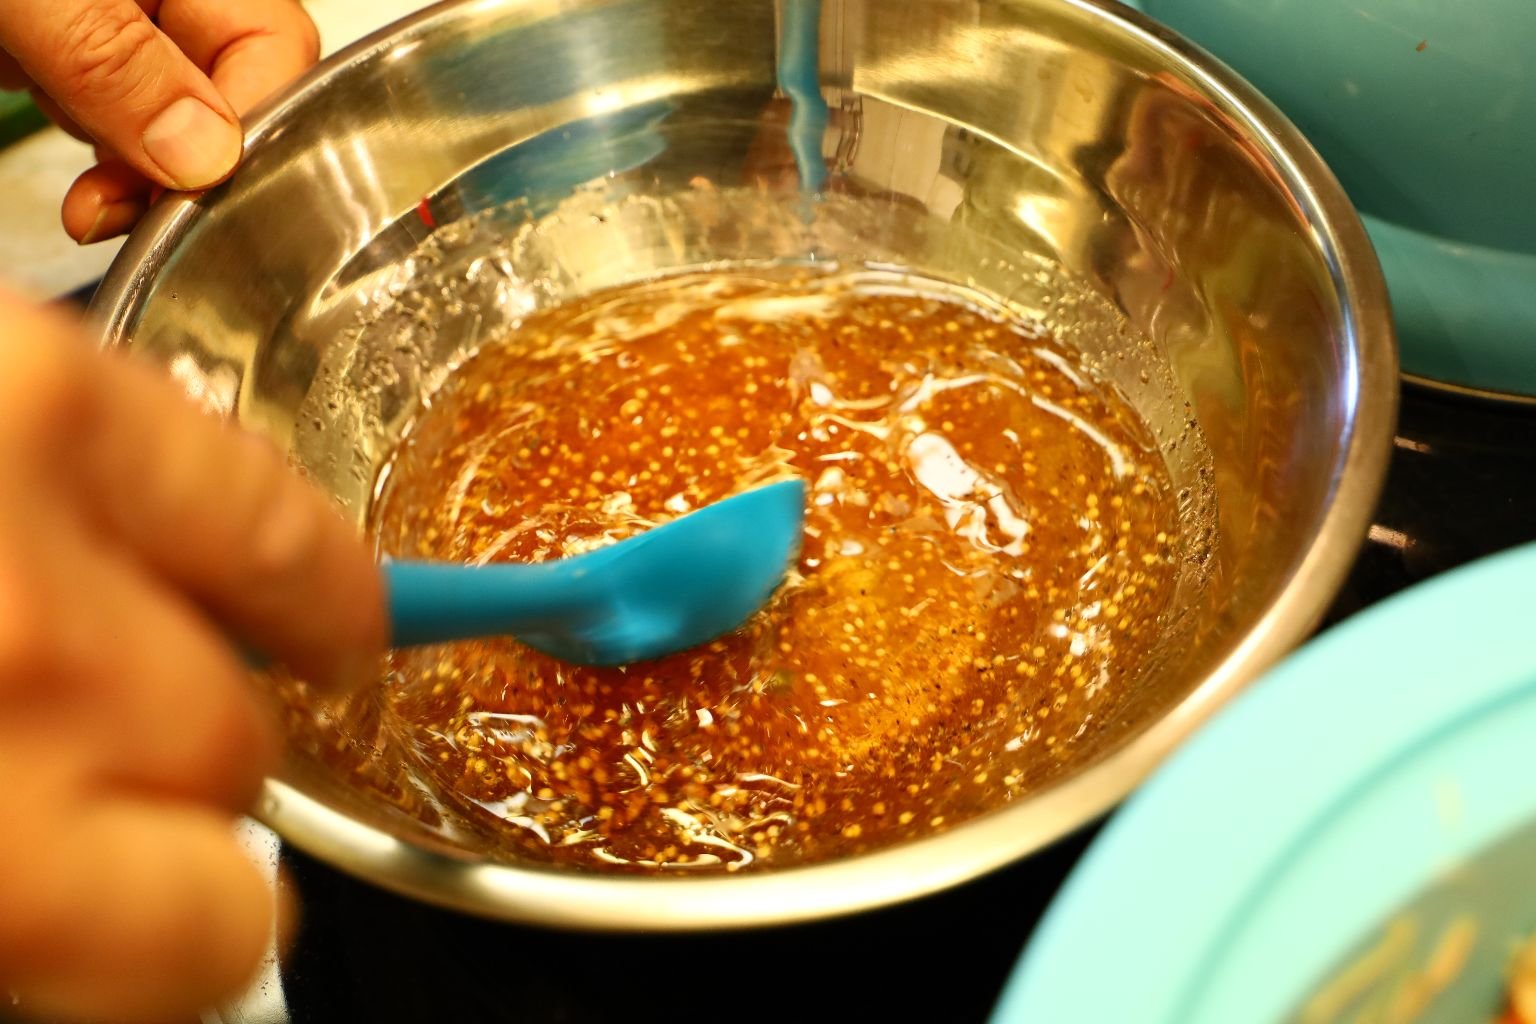
…freshly ground pepper to the bowl and stir together all the ingredients.
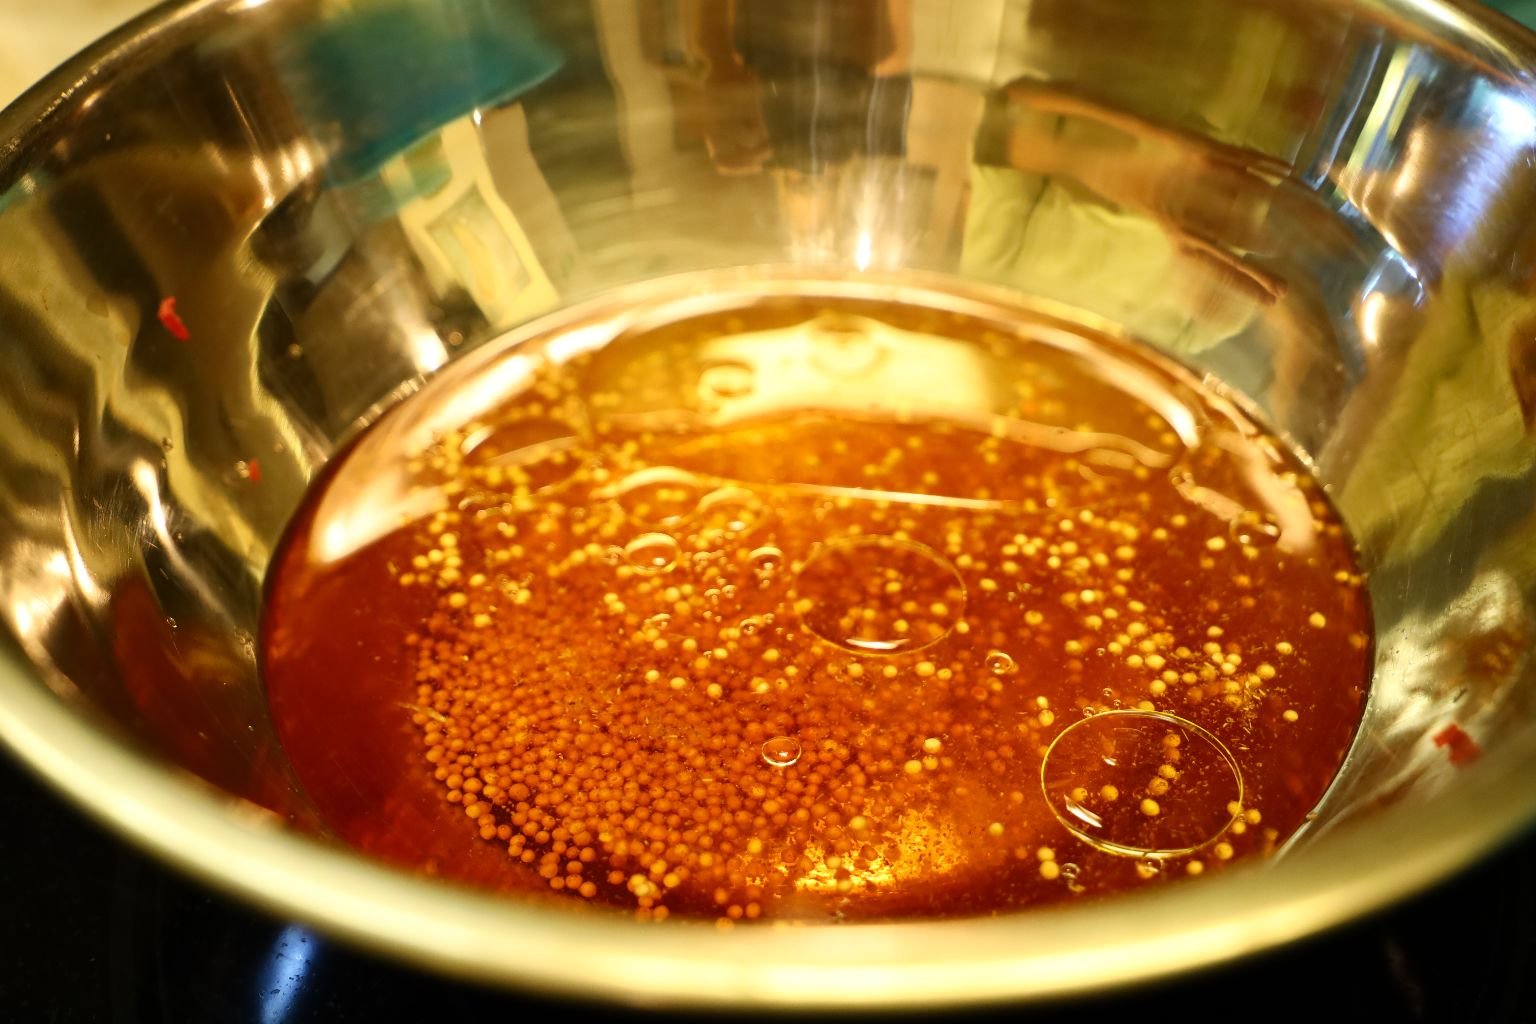
Taste the mixture to see if it is partially sweet and tart and to you liking. If not add more honey or one of the vinegar’s to get it just right.
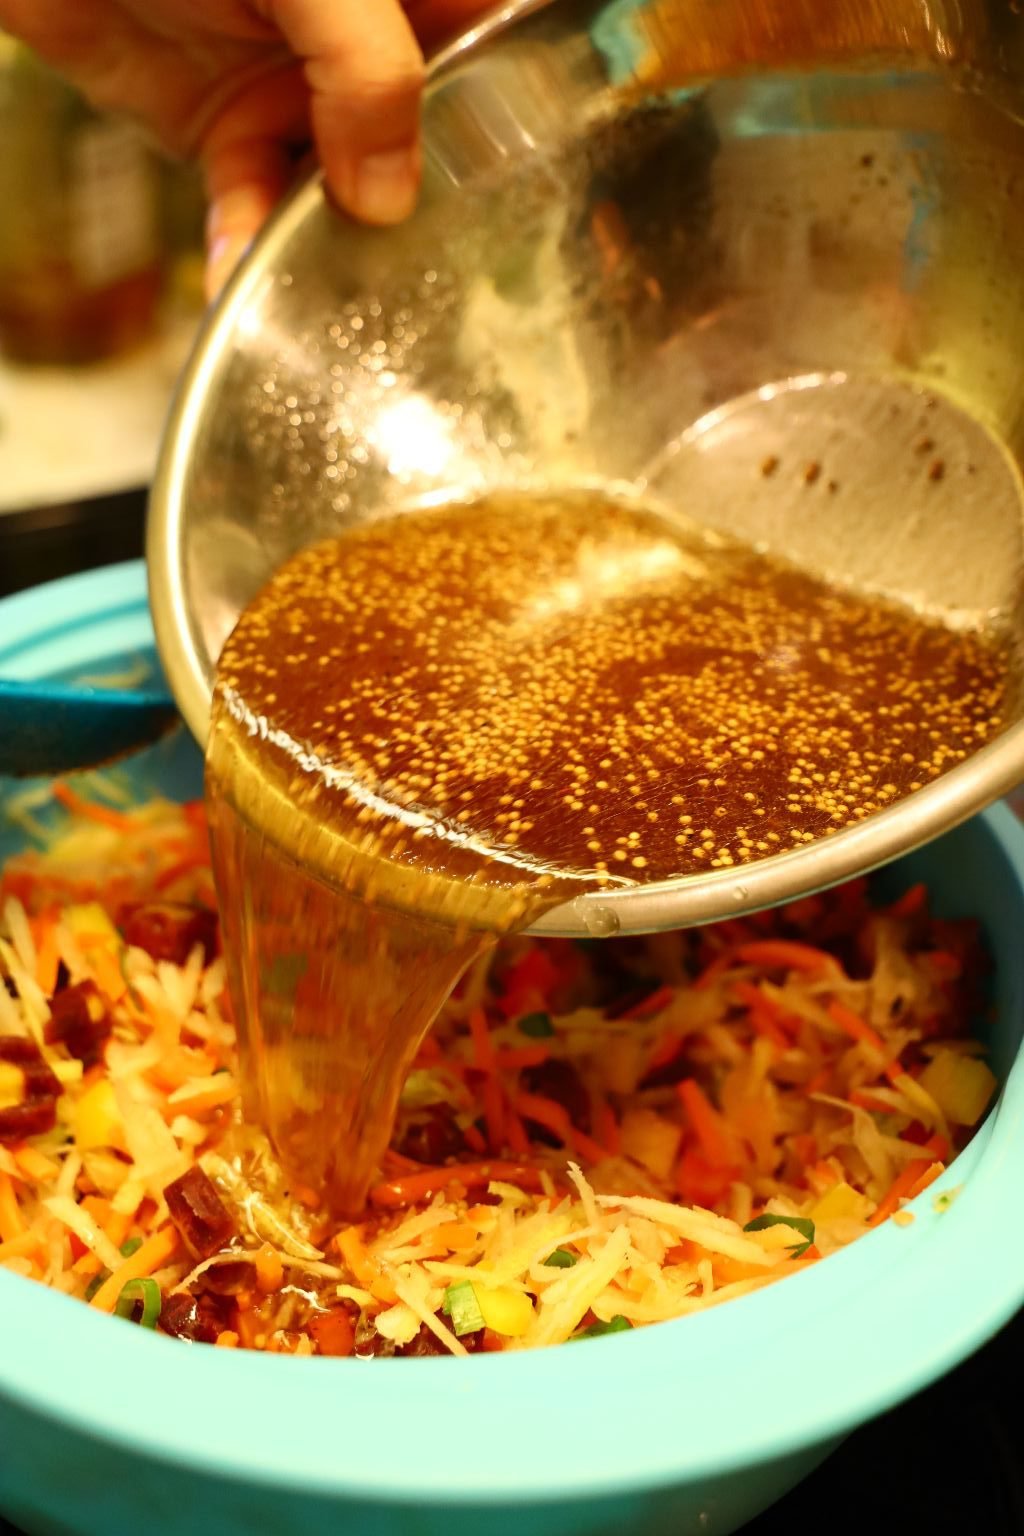
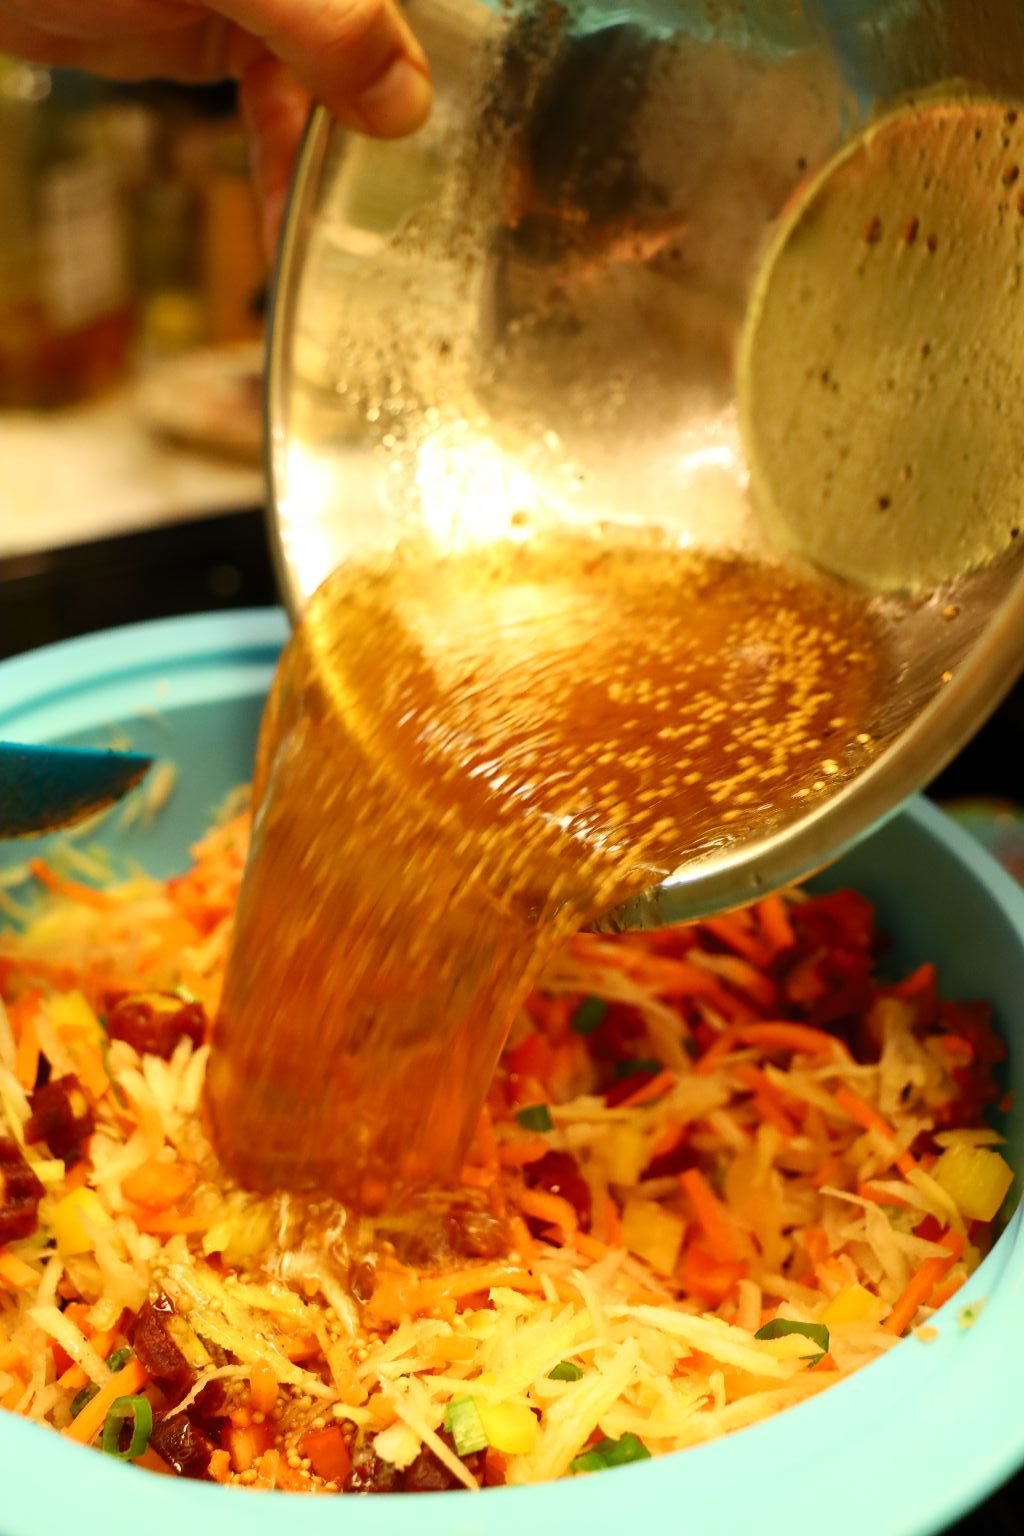
Once the honey has dissolved into the vinegar’s add it to the carrot mixture.
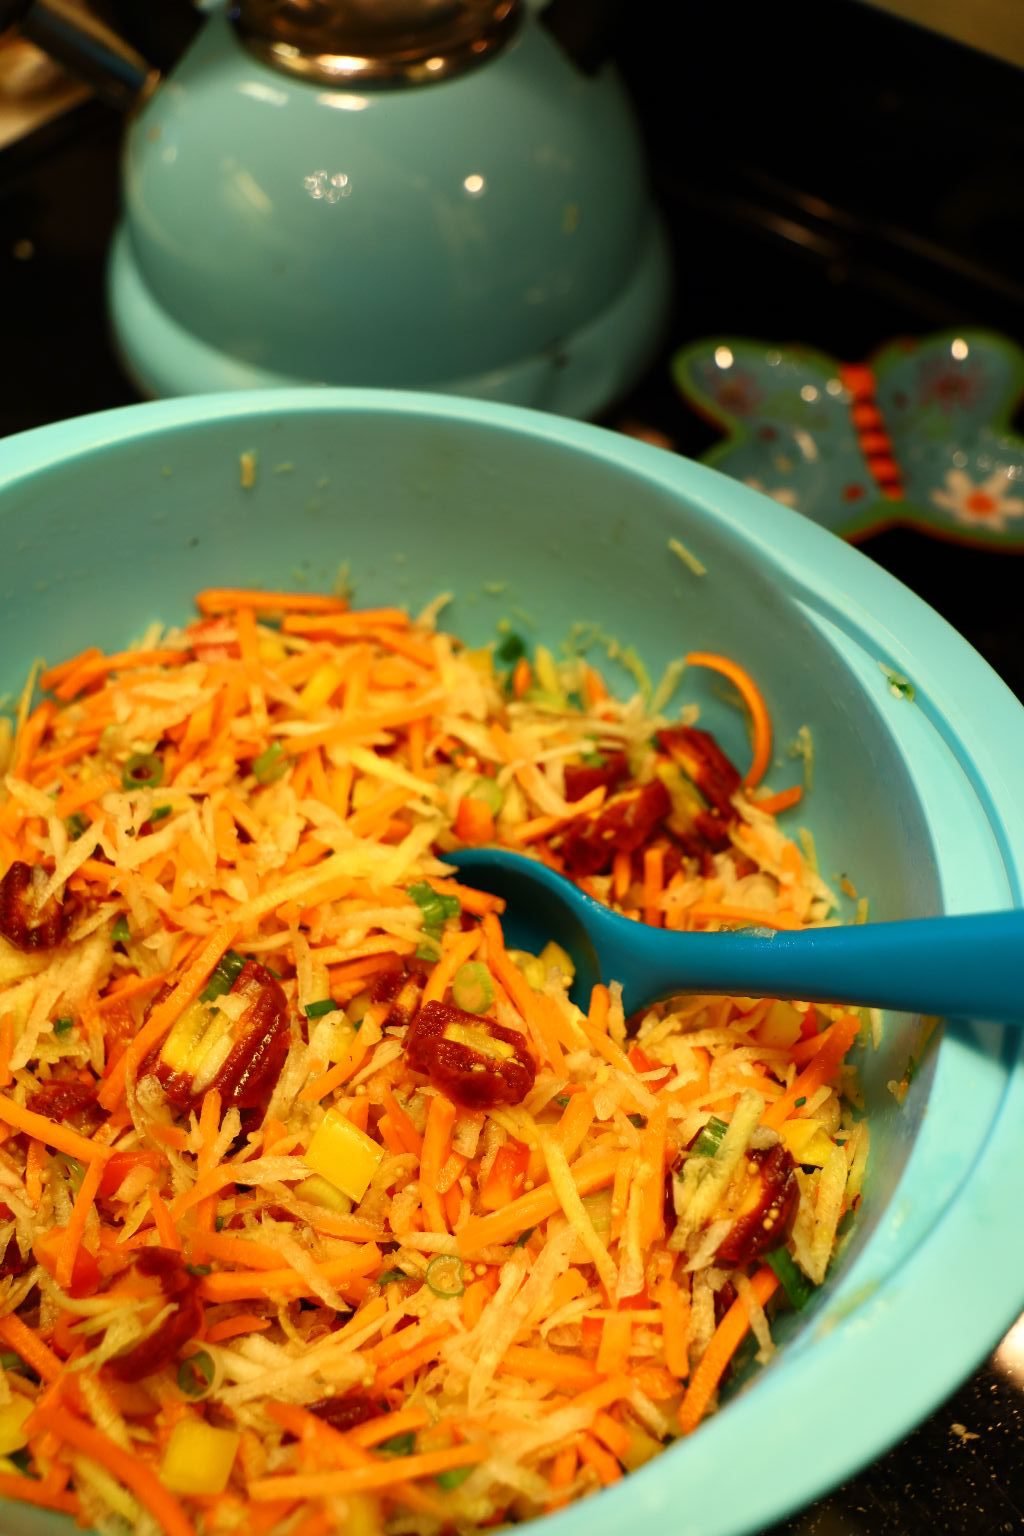
Stir all the ingredients together a few times as you let it sit for a few hours to 24 hours to let the carrots begin to pickle. The longer it sits the better it will taste.
Perfect Easter Side Dish
——————————————————————–

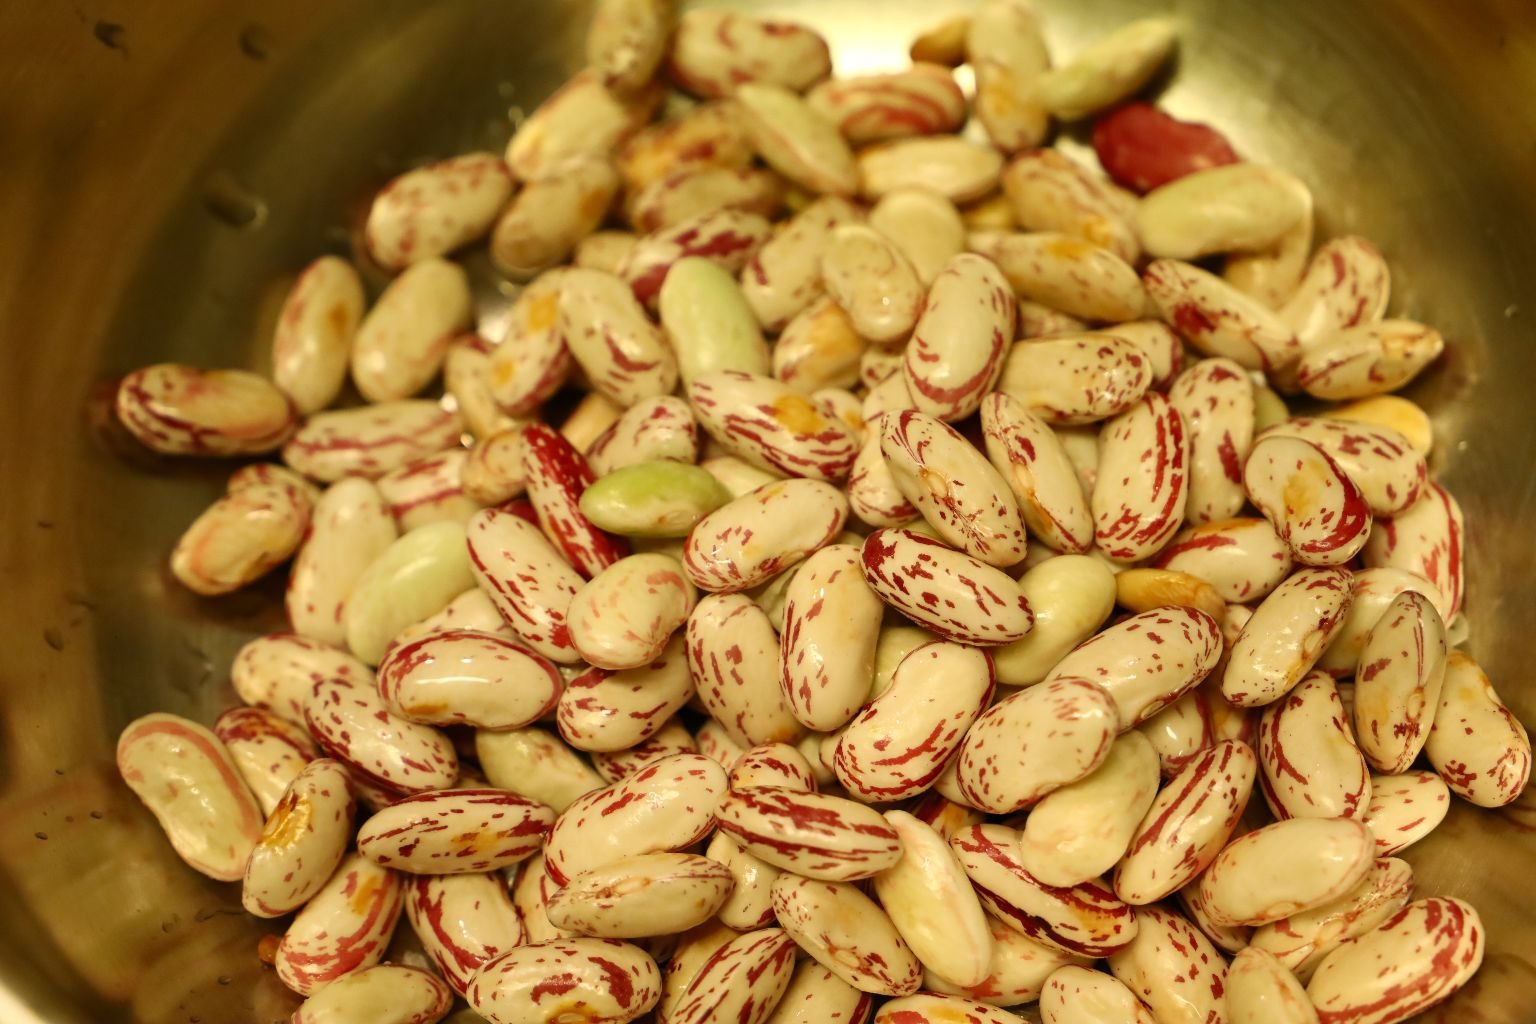
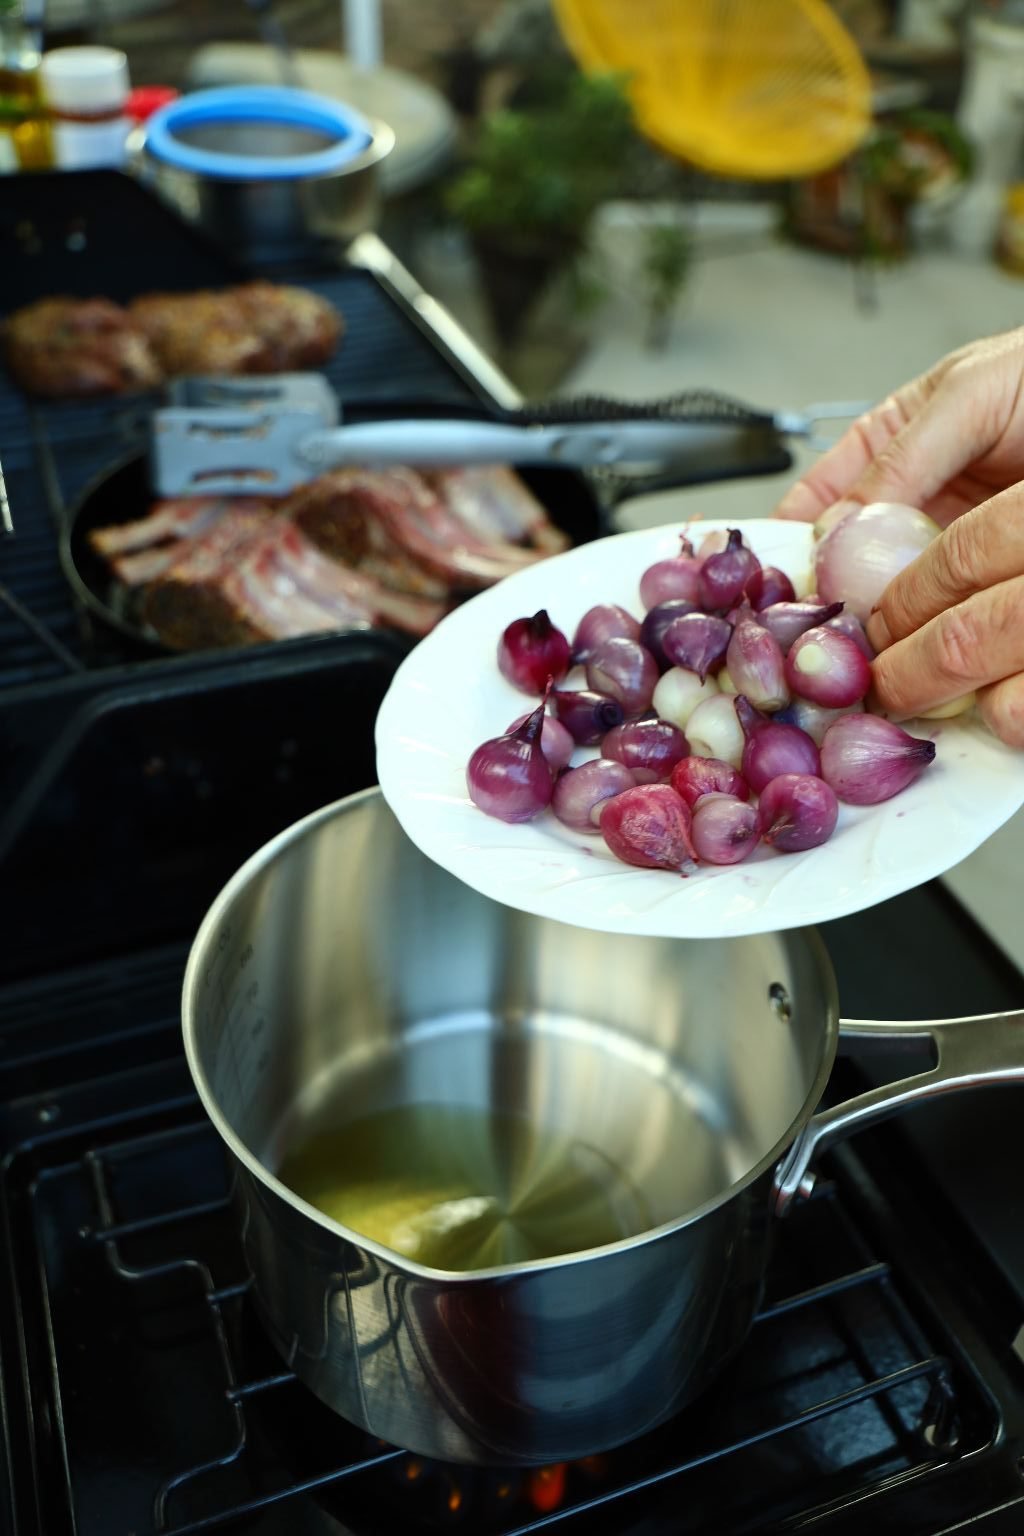
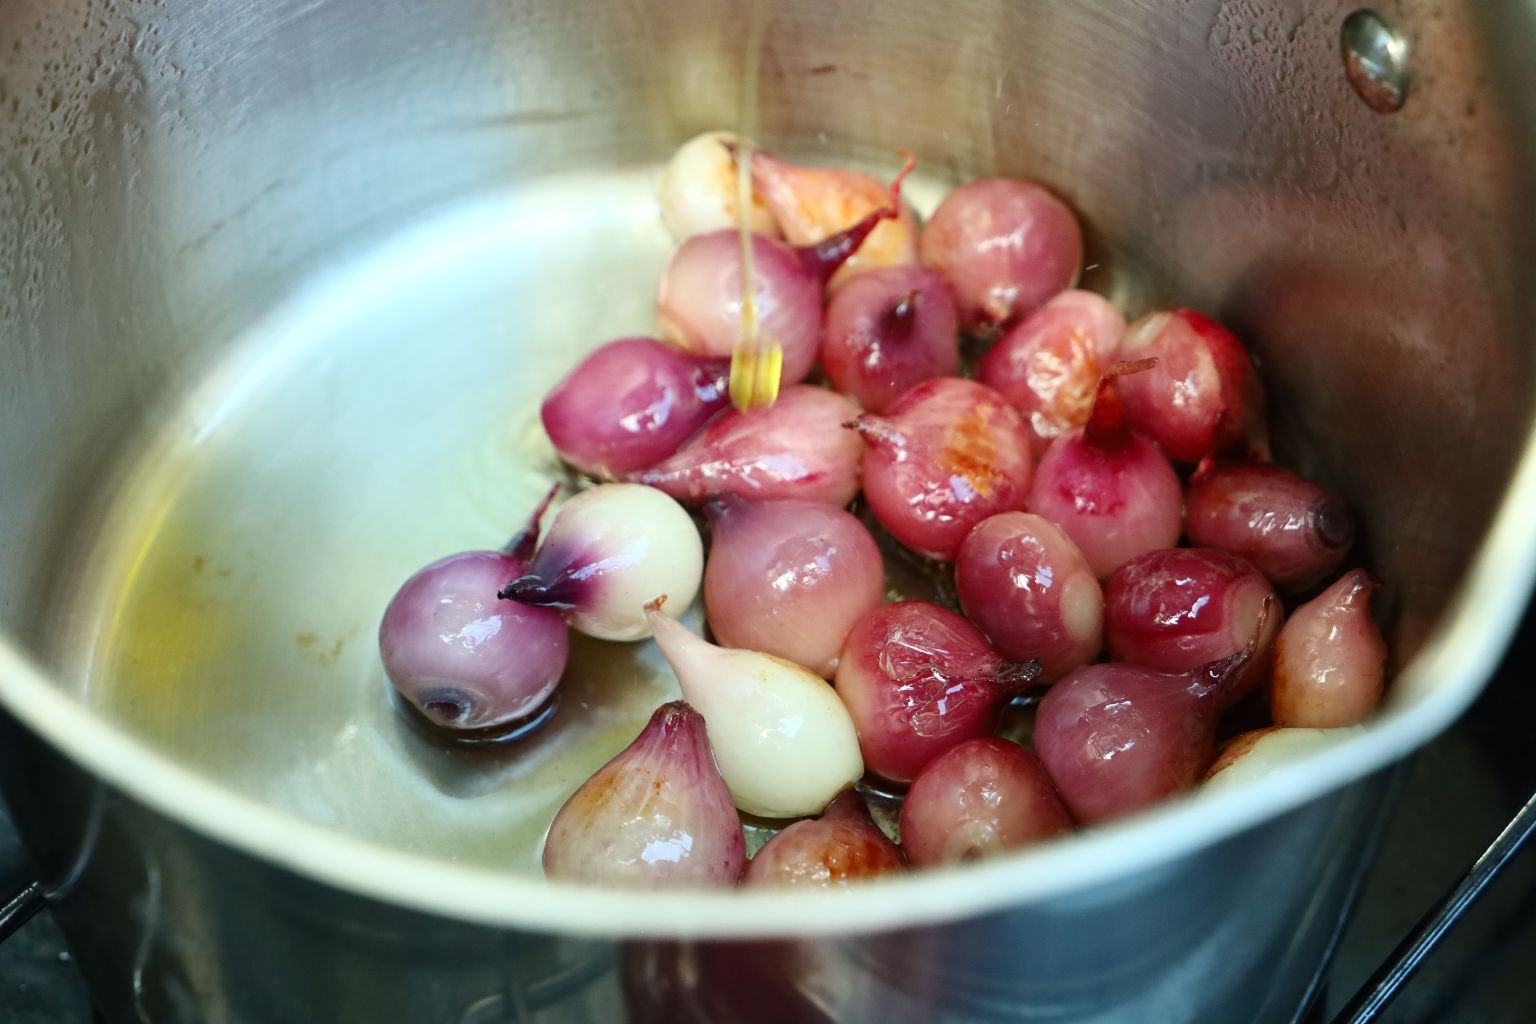
Cranberry and Roman Beans with Pearl Onions
and Snap Peas
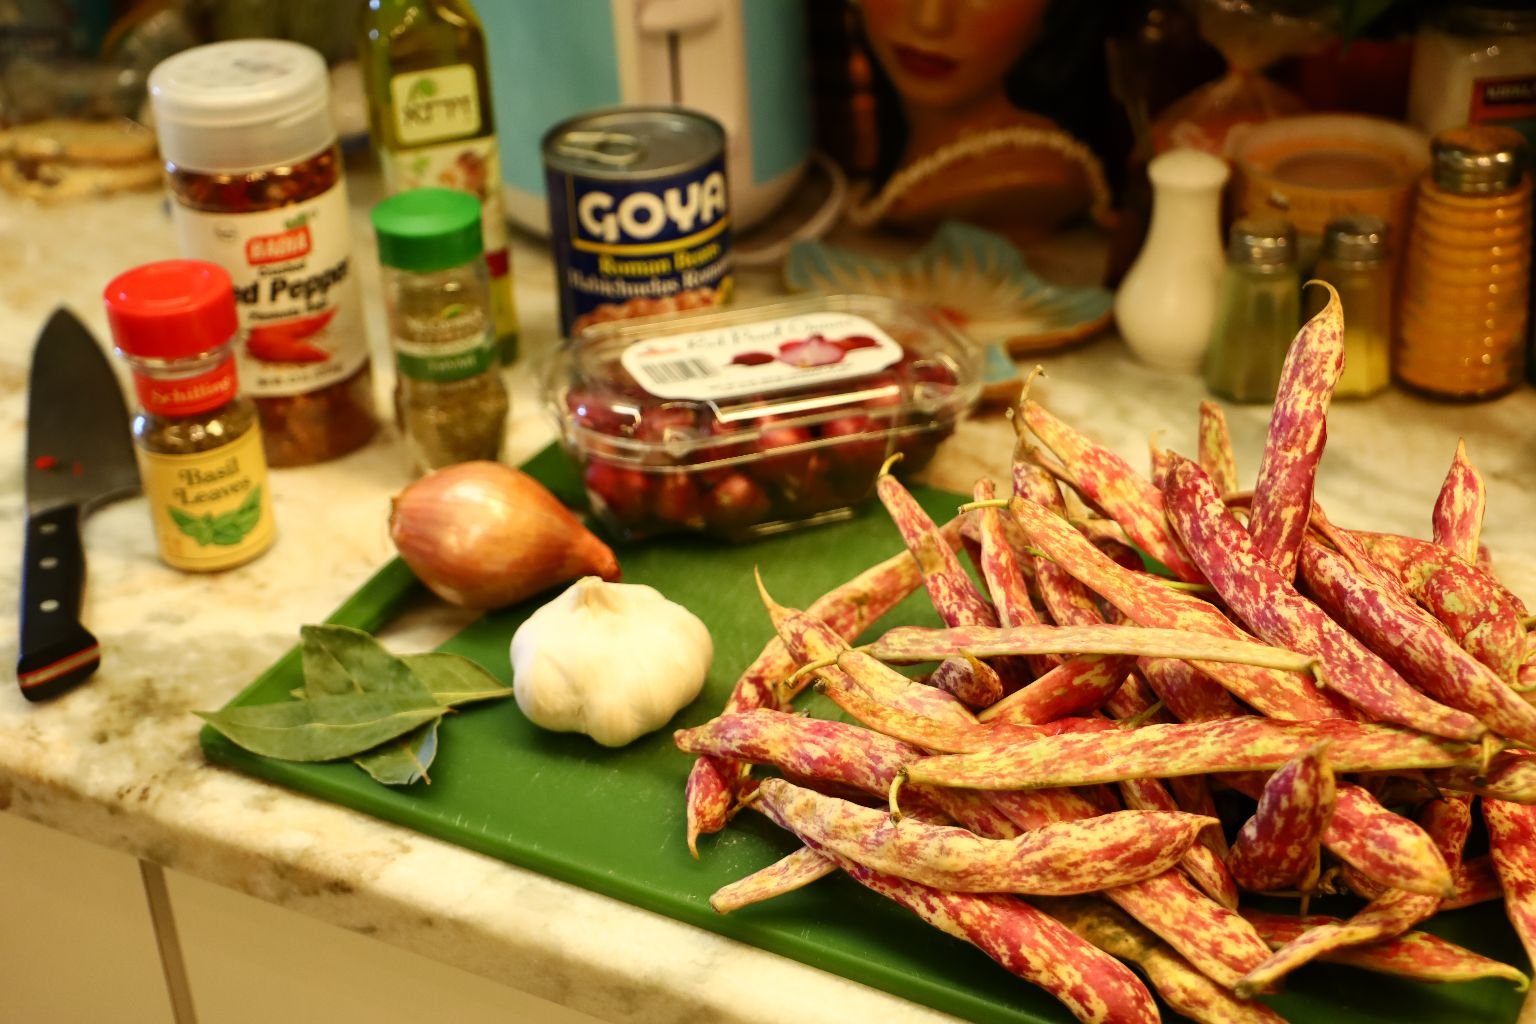
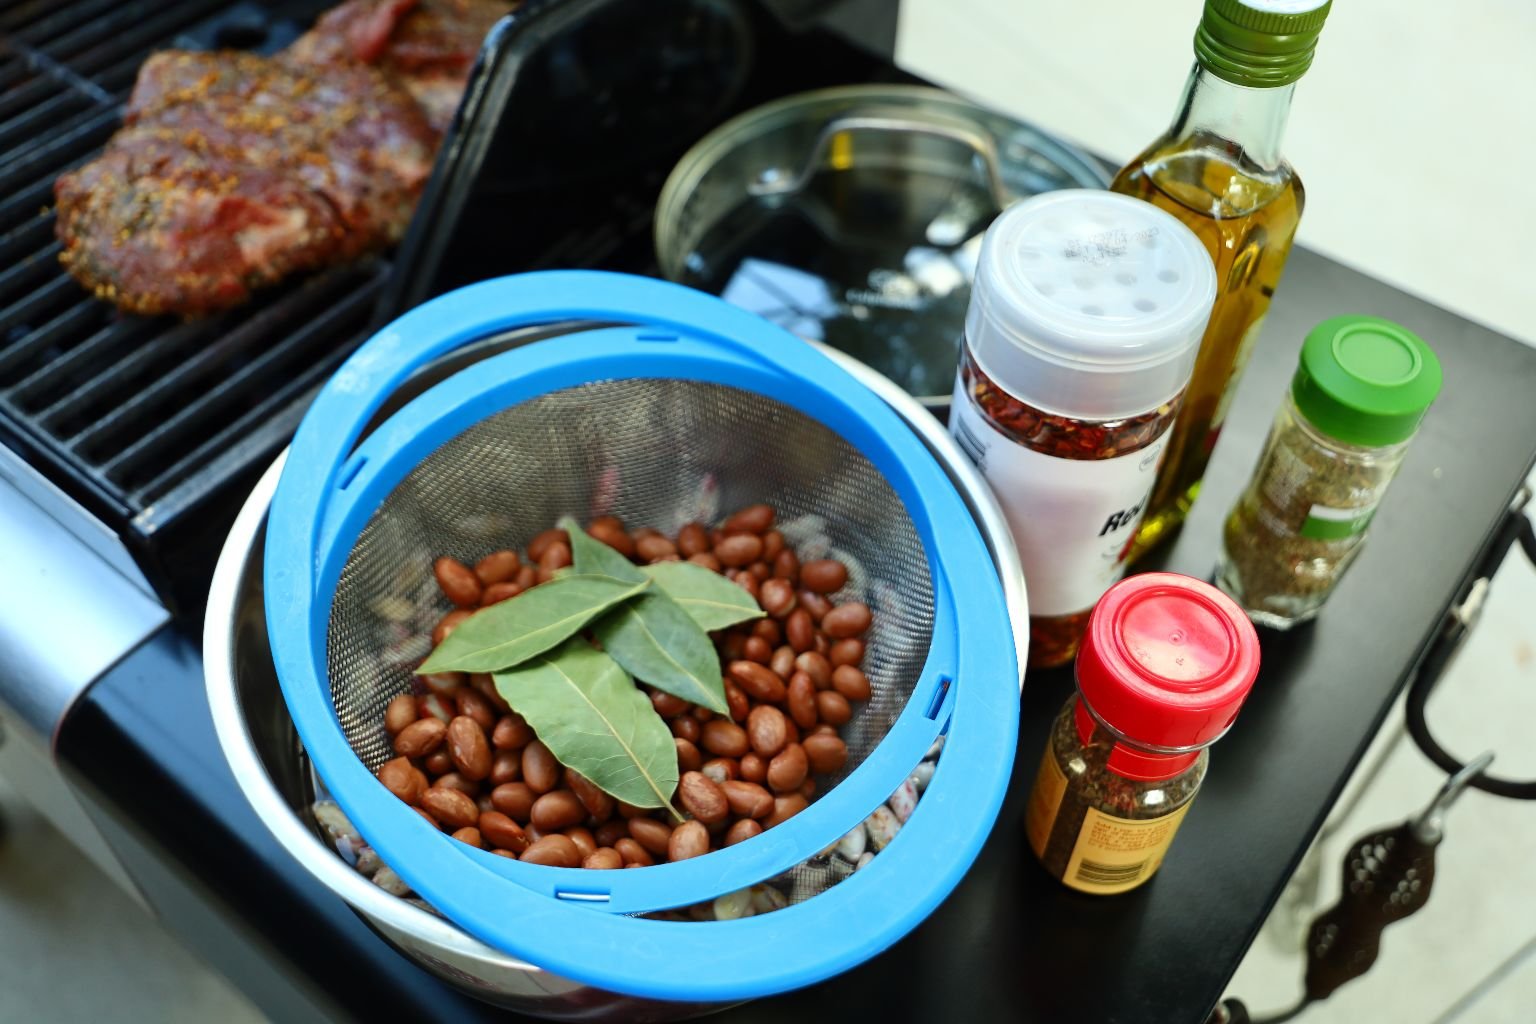
Ingredients:
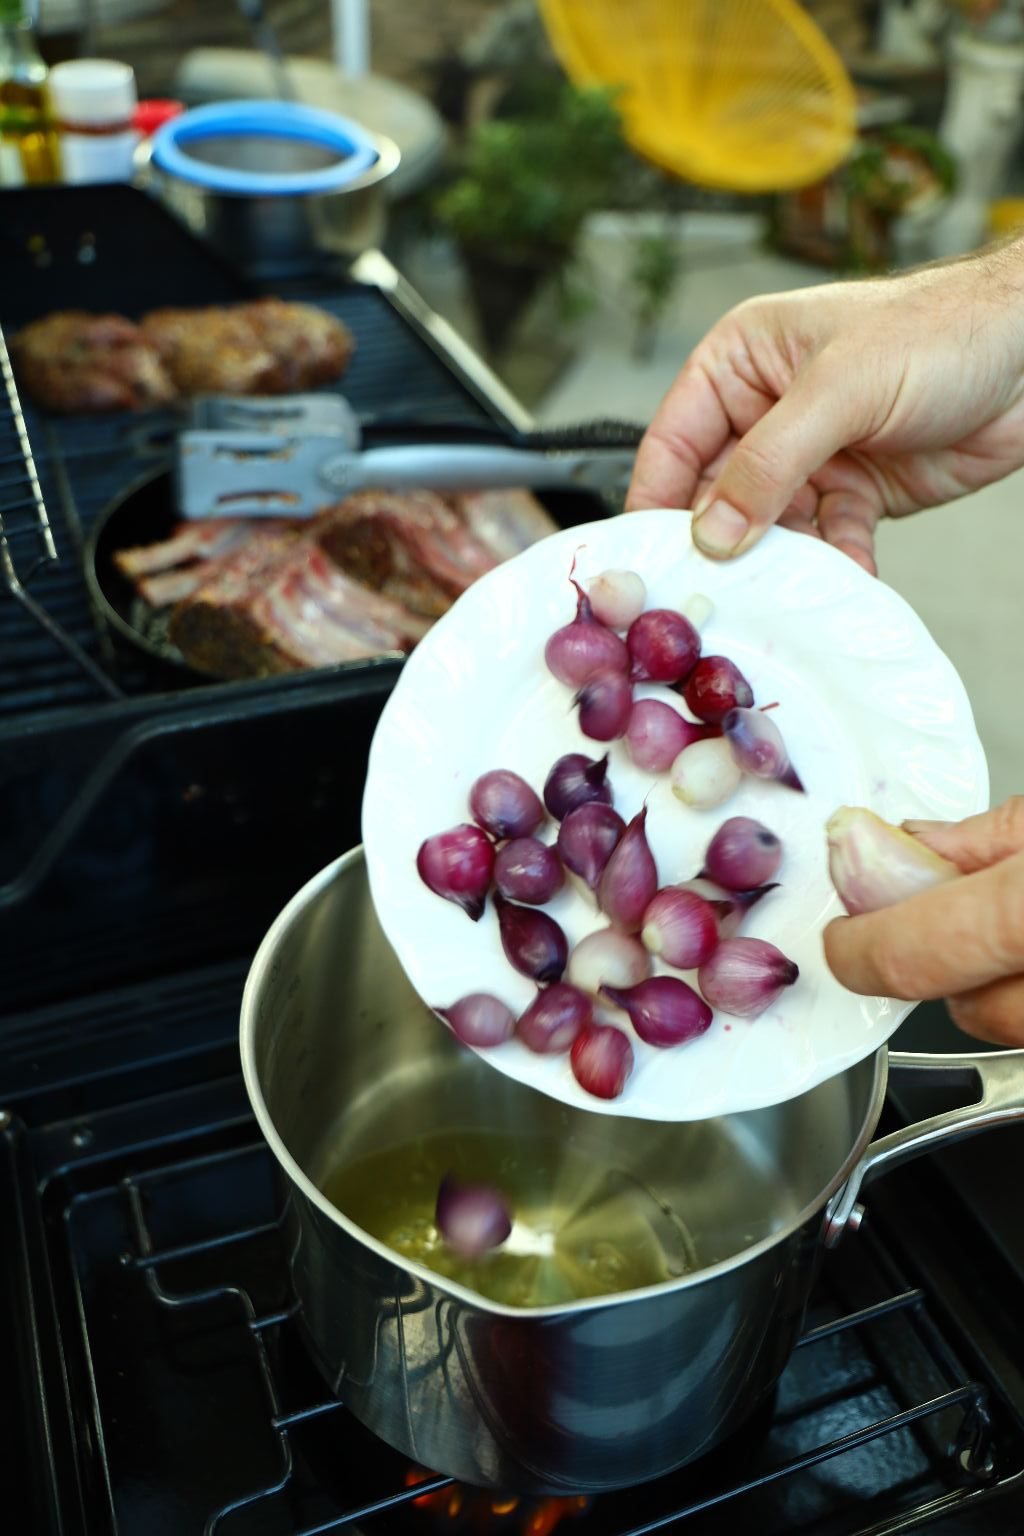
~30 Red Pearl Onions
1 ½ Cups Cranberry Beans – Shelled
1 Can “Roman Beans”
2 Tbsp. Olive Oil
3 Garlic Cloves
½ Shallot – Minced
½ Tbsp Dried Basil
½ Tbsp. Dried Thyme
¼ Tbsp. Red Pepper Flakes
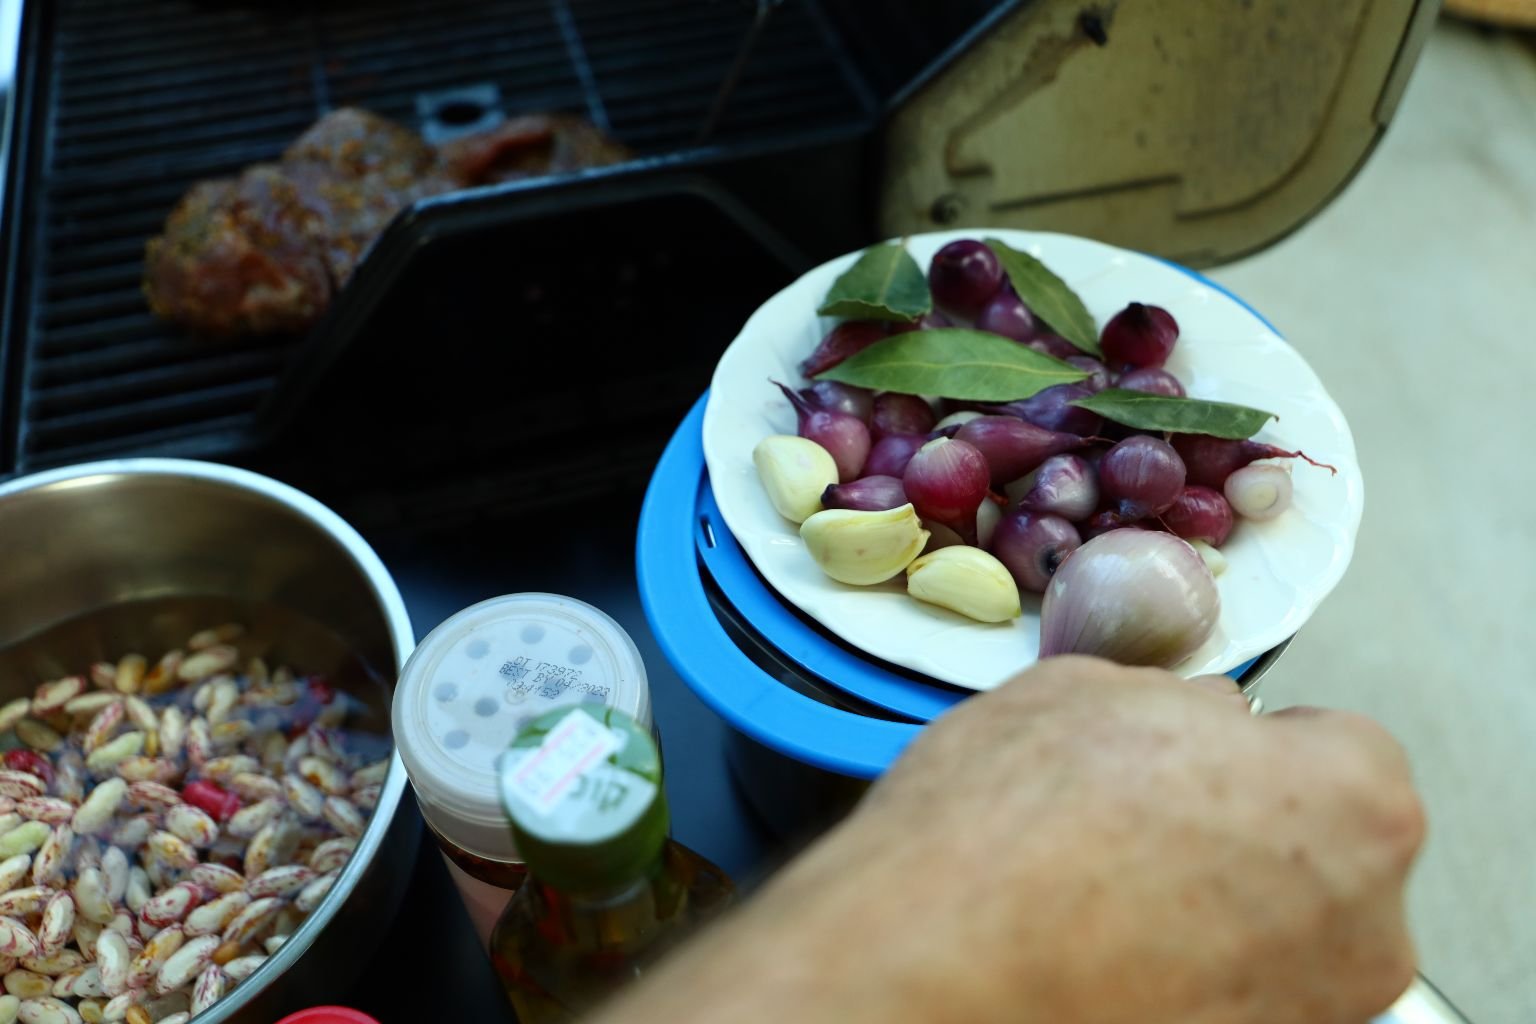
4 Bay Leaves
12-13 Snap Peas as a garnish
———————————————————–
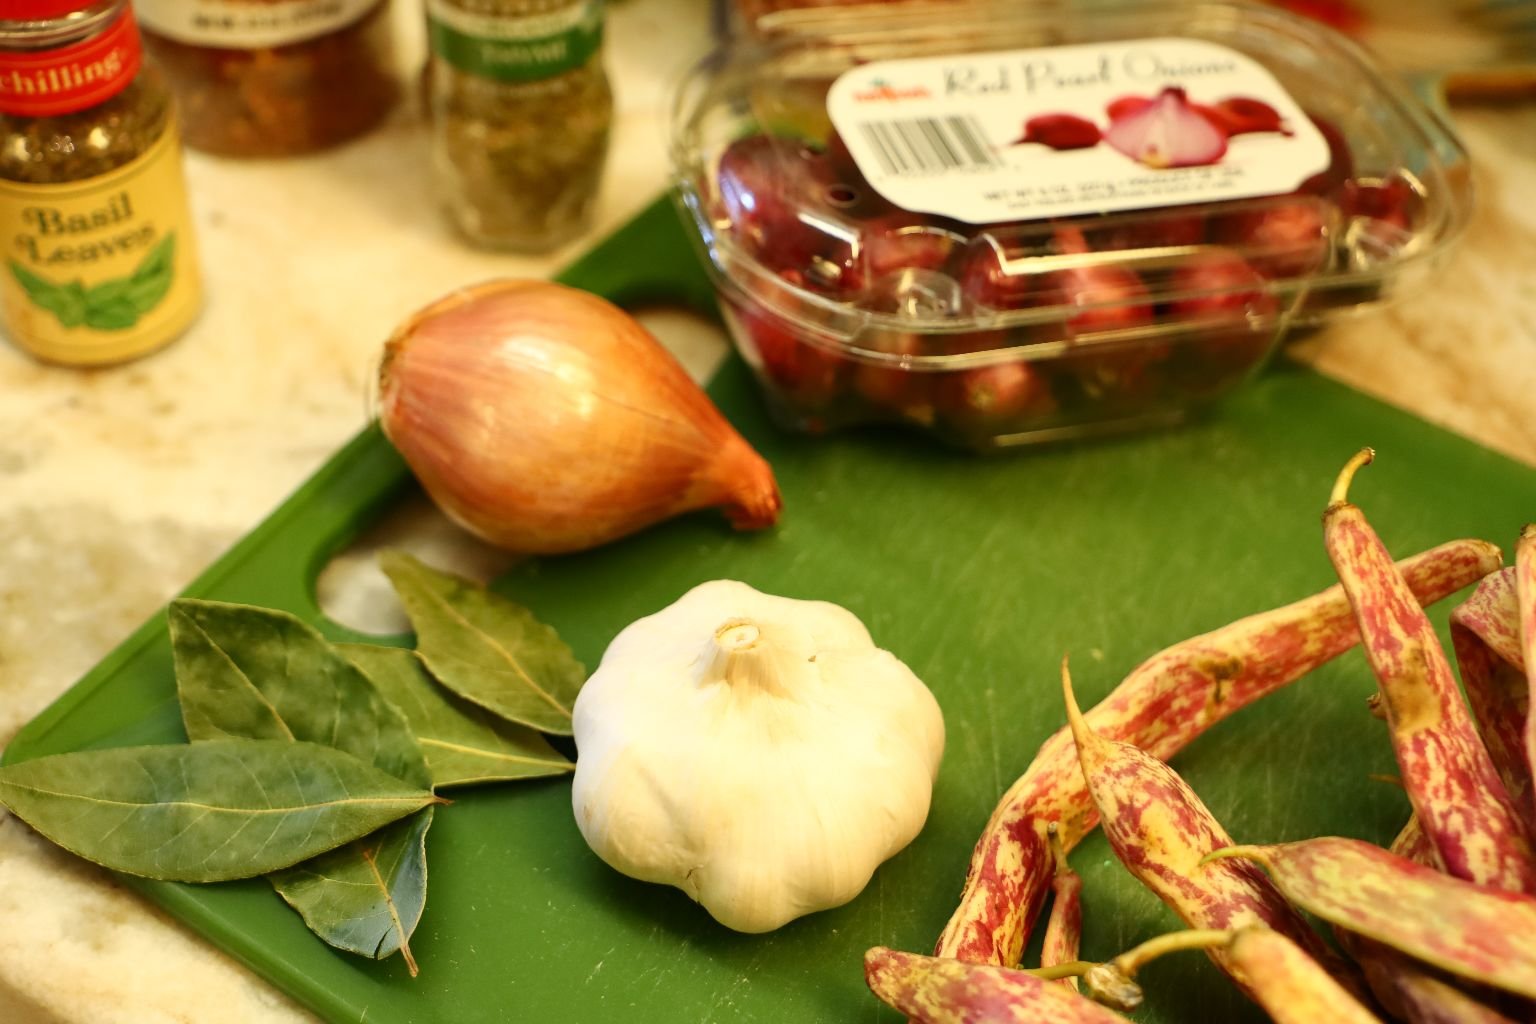
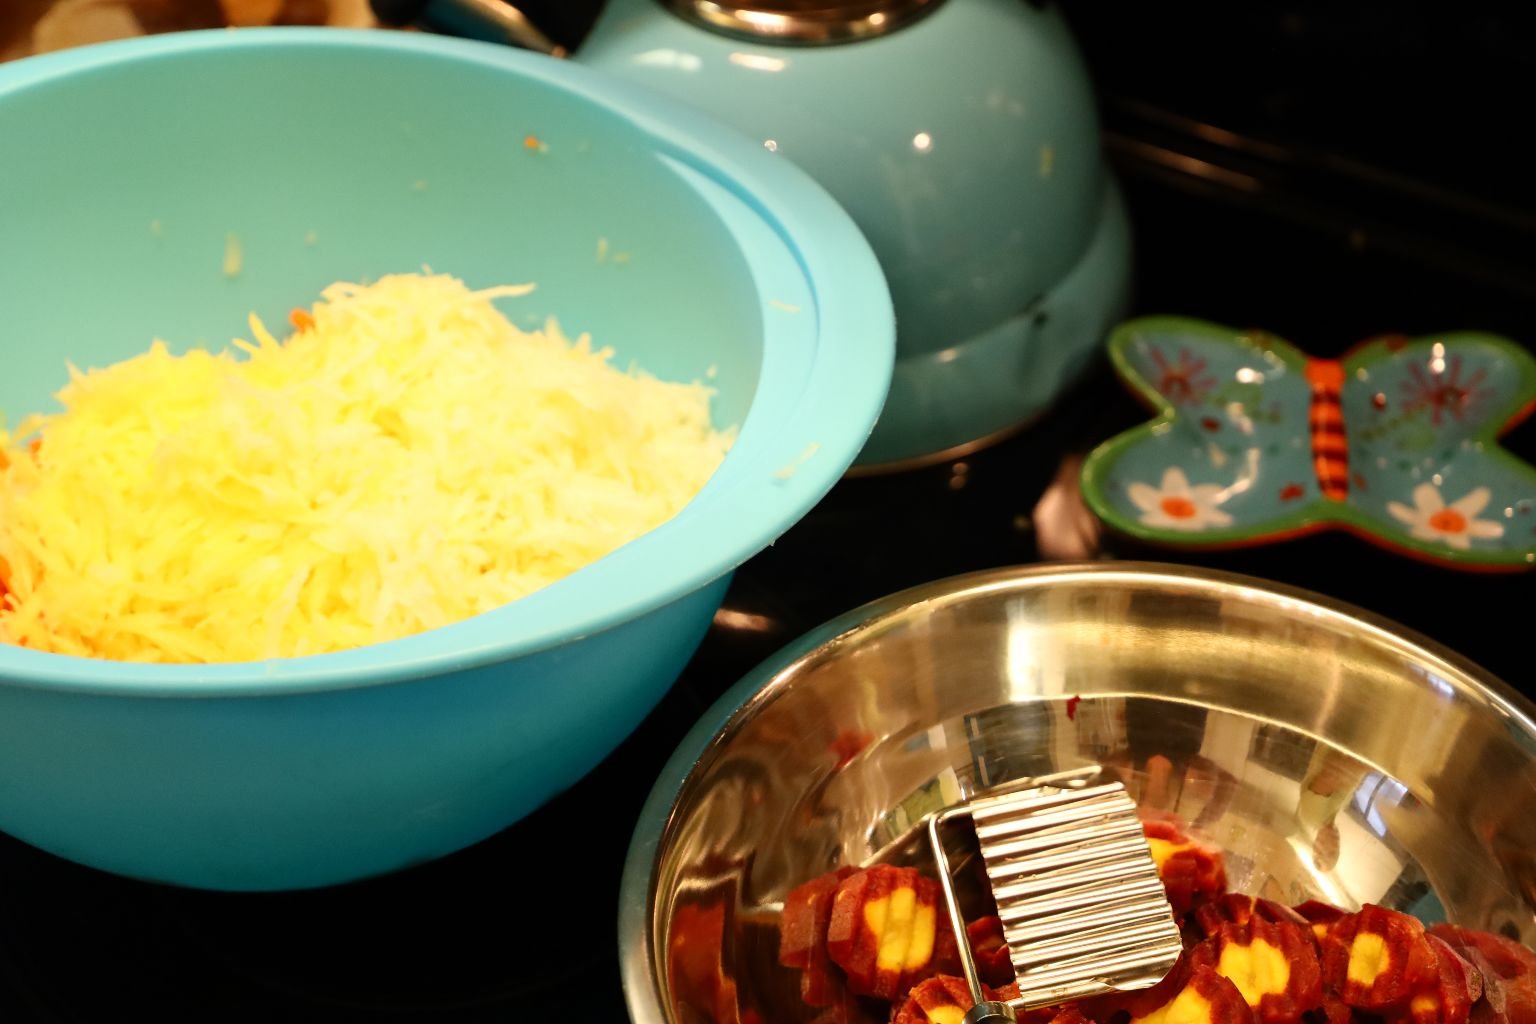
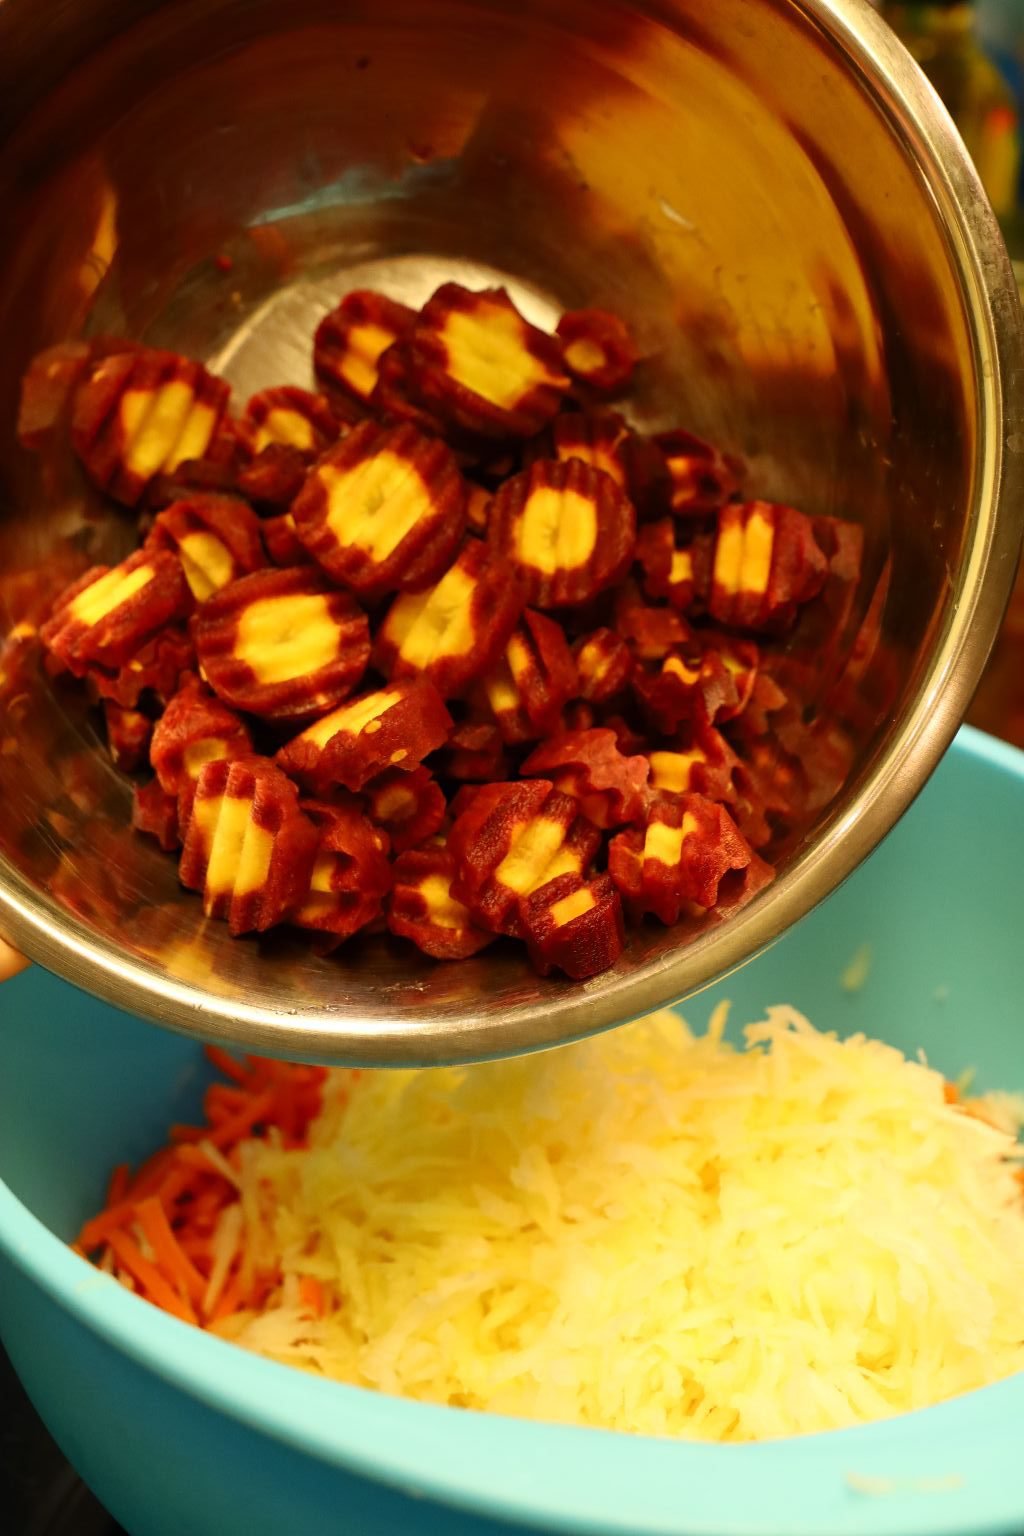
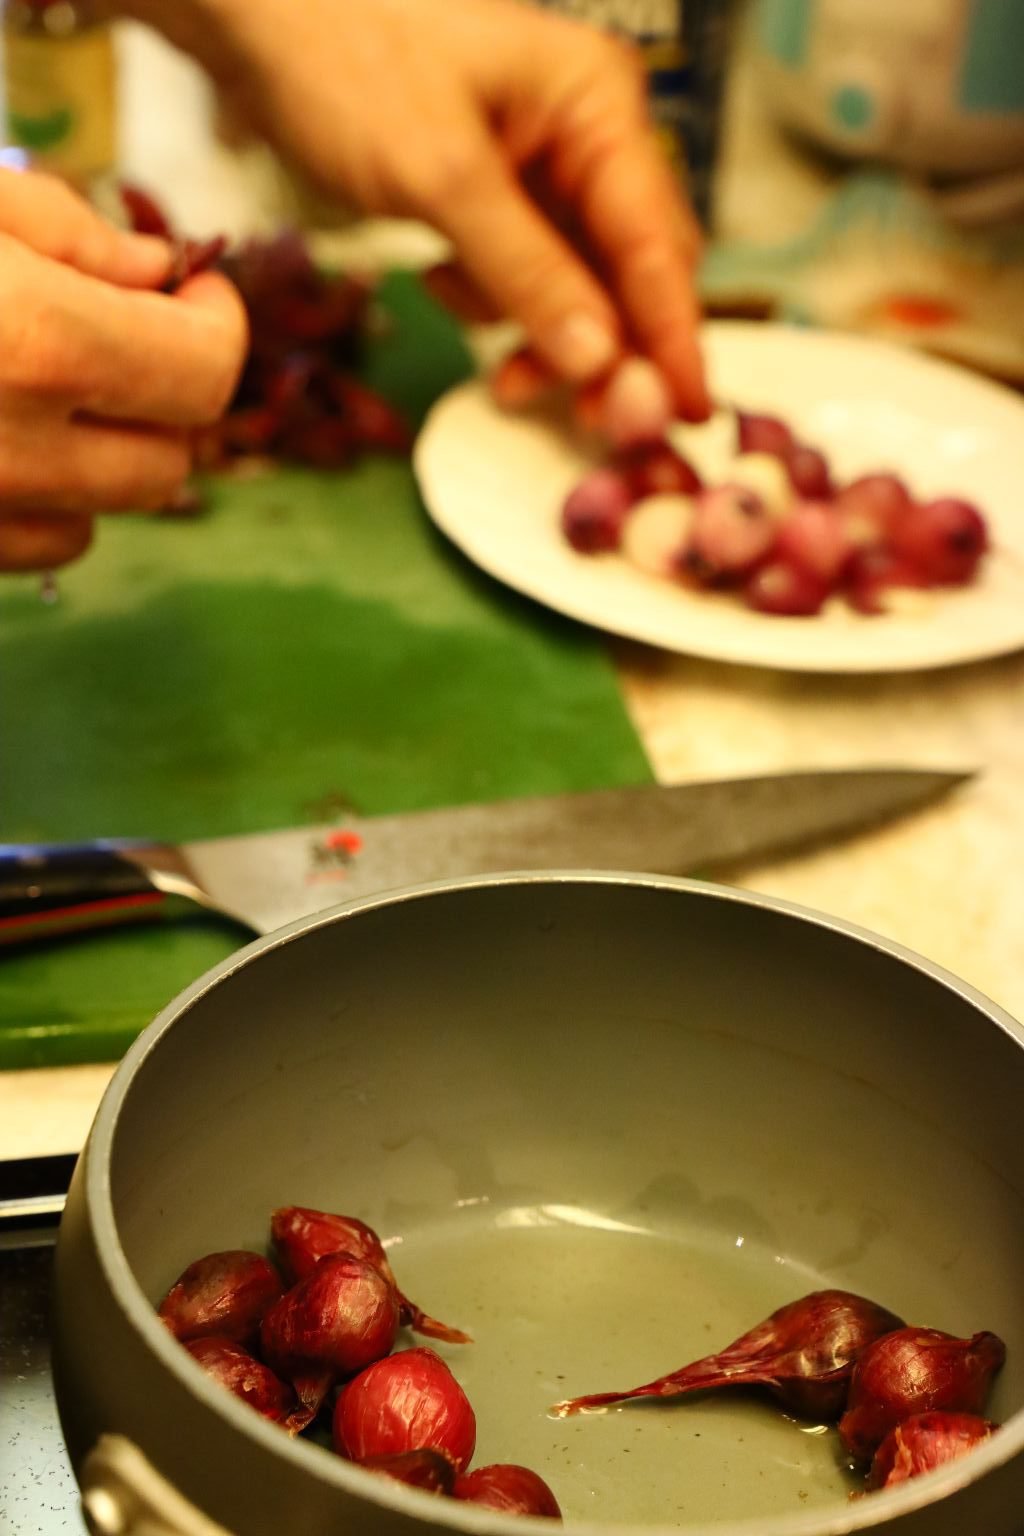
More of our Ingredients, Pictured
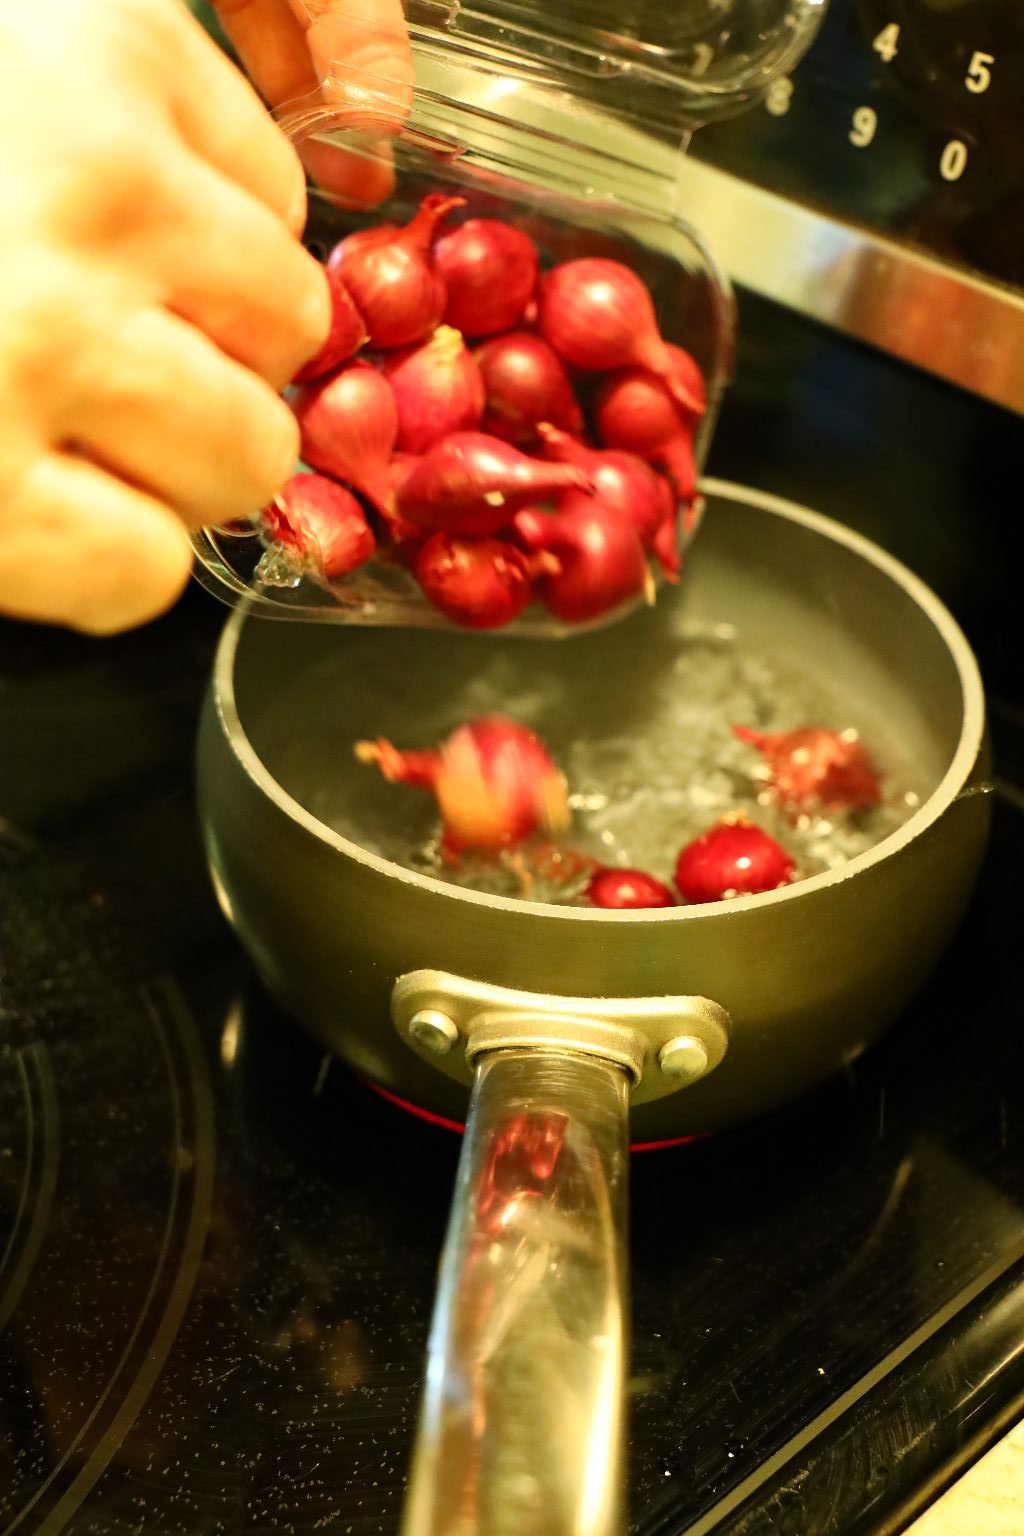
Place your Red Pearl Onions in a pot of water and begin to boil them for about 5 min.
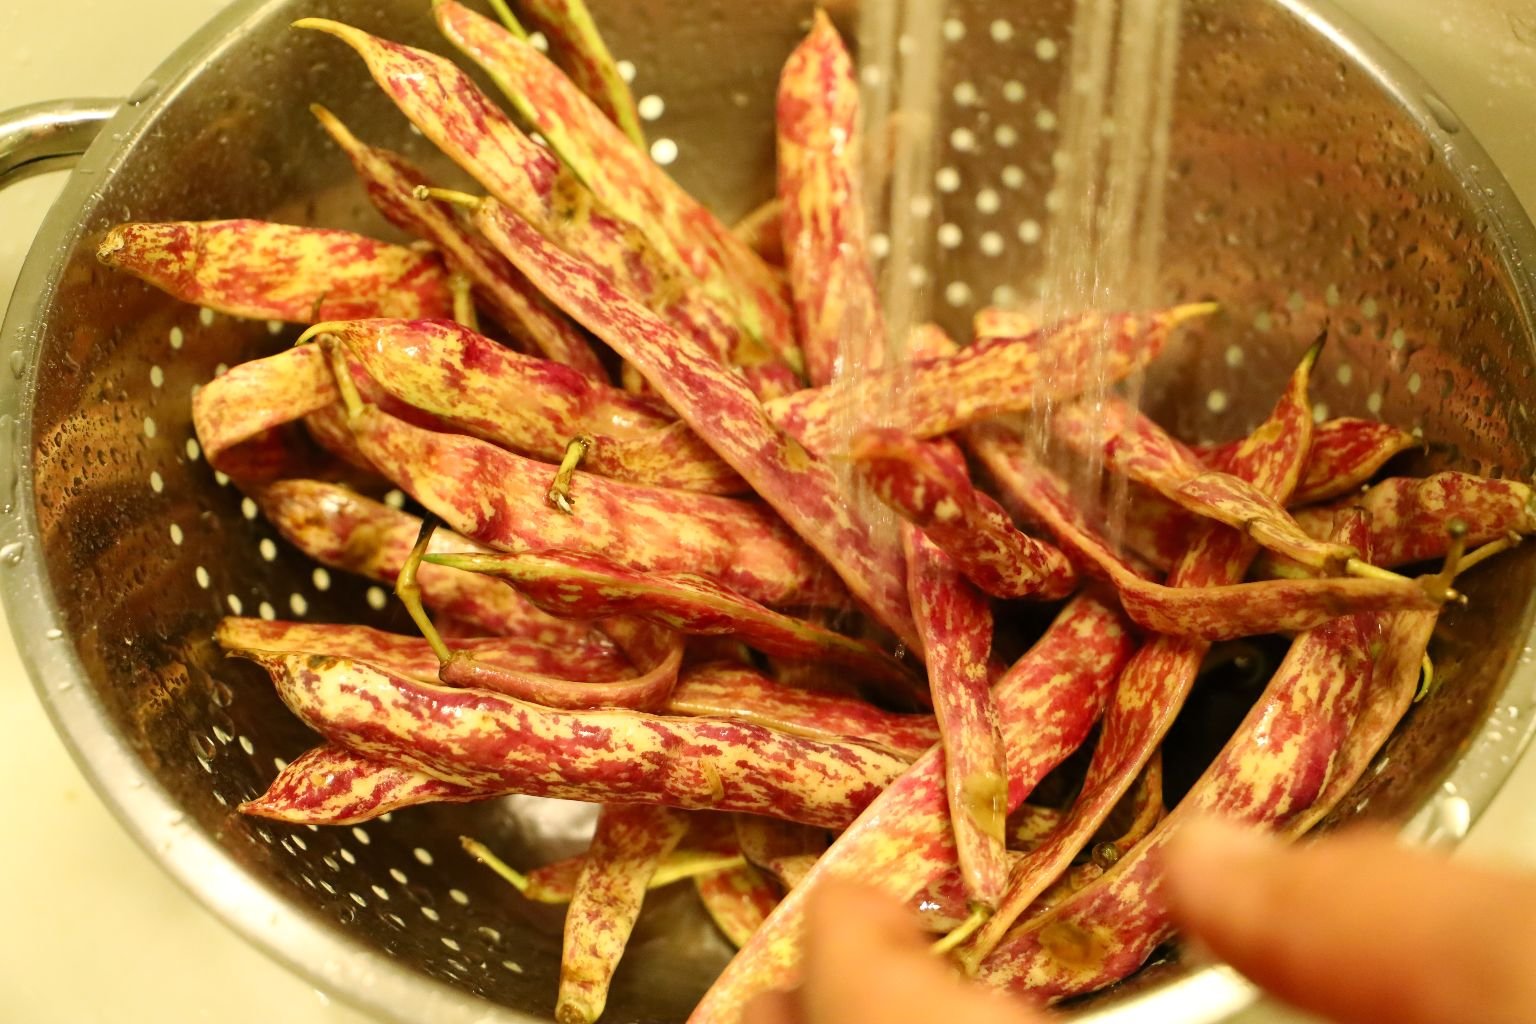
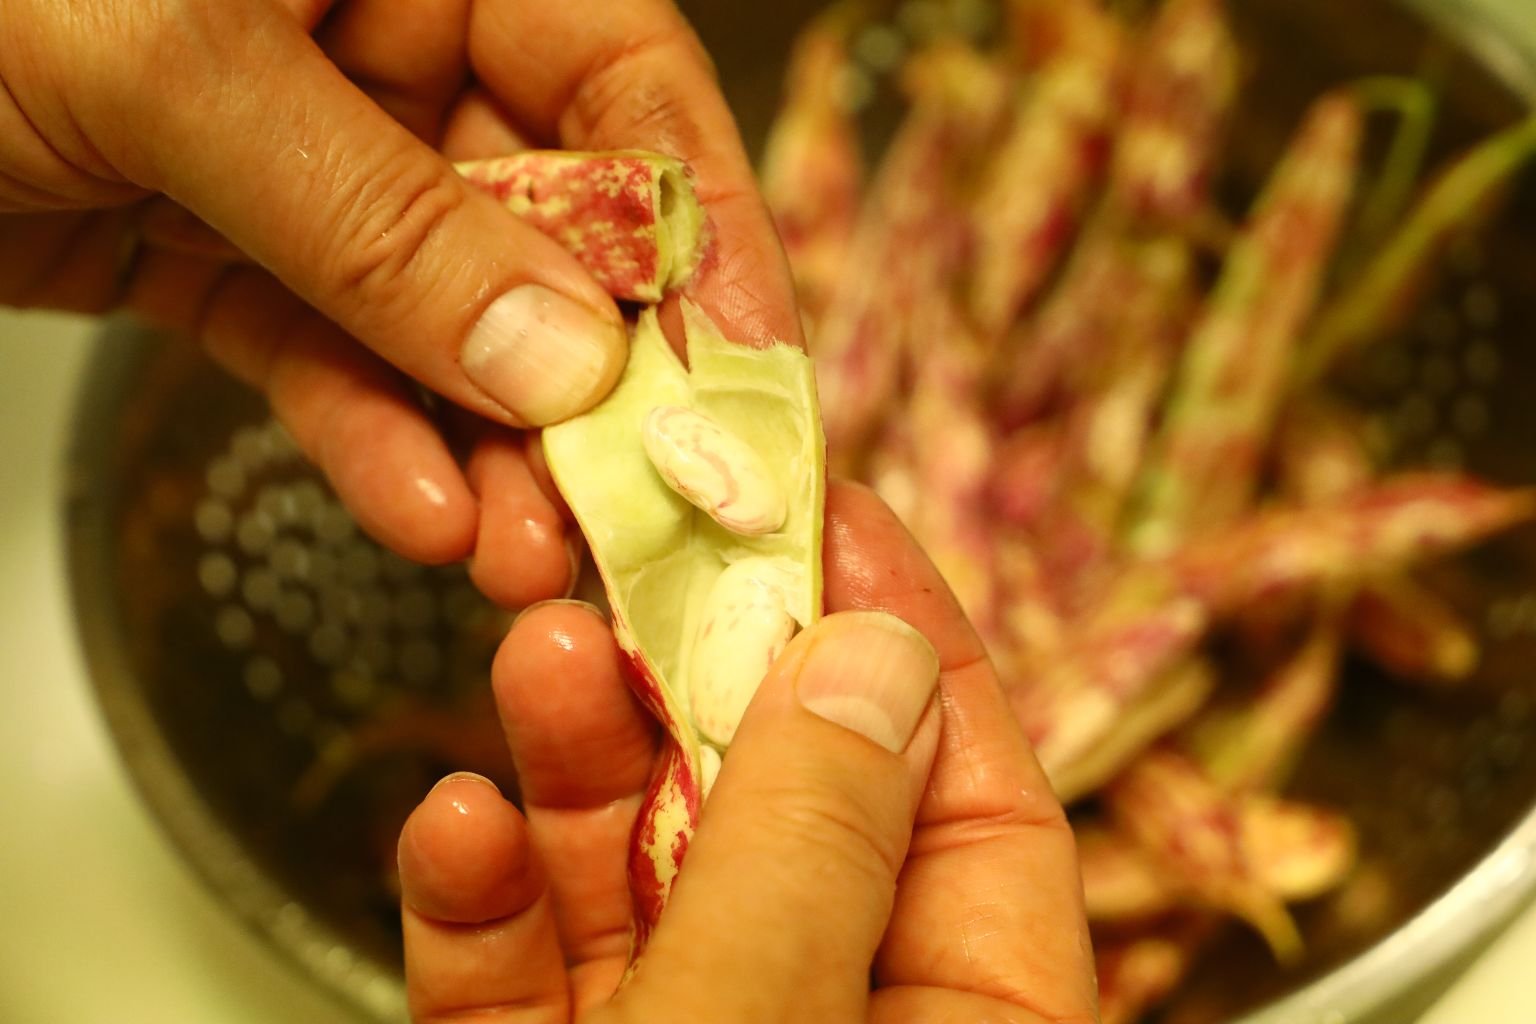
Here are the beautiful Cranberry bean pods
Rinse the bean pods then remove the beans as shown and place into a bowl.
————————————————————-

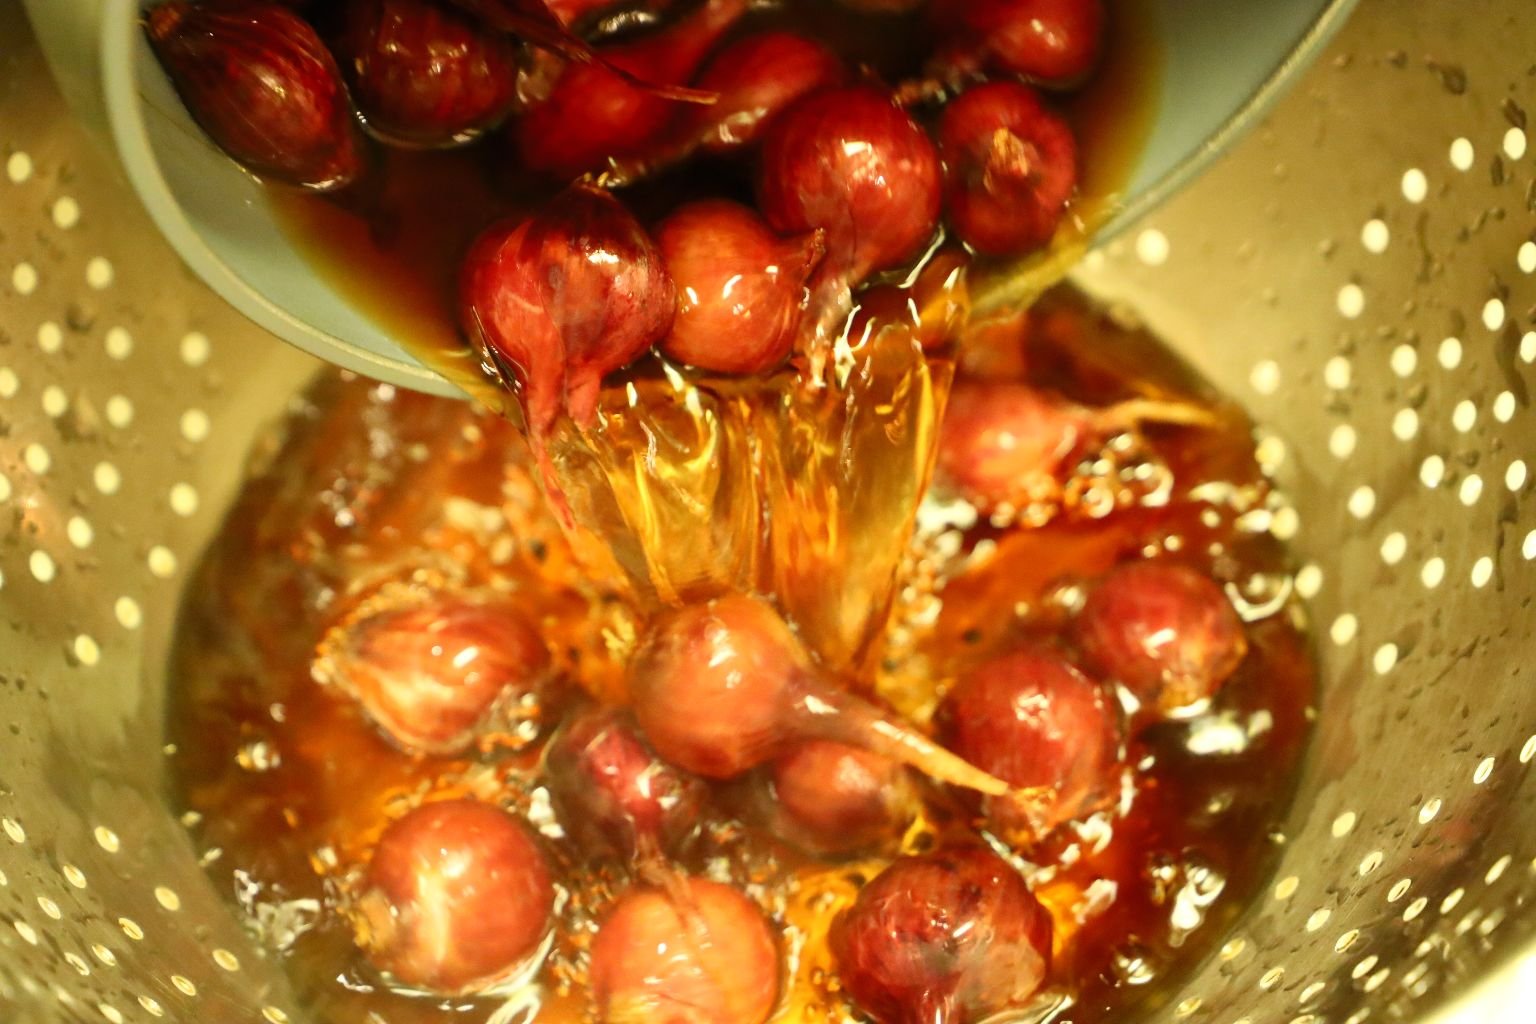
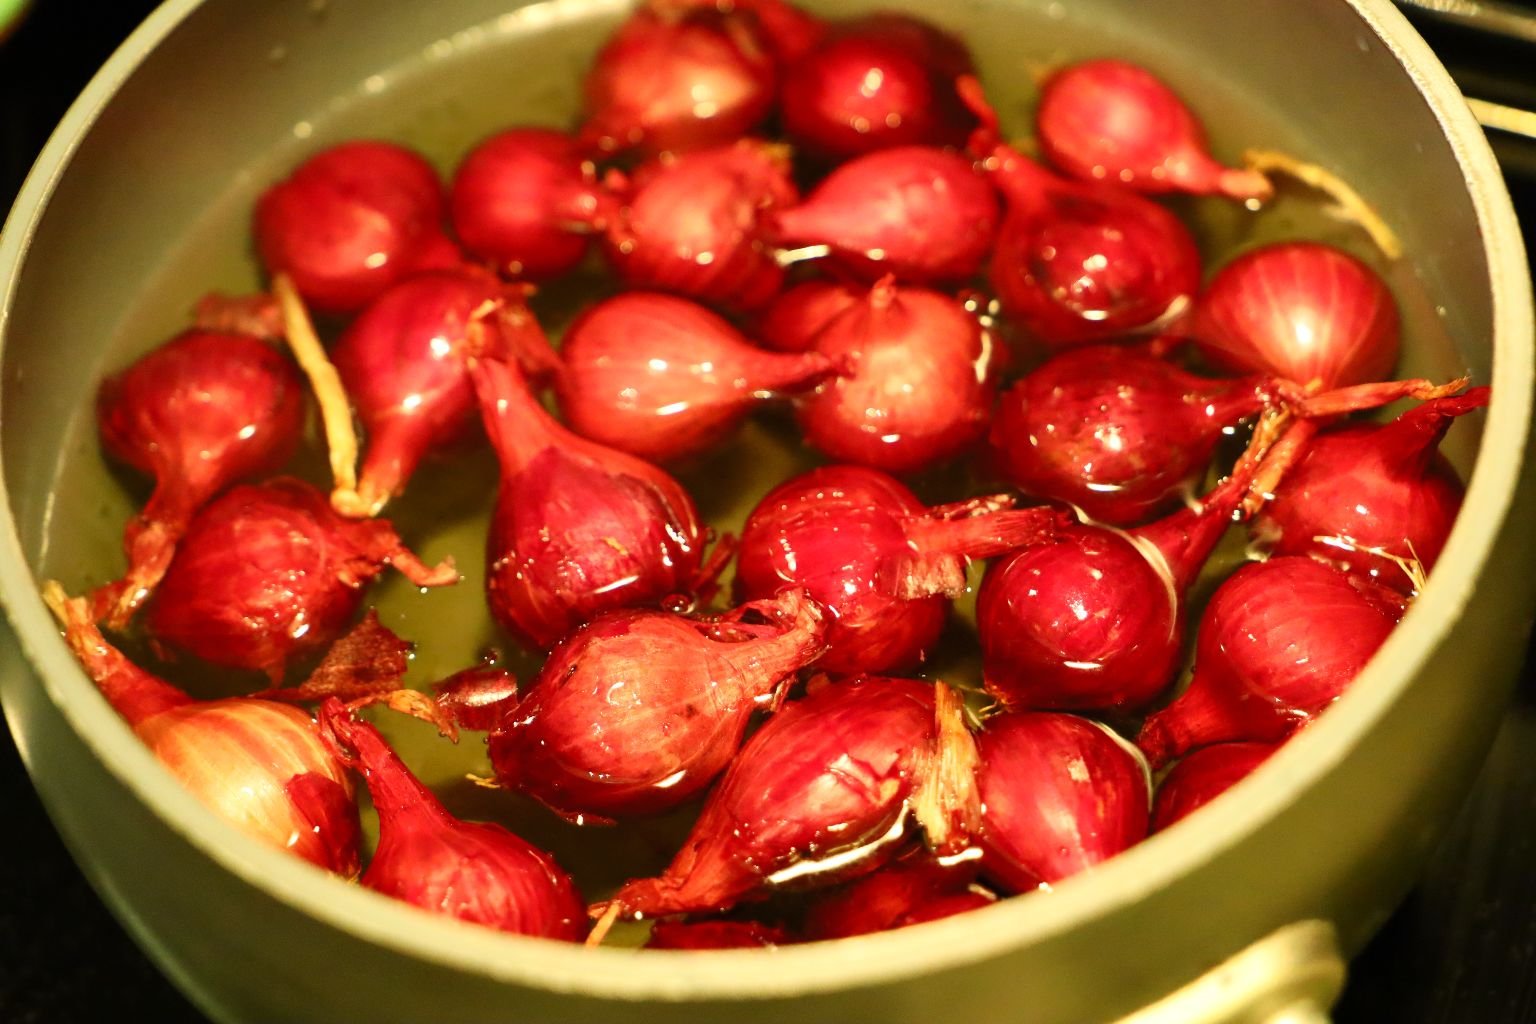
After the onions have boiled for 5 min. remove them into a colander and rinse them with cold water until lukewarm to stop the cooking process.
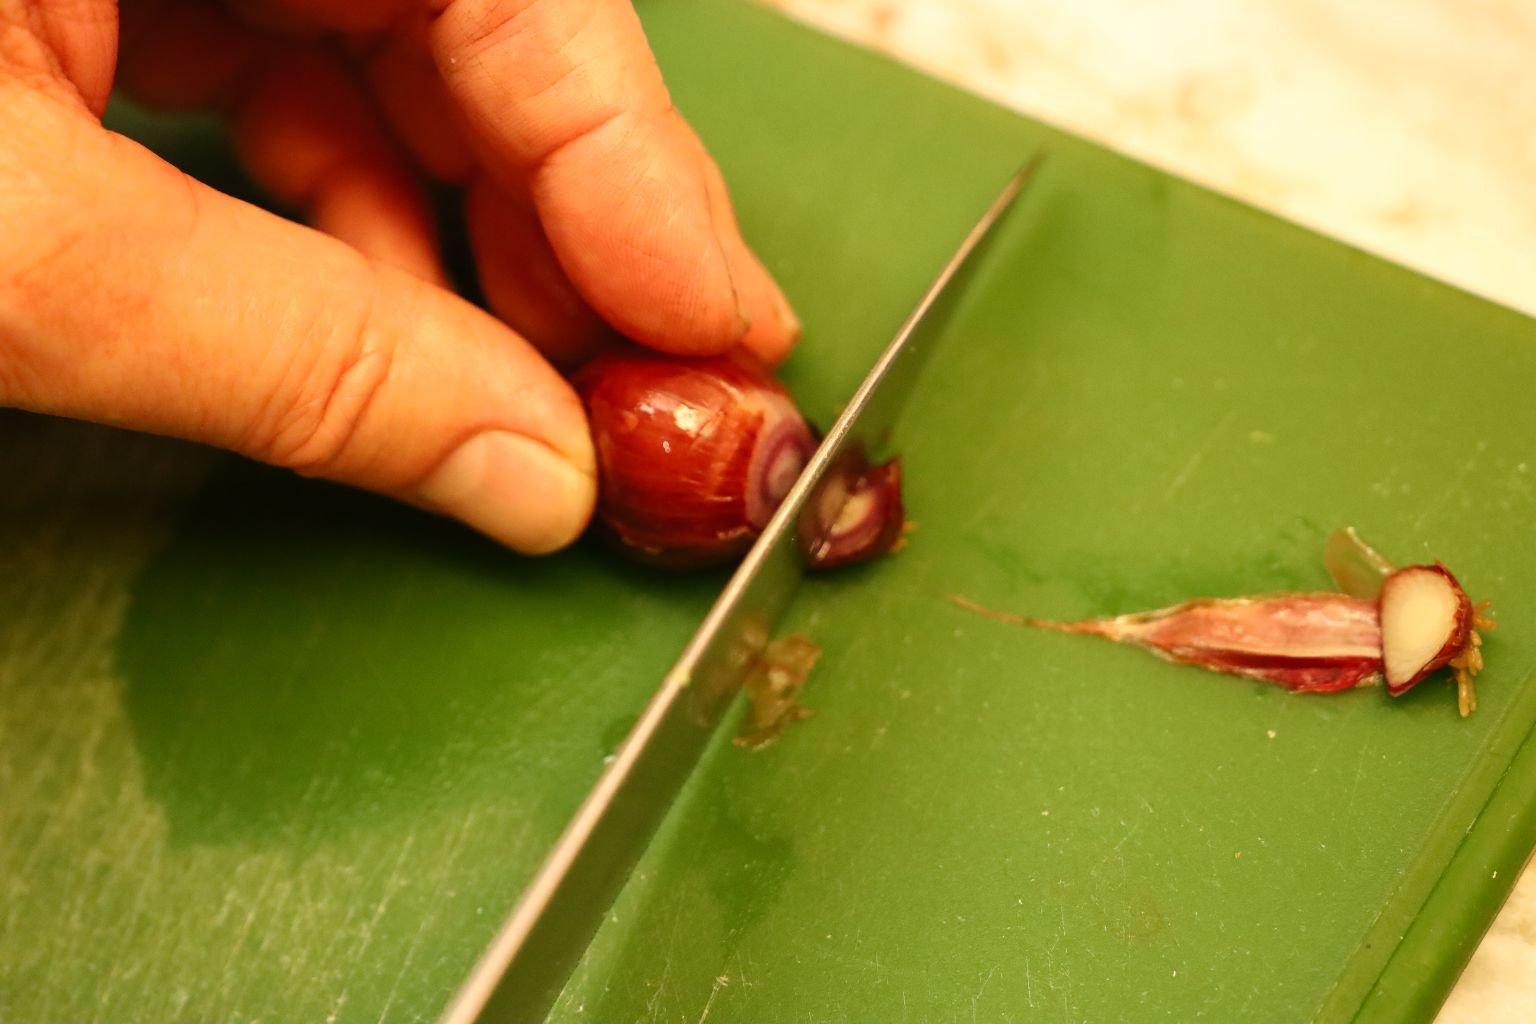
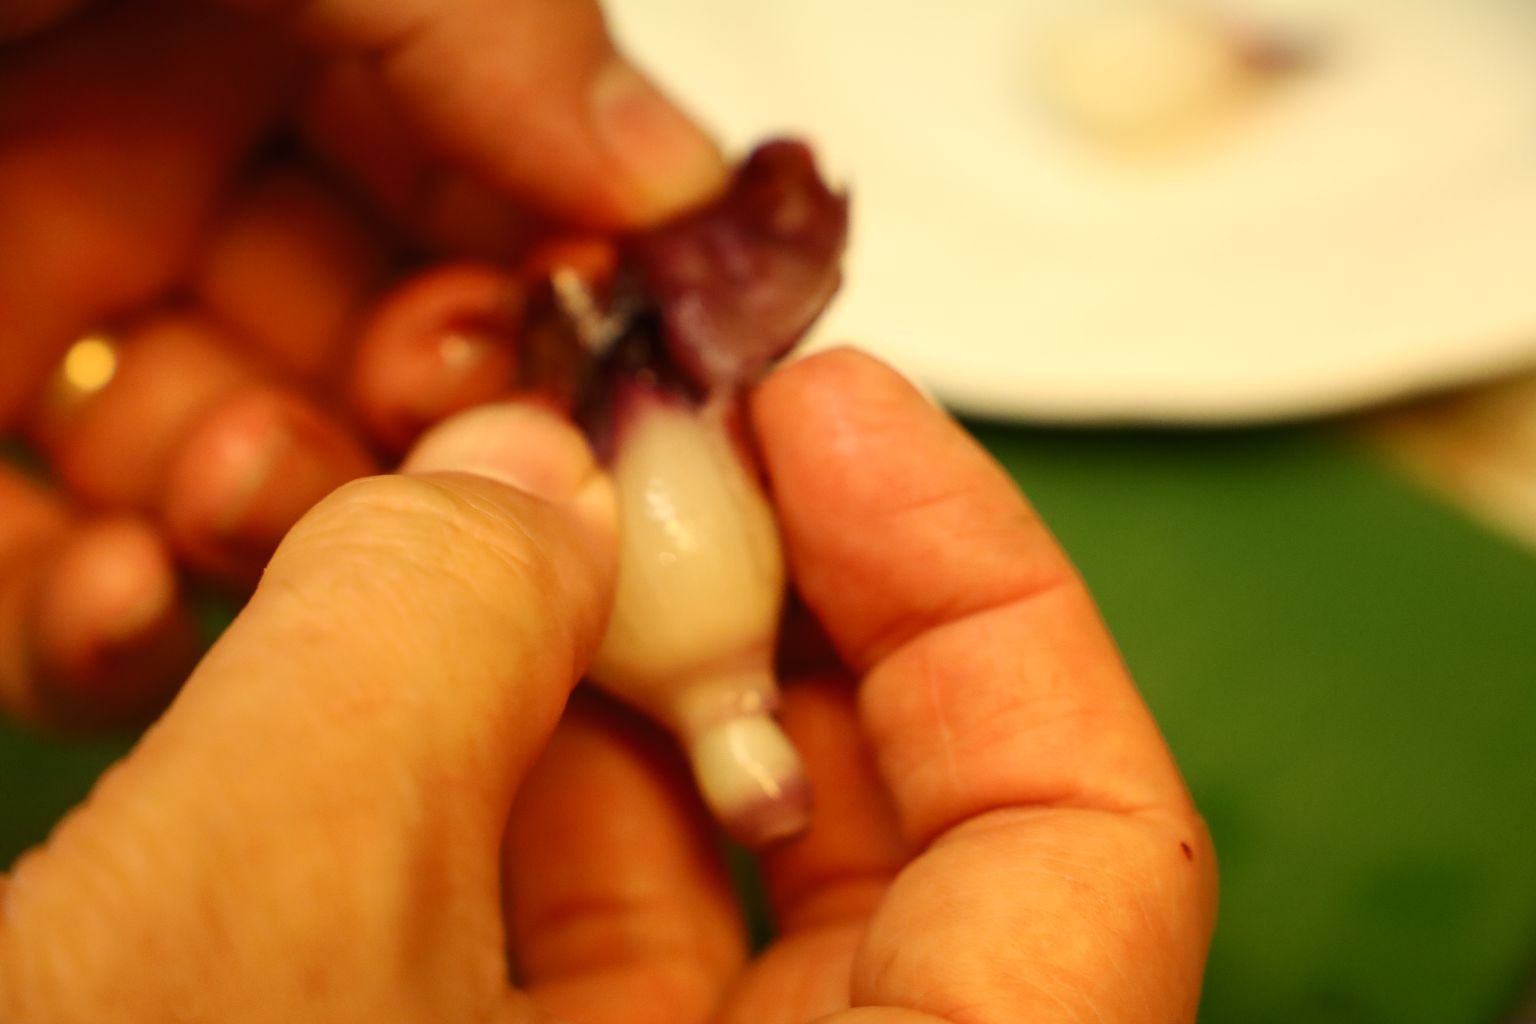
When cooled, slice off the root end and squeeze out the onion.
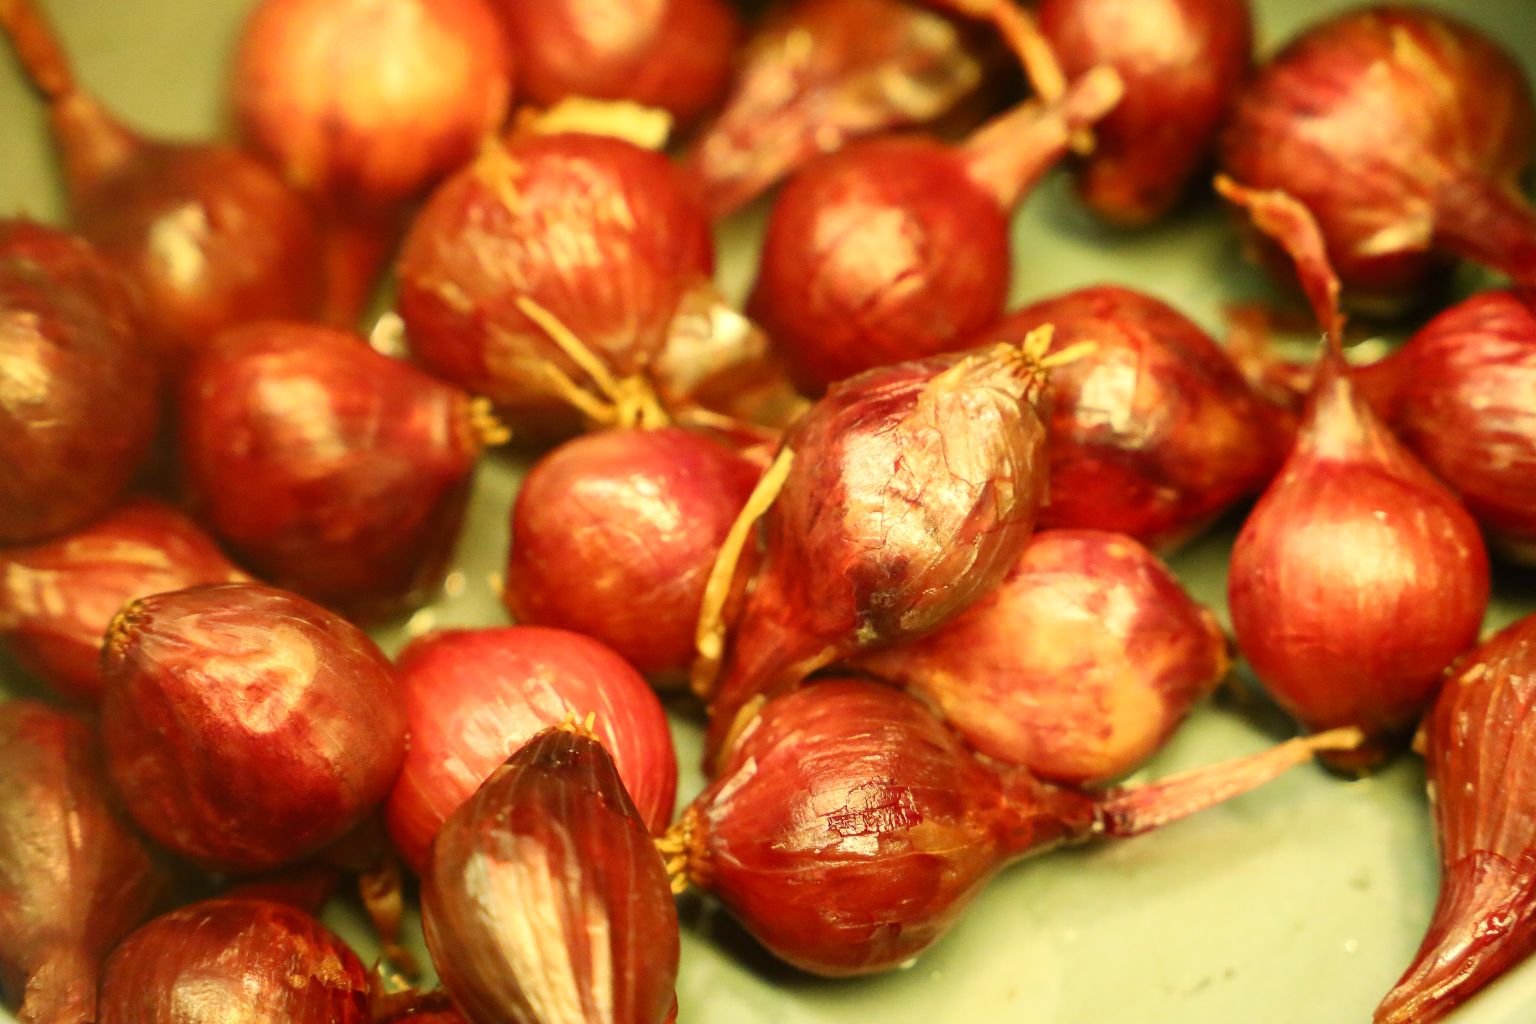
Here are all the onions after they were cooked.
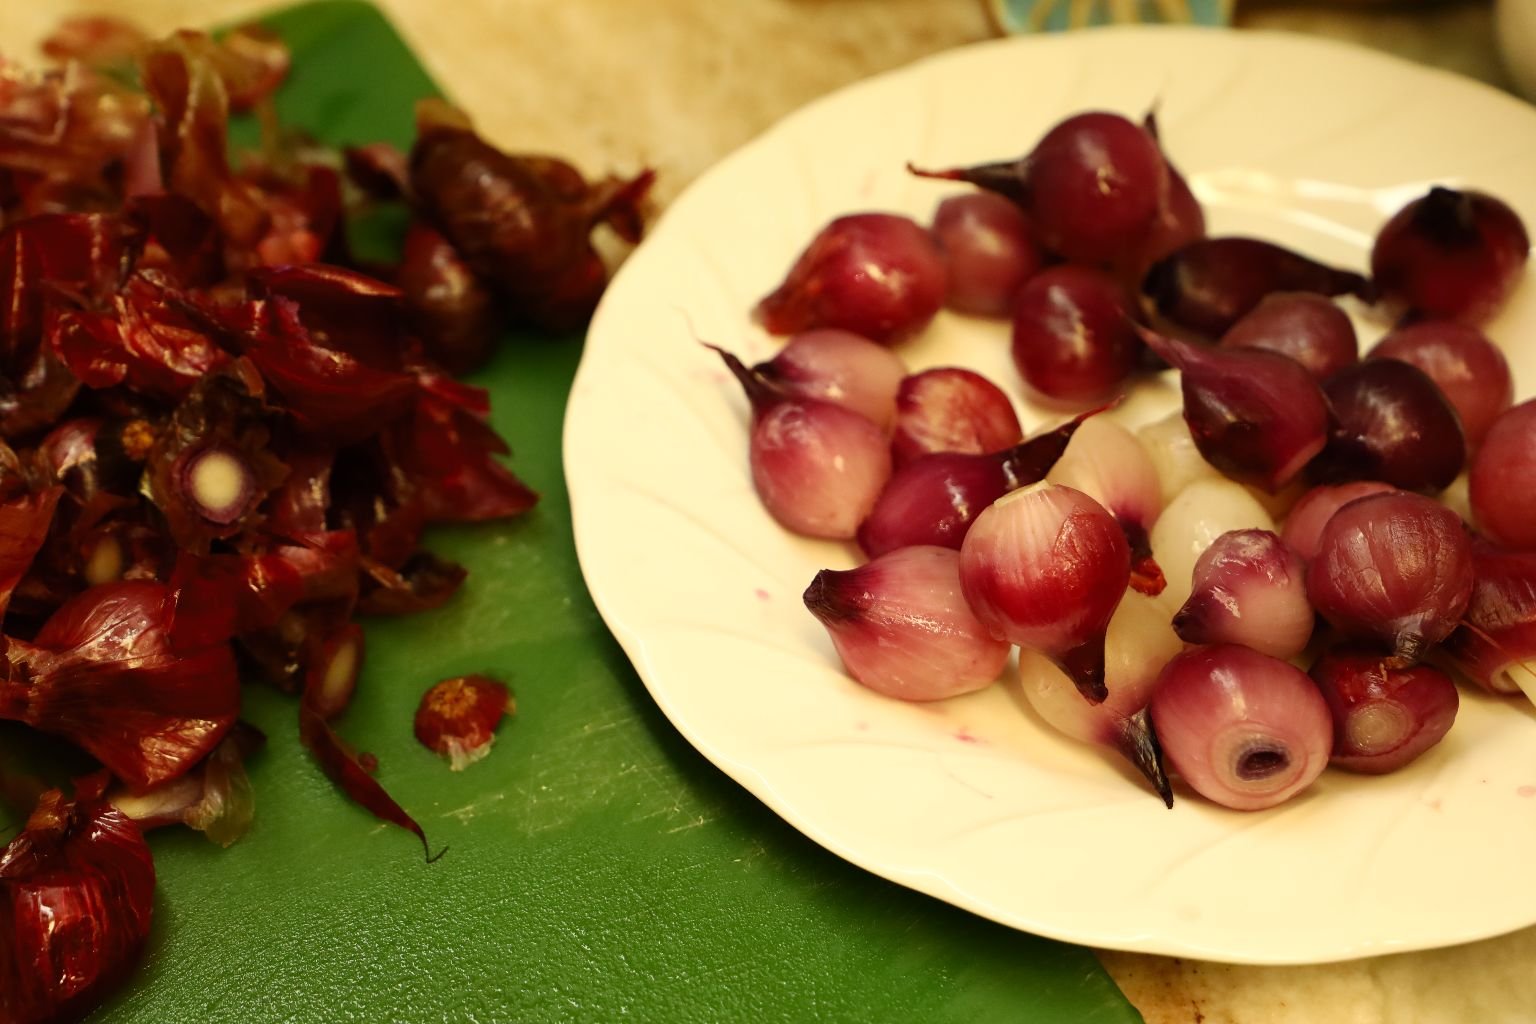
Remove the onions from their exterior skins and place on a plate as shown.
—————————————————————–
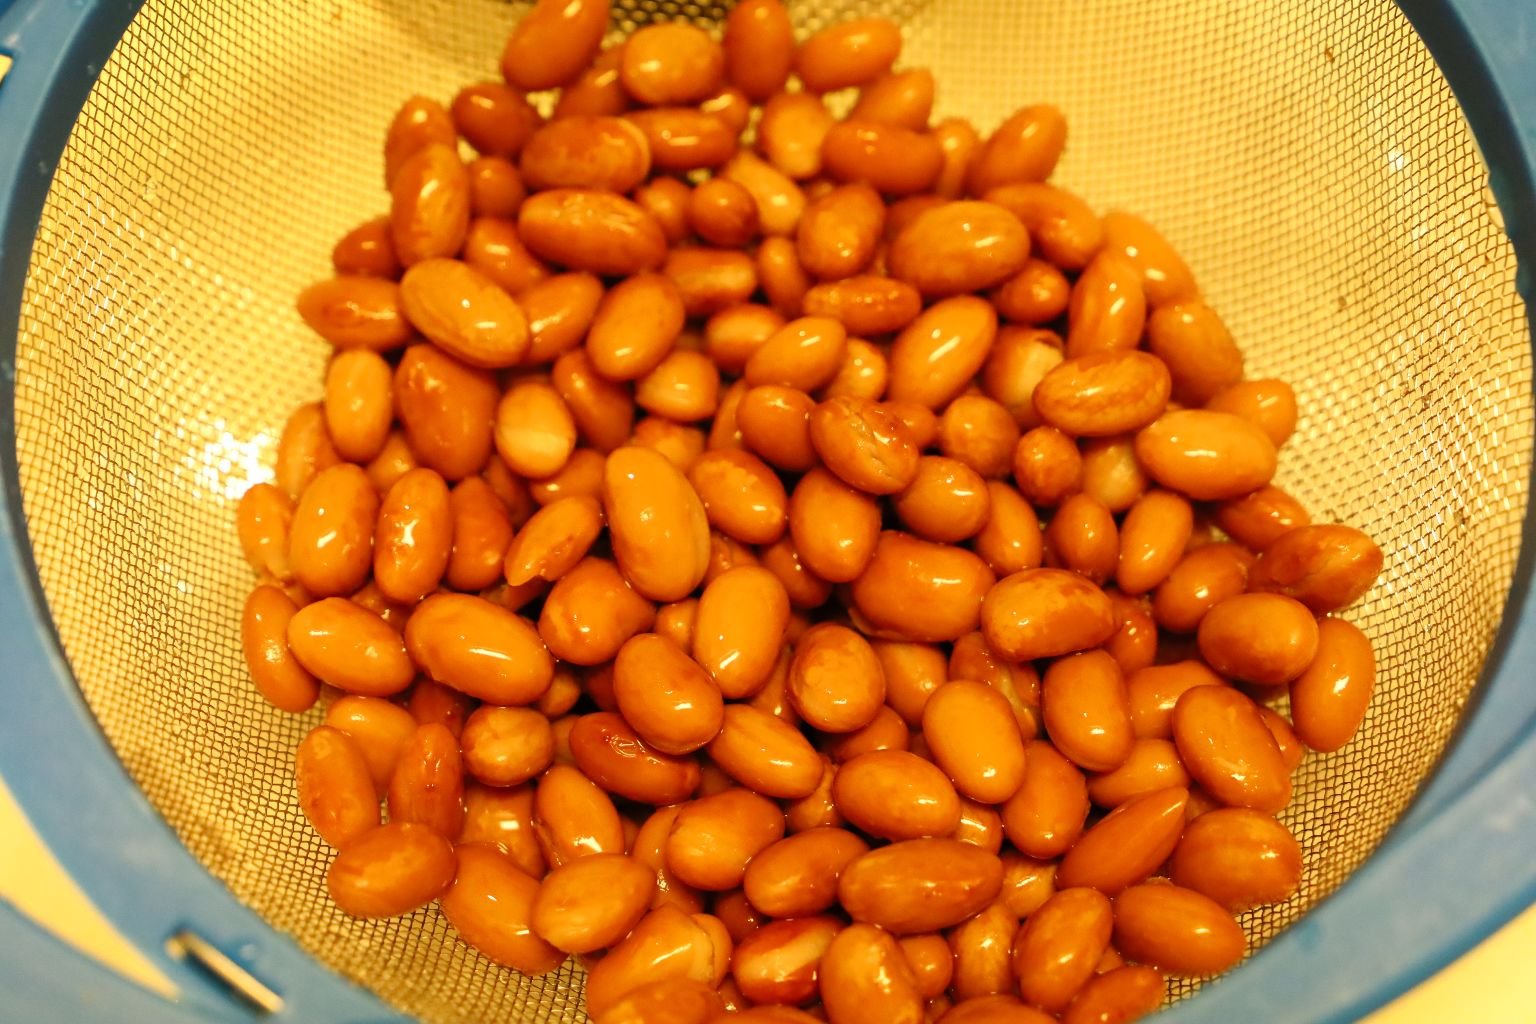
Remove the Roman Beans from the can and rinse them using a colander.
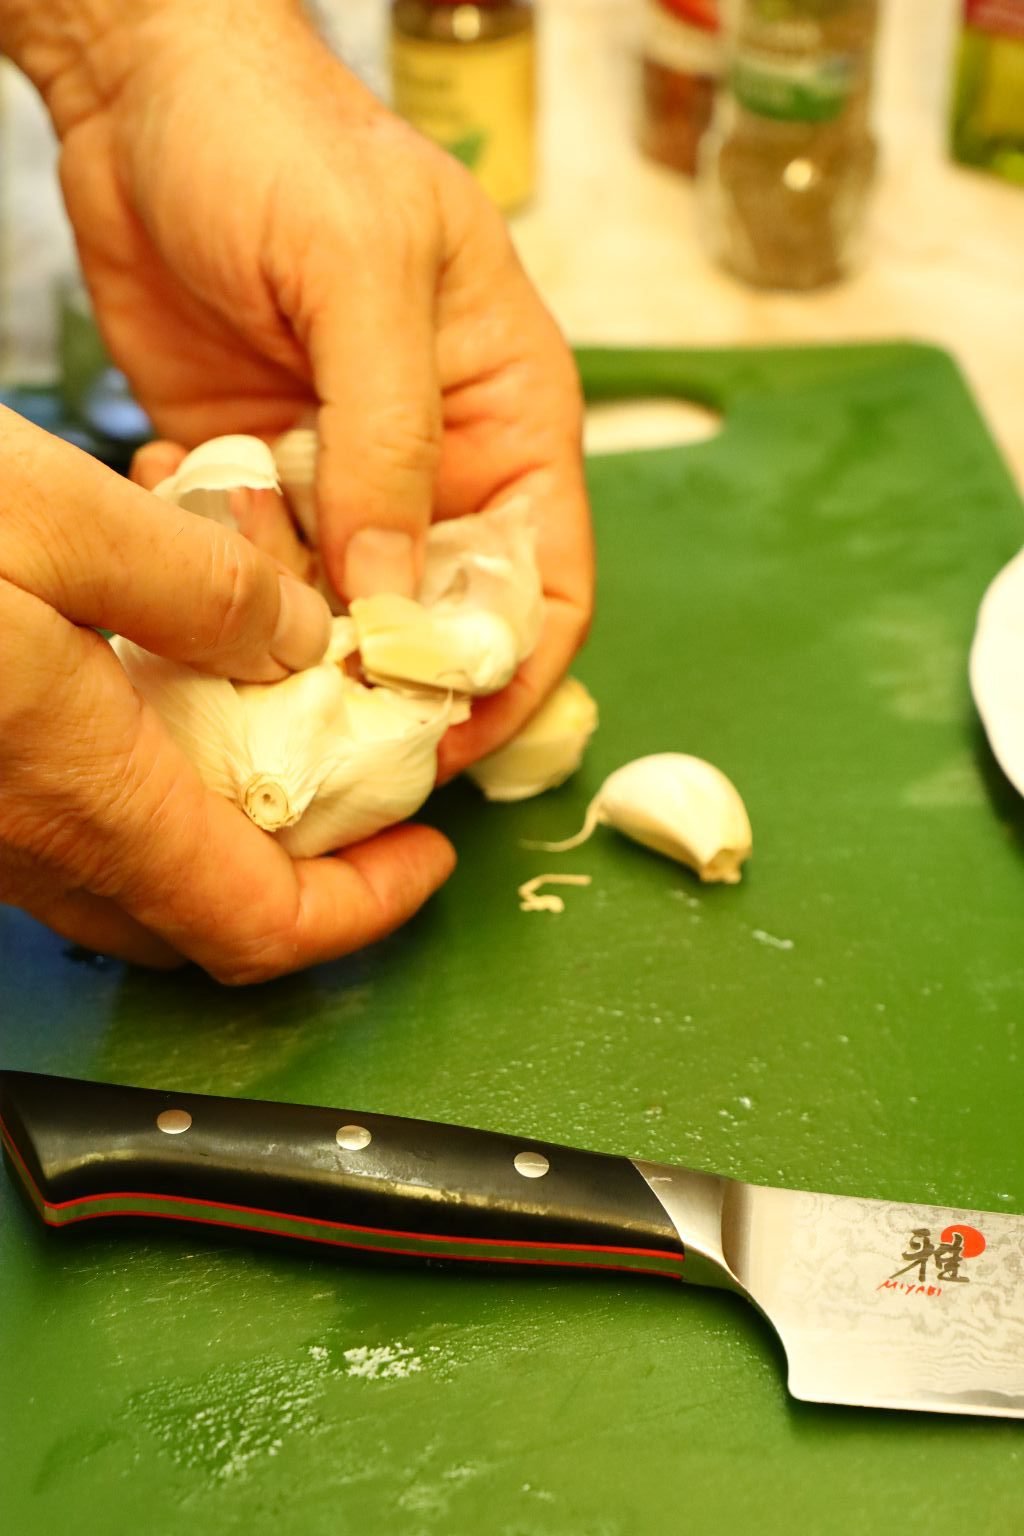
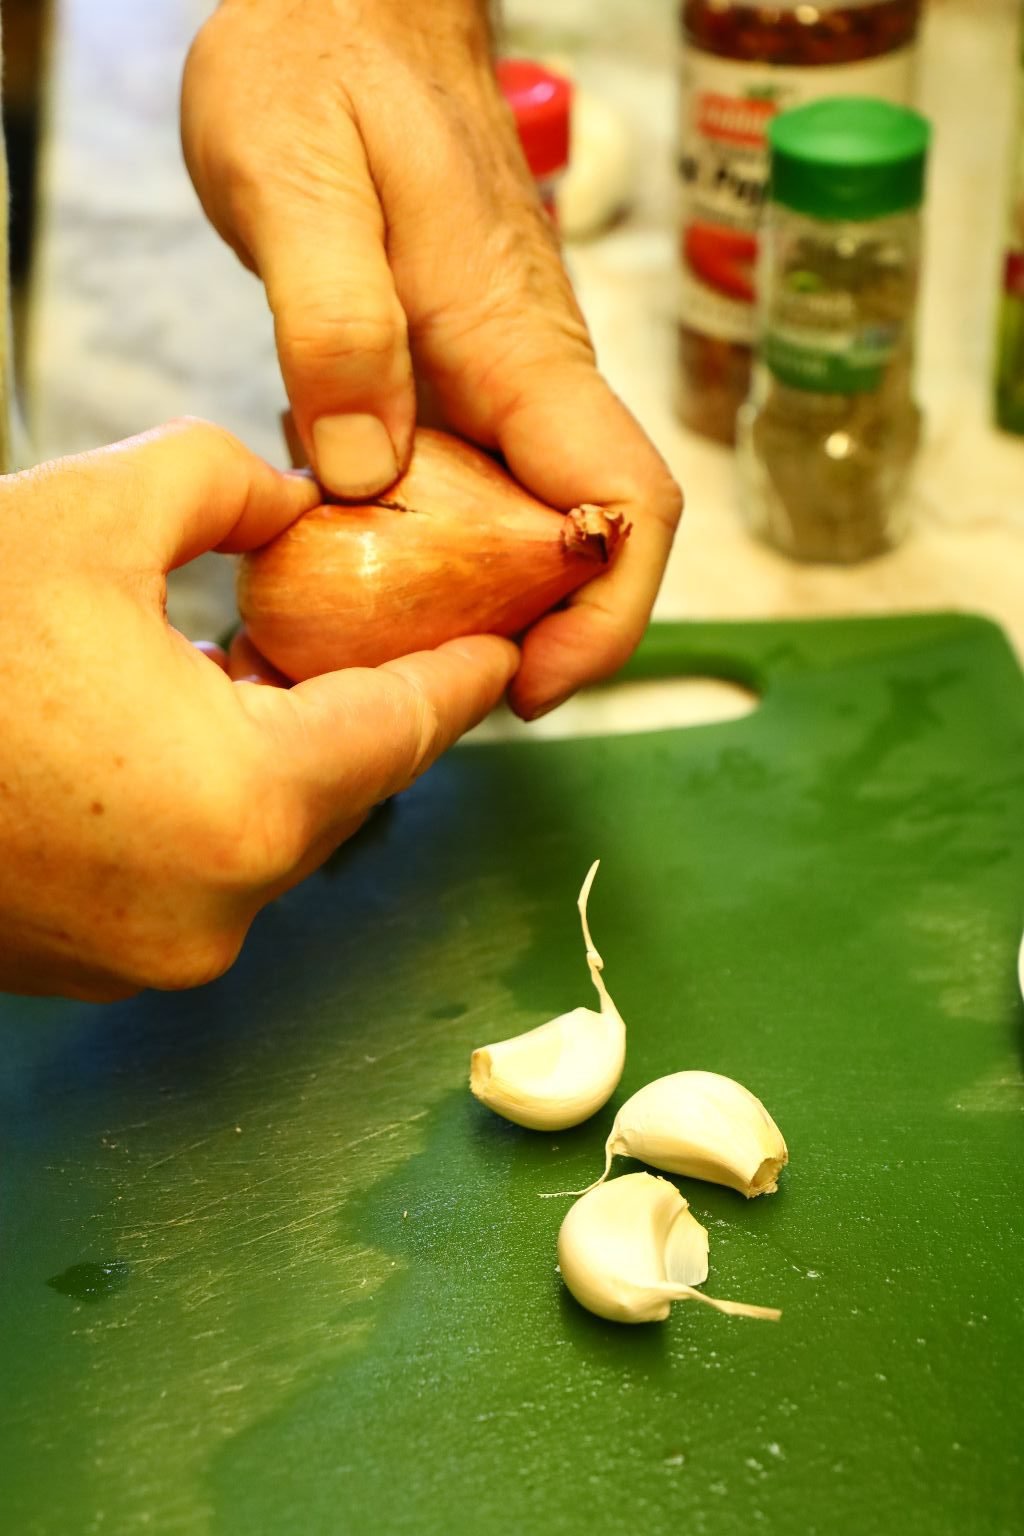

Remove three garlic cloves and use half of a large shallot.
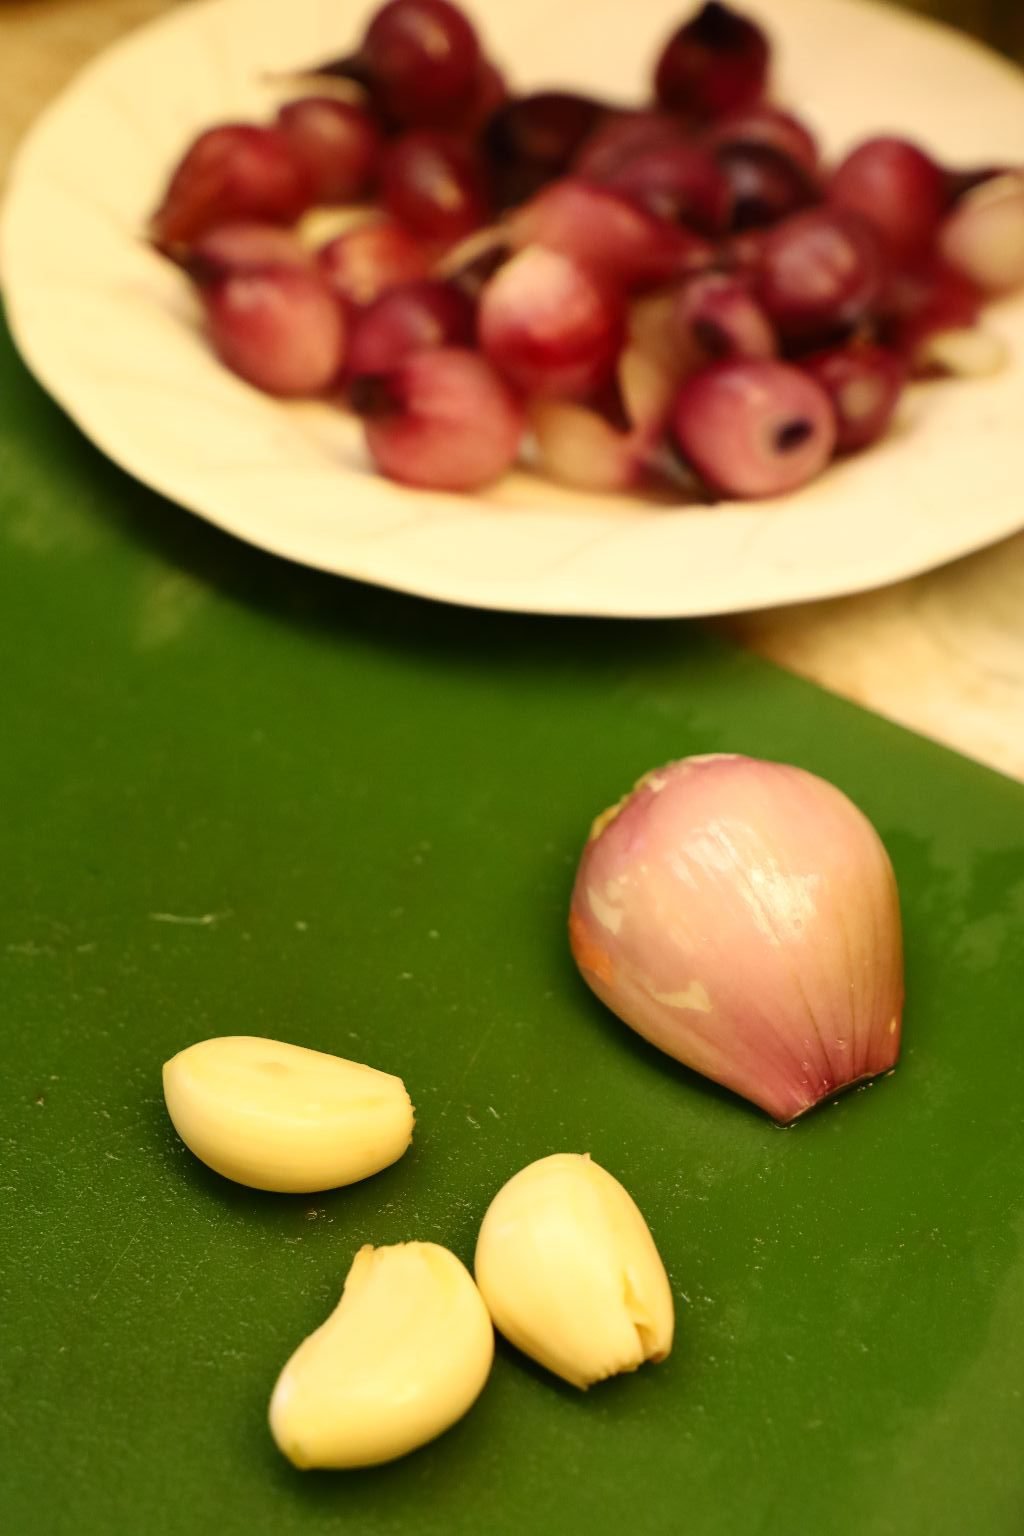
Here are the garlic, and half a shallot ready for slicing.
—————————————————————-
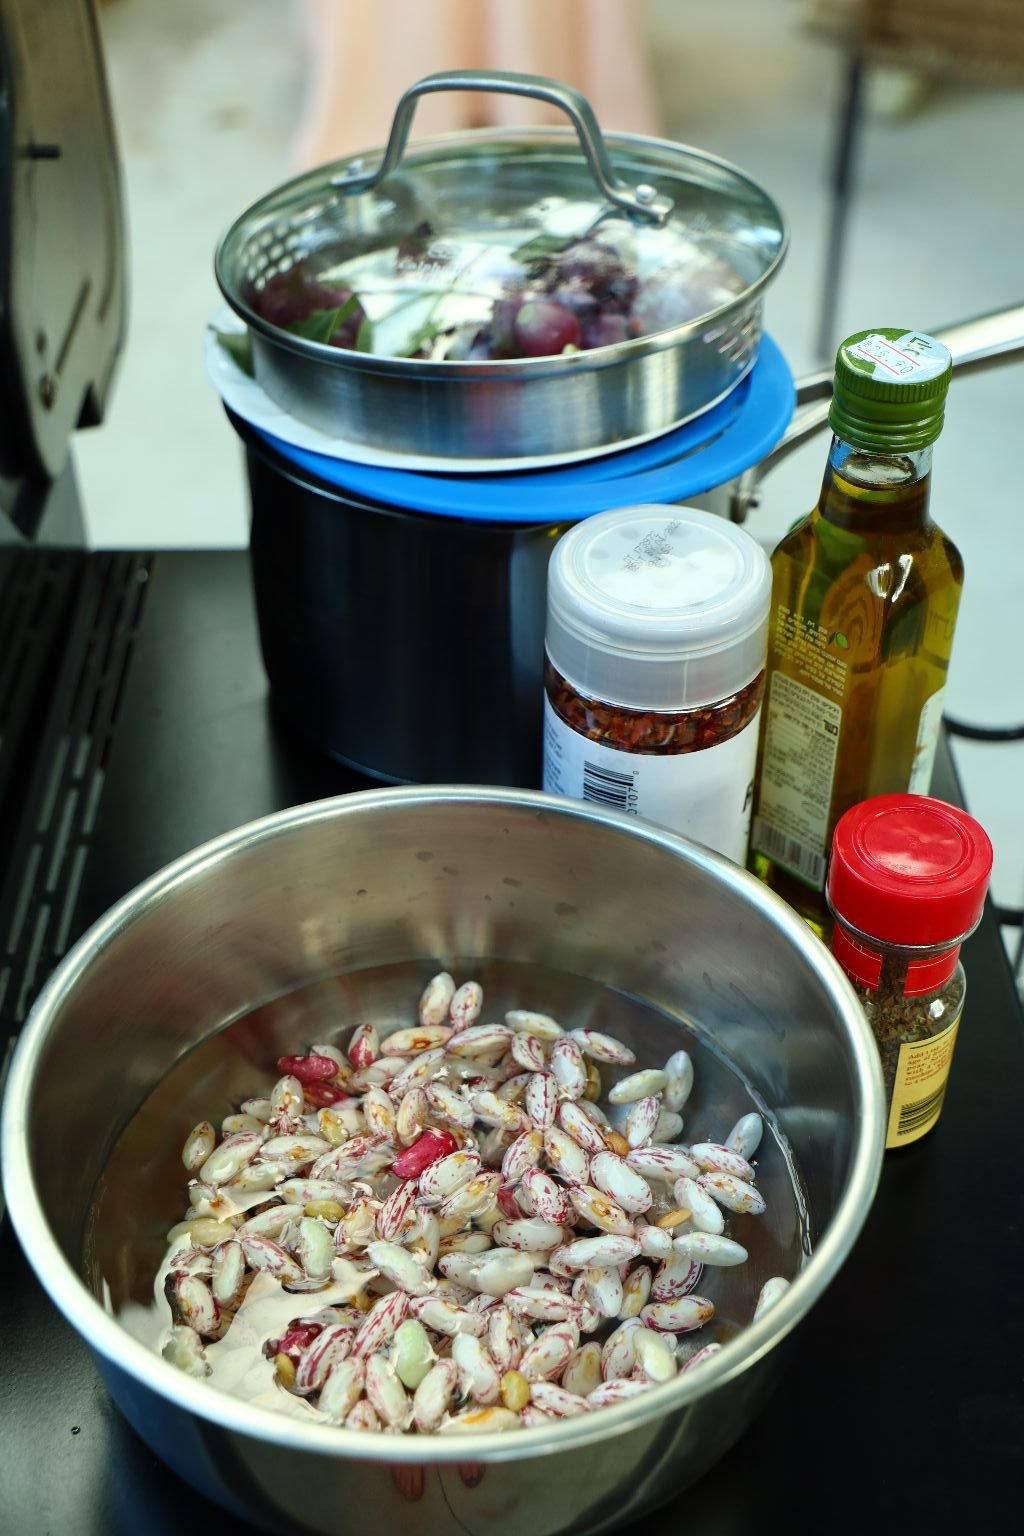
Place the Cranberry beans in a medium pot of slightly salted water. The water should be just an inch or
more over the beans.
Place about 2-3 Tbsp. olive oil into a medium pot.
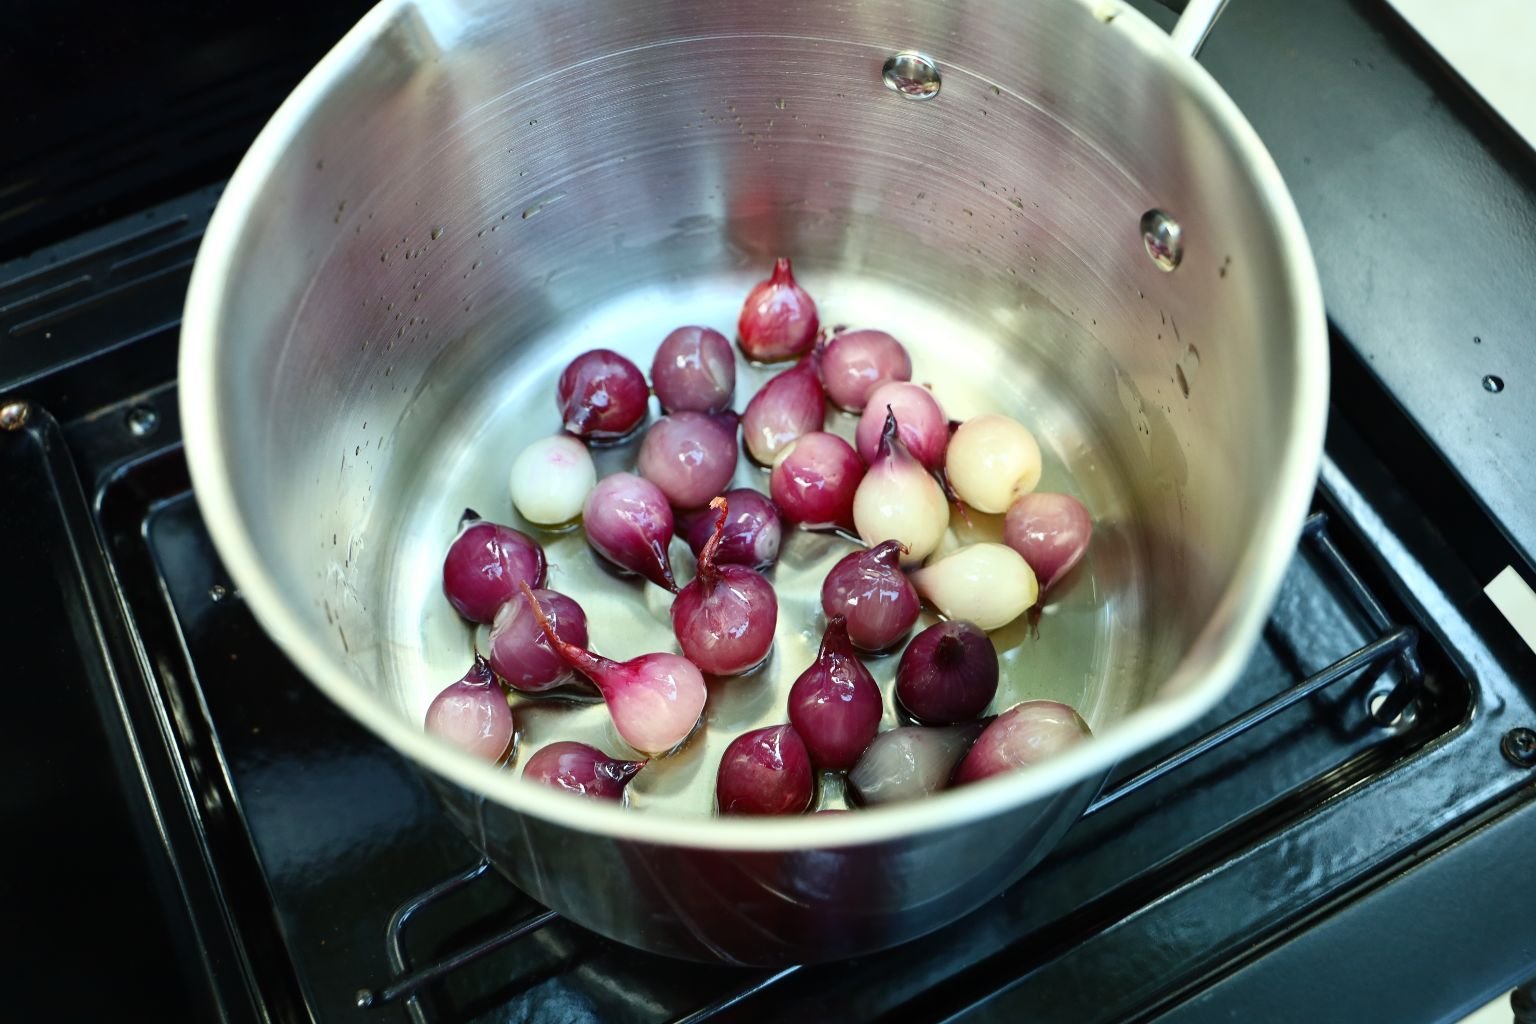
Here are all the Red Pearl Onions from above, in the pot.
Here are the Roman and Cranberry Beans at the ready with the other seasonings. On the left of the
picture you can see the nice leg of lamb grilling.
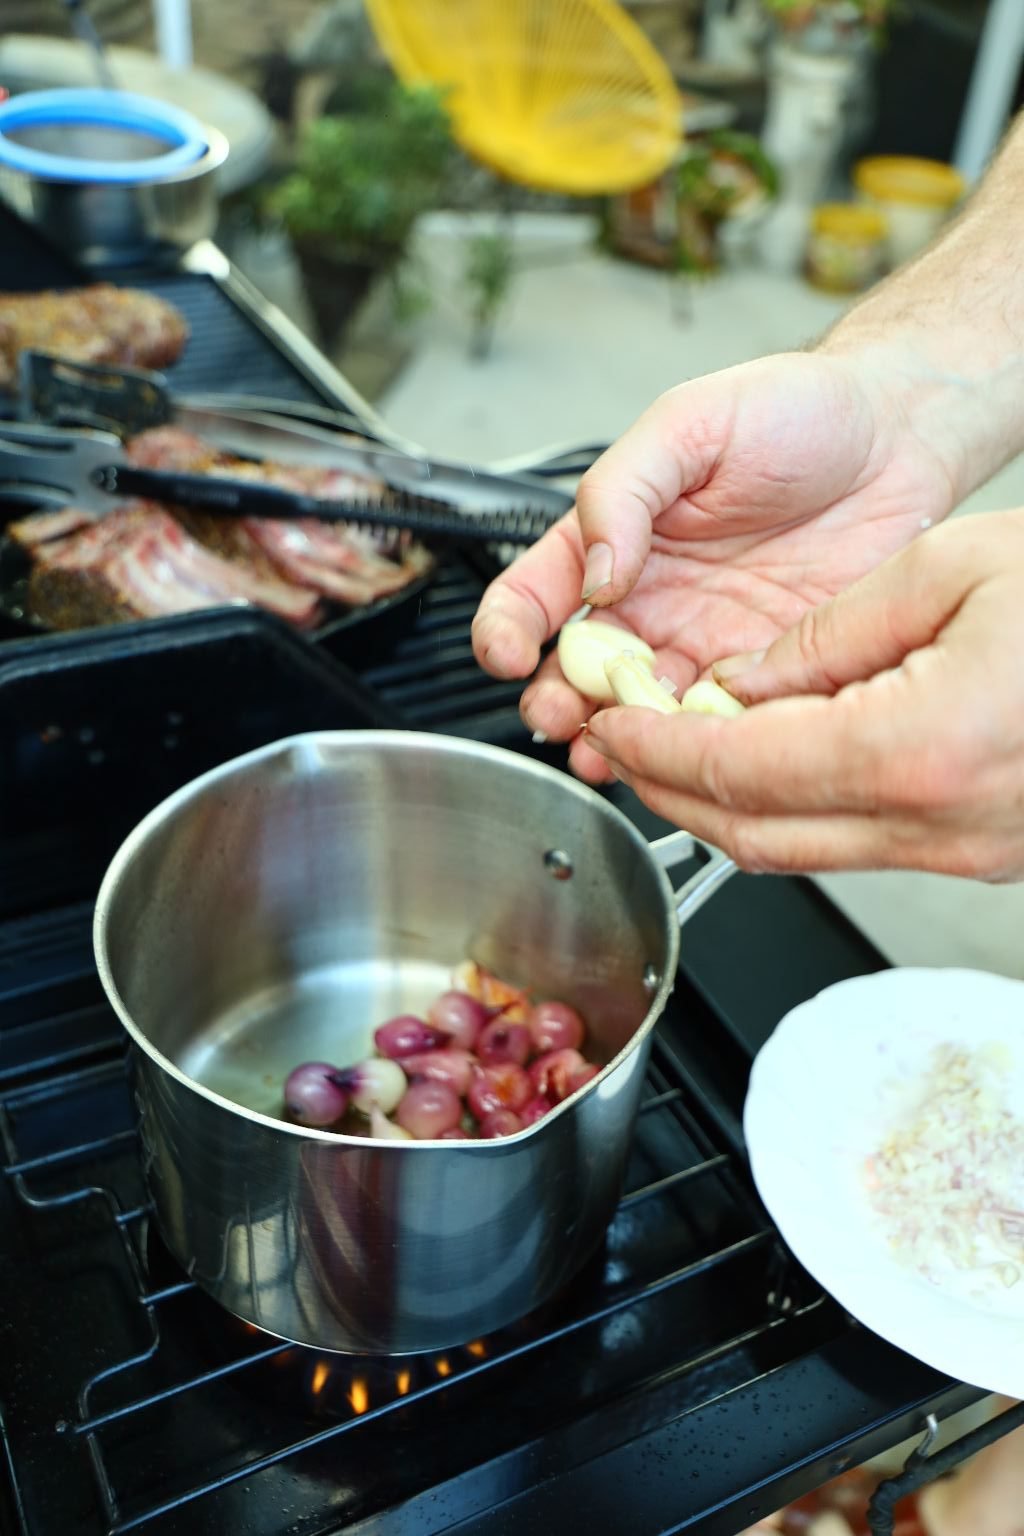
Place your onions over medium heat and begin the cooking process.
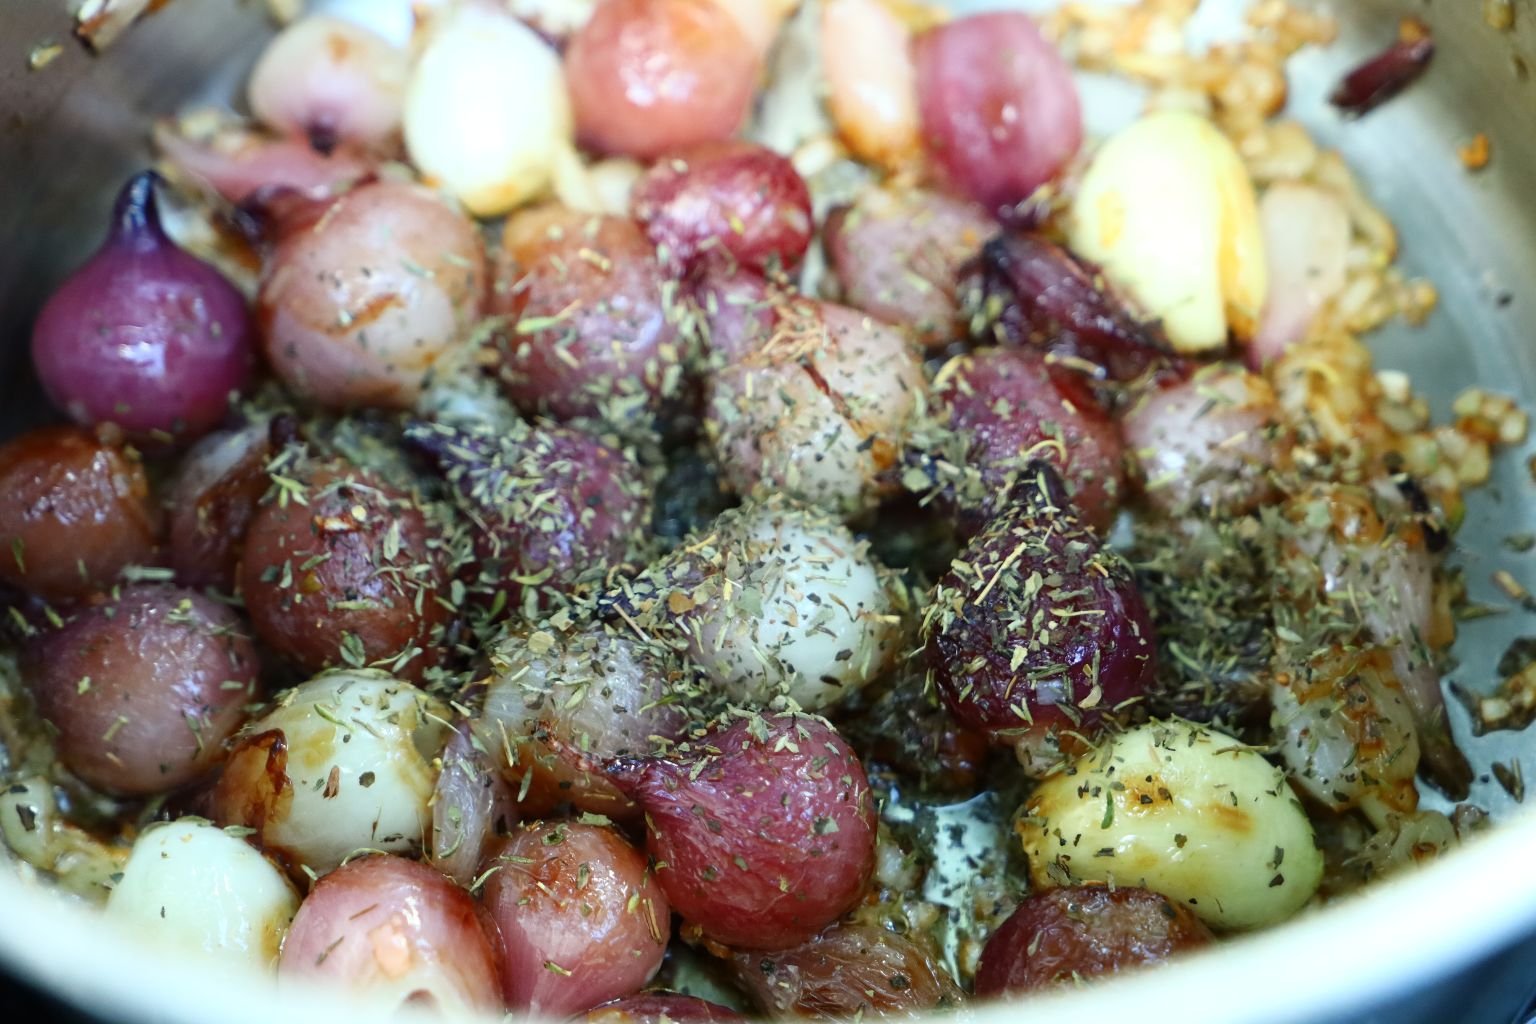
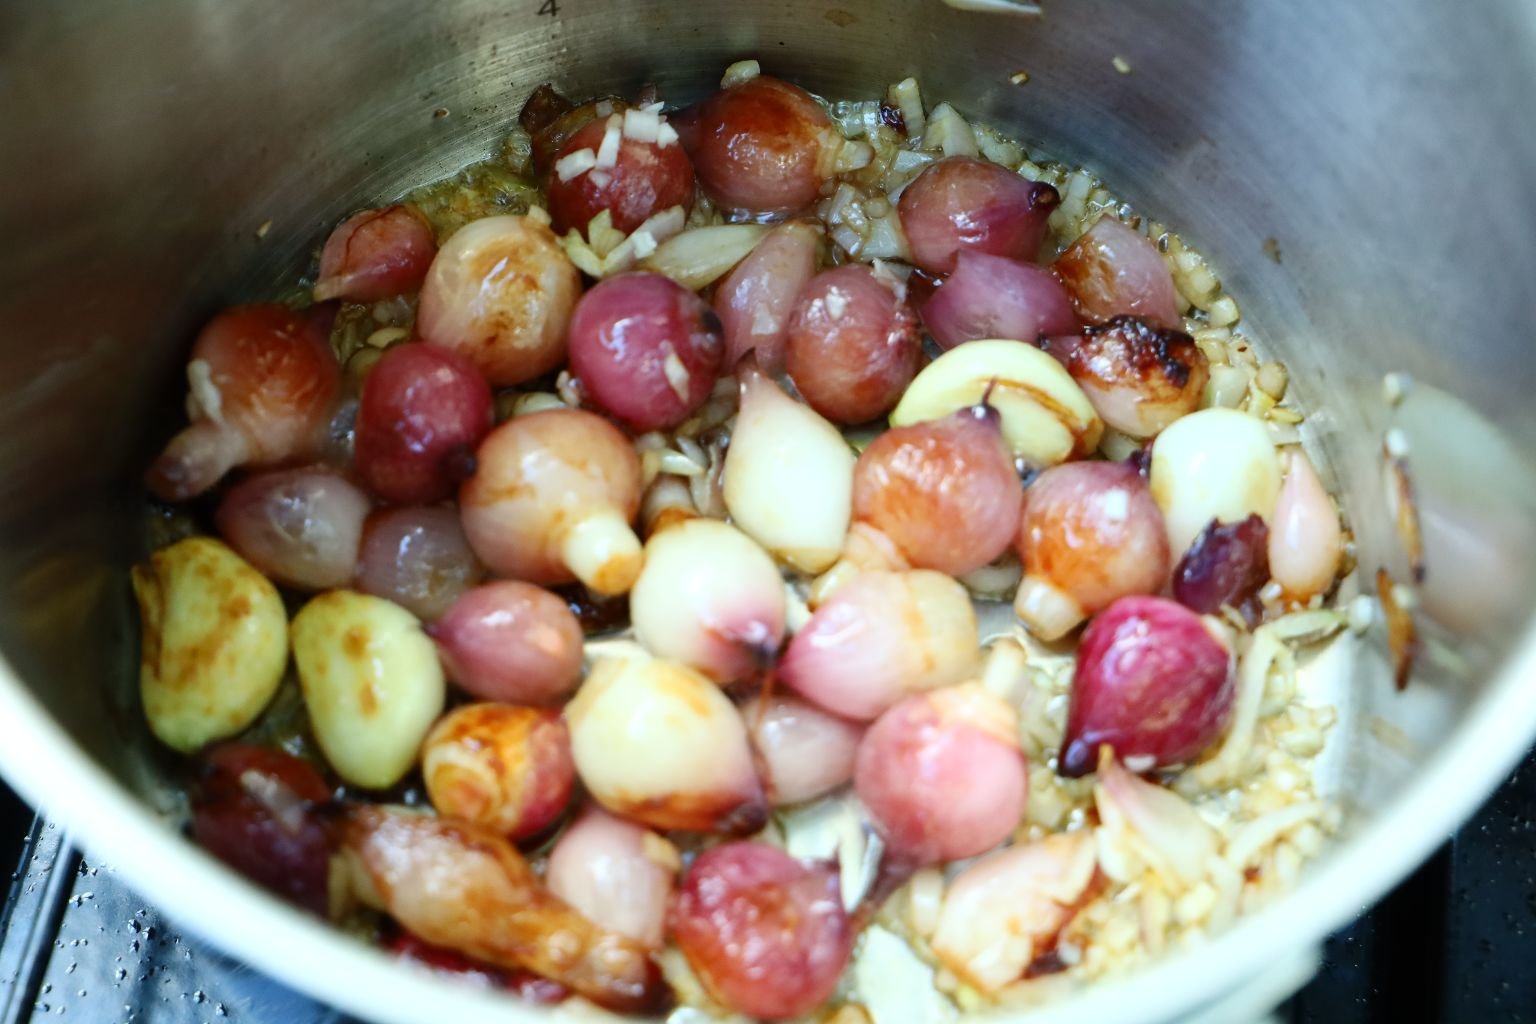
Add your whole garlic cloves and minced shallots to the pot.
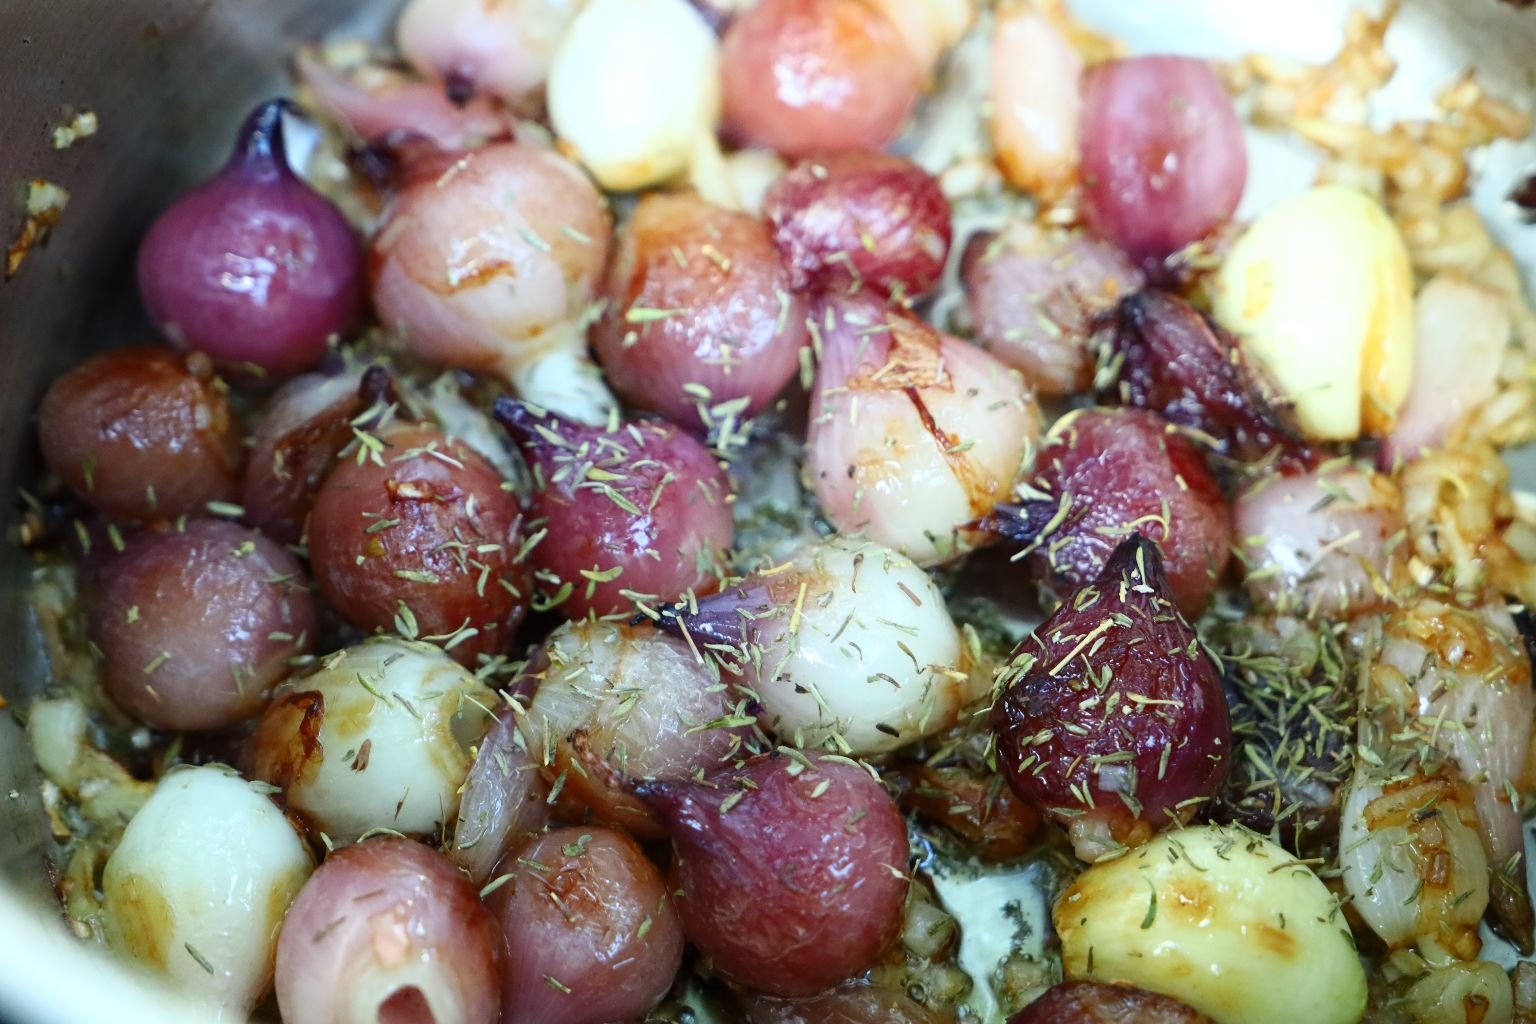
Add your dried basil and dried thyme to the pot.
Here you can see the dried herbs with the onions.
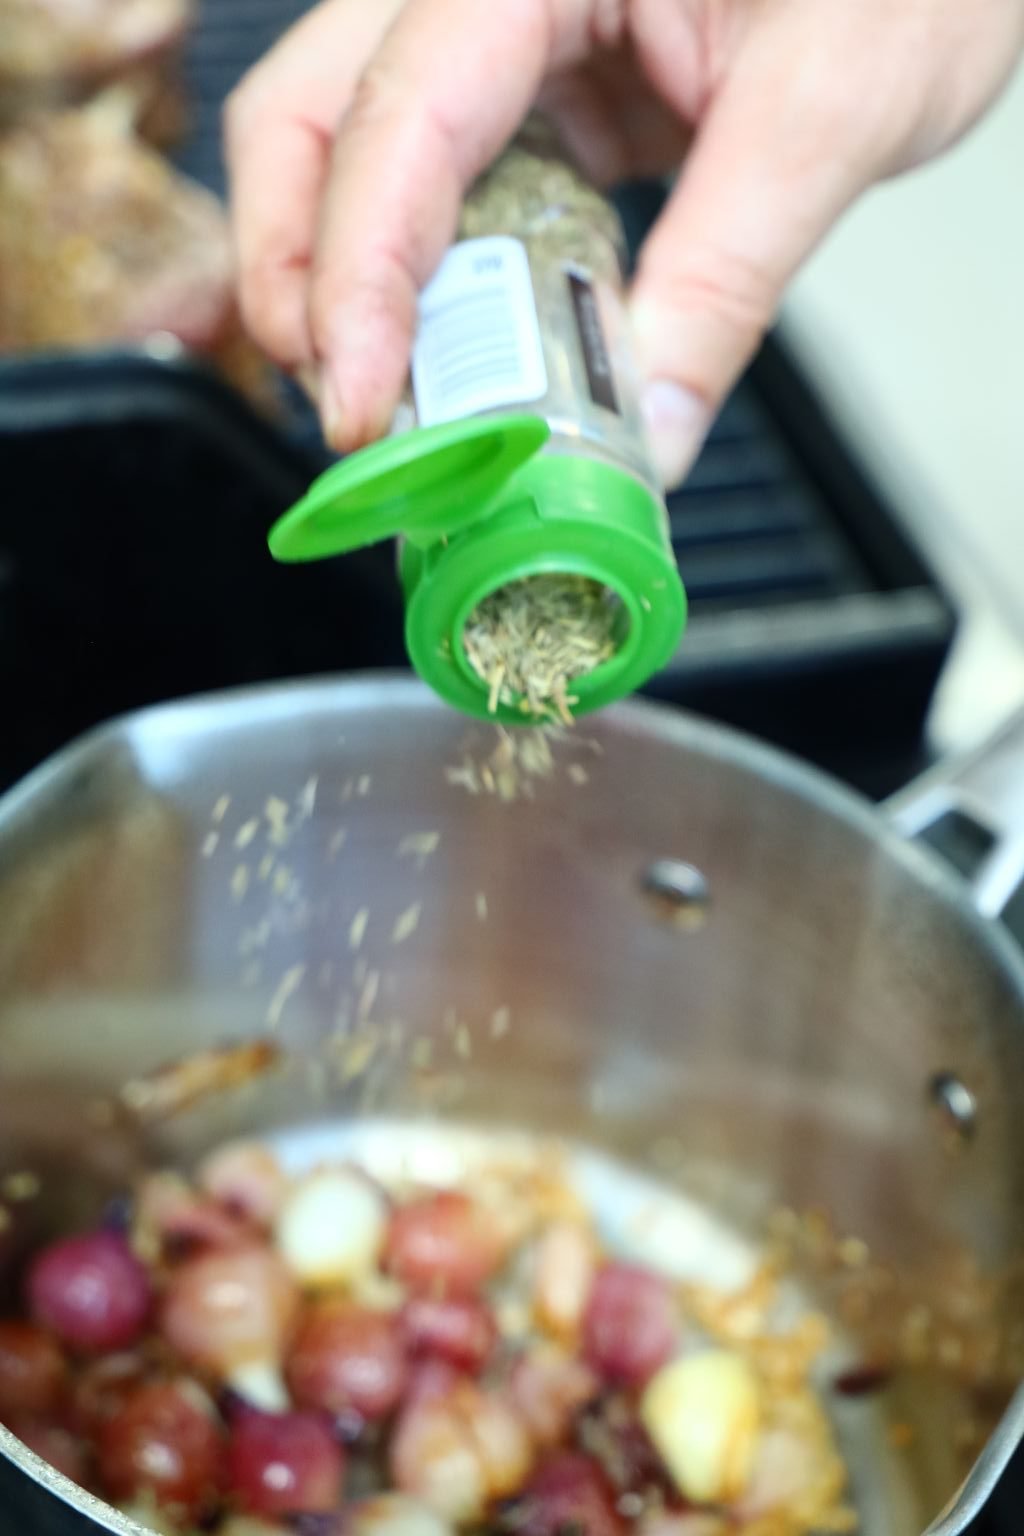
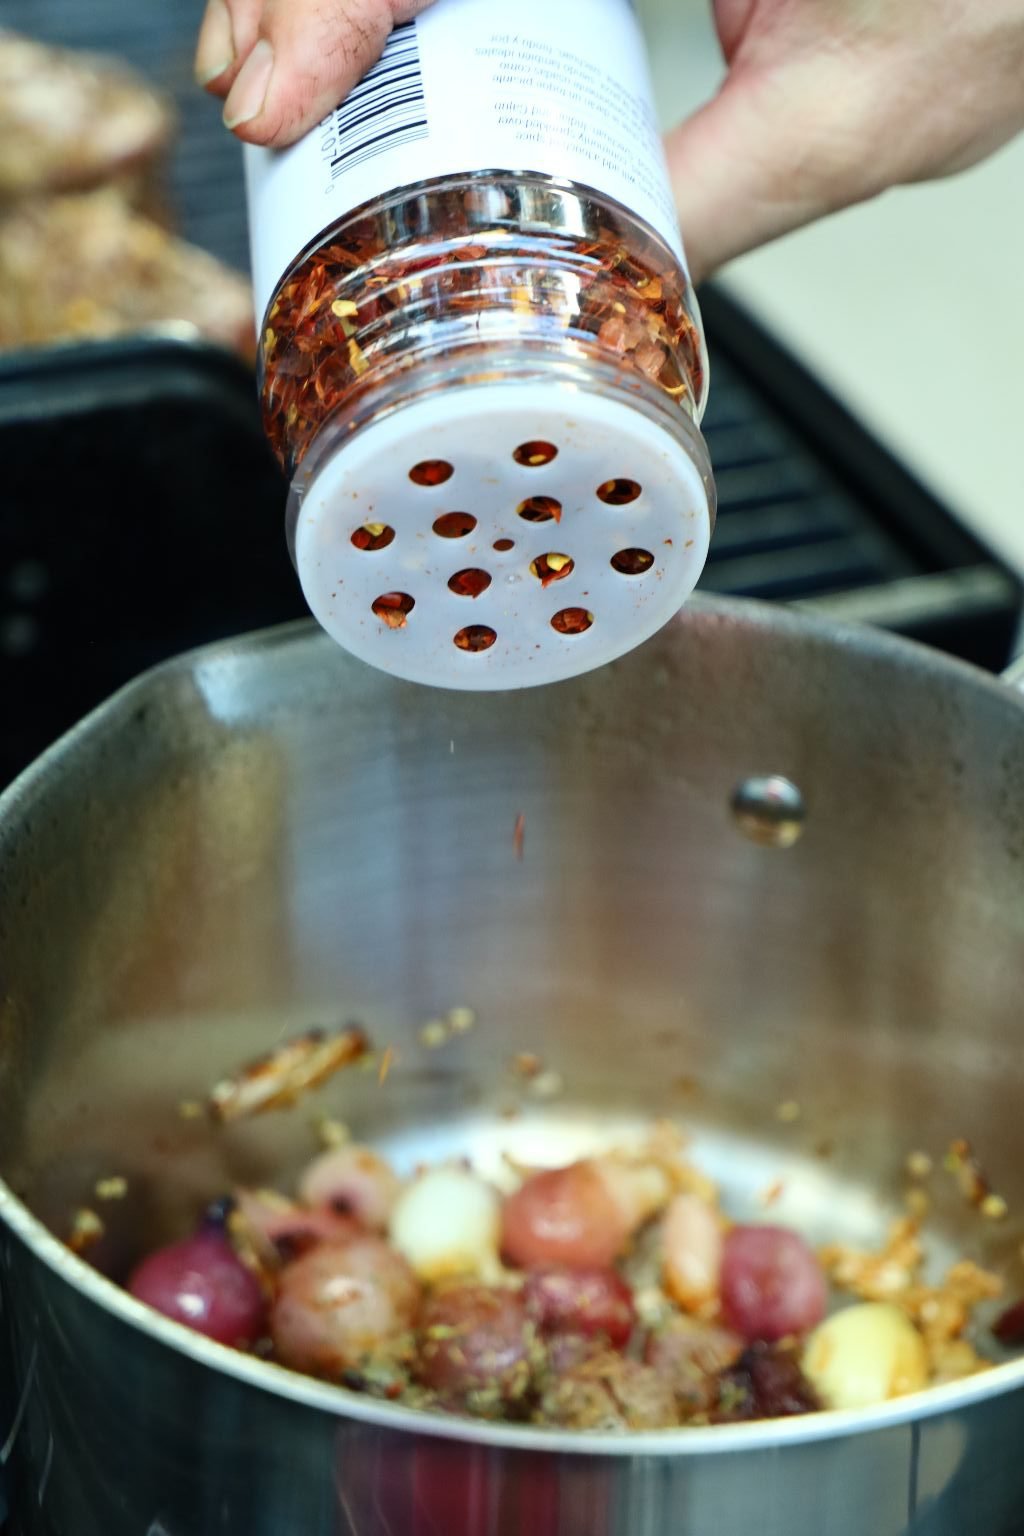
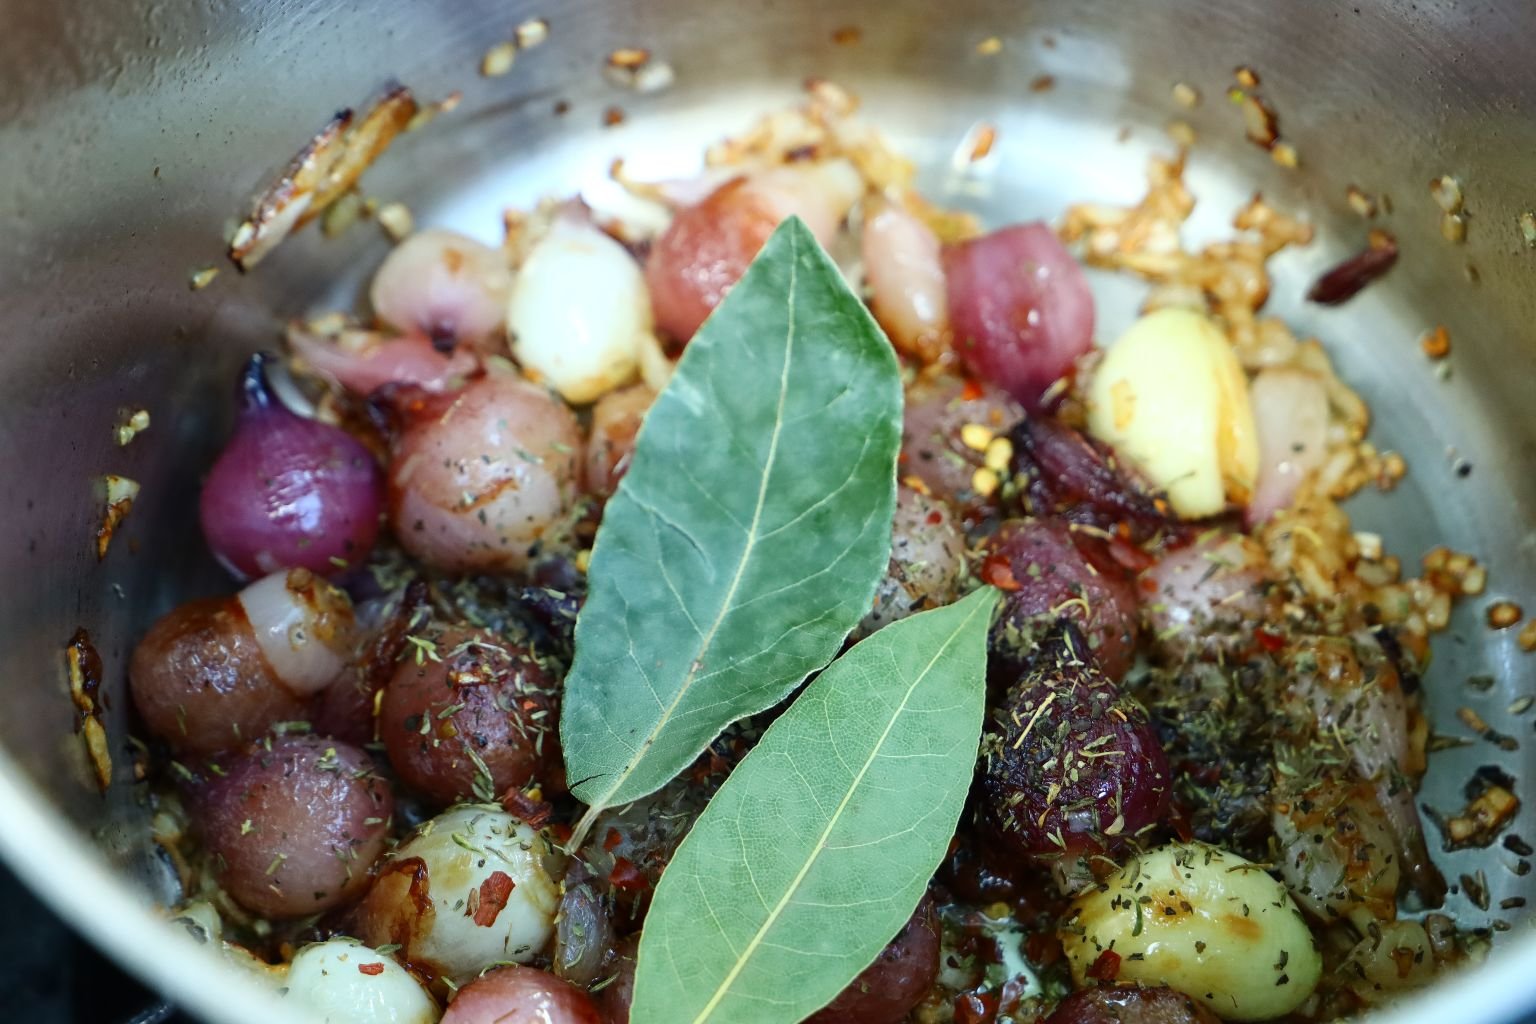
Now add your Red Pepper Flakes and your Bay Leaves to the pot. Cook these ingredients until the garlic
is slightly browned and the shallots become caramelized.
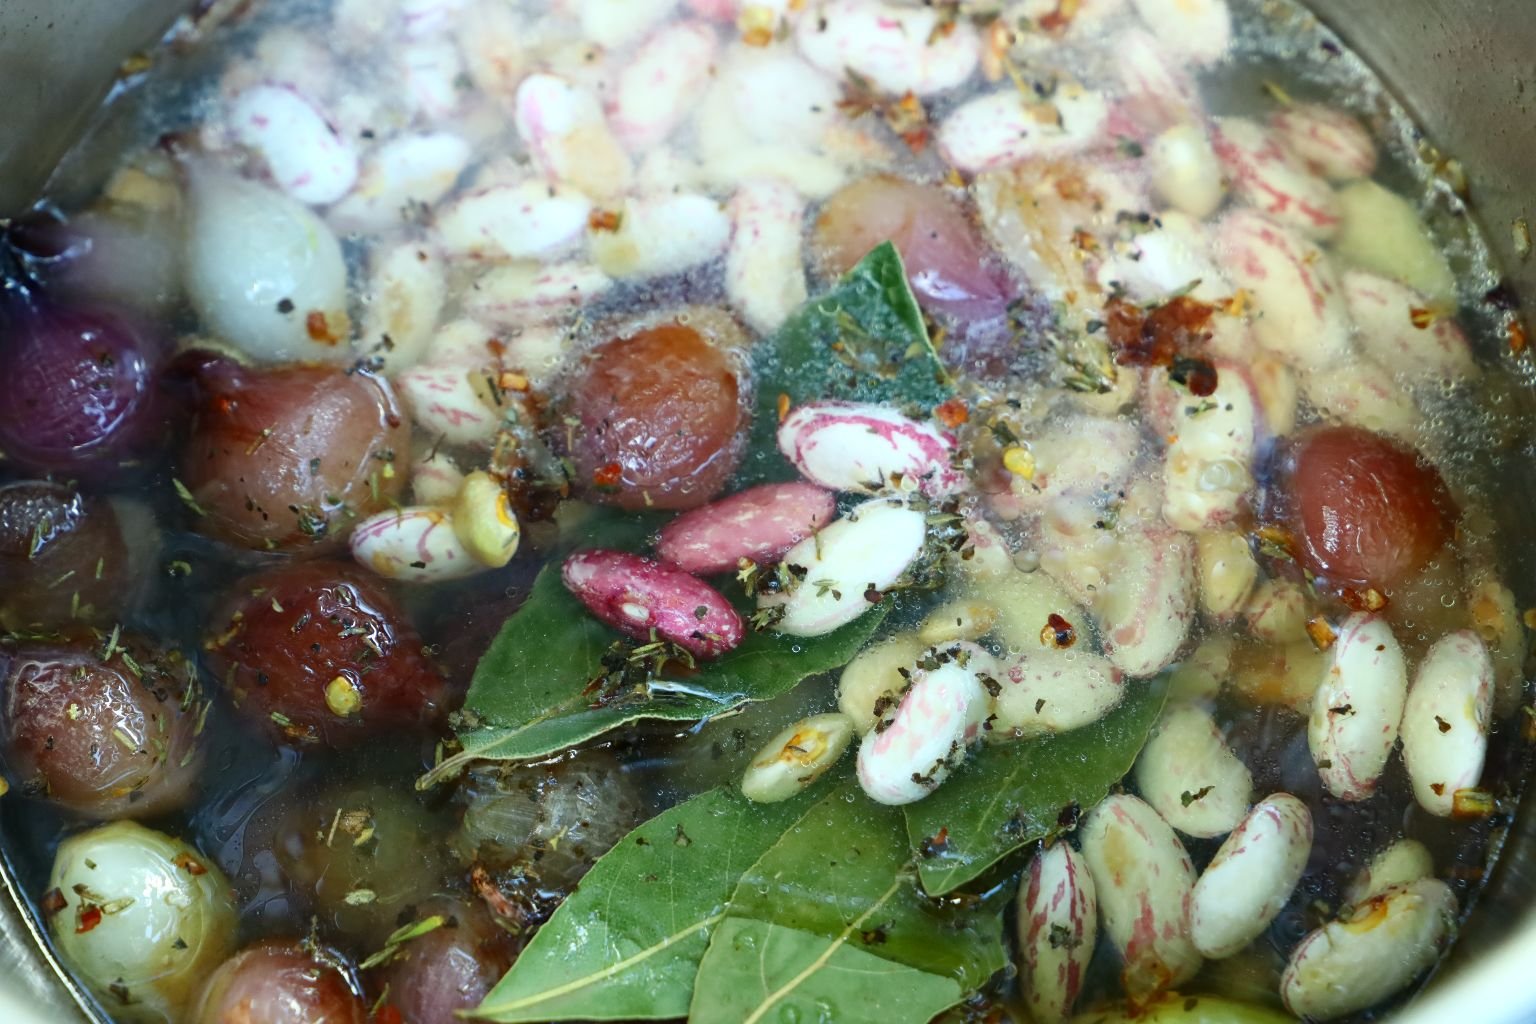
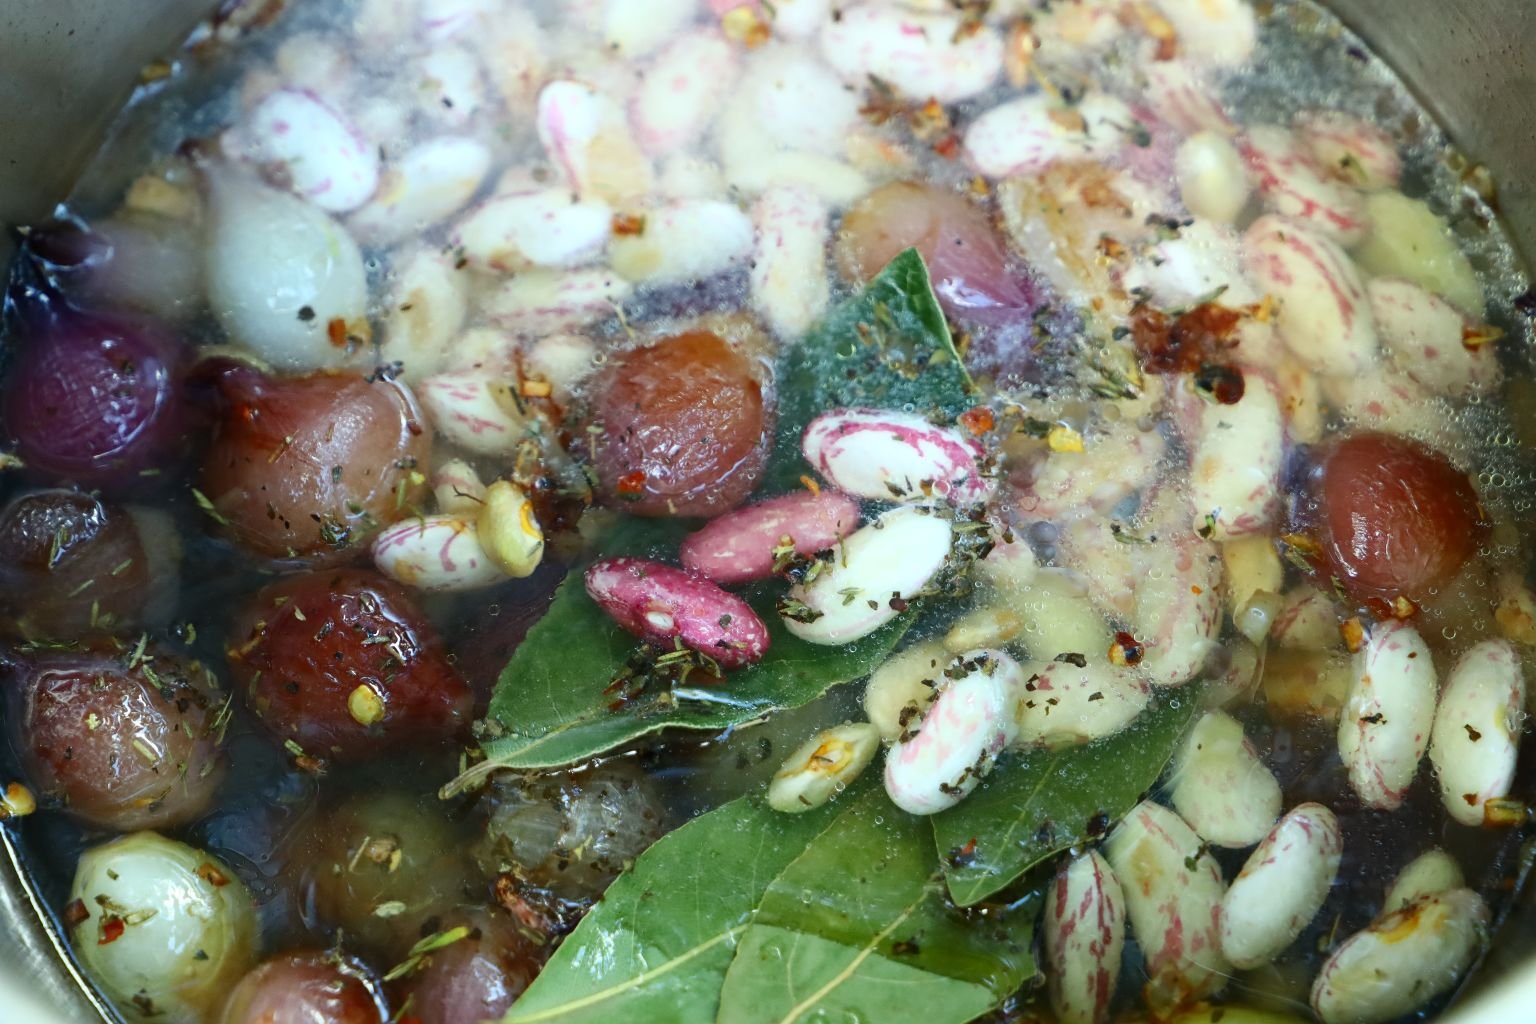
When the onions and garlic are cooked, add the Cranberry and Roman Beans in water to the pot
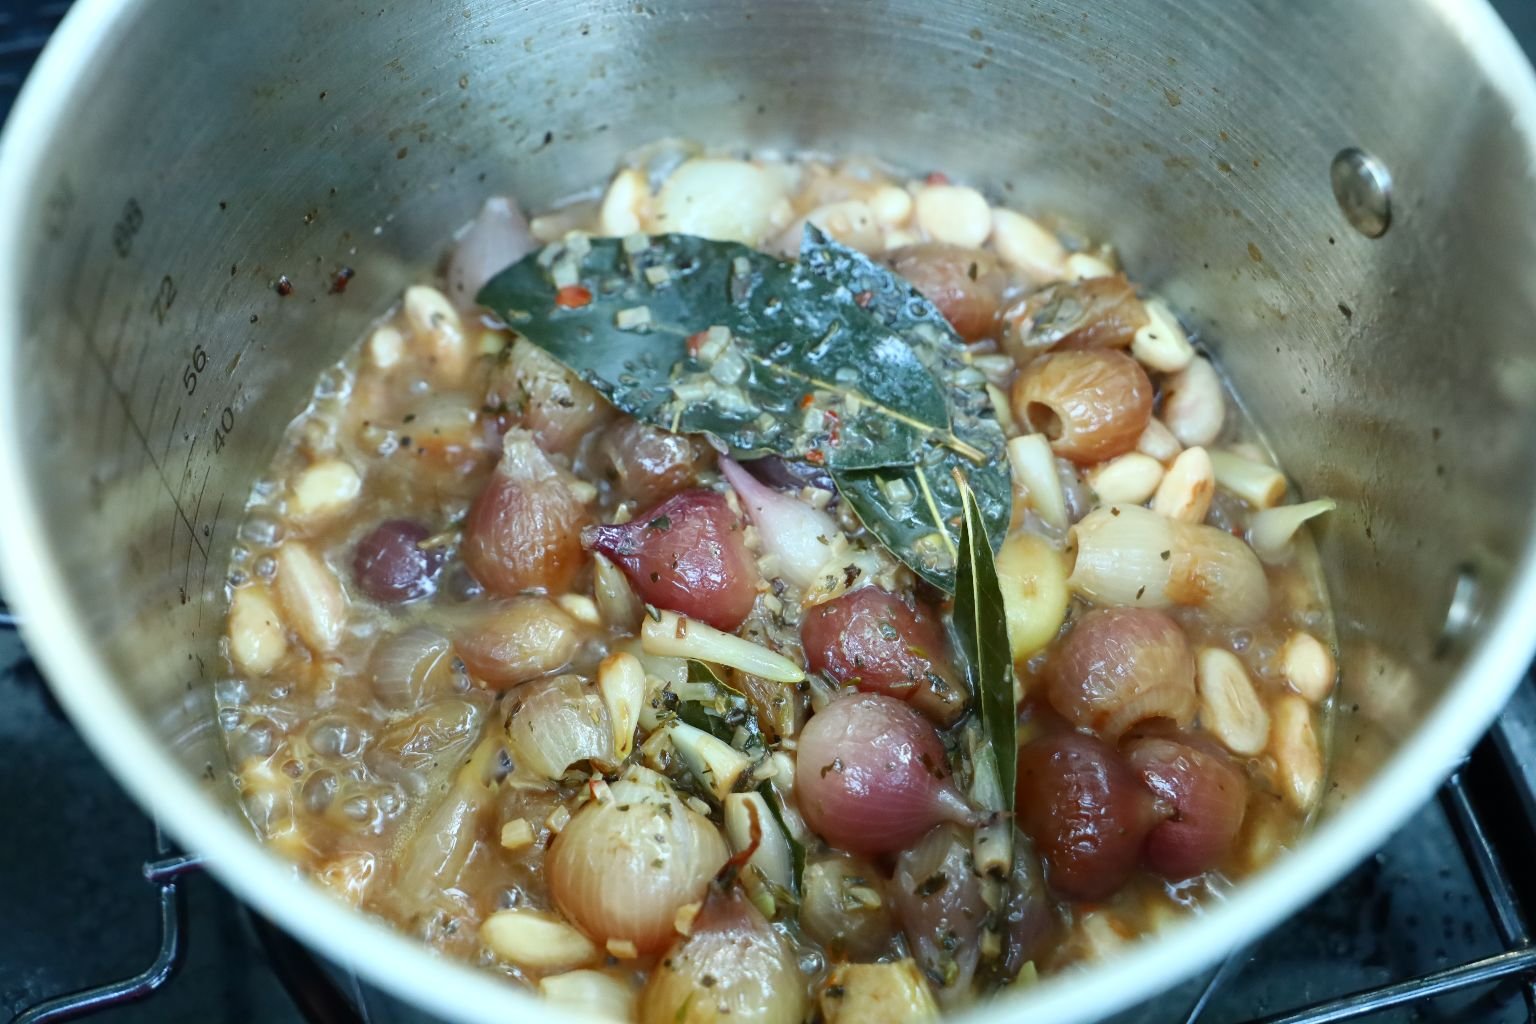
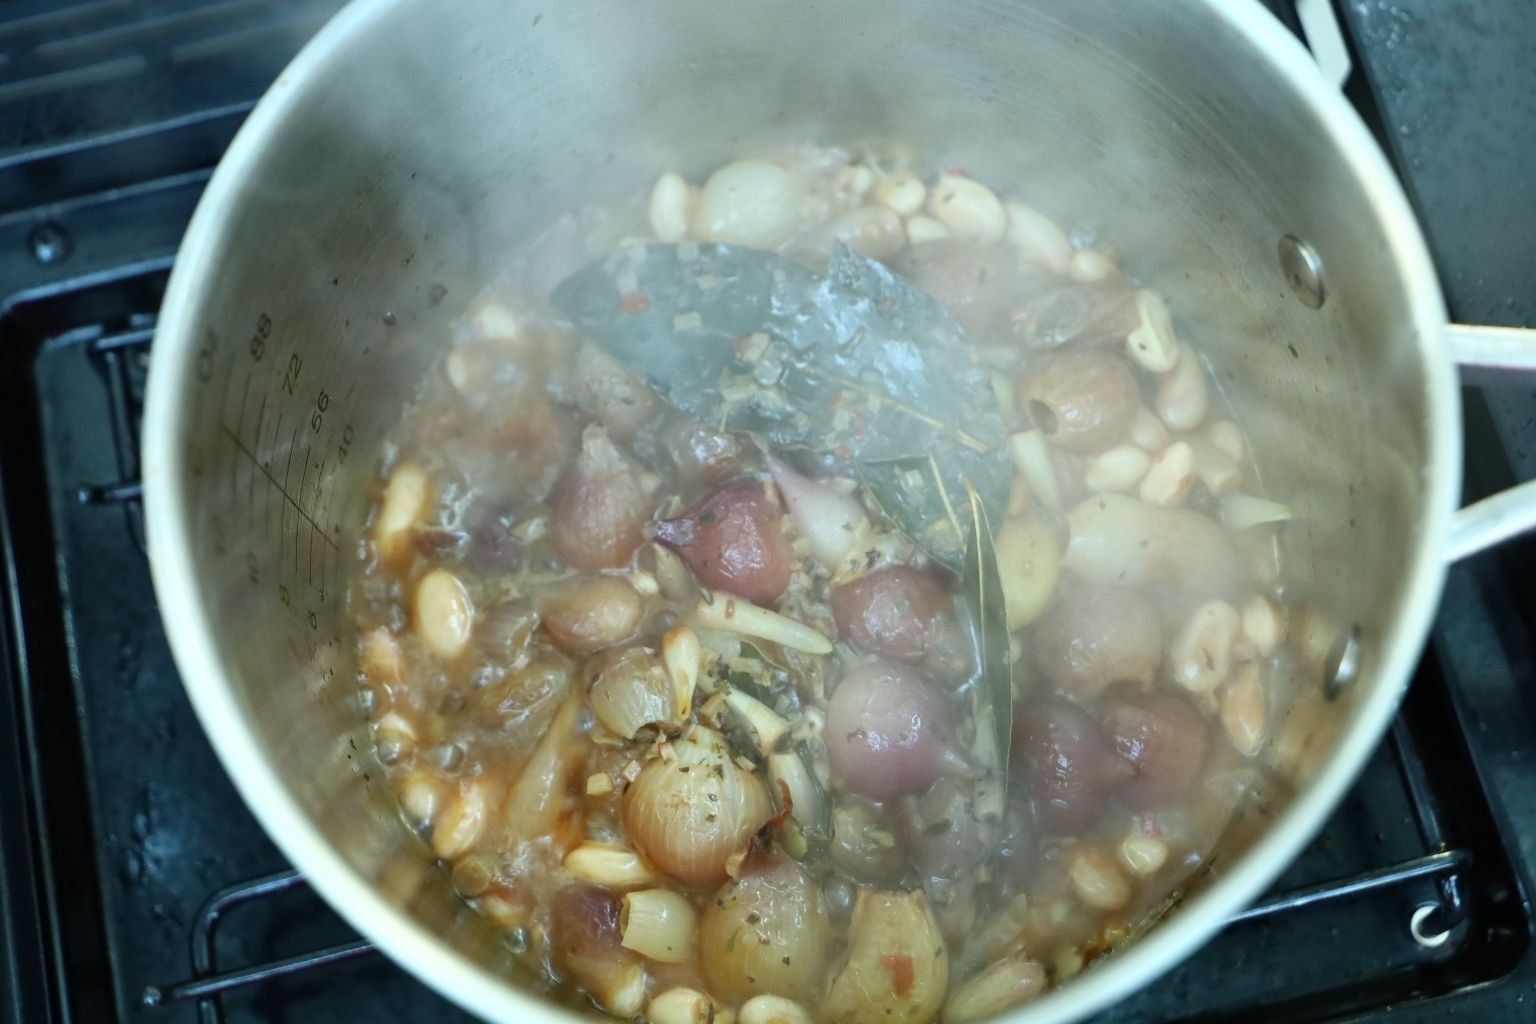
Cook the beans for about 20 – 25 min. or until tender.
Here is another look at the cooking beans in the pot.
Pictured are the cooked beans.
Place the beans in a bowl and add some Snap Peas vertically as a nice
garnish.
————————————————————
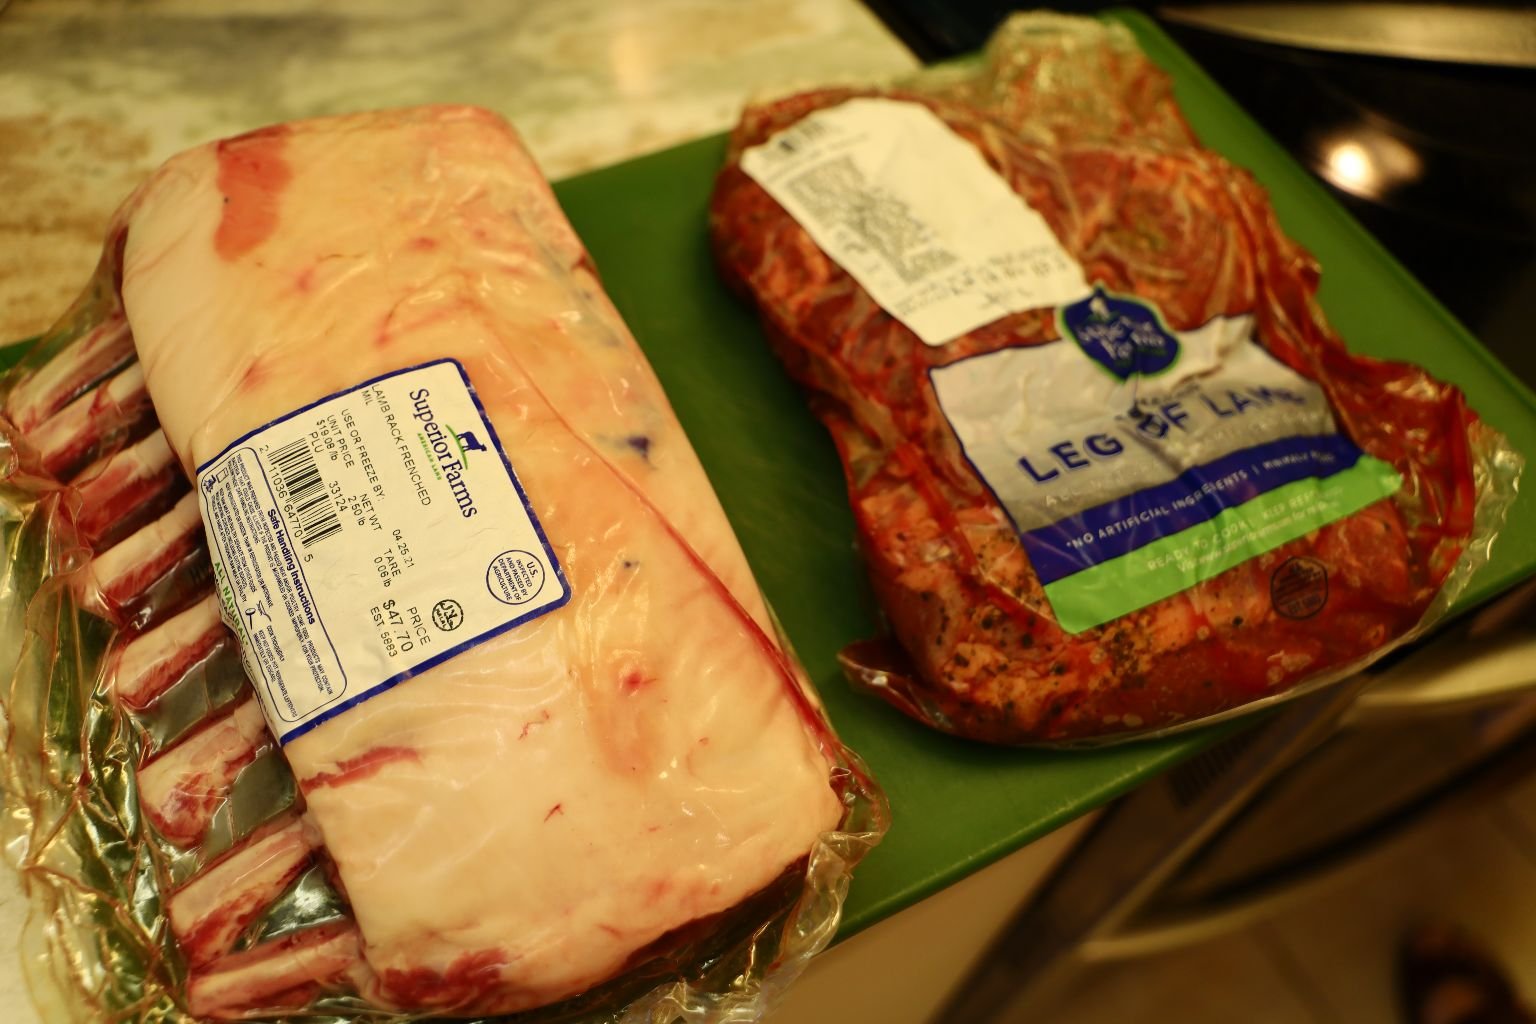
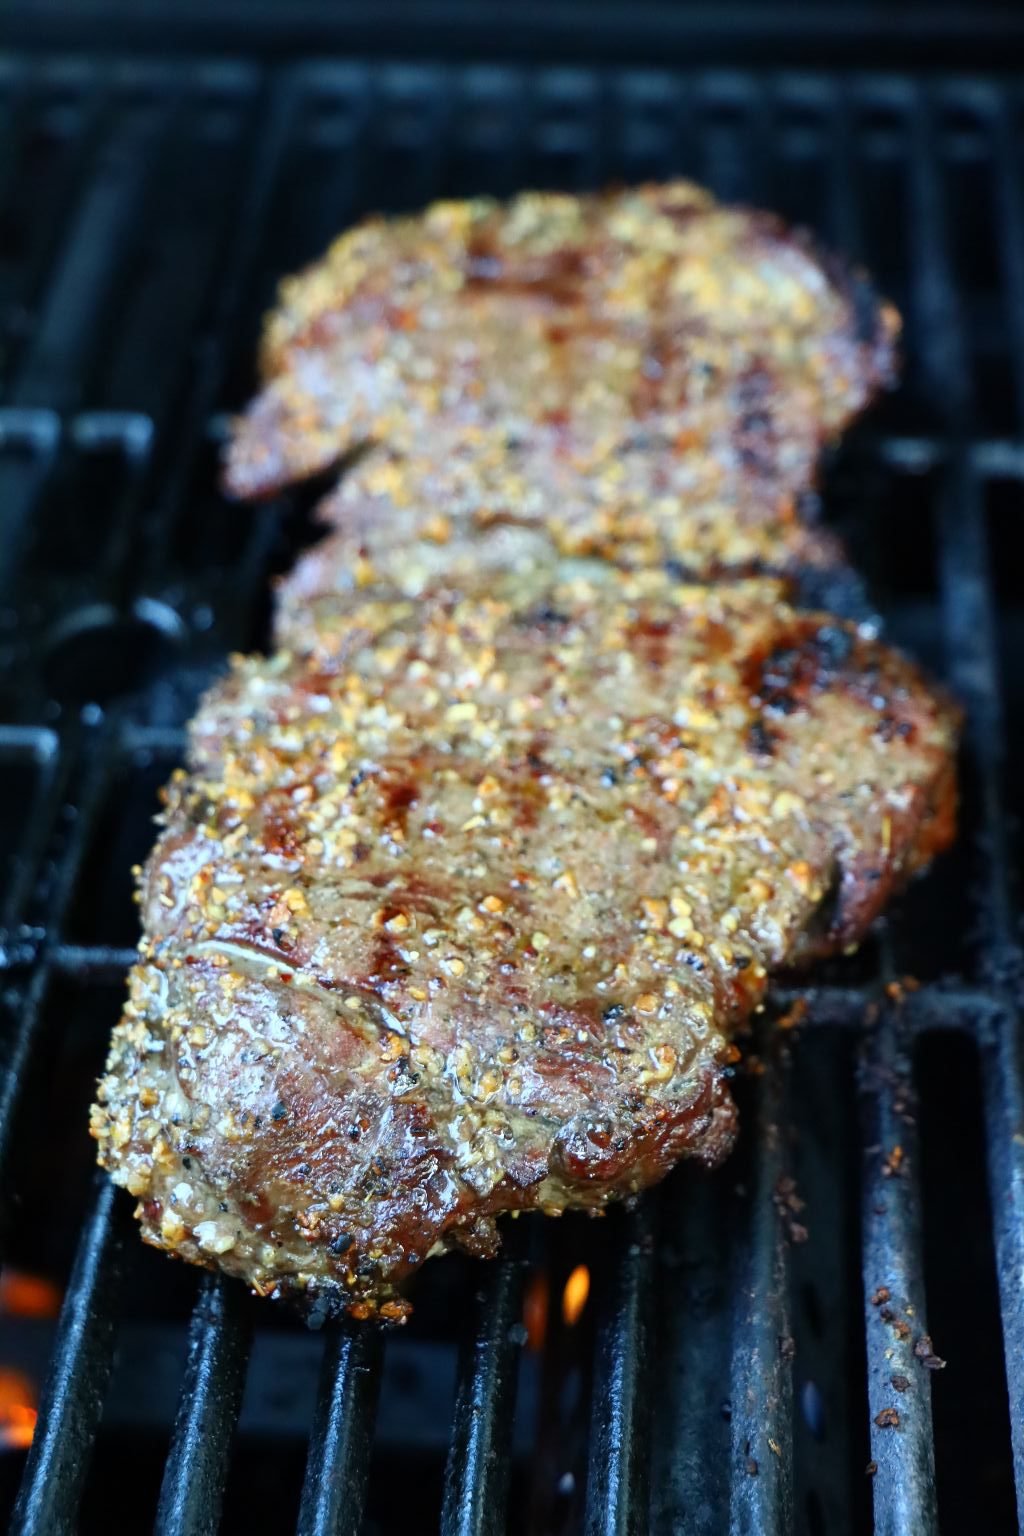
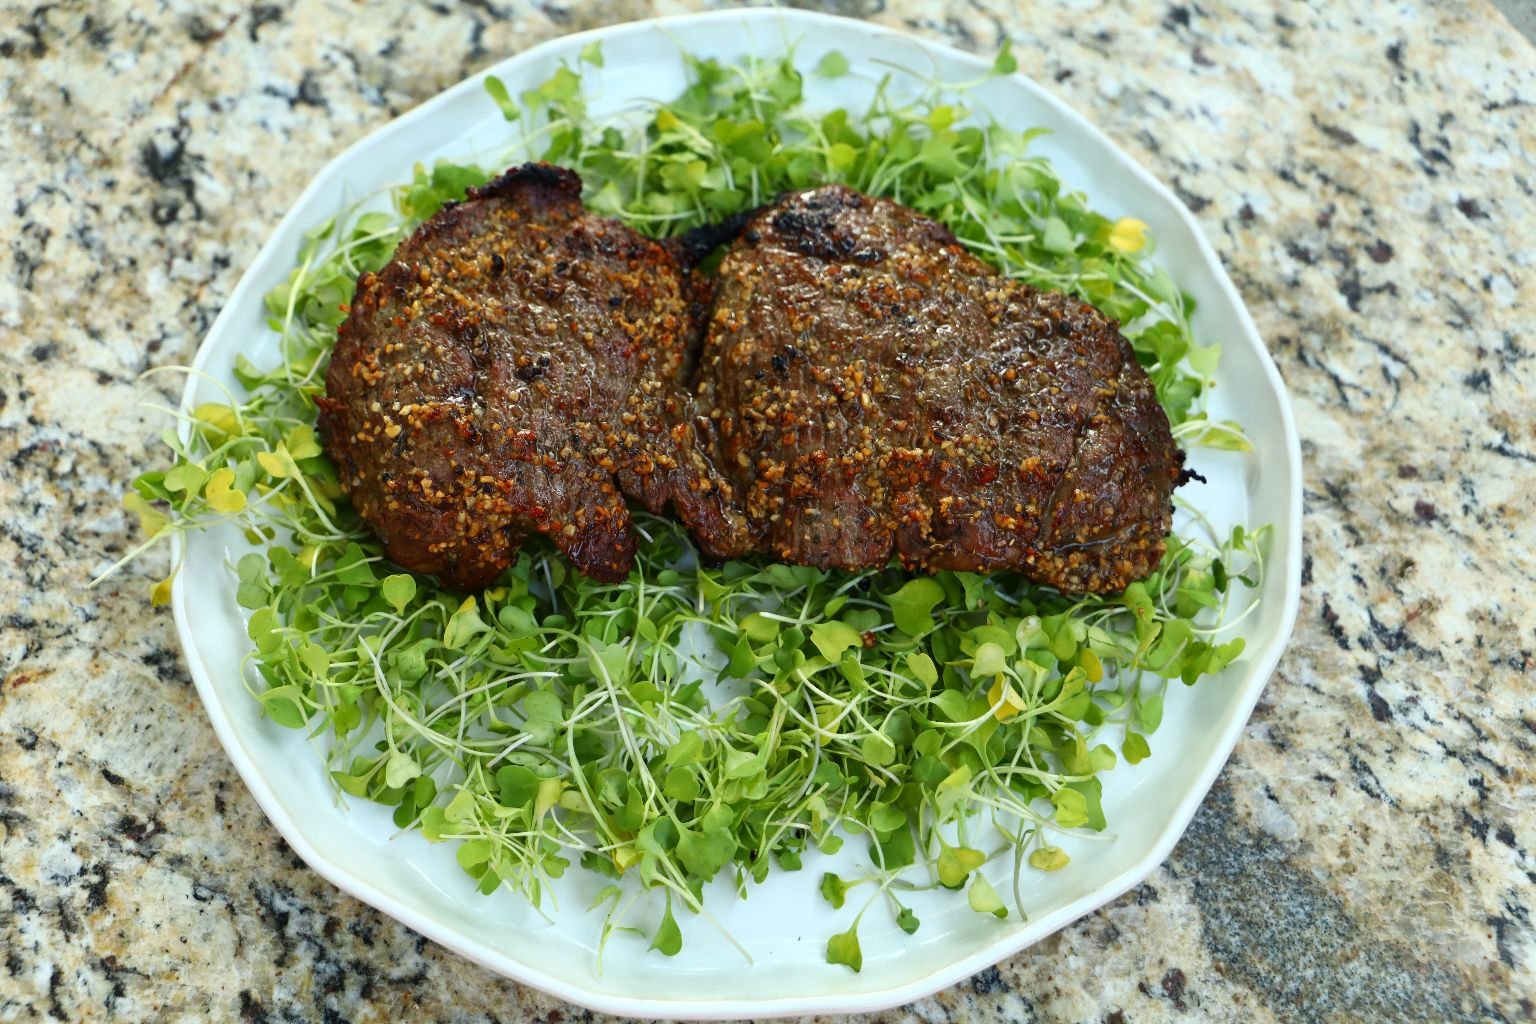
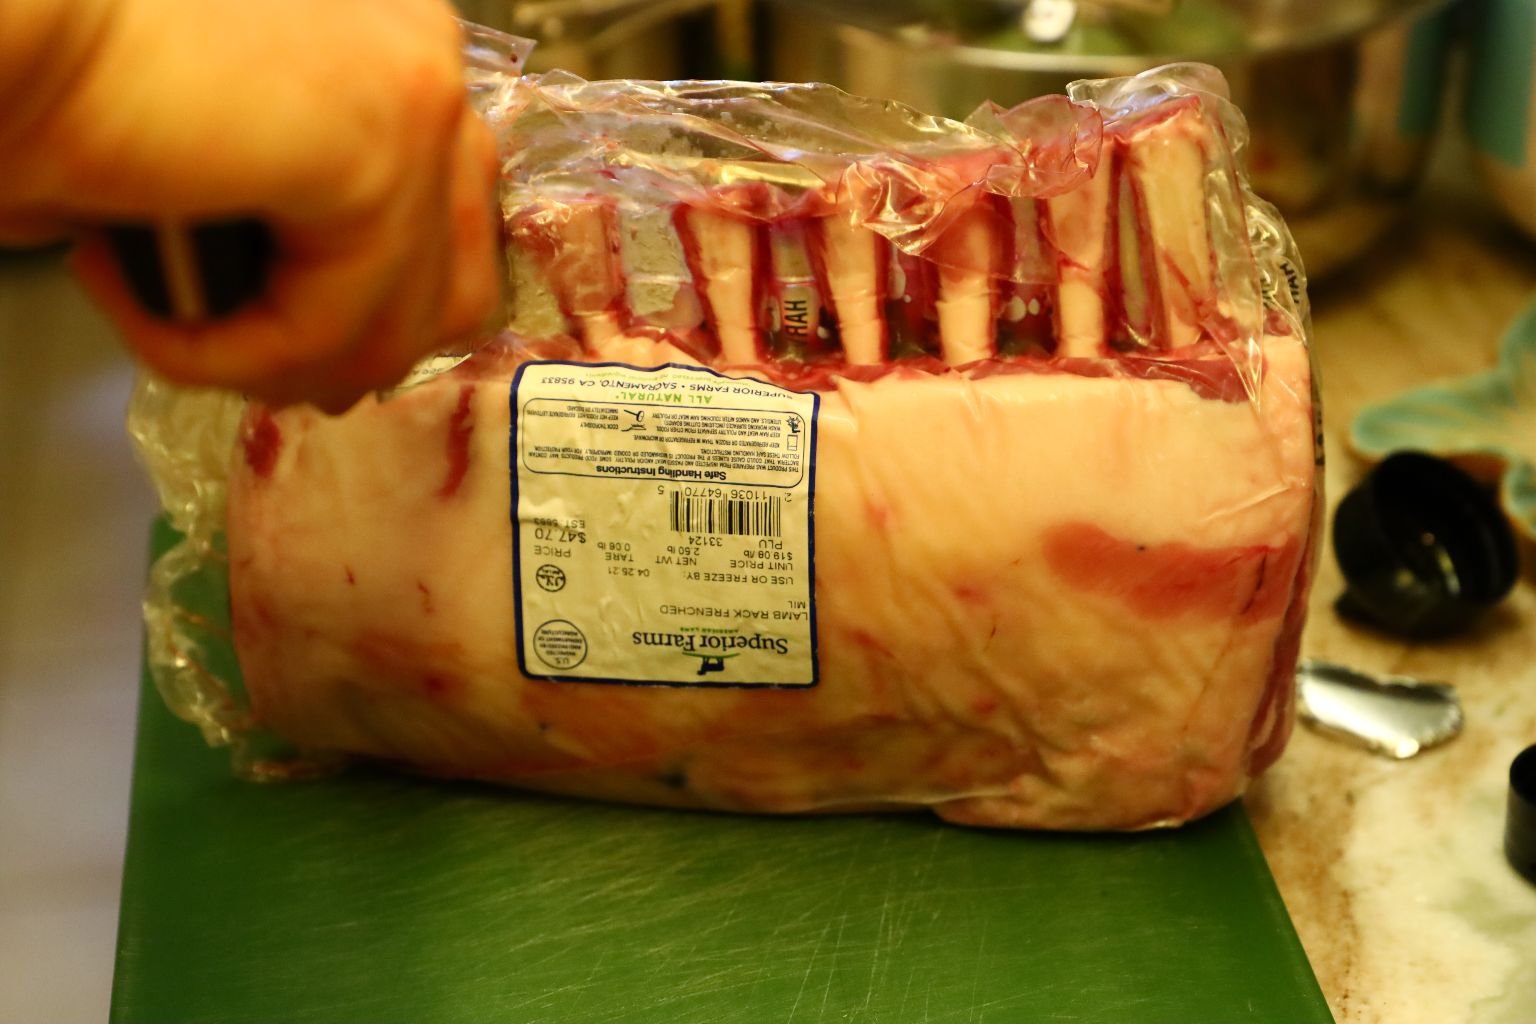
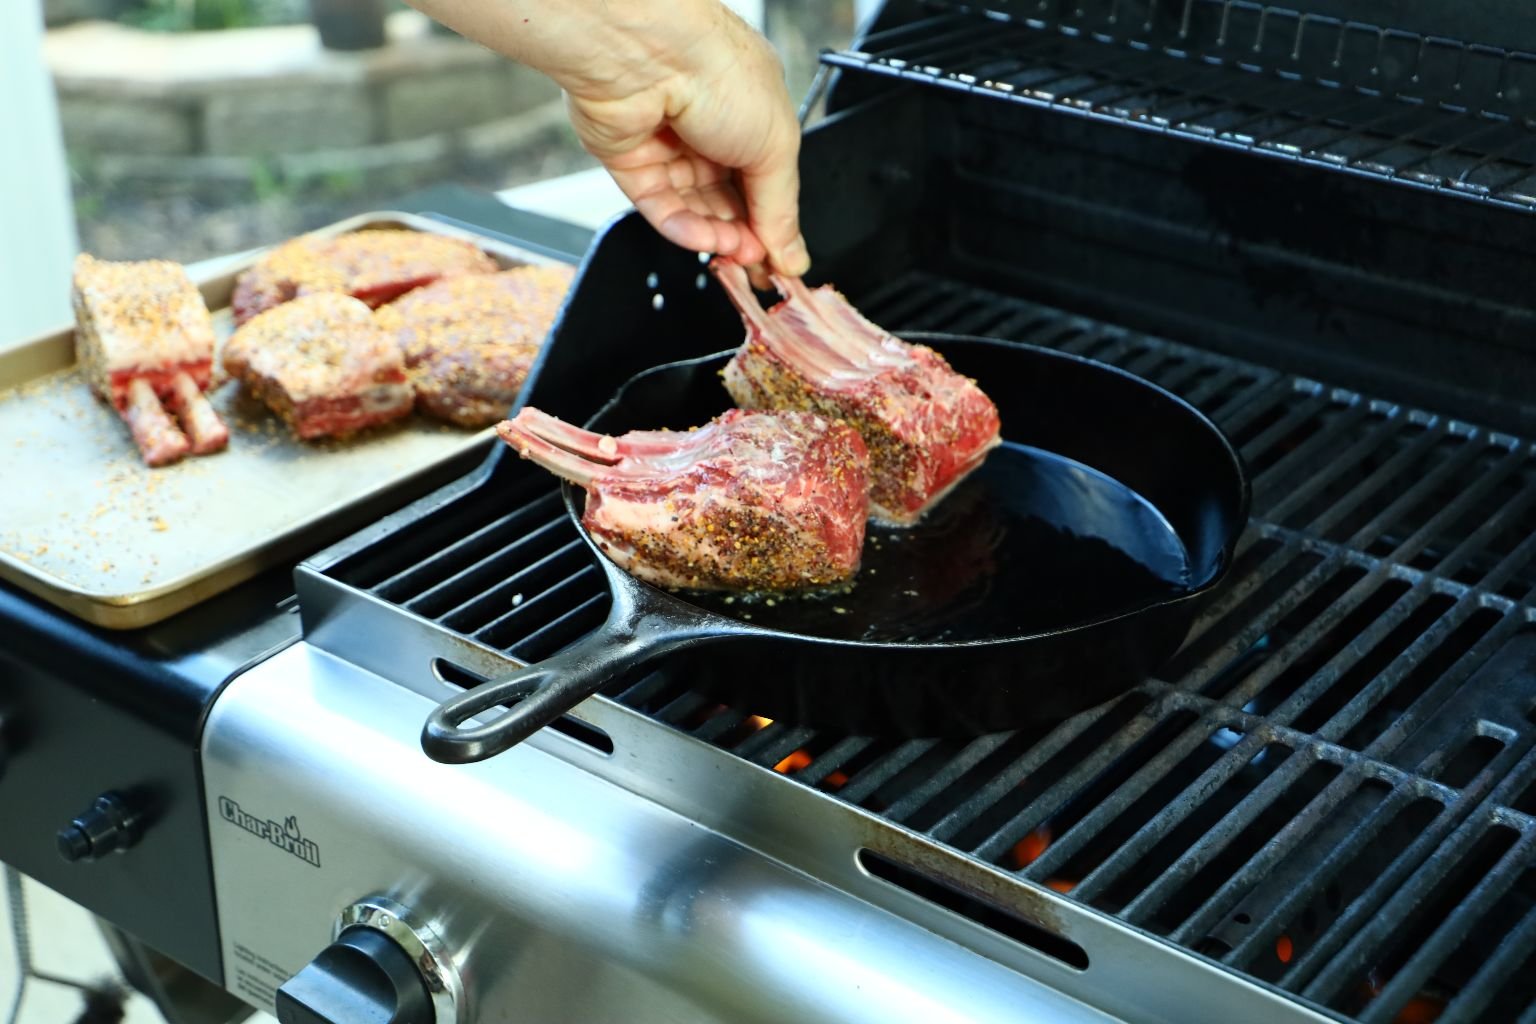
Pictured above are the lamb chops, and leg of lamb we used. They were expensive, but don’t let that
scare you away from cooking them as they are grilled just like any other red meat.
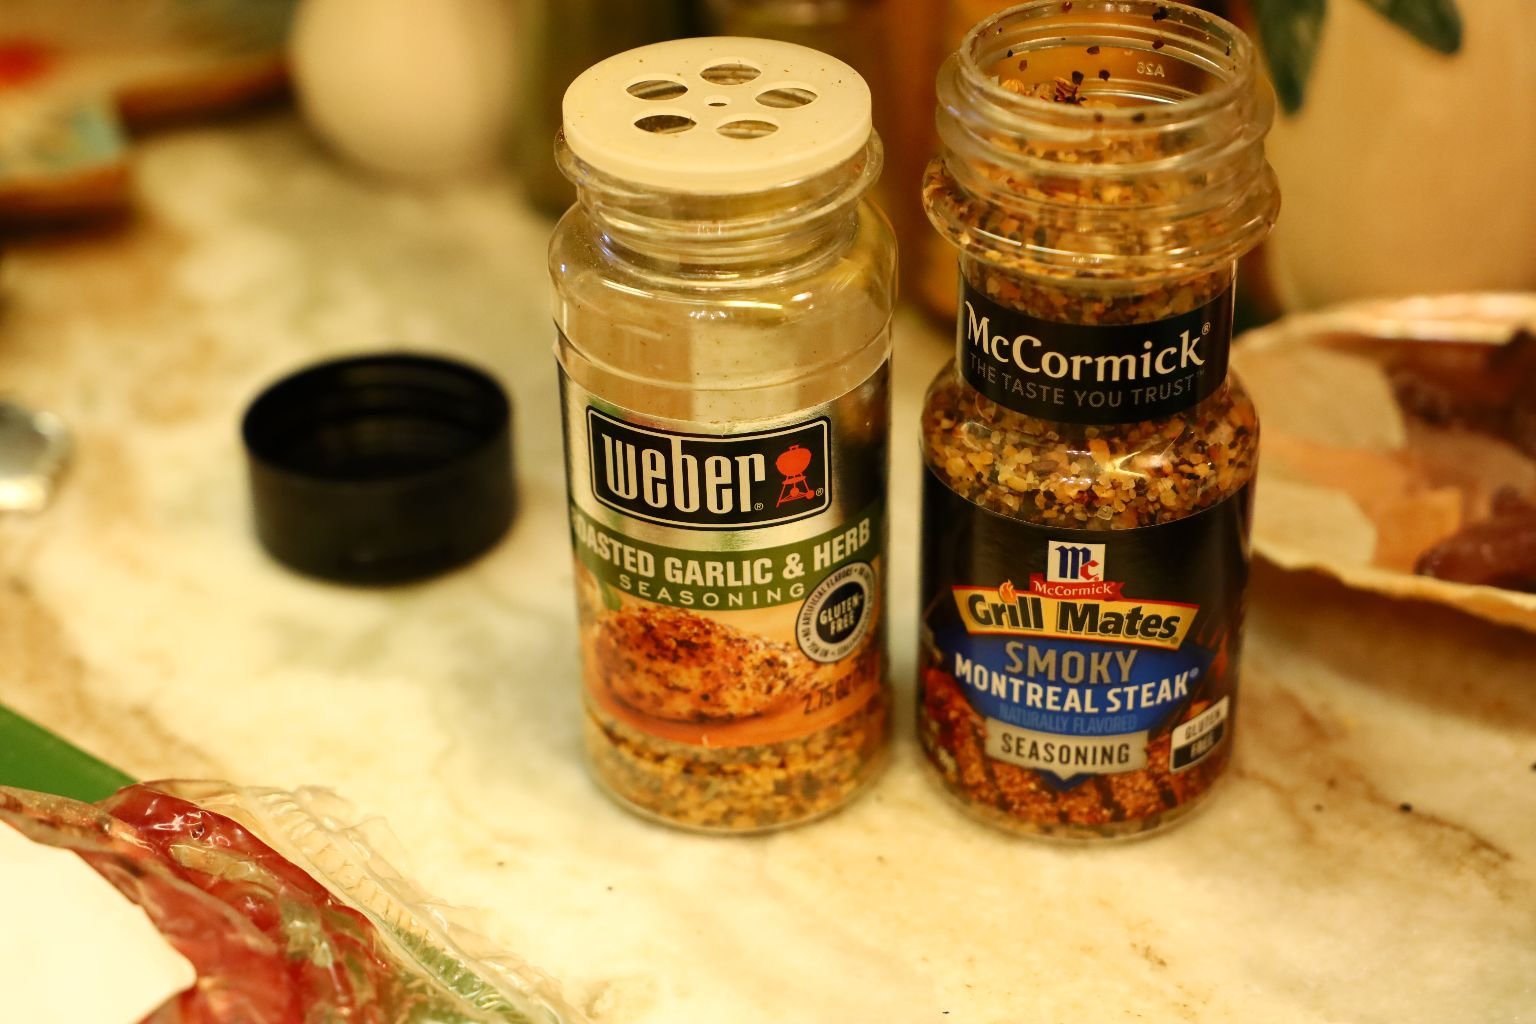
Here are the spices we used as they needed to be bold. I like these steak seasonings because they
provide a good amount of flavor which lamb can handle.
I unpackaged the lamb, gave it a rinse to remove any old blood and bone fragments. Then I placed it on
a cookie tray to help transport it to the grill. You can see the pre-seasoning it came with.
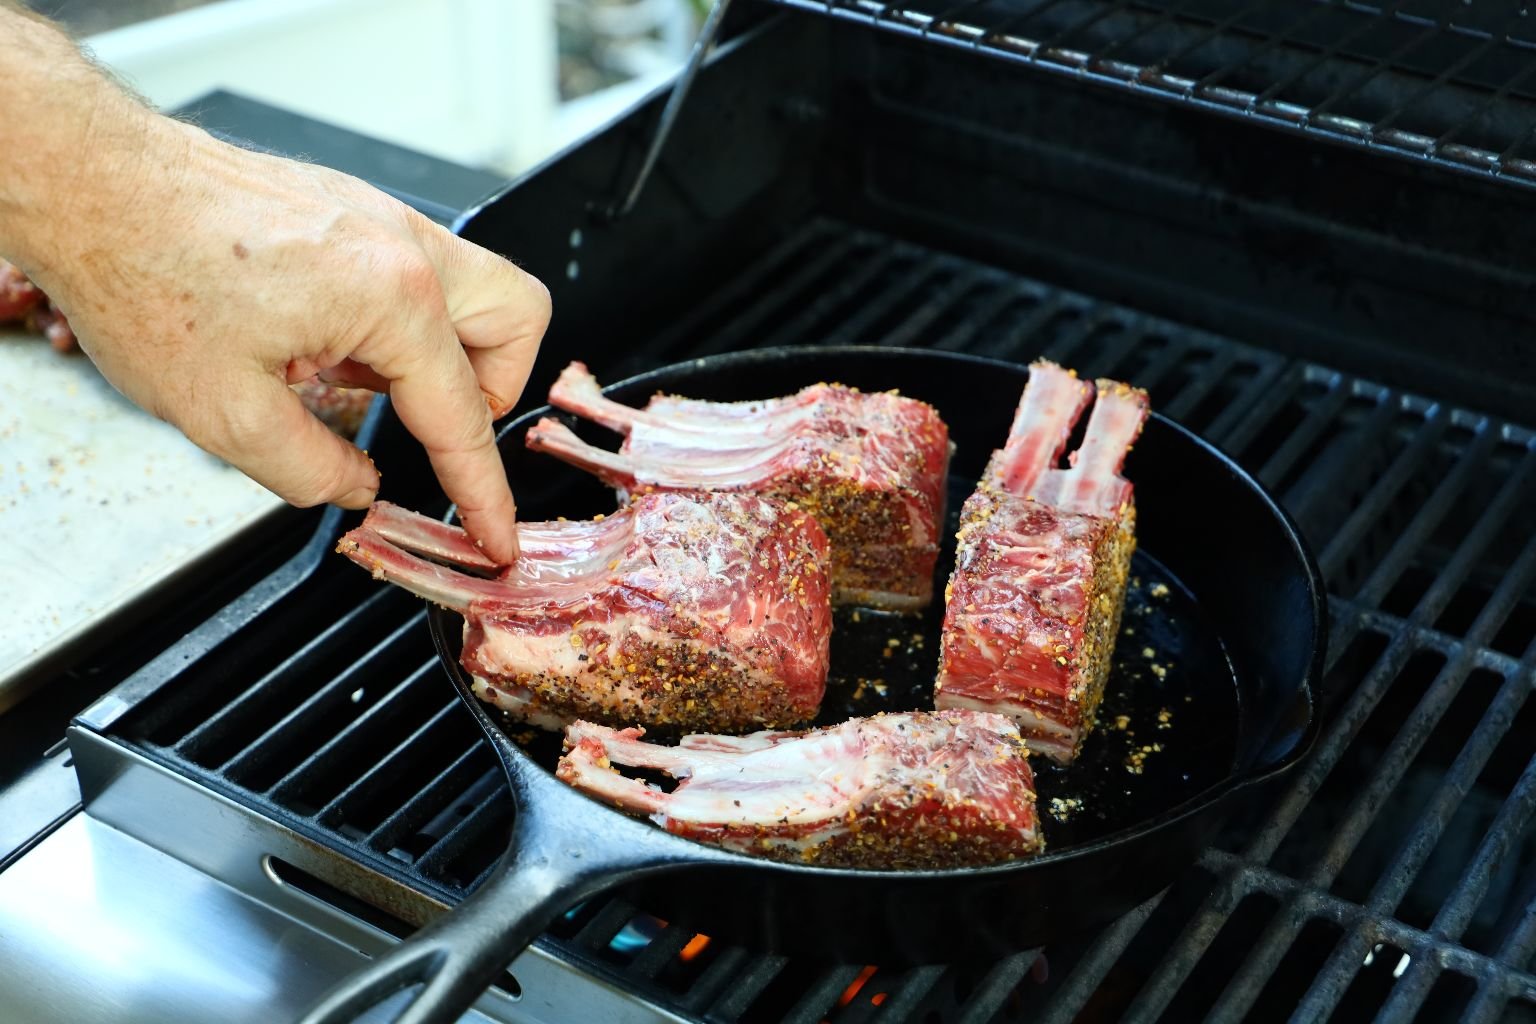
Using your Chef knife, slice through the plastic holding the lamb chops keeping them in two’s.

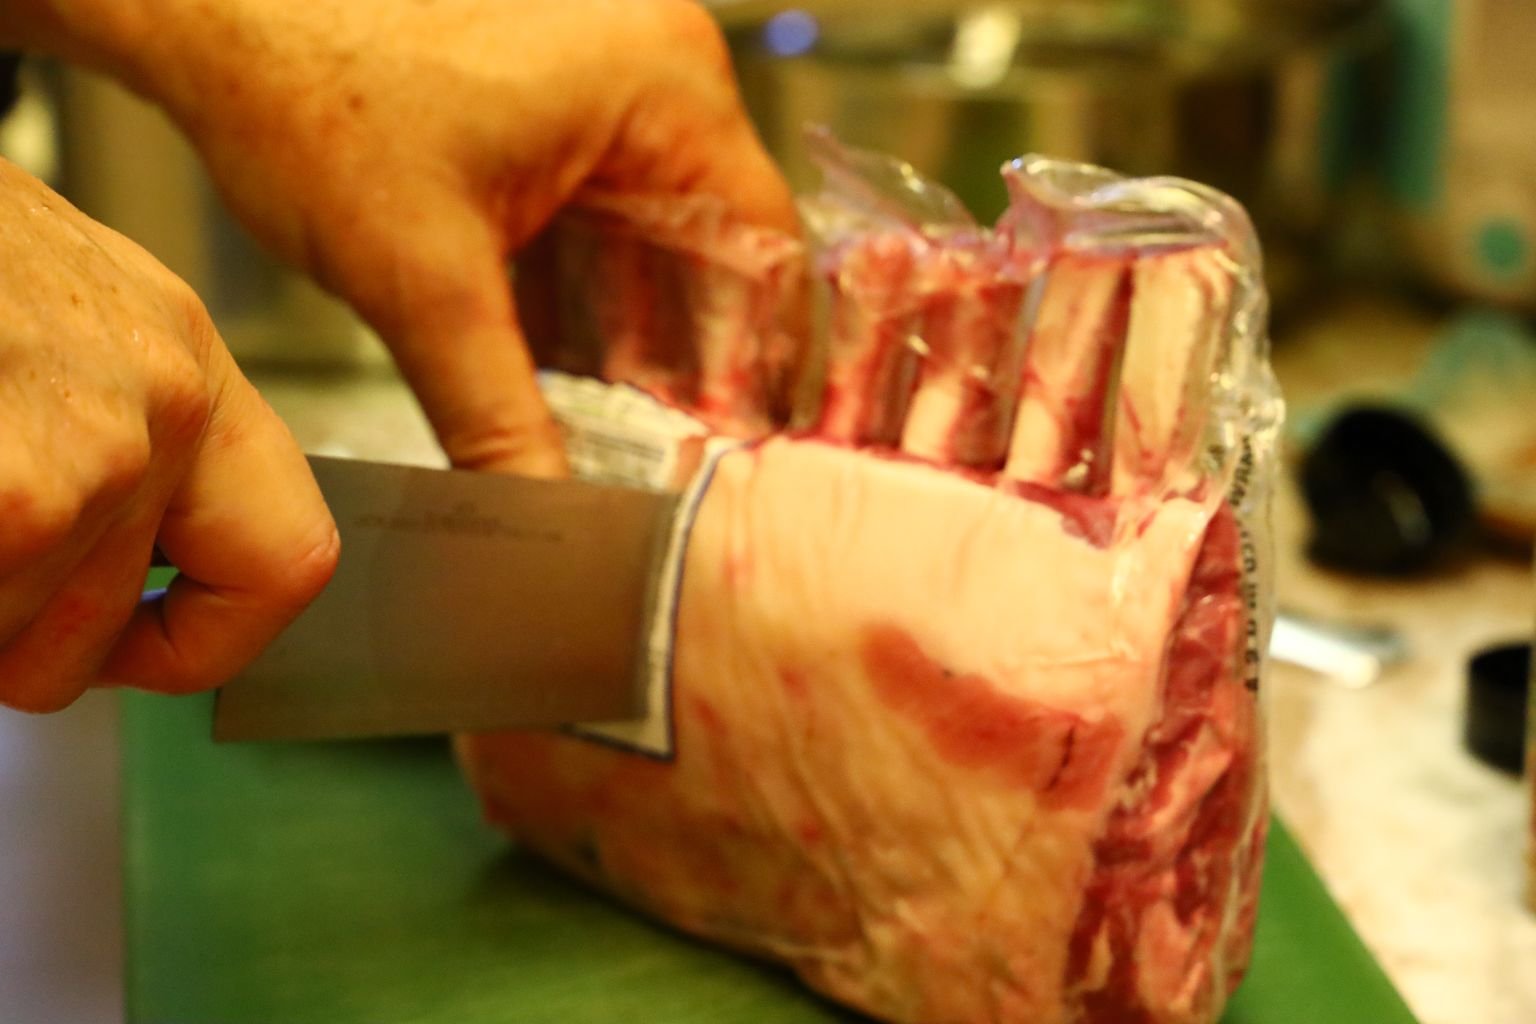
Do this for all the lamb chops. I feel cutting them like this makes them easier to grill and lets you place
more seasoning on them.
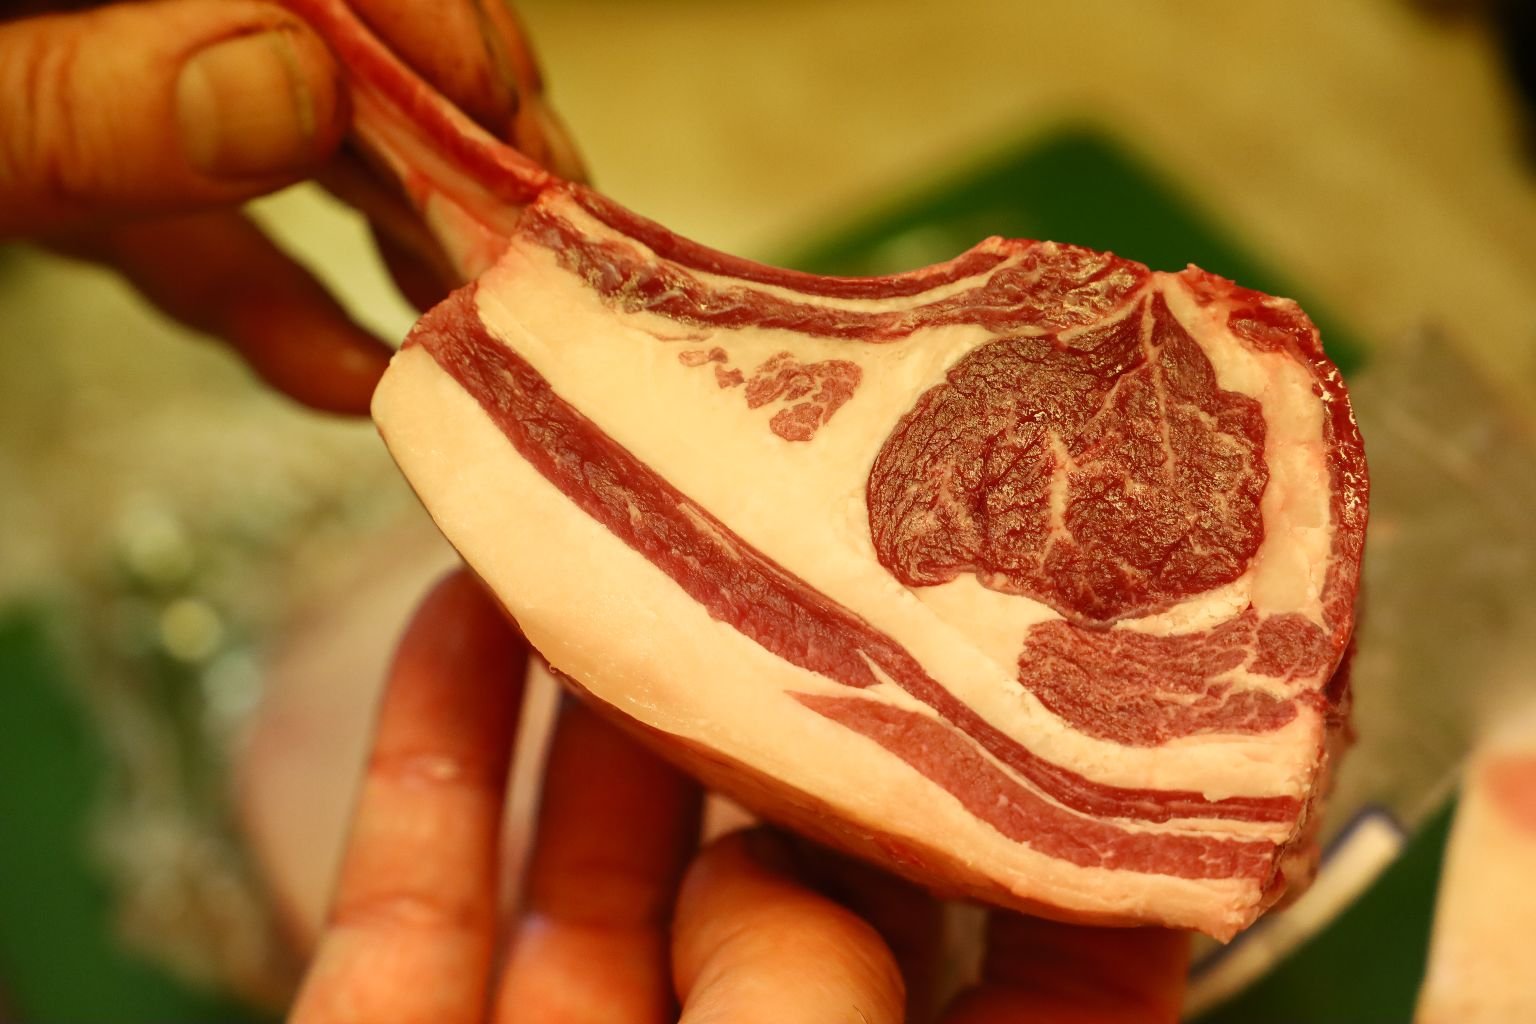
Here is a great picture of the fat and meat of the lamb chop.
The fat provides the meat a great deal of
flavor.
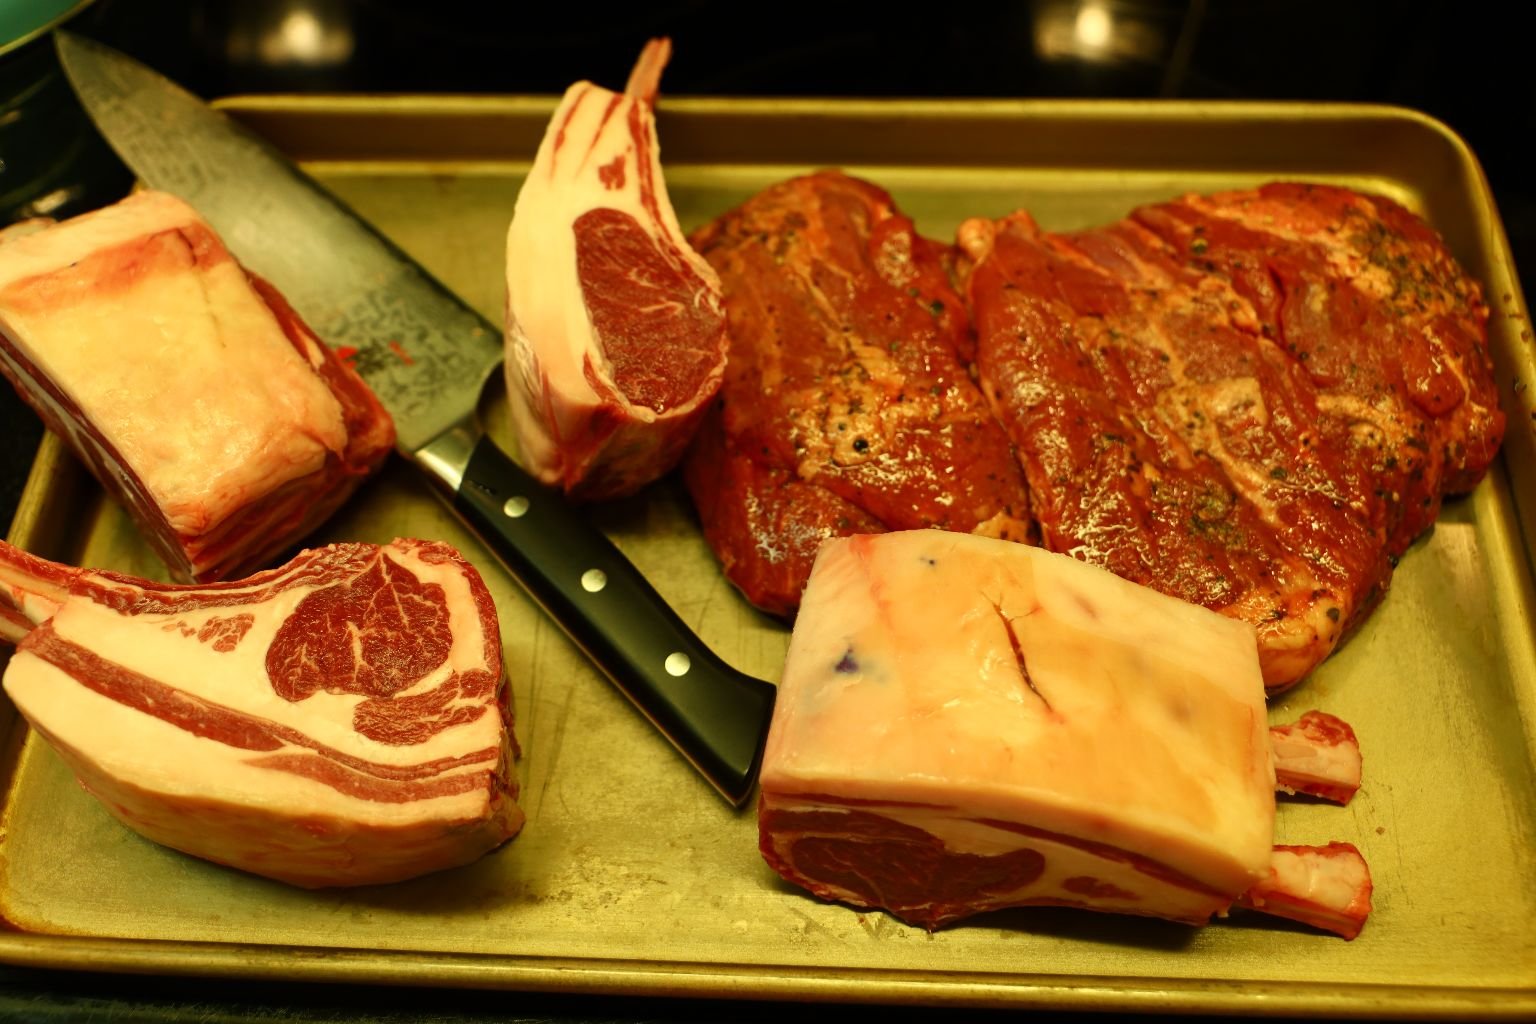
Place the lamb chops on the tray with your leg of lamb.
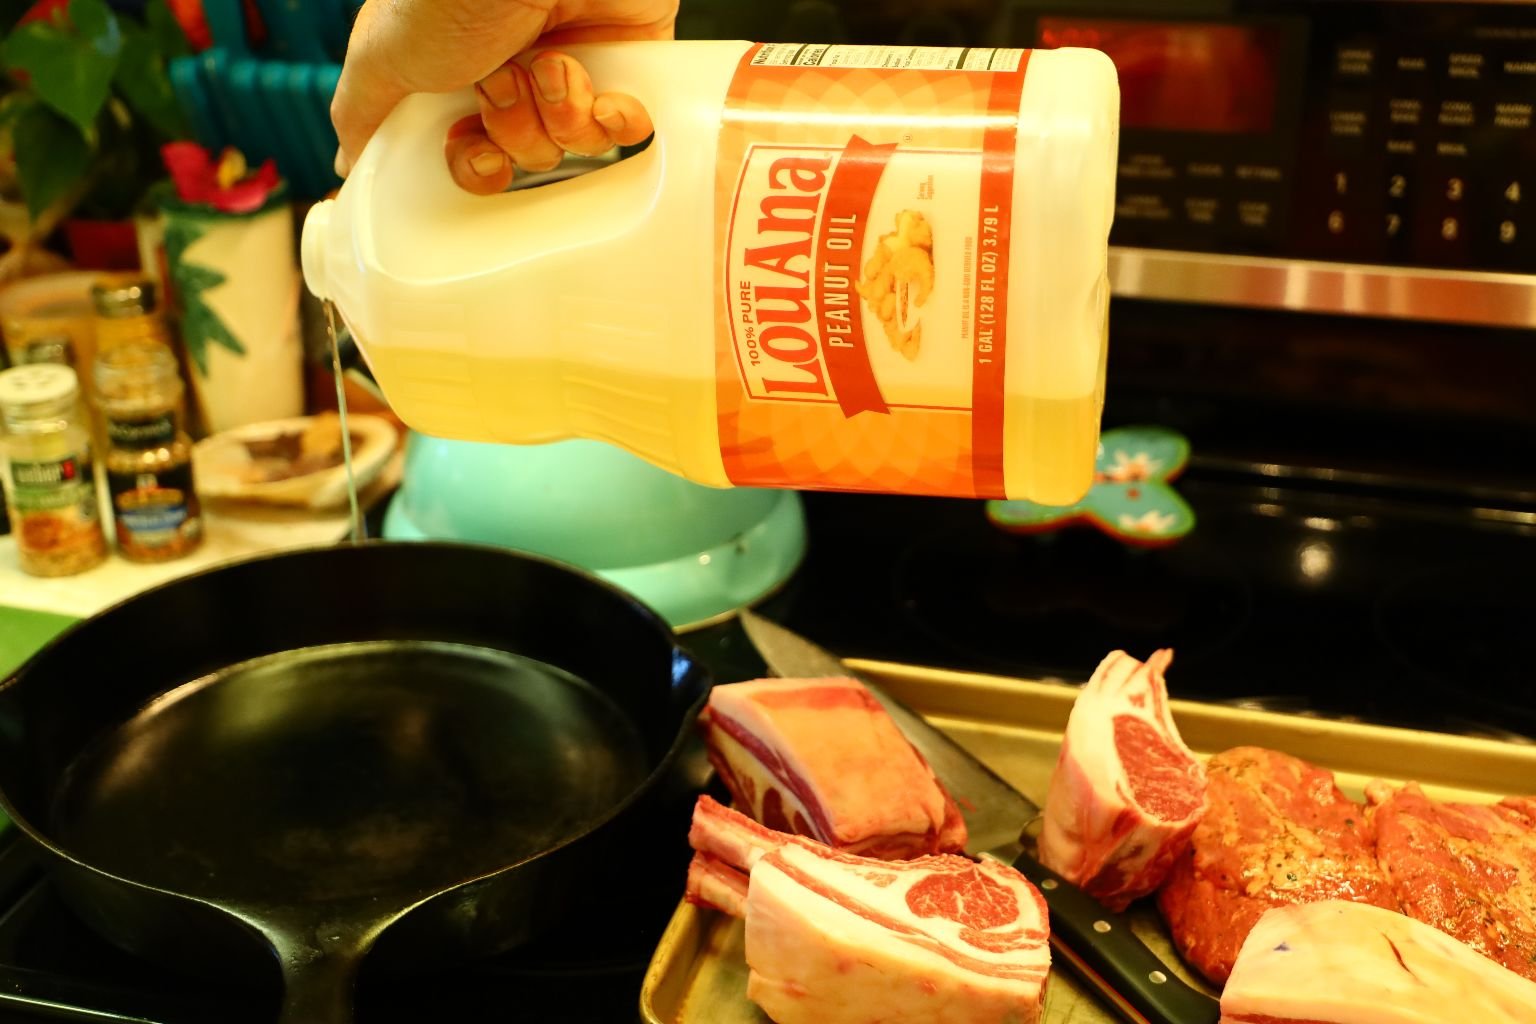
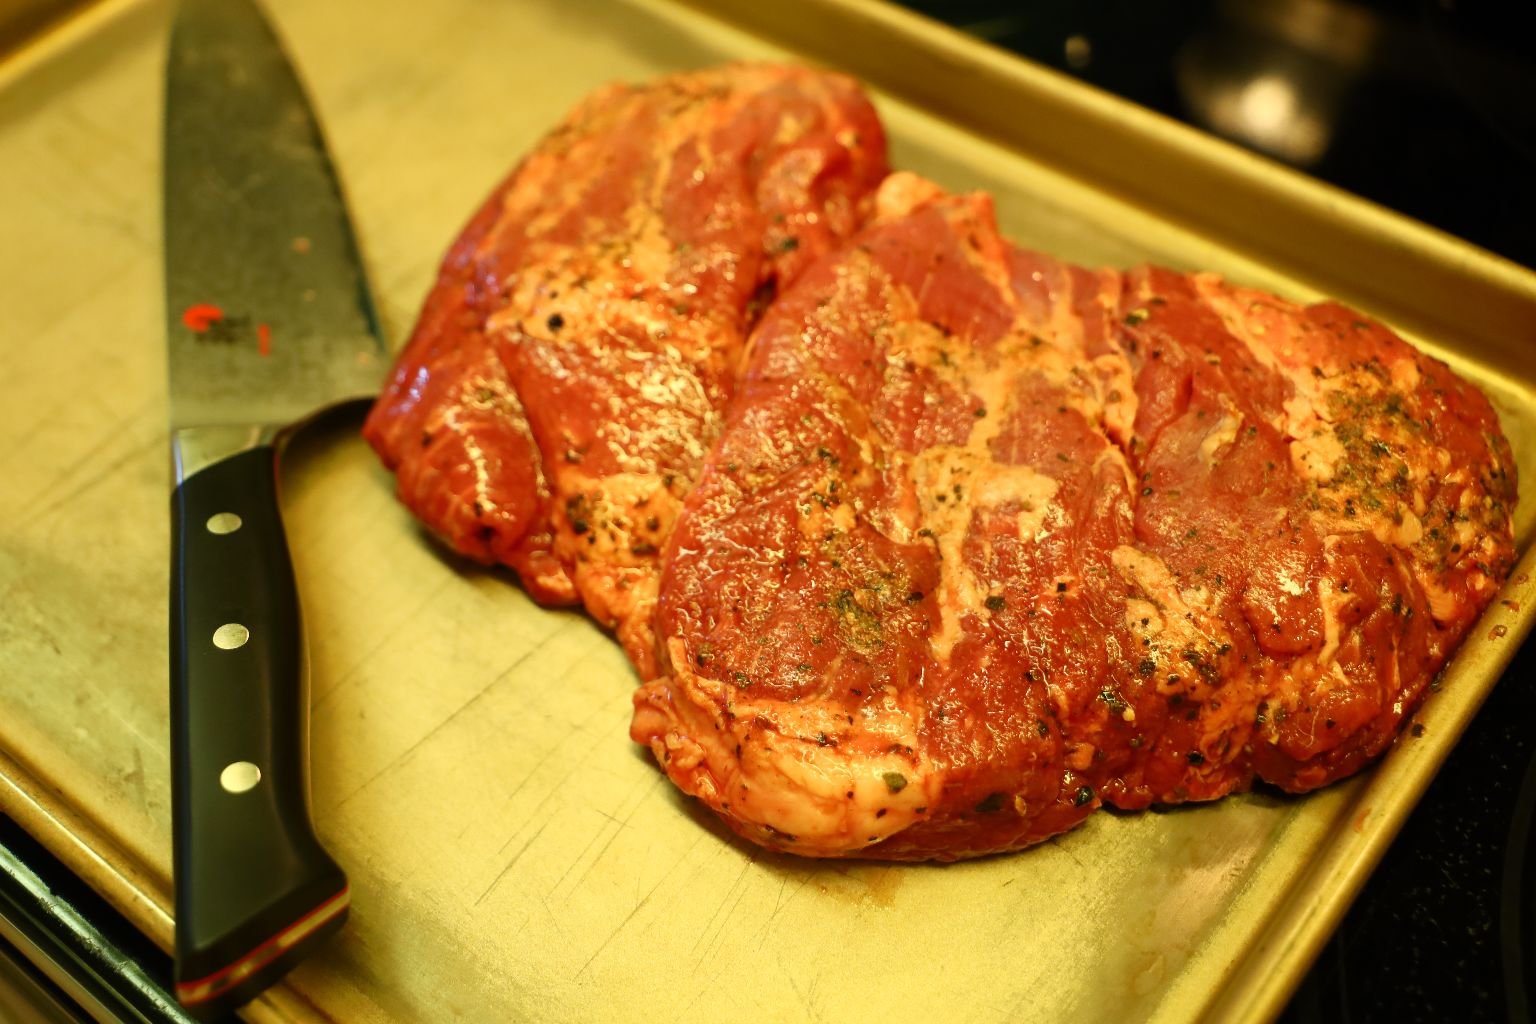
Use a nice large cast iron skillet to cook the lamb chops.
Start by placing three tablespoons of peanut oil into the pan, as this oil has a high burning point.
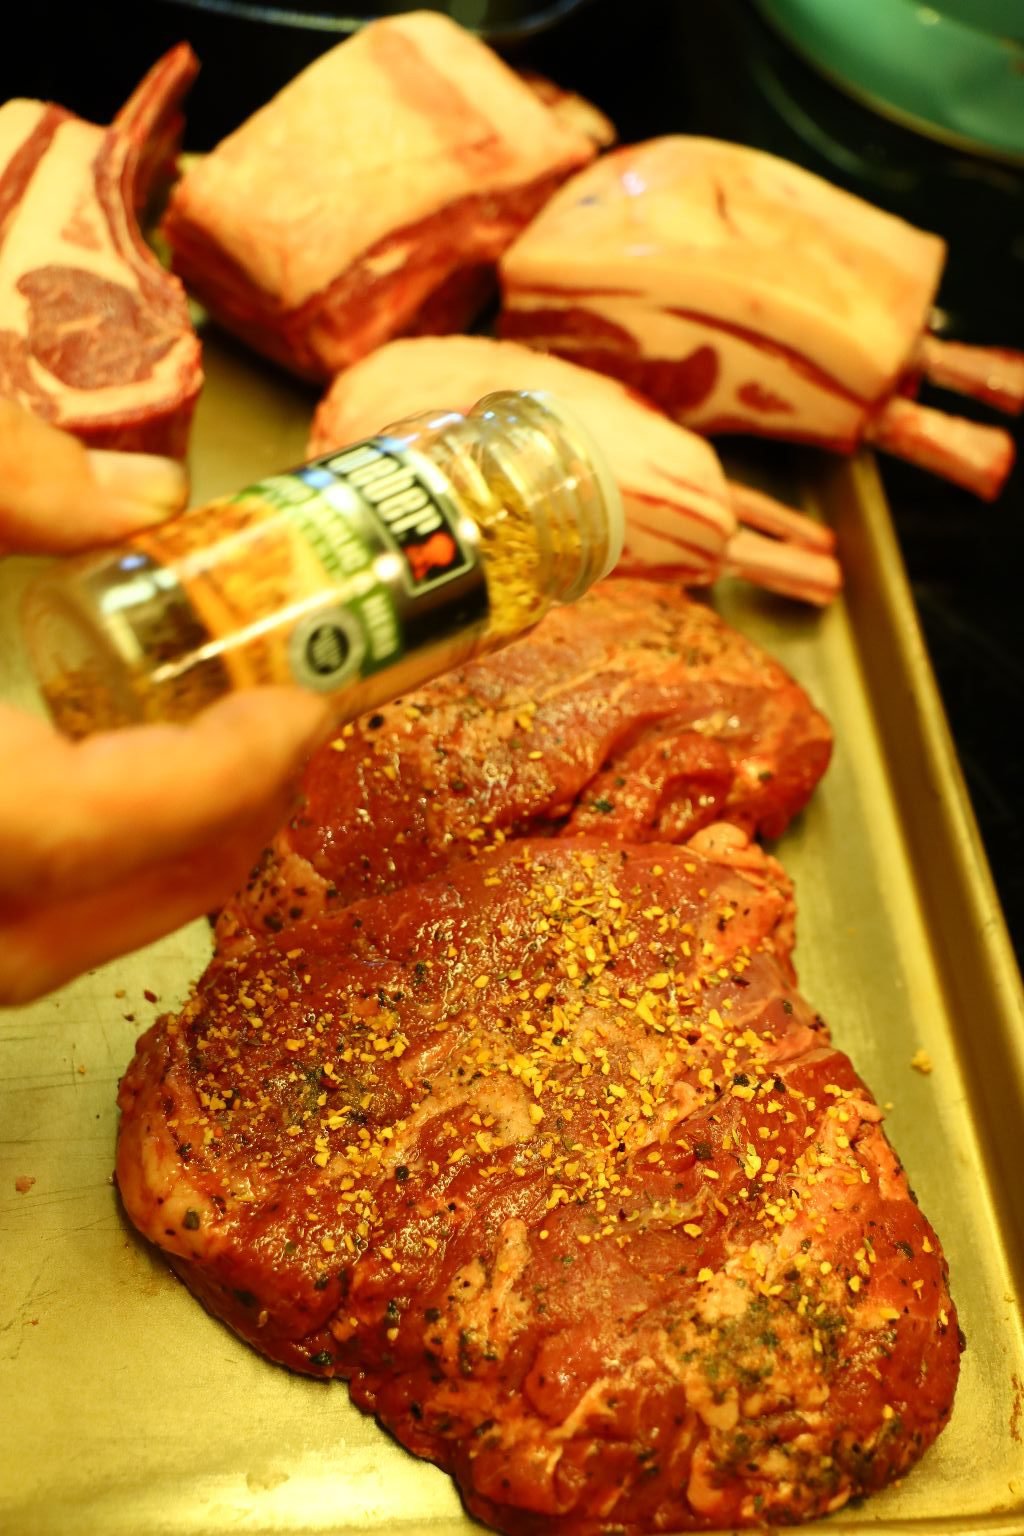
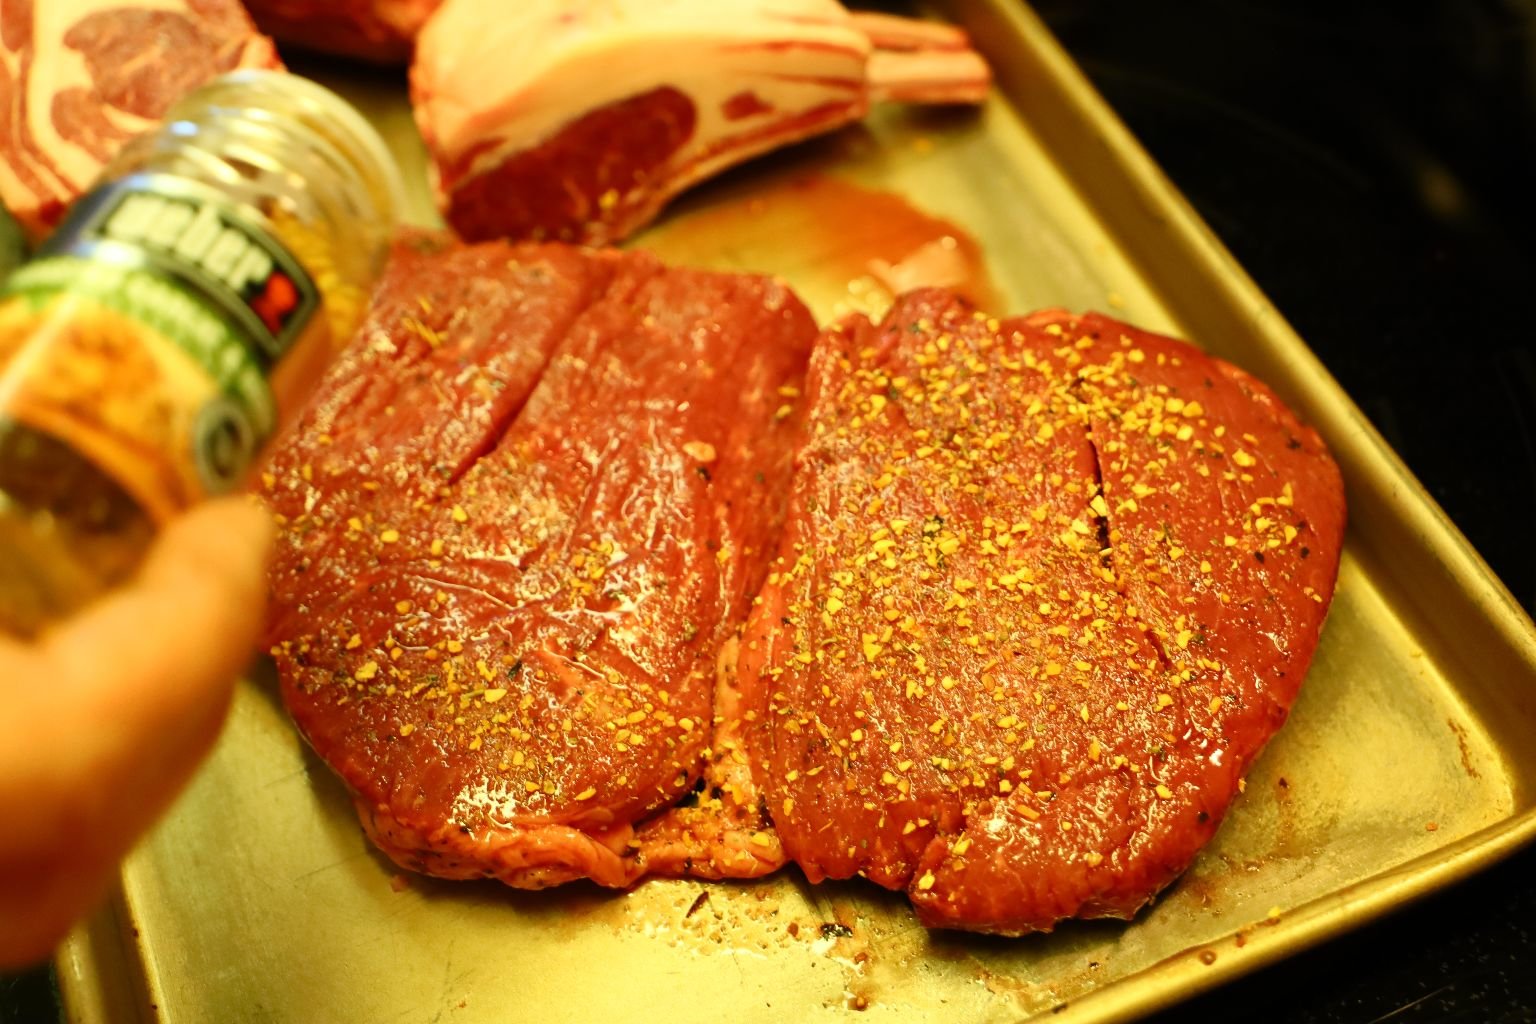
Season the leg of lamb with the seasonings as shown.
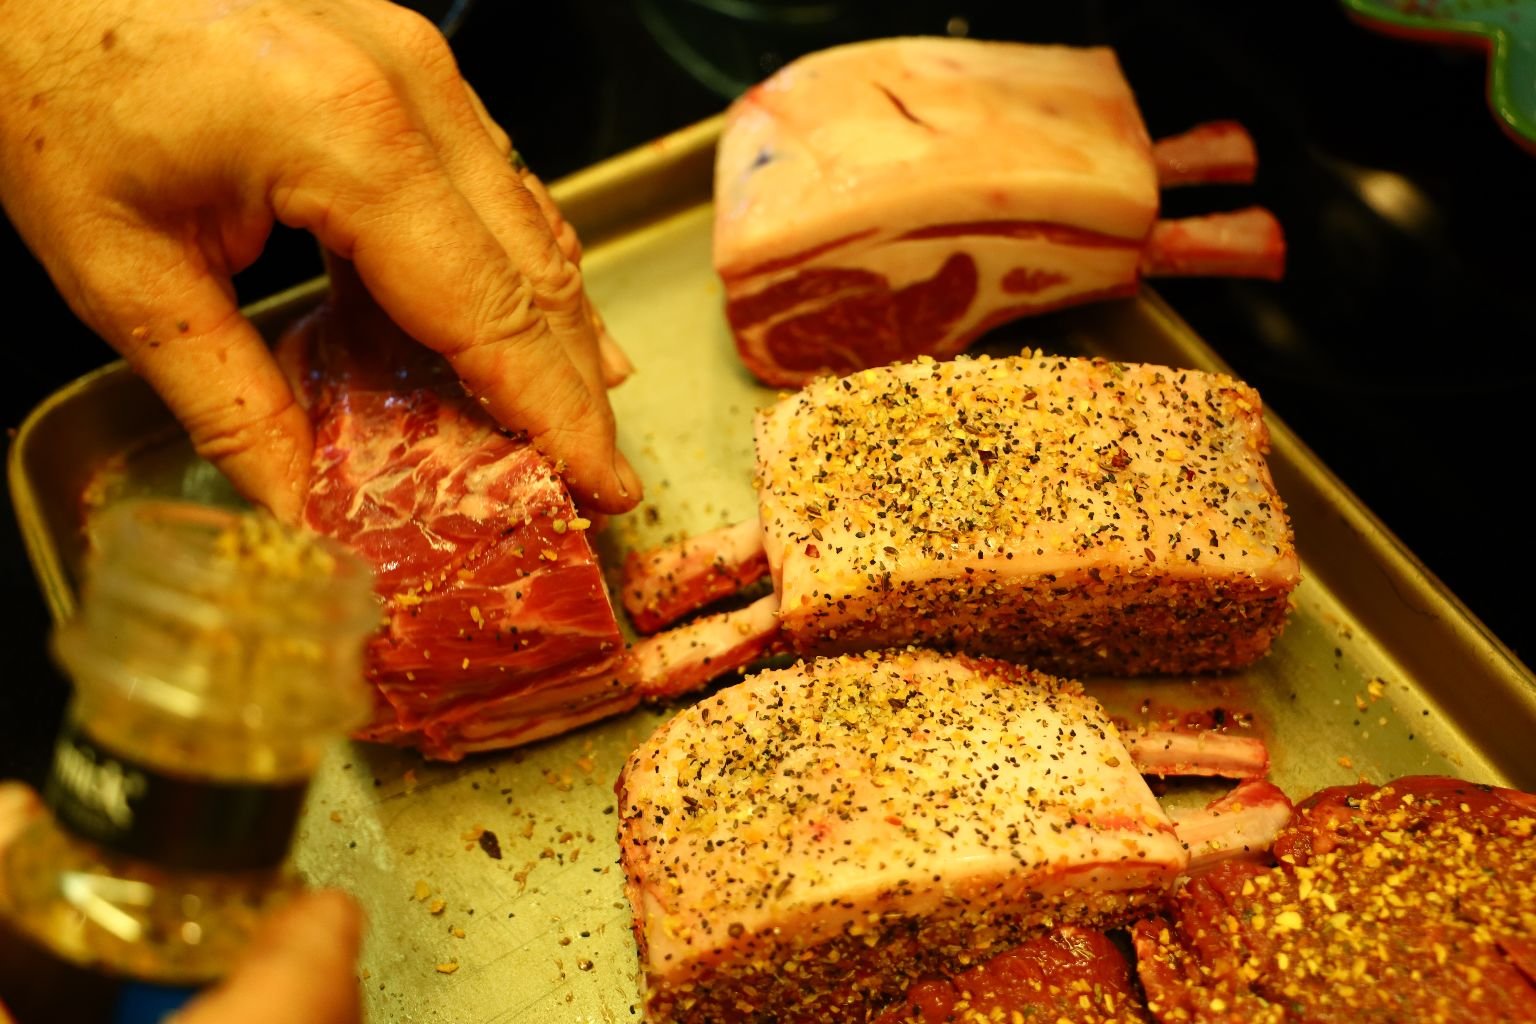
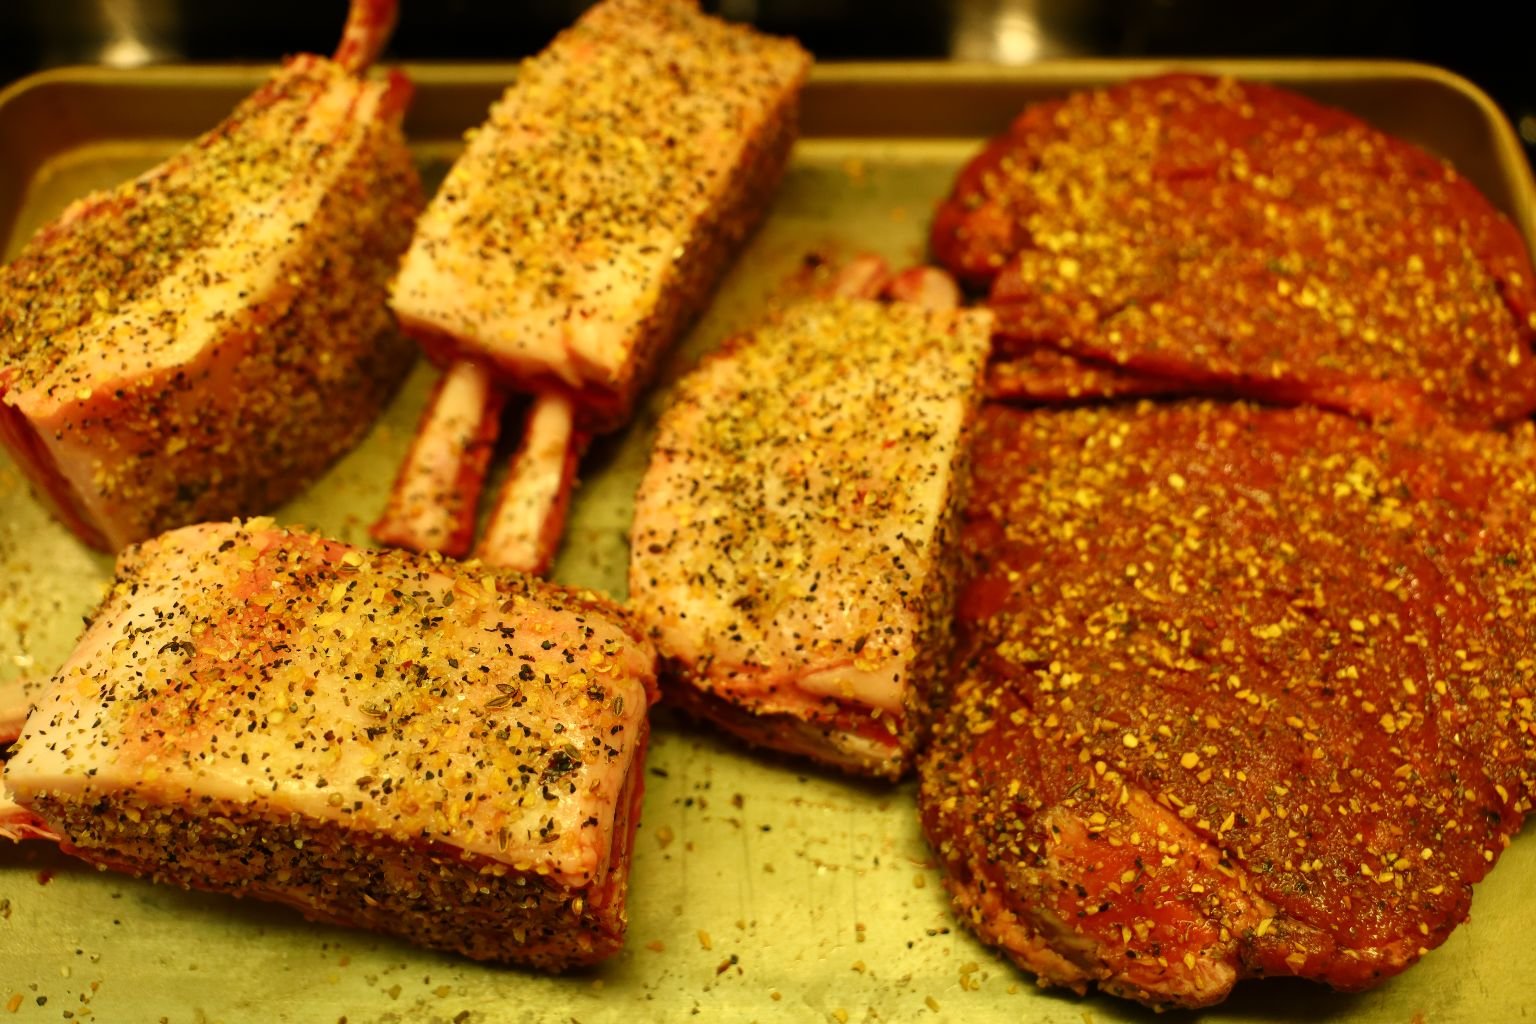
Then season the lamb chops on all sides with the seasoning. Use a good amount as shown as it will
enhance the meat through the surrounding fat.
——————————————————————
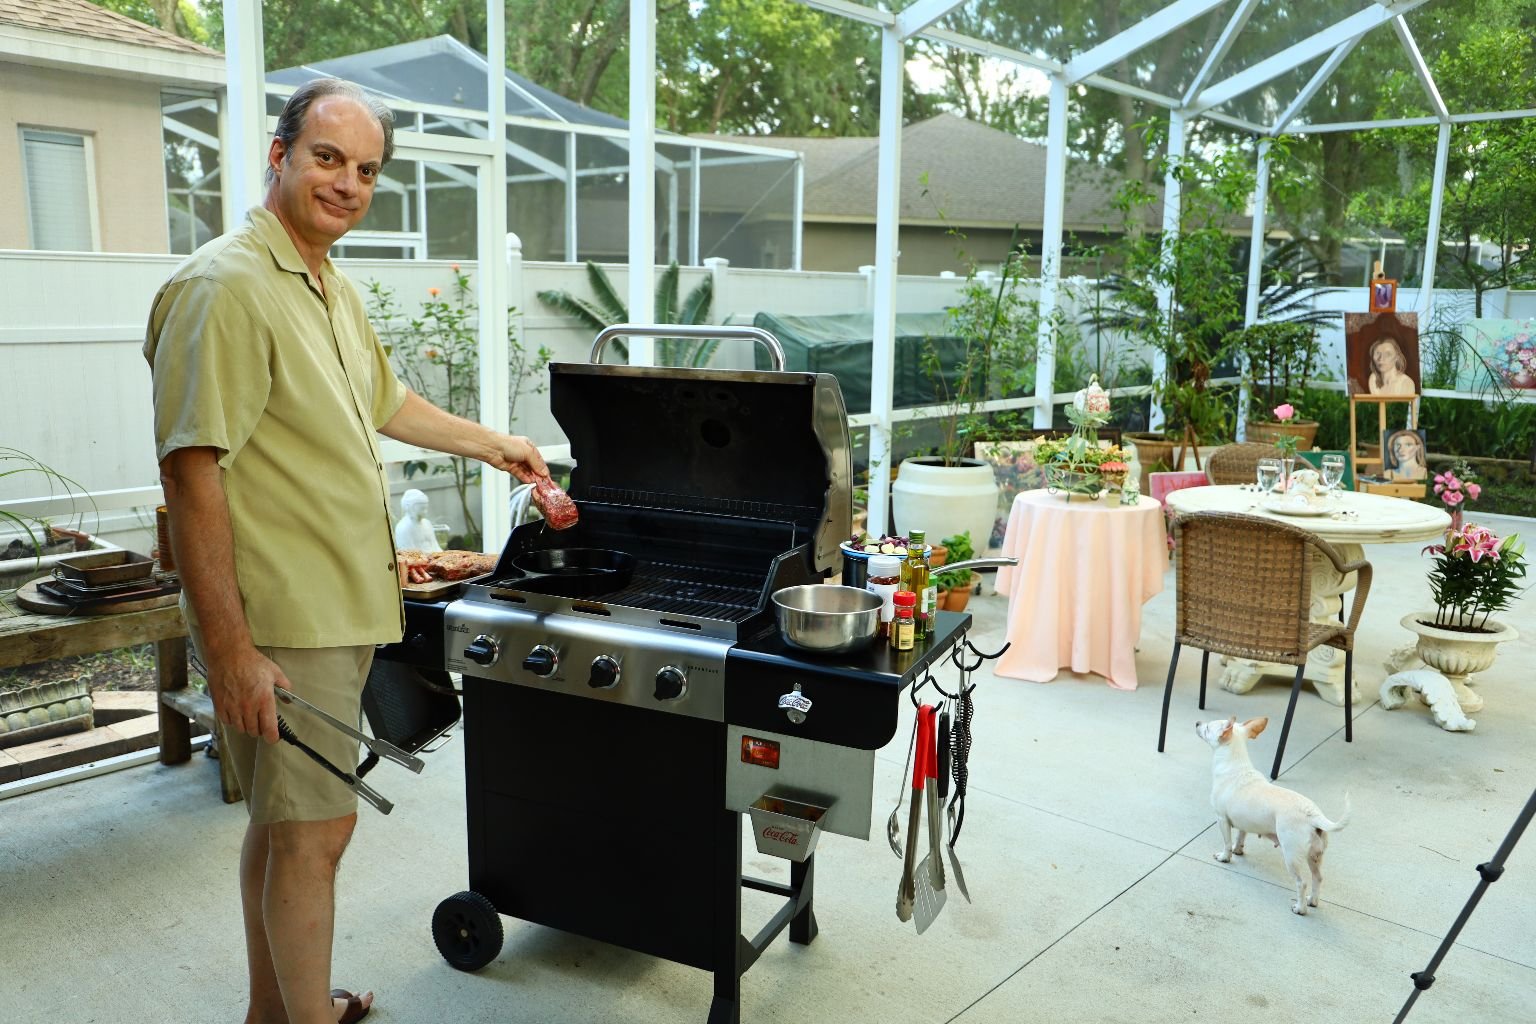
Heat your grill to medium high and place your cast iron skillet over the flame.
After about 5 min. for the
peanut oil is hot, place the lamb chops fat side down onto the skillet.
You should hear the fat sizzling in the pan.
If not, remove it and heat the pan further. This fat side is also called the presentation side or
the side that will be facing up on the plate. Usually this side is cooked first.
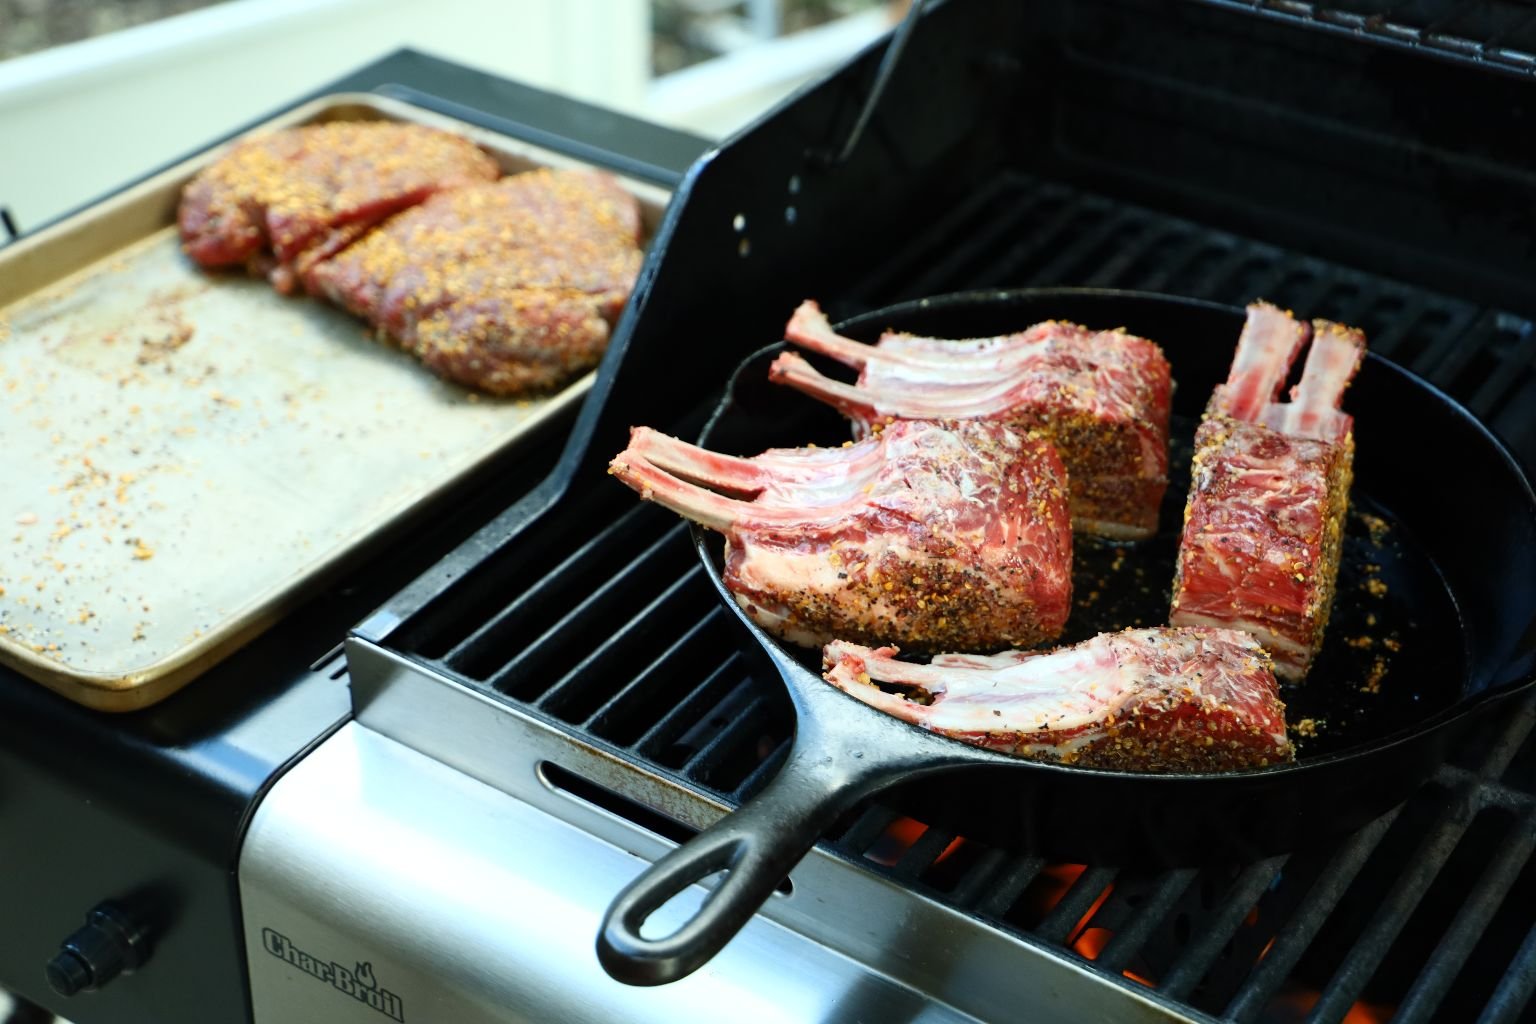
——————————————————-


Here is a closer look at the lamb chops in the pan.
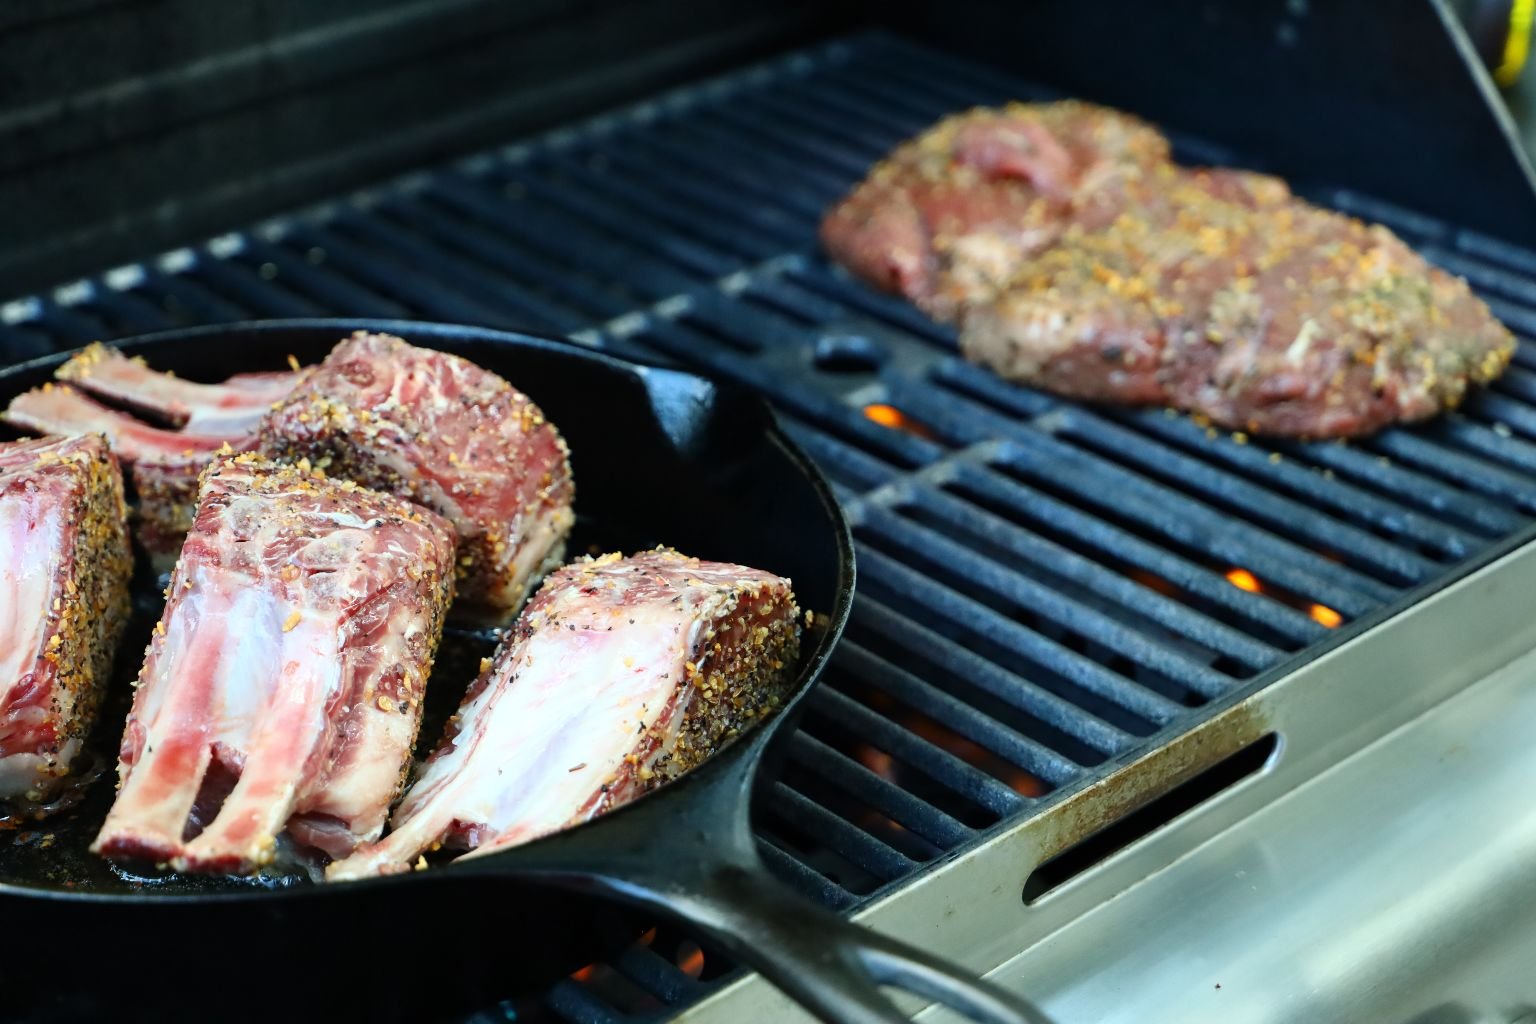
Heat the other side of your grill to medium high heat and when at temperature, place your leg of lamb on the grill.
———————————————————
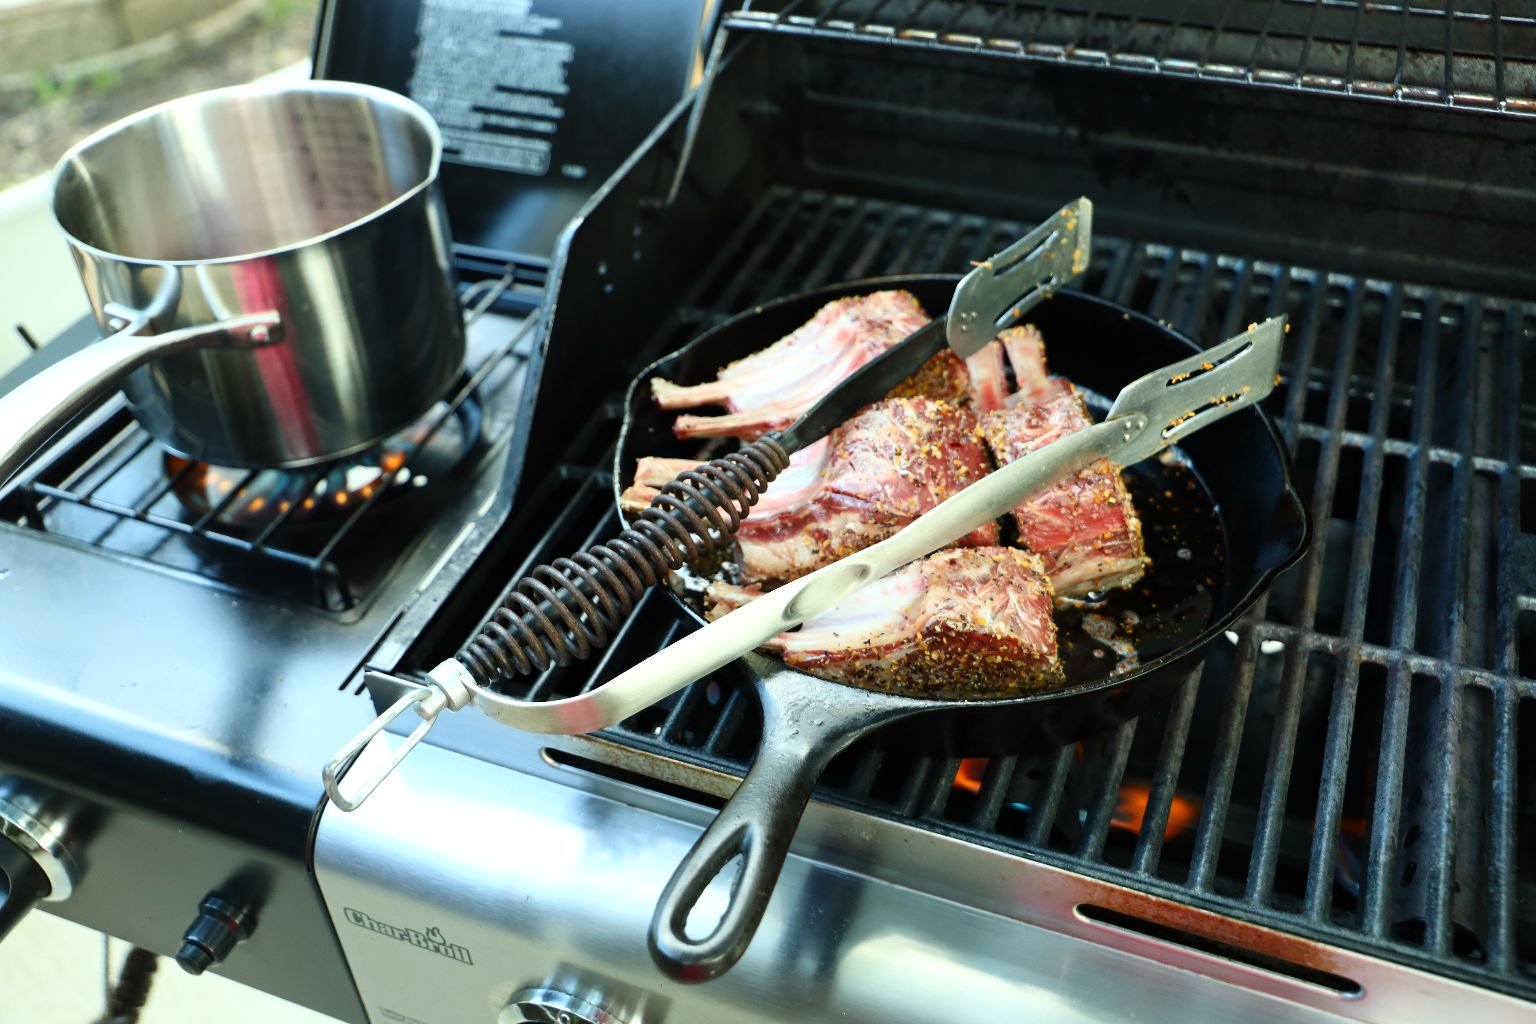
When you have seared the lamb chops to your desired doneness, remove them with your tongs.
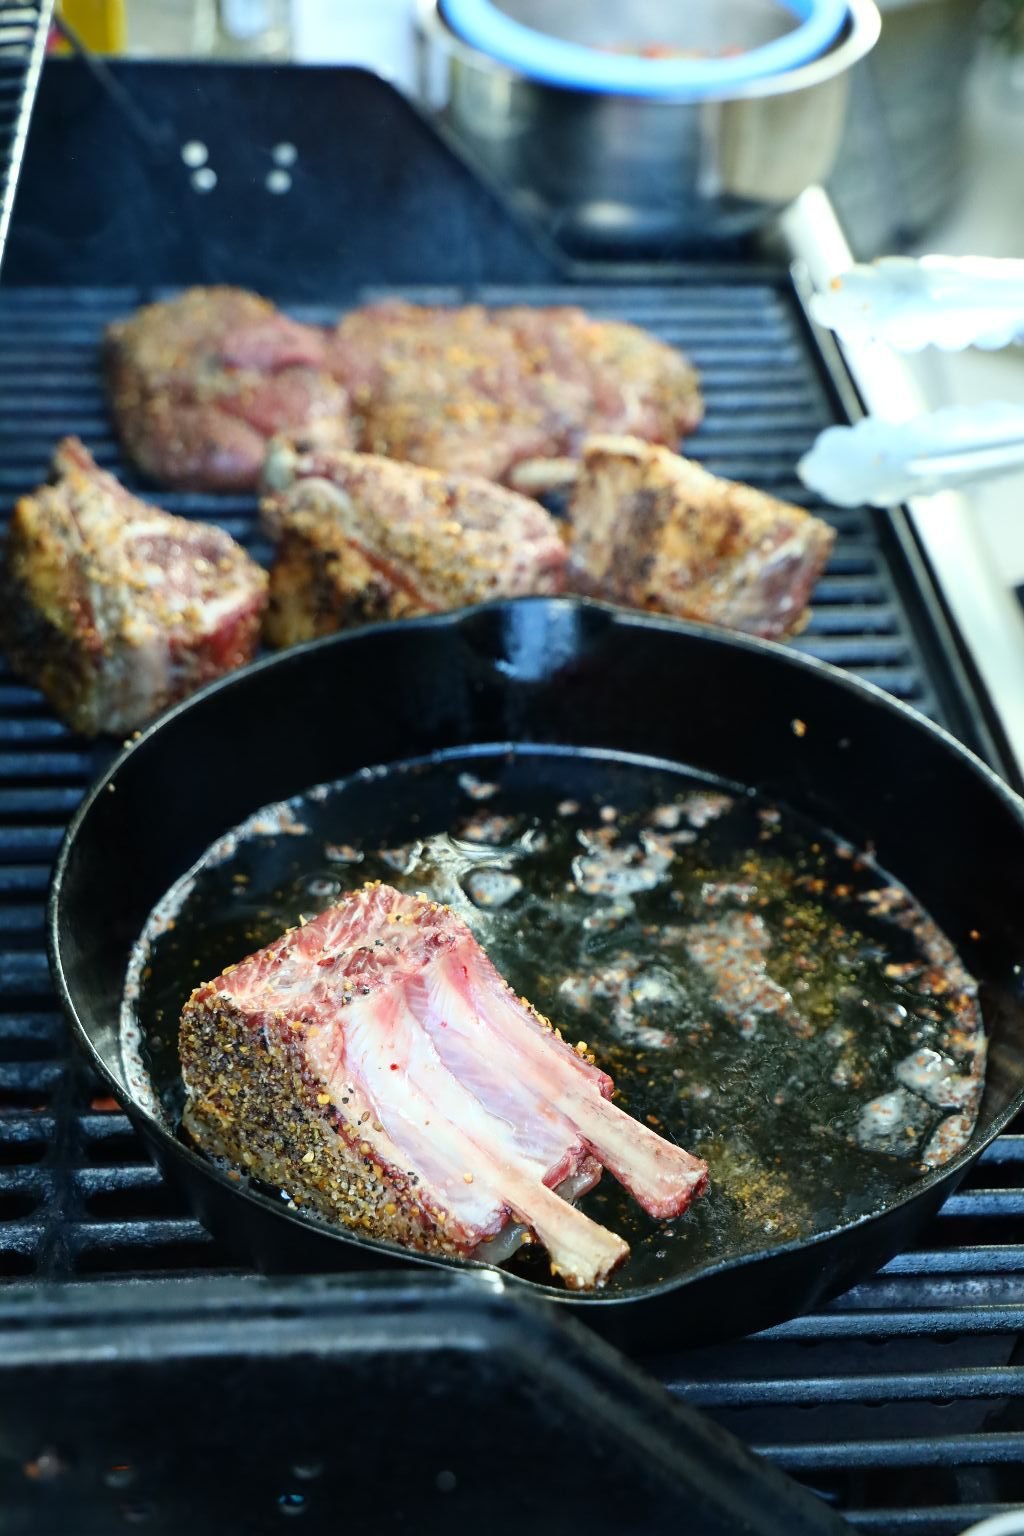

You just want the lamb chops to cook in the pan for about 8 min. or until browned.
When you have seared the lamb chops to your desired doneness, place them on the grill.

——————————————————————-
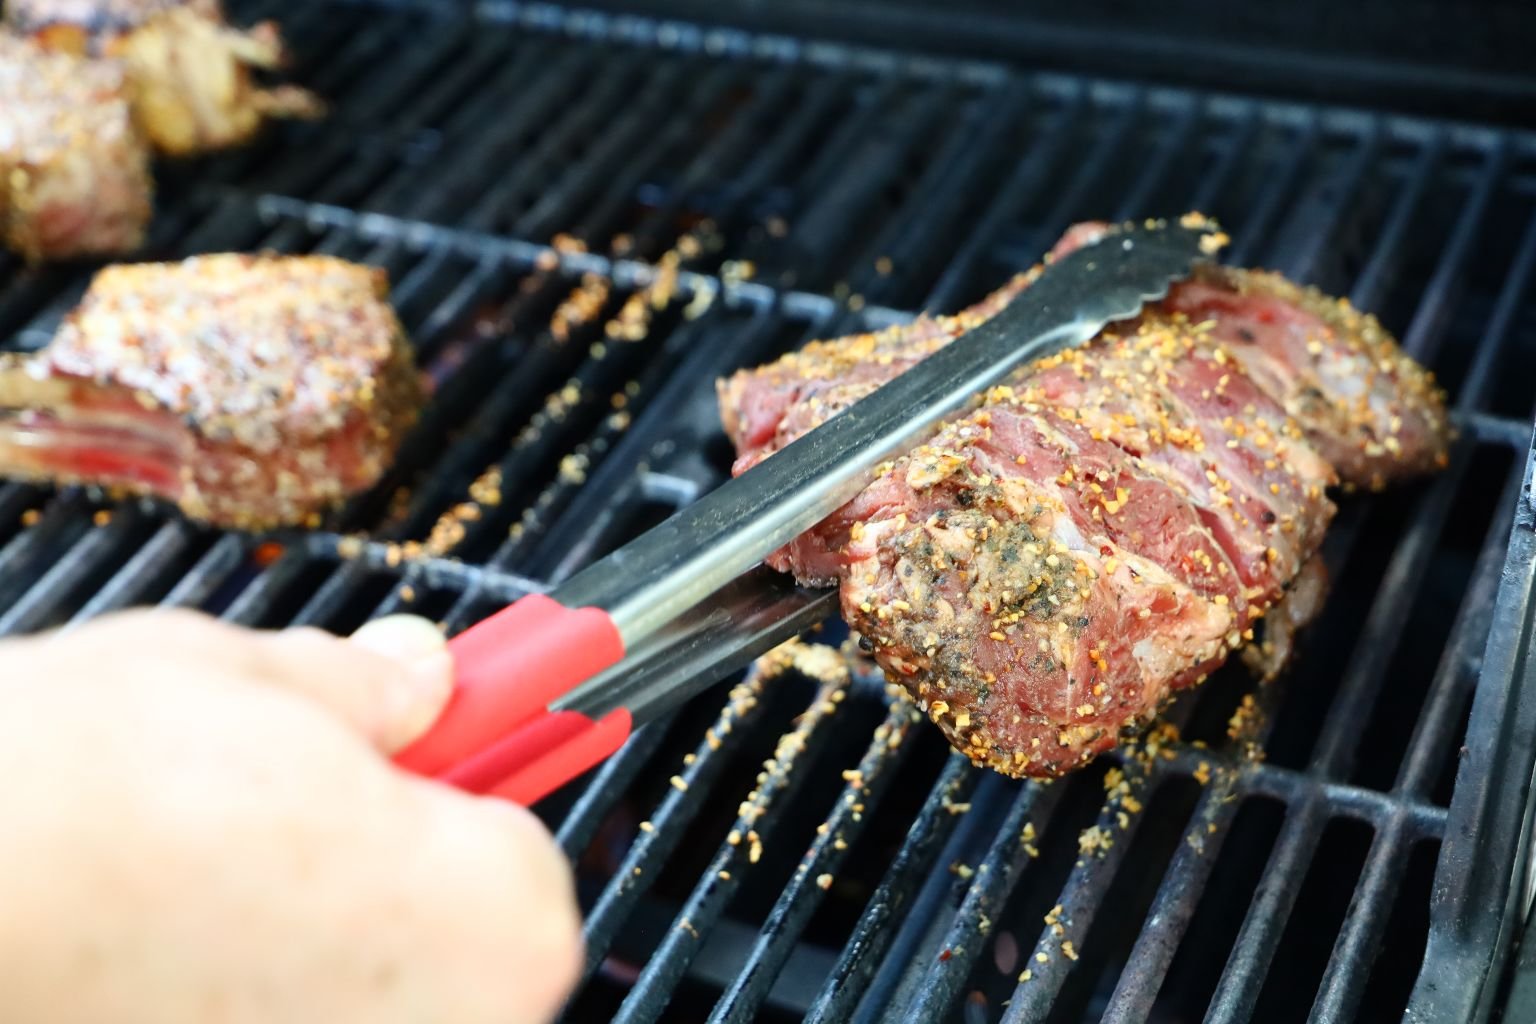
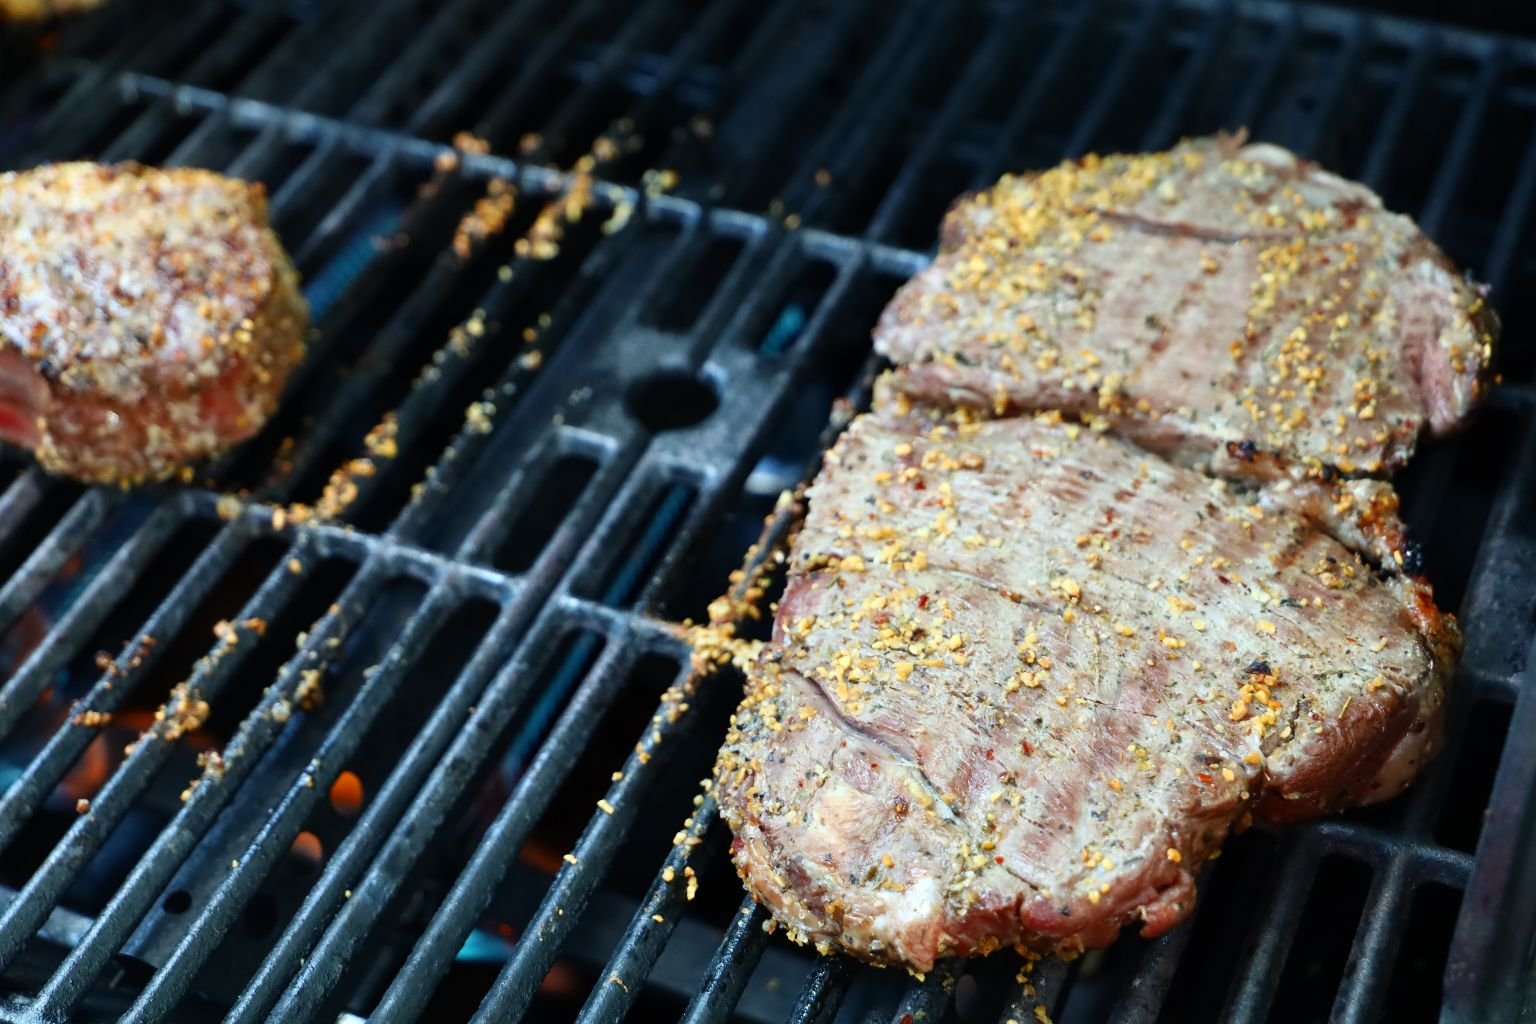
The leg of lamb is not very thick so It won’t take long to cook either.
After about 8 min. or so, you can lift it up and see if it is nicely browned.
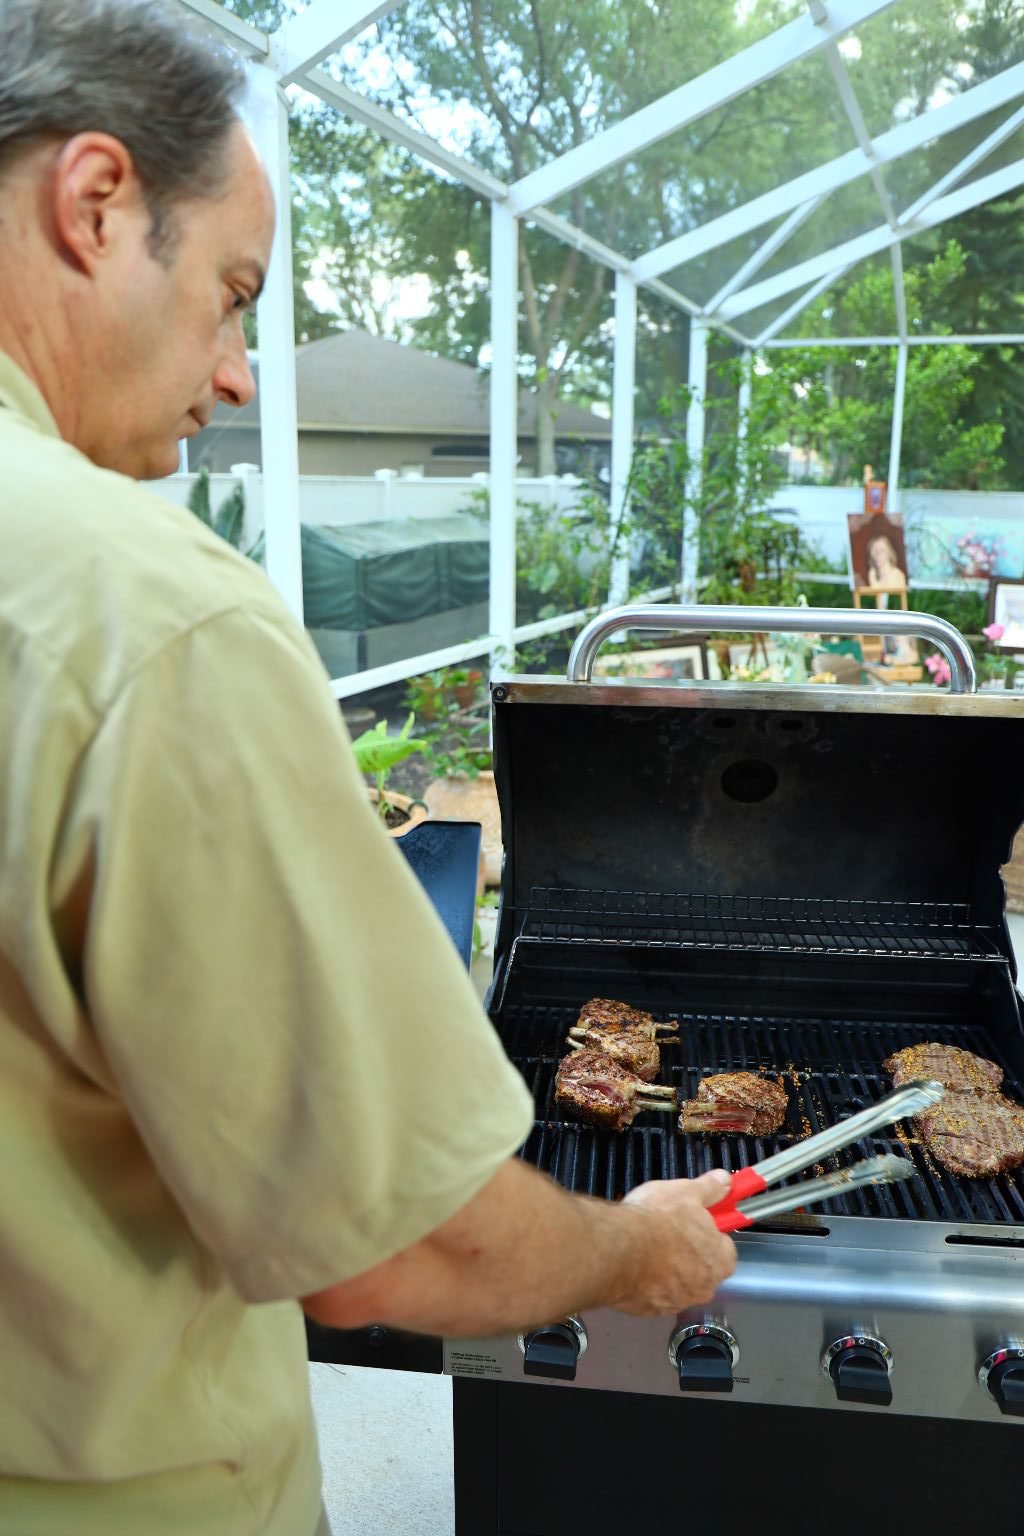
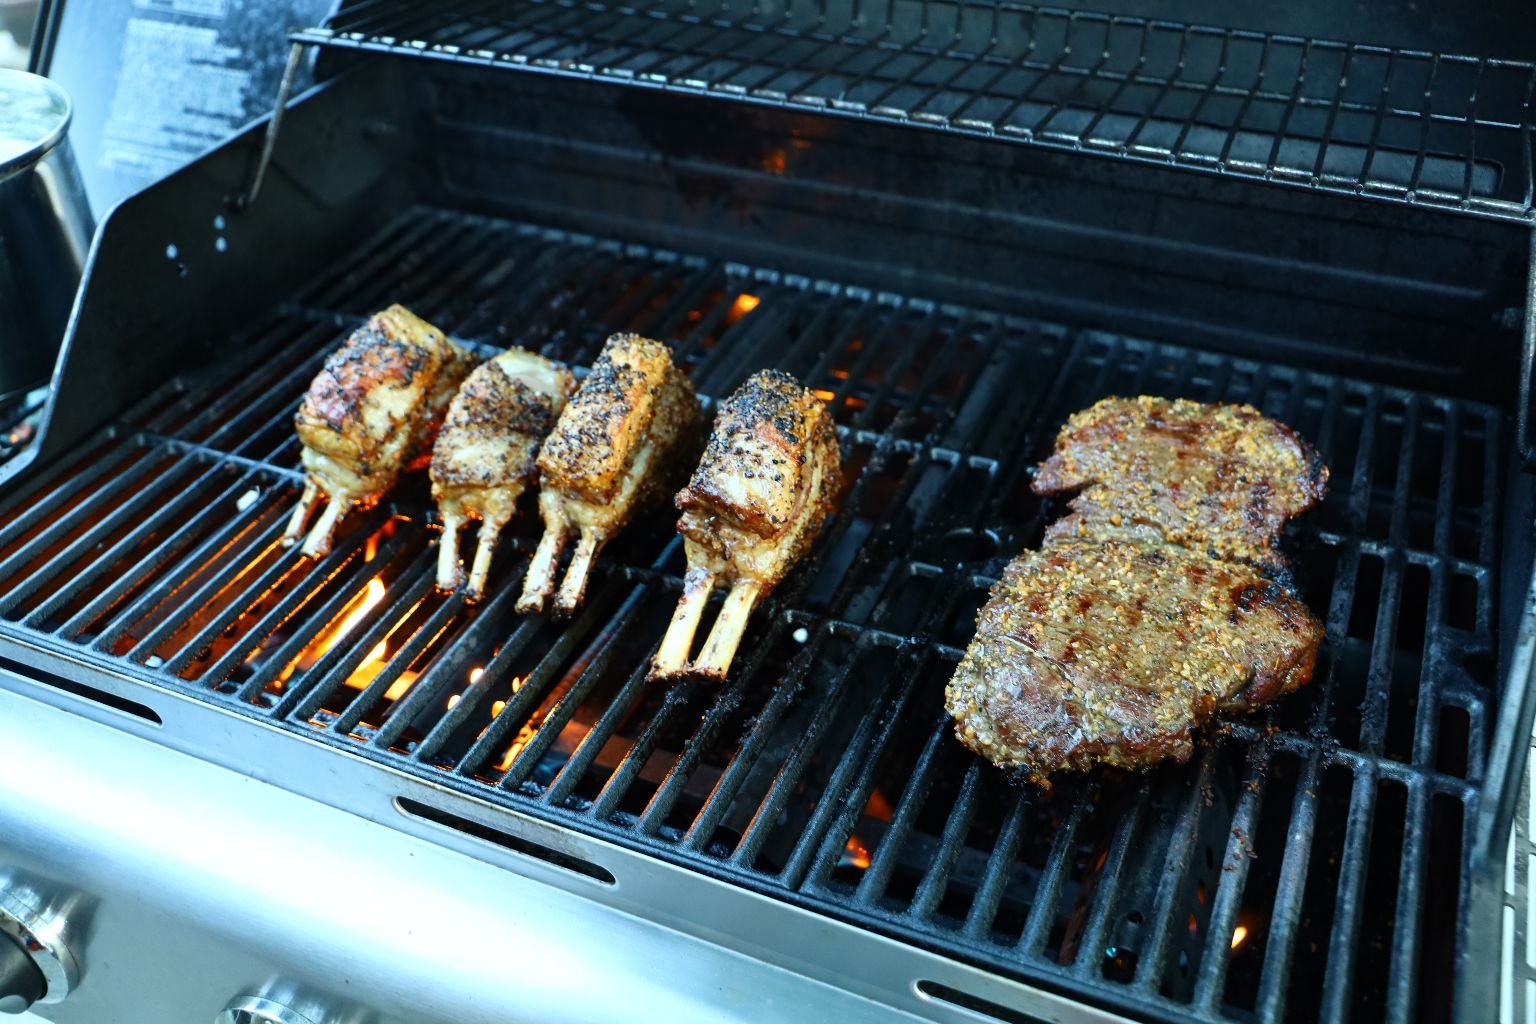
After about 5 min. or more, flip the lamb chop onto another side. You should begin nice browning on the chop as shown.
Here you can see the nice sear the pan gave to the fat side of the lamb chops. Now, place them on their side directly on the grill where the pan was located.
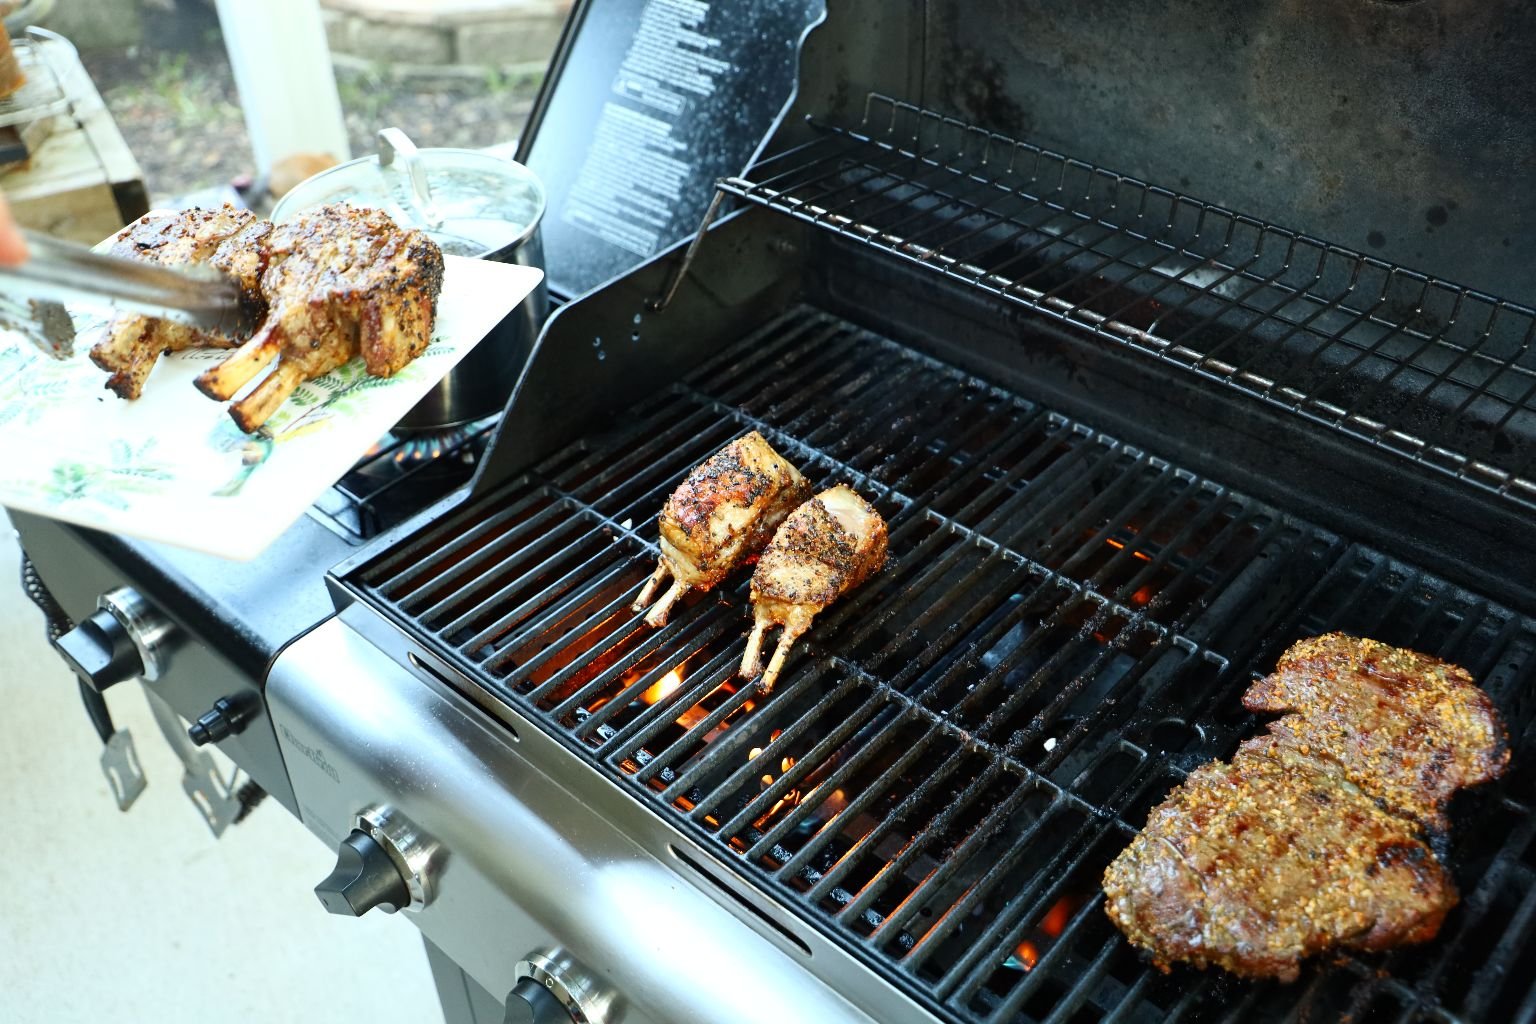
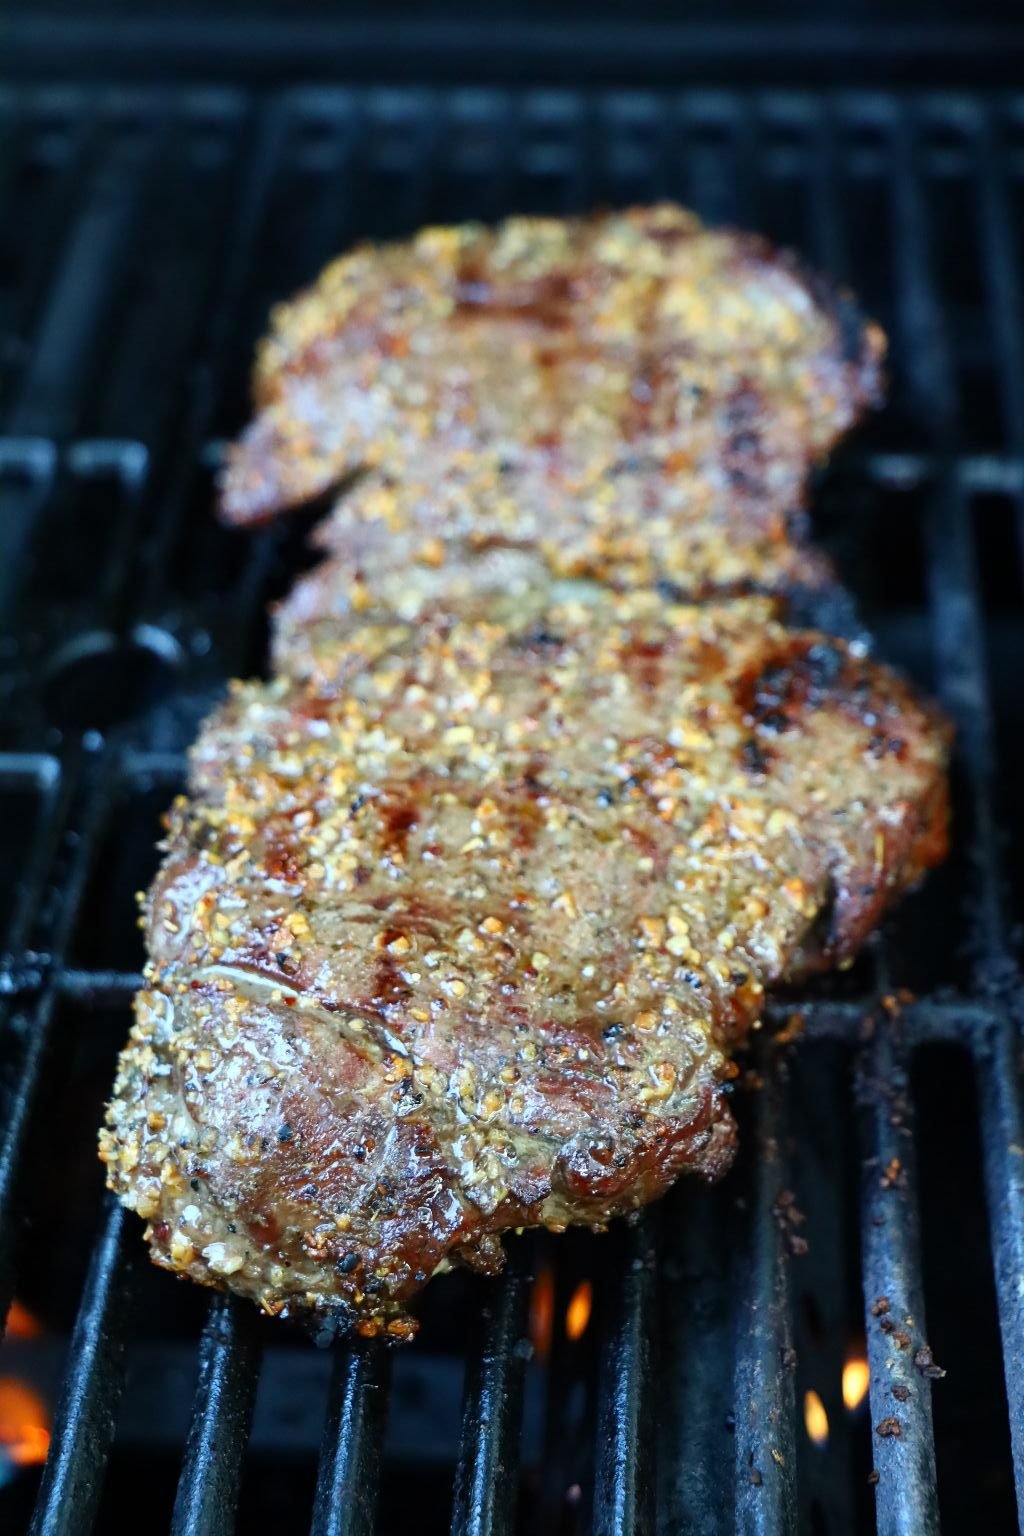
Here you can see me at the final stages of grilling the lamb.
When done, let the lamb rest at least 8 to
10 minutes to allow the heated juices to return to the center of the meat.
The lamb was place on a bed of micro-greens.
——————————————————————-
Lamb Balsamic Reduction Sauce
Ingredients:
1 Cup Balsamic Vinegar
3 Tbsp. Balsamic Glaze
2 Tbsp. White Balsamic Reduction
2 1/2 heaping Tbsp. savory Balsamic Sweet Onion Jam
1 heaping Tbsp. Lingonberries Jam
————————————————————–
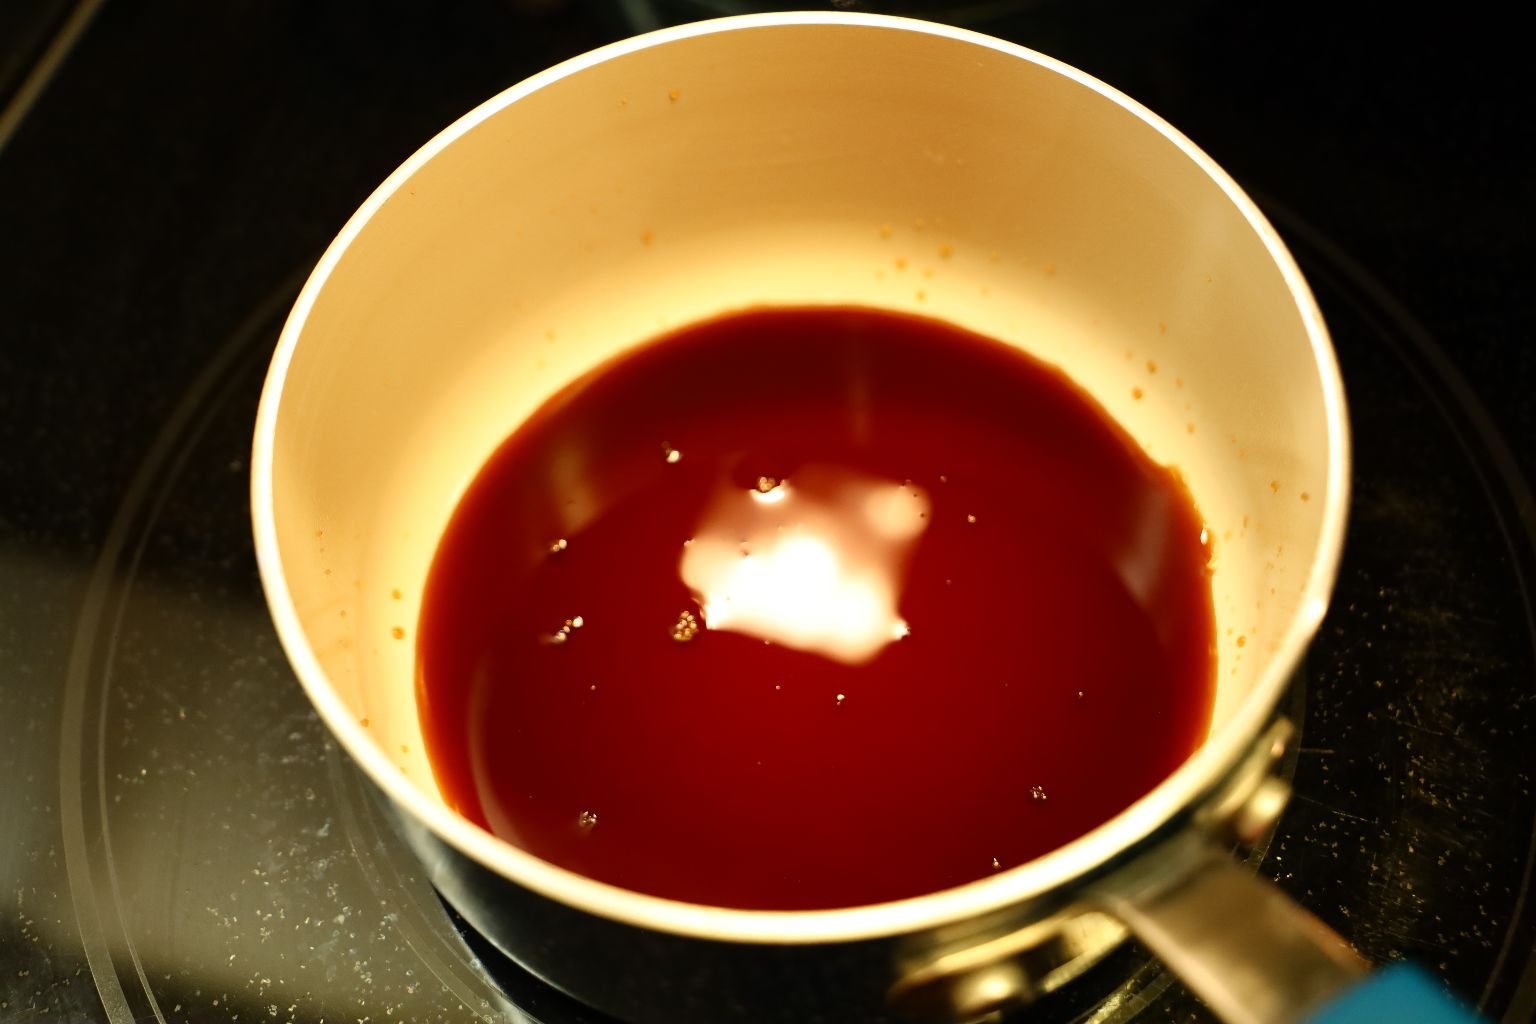
Place the Balsamic Vinegar into a small pot.

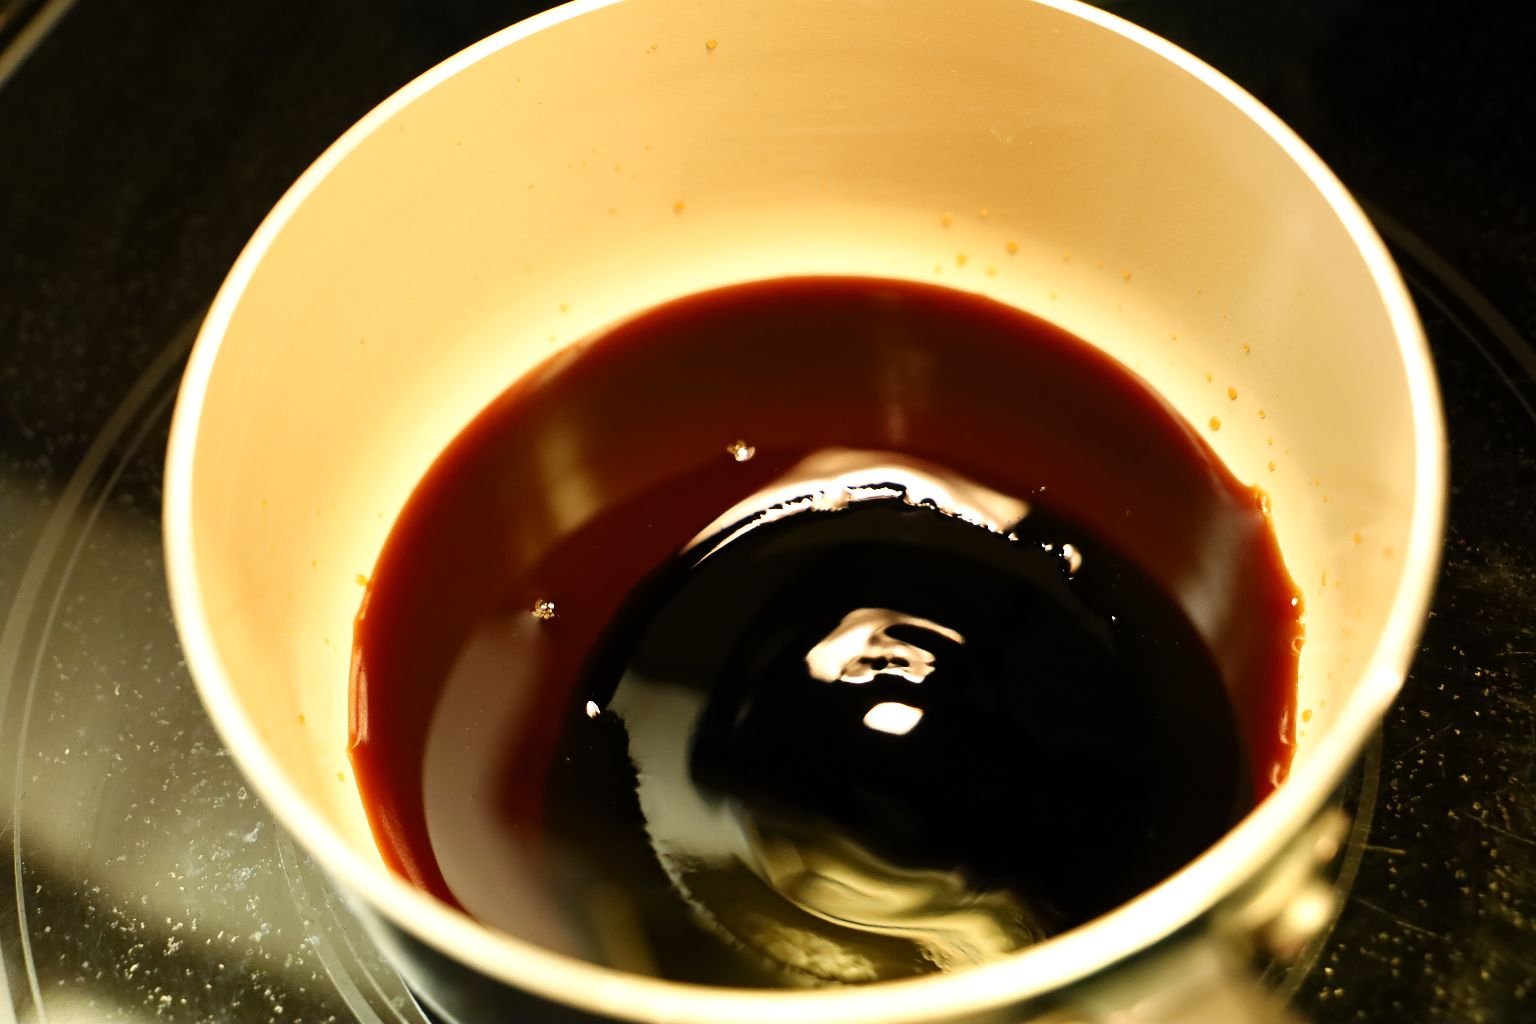
Then add your Balsamic Glaze to the pot.
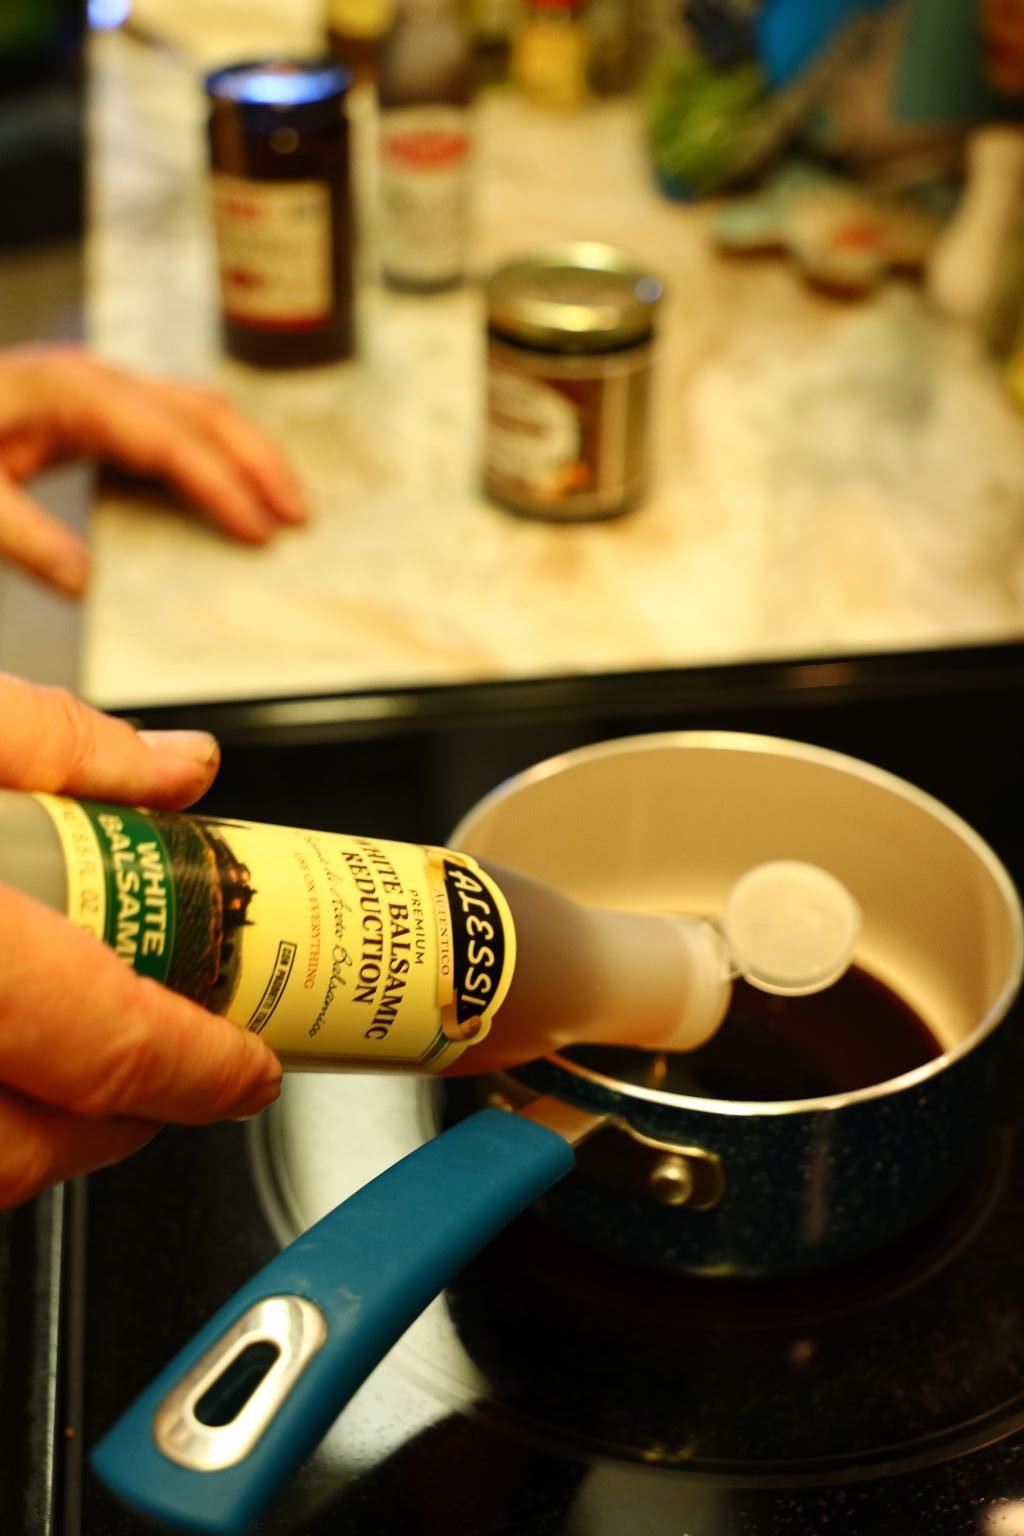
Now, add your White Balsamic Reduction to the pot.
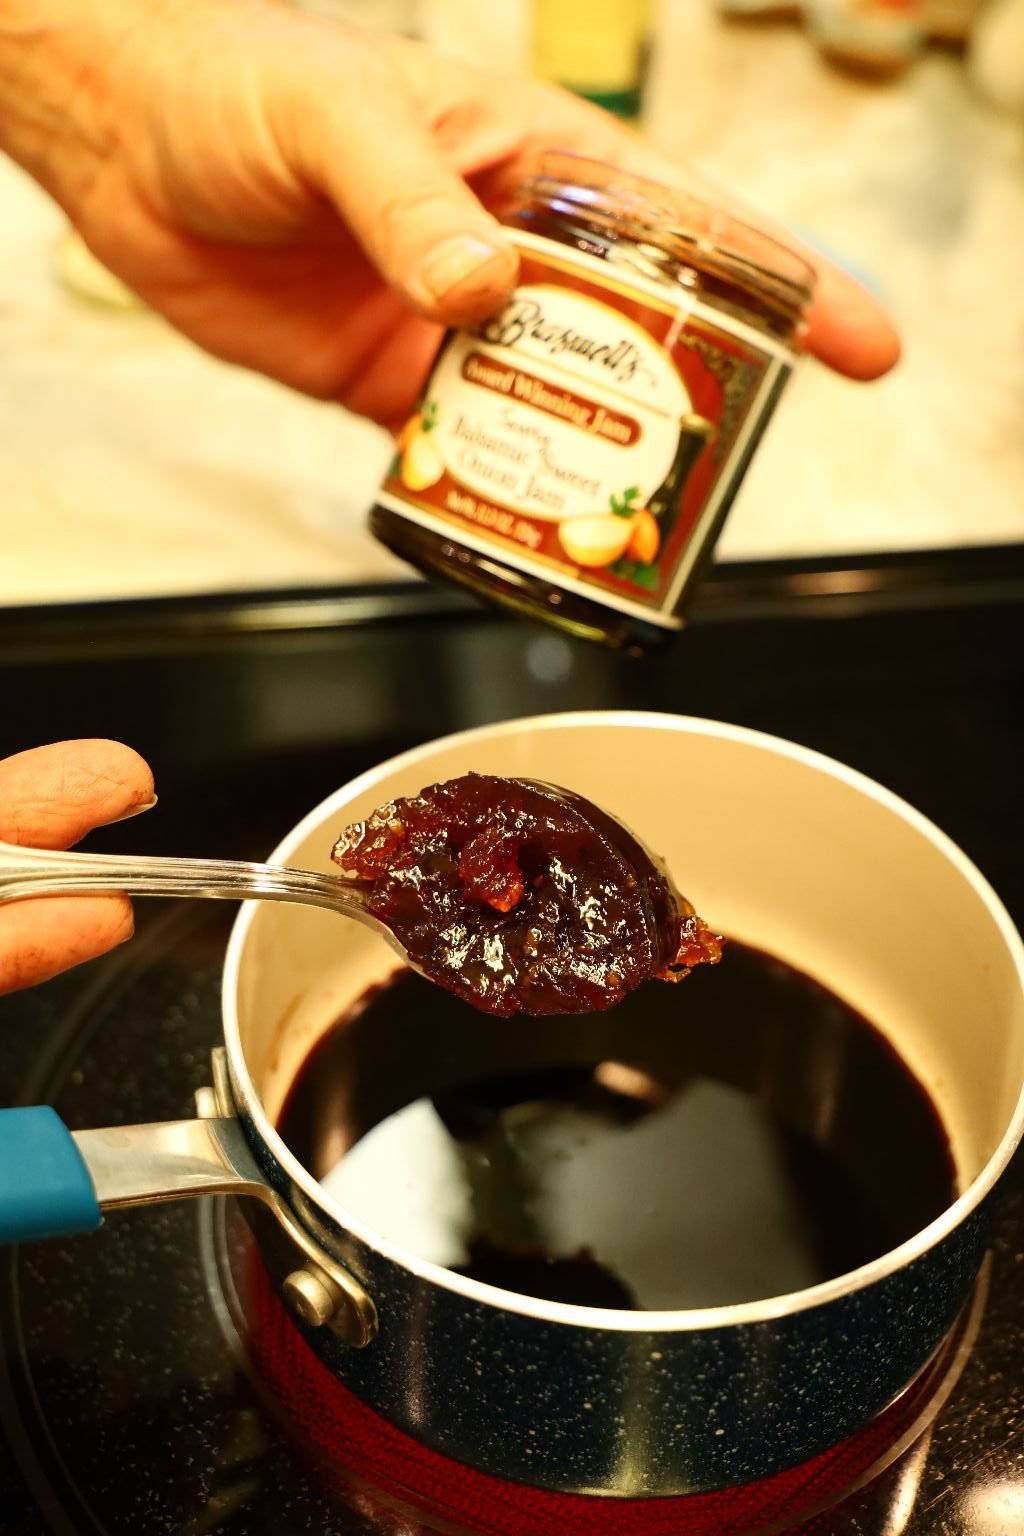
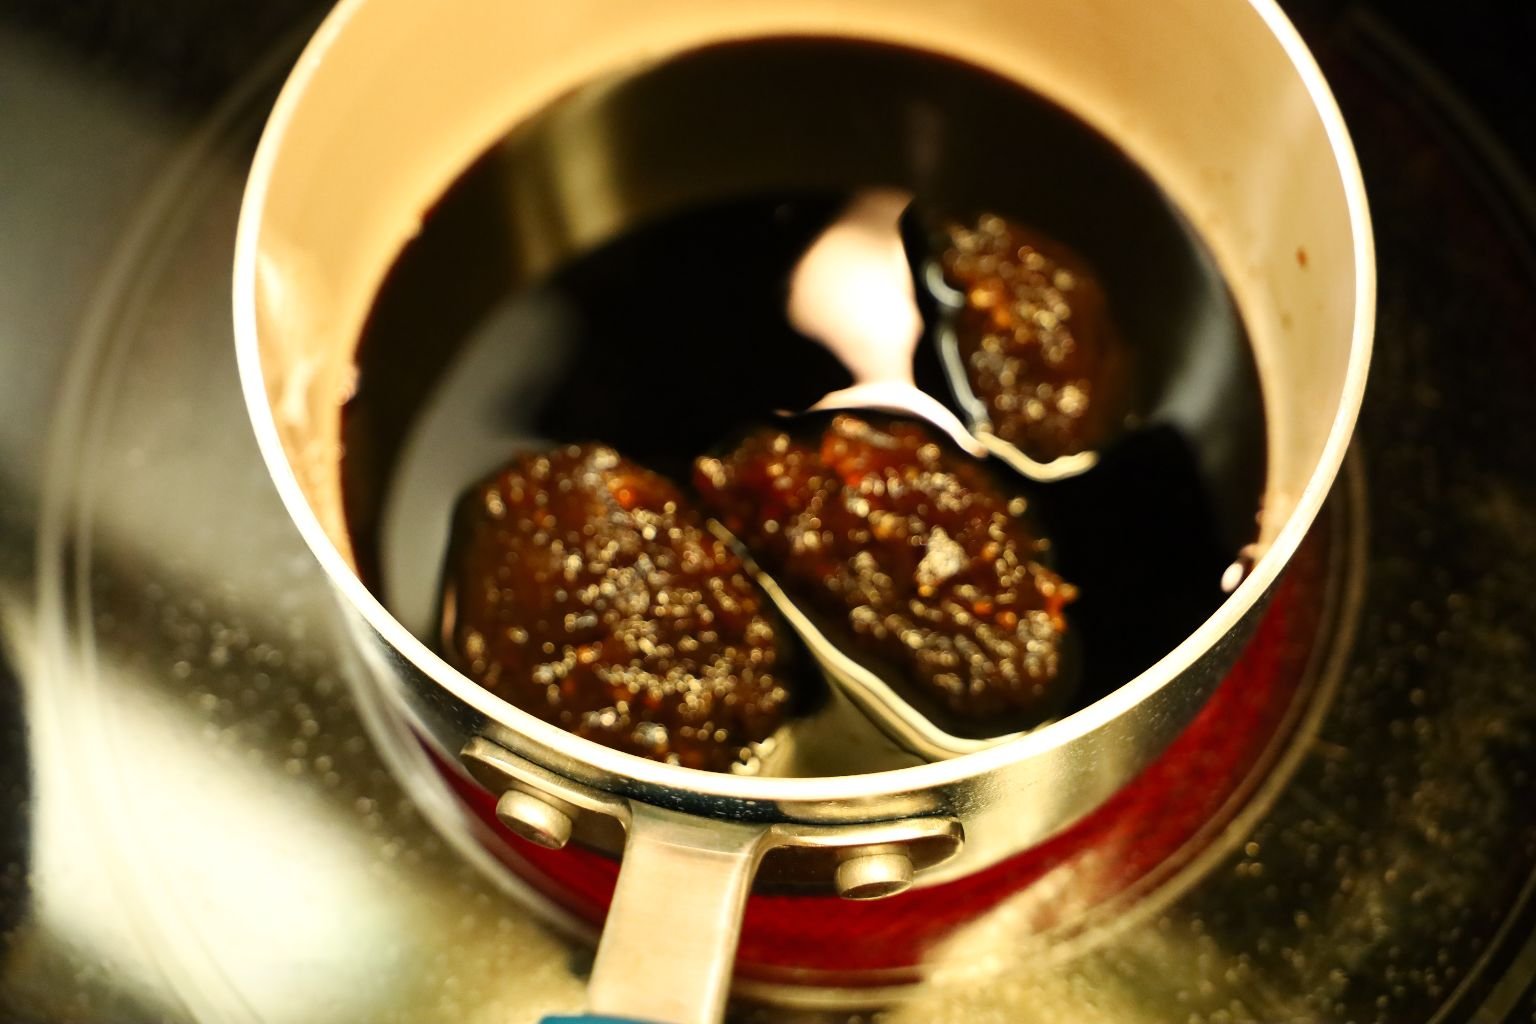
Turn your heat onto medium high heat and begin to cook the ingredients.
Then add your Balsamic Sweet Onion Jam…
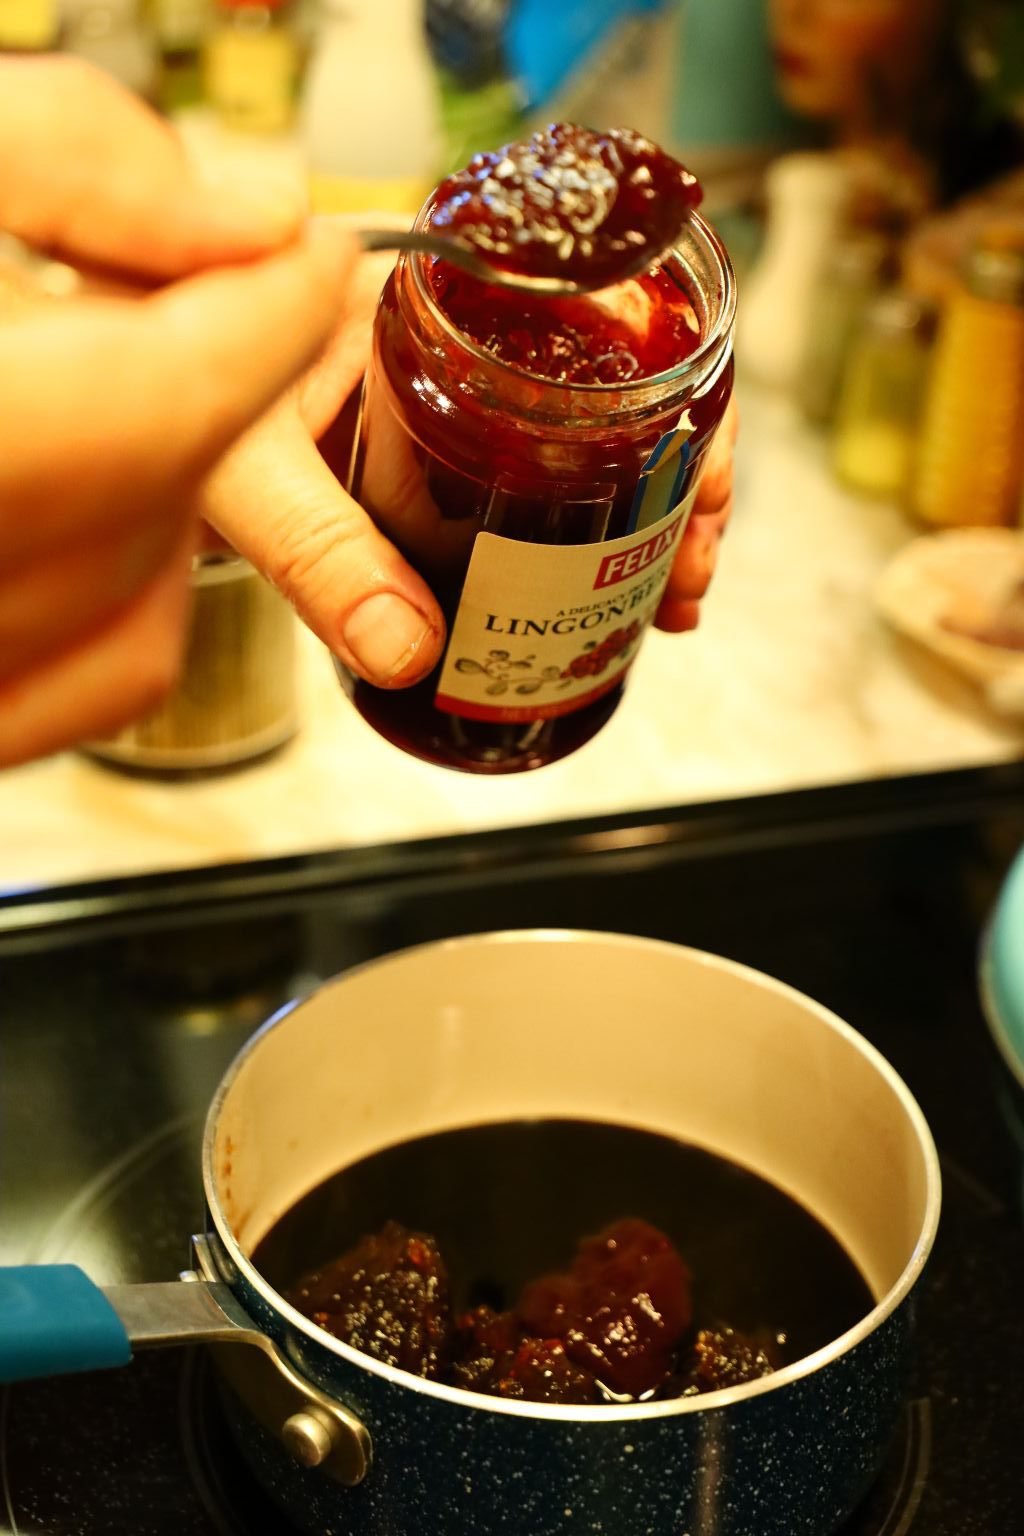
and lastly your Lingonberries Jam to the pot.
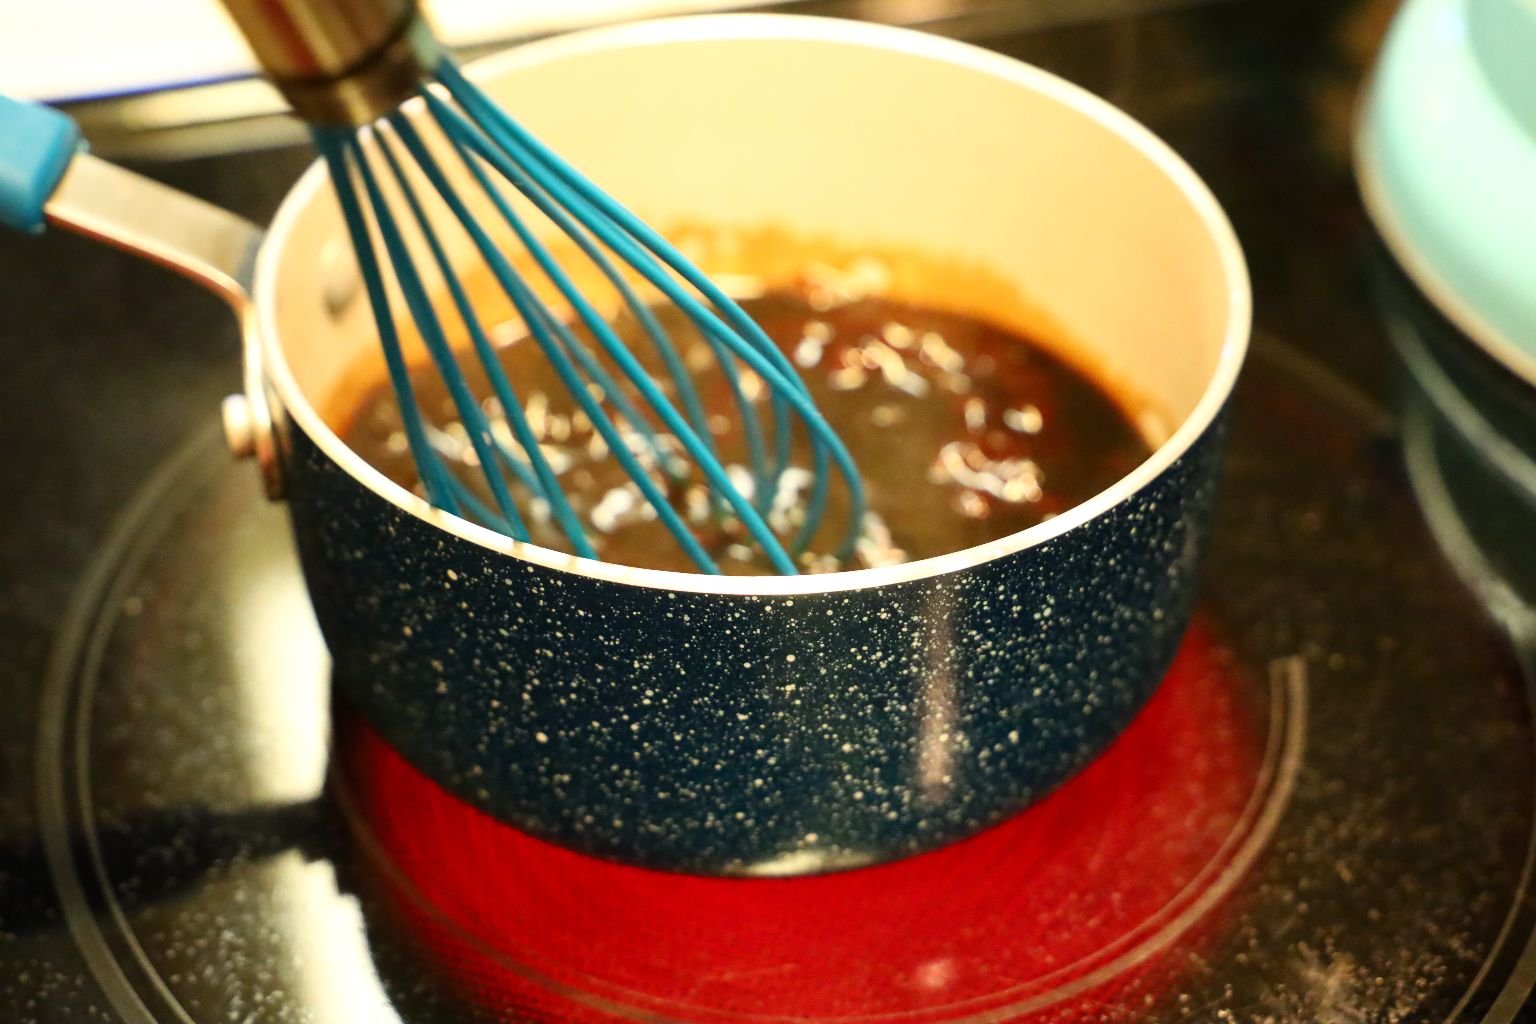
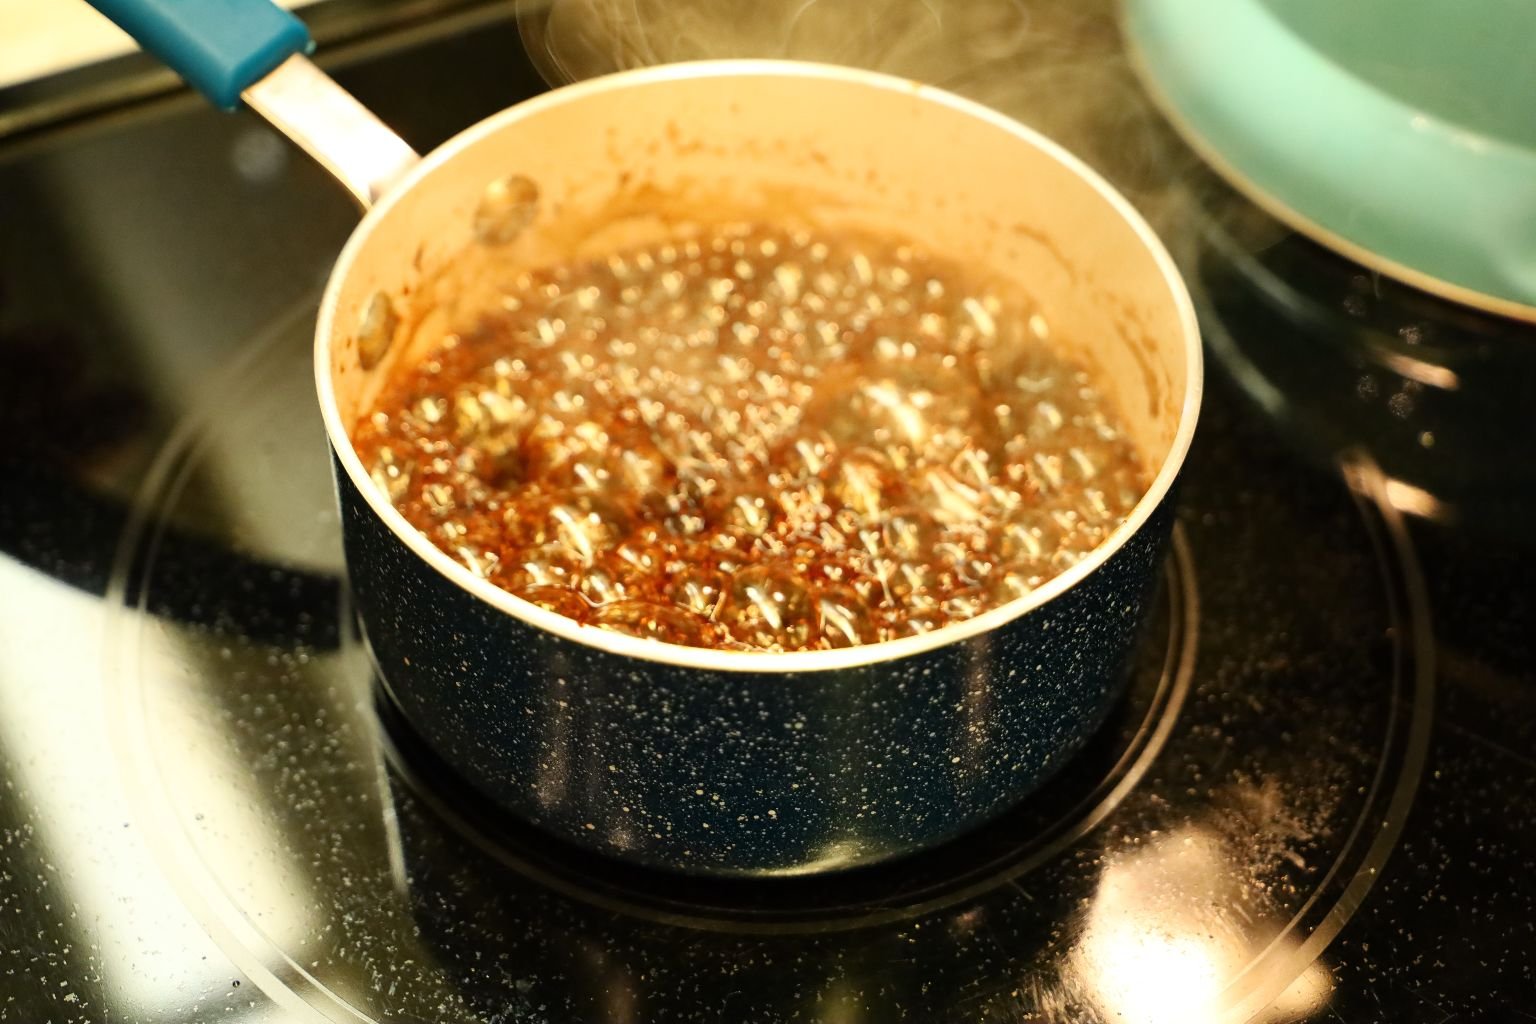
Whisk all the ingredients together and bring them to a boil stirring constantly. Then turn down the heat and let the ingredients cook over medium heat for about another 5 min. The ingredients should become thick like gravy when done. Place the sauce into a gravy boat making a great display. Use this as a dipping sauce for the Lamb as it will help cut through the gaminess of the meat.
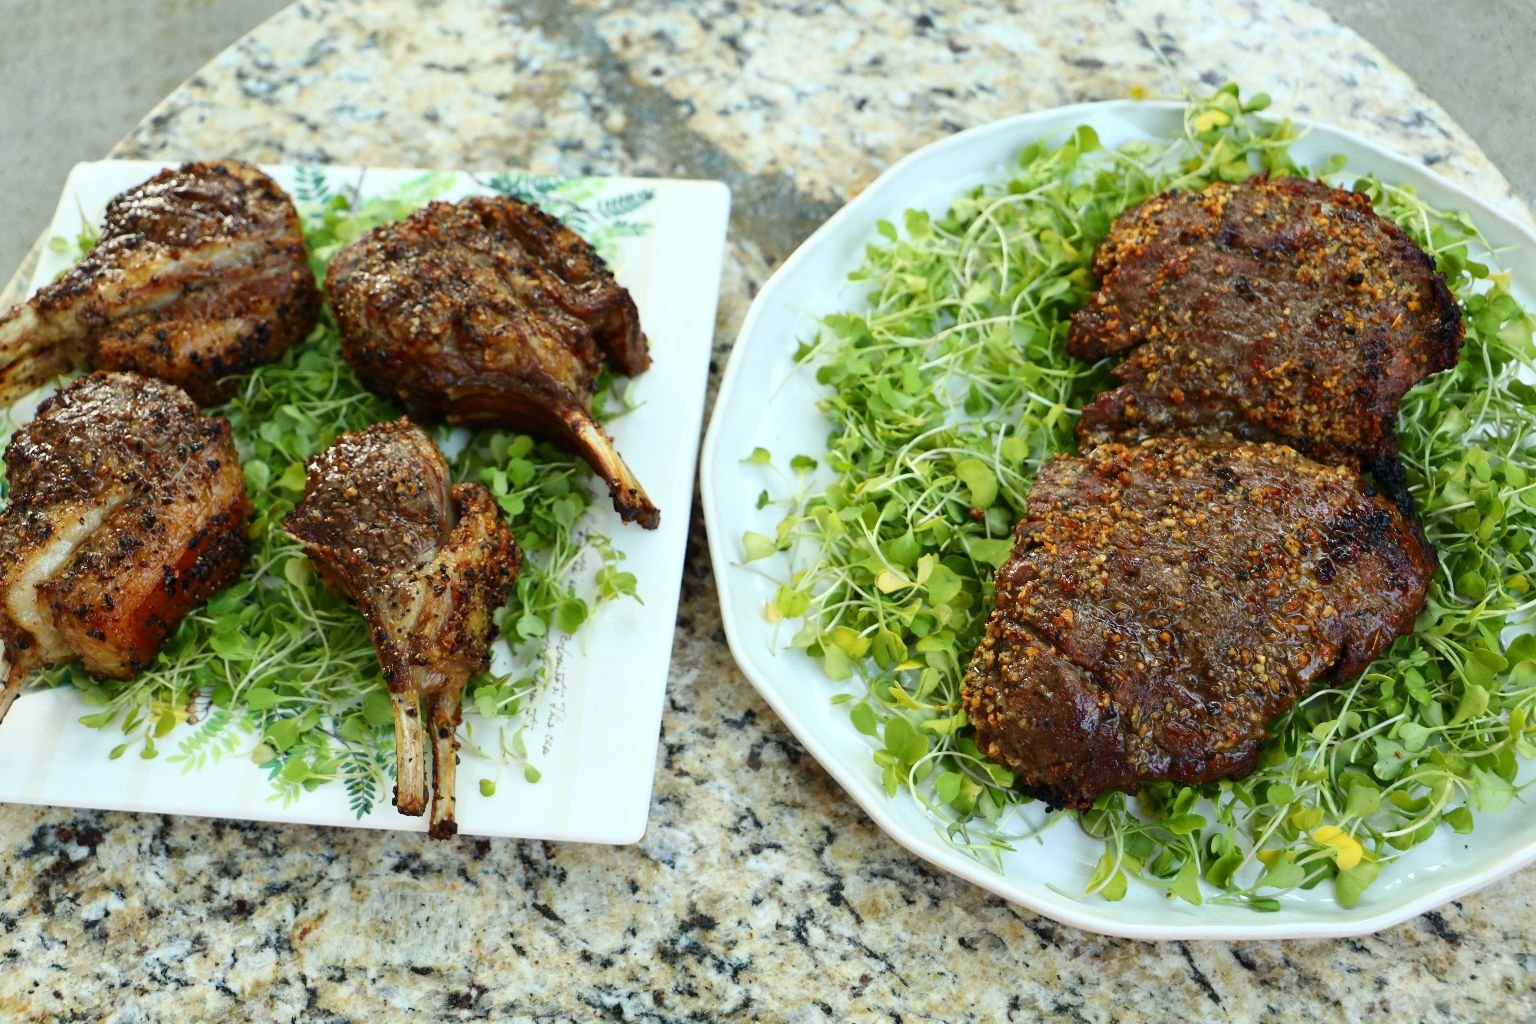
Here are the lamb chops displayed on a bed of micro-greens.
Here is our beautiful table of food we prepared for Easter.
Happy Easter to All

Welcome to My Sixty’s Currently Aging to Perfection (Or Rotting and Disintegrating? But I swear this to you, as long as there are moisturizers and Loreal Superior Performance Medium Blonde, I will always be here for you.) 🙂 When I look …

Welcome to Barefoot Beach Teas I got the idea about 3 years ago to create a nice tea and have it look like the beach. I even thought of putting some sort of seashell candy inside of the tea so that …
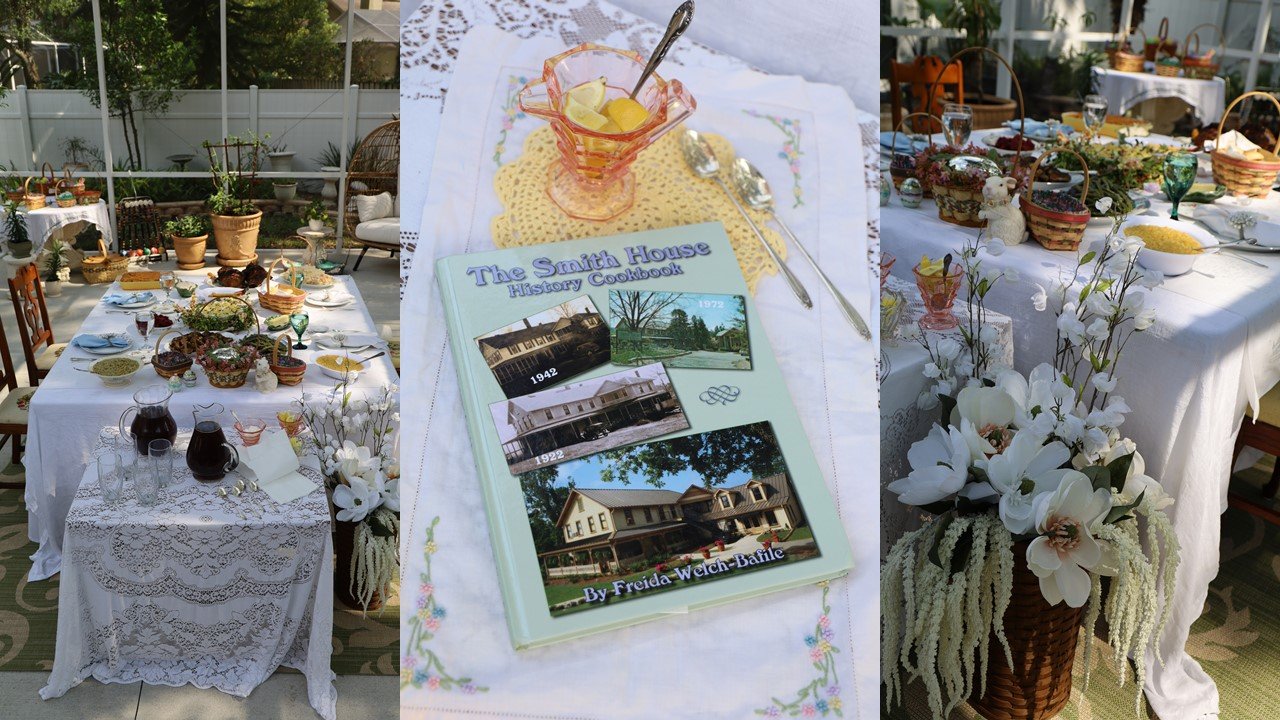
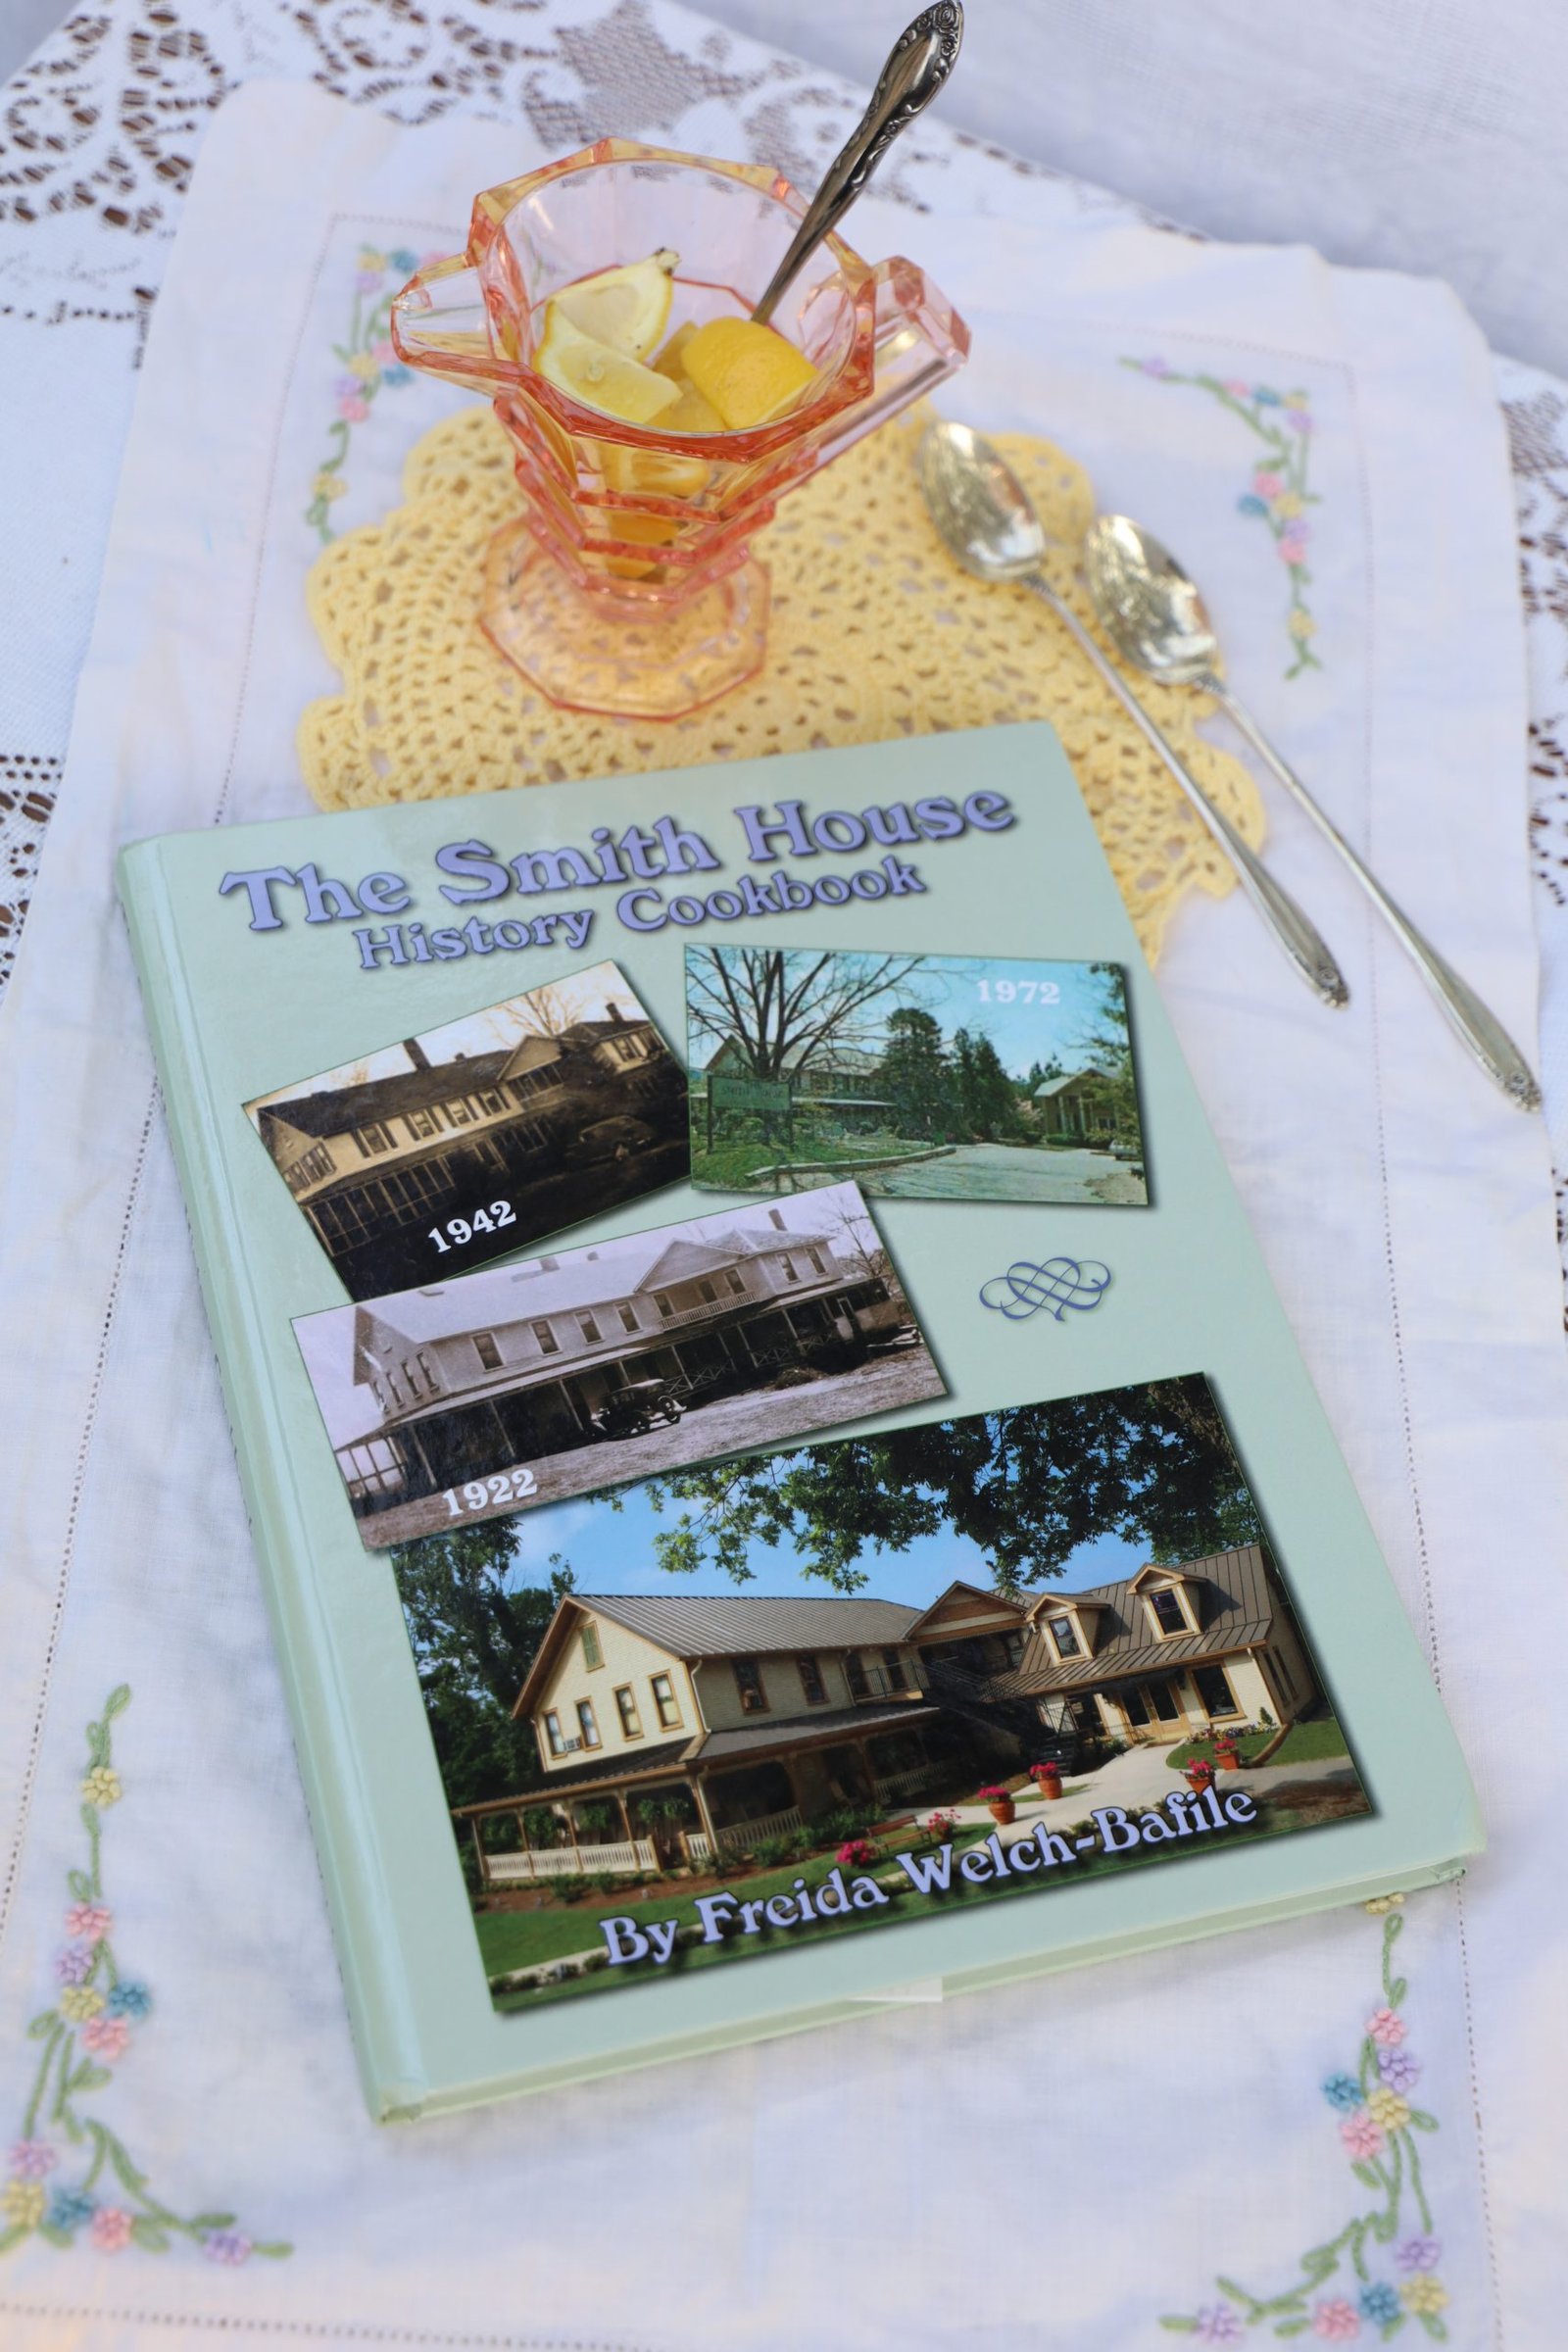
The Smith House History Cookbook
(Only in the south do you find teaspoons. Especially in silverware sets.)
—————————————————–

Easter, 1970
Me, my little brother Johnny and my mother, Mary Keith in our front yard in Dahlonega, Georgia.
(Although my mother does look like an airline stewardess here.)


Me, and Baby Johnny in our Front Yard in Dahlonega on our way to Church.
——————————————————-


We lived in Dahlonega, Georgia for about 3 years when I was a girl. I was 7 when we moved there and 10 when we left to move to Roanoke, Virginia. This was in the late 60’s- early 70’s. My step-father was the only doctor in the small town, he even made house calls. Something unheard of in our ‘for profit’ healthcare system we have now. He liked being a big fish in a small pond. My brother Johnny was born there when I was 8. I was happy there. I think we all were.
One special memory I have of Dahlonega was this restaurant called, The Smith House. It was unlike other restaurants at the time. There was no menu for you to order off of. You would enter the restaurant while being greeted with what was quite a nice tradition at the time called ‘Southern Hospitality.’ Things are a bit different in the south now but I did get to live through a time when the south was hospitable. They would sit you down next to another family that you didn’t know. If you had a large group then you got a table to yourselves, but if you were a family of 2, or 3, or 4, then you would get seated next to another small group of people. We would introduce ourselves to our fellow diner’s and the polite conversation would ensue while we waited for our food to arrive.

Julie and Johnny, Dahlonega 1970
————————————————–
Family Style Dining
(I do love that the bread basket in the photo at right is empty.
Looks like I’m not the only one that loved those dinner rolls.)
The food is cooked fresh everyday in the kitchen and placed into bowls and platters and set on the table in front of you. You had no say on what they placed in front of you. At least that is how I remember it at the time. You would then serve yourself and pass the bowls around to the other people at your table. When you ran out of mashed potatoes you would motion to the waitress and she would disappear into the kitchen and return with a heaping bowl full to place in front of you for you to enjoy. It was all southern cooking. Probably very plain in taste by today’s restaurant standards but the food was delicious because you were tasting the food. Not tons of spices or sauces.
Salt and pepper, butter,
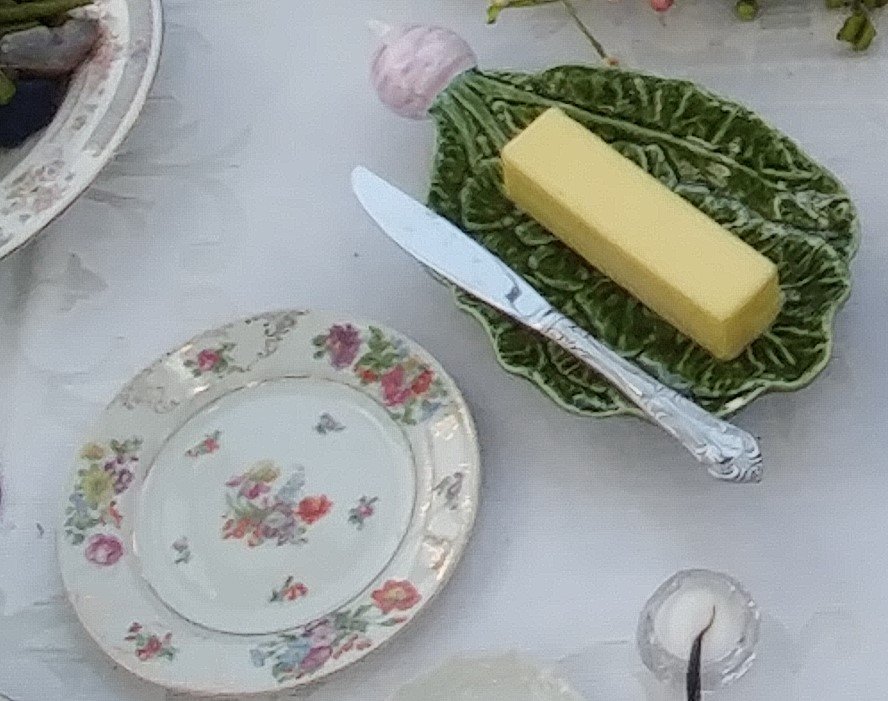
bacon grease, lard, and gravy
were all you really needed to season your food.
At least that’s how we liked it in the south.
—————————————————–
There’s Gold in Them Thar Hills!
I can’t talk about Dahlonega without mentioning it’s gold mining past. It was during The Great Gold Rush to California that gold was discovered in Dahlonega. To prevent the residents of Lumpkin County from leaving, the mayor of Dahlonega said to his residents not to leave because, “There’s gold in them thar hills!”
Most people have heard that quote before but hardly anyone knows who said it.
My family and I used to go spelunking and panning for gold when we lived in Dahlonega. I never found a nugget just lots of gold flakes that were put into a vial of water and worn as a necklace. But we have certainly prowled our way through many caves in our spelunking adventures. My mother has all those photos.
I can also remember us driving up through the mountains and pulling over to the side of the road where I was handed a paper cup by my mother telling me to pick up those Garnet Nuggets because they were everywhere. So, we climbed steep embankments and started looking through the dirt finding them. I don’t remember how they knew they were all over that embankment but we got quite a haul that day. And I believe for my following birthday I was given a rock cleaning and polishing kit. It was a machine and was very loud so we set it out in the garage, but the rocks came out all smooth and shiny. I even have a few of those stones that we had placed into jewelry. They are somewhere in my house.
Spelunking, Panning for Gold, those were the days!

Mary Keith, my mother, and Me
———————————————————
When you drive through Atlanta you will see the Georgia State Capital building and it’s gold dome with gold from Dahlonega.

Georgia State Capital Dome
Atlanta, Georgia

——————————————————
My one food memory that I have from Dahlonega, and The Smith House were their Dinner Rolls. Rolls were my food! As my Grandfather used to say, ‘All Julie cares about eating are rolls, rolls, and rolls.
The Smith House made the best rolls I have ever eaten in my life and it occurred to me to look online and see if the recipe was out there for me to make them myself. That is when I spotted their book online and of course, I purchased it.
The Smith House History Cookbook
Of course I am enjoying reading a bit about the history. Some things I knew and other’s I didn’t.

But what I am enjoying the most are the recipes listed throughout the book.
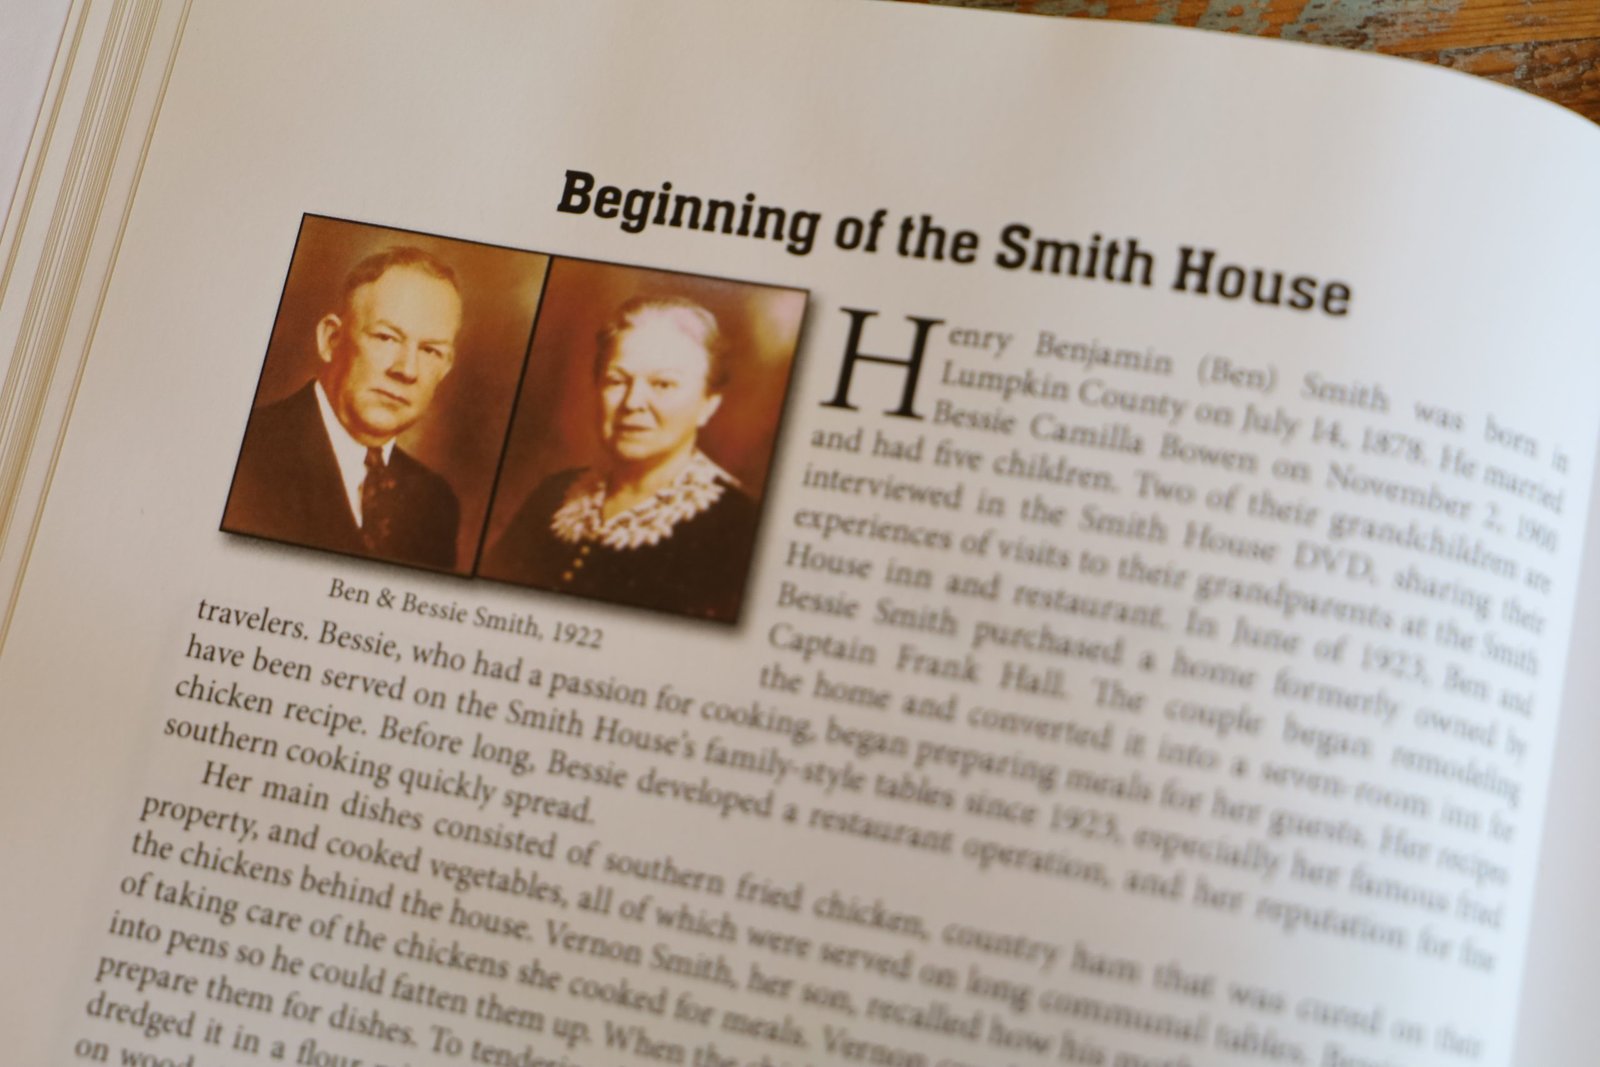


The Recipes!
There are many and I am not going to post them all but the one that I was THE most excited to find…..
IS………..
THIS ONE!
Smith House Yeast Rolls!!
YES! YES! YES!!!
———————————————-
This entire Easter Dinner is based on these.
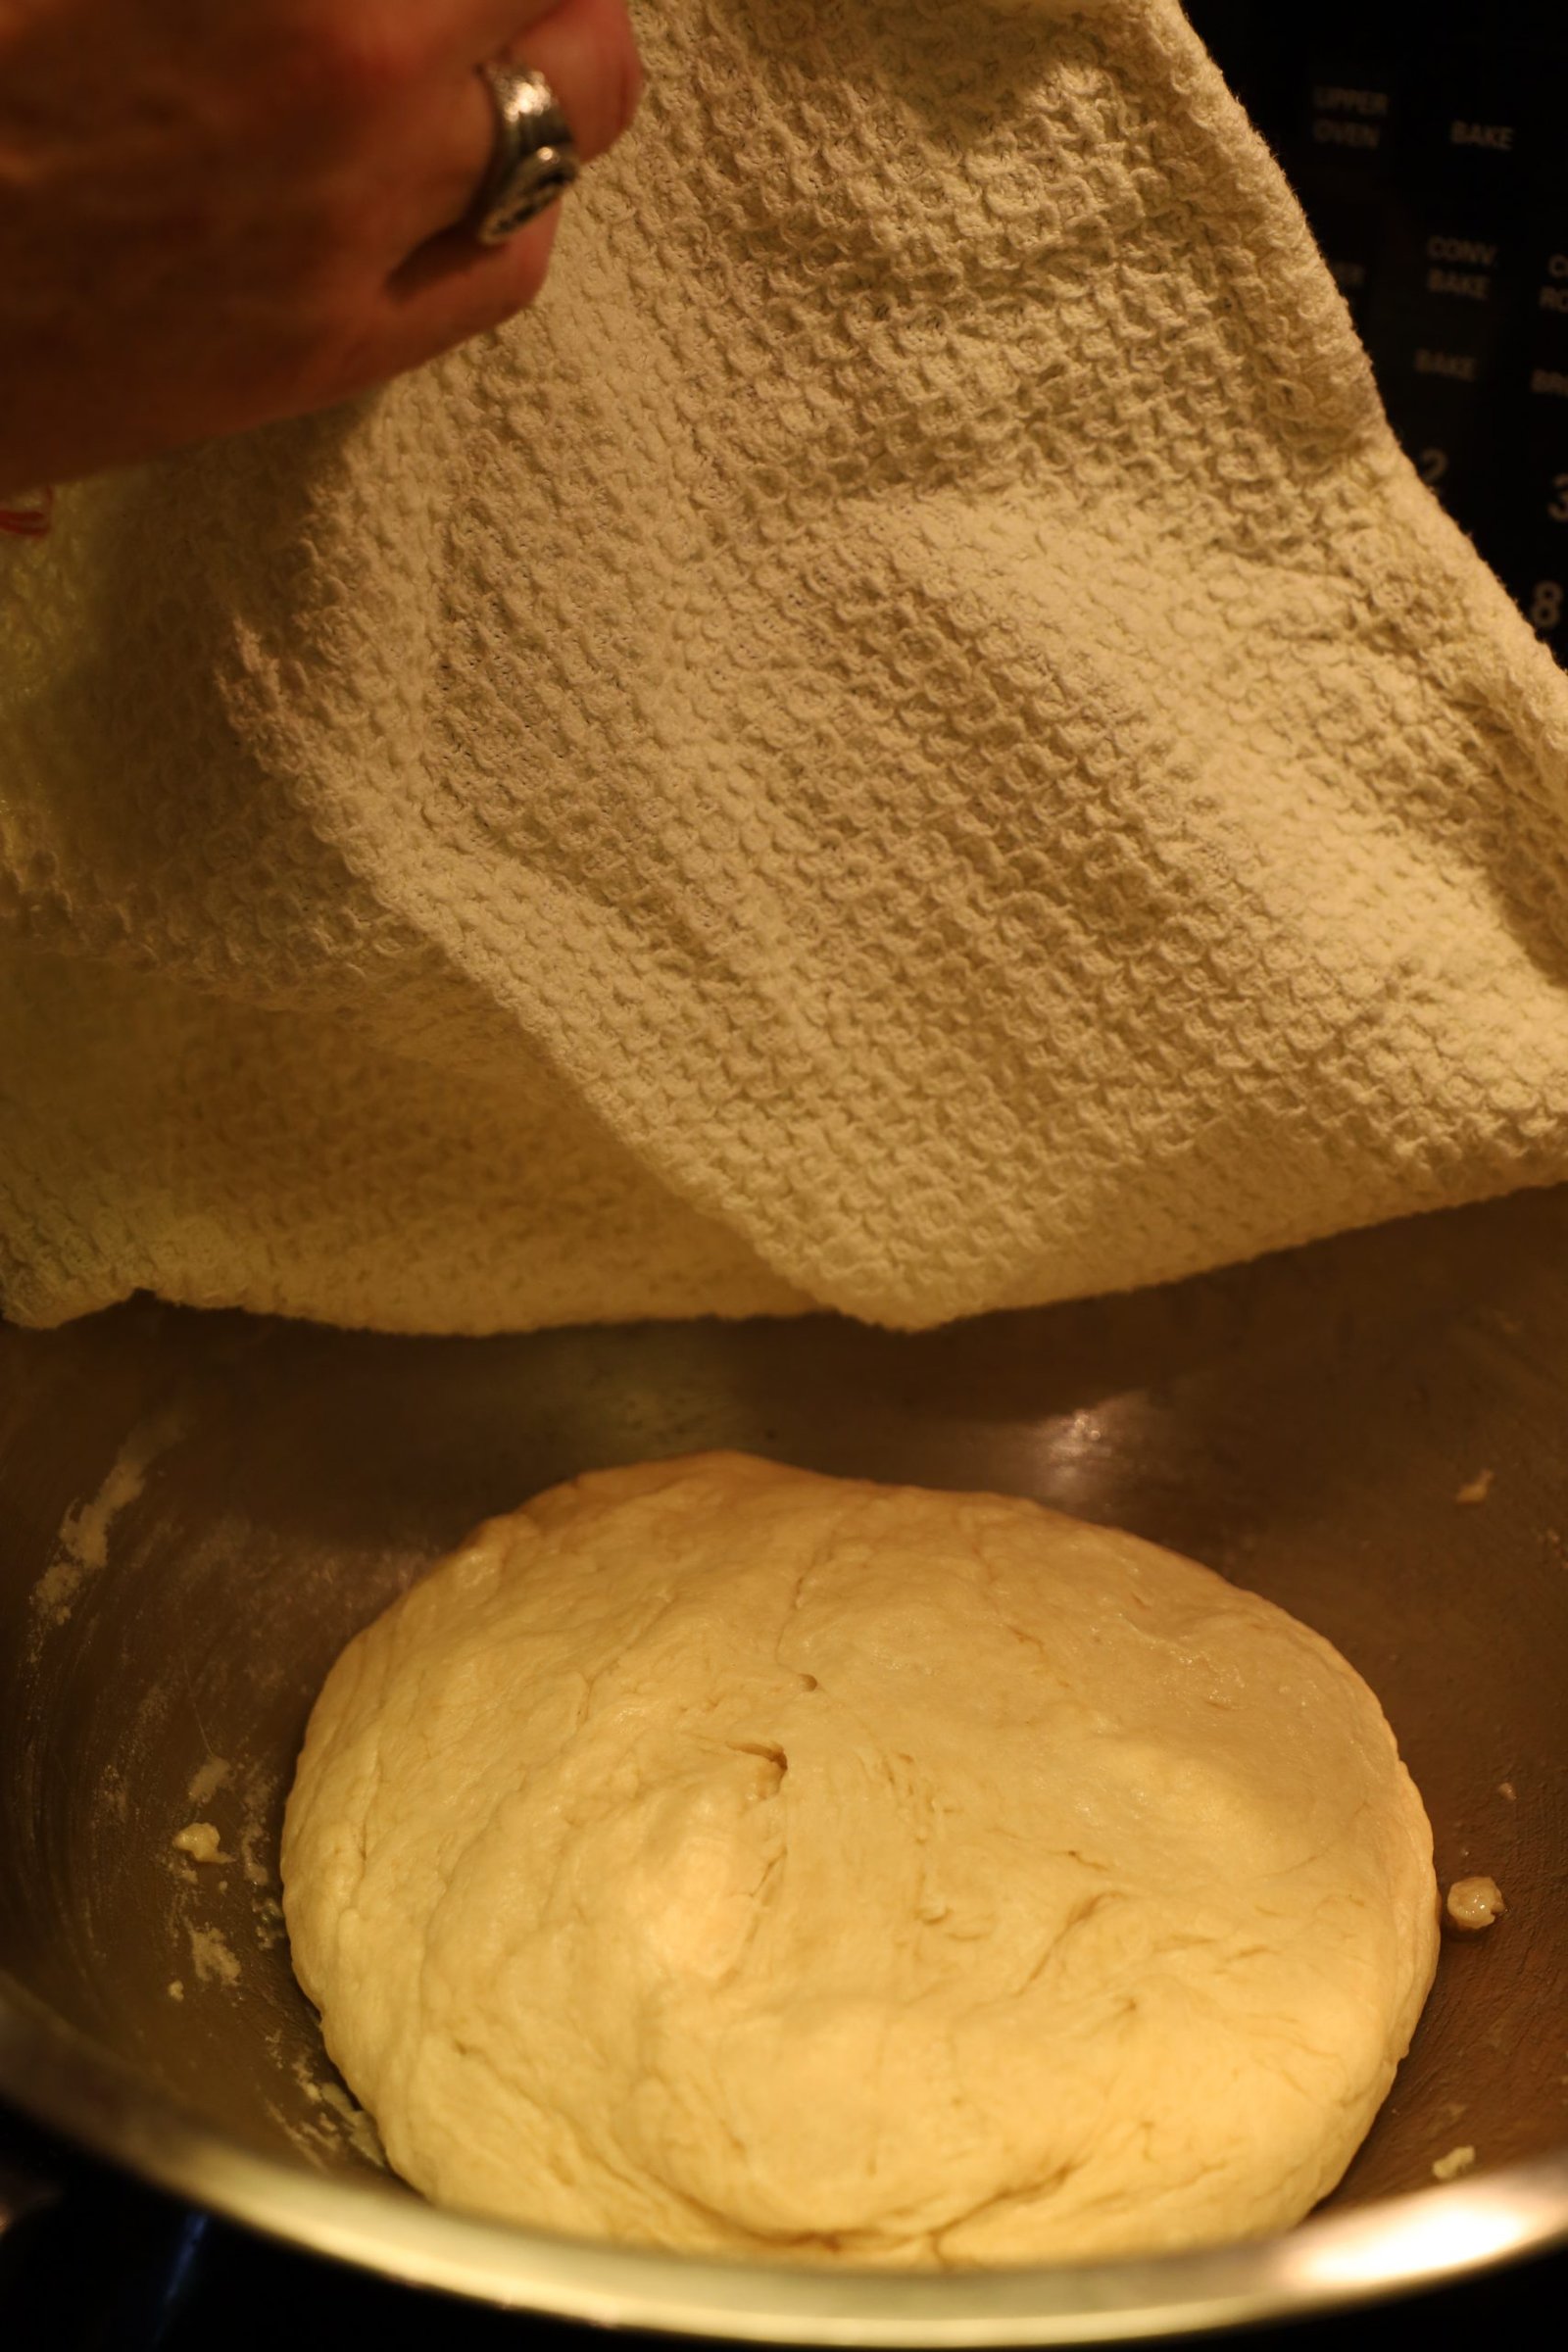

Smith House Recipe Yeast Dough
(Waiting for the dough to rise.)
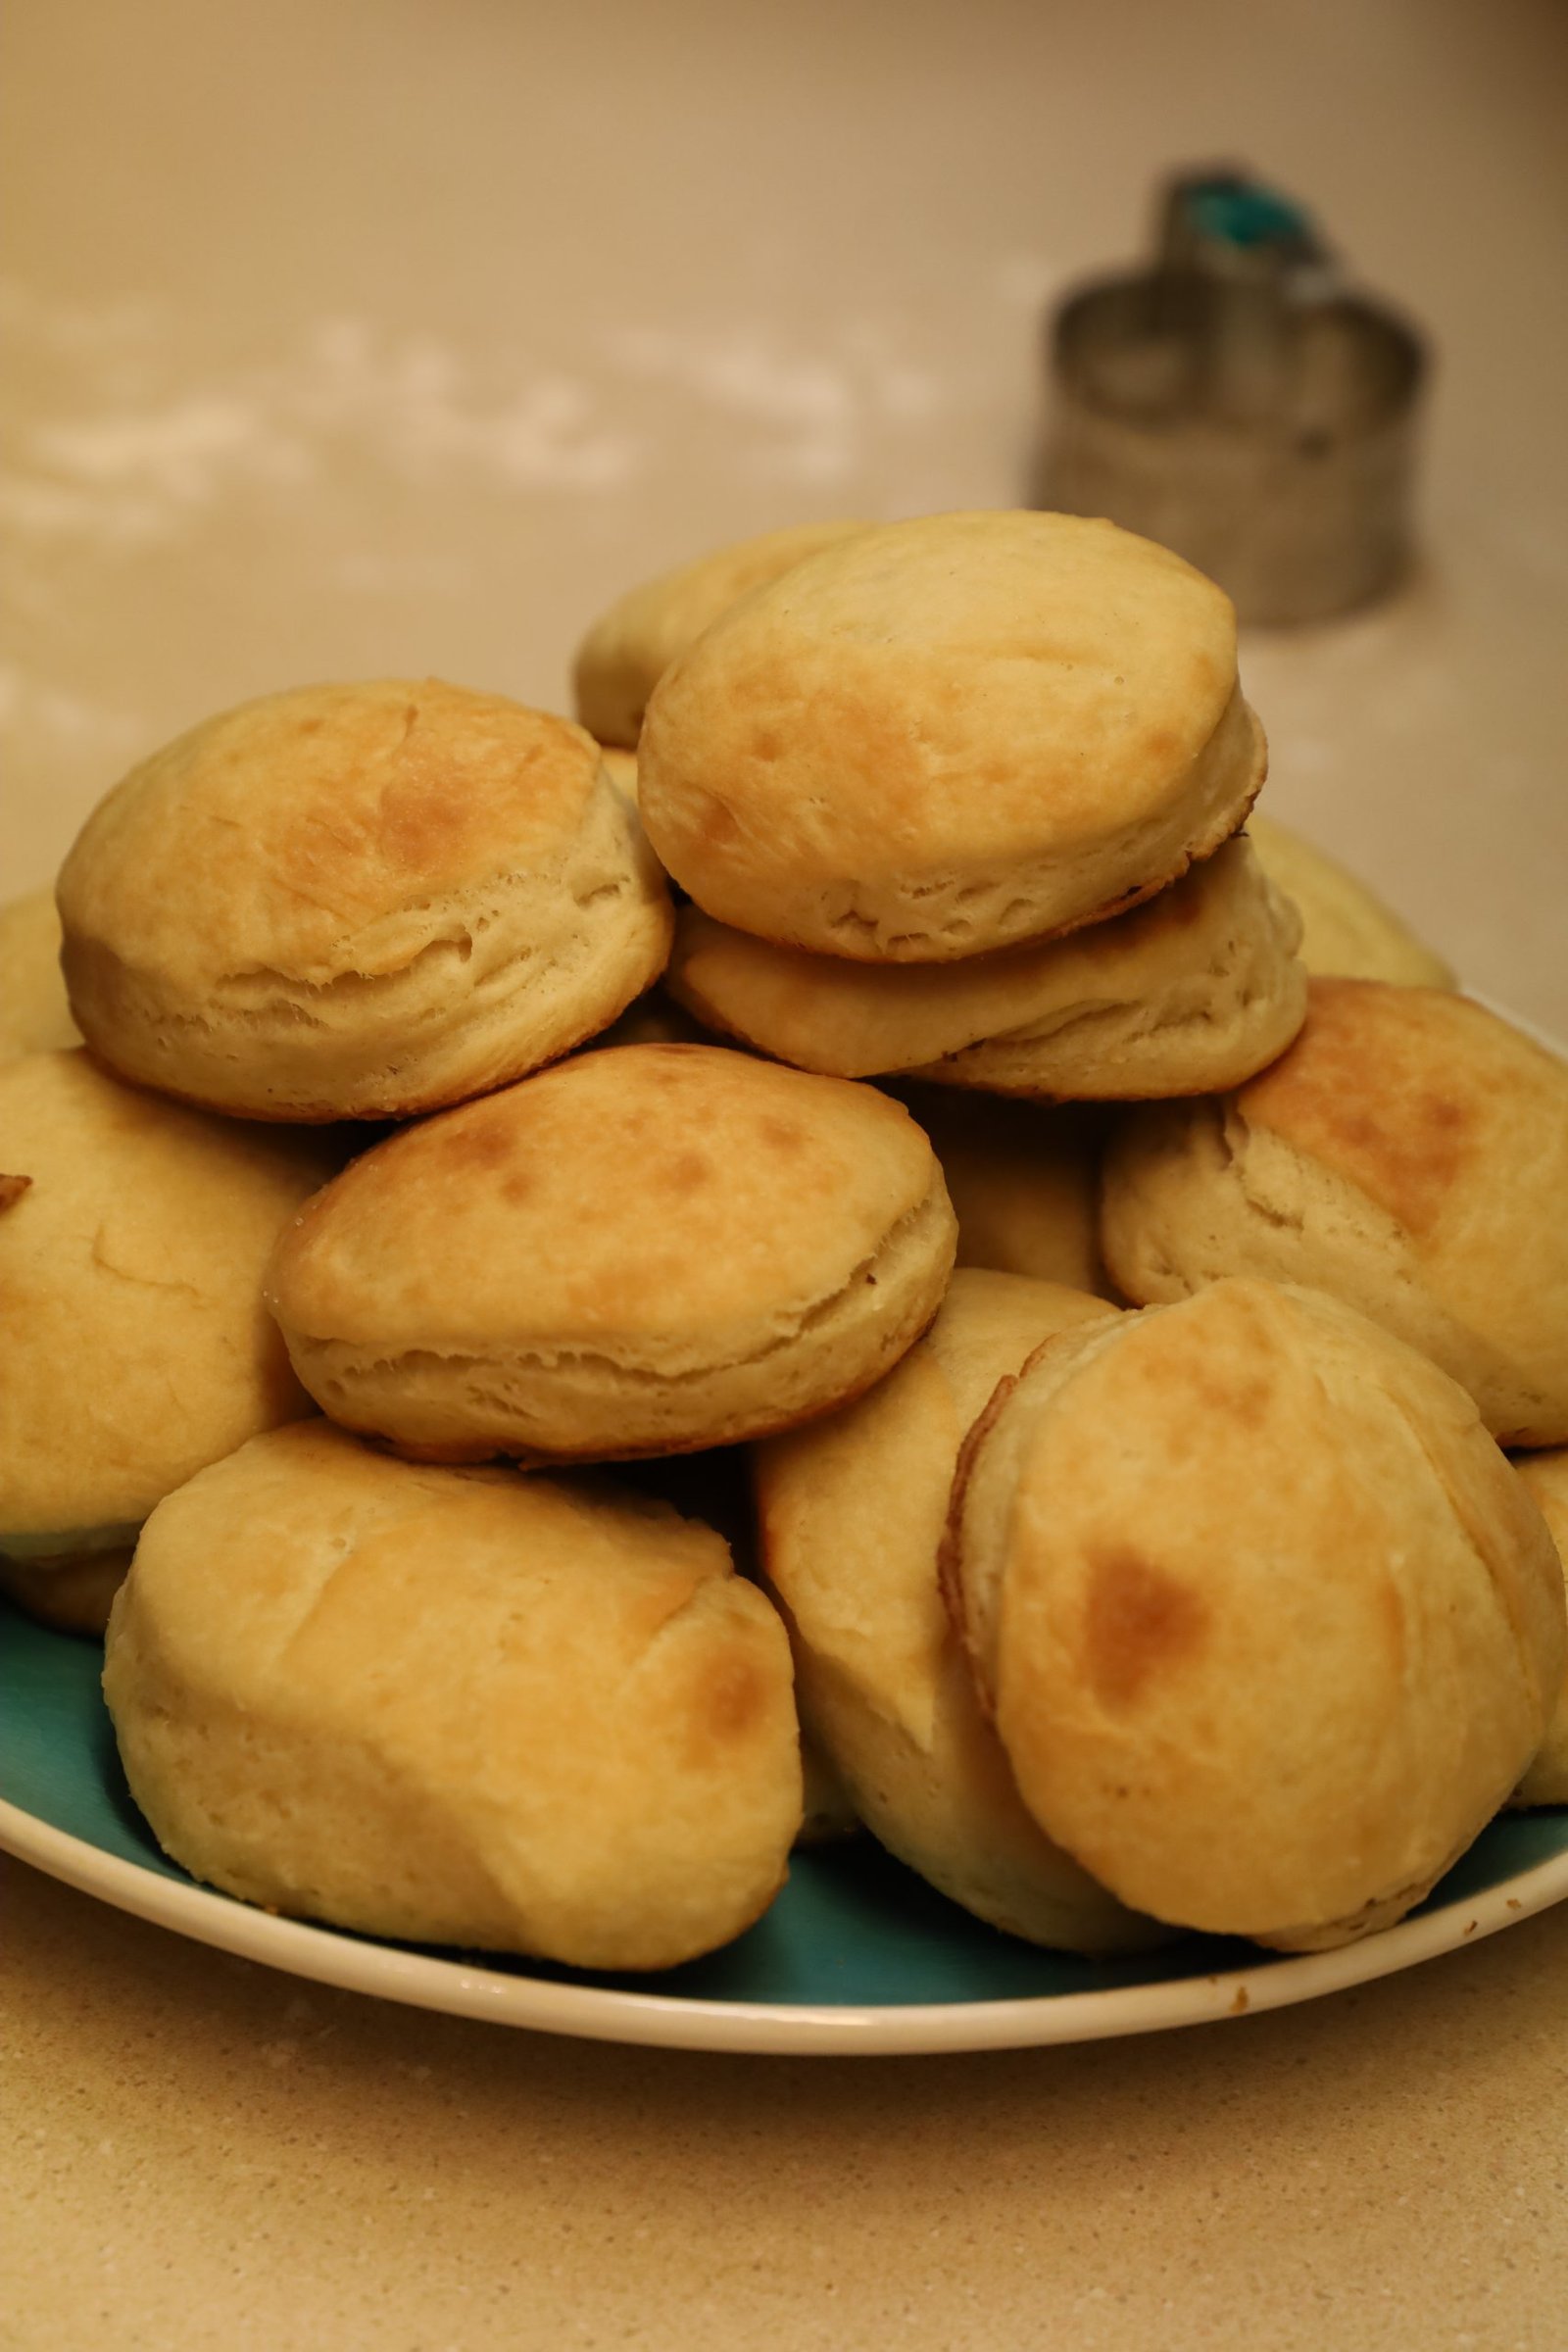
Made by Brodie and Mackenzie
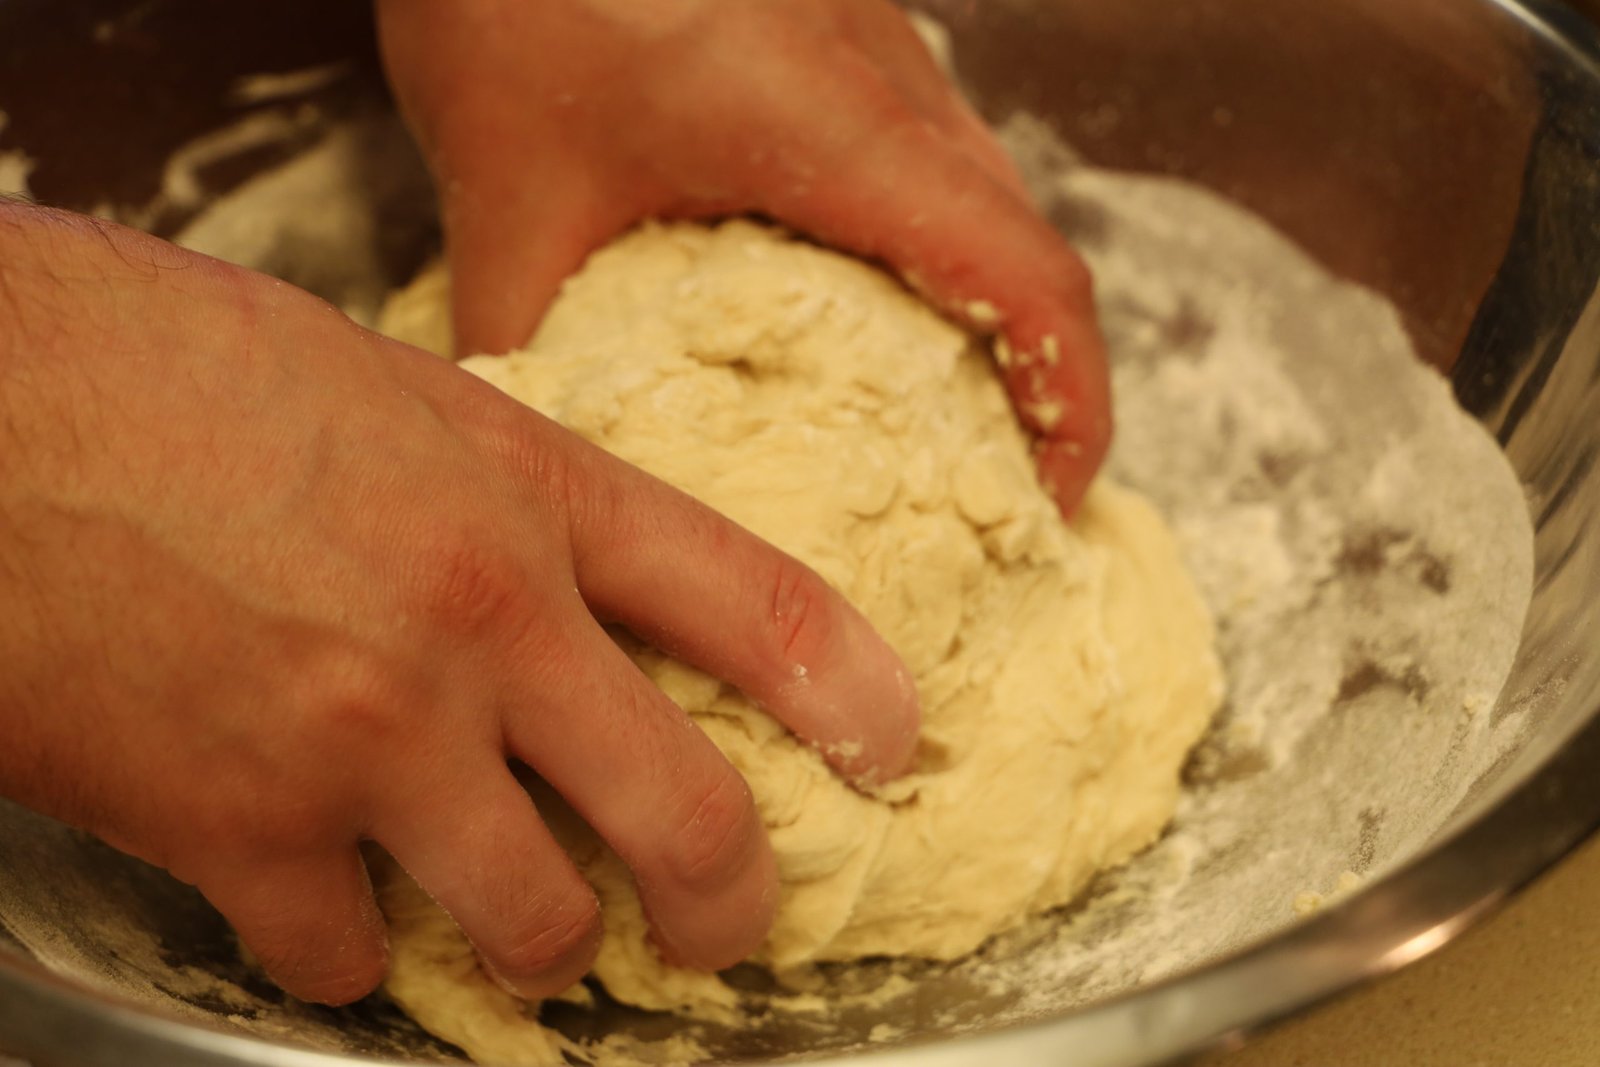

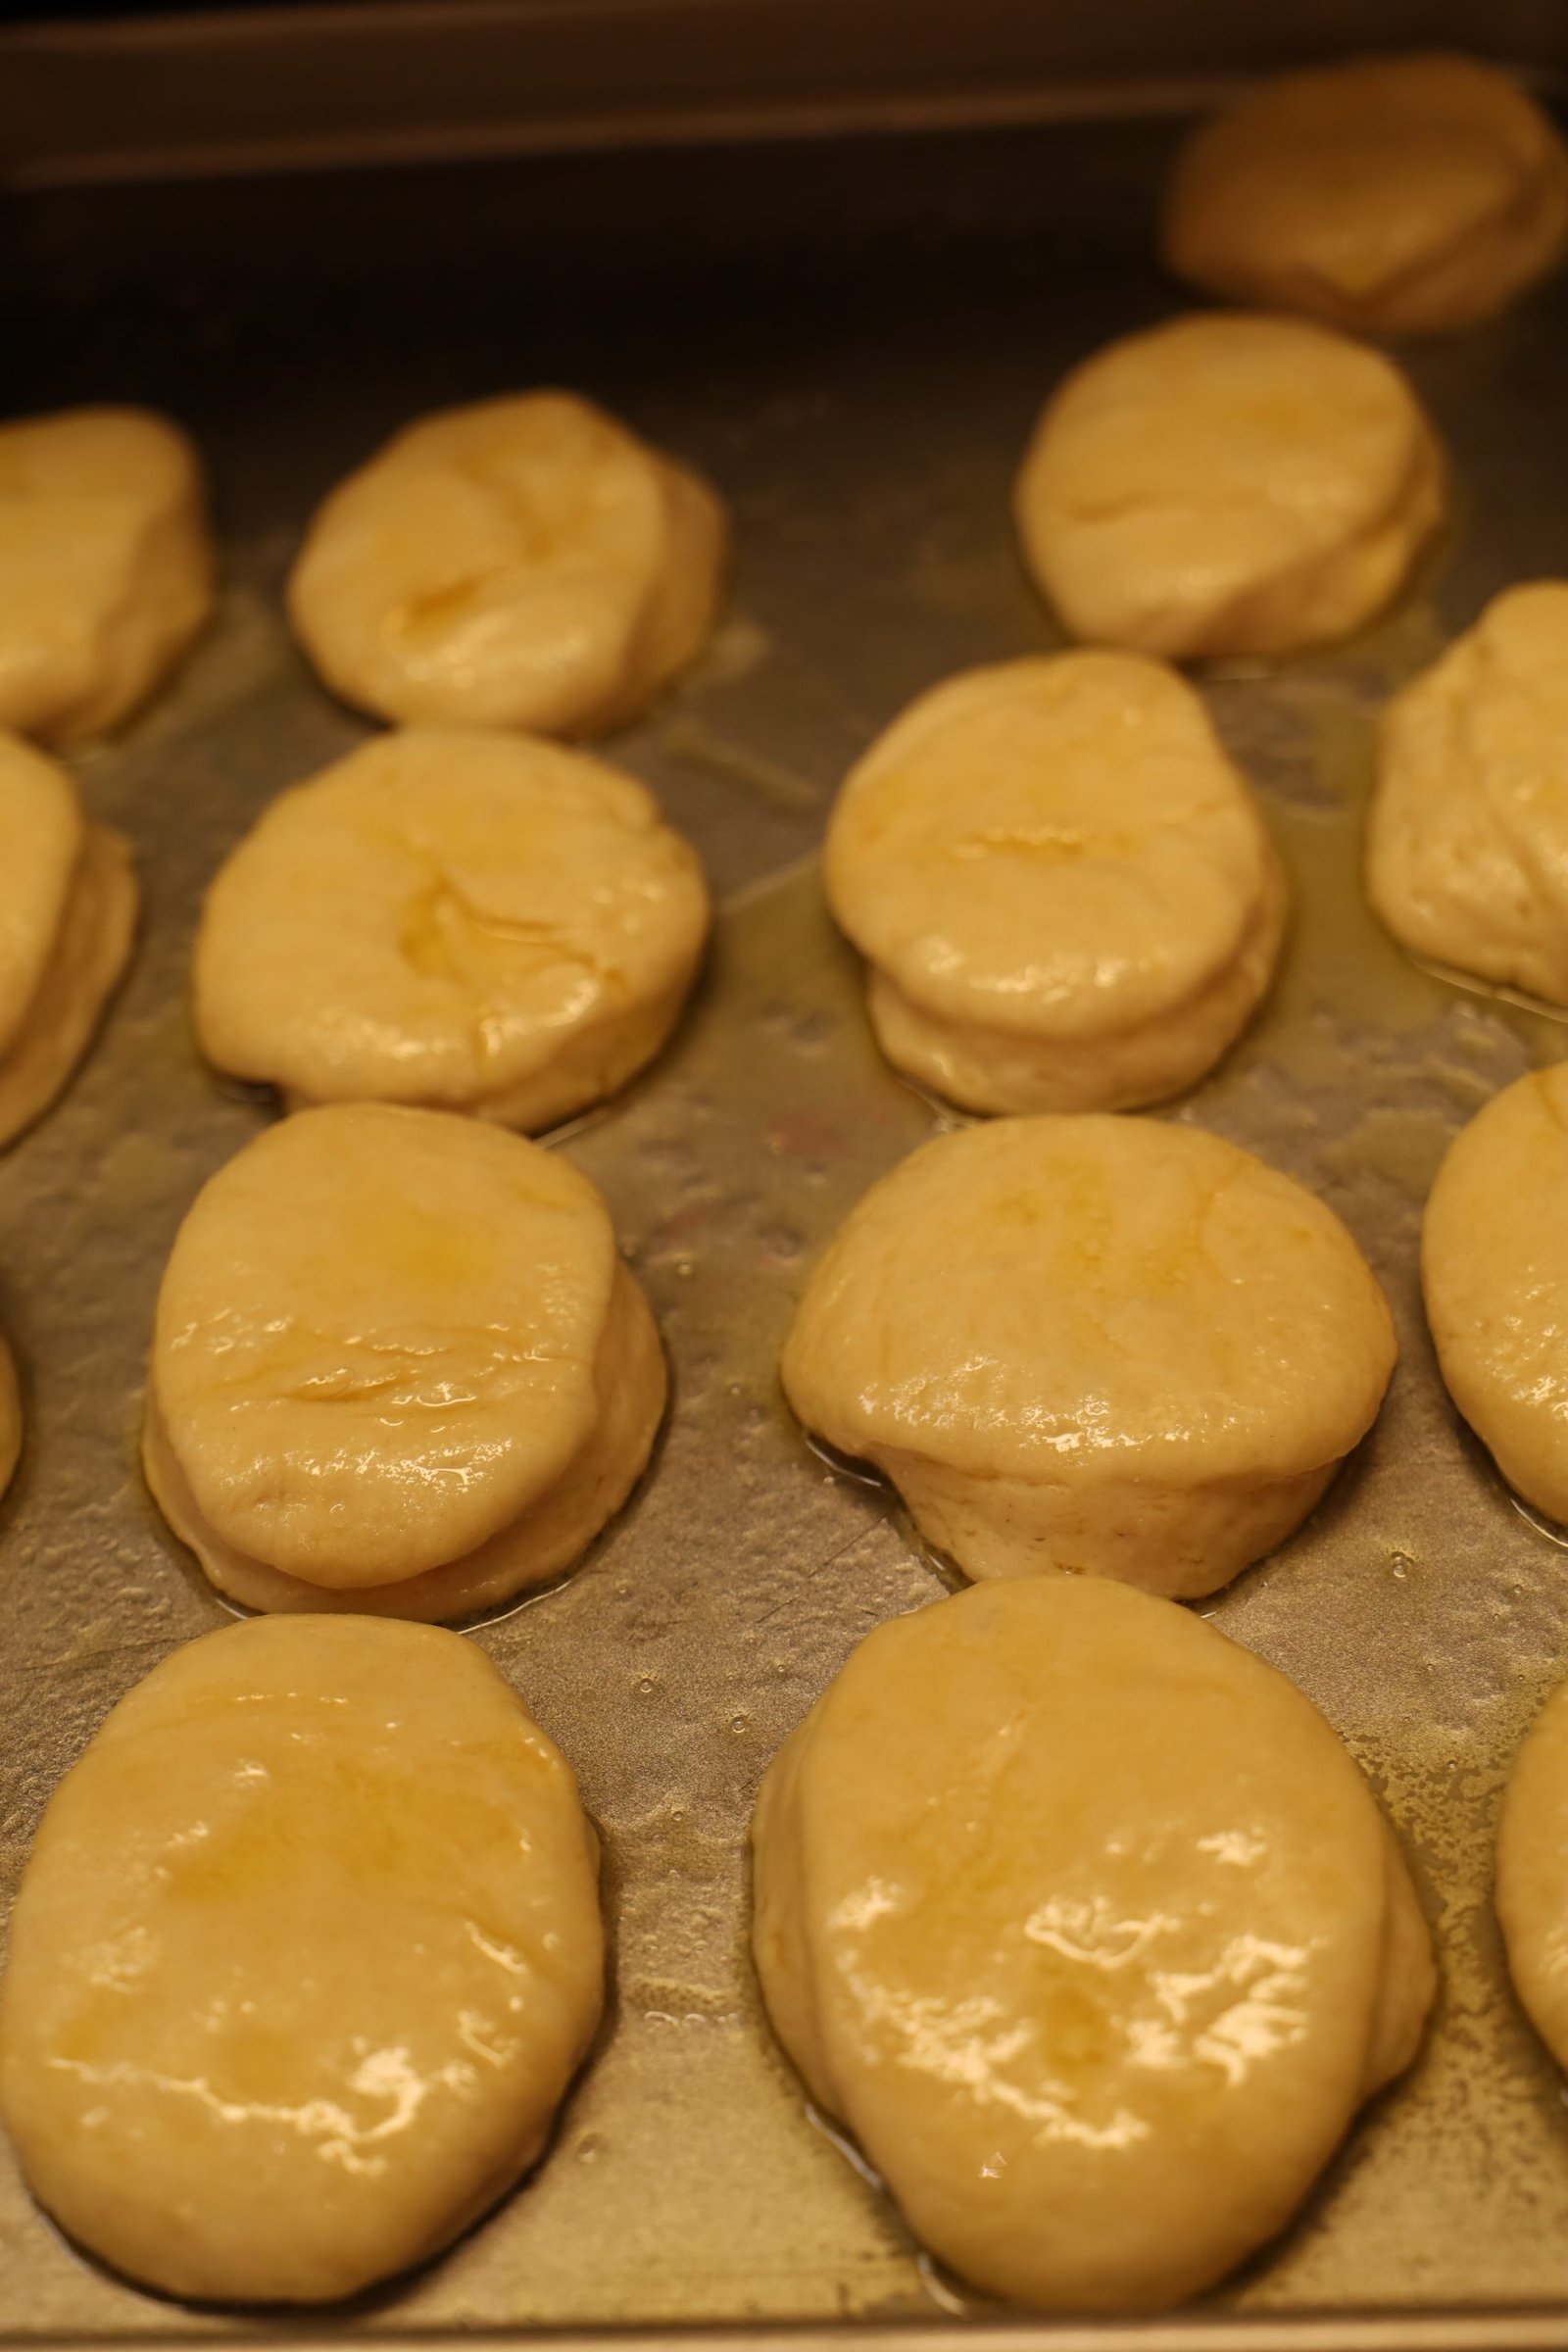
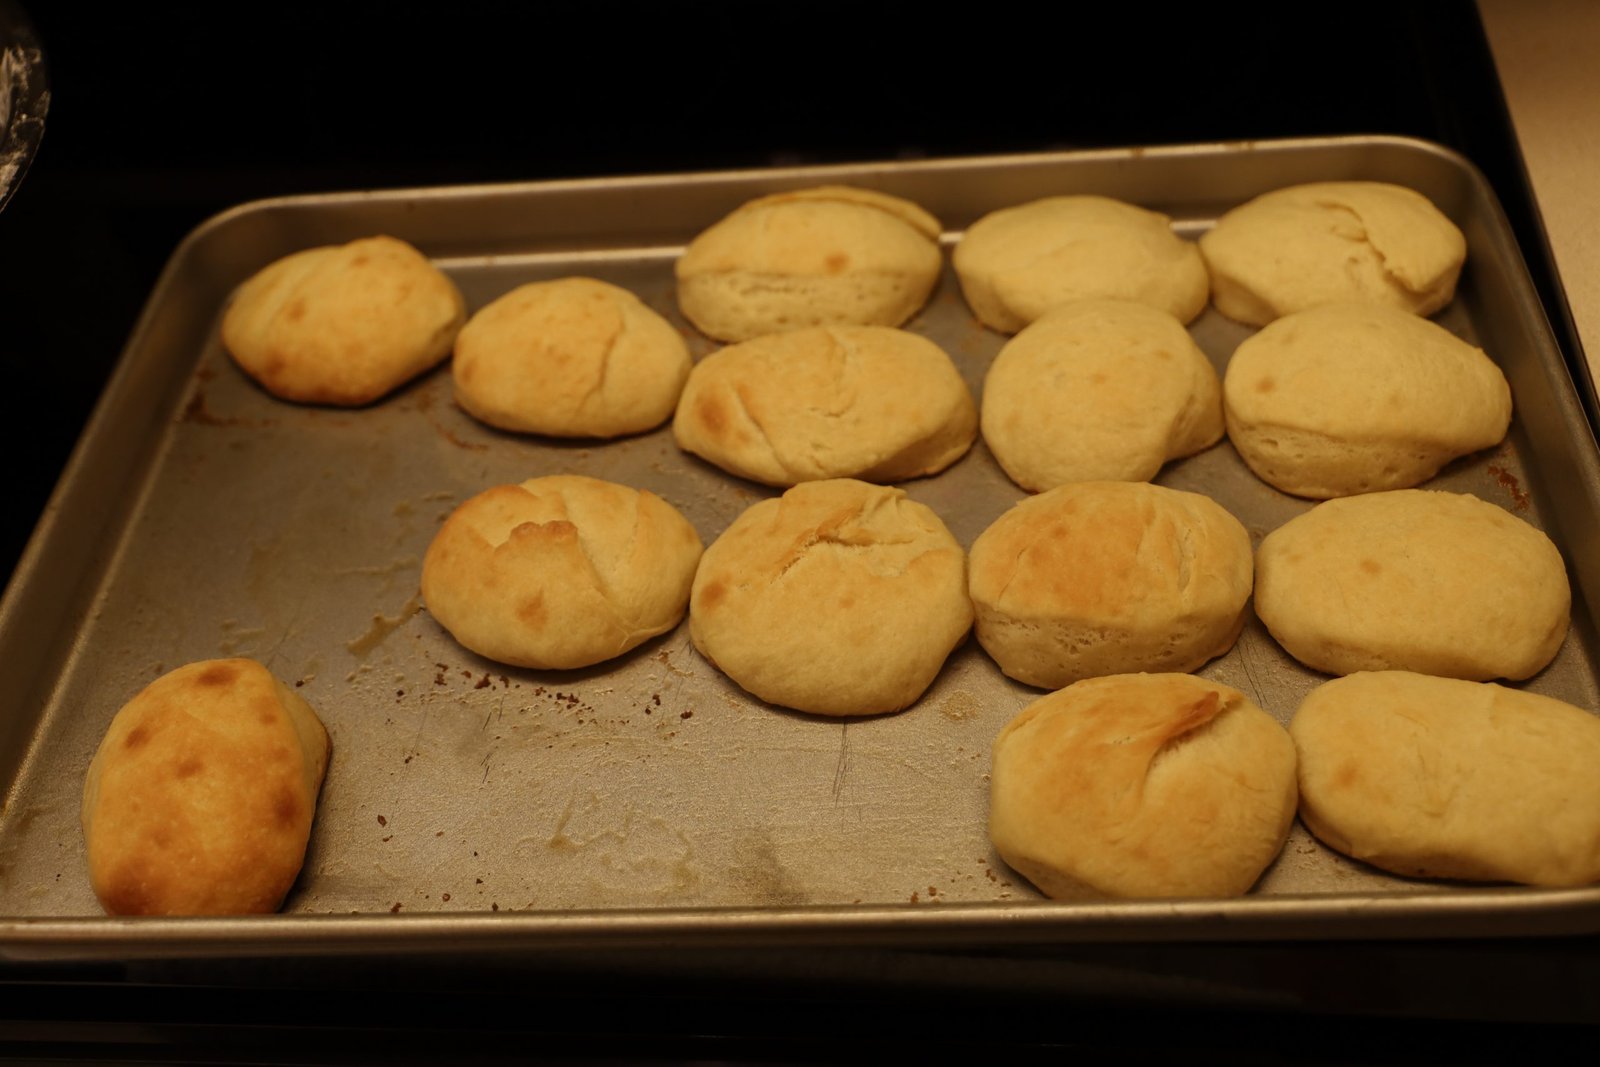
The Smell is Amazing!
————————————————————
2020

I made sure the basket was sitting right next to me on our Easter table. 🙂
The rolls were delicious! They tasted a bit like I remember and Brodie and Mackenzie had never baked bread before so taking all that into consideration they did a wonderful job, but the rolls that I remember had probably been made hundreds of times by the same women in that Smith House kitchen. They had perfected a technique that they probably had no idea that they had. Just handing out a recipe doesn’t mean that we will be able to recreate it exactly as they did. But I was given a delicious taste of a happy childhood food memory that I have carried with me from the age of 7 and I do appreciate that.
——————————————————

Me, on a swing with Anne Catherine Folger in Dahlonega.
(She’s the pretty one. I’m sticking my tongue out.)
——————————————————-
Sequoya’s Alphabet

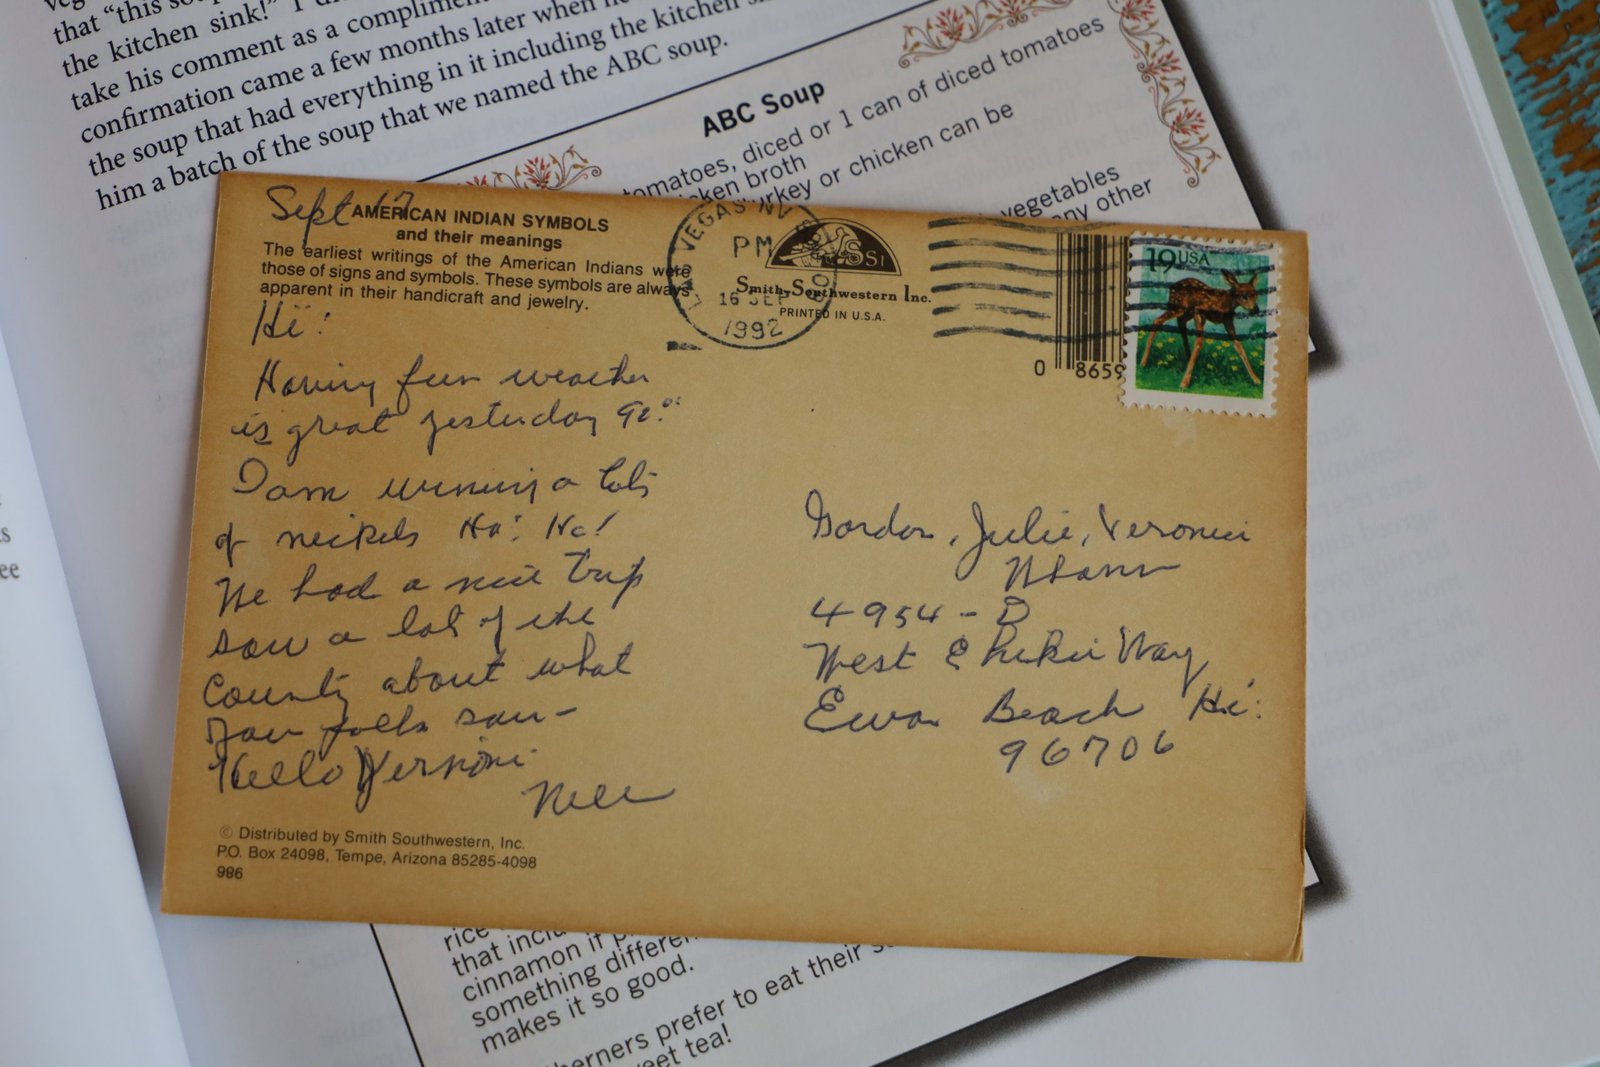
(The photo above is a post card that my Grandmother sent to us from Las Vegas in 1992. It depicts Indian symbols and their meanings. There is a section in the Smith House History Cookbook that speaks of Sequoya (Sikwayi) and his Alphabet.)
The Indian Tribe that we most know of in the state of Georgia is the Cherokee Nation. Sequoya’s mother was Cherokee and his father was white. Sequoya was most impressed that the white man could “put talk on paper.” The Cherokee Alphabet was invented in 1821. Sequoya created an alphabet of 86 characters. The English Alphabet only has 26 letters. The Cherokee Nation embraced Sequoya’s Alphabet.
I grew up in a family that loved our Native American’s and we were taught quite a bit about them. My parents admired them for the great people that they were and are, and they passed that down to me and all 3 of my brother’s. We have spent many a family vacation visiting Indian Reservations throughout our country, in the south as well as out west.

This is me, July 1969. I don’t know where we are here but I know that my Grandfather took the photo. I also remember him buying me that necklace. 🙂 I am with a Native American Chief here.
—————————————————–
Sadly, the Trail of Tears started in my hometown of Rome, Georgia. But, I was happy to see Sequoya included in this Smith House History Cookbook.
———————————————————–
I wanted to add that this Easter Dinner wasn’t just about remembering The Smith House, it was also about remembering all my childhood Easter’s with my Grandparents and Great-Grandparent’s. Adding the table extensions to the dining room table in order to seat 8-10 instead of 4. The dining table pad that would be placed on top of the table. The white linen tablecloths ironed to perfection, same with cloth napkins. The beautiful China bowls and platters set on the table filled with delicious southern, and northern cooking. (I had Yankee relatives too.) Shhh…. 🙂
Remember the crystal goblets, and let’s not forget the silver that would be polished a week or so in advance so that everything gleamed and sparkled on our Easter table.
That is why this year I wanted for us to eat all those delicious southern foods that I grew up with. Some cooked their way, and some cooked our way. I did use the Smith House cookbook as a template for the foods I wanted on our table although the only recipe we followed from the book was for the yeast rolls. At least, so far. Rediscovering traditional southern cooking has been something I have been doing for the last few years. It is fun to try the newest cooking trend but that is all they ever seem to be. Trends. I guess where food is concerned lately I’ve been more interested in going home.


Me, playing on my tire swing in our backyard in Dahlonega. And me with our dog Little Bit. Sadly, the neighbor right in back of us, the Whitmyer’s didn’t like our dog so the man took him away one day and left him in the mountains to die. That is what I was told by my mother. So, on that happy note…..
Happy Easter,
Julie
Oh, and P.S. Former President Jimmy Carter has eaten there. He was born and grew up in Plains, Georgia. His family were the only white people in that small town. He didn’t see his first white person (other than his immediate family) until he was 14.
——————————————————–

Our Easter Table

Easter Baskets Adorn
(Along with the GOLDEN EGG. Something I never found at childhood Easter Egg Hunts.)
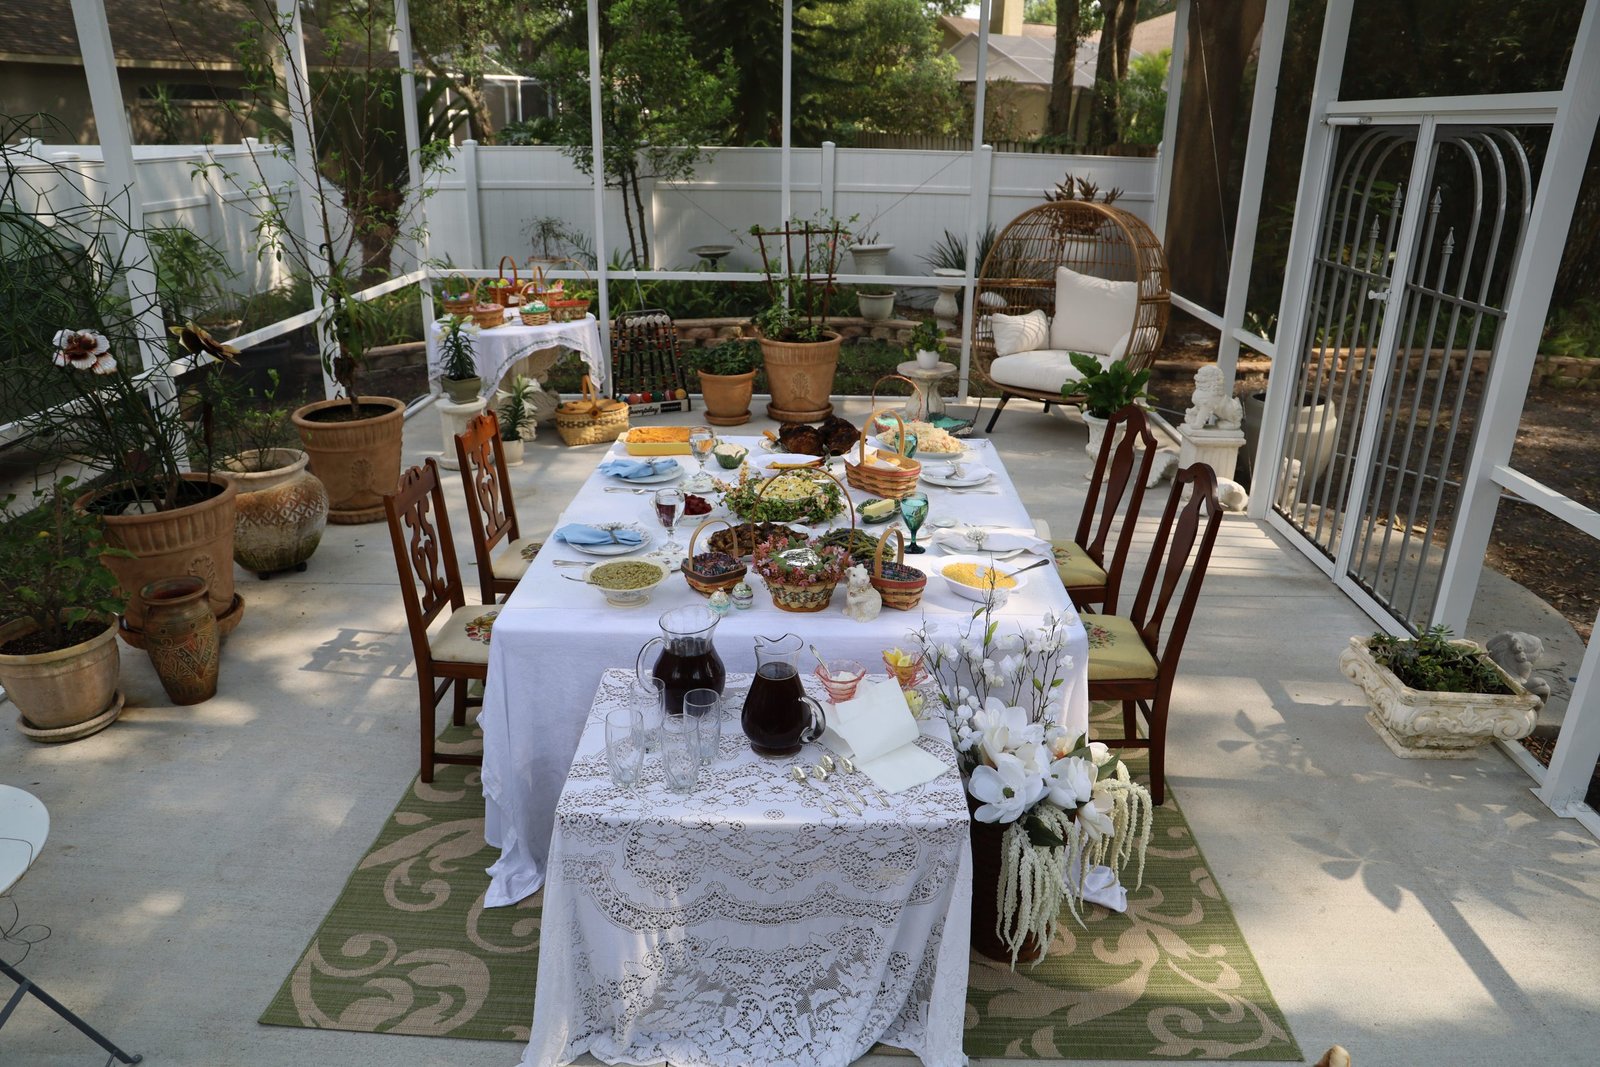
Our Extended Lanai

Brodie and Mackenzie
Living in Florida does give us an advantage to enjoying outdoor life throughout the year. I knew that I wanted us to eat outside and enjoy our spring weather before our hot summer arrived. I also knew that I wanted to make the best of this Easter and just enjoy our lovely holiday while in lockdown due to the Coronavirus. It was just the 4 of us, Gordon, myself, our son Brodie, and his girlfriend Mackenzie.
I knew that I wanted to use all the old linen tablecloths and napkins that belonged to my Grandmother and Great-Grandmother’s. I knew that I wanted to use my Grandmother’s silverware. I knew that I wanted our food put into some of the platters and bowls that once belonged to them as well. I knew that I wanted to set a formal table but also bring it into my tastes. I knew that I wanted to make it formal but also fun and casual all at the same time.
I knew that I wanted for us to cook the foods that I remember from my youth, but I also knew that I wanted Gordon to create something new and tasty at add to our traditional southern menu. And he did!
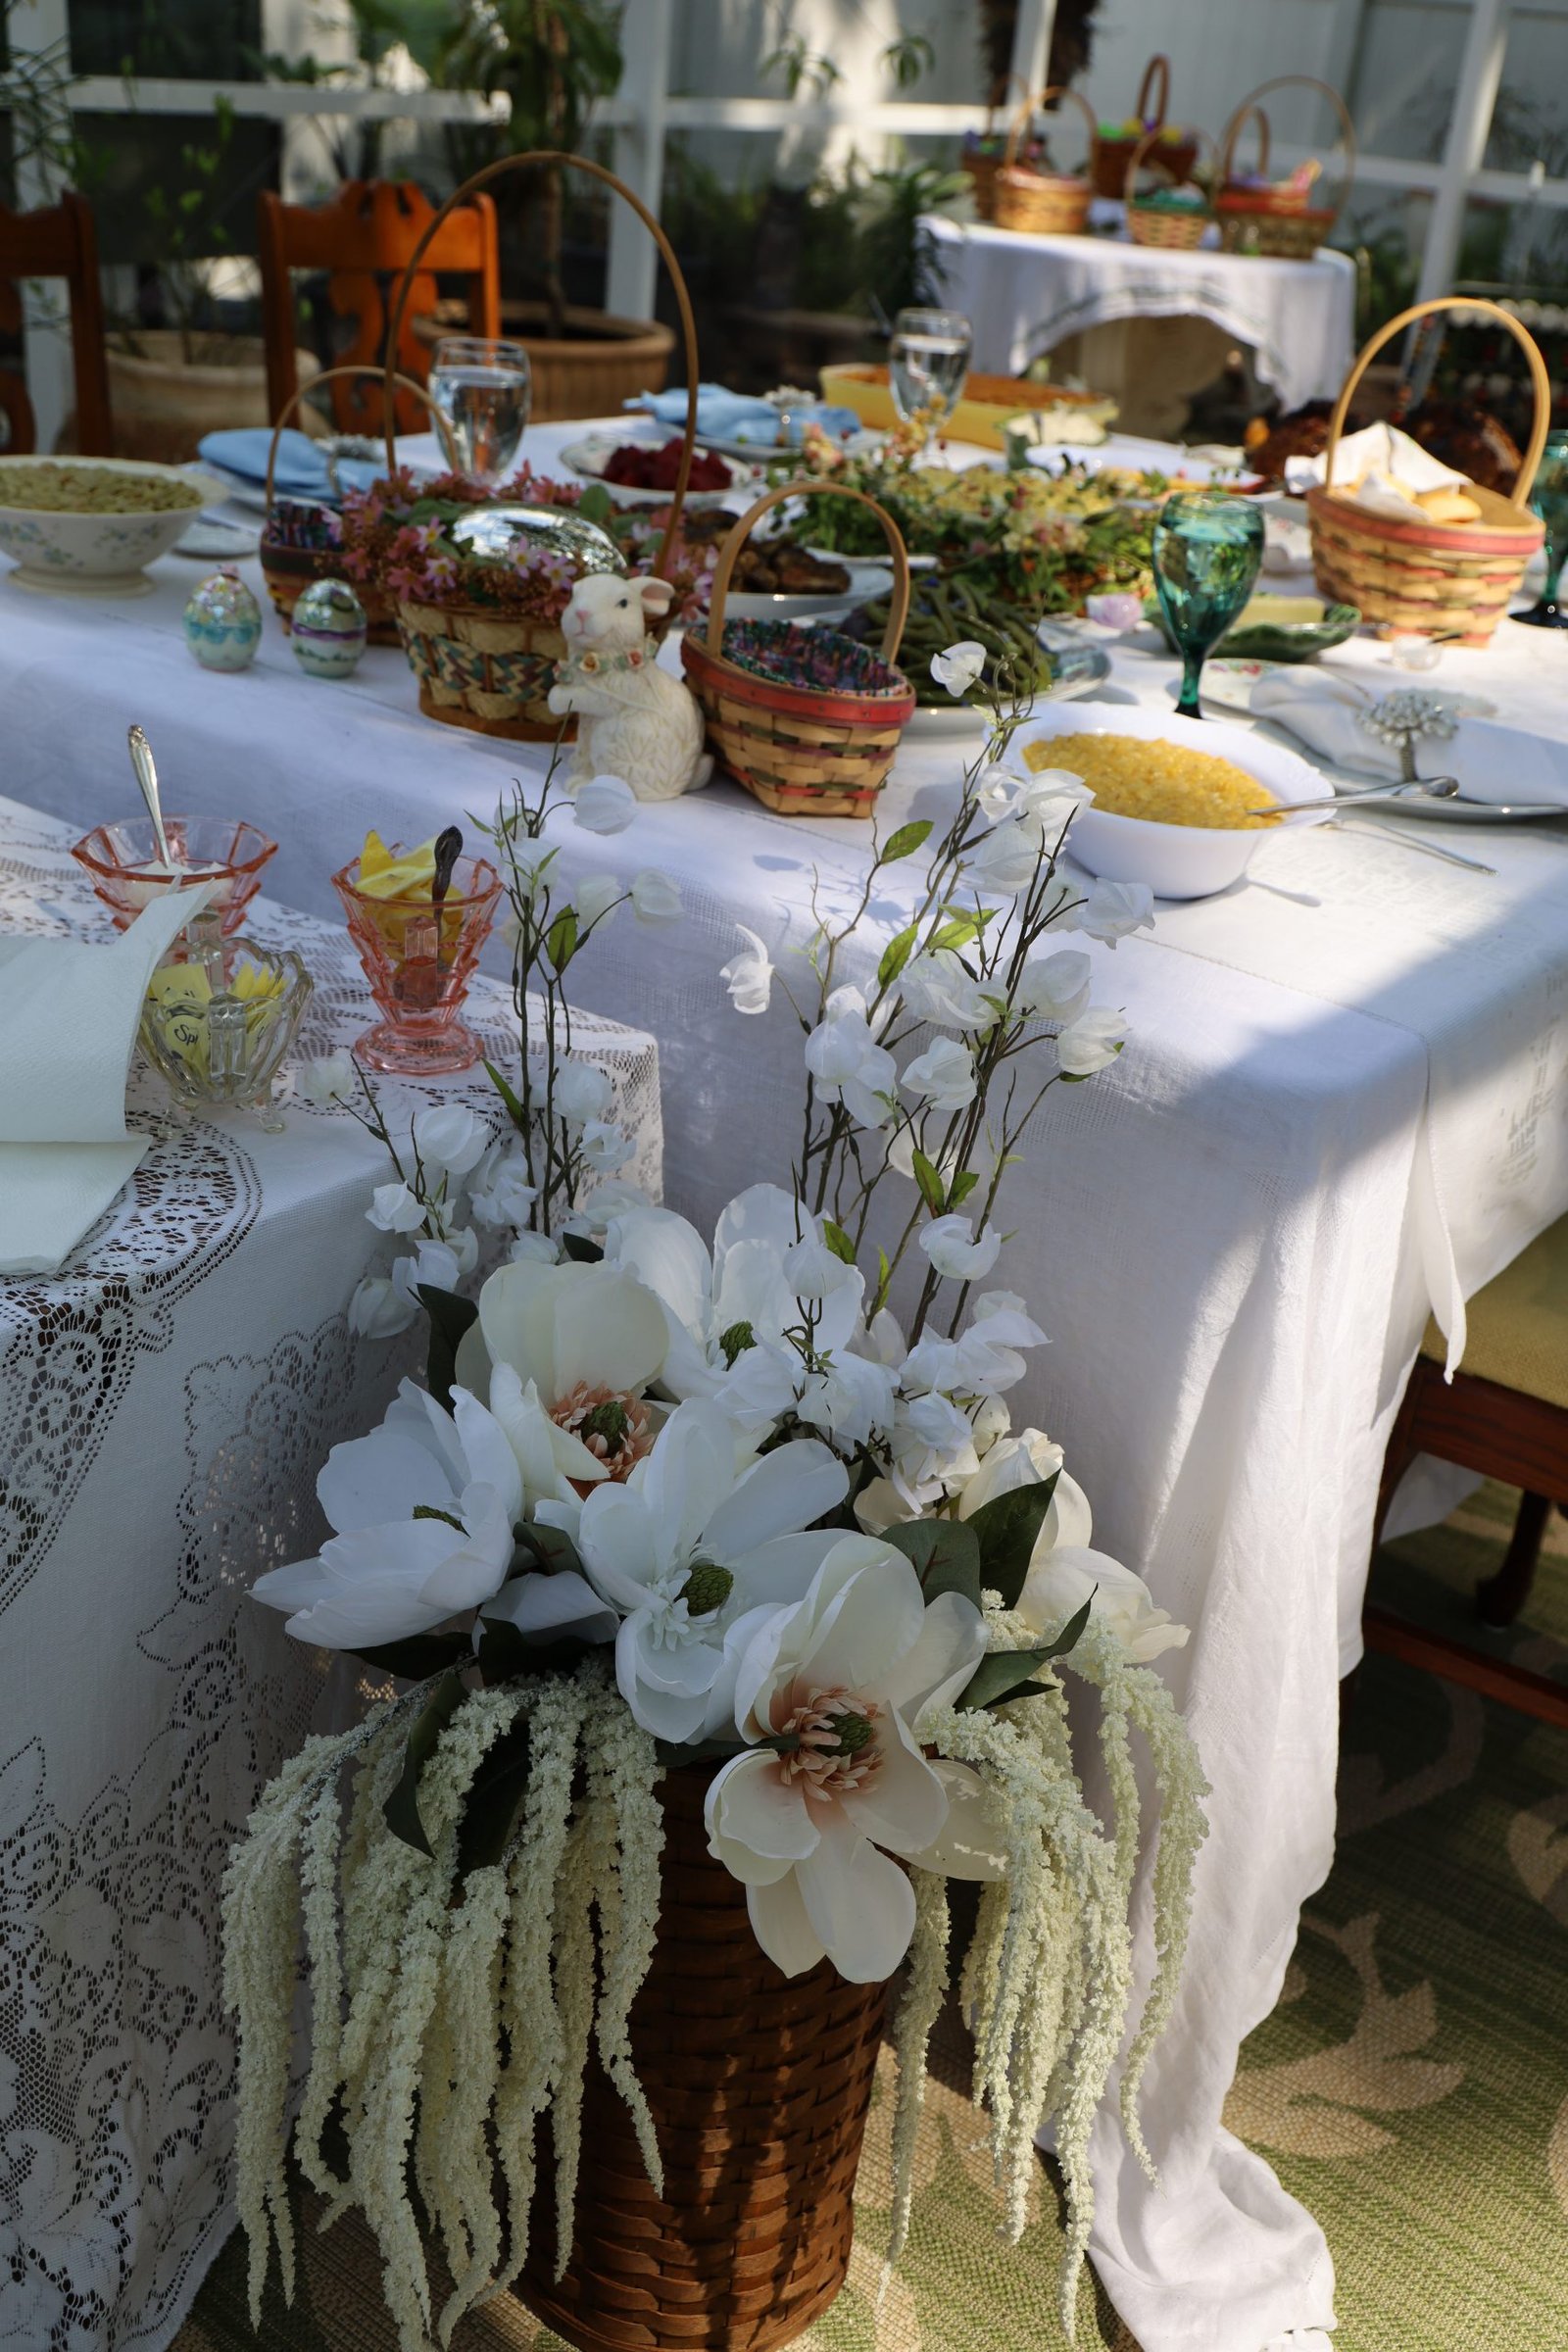
When in Lockdown Fake Flowers work Nicely

Brodie and Mackenzie with Sparky and Spooky
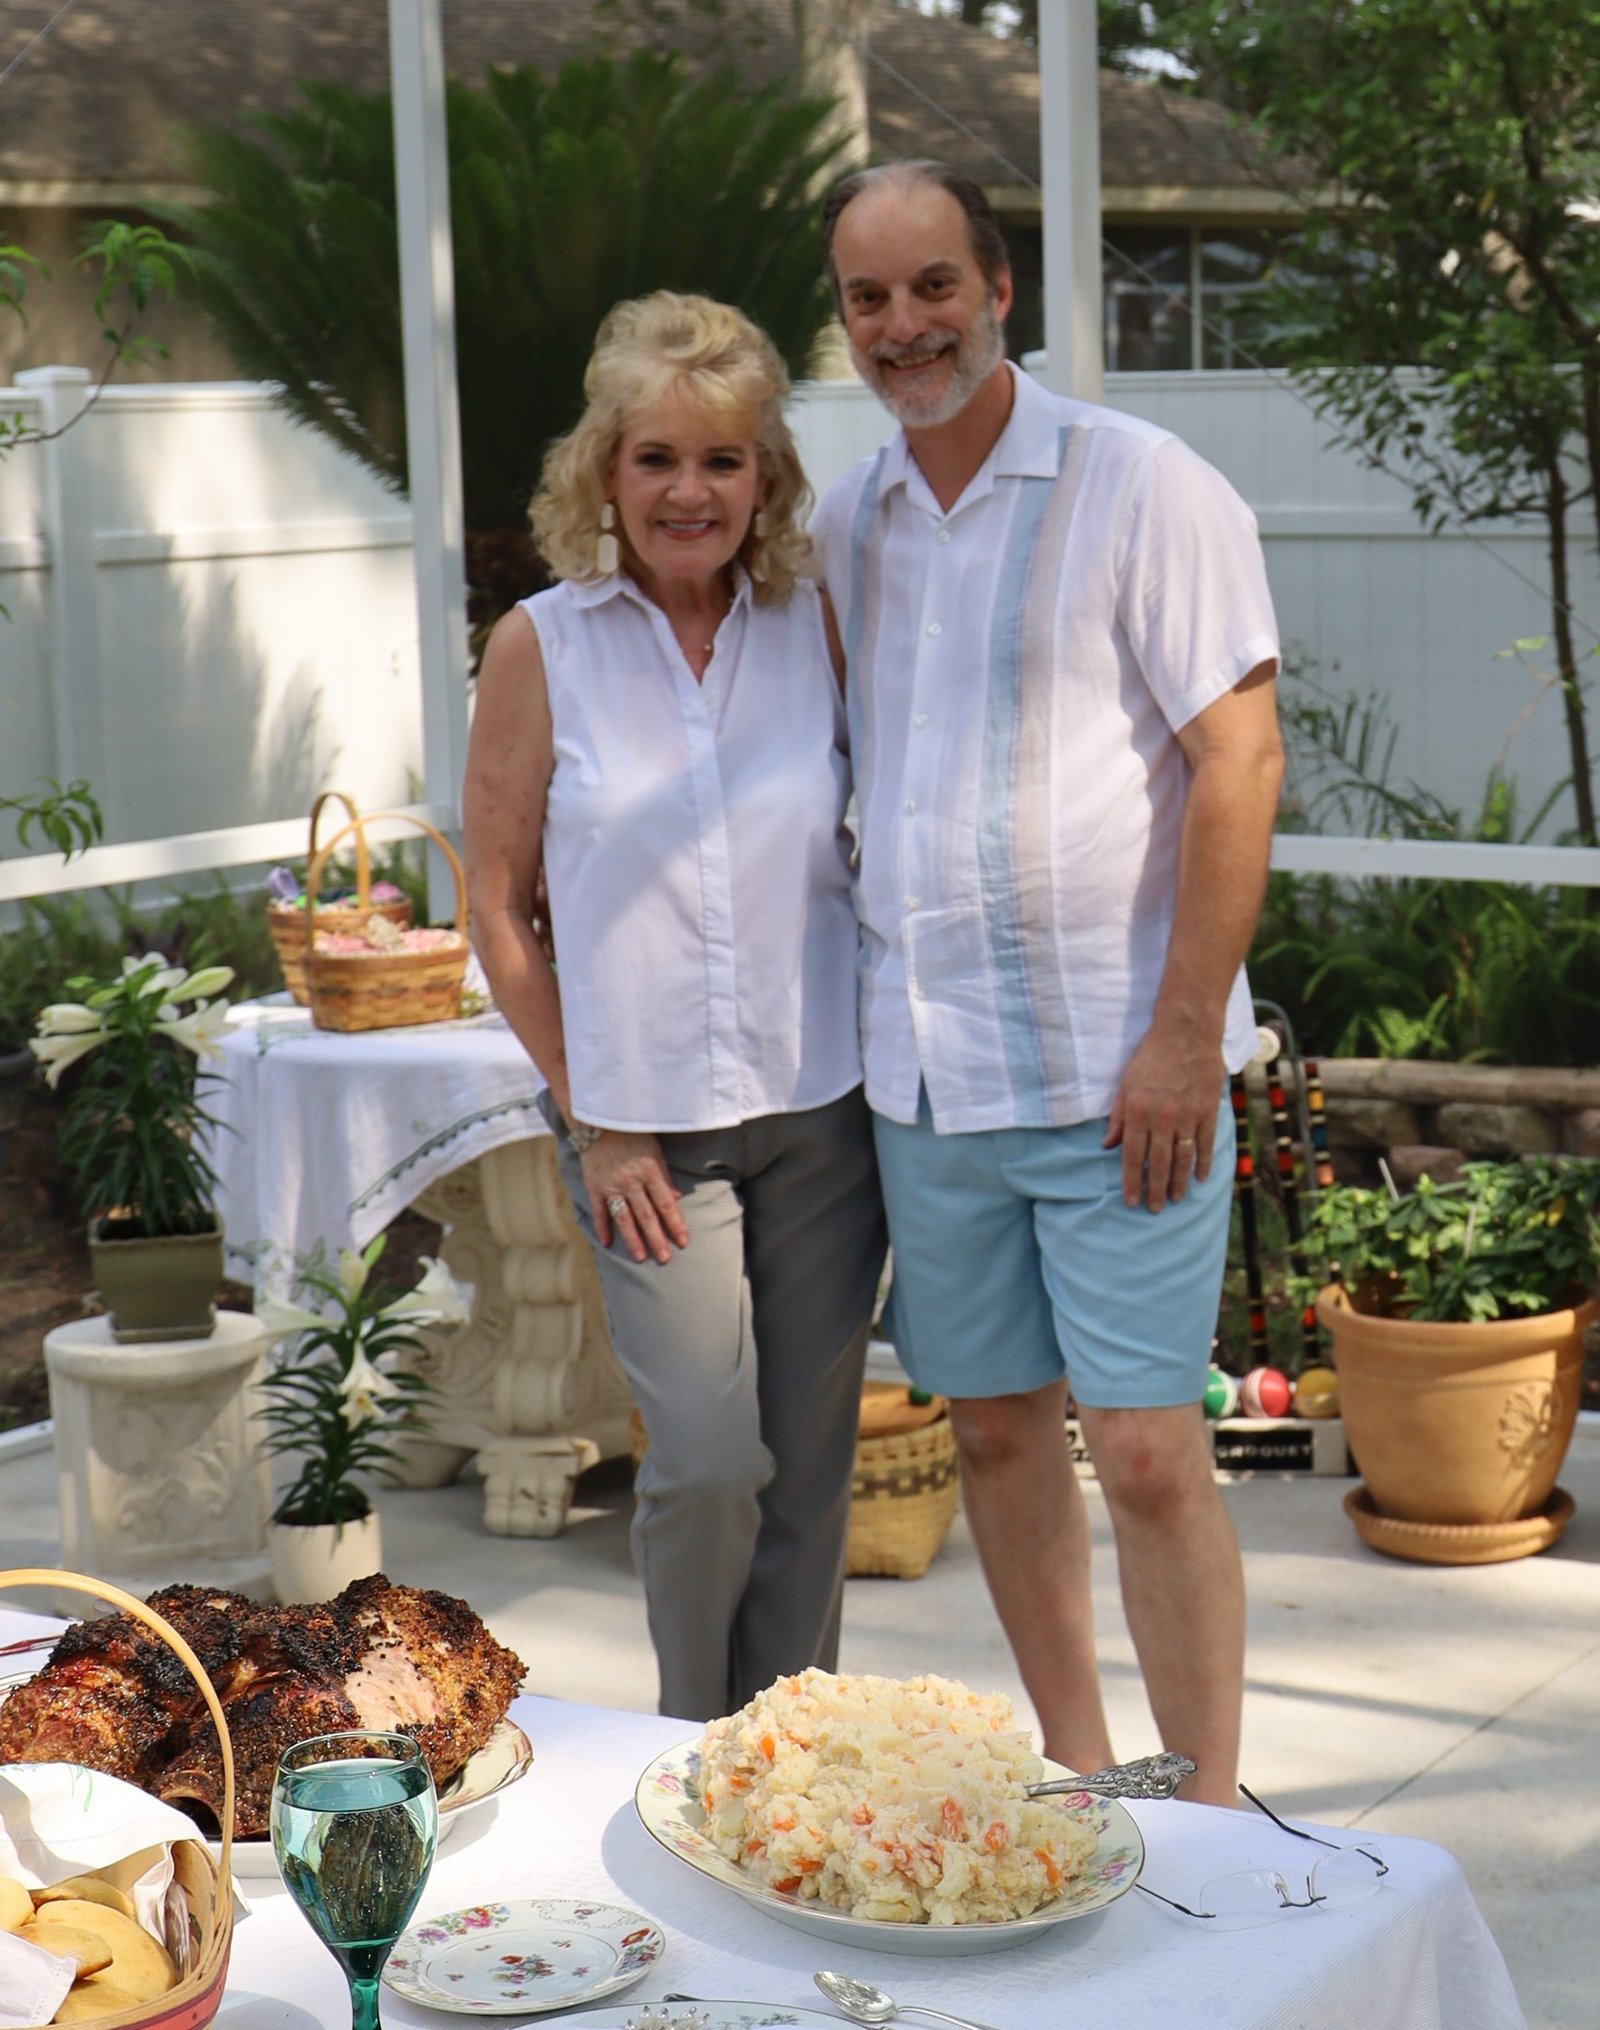

Julie and Gordon

Julie and Mackenzie
—————————————————-
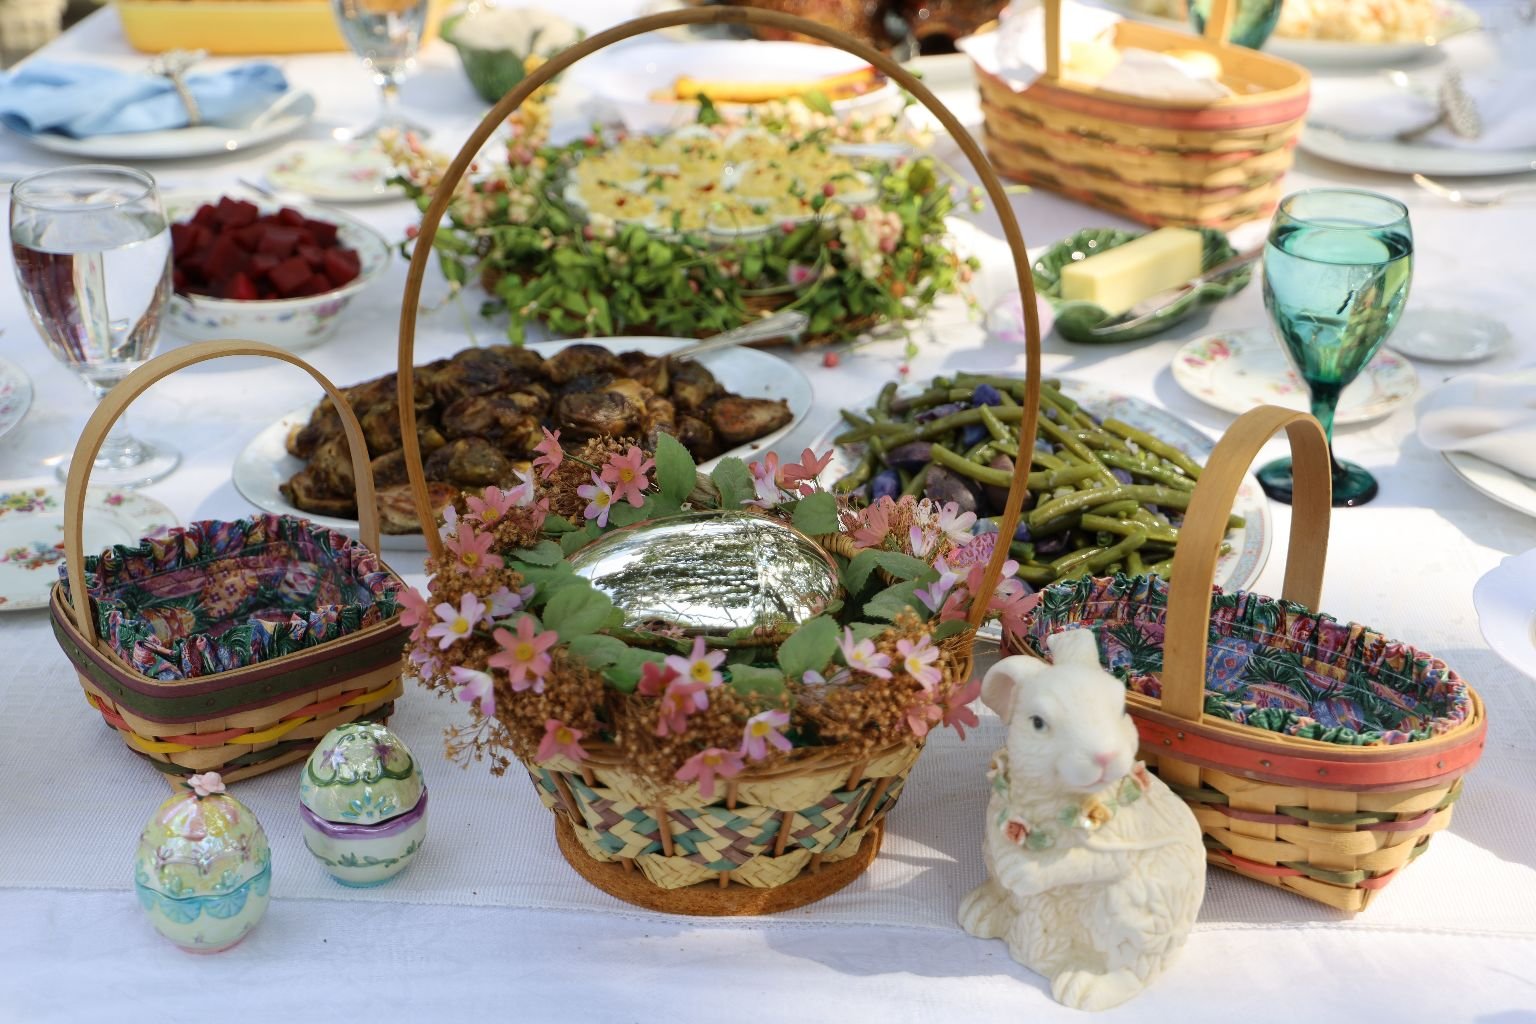
I would like to introduce you to:

Our Easter Menu

Bone In Pork Roast

Mashed Potatoes with Carrots
Macaroni and Cheese
Green Beans with Blue Potatoes
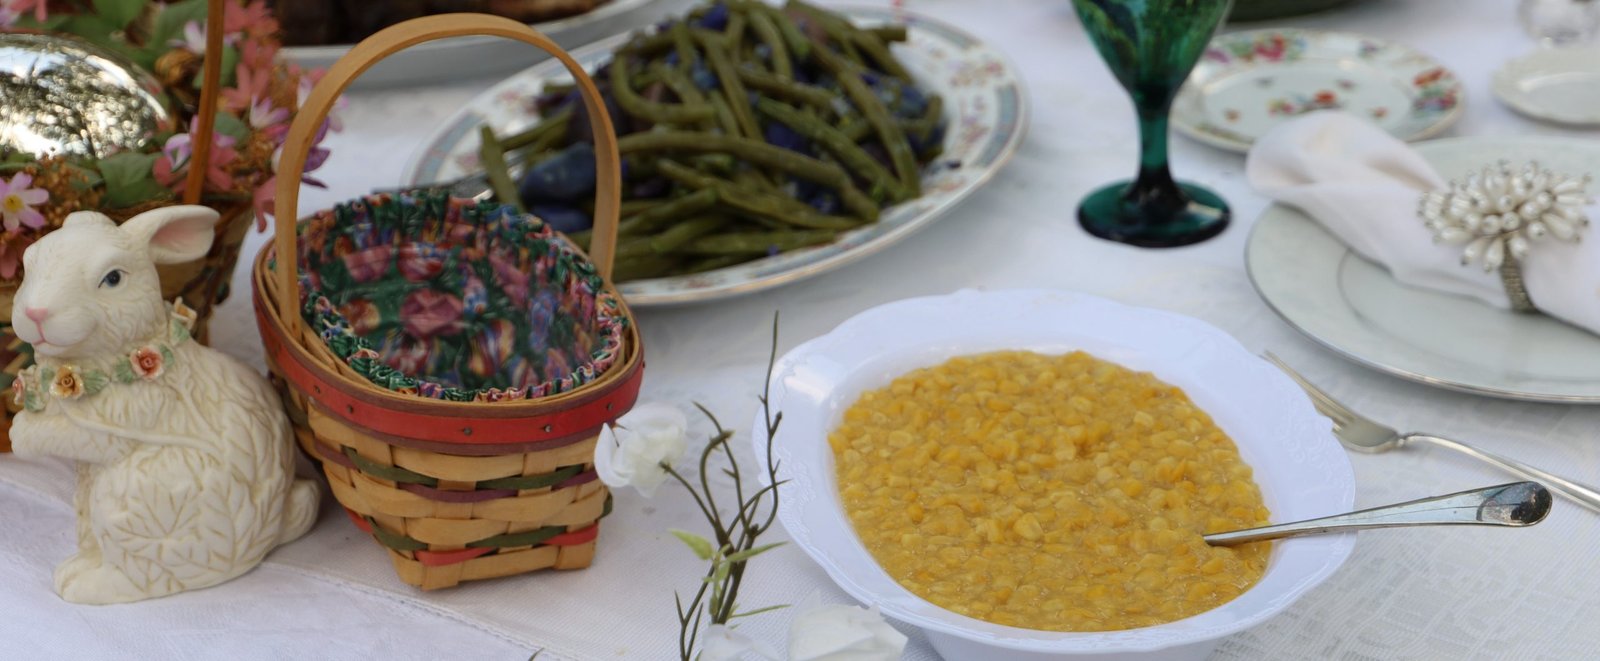
Corn and Creamed Corn

Purple Beets
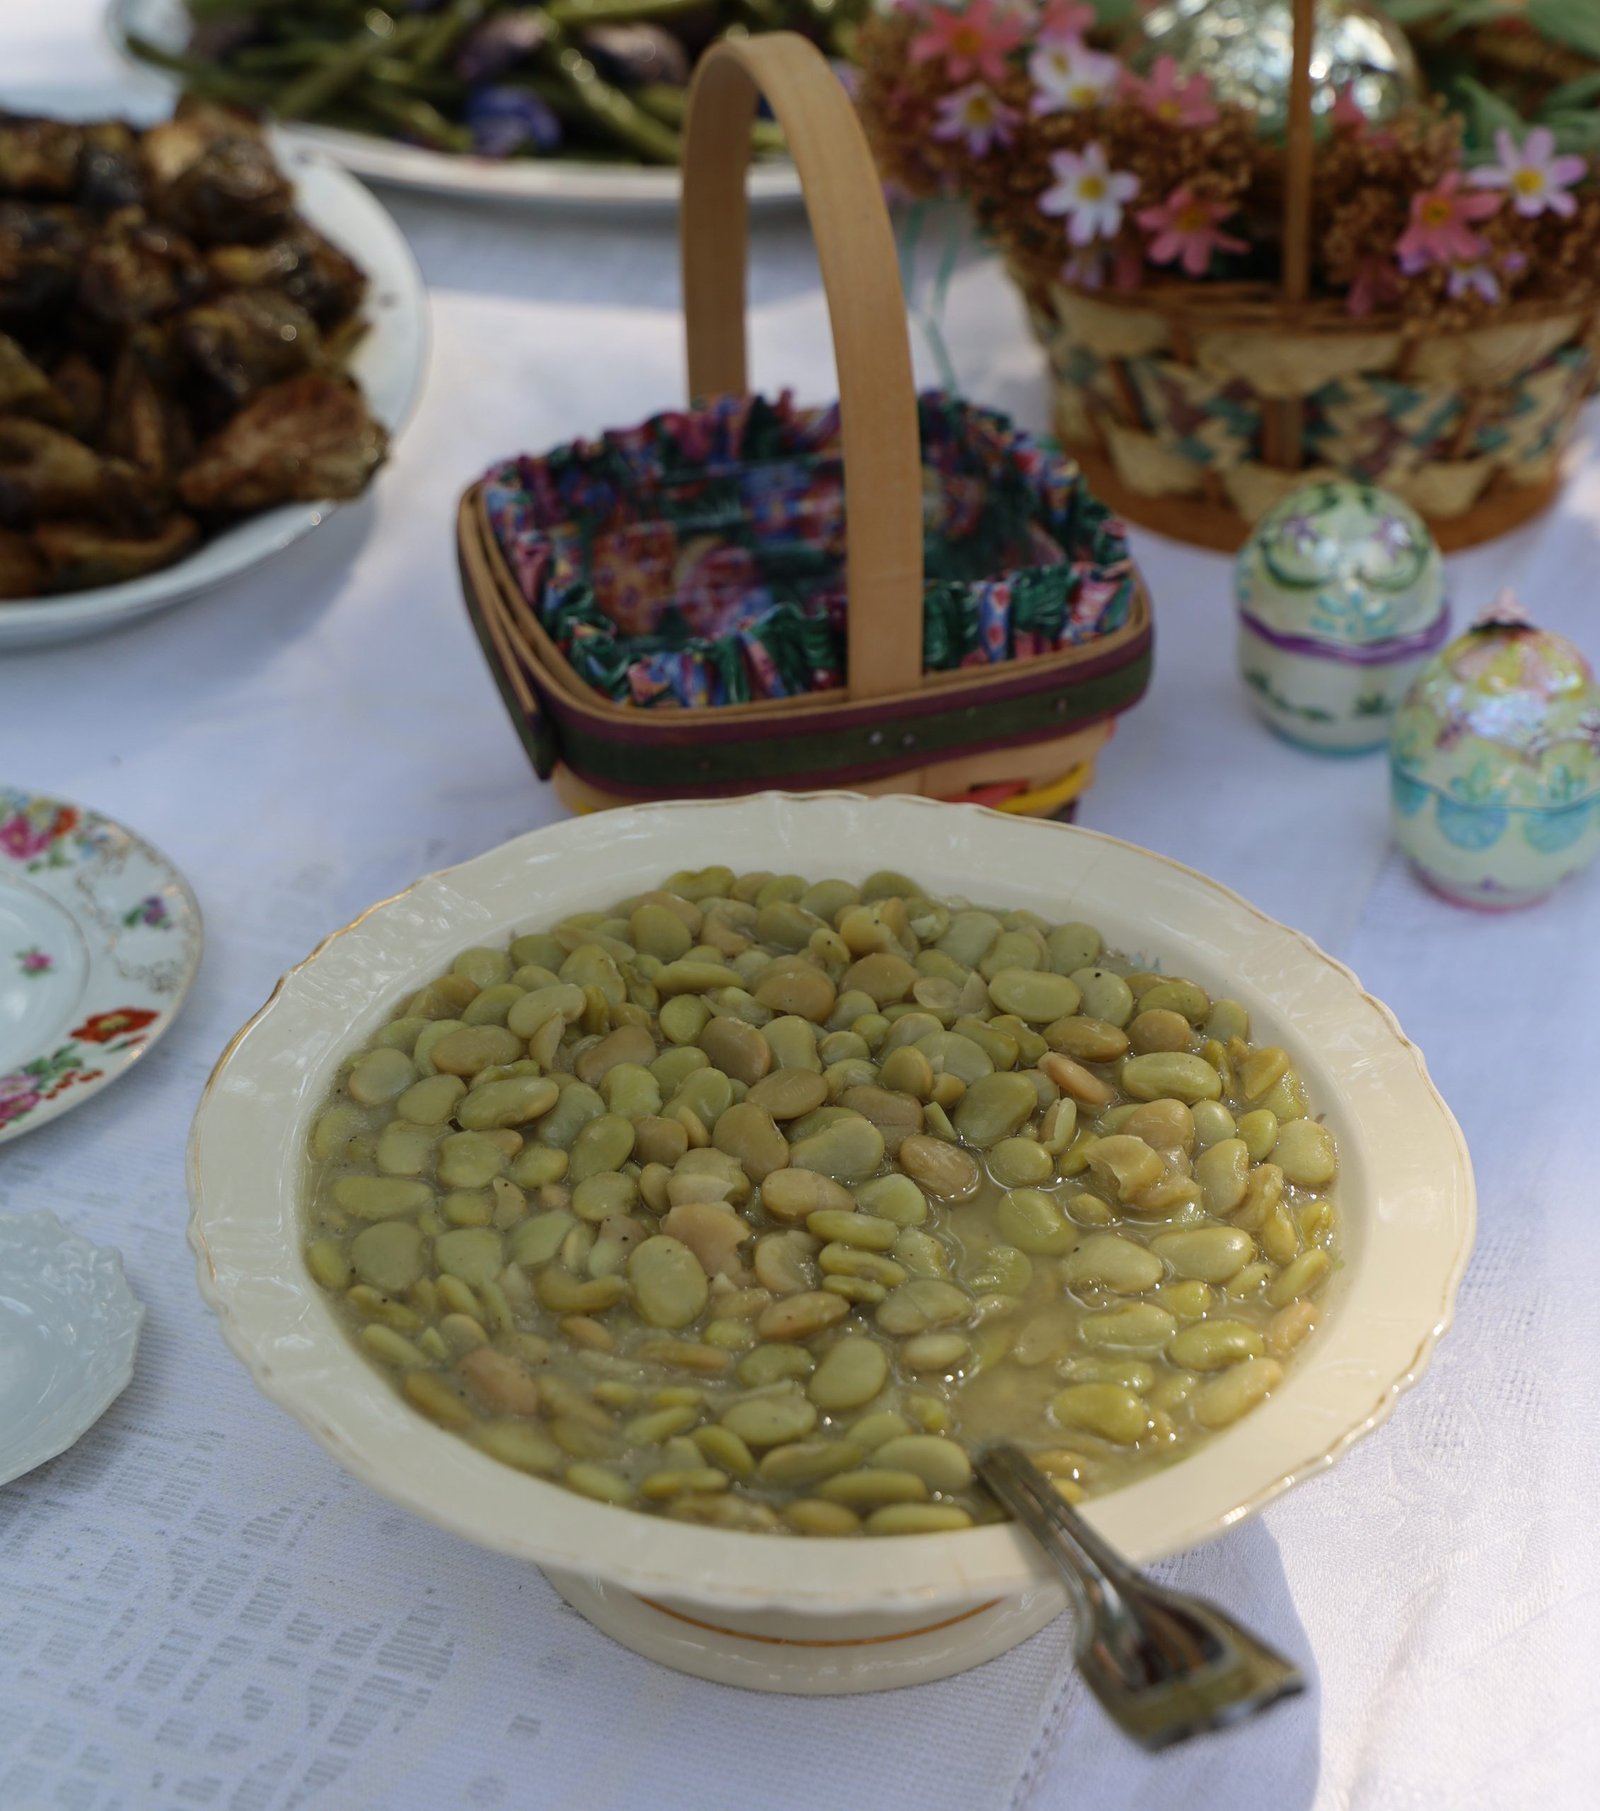
Lima Beans
Sea Island Red Peas and Ham

Roasted Brussel Sprouts

Grandma Nell’s Squash Casserole
Yeast Rolls
Gravy

Julie’s Deviled Eggs
AND,

A little something for the Easter Bunny!
——————————————————–

The Iced (melted) Tea Table
(Served two ways: Sweetened, or Unsweetened.)
I knew that I wanted to honor my past by having what every edible function I had ever been to in my life had, Sweetened, or Unsweetened Iced Tea. Usually with a little card in front of the pitchers letting you know which one was which. Something I didn’t have time to make prior to this dinner. But the two pitchers do represent the only two selections in the south. 🙂
———————————————————
Traditional Place Setting
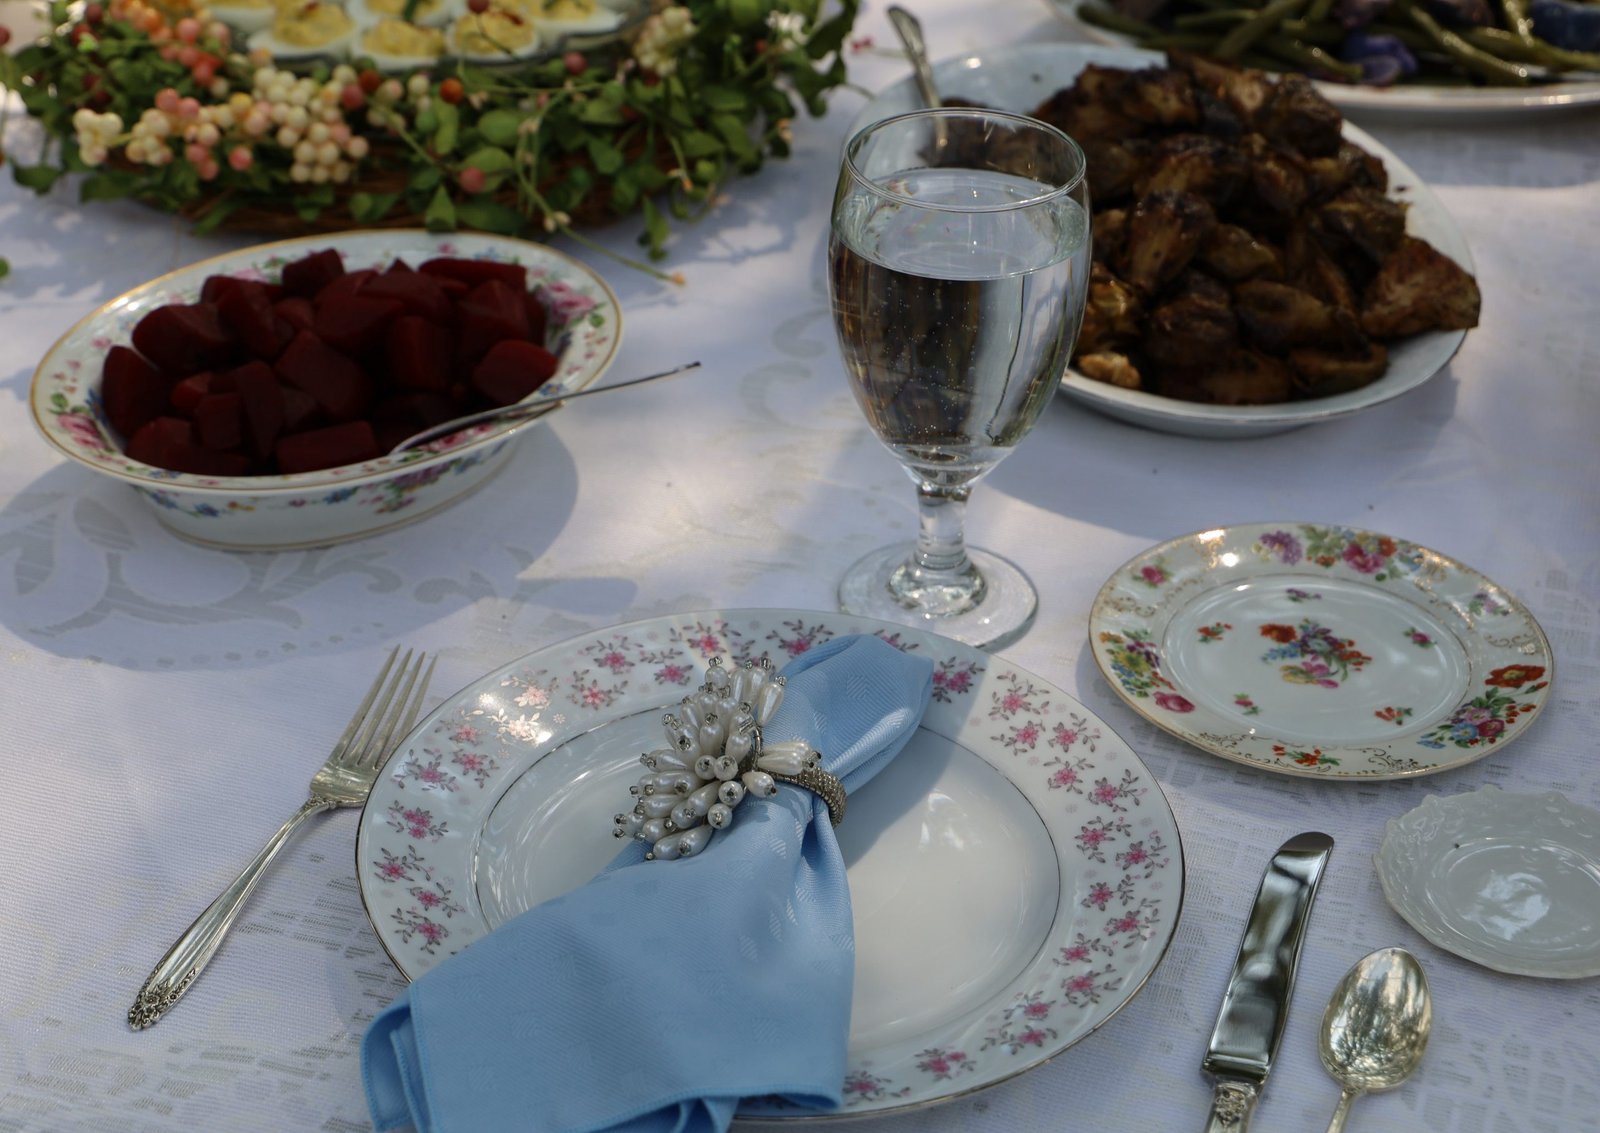
I enjoyed getting out the China and Silver.
No crystal goblets though.
————————————————–
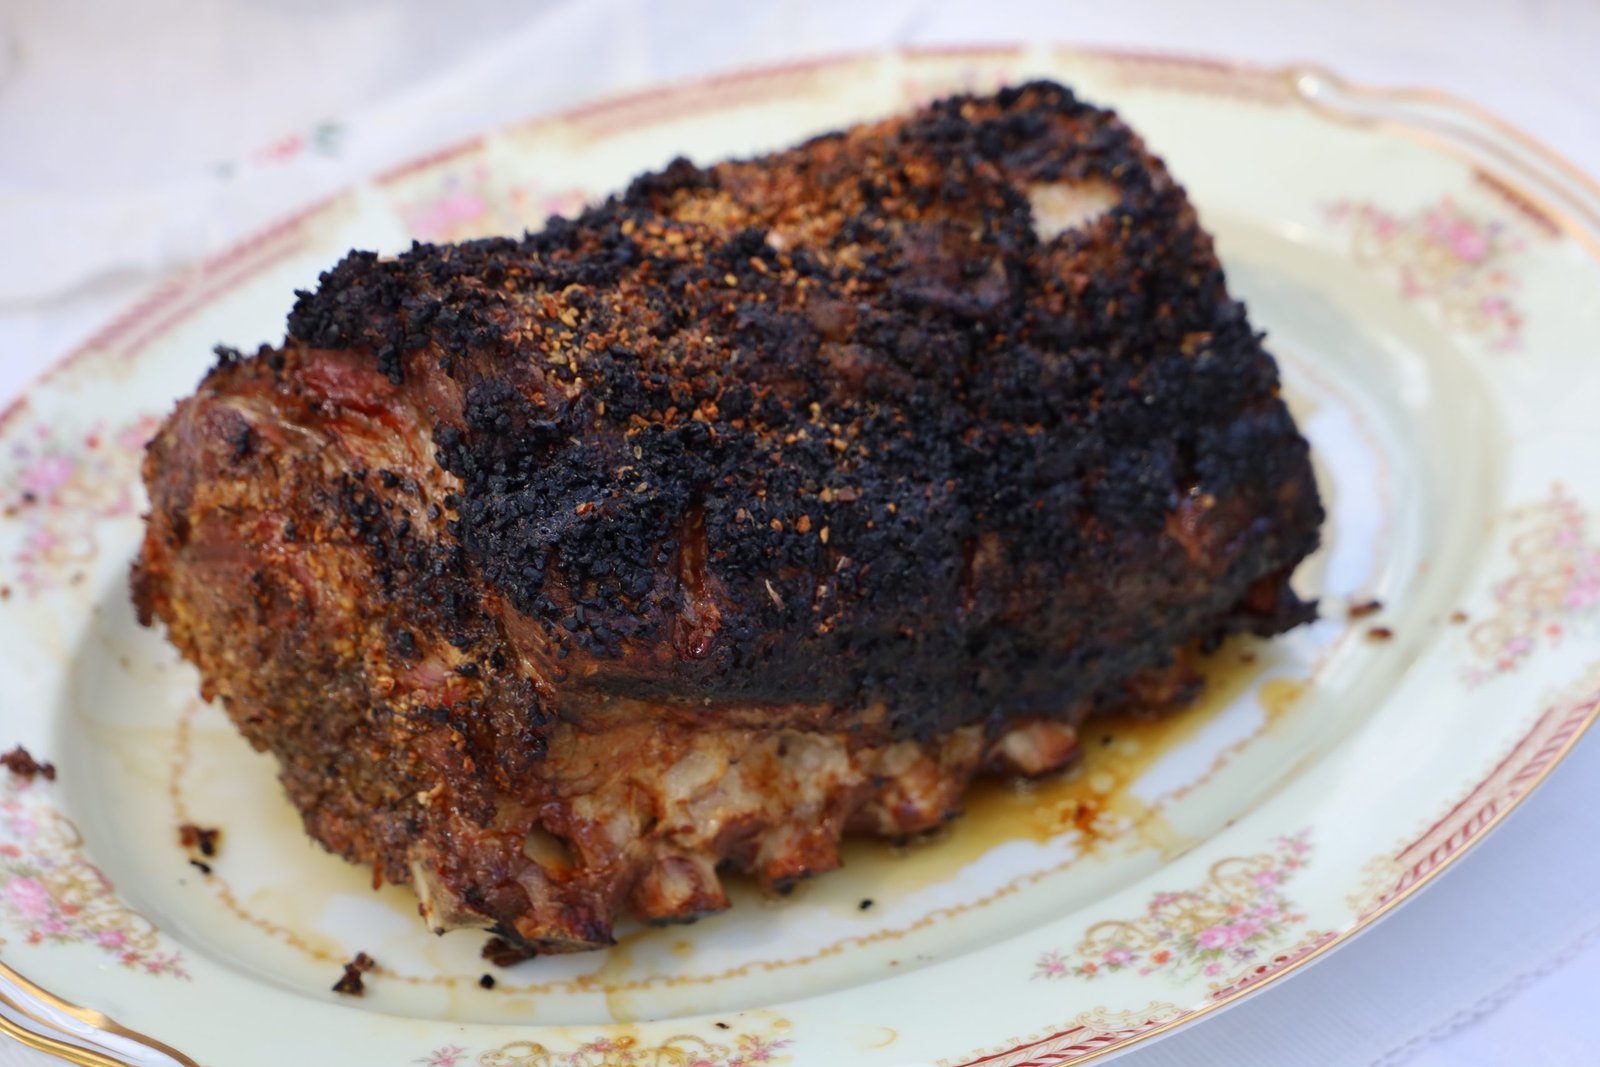
Gordon’s Bone In Pork Roast Cooked on the Grill
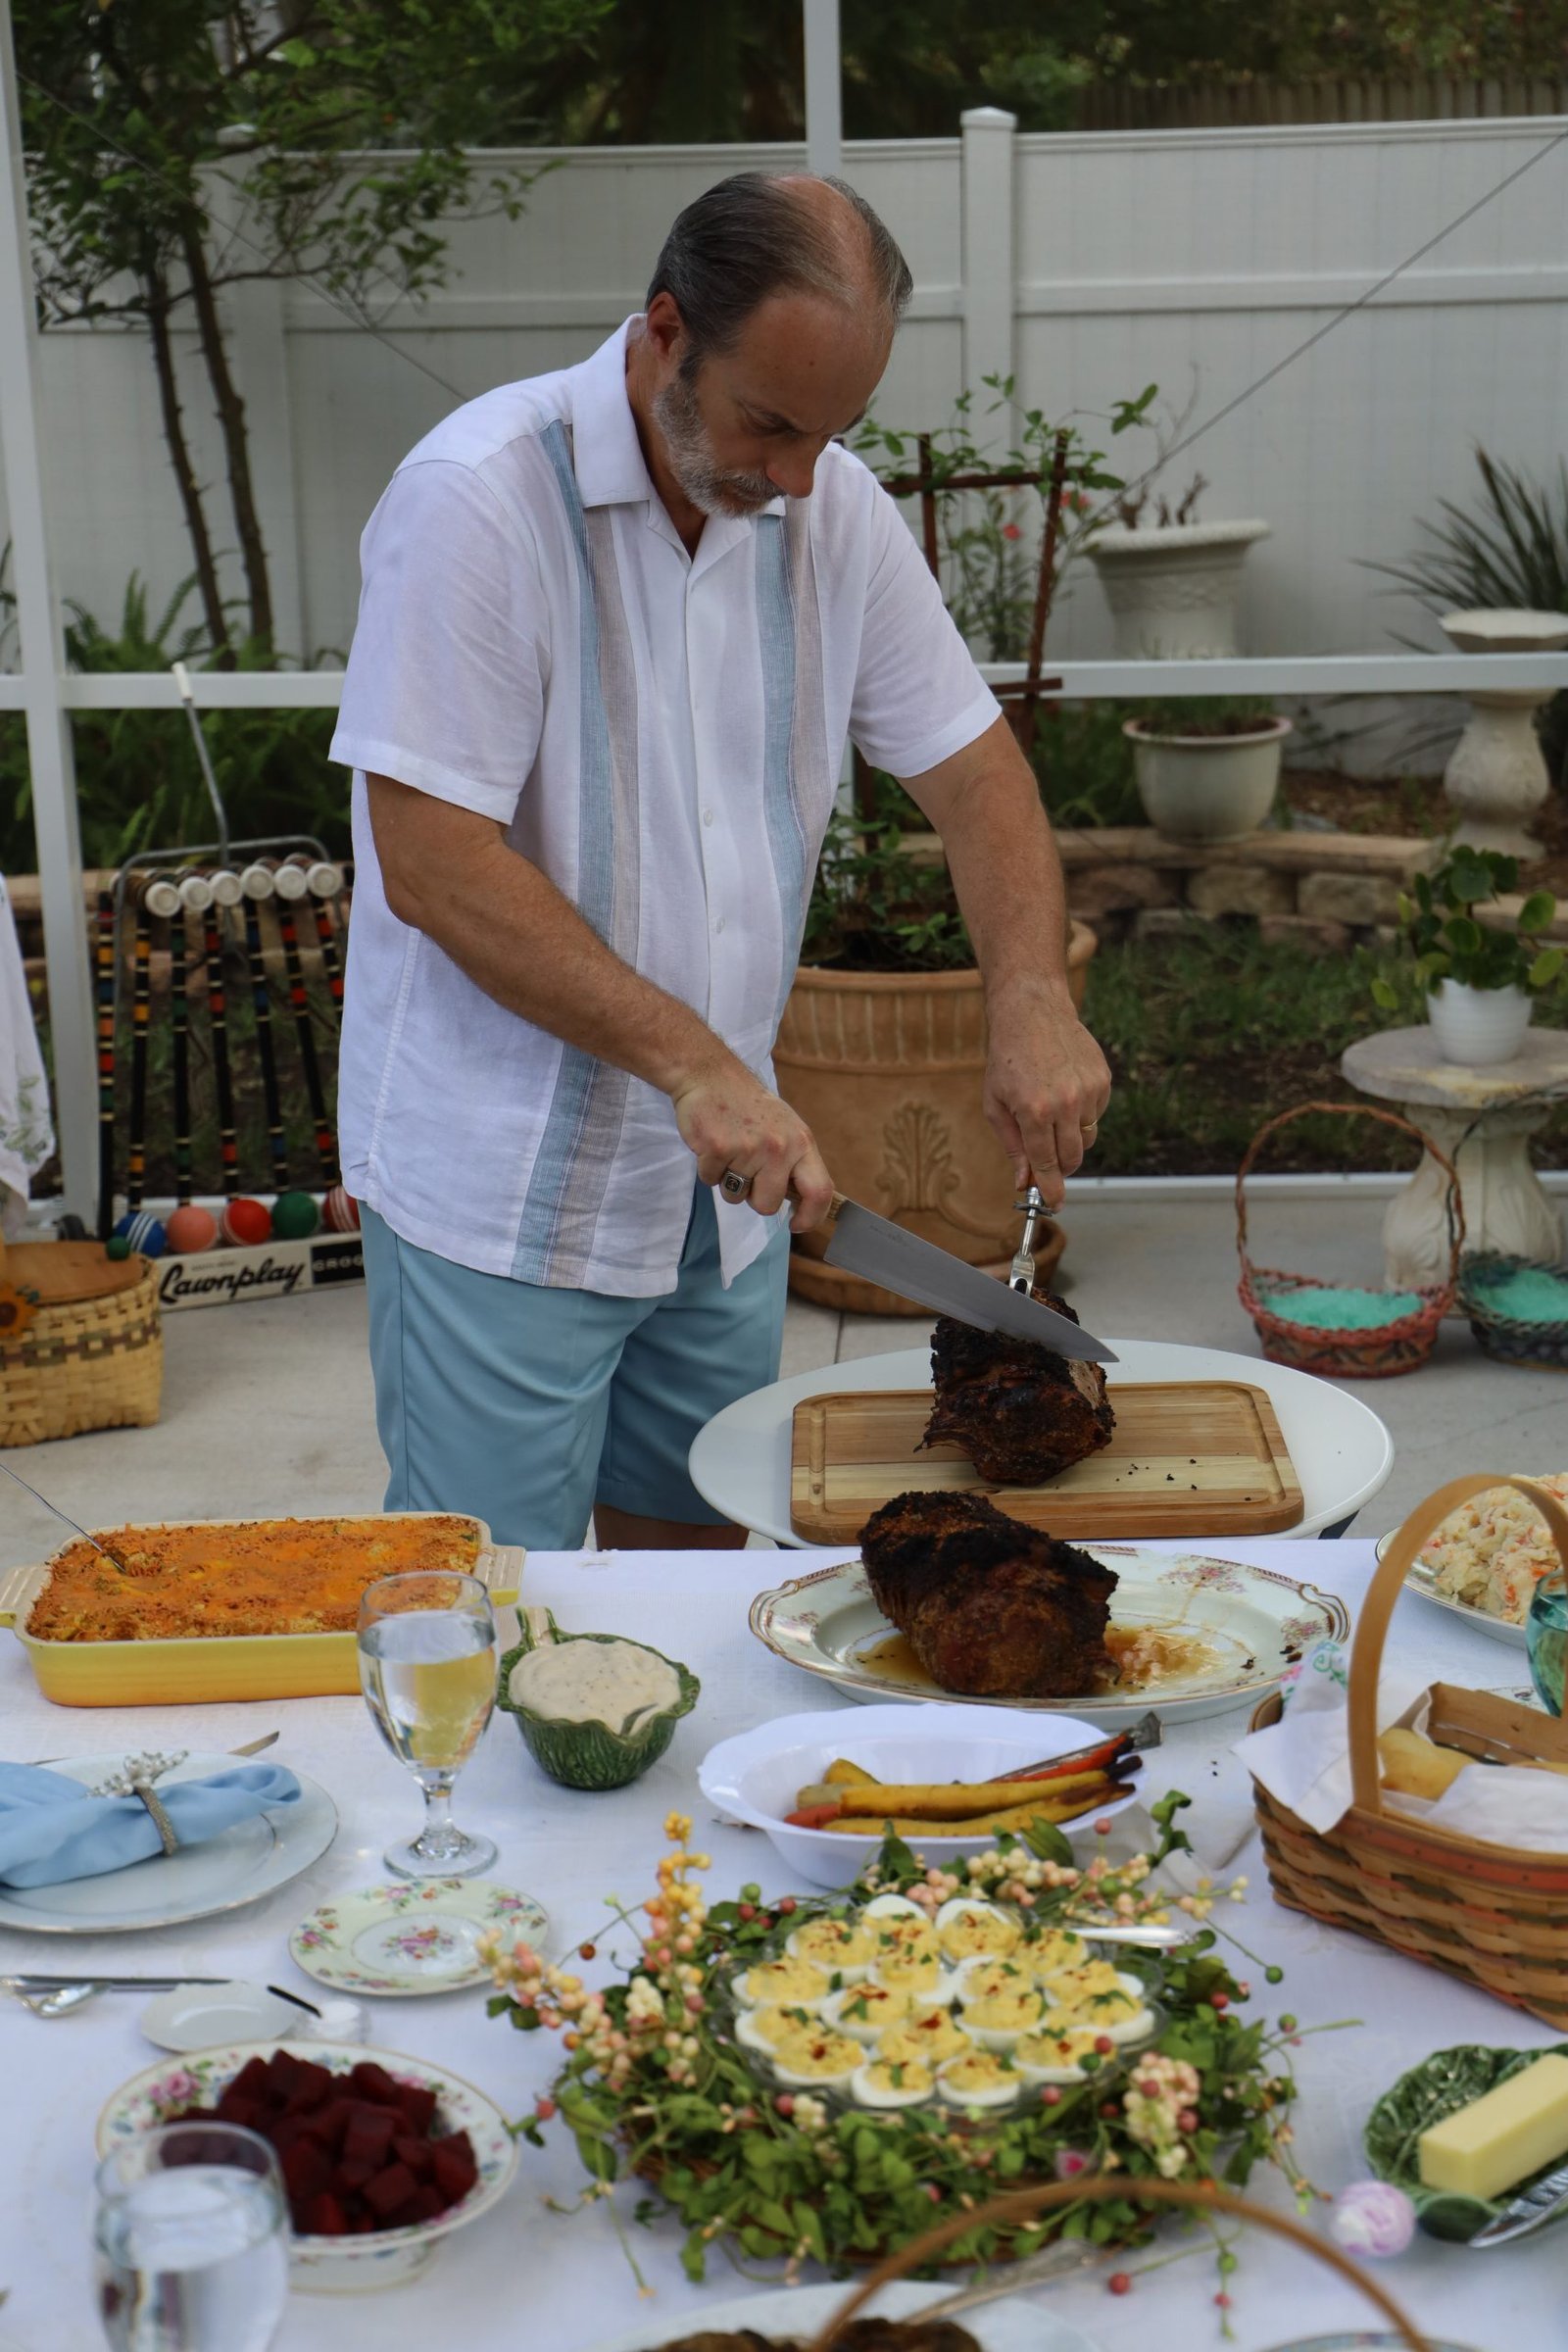
Gordon Carving our Bone In Pork Roast


Looks delicious, doesn’t it?
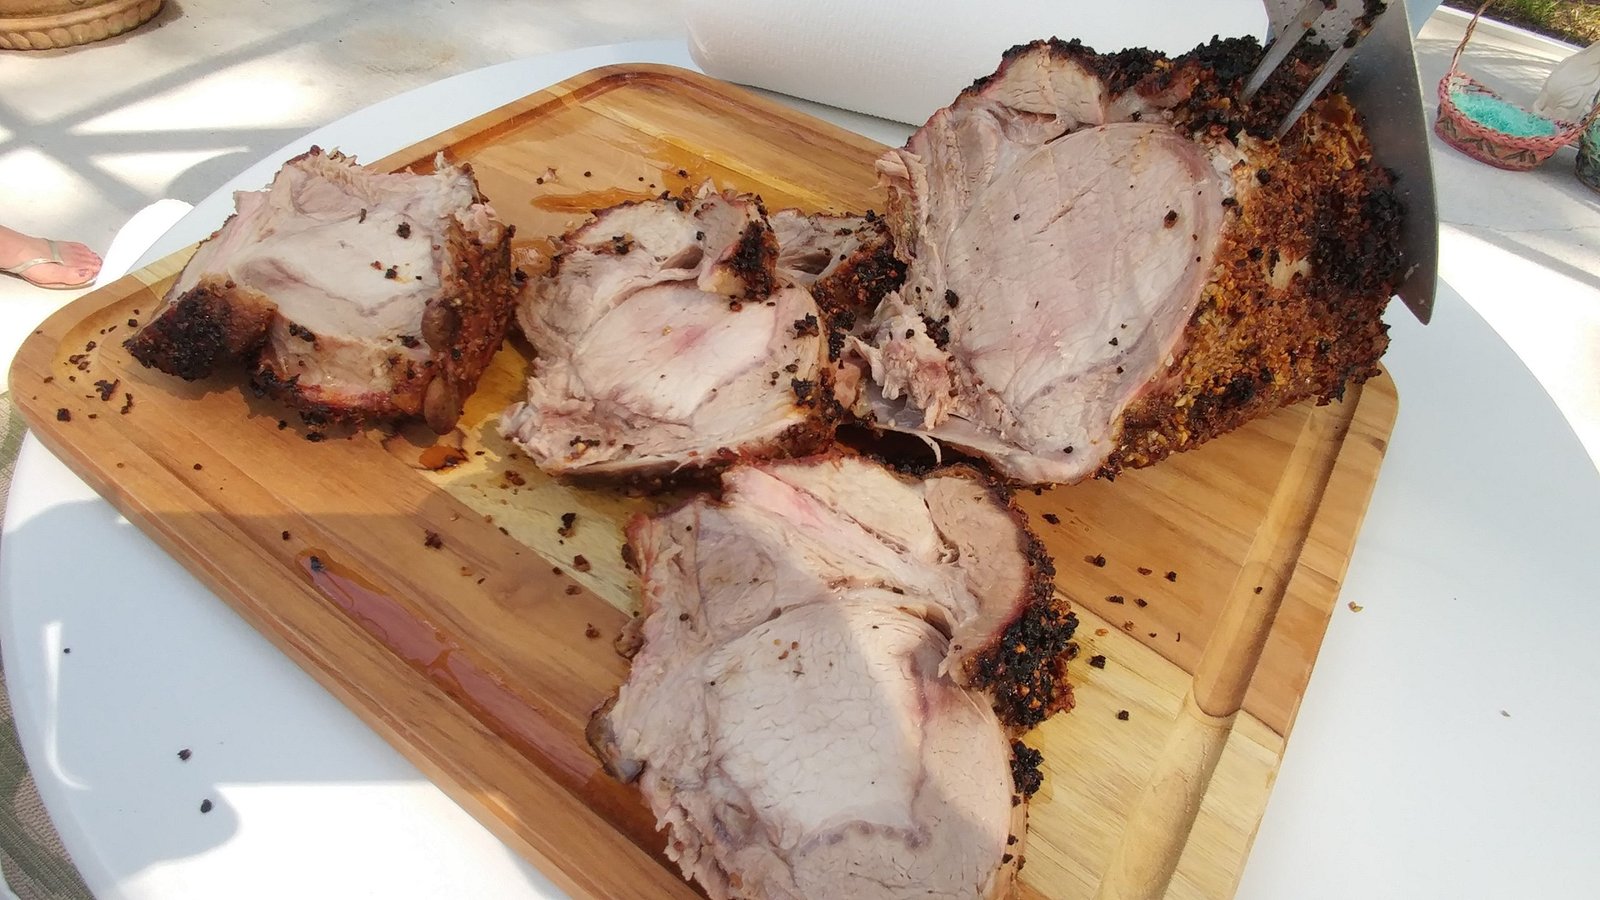
——————————————————-

Our Easter Table
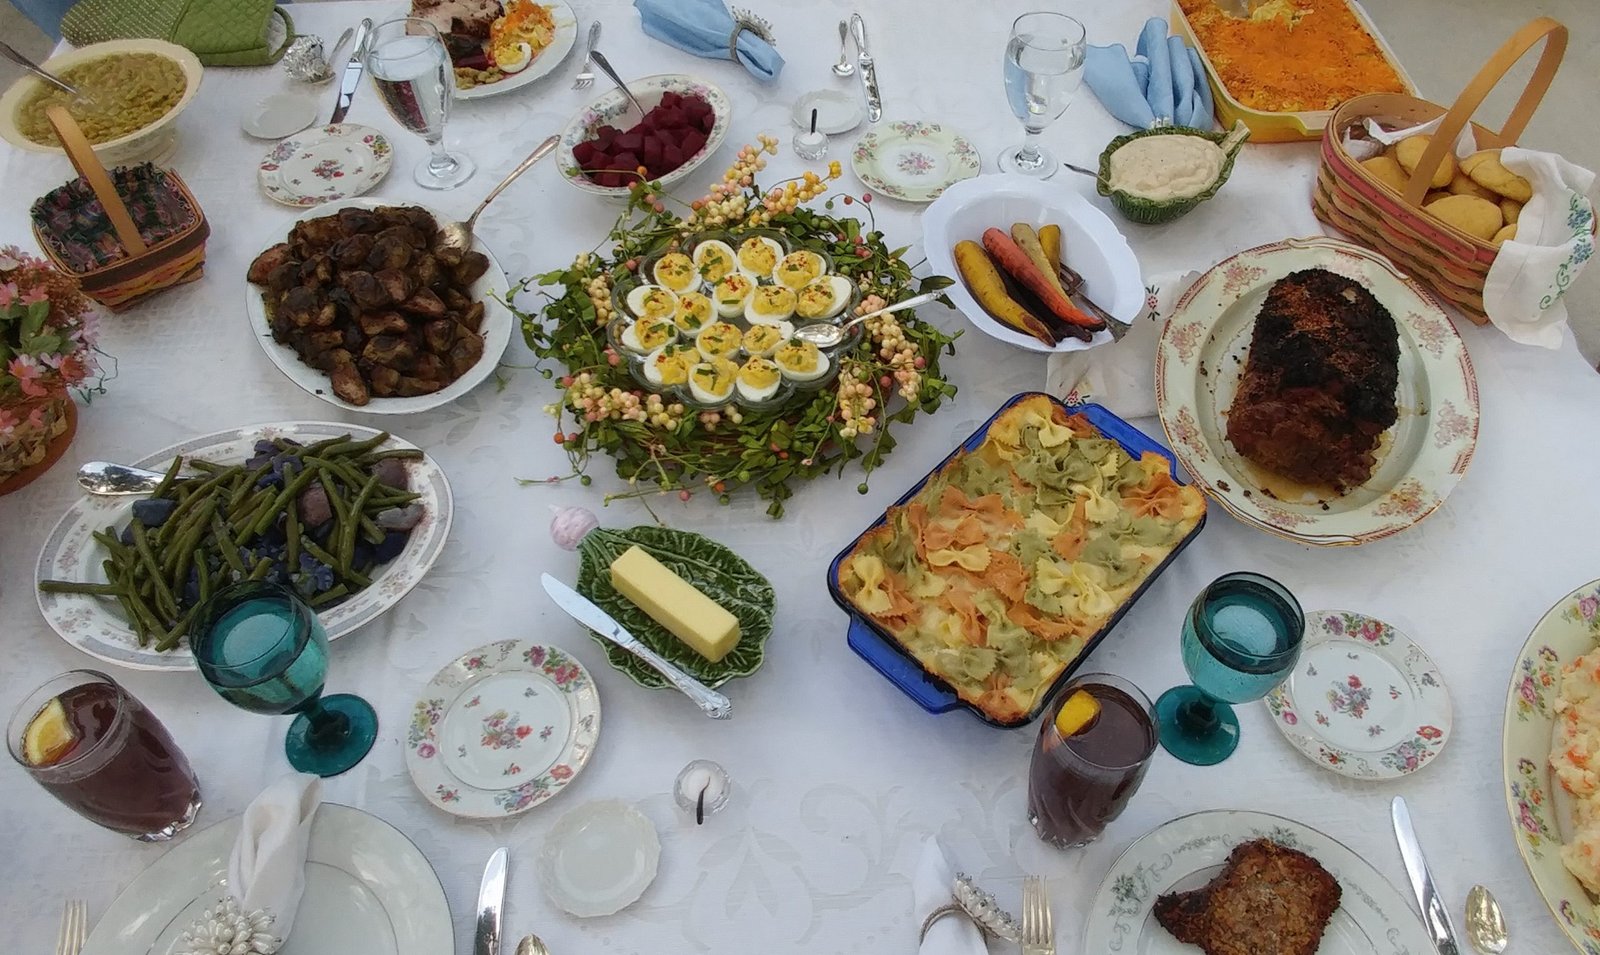
Of course my Deviled Eggs took center stage. Easter is all about the eggs.
I placed them over a pretty spring wreath that I had.
Another thing I love about Easter is that even the foods are very colorful with all the colors of spring.
As if the Easter Bunny had painted them himself.

Mackenzie and Brodie Digging In
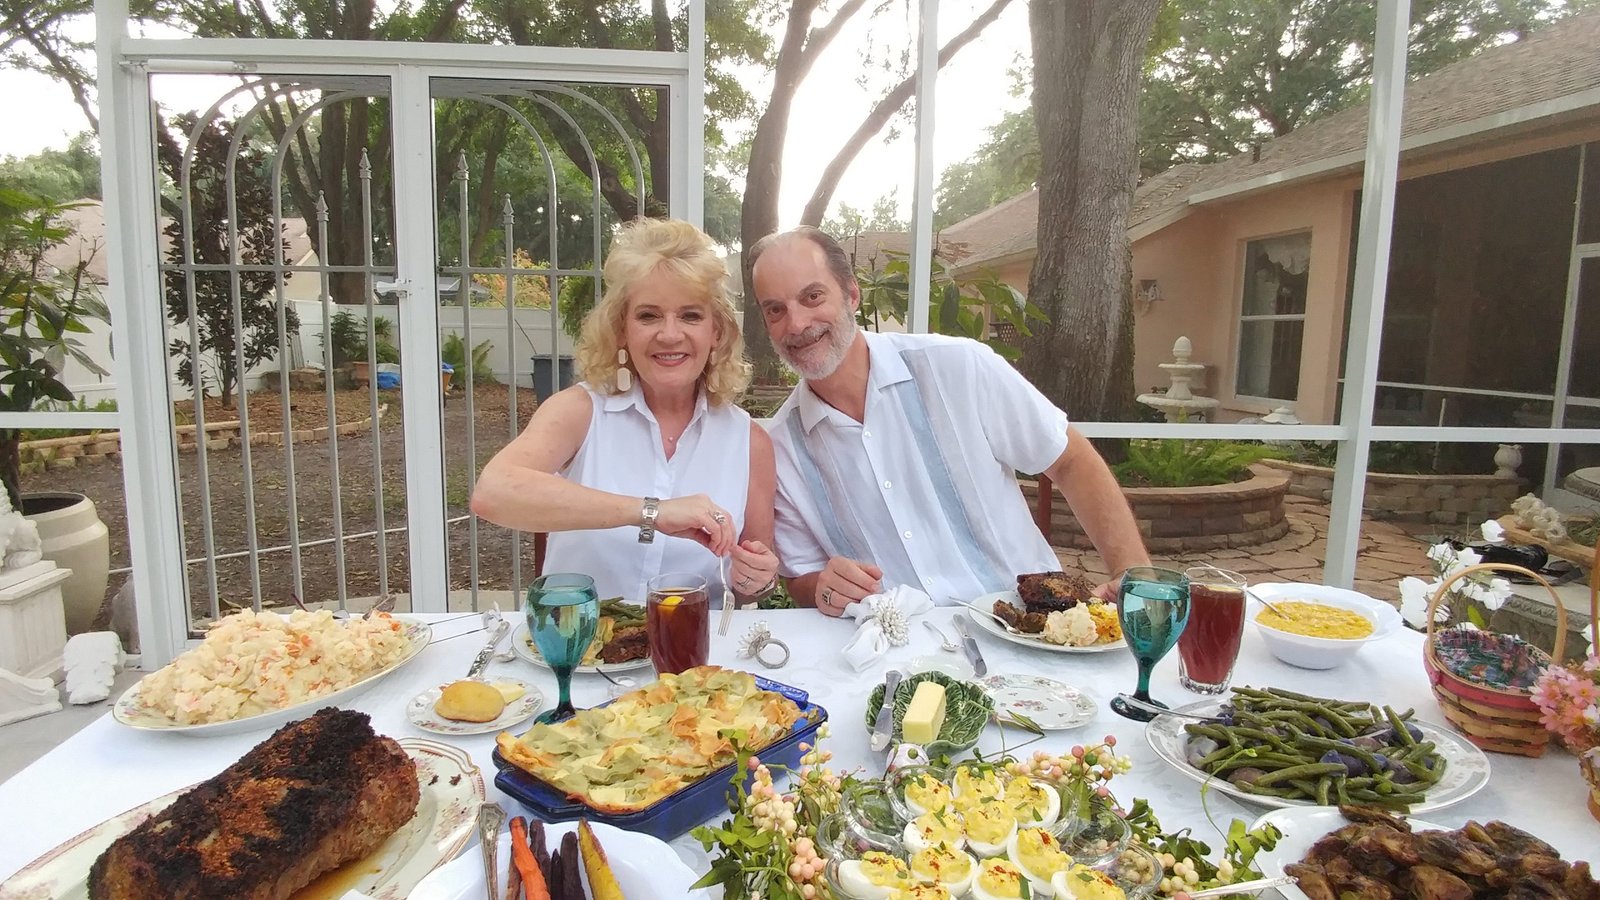
Gordon and Julie Ready to Feast

My, Julie’s, Dinner Plate and Place Setting
——————————————————
Another Southern Reminder…….
My Honeysuckle Vines
I am just waiting for the blooms to emerge. Having grown up in the south most every property had Honeysuckle growing, whether it was crawling all over fences, gates, trellis’s, it was everywhere most of the time growing wild. It was also overlooked as being some weed and not really appreciated. Same with grape vines that grew everywhere. My friends and I would always pick the blossoms off the Honeysuckle Vines and place the sweet stem from the bottom of the blossoms in our mouth and suck out to taste the sweet nectar. I still do whenever I see the vines growing.
——————————————————-
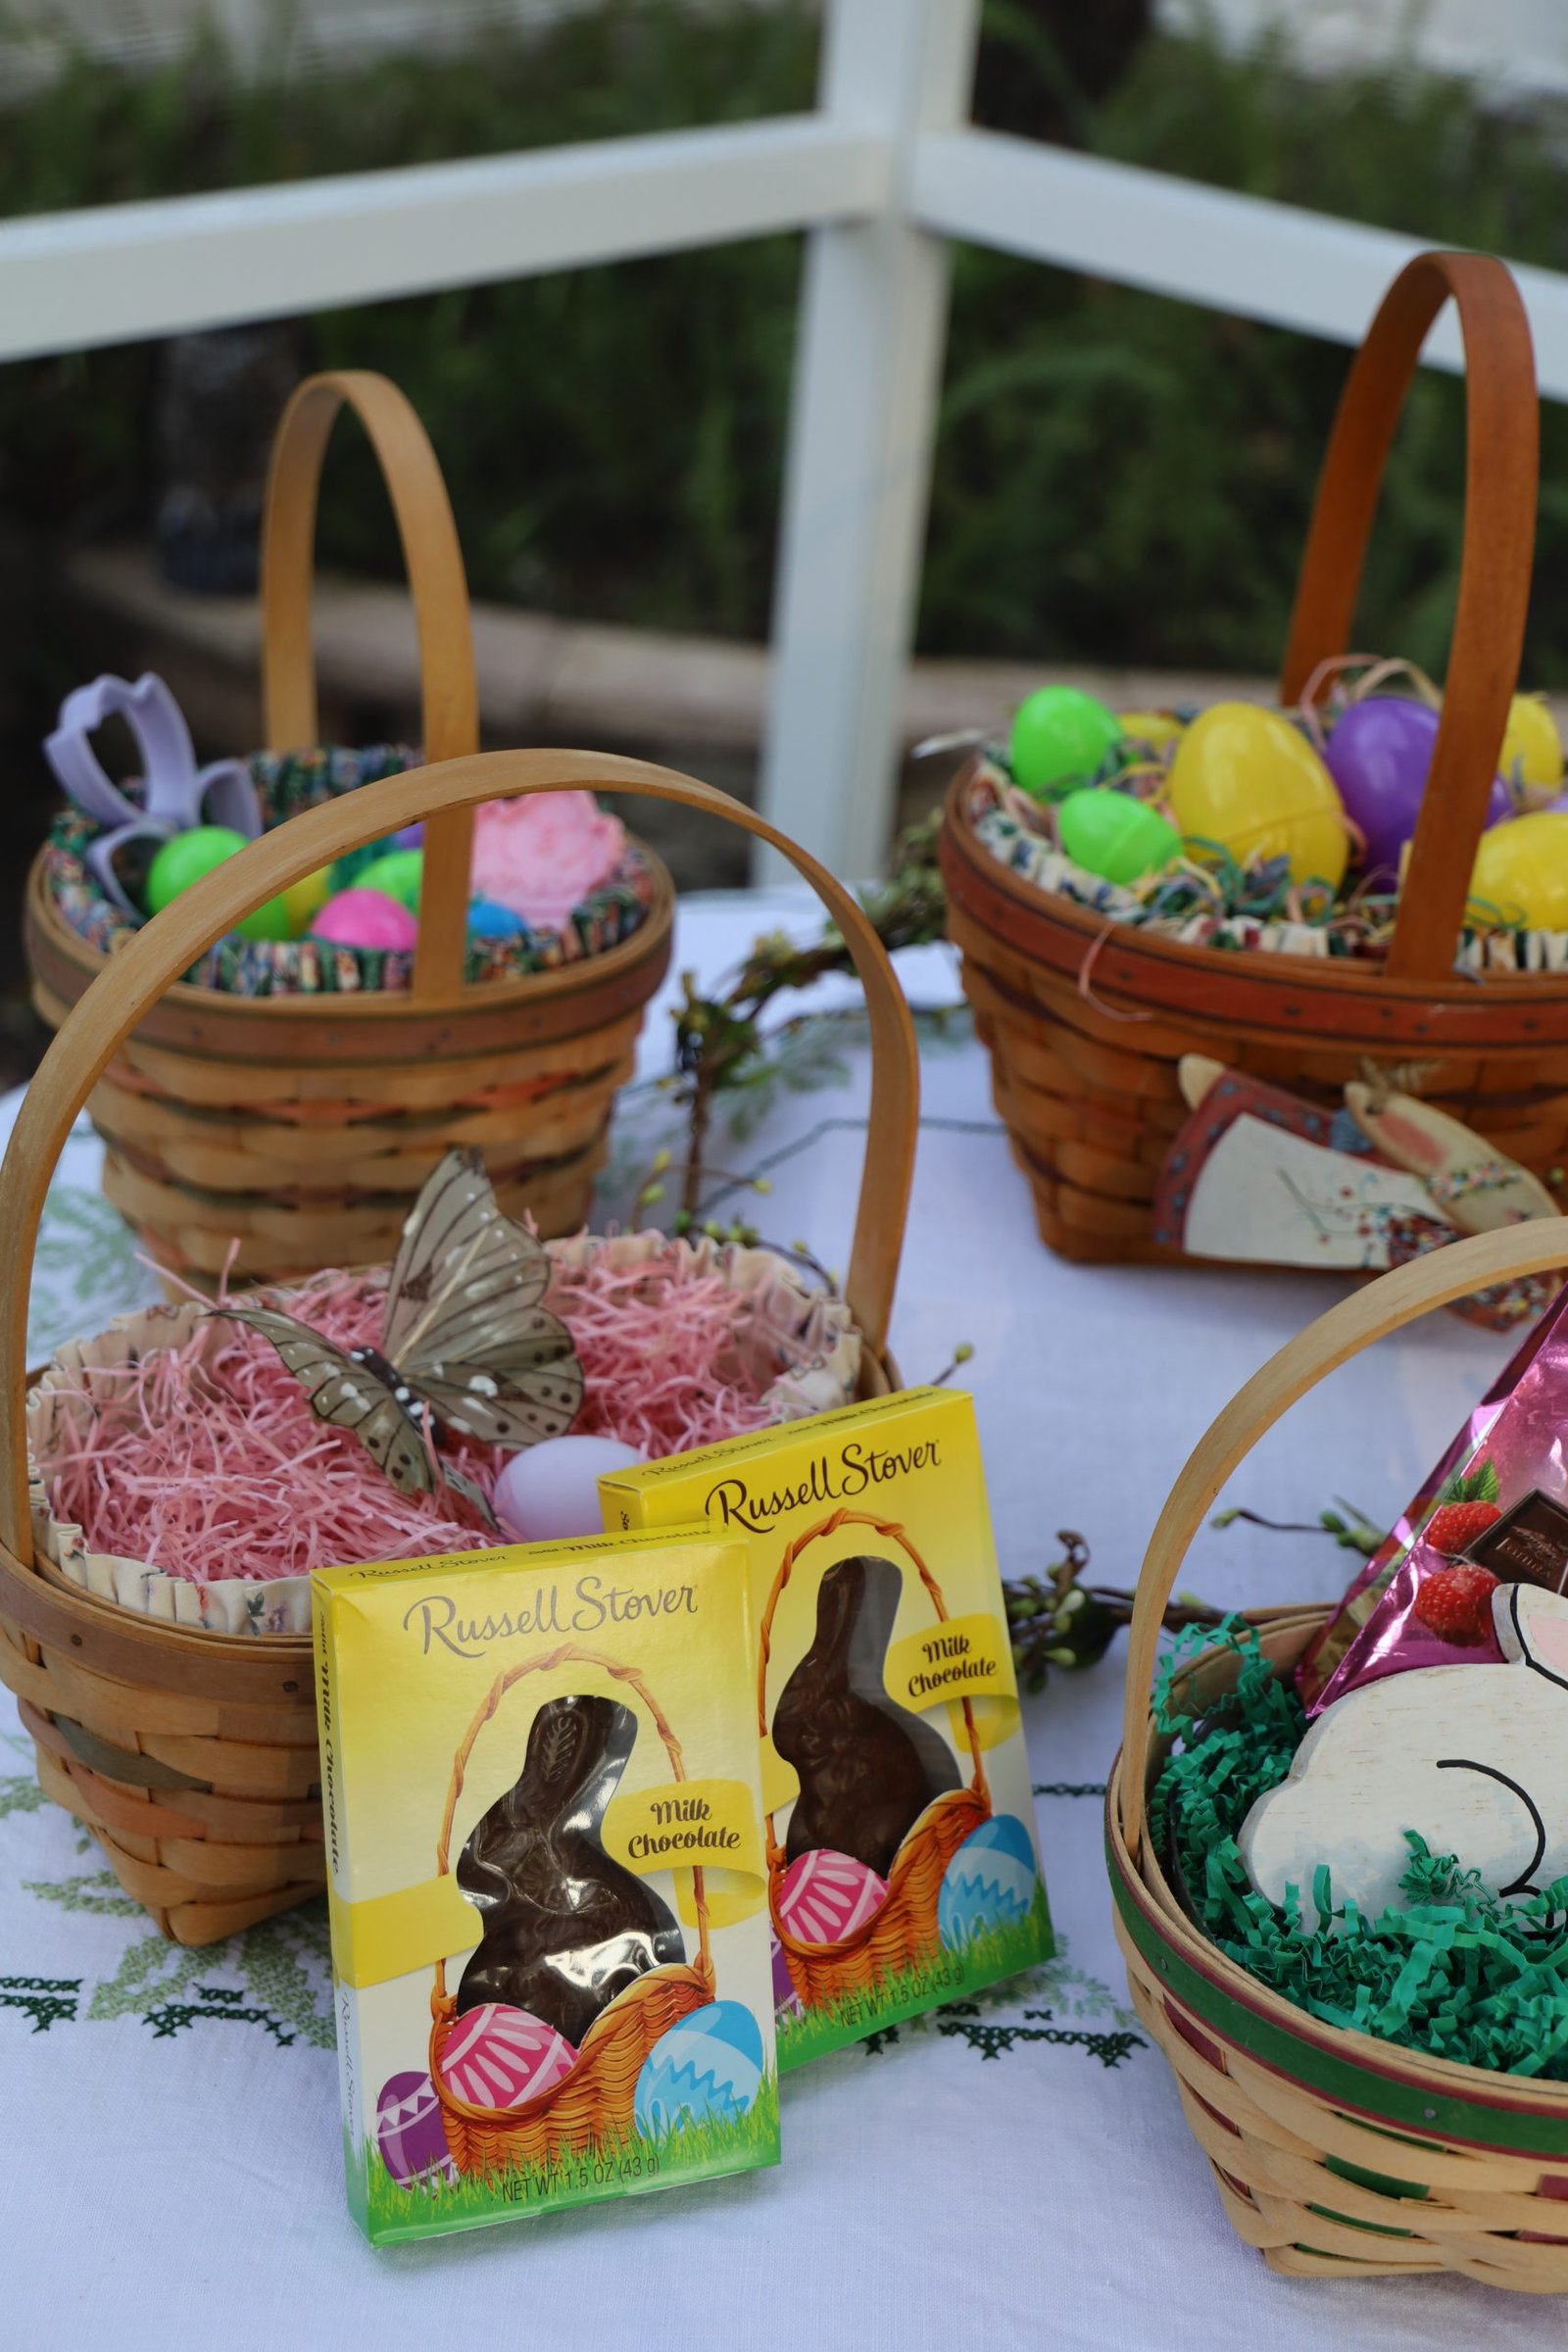

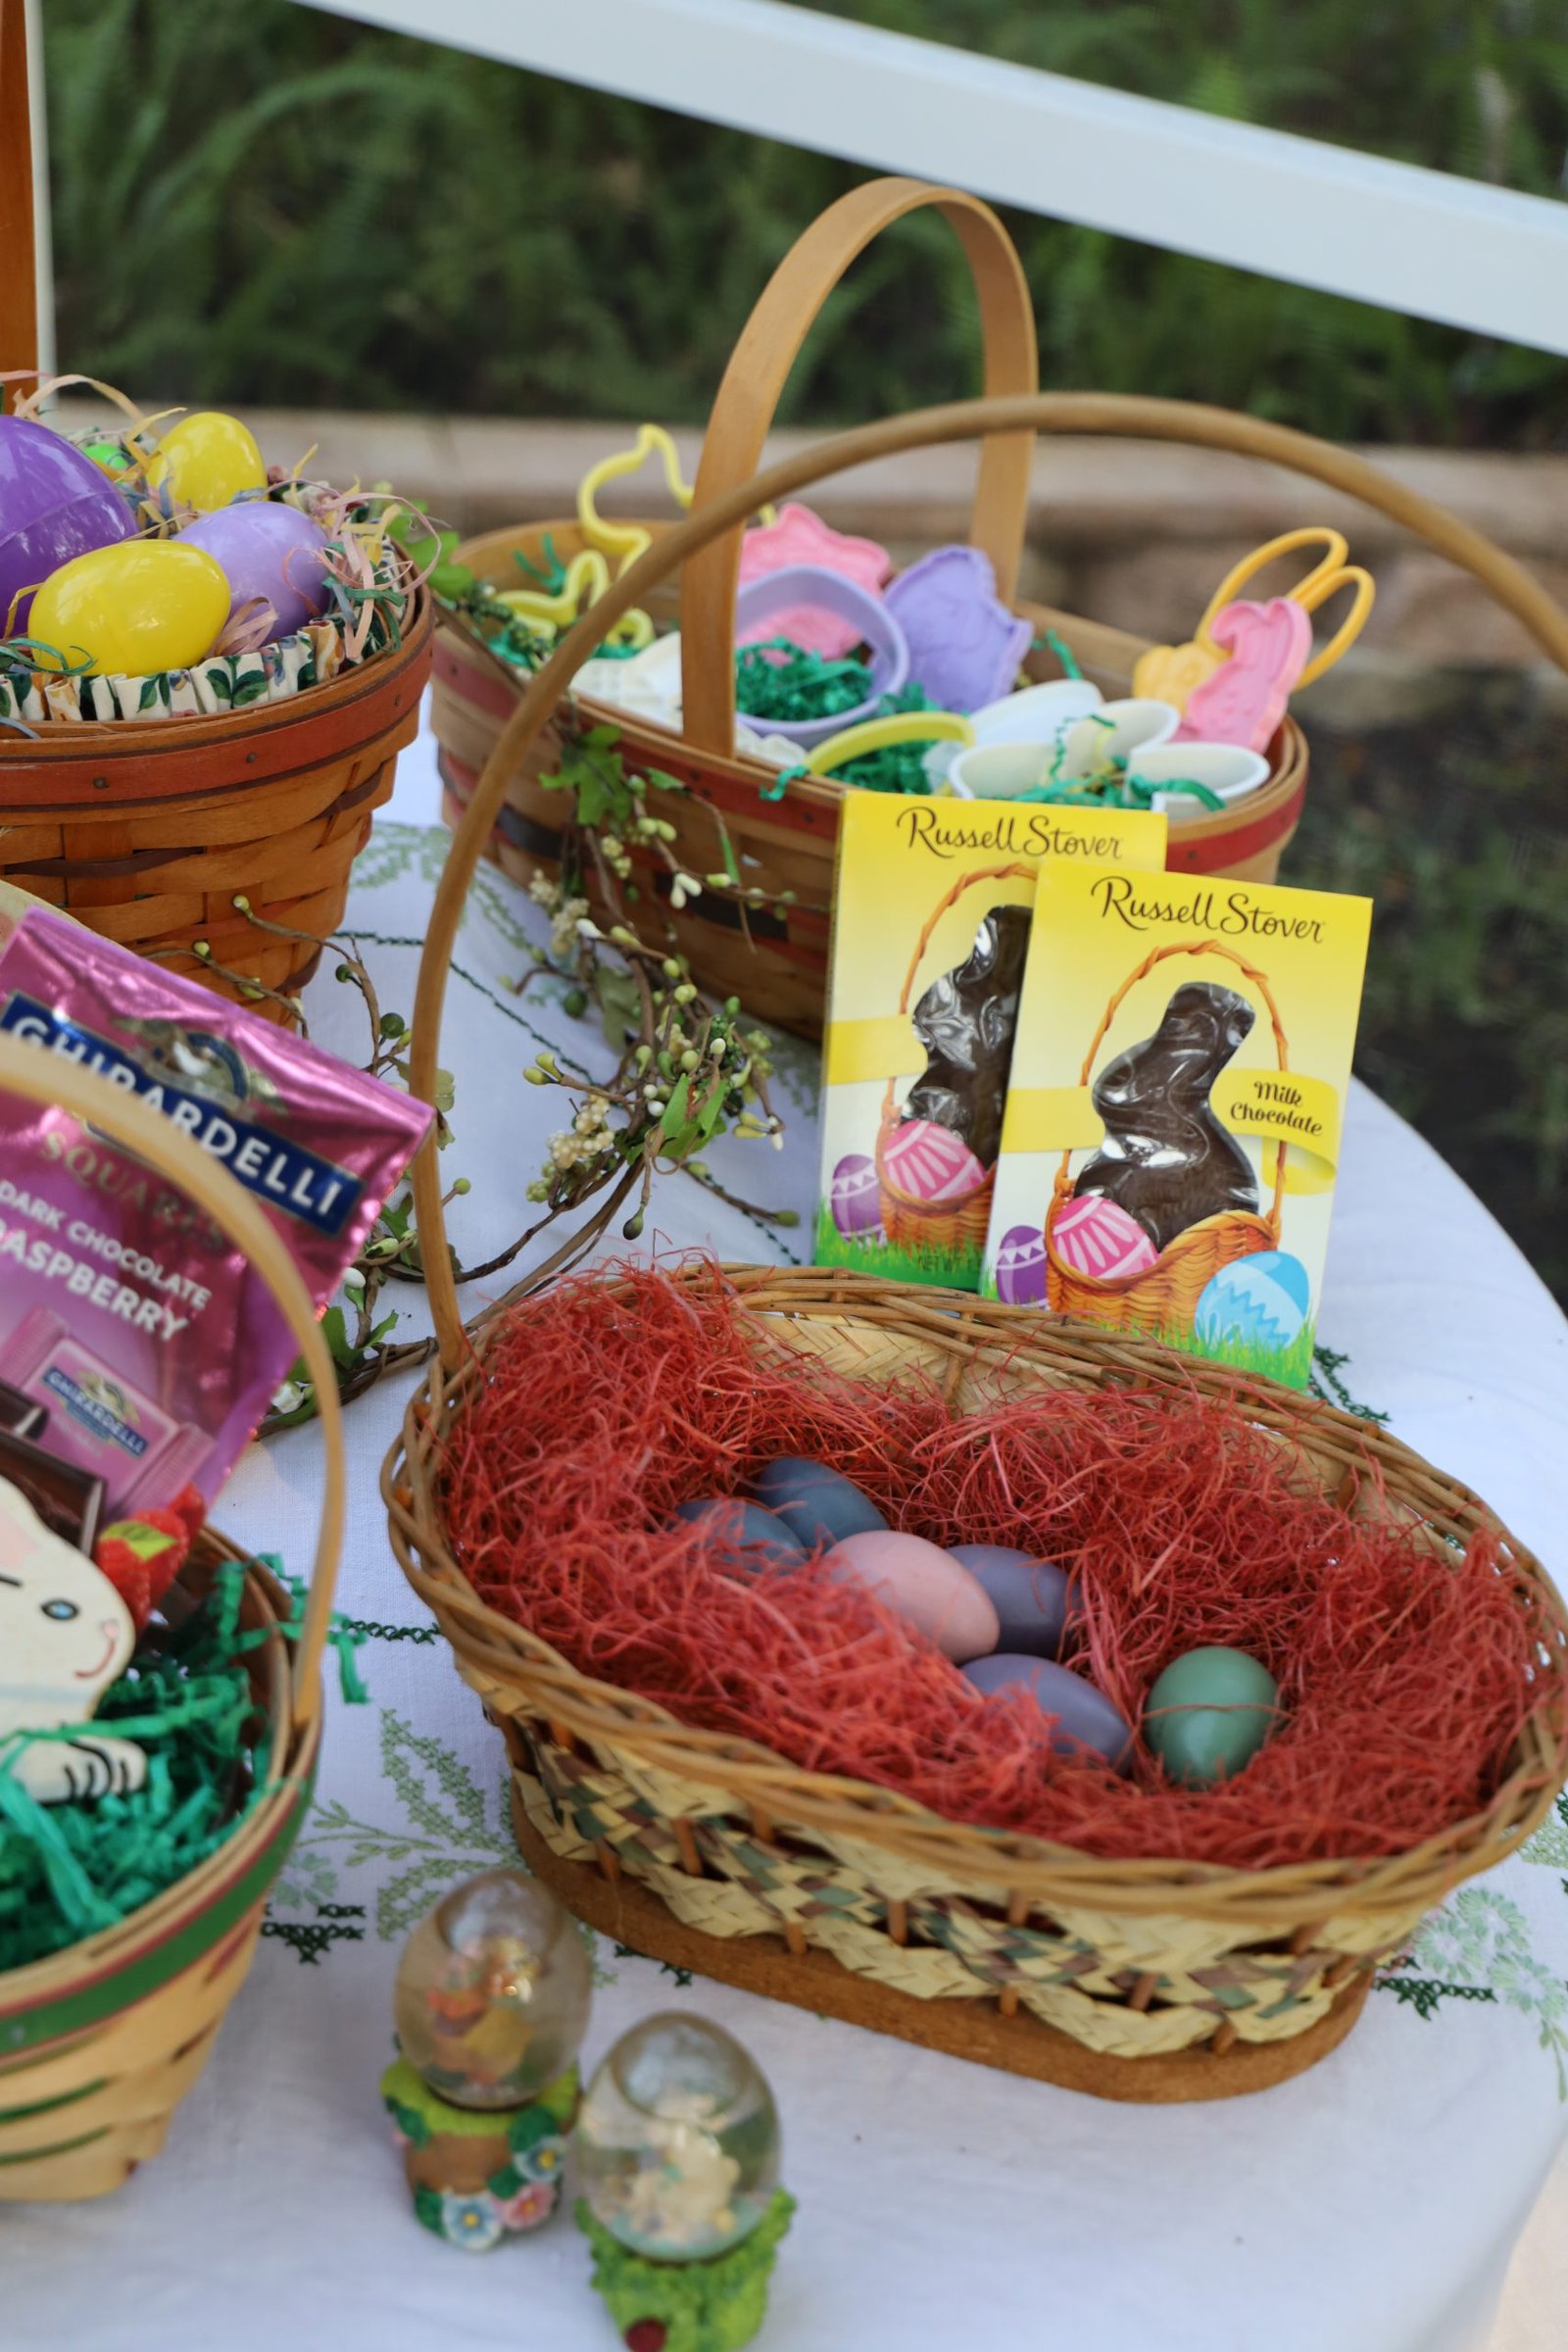
Easter Baskets Filled with Goodies

It wouldn’t be Easter without a Chocolate Bunny, or two.
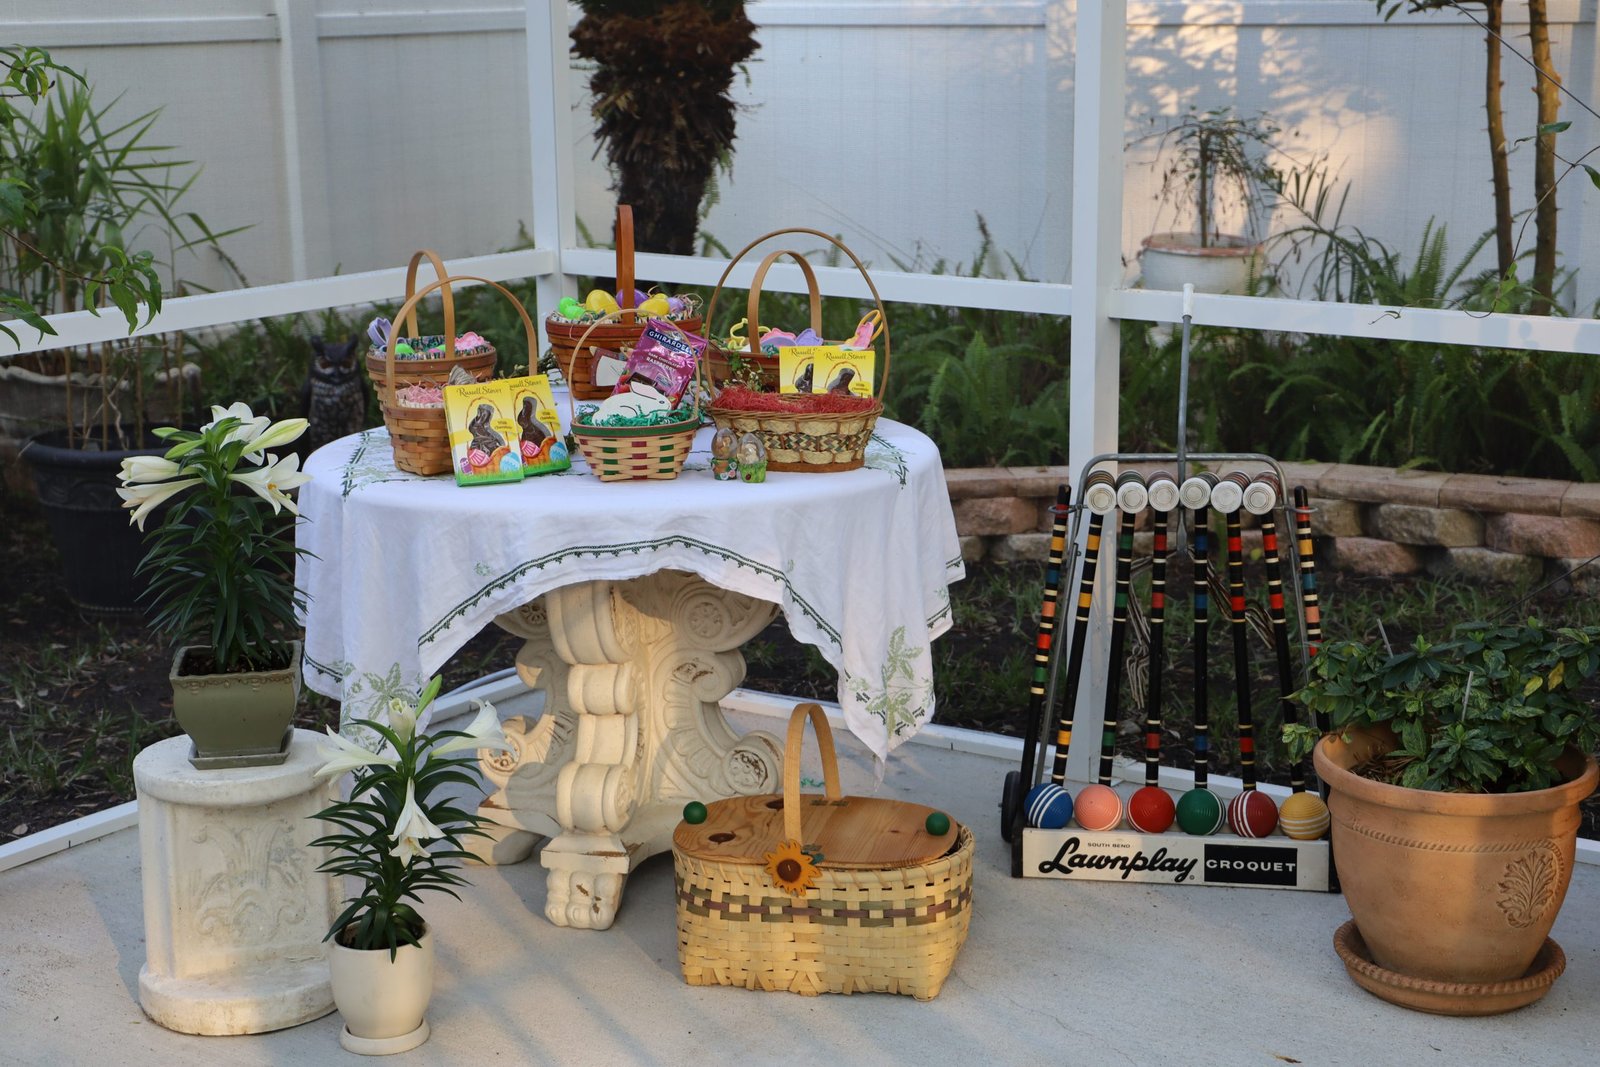
I did manage to get my hands on two Easter Lily plants for this Easter.
Oh, and see the picnic basket in front of the table?
I made that when we were living in Hawaii. It only took me a few hours.
————————————————————

The Dessert Table
(We don’t have time to make everything from scratch.)

3 small pies that we bought from the grocery store and had delivered. 1 peach and 2 apple. I thought they looked plain so I opened our stash of Easter candies and doctored them up a bit.
China plate, Silverware, Magnolia Tree wreath, old Chandelier, Lacey Basket Liner, and a hand drawn in pastels picture by our daughter Veronica that I wanted to include here.
————————————————————–
Into the Kitchen
RECIPES START HERE!
Getting the Lanai Ready for Easter
———————————————————–
Making Southern Iced Tea
(We just call it Ice Tea)
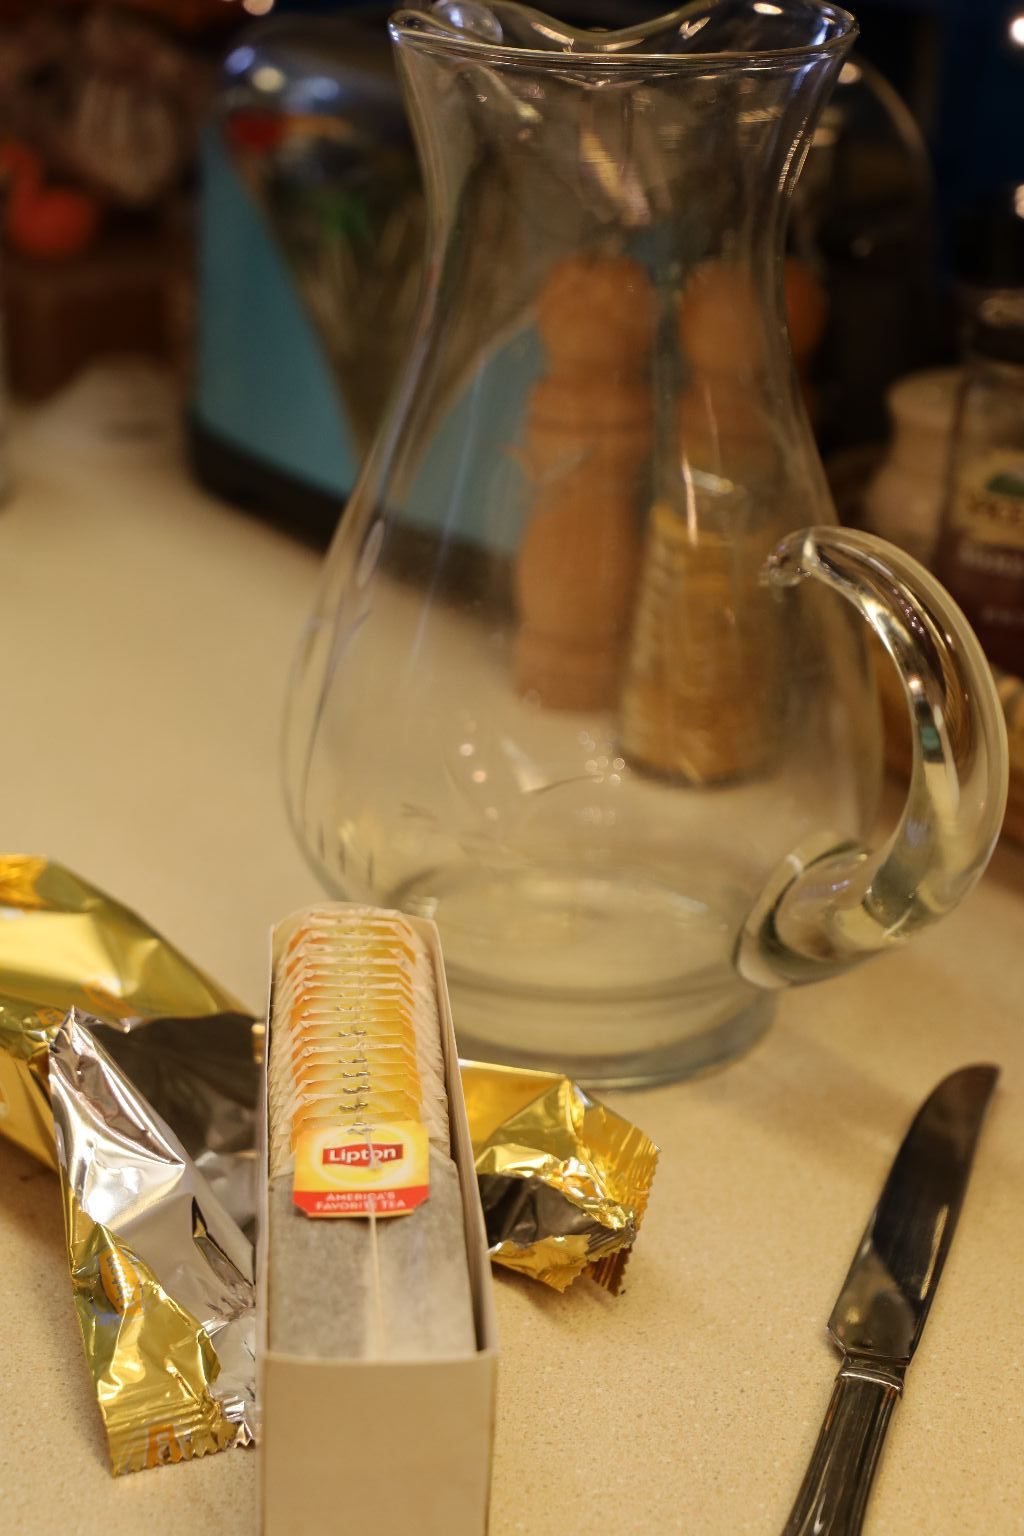
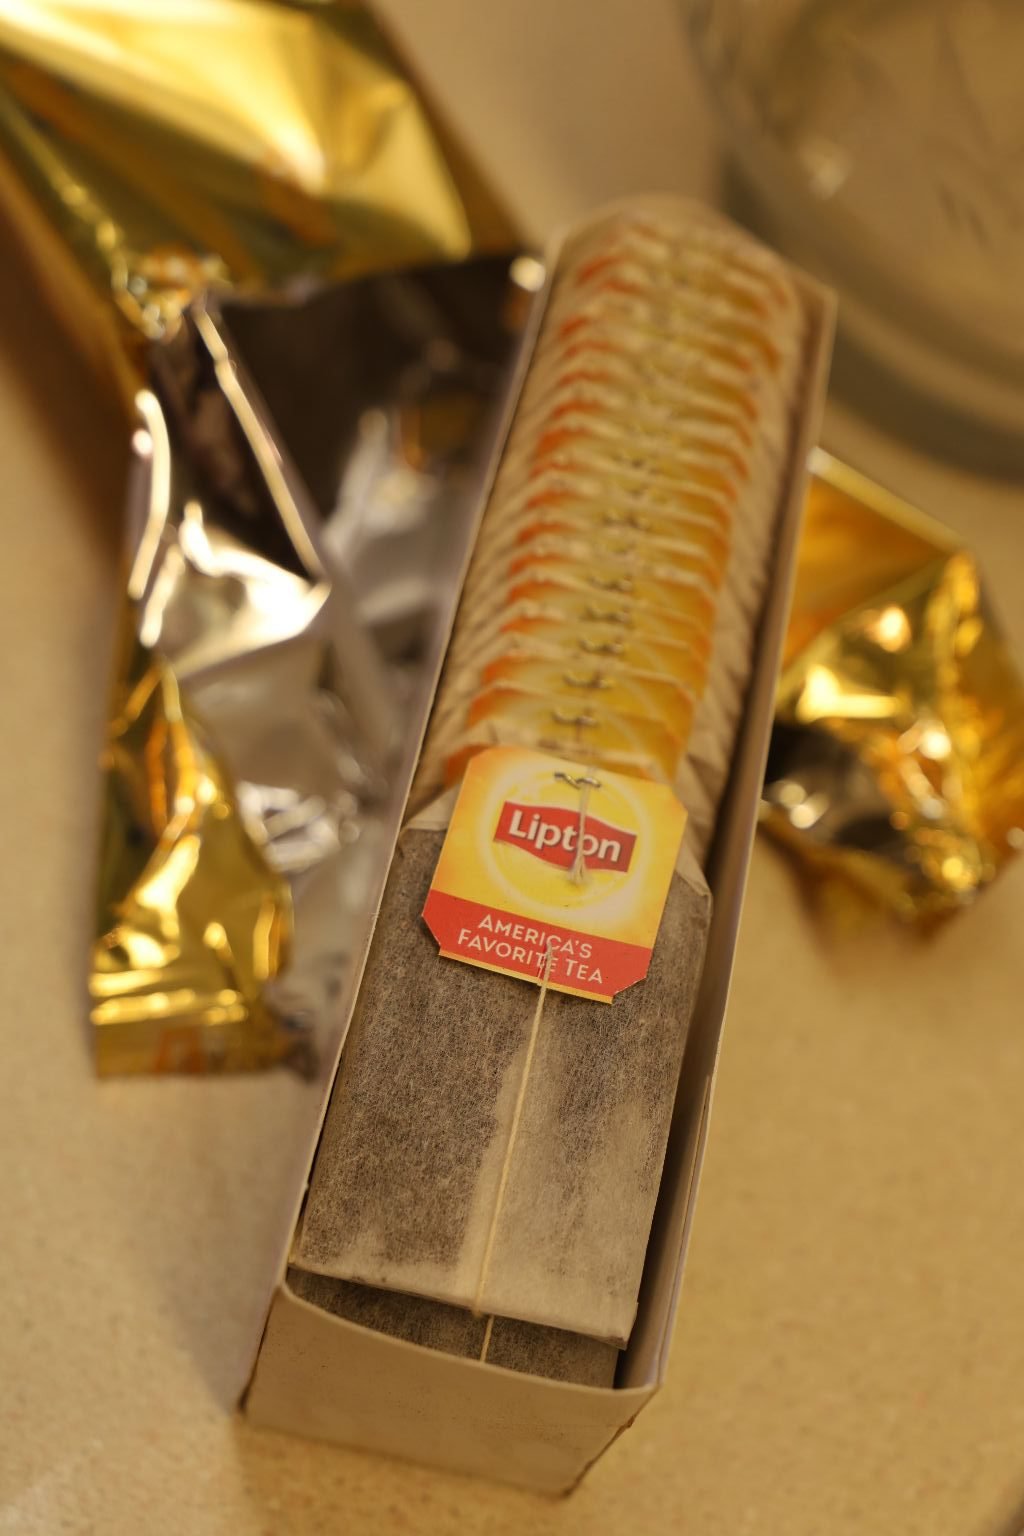
Lipton Tea Bags
(This to the south is GOLD, but to the rest of the world it’s just tea dust.)
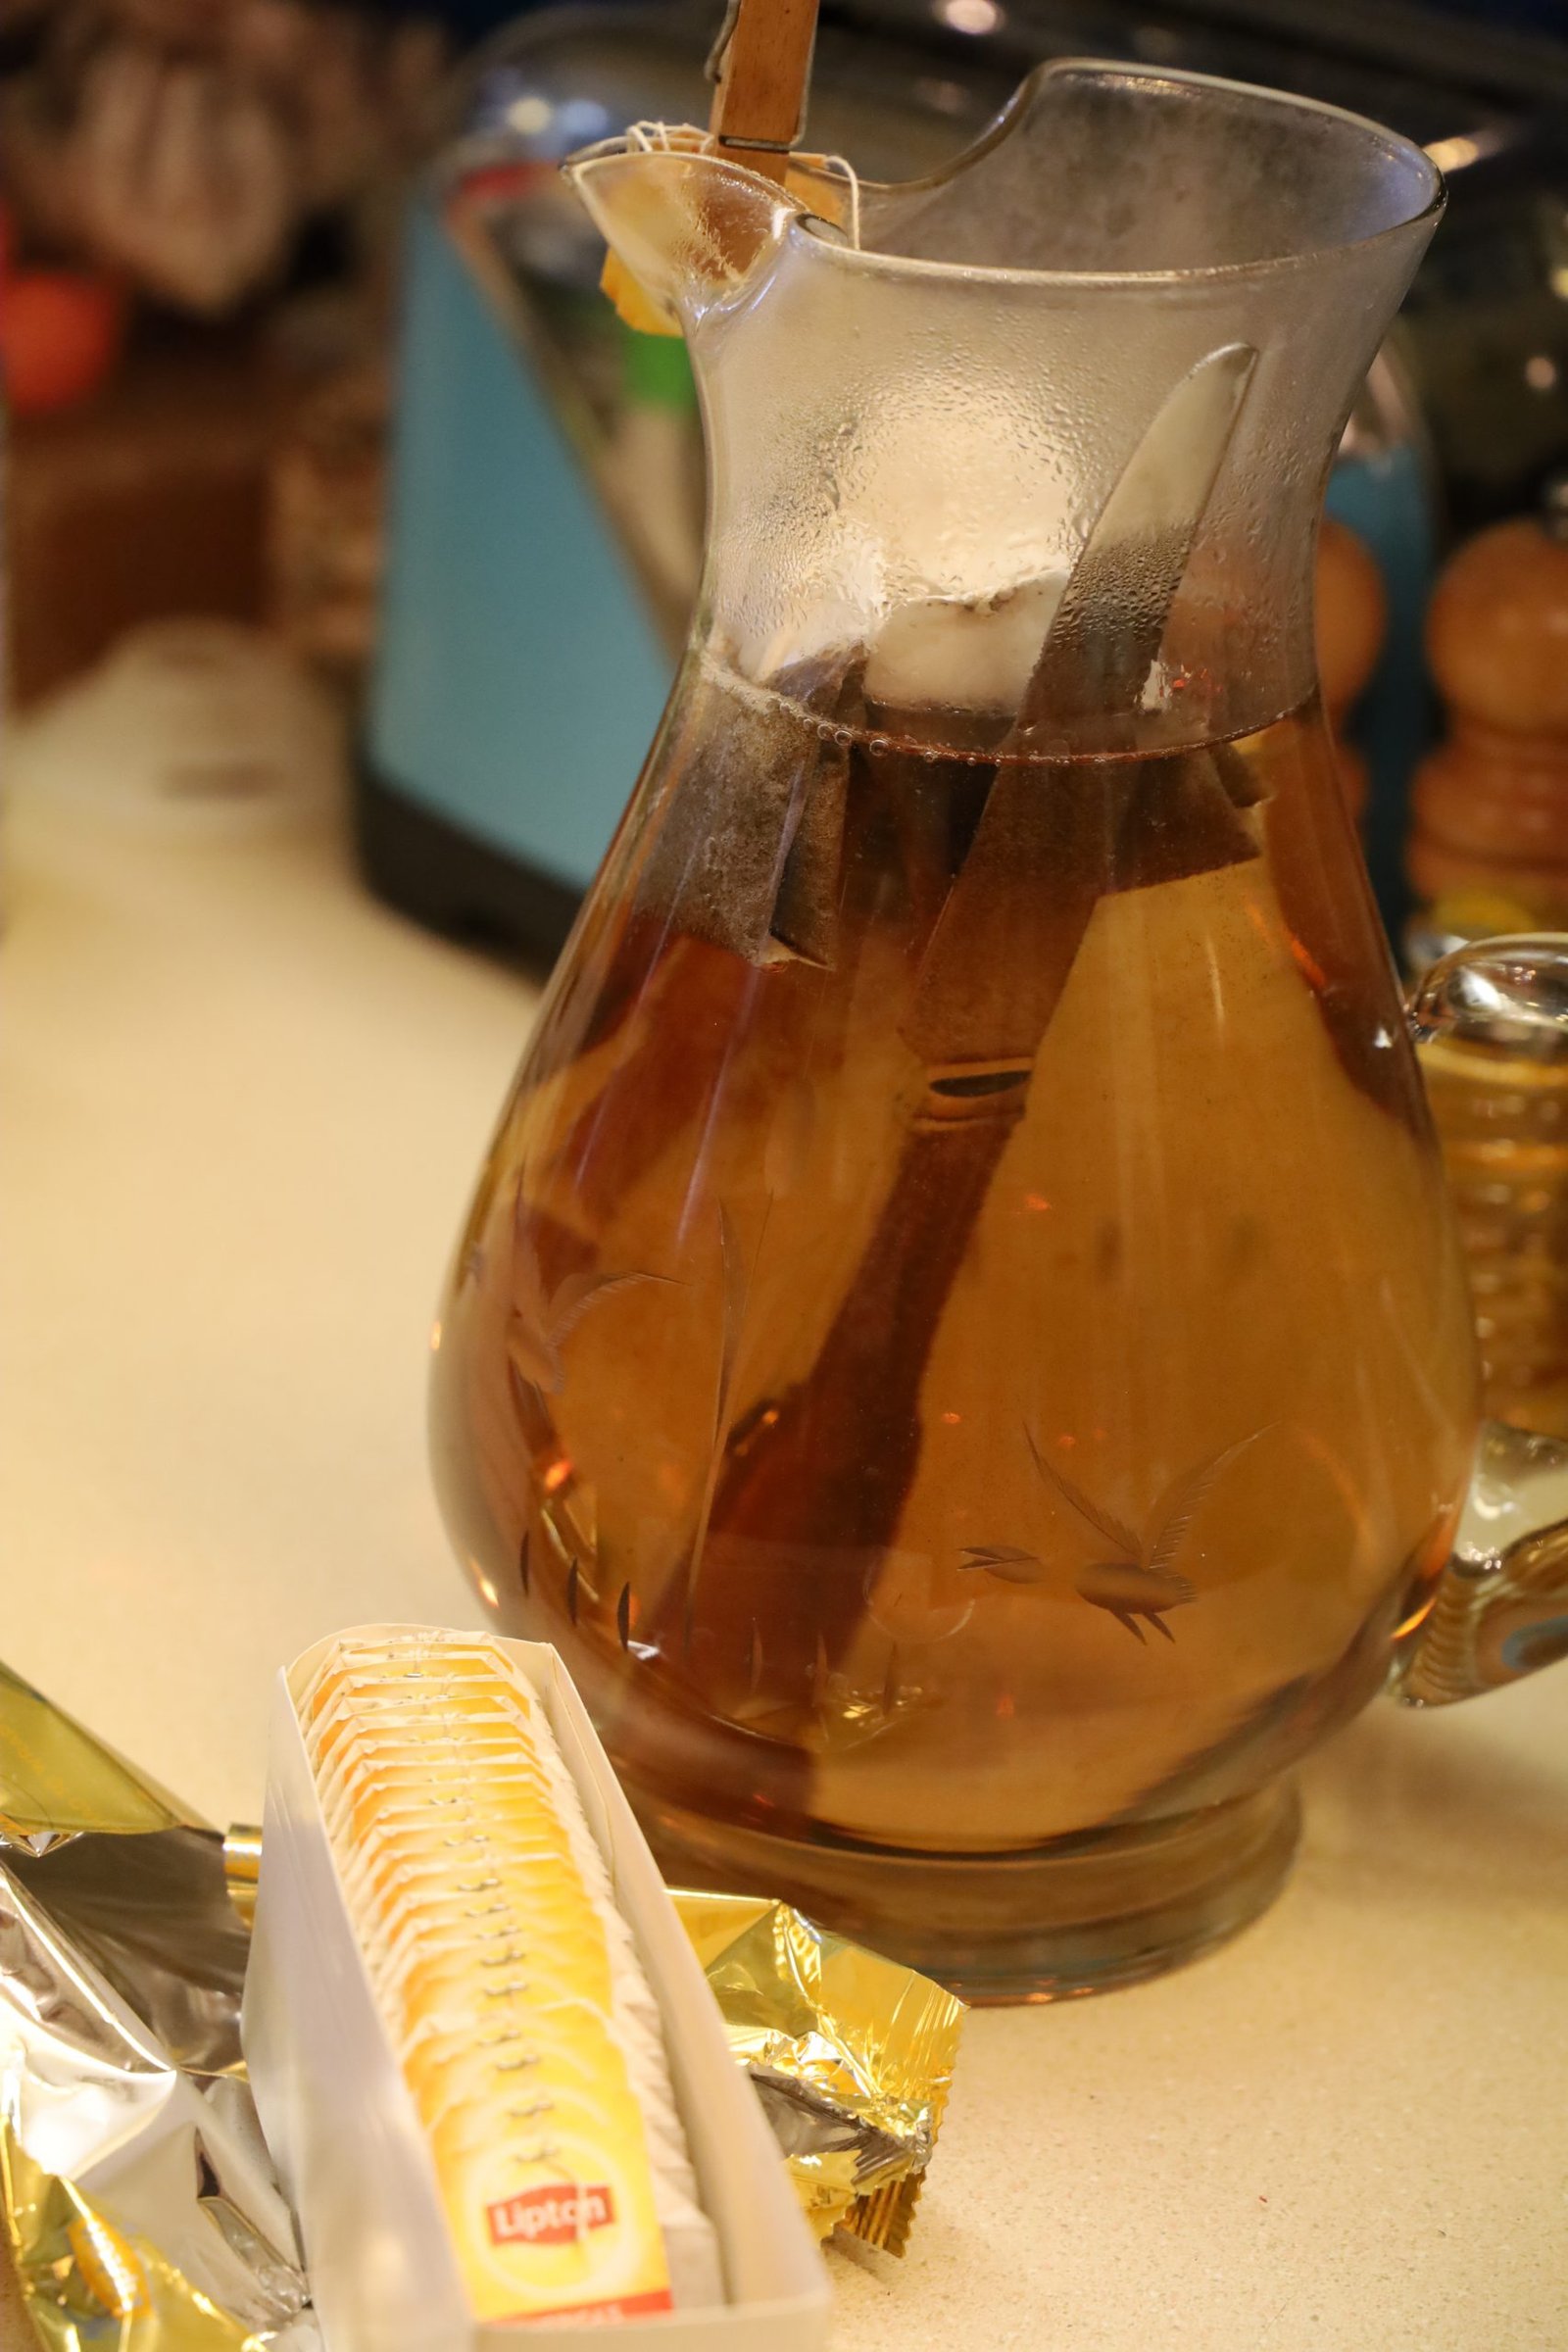
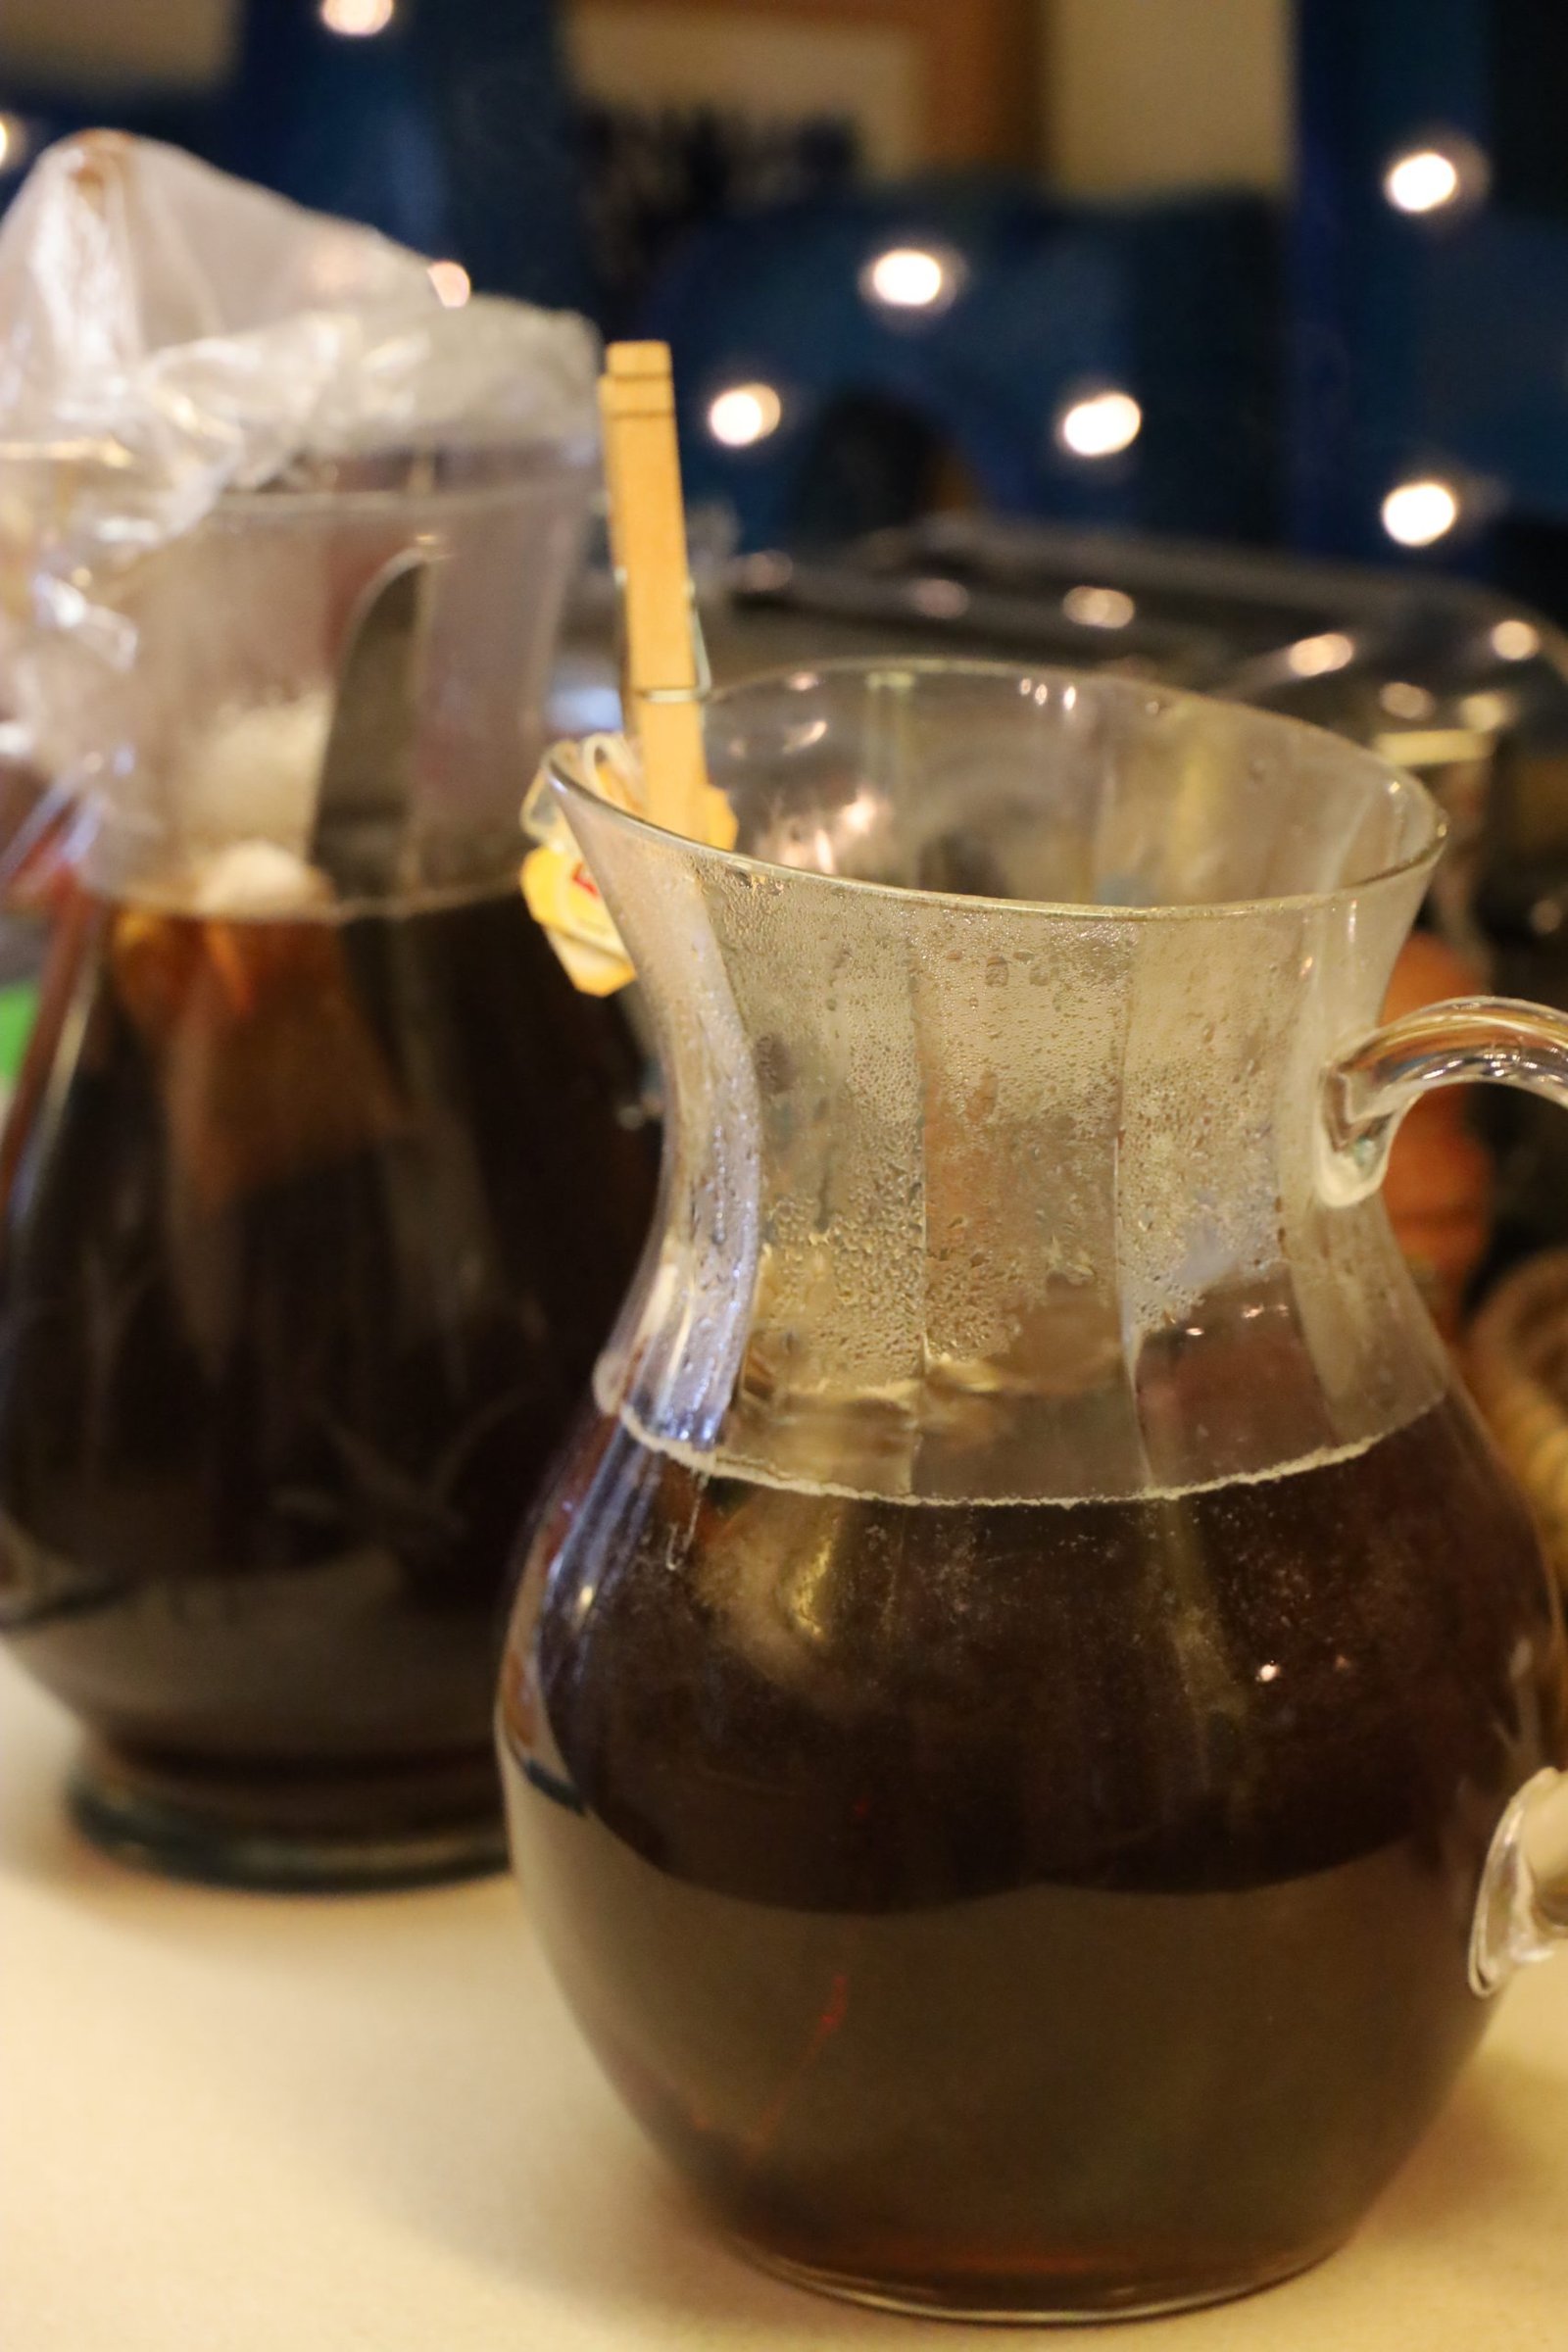
It was always Lipton or Nestle. Those were the brands of tea that everyone would buy. There were always two pitchers, one for Sweet Tea and one for Unsweetened Tea. My grandmother would boil water on the stove top and then pour it piping hot into a glass pitcher with tea bags. To prevent the glass pitcher from breaking she would insert a knife into the pitcher to prevent that from happening. Don’t ask me how it works, it just does.
Once the tea has cooled then into the refrigerator the pitchers go to get really cold. Right before the tea is served ice cubes are usually added to the tea. With sugar added to only one pitcher for those that like it sweet.
———————————————————–
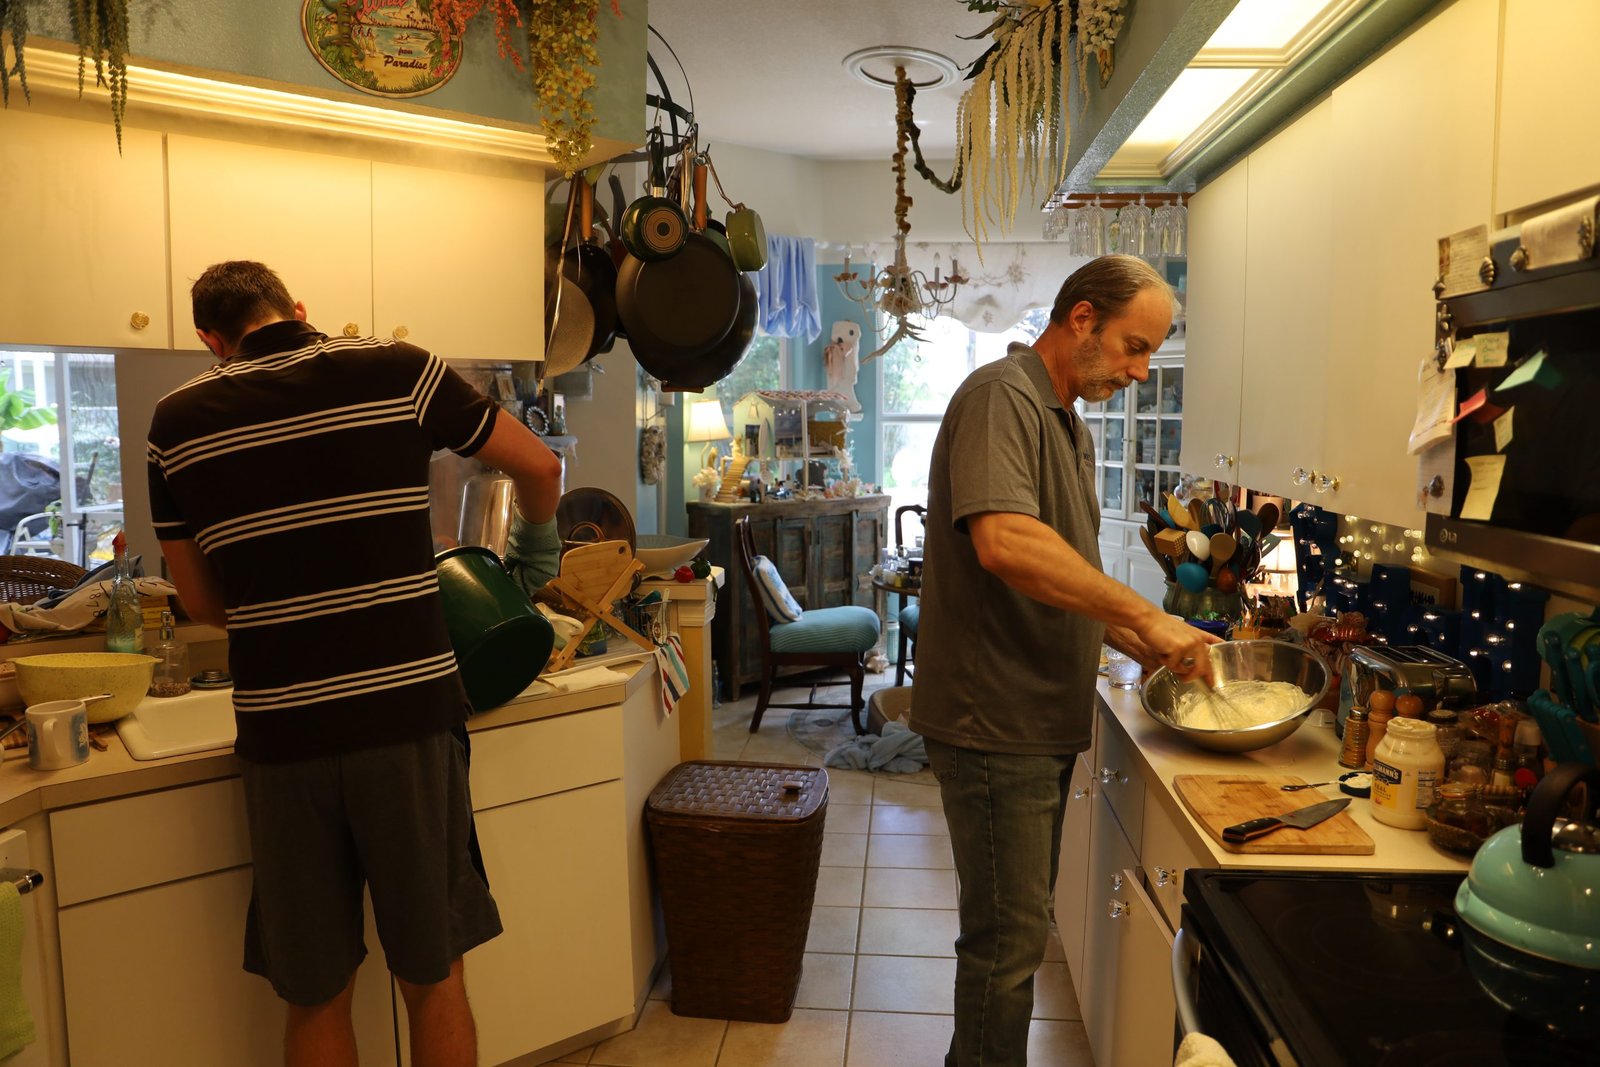
Gordon and Brodie in the Kitchen Working Their Magic

Gordon did grow a beard for lockdown.
——————————————————-

Spooky and Sparky love being in the kitchen with us when we are cooking.
———————————————————-
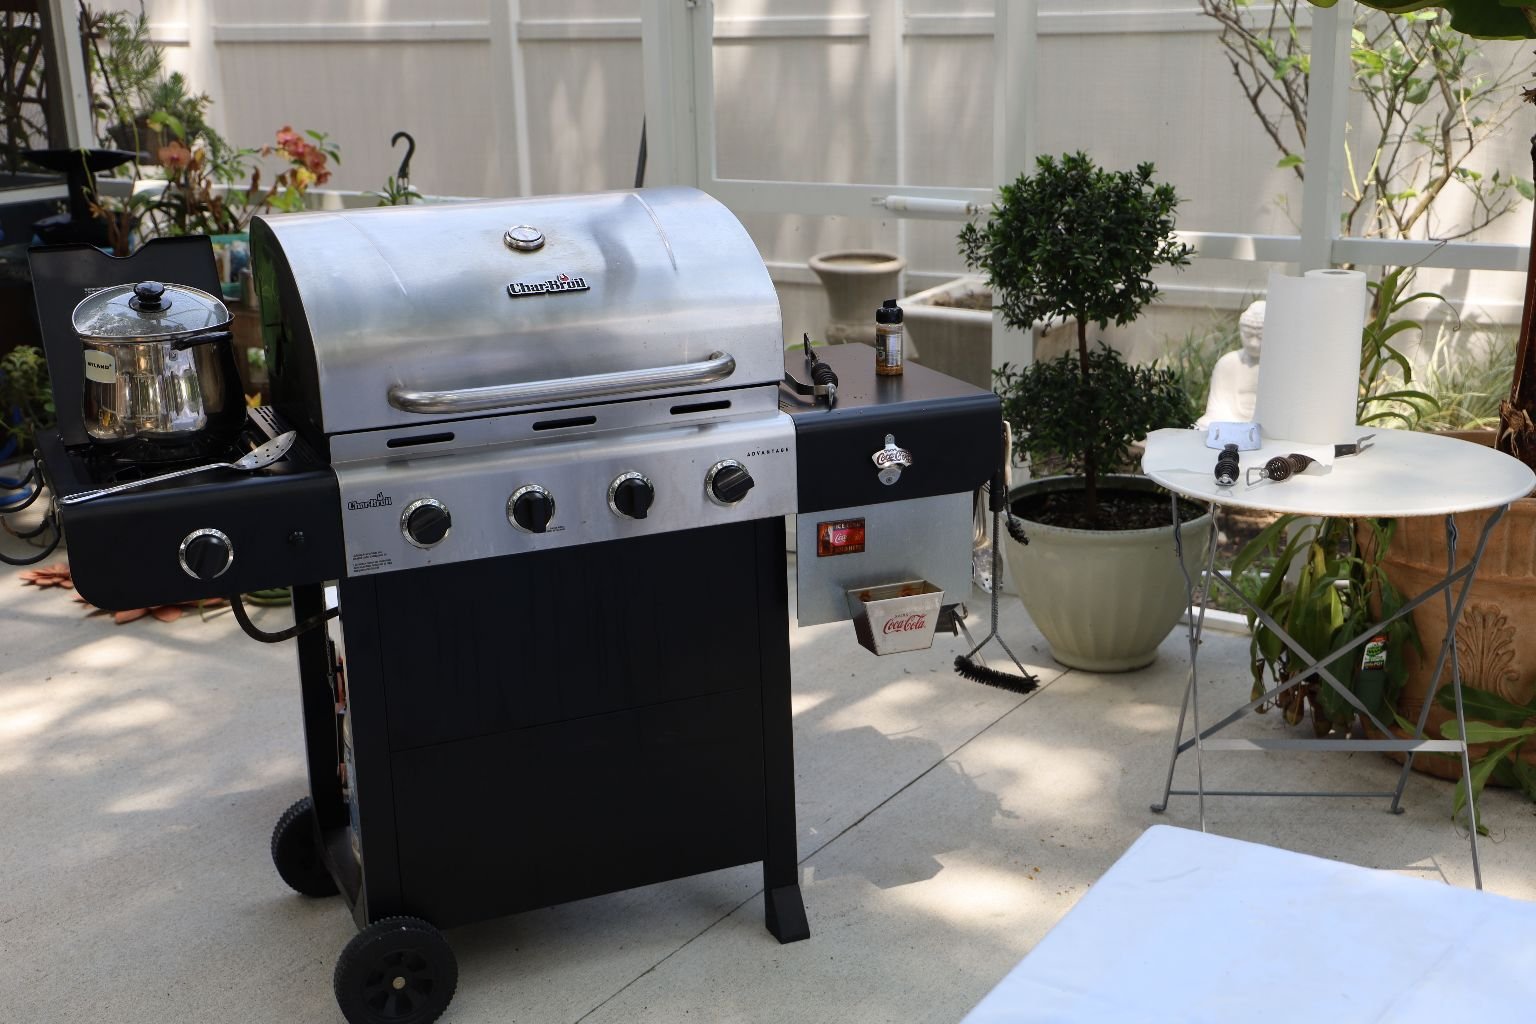
Gordon’s Bone In Pork Roast
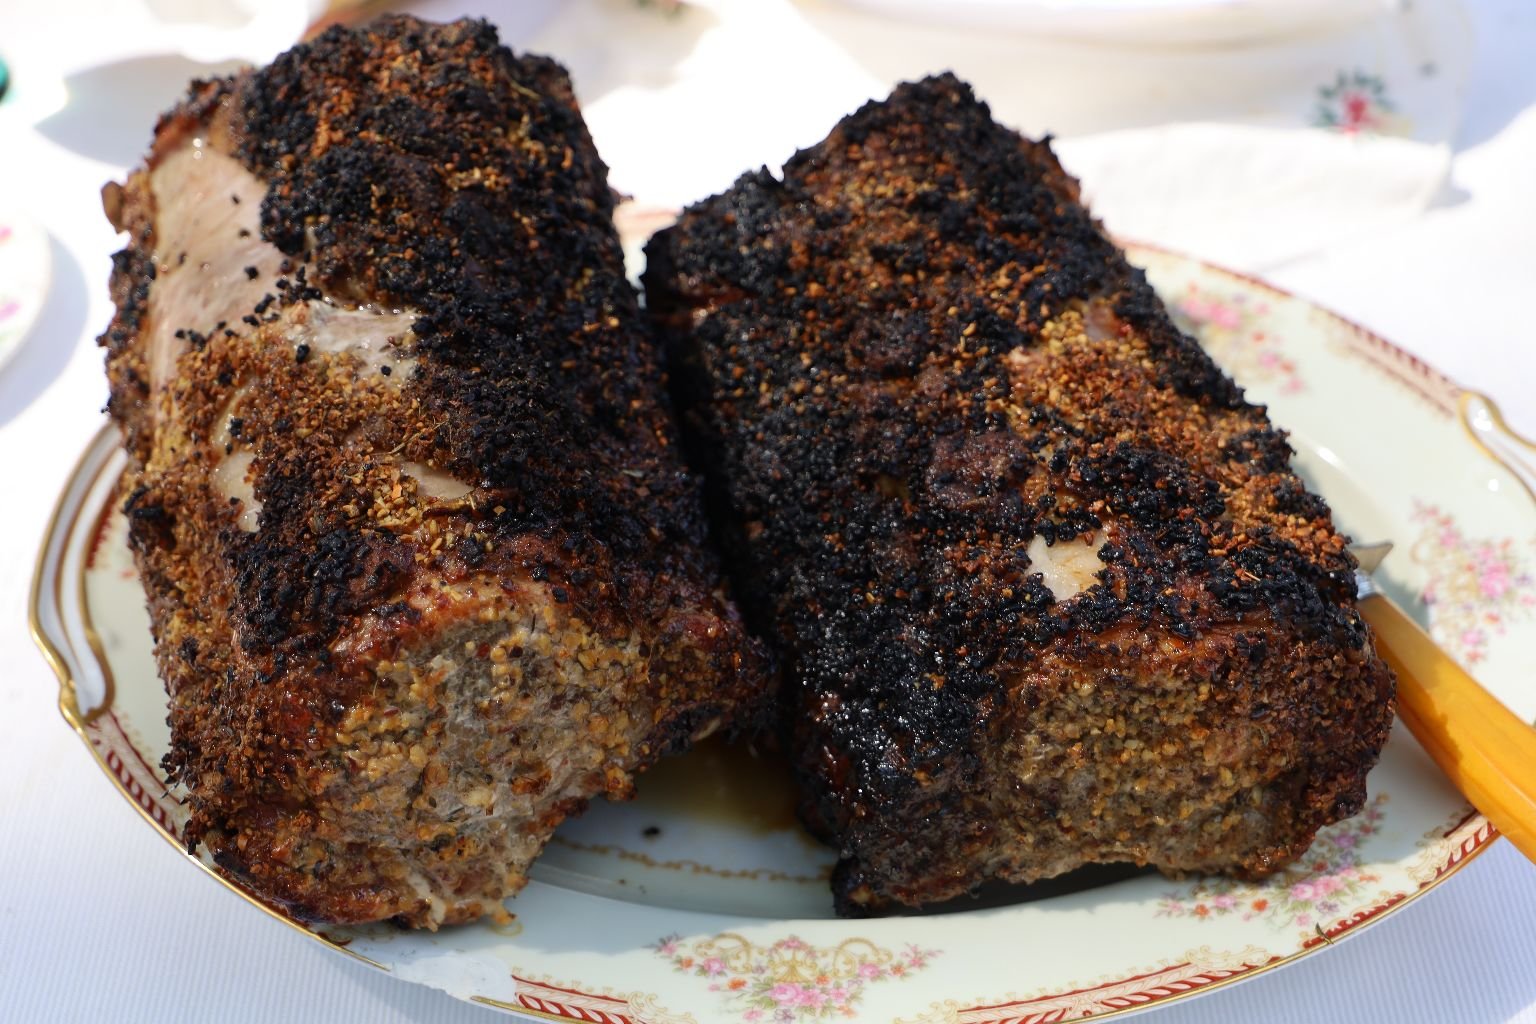
We Made TWO!

——————————————————————-
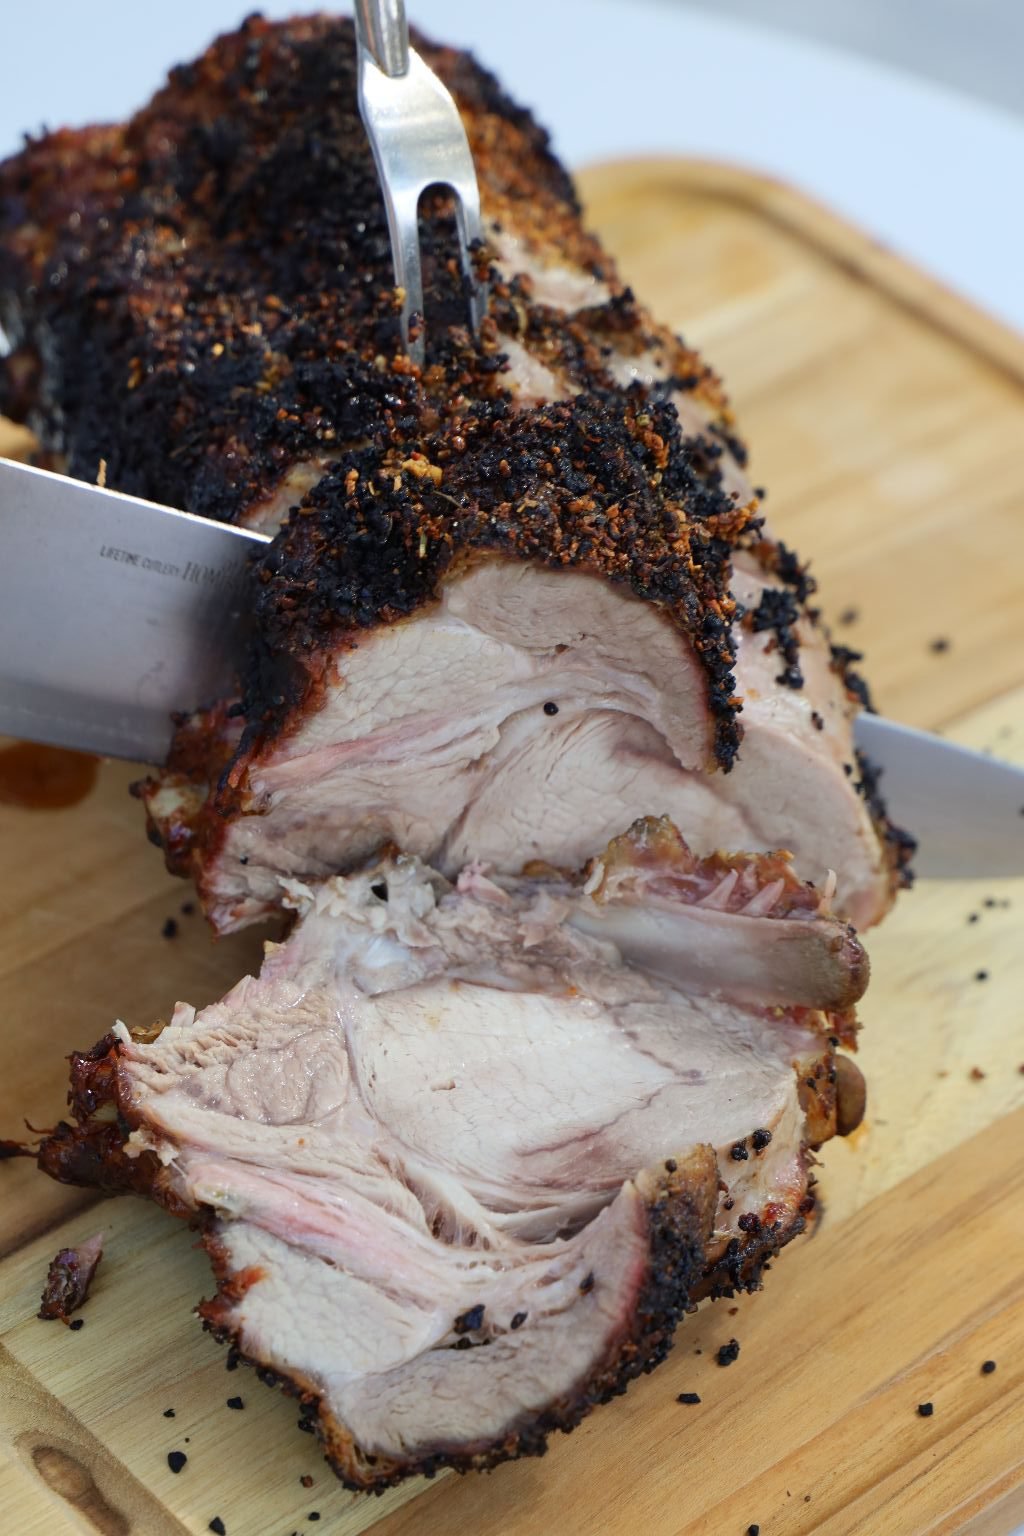
——————————————————————-


Ingredients:
2x ~6lb. Bone in Pork Roasts
1 1/2 Cups (Weber’s) Roasted Garlic and Herb seasoning
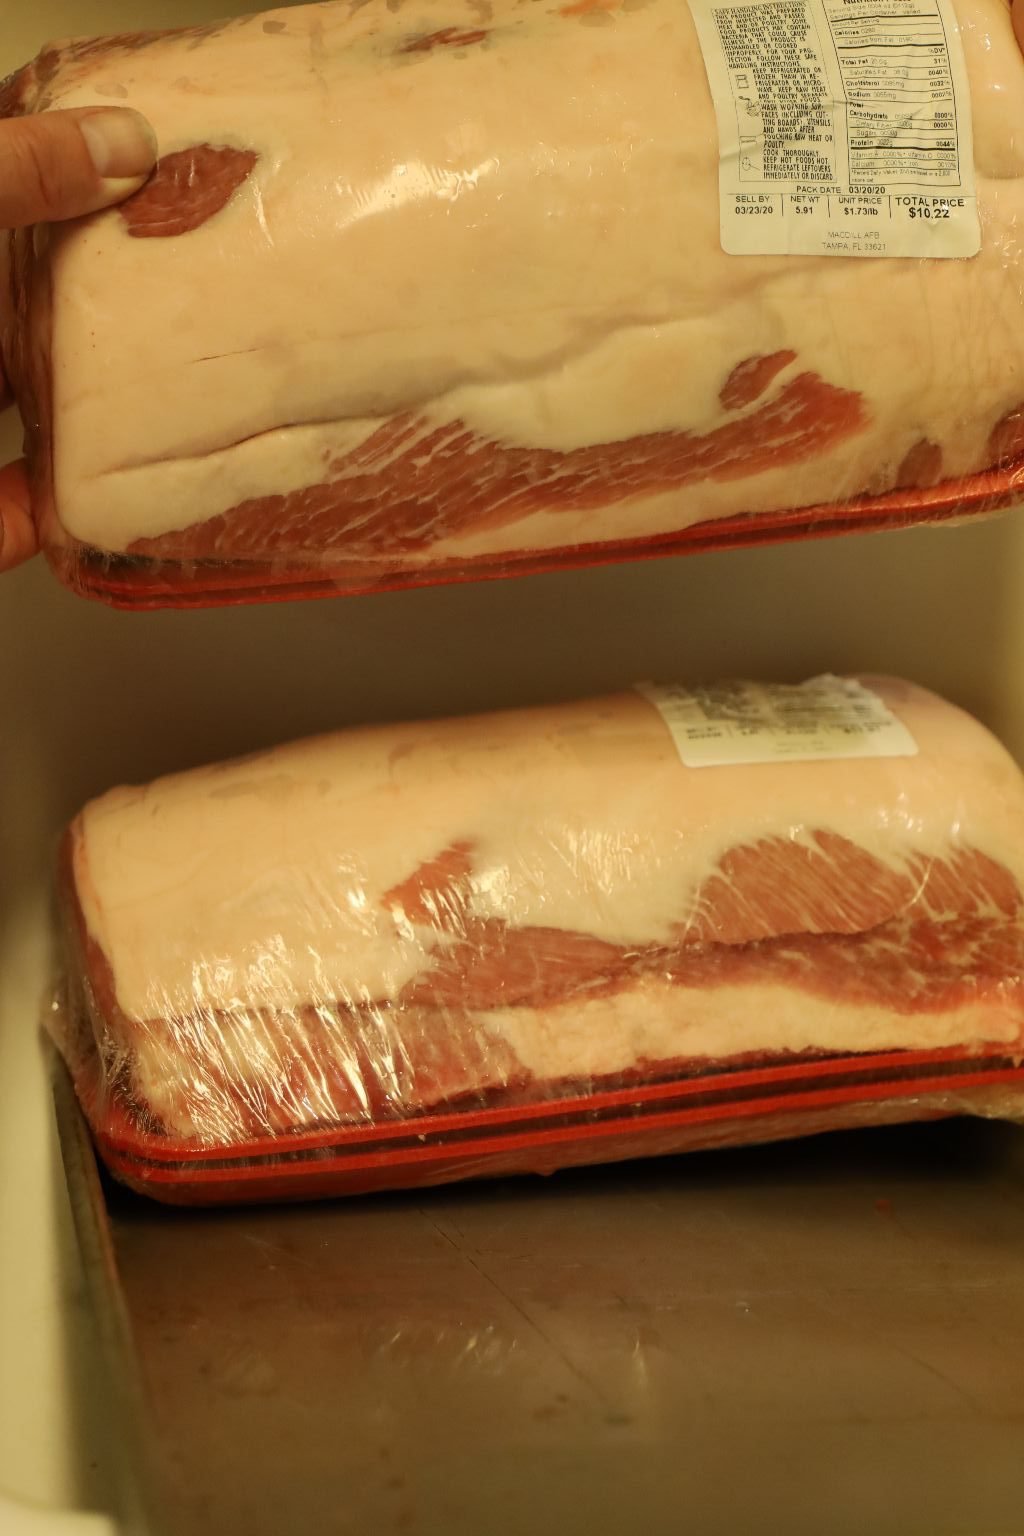
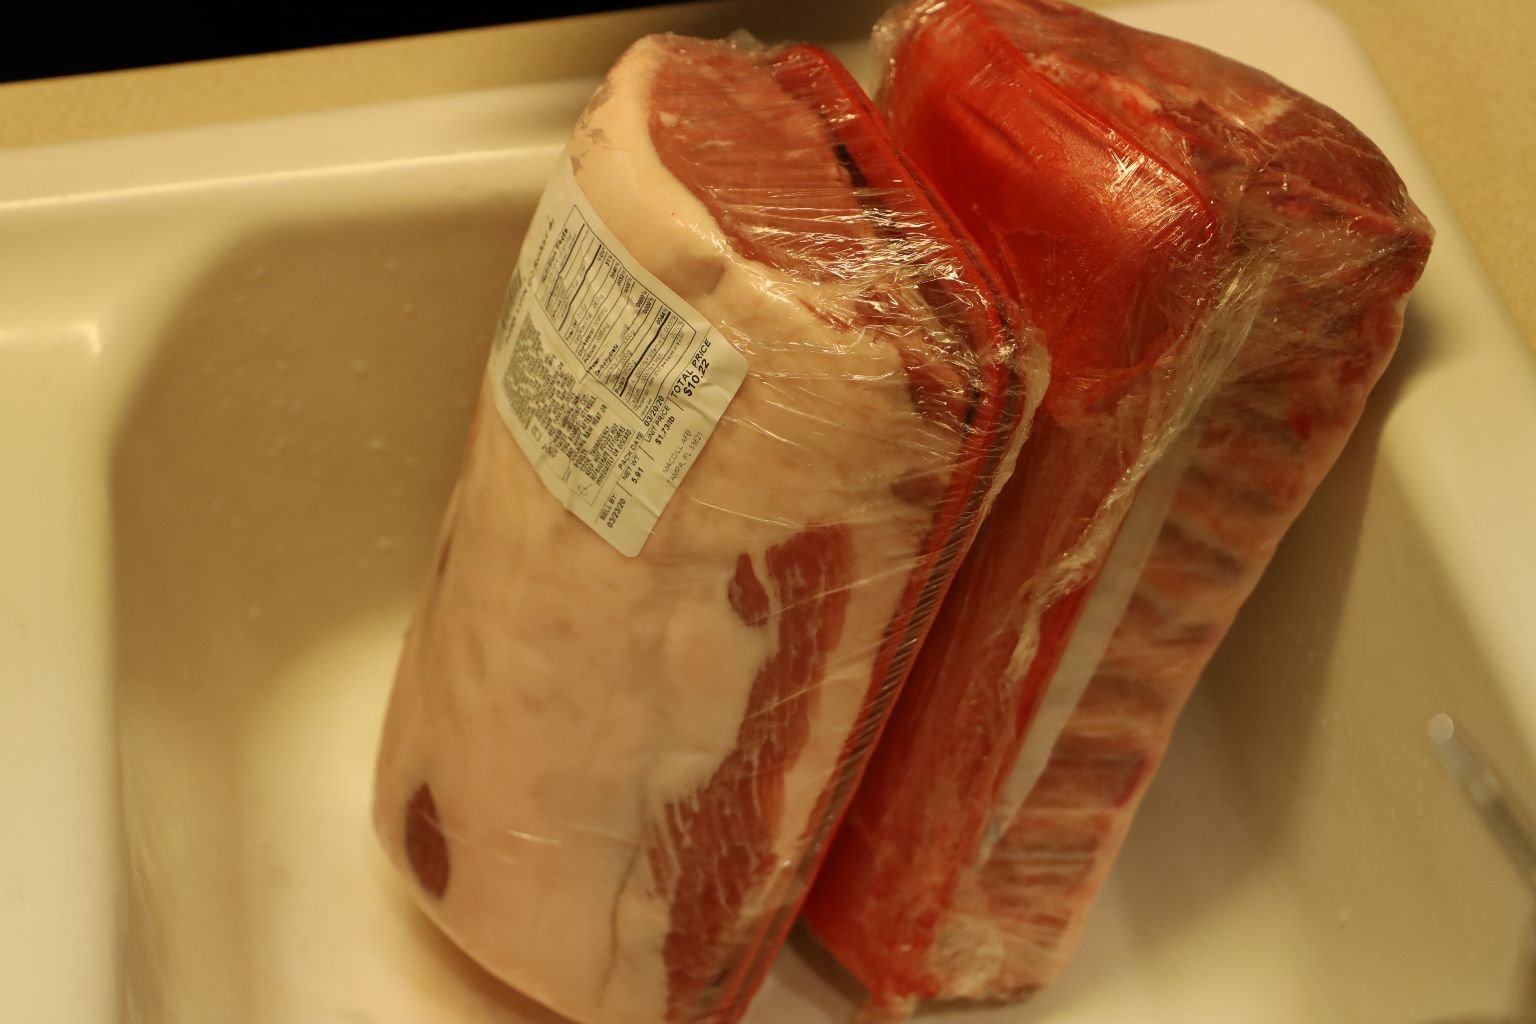
Let the pork roasts come to room temperature.
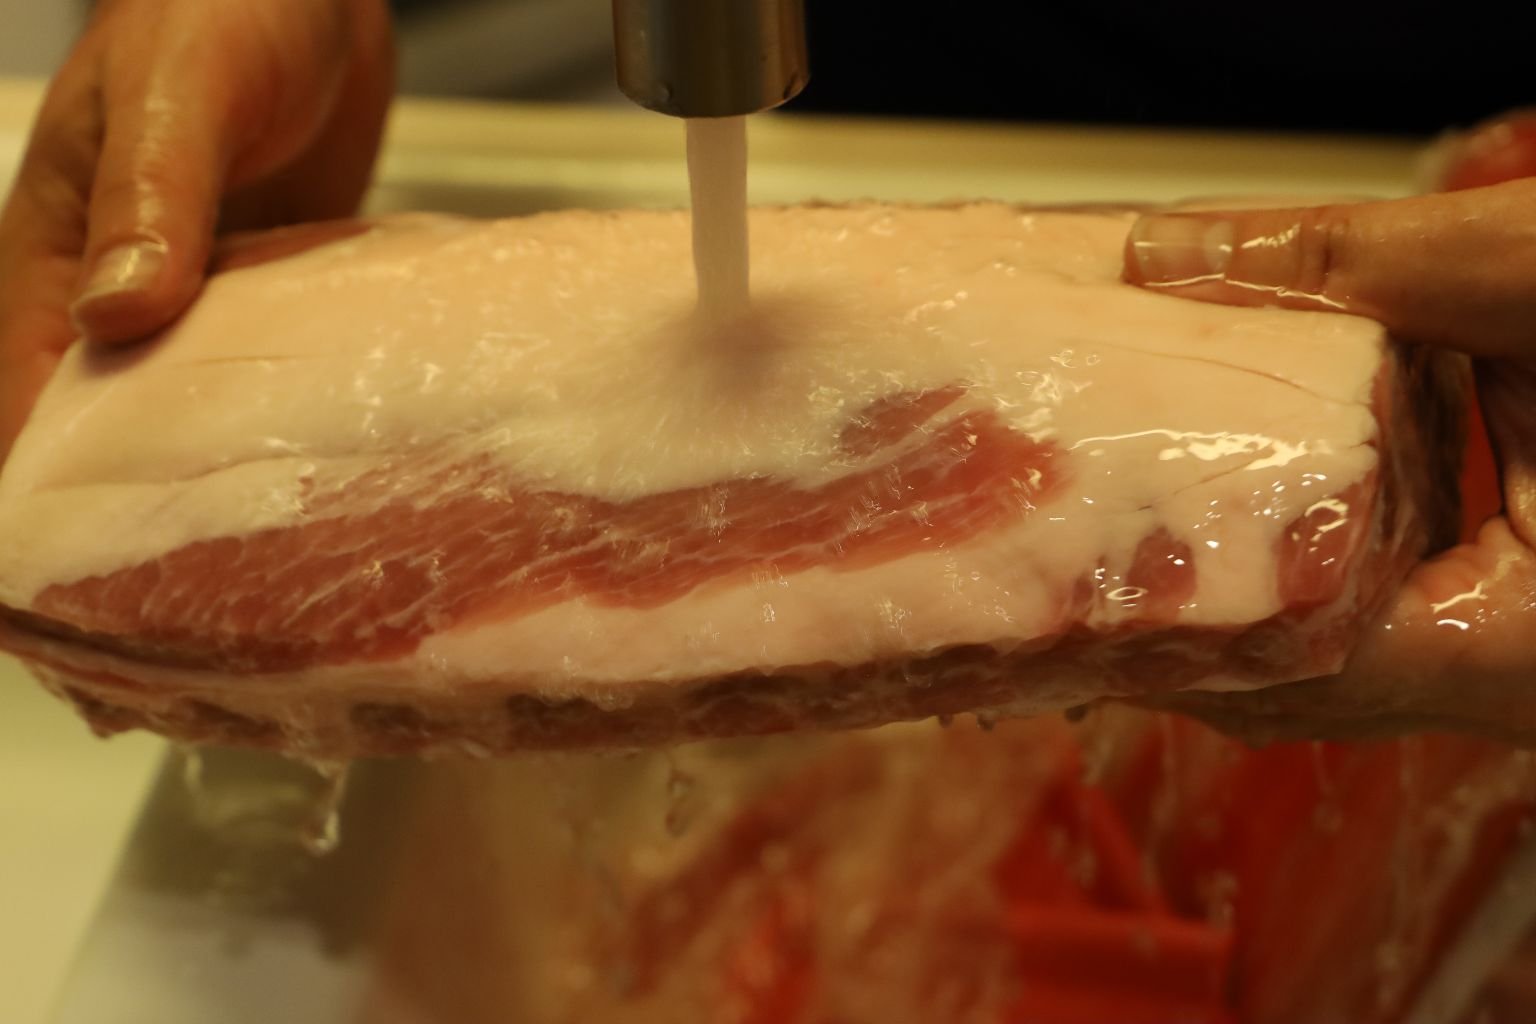
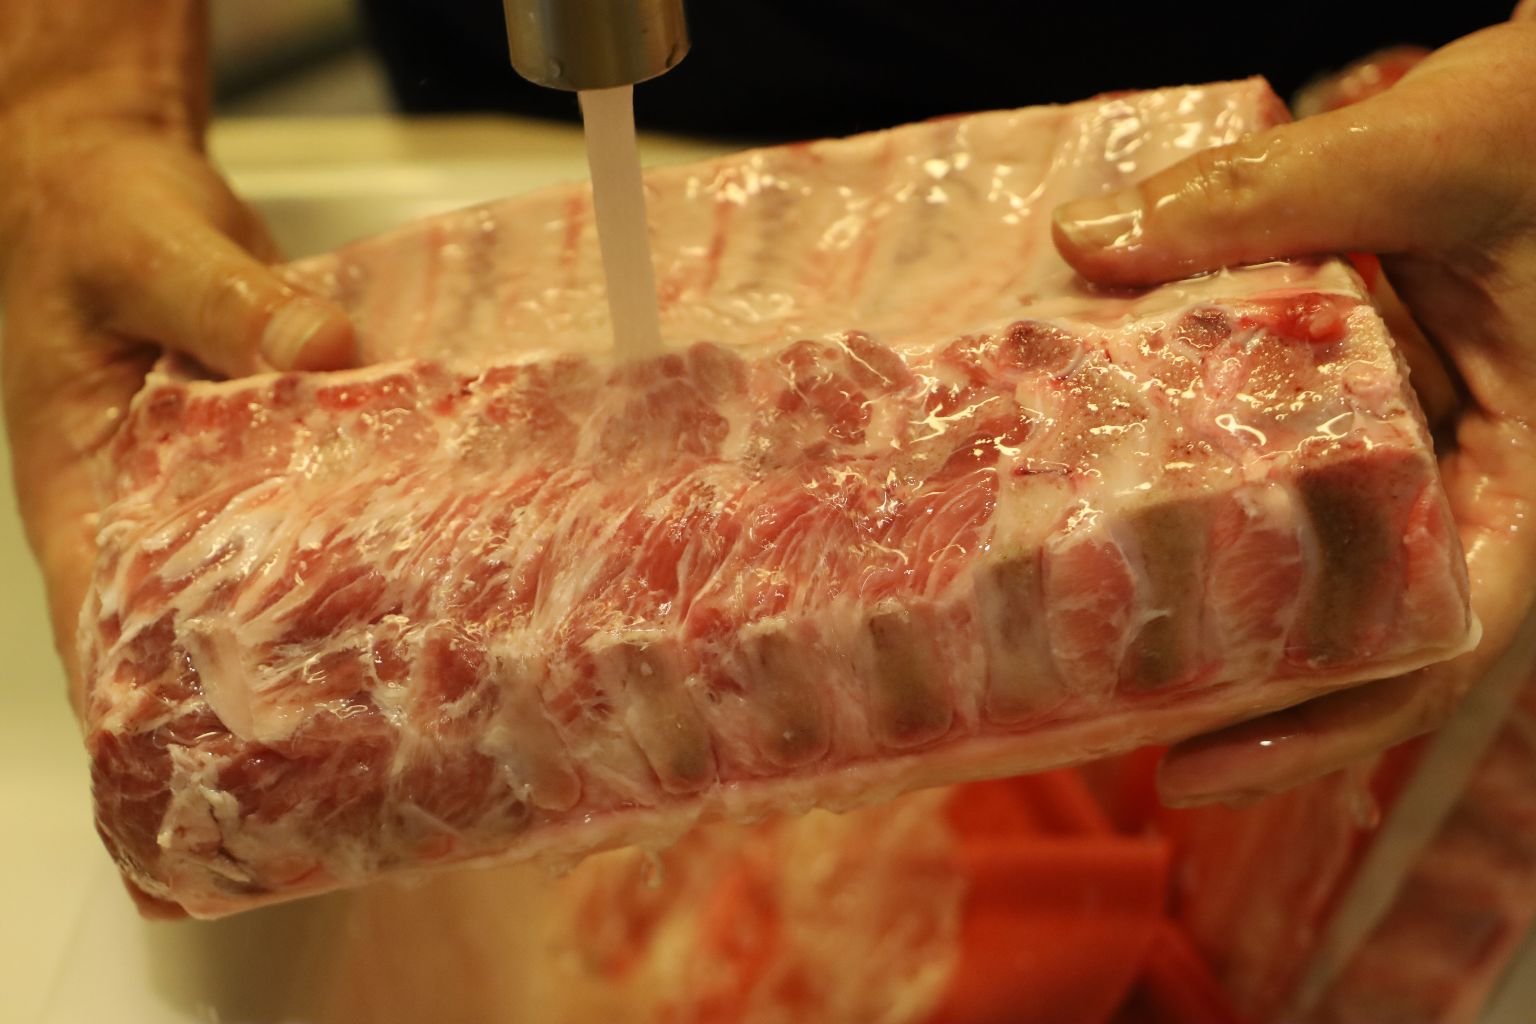
Remove the plastic covering on the pork roasts and rinse the excess blood and bone debris with fresh water. Not shown, remove the silver skin from behind the bones as your would with ribs. It usually peals off fairly easily once started.
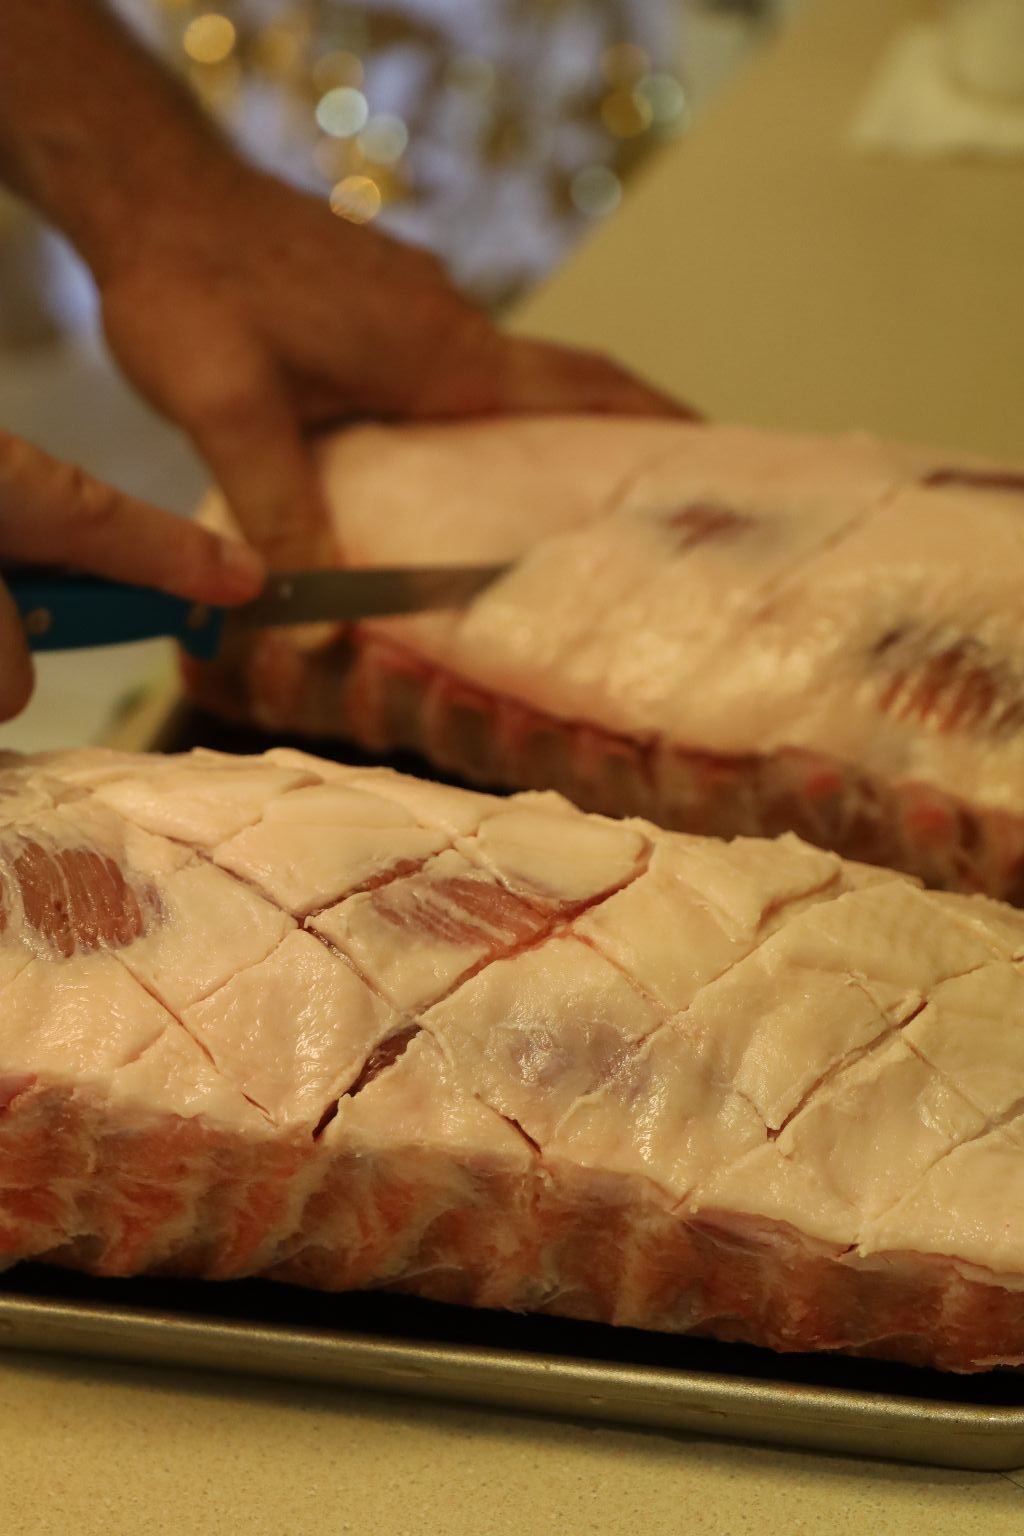
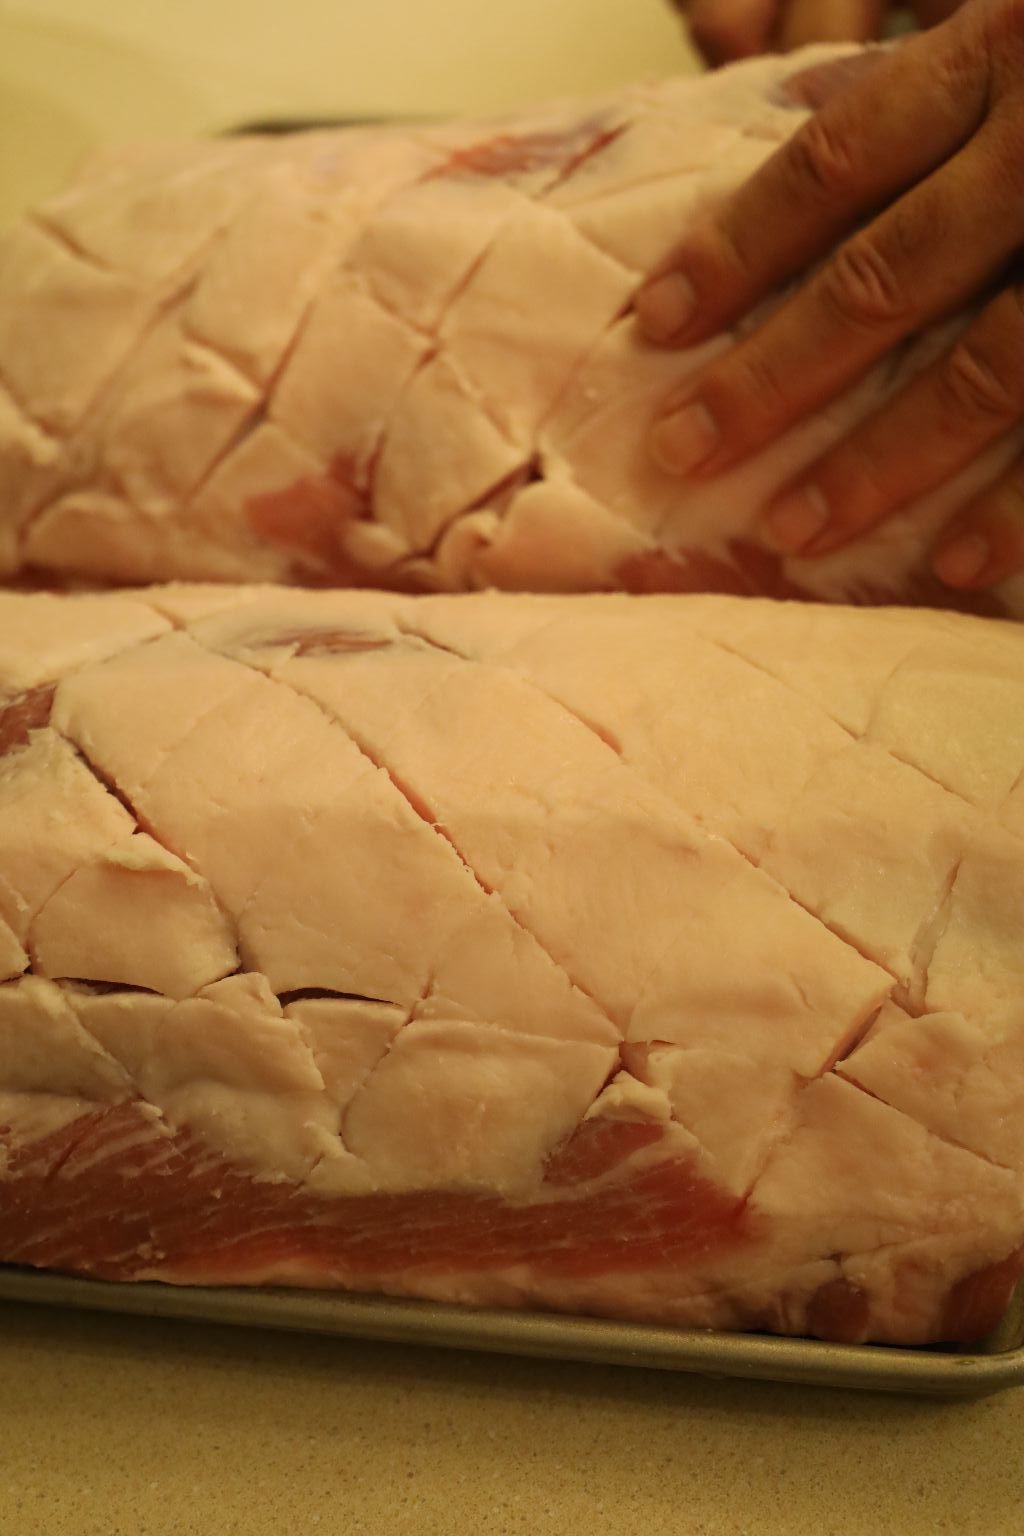
Remove the excess water using a paper towel until dry. Using a sharp knife, score the fat about 1/8 inch deep to allow the spices to penetrate the meat and help the fat to drain off.
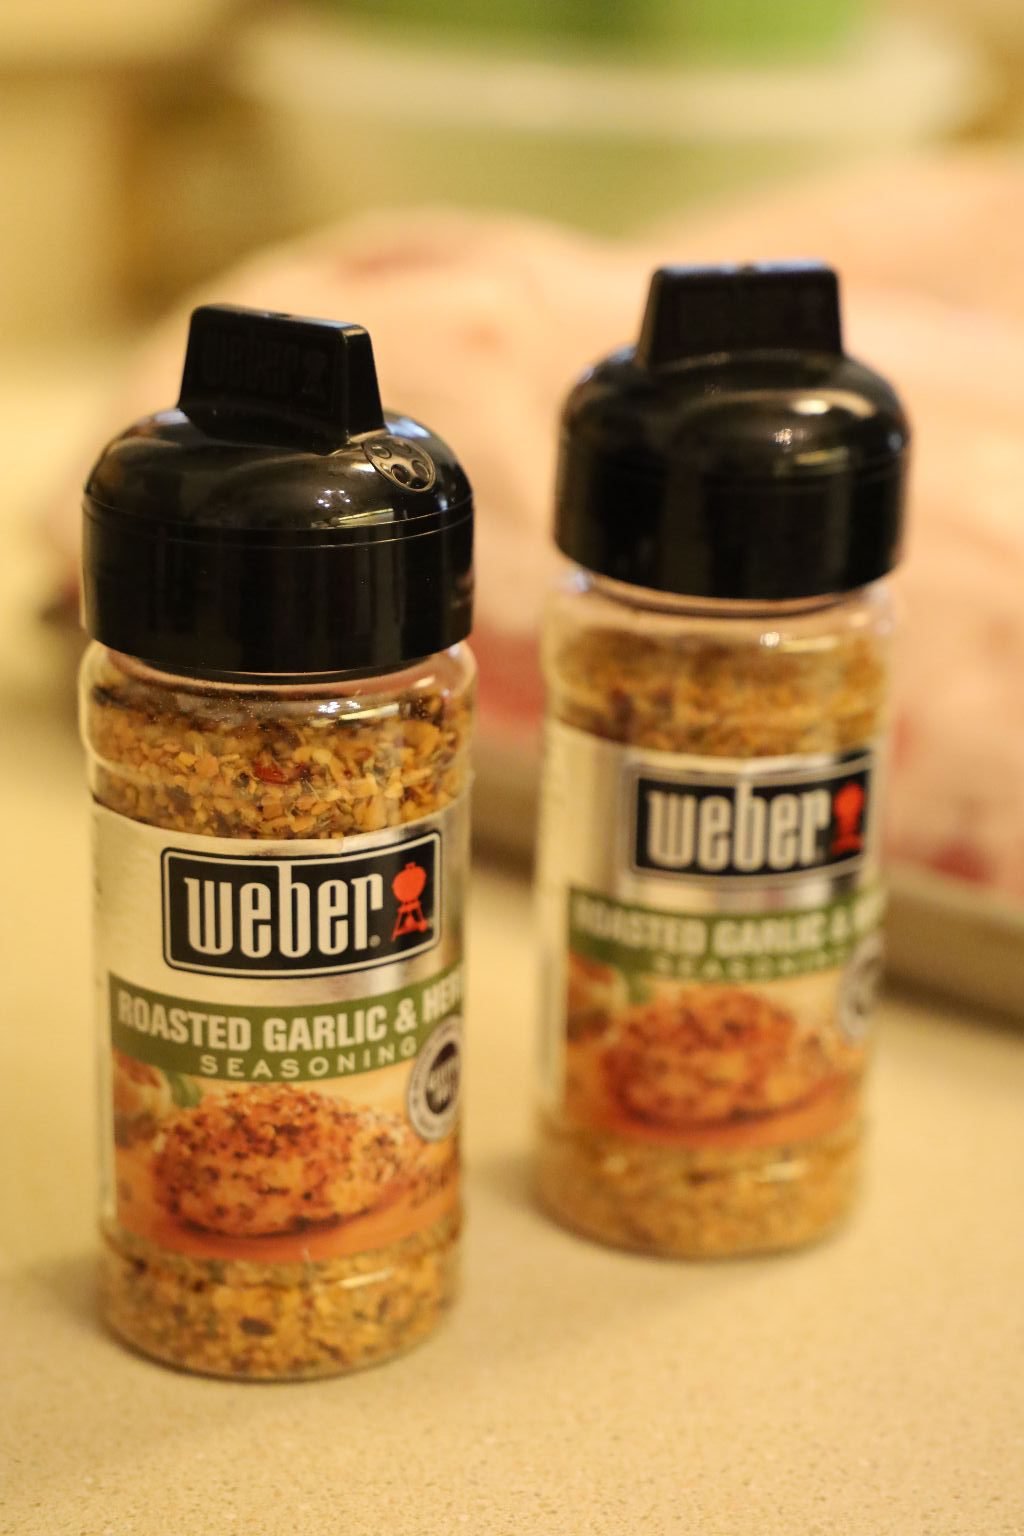
Here is a picture of the spices I used.
These have a bold garlic taste and the herbs compliment the flavor of the meat.
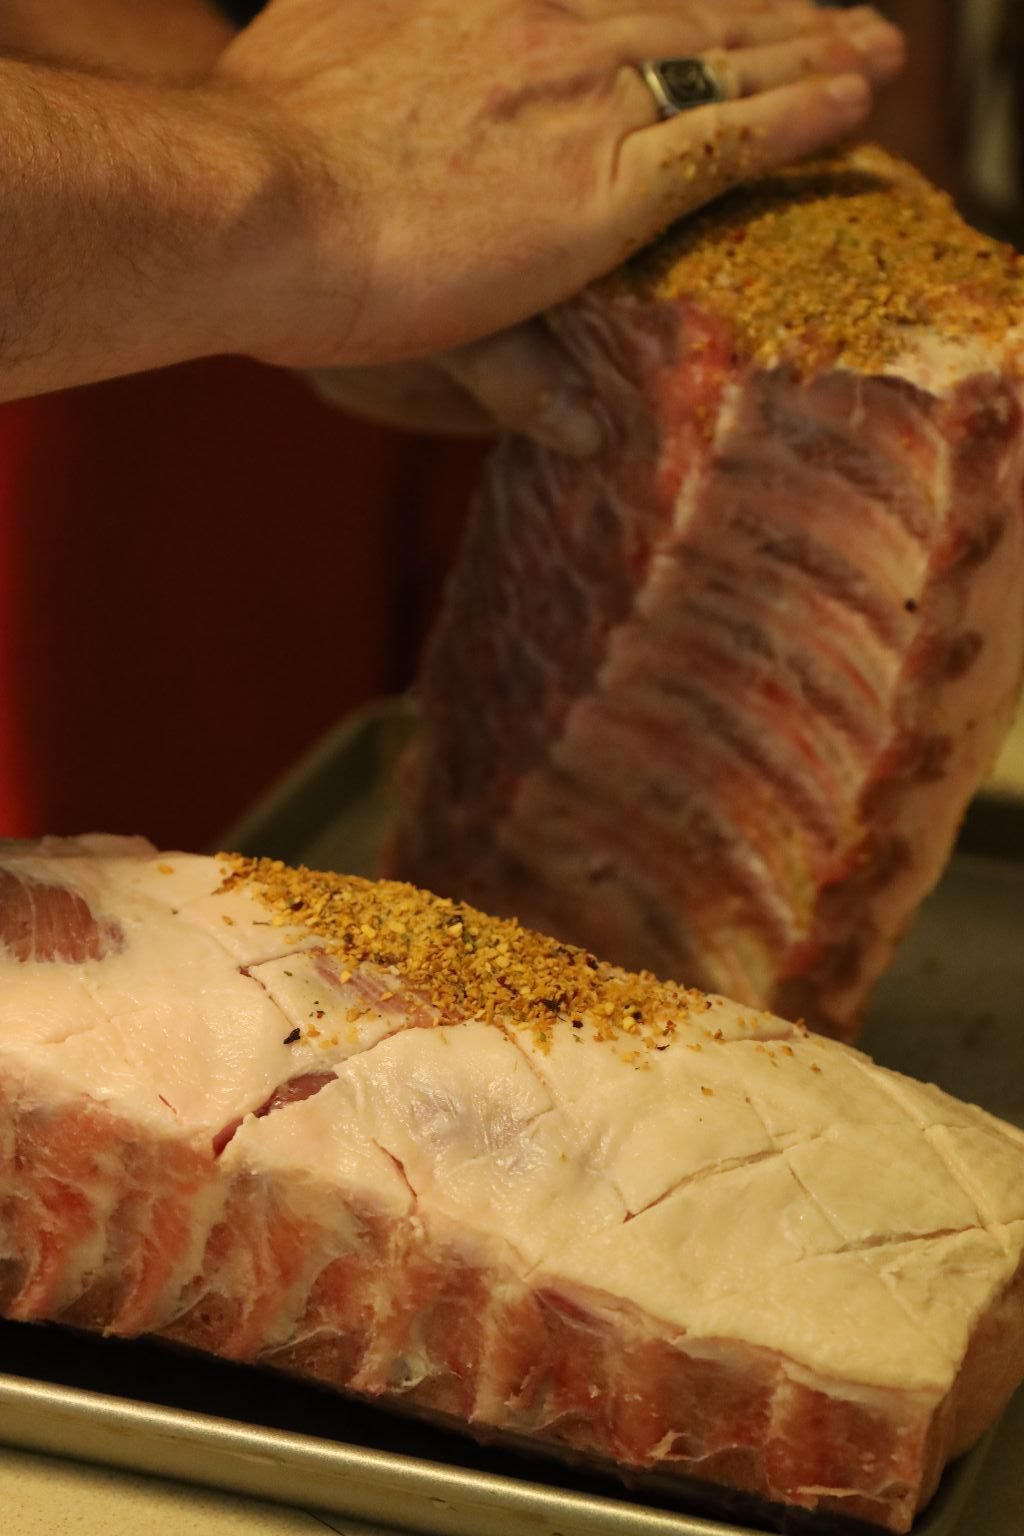
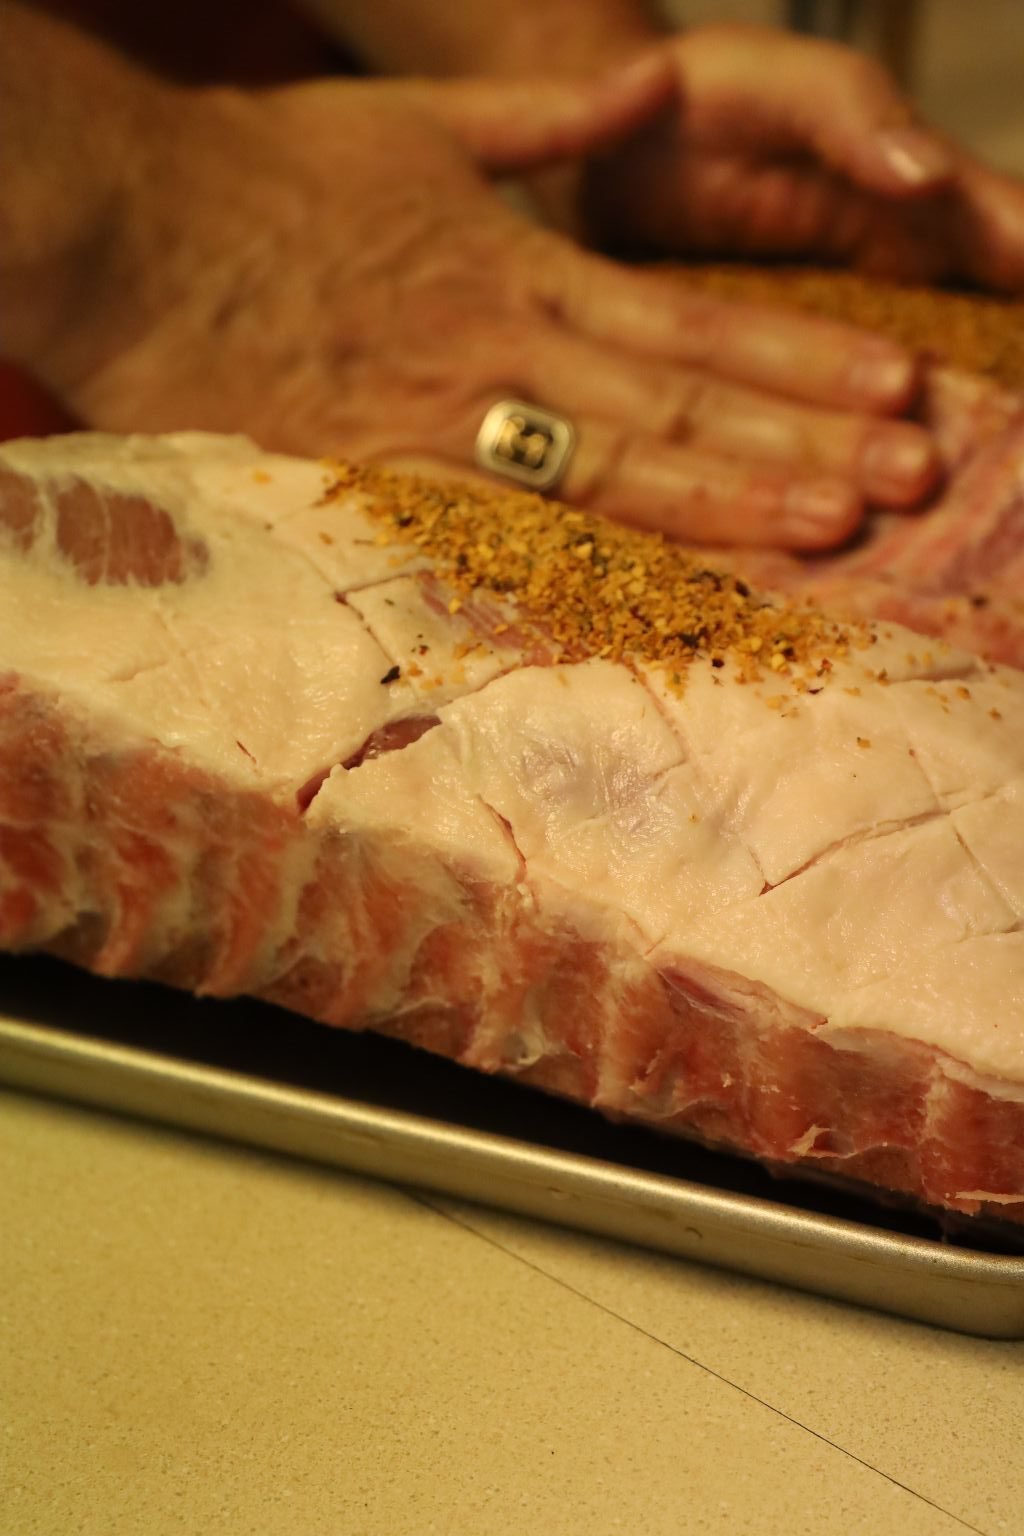
Place a large amount of the spices into your hands and push and rub the spices into the meat.
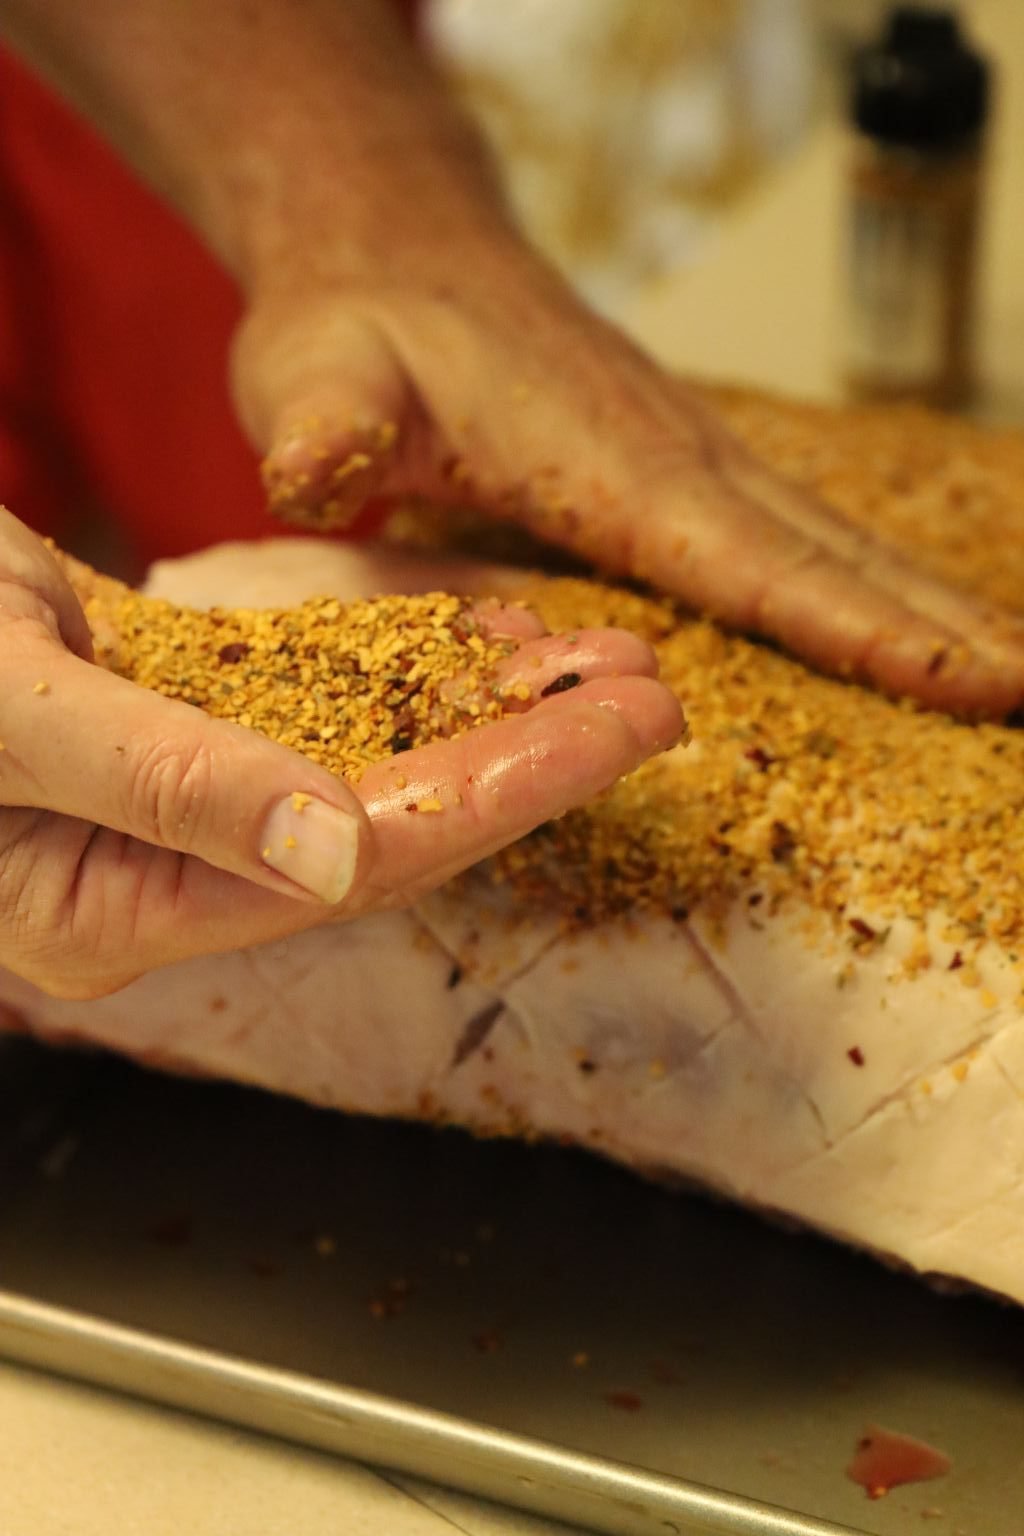
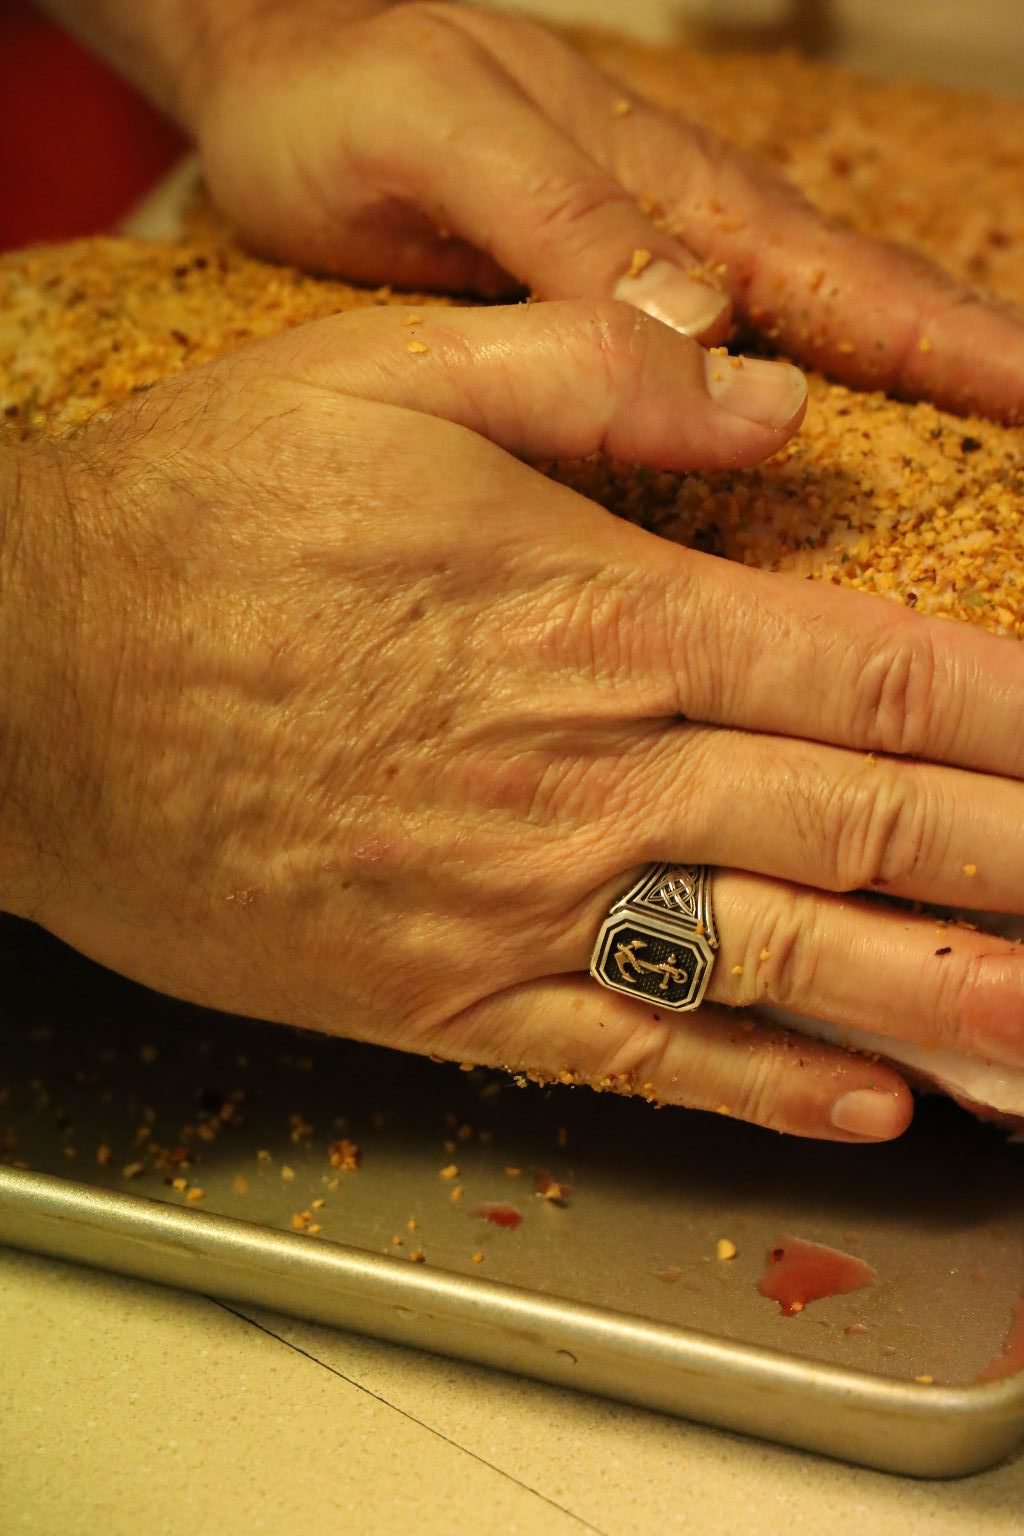
Do this on all sides of the meat.
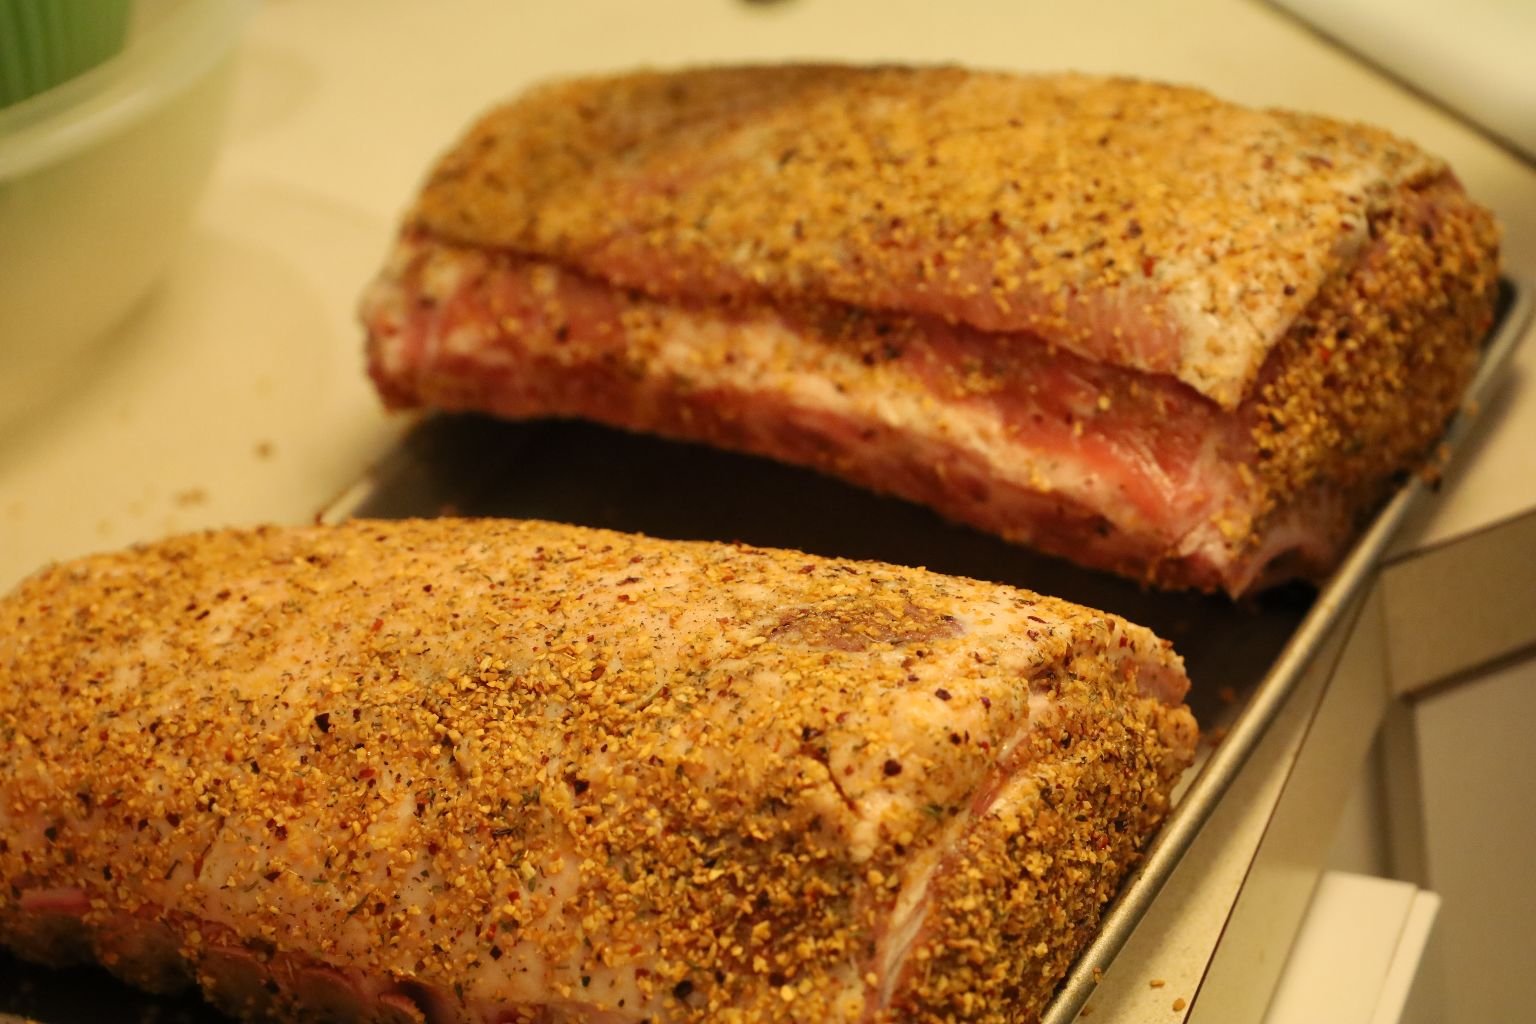
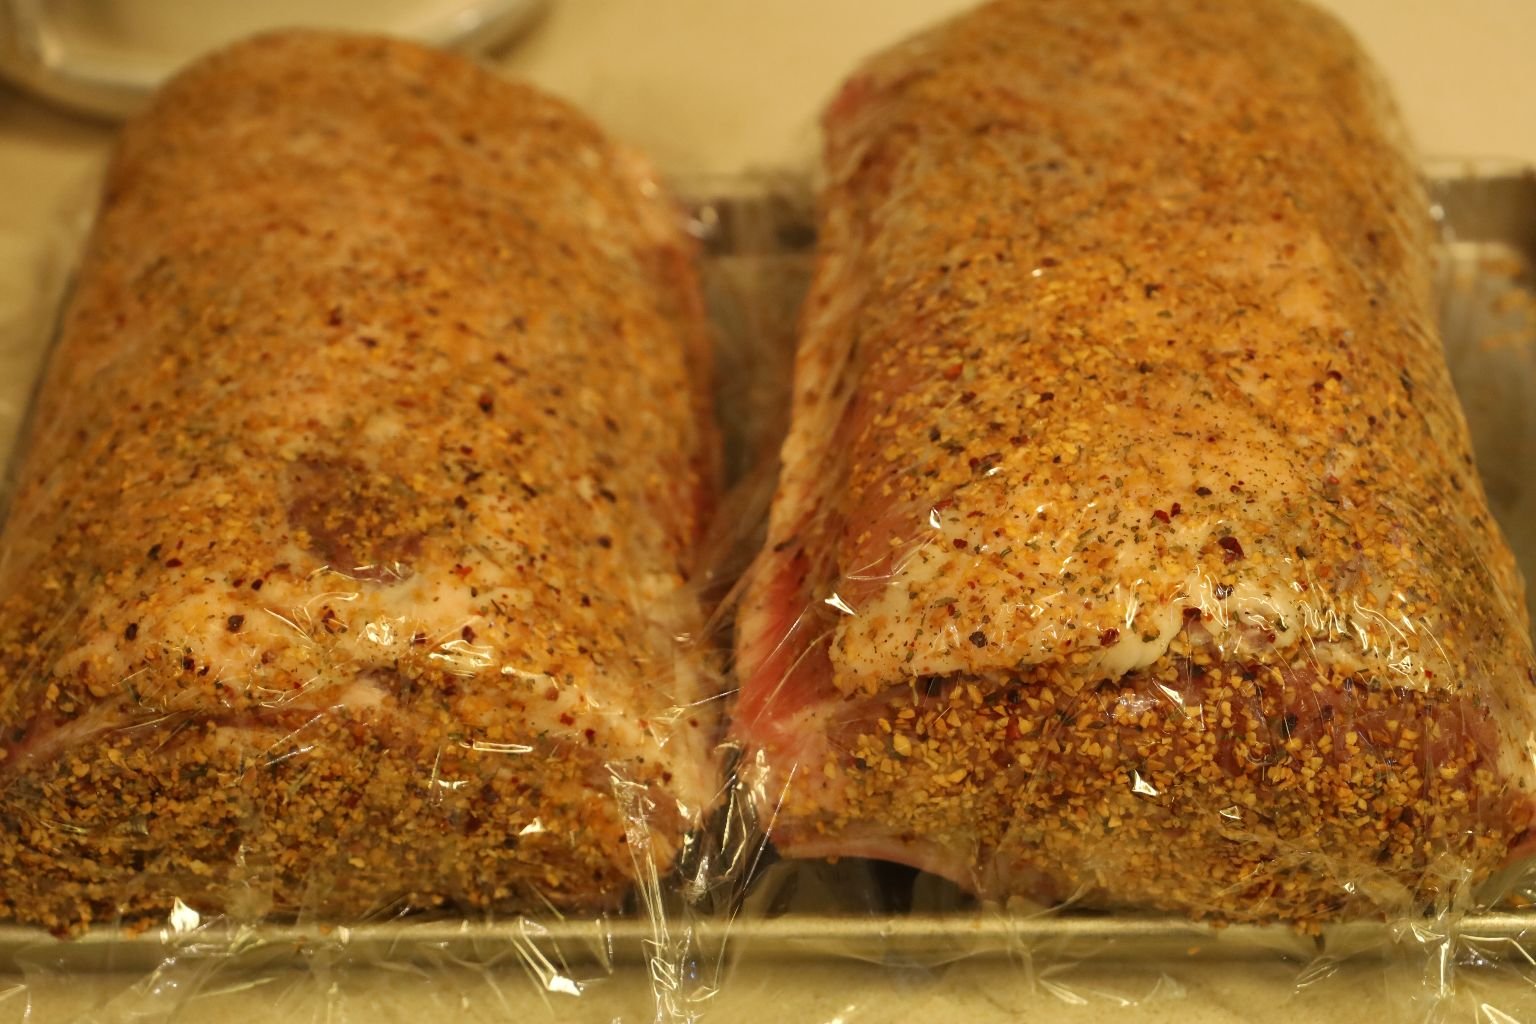
Here you can see the meat is well seasoned. I then wrapped the meat in plastic until I was ready to cook them. This will also allow the seasoning to somewhat marinade the meat.
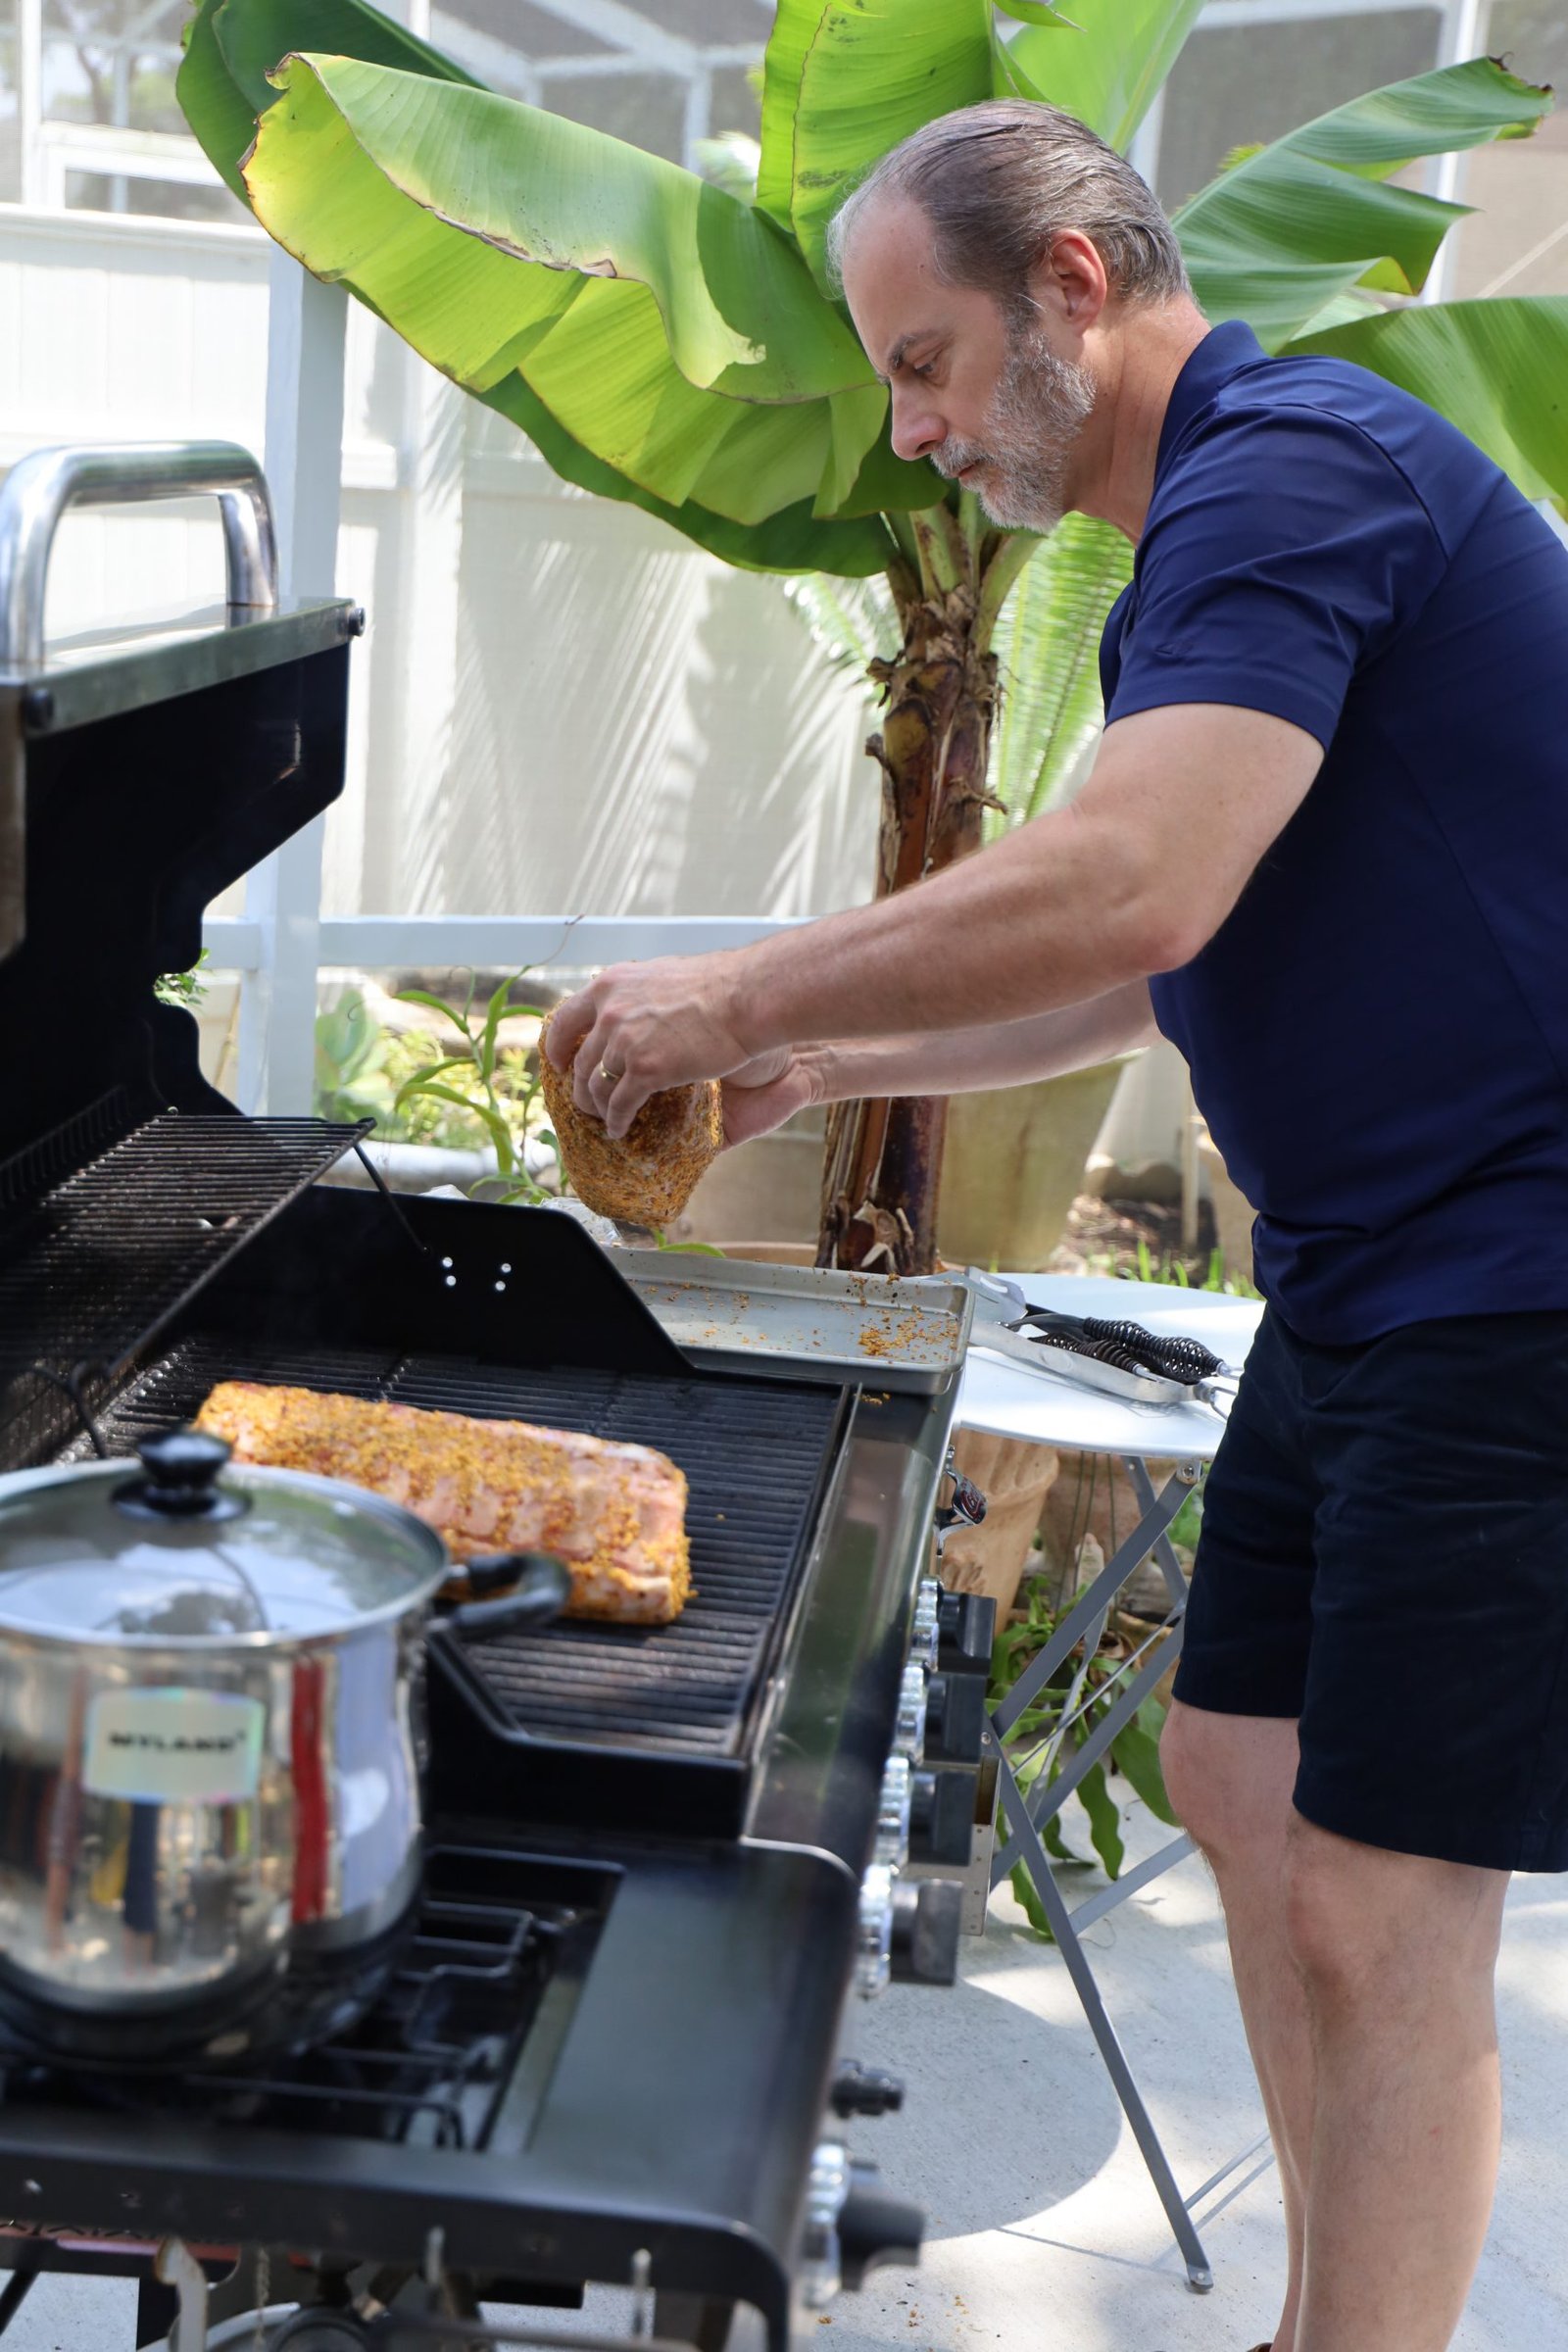
Heat your grill to medium heat and place the fat side down to get some initial cooking on the fatty side. Here I have the burners on directly under the meat.
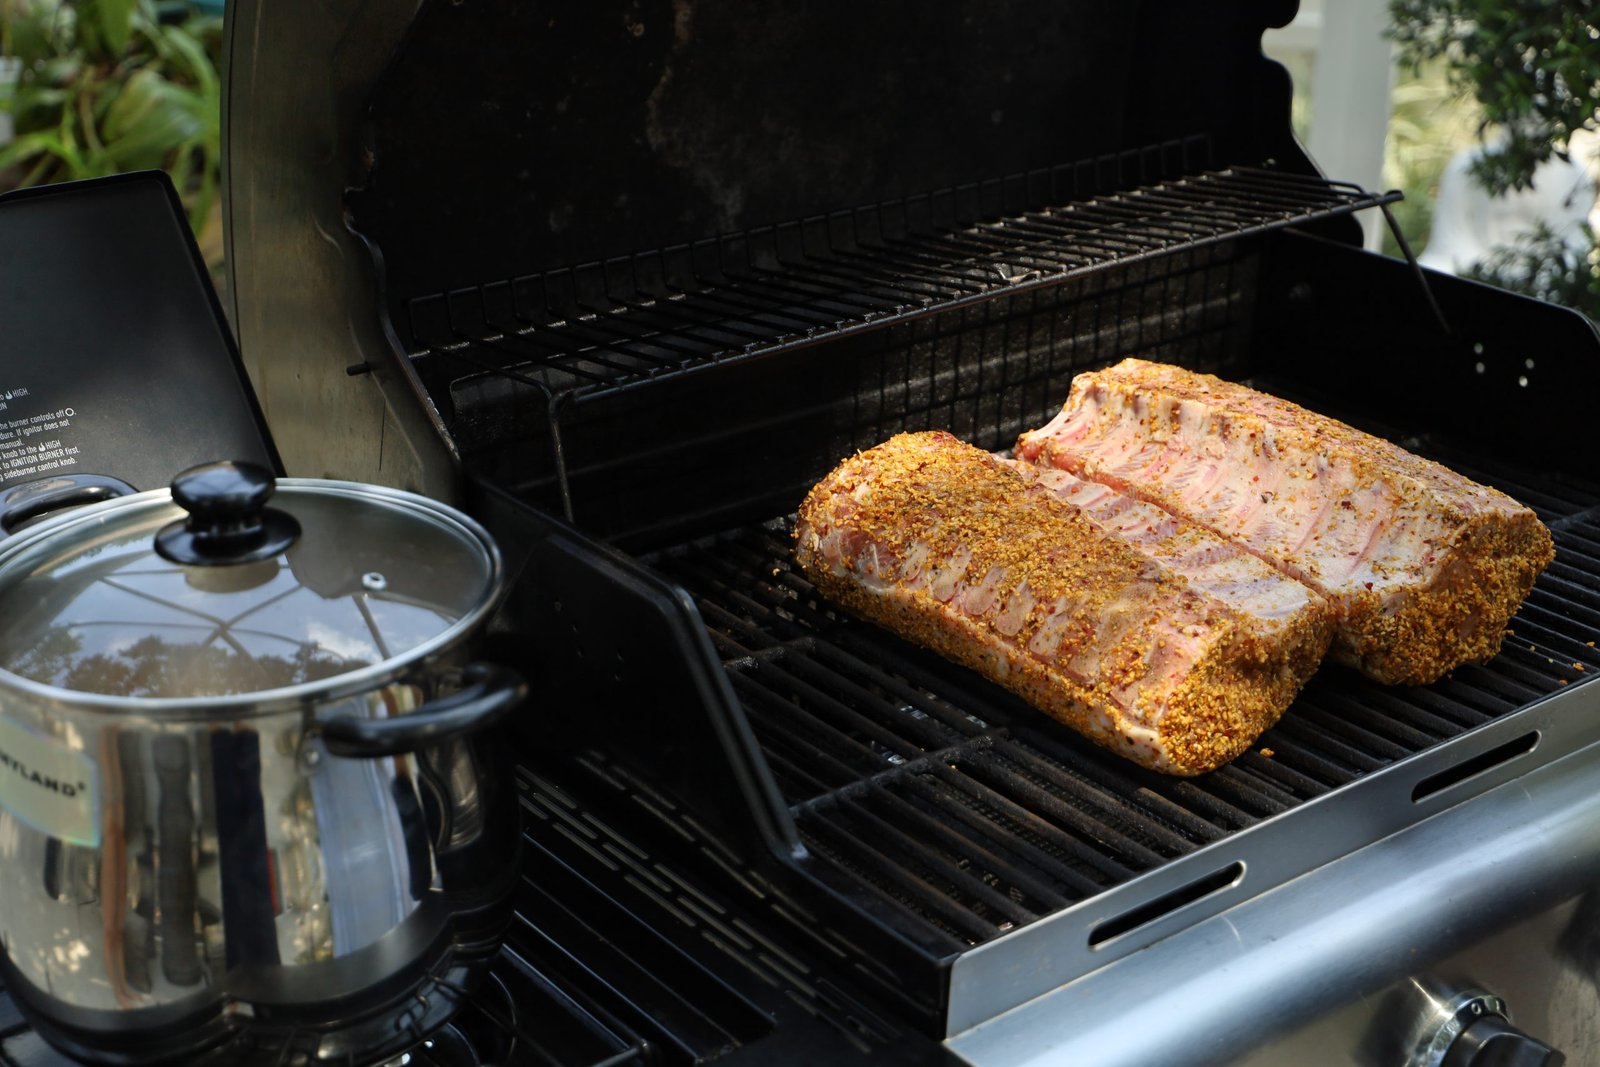
Here you can see I am cooking more food in the pot next to the grill.
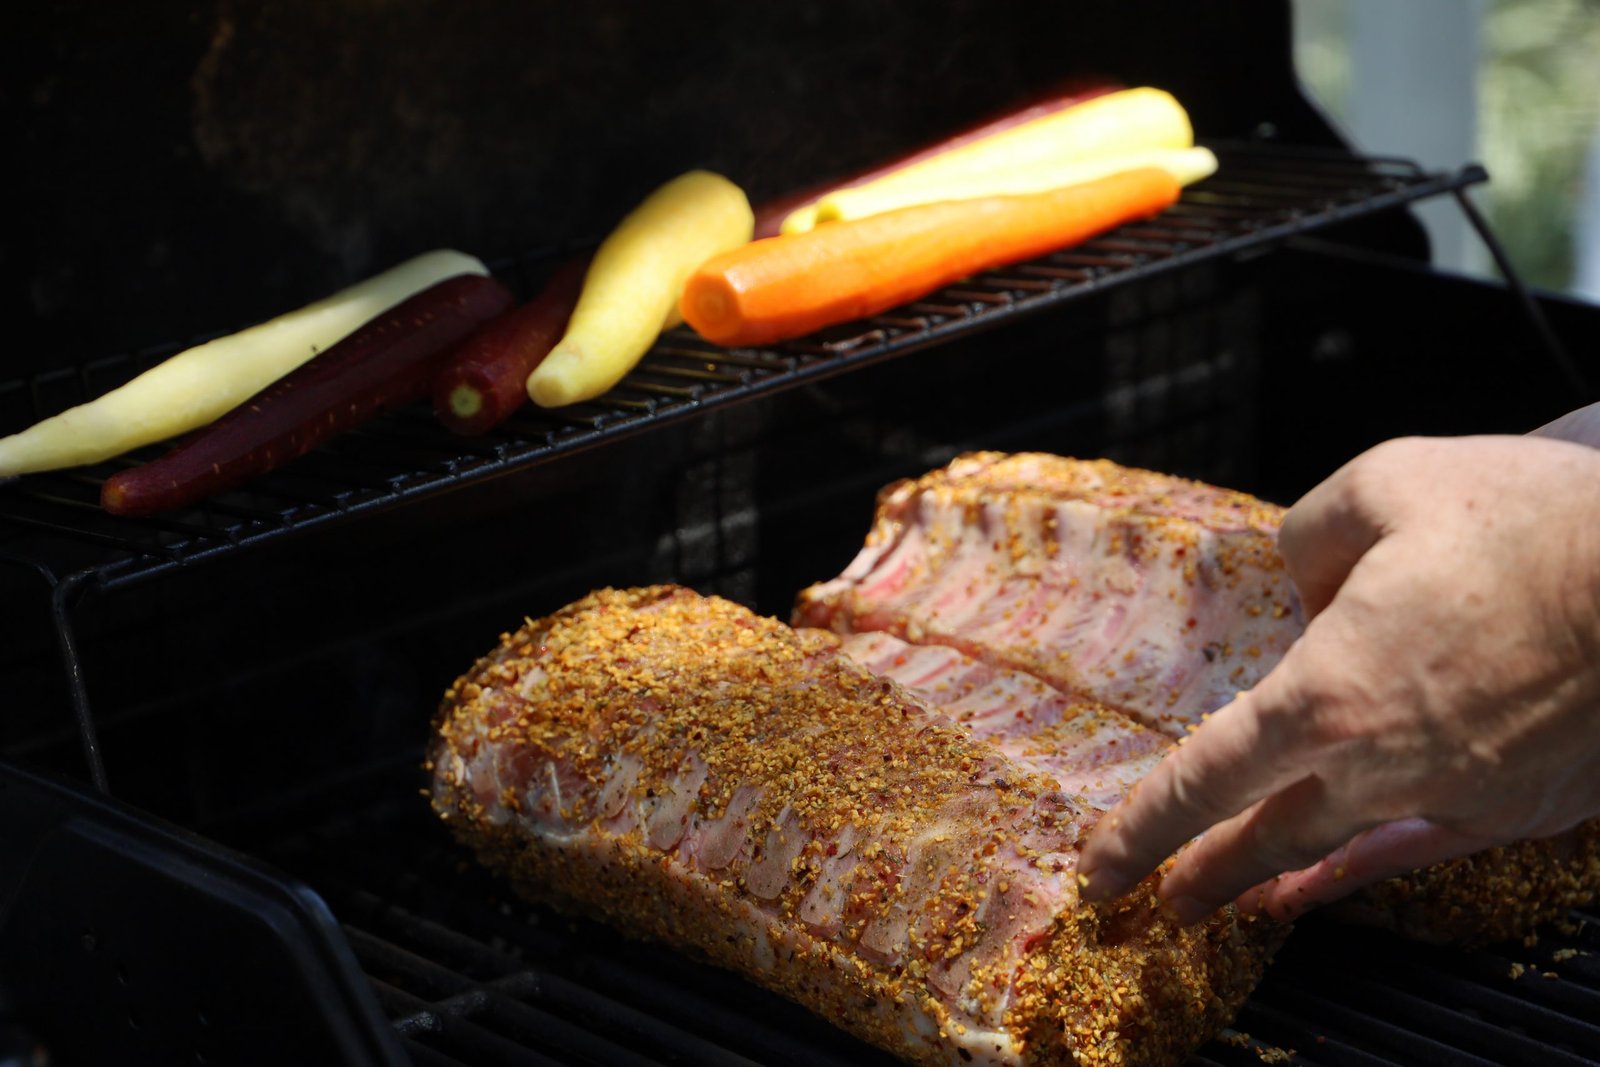
Cook the meat on the fatty side until you begin to get some good char.
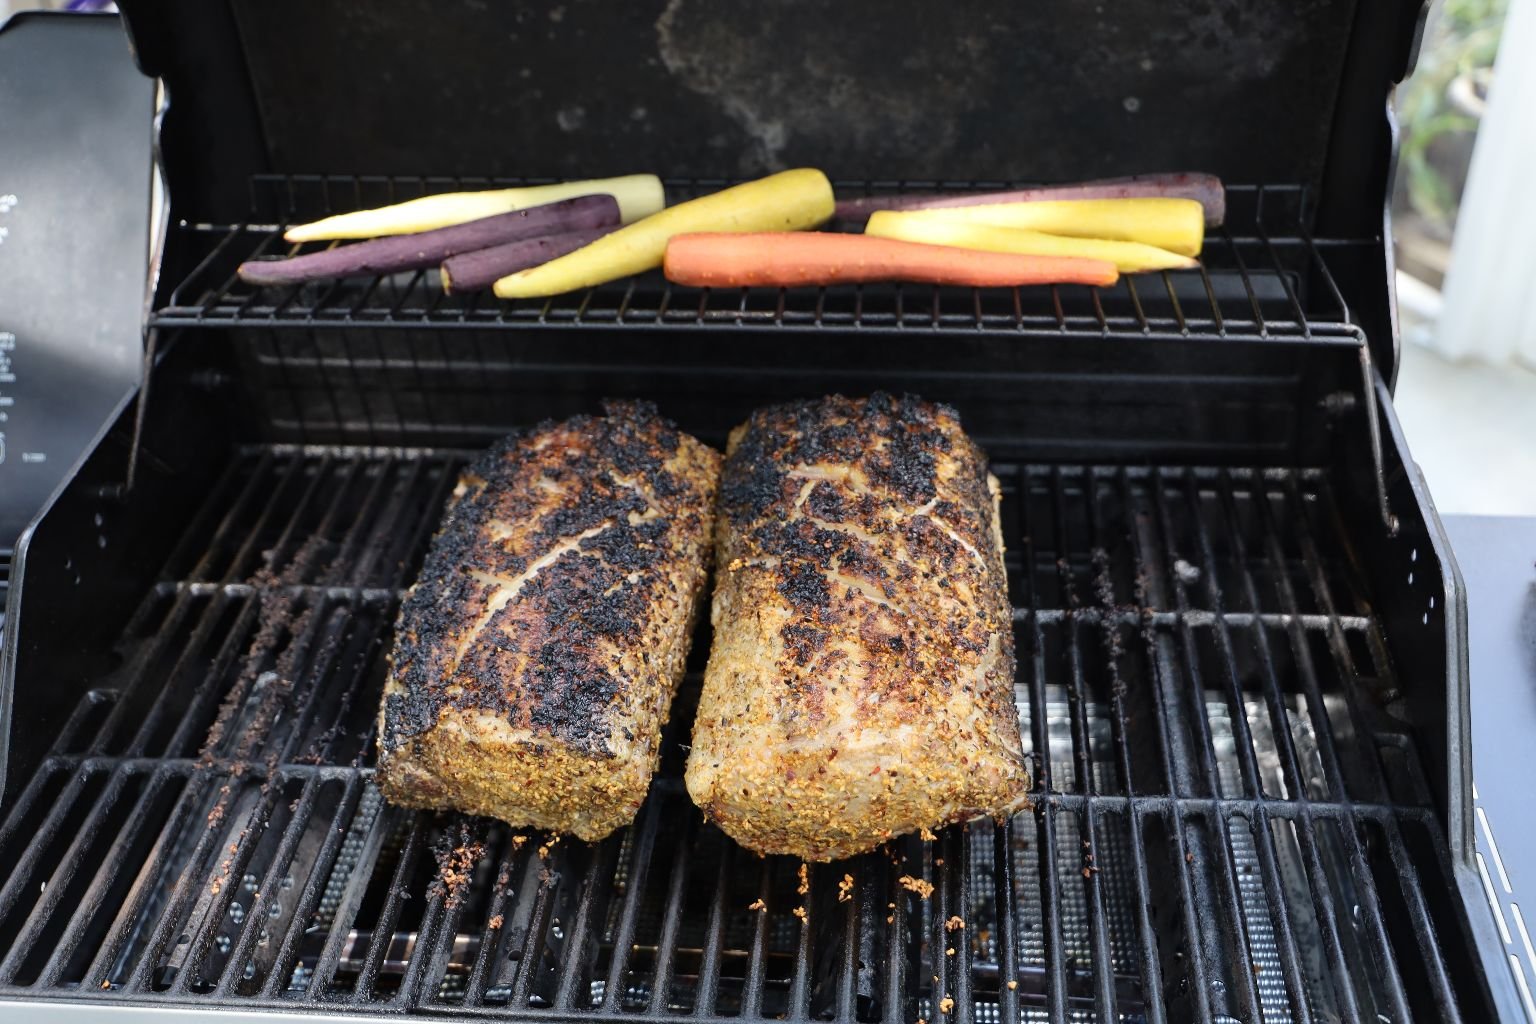
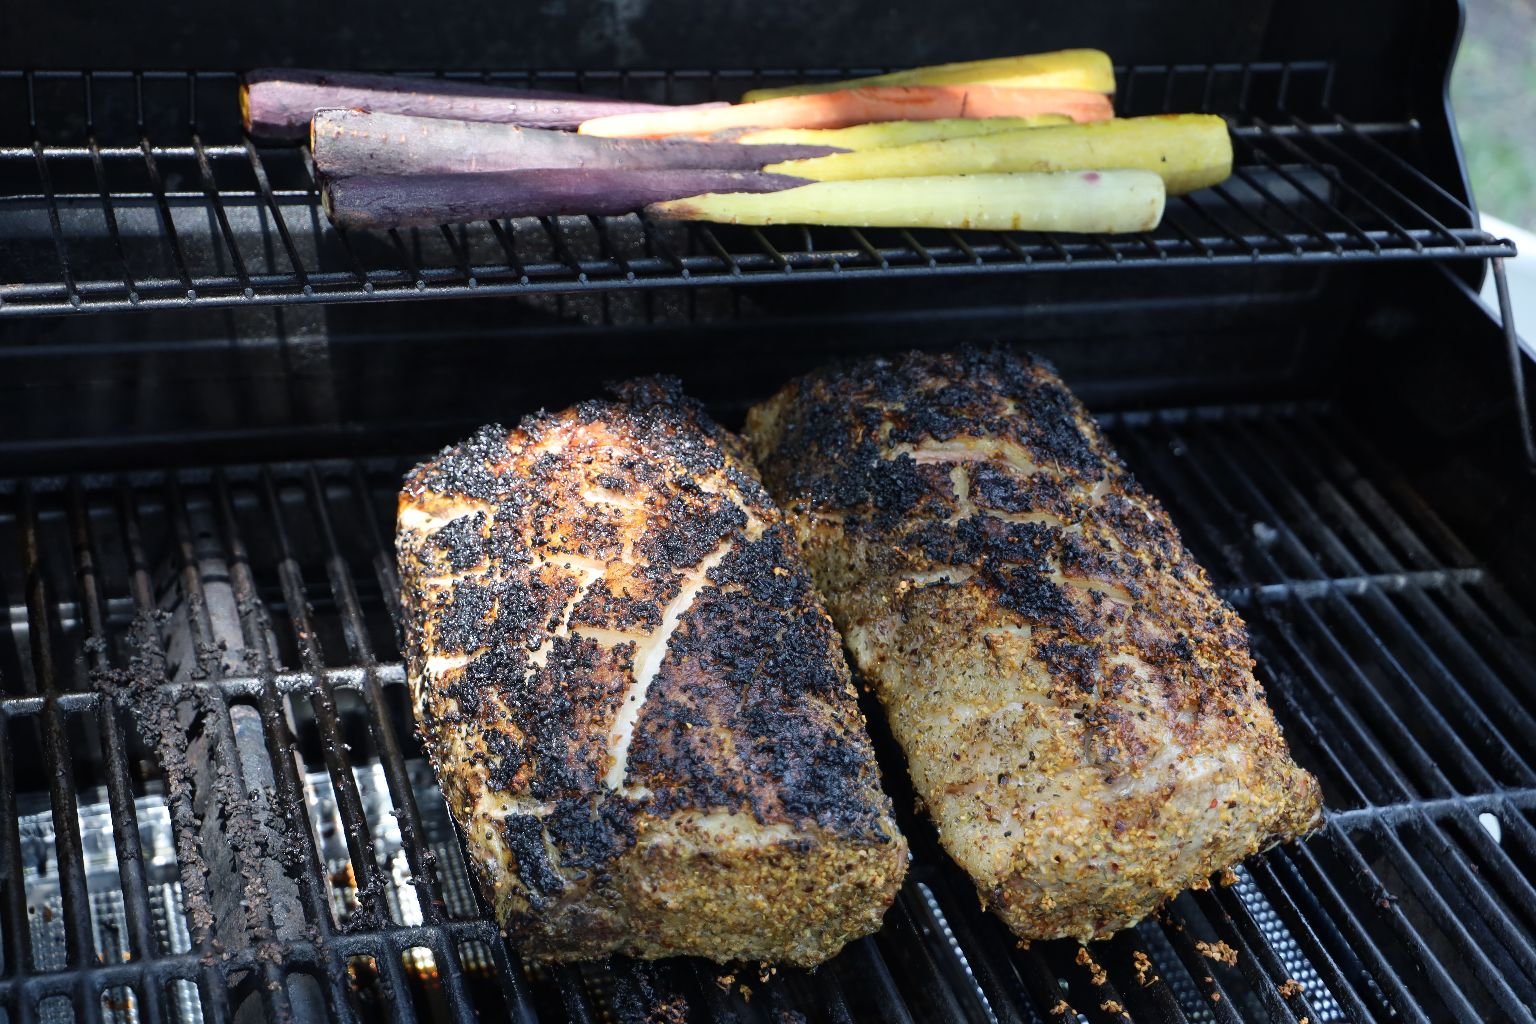
(Easter Bunny Carrots Grilling as well.)
Once you have the char you like, turn the meat over and begin to cook the meat on the other side. Now, turn off the burners directly under the meat and turn on the ones to the outside of the meat to medium high. This will prevent the fat from catching on fire and burning your meat. Having the burners on will roast the meat from the heat on both sides.
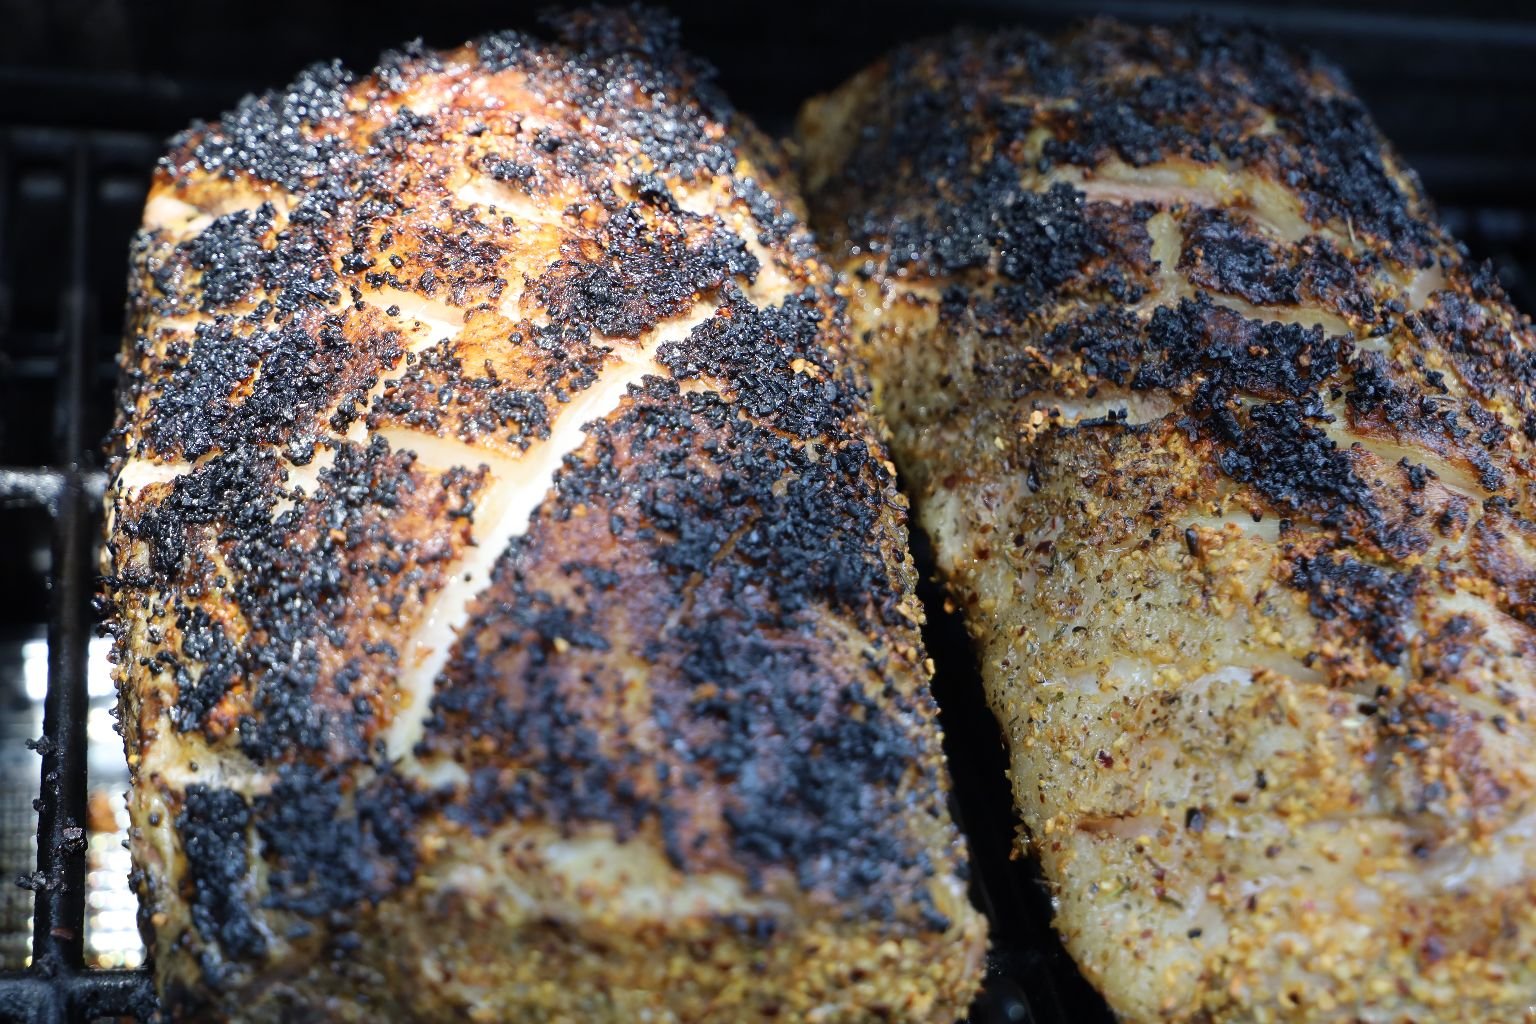
Cook your pork roasts until they have an internal temperature of ~140’F.
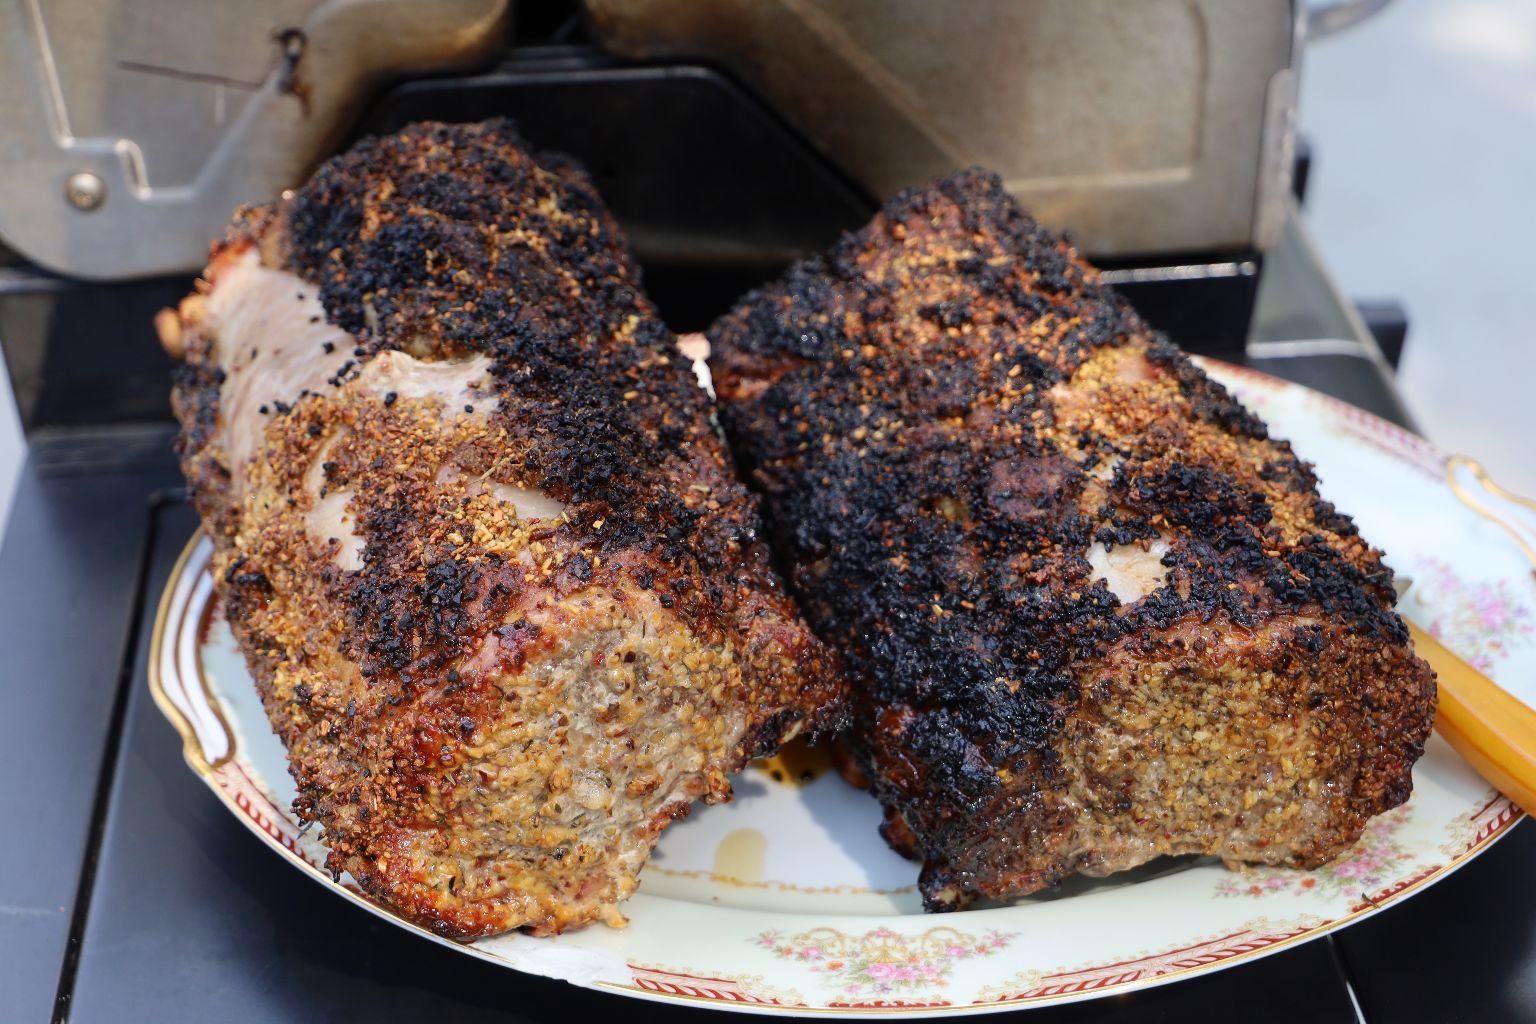
The heated juices will raise the meats internal temperature to 145’F as the meat rests. The heated juices will return to the center of the meat if you let it rest for ~15 min.
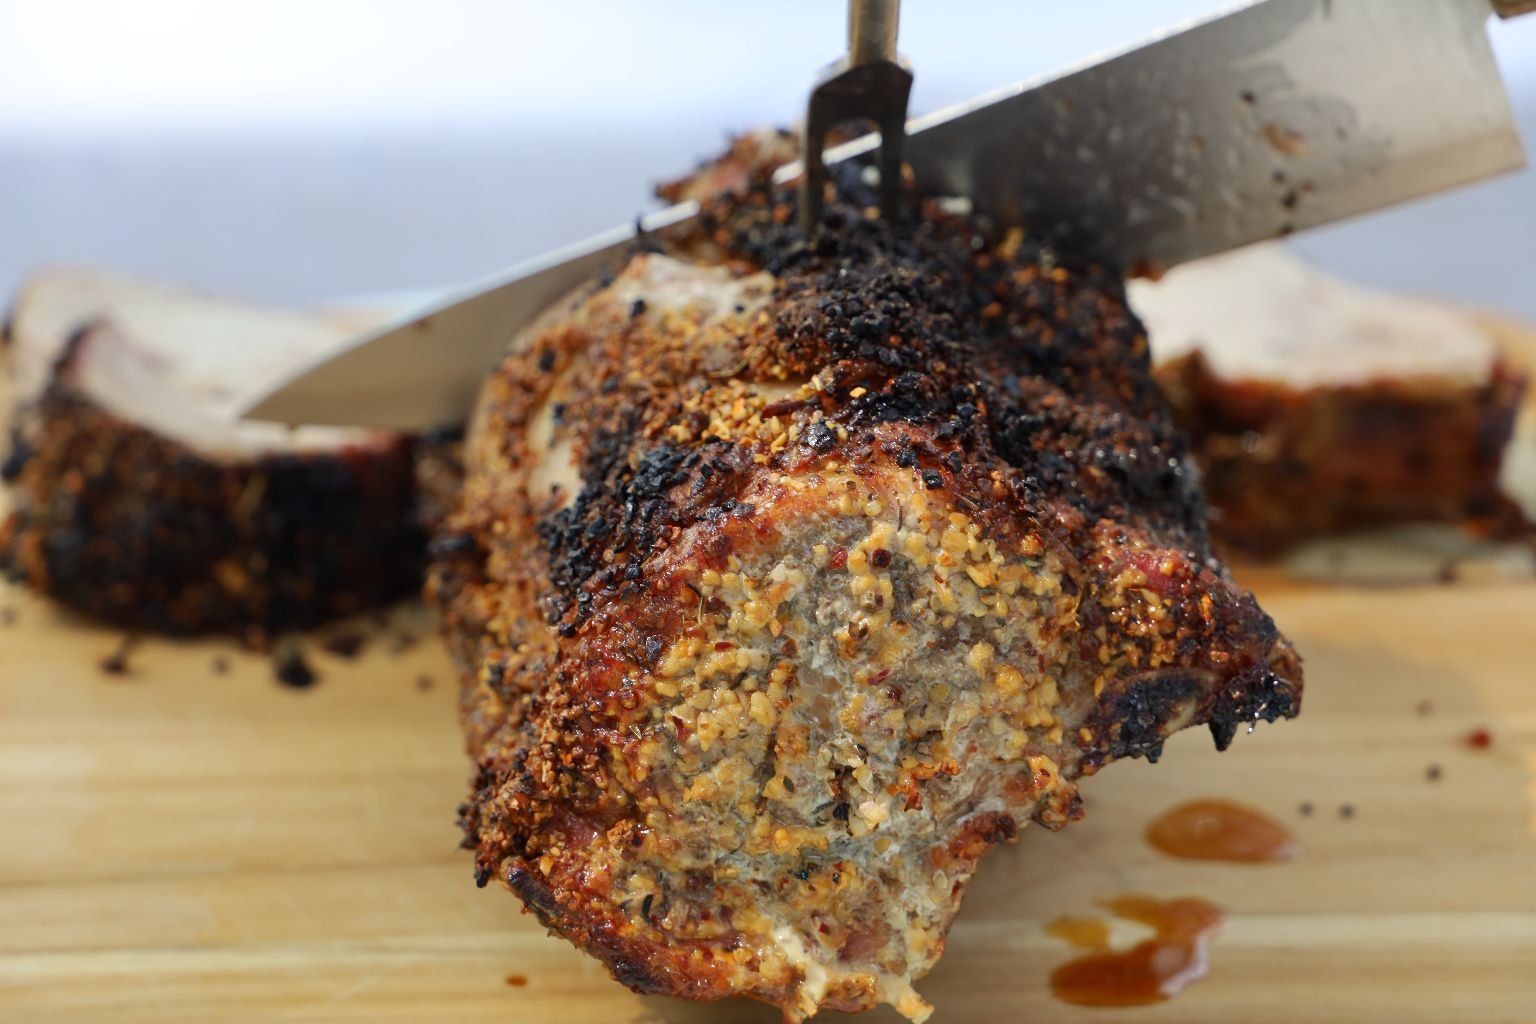
If you don’t let it rest and immediately cut into the roast, those moving juices will just run all over your plate. Here you can see a nice end cut of the meat. Trust me, it is difficult to let the meat rest as it looks so good!
———————————————————–
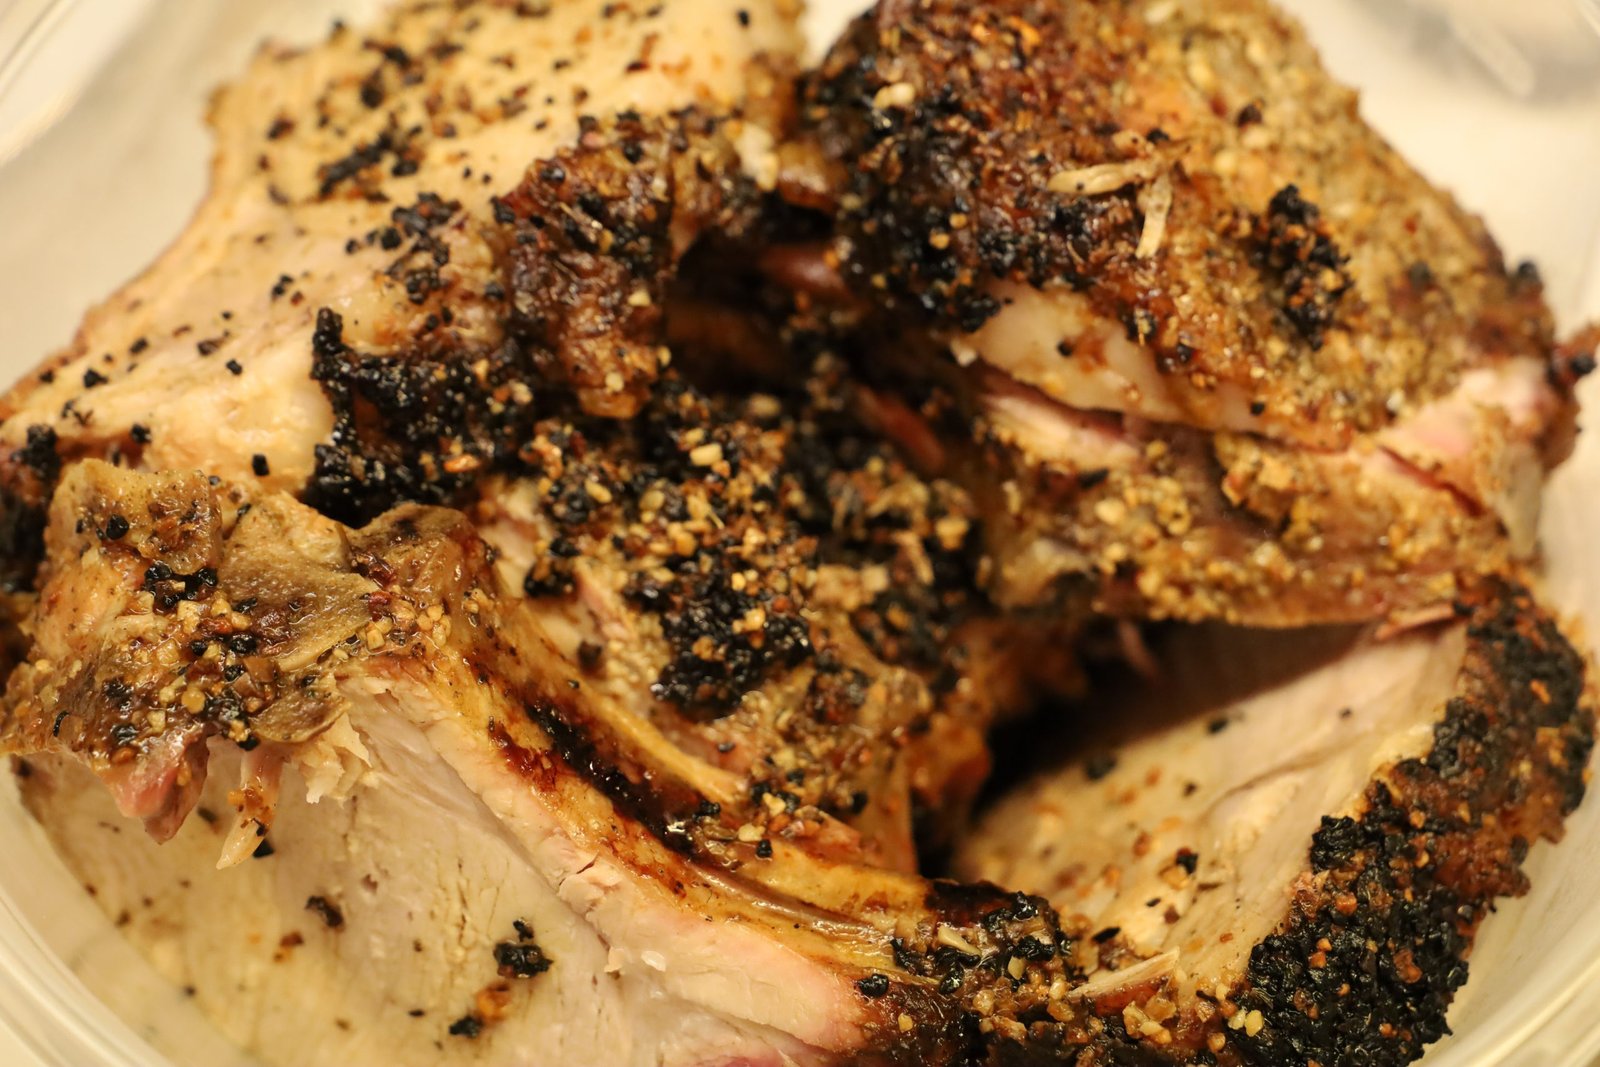
Leftovers……. 🙂
—————————————————————–
Easter Bunny Food

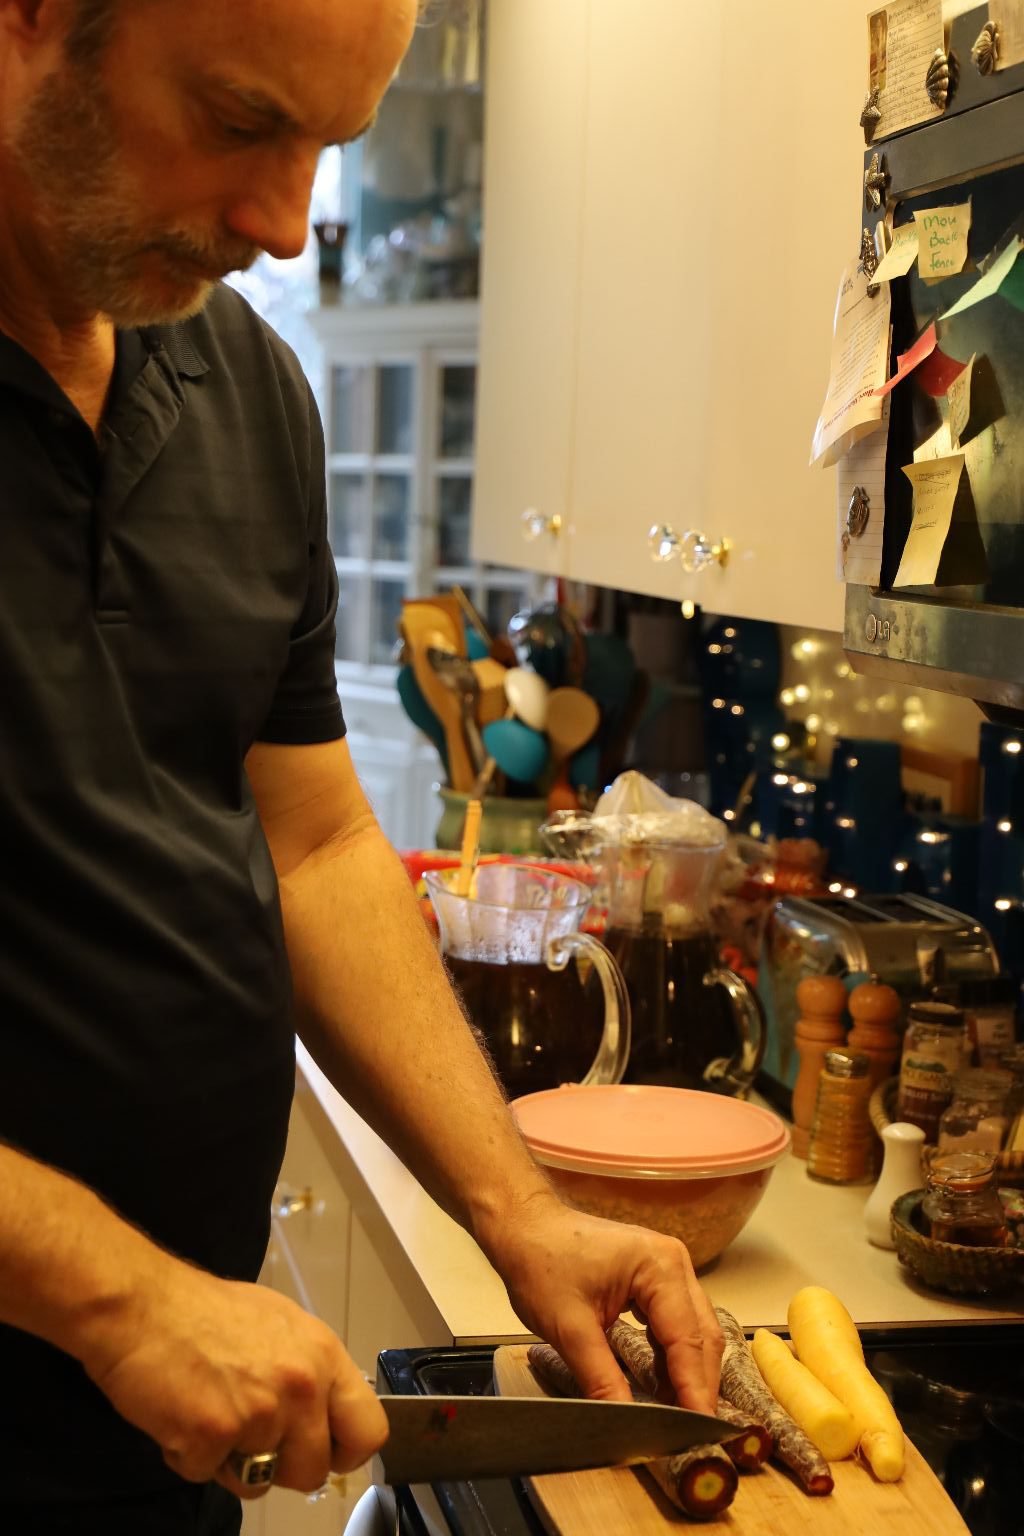
Here Gordon is preparing the multi-colored carrots for roasting in the grill. Slice off both ends of the carrots and peel them if you like.

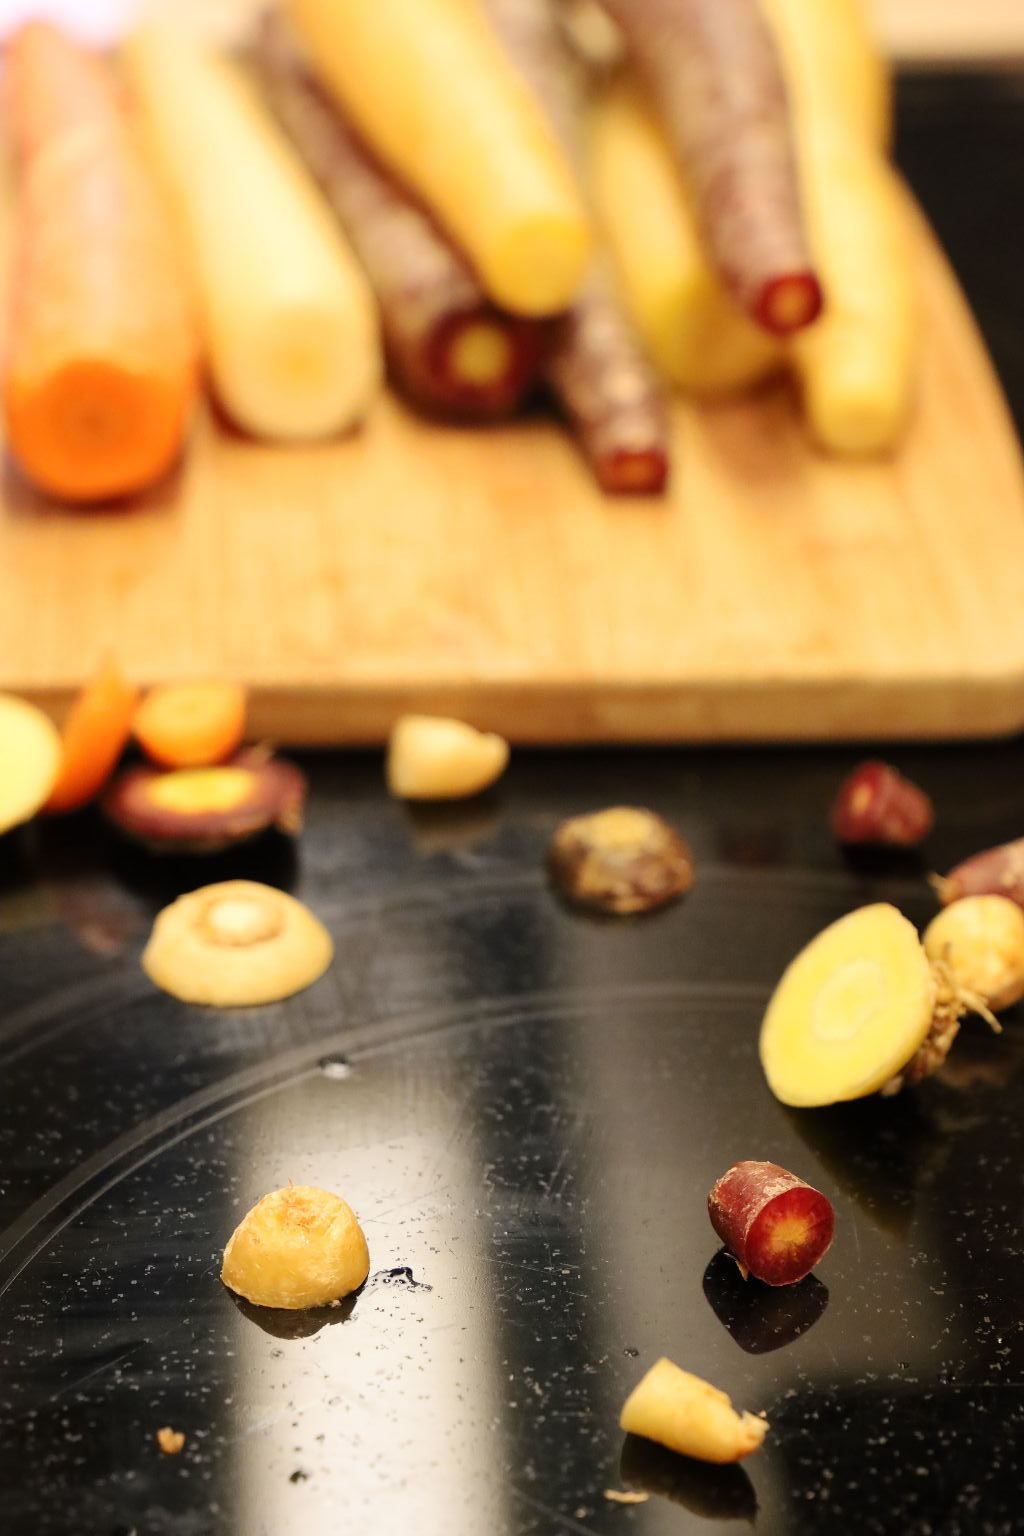
Her you can see the sliced carrots.
He roasted the carrots above the pork where they will cook absorbing the great pork flavors. Roast them until just tender about 35 minutes.
——————————————————-
Sea Island Red Peas


Soak the Red Peas in water for at least 24 hours. This will re-hydrate the peas.


Just place them in any sort of container with a lid.
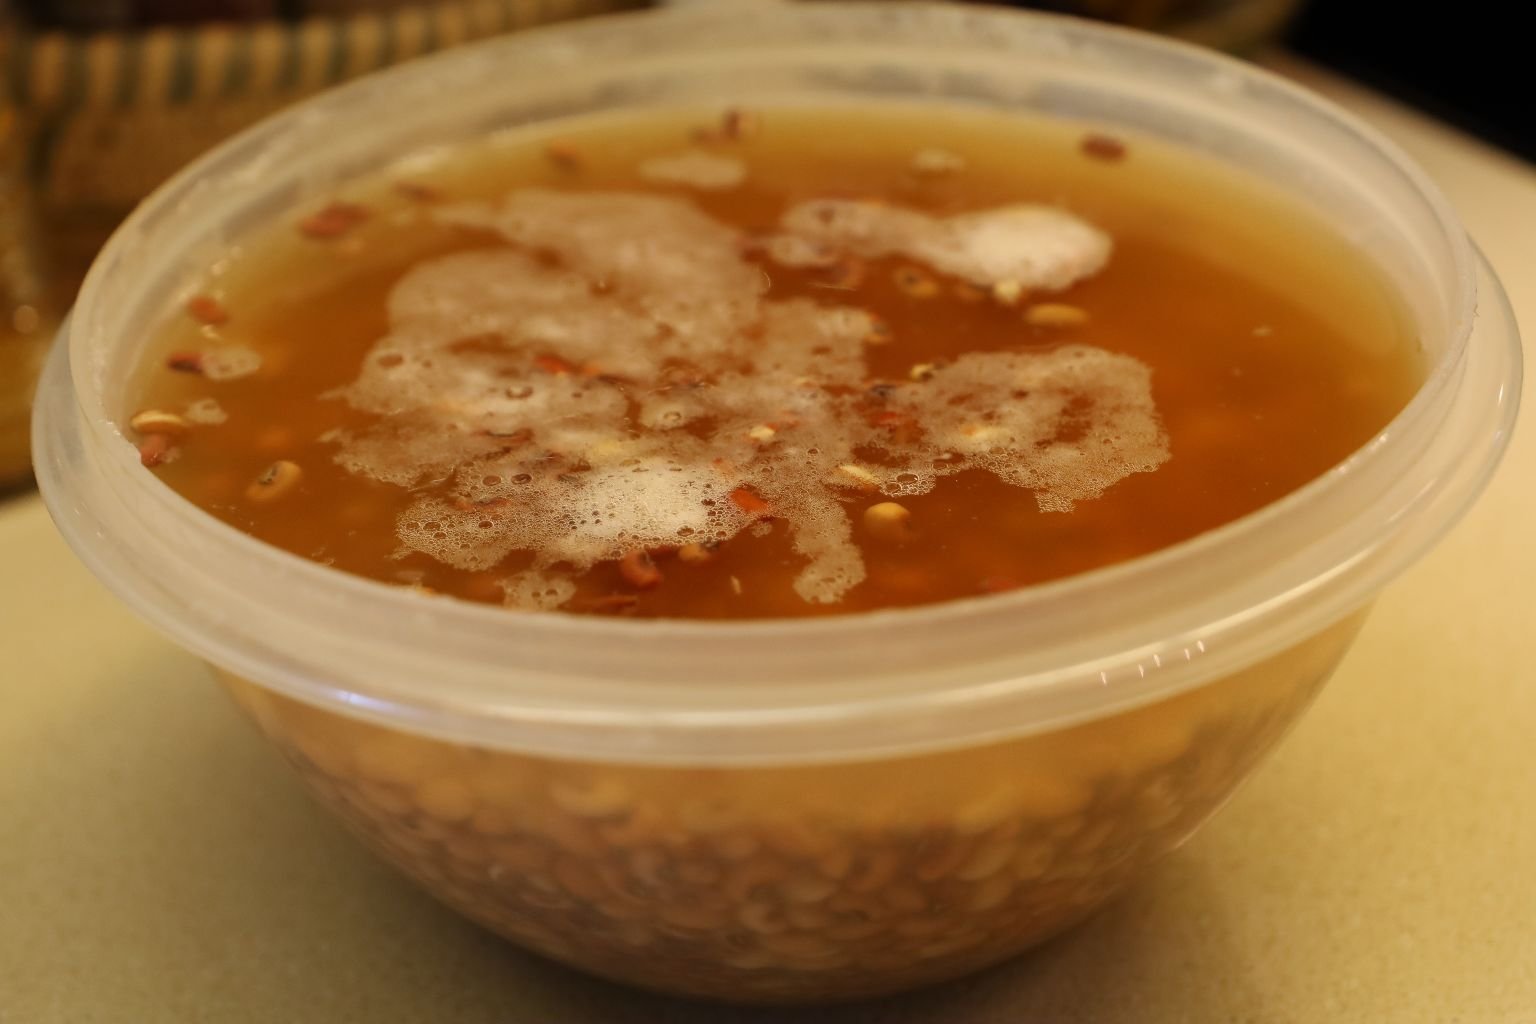
After 24 hours when the peas are tender then drain them of the excess water through a colander and rinse them.
—————————————————————
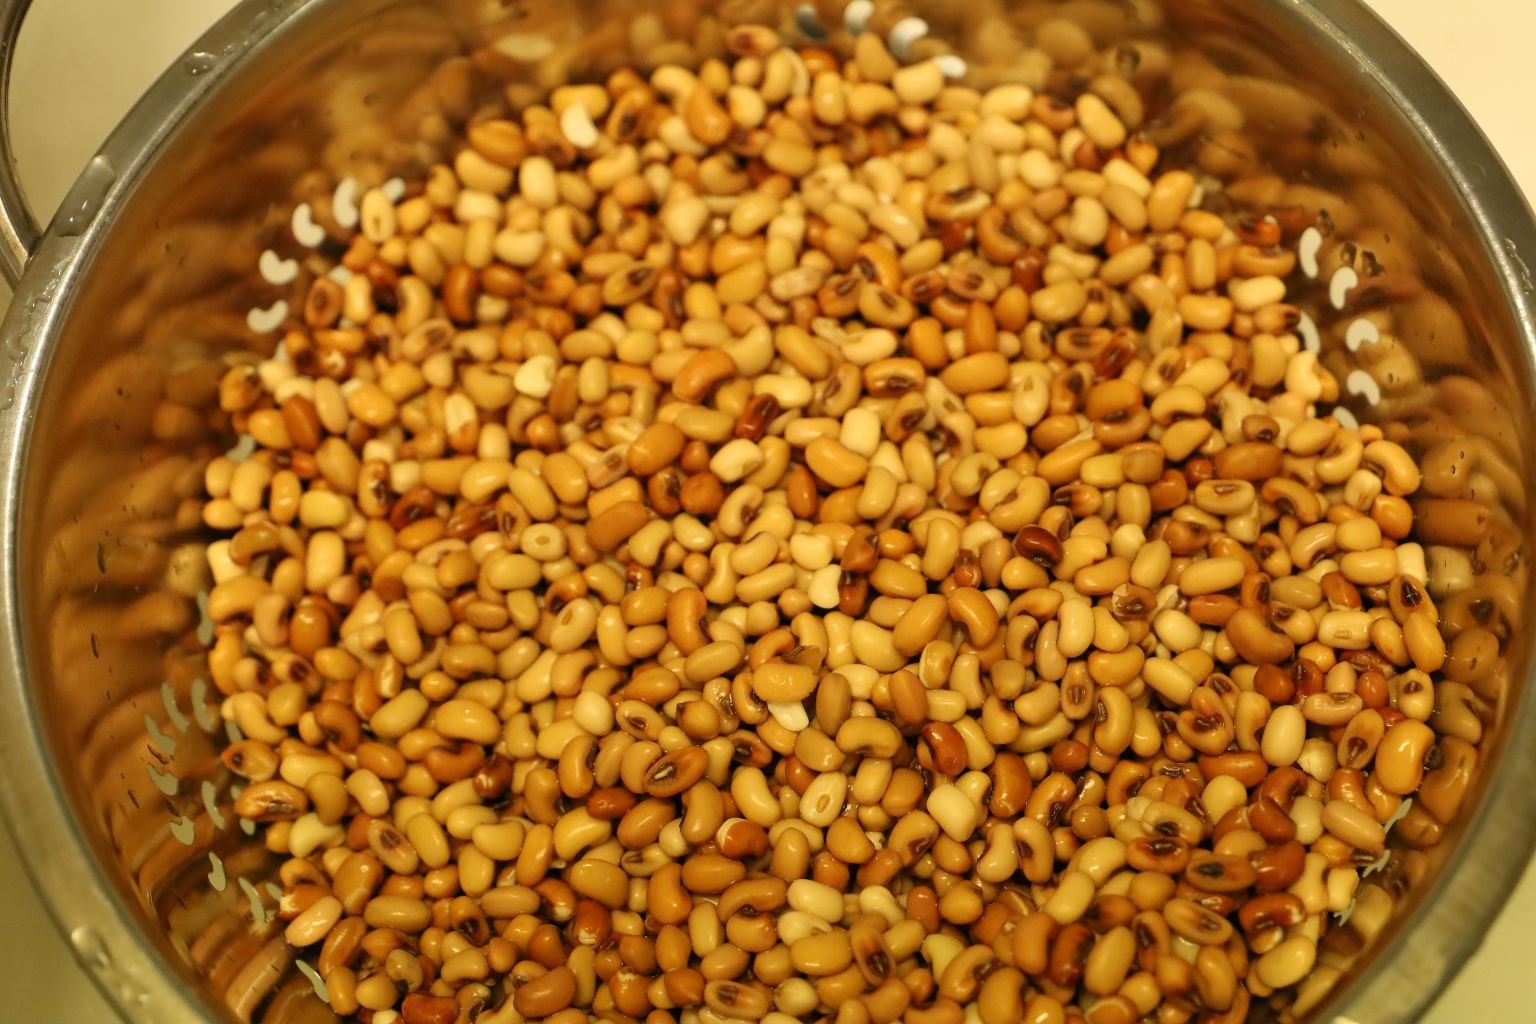
Here you can see the peas after they have absorbed the water and are ready for cooking.

Mackenzie showing off her knife skills by slicing a medium yellow onion to a small dice.
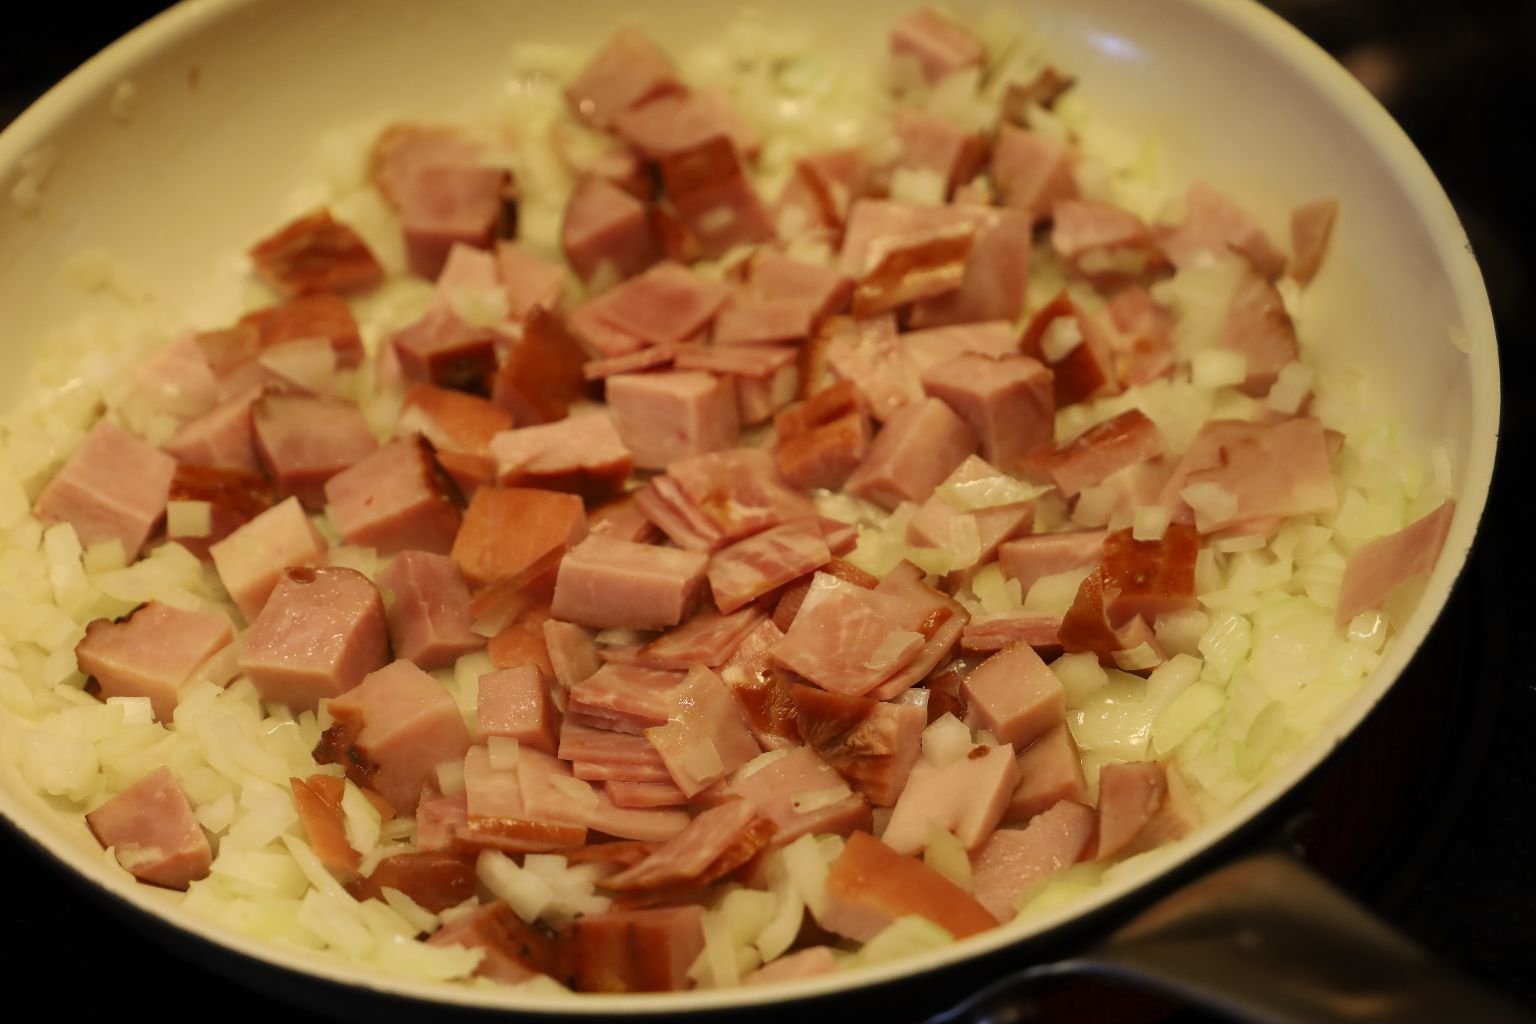
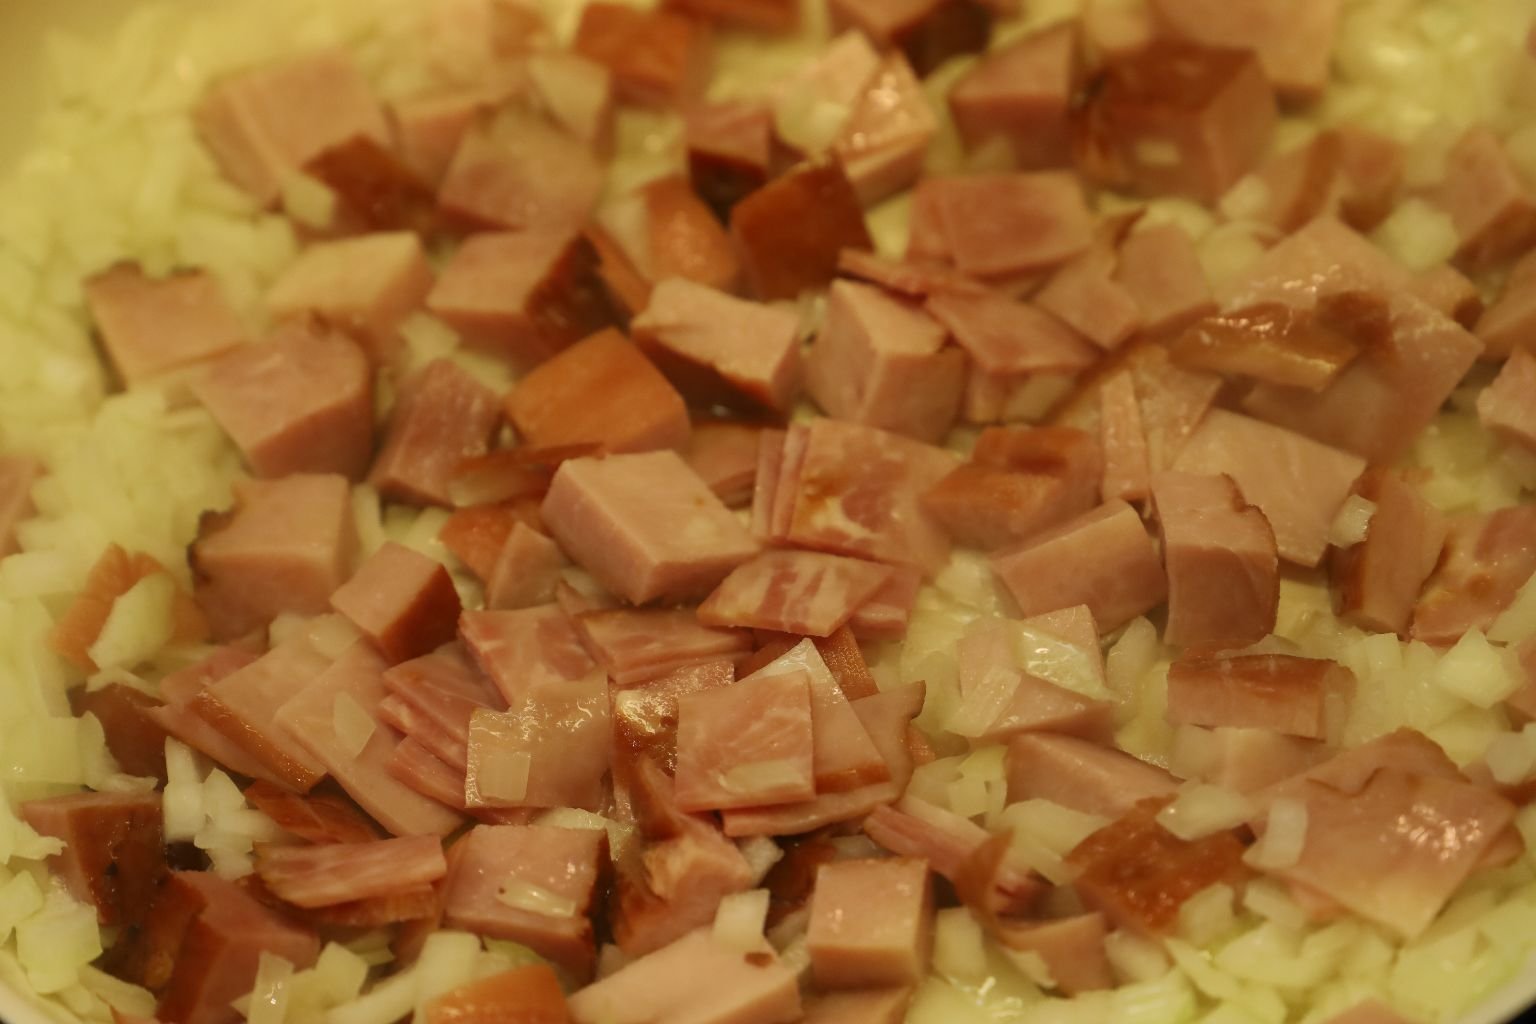
Add the diced onion to a large saute pan with a few tablespoons of bacon fat/grease. Let the onions cook for a few minutes then add some diced ham. I buy the Deli end cuts all the time from the Commissary (Military Supermarket) This isn’t sold in most stores. The end cuts are exactly that, the ends of the meat that are cut off to get to the nicer slices. In the Commissary they are half the price per pound and are perfect for dishes like this. Brodie is slightly browning the onions and ham together where each will absorb the other’s flavors, along with the great taste of the bacon fat!

Here you can see Brodie sauteing the ingredients with the bacon fat.
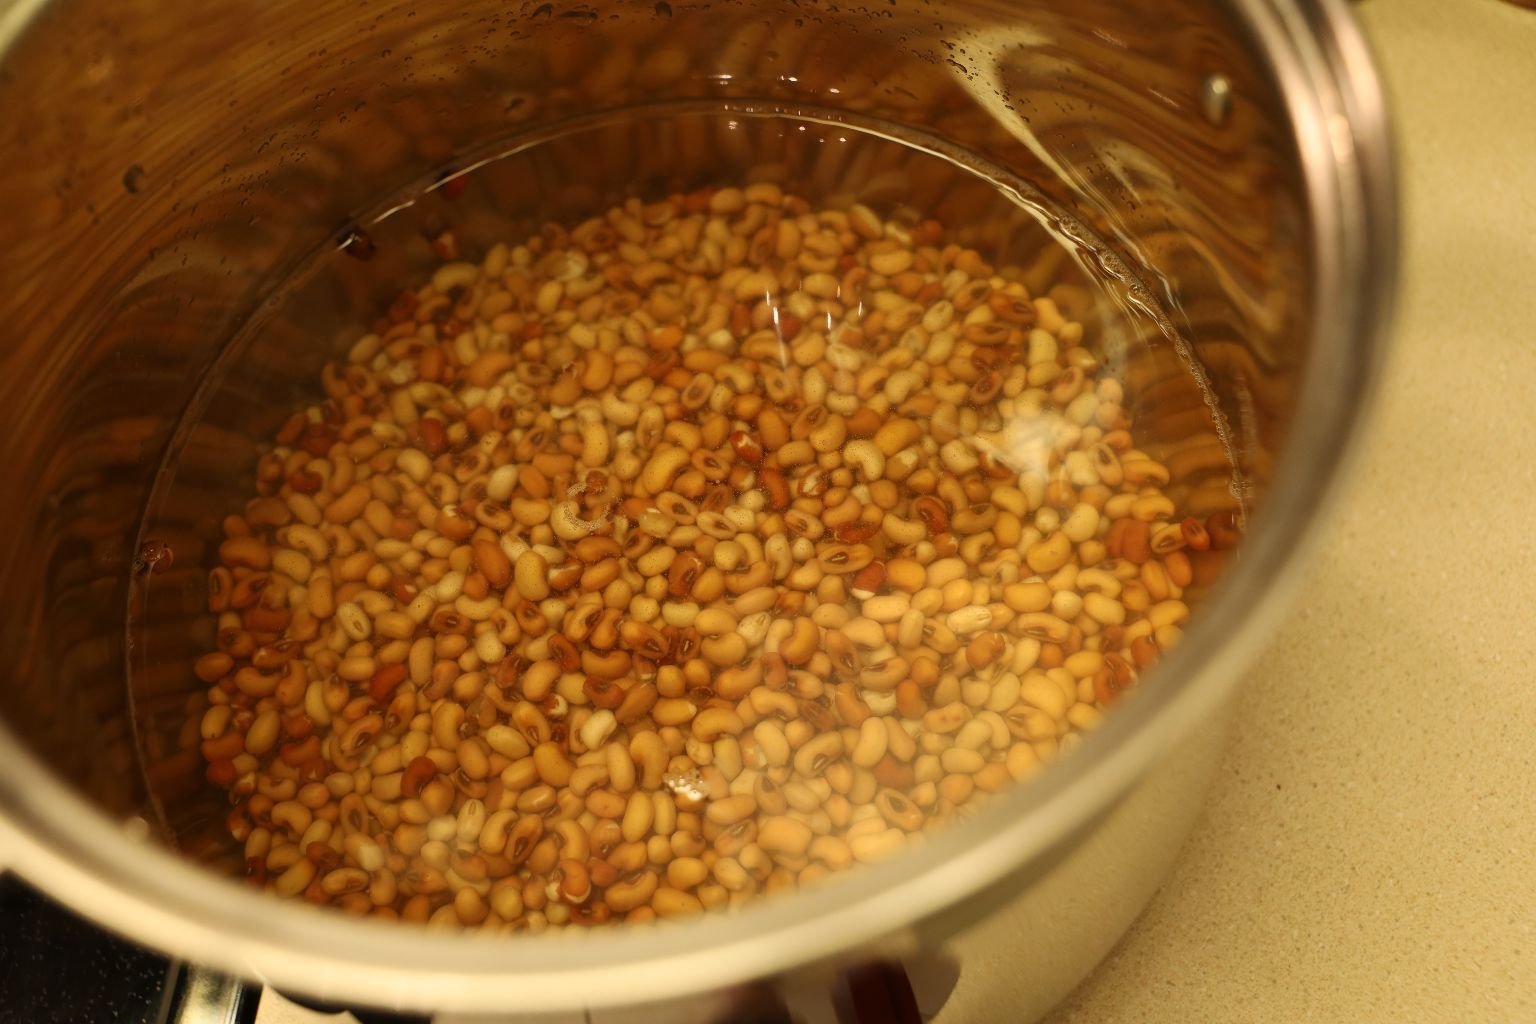
Cook the peas in a large amount of water to help them become tender. This will take a few hours of cooking. I didn’t add much salt to the water as the pork and bacon fat have enough salt in them.
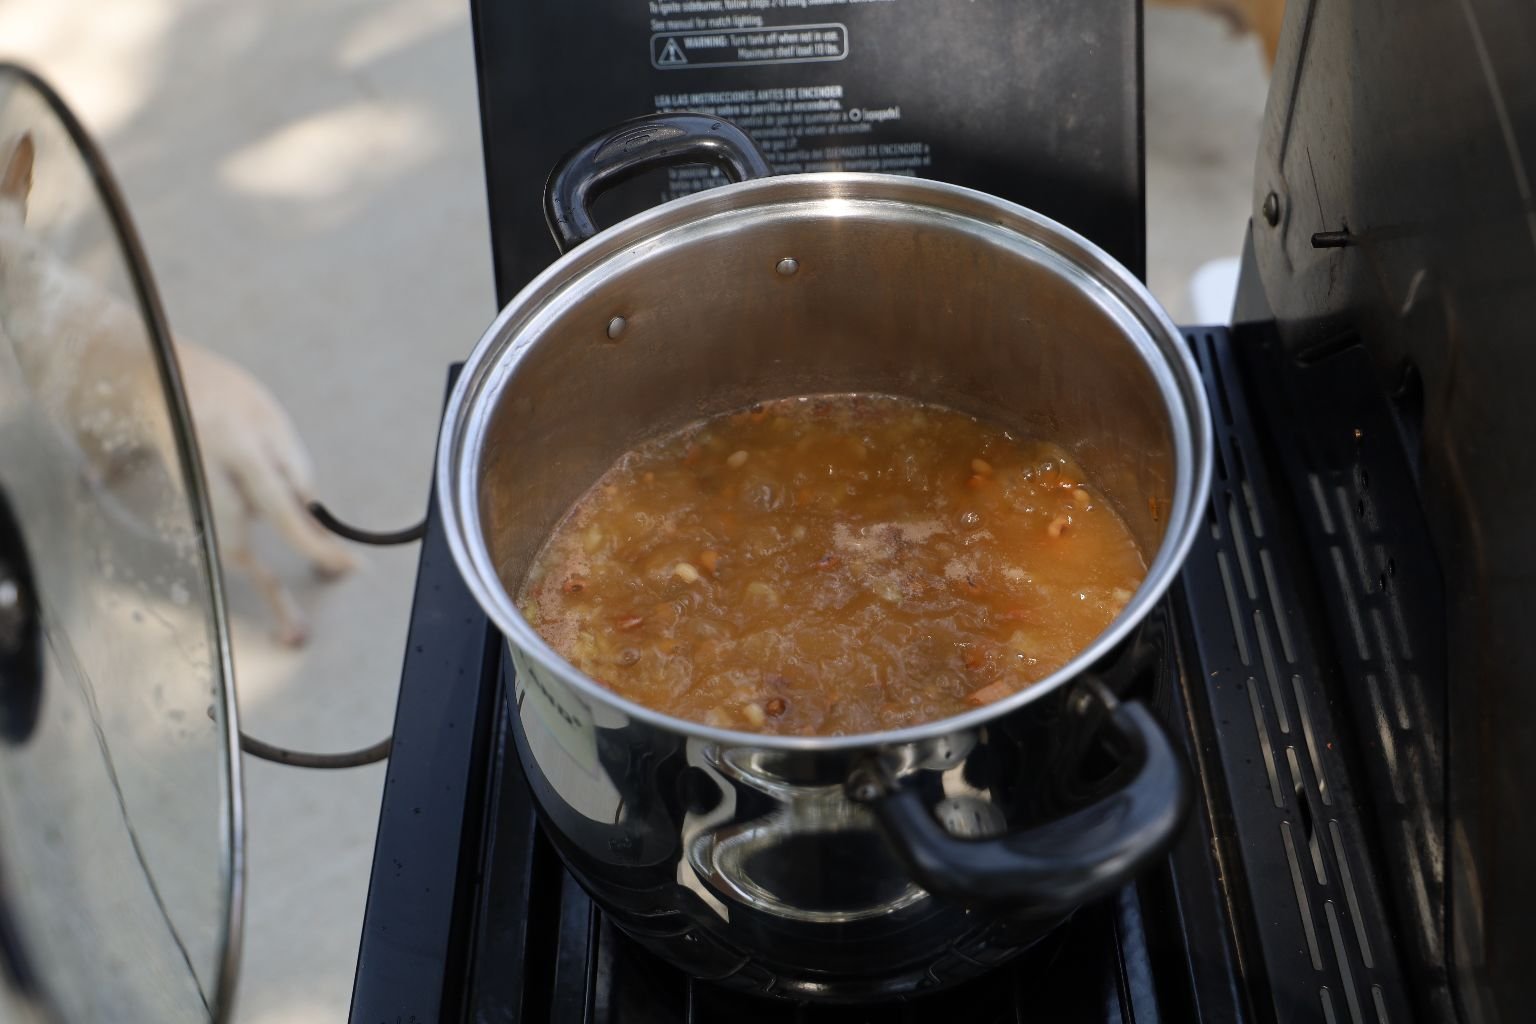
Since I was cooking at the grill, I thought it would be a great idea to use my grill’s side burner as shown. Cover the Red Peas and cook them until tender.
———————————————————————
Cooking the Red Peas on the Grill Burner

Once the peas are tender, remove most of the water and add the pork and onion mixture, cover with a lid and place on low heat stirring occasionally so they don’t burn.
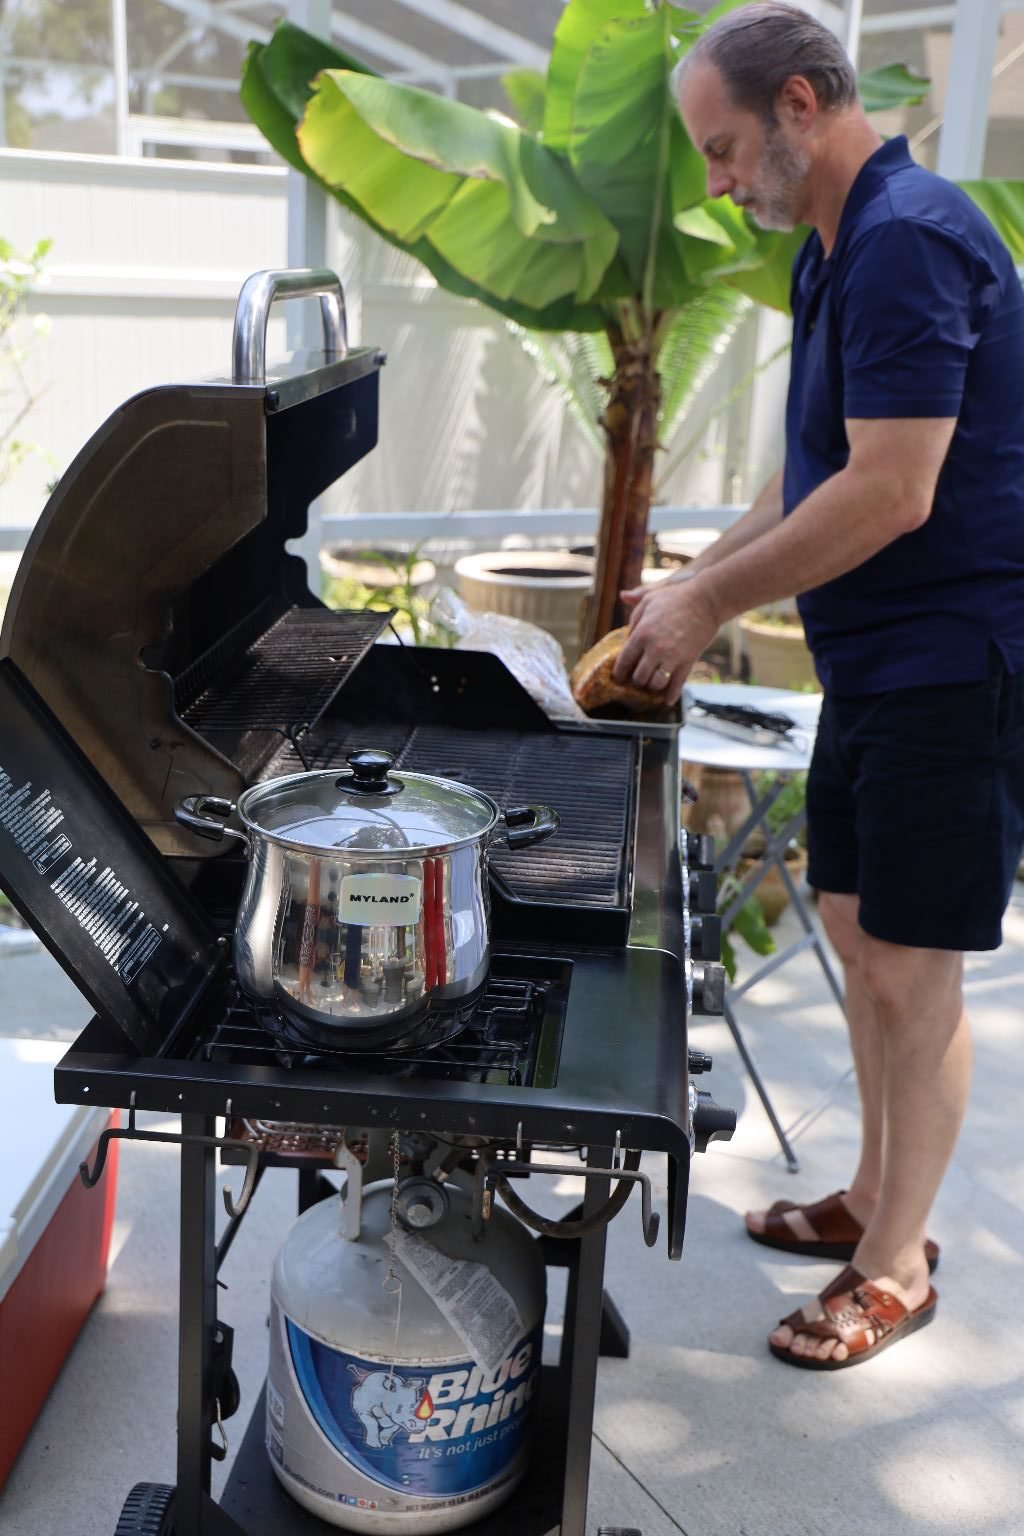
Seeing as how we ate outside we didn’t plate the peas. We just kept them on a simmer to stay warm and everyone just helped themselves.
——————————————————————–
Smith House Yeast Rolls
Below are the ingredients from above:
1 Package Yeast
1 1/2 Cups lukewarm water
2 Unbeaten Eggs
4 Tbsp. Sugar
1 tsp. Salt
3/4 Cups Wesson Oil
4 1/2 Cups Plain Flour
When ready to bake:
1 Stick of Melted Butter
Smith House Recipe Yeast Dough
(Waiting for the dough to rise.)
Made by Brodie and Mackenzie


Mackenzie ready to make some biscuits from scratch!

Here are all the ingredients they used to make the great biscuits.


Here they are dissolving the yeast in a bowl in the lukewarm water.

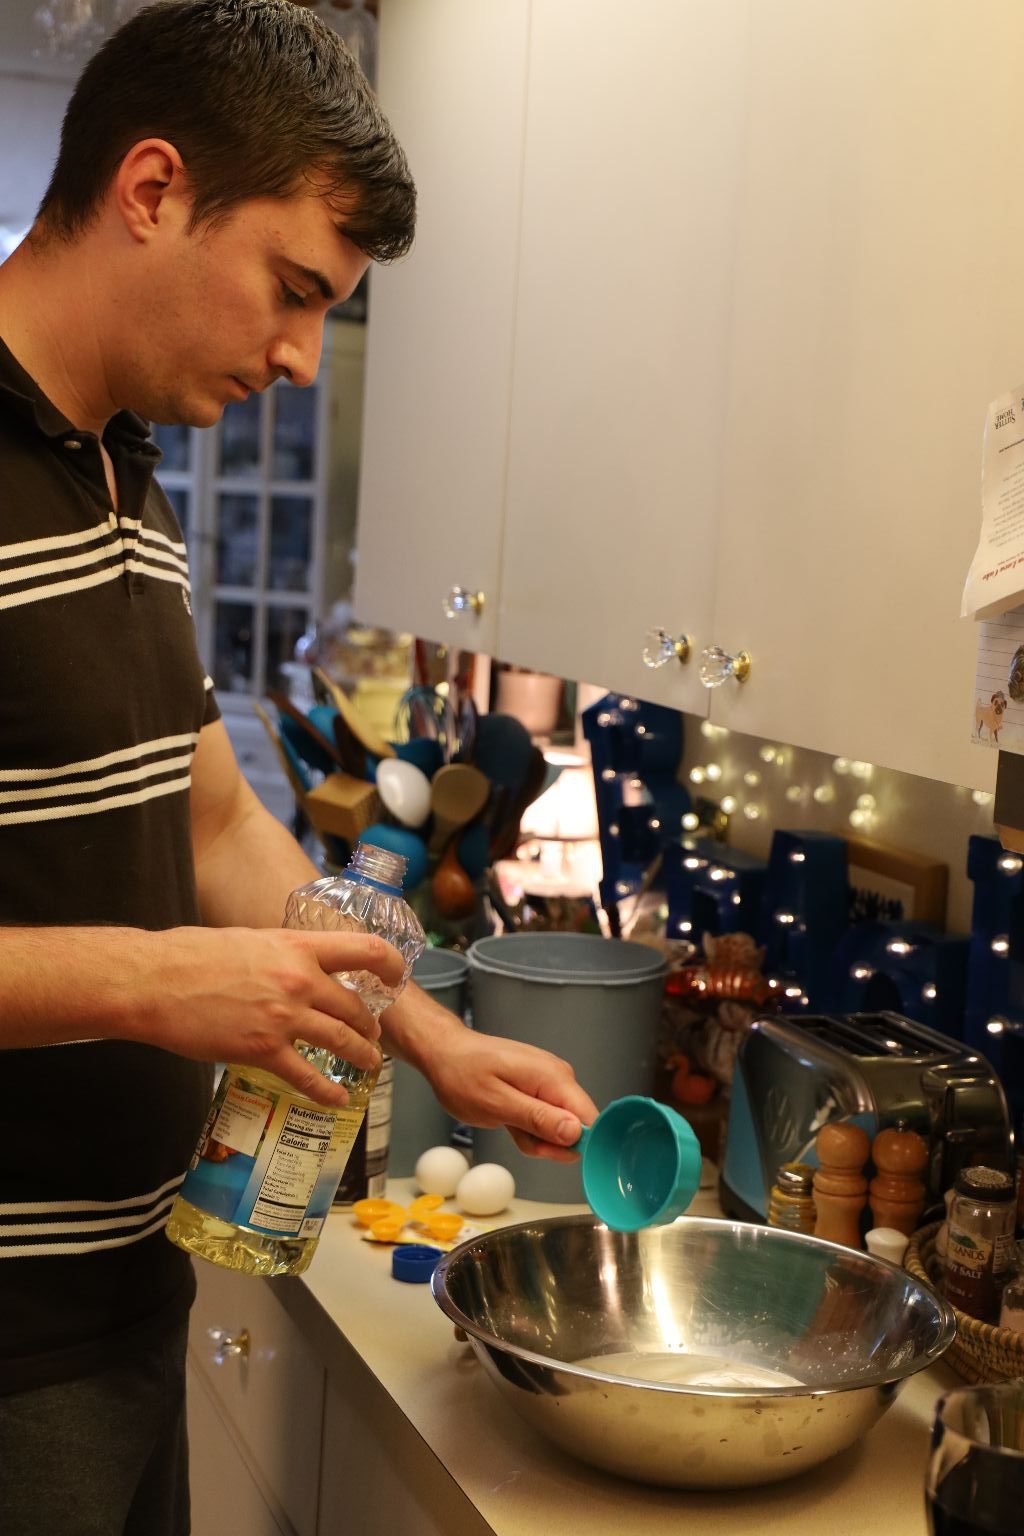
Brodie is then adding the Wesson Oil to the bowl.

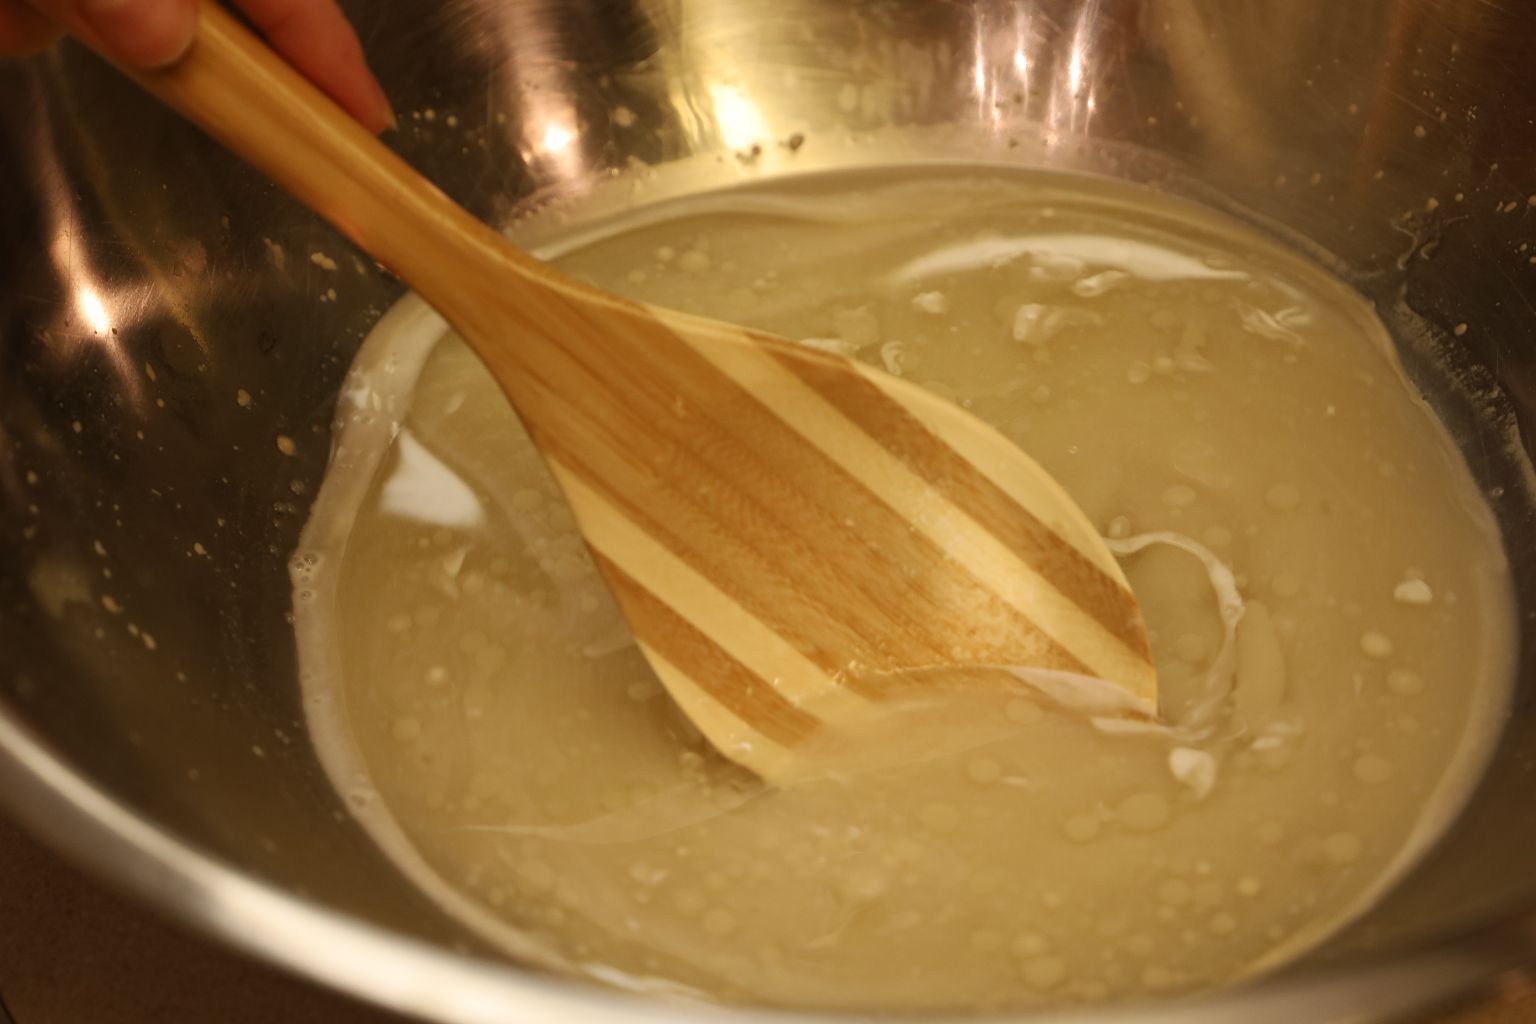
Stir in a little bit of the sugar to help the yeast activate which will only take a few minutes. You will see frothy bubbles forming when the yeast activates or blooms.

Once the yeast activates, add in the rest of the ingredients.
Here they are adding the eggs.


Then add the salt, sugar, and lastly the flour. Mix all the ingredients together as shown.

Adding more flour….

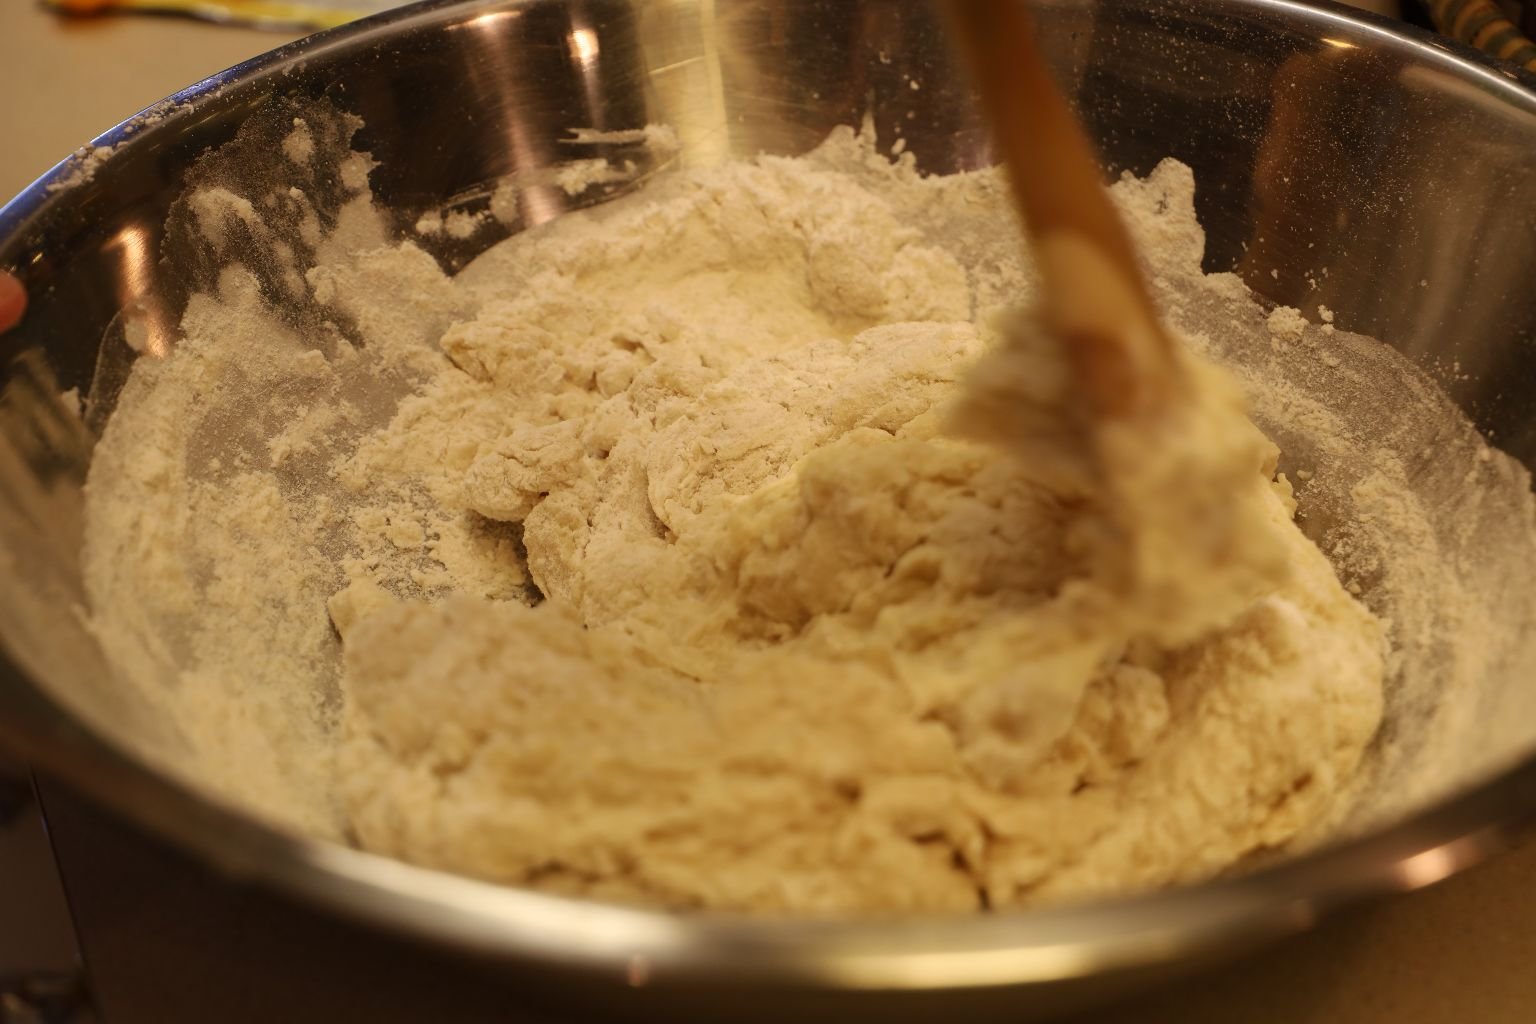
as you add the flour, you will see the dough start to form.
This is what you will get once all the flour is added. Now, knead the flour folding it over and over again on itself for a few minutes. This will help to combine all the ingredients and start the dough to form gluten, which makes the dough elastic.


Place the dough in a large bowl that has been lightly oiled. Oil the dough as well which as is grows will help it to rise along the sides of the bowl. Place the dough in a warm spot and cover with a dish cloth. If it is cold out, I will use my oven for this. Turn the oven on for about 30 seconds then turn it off and place the covered bowl inside. Don’t open the oven for about 45 min.
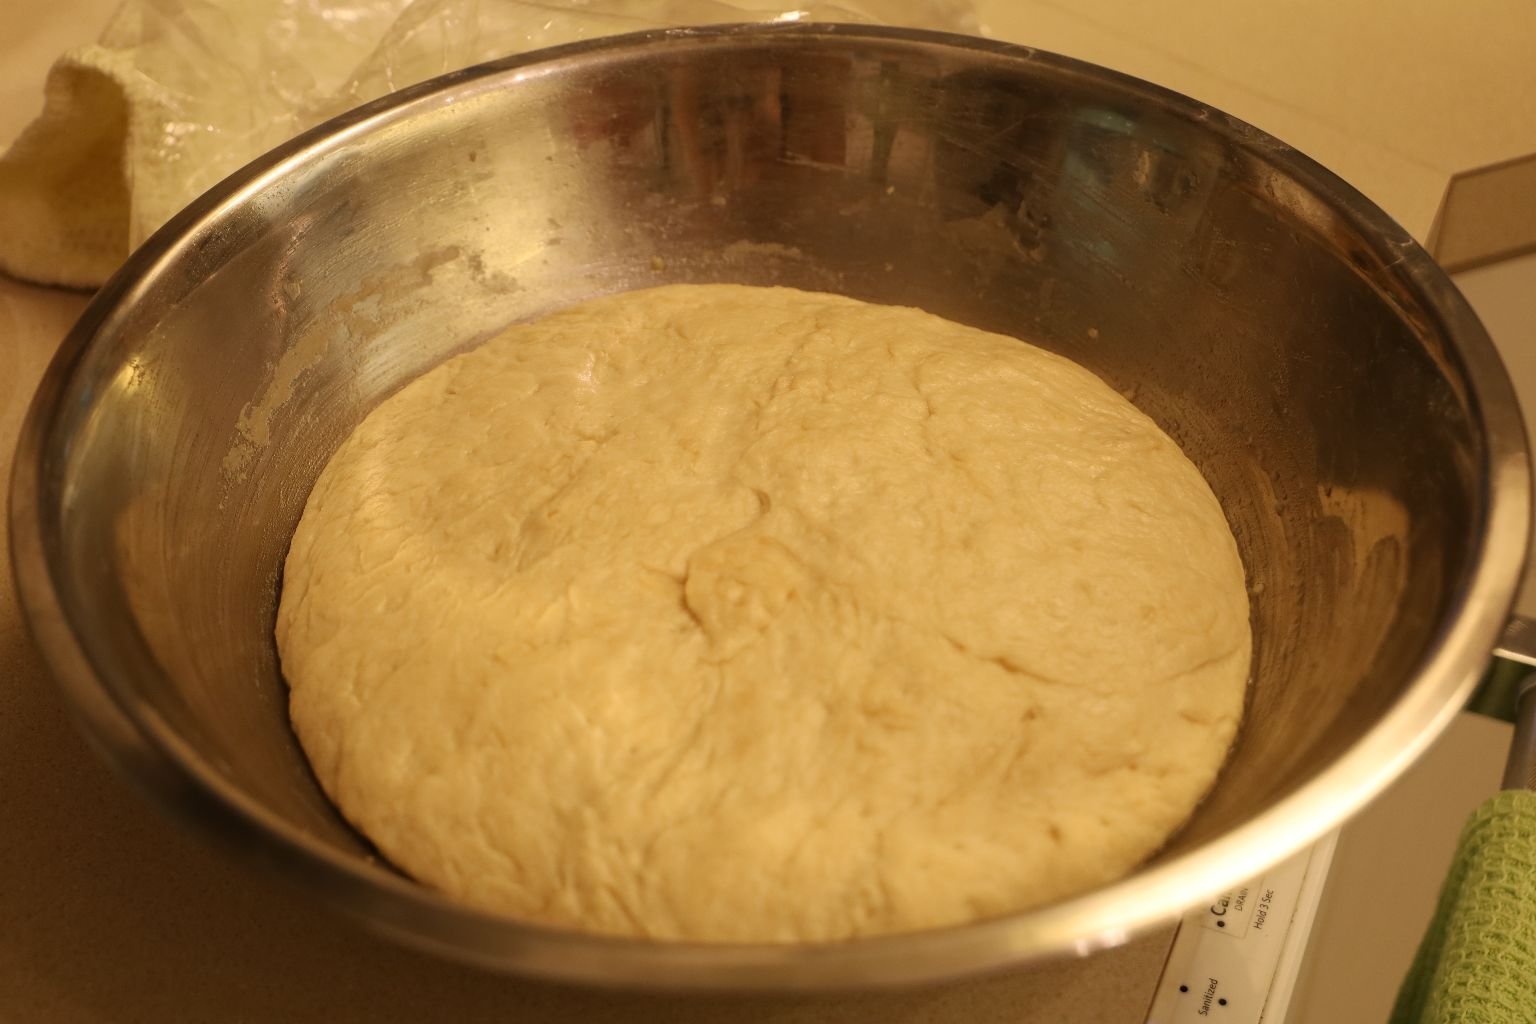
Here you can see the dough has risen.

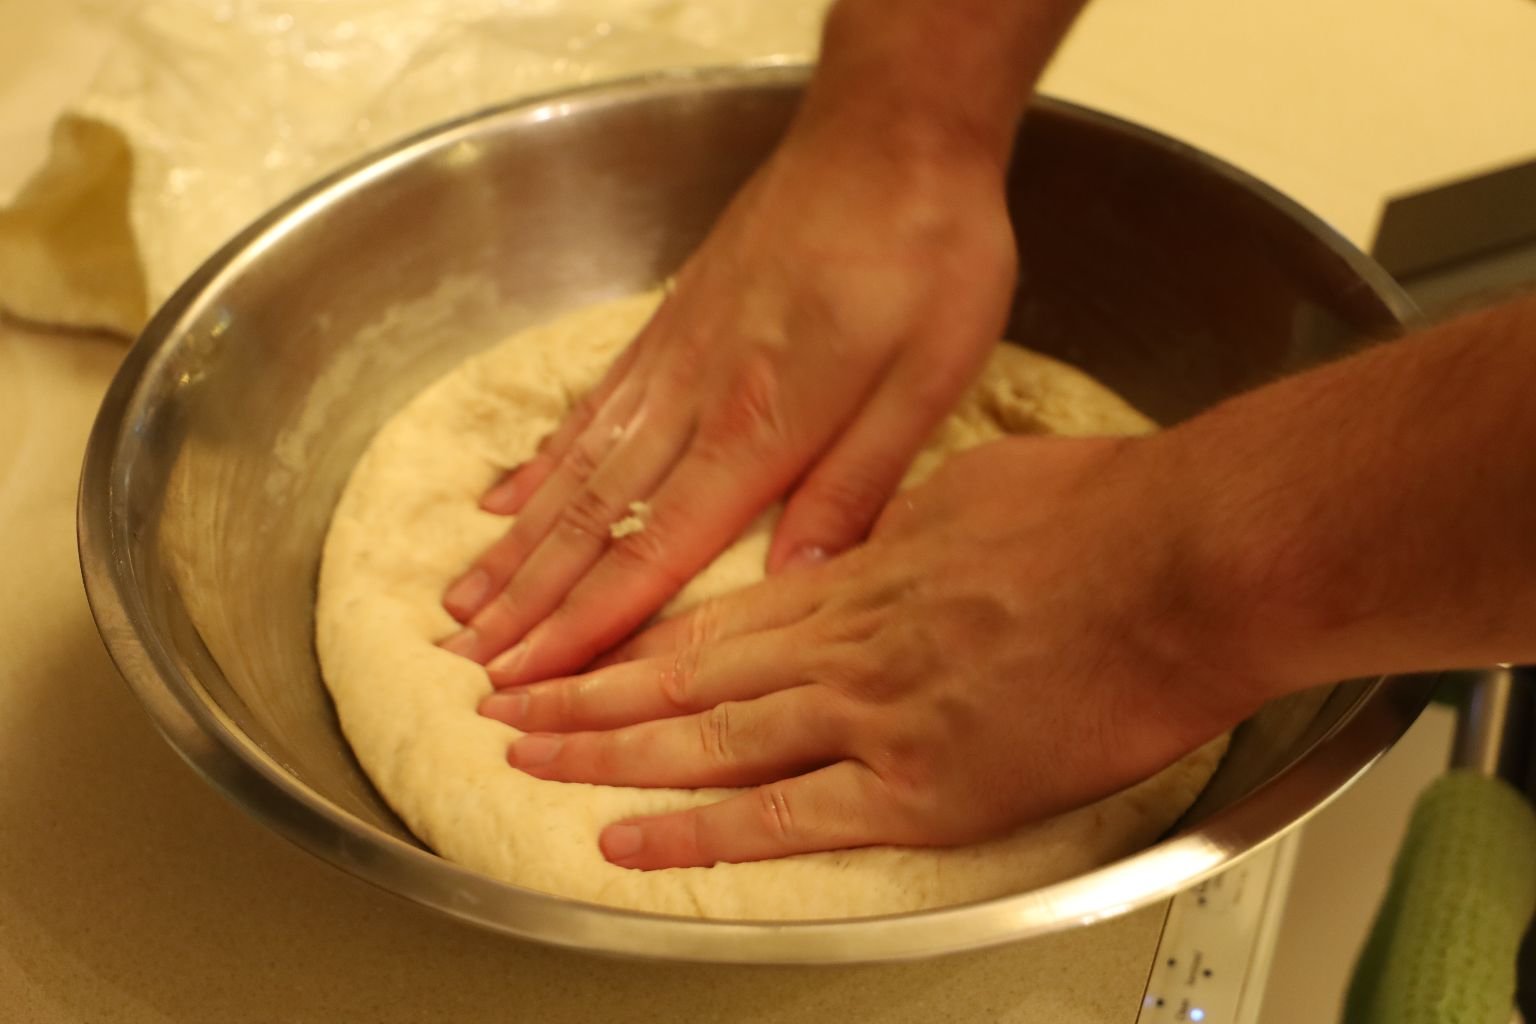
Now punch down the dough as Brodie is doing and place the dough back in the warm spot for another 45 min. to let it rise again.

Here you can see the dough has risen a second time and Brodie is now ready to roll it out on a floured surface.
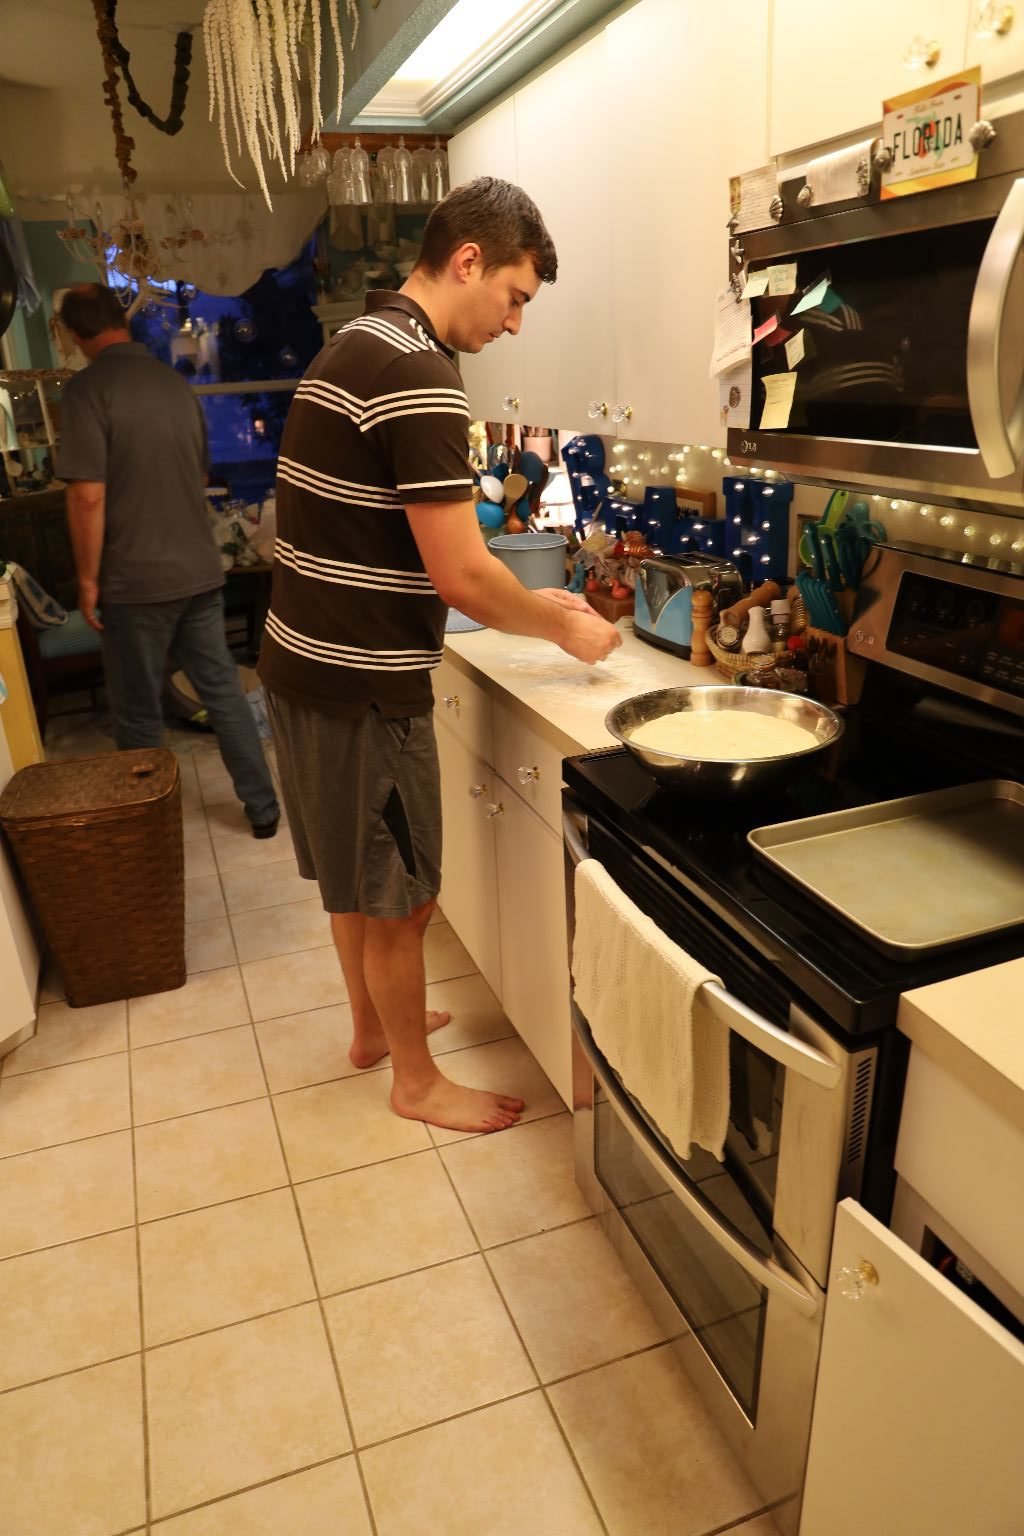
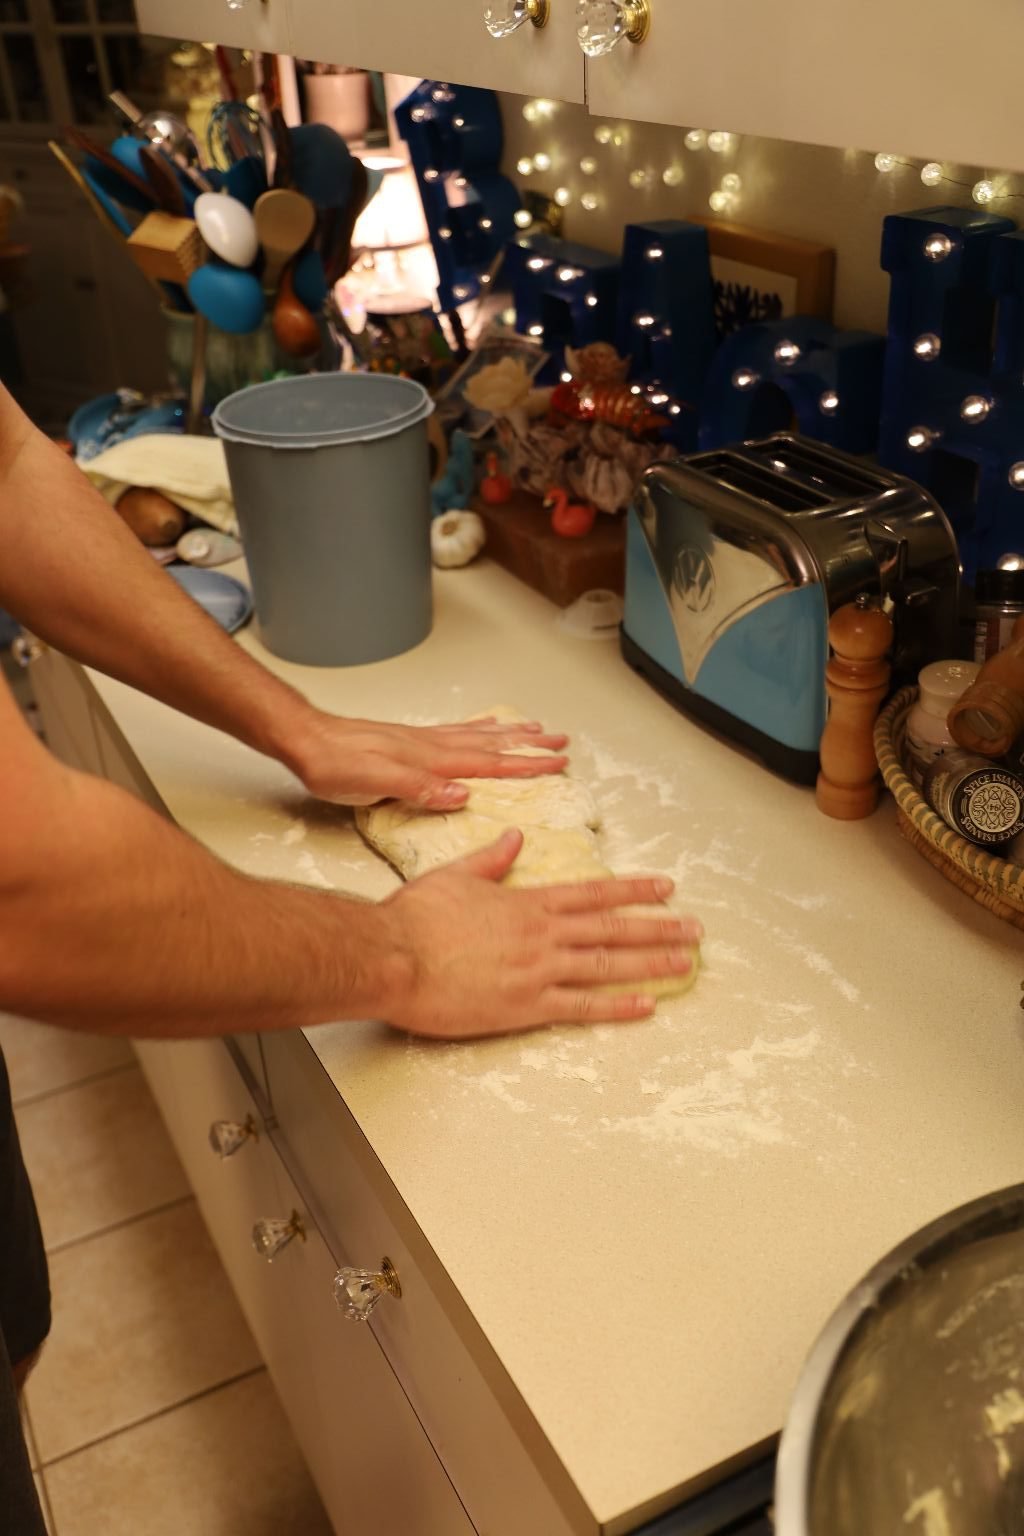
Lightly sprinkle the flour over the counter top as shown. Remove the dough from the bowl and begin to flatten it to 3/4 of an inch thick.
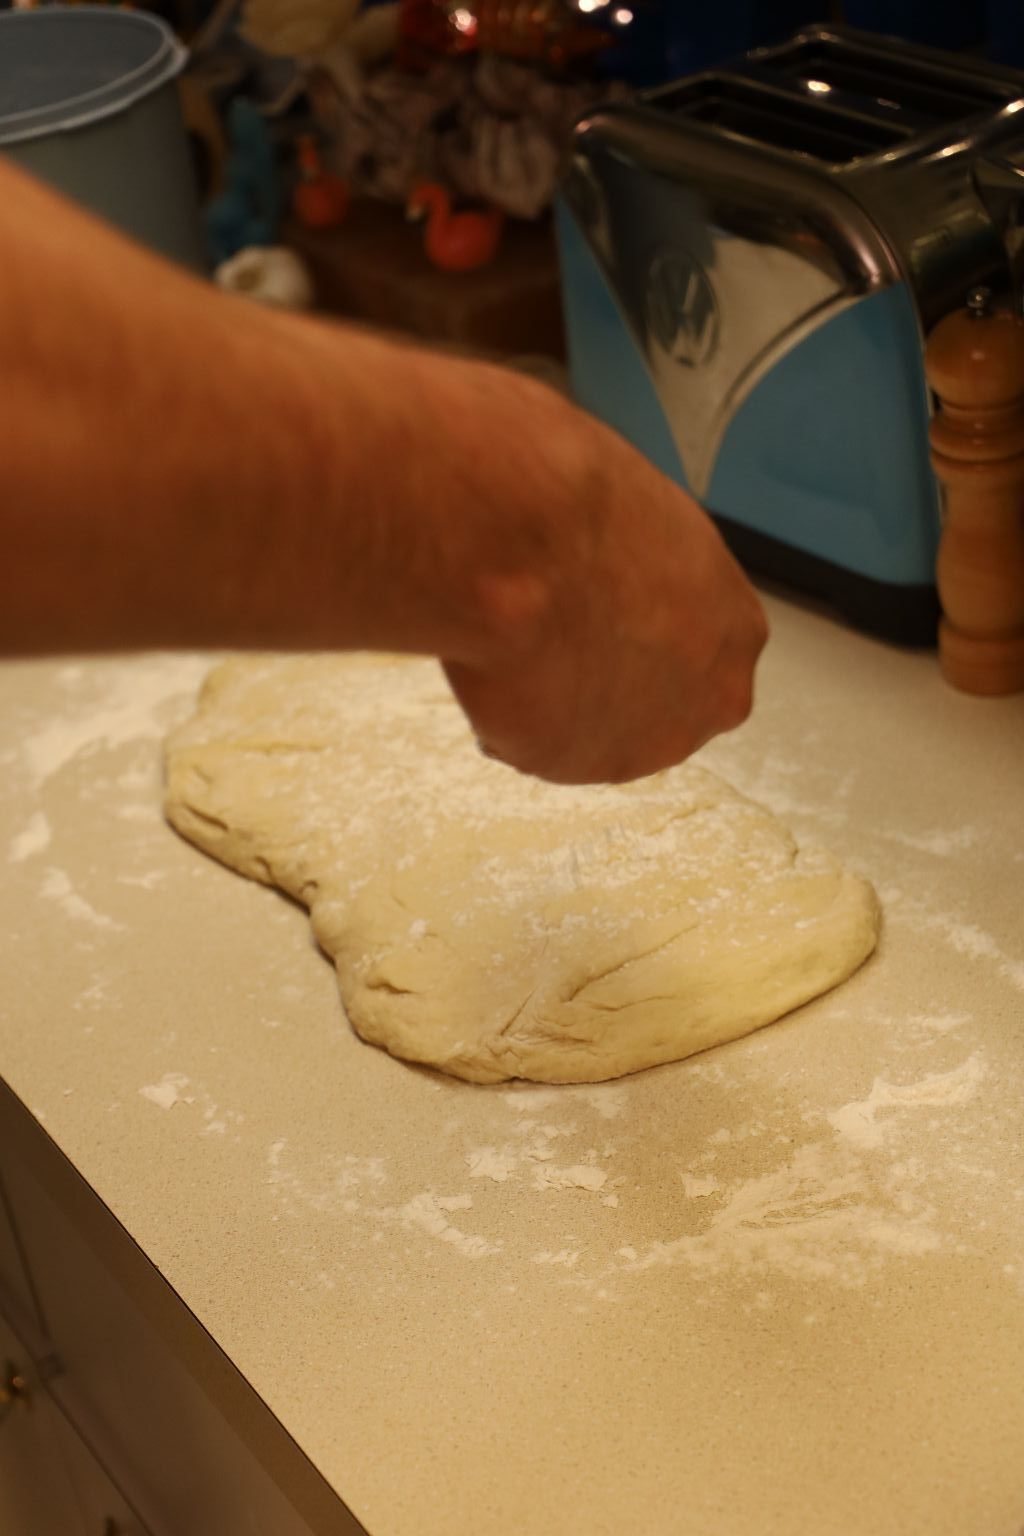
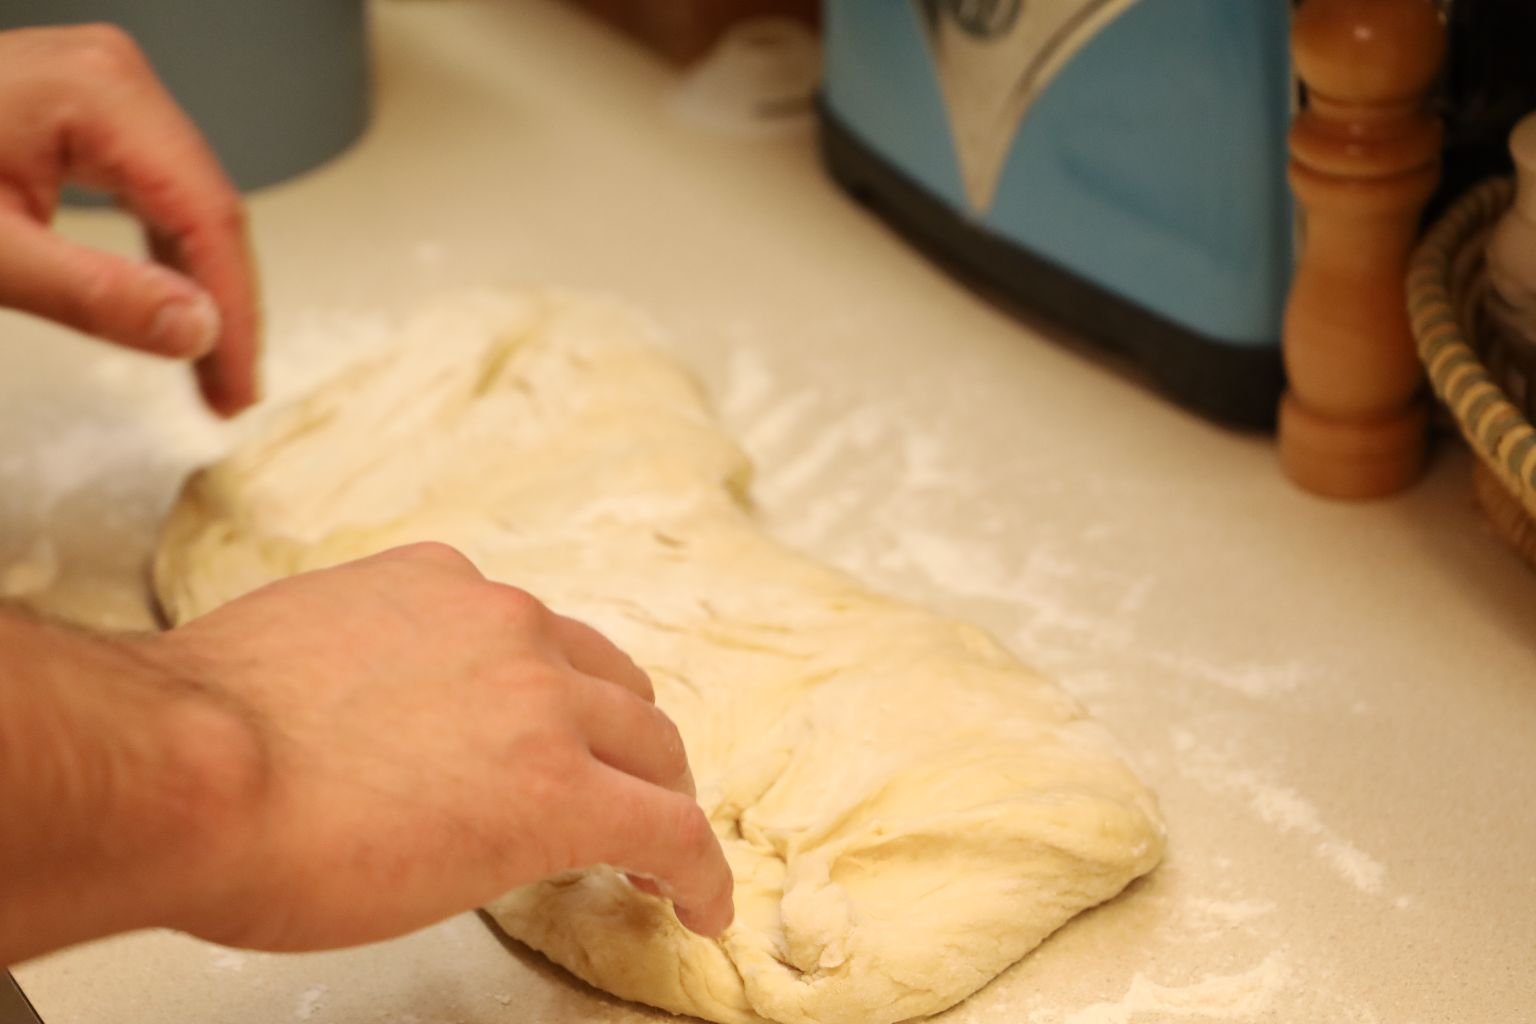
Brodie is placing a little flour on top as well to prevent the roller from sticking.
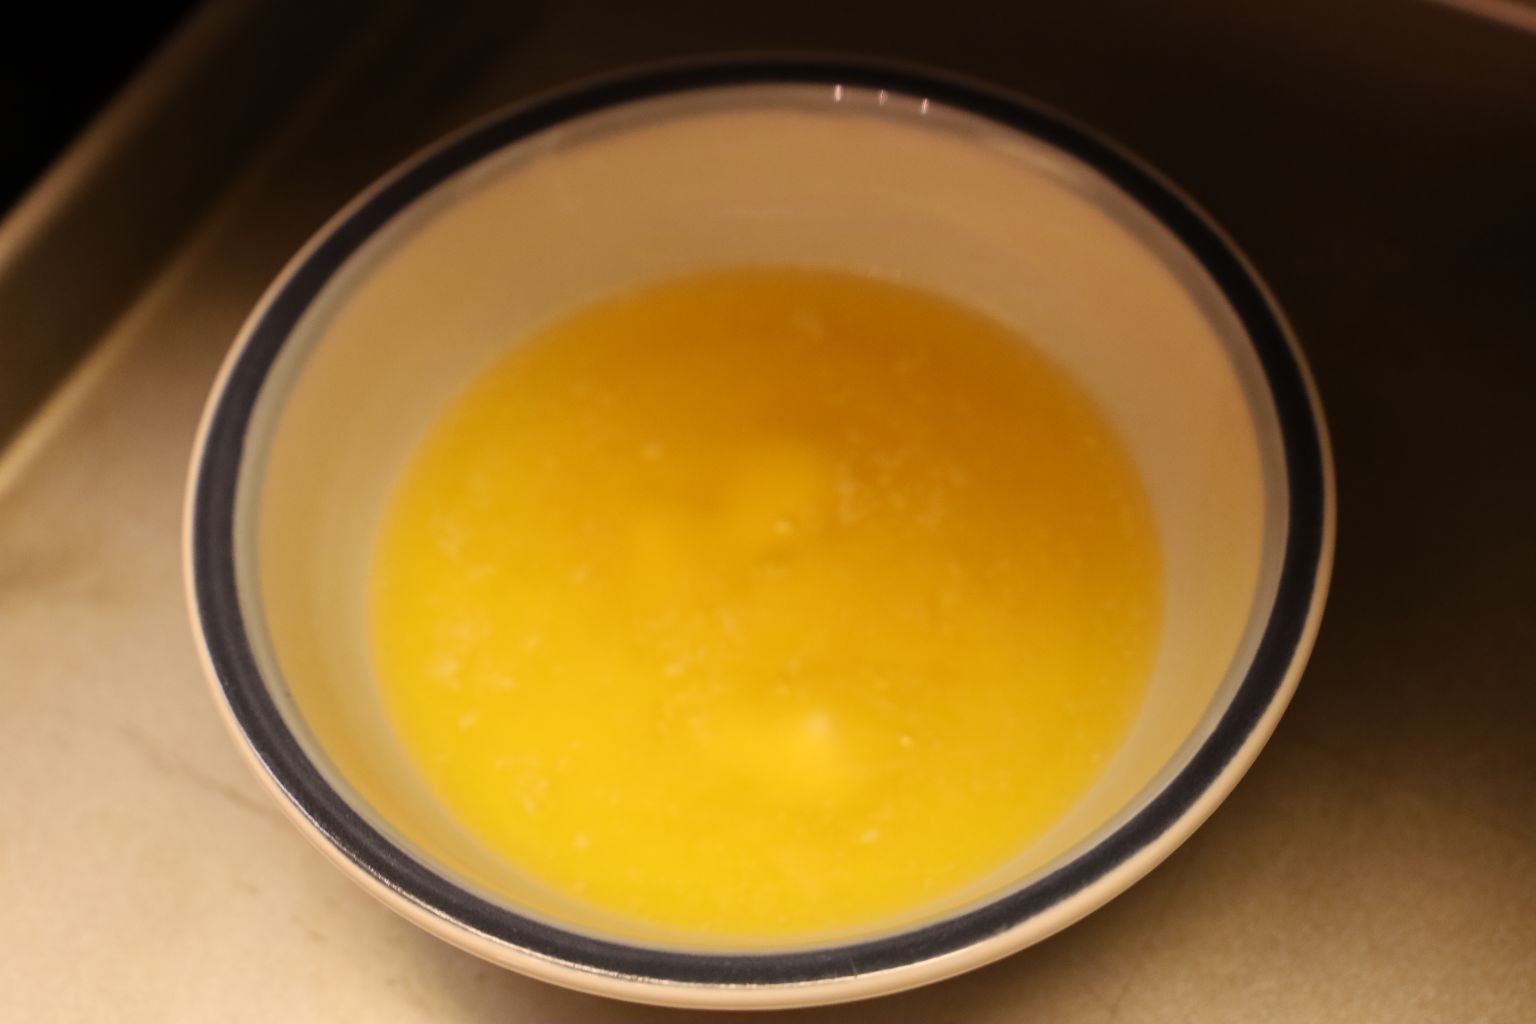
Melt one stick of butter in the microwave.
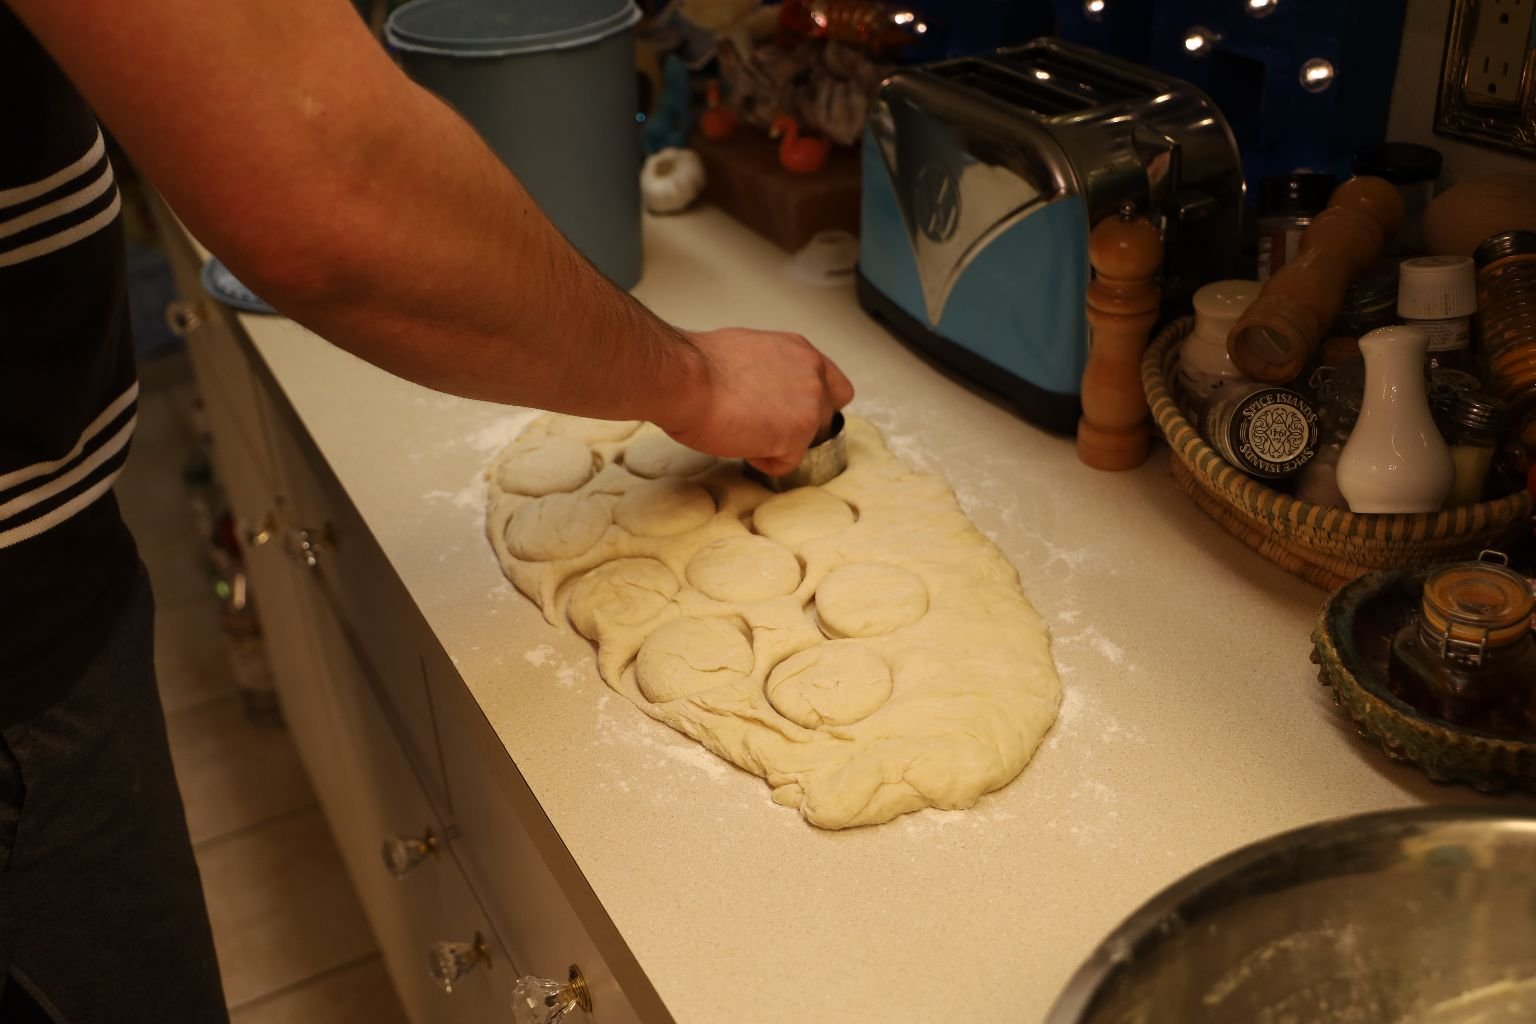
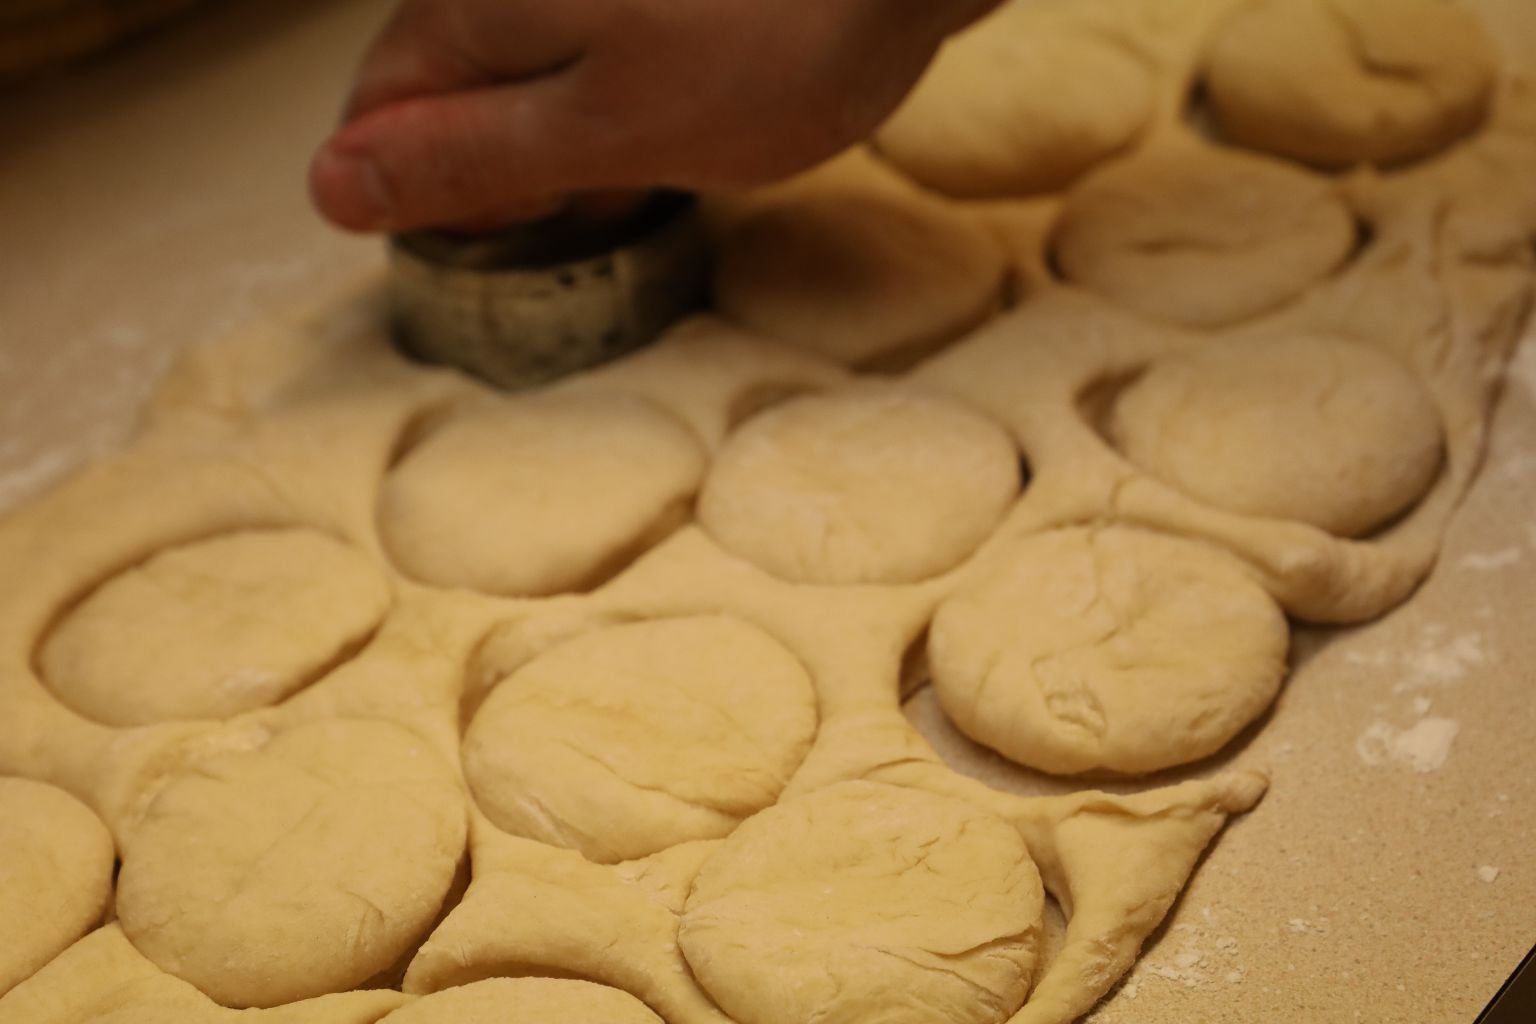
Using a biscuit cutter, cut the biscuits into perfect rounds.
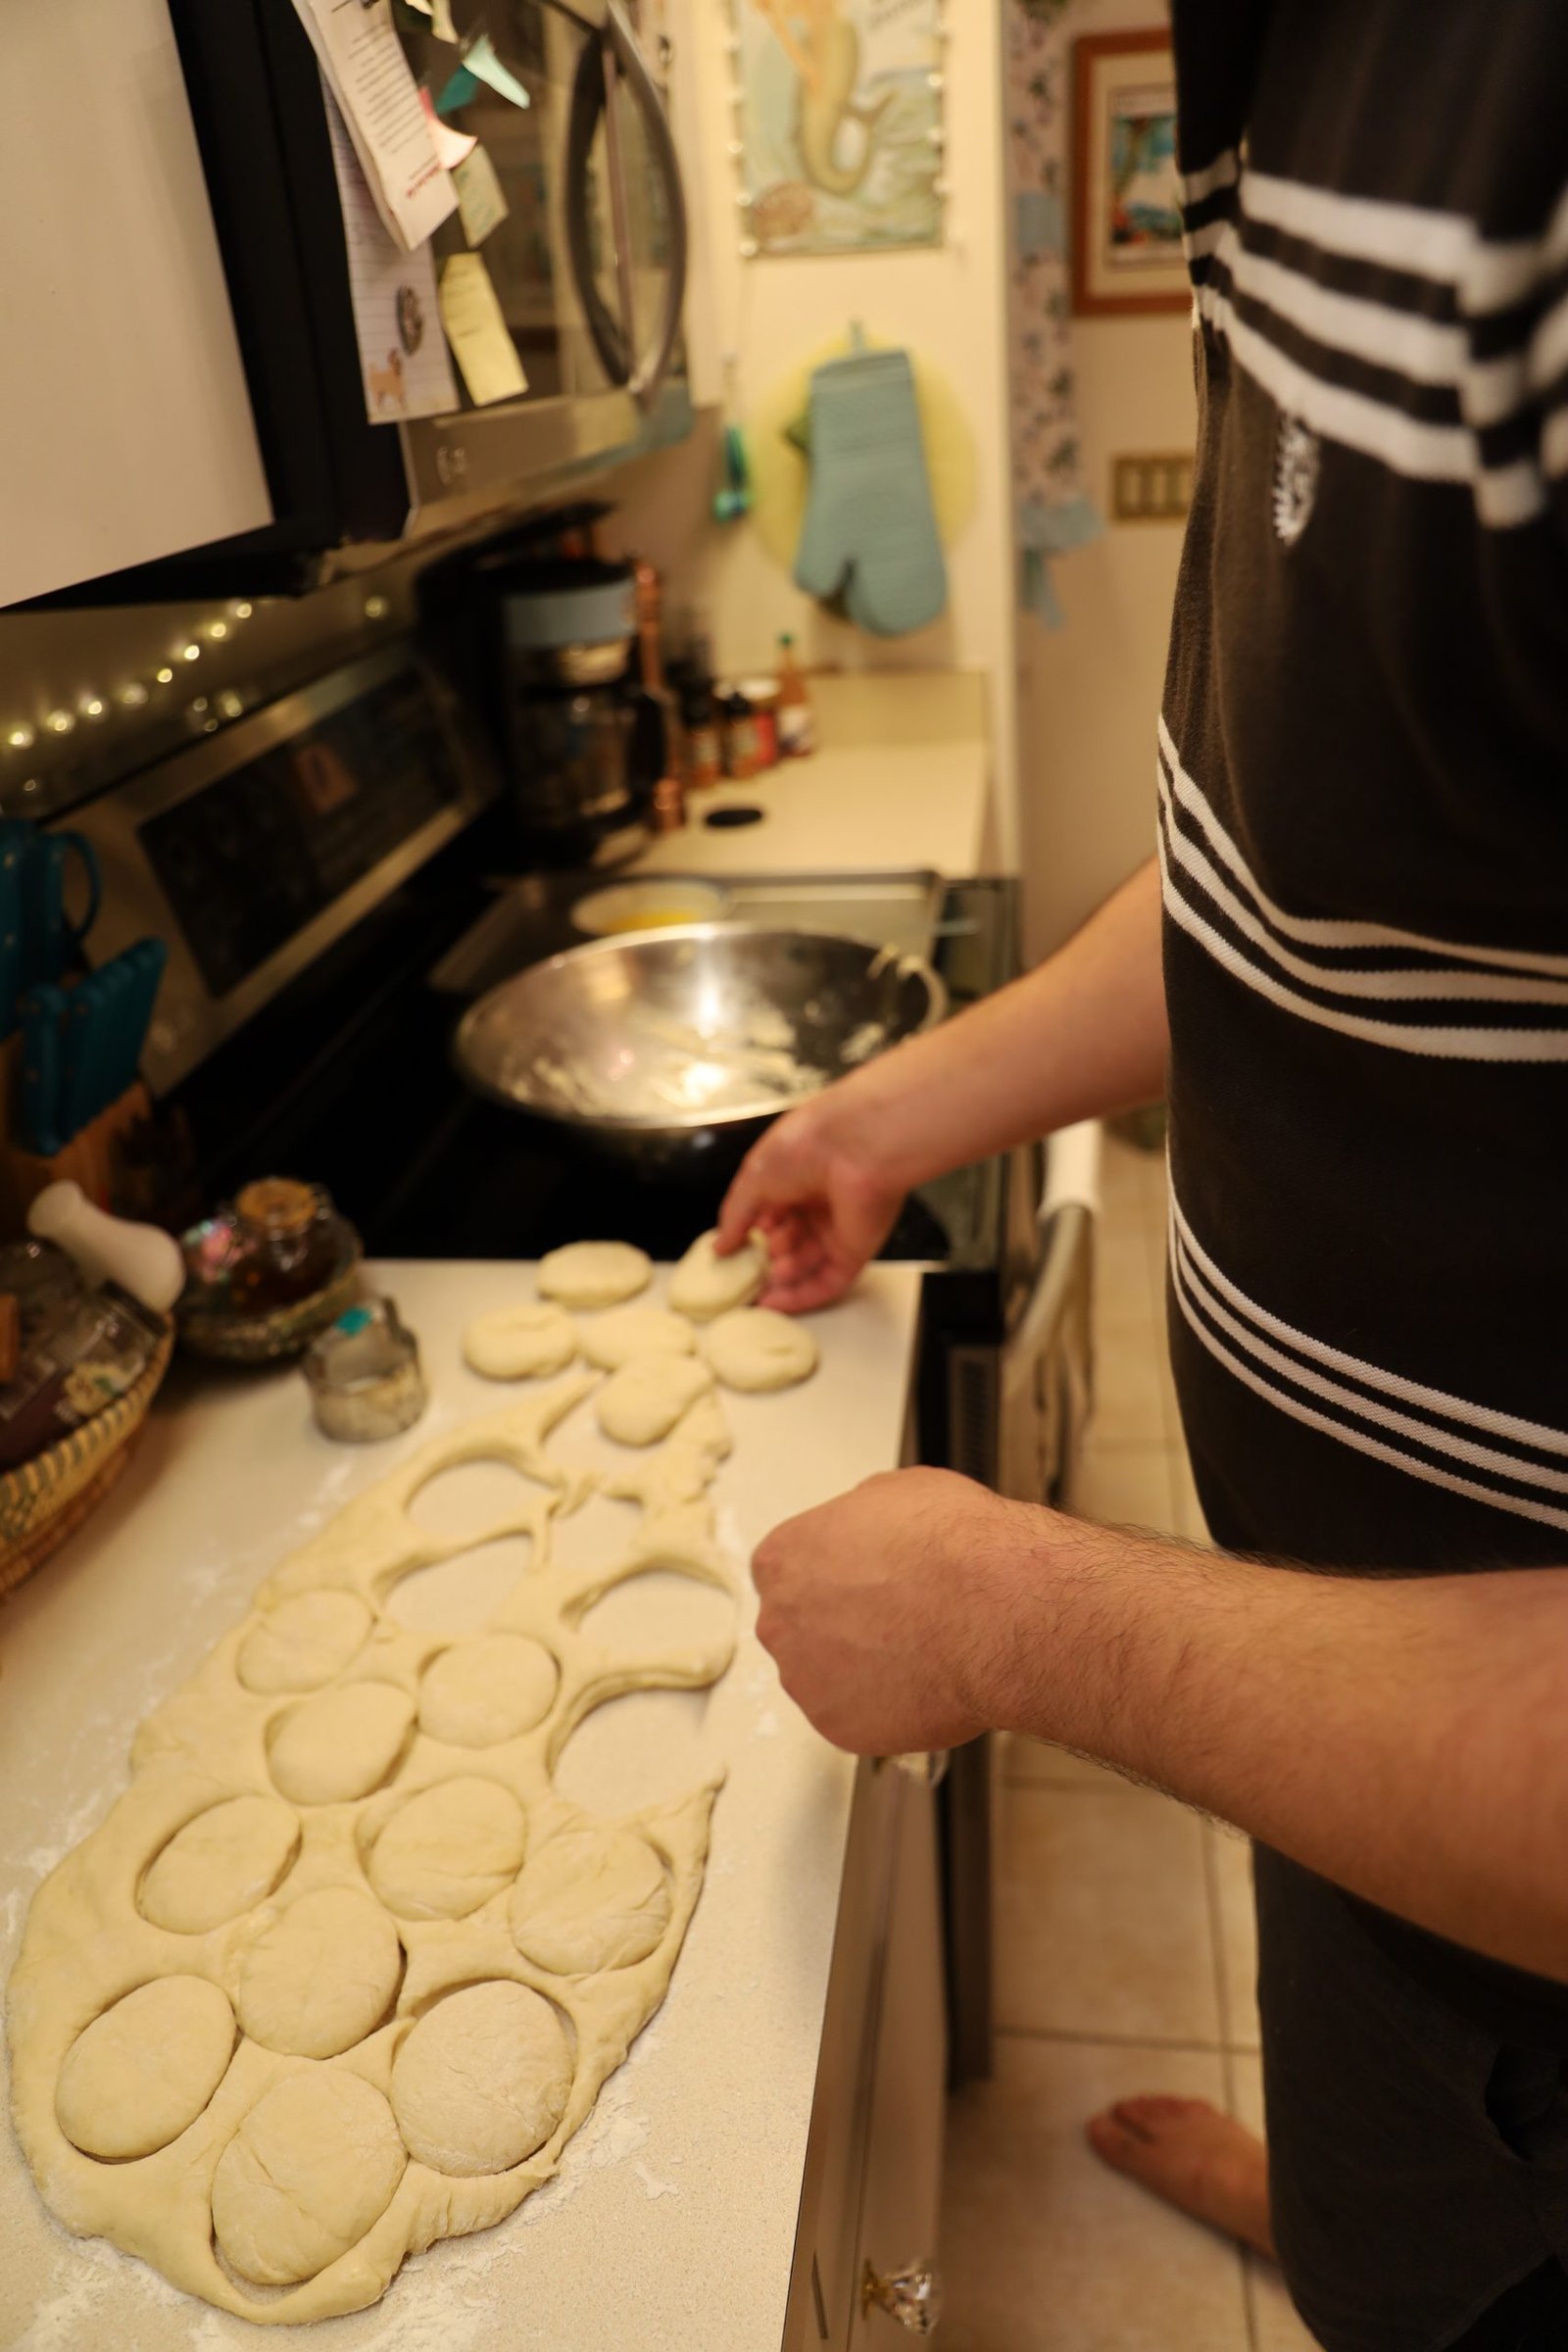

Here you can see the nicely cut biscuits.
Remove the excess dough and form it again into 3/4 inch round and continue to cut out more biscuits.

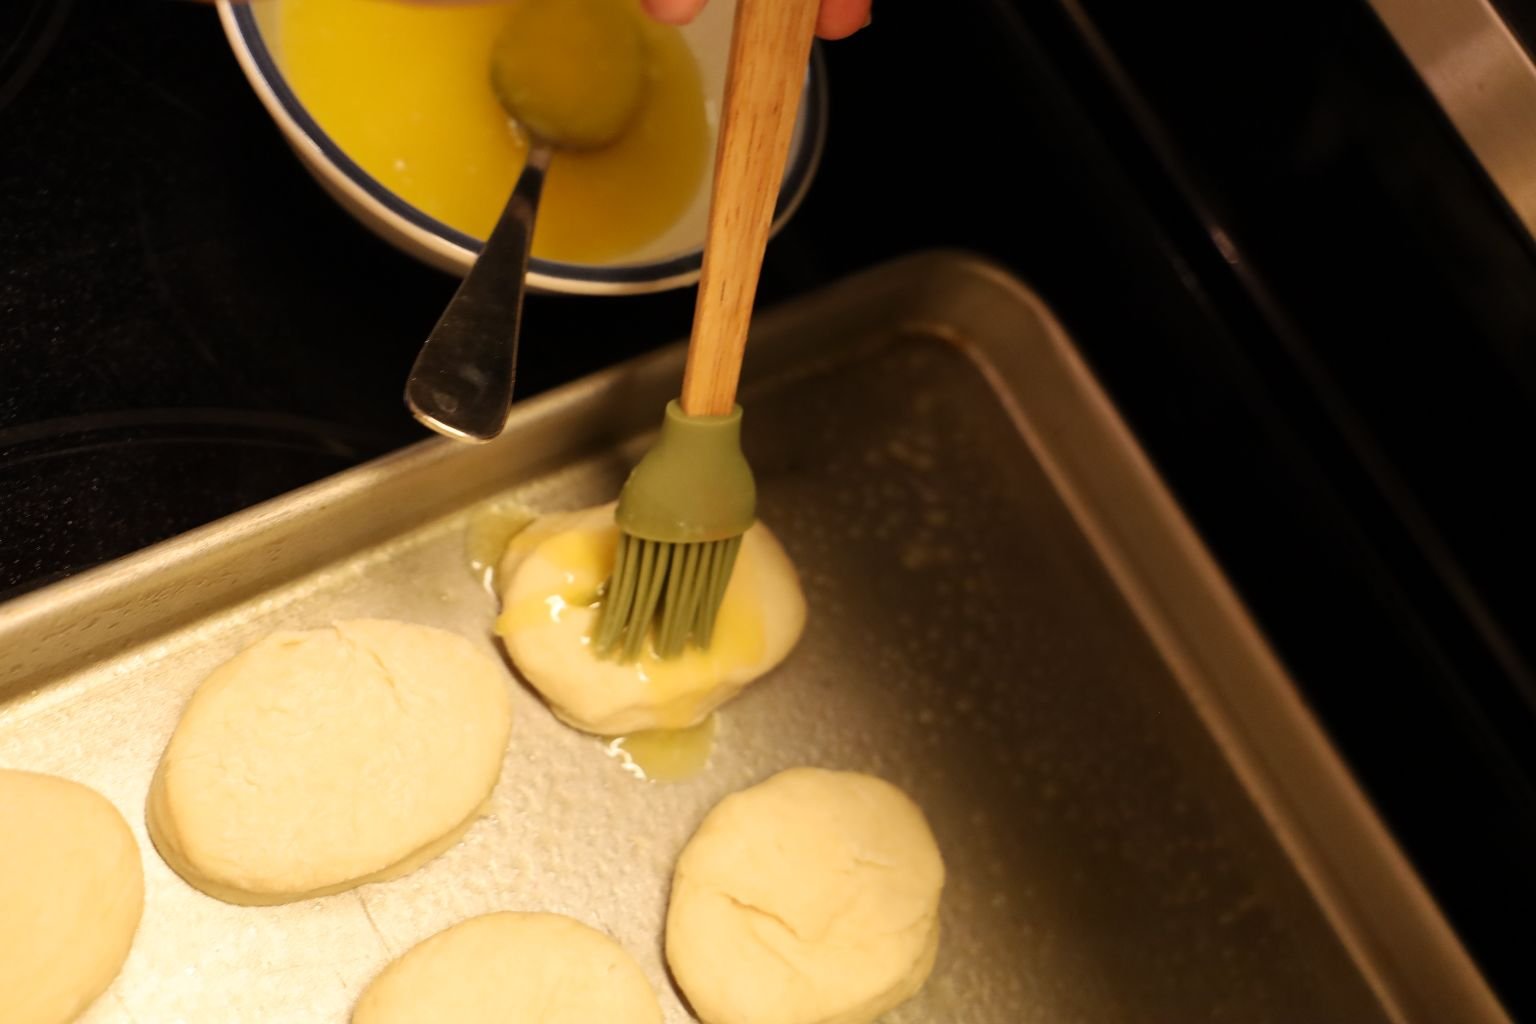
Spray some oil onto a baking pan and place your biscuits on it with a little separation as shown. They then brushed the butter on the top of the biscuits instead of dunking them as per the recipe directions.
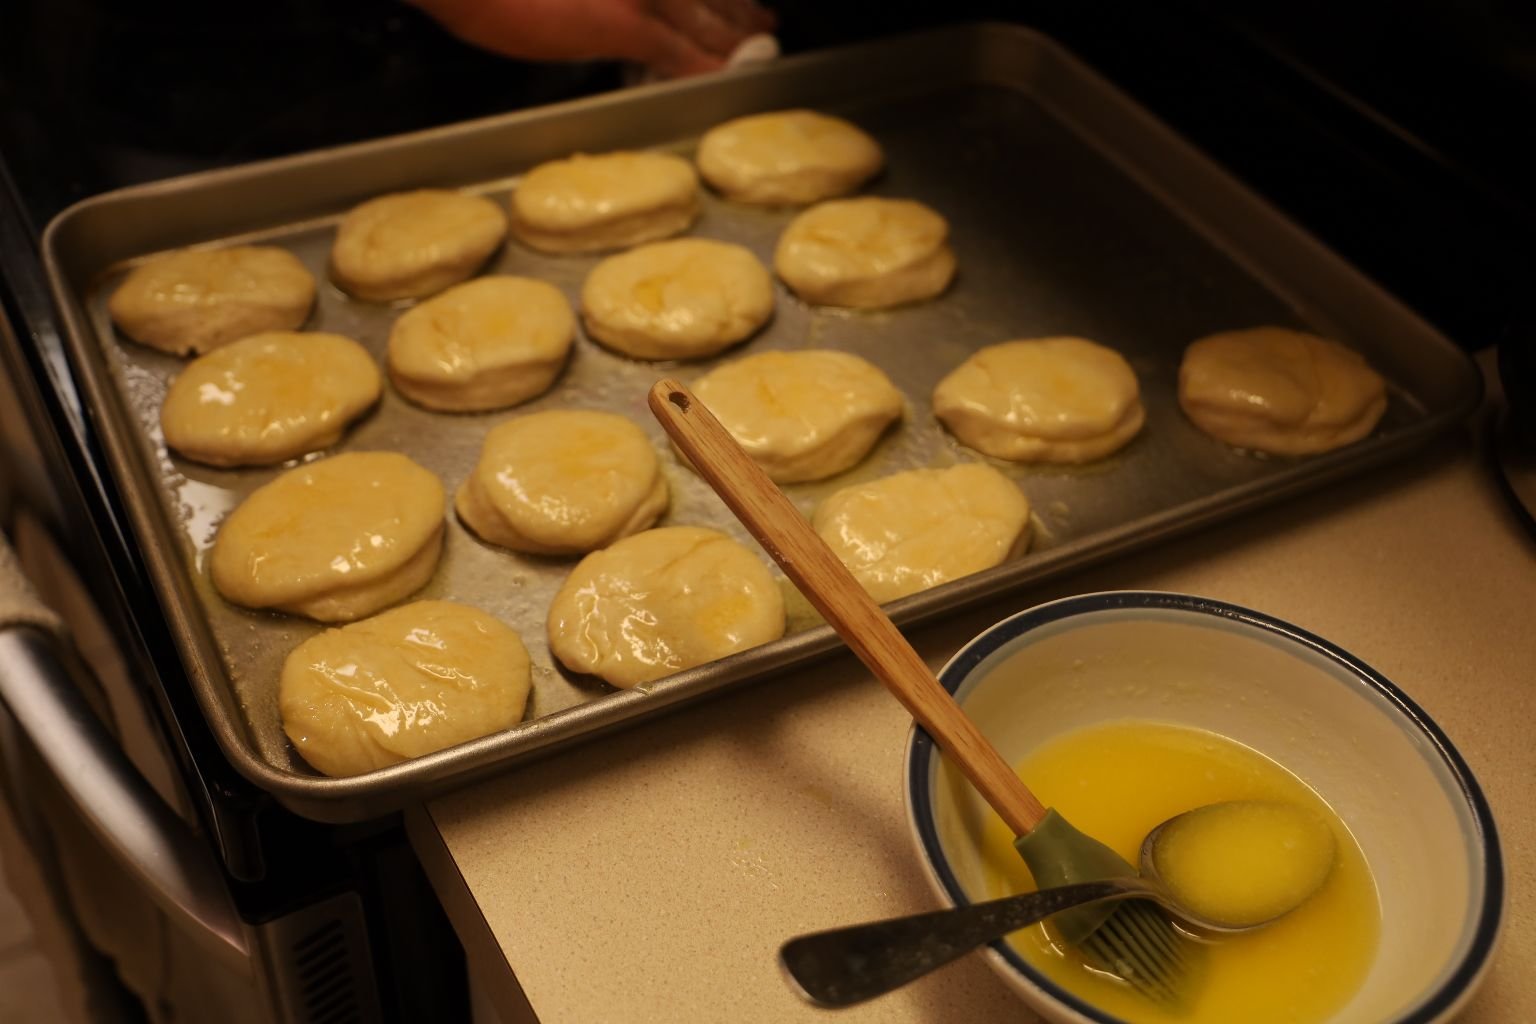
Set the biscuits aside for about 30 min. to let the biscuits rise for a third time.
Here, the biscuits are ready to be baked at 400’F for about 10 – 12 min. or until lightly browned. Halfway through the baking, turn the biscuit pan in the oven for even baking.
The Smell is Amazing!
Because these were made the day before Easter we allowed them to cool and then ate them at room temperature the following day. That’s the thing about bread. It tastes good hot, neutral, or cold. 🙂

———————————————————
Macaroni and Cheese
Macaroni and Cheese is always a favorite at our house. I especially love the colorful pasta that we use when we do make it. This time I had some lovely Bow Tie Pasta’s from Italy that I wanted for us to use. They are vegetable dyed. Brodie and Mackenzie made this the day before Easter and we just kept it in the refrigerator overnight, and then baked it about an hour or so before we ate.
This is a recipe that we sometimes change up our cheeses by using whatever we have in our refrigerator. But, most of the time they are white cheeses like Manchego, Parmesan and Gruyere. White cheese also has less cholesterol than the yellow ones.
——————————————————————–


Ingredients:
About 1 Pound of Pasta
4 T. Flour
4 T. Butter/Margarine
3 Cups of Milk (I used Skim)
1 Cup Half and Half
Freshly Ground Black Pepper
Grated Nutmeg (About a good sized Pinch)
4 Cups White Grated Cheeses of Your Choice
(We used Gruyere, Manchego, White Cheddar, Fontina, Parmesan, and some leftover Cheeses.)


Gordon Supervising the Cooking… a great teaching moment!

To make the Cheese Sauce (in culinary terms called a Mornay Sauce) you first have to make a roux, then a gravy (Bechamel Sauce), then a Cheese Sauce (Mornay Sauce or Fondue). This is done by first measuring out equal parts flour and oil/fat/butter/bacon grease. As you can see you can make many different flavors of roux as it will be based upon the fat you use. About 1 Tbsp. of flour will make just over 1 cup or so of Bechamel Sauce.
Using a large saute pan or cast iron skillet, melt your butter over medium heat then add your flour. Mix the two together making a wet sand consistency. Continue to cook the now roux for about 3 min. stirring constantly. You need to cook the flour slightly which will rid it of that flour taste. You don’t want the roux to turn color as it will not be able to thicken as much the more it browns.
TIP: If you want to make a brown gravy, simply continue to cook the flour and butter mixture until you get a light brown. The mixture will also turn a slight amber if you cook it longer, but this will not thicken as much as a light brown roux will which is a typical brown gravy. Follow the rest of the below procedures to make the brown gravy.
Now that you have slightly cooked the flour and butter, add 3 cups of milk and continue to stir all the ingredients together. In just a short time the magic will happen and the milk will thicken.

Here you can see Brodie adding the milk to the roux. After making it many times, you won’t need to measure the milk you add.


Here you can see the ingredients getting thick. Once it begins to thicken again, add your half and half and stir in to combine. You can see it has thickened when you can make a line in the pan and it stays. You can also use a whisk for this step if needed to make smooth. Once combined, turn down the temperature to low.
Congratulations… you have now made a Bechamel Sauce!
—————————————————————


To make a Mornay Sauce, simply add your cheese! Using your spatula, stir all the ingredients together. As the cheese melts it will create a beautiful smooth sauce.


TIP: If the Mornay sauce is too thick, add a little more milk or half and half and stir to combine. As the flour sits, it will continue to absorb the liquids, so you may have to add a touch more milk or Half and Half just before serving as a Fondue if it sits for a period of time.

Here you can see they added a touch more milk making the Mornay nice and creamy!
Perfect guys! They are also done cooking the pasta in a large pot of boiling water… nice timing!

Drain the pasta in a large colander as shown, being sure not to rinse it. Rinsing it would remove the starch making the cheese not stick to the pasta.


Here they are grating some fresh nutmeg to the Mornay Sauce. It just doesn’t get any better than that!

Stir in to combine.

I really enjoy teaching my son all the culinary things I learned over the years and at school. It’s also great that Mackenzie is interested in learning as well.

He and Mackenzie have really become great cooks.
————————————————————–


Now time to add the pasta to a large bowl and ladle in the Mornay sauce.

———————————————————————-


Continue to add the Mornay Sauce to the pasta until it is to your liking. Gently fold all the ingredients together so as not to breakup the pasta.

Add a ladle of Mornay Sauce to the bottom of the baking dish as well…
this will help prevent the pasta from sticking or burning.

Then pour your pasta into the baking dish.

Place the pan into a 350’F oven for about 45 min. or until the mixture begins to boil around the edges and middle. If you want you can top with some grated cheese or breadcrumbs if you like.
Always a family favorite!
—————————————————–
Grammaw Nell’s Squash Casserole
This is a family recipe that my grandmother would make quite a bit. Except, she never topped hers with cheese and breadcrumbs. Hers was perfect just the way that it was. BUT, I have experimental cooks and a chef in the family that likes to change things up every now and then. Hence, the toppings. It was good, but you don’t mess with perfection and you DON’T mess with a tried and true family recipe. I just wanted to think of her on this day and taste her recipe, not something new.

Ready for the Oven
————————————————————–
Brodie and Mackenzie also made this, with Gordon’s supervision, of course. They made it the day before Easter which helped out tremendously, and we baked it about an hour or so before we ate dinner. It really does help to eliminate the stress and amount of cooking if you can make things ahead of time.
—————————————————————-

Ingredients: Squash Casserole
—————————————————————————–
Old Photo of my Grandmother’s Casserole and what it is supposed to look like.
Here are The Ingredients For HER Casserole
4 Zucchini Squash (sliced into rings)
7 Yellow Squash (sliced into rings)
3 Onions (sliced into half rings)
1 1/2 Cups Sharp Cheddar Cheese (1/4 Cup reserved)
3 Eggs Beaten
1/2 Cup Miracle Whip
3/4 Cup Seasoned Bread Crumbs
Salt and Pepper to taste

And this is how clean it comes out when done.
——————————————————————
Here is the start of Gordon, Brodie and Mackenzie’s Squash Casserole
(I’ll let Gordon do this write up.)

Slice your Zucchini and Yellow Squash into ¼ inch thick round slices.


Then slice your onions the same way into rounds. Place all the Zucchini, Yellow Squash, and Onion into a large pot adding enough water to just cover them.


Bring the water to a boil and add about a tsp. of salt to the pot and vegetables. Boil the vegetables for about 5 min. or until just tender.


————————————————————-

Occasionally remove a round of squash to test its tenderness. You don’t want it fully cooked and mushy, to be technical. You want the squash to still have a little bite to it.


——————————————————————
When done, pour the squash and onion rounds into a colander and drain fully.
In a large mixing bowl, mix together your eggs, and Miracle Whip, then add your cheddar cheese.
Pour the drained squash and onions into the cheese mixture and add a touch more salt and freshly ground pepper.
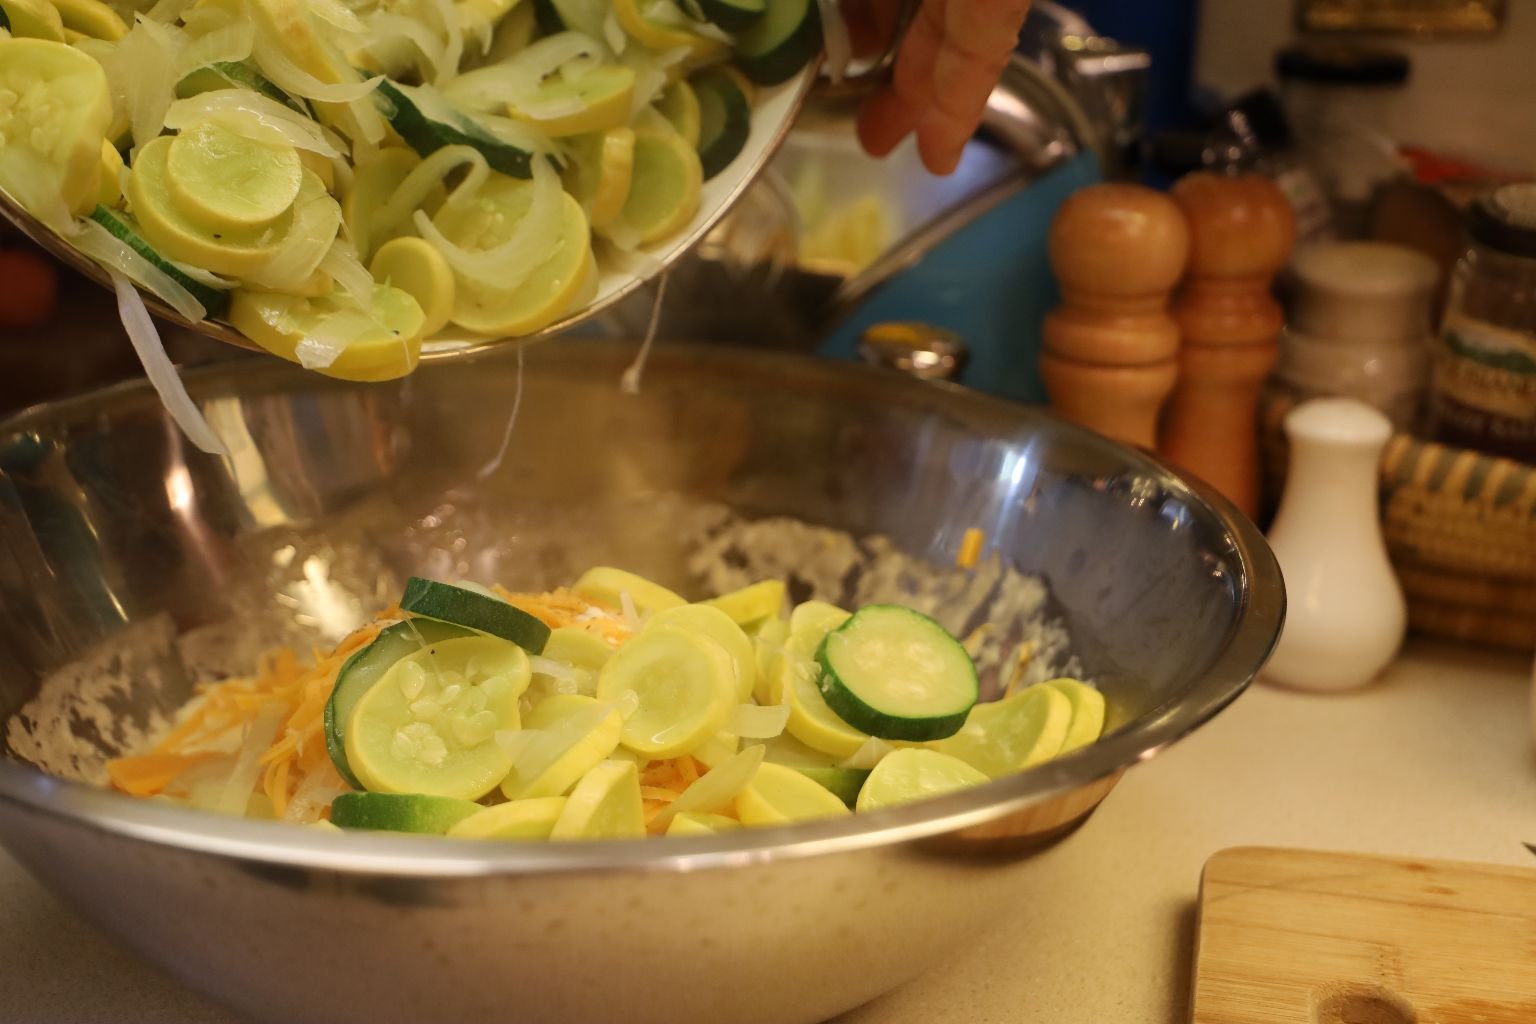
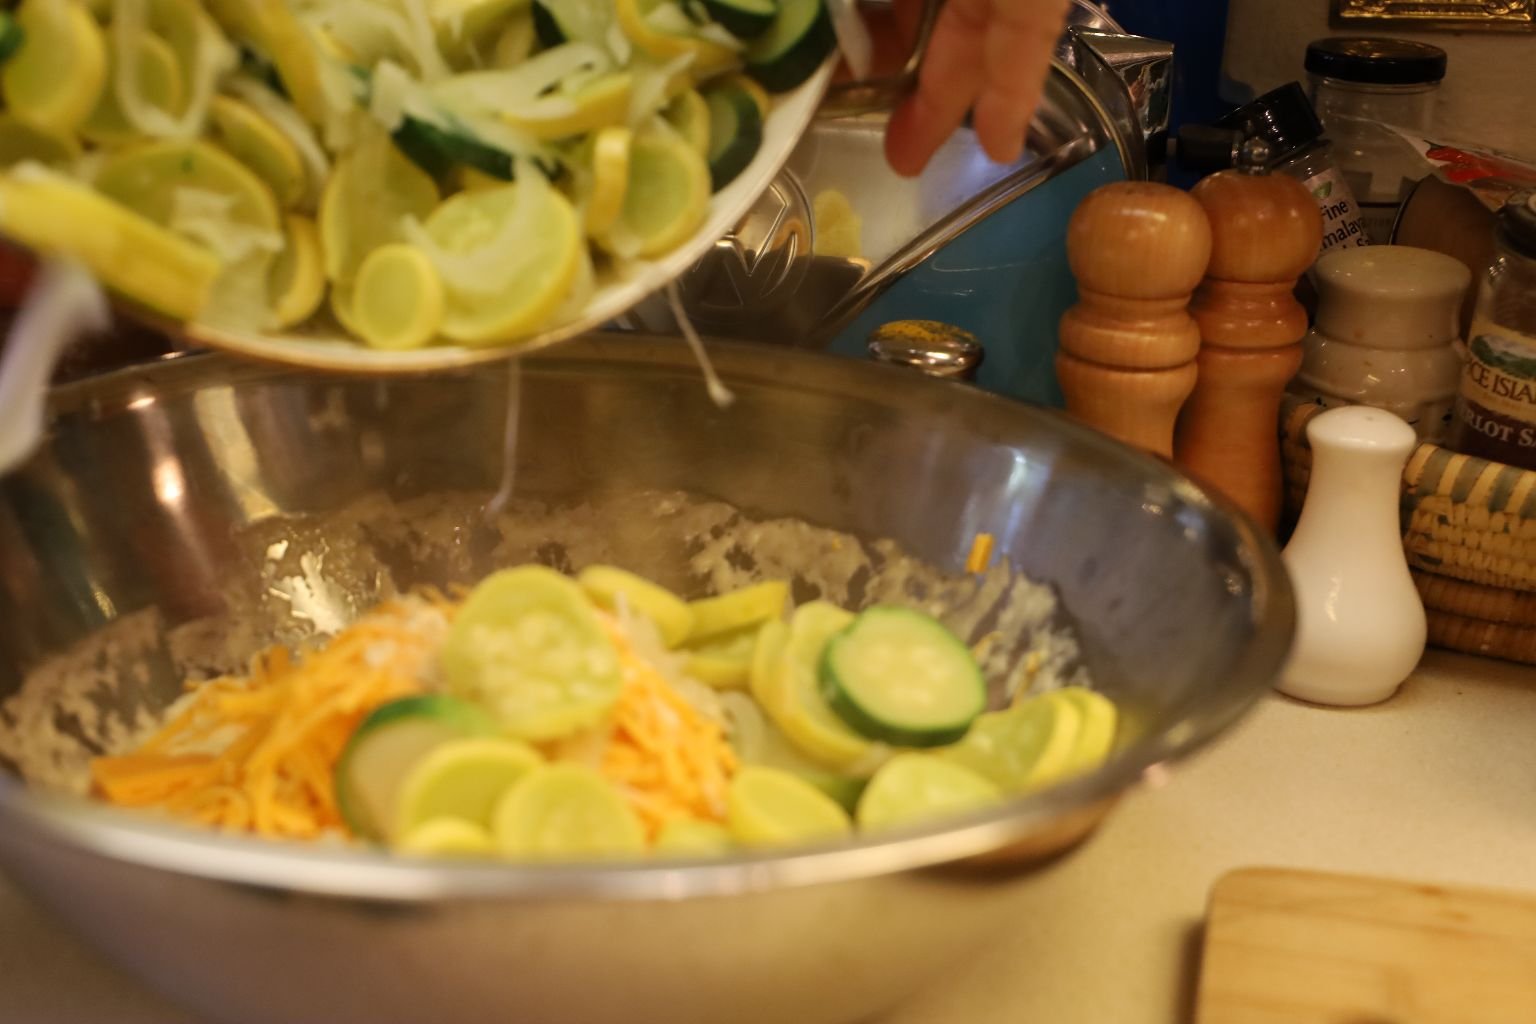

Fold all the ingredients together until fully mixed.

Here is what it looks like when fully combined.
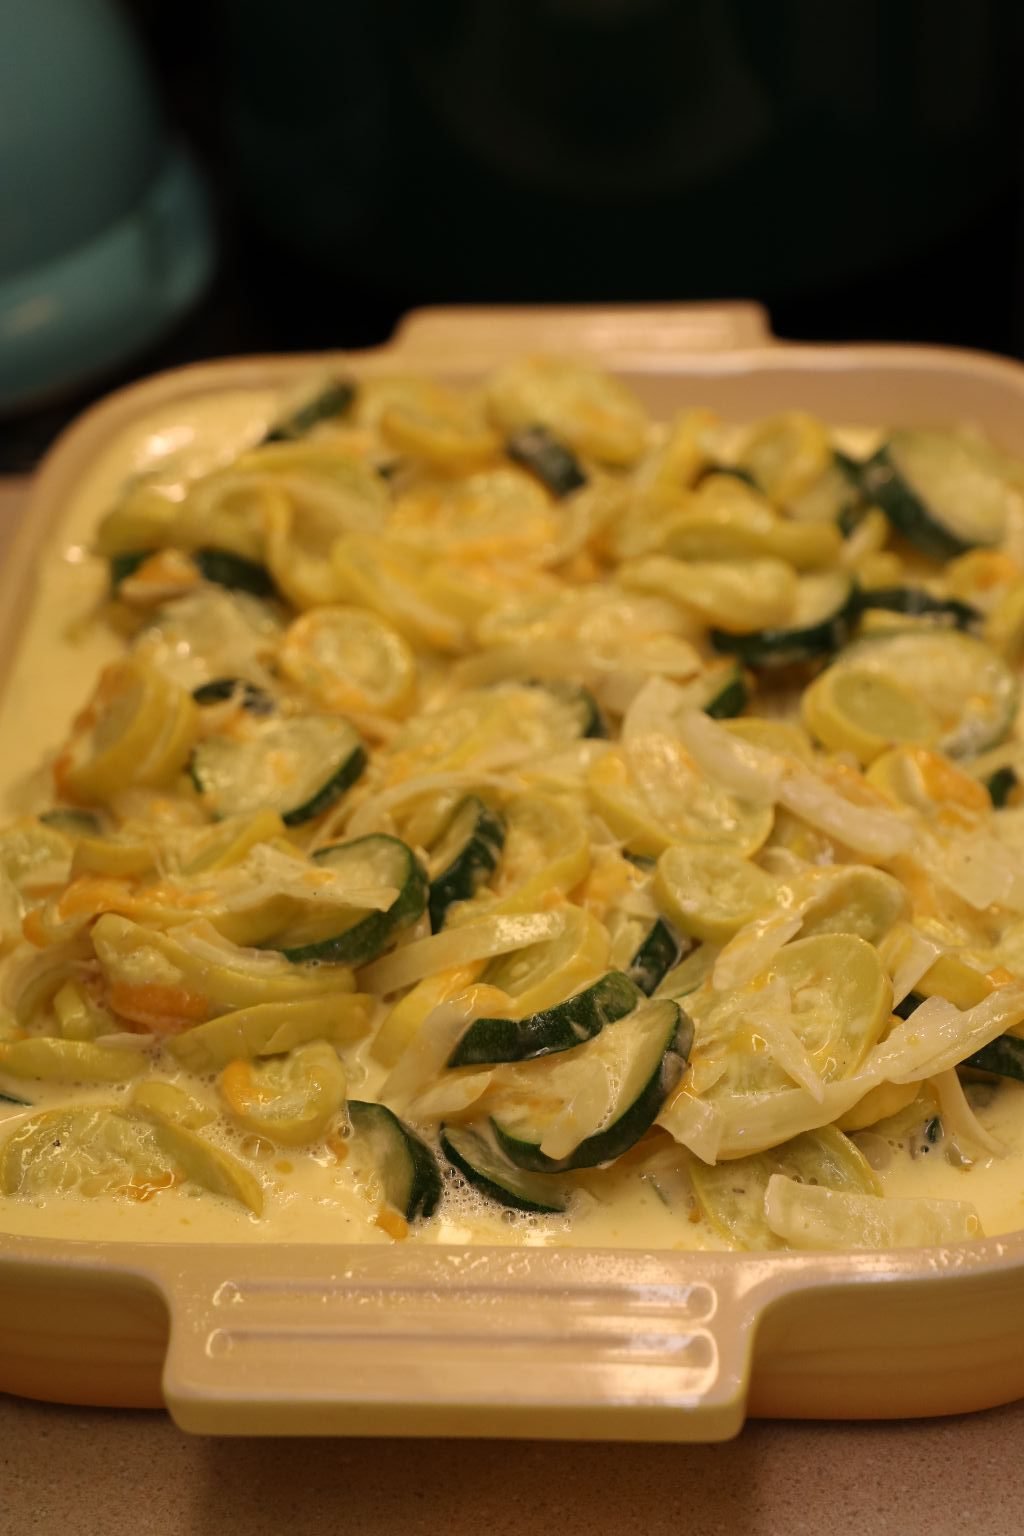

Spray a large casserole dish with cooking spray and add the squash and cheese mixture to the dish.

Add your seasoned breadcrumbs to the top of the casserole. Bake the casserole at 350 for ~45 min.
(Ignore that fried SPAM in the photo at left, top.) 🙂
About 5 minutes before the casserole is done you can top it with more cheese and then place back into the oven to finish cooking and to melt the cheese.
———————————————————————

Into the Oven Go our Squash Casserole and our Macaroni and Cheese Dishes
—————————————————————
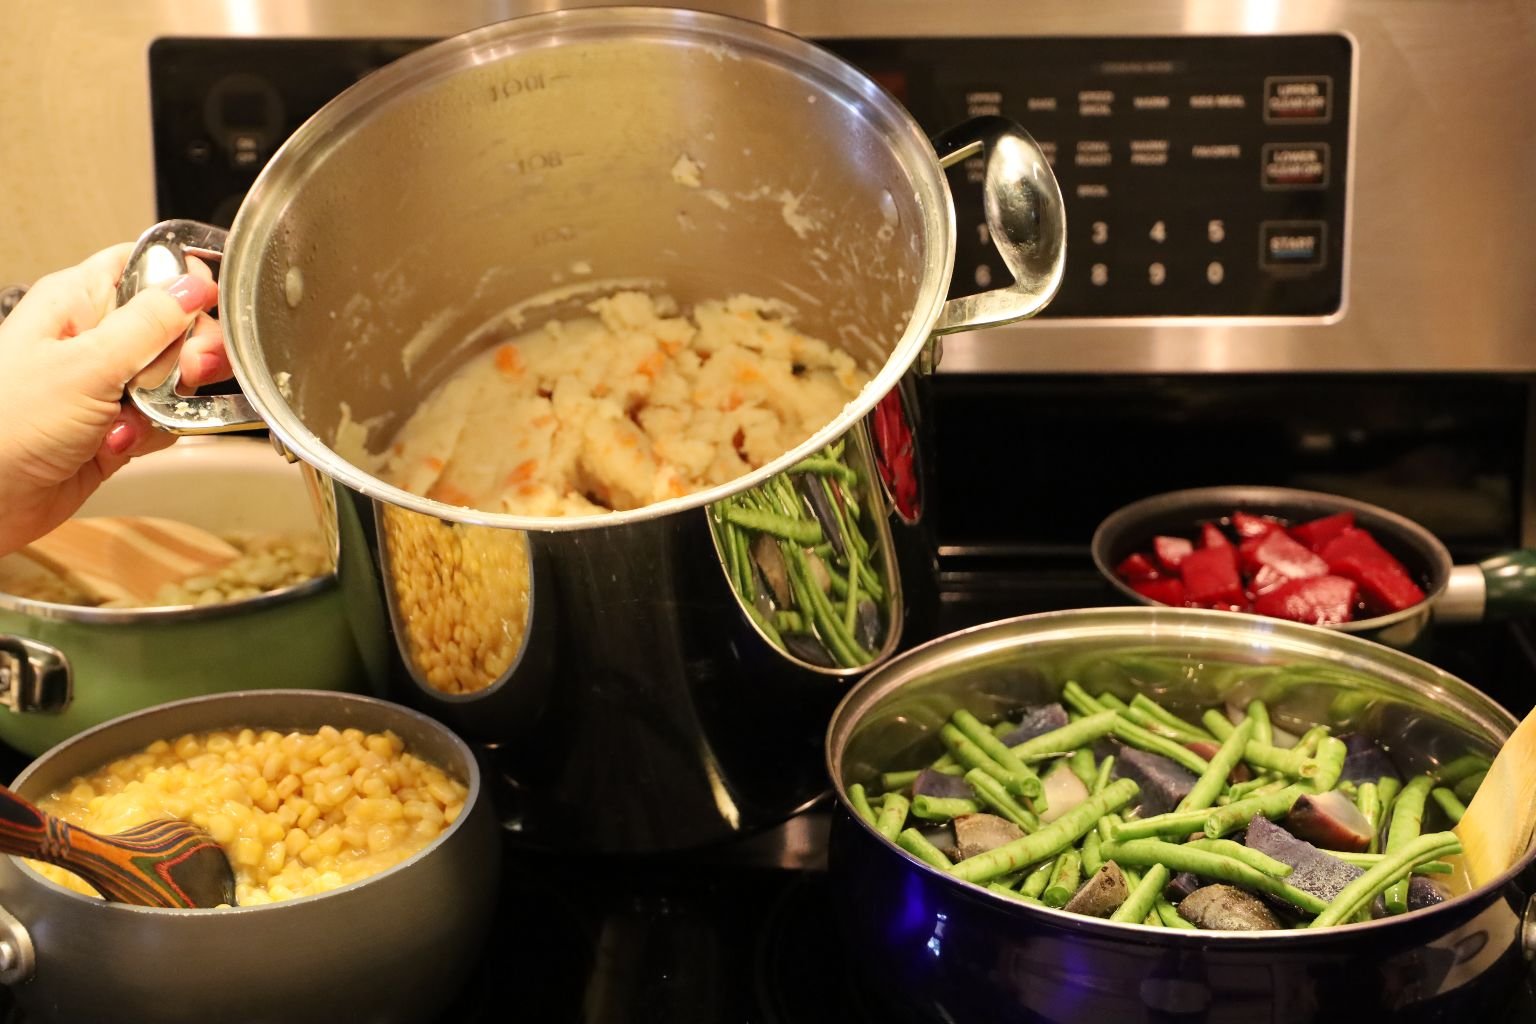
Vegetables on the Stove Top Cooking
L to R: Lima Beans, Corn and Creamed Corn, Pot of Mashed Potatoes and Carrots, Green Beans and Blue Potatoes, and Purple Beets.
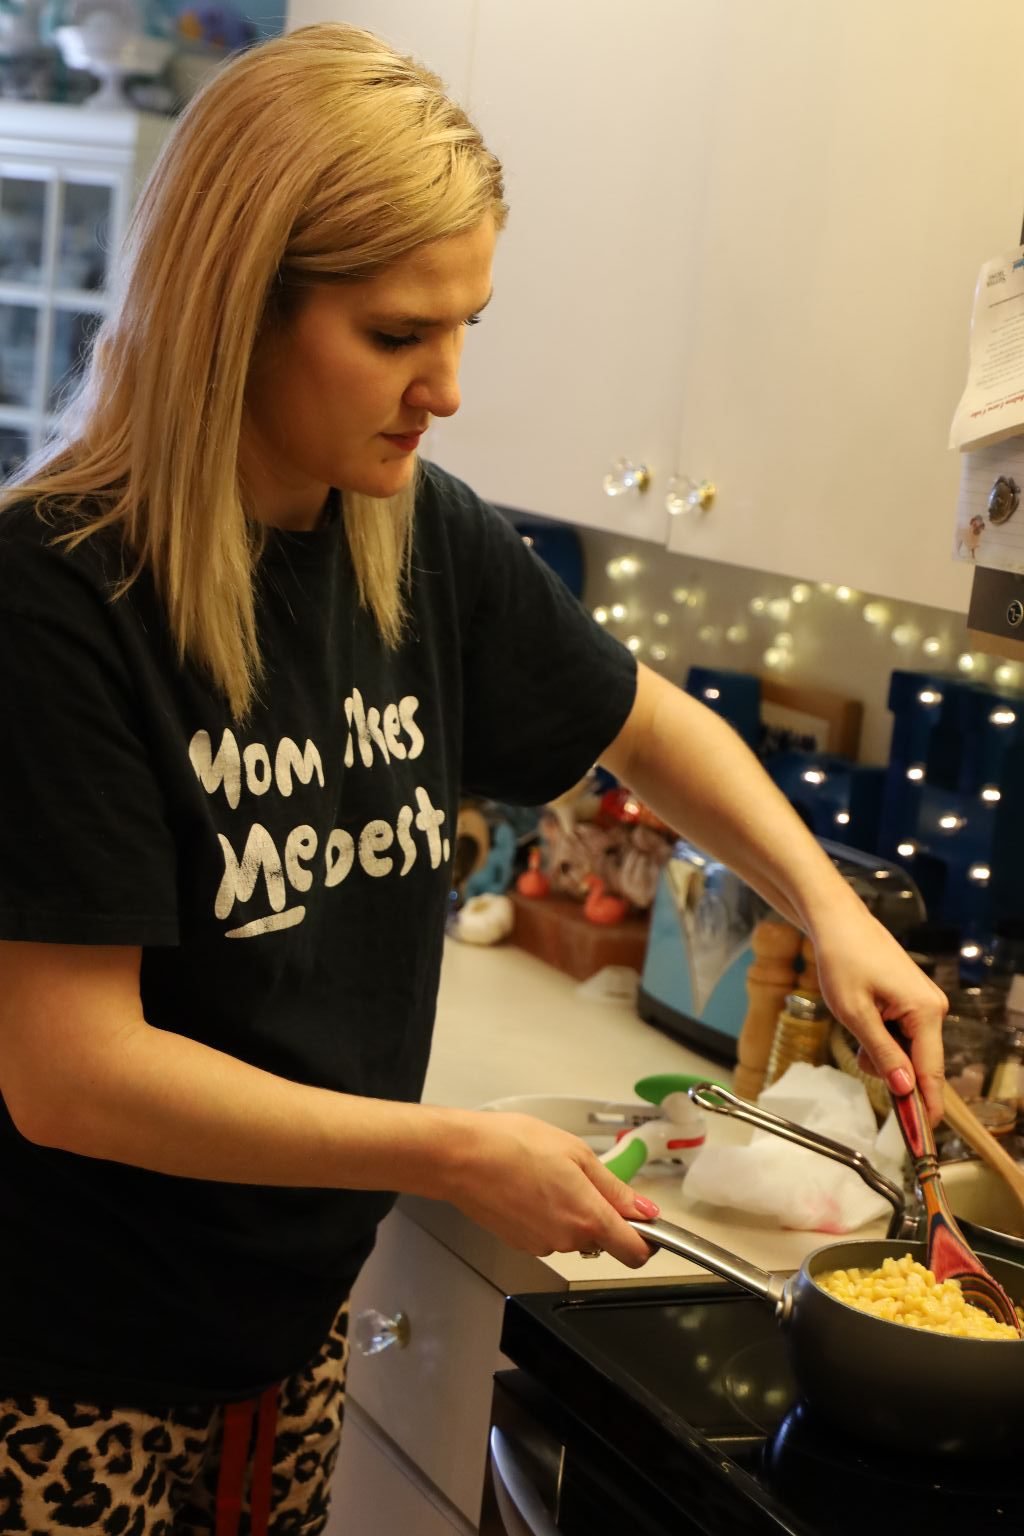
Mackenzie Stirring the Corn, and Creamed Corn
—————————————————————-
Time to Make the Blue Potatoes and Green Beans

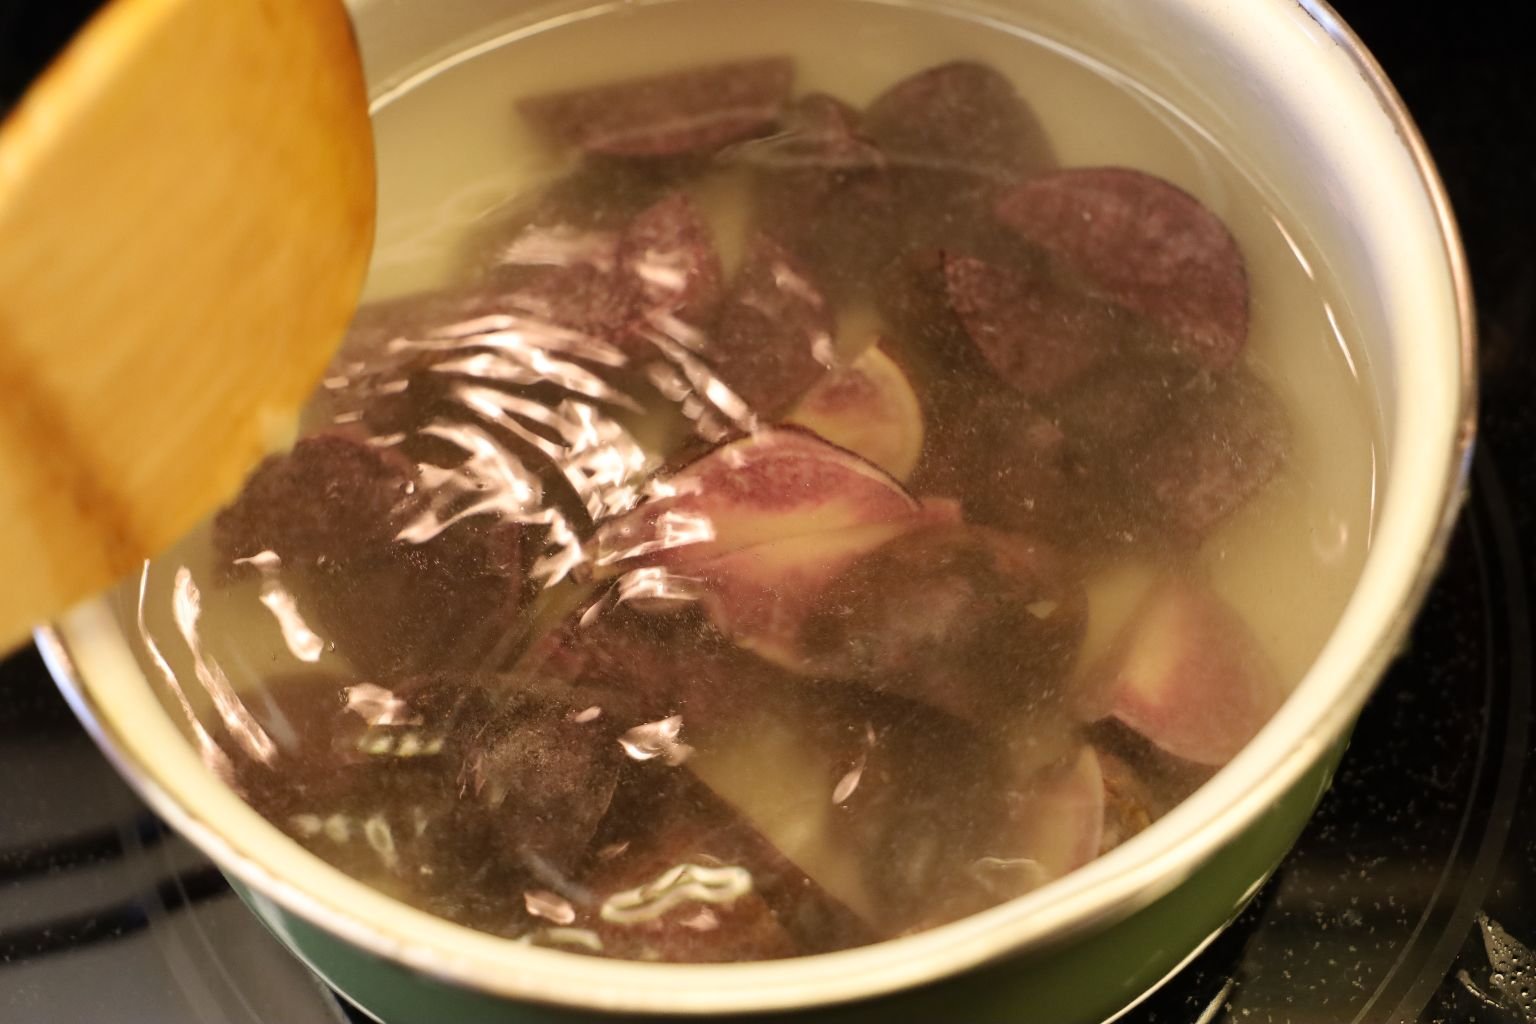
Scrub and wash your potatoes.
Slice into quarters about 2 to 3 potatoes per person. Place the potatoes into a large pot of water and turn the water on to boil. Add about ½ tsp. salt to the water to add flavor to the potatoes.
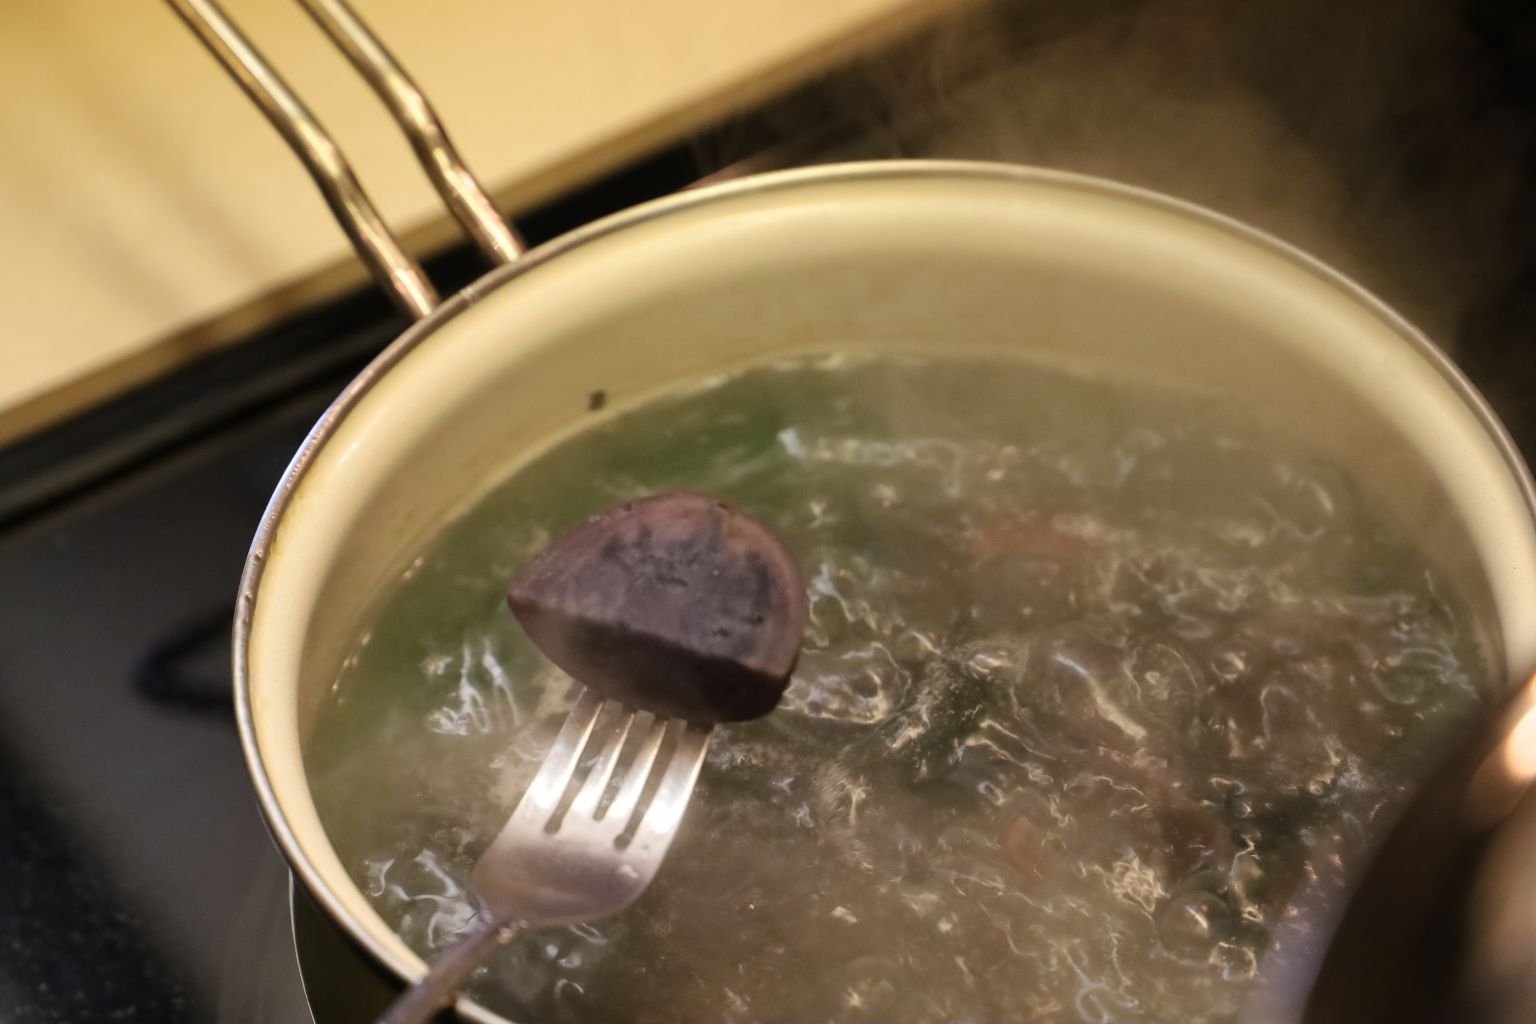
Cook the potatoes until they are fork tender which takes about 15 min. of boiling.

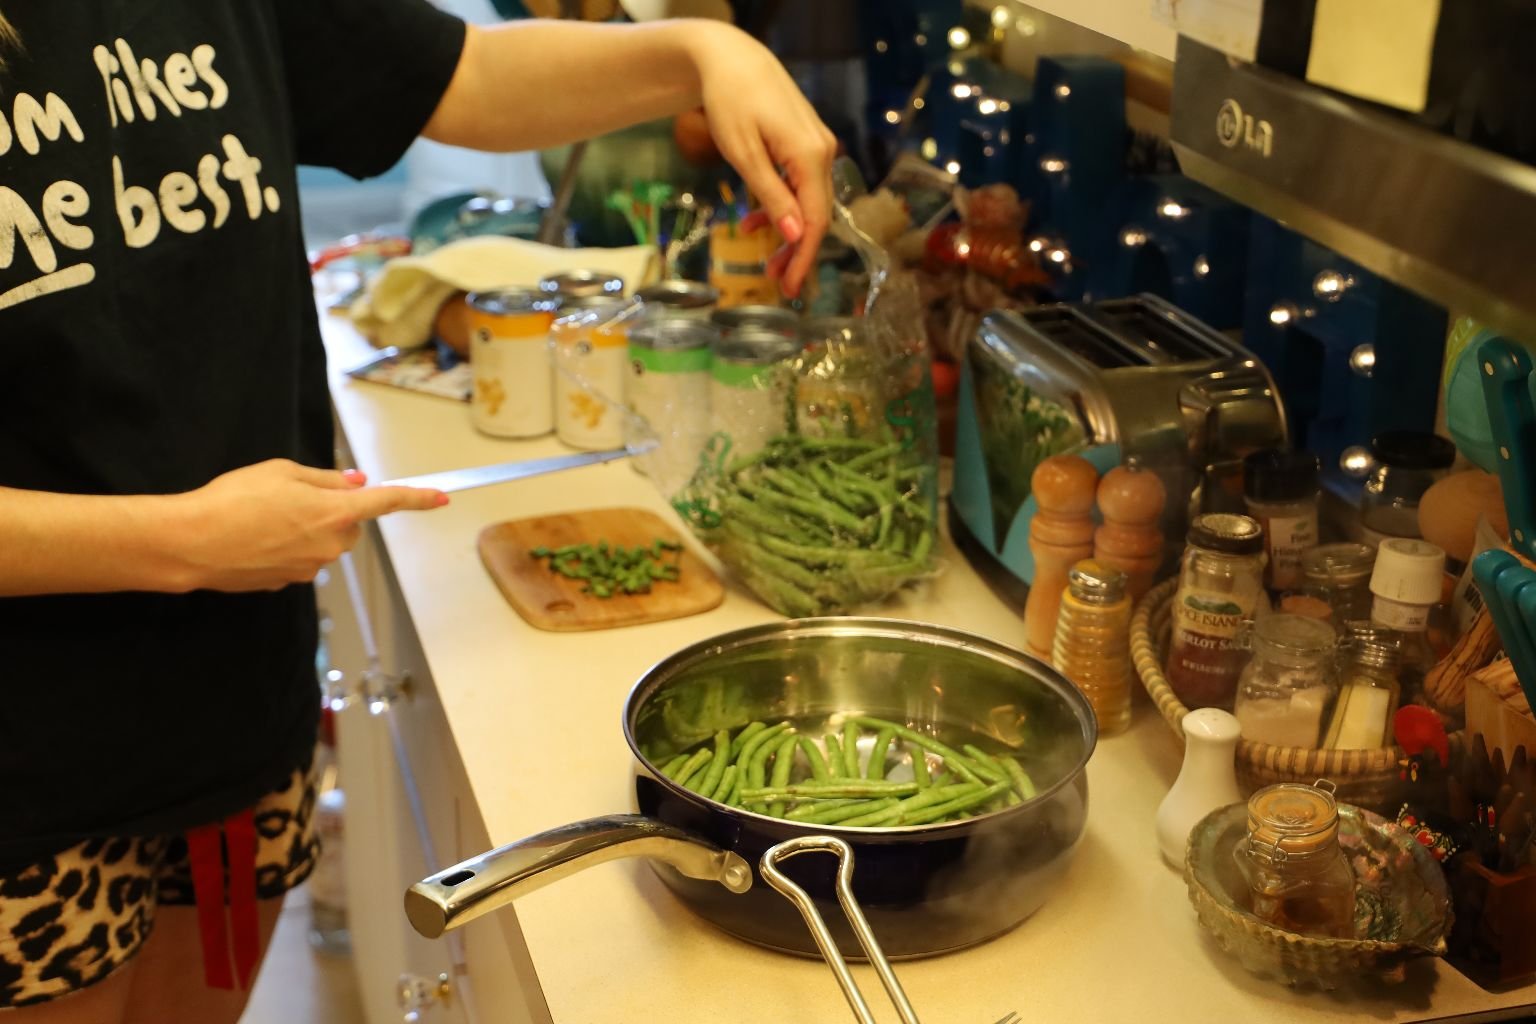
At the same time, wash your green beans and cut off the ends.
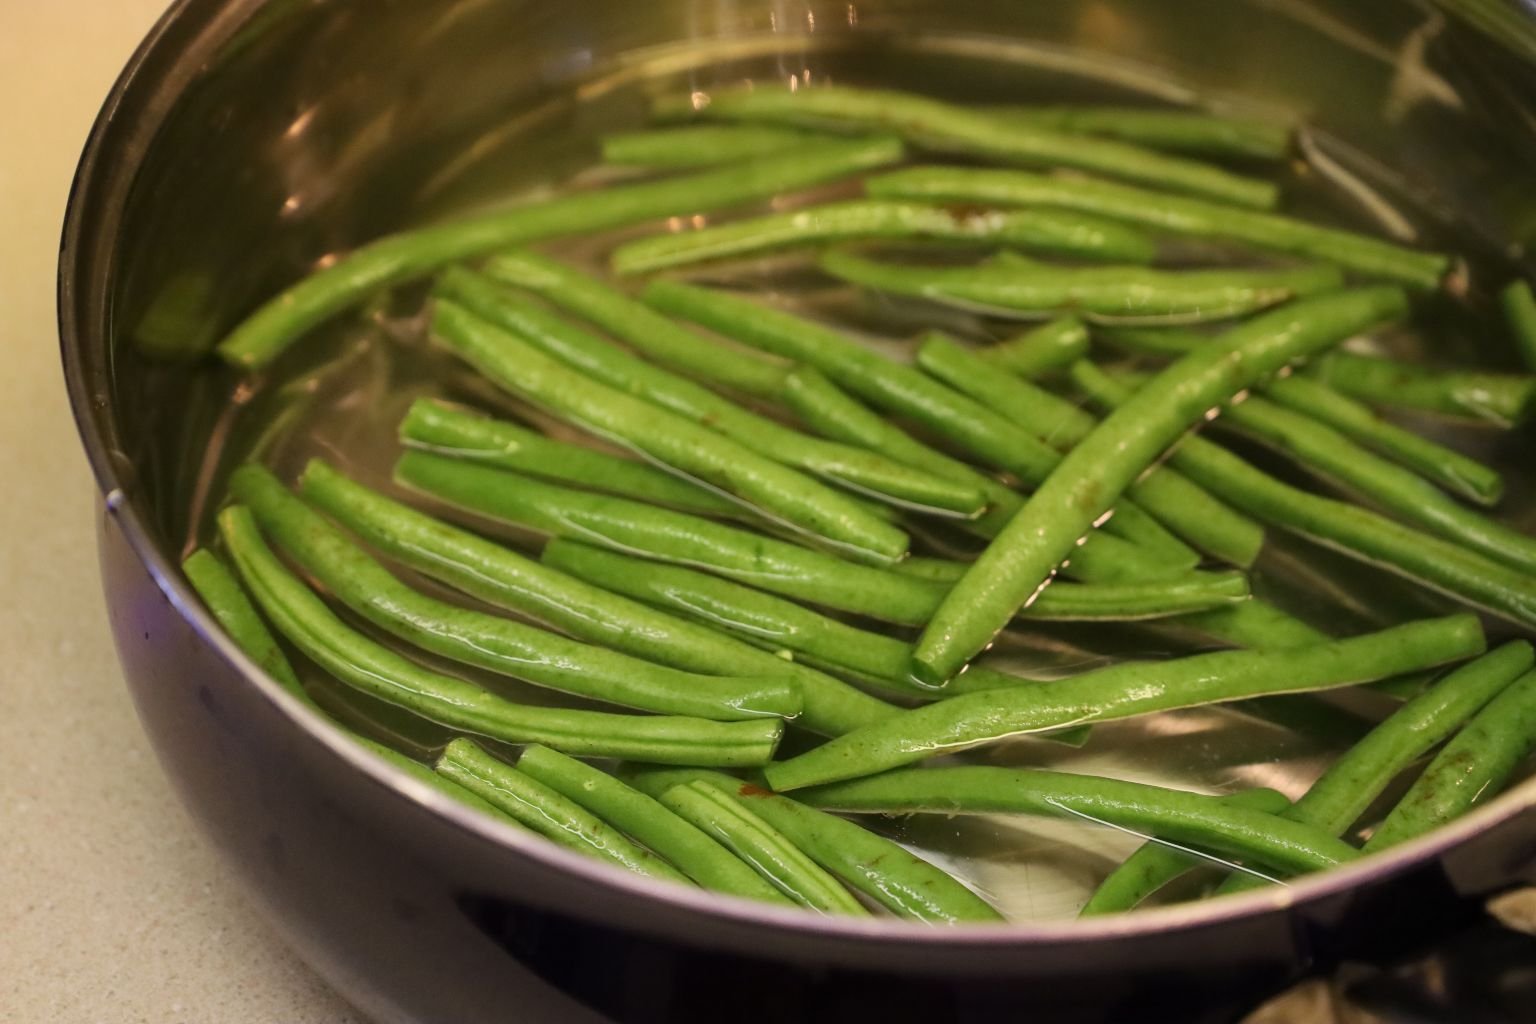
Place the beans in a pot of water as shown and boil them for about 10 min. or until just tender.
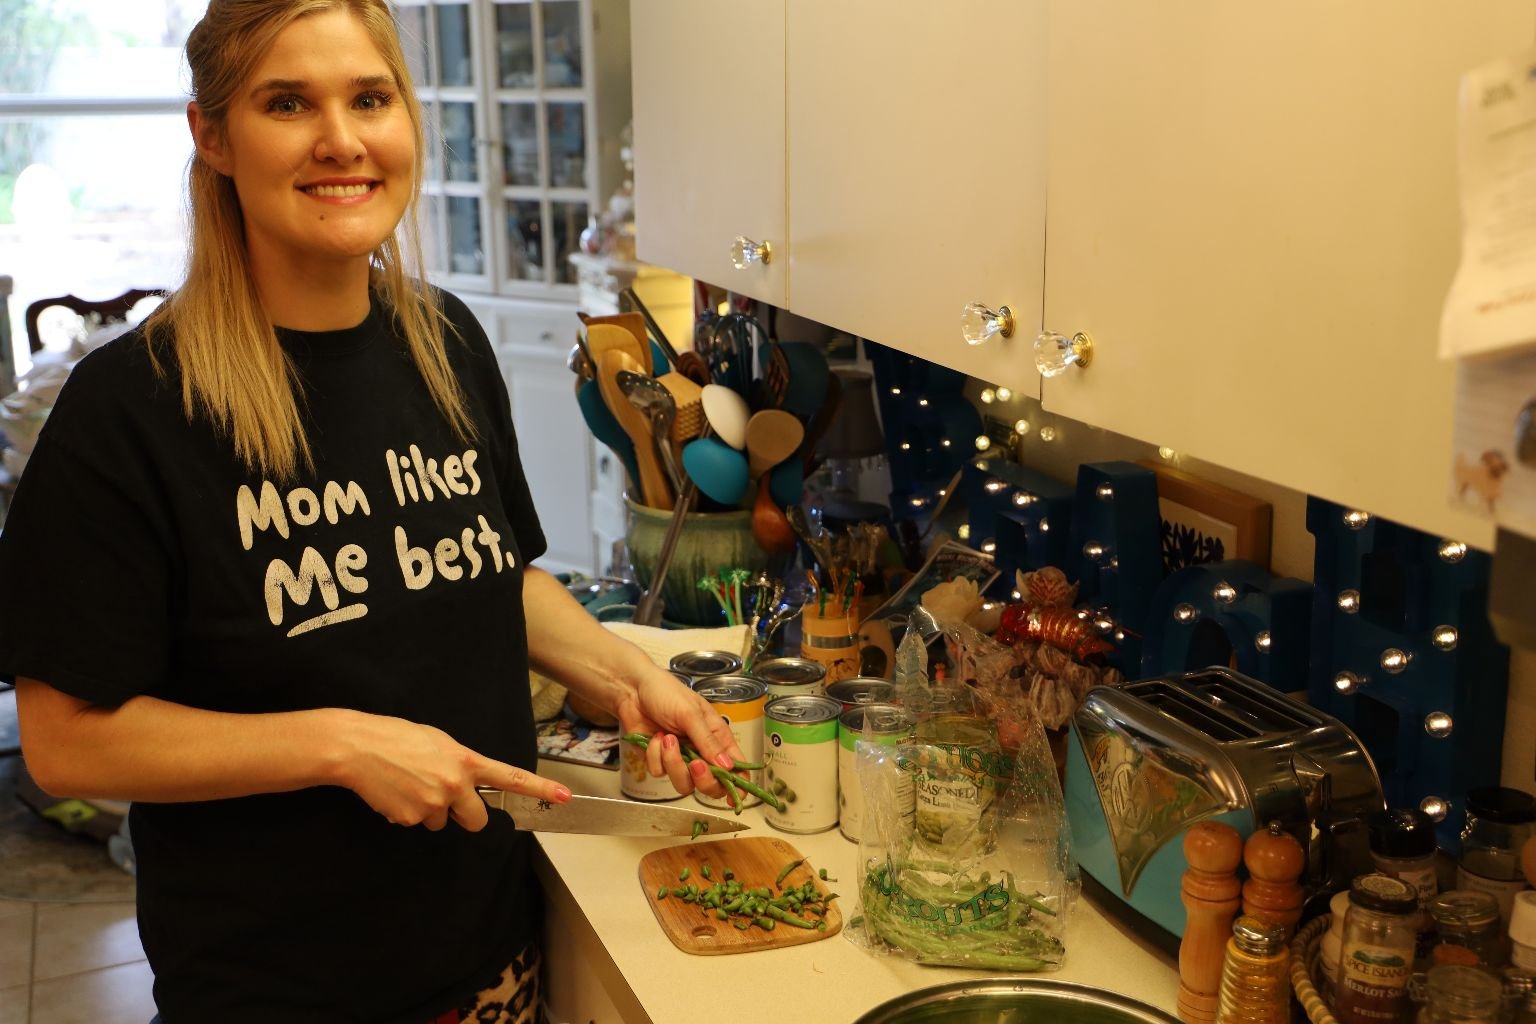
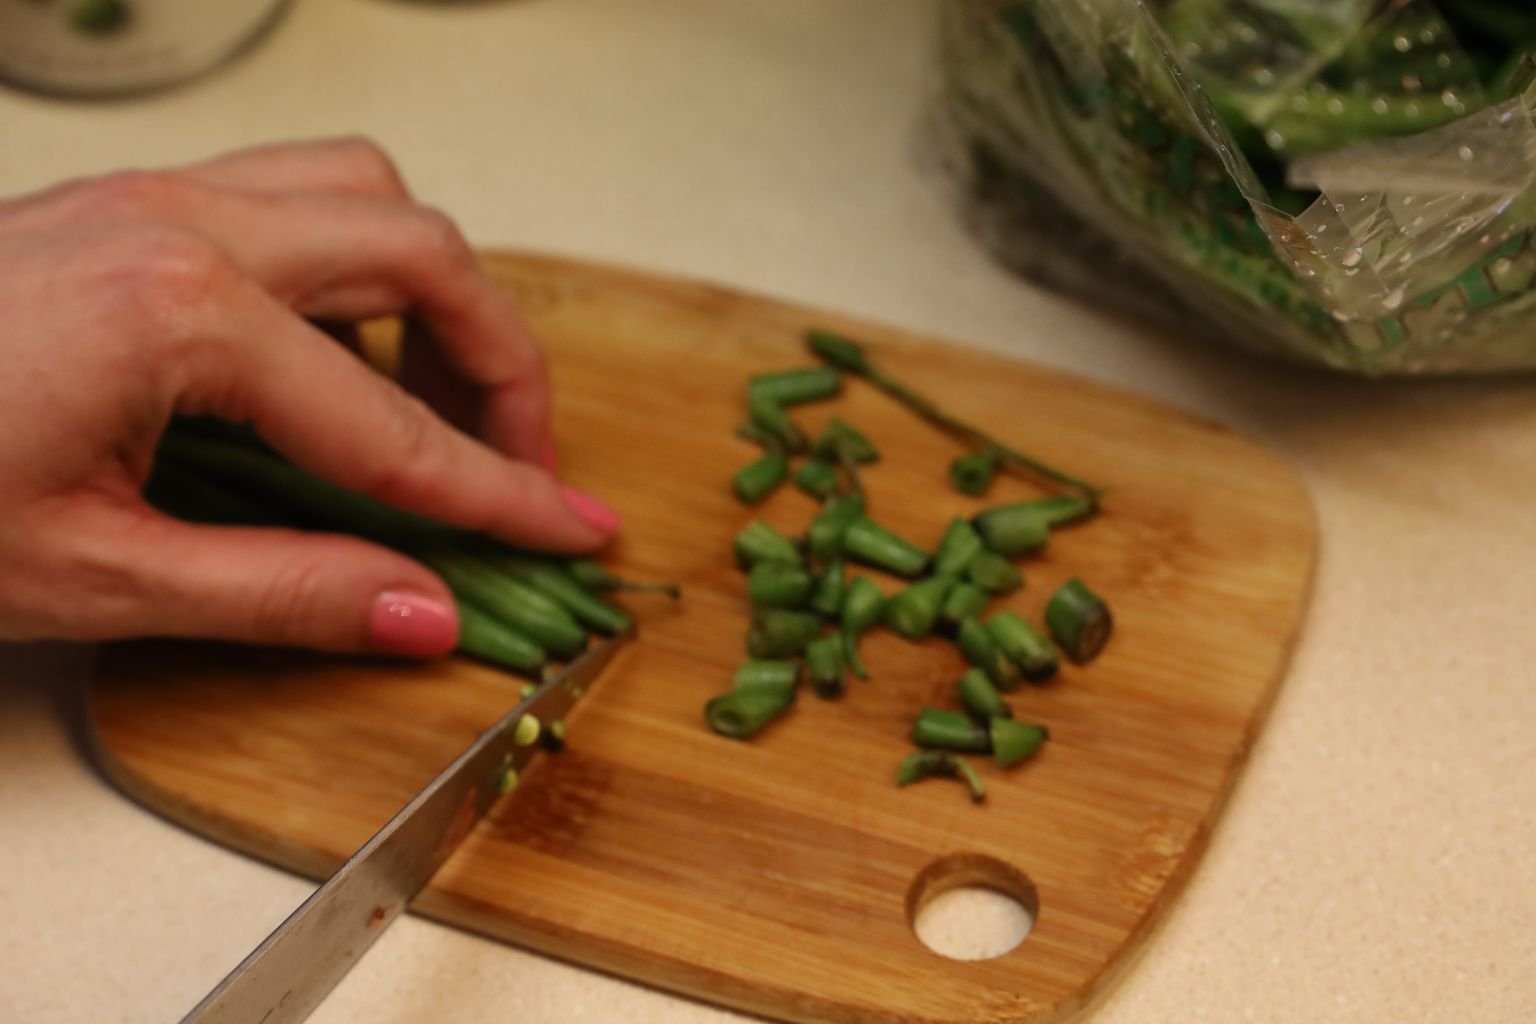
Drain the beans in a colander and add the cooked potatoes to the green beans in the pan.

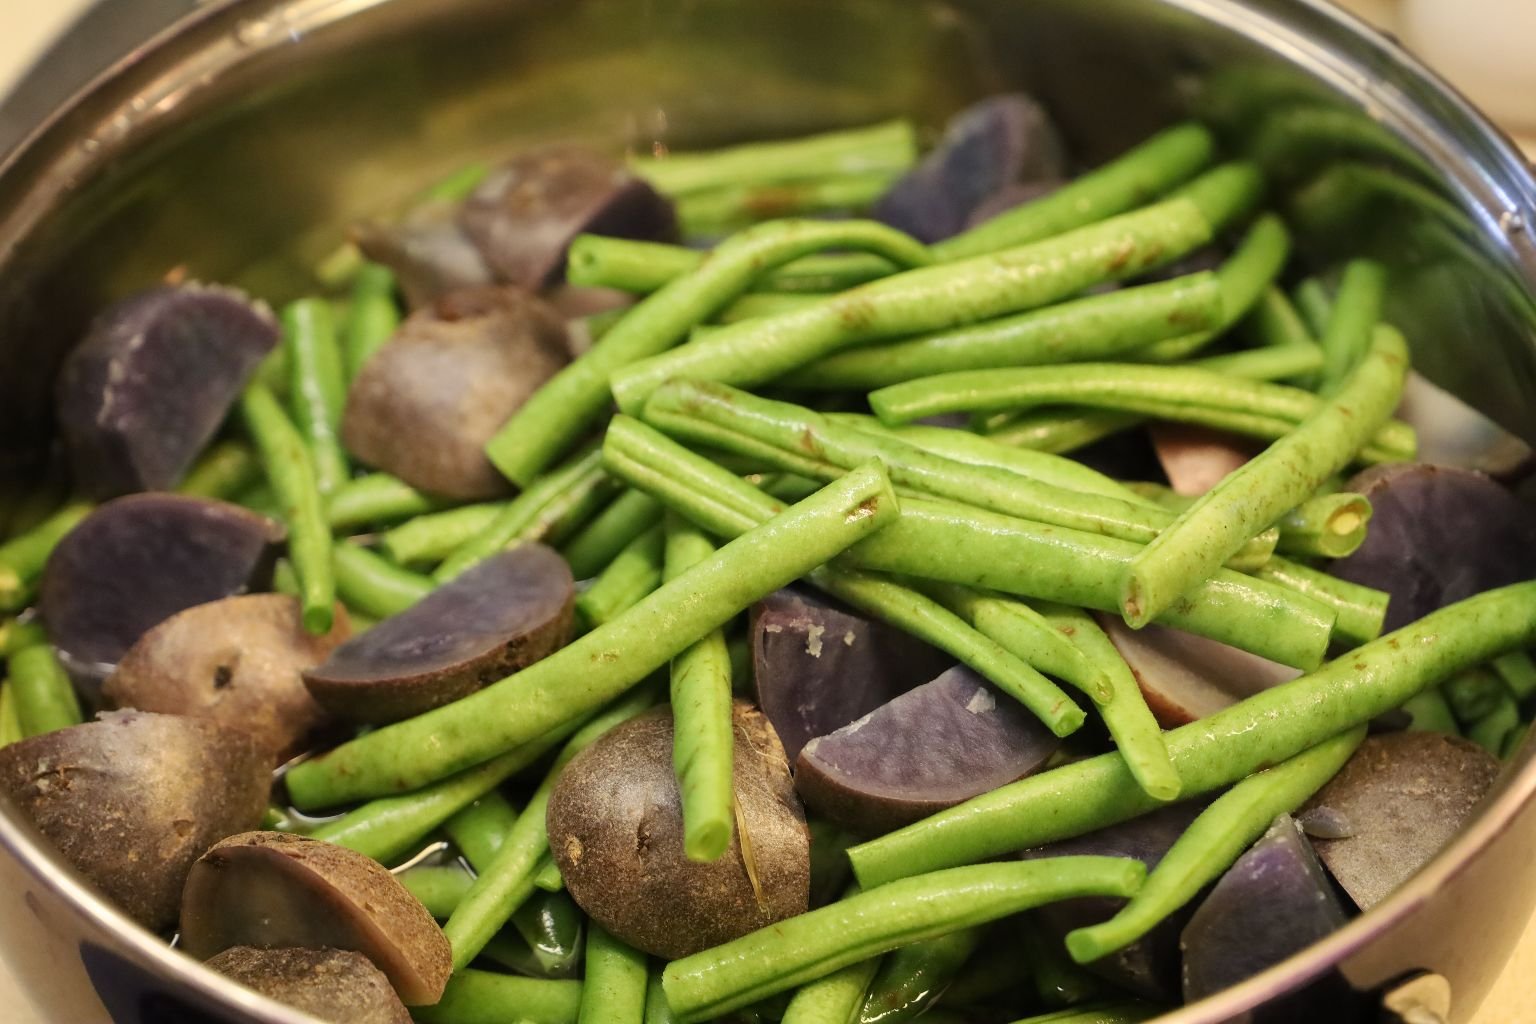
You can reserve a little bit of the water so they don’t burn and just keep the burner on low until ready to serve. You could also add a little bit of olive oil and some garlic powder if you like.
—————————————————————————
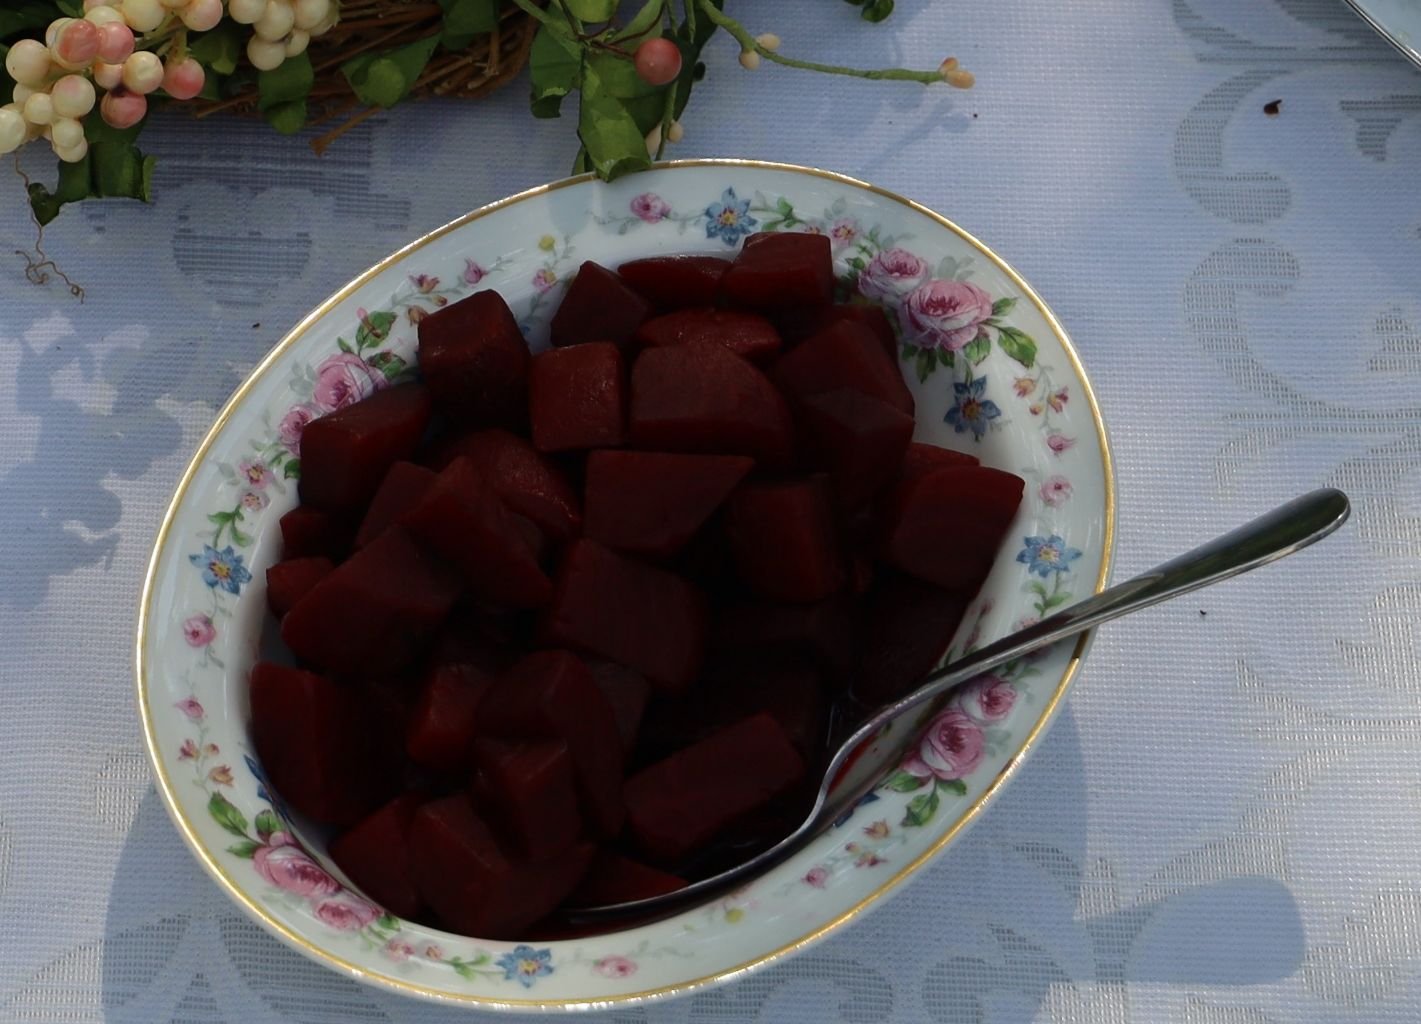
Purple Beets
(This pretty much came from a can heated up on the stove top so there is no write up.)
—————————————————————–

Corn, Creamed Corn, and Blue Potatoes and Green Beans
(The Corn and Creamed Corn came from cans as well so there is no recipe for these. I was just a bit disappointed that the creamed corn was so runny and I added a can of regular corn just to thicken it up.)
———————————————————————–

Roasted Brussel Sprouts
This is also a big family favorite of ours as well. Easy and delicious. Can also be prepared a few days in advance but does need to roast the day of.

Brodie Placing the Brussel Sprouts onto a Sheet Pan with Foil
(Although we don’t have many photos in the preparation of these. I can explain to you what we did.)
A Few Days Before Easter…..
Wash the Brussel Sprouts and slice them in half. Place the cut halves into a large Ziplock Bag and marinate the cut halves in about 2 packets of dry Zesty Italian Seasoning Mix. Add just enough Extra Virgin Olive Oil to the sprouts to just coat them. Marinate the sprouts in the refrigerator for at least 24 hours.
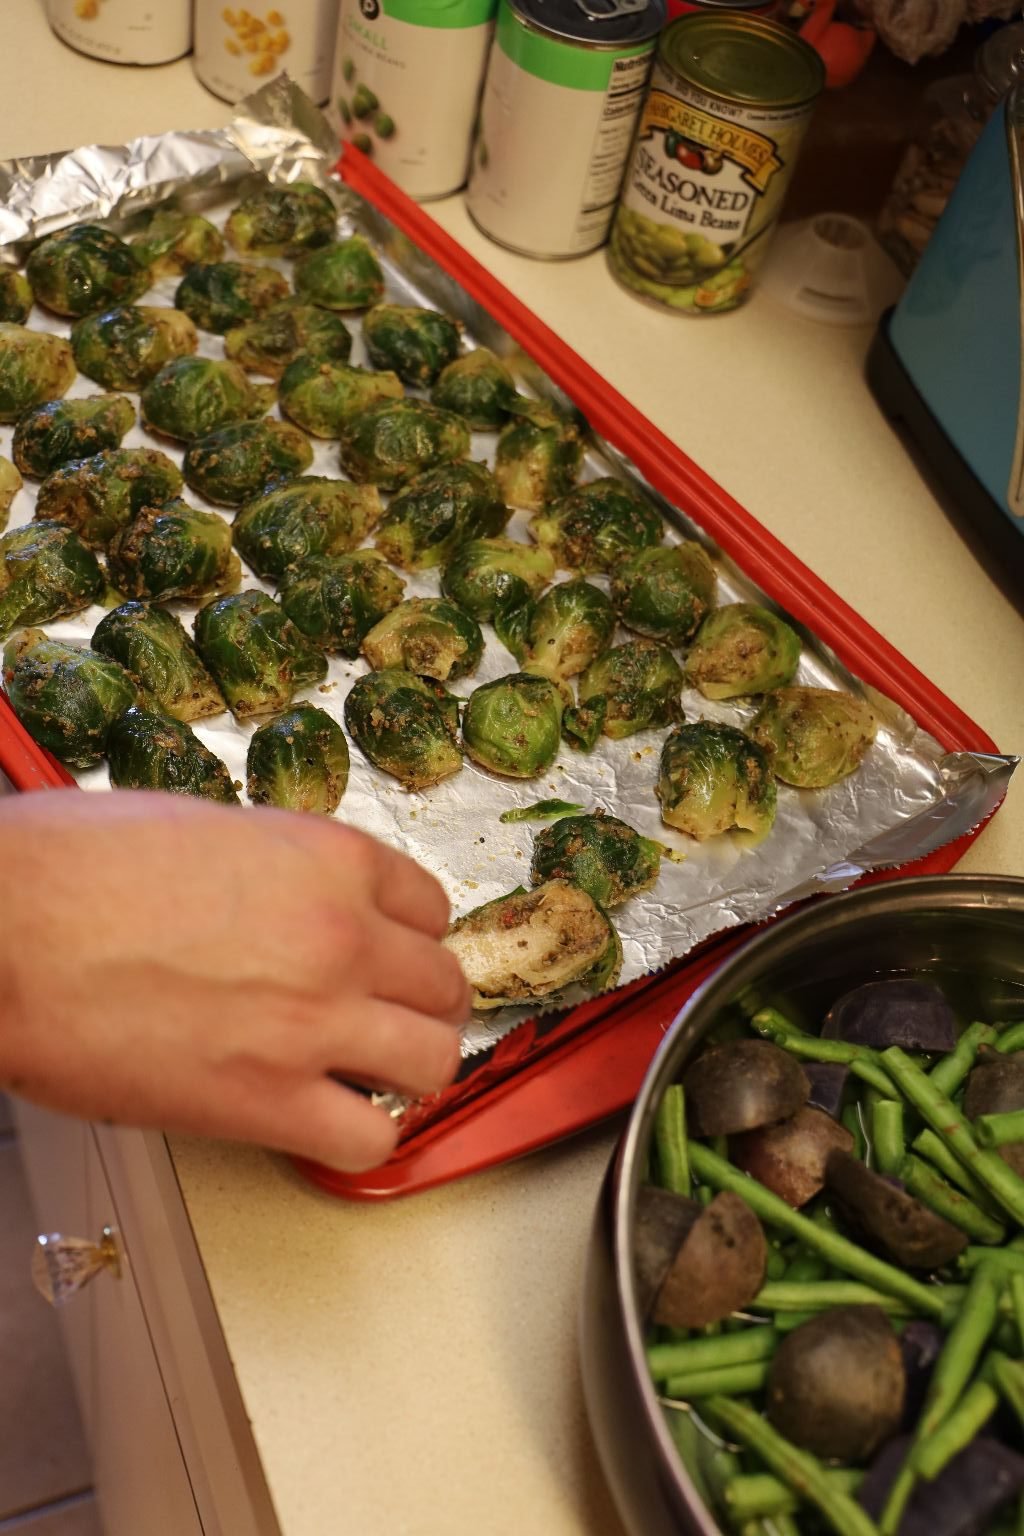

Place a sheet of non-stick aluminum foil on a sheet pan and place the sprouts cut side down. Roast the sprouts at 400”F for ~20-25 min. or until the cut side turns slightly brown and caramelized.

Roasting in the Oven for Easter
————————————————————————

Mashed Potatoes with Carrots
(This recipe is based on Gordon’s sister Heather’s recipe. I, Julie, first ate Heather’s Mashed Potatoes with Carrots when we stayed with them in Orlando in 1986 on our way to Hawaii to live. She made these for us and they are the best mashed potatoes that I have ever eaten. To tell you the truth, I don’t even remember what else we ate. I only cared about these. Which is why I wanted to recreate these for this Easter meal.)
———————————————————-
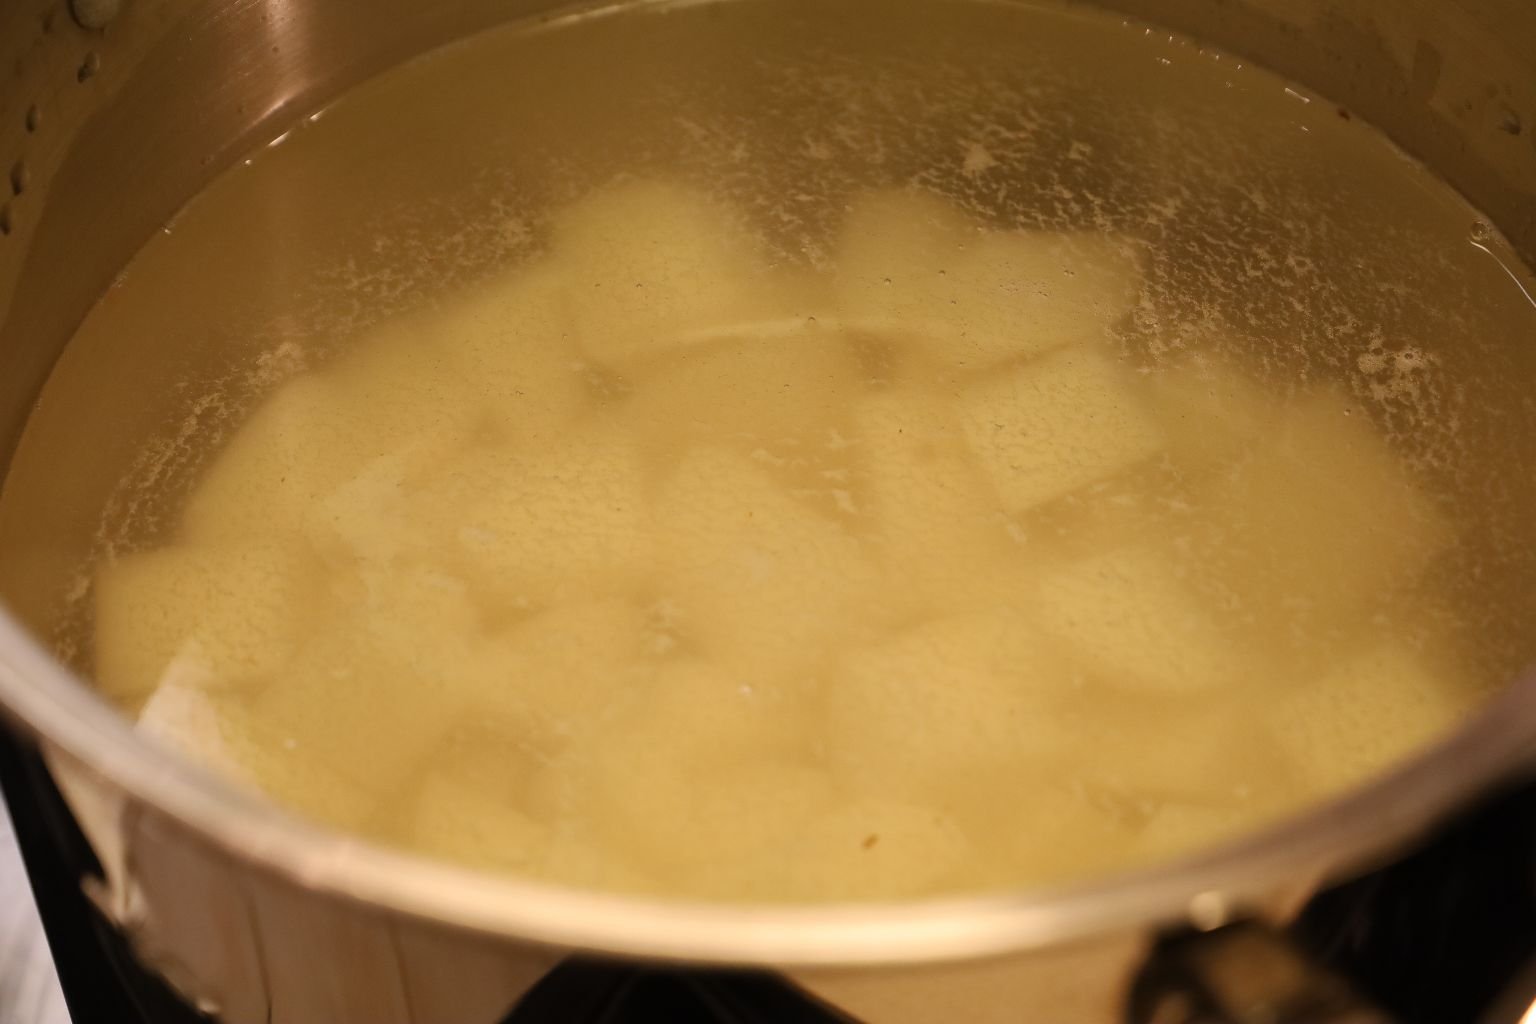
Wash and peel about 8 potatoes and cut them into medium chunks. Wash and peel your carrots as well and cut them into rounds or chunks. Place your potatoes into a large pot of water and turn on high to boil.
TIP: If you place the cold potatoes into boiling water, you will over cook the outside of the potatoes before the inside is cooked. This is why some peoples potato salad is mushy and the potatoes don’t have a nice shape to them.
After the potatoes have cooked for about 15 min. add your carrots to the pot. Yes, the boiling water will cook the outside of the carrot faster, but the carrot is a little more dense and hearty than a potato and won’t hurt it. Cook the carrot and potatoes for about another 10 min. or until the carrots are tender and the potatoes are fully cooked.
When cooked, pour the carrots and potatoes into a colander.
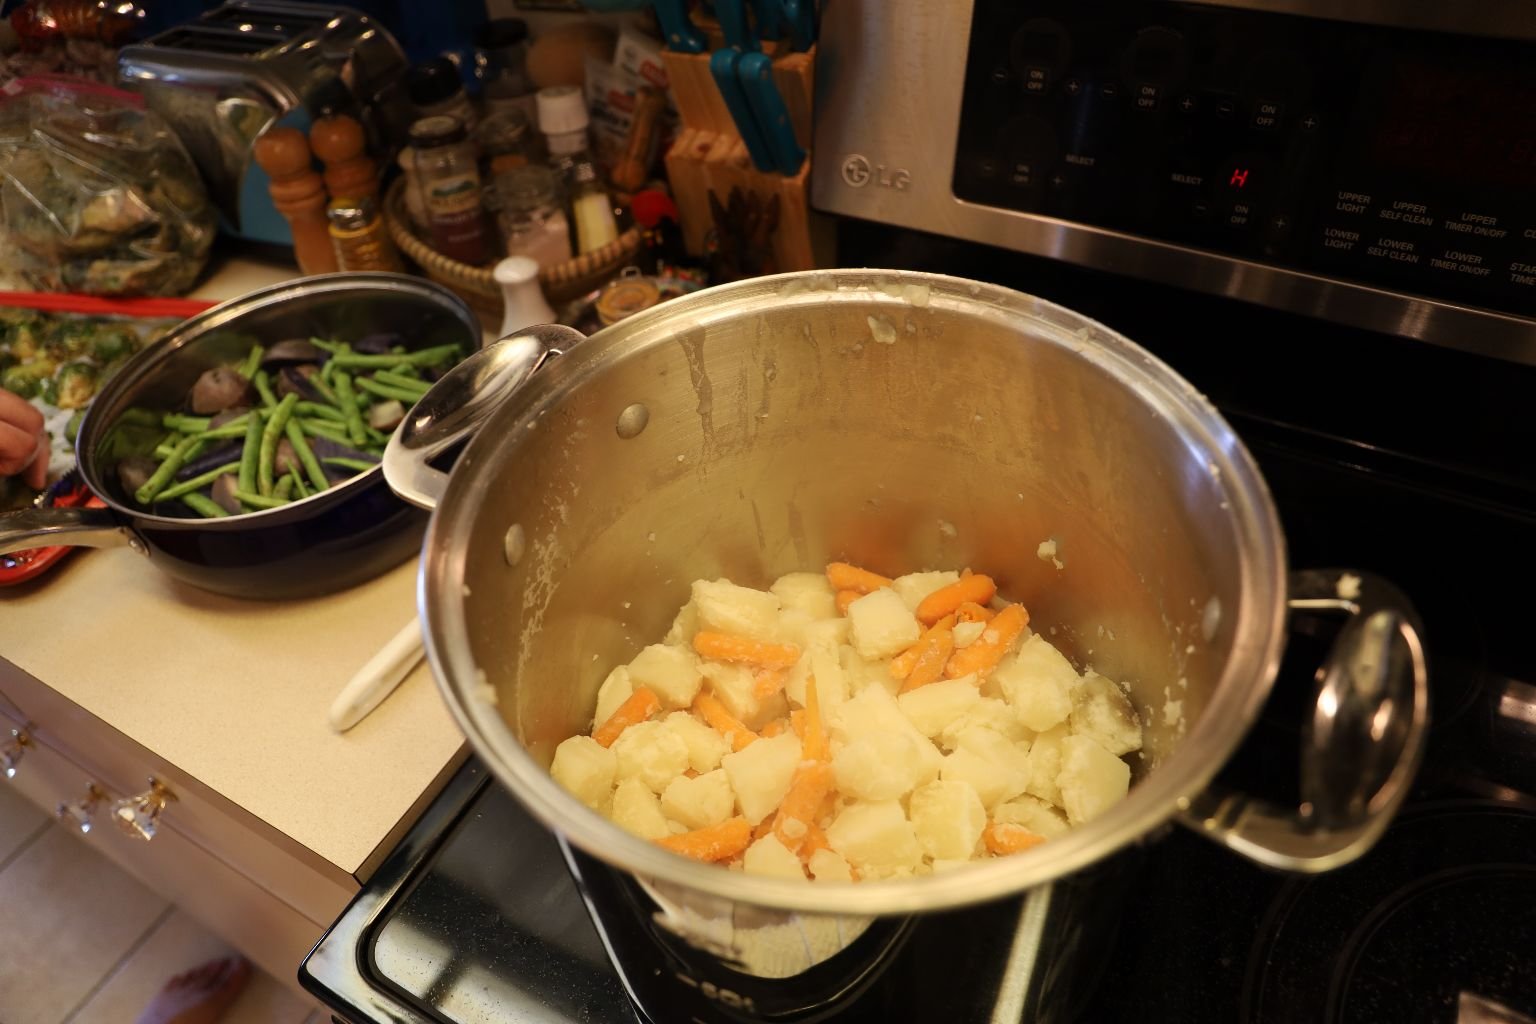

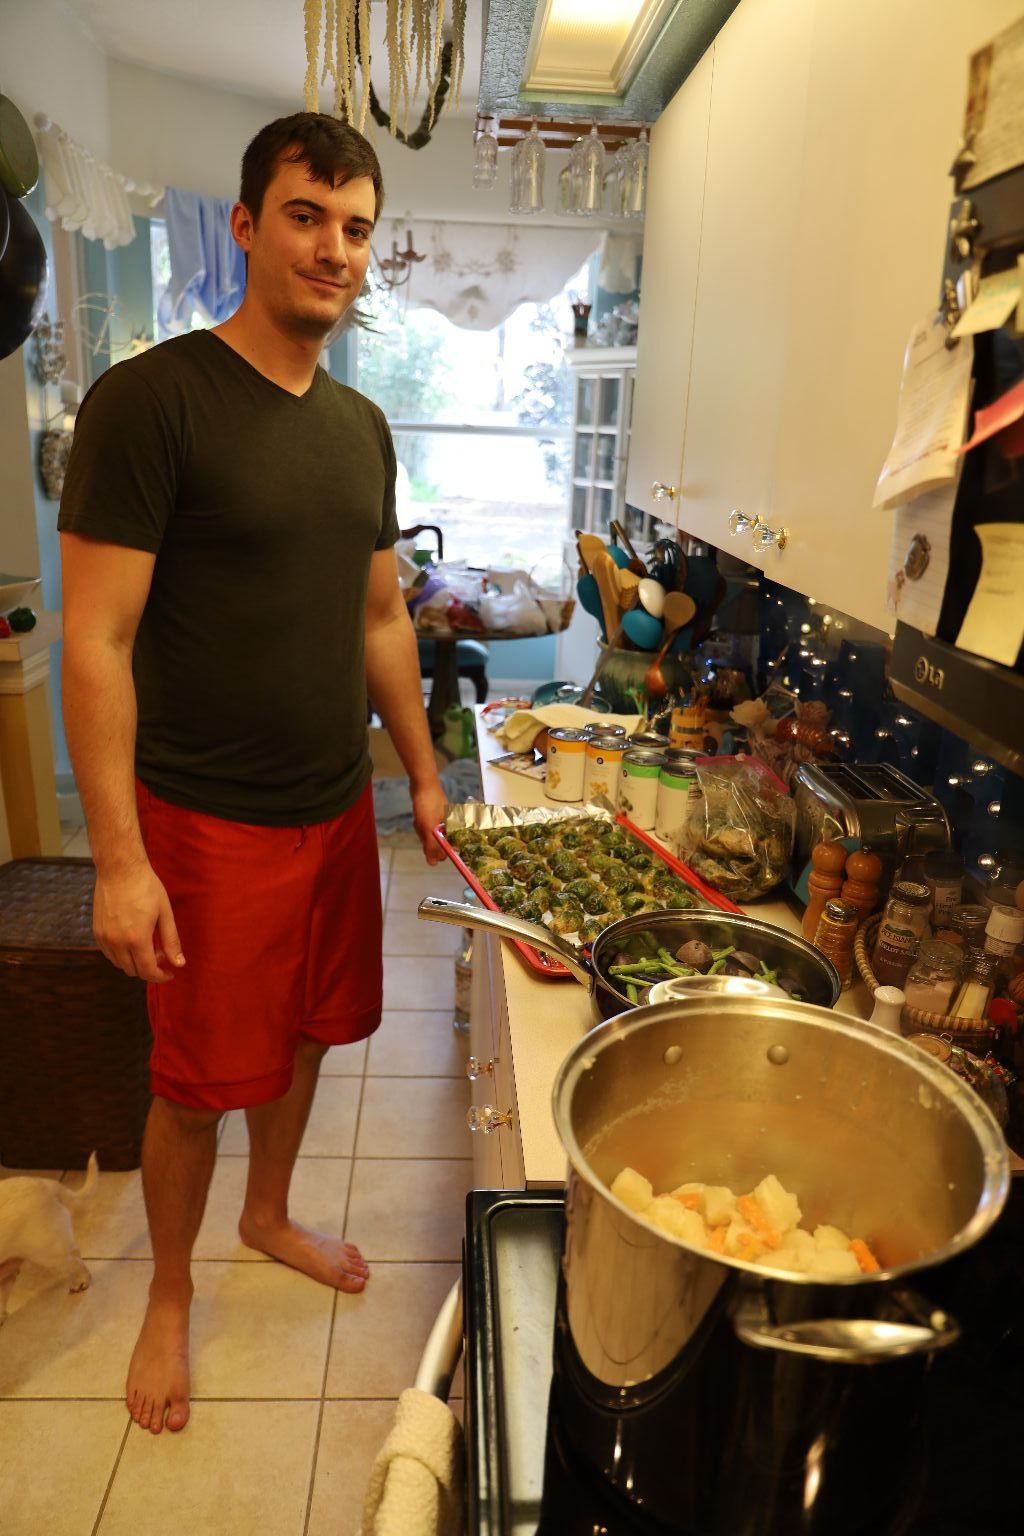
—————————————————————

Add a few tablespoons of butter the the pot.
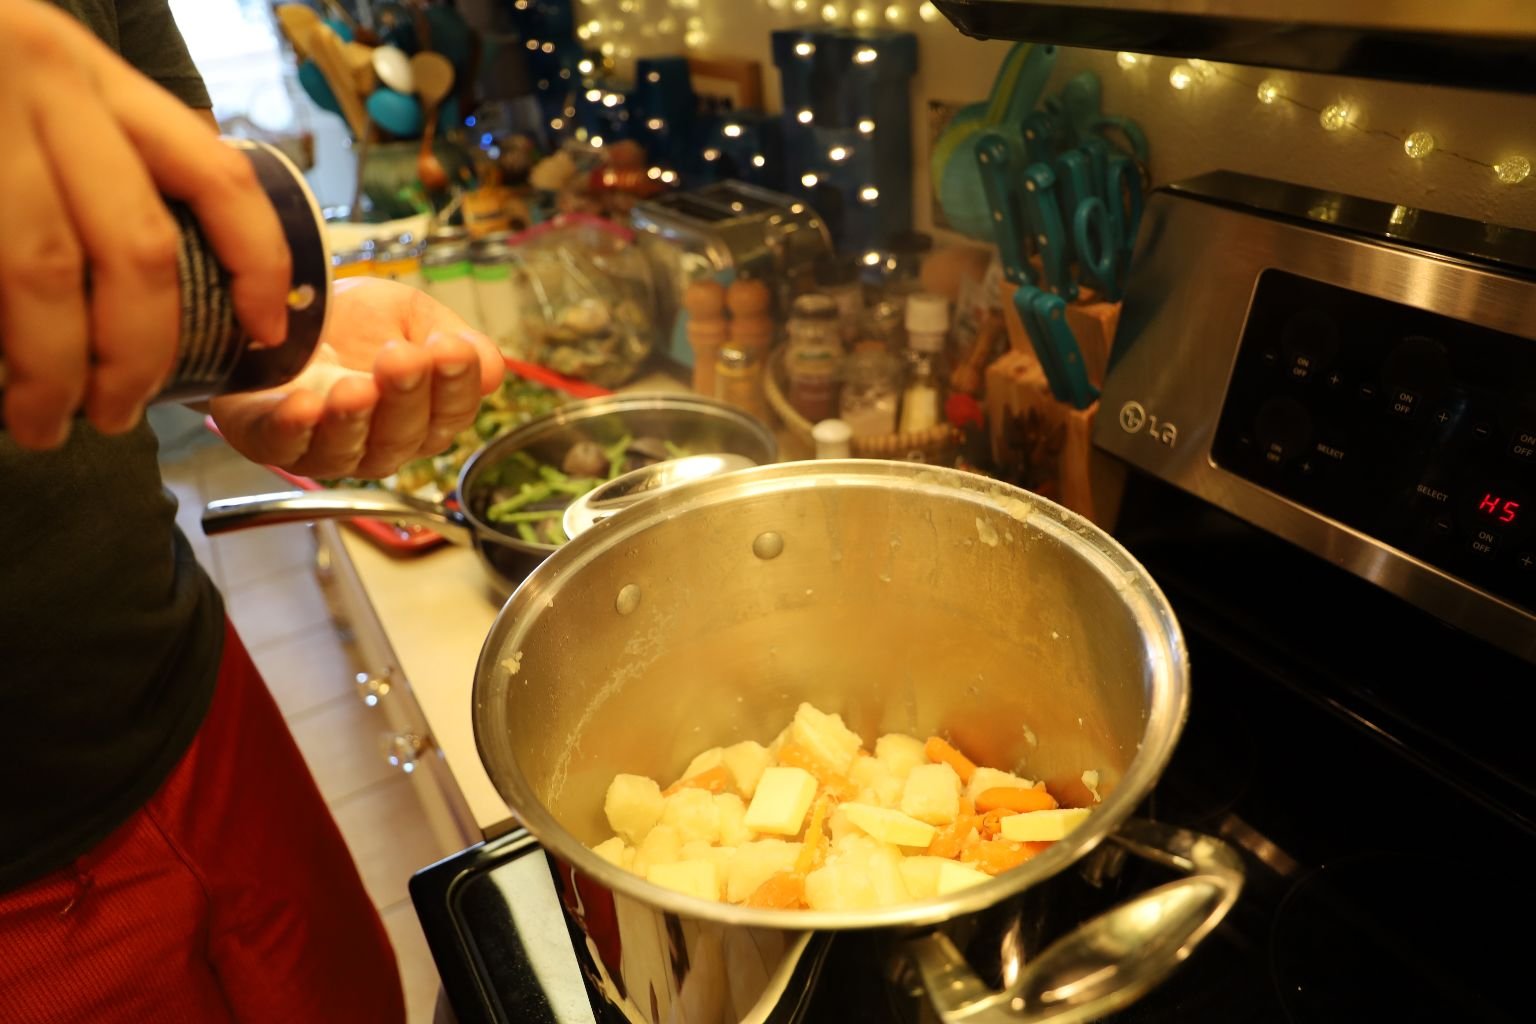
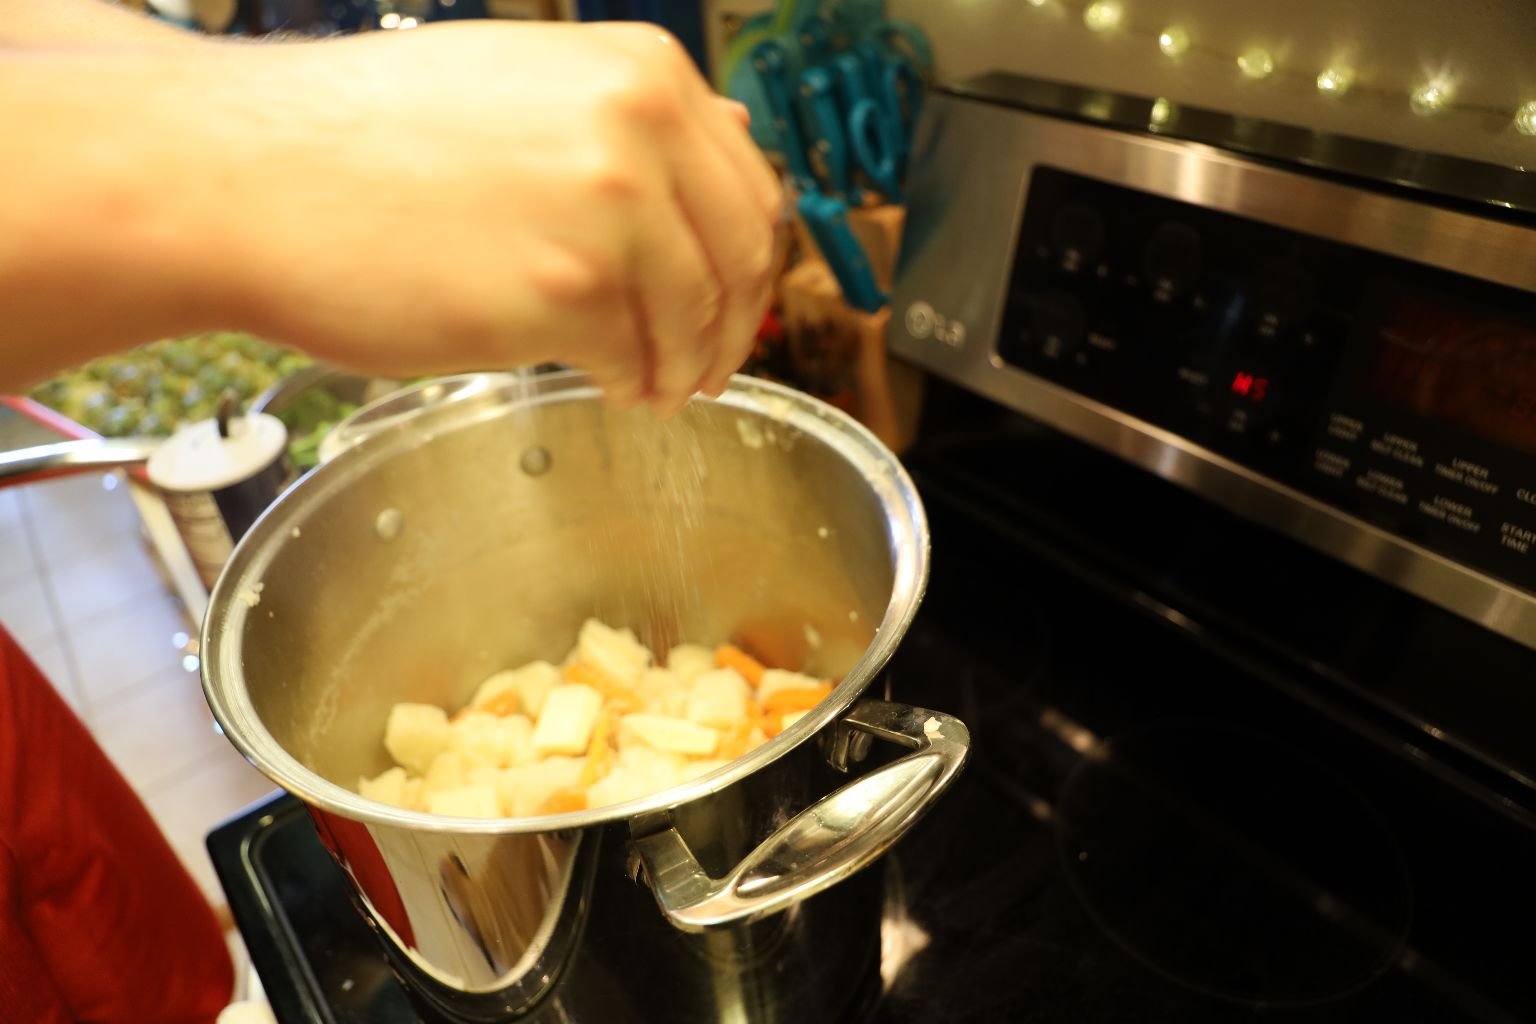
Then add some course Sea Salt.
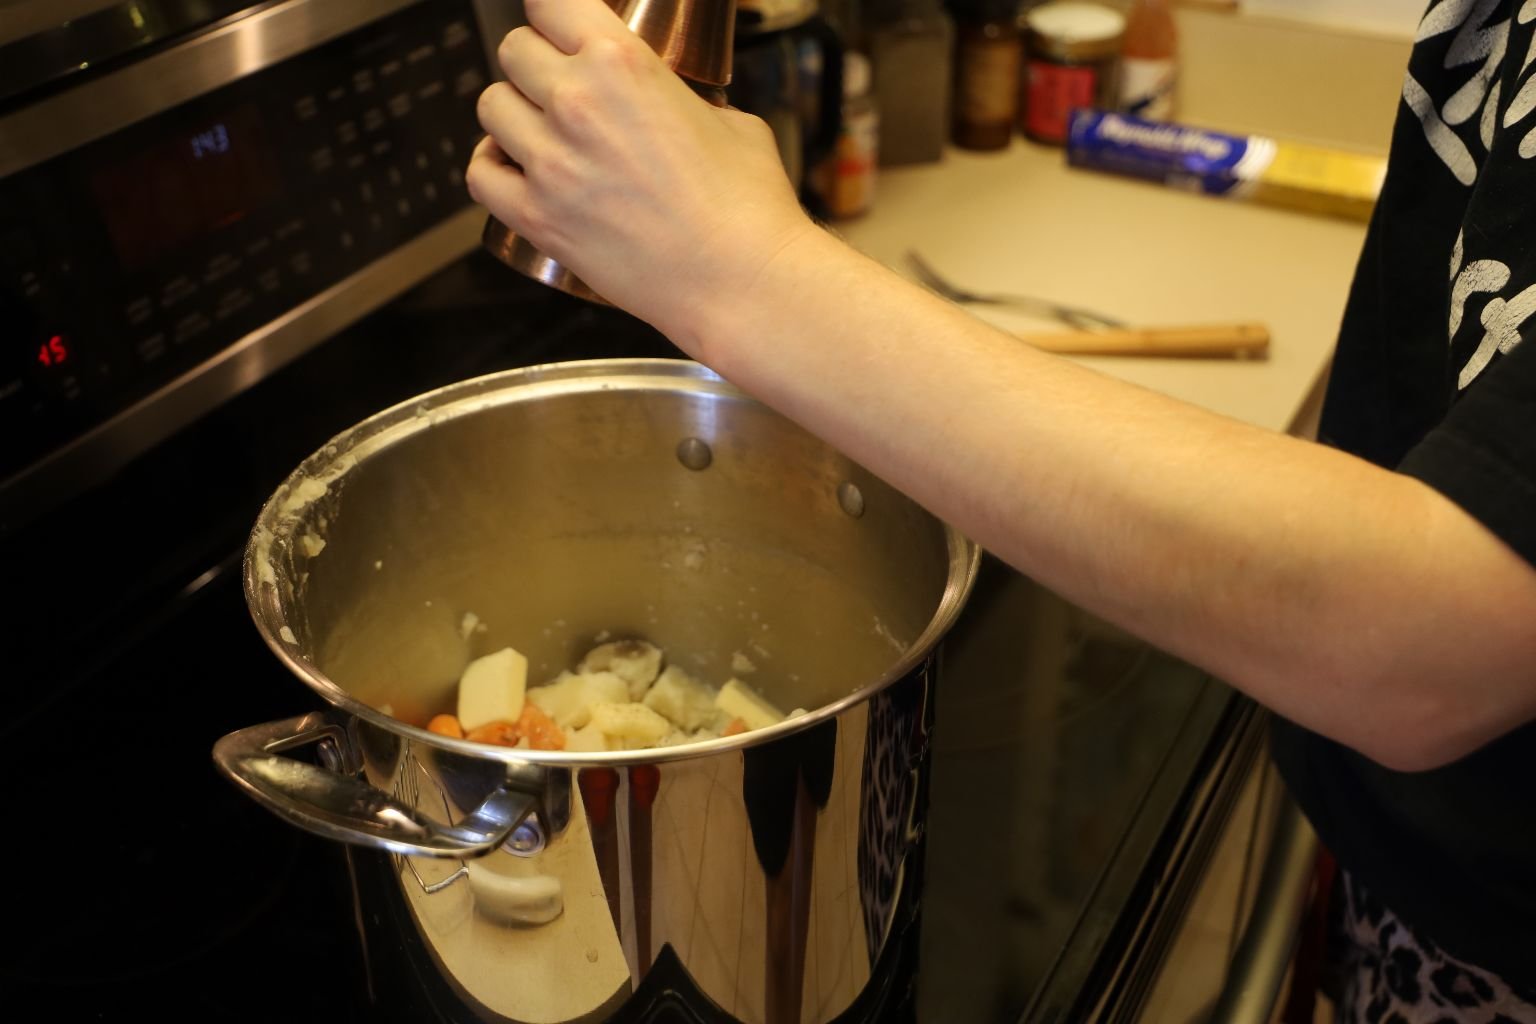
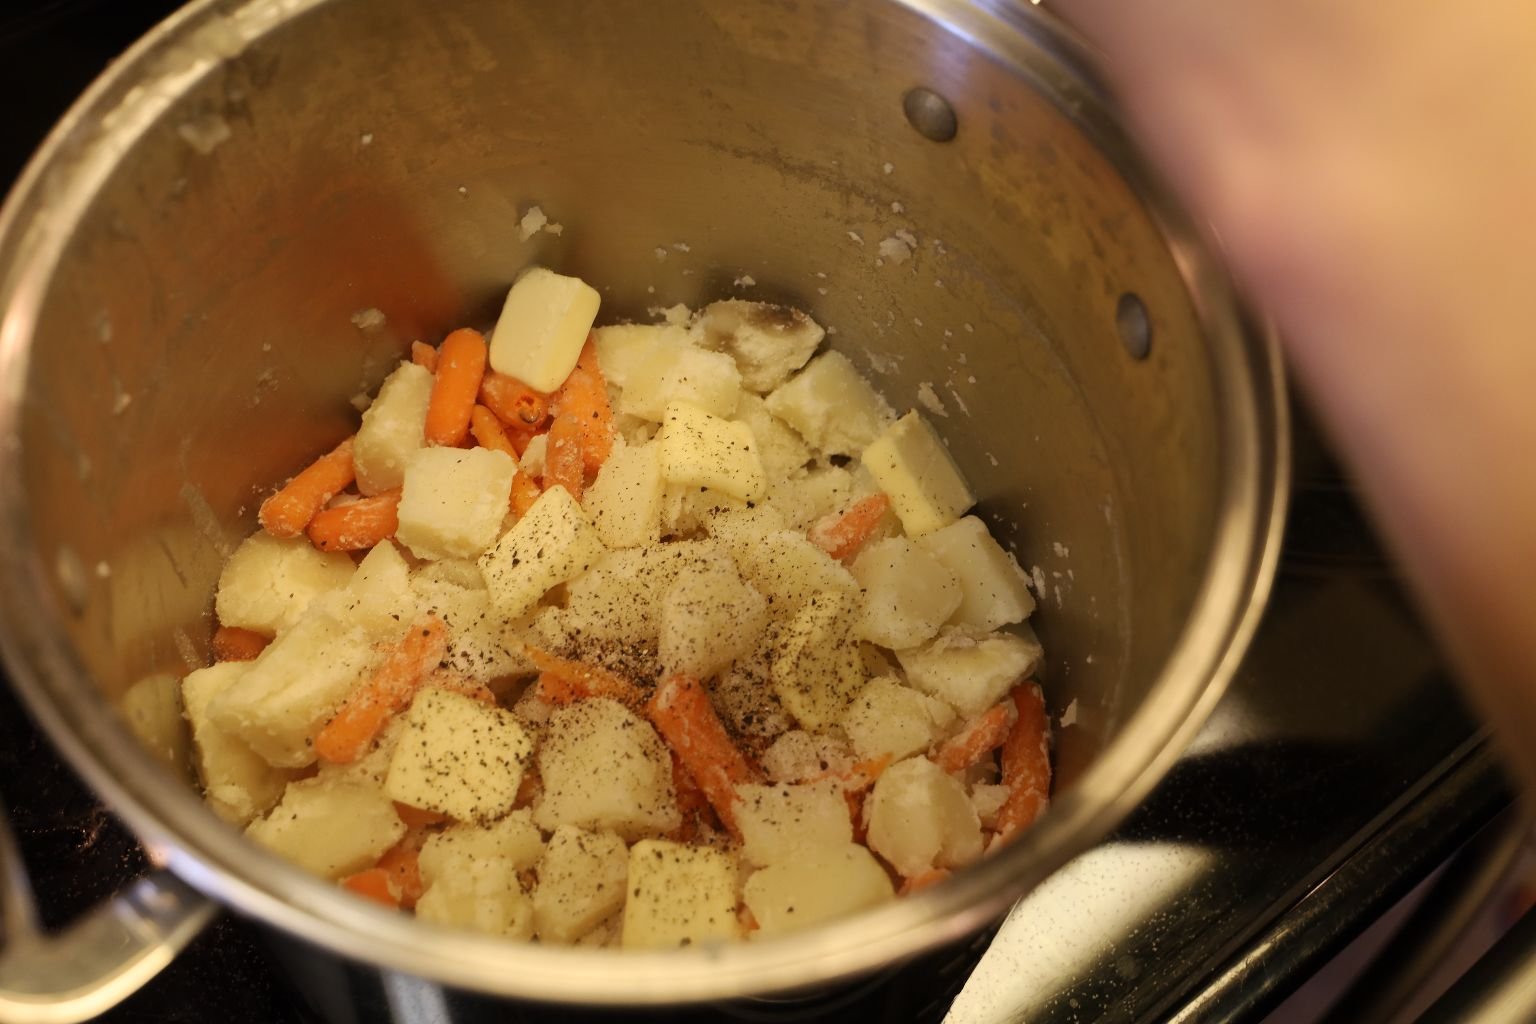
Then some fresh cracked pepper.
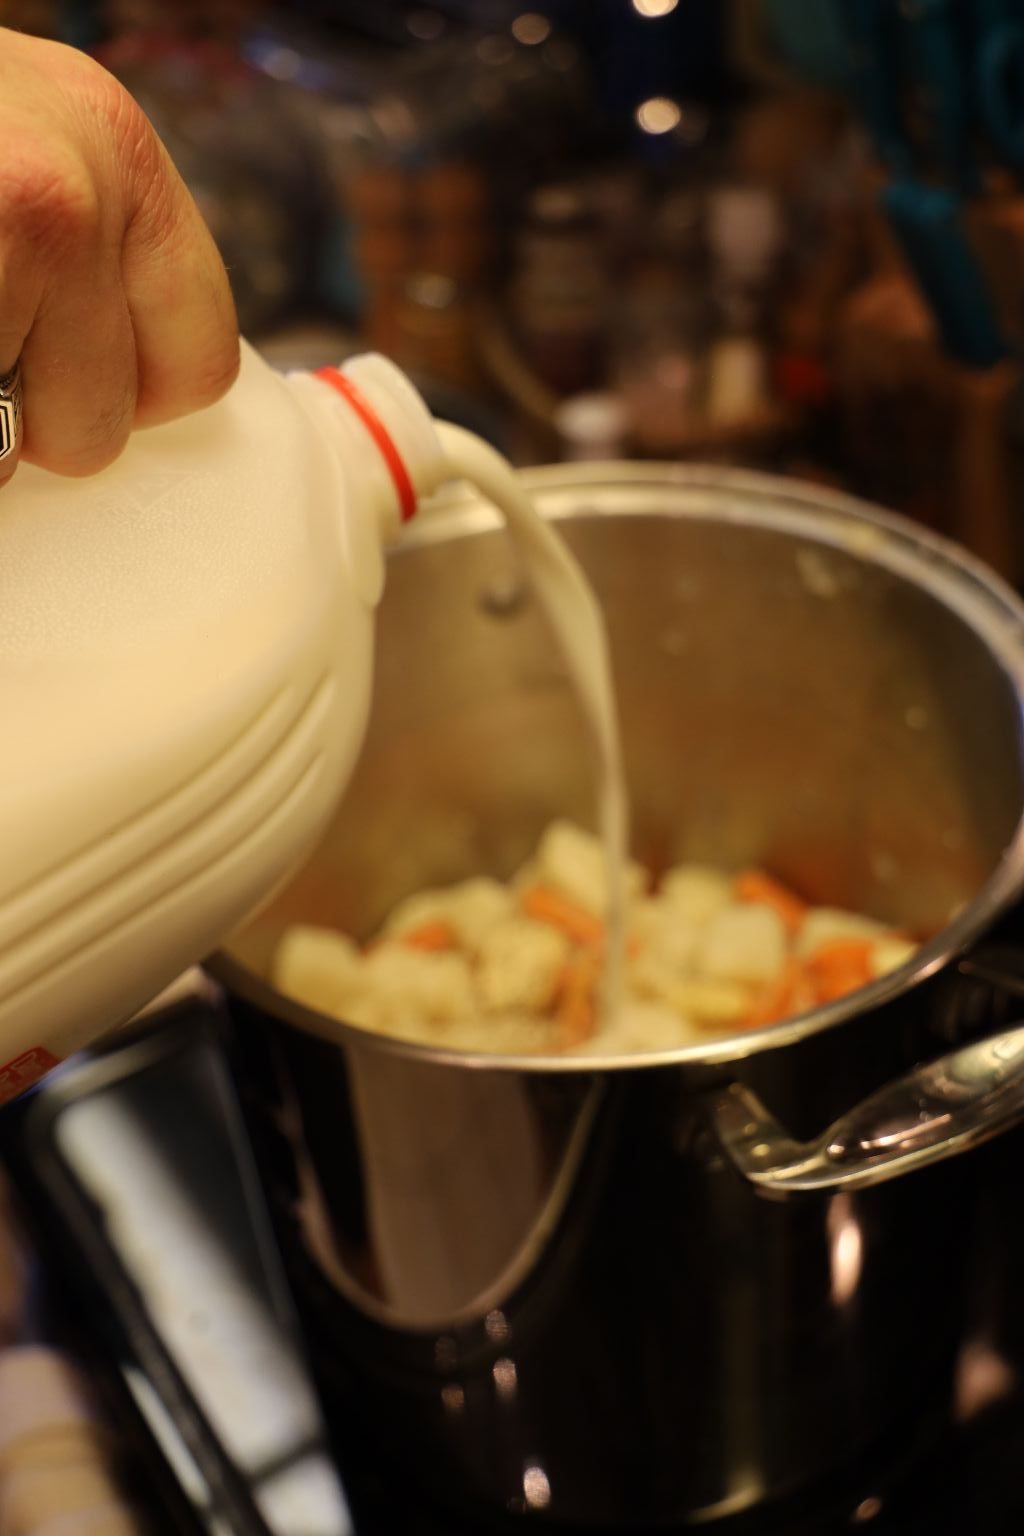
Lastly, add about 1/2 Cup of milk to the pot.

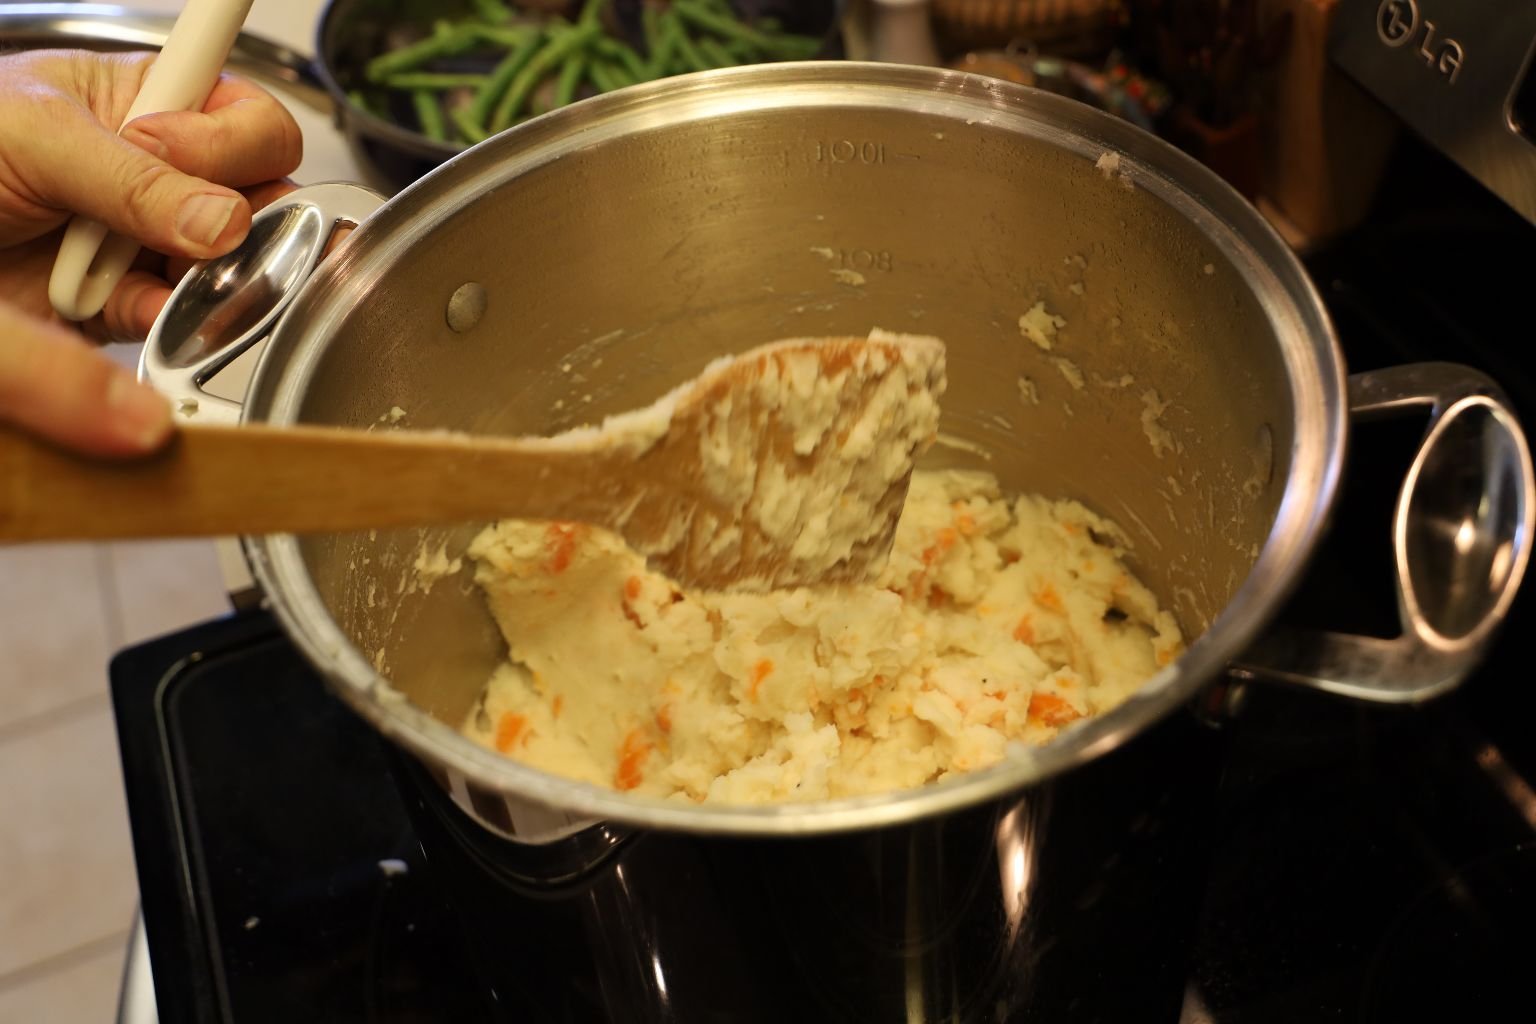
Using a potato masher, mash the potatoes and carrots until just combined. Over mixing these ingredients will make them turn to paste. Taste the mixture, and add salt, pepper, butter or more milk if needed.

A nice twist on simple mashed potatoes.
———————————————————-
Lima Beans

Gordon HATES Lima Beans! 🙂
These came from a can so there is no recipe but at least I don’t have to worry about Gordon eating them all. 🙂
—————————————————————————–
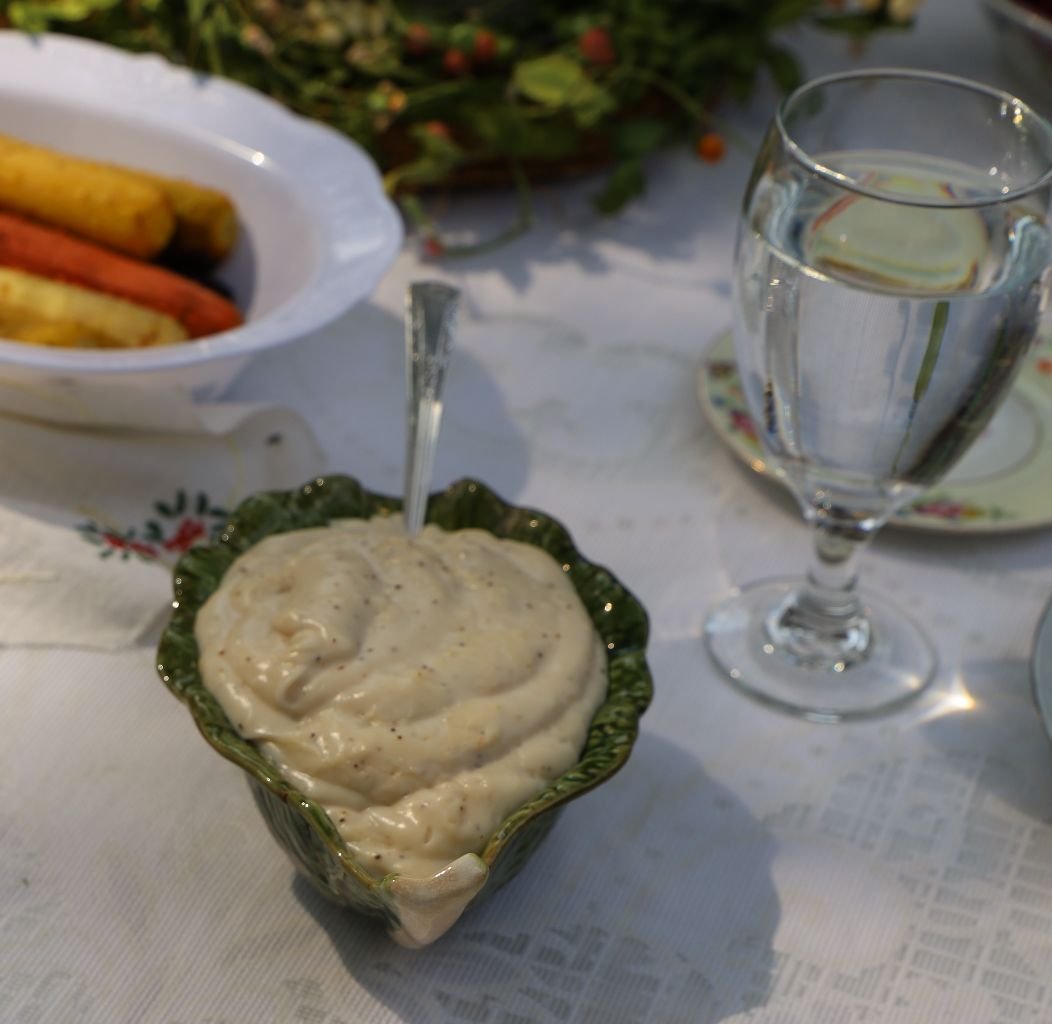
“Homemade” Gravy

SouthEastern Mills, Inc.
Rome, Georgia
(Gravy from home.) 🙂
I am originally from Rome, Georgia so this gravy is HOME! It is a white gravy, which is a country gravy. We just followed the package directions. You can always add a spice or two to anything. Remember that. Although we didn’t doctor this up, you always can.
———————————————————–

Cute Spooky and Sparky Doggie Break
w/ their Stuffed Critters

————————————————————–

I wanted to give a big THANK YOU to Brodie and Mackenzie for all that they did to make this holiday meal special.
I knew that they had done a lot of the cooking but I never realized just how much they did until I put all of this together when I worked on this post.
They have a future of bringing delicious meals to their own table and satisfying their future guests with their cuisines.
We love you guys!!!!
Julie and Gordon
(Just invite us over occasionally.) 🙂
——————————————————————

Good Lighting, Camera, ACTION!


Happy Easter!
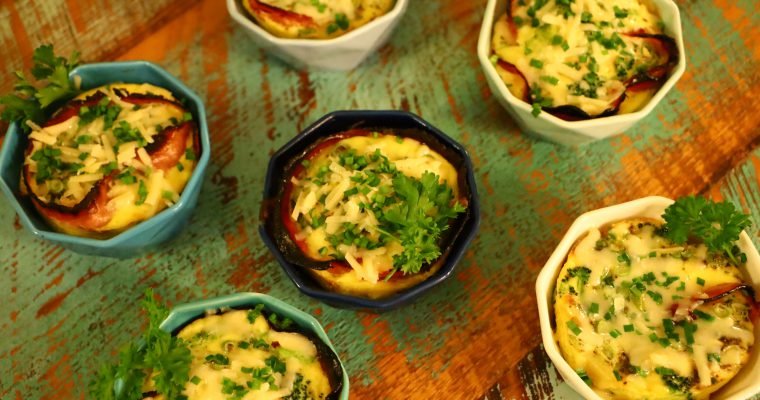
Good Morning! Rise and Shine! Our Sunny Kitchen Table —————————————————————– Is Everybody Hungry? Juice? Coffee? Oh, I know, how about our: Whole Wheat Heaven and Heat Breakfast Muffins? Don’t they smell absolutely delicious? If you’d like the recipe scroll down the …