Tavolino Da Caffe Italiana (Coffee Table Italian)


February, 2024
Super Bowl Sunday
Airport Pick-Up, w/ Great Coffee Table Italian Foods to Follow 🙂
—————————————————————————
With Gordon working overseas, he doesn’t get to come home very often. This was a very nice visit filled with lots of Coffee Table Italian. (I never knew we loved sandwiches so much until after he left to fly back overseas and I looked at all of our food photos.)
All of these creations were of so much fun!
We hope you enjoy them as much as we did. I mean, who doesn’t love a good sandwich?
Grazie Mille,
Julie and Gordon
———————————————————————————-
The Menu:

Pasta Topped Polenta w/ Sun Dried Tomatoes and Basil Leaves
Casserole

————————————————————————————-

An Italian Staple of Ours:
Focaccia, and Roasted Garlic

The Ultimate Italian Sandwich

This is one of the BEST Sandwiches that we have ever MADE!

—————————————————————————-

The Sandwich is Excellent with our Polenta Casserole from Above
—————————————————————————————-

Olive Egg Salad, and Cider Vinegar Potato Salad

——————————————————————————

Corona with Lime

Our Super Bowl Italian Sandwich

Buon Appetito!
————————————————————————
Chicken Parm Sandwiches (TWO WAYS)
Number 1
One day I Julie, was shopping in Sprouts and saw this delicious Chicken Parmesan, ready made. They just looked so good and I didn’t feel like cooking anything that night, so I bought them. I really hadn’t thought how I would be eating them? I just assumed that I would be baking them in the oven (to finish the baking process), and having them with a few vegetables. It was when I was going through the refrigerator that I spotted the Italian Mustard that I love so much. I wondered how I could have the mustard with the Chicken Parm I had just bought? That is when I realized how great a sandwich this would make! I even had the Baguettes and some great greens to eat it all together with.

The Chicken Parm was too big for one of my Baguettes, so I baked two!

This was an Excellent Sandwich..

..With Great Leftovers!
(Recipe Down Below)
———————————————————————————————-
Chicken Parm Sandwich
Number 2

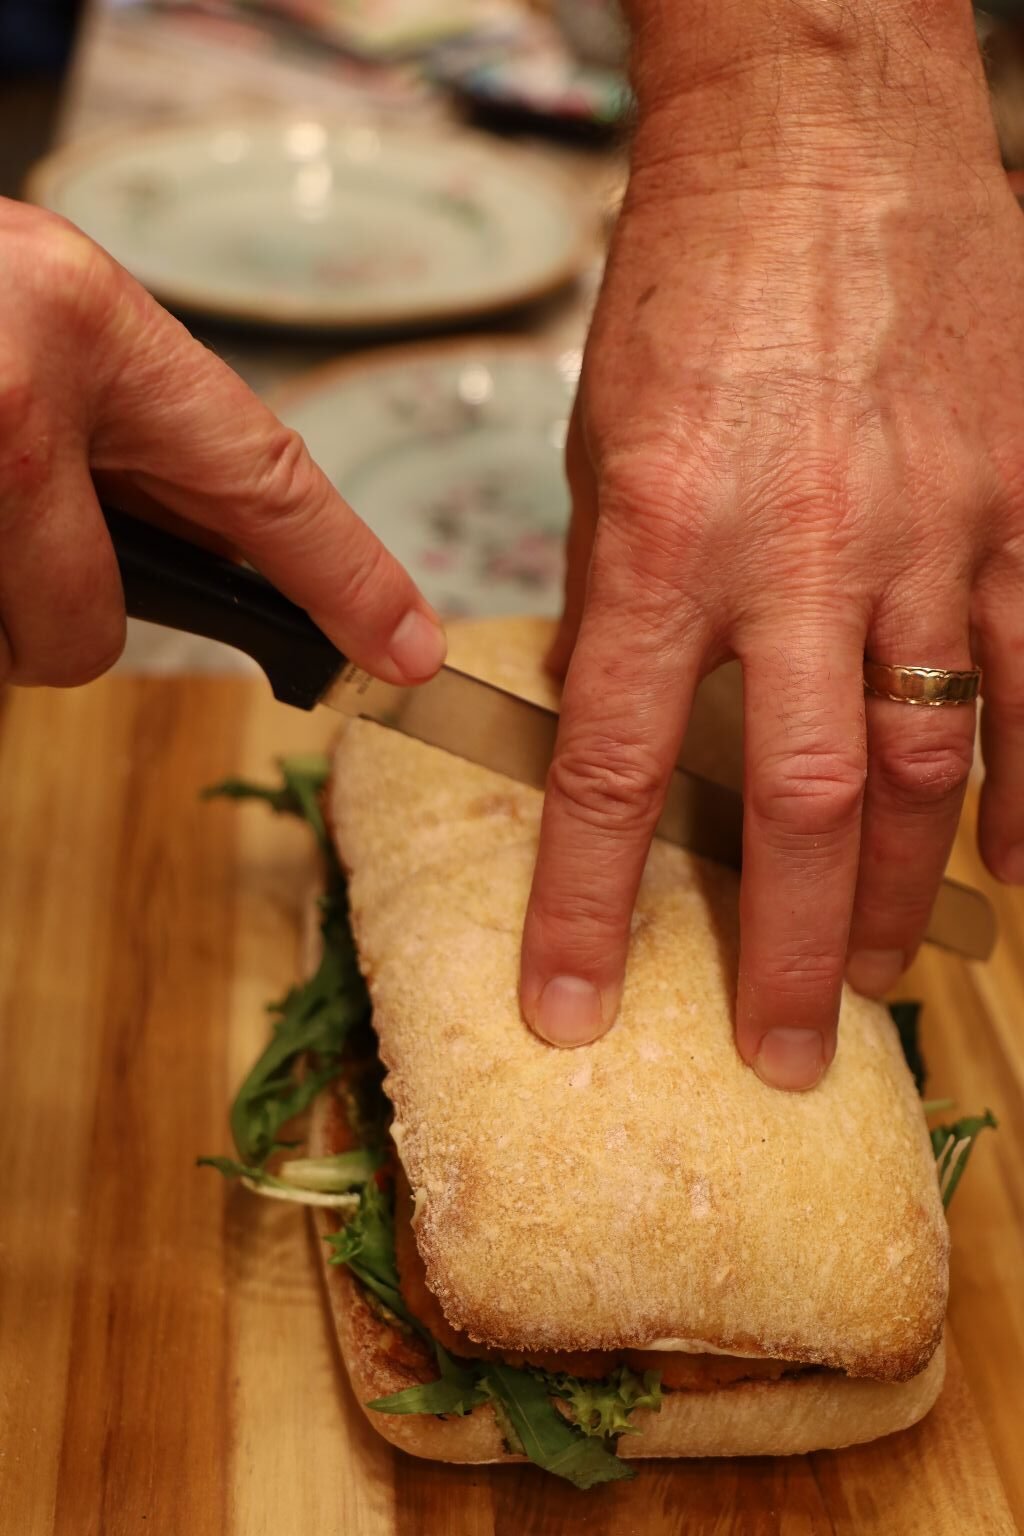
This is a great picture of the sandwich before it is cut, so you can see how it was laid out.
With Gordon working overseas, when he came back home for his Homecoming, October 2024, I told him about the great sandwich that I made and I would like for us to have one while he’s home. I gave him my ideas for making the sandwich even more elaborate than I had made it prior.

We did. And it was even more delicious than the one I had originally made.


We will tell you how we did it down below.
(Recipe Down Below)
——————————————————————————-
Coffee Table Lasagna

Perfect find from the freezer for a very nice long weekend of Italian Feasting.

(Recipe Down Below)

—————————————————————————————-
UNDER CONSTRUCTION
The Gigantic Julie
(Sandwich, that is.)
(Recipe Down Below)
———————————————————————————
Recipes Start Here
———————————————————————

Pasta Topped Polenta w/ Sun Dried Tomatoes and Fresh Basil
——————————————————————————-

Ingredients:
Pam “Olive Oil” Spray – as needed
Hawaiian Sea Salt
1 Cup Yellow Corn Polenta
4 Cups Water
1/3 Cup Heavy Whipping Cream
½ Cup Parmesan Cheese – Grated
1 Pkg. Thin Spaghetti
~6 Cups of Water to boil the Spaghetti
8 oz. Sun-Dried Tomato Pesto
~14 Basil Leaves
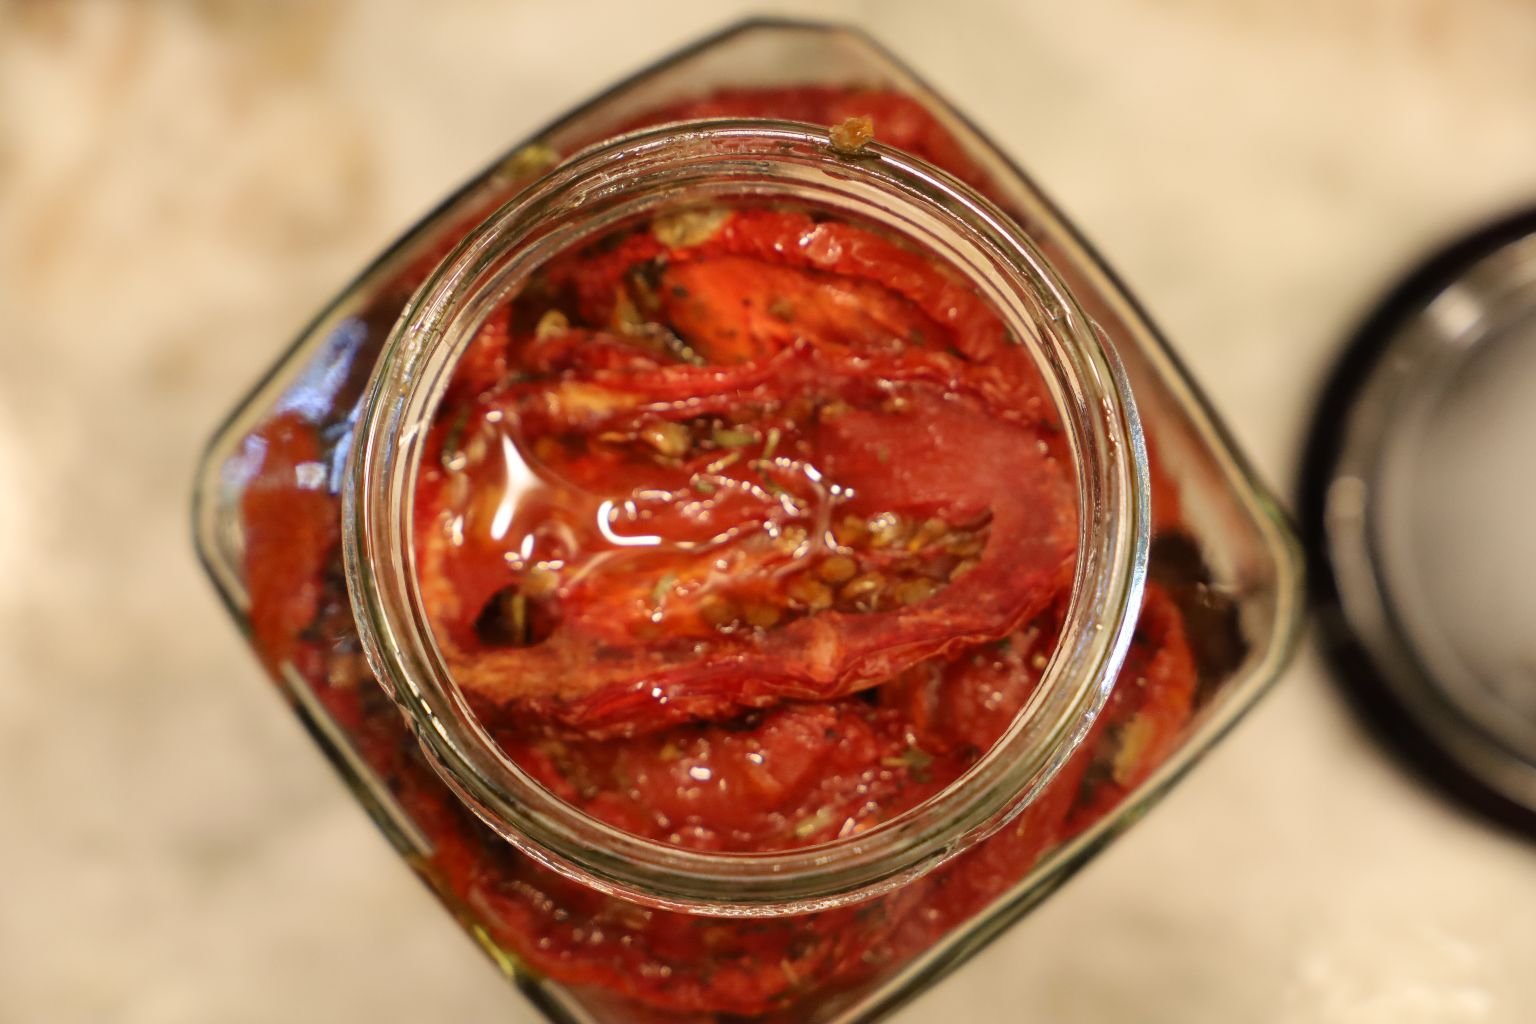
~1/2 Cup Smoked Sun-Dried Tomatoes
—————————————————————————–


This was an excellent recipe.
It was just something we threw together. It was Julie’s idea.

——————————————————————————

Hawaiian Sea Salt
——————————————————————————

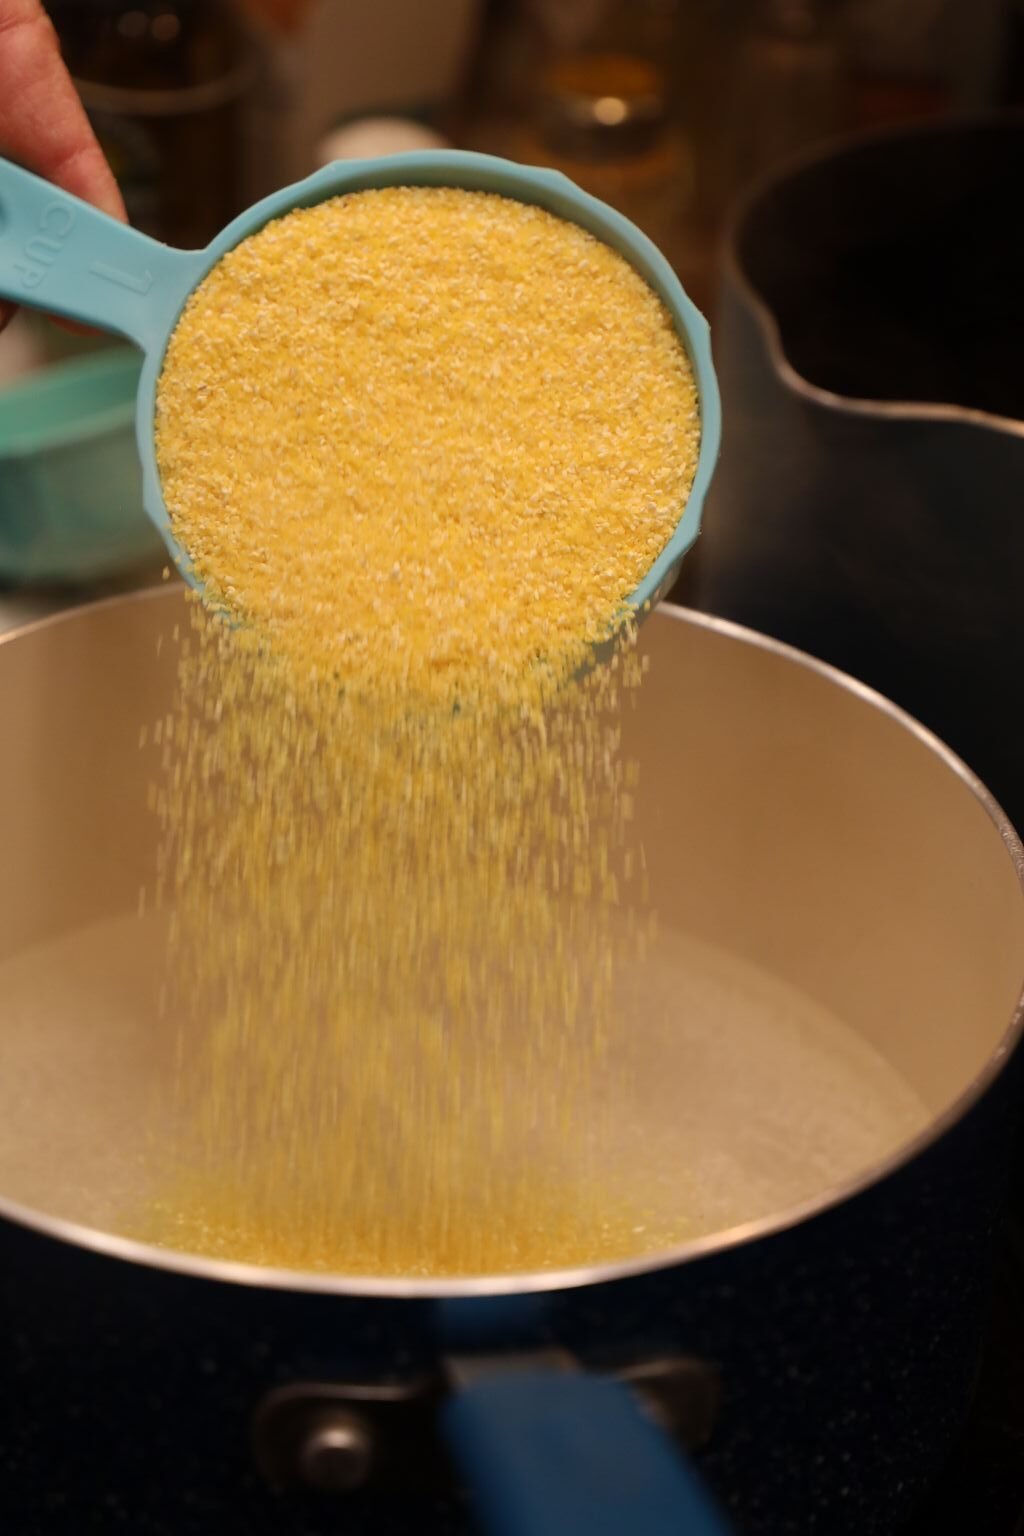

This is a really good Polenta as we like all of this brand’s ingredients. Pour 1 Cup of dried Polenta into a medium sized pot, then add your water as directed. Heat to a boil and stir with a whisk to prevent lumps.

Cook the Polenta as directed switching to a rubber spatula, then turn off the heat.

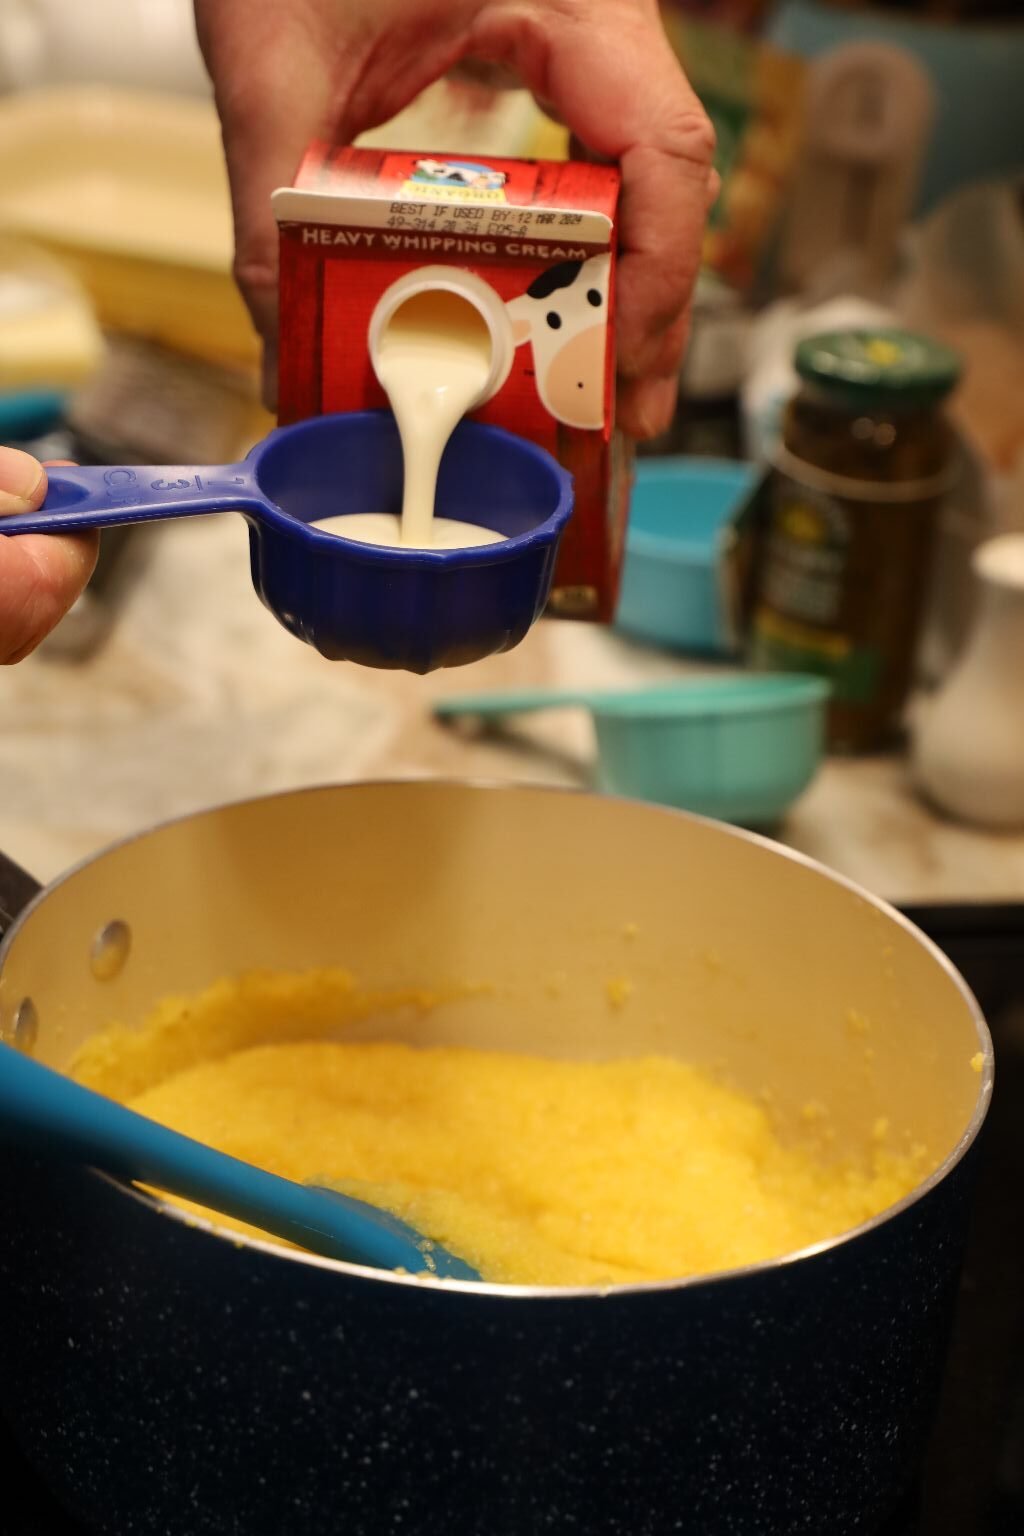
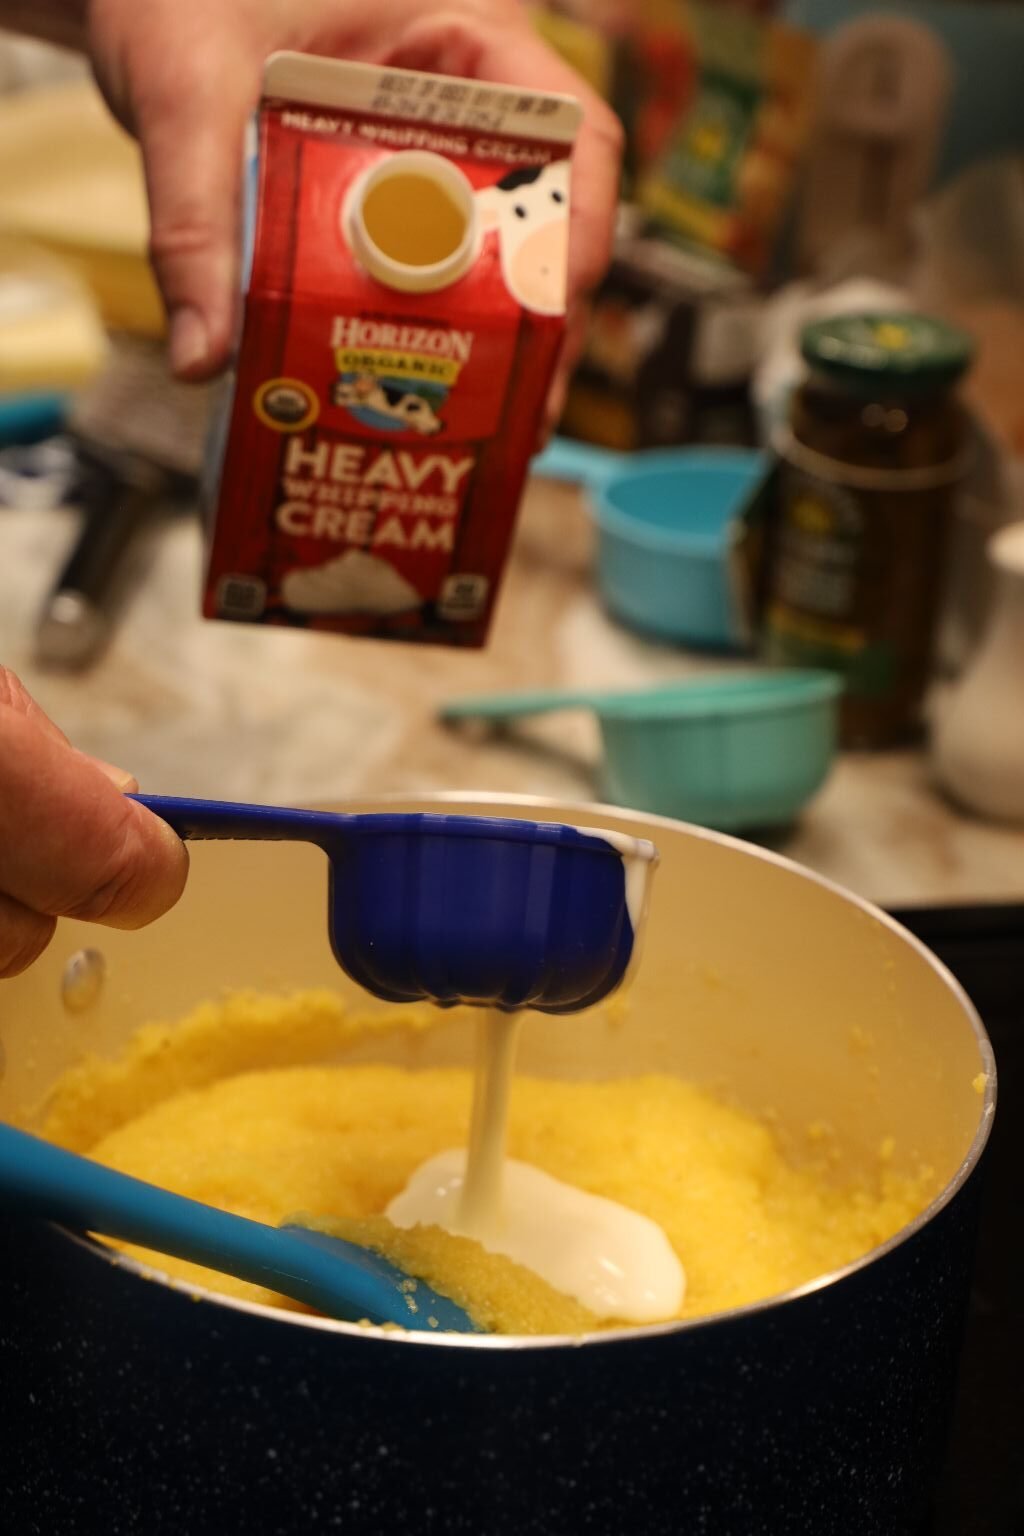
Now add your Heavy Whipping Cream to the cooked Polenta.


Use your spatula to mix in the Whipping Cream.


Grate in your Parmesan Cheese


Mix the ingredients well …


Then add them into a large casserole dish that has been sprayed with the Pam cooking oil spray. You can use an Olive Oil spray.


Use your spatula to smooth and even out the Polenta in the dish.
Set this aside for later.
—————————————————————————-

Pictured are your next set of ingredients.


This Spaghetti worked great in this recipe as it was shorter than usual, making it easier to eat with the Polenta. You will better see what I mean later.


Cook the Spaghetti as directed.
Drain the Spaghetti in a colander without rinsing it. Rinsing pasta removes the starch on the noodles preventing the sauce, in this case our Pesto, from sticking to it.
—————————————————————————–

Fresh Basil is amazing and easy to grow!


Place your cooked Spaghetti into a large bowl, then add your Sun-Dried Tomato Pesto.


Toss the ingredients together as shown.


Add your Spaghetti to the top of your Polenta.


Top this with a good helping of your Smoked Sun-Dried Tomatoes. (We used regular Sun Dried Tomatoes as well as the Smoked.)

Looks great as it is!


Now, top this with your Fresh Basil Leaves.
This smells wonderful!

The sides are some leftover pasta salad, and Kalamata Olives.
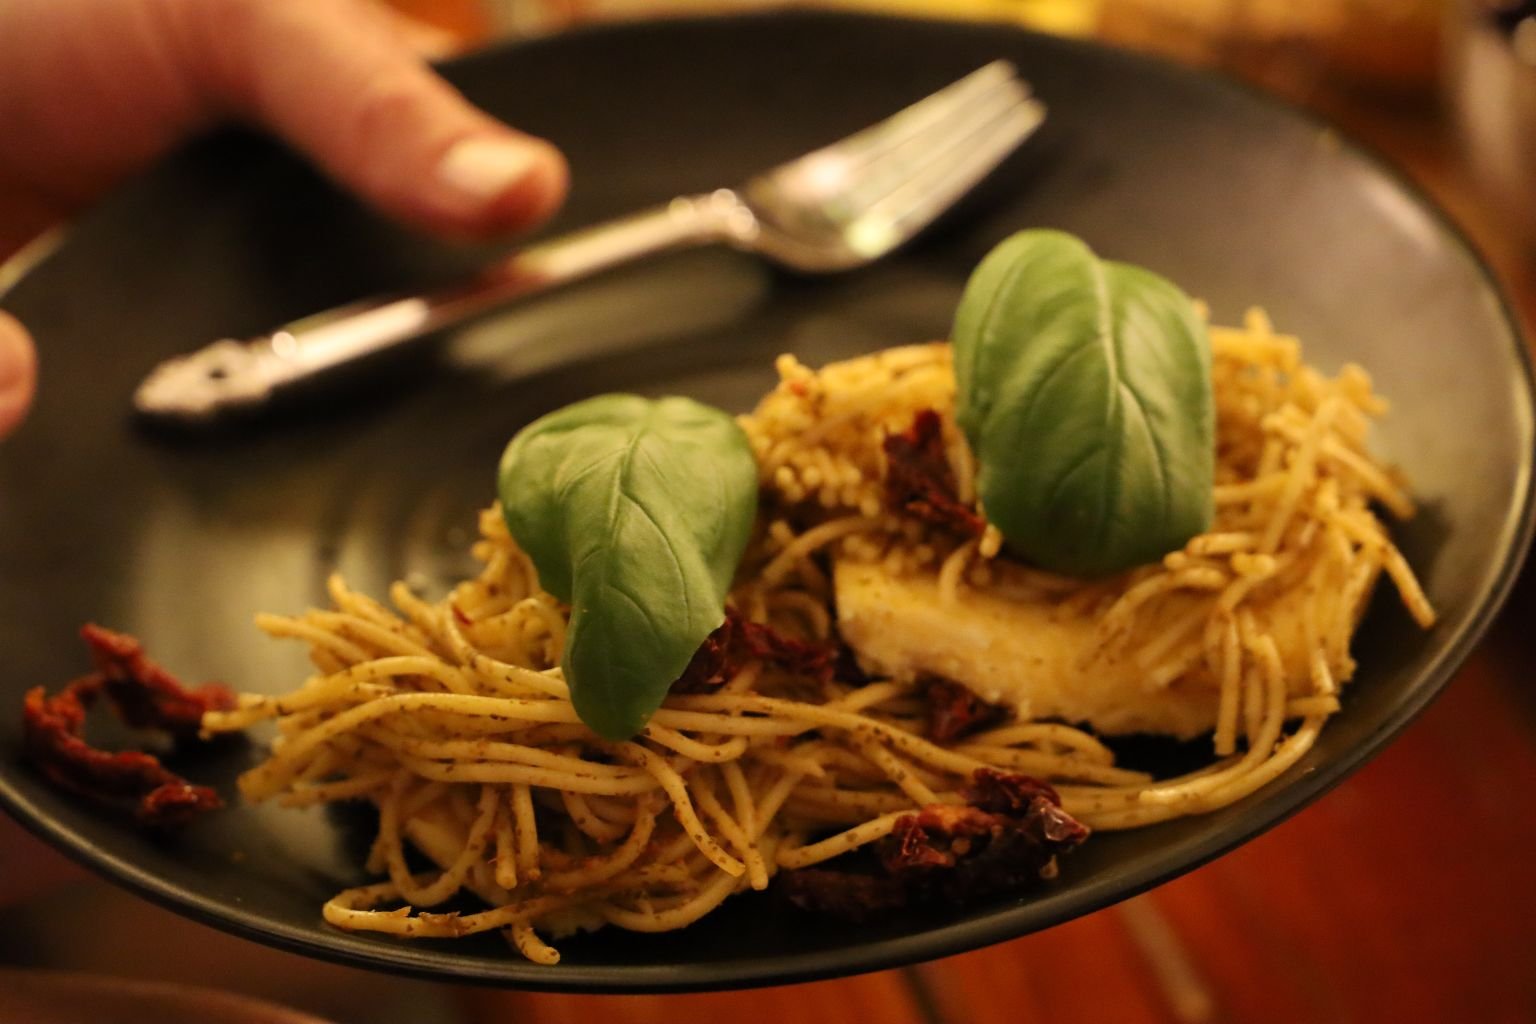
Slice out some of this wonderful combination of ingredients and dig in!
———————————————————————————-
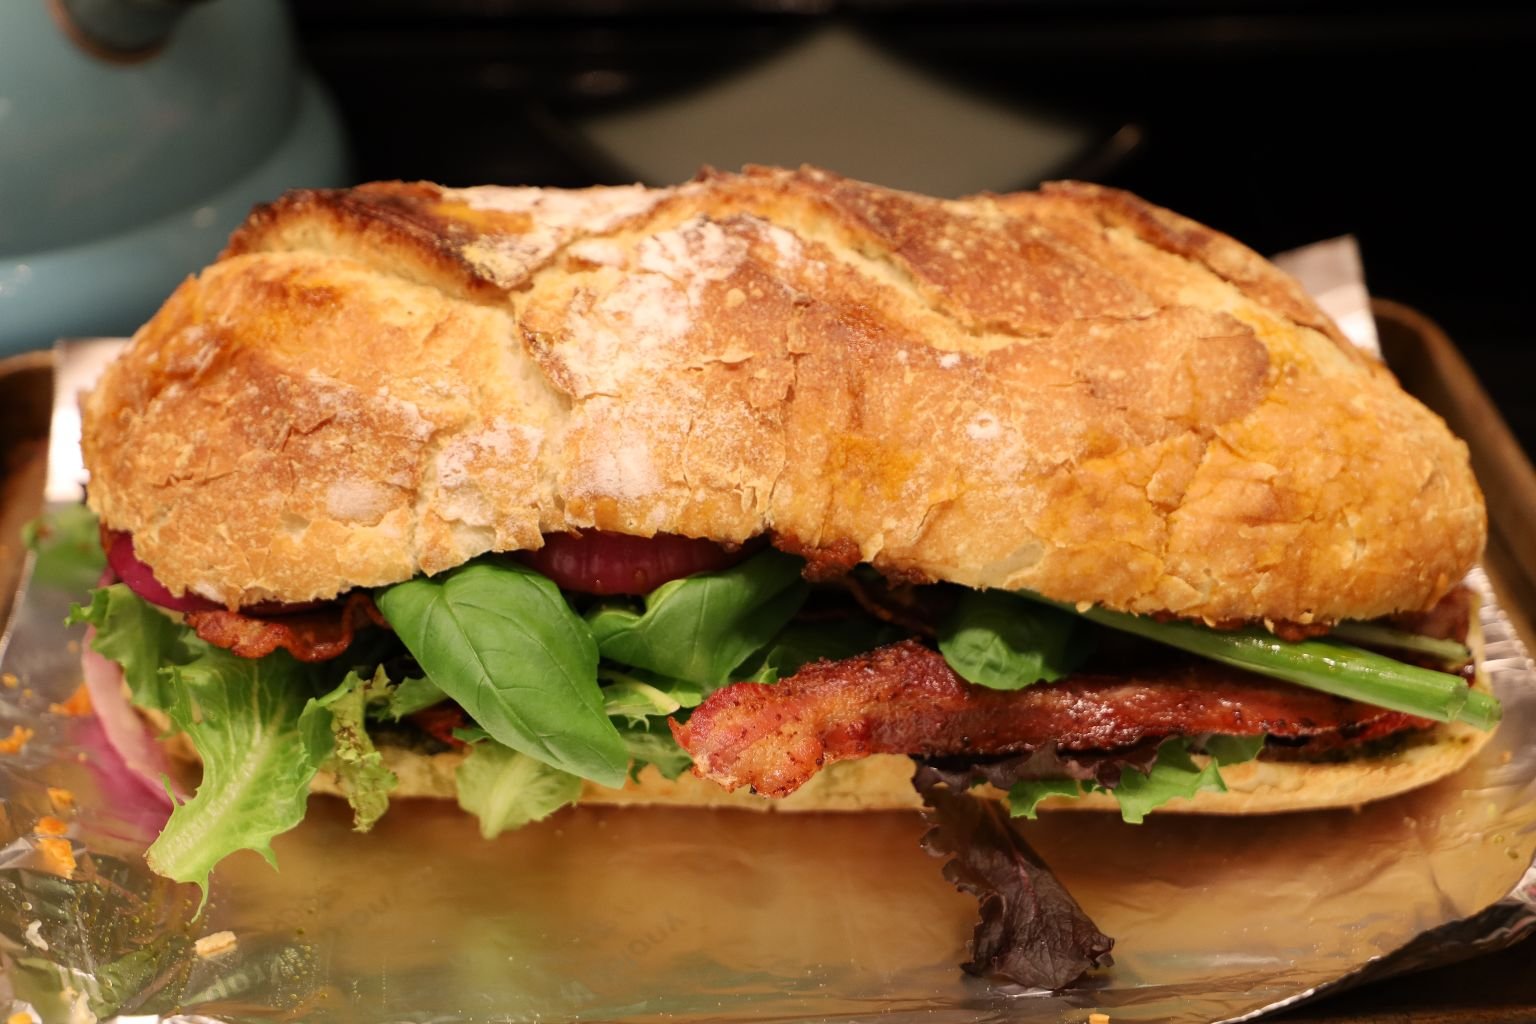
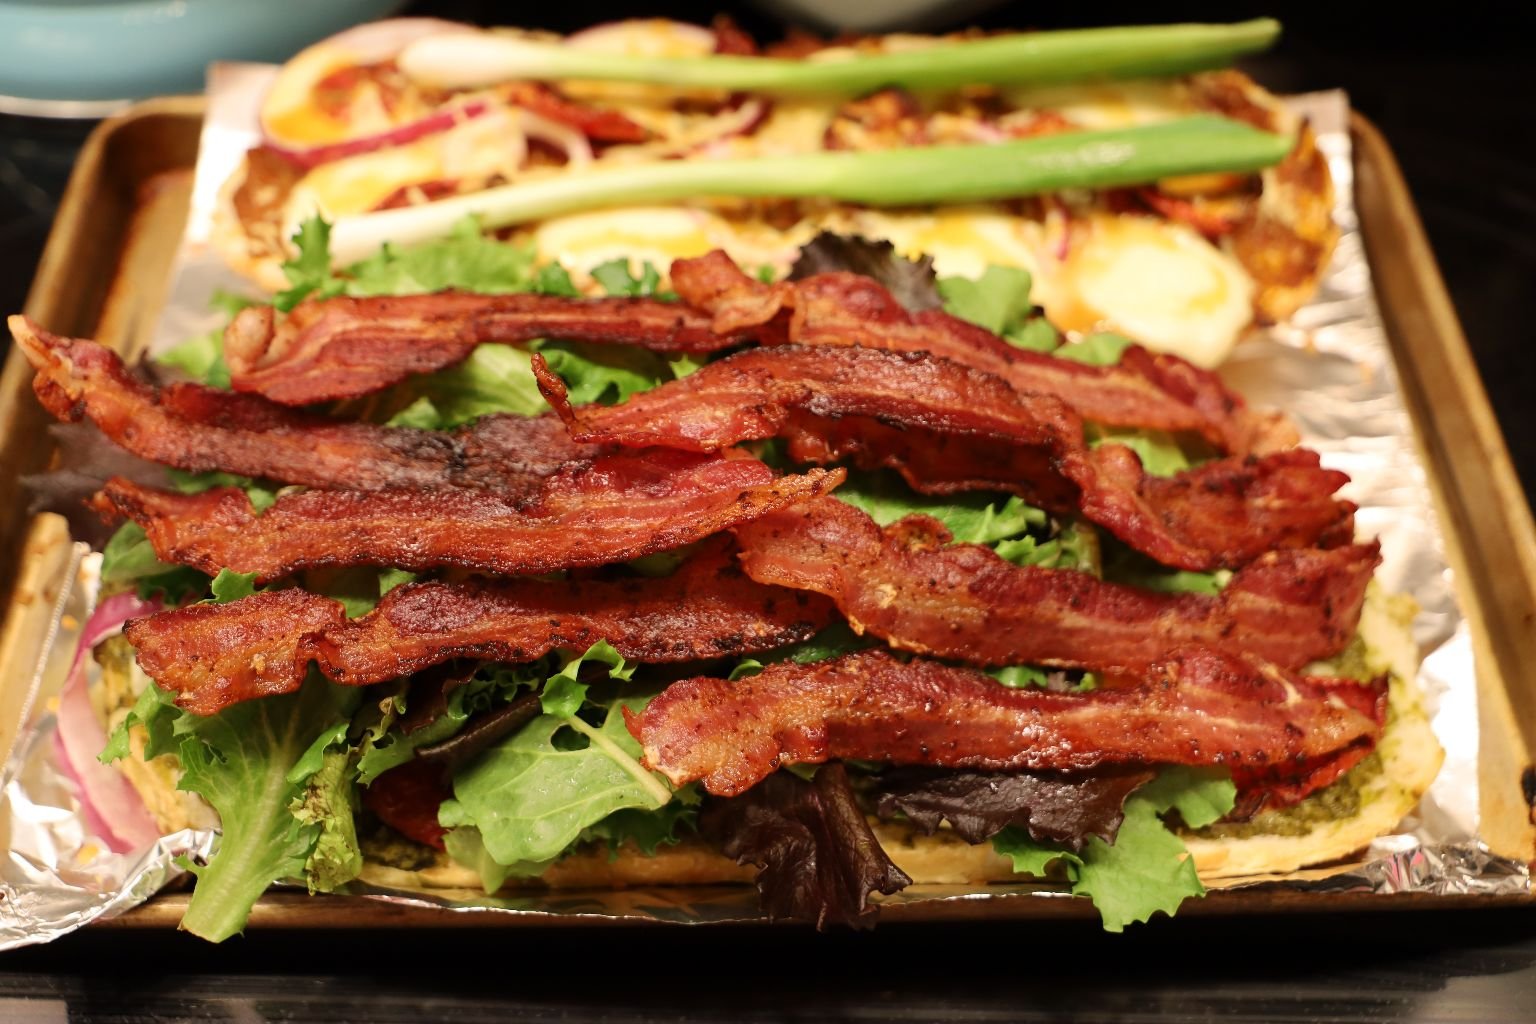
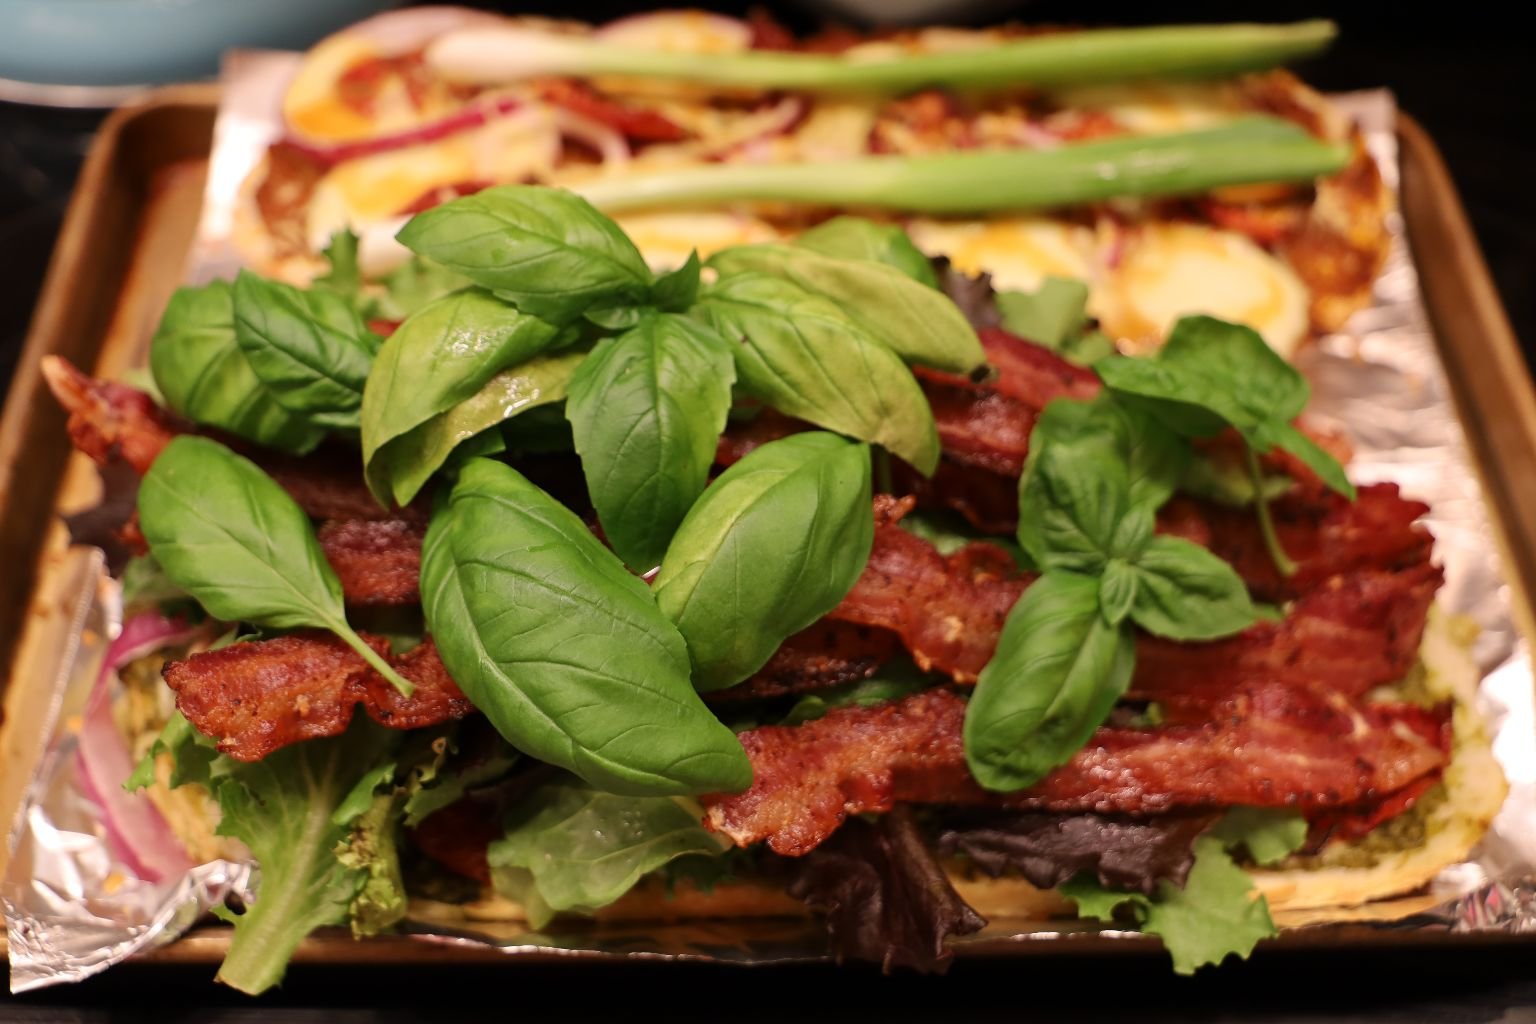
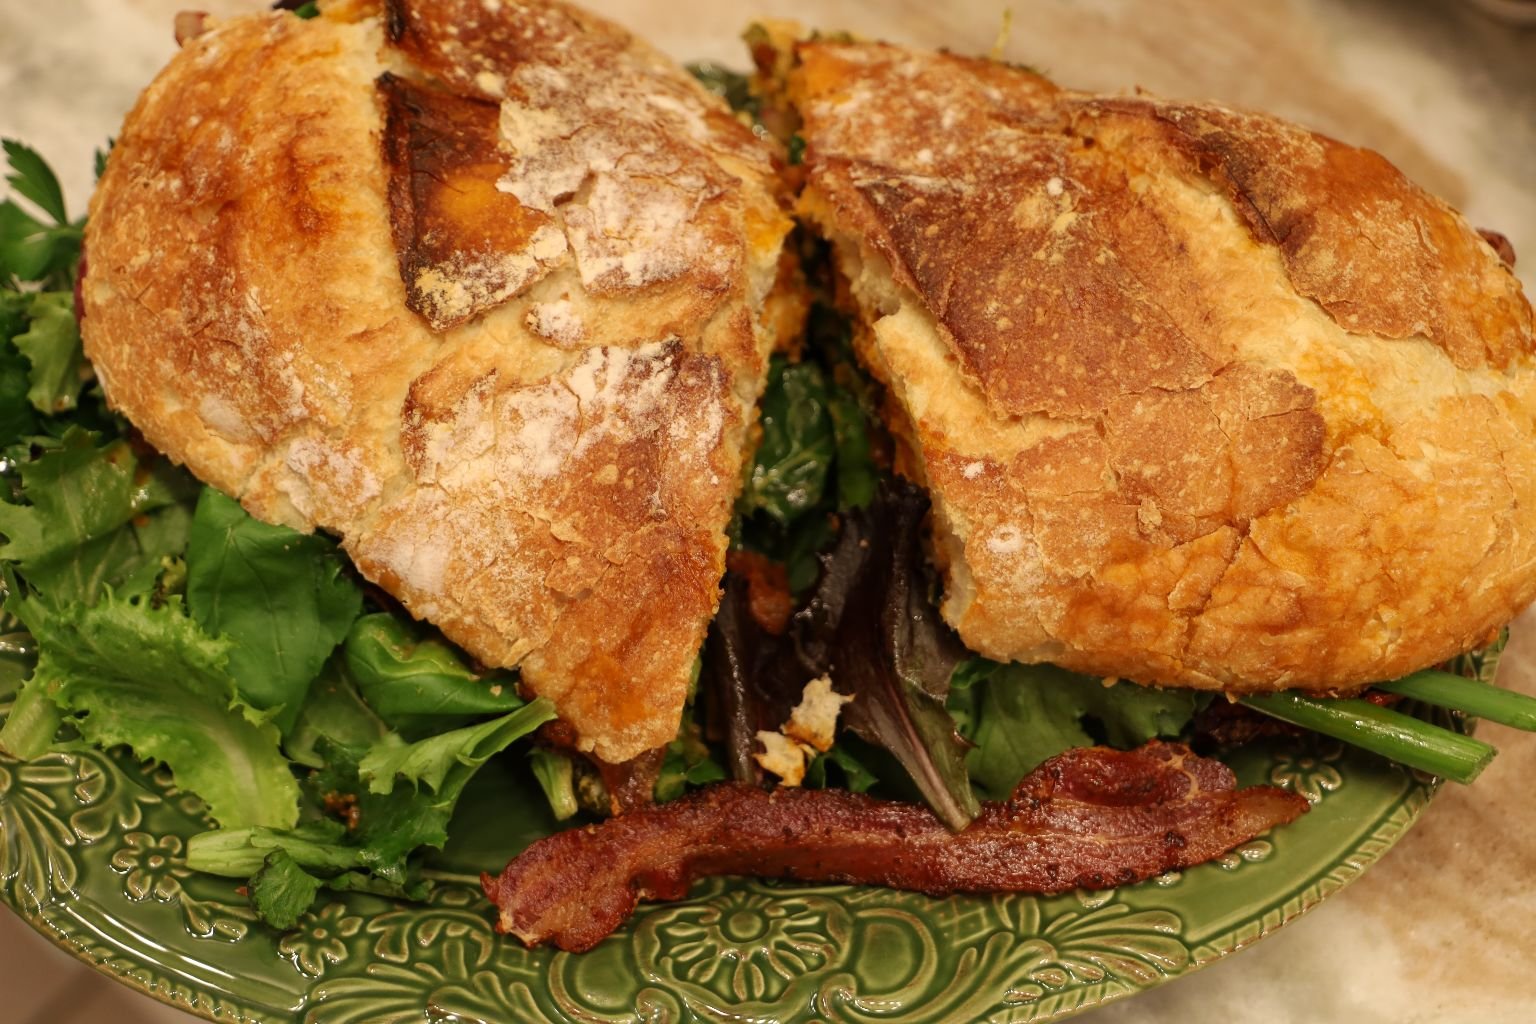
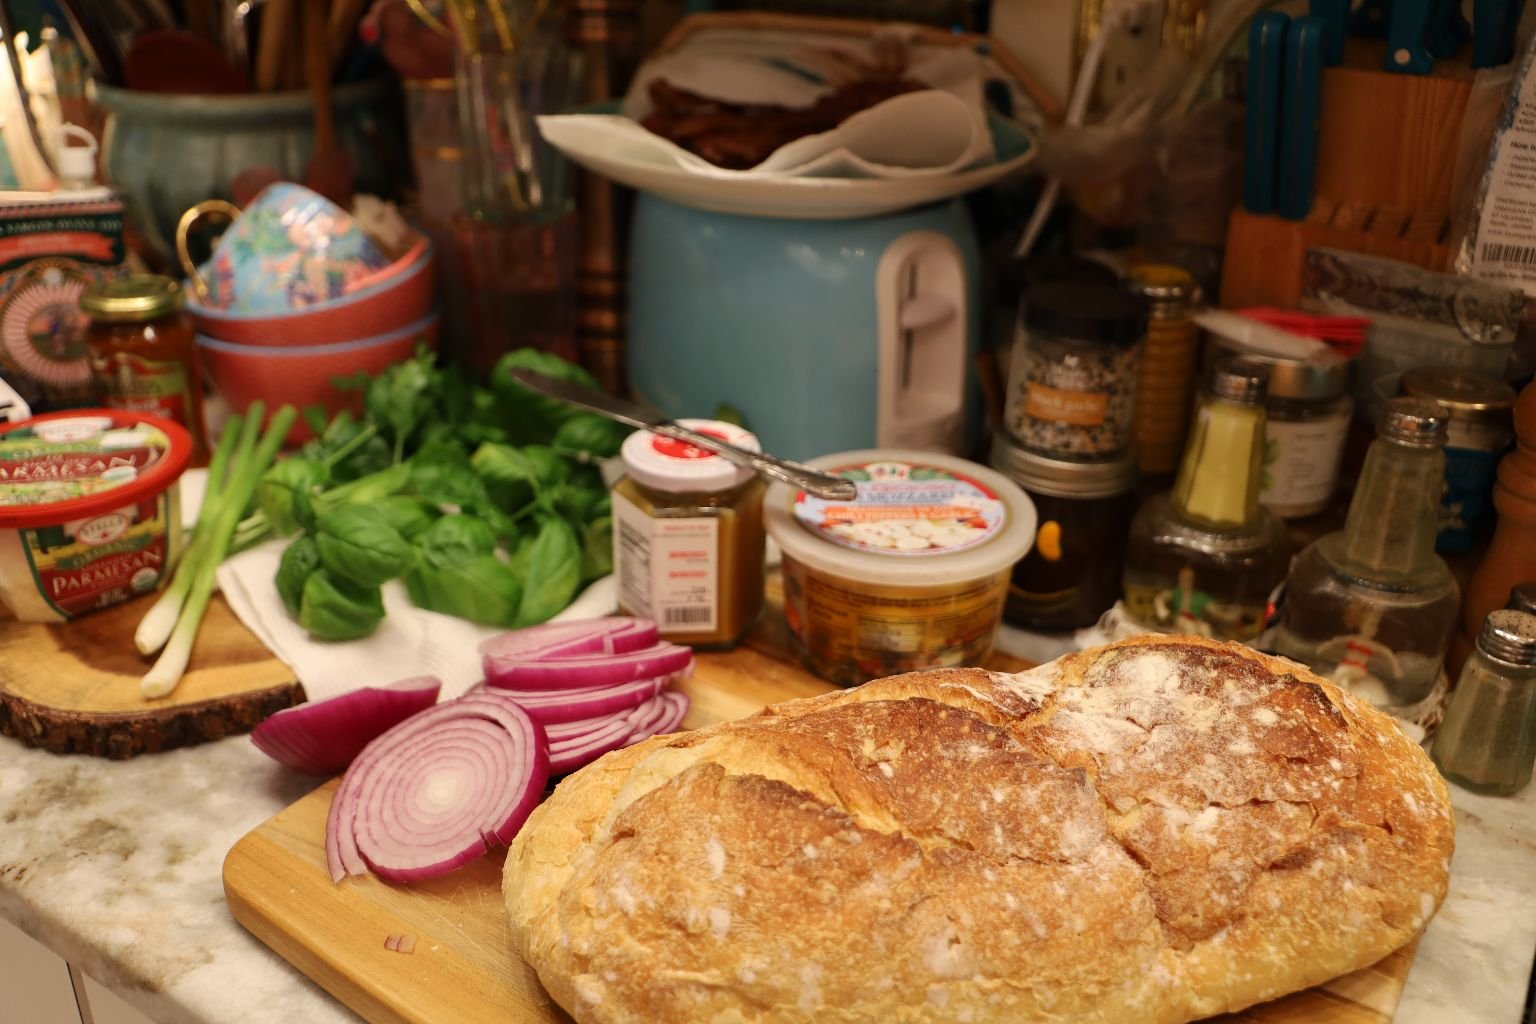
The Ultimate Italian Sandwich


—————————————-

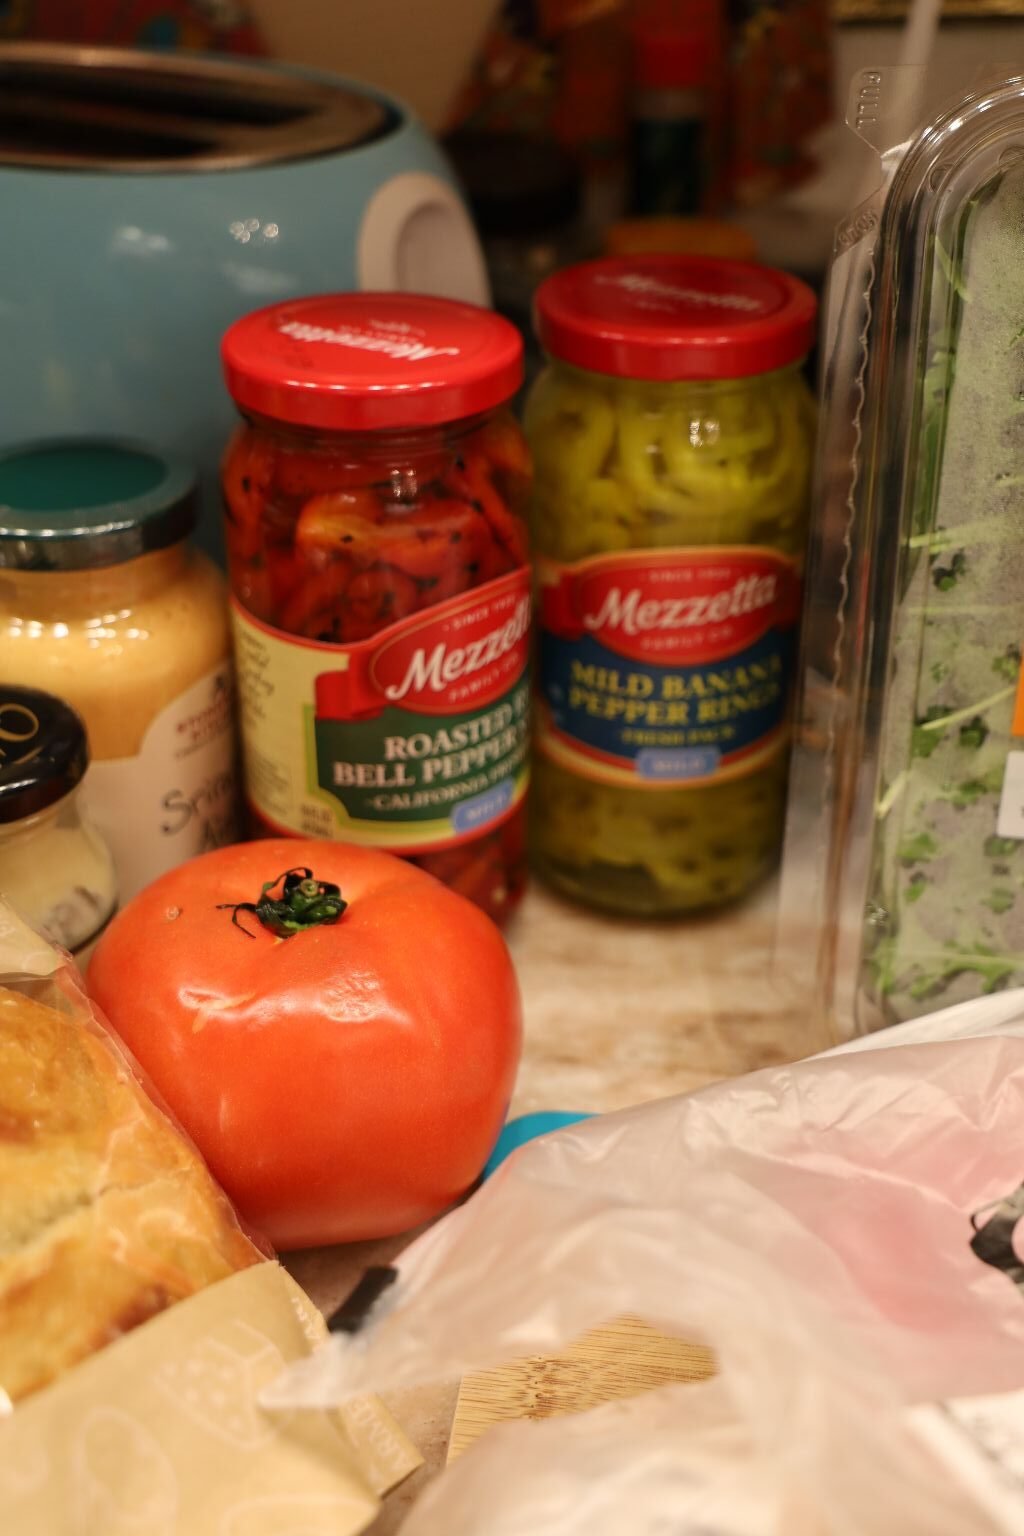
Pictured are some of the ingredients we used.
Ingredients:
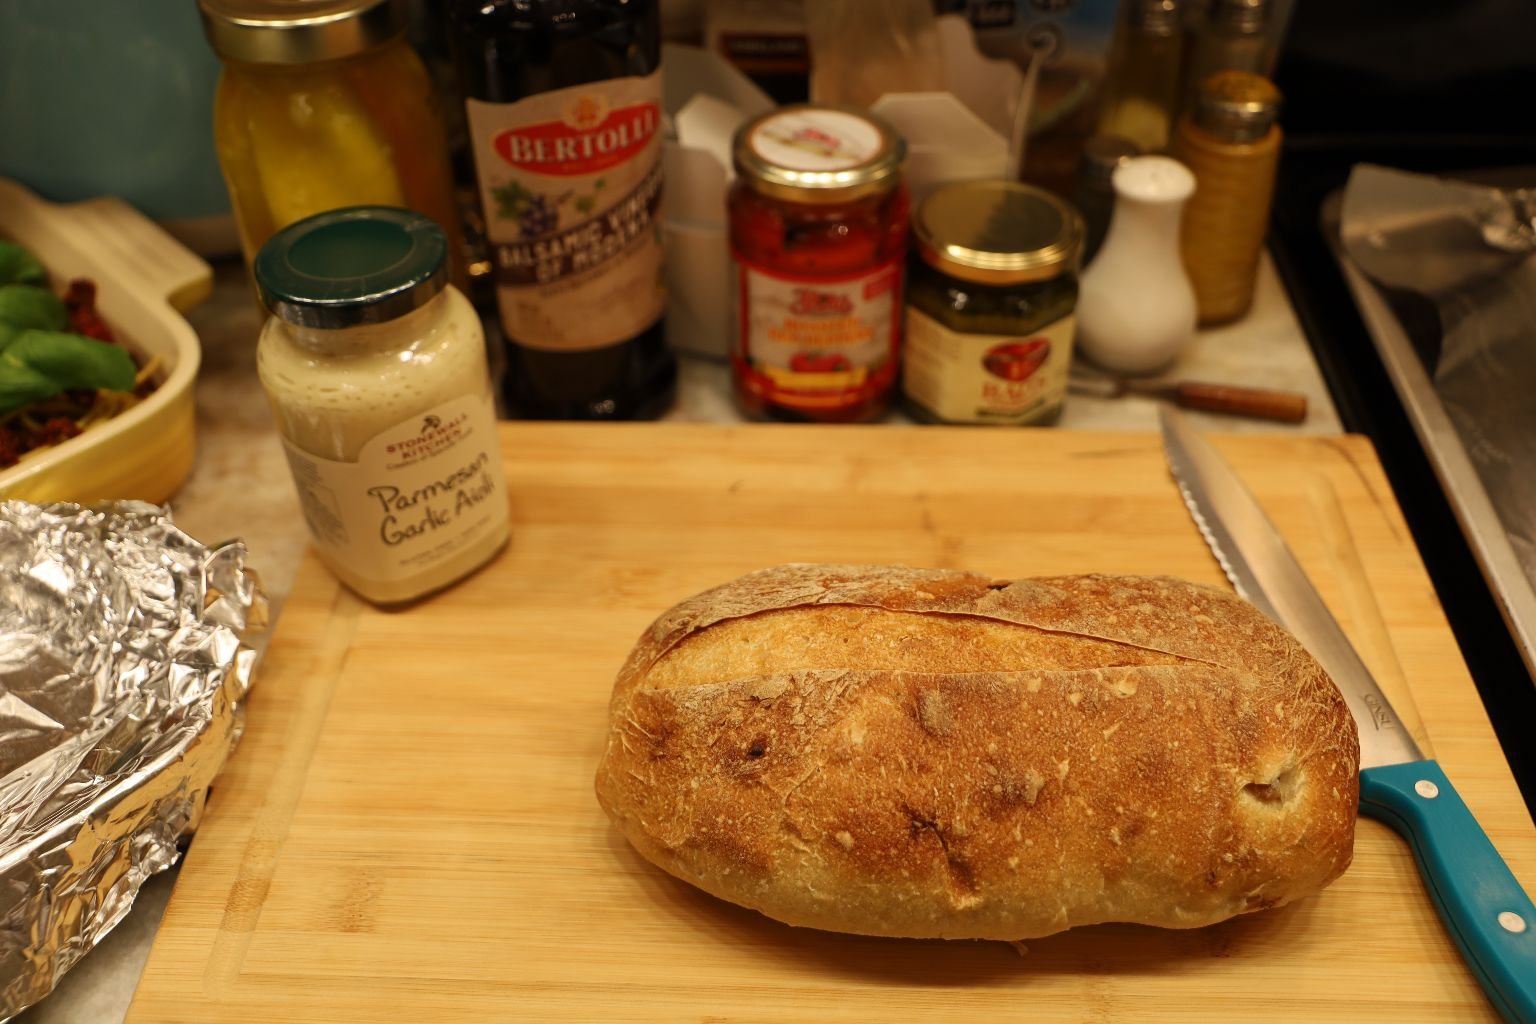
Focaccia Olive Oil & Sea Salt bread – some insides removed to create a cavity
Pickled Banana Peppers – Drained
Roasted Red Peppers – Drained
1 heaping Tbsp. Parmesan Garlic Aioli
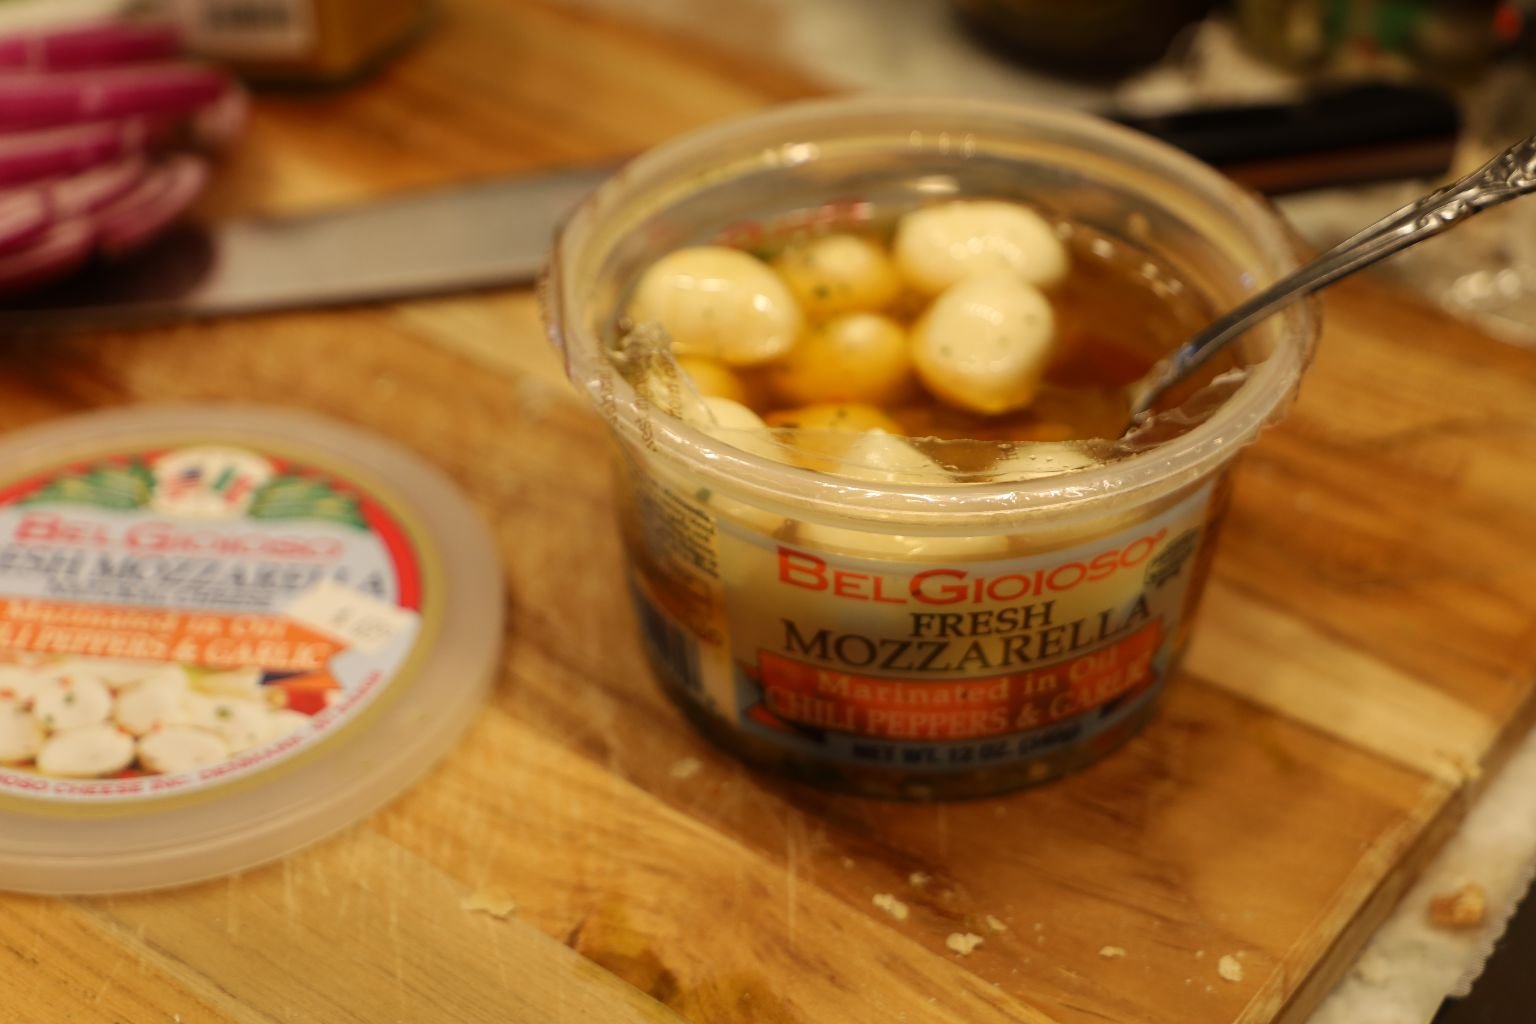
10 Coppa “Capicola” Italian Dry-cured Ham Slices
6 Provolone Cheese Slices
4 Prosciutto Ham Slices
2 Tbsp. Basil Pesto
2 Roma Tomatoes – Sliced to a medium thickness
1 Cup Micro Greens
4 Basil Leaves
~2 Tbsp. Balsamic Vinegar
————————————————————————-
Now this is a Great Sandwich… one of our favorites!
The pictures Julie took fully illustrate what we mean!

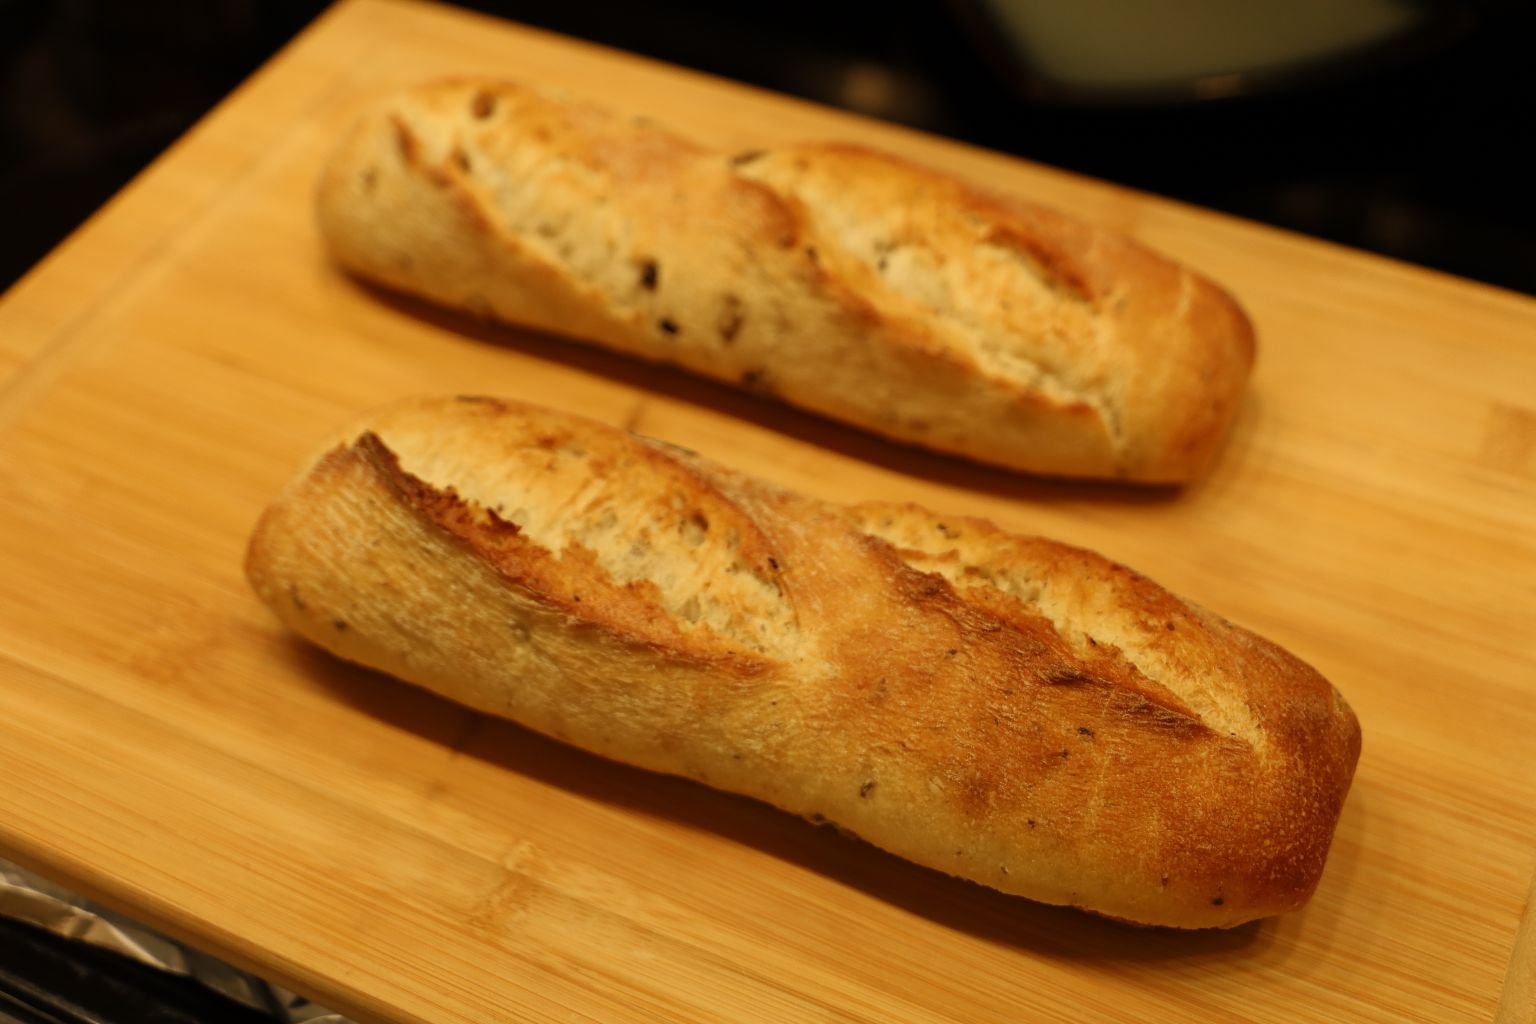
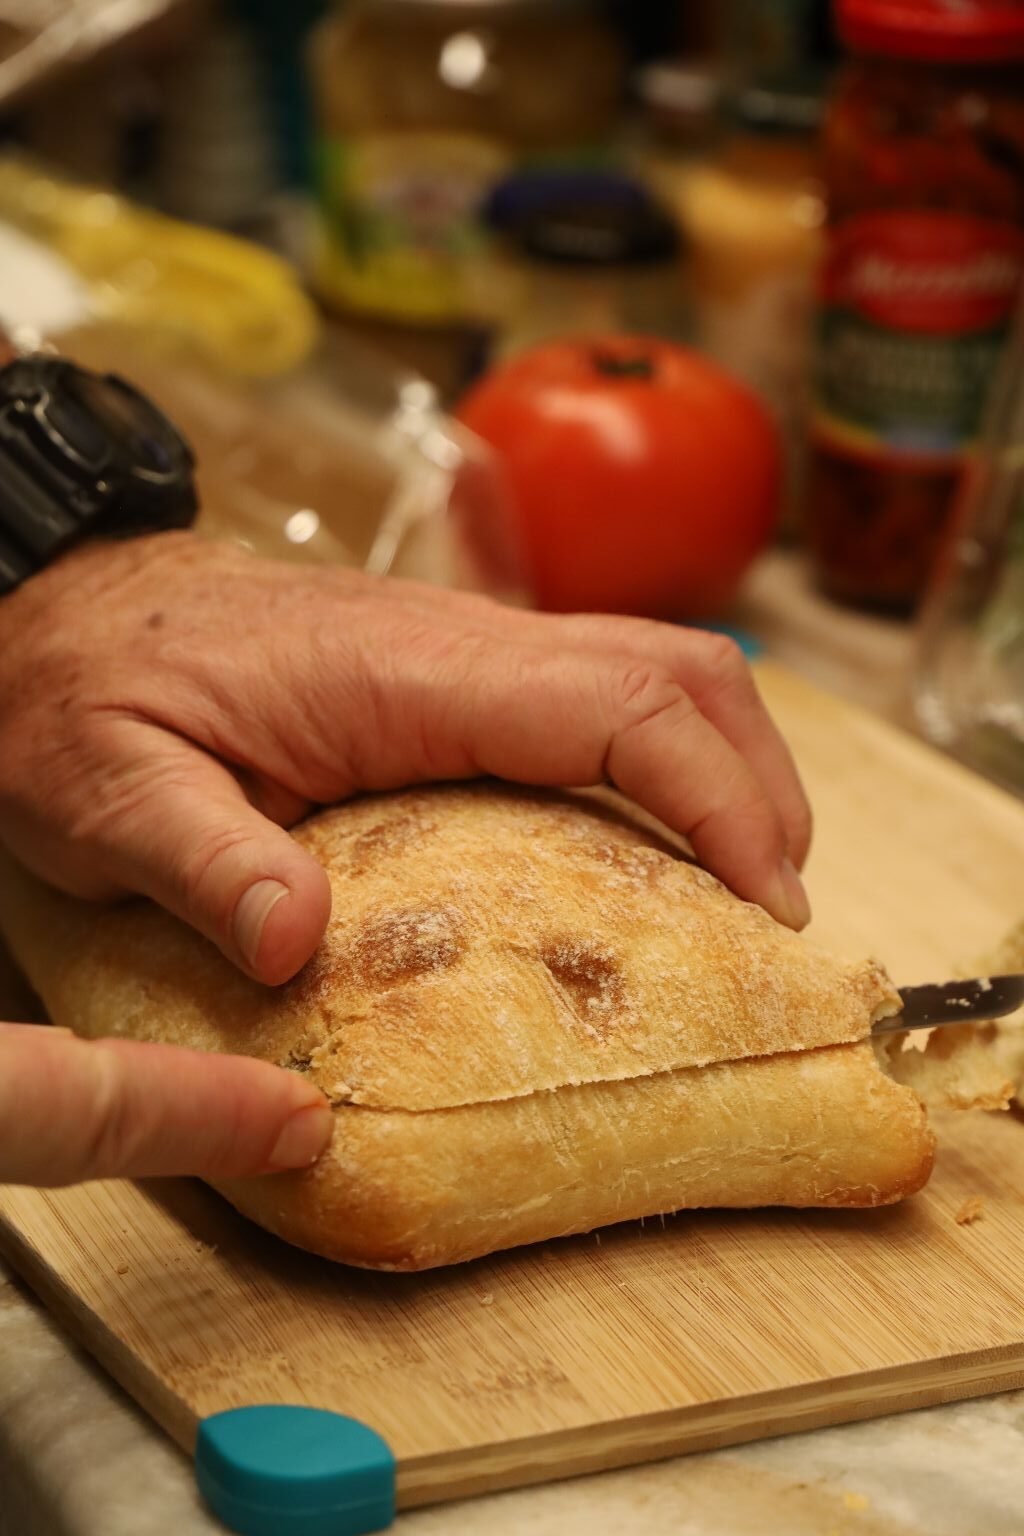
This bread was perfect as it was crunchy on the outside, while being soft on the inside.
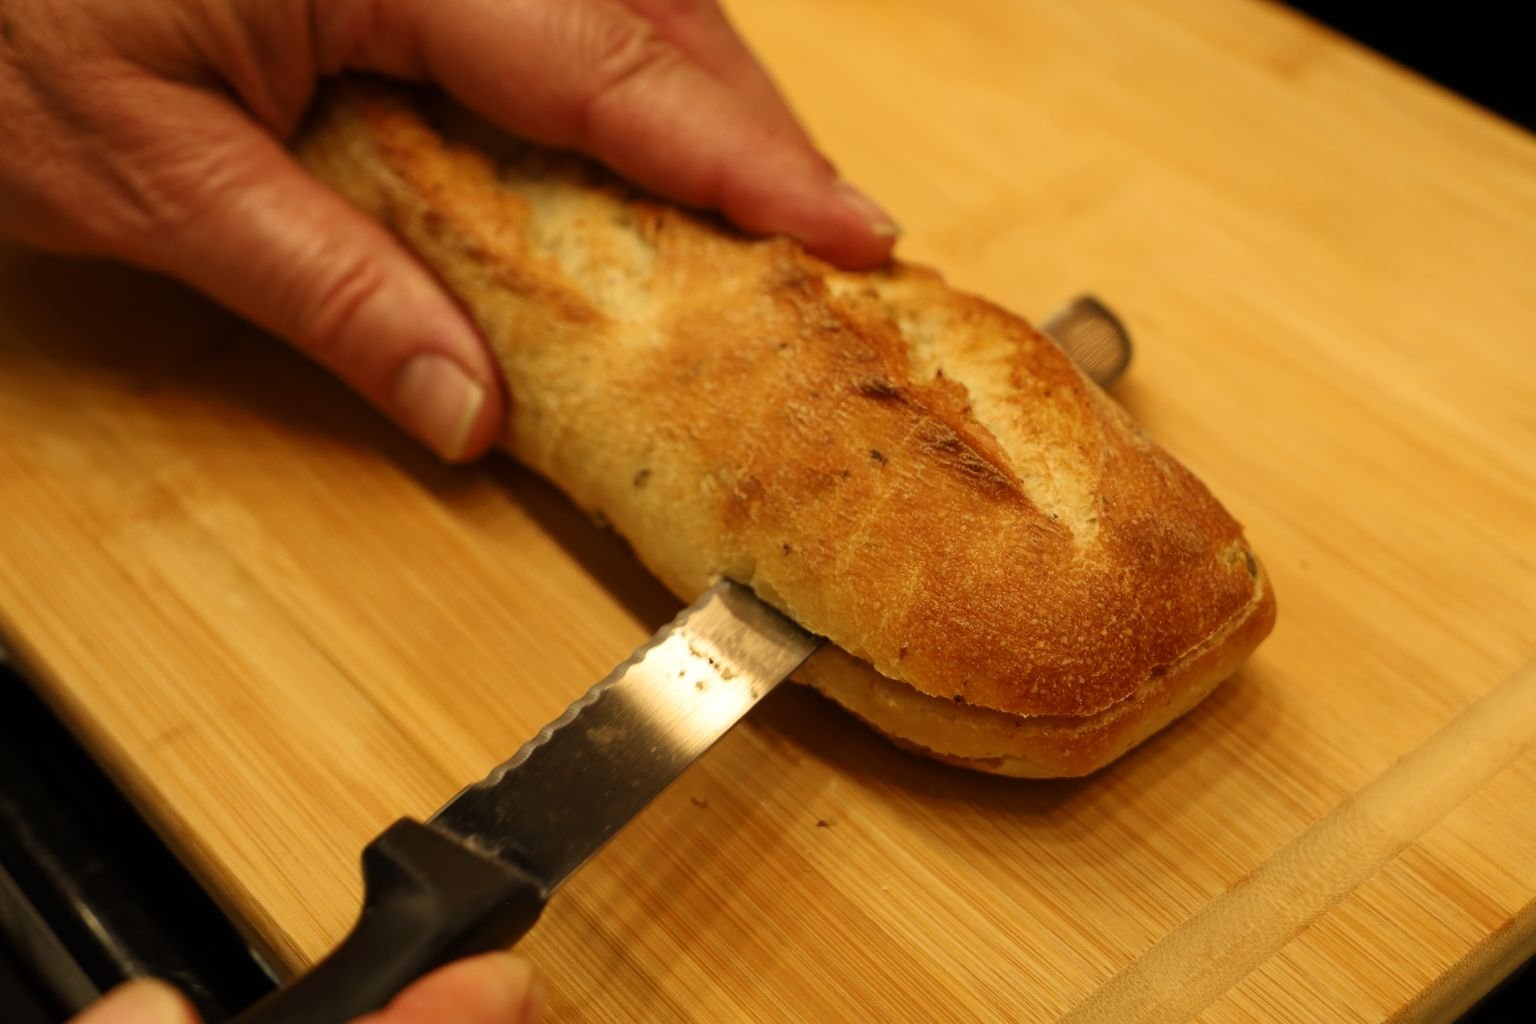
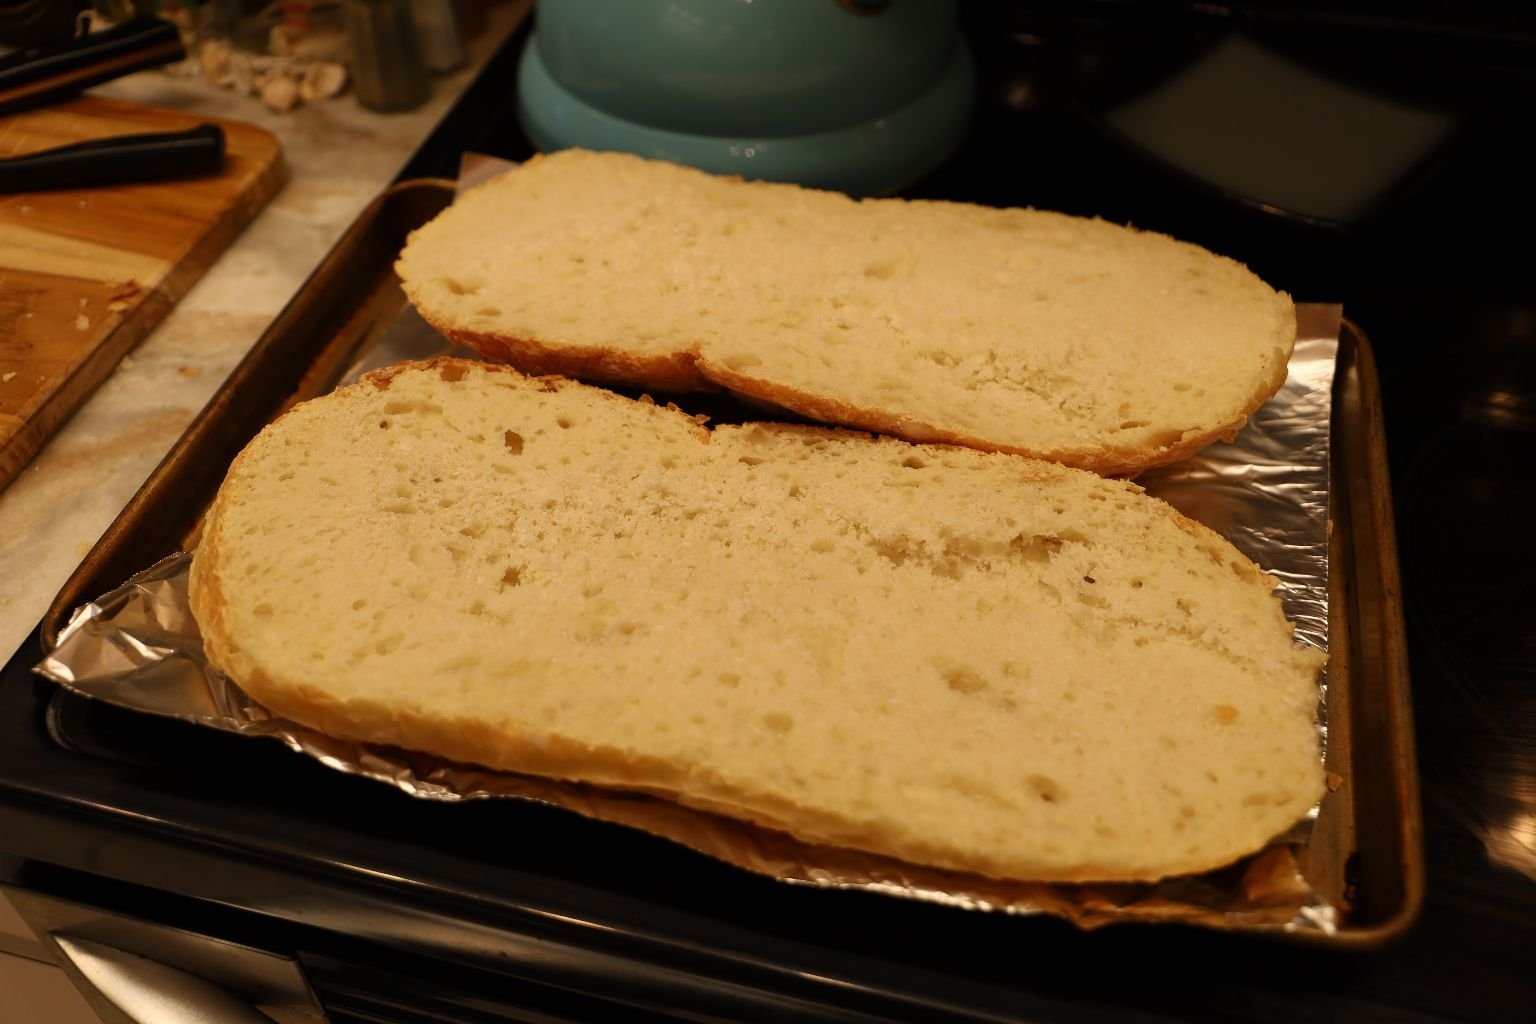
Begin by slicing the bread loaf in half horizontally using your bread knife, then remove some of the bread from the top slice as shown.

Here are the jars of Pickled Banana Peppers and Roasted Red Peppers we used.


Place them in a colander, being sure to drain them well.

—————————————————————————
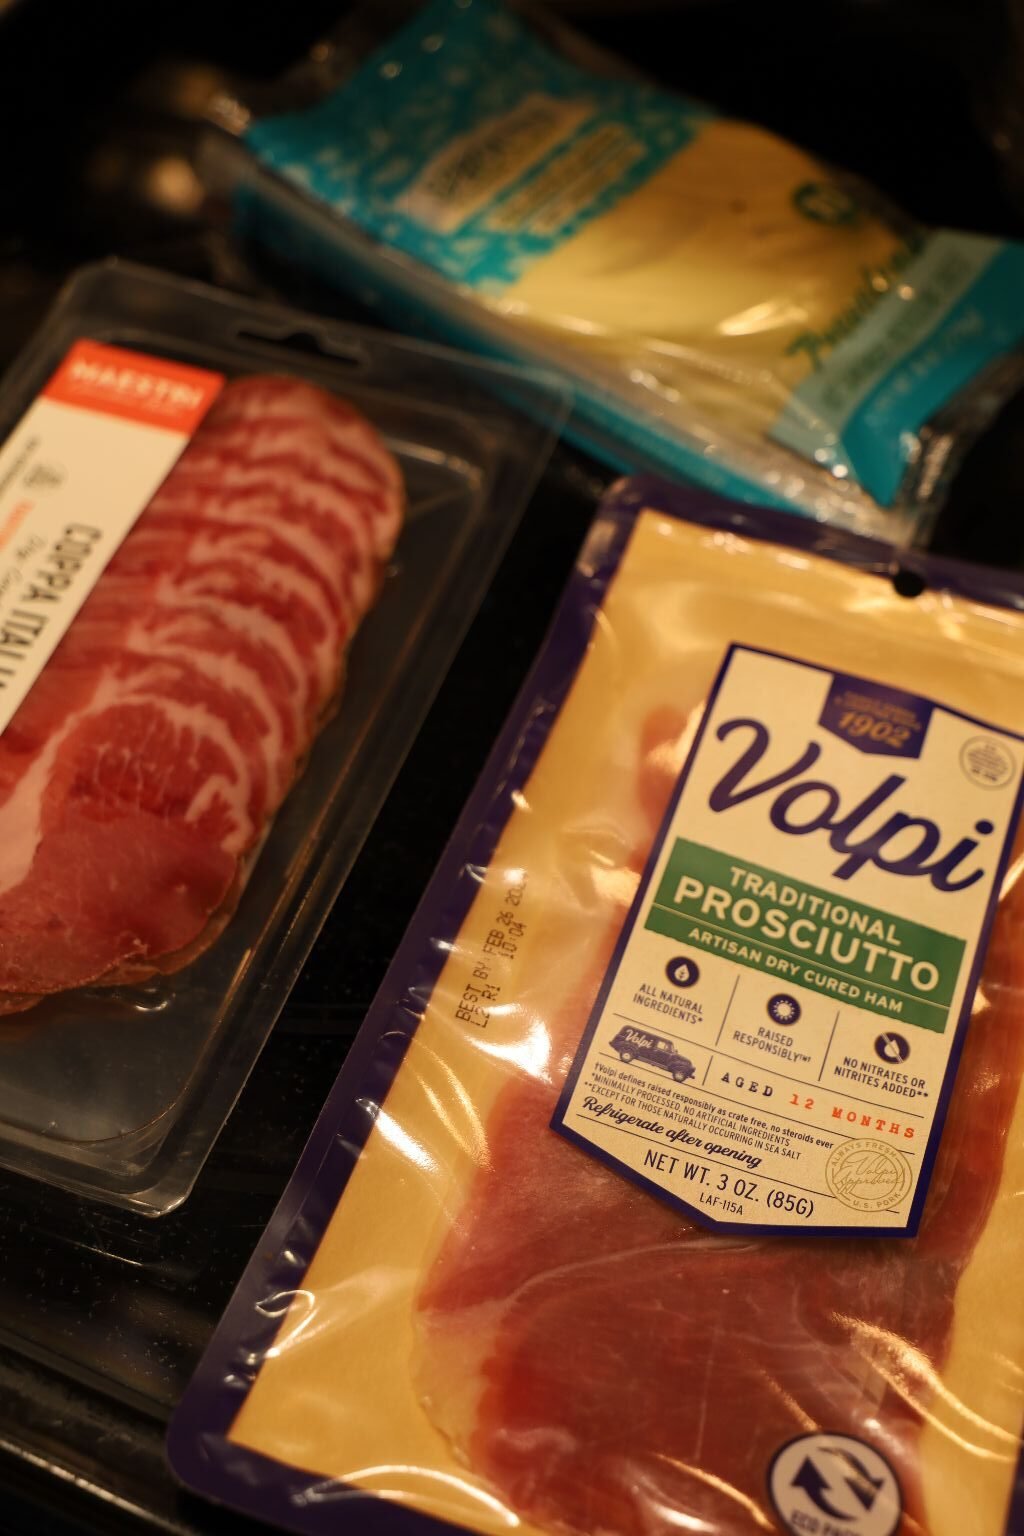
A nice picture of the meats and cheese we used.
You should be able to find them in most any grocery store.


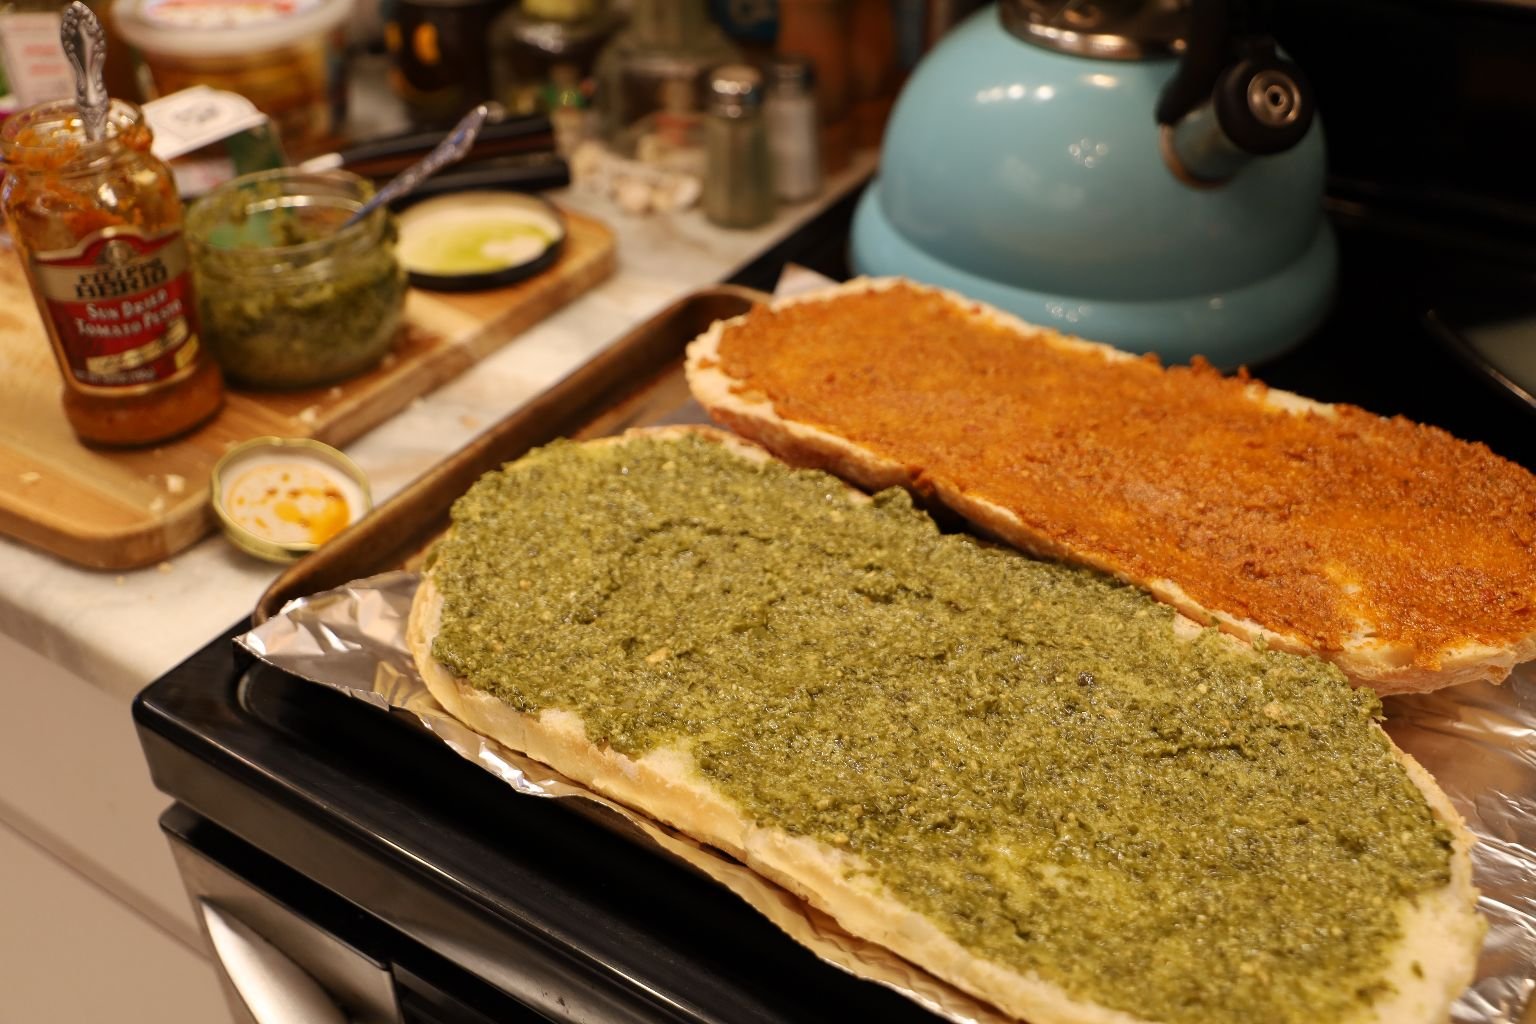
This Parmesan Garlic Aioli was a great addition to the sandwich. This may be a little harder to find, but well worth the effort. Spread a good amount of it over the lower half of the sandwich. If you can’t find it use your favorite mustard.


Now, place your sliced Capicola, Provolone Cheese, and Prosciutto onto the Aioli.


For good measure, I placed two more slices of Provolone and Capicola on top.


For the top side of the sandwich, I spread a layer of the Basil Pesto. This really gave the sandwich a great Italian flavor.

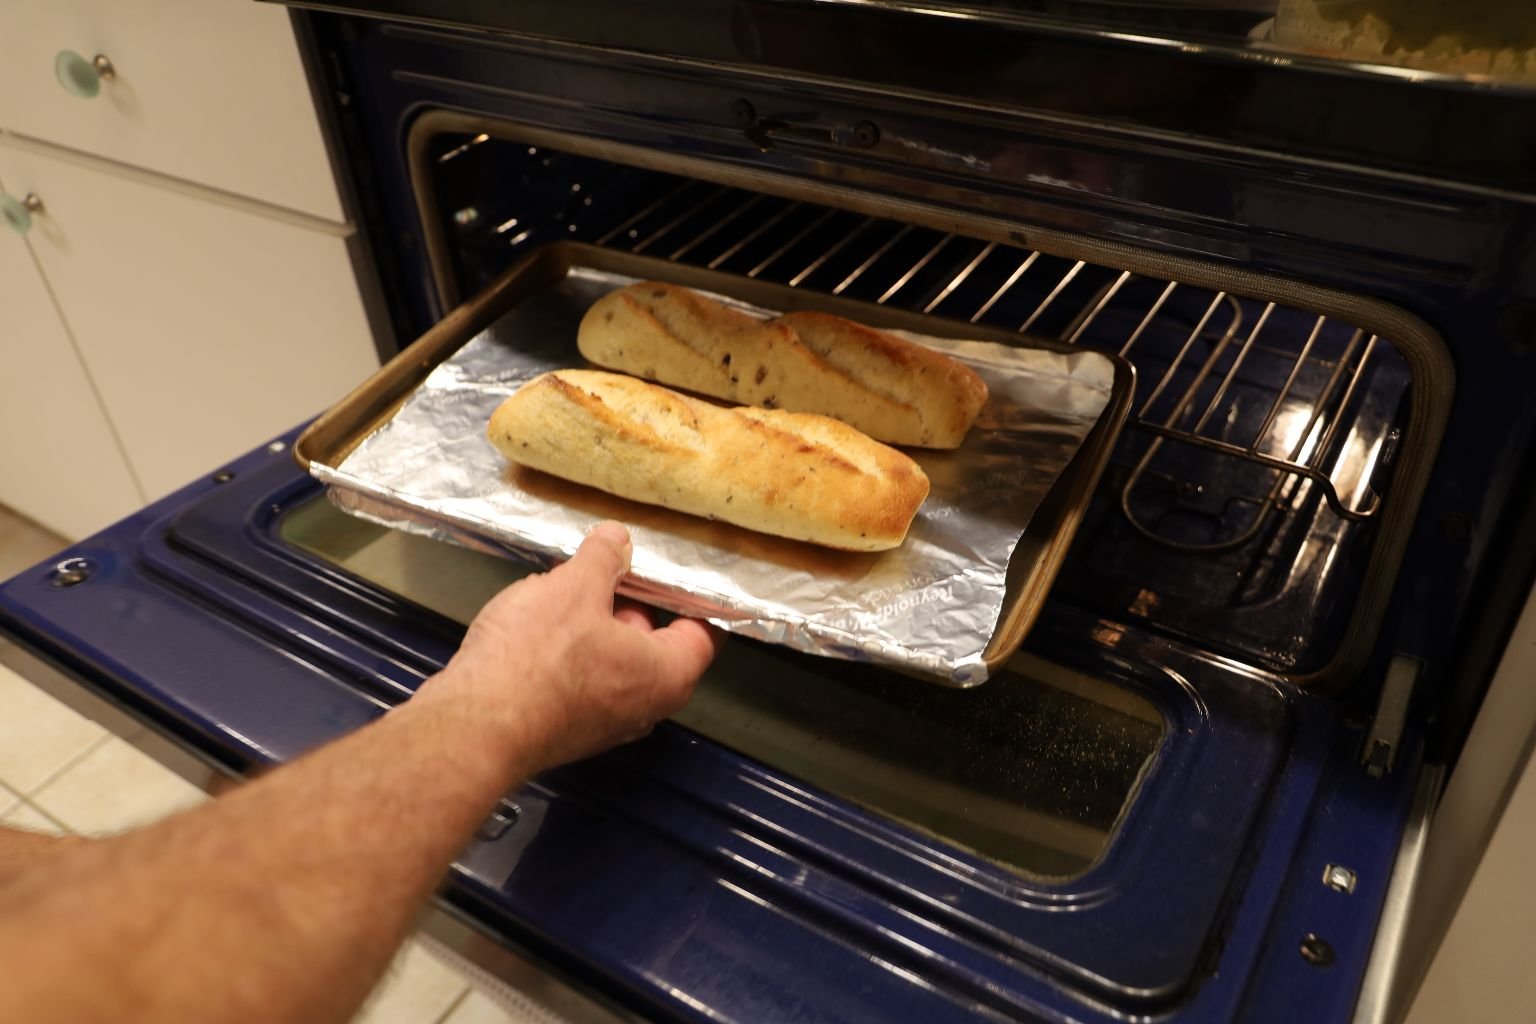
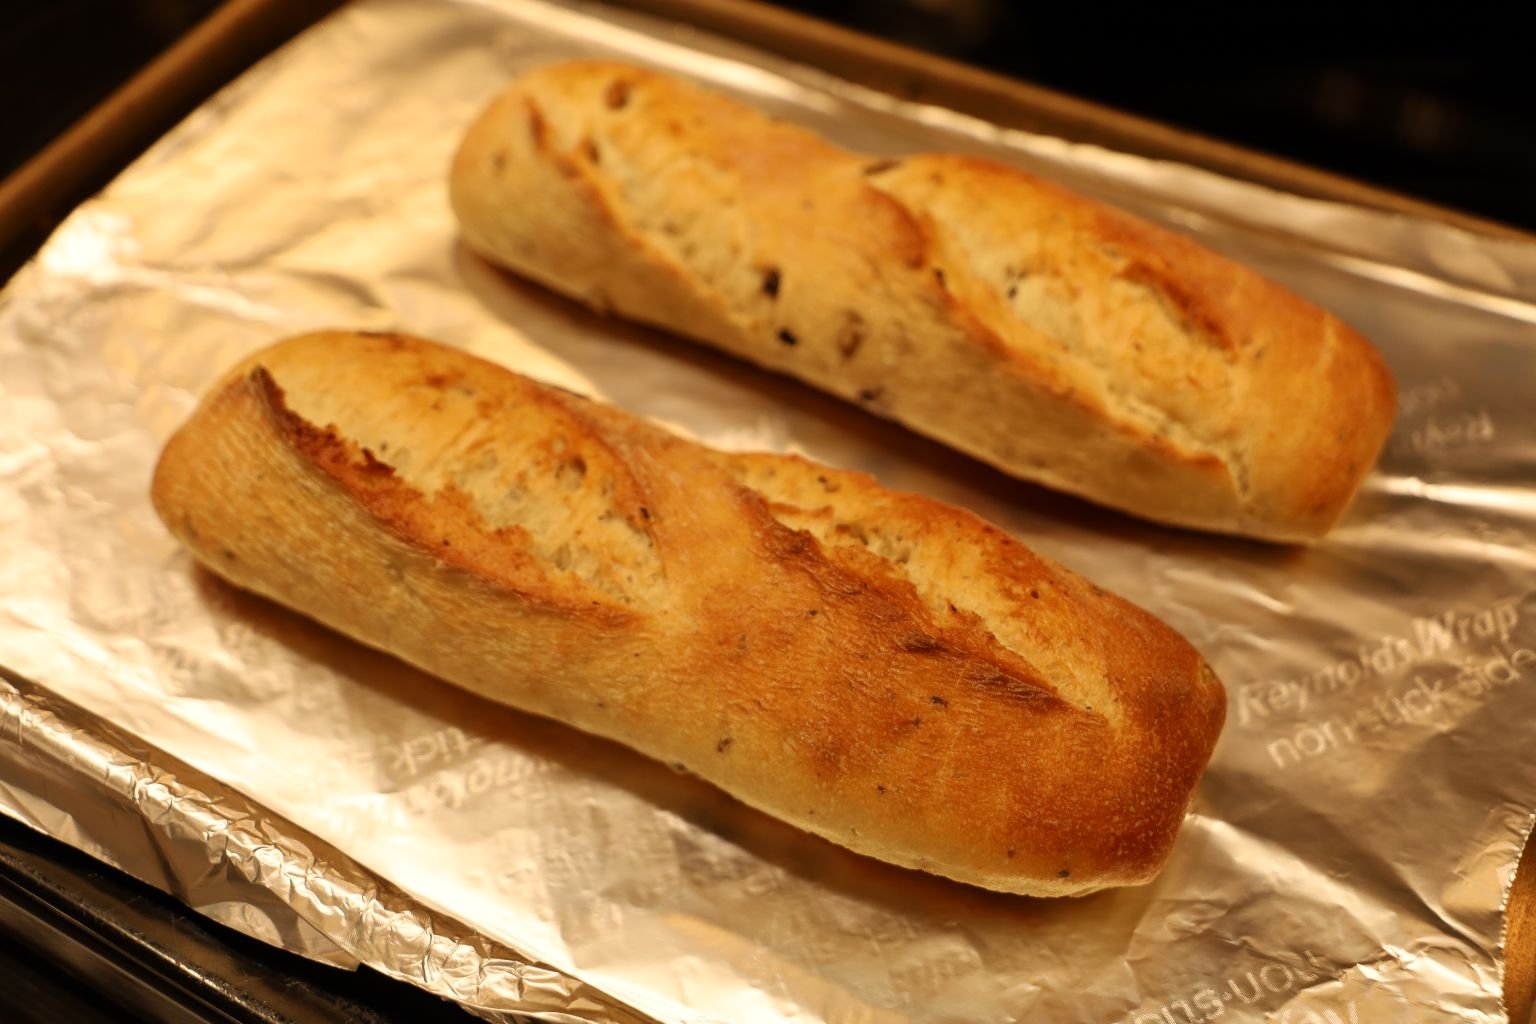
Turn your oven to 400’F and place your sandwich slices on a sheet pan lined with non-stick aluminum foil.


When the oven has come to temperature, place your sandwich in and let it bake for about 10 min. or until the cheese is melted.
—————————————————————————–


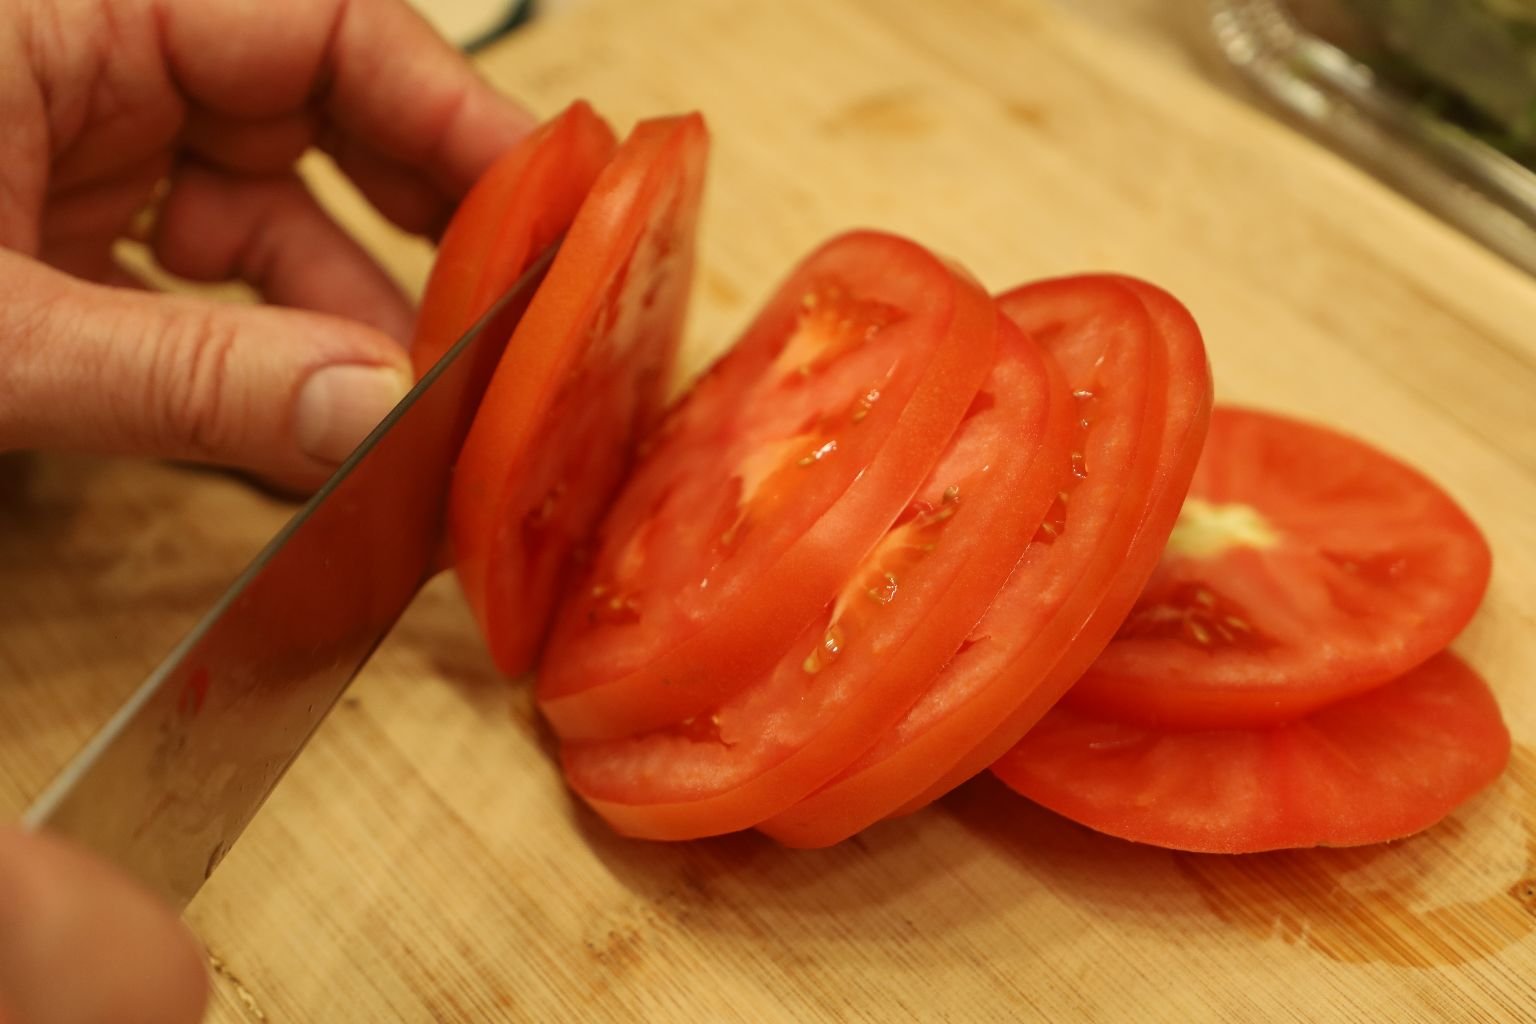
Meanwhile, slice your Roma Tomato into medium thick slices.


Now that your sandwich is browned and the cheese has been slightly melted, place on your Roma Tomato slices, and both types of peppers on top of the meat.
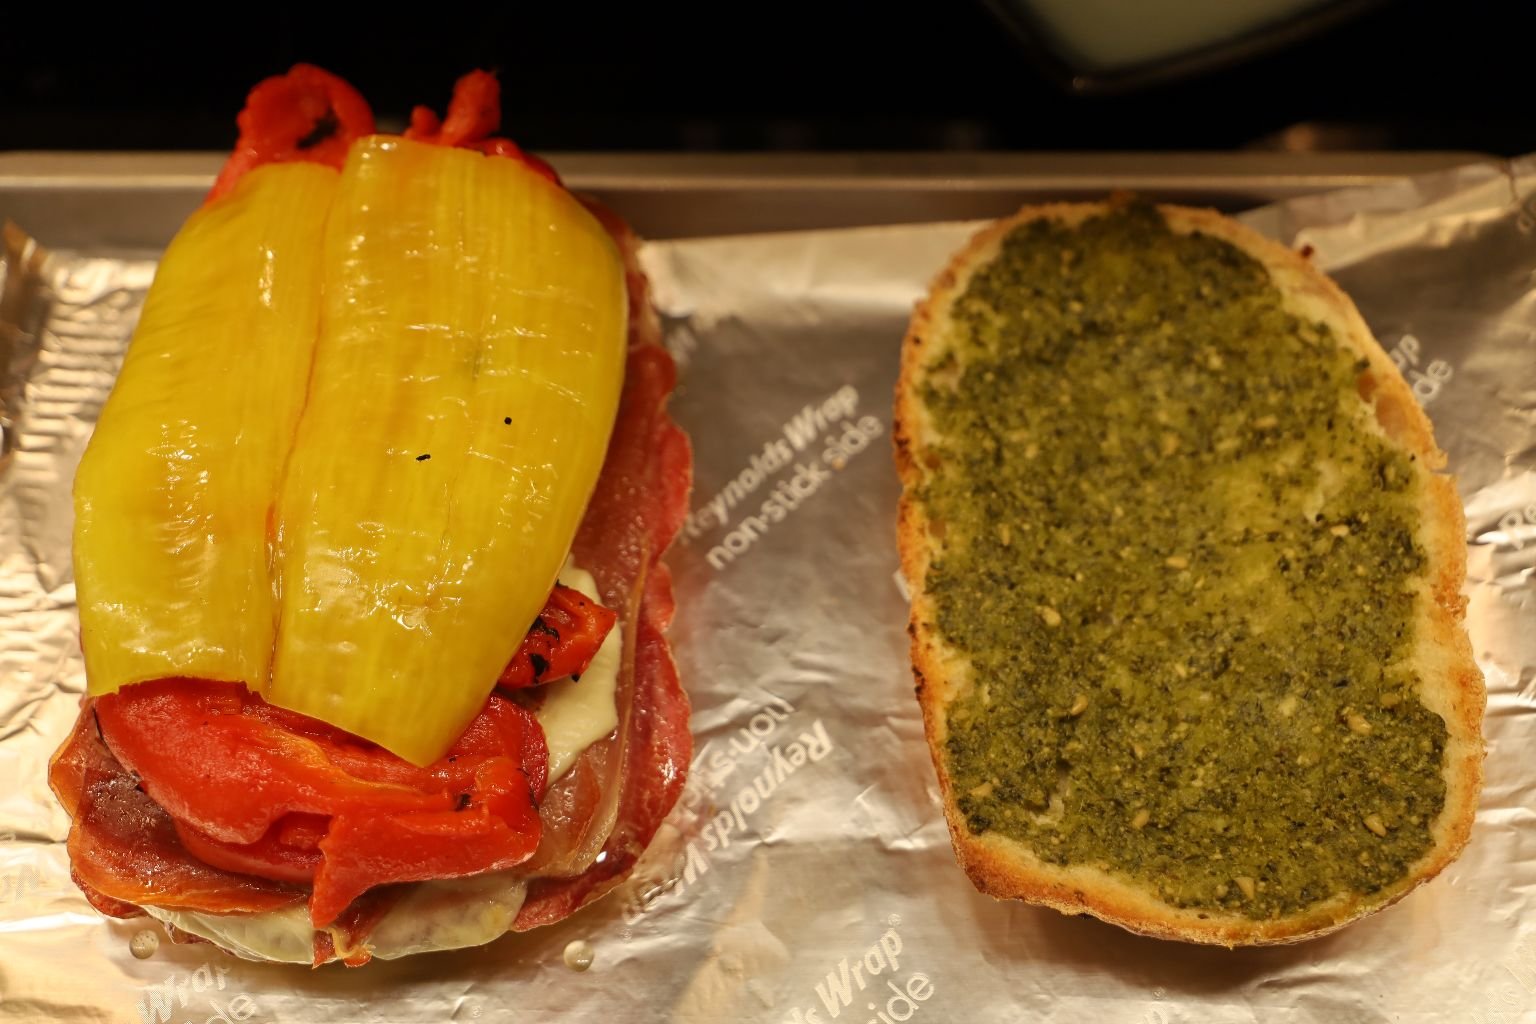
—————————————————————————————–


Add your Micro Greens to the cavity side of the sandwich. Now you see why we removed some of the bread.


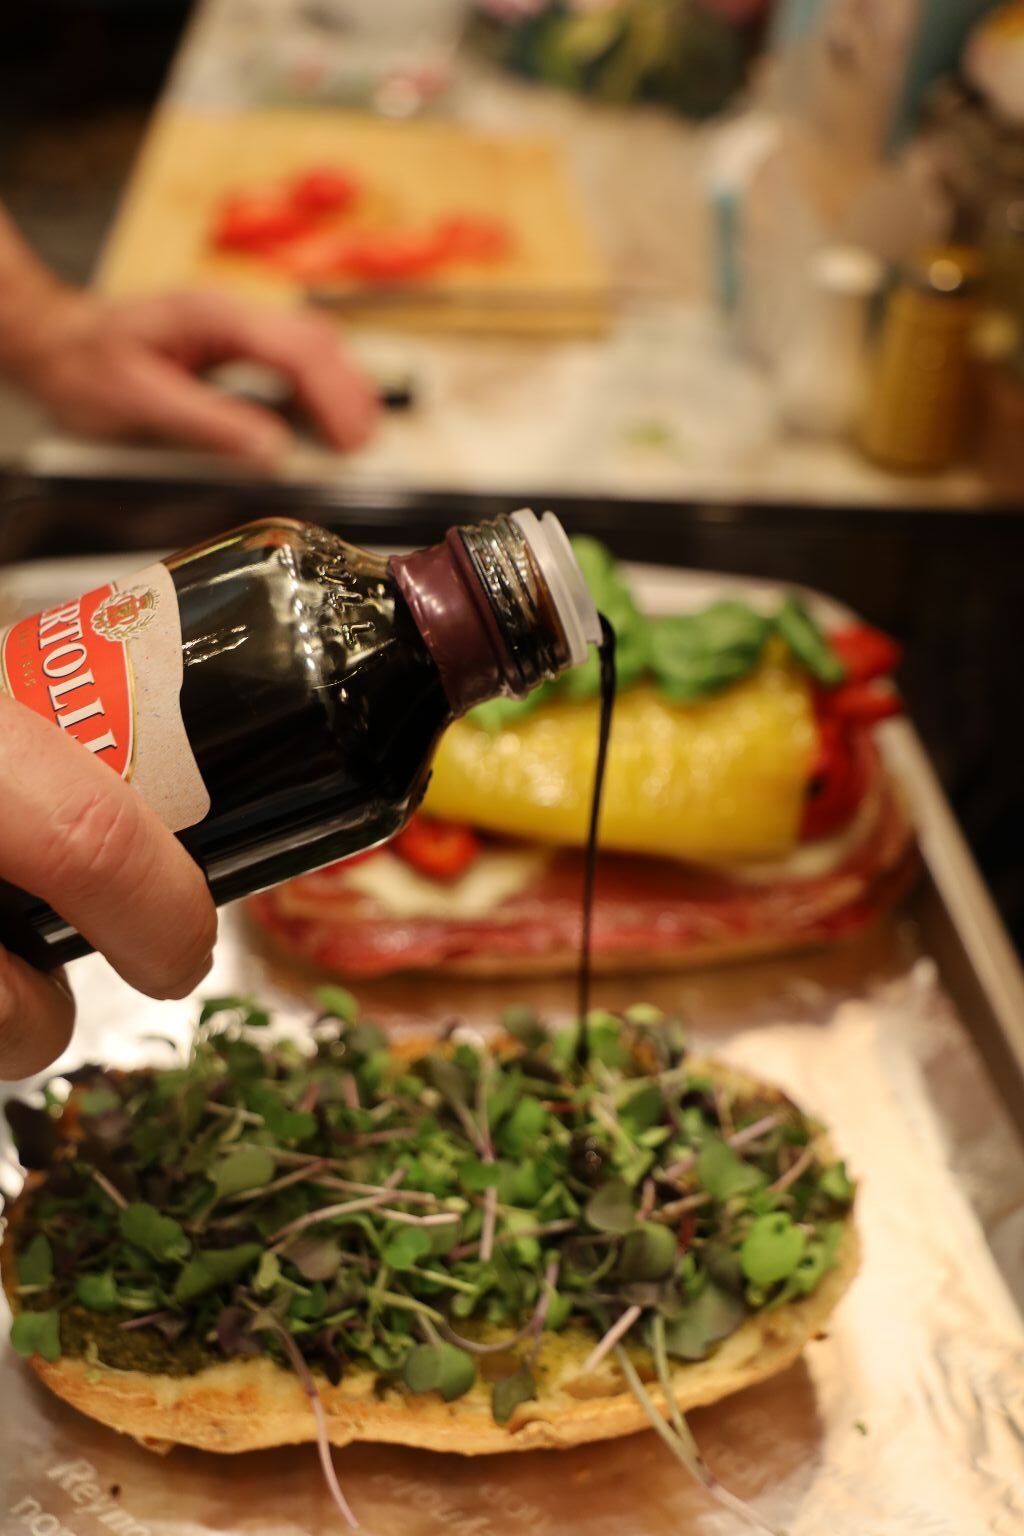
Top the Peppers with some Fresh Basil and pour your Balsamic Vinegar over the Micro Greens.
—————————————————————————-


Slide the two halves of the sandwich close together, and bring both slices together, then place the bottom side down. Slice the sandwich in half using your bread knife.

If your mouth isn’t watering right now, I think something might be wrong with you, because this looks delicious!

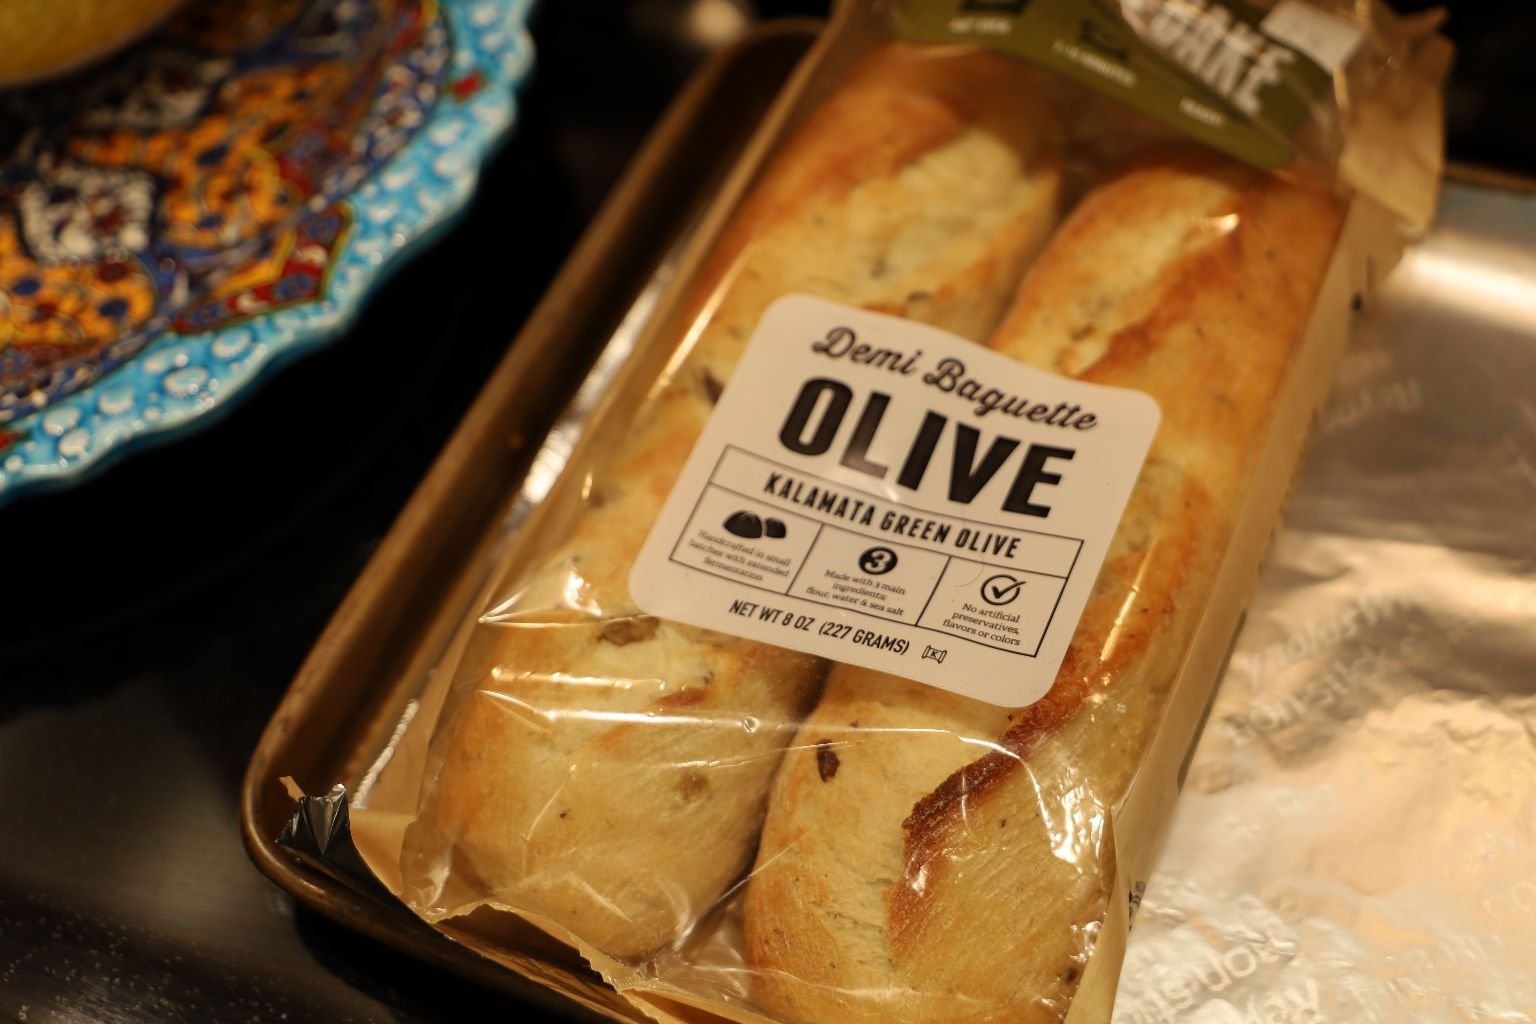
This is a great meal, a side of Focaccia Bread with Roasted Garlic as an appetizer, the sandwich is paired with some Blue Corn chips for a great contrast in color and texture.
You have got to try this sandwich as we know you will enjoy it!

Buon Appetito!
————————————————————————————-

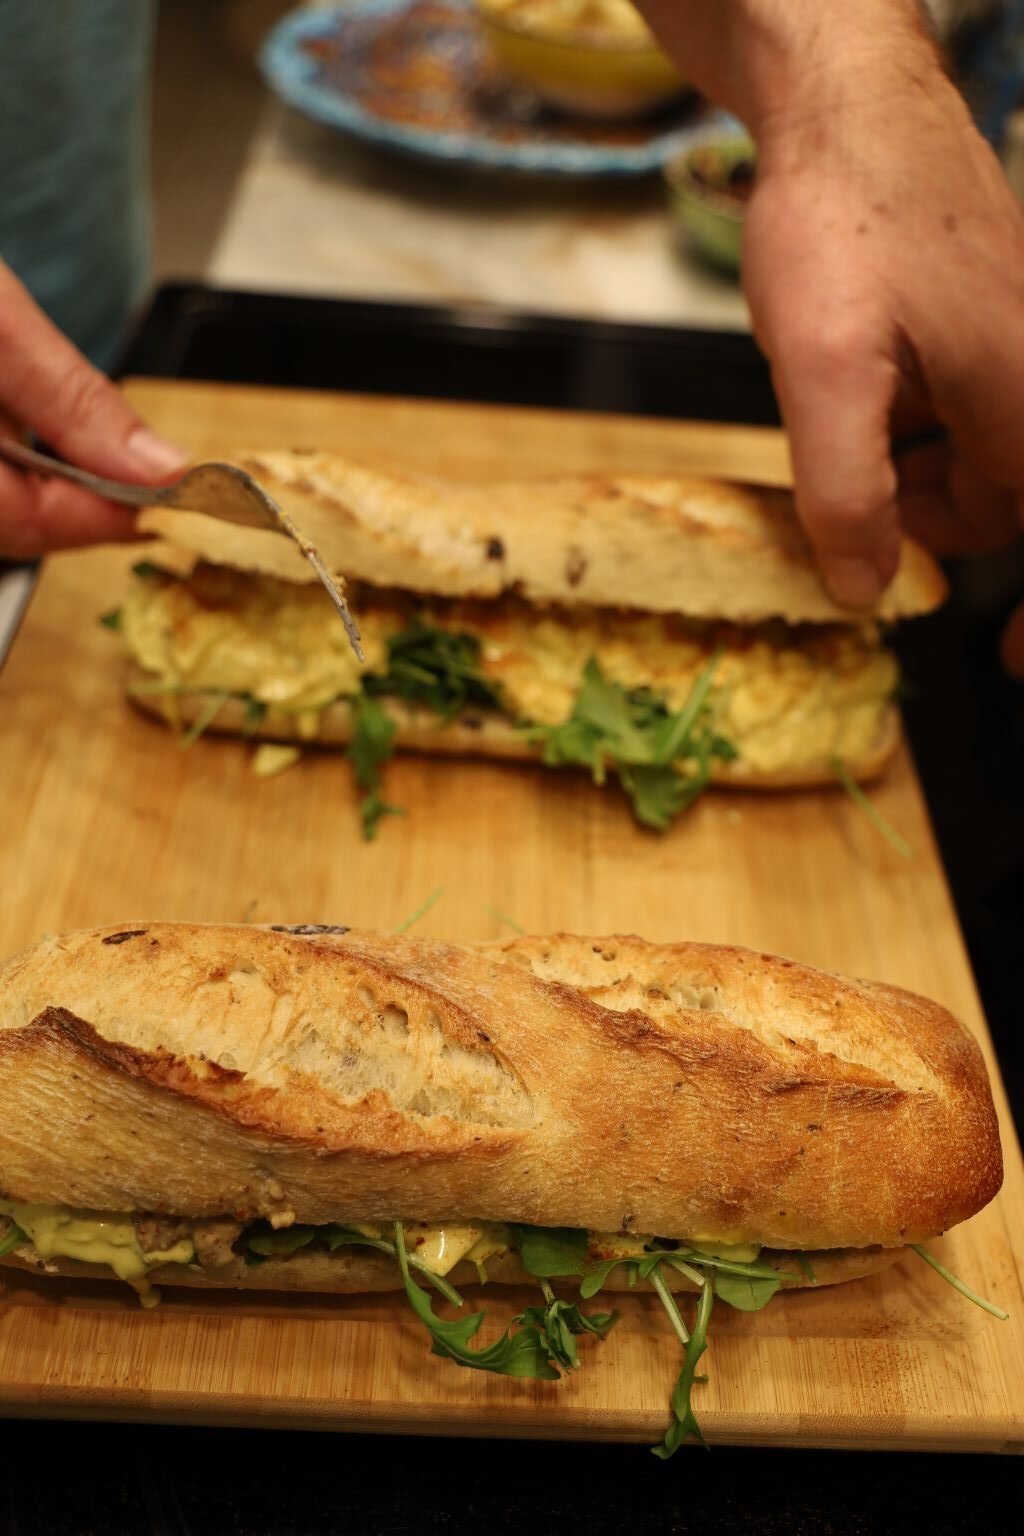
Olive Egg Salad and Cider Vinegar Potato Salad
I Julie, saw this Olive Bread and knew immediately what I wanted to do with it.
I could just see my Olive Egg Salad would be perfect with it. Along with this excellent Moroccan Olive Spread that I had discovered months prior. It turned out great! It’s a keeper!

This bread requires that you finish cooking it before you eat it. Here, that is what Gordon is doing.
When done, just slice into it lengthwise.
—————————————————————————–

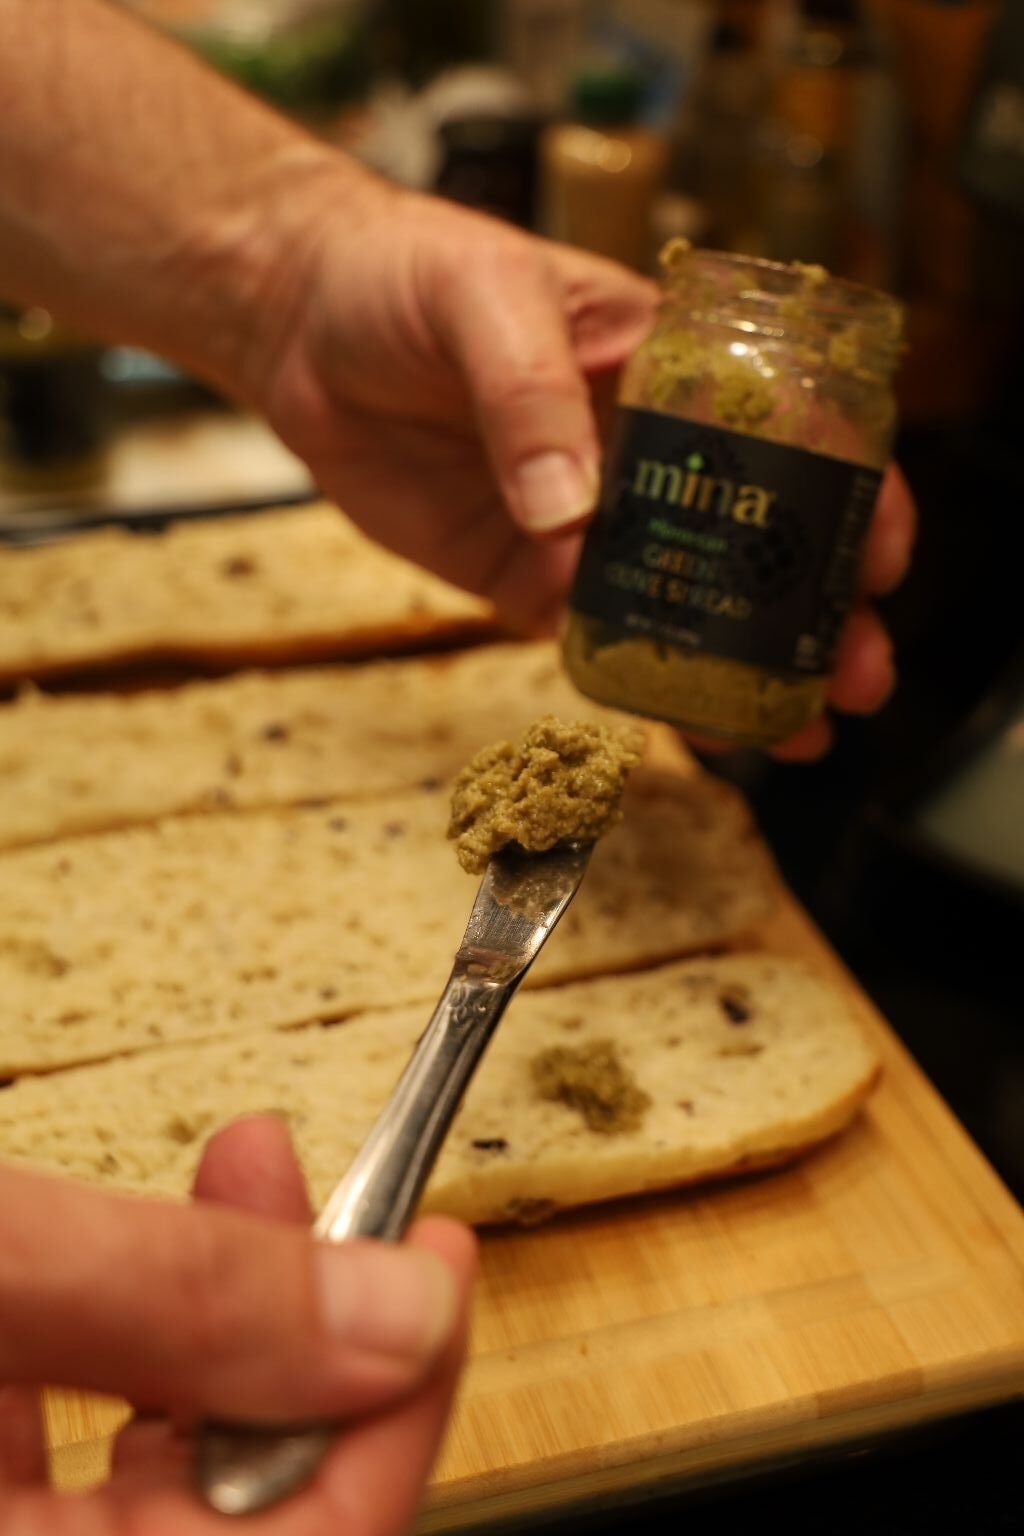
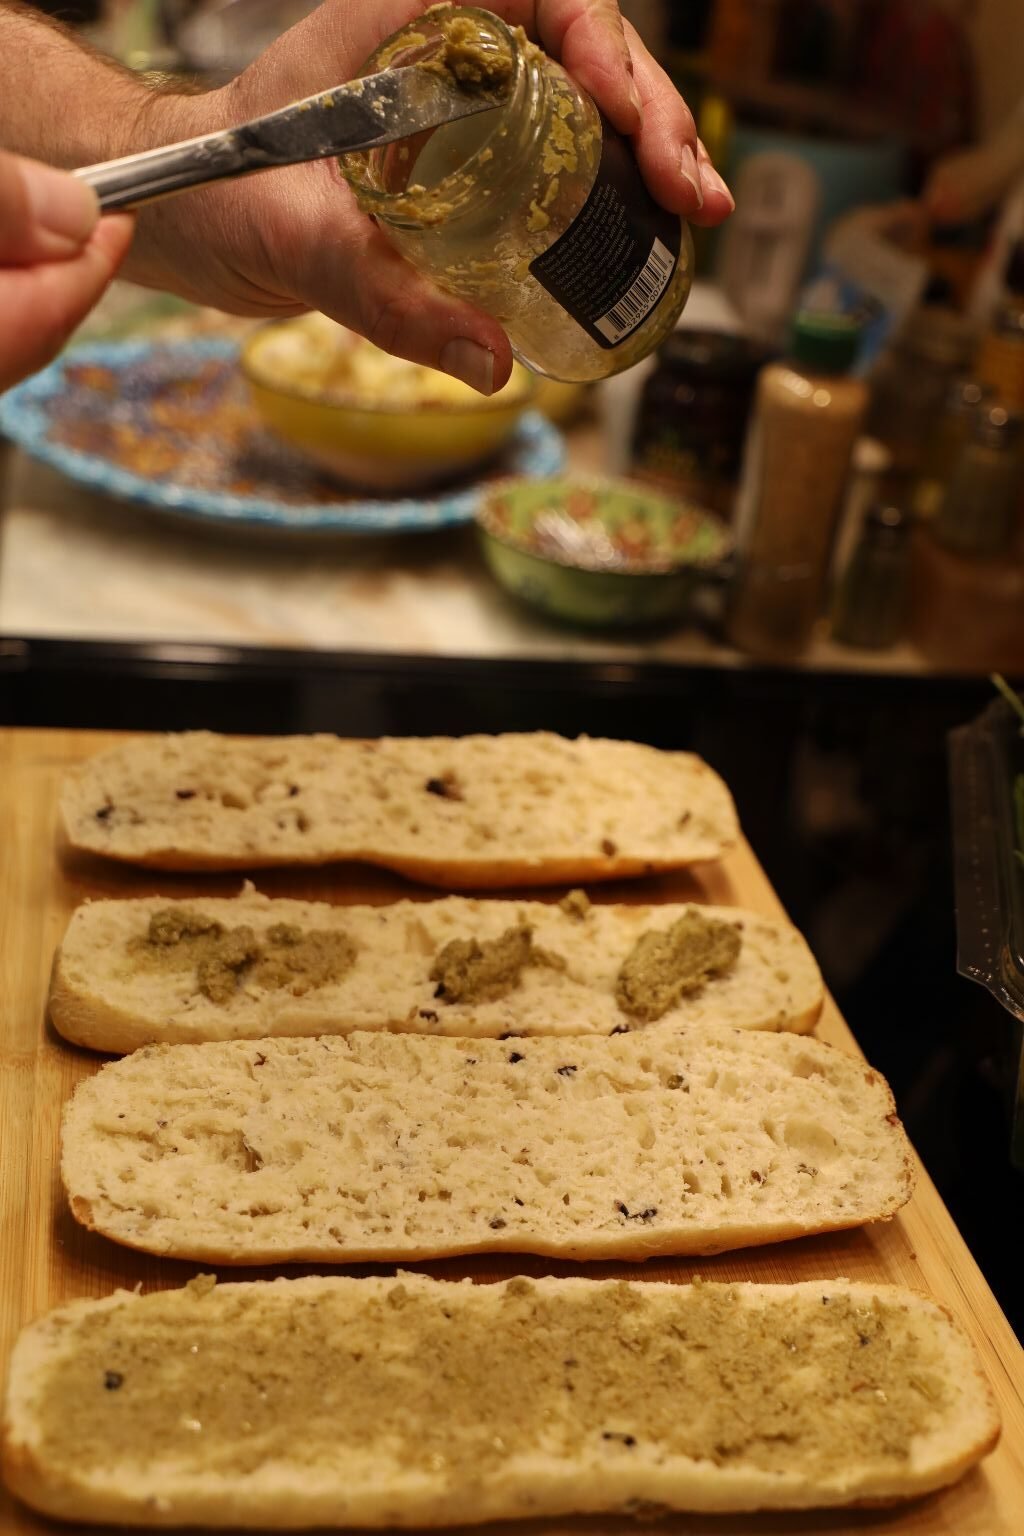
Here is that delicious Olive Spread I was telling you about. Gordon is spreading it onto the bread halves above.


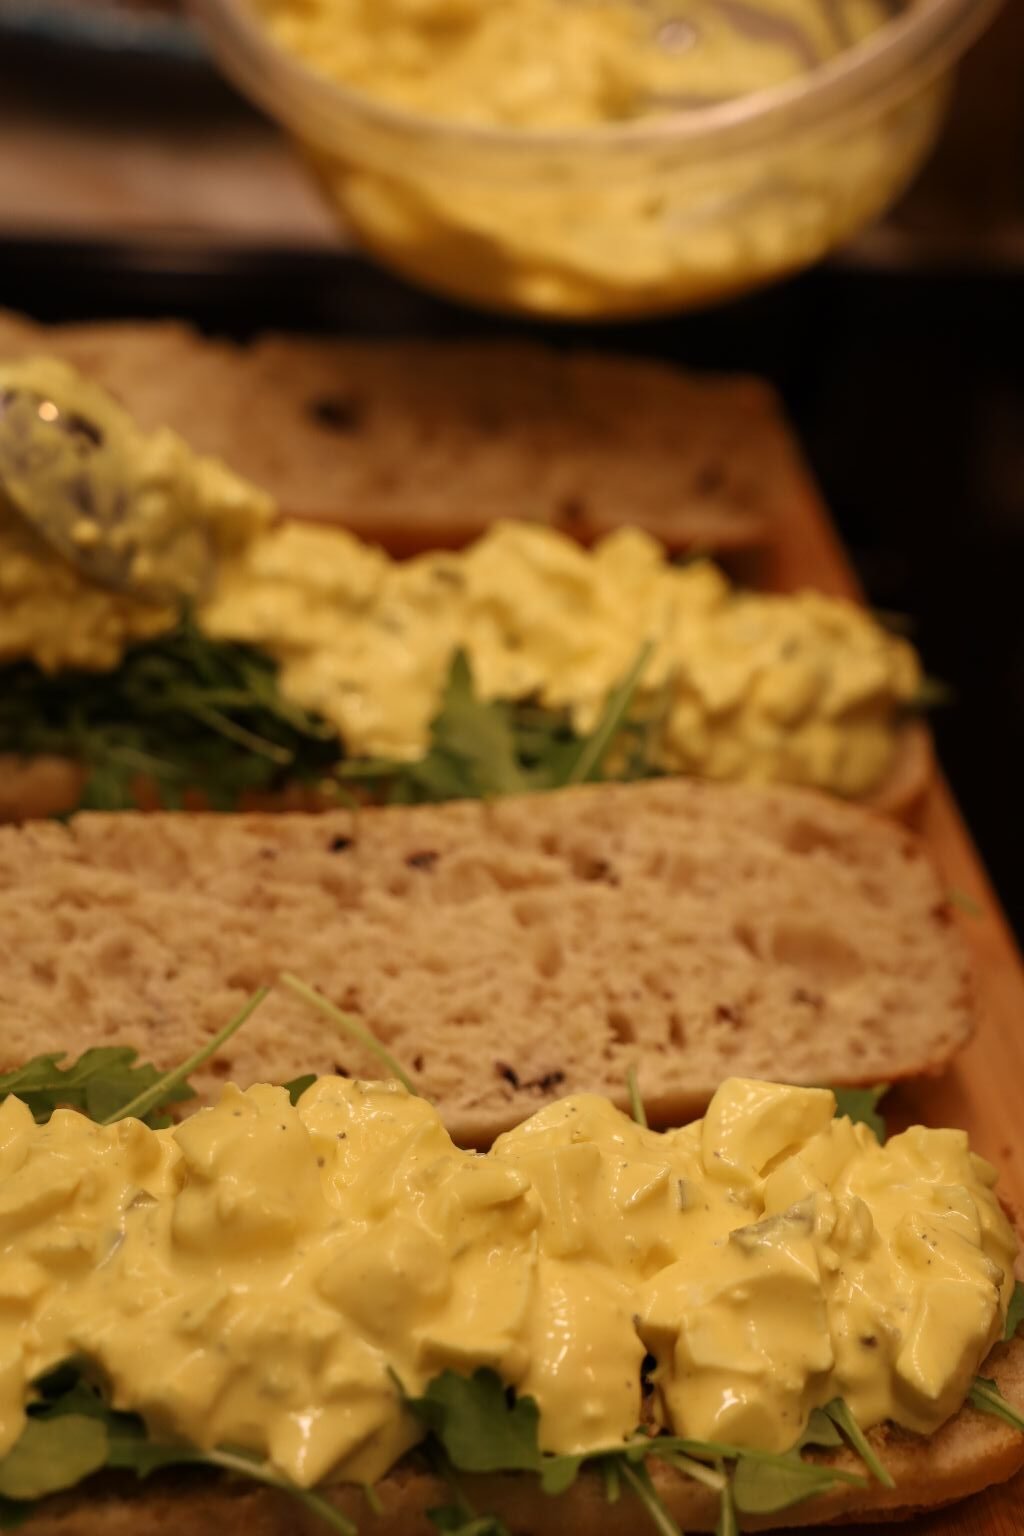
Now he is adding some Arugula and my Olive Egg Salad.
(I wasn’t going to write my Egg Salad recipe here as it is in many places throughout the website. But, I will say that I made my Egg Salad in the usual way except instead of adding Dill Pickles, or Dill Pickle Relish, I simply chopped as many Olives as I liked and added them instead.)
—————————————————————————


A Nice Sprinkling of Paprika..


..A Nice Mustard

————————————————————————

I Did Consider Placing Some Whole Olives Onto My Egg Salad, But They Already Have Plenty of Olives In It
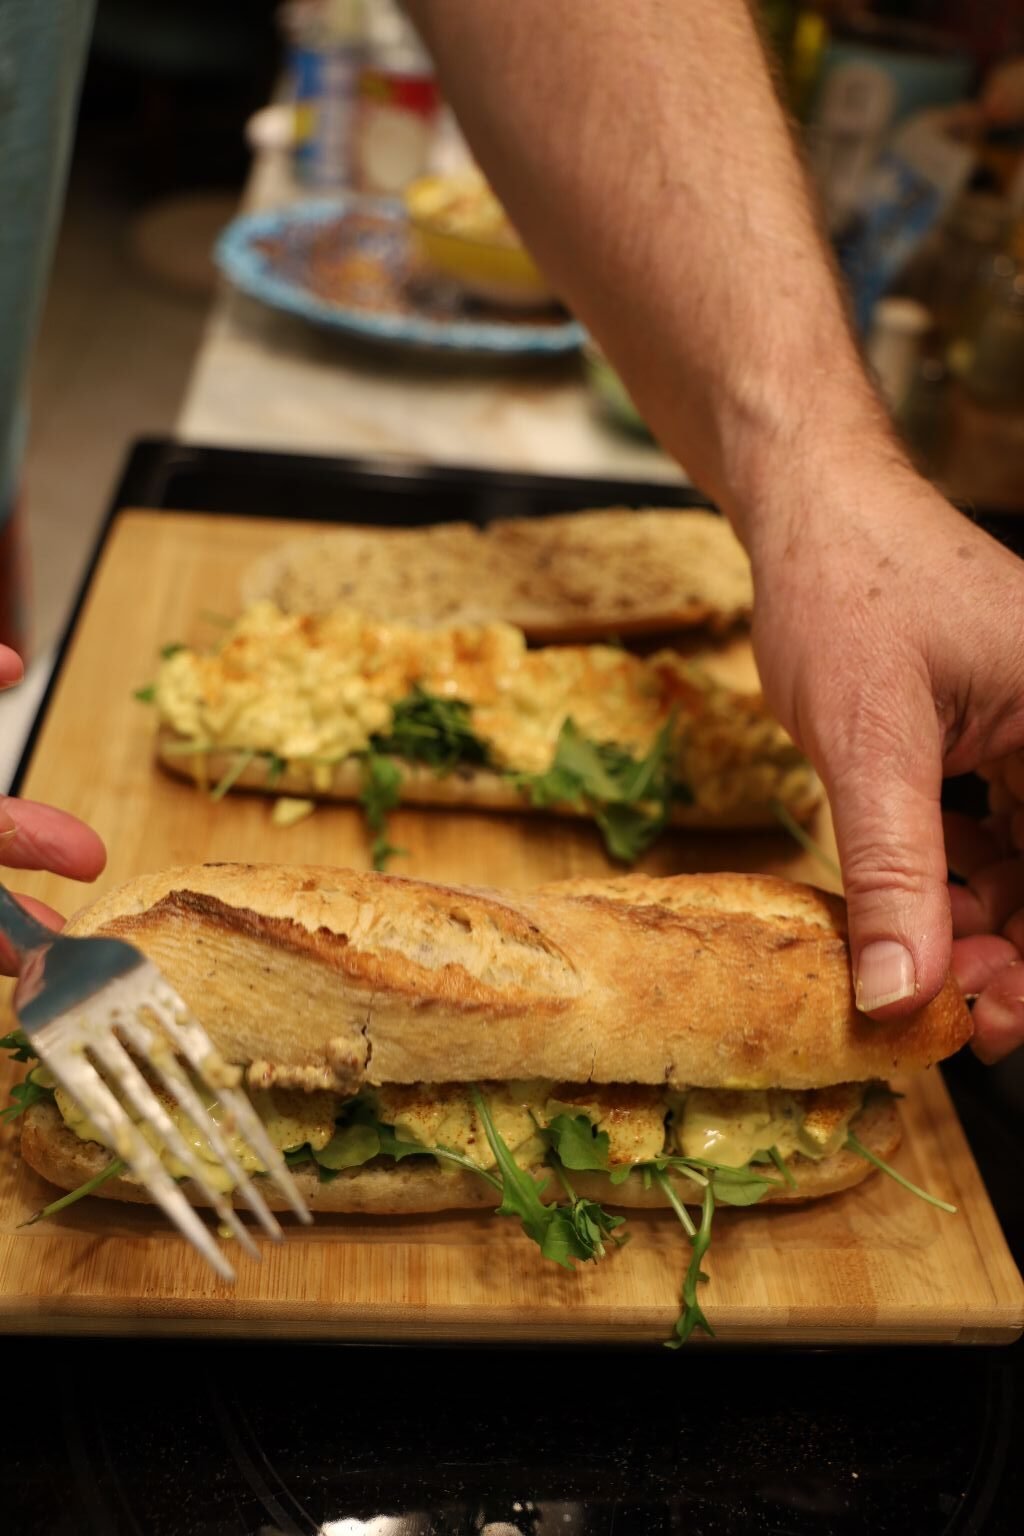
Close The Sandwiches Together

Then Slice Into
Plate, and Enjoy!
——————————————————————————-
The Potato Salad Cider Vinegar Dressing
Recipe From Gordon’s Mother, Sarajane Whann
She passed along many recipes to us in a hodgepodge of an Herb Notebook in disarray, and a simple box with handwritten recipes and booklets in a small box. I found this and decided to try it. It is as she says, excellent!

The Recipe
(I used this recipe as a guide. I did add more than was instructed. I also added a few things that weren’t listed in the recipe. You can do the same!)
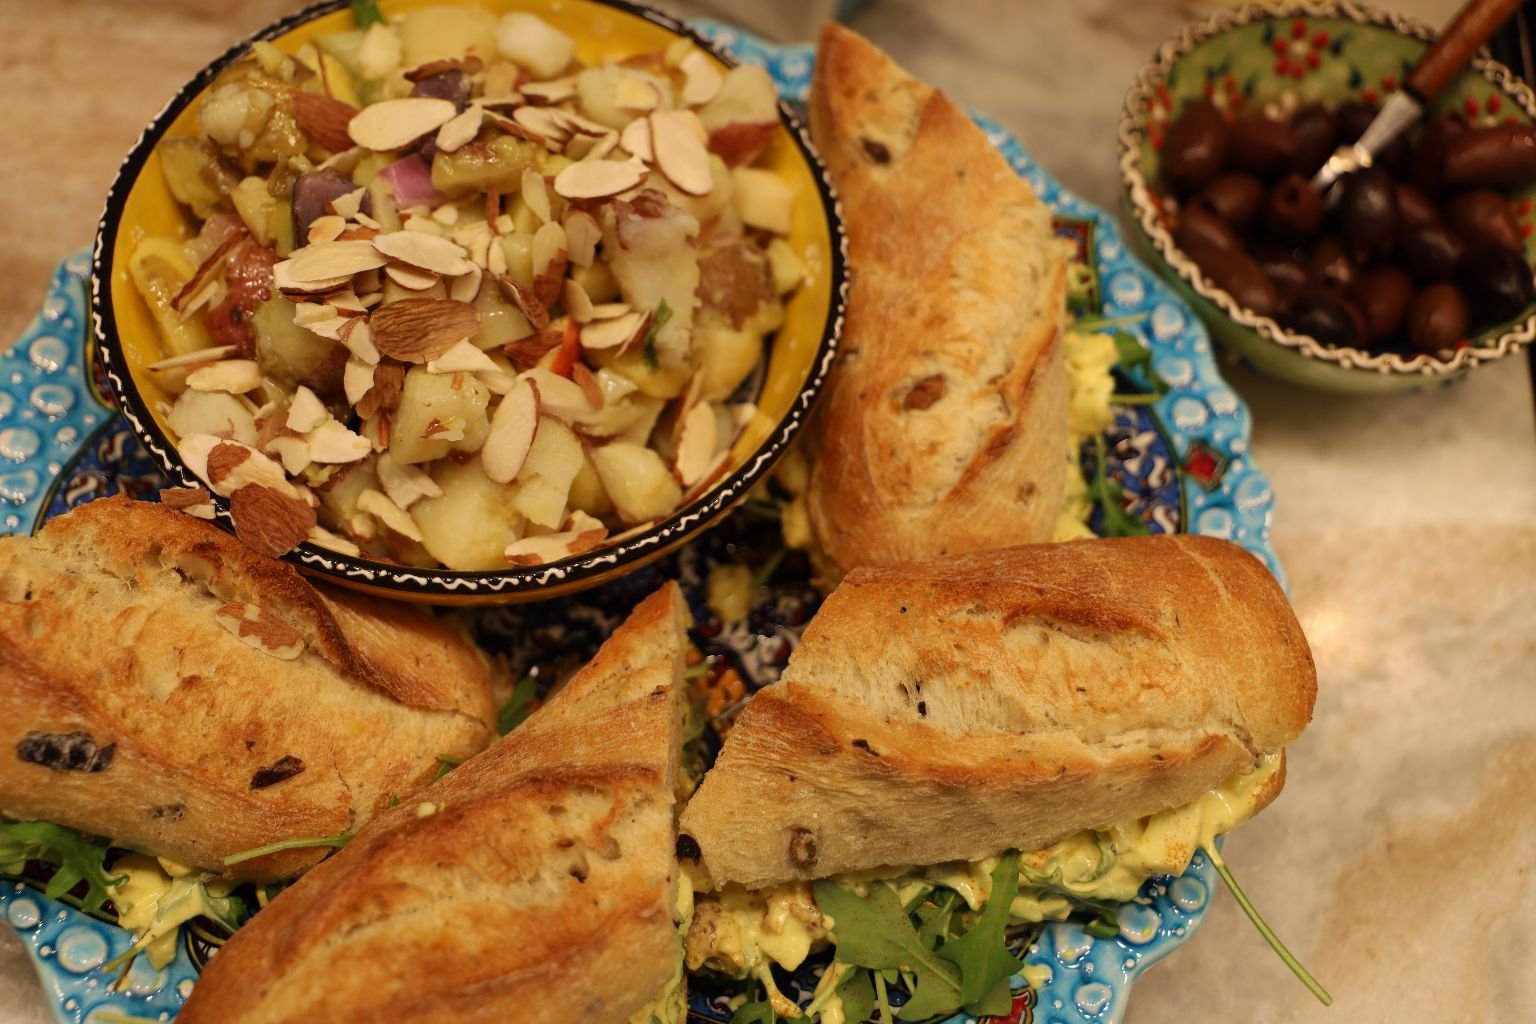
Excellent with our Olive Egg Salad Sandwiches
—————————————————————————–

Ingredients:
1/4 Cup Slivered Almonds
5 Medium Potatoes
3 Celery Sticks, Chopped
4 Spring Onions, Chopped
4 Green Shallots, Chopped
1 Medium Apple, Chopped
1 T. Lemon Juice
————————————————————————-
Cider Vinegar Dressing
2 T. Cider Vinegar
1/3 Cup Olive Oil
2 t. Lemon Juice
2 t. Lime Juice
2 t. Brown Sugar
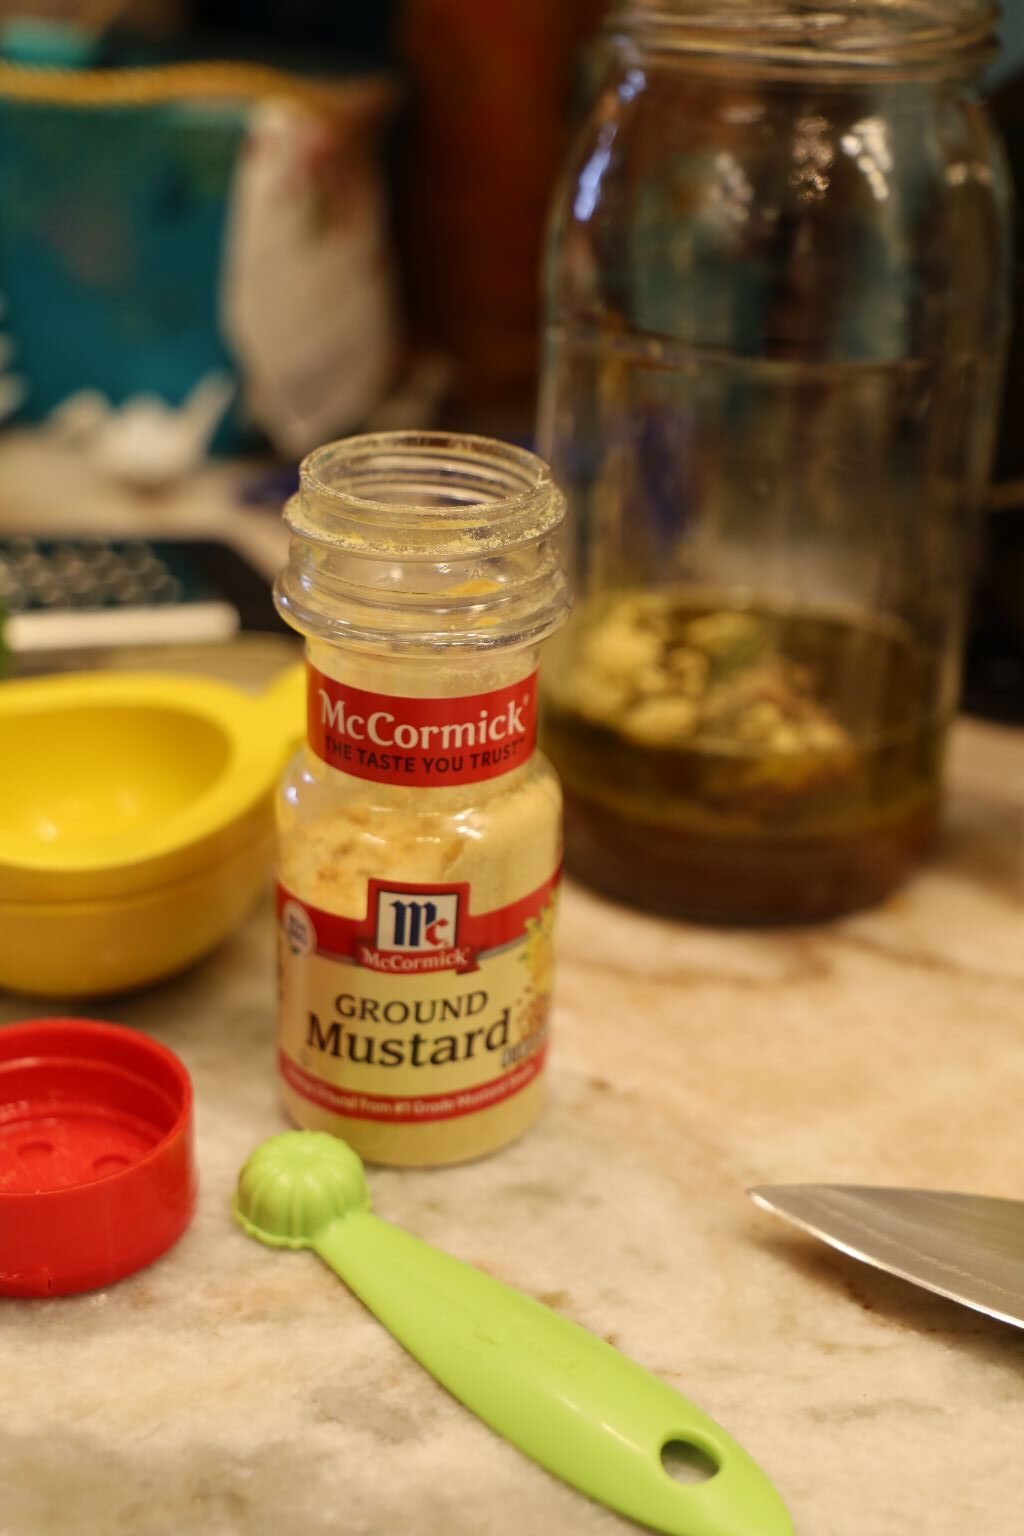
1/4 t. Dry Mustard
1 Clove Garlic, Crushed
———————————————————————————–
Make sure all of your ingredients have been washed.


—————————————————————


Washed Potatoes, Left—Placed Into a Pot of Water to Boil, Right
Boil on a High Heat until they are fork tender.

You Will Need A Large Mixing Bowl


When The Potatoes Are Done, Cut Them Into Bite Sized Chunks,
As You Can See, I Used A Nice Variety Of Colors


———————————————————————–


Now, Slice Your Cleaned Celery Into Diced Sized Pieces
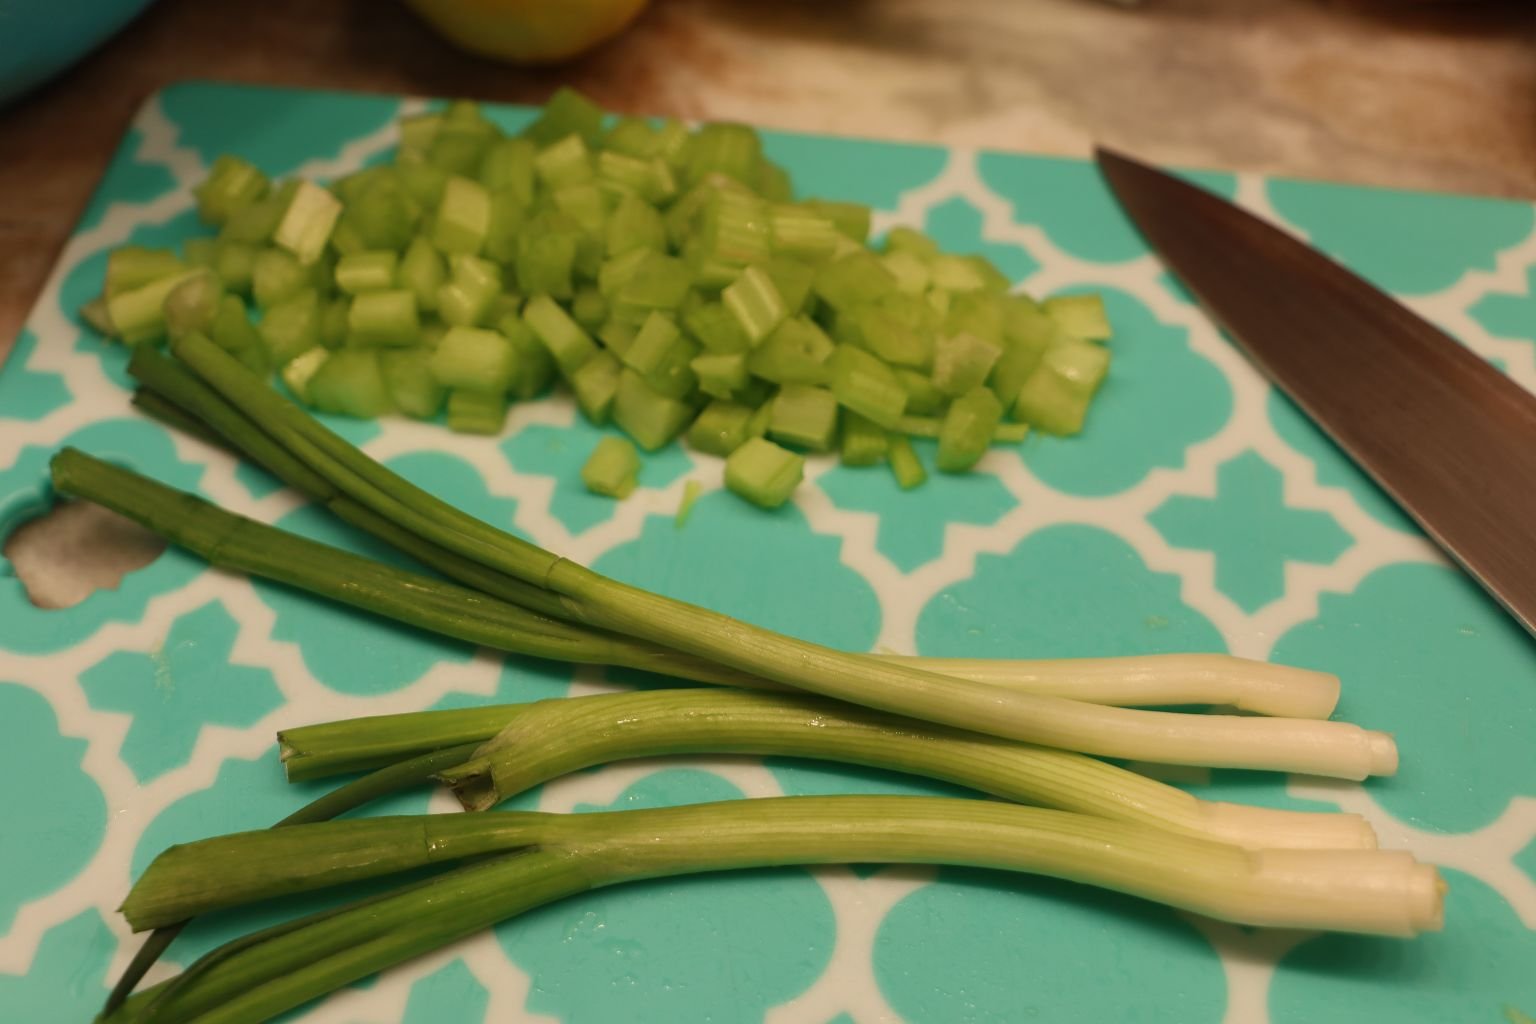

I Also Added Some Chopped Spring Onions

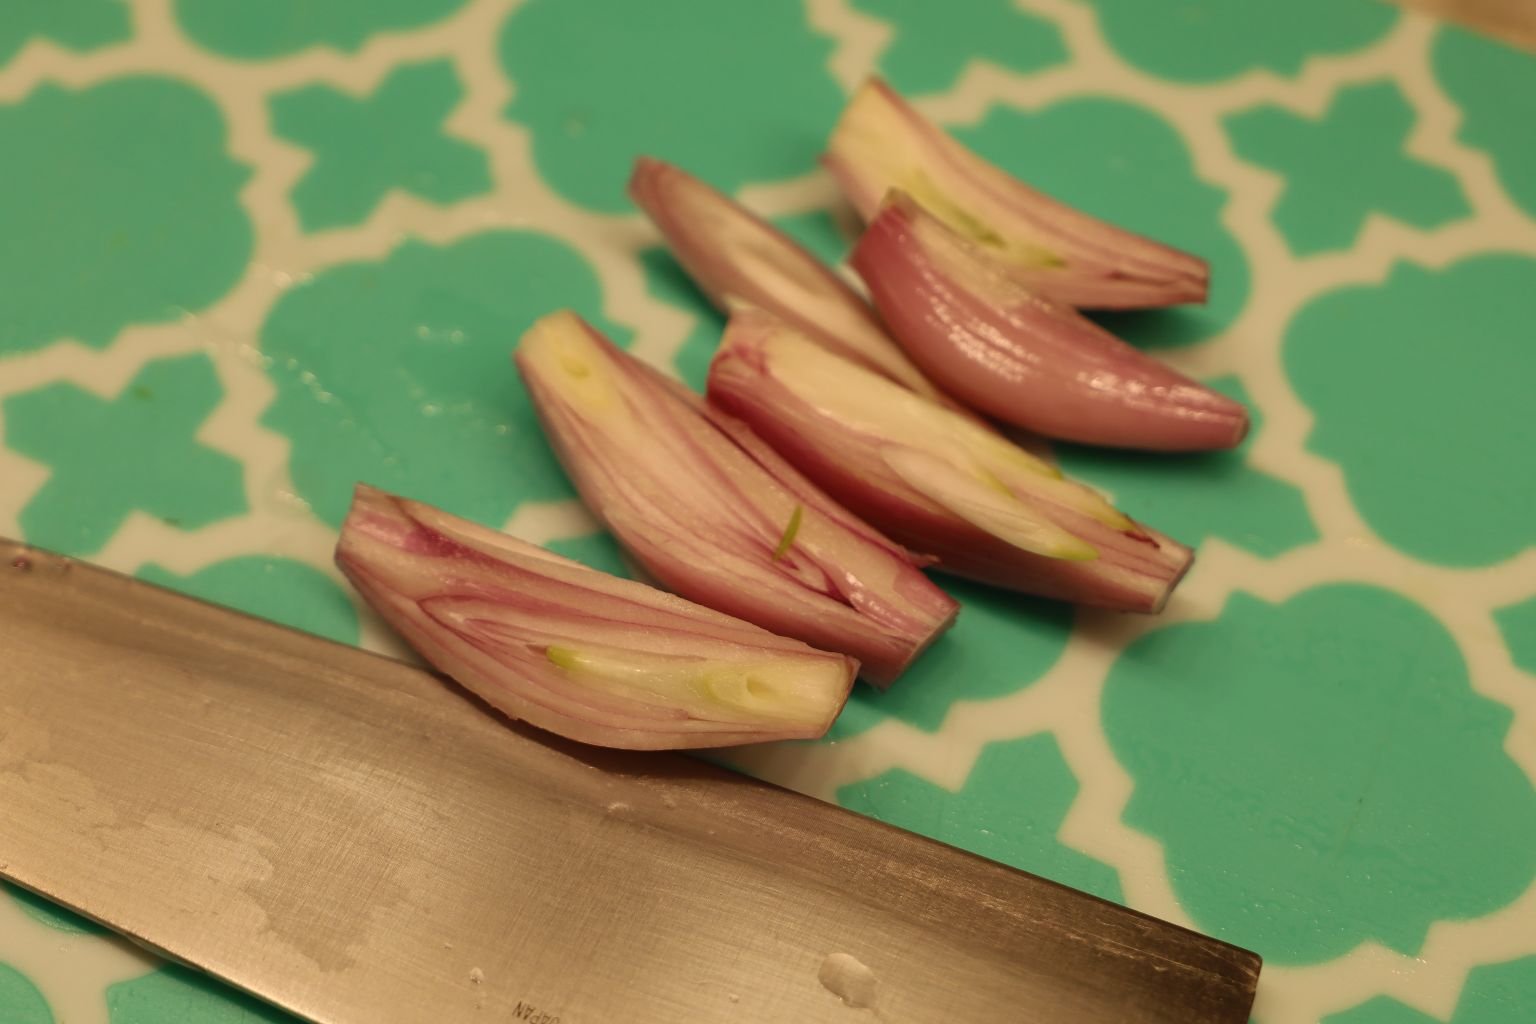
Chopping The Shallots


Adding Everything To The Mixing Bowl
—————————————————————————

Chopping My Apples


——————————————————————————-
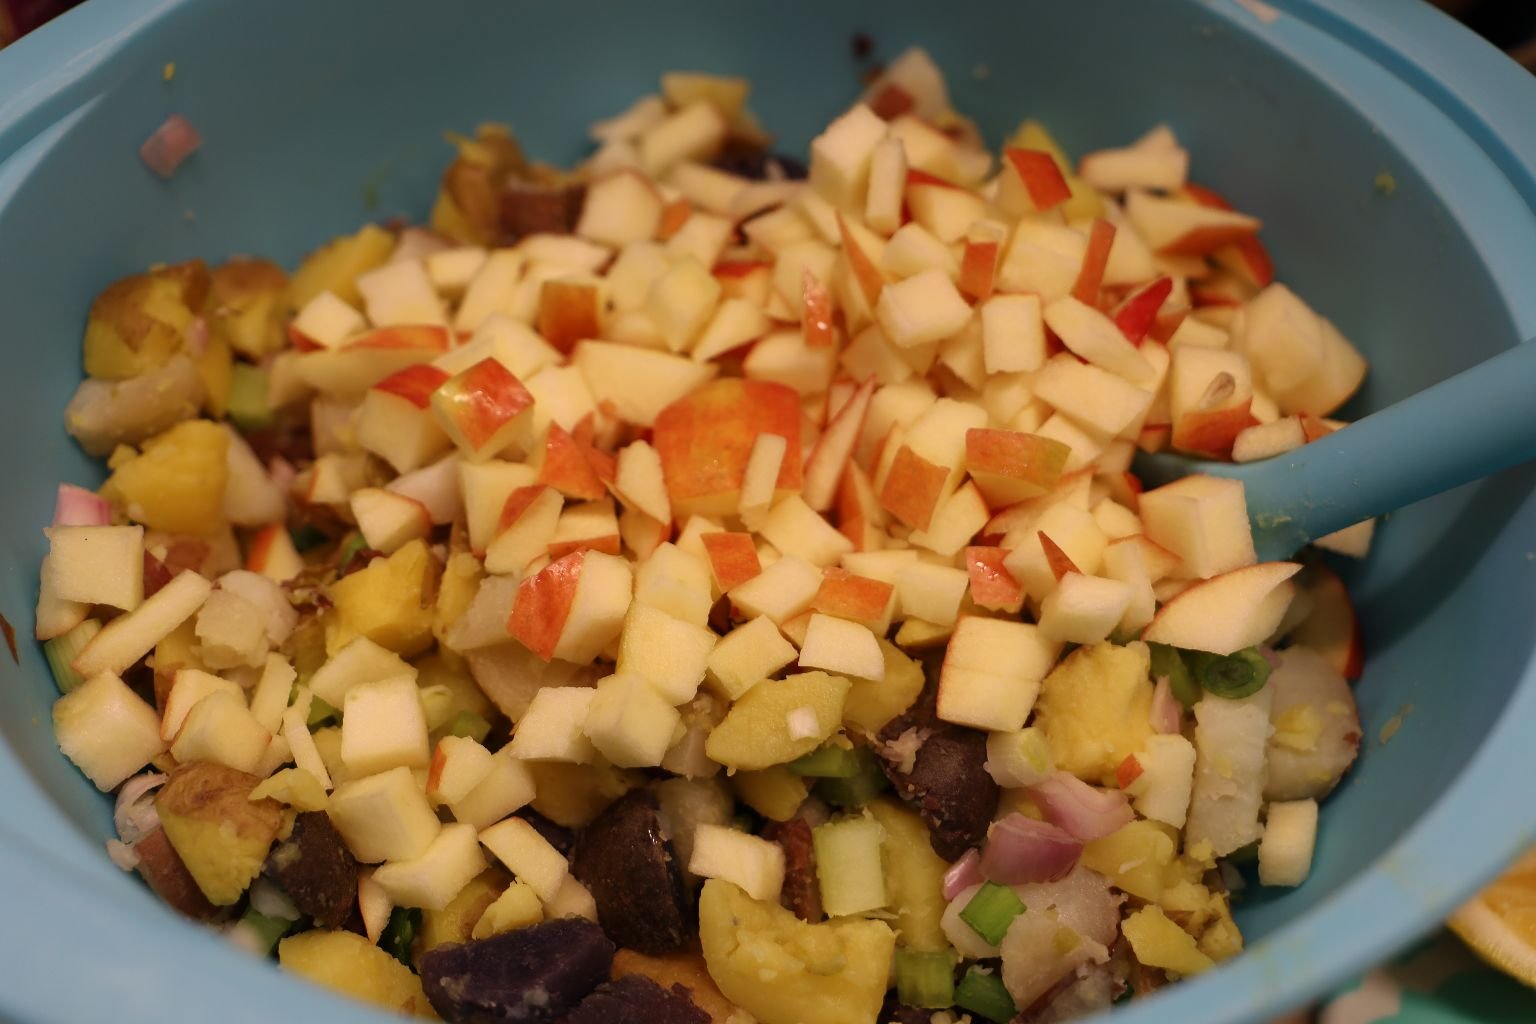

Adding Them and The Lemon Juice To The Ingredients

Cover With Saran Wrap and Place Into The Refrigerator to Chill
———————————————————————————
The Cider Vinegar Dressing

LIMES


Toast Slivered Almonds in a 350F Oven for about 5-7 minutes.
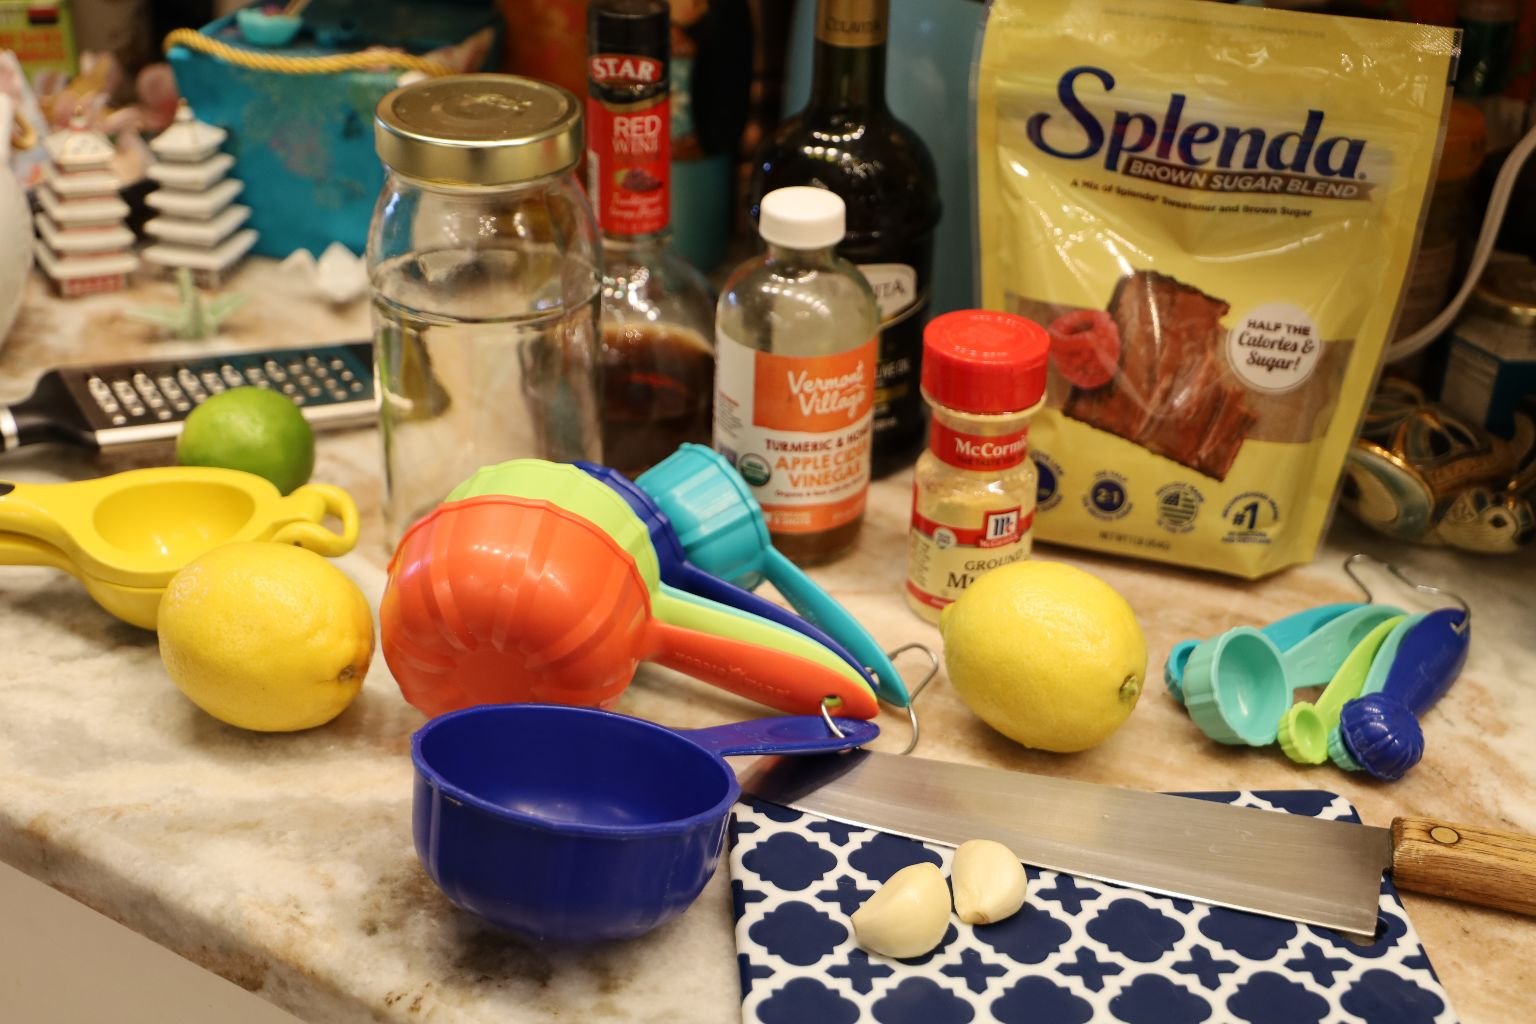
Our Dressing Ingredients


I Used Two Different Vineger’s Here. Each Provides a Different Taste.

You Simply Want To Place All Of Your Ingredients Into A Jar As You go
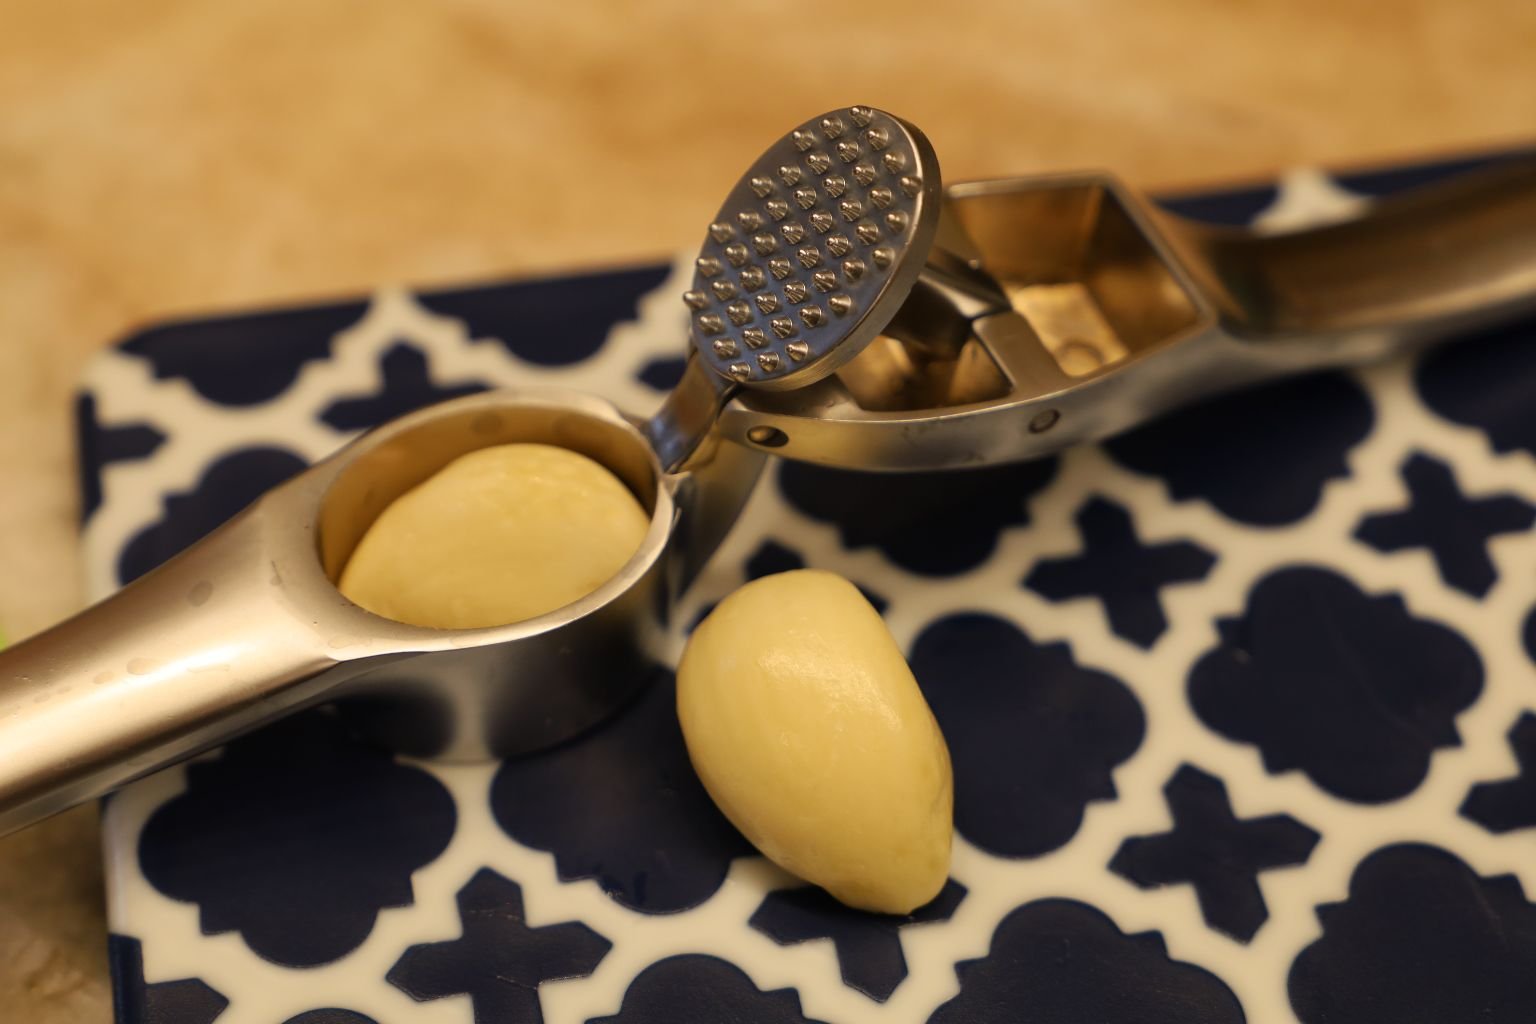
Crushing Garlic Cloves


And There It Is! The Dressing
Keep Everything Refrigerated
Hope You Like!
———————————————————————————
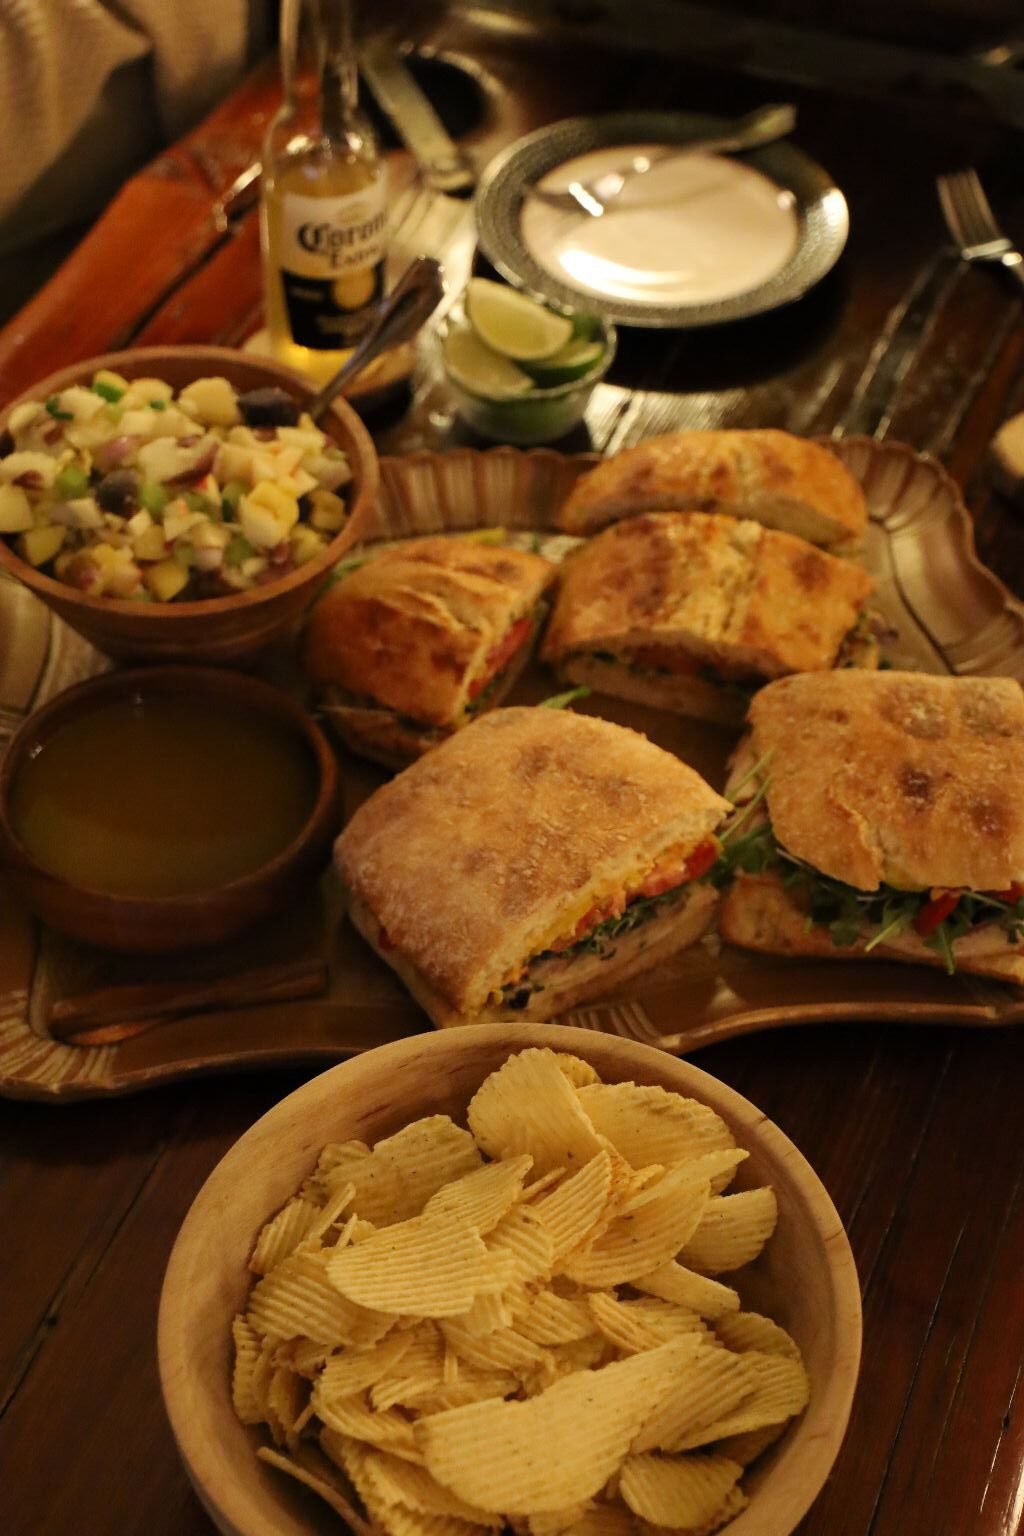
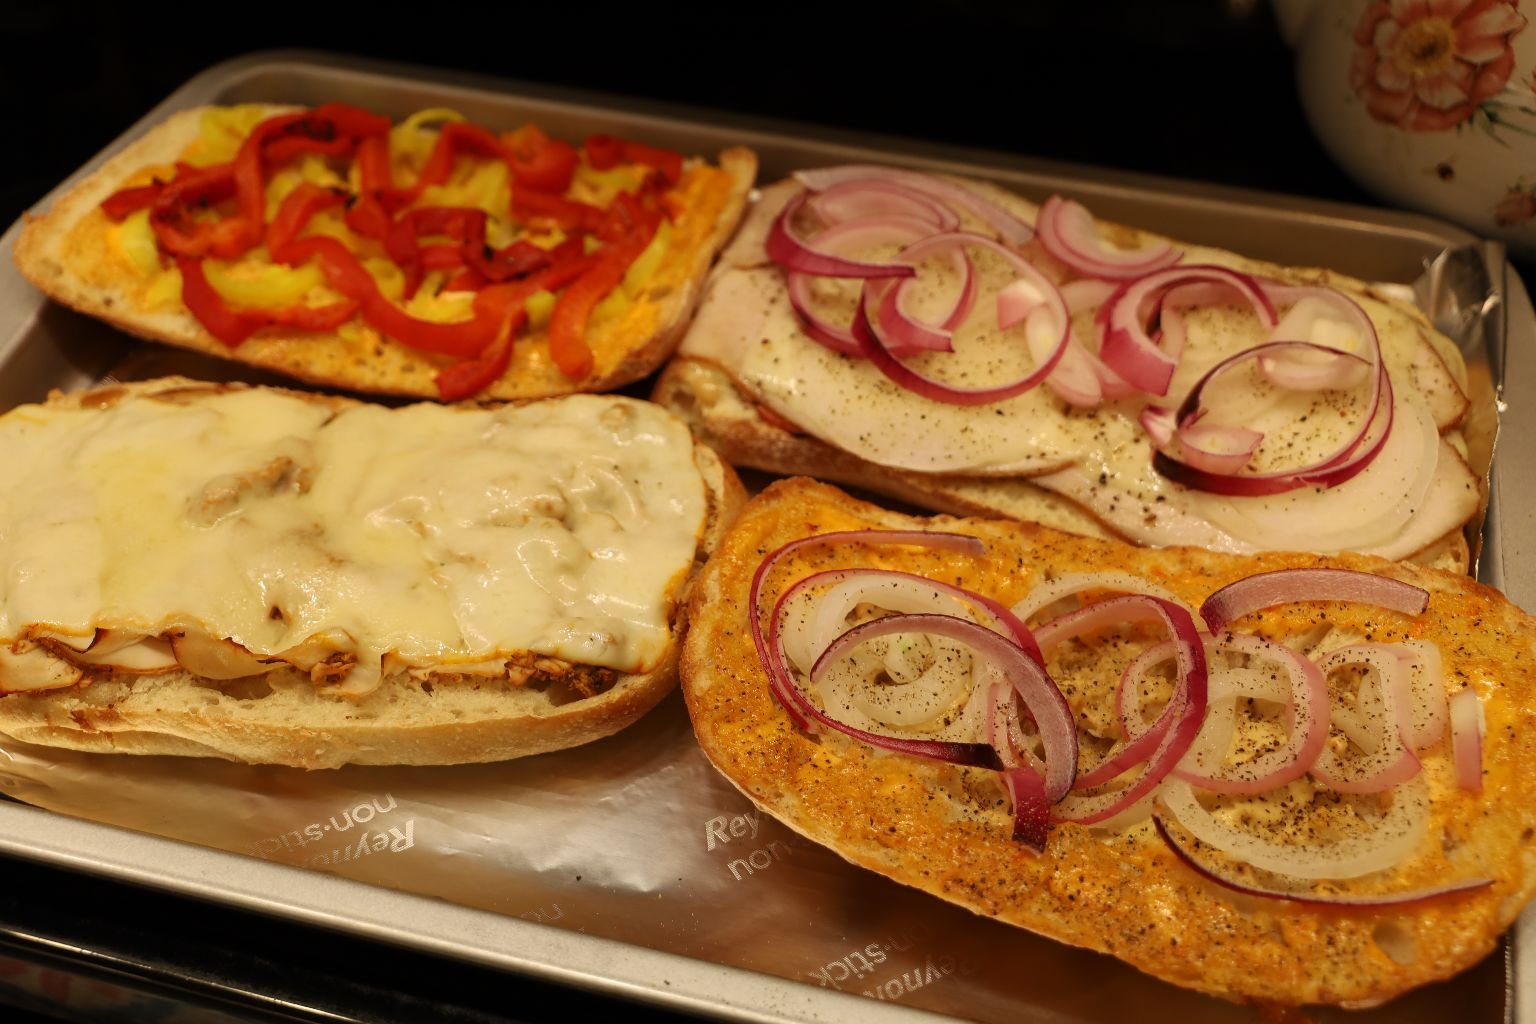
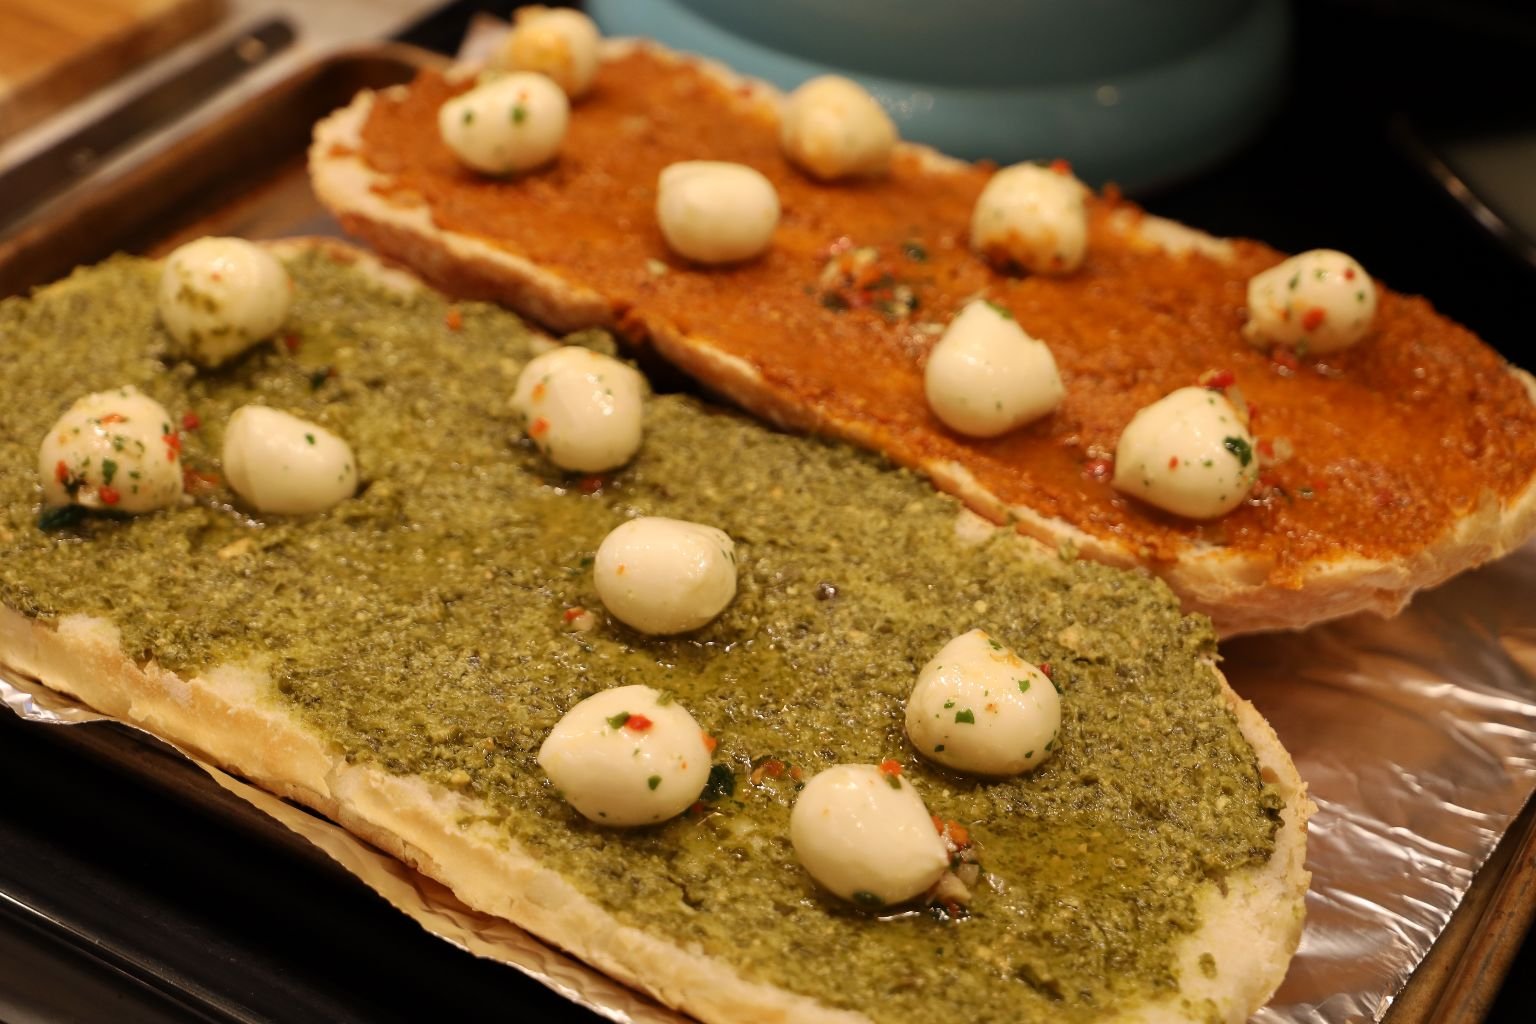
Our Super Bowl Italian Sandwich

Ingredients:
2 Garlic Batard Bread Loafs – Top half insides removed
Honey Dijon Mustard
Woebers Reserve Brand Mustard
Sriracha Aioli
Grey Poupon
Roasted Garlic Mustard
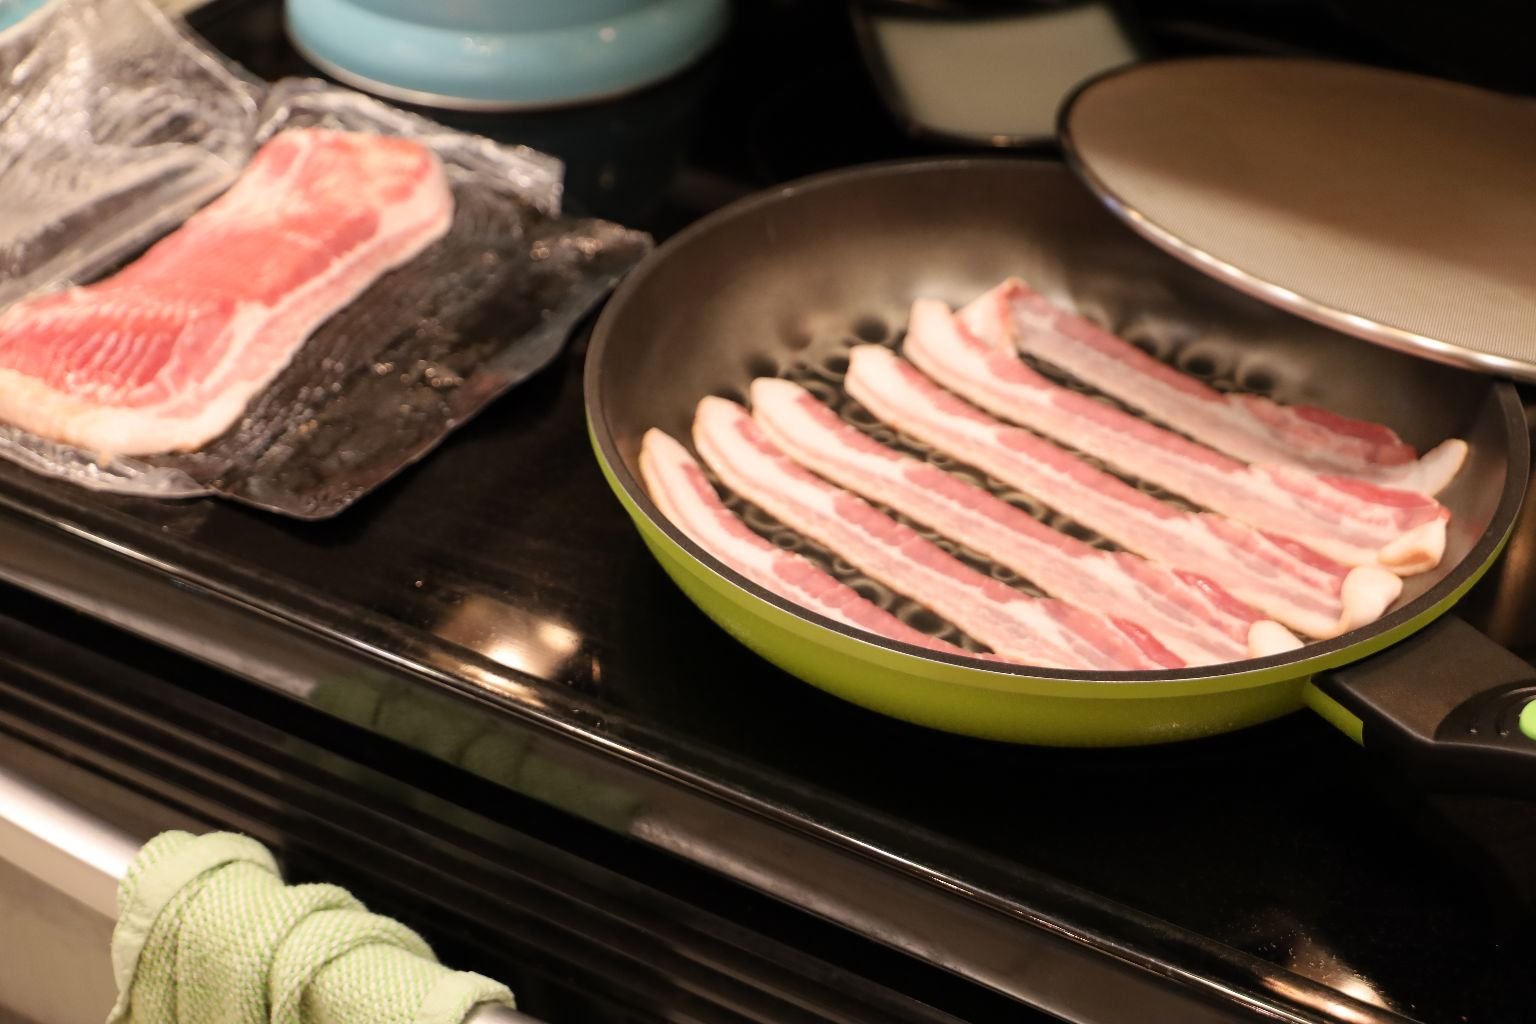
4 Honey Ham slices
4 Swiss Cheese slices
Deli Turkey Slices
Roasted Red Pepper Strips
Mild Banana Pepper Rings
Vidalia Onion – sliced thinly
Freshly Ground Black Pepper to taste
1 Large Tomato sliced
Salsalito Turkey
Red Onion slices
Muenster Cheese
Baby Arugula
Rainbow Micro Greens
—————————————————————————–
Our Super Bowl Italian Sandwich
——————————————————————-

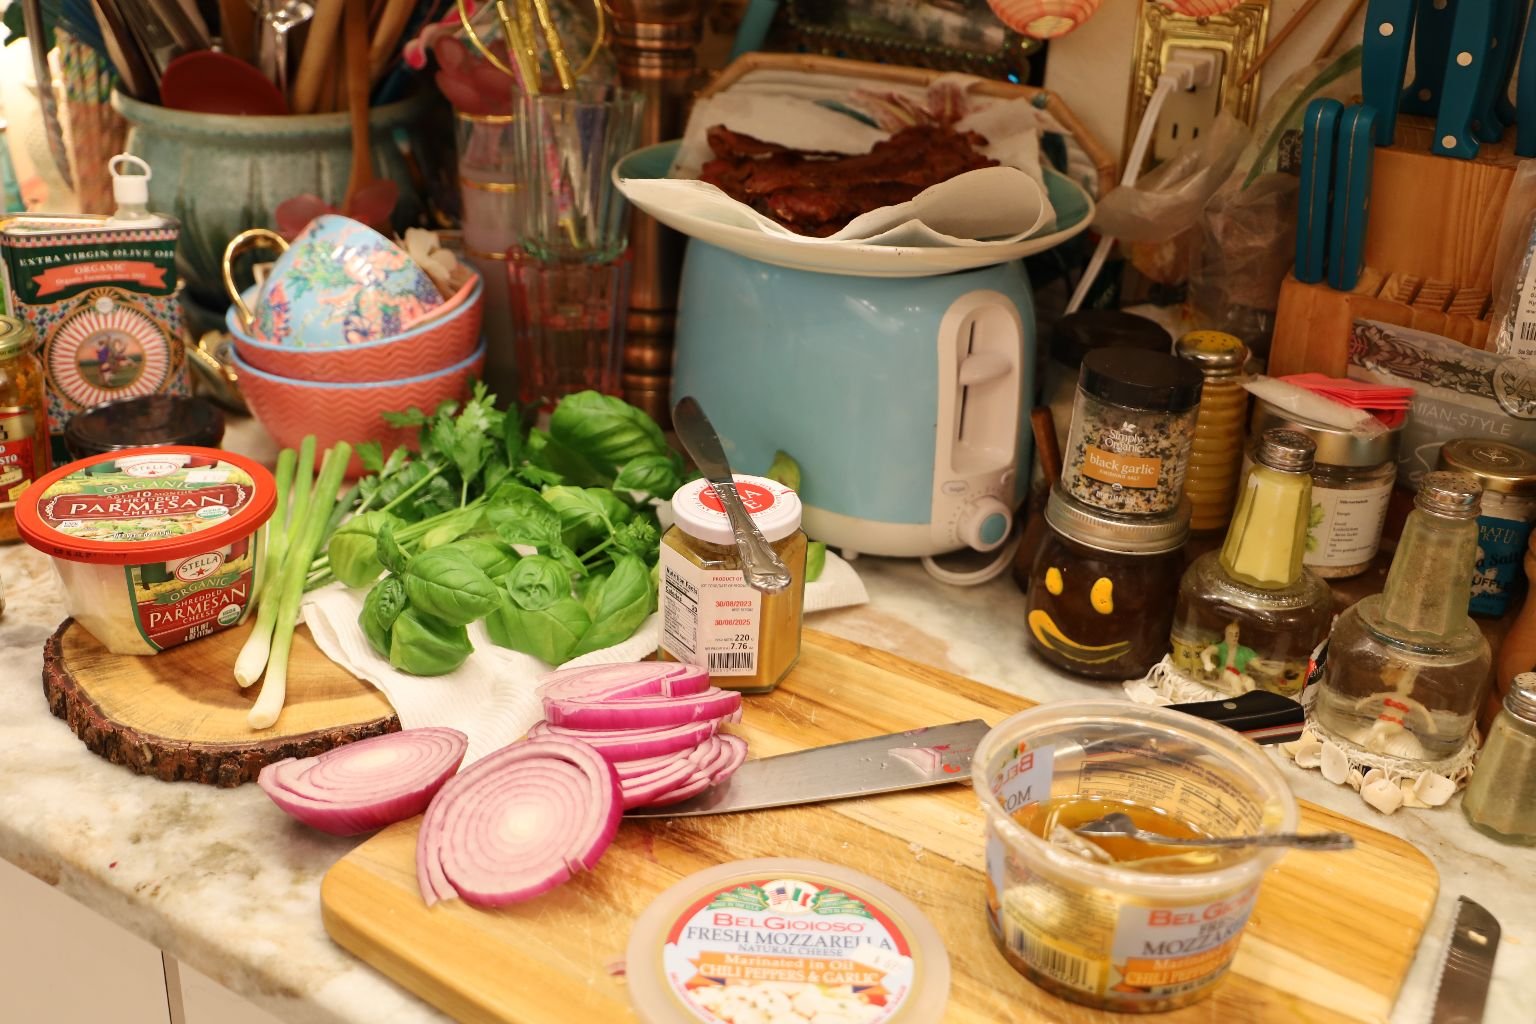
More ingredients we used.


And here are even more ingredients we used.
—————————————————————————-


Sliced the bread in half, and remove some of the insides of the top halves.

Here I am slicing the other bread loaf in half using a bread knife. Good thing I have my thumb out of the way. 🙂
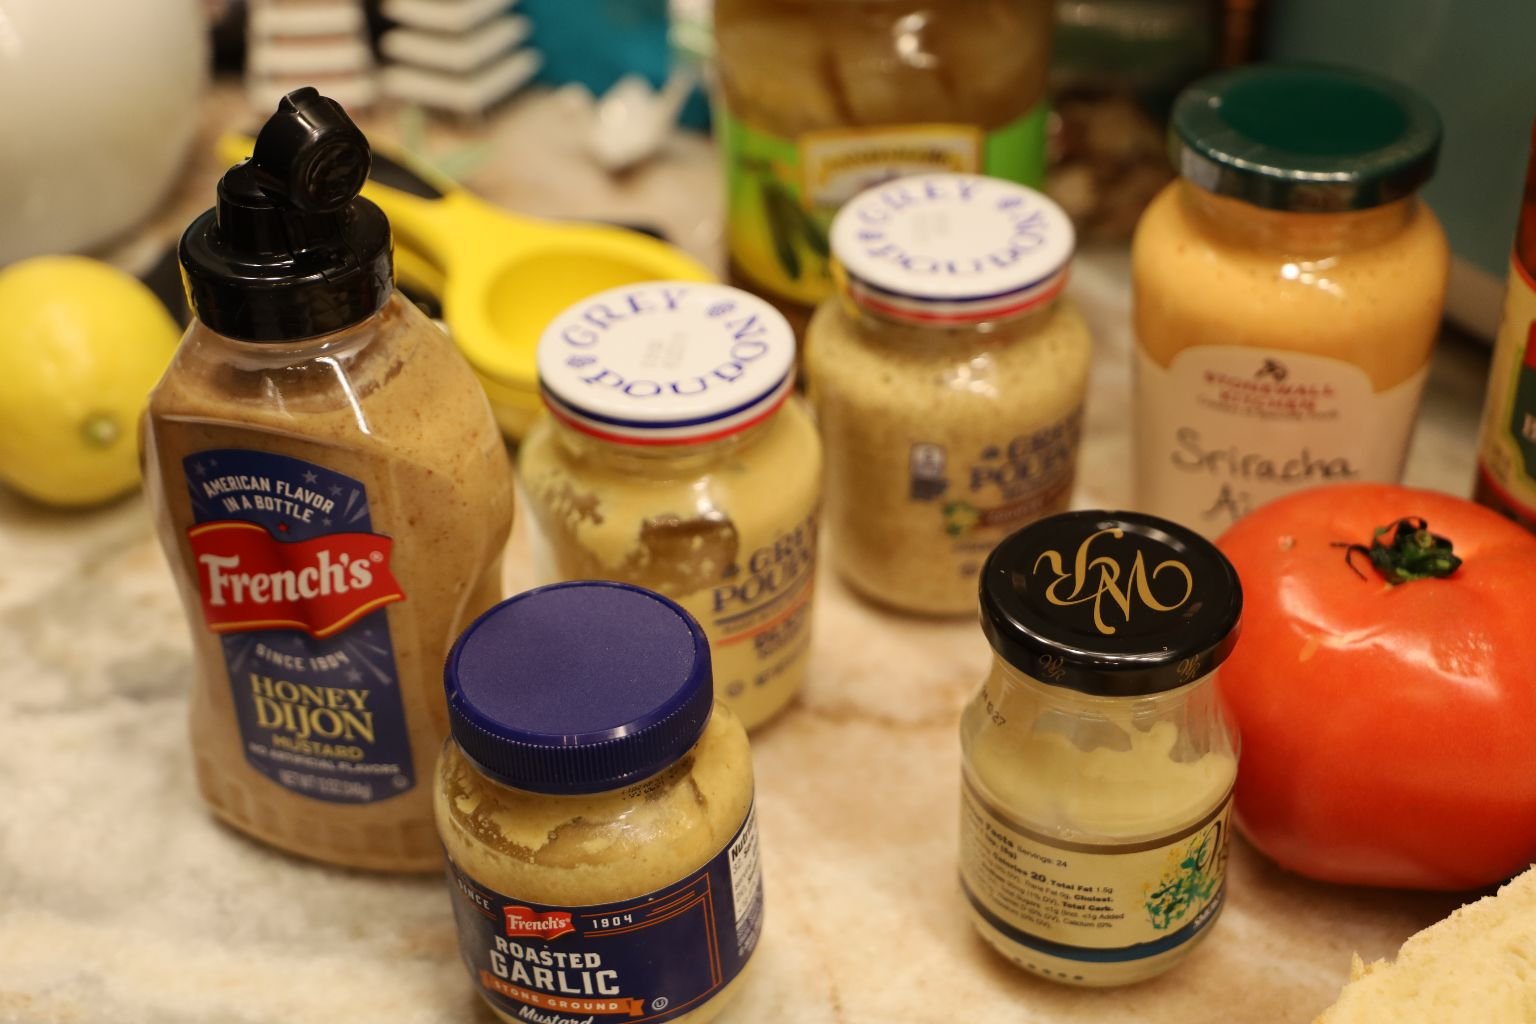
Pictured are the mustard’s we used.


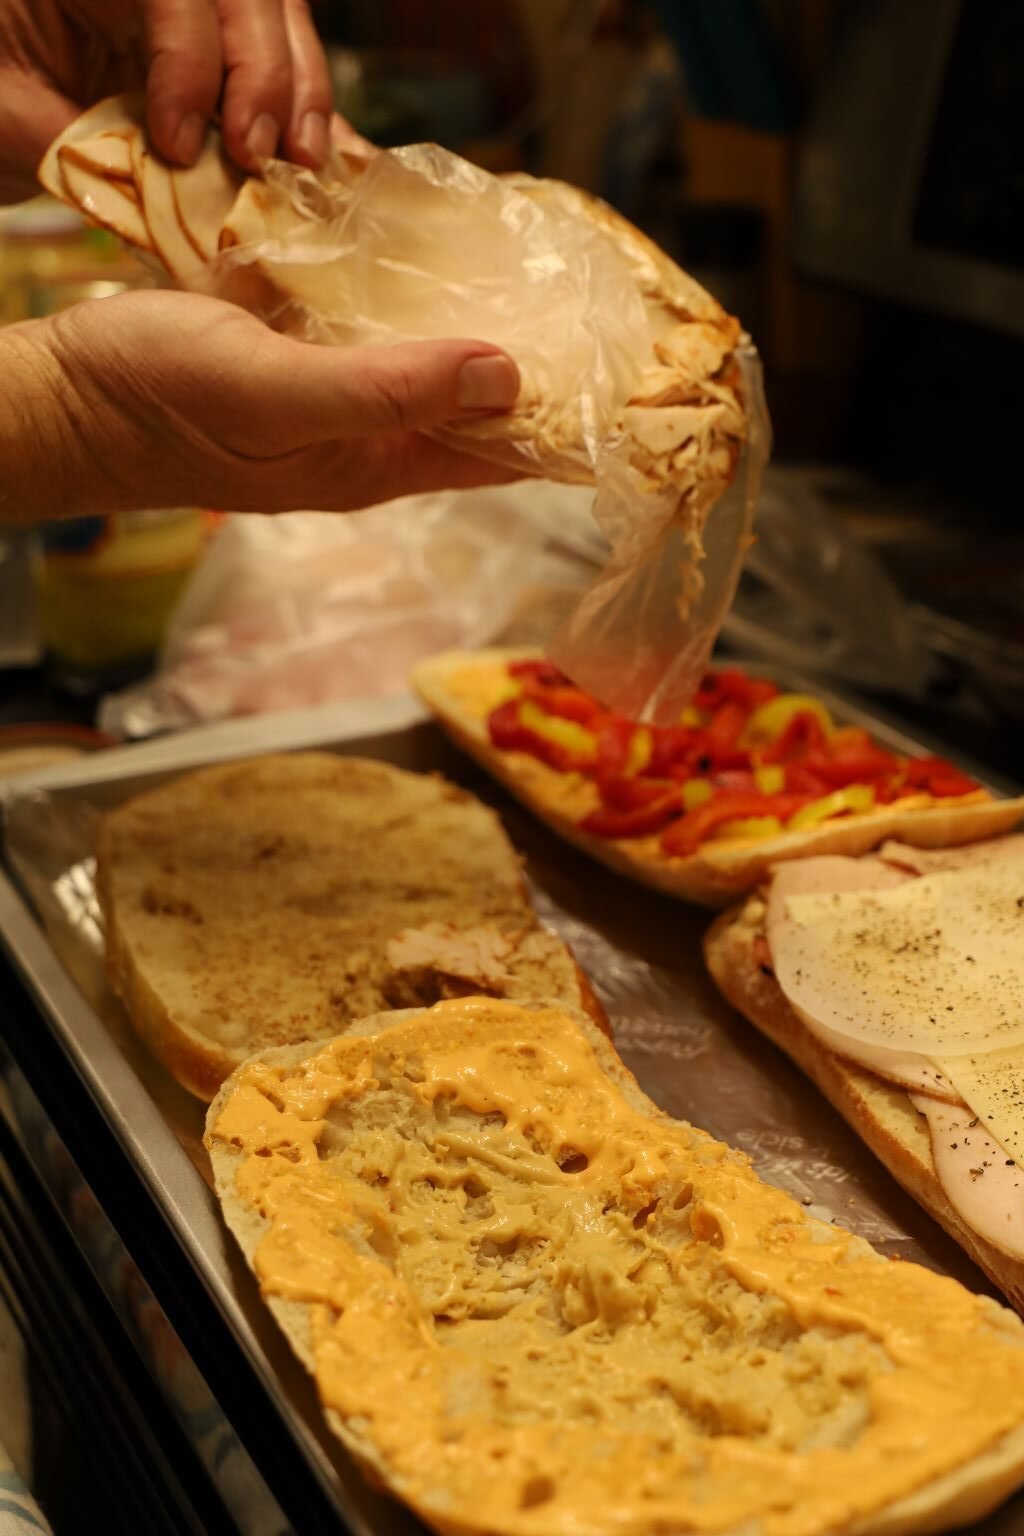
For one on the sandwiches, I squeezed a liberal amount of the Honey Mustard on the bottom half of the bread loaf.

Since we only had a little bit of the Woebers Reserve, I spread it on top of the Honey Mustard.

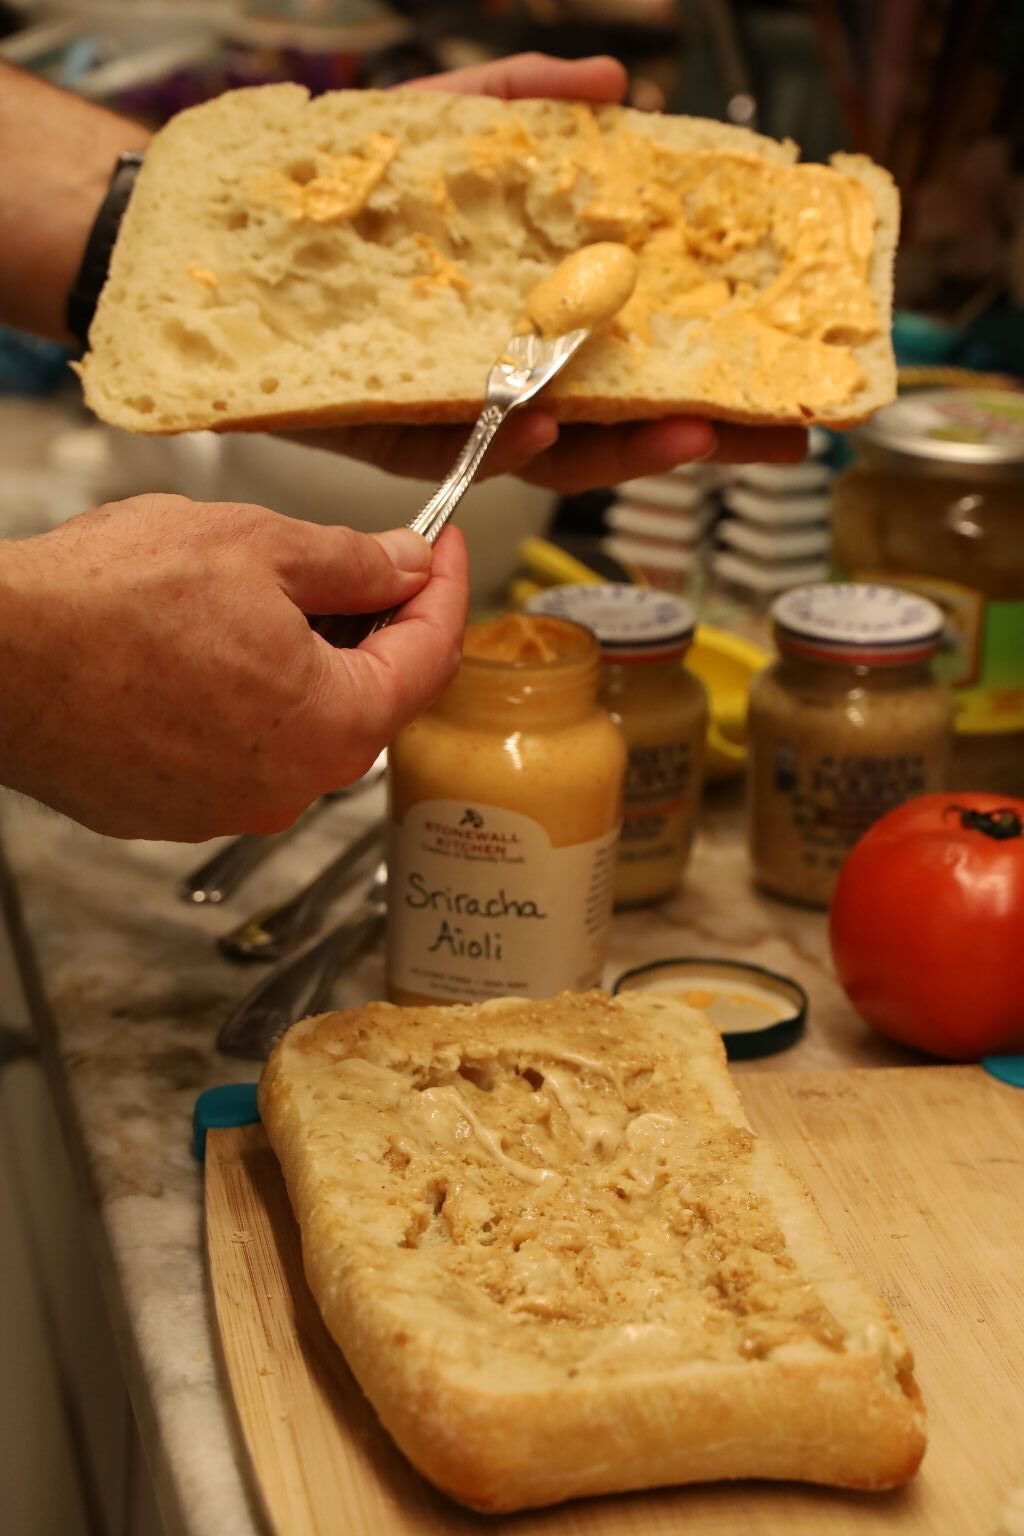
On the top half, I spread a liberal amount of the Sriracha Aioli. It is a little hot, so taste it before you do this.

On top of the Honey Mustard, I placed four Sweet Honey Ham slices.


Swiss Cheese goes perfect with the Ham, so I added a few slices on top of the Ham, then I added some nice Roasted Turkey slices, and topped it with more Swiss Cheese.
—————————————————————————-

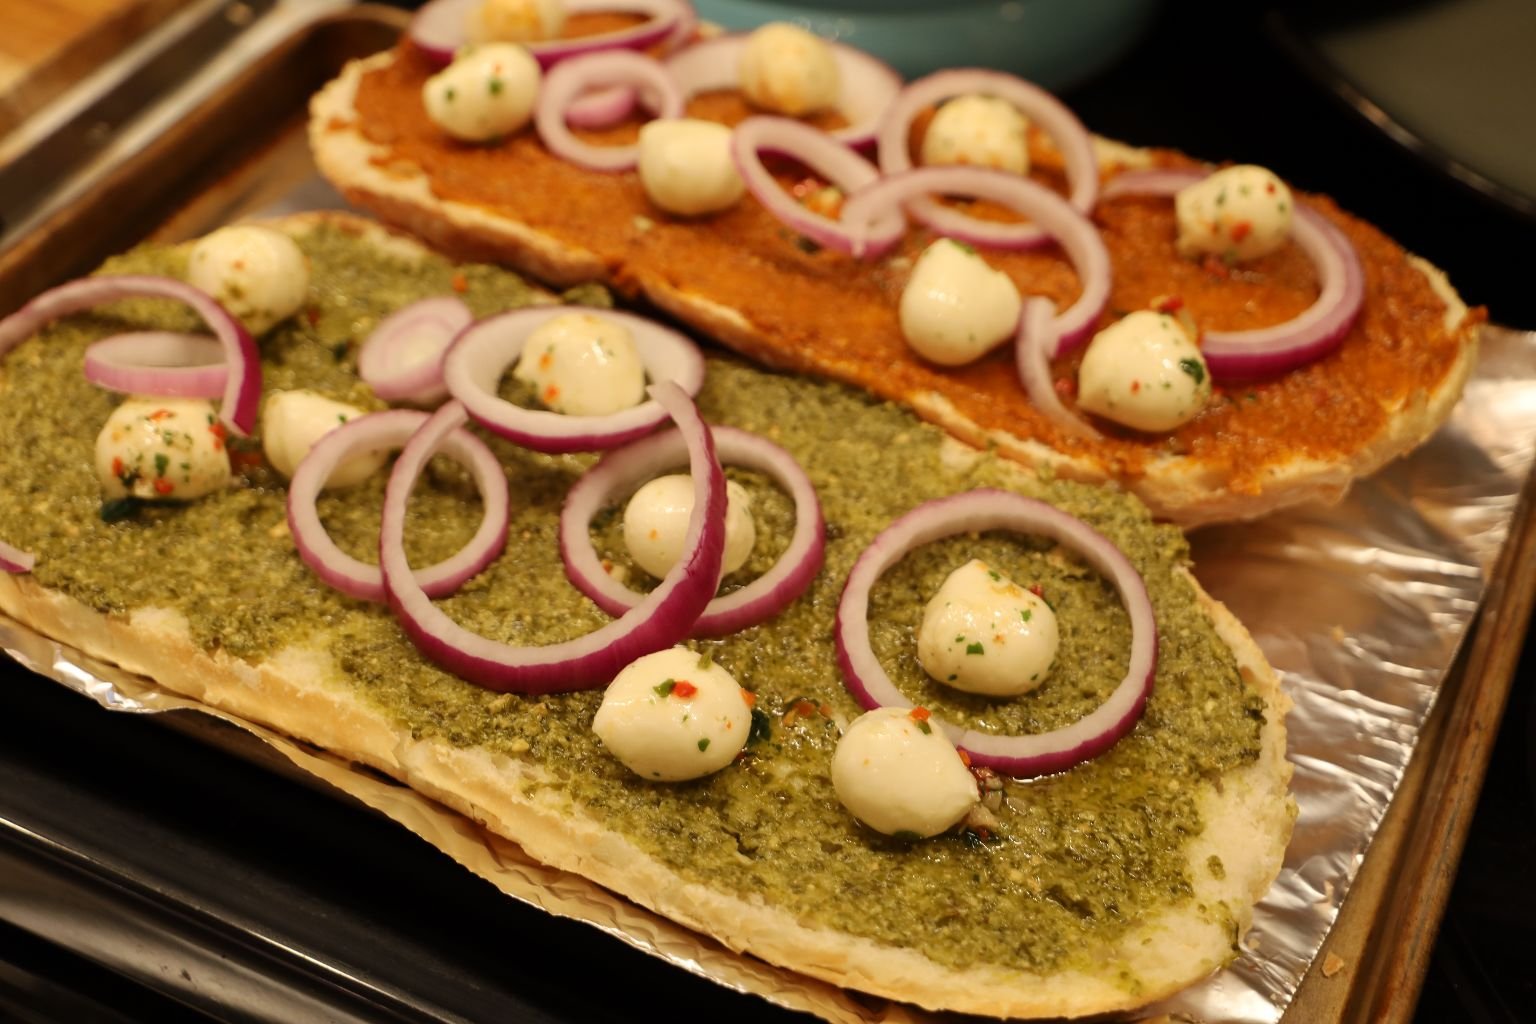
These are good peppers to use on a sandwich. They are very flavorful, and the mild Banana Peppers have just the right amount of heat.


Place a good amount of them on each sandwich. Don’t be shy with them!

The Roasted Red Bell Peppers taste as good as homemade.
So far so good!
——————————————————————-


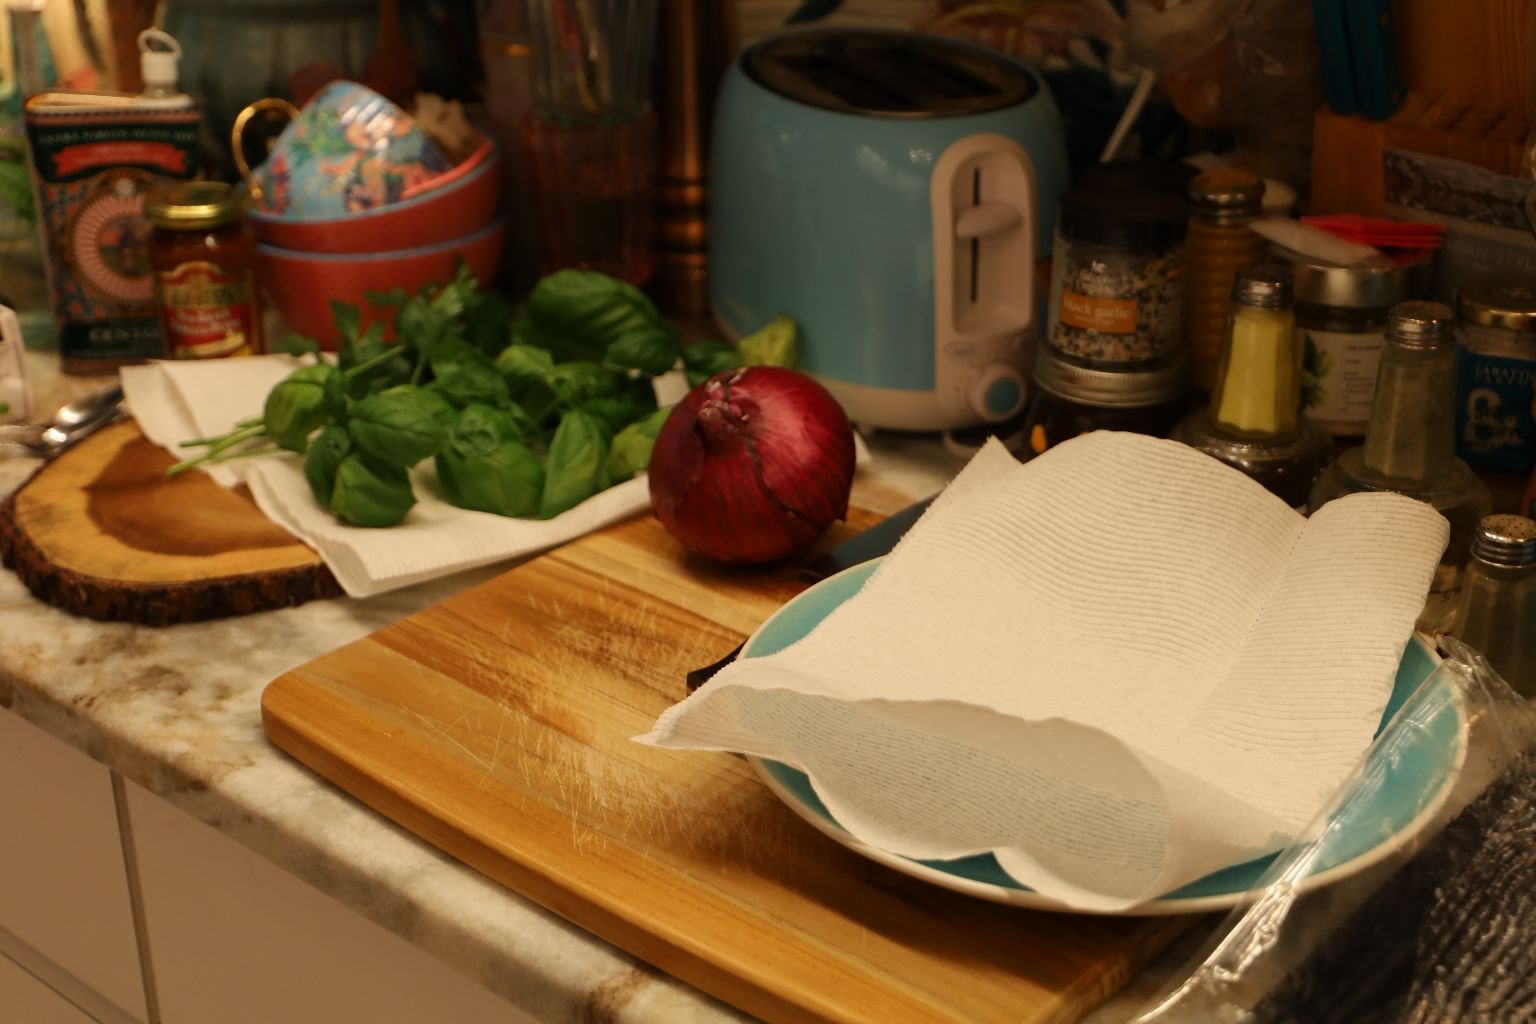
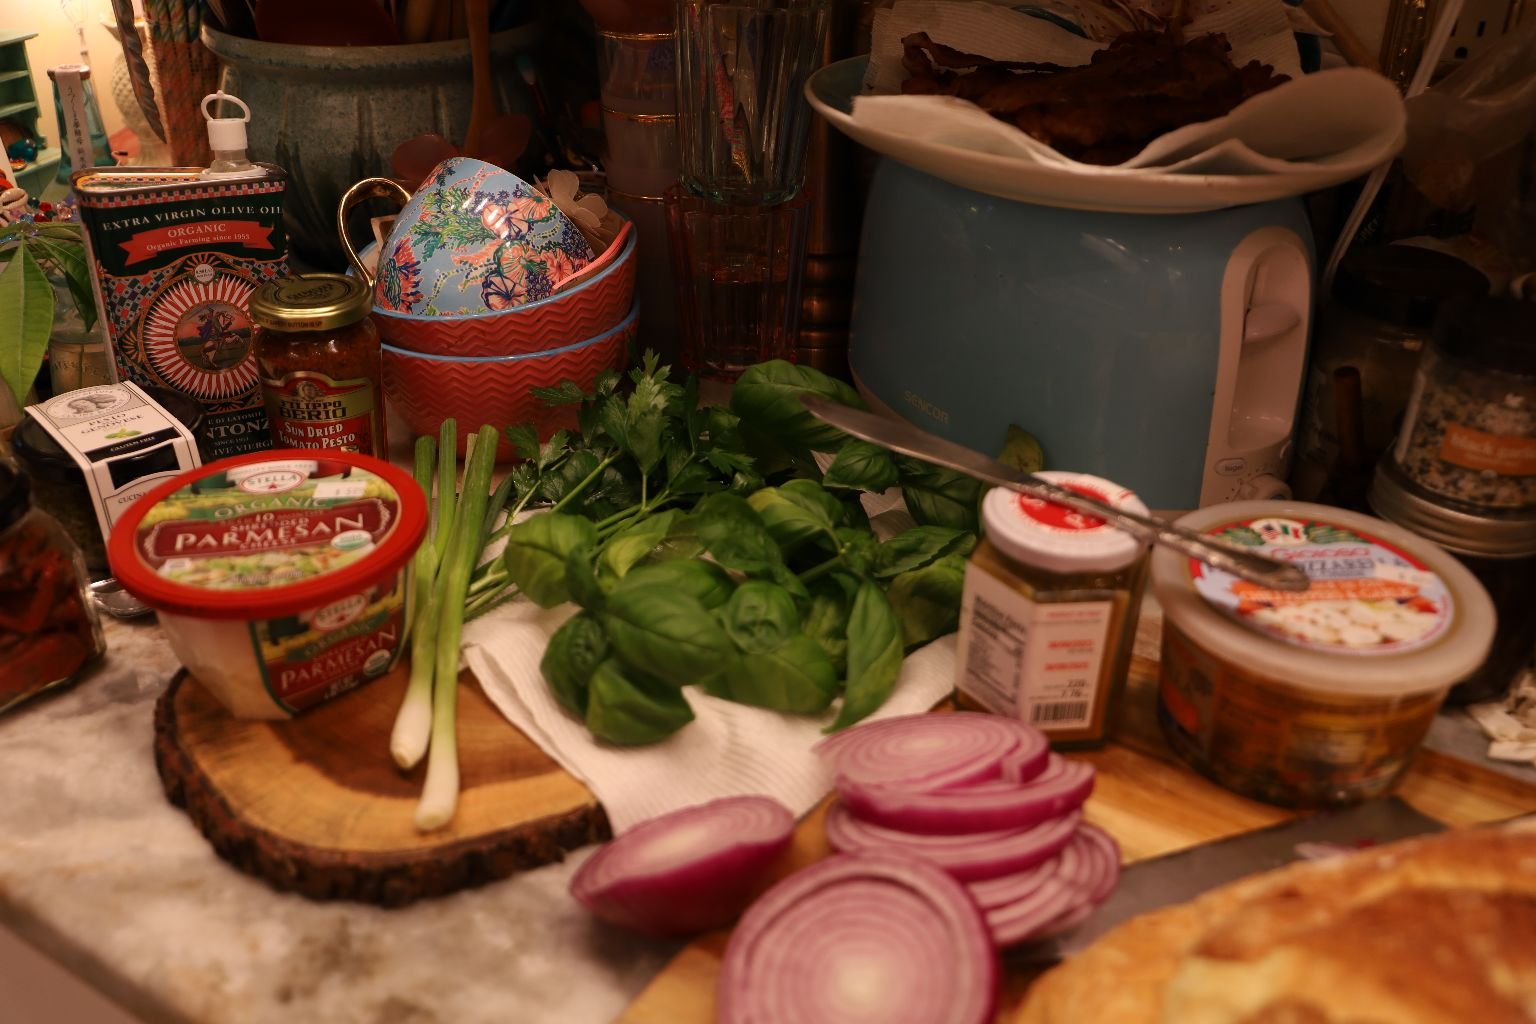
Slice your Sweet Vidalia Onion thinly. Julie and I both love the taste of raw onions on our sandwiches. They are also great on Veggie Burgers. They just give it an amazing taste and crunch.
Add your freshly cracked Black Pepper.
Slice your tomato to use later.
For the other sandwich, I started with some Grey Poupon on the bottom sections, I used the Sriracha Aioli just around the outside of the sandwich and spread the Garlic Mustard on the inside section. I then placed some slices of the Salsalito Turkey. This Turkey has some great heat to it, and Julie loves it. 🙂


Top the Turkey with some Muenster Cheese and a single slice of Swiss for good measure.

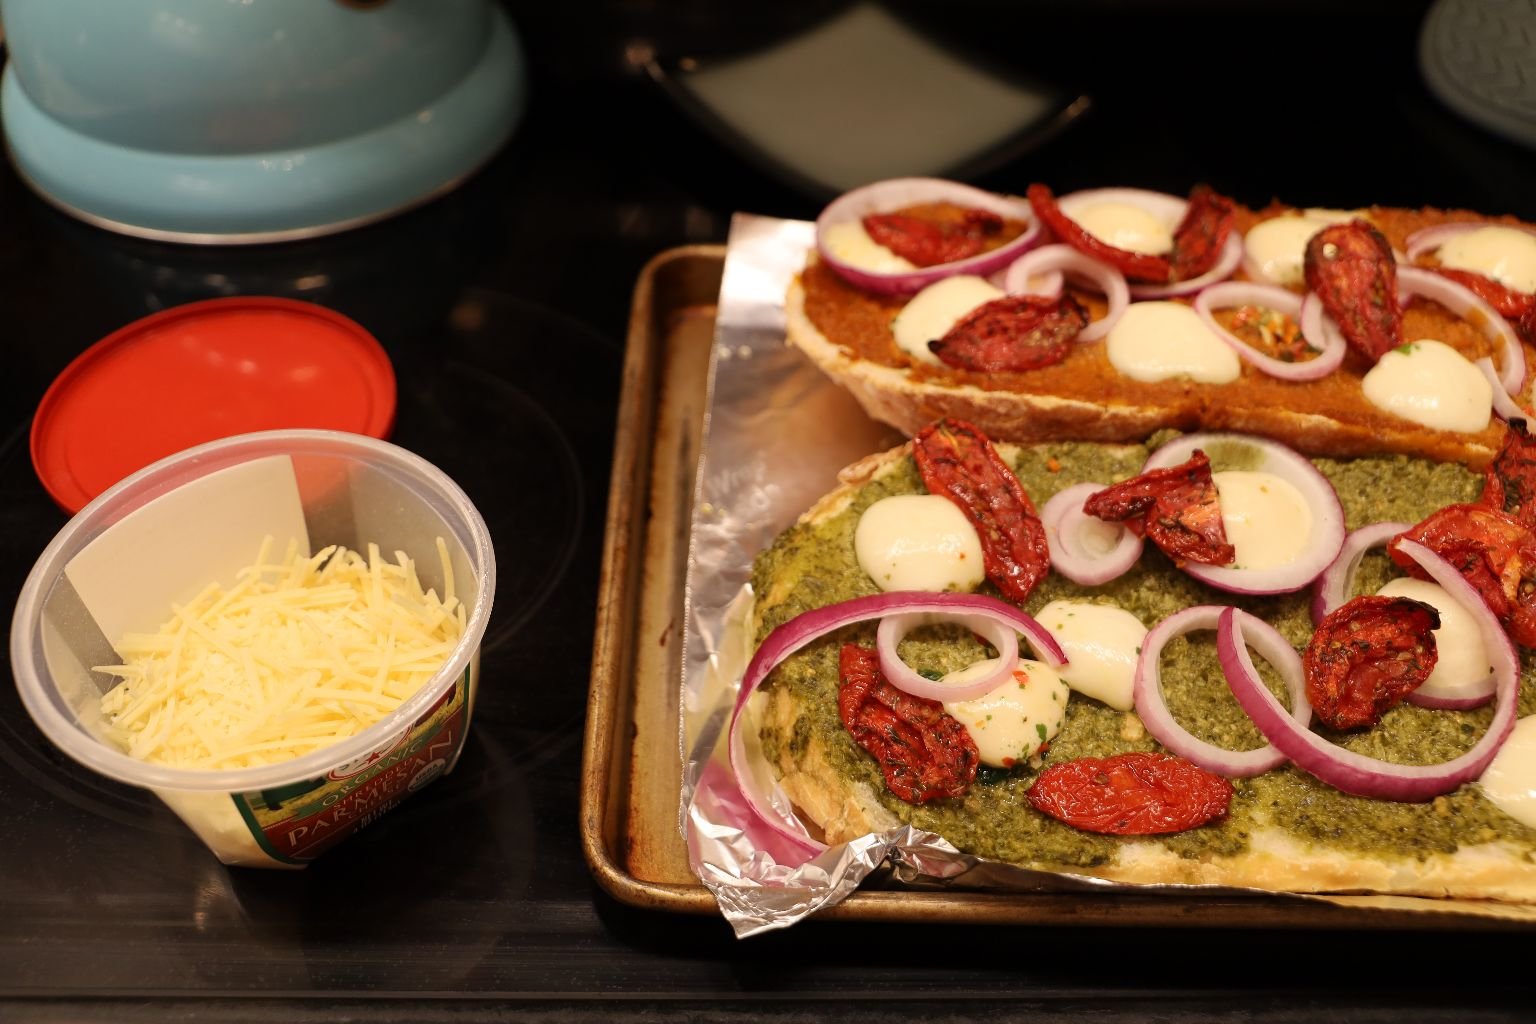
We had some Red Onion in the refrigerator, so I added them to both sandwiches.
Red Onions have a unique flavor to them.
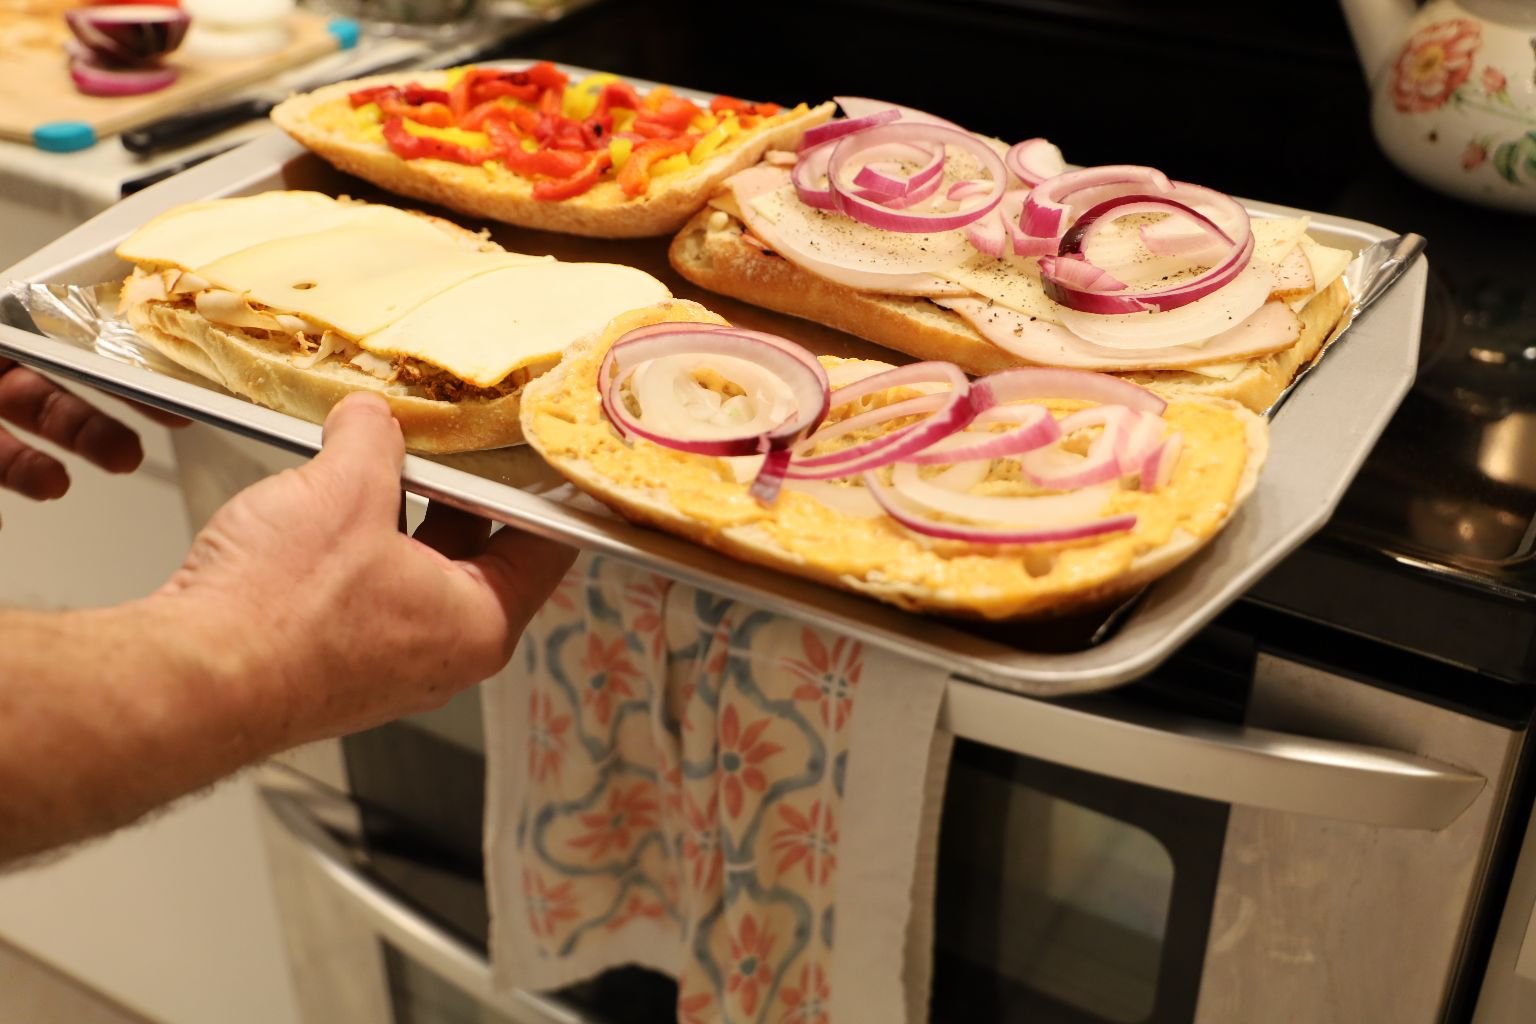
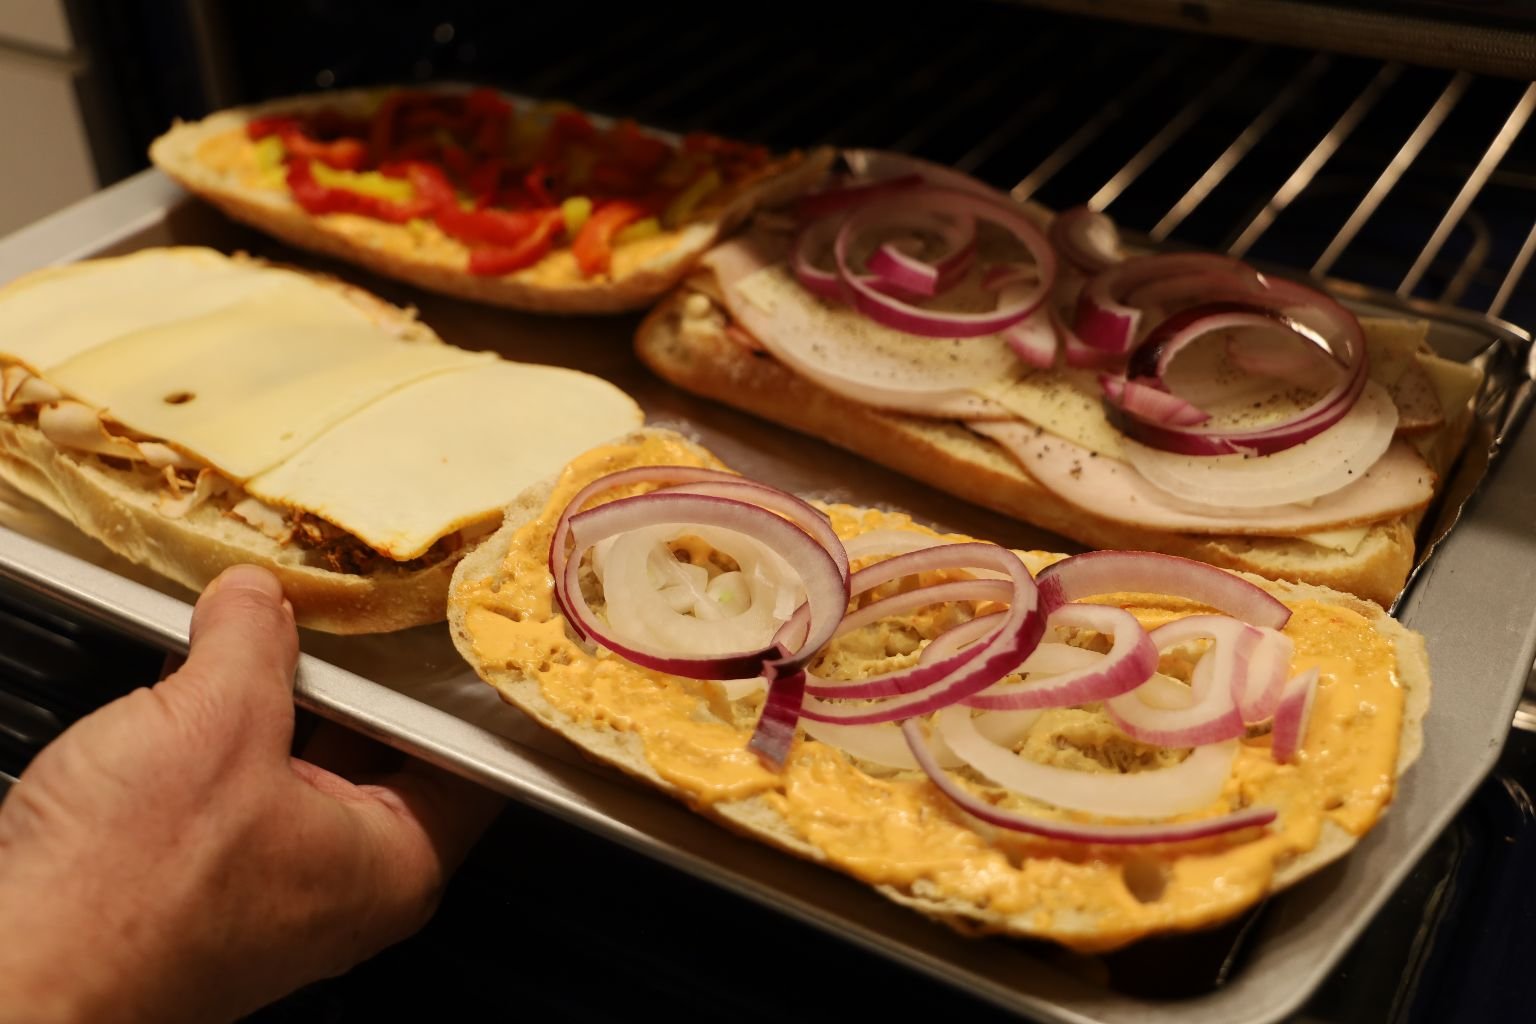
If you haven’t done so already, place your sandwiches on a sheet pan lined with Non-stick aluminum foil. Turn your oven on to 400’F. When your oven is at temperature, place your sandwiches in for about 10 min. or until the cheese is good and melted.
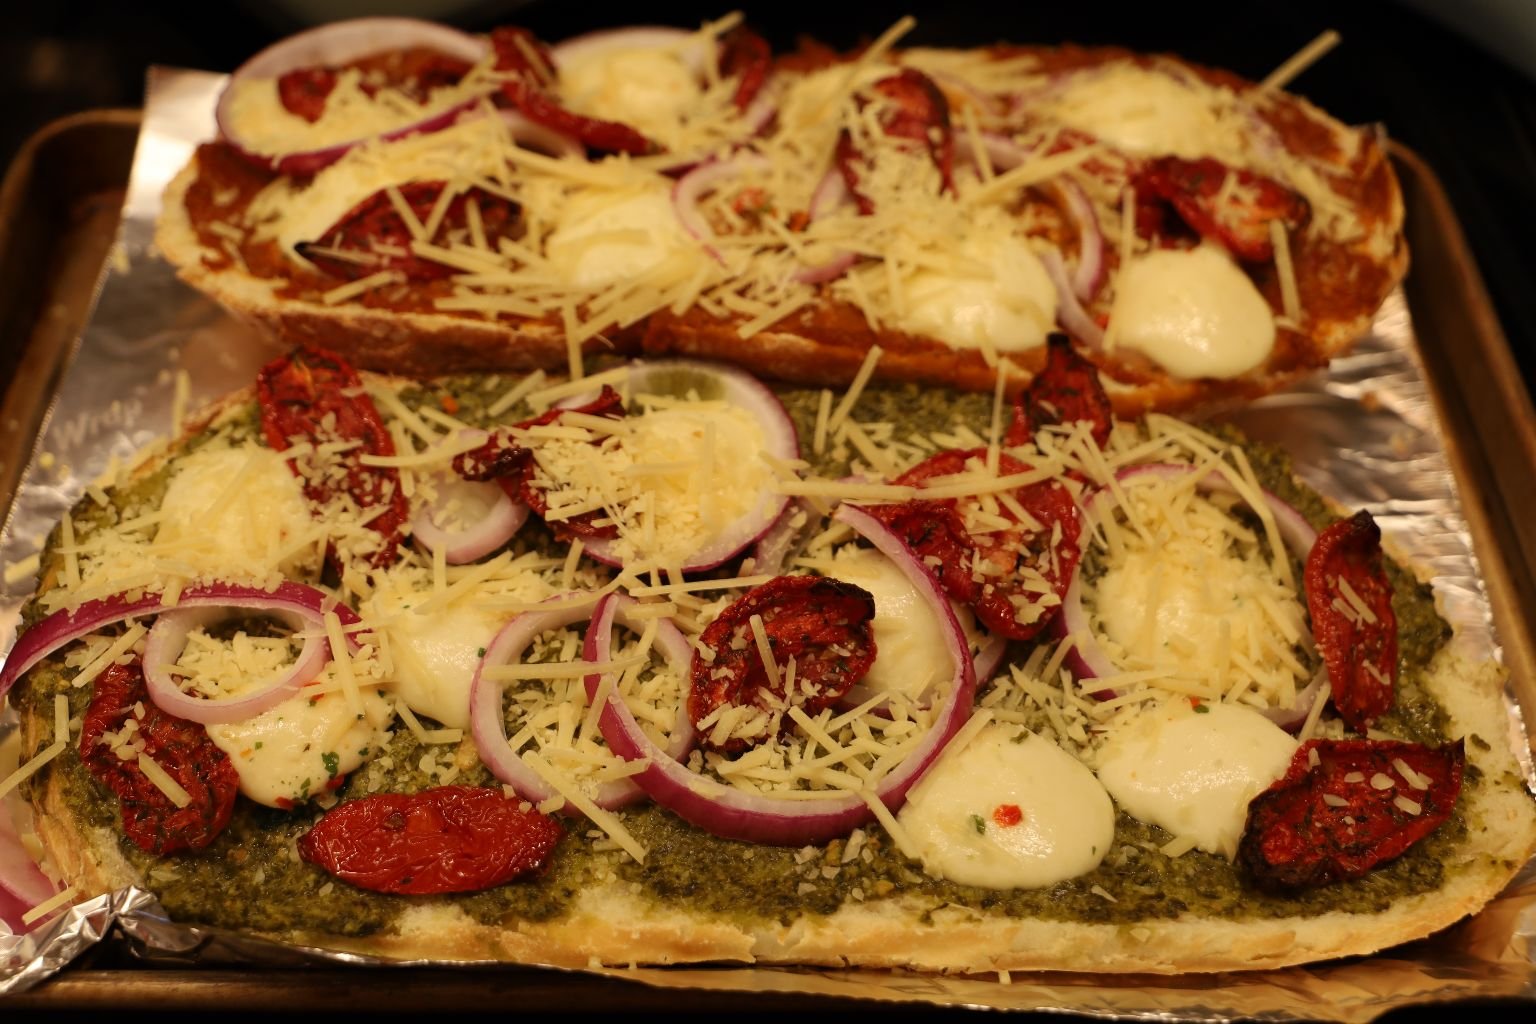
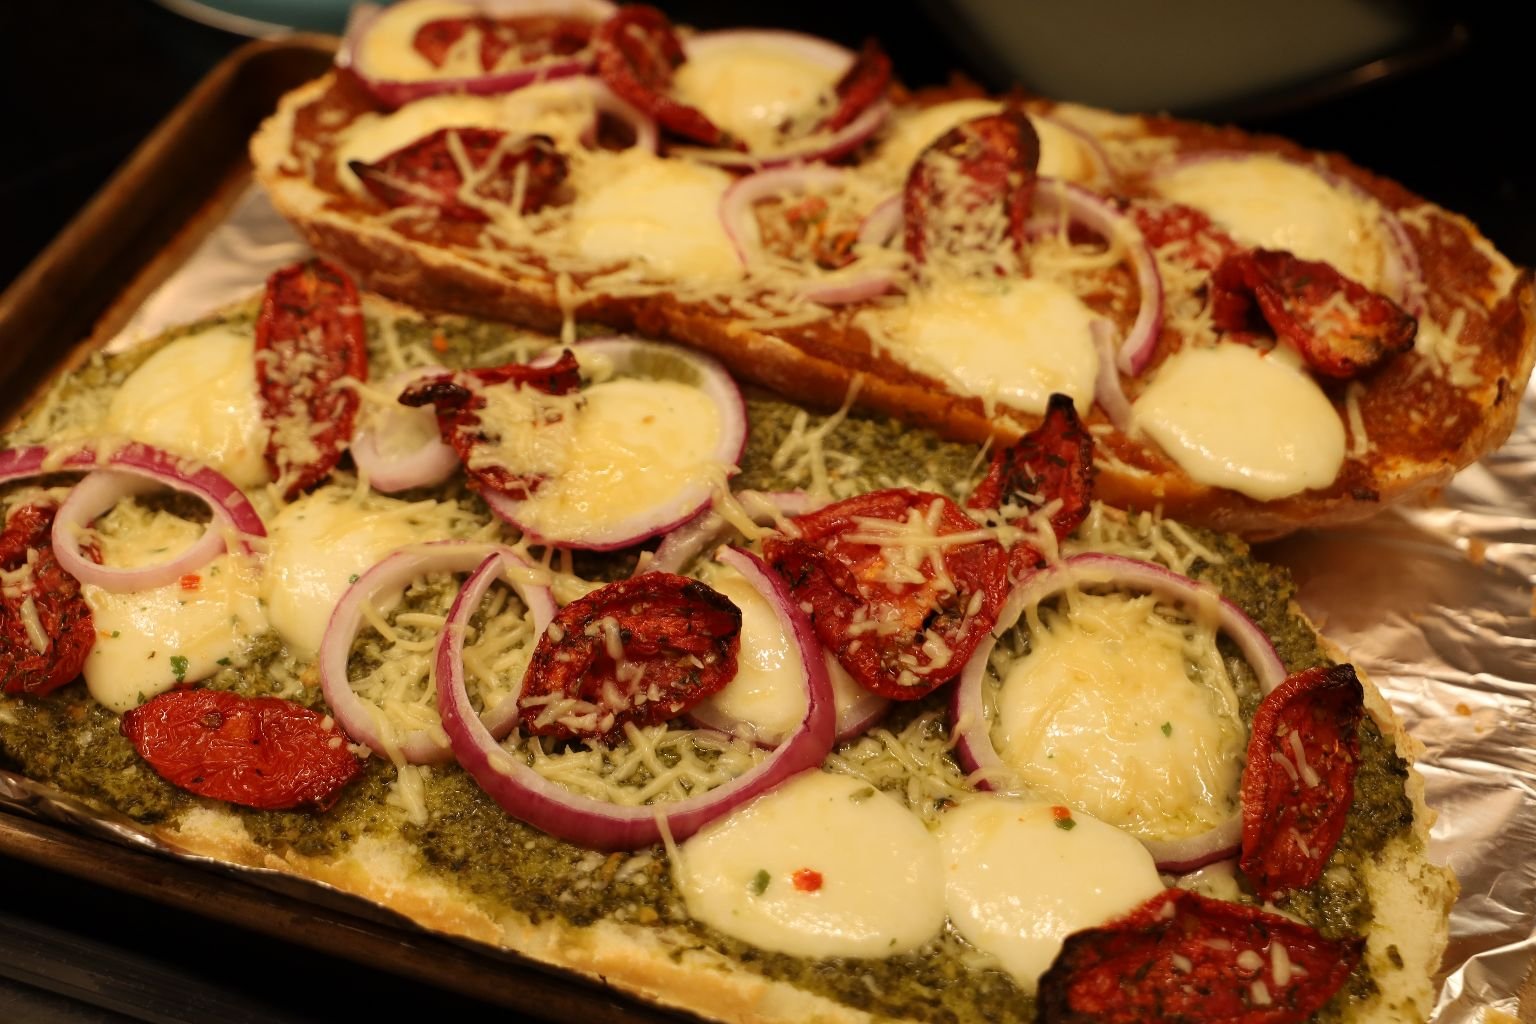
You can see the cheese has melted nicely and the onion are slightly cooked as well.

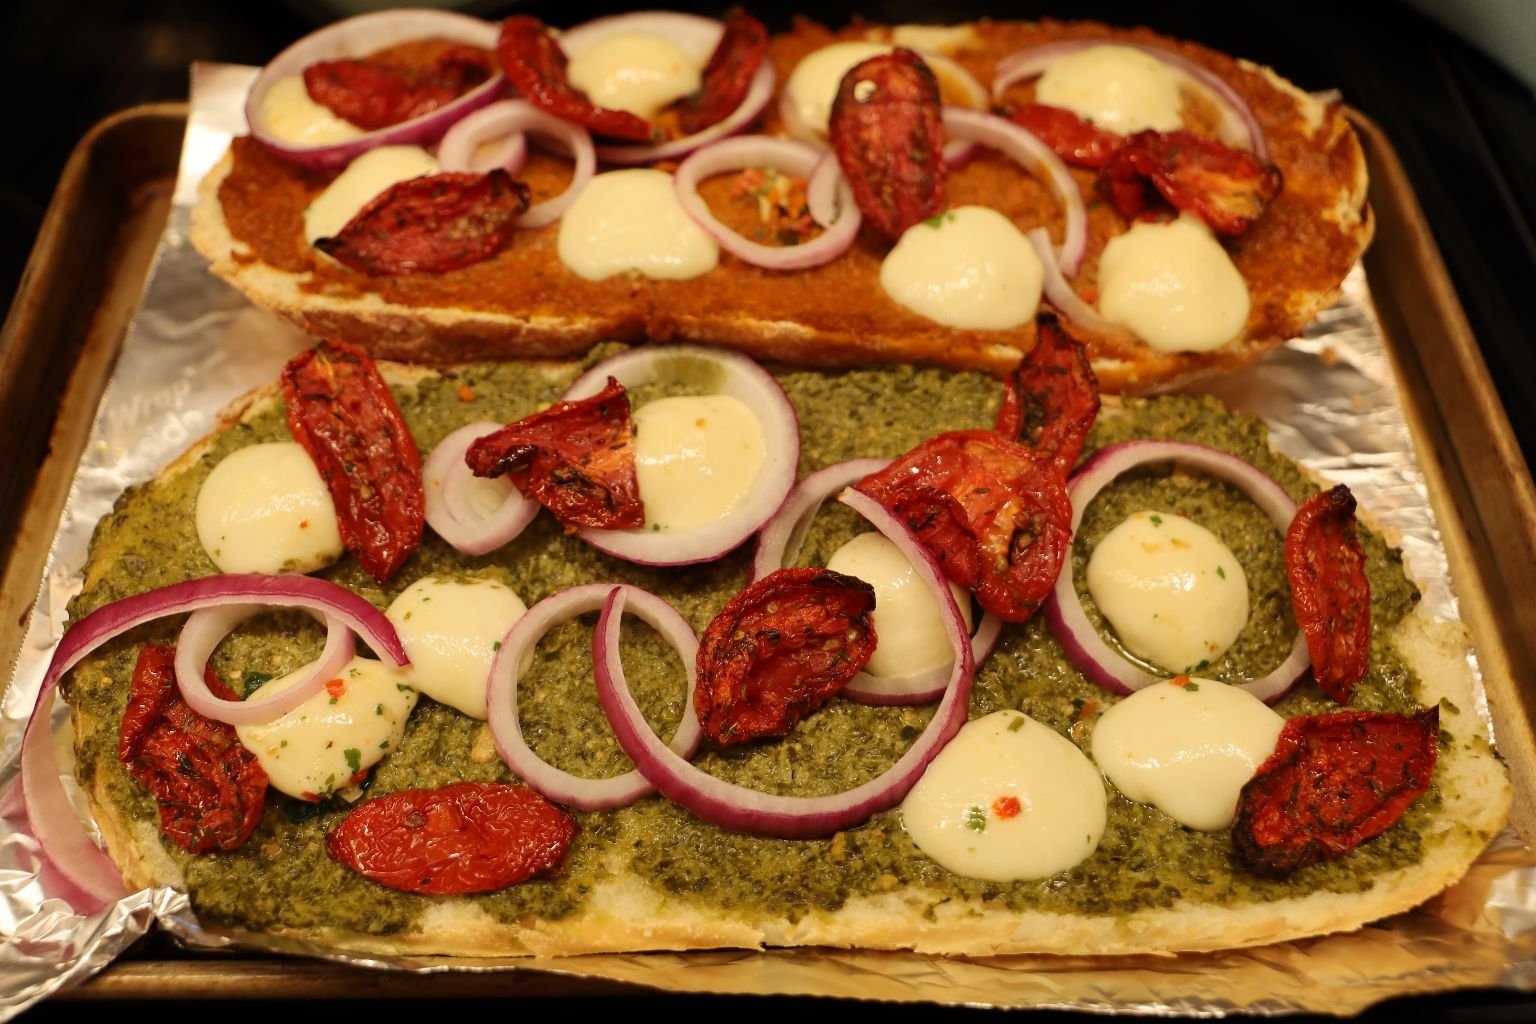
Add your Micro Greens, Tomato slices, and Pepper Rings to the sandwiches.

I love Arugula as it has a Black Pepper taste.

Have fun with the ingredients!

Place the sandwich halves close then bring the halves quickly together with the bottom half down. Now that looks delicious!

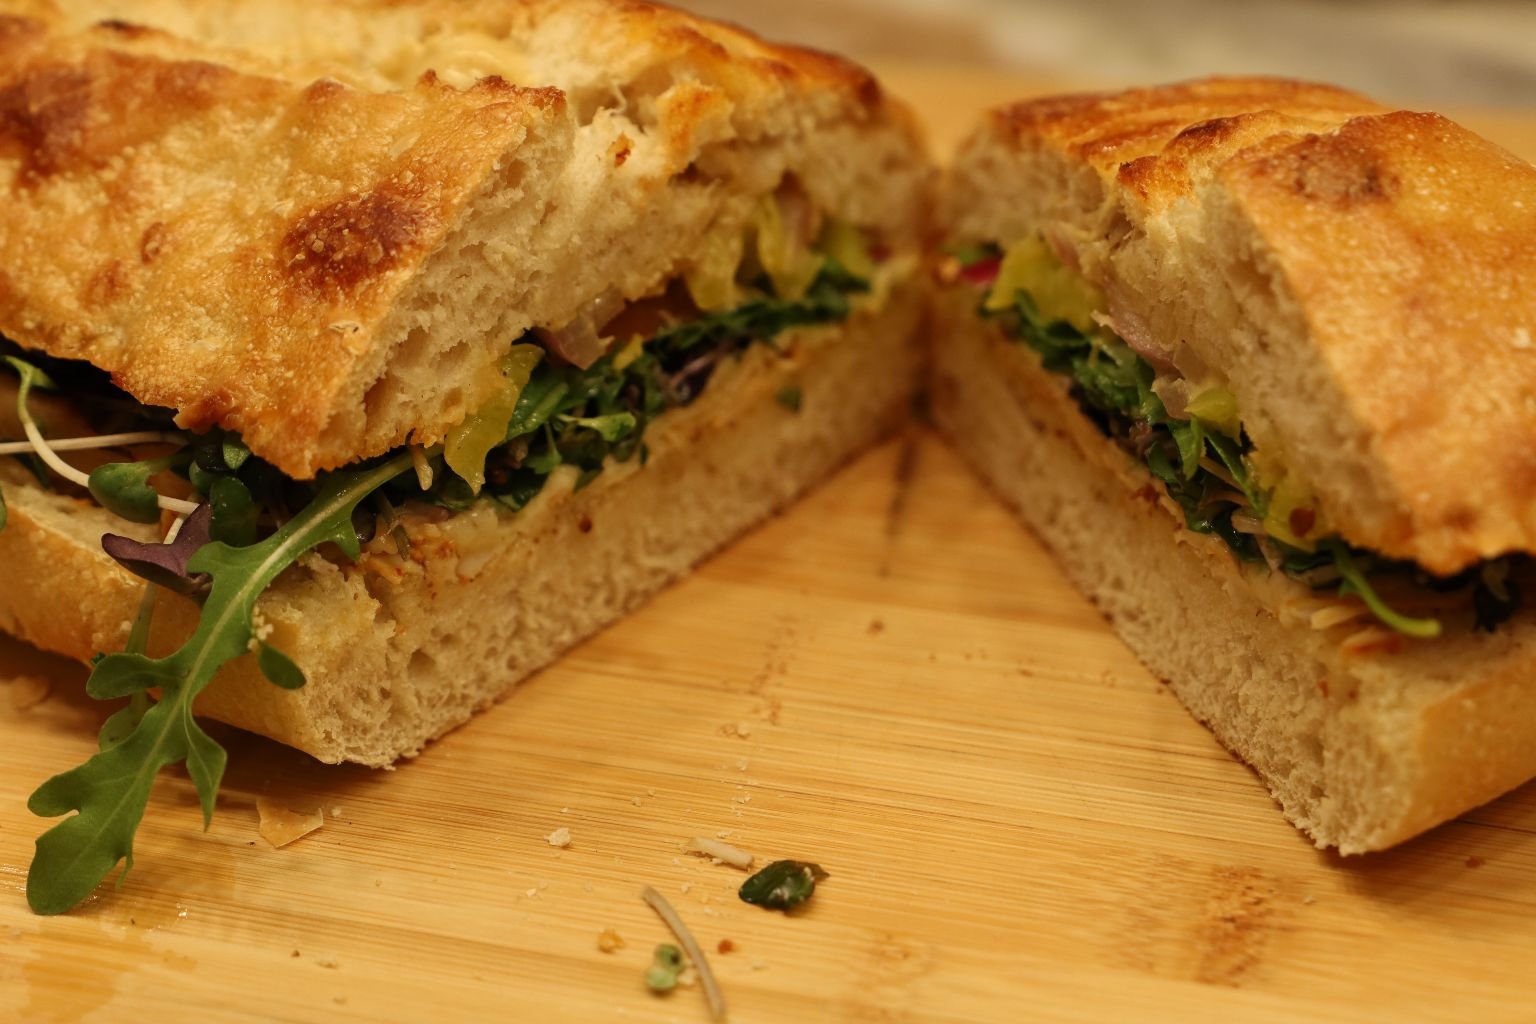
Move the sandwich to your cutting board and slice them into thirds as they are pretty big. Leftovers are great!

We love the different combinations of ingredients.


You can see this was a big sandwich.
The bread really browned nicely.

Julie found a nice platter for the sandwiches. We hope you will try these great sandwich creations!
——————————————————————————

The Leftover Potato Salad with Cider Vinegar


Perfect with our Super Bowl Sandwiches
——————————————————————————–
Chicken Parm Sandwiches (TWO WAYS)
First Sandwich Version:
I write about my thought process on this in the description at the top of this page.
My Version Was Delicious All On It’s Own 🙂
———————————————————————————————————–

Bread, Chicken Parm, and Italian Mustard

I placed the Chicken Parm onto a Baking Sheet and finished the cooking process in the oven according to the package instructions.

I also placed the bread onto a Baking Sheet and placed it into the oven according to package instructions.


Once Done….
—————————————————————————————————–

Now It’s Time To Build This Delicious Sandwich

Italian Mustard on Both Sides, Fresh Salad Mix, Chicken Parm, More Microgreens, Topped with the Tops

Just Slice and Eat

I Do Love Lots of Greens!
———————————————————————————————————-

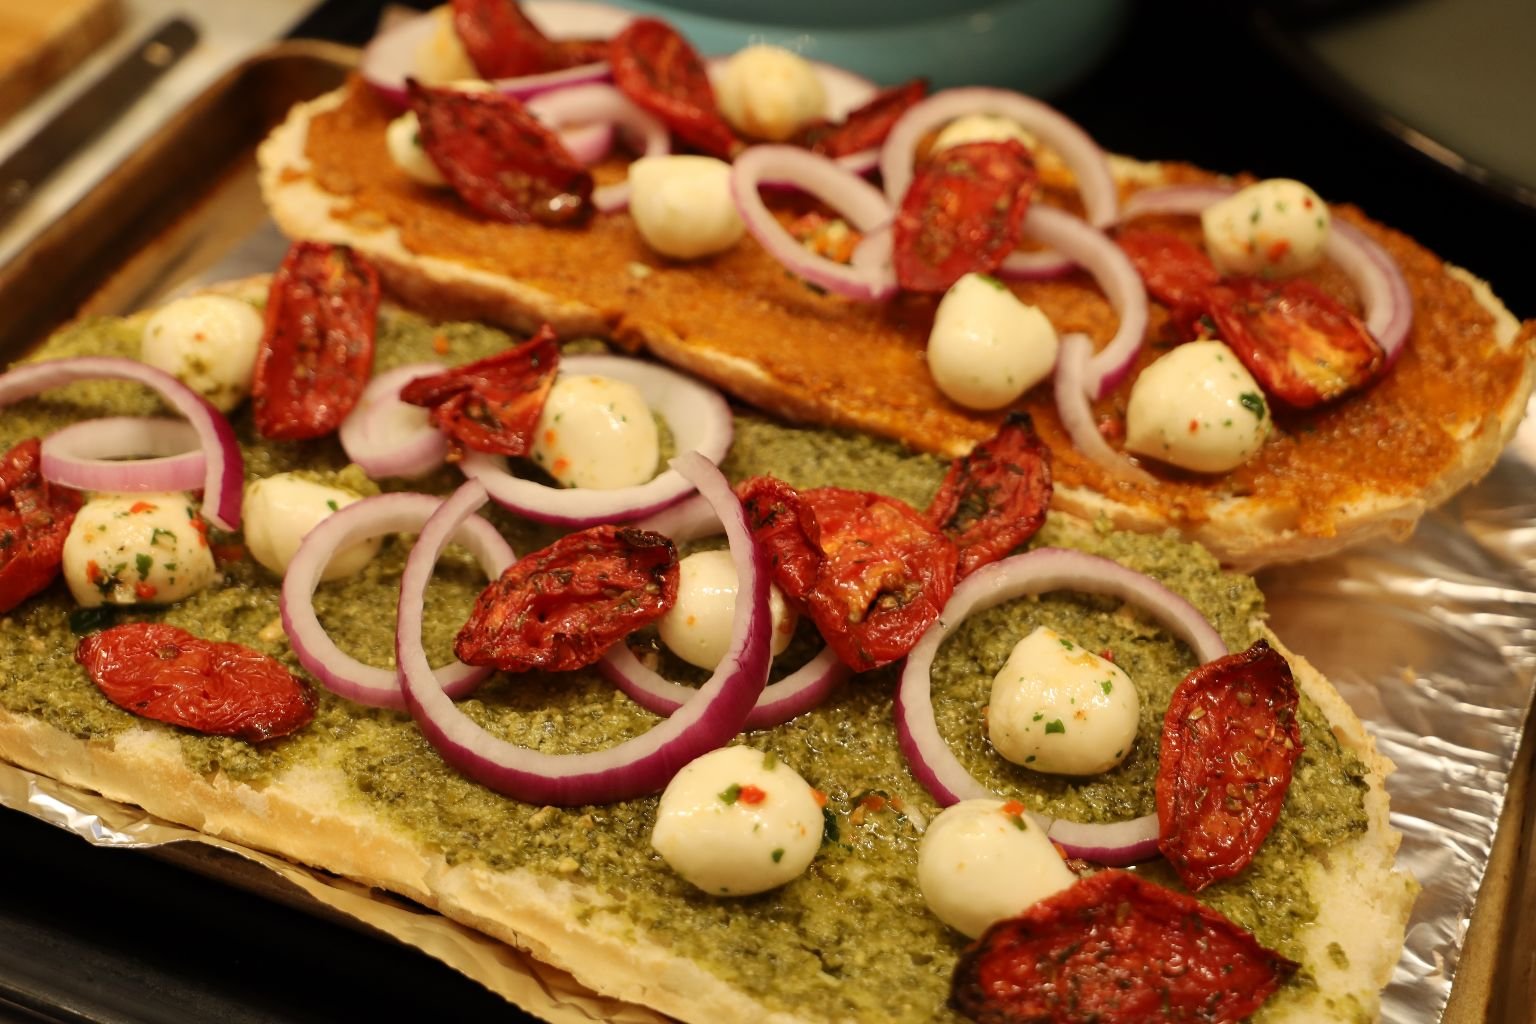
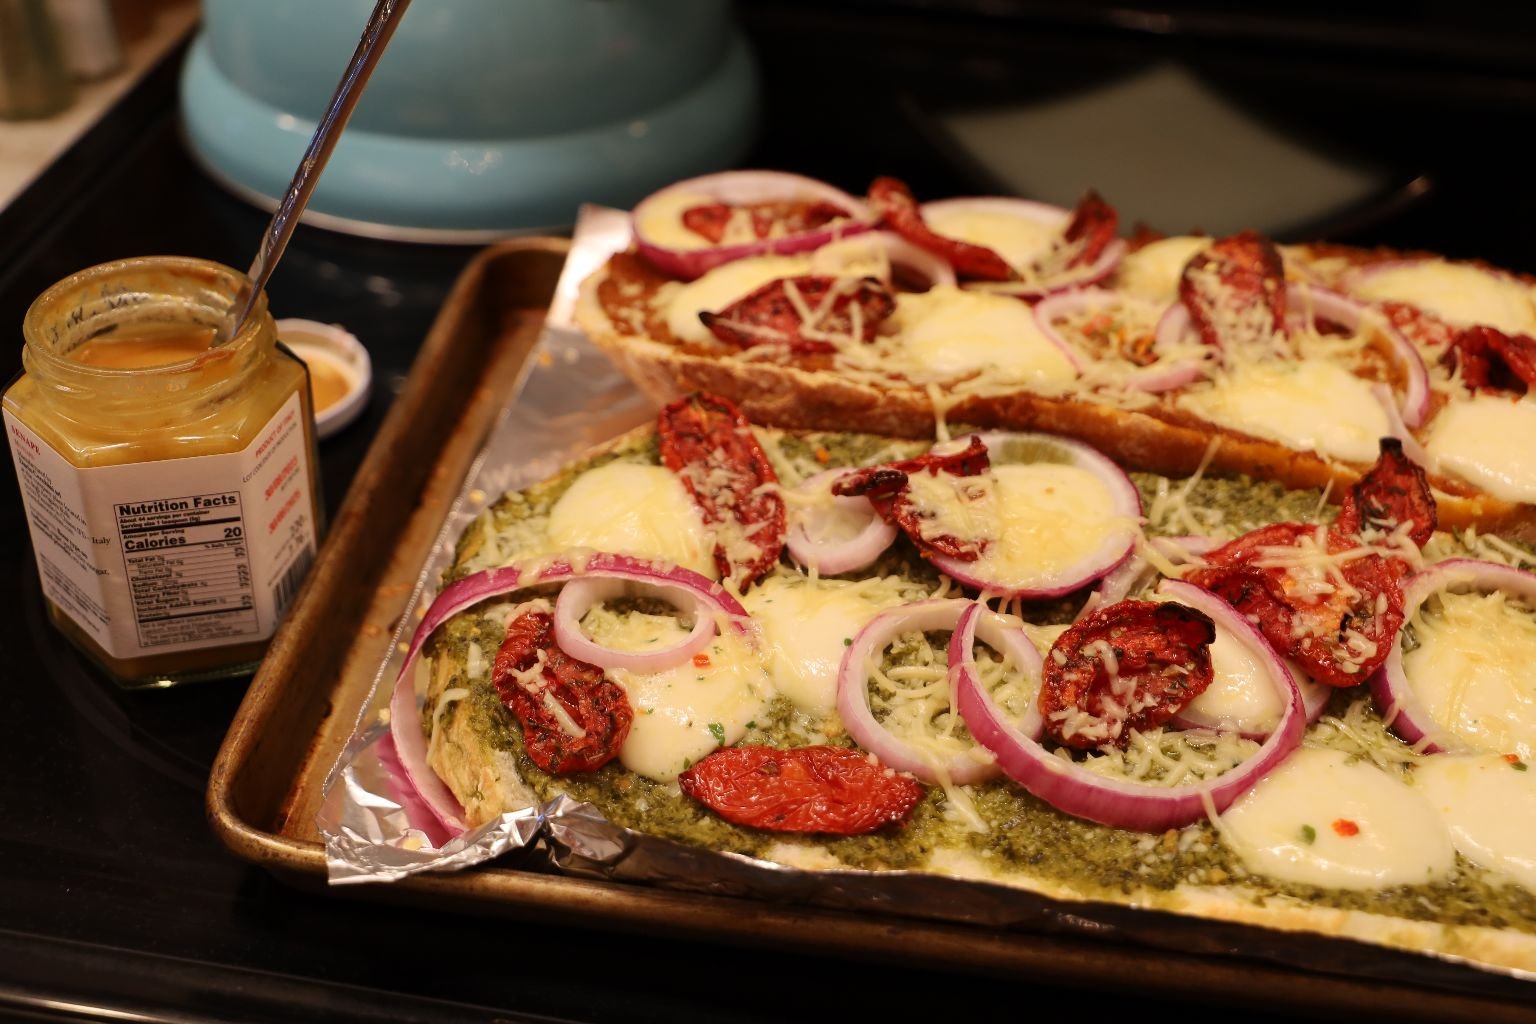
Second Sandwich Version:
I Julie, write about this version as well in the upper portion of this page, and how this recipe came to be.
I tend to save the more elaborate recipes for when Gordon is home from working abroad. I love creating the ideas, and I love the photography that comes with it. It’s hard when I have to do it all at once by myself. This is why I will wait until Gordon is home so that we can work on the more elaborate food projects together, and not just me alone.
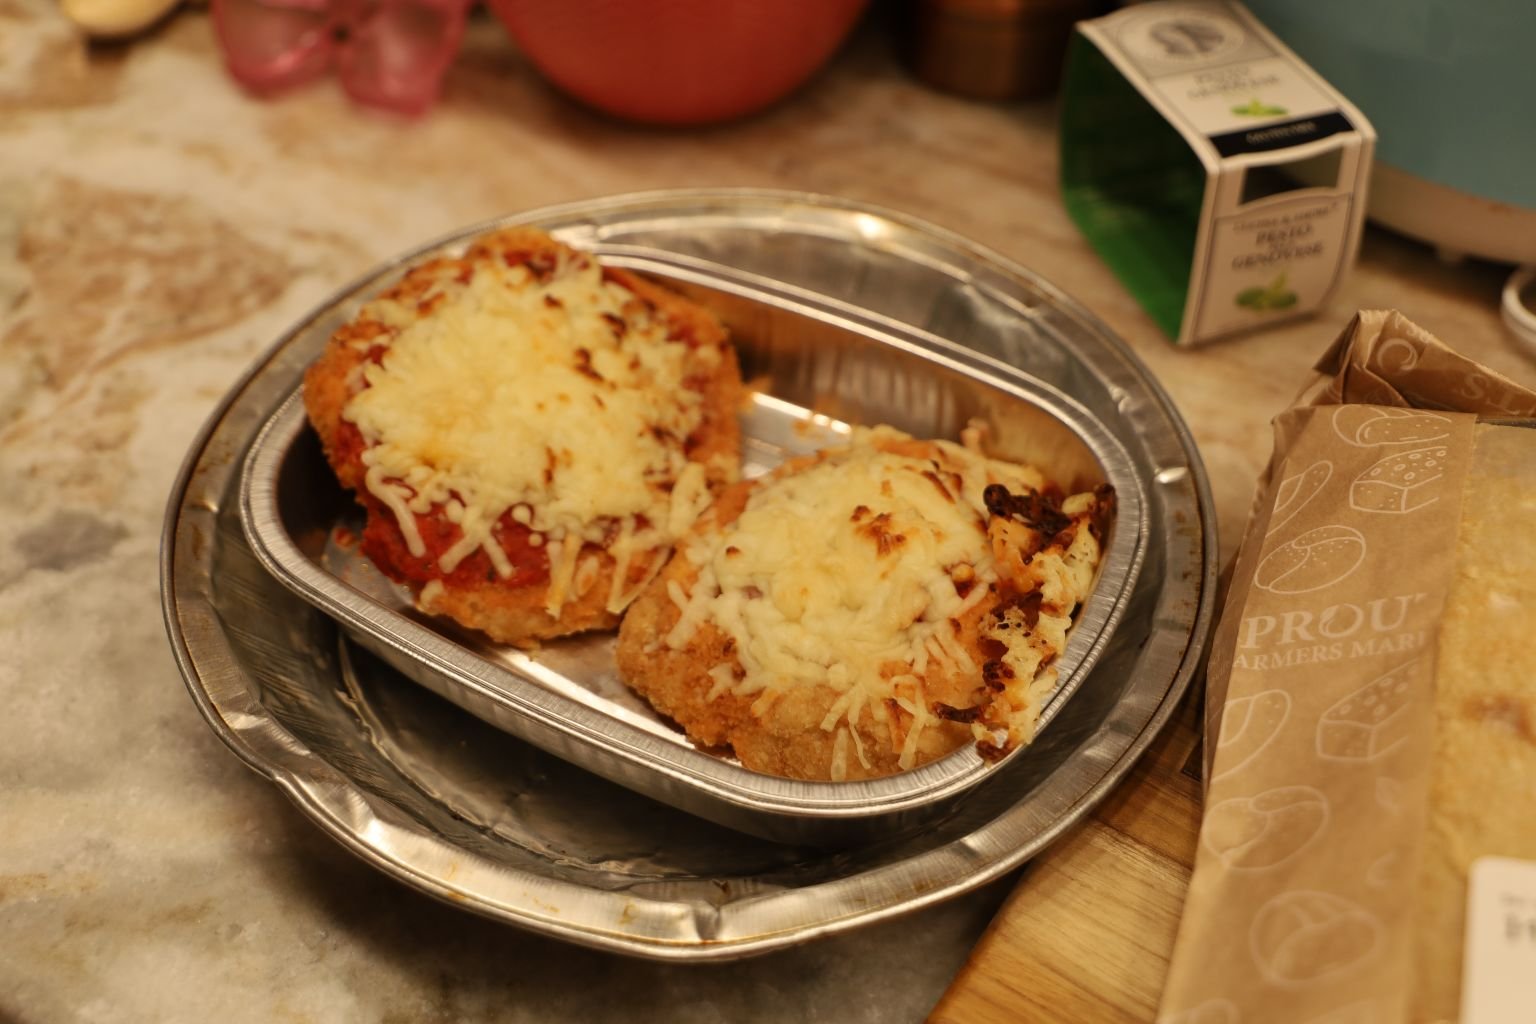
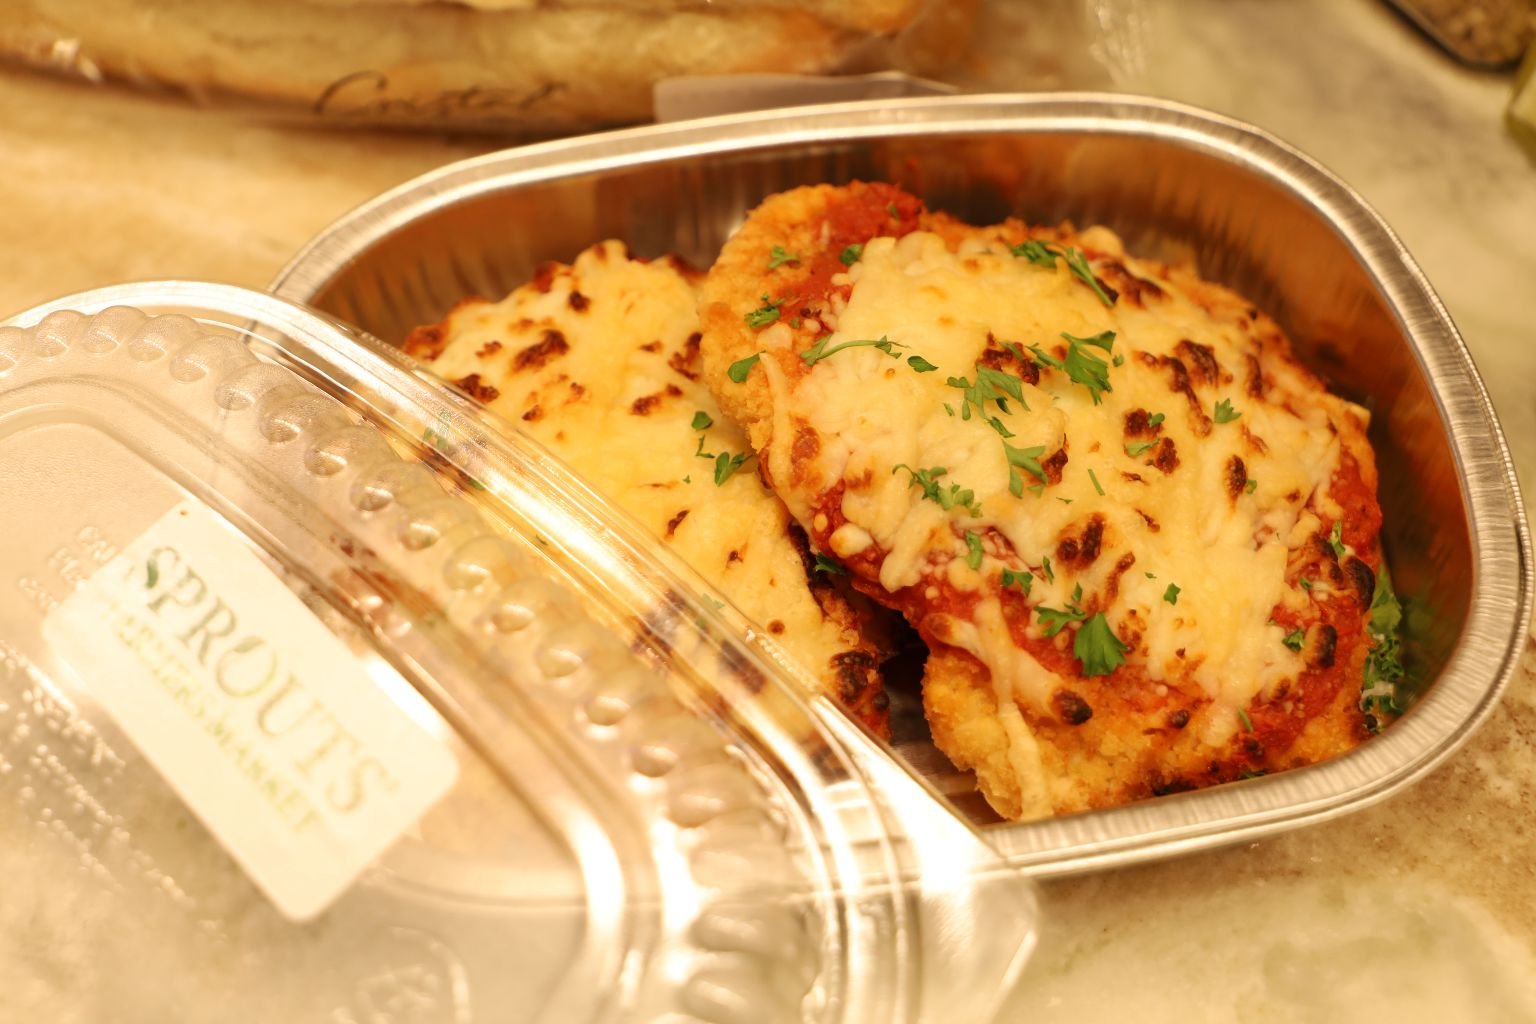
Our Chicken Parm I Bought From Sprouts, Ready for the Oven
(Bake according to the package instructions.)
(Gordon’s Write Up)


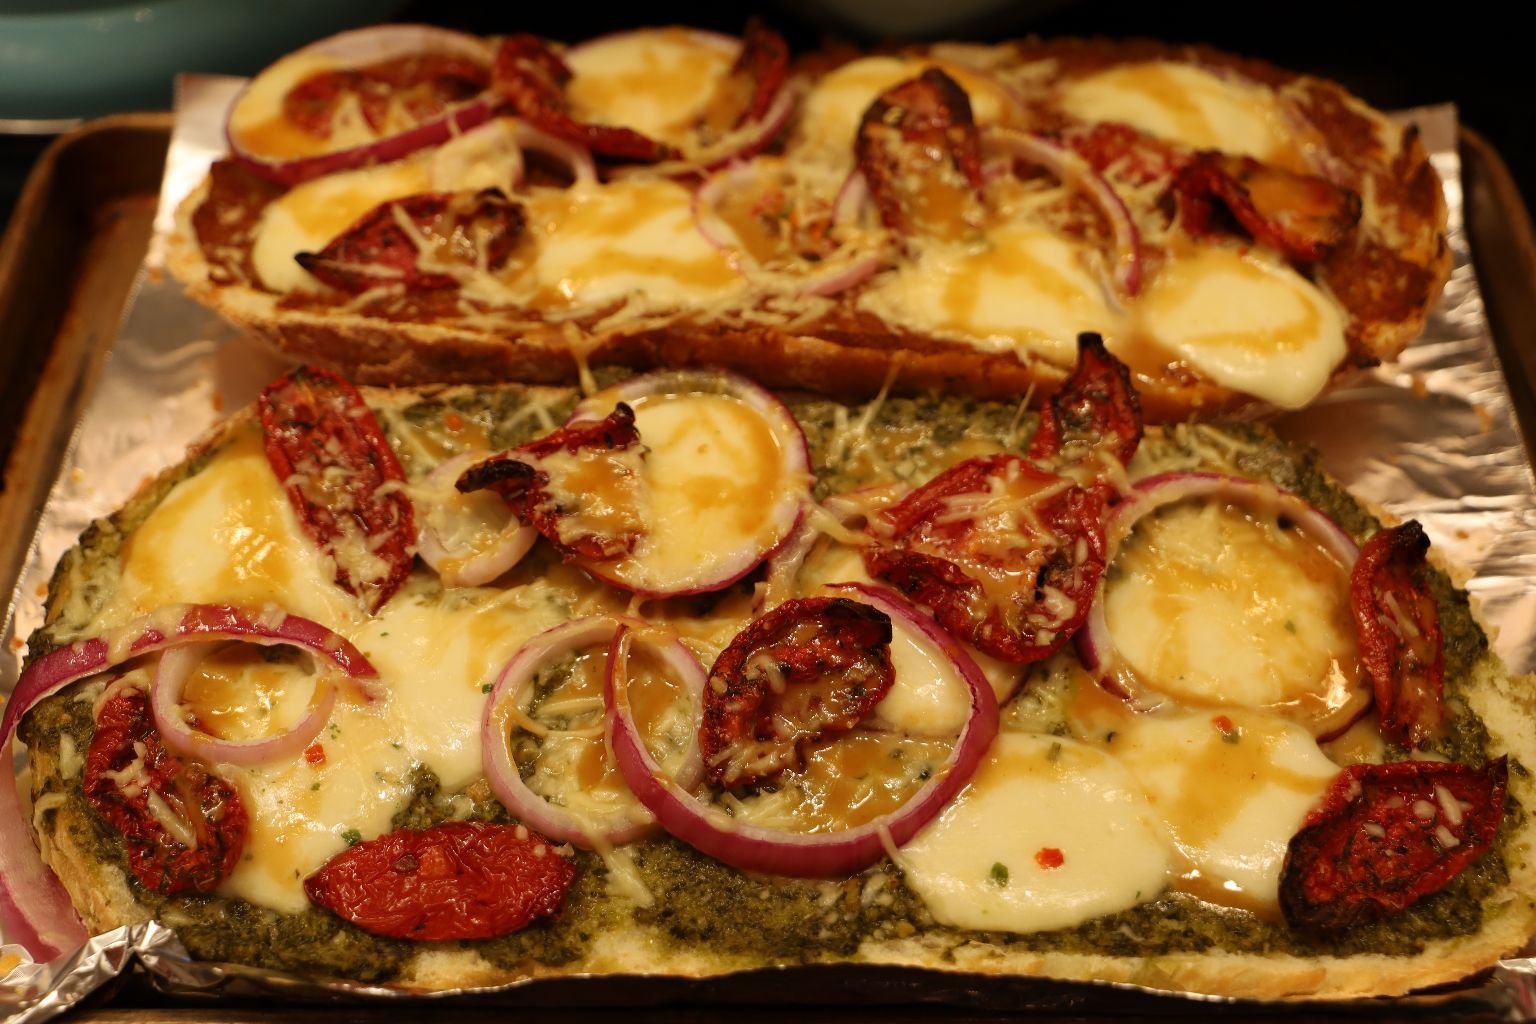
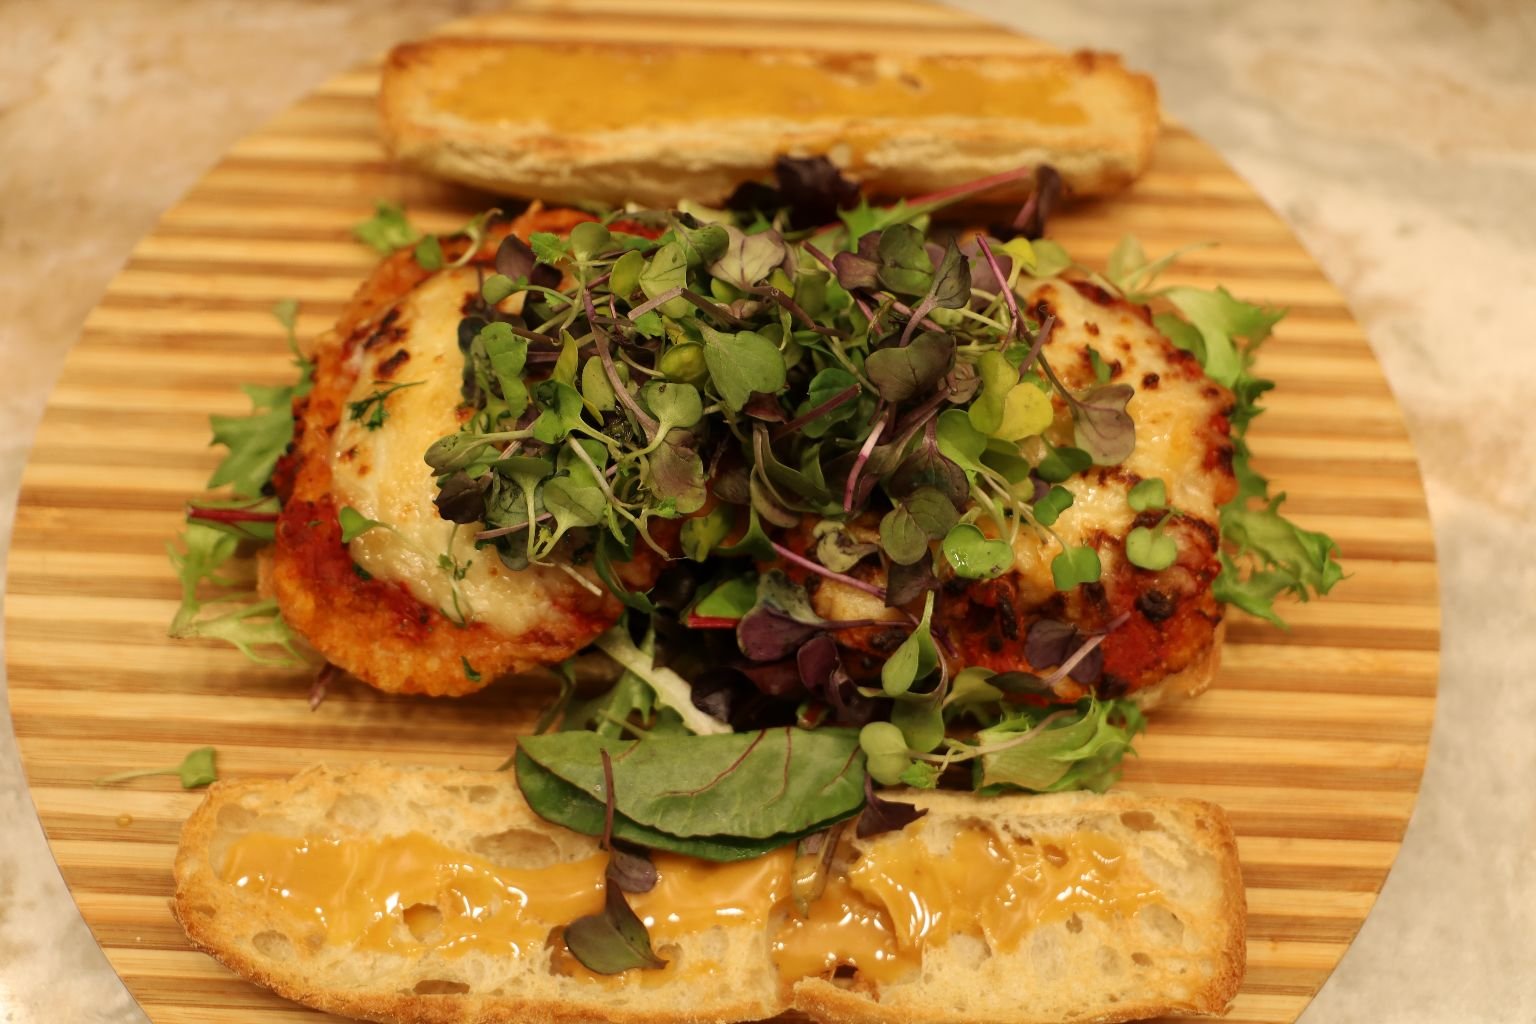
Pictured are the ingredients to make the sandwich:
Ciabatta Bread Loaf – sliced in half down the middle, as shown
3- Provolone Cheese Slices
Shredded Italian Cheese
Pesto
Spring Salad Mix
Sweet Italian Mustard
Black Garlic Finishing Salt
———————————————————————————————-


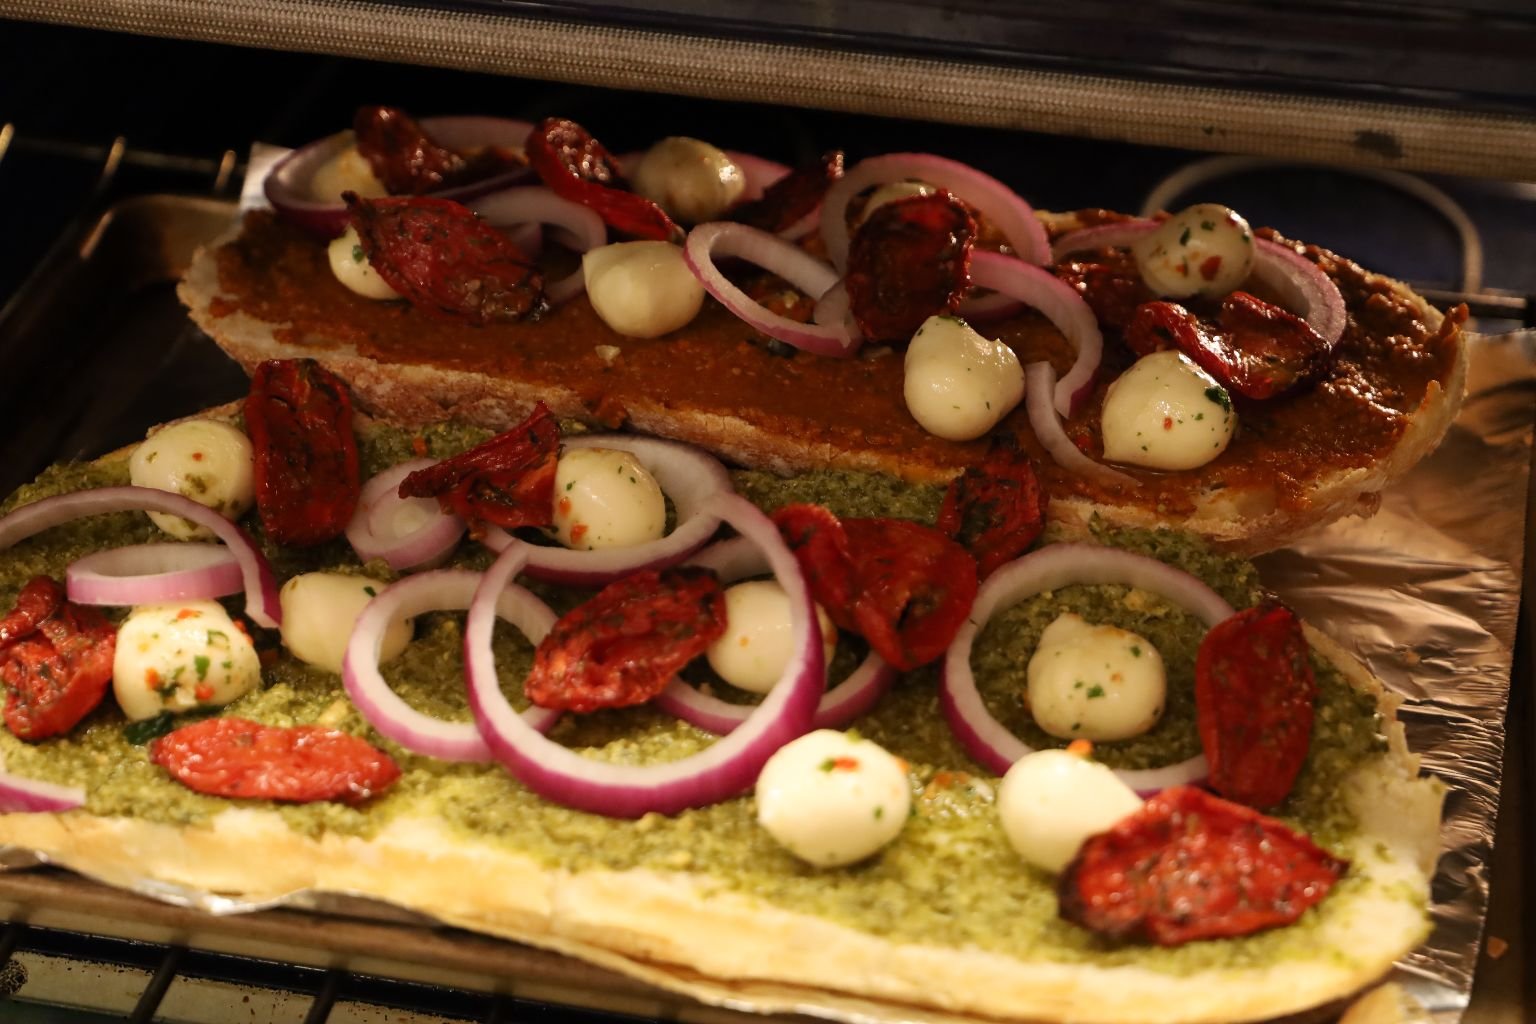
Turn on your oven’s broiler and place your sliced bread on a baking sheet.
Then place your bread and Chicken Parmesan into your oven.
Watch it cook the bread and when the bread is to your liking, remove it from the oven… and turn your oven off.

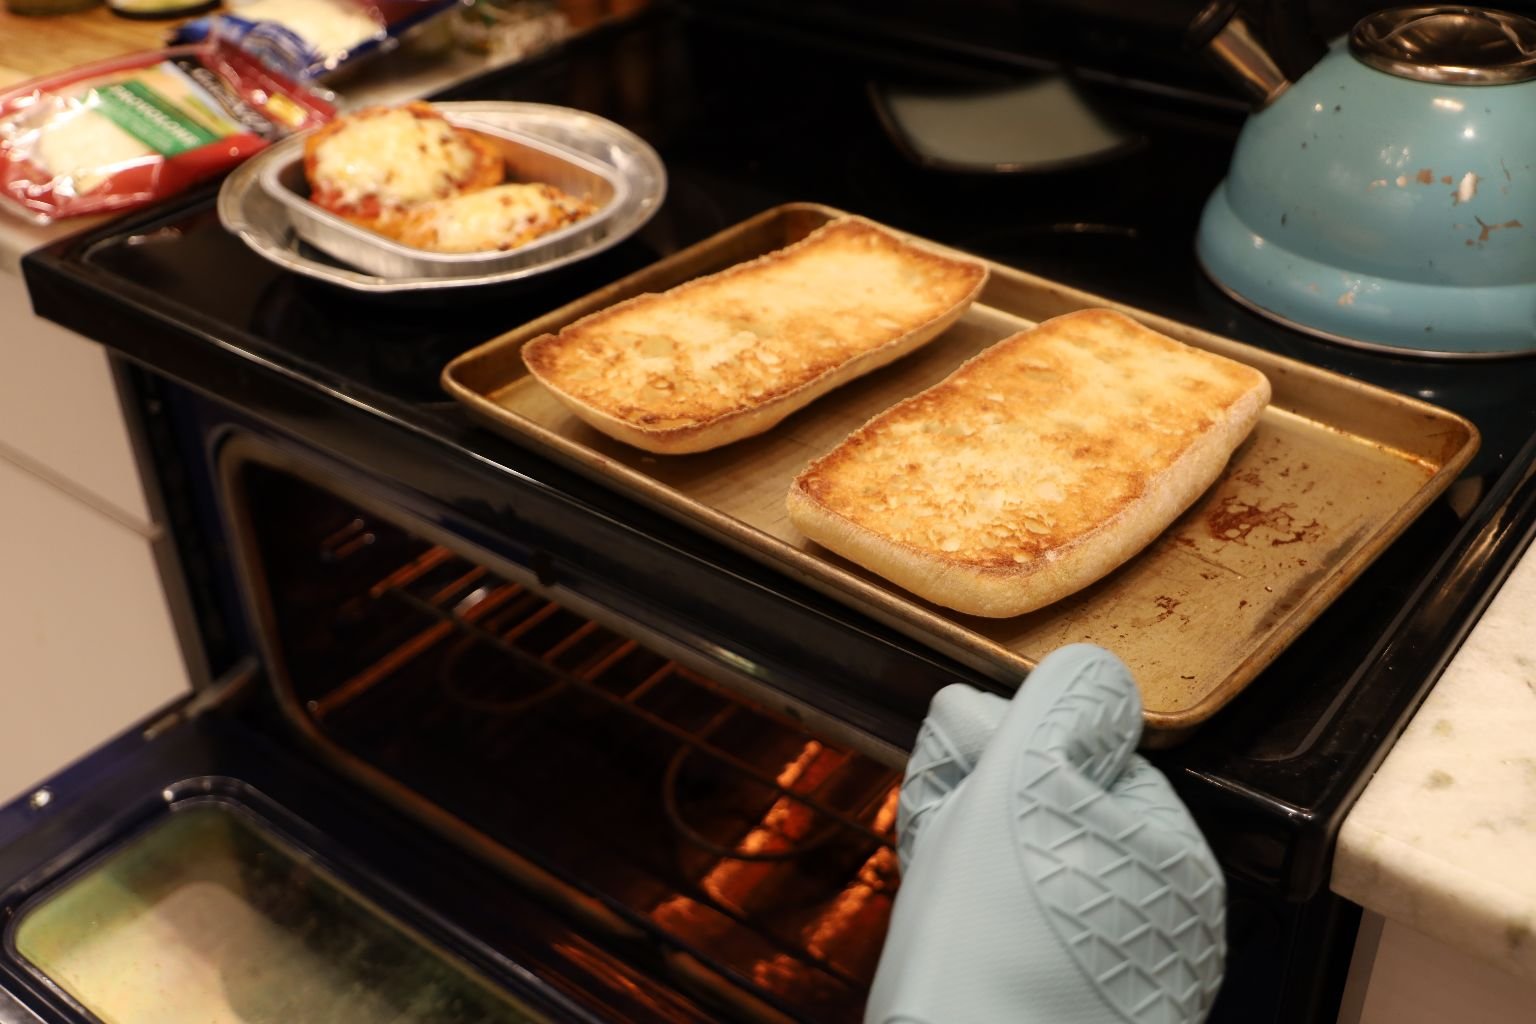
You can see our Ciabatta Bread halves are nicely toasted.
Set your Chicken Parmesan aside and place your bread on a large cutting board.
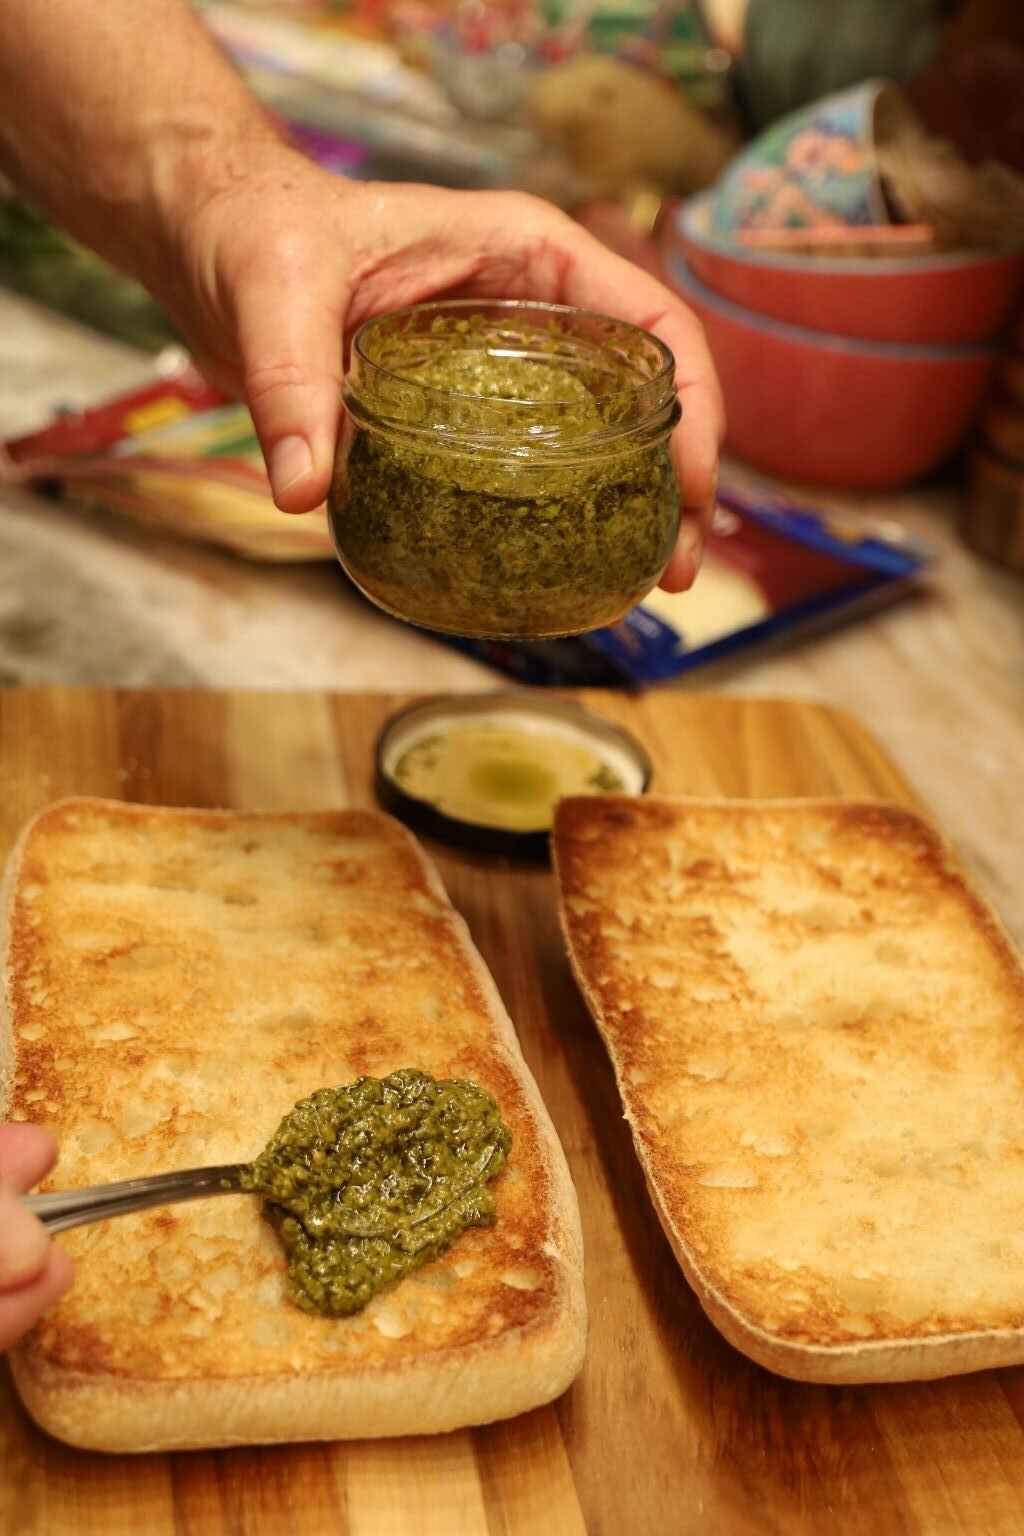

On the bottom half of the bread with the sliced side up, spoon on a good amount of your favorite pesto, then top your pesto with the Spring Salad Mix as shown.

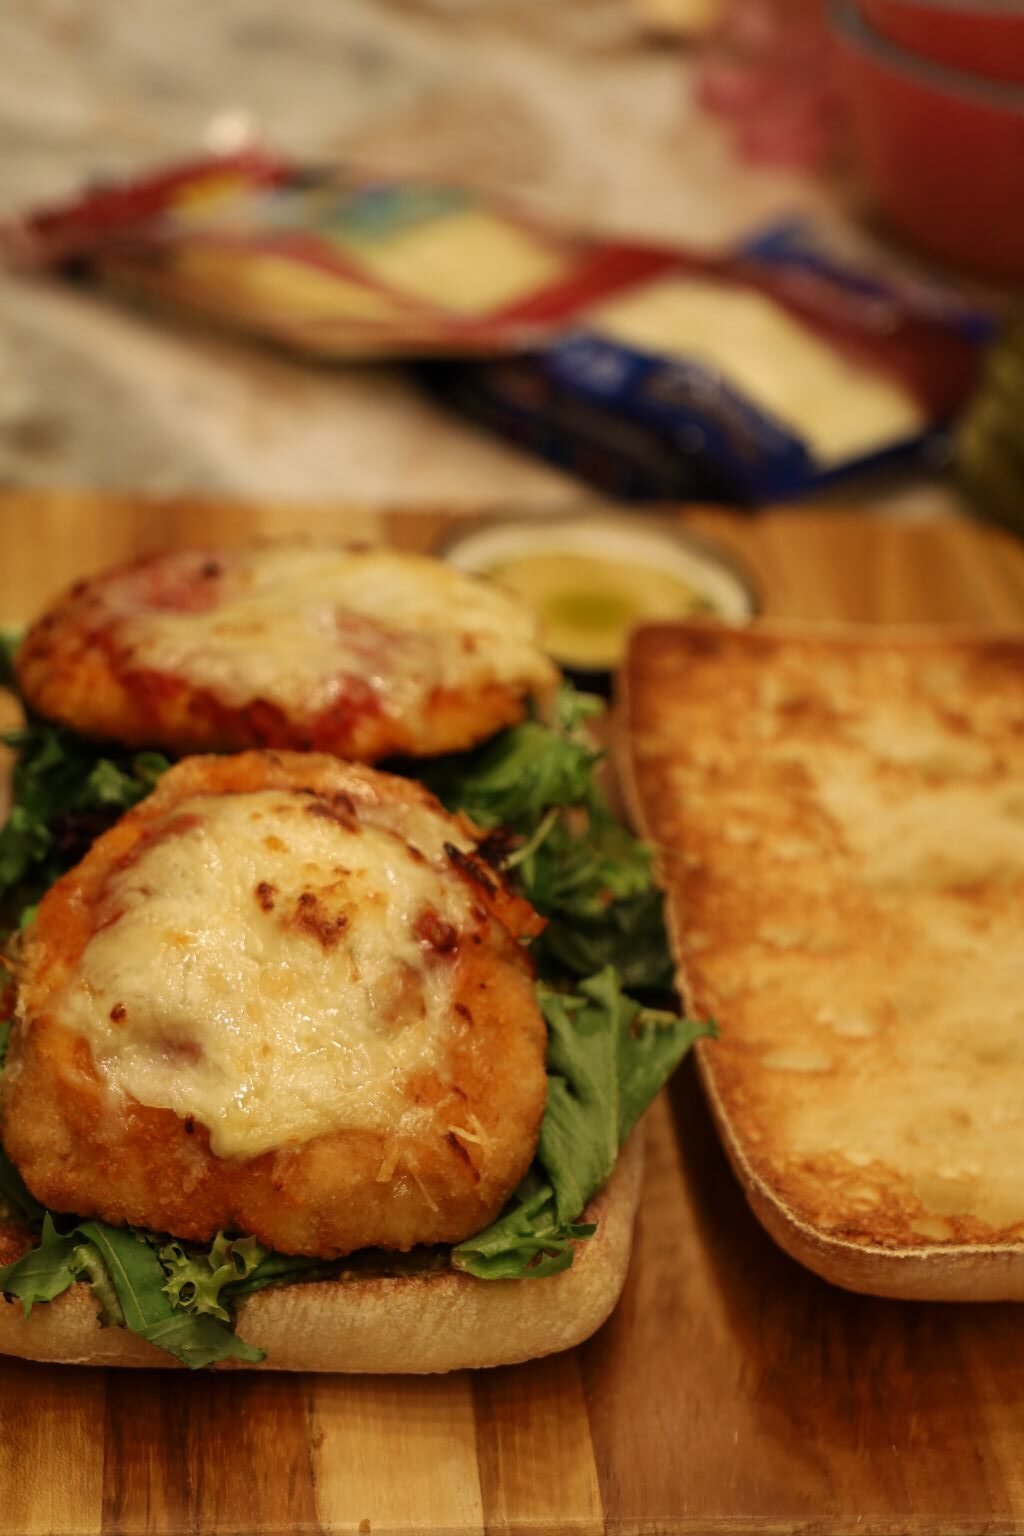
Top your Spring Salad Mix with your Chicken Parmesan.


On the Top half of the bread sliced side up, spread the Sweet Italian Mustard.
This sweet tangy mustard really works well with the flavor combination of the other ingredients.
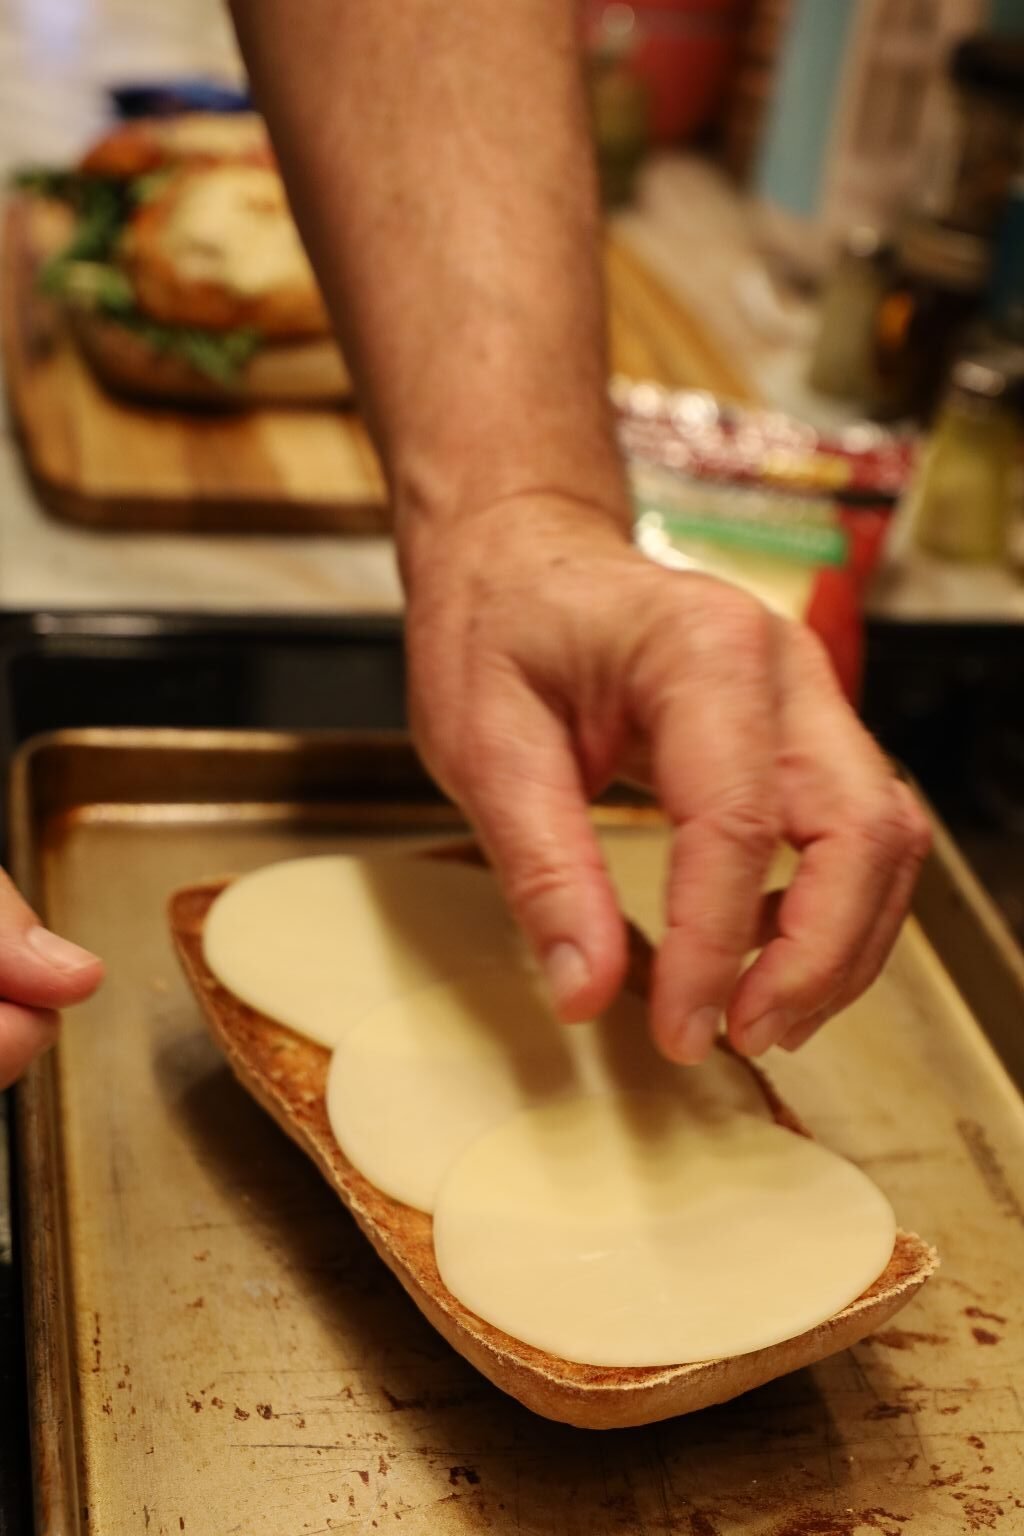

Now, add your 3 slices of Provolone Cheese


Then top this with a good amount of the shredded Italian cheese.
Add your Black Garlic Salt to taste to the top of the shredded Italian cheese.
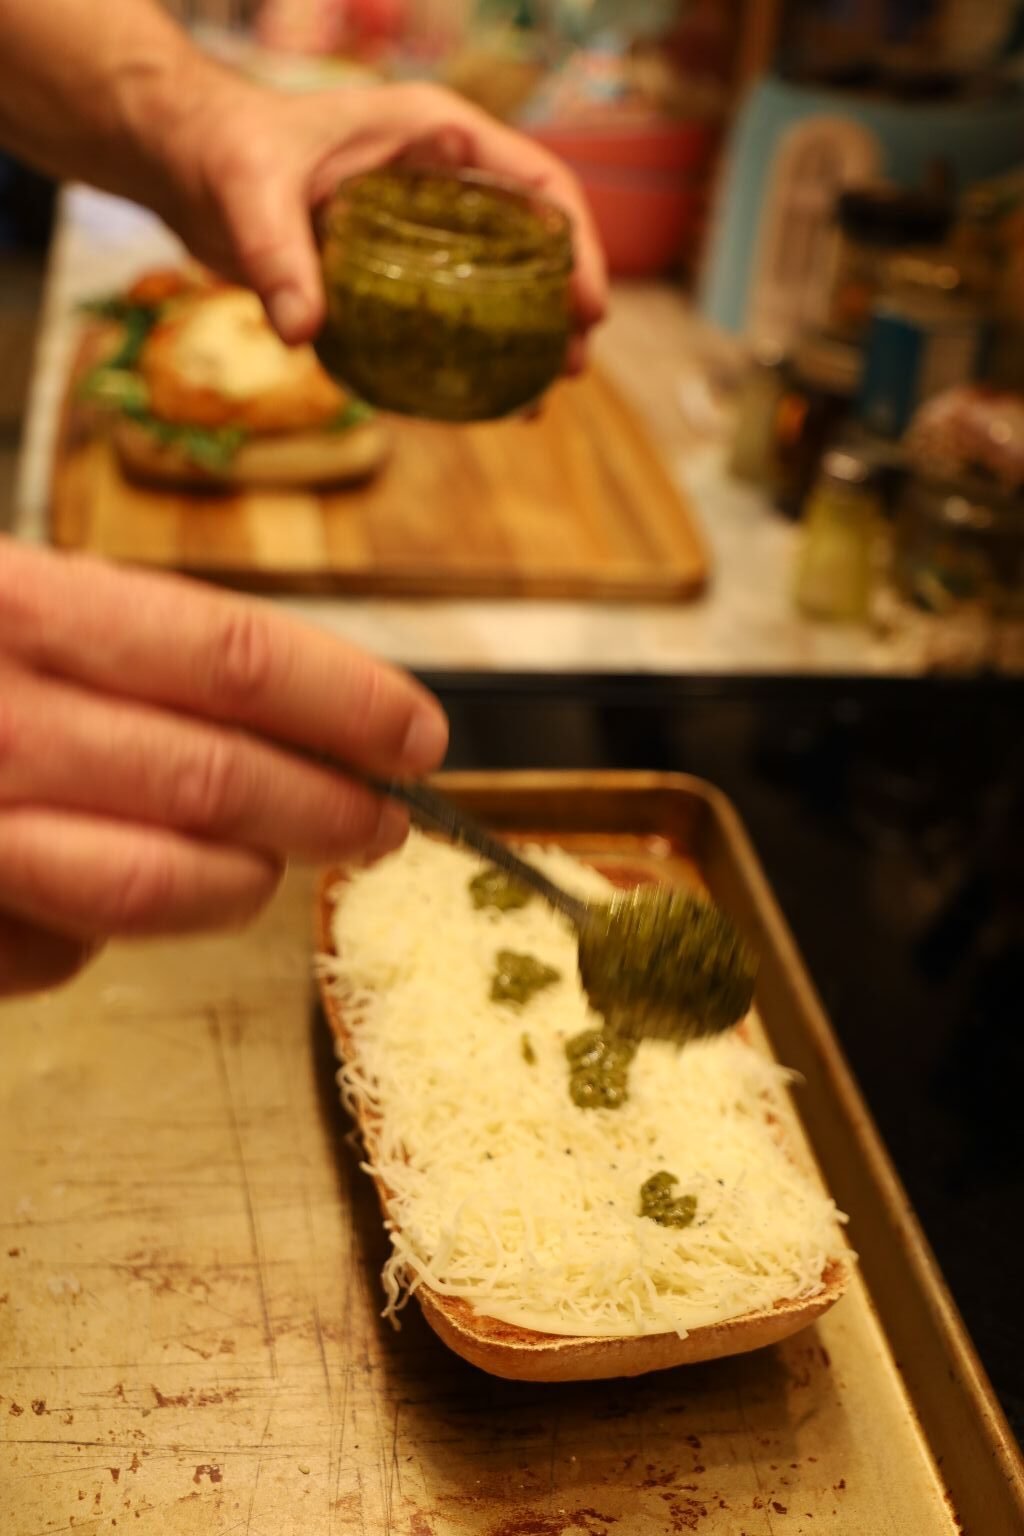

Using a spoon, dollop more of the Pesto on top of the shredded Italian cheese as shown.
Or not, but we really love Pesto.
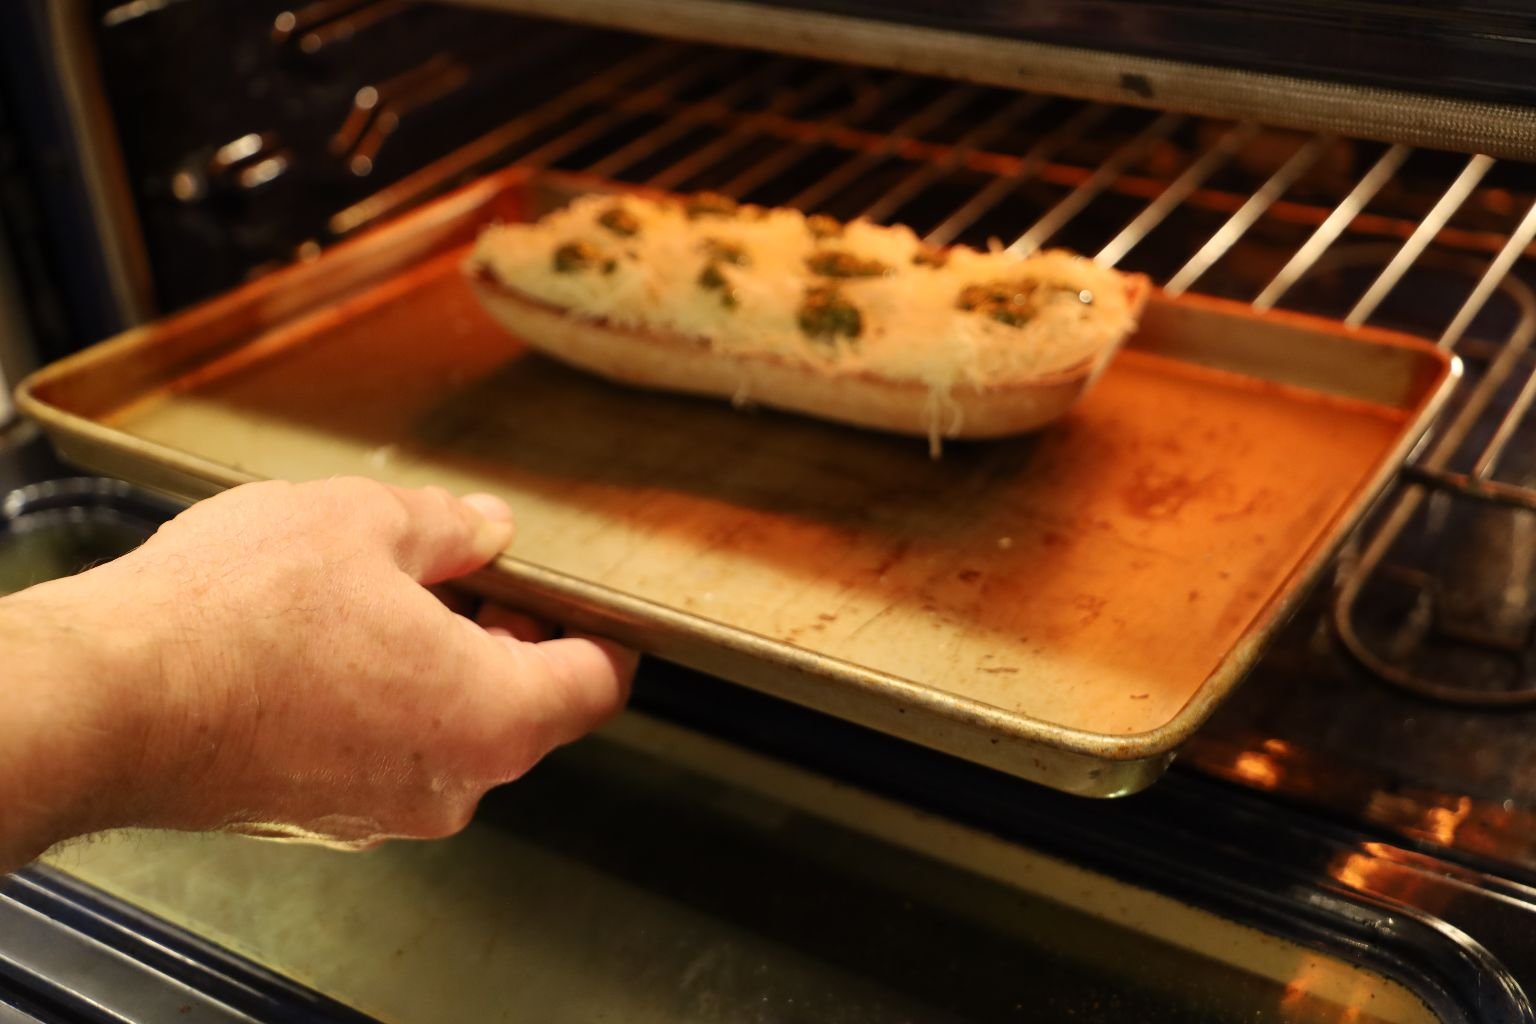
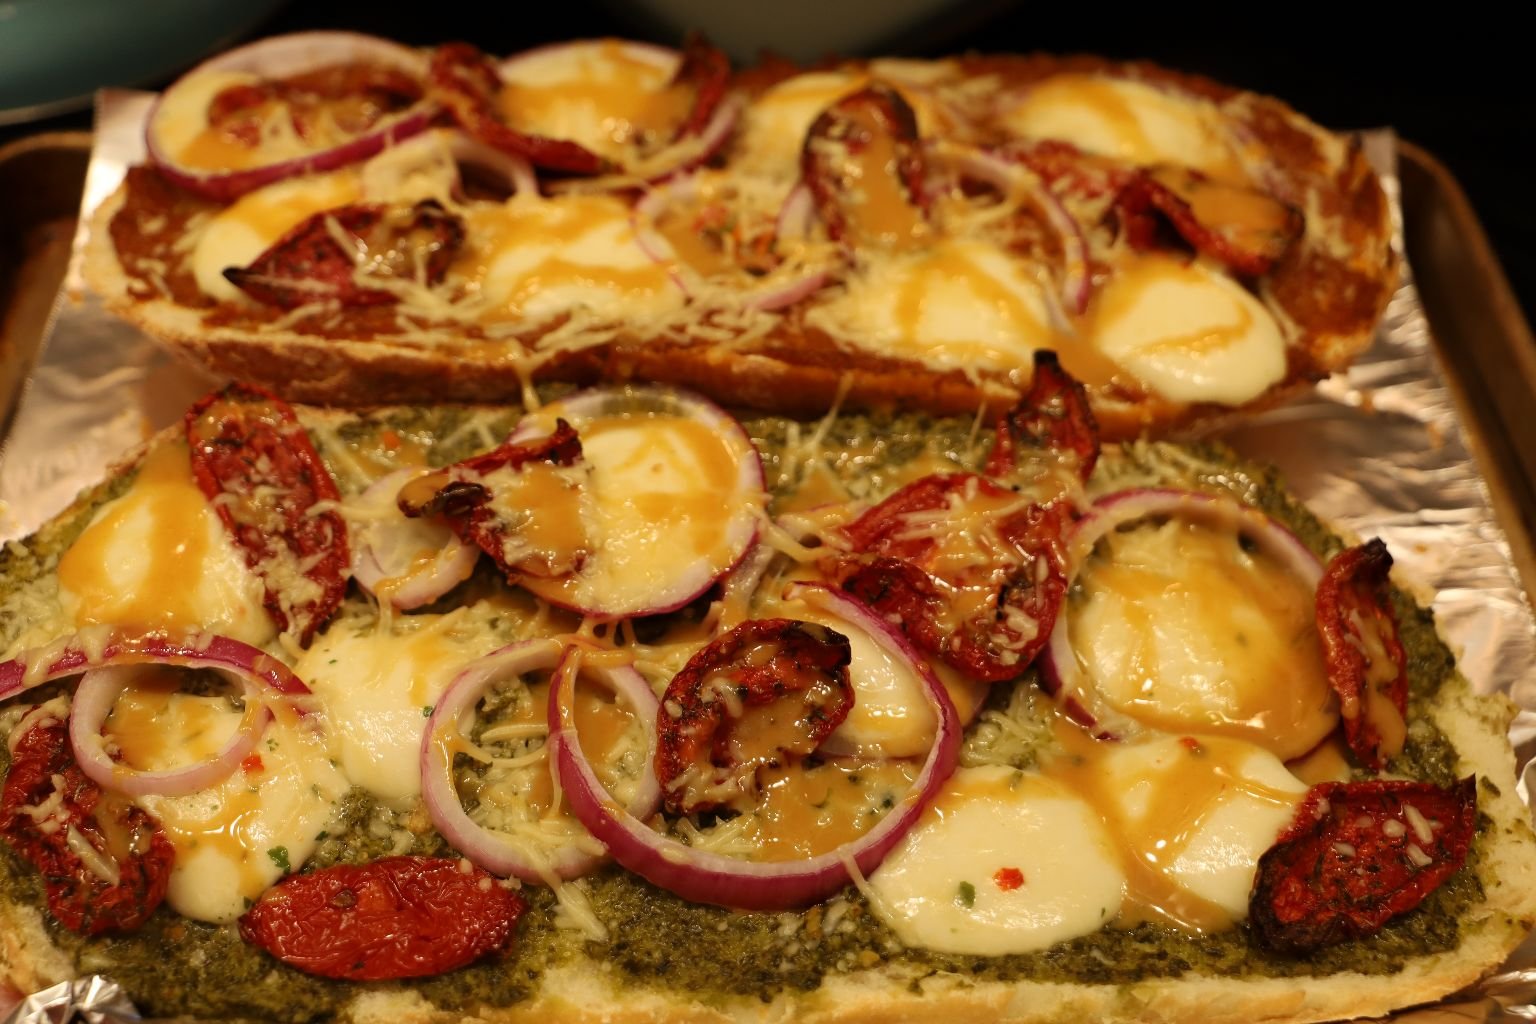
Place this side of the sandwich back onto the sheet pan and broil it in your oven until the cheese melts… takes only a few minutes to complete.
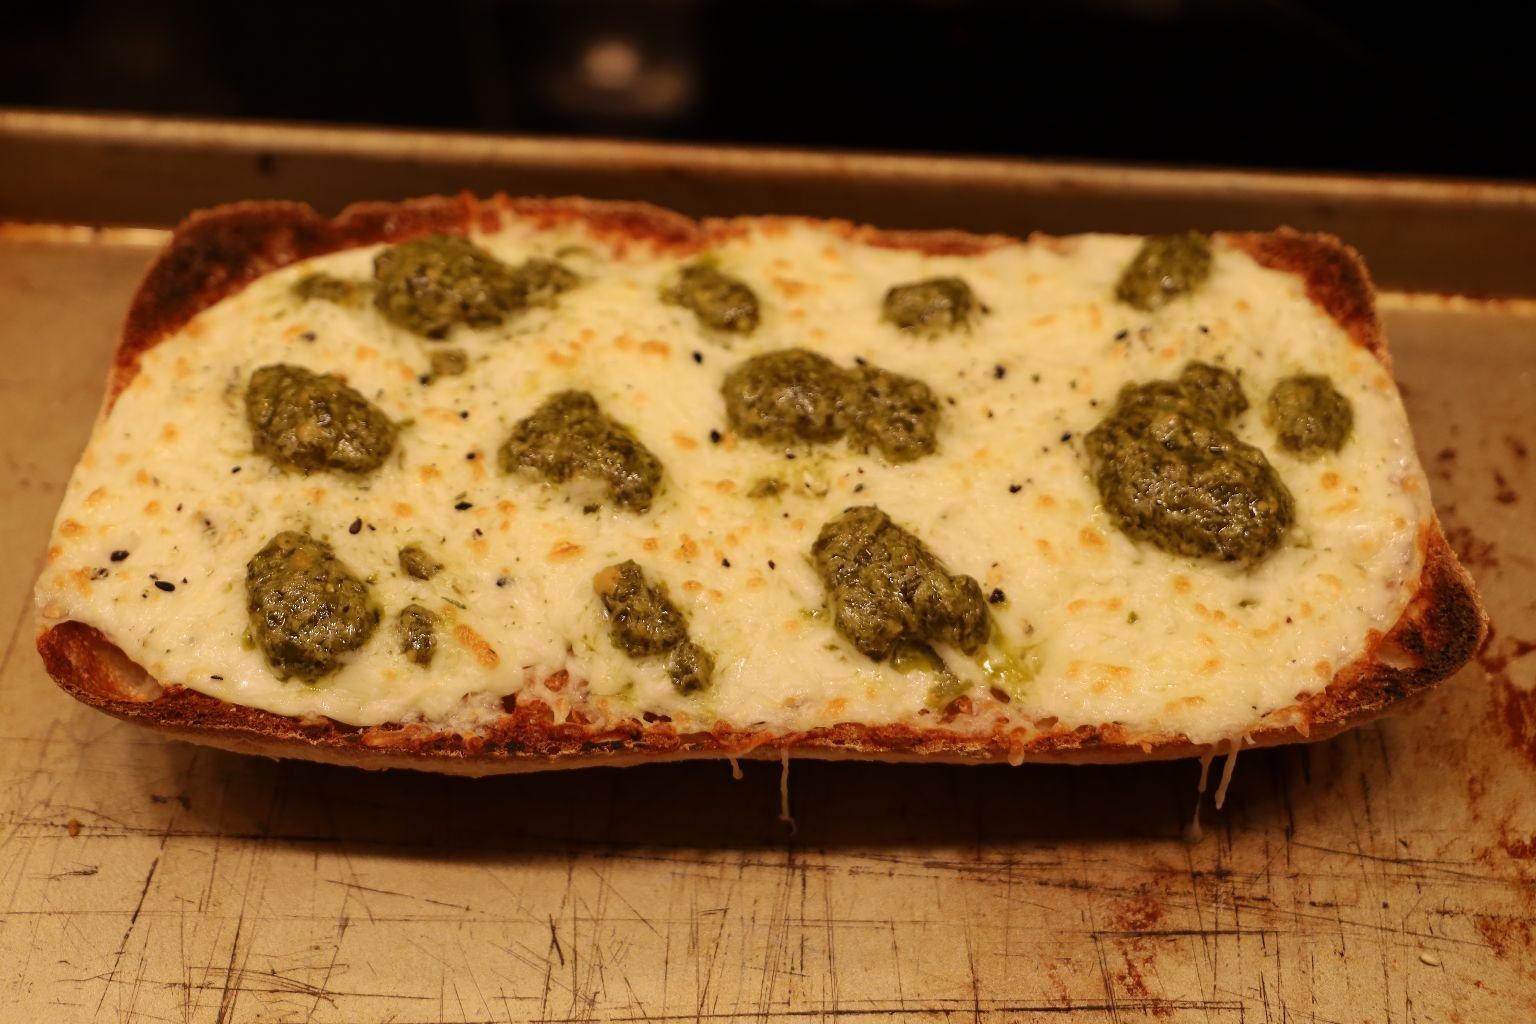
Pictured is what it will look like when done… you can see the cheese was just starting to brown… This would be delicious to eat by itself!


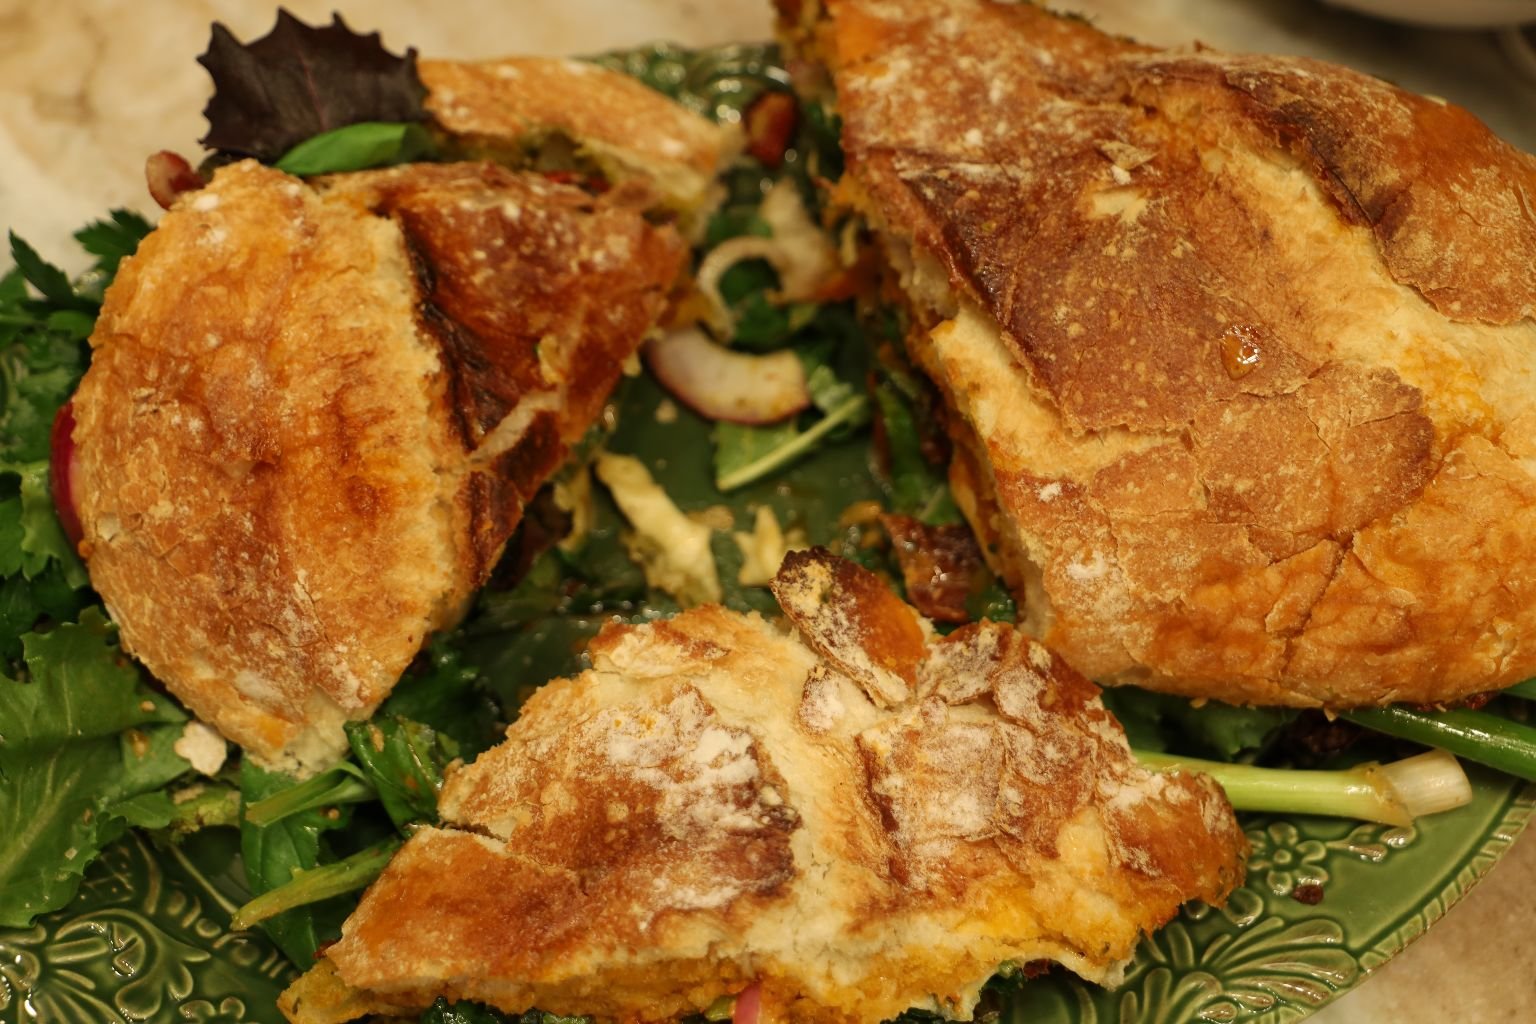
Time to put the sandwich together.
I always like to make the sandwich having one side with less ingredients than the other, making it easier to combine.

Take the Ciabatta cheese side and place it on top of the sandwich.
Slice the sandwich in half or on the bias.

Again, the picture speaks volumes of how good this sandwich really is.


We hope you enjoy this great Italian themed sandwich as much as we did!
—————————————————————————————————
Coffee Table Lasagna
(The Ingredients you see Below Were Made for TWO Large Lasagna’s. One to Eat, One to Freeze.)

——————————————————————————————————–
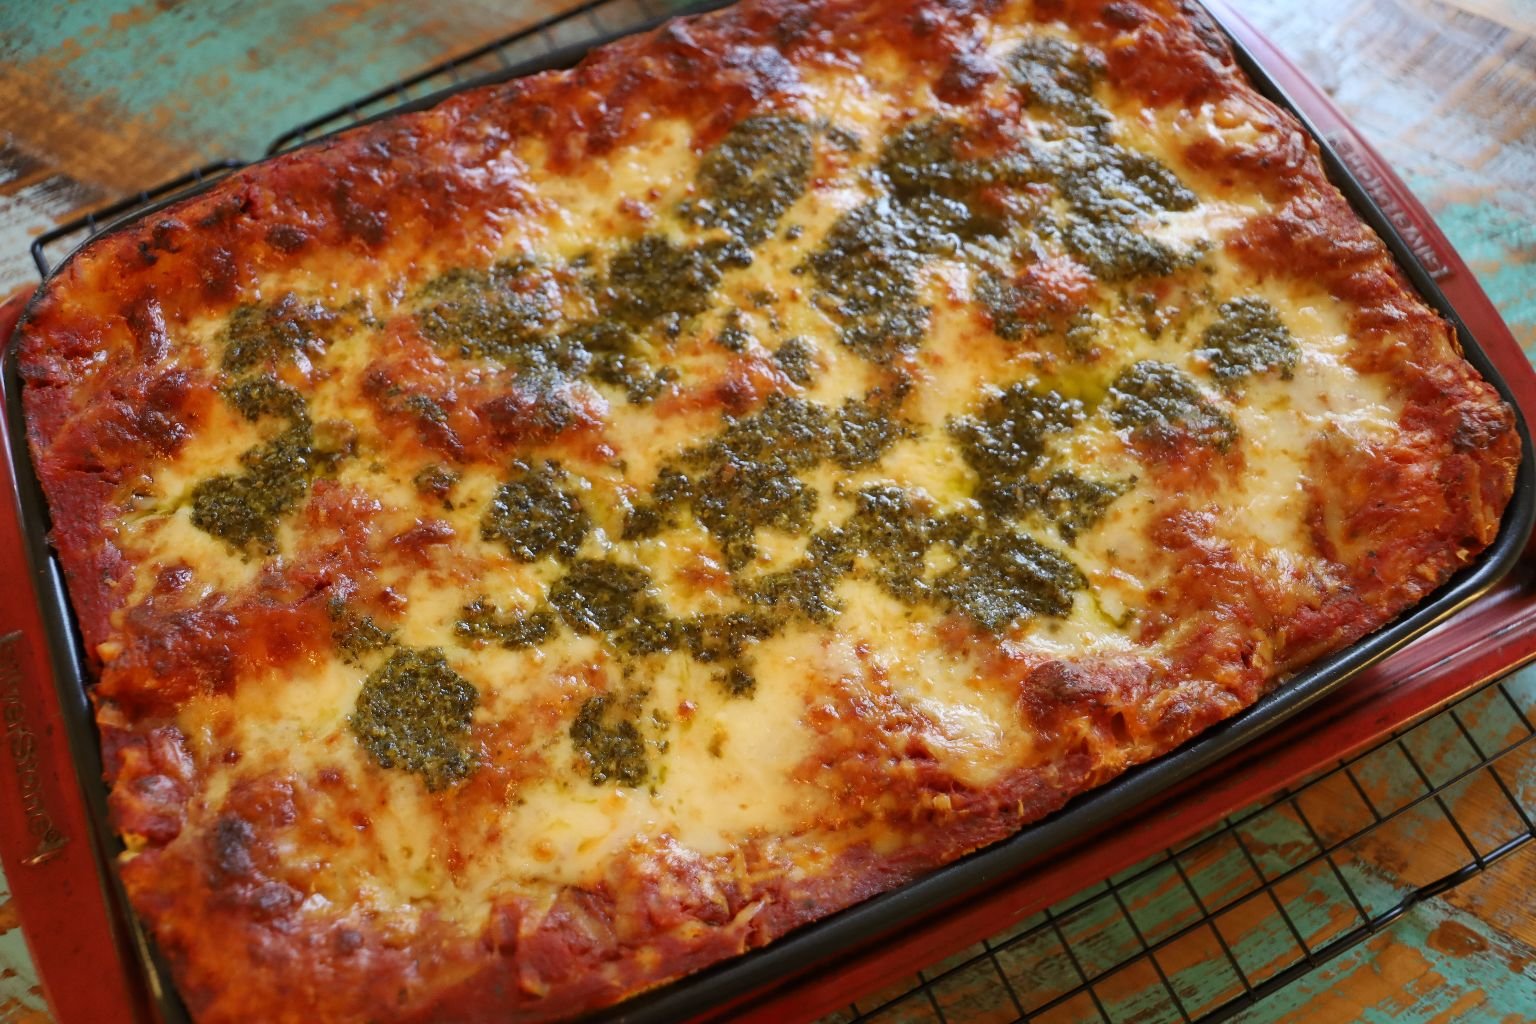
This is the one we ATE.
The above photos are the one we FROZE.
——————————————————————————————-

Ingredients: (Where Do I Even Start?)
(You can always half the ingredients in order to make just one large Lasagna.)
—————————————————————————
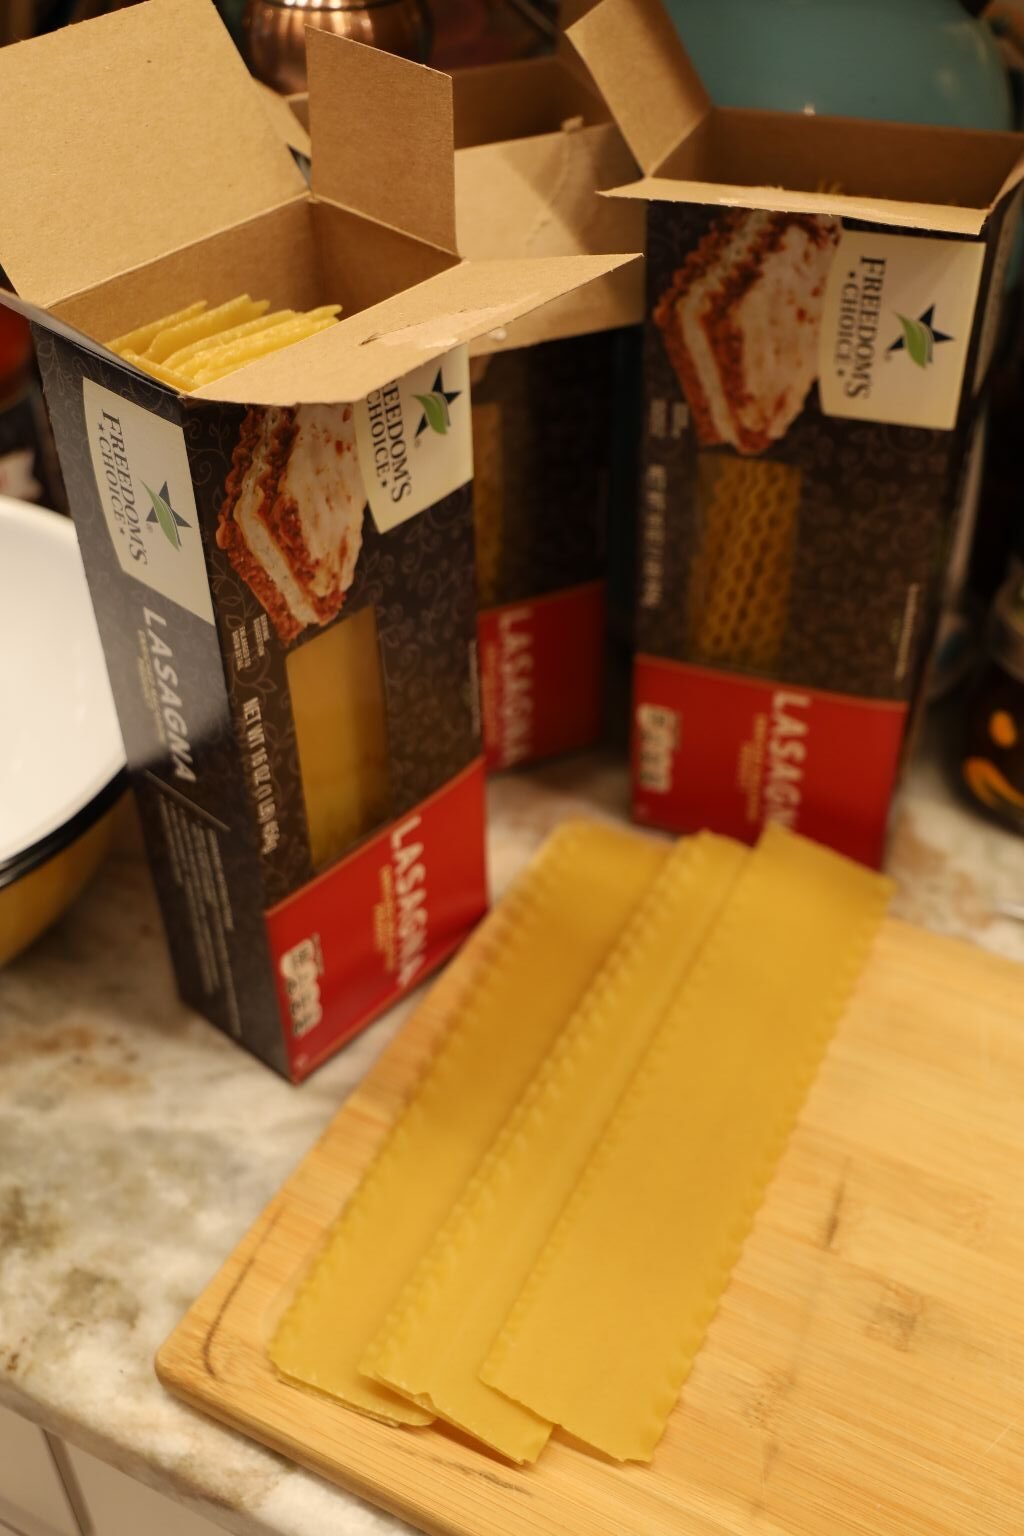
3, 16 oz. Lasagna Pasta Noodles (You may not use all of them, but you will use most of them.)
5 Jars Various Spaghetti Pasta Sauces (Around 24 oz. Each)
2, 1b. Italian Sausage, Sweet and Hot
3, 2 lb. Container’s of Ricotta Cheese
1, 16 oz. Container Cottage Cheese
Crinkle Cut Carrots (About 2 Cups)
2, 14 oz. Bags of Frozen Broccoli, Thawed and Drained
4-6 Large Whole Garlic Cloves, Minced
1/4 Cup or as Much as you Like, Italian Style Bread Crumbs
Sliced Fresh Mozzarella Cheese, as much as you like
8 oz. Blocks of Parmesan and Parmesan-Reggiano Cheese, Grated
Freshly Ground Black Pepper to Taste
Fresh Herbs of Basil, Oregano, and Parsley, as much as you want
Topping: 7.9 oz. Basil Pesto
High End Extra Virgin Olive Oil for Drizzling Overtop
————————————————————————————————————-


So Excited and Ready To Get Started 🙂
————————————————————————————————

The first thing that I want to do is to brown my Sausage in a large sauce pan on a medium-high heat.
The pan is a non-stick and I don’t need to add any Olive Oil. The Sausage will provide the fat needed.


Some of my Sausage is in casings. You just want to slit the casing open to remove the Sausage so that it can be browned evenly with the rest of the Sausage.
I’m using a combination of Sweet and Hot Sausage.


In the meantime, I have placed my Frozen Broccoli into a microwave safe casserole dish, with a lid, in order to thaw and cook my Broccoli. You can always use fresh Broccoli if you like. I’ve used both in the past and I don’t find that it matters much if you use Fresh or Frozen. I find that keeping Frozen Broccoli in the freezer to use for recipes like this comes in handy.
Cook the Broccoli according to your Microwave’s directions for Thawing and Cooking Frozen Vegetables.
—————————————————————————————


While my Sausage is browning in the sauce pan I am mincing some Garlic Cloves. Gordon and I used to chop so much Garlic that it would take forever to mince all that up into such small bits. Now, we just grab this wonderful tool and squeeze to have it turn out exactly how we want it and in just a few seconds. I’m mincing about 4-5 large Garlic Cloves in the photo above. You can use as much or as little as you like. We just LOVE Garlic!

Broccoli Ready…


Here I am draining the water out of the casserole dish and into the sink.
Then filling the casserole dish with cold water for the Broccoli to sit in so that it will stop the cooking process.
——————————————————————————————–

My Sausage and Garlic have finished cooking. I used the spatter screen you see in the photo above to drain the excess fat into the sink.
Just make sure your Sausage doesn’t fall into the sink as well.
————————————————————————————-


In a very large pot on the stove top on a high heat, start boiling your water to cook the Lasagna Noodles in.
Add a bit of Salt to the water.
While that comes to a boil….


Make Sure the Fresh Herbs are Clean and Dry
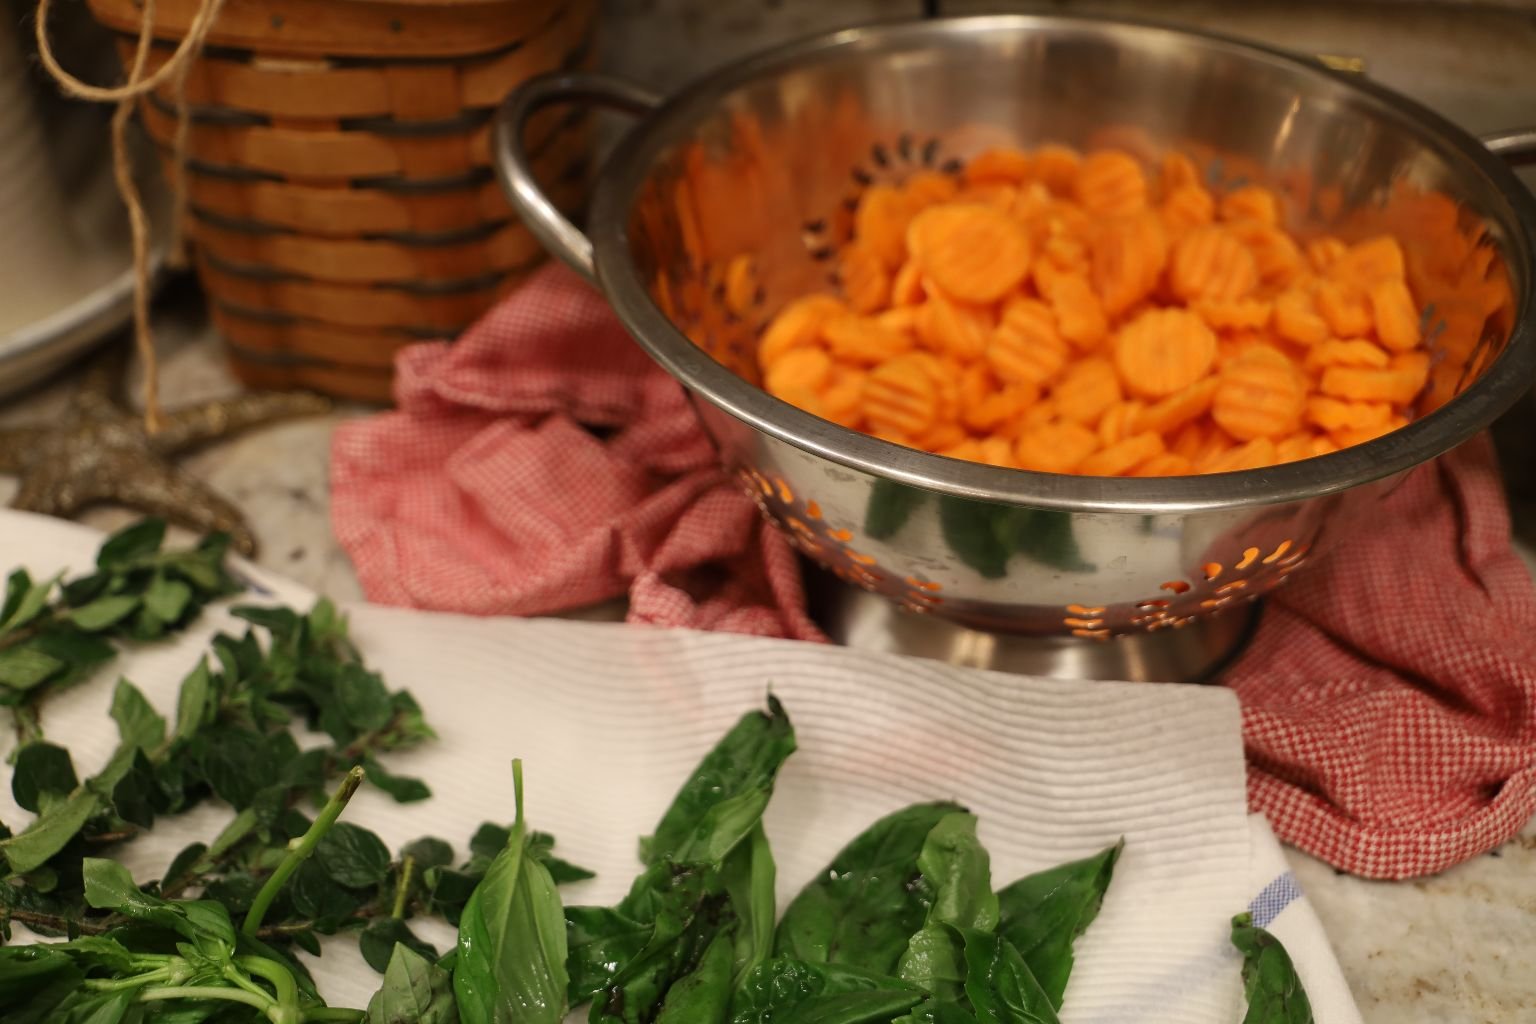

Fresh Herbs, Carrots, and the Broccoli
The Carrots have been washed and the water is being drained from them.
—————————————————————————————–
Now that my water has come up to boiling…
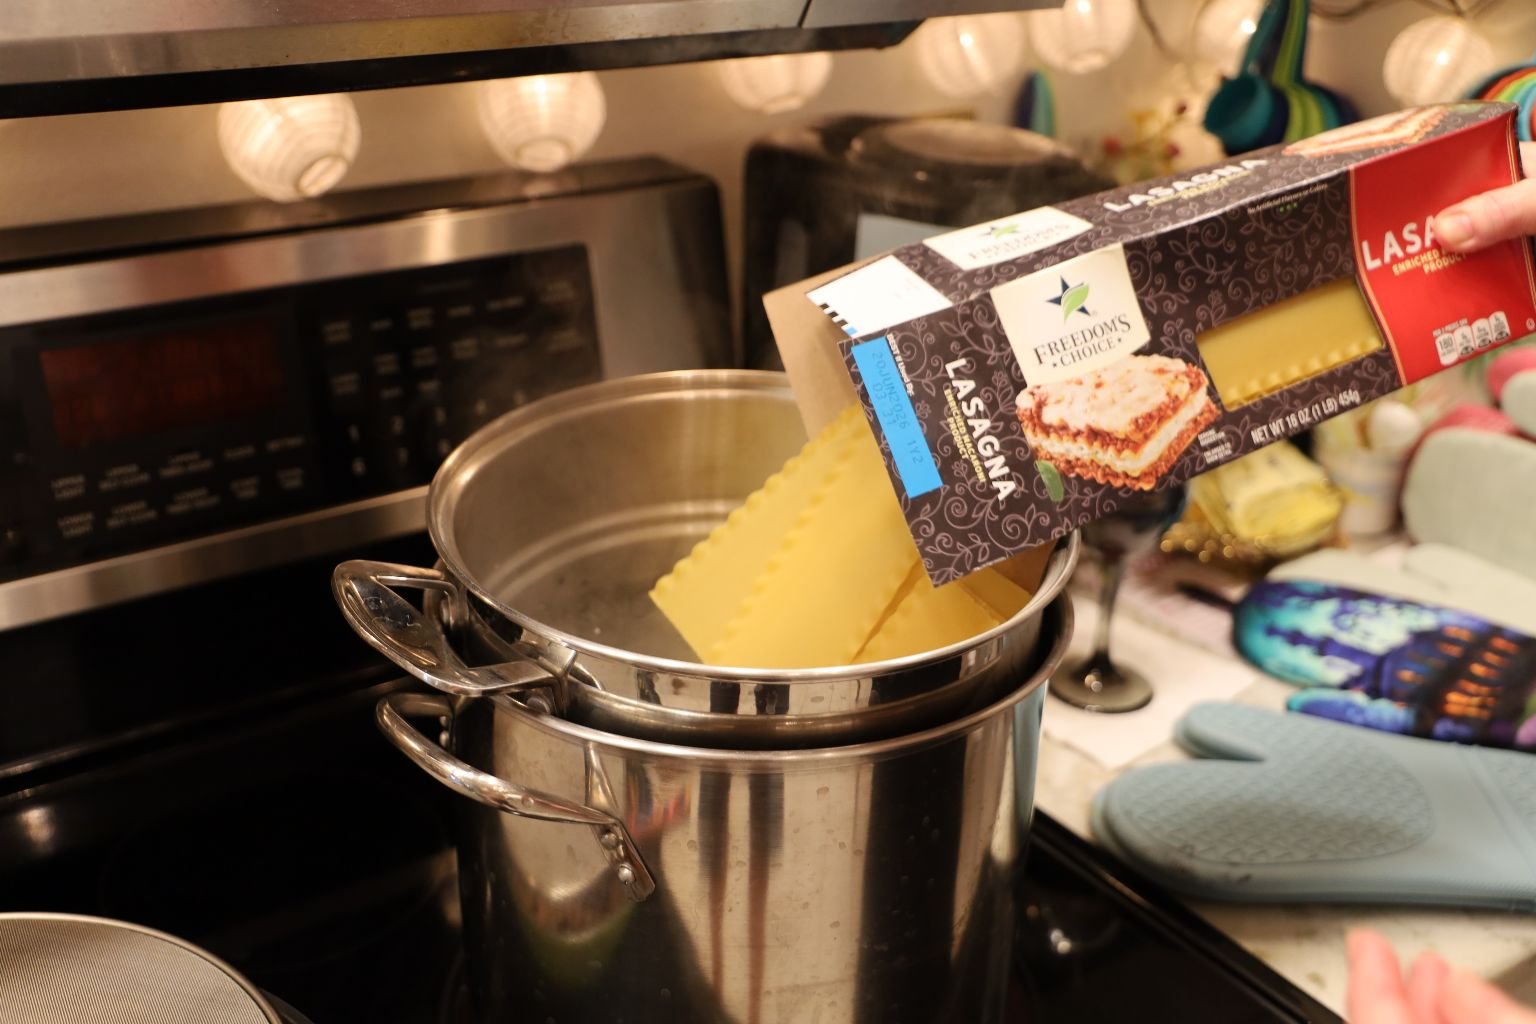

It’s time to add the Lasagna Noodles
(Cook according to the package instructions.)
—————————————————————————————


My Ricotta Cheeses
In two separate bowls I will be mixing the Ricotta Cheese with other things.
I am evenly dividing up all 3 containers to place into the two bowls.


In this bowl I am placing in some Fresh Parsley Leaves.
I don’t chop them I just pluck the flowering end off and add it to the bowl.
———————————————————————————————–
My Lasagna Noodles are Done!


Time to Drain into a Colander

Allow to Cool a Bit
Keep them in the sink because you may need to add water to the noodles if they start to harden up while you are still working with them building your Lasagna.
————————————————————————————————-
Into the Second Bowl of Ricotta…


Place a Nice Basil Pesto, as much as you Like
(Reserve some of the Pesto as a Lasagna topping.)
—————————————————————————————–


Here Gordon is Chopping Some Basil…

..To be Equally Distributed into Each Bowl
——————————————————————————————–


Our Two Casserole Dishes
Coat Both Well With a Cooking Oil Spray, Bottom and Sides
(One we are giving to Veronica and Brian as a gift, along with this great Lasagna that it will house, and the other is ours to place into the freezer for a later date.)
——————————————————————————————————-


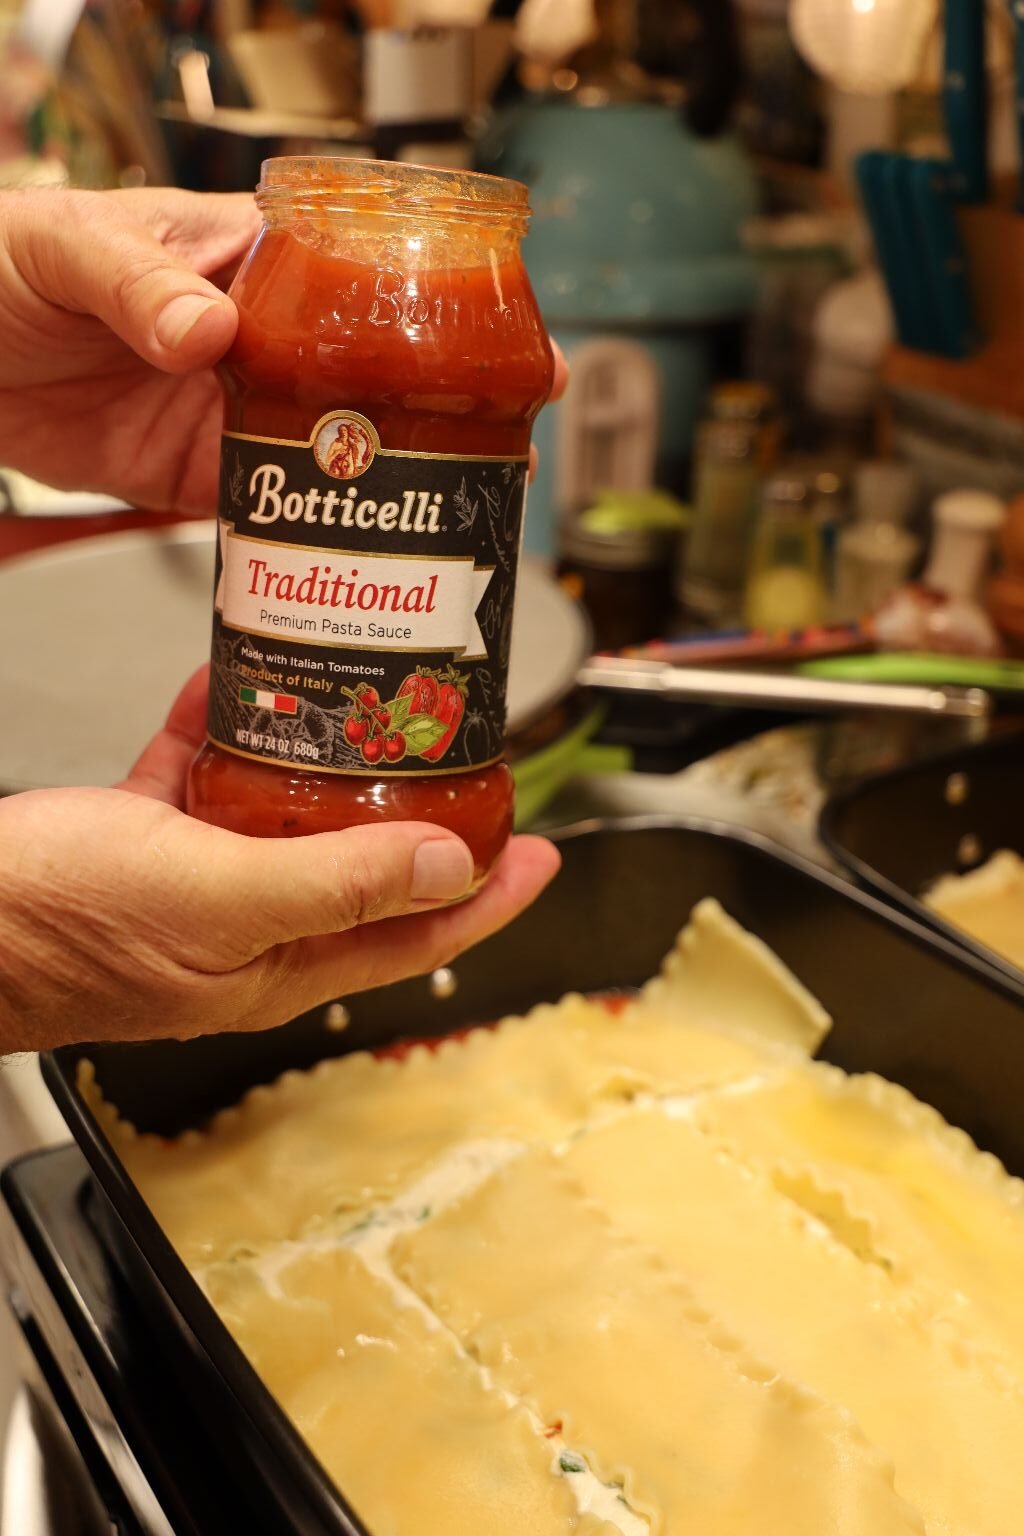
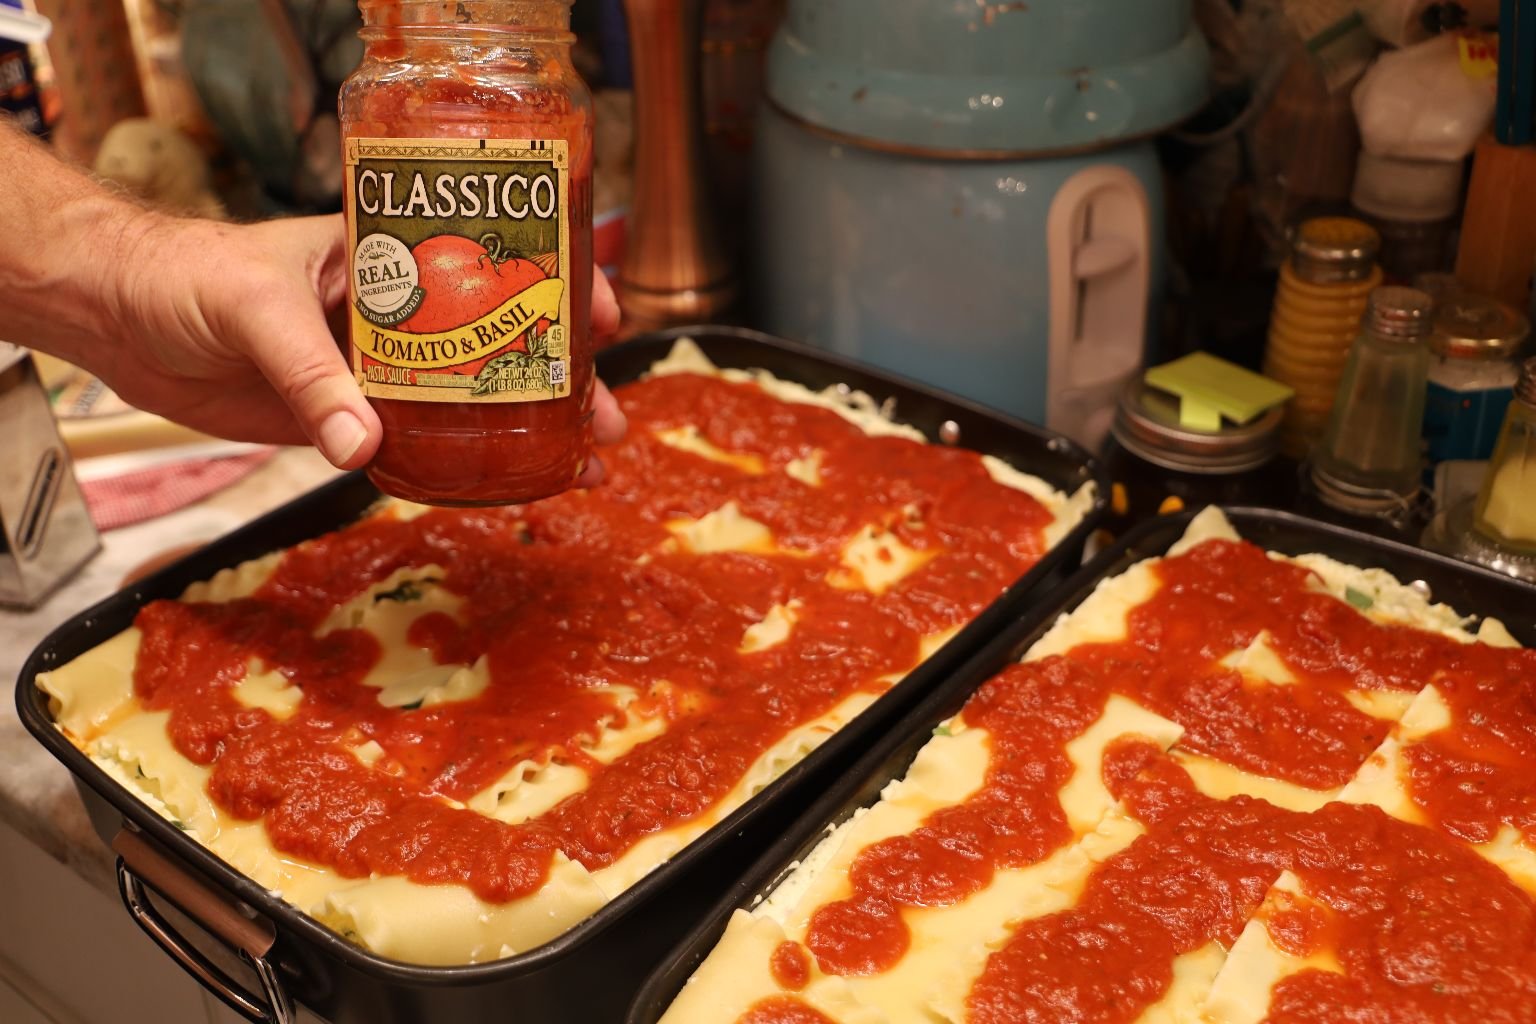
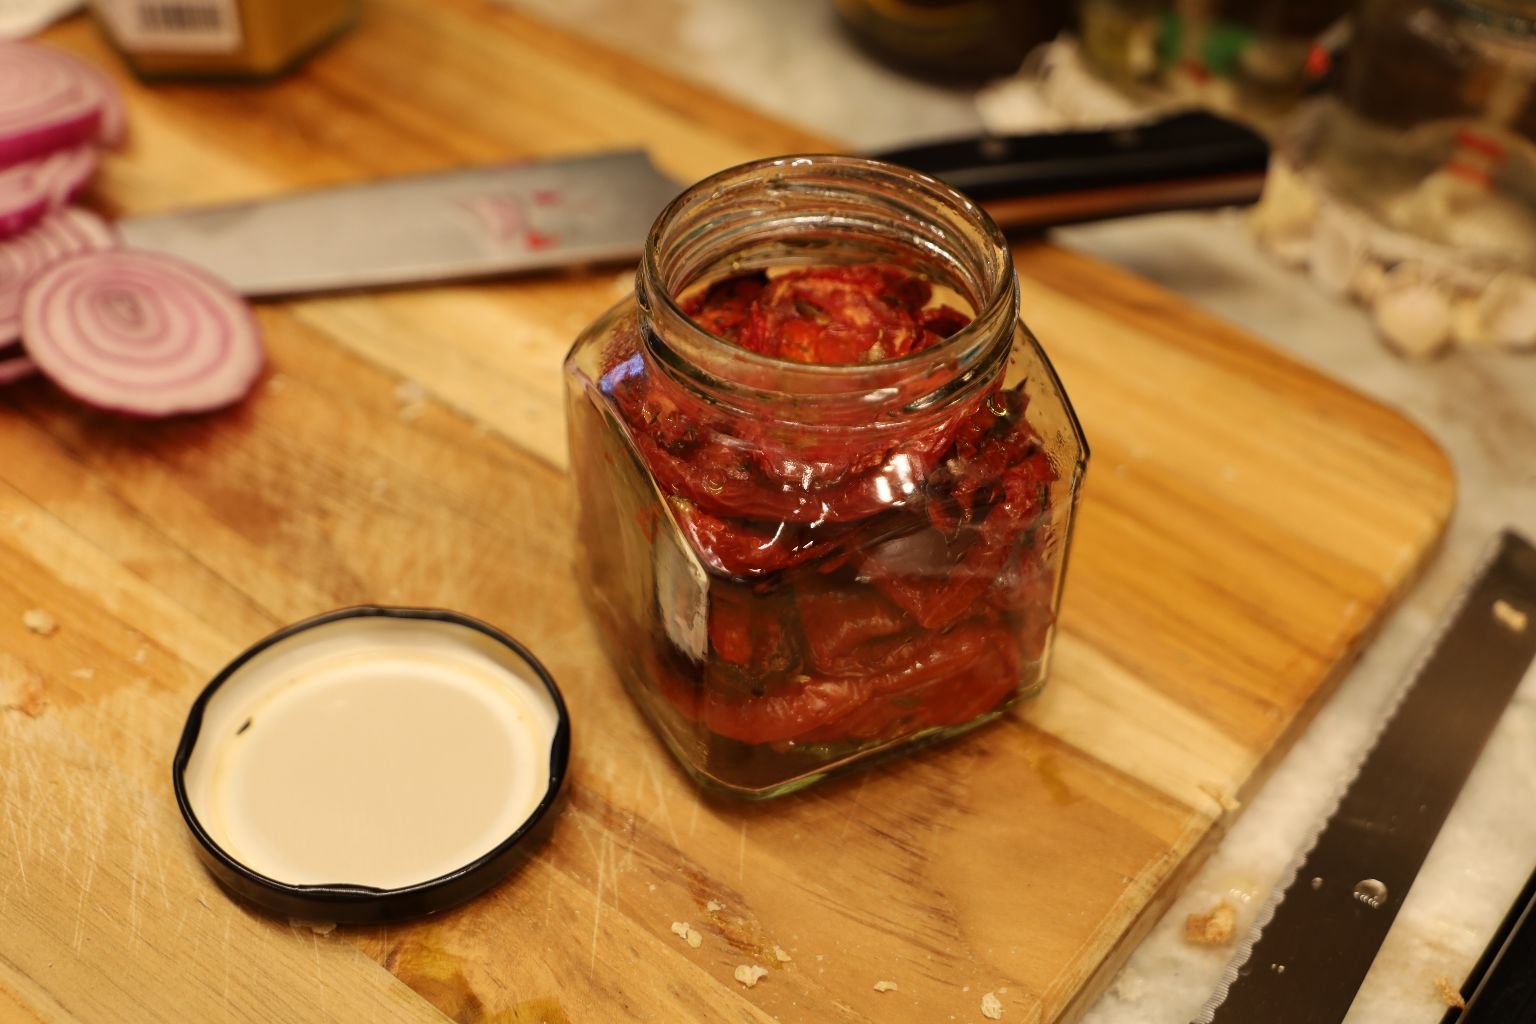
My Various Jars of Spaghetti Sauces

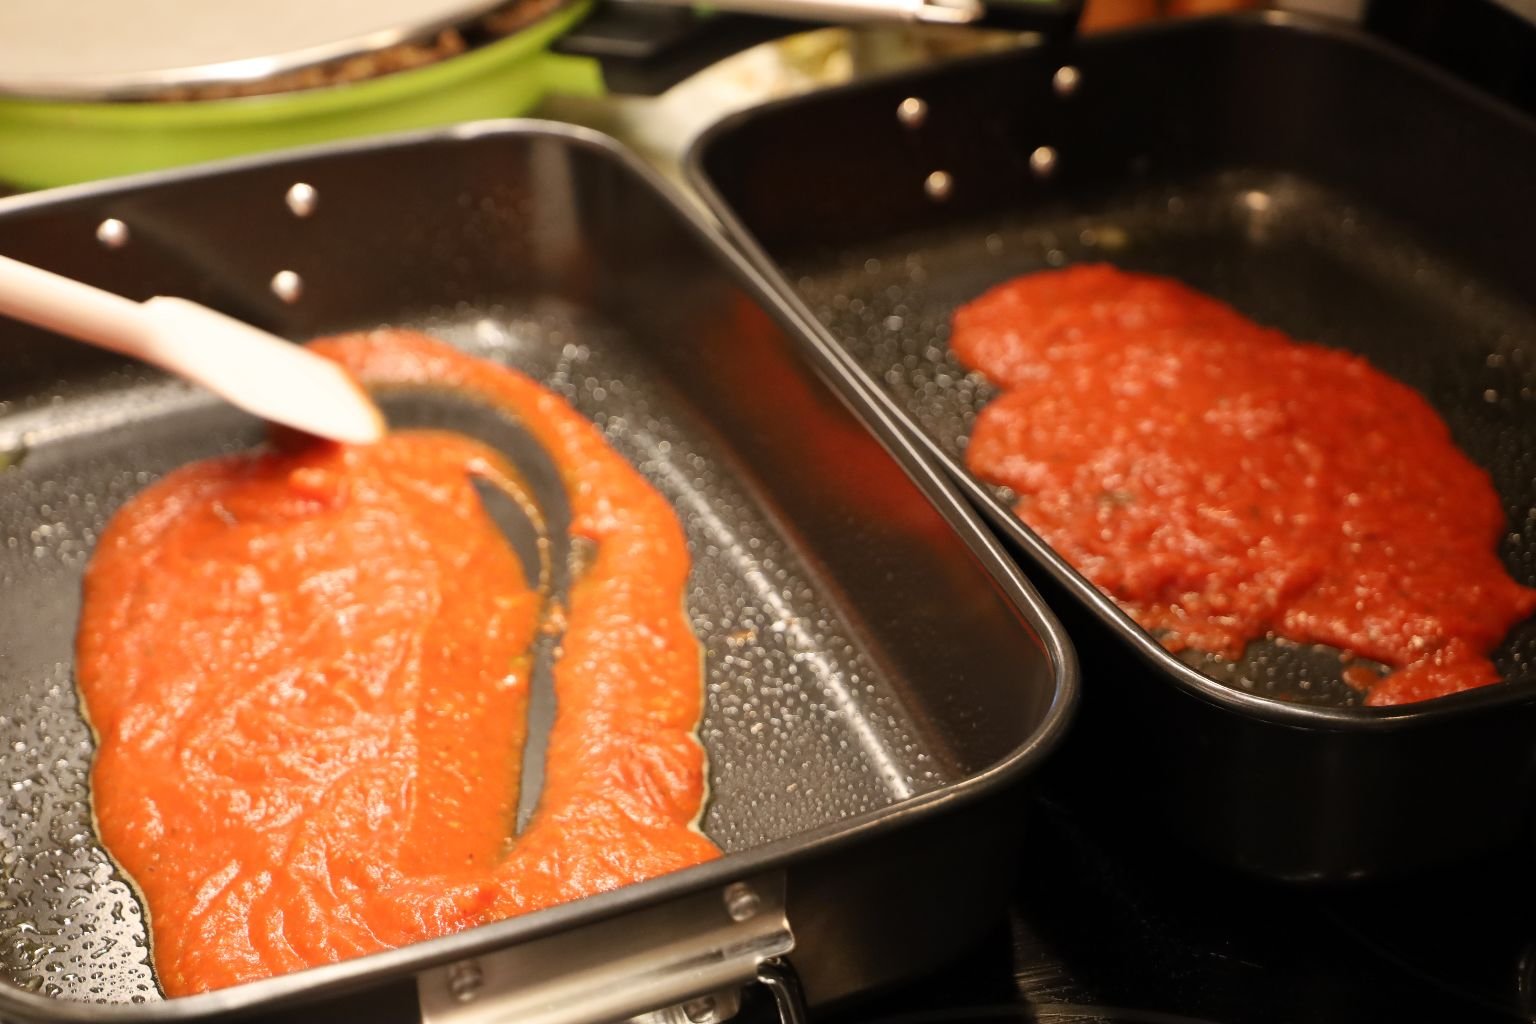
In the bottom of each casserole dish place enough of the Sauce to cover the bottom.
You just need a nice thin layer.


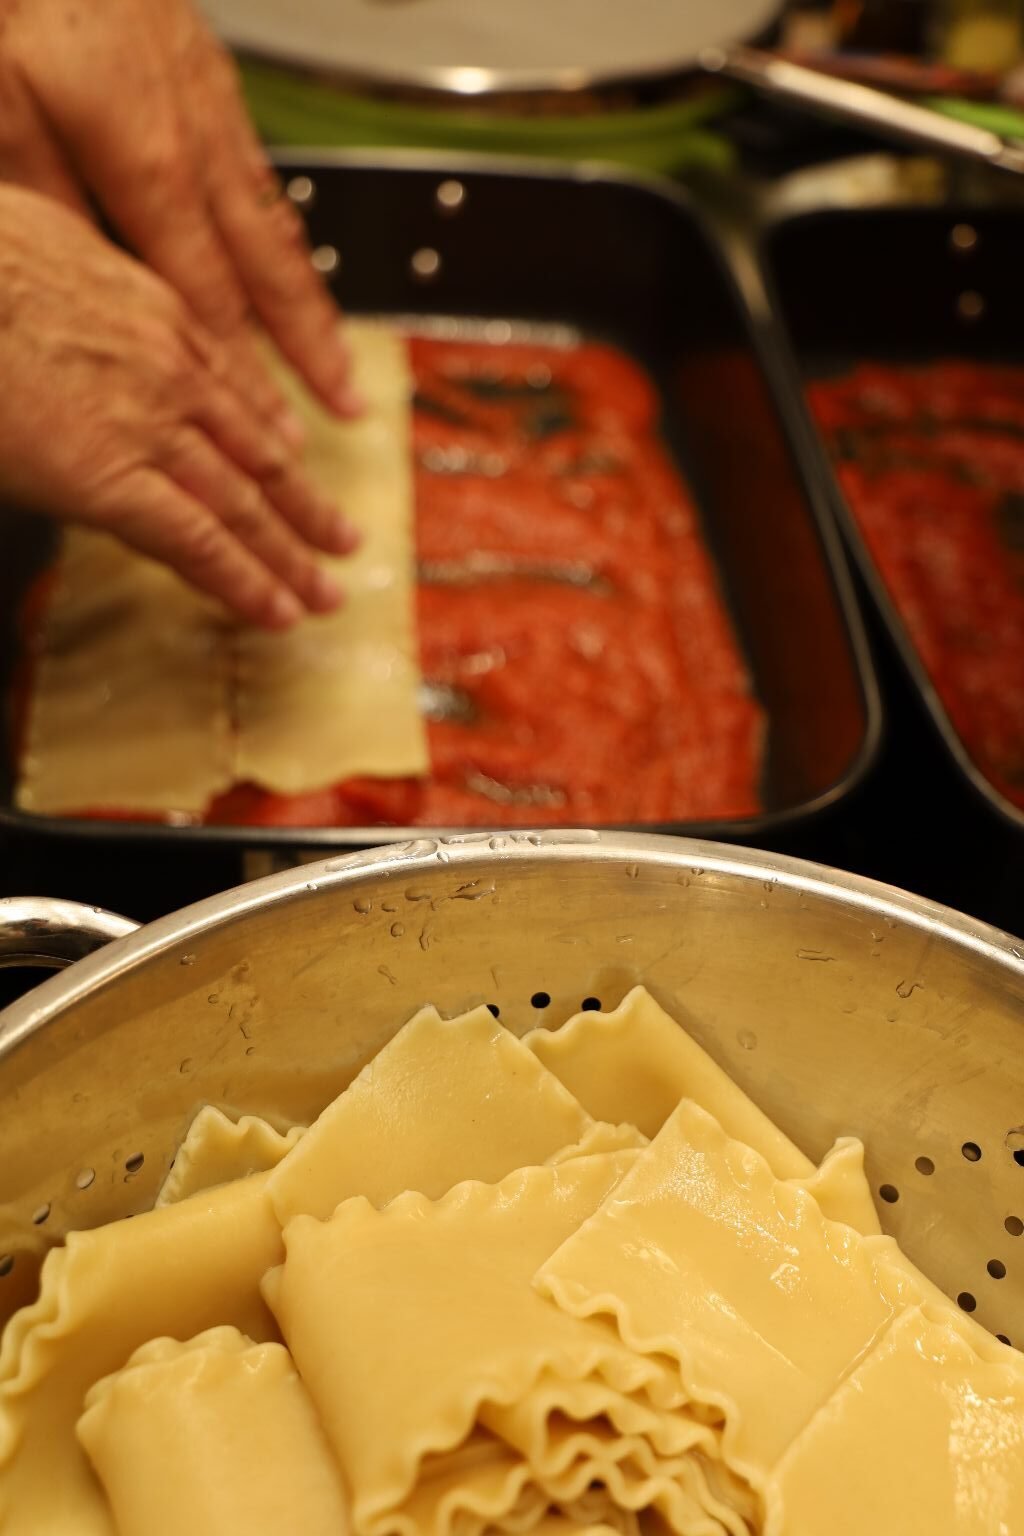
Now, place down a layer of the Lasagna Noodles over the Sauce.


Like So…


Now place some of your Herby Ricotta Cheese.

Spread out a nice layer. Use a spatula to spread around.


Then add more of the Lasagna Noodles over the Ricotta Cheese, and then add a layer of yet another Spaghetti Sauce.

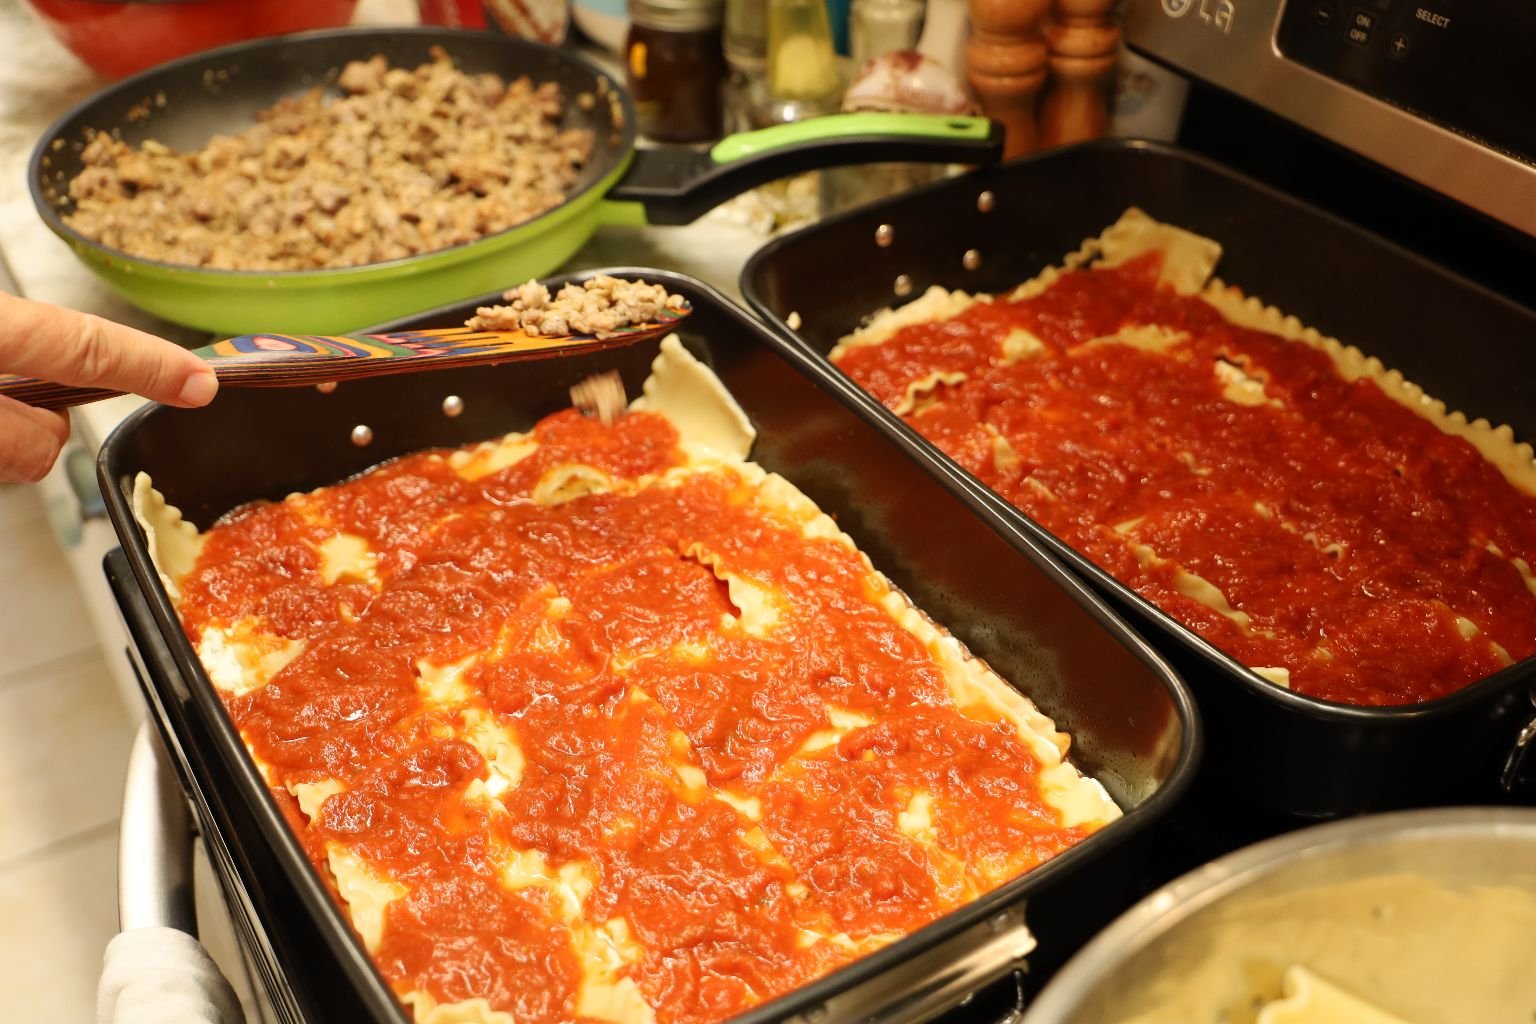
Like So..


Time for a nice layer of the Sausage.


Then top with more Lasagna Noodles.


More Ricotta Cheese….

More Sauce….


————————————————————————————————–
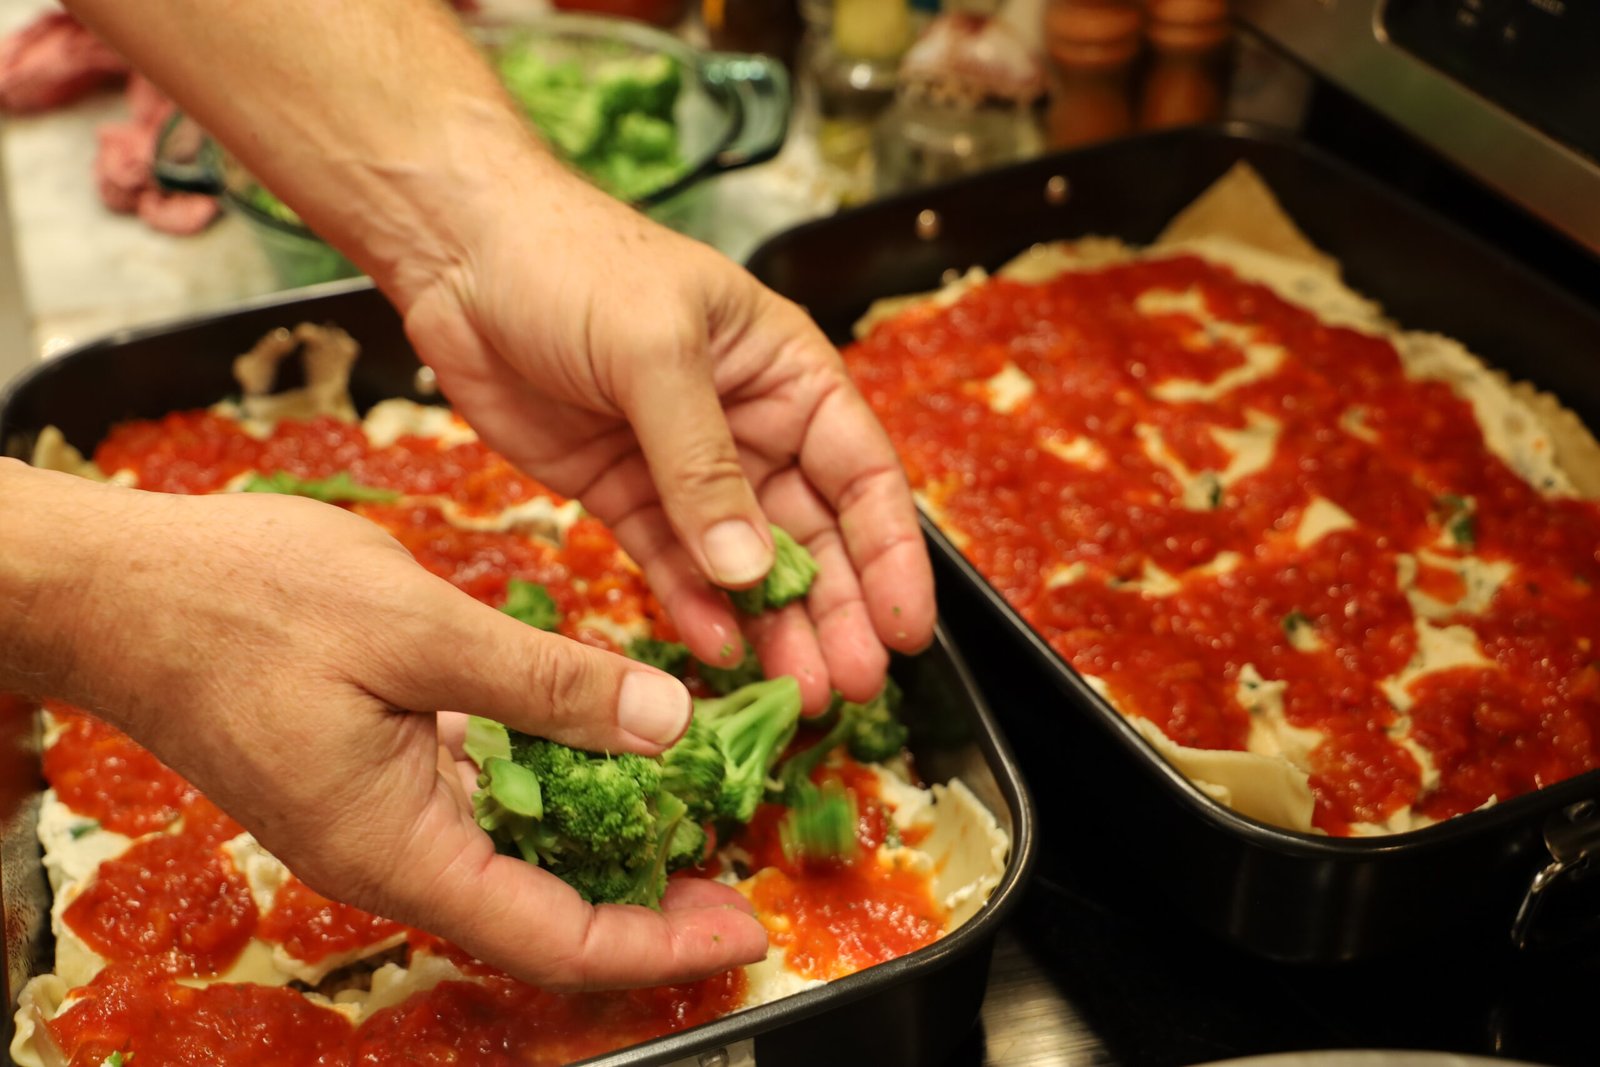

Remember our Broccoli? Time to add it here.


Cooking and Softening the Carrots in the Microwave
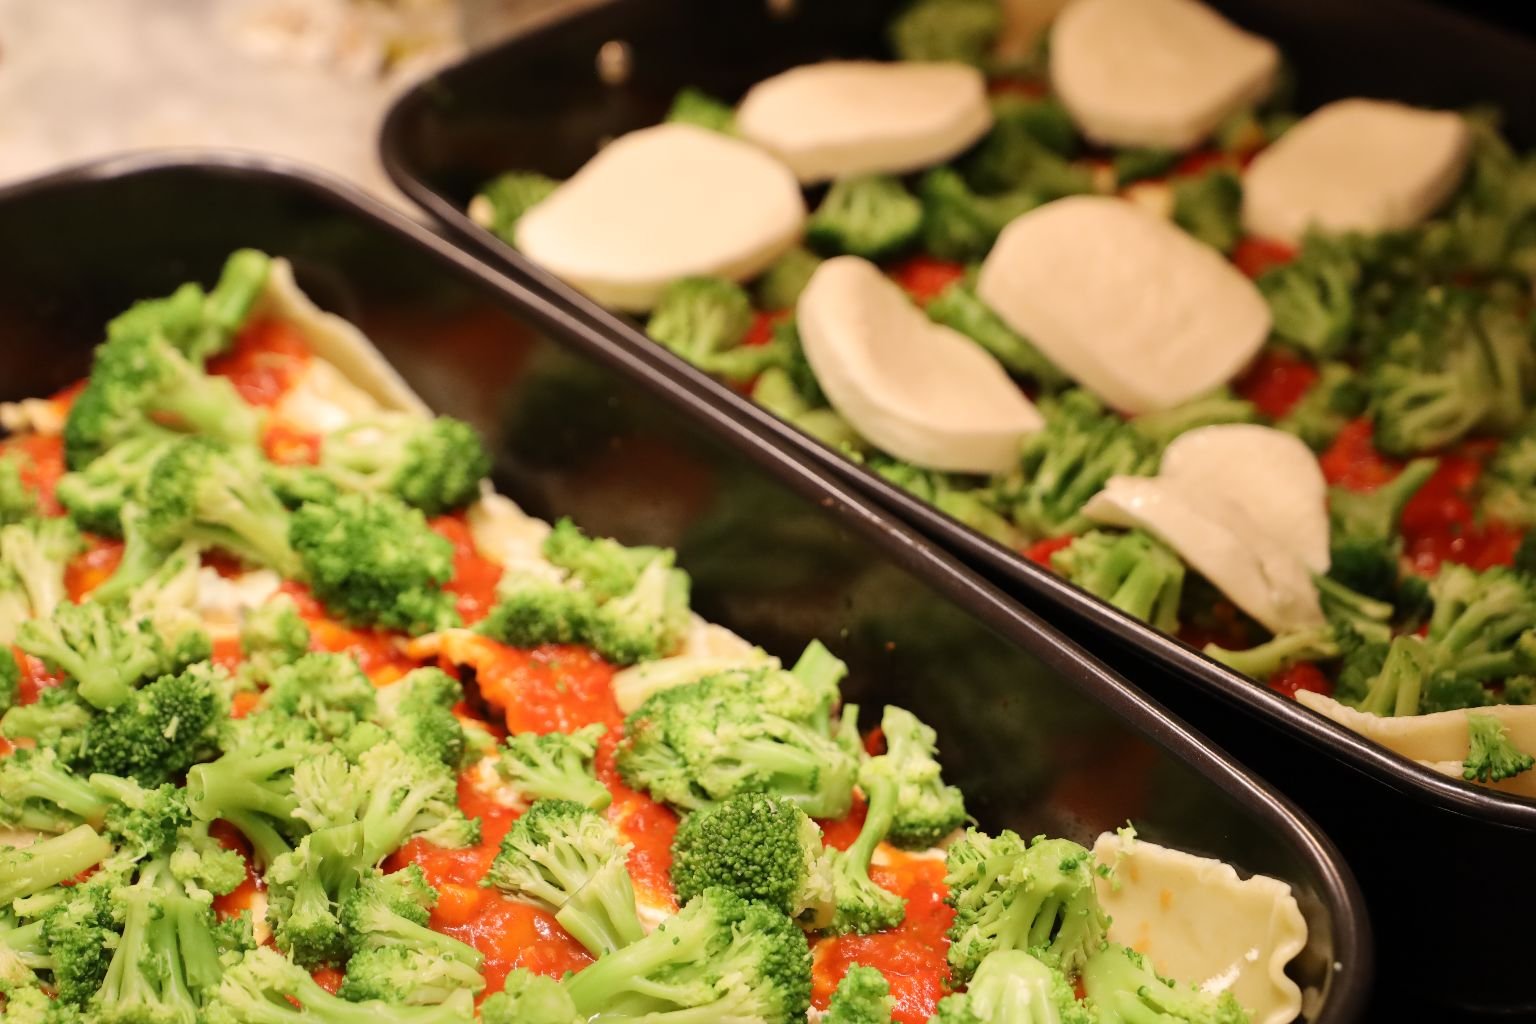

Adding Slices of Fresh Mozzarella Over the Broccoli
———————————————————————————

Cottage Cheese


Dolloping spoons of Cottage Cheese between the slices of Mozzarella Cheese Slices, photo top left.
My Carrots are cooked the ready, time to add them over top.
———————————————————————————-

Italian Bread Crumbs
————————————————————————————————

Here I did sprinkle some of the Italian Bread Crumbs from above, over the top.
Maybe about 1/4 Cup?


Now it’s time for more Lasagna Noodles
You can see them beginning to get hard in the photos above.
When this happens you can just add more water over top underneath the sink faucet and that will get them pliable again.

——————————————————————————–

Time For More Ricotta Cheese….


Dollop as much as you like and smooth over with a spatula.


Here I Added Fresh Herbs of Oregano
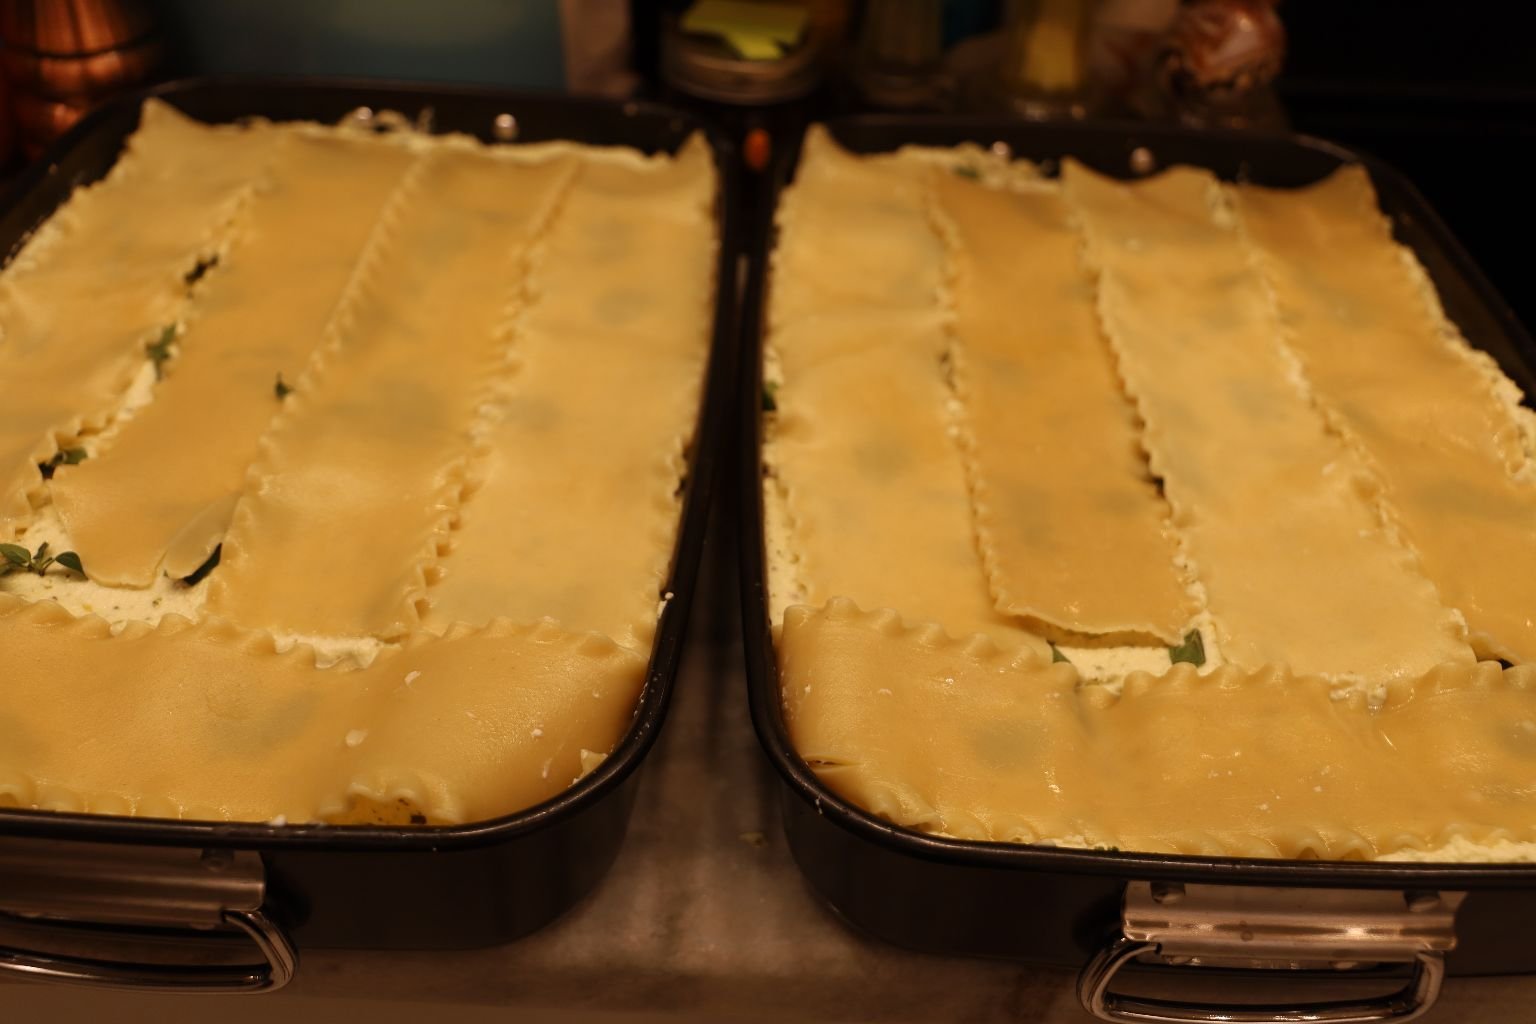
Then Top With More Lasagna Noodles
————————————————————————————————


Time to Top Them Off With the Remaining Spaghetti Sauce
——————————————————————————————
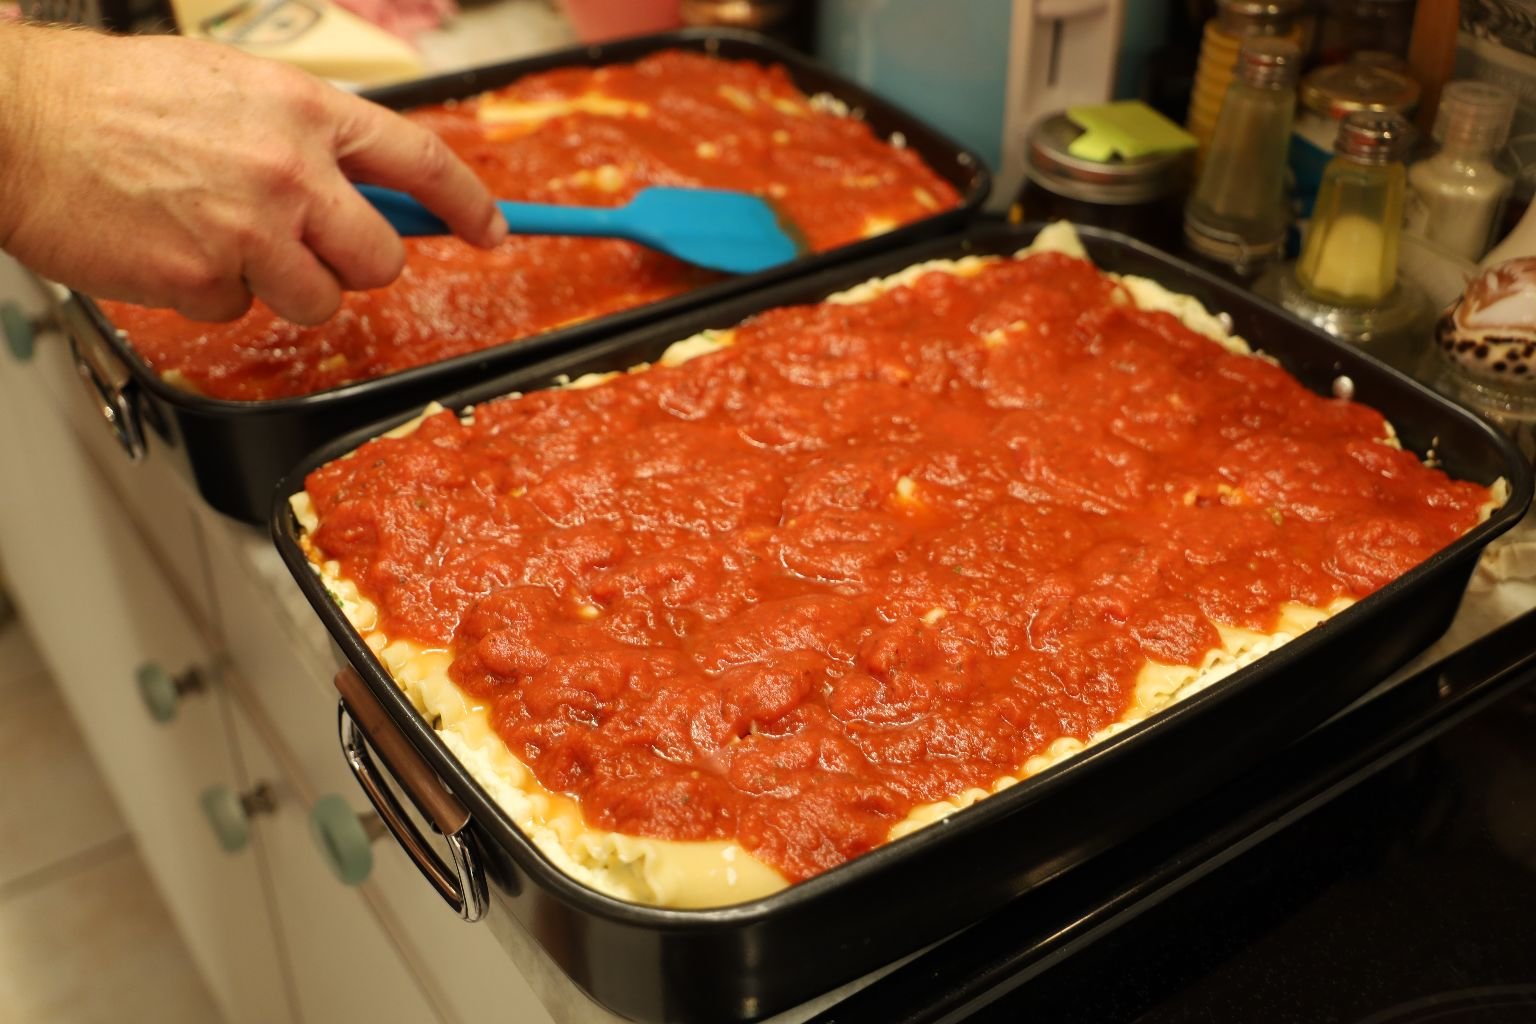
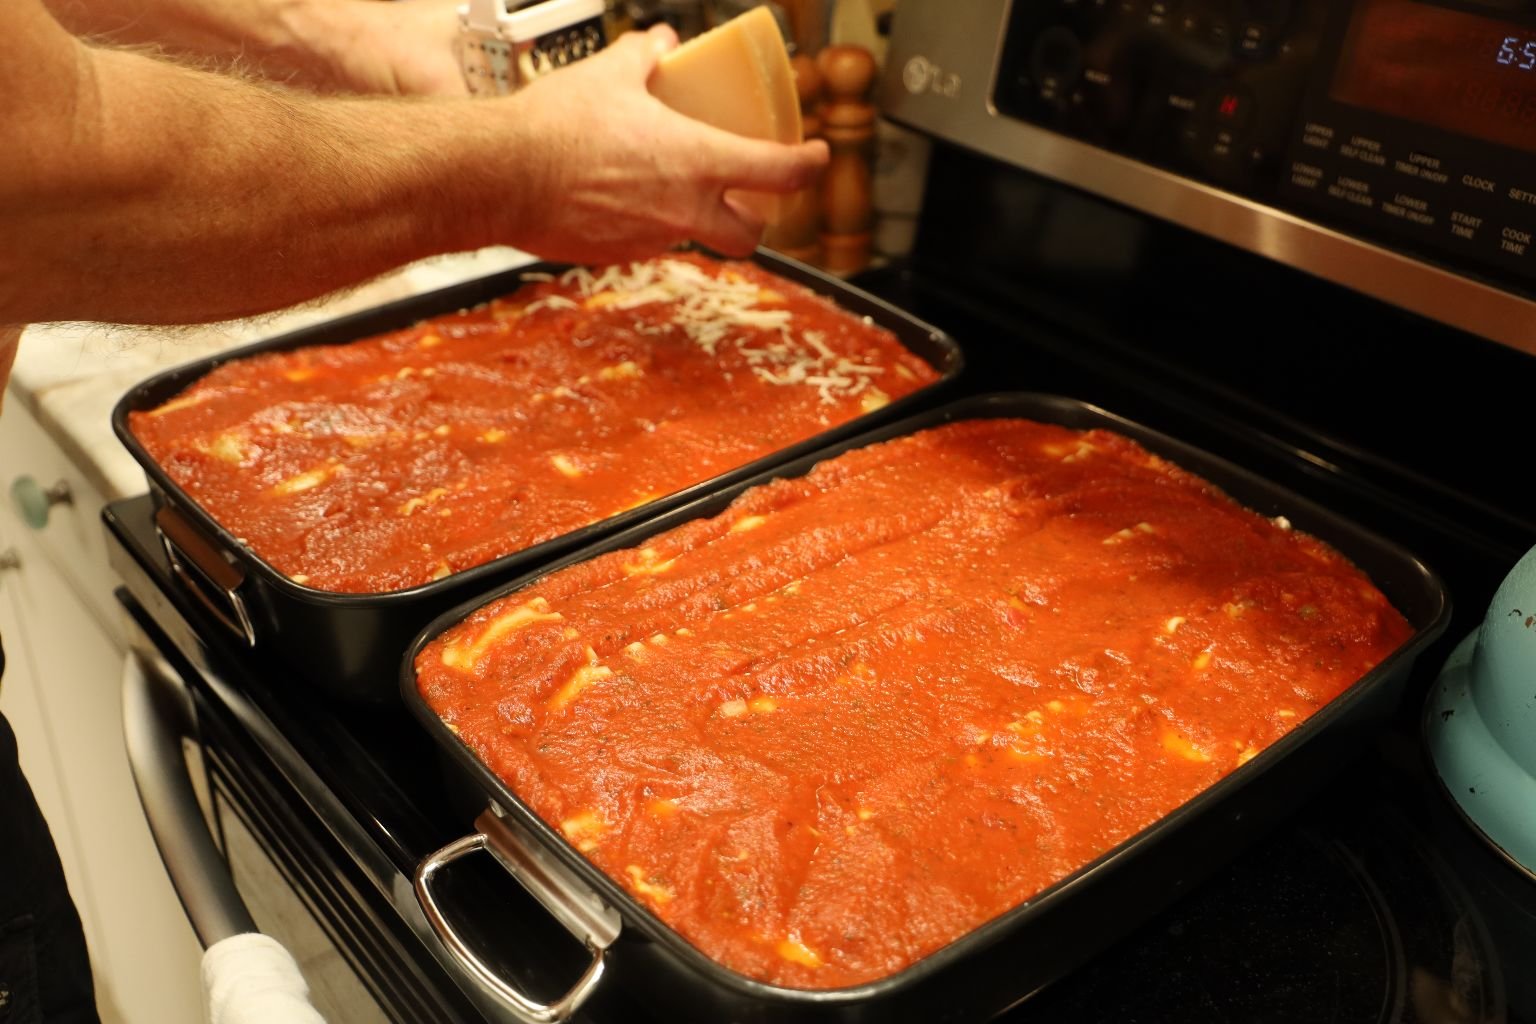
We Have Built Our Lasagna Up To The Very TOP!


Now It’s Time To Grate Our Two Parmesan Blocks Of Cheese

Grate As Much As You Like
—————————————————————————————-


We Then Topped This Lasagna With The Leftover Basil Pesto, and a Drizzle of Really Nice Extra Virgin Olive Oil Overtop
———————————————————————————————–

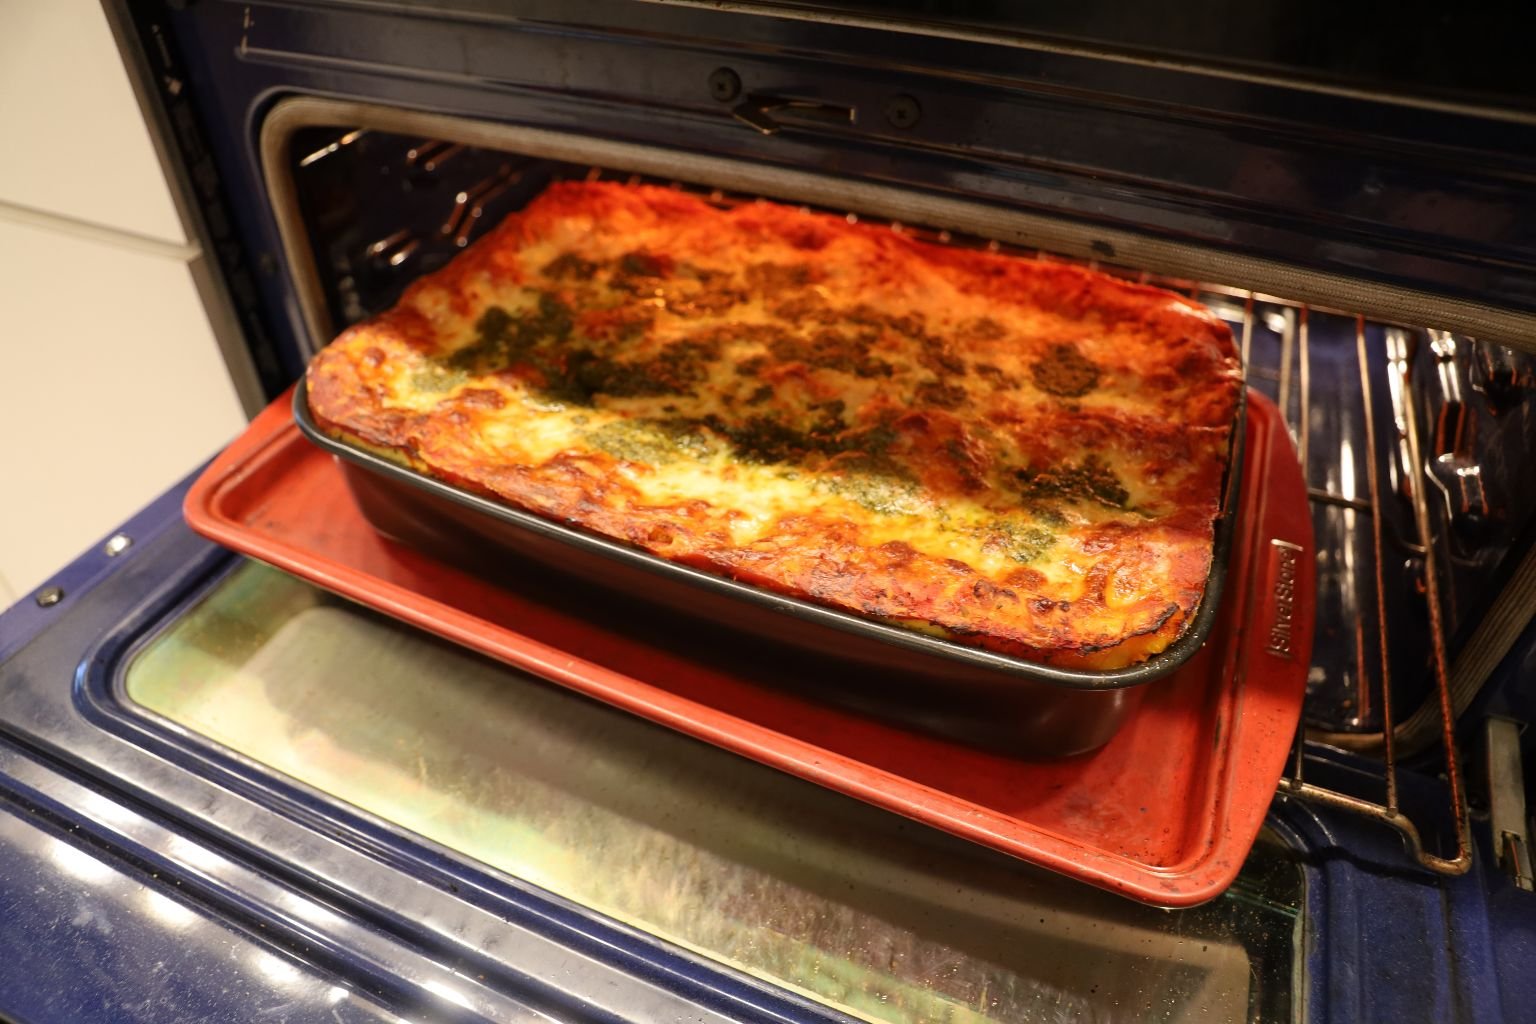
Place Into a 350F Oven for About 45 Minutes.
Be sure to check it at about 30 minutes to make sure it isn’t burning on top.
You can always cover it with Aluminum Foil to prevent it from burning.
——————————————————————————————-


Allow To Cool A Bit
It’s Looking So Beautiful!

Delicious too!
——————————————————————————————————-

THIS is the Lasagna we Chose to Freeze…
..And we are Enjoying Right NOW!

Leftovers for Us, and Leftovers for Our Loved Ones
————————————————————————————————-
UNDER CONSTRUCTION
————————————————————————————————–
The Gigantic Julie


——————————————————————–
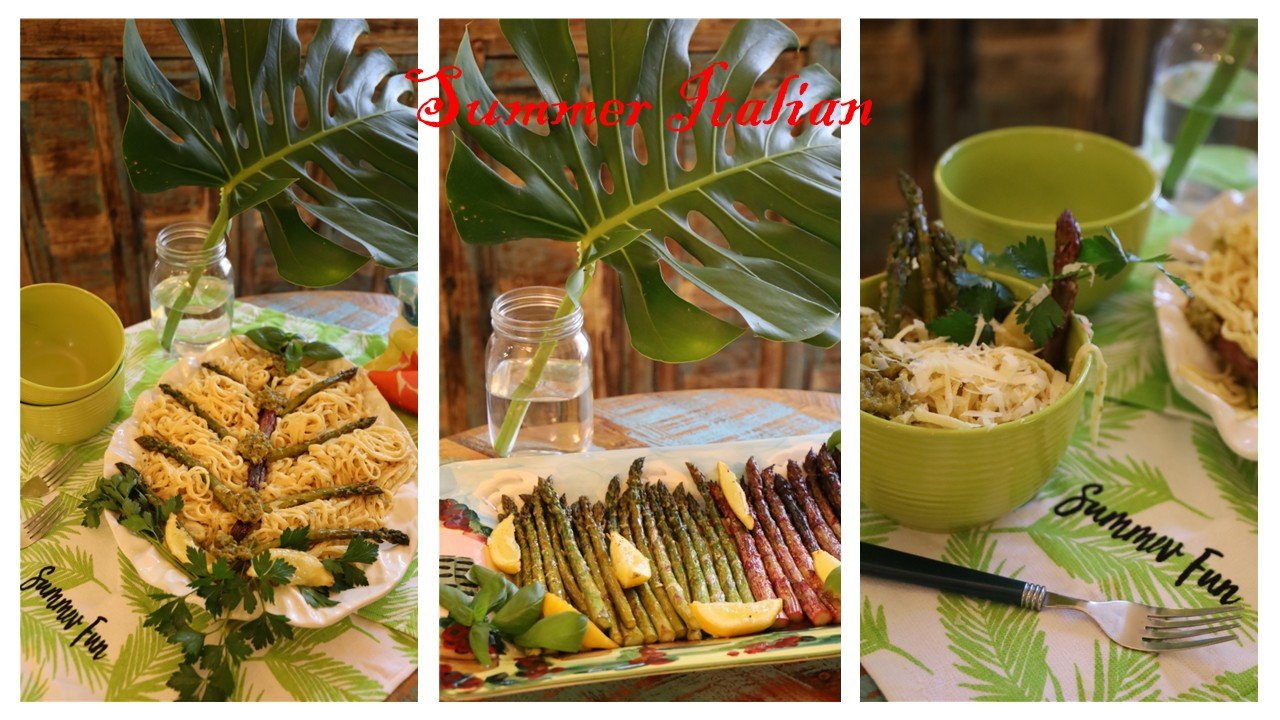
If you would like to view our other Italian food posts……
Julie’s Italian Appetizers and Edible Gifts

———————————————————
Gordon and Julie Italian Seconda Parte 2

—————————————————-

——————————————————–

————————————————–

——————————————–
La Sciatta Giulia Anna’s (Italian Sloppy Julie Ann’s)

———————————————–

———————————————————-
Edible Gifts: Italian, Greek, and Irish

———————————————-

————————————————————

————————————————

—————————————————

——————————————————-

———————————————————-

————————————————

——————————————–

————————————————————

—————————————————

————————————————
Modern Day Mona (Lisa) Halloween

——————————————–
Even More Italian (Just For You)

————————————————

————————————————
Tavolino Da Caffe Italiana (Coffee Table Italian)
——————————————–

————————————–

—————————————————————————-
—————————————————————————————
————————————————————————————————–

———————————————–
Grazie,
Julie and Gordon