Thanksgivin’ Grillin’

Happy Thanksgiving

Welcome to Thanksgivin’ Grillin’

I’m Julie and this is Sugar, and Monk.

Gordon got the idea to make a Beer Can Turkey using Steven Raichlen’s recipe for our big Thanksgiving feast.

Gordon Cooking our Beer Can Turkey on the Grill

This is one of the best turkey’s we’ve ever eaten and we even replicated it the following year.
—————————————
ThanksGrillin’
Meet Gordon

Gordon with his Beer Can Turkey

This was a 9 Pound Turkey

Gordon: It had to be this size because any bigger and it wouldn’t fit on the grill. I removed the grill’s cooking grid and placed the roasting pan directly on the heat plates. Doing this still gave me a sturdy place to rest the roasting pan on and lowered the turkey by more than an inch.


The slight red color in the meat is from the smoking process. Above, you can see the clear juices which is from letting the meat rest for about 25 min. to let the hot juices cook the bird to the temperature of 165’F.

I used my own rub which is a combination of many spices. I place most of the spices on the inside of the bird, leaving some for the outside after rubbing the bird’s skin with olive oil.

So Delicious!


In the Kitchen with the Checklist!
———————————-

You can see what a beautiful presentation this is.

Having the Turkey sit straight up, ensures the smoke will penetrate the entire way around the bird. The beer also gets some of my spice mixture which boils within the beer, enhancing the flavor of the meat from the inside. The hot steam also helps with the cooking process cooking it a bit faster.
—————————————-
Our Dinner Plates

Now THIS is a Thanksgiving Day Dinner Plate!

A Variety of Delicious Foods all Running Together.

——————————–
Our Thanksgiving Menu

Steven Raichlen’s Beer Can Turkey

Gordon’s Sausage Stuffing

Smashed Red Potatoes

Michelle Obama’s Green Beans
Roasted Brussel Sprouts
Roasted Carrots
Gravy
Cranberry Sauce
Dinner Rolls
———————————
All of these recipes are on this blog post, below.
Just scroll downward.
Thank you very much for your interest, and Happy Thanksgiving,
Julie and Gordon
——————————-
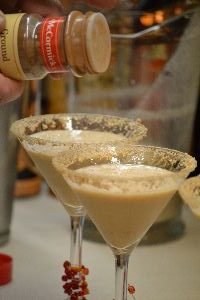
Pumpkin Spice and Everything Nice
Our Thanksgiving Cocktails

Gordon does create the nicest martini’s. 🙂

This one tasted great with our pumpkin/raisin/cranberry/pecan bread.

Click Here for Autumn Baking Edible Gifts
———————————
Pumpkin Bread with Pumpkin Spiced Martini’s

The Ingredients:
First you want to make a simple syrup.

You do this by combining equal parts sugar and water.

Heat them over medium heat to combine for about 3 min. then remove from the heat to cool the mixture while you make the drink.


For the rim topping I used Keebler Fudge Stripes Pumpkin Spiced cookies.
Crush the cookies with a fork, then spread them out in an even layer.
First in goes the cold pumpkin spice coffee that we made that morning.
I used about 1 Cup.
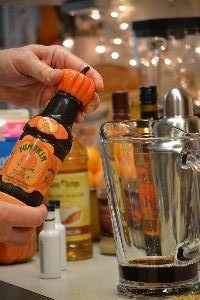

This is “Pumpkin Juice” that we bought at Universal Studios, Islands of Adventure, at the Harry Potter section of the park at the restaurant, The Three Broomsticks.
I used about a Cup of this also.


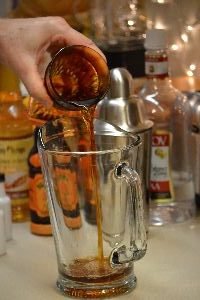
Use about 1/3 Cup of this Pumpkin Spiced Kahlua.
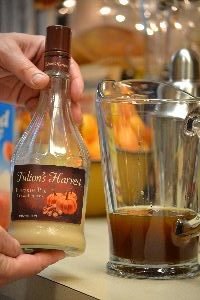

Now, pour in about 1/4 Cup Fulton’s Harvest Pumpkin Pie Cream Liqueur.


To go with the Kahlua, I used about 1/3 Cup Vodka.
To give it a little sweetness, I used 1/3 Cup sugar free Skinny Syrups Pumpkin Caramel. You could also use Pecan Caramel flavor.

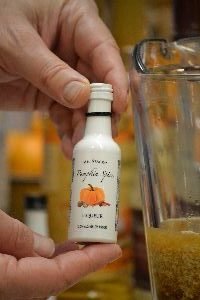

Now pour in 2 Mr. Stacks Pumpkin Spice Liqueur.

To give the drink a creamy taste, pour in 1/2 Cup Almond Breeze Unsweetened Vanilla flavor.

Mix with a whisk to combine.
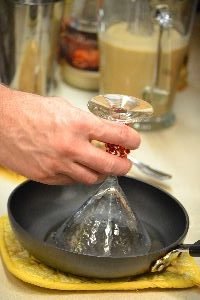

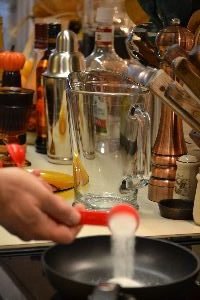
Dip your glass rim into the cooled sugar syrup letting any residue drip off.

Now, plunge the glass rim into the crushed cookies to coat the rim.


Place about 5 ice cubes into your cocktail shaker along with some of your Pumpkin Spice and Everything Nice drink.
Place your strainer and top, onto the shaker.

Shake until you can barely hold the shaker due to the chill.

Remove the top and pour your drink into the glass without hitting the rim.
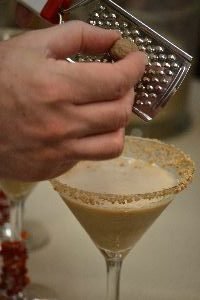

Top with some freshly grated nutmeg and a dash of cinnamon.


Definitely a Thanksgiving Treat!
Try not to eat the rim of the glass.
———————————

Gordon Pouring Cocktails and Cooking in the Kitchen

Gordon always works very hard every holiday and he spends most of the time in the kitchen.

Justin Playing with the Pugs

Dainty Justin
———————————-
First Up: The Turkey

Many Spices

Gordon Putting Together His Spice Mixture for the Turkey


Gordon: I won’t divulge all the ingredients, but I will say I used spices which I feel go well with poultry.
We can’t give away all of our secrets!


Freshly Ground Black Pepper, top left, and Hungarian Paprika, top right.


It Looks Beautiful and it Tastes Wonderful!

I just hope Foster’s Lager stays in business, as this is the perfect sized beer to use to keep the turkey upright.


Be sure to soak your wood chips prior to smoking your turkey. I feel they don’t need to be soaked more than an hour to get good results. I also use a roasting pan to keep the turkey fat and juices from causing flareups. I have also found it best to use a digital thermometer to get a precise cooking temperature. I usually take the turkey out when the internal temperature reaches 158’F, as the super heated turkey juices running back into the meat, will take the temperature up to 165’F.


Hickory Wood Chips


Here Gordon is measuring how many chips will fit into the Smoker Box to ensure he has enough.


Place Wood Chips into a Bowl and Fill with Water

Let them soak for ~ an hour.

When wood chips have finished soaking place them into the Smoker Box.

Here you can see I place the smoker box directly on my burner. To accomplish this you have to remove the cooking grate and the heat distributor. I turn the heat up to high to start the smoking process by charring the wood chips. Once the chips start to smoke, I turn the burner down or even off, so as not to catch the chips on fire.


We are moving now into the preparation of the turkey. The steps above are only done after you have prepped the turkey for smoking.
—————————————


Be sure to wash your bird, as the blood within the bag could become stagnant and go bad, and its just not appealing to me.
Dry off the outside of your bird with paper towels, then carefully move your fingers under the skin and place either butter or olive oil all over the meat to help keep it juicy and the skin crispy.


Like so……


I use olive oil on the outside of the bird’s skin to help with the browning process.


Here, I am rubbing my spice rub on the outside of the bird’s skin, but you can also place some under the skin to flavor the meat.
I also place some in the cavity of the bird.


There are plenty of Poultry Spice Mixtures that you can buy for your own turkey, sold at your local grocery stores.

Seasoning the Turkey


Pour out half of your beer to allow for it to boil and place some of your spice mixture within the beer still in the can.
You will then have some beer to drink while tending your grill waiting for the bird to cook while you relax a bit.

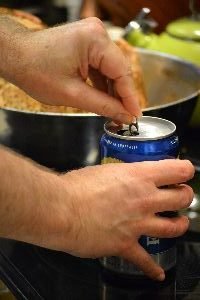
Be sure to wash your hands before pouring your beer into your glass, so you don’t cross contaminate your glass.


I placed some extra holes in the top of the can using a can opener to allow for more steam.
Use a funnel to help get the spices into the can. A bay leaf or two are also a good idea to season the beer.


——————————–
Cut a small hole behind the wing to insert the wing tip into.
Doing this will help keep the wingtip from burning and the bird more compact for even cooking.


Here is the turkey in a neat compact package ready for smoking. Place the legs in front to help stabilize the turkey on the beer can while it is in the roasting pan. I also place about a Qt. of chicken stock in the pan to help keep the turkey’s fat and drippings from burning.

——————————–


Gordon and Brodie Setting up the Grill


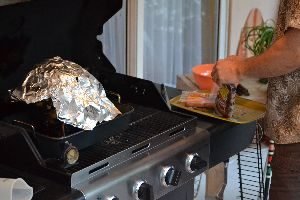
Use indirect heat to smoke the turkey. To accomplish this, keep the burners that are directly under the turkey off, and the ones off to the side on. I keep the grill to about an average temperature between 375-400’F. To keep the temperature at that setting, keep the grill shut as much as possible. This is also where using an internal thermometer comes in handy. Above right, I also use a grill thermometer to monitor the grills temperature as a backup to the one the grill comes with.


Turkey on the Grill

This is Thanksgivin’ Grillin’

Gordon and Julie on the Lanai
Below, I am using more of my spice mixture, mixed with a little olive oil to enhance the browning process.

Be sure to cover or tent the turkey with aluminum foil once the birds skin has cooked to your desired color.
You can then continue to cook the turkey to ~158’F before pulling it off.


That beautiful Golden/Yellow color is the Turmeric.
Me, with a cold Foster’s Lager and cooking with our little sweet Sugar.
She also enjoyed reading Steven Raichlen’s grilling tips in his BBQ Bible!


Brodie, and best friend Justin, anxious for some turkey.


Liking the color of the bird, I am tenting it with foil to stop the skin getting any darker.


Once the internal temperature reaches 158’F, I pull the bird off the grill. This is tricky, as you have to remove the beer can out of the cavity of the bird. I use tongs to grasp the beer can, so I can then lift it off. You may need a second person to help you accomplish this.


Perfection… If I do say so myself.


The red hue is the smoke which penetrated into the meat.
Monk and Sugar were great little helpers!


Our Favorite Couple
————————————–


I AM the Photographer…..

Veronica and Brodie


Brian

Forever they will be our little children. 🙂

————————————————————–
Grilled Sausage Dressing

Ingredients:
8 slices of day old wheat bread
8 cooked sausages
1 bag of bread cubes
1 Large Onion – sliced
4-5 Celery Stalks – sliced
2 Qts. Turkey or Chicken Stock or Broth – as needed
2 Garlic Cloves – chopped
Olive oil – as needed to saute the onions and celery and to coat the casserole dish
3 Tbsp Rosemary
3 Tbsp Sage
3 Tbsp Marjoram
4 Tbsp Thyme
Salt and Pepper to taste

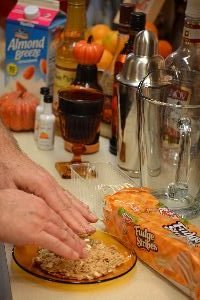
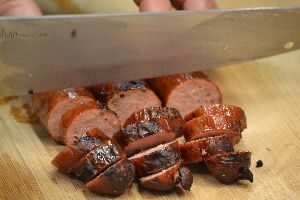
While the turkey was cooking, I grilled the sausages for the dressing.

Some of the sausages were spicy and some were sweet.

The sausages will take about 20 min. on the grill turning about every 5 min. for even cooking.


Below, I am cubing some wheat bread to use for the stuffing. Roasting them in the oven at 350’F for about 20 min. will help to dry them out.
I cut off the bread crust as it will sometimes burn during the cooking process. Be sure to mix your breadcrumbs around on the sheet pan partly through the cooking process, so they don’t burn and so they cook evenly.


Chop your onion and celery to about the same size for even cooking.


In a large skillet, heat your 2-3 Tbsp. of olive oil to medium high and saute your onions and celery.


I also used olive oil in the casserole dish we were going to use to bake the dressing in.


Saute your onions and celery until soft and translucent.


Add your seasonings to the mixture to bring out their oils and enhance their flavors.

Add your sliced garlic and cook for another min or two.


Add a cup or two of your turkey or chicken broth to the pan to deglaze it, which will lift off the stuck bits or Fond from the bottom of the pan.


Add your freshly roasted bread cubes to the mixture. Doing this will allow all the seasonings and leftover juices to be absorbed into the bread.


Mix well then place into a large bowl.


Add the rest of your bread cubes and add enough turkey or chicken stock to just make the bread cubes damp.
You don’t want them to be soggy. Add a little stock at a time a stir.


Taste your mixture and season to your tasting.


————————————
Once the sausages have rested for at least 5-10 min. slice them into rounds.

Place your dressing into your oiled casserole dish.

Smooth out as necessary.


Place your sausage rounds evenly into the dressing


Bake your dressing in a 350’F oven for about 30 min. or until slightly browned.

A nice close up of the finished dressing.

According to our son Brodie, this is the best dressing he has ever eaten and wants it every year from now on.
That’s good to hear!
————————————-

Herb Baked Red Potatoes

Ingredients:
1 Bag Red Potatoes
3 Garlic Cloves
8 Sprigs of Thyme
8 Sprigs of Rosemary
6 Tbsp Butter or Margarine
3 Tbsp Roasted Garlic Powder
4 Tbsp Salt – 2 for the boiling process and 2 for on top of the potatoes


Wash your potatoes well.

Start your potatoes in cool salted water, then bring the water to a boil using some sprigs of thyme and rosemary to season the liquid.
I also placed a few garlic cloves in the water.


We grow these herbs in our garden.

—————————————————————


Once mostly cooked, remove the potatoes out of the water and place on a baking tray.


Using the palm of your hand slightly smash the potatoes until it just cracks revealing the inside flesh.


Brush your melted butter onto the potatoes.


Season them with roasted garlic powder and sea salt and freshly ground black pepper.


Top the potatoes with more herb sprigs …

and bake in a 400’F oven for around 15-20 min.

Cooking them twice will crisp up the skin leaving the inside soft.
The herbs will really be evident when you taste these potatoes.
————————————-

Our Former First Lady’s Green Beans with Almonds
as taken from her: American Grown, The Story of The White House Kitchen Garden and Gardens Across America, cookbook.


These are some of the best green beans we have ever eaten and are a favorite of ours.

The Ingredients:
1 1/2 lb. Fresh Green Beans, Washed and Trimmed
1 Cup Slivered Almonds
1 t. Melted Butter
1 t. Sweet Paprika
1 t. Extra-Virgin Olive Oil
1 T. Butter
2 Shallots, Minced (about 1/4 cup)
1 T. Chopped Fresh Flat-Leaf Parsley
Salt and Freshly Ground Black Pepper
——————————–
As written in the book:
This twist on a classic side dish makes any grilled or roasted poultry or meat special. You can use any kind of almonds that you have on hand. Shallots have a mild, sweet onion flavor, but you can substitute the same amount of regular onions or even leaks or scallions if you prefer. And if you can’t find flat-leaf parsley, curly will do as well. ~~~Chef Cris


Gordon Adding Salt to the Water and Cooking the Green Beans
- Bring a large pot of salted water to a boil. Cook the green beans for about 5 minutes. Drain and place the beans in a large bowl of ice water to cool quickly. Drain again and set aside.
- Preheat the oven to 350F. On a rimmed baking sheet lined with foil, toss the almonds with the melted butter and paprika. Spread in a single layer and bake for 7 minutes, or just until fragrant. Do not let the almonds burn. Remove from the oven and set aside.


Melting the Butter and Adding the Paprika
We did skip the #2 step above and placed the butter, paprika, and almonds in a small sauce pan and sauteed them.


3. (We skipped this step in the recipe.) In a medium pan over medium heat, warm and olive oil and butter. Add the shallots and saute for 2 to 3 minutes. Add the green beans and saute until warmed through. Remove from the heat and add the parsley. Season with salt and pepper.


Gordon then added our green beans to the almonds in the sauce pan to warm everything through.

4. Place the beans in a serving dish and garnish with the toasted almonds. Serve immediately.
——————————————


——————————————-
Roasted Brussel Sprouts


Here you can see them in their natural state, still on the stalk.
This way you know they are fresh!
To keep them that way place in a vase with water!

Remove the sprouts from the stalk using a small knife and place in a colander.

Wash the sprouts well with fresh water.


Slice the sprouts in half.


Place the sprouts in a large Zip Lock bag and add fresh black pepper, olive oil and the rest of your seasonings.

Close the bag and mix well. Store them overnight in the refrigerator.

Here, I did the same process with some carrots using basically the same herb mixture.


Adding the Olive Oil

Storing in the Frig Until Needed
This you can make the night before.


Place the carrots and Brussel sprouts on a sheet pan with the cut side of the sprouts down.

Cook the sprouts and carrots in a 400’F oven for ~20-25 min. or until the cut side of the sprouts become caramelized.

——————————–

I guess you “CAN” see the Cranberry Sauce that we used. 🙂
———————————-
——————————–

Click Here for Autumn Baking and Edible Gifts

Dessert for our Thanksgiving Was Julie’s Pumpkin Bread
———————————–

Thanksgiving is about appreciating what you have and giving to others what they don’t have.

We will always appreciate these two!


Thanks for Coming!
Don’t forget your pumpkin bread!


We also gave Corn Relish as Take Home Gifts

Click Here for Corn on the 4th. of July
—————————–

Happy Thanksgiving from Monk and Sugar!